


 Loading...
Version 1.0 | 11/11/2013
User Manual
Wireless AC750 Dual Band Router
DIR-803
Preface
D-Link reserves the right to revise this publication and to make changes in the content hereof without obligation to notify any person or organization of such revisions or changes.
Manual Revisions
Revision |
Date |
Description |
1.0November 11, 2013 • Initial release for Revision A1
Trademarks
D-Link and the D-Link logo are trademarks or registered trademarks of D-Link Corporation or its subsidiaries in the United States or other countries. All other company or product names mentioned herein are trademarks or registered trademarks of their respective companies.
Copyright © 2013 by D-Link Systems, Inc.
All rights reserved. This publication may not be reproduced, in whole or in part, without prior expressed written permission from D-Link Systems, Inc.
D-Link DIR-803 User Manual |
i |

Table of Contents
Table of Contents
Preface.................................................................................. |
i |
Manual Revisions........................................................................... |
i |
Trademarks....................................................................................... |
i |
Product Overview............................................................... |
1 |
Package Contents......................................................................... |
1 |
System Requirements.................................................................. |
2 |
Introduction.................................................................................... |
3 |
Features............................................................................................ |
4 |
Hardware Overview...................................................................... |
5 |
Connections............................................................................ |
5 |
LEDs............................................................................................ |
6 |
Installation.......................................................................... |
7 |
Before you Begin........................................................................... |
7 |
Wireless Installation Considerations...................................... |
8 |
Manual Setup................................................................................. |
9 |
Configuration.................................................................... |
11 |
Quick Setup Wizard.................................................................... |
12 |
QRS Mobile App........................................................................... |
17 |
Web-based Configuration Utility........................................... |
18 |
Internet Connection Setup.............................................. |
19 |
Internet Connection Setup Wizard............................... |
20 |
Internet (Manual)................................................................. |
26 |
Static (assigned by ISP)................................................. |
28 |
PPPoE (DSL)...................................................................... |
29 |
PPTP.................................................................................... |
31 |
L2TP..................................................................................... |
33 |
DS-Lite................................................................................ |
35 |
Wireless connection setup wizard................................ |
36 |
Wi-Fi Protected Setup Wizard......................................... |
39 |
Manual wireless network setup..................................... |
40 |
Wireless Security.................................................................. |
49 |
What is WPA?.................................................................... |
49 |
Network Settings................................................................. |
50 |
Router Settings................................................................ |
50 |
DHCP Server Settings.................................................... |
51 |
DHCP Reservation.......................................................... |
53 |
IPv6........................................................................................... |
54 |
IPv6 Internet Connection Setup Wizard................. |
55 |
IPv6 Manual Setup......................................................... |
60 |
Advanced............................................................................... |
69 |
Virtual Server.................................................................... |
69 |
Port Forwarding.............................................................. |
70 |
Application Rules............................................................ |
71 |
QoS Engine....................................................................... |
72 |
Network Filters................................................................ |
74 |
Access Control................................................................. |
75 |
Website Filters................................................................. |
78 |
Inbound Filters................................................................ |
79 |
Firewall Settings.............................................................. |
80 |
Routing............................................................................... |
82 |
D-Link DIR-803 User Manual |
ii |

Table of Contents
Advanced Wireless......................................................... |
83 |
Wi-Fi Protected Setup (WPS)...................................... |
84 |
Advanced Network Settings....................................... |
86 |
Guest Zone....................................................................... |
87 |
Tools......................................................................................... |
88 |
Admin................................................................................. |
88 |
Time..................................................................................... |
89 |
SysLog................................................................................. |
90 |
Email Settings.................................................................. |
91 |
System................................................................................ |
92 |
Firmware............................................................................ |
93 |
Language Pack................................................................ |
93 |
Dynamic DNS................................................................... |
94 |
System Check................................................................... |
95 |
Schedules.......................................................................... |
96 |
Status....................................................................................... |
97 |
Device Info........................................................................ |
97 |
Logs..................................................................................... |
98 |
Statistics............................................................................. |
99 |
Internet Sessions......................................................... |
100 |
Routing............................................................................ |
101 |
Wireless........................................................................... |
102 |
IPv6................................................................................... |
103 |
Support................................................................................ |
104 |
Connect a Wireless Client to your Router..................... |
105 |
WPS Button................................................................................ |
105 |
Windows® 8................................................................................ |
106 |
WPA/WPA2.......................................................................... |
106 |
Windows® 7................................................................................ |
108 |
WPA/WPA2.......................................................................... |
108 |
WPS....................................................................................... |
111 |
Windows Vista®......................................................................... |
115 |
WPA/WPA2.......................................................................... |
116 |
WPS/WCN 2.0..................................................................... |
118 |
Windows® XP............................................................................. |
119 |
WPA/WPA2.......................................................................... |
120 |
Troubleshooting............................................................. |
122 |
Wireless Basics................................................................ |
126 |
What is Wireless?...................................................................... |
127 |
Tips................................................................................................ |
129 |
Wireless Modes......................................................................... |
130 |
Networking Basics.......................................................... |
131 |
Check your IP address............................................................. |
131 |
Statically Assign an IP address............................................. |
132 |
Technical Specifications................................................. |
133 |
D-Link DIR-803 User Manual |
iii |

Section 1 - Product Overview
ProductPackageOverviewContents
DIR-803 Wireless AC750 Dual Band Router
Ethernet Cable
Power Adapter
Wi-Fi Configuration Note |
WI-FI Configuration Note |
If any of the above items are missing, please contact your reseller.
Note: Using a power supply with a different voltage rating than the one included with the DIR-803 will cause damage and void the warranty for this product.
D-Link DIR-803 User Manual |
1 |

Section 1 - Product Overview
System Requirements
Network Requirements |
• An Ethernet-based Cable or DSL modem |
• IEEE 802.11ac, 802.11a, 802.11n or 802.11g wireless clients |
|
|
• 10/100 Ethernet |
|
|
|
Computer with the following: |
|
• Windows®, Macintosh, or Linux-based operating system |
|
• An installed Ethernet adapter |
Web-based Configuration |
Browser Requirements: |
Utility Requirements |
Microsoft Internet Explorer® v7, Mozilla® Firefox® v9.0, |
|
Google® Chrome 16.0, or Safari® v4 or higher version |
|
Windows® Users: Make sure you have the latest version of Java |
|
installed. Visit www.java.com to download the latest version. |
|
|
D-Link DIR-803 User Manual |
2 |

Section 1 - Product Overview
Introduction
The D-Link DIR-803 is a IEEE 802.11ac compliant device that delivers up to 3 times faster speeds than 802.11n while staying backward compatible with 802.11a/g/b devices. Connect the DIR-803 to a Cable or DSL modem and provide high-speed Internet access to multiple computers, game consoles, and media players. Create a secure wireless network to share photos, files, music, videos, printers, and network storage. Powered by the 802.11ac technology this router provides wireless coverage for homes and offices, or for users running bandwidth-intensive applications.
With some routers, all wired and wireless traffic, including VoIP, Video Streaming, Online Gaming, and Web browsing are mixed together into a single data stream. By handling data this way, applications like video streaming could pause or delay. With the D-Link Intelligent QoS Technology, wired and wireless traffic are analyzed and separated into multiple data streams.
The DIR-803 supports the latest wireless security features to help prevent unauthorized access, be it from over a wireless network or the Internet. Support for WPA™ and WPA2™ standards ensure that you will be able to use the best possible encryption regardless of your client devices. In addition, this router utilizes Dual Active Firewalls (SPI and NAT) to prevent potential attacks from across the Internet for the ideal centerpiece for your wireless network in the home or office.
D-Link DIR-803 User Manual |
3 |

Section 1 - Product Overview
Features
•Ultimate FastWireless Networking - The DIR-803 provides up to 300Mbps wireless connection in 2.4GHz band, 433Mbps wireless connection in 5GHz with other 802.11ac and draft 802.11n wireless clients. This capability allows users to participate in real-time activities online, such as video streaming, online gaming, and real-time audio. The performance of this 802.11ac wireless router gives you the freedom of wireless networking at speeds 3x faster than 802.11n.
•Compatible with 802.11a/g/n Devices - The DIR-803 is still fully compatible with the IEEE 802.11a, 802.11g and 802.11n, so it can connect with existing 802.11a, 802.11g and 802.11n PCI, USB, and Cardbus adapters.
•Advanced Firewall Features - The Web-based user interface displays a number of advanced network management features including:
•Content Filtering - Easily applied content filtering based on MAC Address, URL, and/or Domain Name.
•Filter Scheduling - These filters can be scheduled to be active on certain days or for a duration of hours or minutes.
•Secure Multiple/Concurrent Sessions - The DIR-803 can pass through VPN sessions. It supports multiple and concurrent IPSec and PPTP sessions, so users behind the DIR-803 can securely access corporate networks.
•User-friendly SetupWizard -Through its easy-to-useWeb-based user interface, the DIR-803 lets you control what information is accessible to those on the wireless network, whether from the Internet or from your company’s server. Configure your router to your specific settings within minutes.
*Maximum wireless signal rate derived from IEEE Standard 802.11a, 802.11g, 802.11n and draft 802.11ac specifications. Actual data throughput will vary. Network conditions and environmental factors, including volume of network traffic, building materials and construction, and network overhead, lower actual data throughput rate. Environmental conditions will adversely affect wireless signal range.
D-Link DIR-803 User Manual |
4 |

Section 1 - Product Overview
Hardware Overview
Connections
|
|
|
|
|
|
|
|
|
|
|
|
1 |
2 |
3 |
4 |
||||
|
|
|
|||||||
1 |
LAN Ports (1-4) |
Connect 10/100 Ethernet devices such as computers, switches, storage (NAS) devices and game consoles. |
|||||||
|
|
|
|||||||
2 |
Internet Port |
Using an Ethernet cable, connect your broadband modem to this port. |
|||||||
|
|
|
|
|
|
|
|
|
|
3 |
Power Receptor |
Receptor for the supplied power adapter. |
|
|
|
|
|
|
|
|
|
|
|||||||
4 |
Reset Button |
Insert a paperclip in the hole and wait for 10 seconds to reset the router to default settings. |
|||||||
|
|
|
|
|
|
|
|
|
|
D-Link DIR-803 User Manual |
5 |
Section 1 - Product Overview
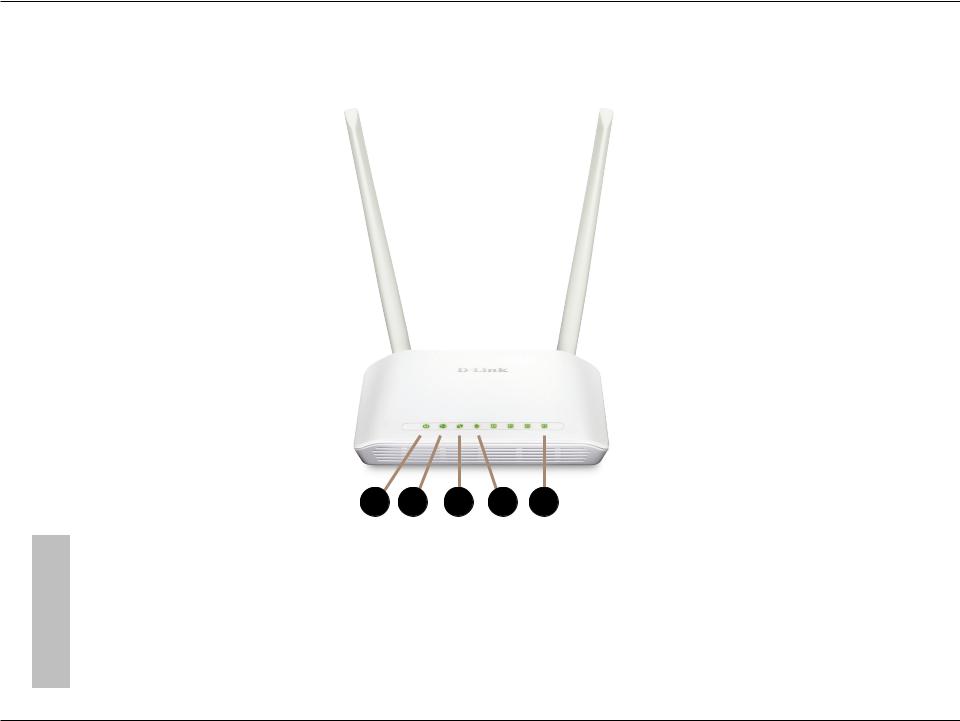
Hardware Overview
LEDs
|
|
1 |
2 |
3 |
4 |
5 |
|
|
|
|
|
||
1 |
Power LED |
A solid green light indicates a proper connection to the power supply. |
||||
|
|
|
|
|
||
2 |
Internet LED |
A solid light indicates connection on the Internet port. |
||||
|
|
|
|
|
||
3 |
WPS LED |
This LED blinks during WPS handshake phase. |
|
|||
|
|
|
|
|
||
4 |
Wireless LED |
A solid light indicates that the wireless segment is ready. This LED blinks during wireless data transmission. |
||||
|
|
|
|
|
||
5 |
Local Network LEDs |
A solid light indicates a connection to an Ethernet-enabled computer on ports 1-4. |
||||
This LED blinks during data transmission |
|
|||||
|
|
|
||||
D-Link DIR-803 User Manual |
6 |
Section 2 - Installation
Installation
This section will walk you through the installation process. Placement of the router is very important. Do not place the router in an enclosed area such as a closet, cabinet, or in the attic or garage.
Before you Begin
•Please configure the router with the computer that was last connected directly to your modem.
•You can only use the Ethernet port on your modem. If you were using the USB connection before using the router, then you must turn off your modem, disconnect the USB cable and connect an Ethernet cable to the Internet port on the router, and then turn the modem back on. In some cases, you may need to call your ISP to change connection types (USB to Ethernet).
•If you have DSL and are connecting via PPPoE, make sure you disable or uninstall any PPPoE software such asWinPoet, Broadjump, or Enternet 300 from your computer or you will not be able to connect to the Internet.
D-Link DIR-803 User Manual |
7 |

Section 2 - Installation
Wireless Installation Considerations
The D-Link wireless router lets you access your network using a wireless connection from virtually anywhere within the operating range of your wireless network. Keep in mind, however, that the number, thickness and location of walls, ceilings, or other objects that the wireless signals must pass through, may limit the range. Typical ranges vary depending on the types of materials and background RF (radio frequency) noise in your home or business. The key to maximizing wireless range is to follow these basic guidelines:
1.Keep the number of walls and ceilings between the D-Link router and other network devices to a minimum - each wall or ceiling can reduce your adapter’s range from 3-90 feet (1-30 meters.) Position your devices so that the number of walls or ceilings is minimized.
2.Be aware of the direct line between network devices. A wall that is 1.5 feet thick (.5 meters), at a 45-degree angle appears to be almost 3 feet (1 meter) thick. At a 2-degree angle it looks over 42 feet (14 meters) thick! Position devices so that the signal will travel straight through a wall or ceiling (instead of at an angle) for better reception.
3.Building Materials make a difference. A solid metal door or aluminum studs may have a negative effect on range. Try to position access points, wireless routers, and computers so that the signal passes through drywall or open doorways. Materials and objects such as glass, steel, metal, walls with insulation, water (fish tanks), mirrors, file cabinets, brick, and concrete will degrade your wireless signal.
4.Keep your product away (at least 3-6 feet or 1-2 meters) from electrical devices or appliances that generate RF noise.
5.If you are using 2.4GHz cordless phones or X-10 (wireless products such as ceiling fans, lights, and home security systems), your wireless connection may degrade dramatically or drop completely. Make sure your 2.4GHz phone base is as far away from your wireless devices as possible. The base transmits a signal even if the phone in not in use.
D-Link DIR-803 User Manual |
8 |
Section 2 - Installation
Manual Setup
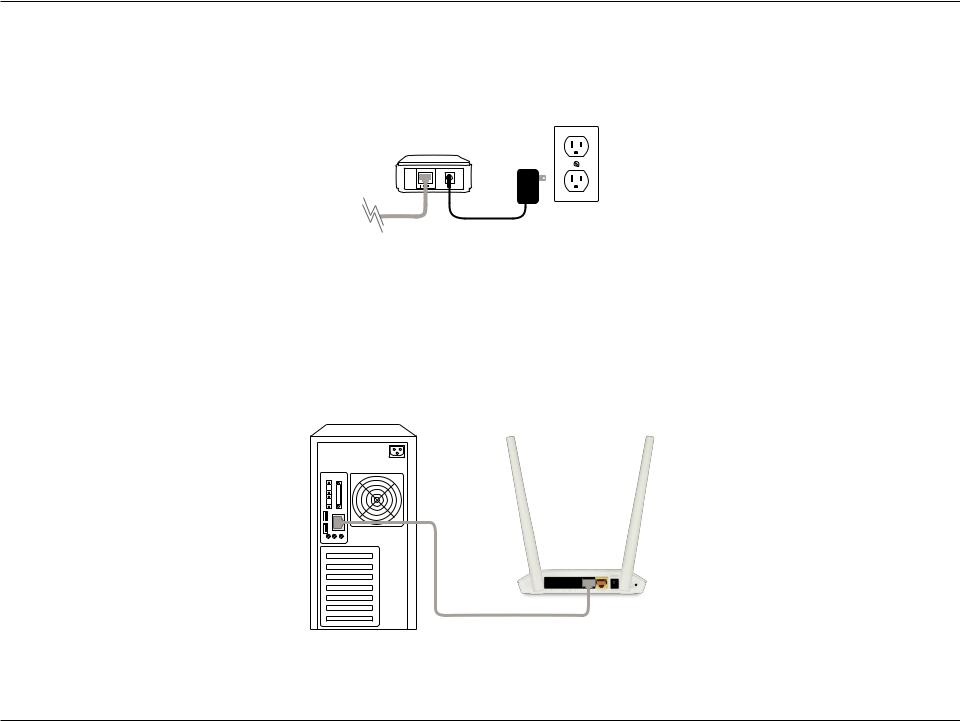
1. Turn off and unplug your cable or DSL broadband modem. This is required.
Modem
2.Position your router close to your modem and a computer. Place the router in an open area of your intended work area for better wireless coverage.
3.Unplug the Ethernet cable from your modem (or existing router if upgrading) that is connected to your computer. Plug it into the LAN port labeled 1 on the back of your router. The router is now connected to your computer.
DIR-803
Computer
D-Link DIR-803 User Manual |
9 |
Section 2 - Installation
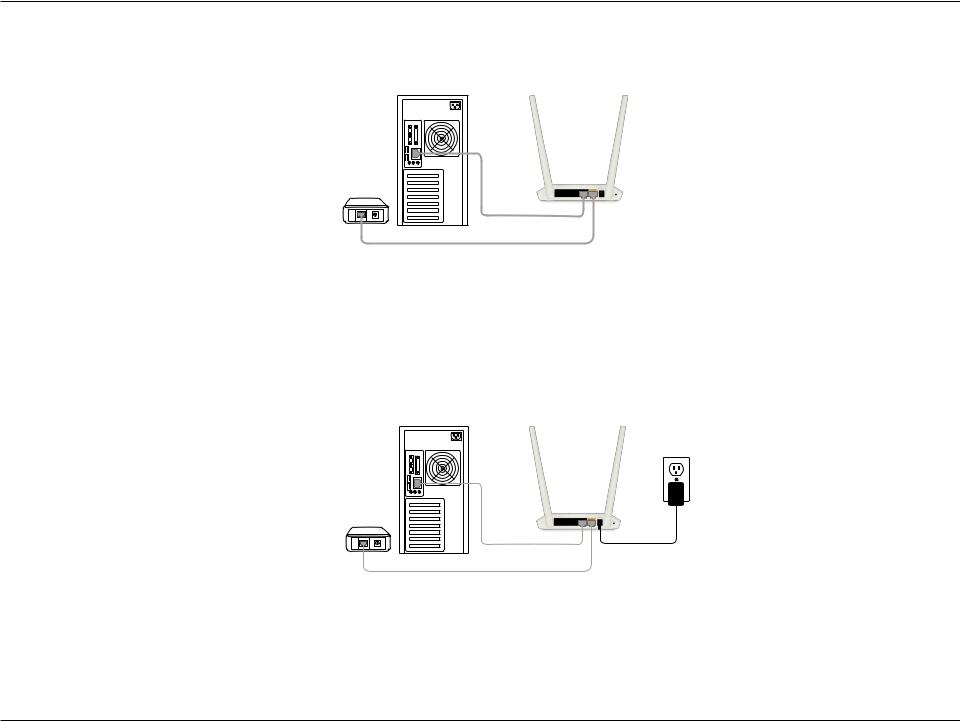
4.Plug one end of the included blue Ethernet cable that came with your router into the yellow port labeled INTERNET on the back of the router. Plug the other end of this cable into the Ethernet port on your modem.
Computer
DIR-803
Modem
INTERNET
5.Reconnect the power adapter to your cable or DSL broadband modem and wait for two minutes.
6.Connect the supplied power adapter into the power port on the back of the router and then plug it into a power outlet or surge protector. The power LED is lit. Allow 1 minute for the router to boot up.
Computer
DIR-803
Modem
INTERNET
7.If you are connecting to a Broadband service that uses a dynamic connection (not PPPoE), you may be online already. Try opening a web browser and enter a web site. If a solid light indicates connection on the Internet port and the router can connect to the Internet.
D-Link DIR-803 User Manual |
10 |

Section 2 - Installation
Configuration
There are several different ways you can configure your router to connect to the Internet and connect to your clients:
•D-Link Setup Wizard - This wizard will launch when you log into the router for the first time. Refer to page 12.
•QRS Mobile App - Use your iPhone, iPad, or iPod Touch to configure your router. Refer to page 19
•Manual Setup - Log into the router and manually configure your router (advanced users only). Refer to page 25.
D-Link DIR-803 User Manual |
11 |
Section 3 - Configuration
Quick Setup Wizard
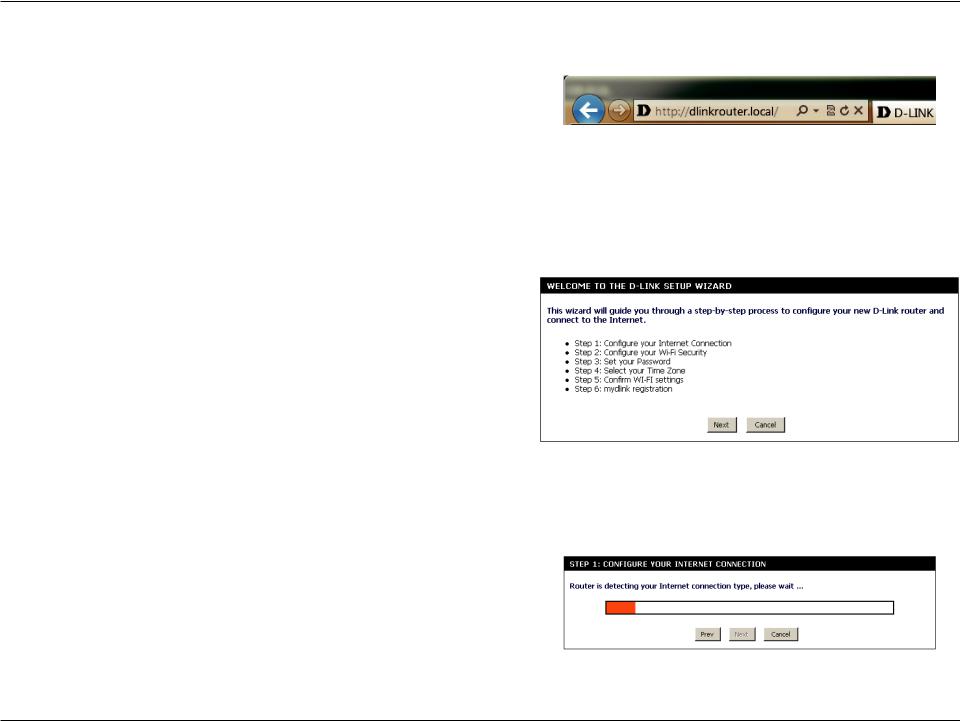
If this is your first time installing the router, open your web browser. You will automatically be directed to the Wizard Setup Screen. If not, enter “http://dlinkrouter.local.” Then, press Enter.
If you have already configured your settings and you would like to access the configuration utility, please refer to page 27.
If this is your first time logging into the router, this wizard will start automatically.
This wizard is designed to guide you through a step-by-step process to configure your new D-Link router and connect to the Internet.
Click Next to continue.
Please wait while your router detects your internet connection type. If the router detects your Internet connection, you may need to enter your ISP information such as username and password.
D-Link DIR-803 User Manual |
12 |
Section 3 - Configuration
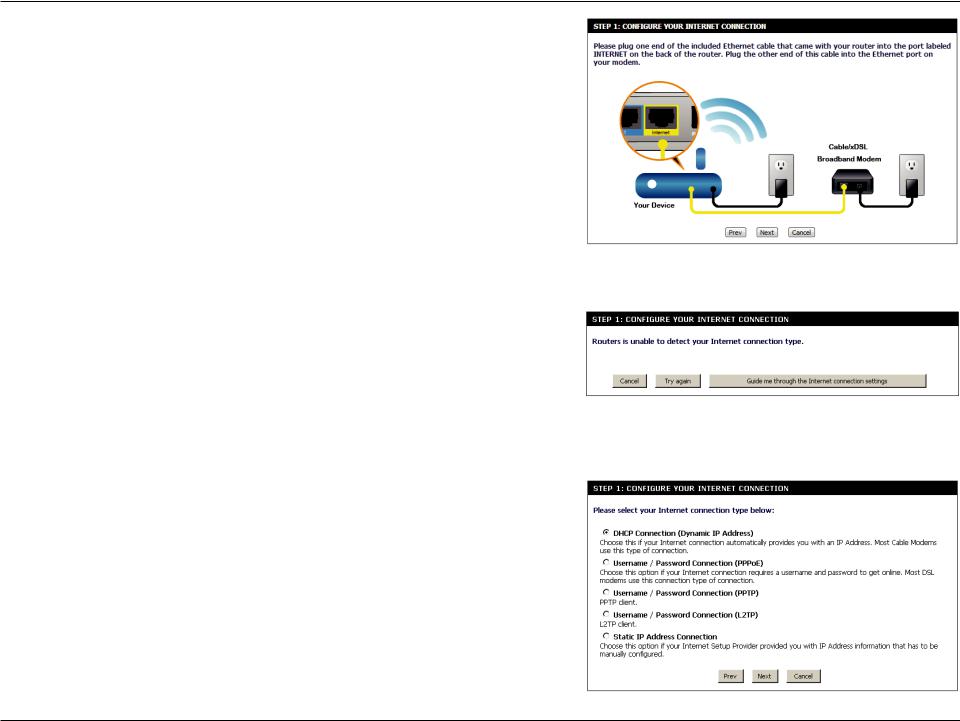
If the router does not detect a valid Ethernet connection from the Internet port, this screen will appear. Connect your broadband modem to the Internet port and then click Try Again.
If the router detects an Ethernet connection but does not detect the type of Internet connection you have, this screen will appear. Click Guide me through the Internet Connection Settings to display a list of connection types to choose from.
Select your Internet connection type and click Next to continue.
D-Link DIR-803 User Manual |
13 |
Section 3 - Configuration
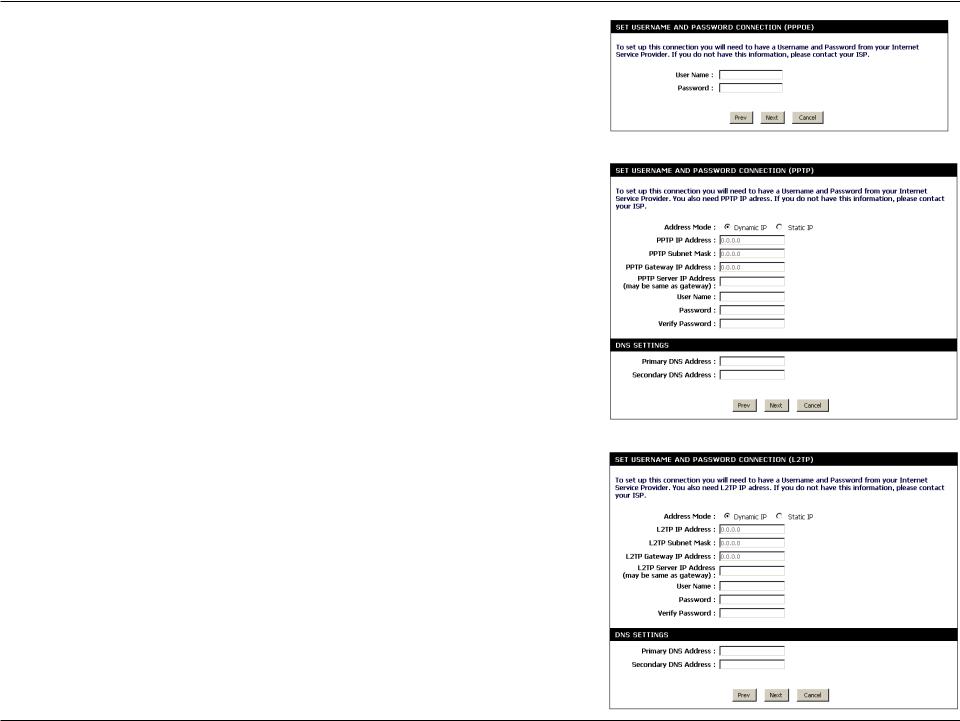
If the router detected or you selected PPPoE, enter your PPPoE username and password and click Next to continue.
Note: Make sure to remove your PPPoE software from your computer. The software is no longer needed and will not work through a router.
If the router detected or you selected PPTP, enter your PPTP username, password, and other information supplied by your ISP. Click Next to continue.
If the router detected or you selected L2TP, enter your L2TP username, password, and other information supplied by your ISP. Click Next to continue.
D-Link DIR-803 User Manual |
14 |
Section 3 - Configuration
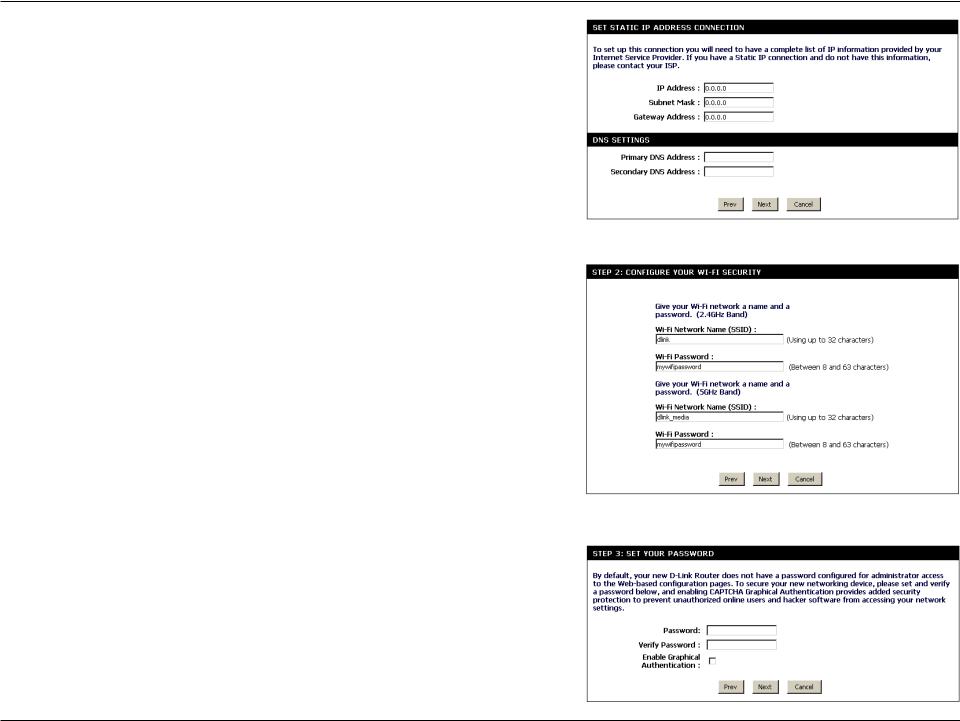
If the router detected or you selected Static, enter the IP and DNS settings supplied by your ISP. Click Next to continue.
For both the 2.4GHz and 5GHz segments, create a Wi-Fi network name (SSID) using up to 32 characters.
Create a Wi-Fi password (between 8-63 characters). Your wireless clients will need to have this passphrase or key entered to be able to connect to your wireless network.
Click Next to continue.
In order to secure your router, please enter a new password. Check the Enable Graphical Authentication box to enable CAPTCHA authentication for added security. Click Next to continue.
D-Link DIR-803 User Manual |
15 |
Section 3 - Configuration
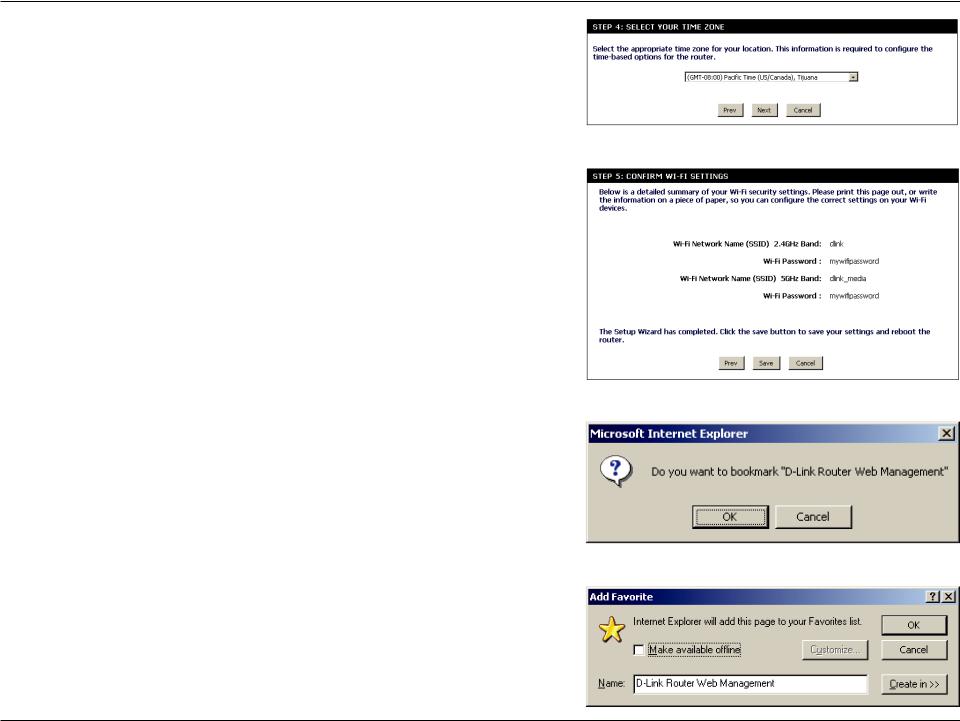
Select your time zone from the drop-down menu and click Next to continue.
The Setup Complete window will display your Wi-Fi settings. Click Save and Connect to continue.
If you want to create a bookmark to the router, click OK. Click Cancel if you do not want to create a bookmark.
If you clicked Yes, a window may appear (depending on what web browser you are using) to create a bookmark.
D-Link DIR-803 User Manual |
16 |
Section 3 - Configuration
QRS Mobile App
D-Link offers an app for your iPad, iPod Touch, or iPhone (iOS 4.3 or higher) to install and configure your router.
Step 1
From your iPad, Touch, or iPhone, go to the iTunes Store and search for ‘D-Link’. Select QRS Mobile and then download it.
You may also scan this code to download.
Step 2
Once your app is installed, you may now configure your router. Connect to the router wirelessly by going to your wireless utility on your device. Scan for the Wi-Fi name (SSID) as listed on the supplied info card. Select and then enter your Wi-Fi password.
Step 3
Once you connect to the router, launch the QRS mobile app and it will guide you through the installation of your router.
D-Link DIR-803 User Manual |
17 |
Section 3 - Configuration
Web-based Configuration Utility
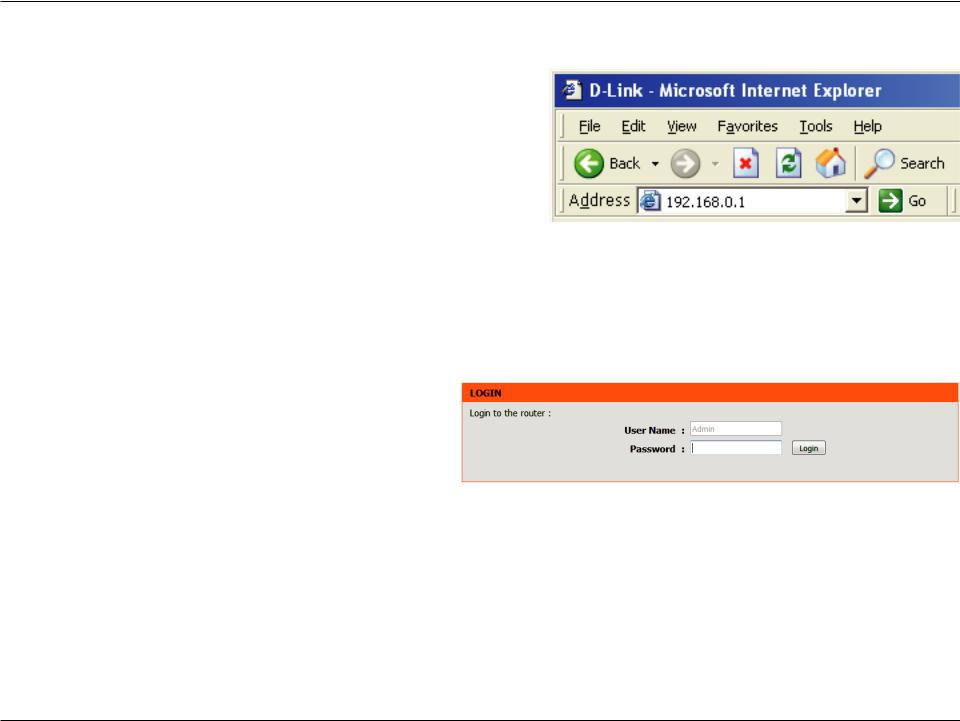
To access the configuration utility, open a web-browser such as Internet Explorer and enter address of the router (http://dlinkrouter.local. or http://192.168.0.1).
Non-Windows and Non-Mac users may also connect by typing
http://192.168.0.1 in the address bar.
Leave the password blank by default.
D-Link DIR-803 User Manual |
18 |
Section 3 - Configuration
Internet Connection Setup
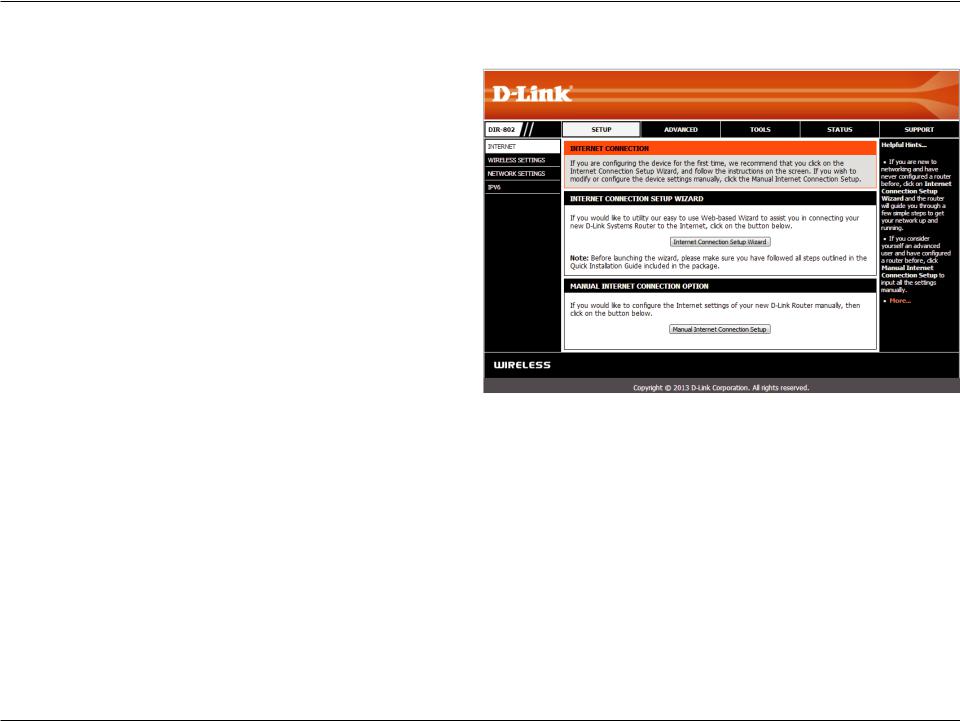
Click Manual Internet Connection Setup to configure your connection manually and continue to the next page.
If you want to configure your router to connect to the Internet using the wizard, click Internet Connection Setup Wizard. You will be directed to the Quick Setup Wizard.
D-Link DIR-803 User Manual |
19 |

Internet Connection Setup Wizard
When configuring the router for the first time, we recommend that you click use the Internet Connection SetupWizard, and follow the instructions on the screen. This wizard is designed to assist user with a quick and easy method to configure the Internet Connectivity of this router.
Anytime during the Internet Connection Setup Wizard, the user can click on the Cancel button to discard any changes made and return to the main Internet page. Also the user can click on the Prev button, to return to the previous window for reconfiguration.
Welcome:
This wizard will guide you through a step-by-step process to configure your new D-Link router and connect to the Internet.
Click Next to continue.
Step 1: Set Your Password
By default, the D-Link Router does not have a password configured for administrator access to the Web-based configuration pages. To secure your new networking device, please enter and verify a password in the spaces provided. The two passwords must match.
Click Next to continue.
D-Link DIR-803 User Manual |
20 |
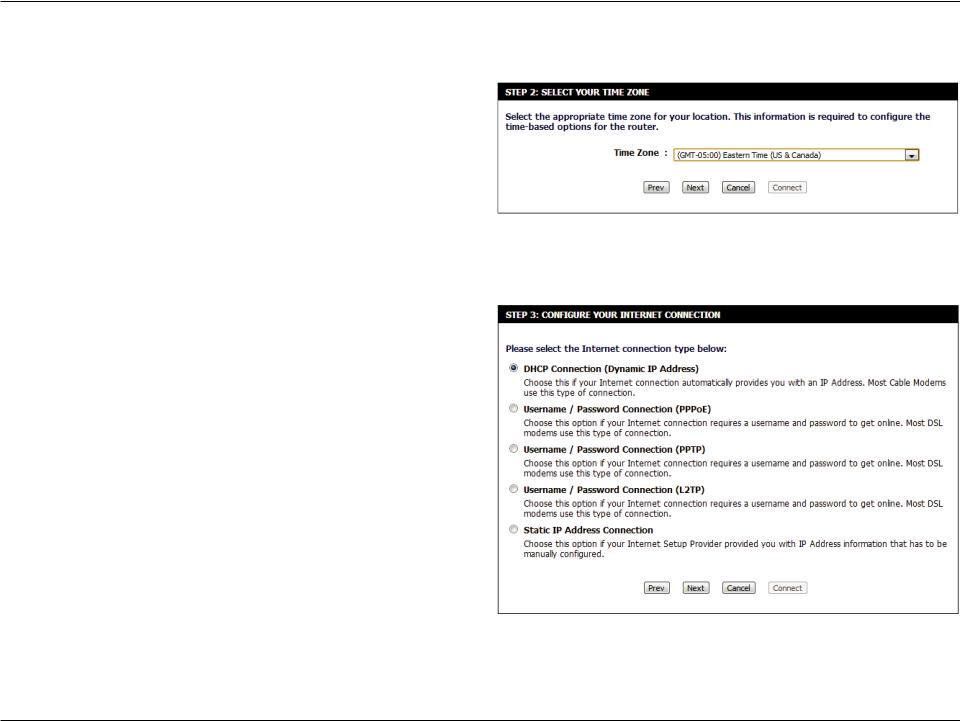
Step 2: Select Your Time Zone
Select the appropriate time zone for your location. This information is required to configure the time-based options for the router.
Click Next to continue.
Step 3: Internet Connection
Here the user will be able to configure the Internet Connectivity used by this device. You can proceed to select any of the other manual Internet Connection methods listed below.
The following parameters will be available for configuration: Dynamic IP Address: Choose this if your Internet connection
automatically provides you with an IP Address. Most Cable Modems use this type of
connection.
PPPoE: Choose this option if your Internet connection requires a PPPoE username and password to get online. Most DSL mo-
dems use this type of connection. PPTP: Choose this option if your Internet con-
nection requires a PPTP username and
password to get online.
L2TP: Choose this option if your Internet connection requires an L2TP username and
password to get online.
Static IP Address: Choose this option if your Internet Setup Provider provided you with IP Address information that has to be manually configured.
D-Link DIR-803 User Manual |
21 |

Step 3: Internet Connection (Dynamic IP Address)
After selecting the Dynamic IP Address Internet connection method, the following page will appear.
The following parameters will be available for configuration:
MAC Address: Enter the MAC address of the Internet gateway (plugged into the Internet port of this
device) here.
Clone Button: If the configuration PC also acts as the Internet gateway, then click on the Clone Your PC’s MAC Address button to copy the PC’s MAC address into the space provided. If you’re not
sure, leave the MAC Address field blank. Host Name: Enter the host name used here. You may also
need to provide a Host Name. If you do not have or know this information, please contact
your ISP.
Primary DNS Address: Enter the Primary DNS IP address used here. Secondary DNS Address: Enter the Secondary DNS IP address used
here. This field is normally optional. Only one DNS address is required for a functional Internet connection, but using a second DNS address provides more stability.
Click Next to continue.
Step 3: Internet Connection (PPPoE)
After selecting the PPPoE Internet connection method, the following page will appear:
The following parameters will be available for configuration:
User Name: Enter the PPPoE account user name used here.
This information is given by the ISP.
Password: Enter the PPPoE account password used here.
This information is given by the ISP.
Click Next to continue.
D-Link DIR-803 User Manual |
22 |

Step 3: Internet Connection (PPTP)
After selecting the PPTP Internet connection method, the following page will appear:
The following parameters will be available for configuration: Address Mode: Here the user can specify whether this
Internet connection requires the use of a Dynamic or Static IP address. PPTP usual
requires a Dynamic IP configuration. PPTP IP Address: Enter the PPTP IP address used here. This
option is only available if Static IP is se-
lected.
PPTP Subnet Mask: Enter the PPTP Subnet Mask used here. PPTP Gateway IP Address: Enter the PPTP Gateway IP address used
here.
PPTP Server IP Address: Enter the PPTP Server IP address used here. This is normally the same a the PPTP
Gateway IP address.
User Name: Enter the PPTP username used here. Password: Enter the PPTP password used here.
Verify Password: Re-enter the PPTP password used here.
Primary DNS Address: Enter the Primary DNS IP address used here.
Secondary DNS Address: Enter the Secondary DNS IP address used here. This field is normally optional. Only one DNS address is required for a functional Internet connection, but using a second DNS address provides more stability.
Click Next to continue.
D-Link DIR-803 User Manual |
23 |
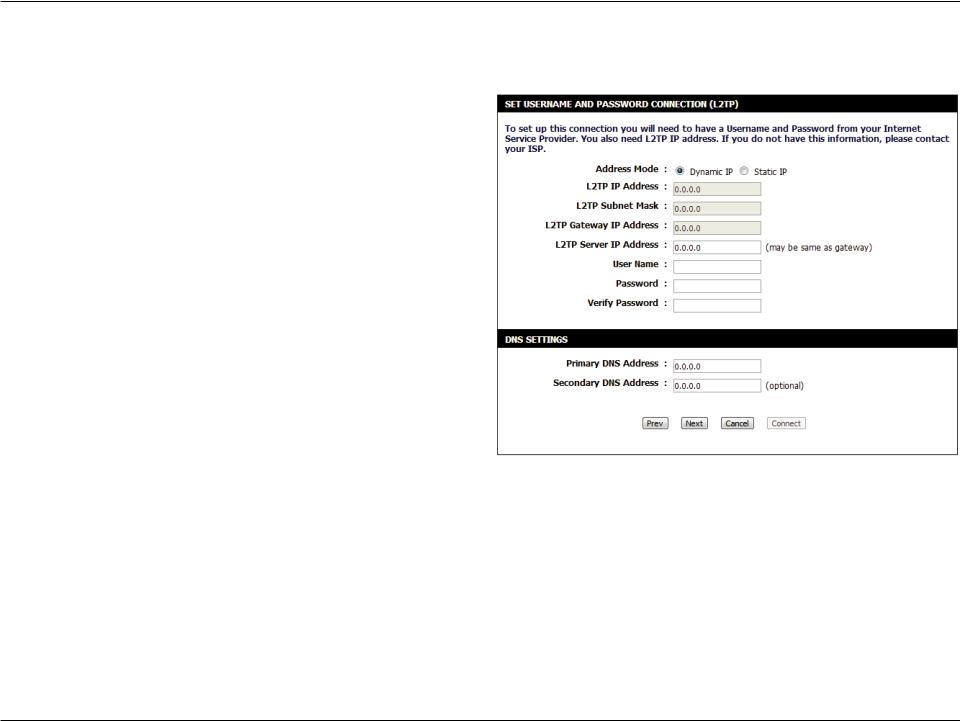
Step 3: Internet Connection (L2TP)
After selecting the L2TP Internet connection method, the following page will appear:
The following parameters will be available for configuration: Address Mode: Here the user can specify whether this
Internet connection requires the use of a Dynamic or Static IP address. L2TP usual
requires a Dynamic IP configuration. L2TP IP Address: Enter the L2TP IP address used here. This
option is only available if Static IP is se-
lected.
L2TP Subnet Mask: Enter the L2TP Subnet Mask used here. L2TP Gateway IP Address: Enter the L2TP Gateway IP address used
here.
L2TP Server IP Address: Enter the L2TP Server IP address used here. This is normally the same a the L2TP
Gateway IP address.
User Name: Enter the L2TP username used here. Password: Enter the L2TP password used here.
Verify Password: Re-enter the L2TP password used here. Primary DNS Address: Enter the Primary DNS IP address used
here.
Secondary DNS Address: Enter the Secondary DNS IP address used here. This field is normally optional. Only one DNS address is required for a functional Internet connection, but using a second DNS address provides more stability.
Click Next to continue.
D-Link DIR-803 User Manual |
24 |
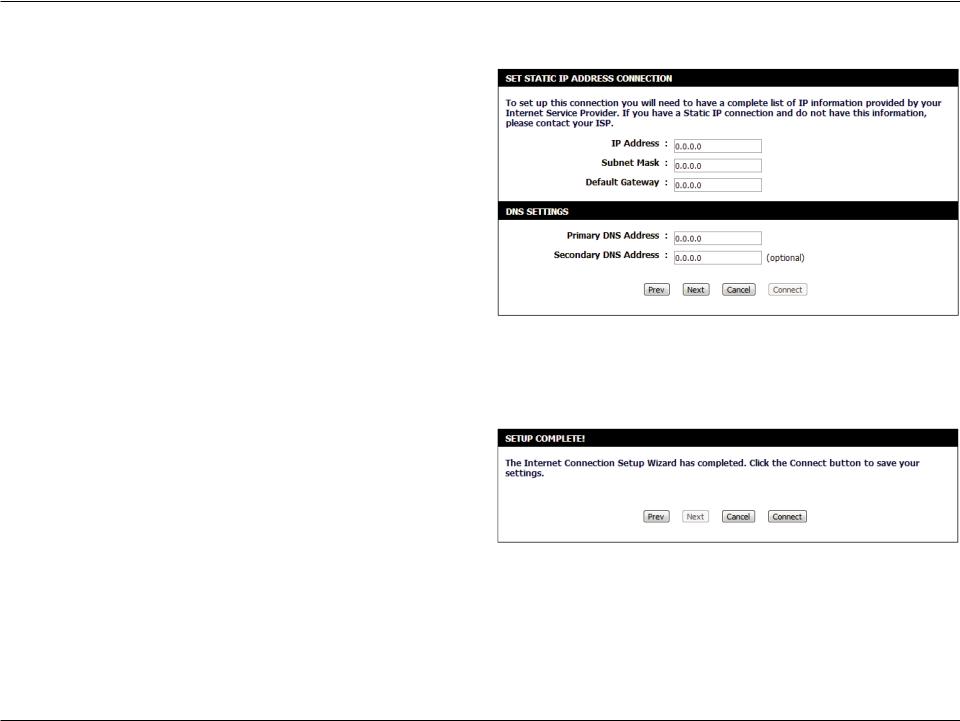
Step 3: Internet Connection (Static IP Address)
After selecting the Static IP Address Internet connection method, the following page will appear:
The following parameters will be available for configuration:
IP Address: Enter the Static IP address provided by the
ISP here.
Subnet Mask: Enter the Subnet Mask provided by the ISP
here.
Gateway Address: Enter the Gateway IP address provided by
the ISP here.
Primary DNS Address: Enter the Primary DNS IP address used
here.
Secondary DNS Address: Enter the Secondary DNS IP address used here. This field is normally optional. Only one DNS address is required for a functional Internet connection, but using a second DNS address provides more stability.
Click Next to continue.
Setup Complete!
This is the last page of the Internet Connection Setup Wizard.
Click the Connect button to save your settings.
D-Link DIR-803 User Manual |
25 |
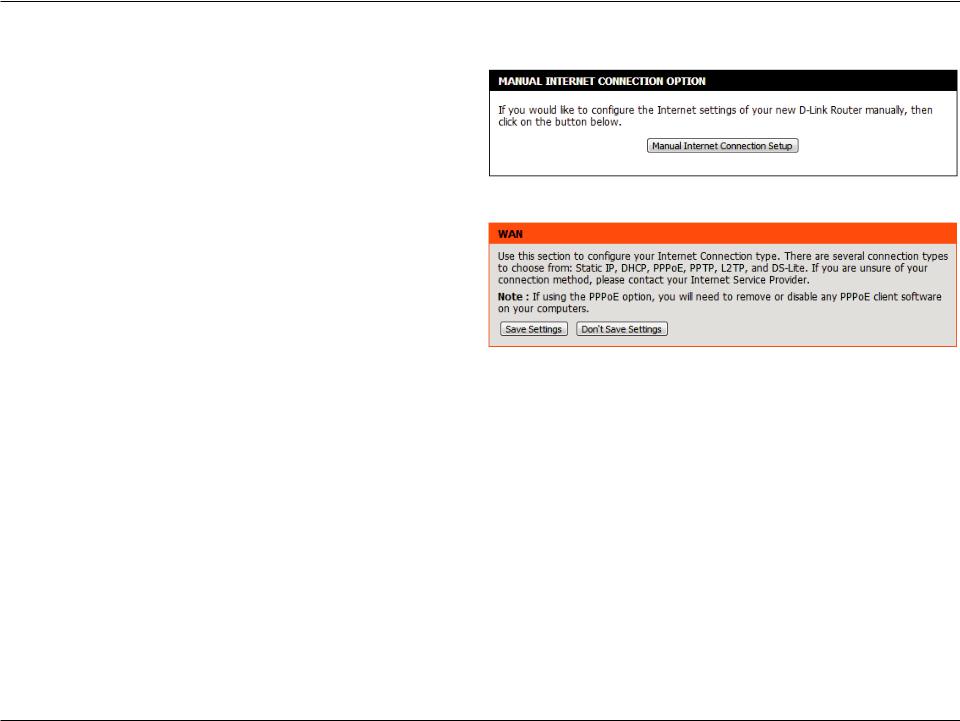
Internet (Manual)
On this page the user can configure the Internet Connection settings manually. To access the Manual Internet Connection Setup page, click on the Manual Internet Connection Setup button. On this page there a multiple parameters that can be configured regarding the Internet Connection setup. We’ll discuss them from top to bottom.
At any given point the user can save the configuration done, on this page, by clicking on the Save Settings button. If you choose to discard the changes made, click on the Don’t Save Settings button.
D-Link DIR-803 User Manual |
26 |
Loading...