

D-Link DGS-1100-16/ME, DGS-1100-24/ME, DGS-1100-26/ME, DGS-1100-18/ME, DGS-1100-24P/ME Reference Manual
Page 1
D-Link™ DGS-1100/ME
Metro Ethernet Managed Switch
CLI Reference Guide
V1.0
Page 2

Information in this document is subject to change without notice.
© 2015 D-Link Corporation. All rights reserved.
Reproduction in any manner whatsoever without the written permission of D-Link Corporation is strictly
forbidden.
Trademarks used in this text: D-Link and the D-Link logo are trademarks of D-Link Corporation;
Microsoft and Windows are registered trademarks of Microsoft Corporation.
Other trademarks and trade names may be used in this document to refer to either the entities claiming
the marks and names or their products. D-Link Corporation disclaims any proprietary interest in
trademarks and trade names other than its own.
FCC Warning
This equipment has been tested and found to comply with the limits for a Class A digital device,
pursuant to Part 15 of the FCC Rules. These limits are designed to provide reasonable protection against
harmful interference when the equipment is operated in a commercial environment. This equipment
generates, uses, and can radiate radio frequency energy and, if not installed and used in accordance
with this user’s guide, may cause harmful interference to radio communications. Operation of this
equipment in a residential area is likely to cause harmful interference in which case the user will be
required to correct the interference at hisown expense.
CE Mark Warning
This is a Class A product. In a domestic environment, this product may cause radio interference in
which case the user may be required to take adequate measures.
Warnung!
Dies ist ein Produkt der Klasse A. Im Wohnbereich kann dieses Produkt Funkstoerungen verursachen. In
diesem Fall kann vom Benutzer verlangt werden, angemessene Massnahmen zu ergreifen.
Precaución!
Este es un producto de Clase A. En un entorno doméstico, puede causar interferencias de radio, en
cuyo case, puede requerirse al usuario para que adopte las medidas adecuadas.
Attention!
Ceci est un produit de classe A. Dans un environnement domestique, ce produit pourrait causer des
interférences radio, auquel cas l`utilisateur devrait prendre les mesures adéquates.
Attenzione!
Il presente prodotto appartiene alla classe A. Se utilizzato in ambiente domestico il prodotto può causare
interferenze radio, nel cui caso è possibile che l`utente debba assumere provvedimenti adeguati.
VCCI Warning
March, 2015
Page 3

Table of Contents
INTRODUCTION ...................................................................................................................................................... 1
PRODUCT INTRODUCTION ................................................................................................................................... 2
DGS-1100-16/ME ................................................................................................................................................................. 2
Front Panel ........................................................................................................................................................................ 2
Rear Panel ......................................................................................................................................................................... 2
DGS-1100-18/ME ................................................................................................................................................................. 3
Front Panel ........................................................................................................................................................................ 3
Rear Panel ......................................................................................................................................................................... 3
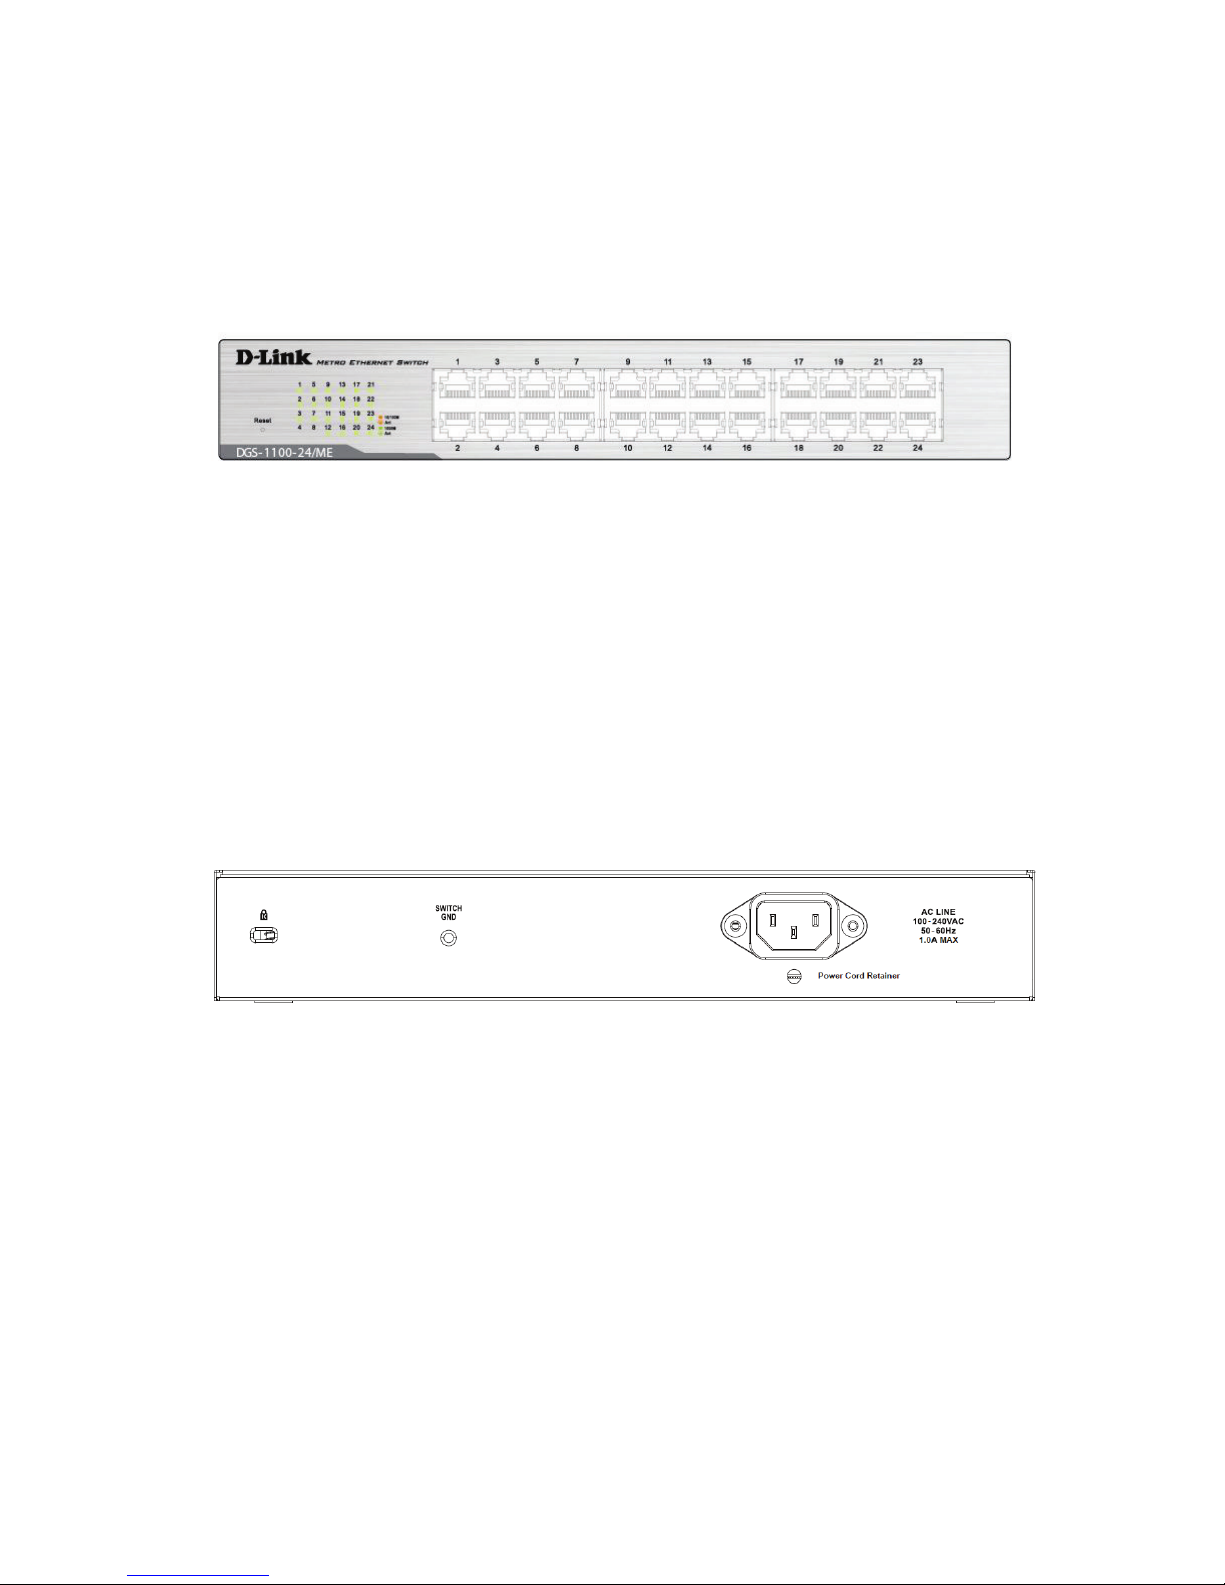
DGS-1100-24/ME ................................................................................................................................................................. 4
Front Panel ........................................................................................................................................................................ 4
Rear Panel ......................................................................................................................................................................... 4
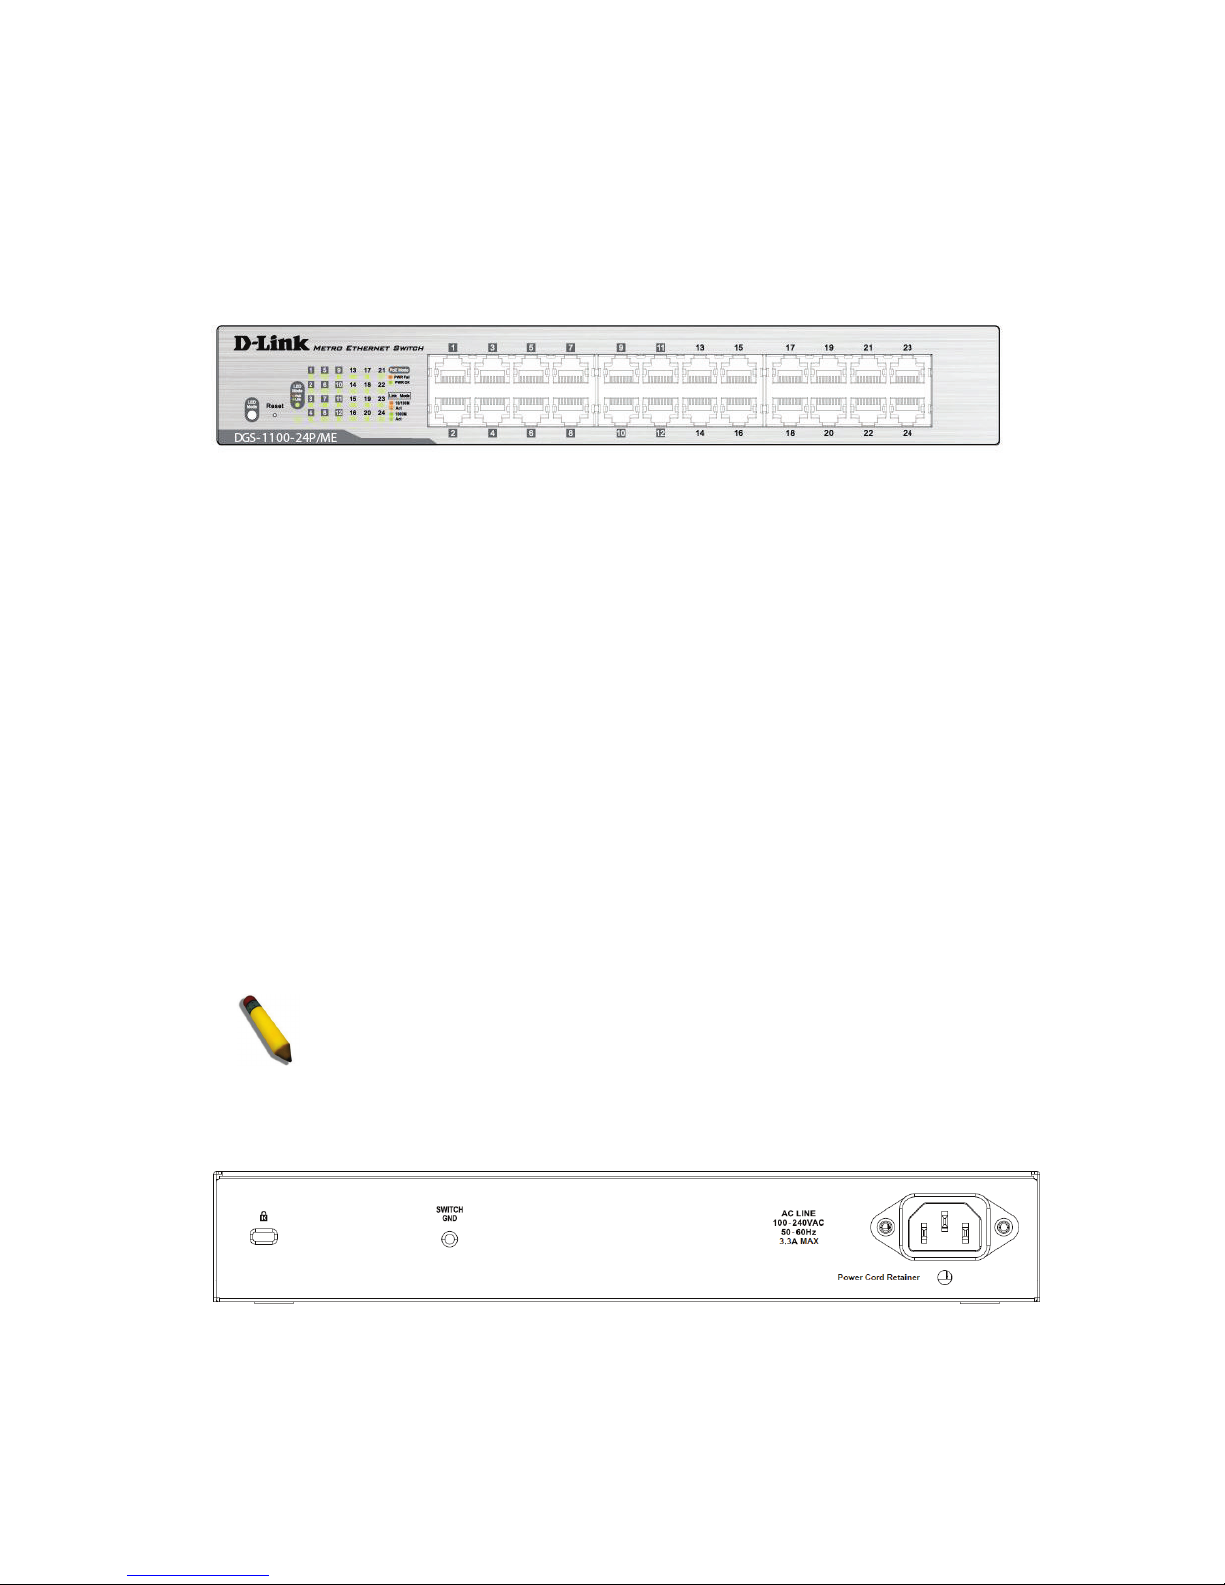
DGS-1100-24P/ME ............................................................................................................................................................... 5
Front Panel ........................................................................................................................................................................ 5
Rear Panel ......................................................................................................................................................................... 5
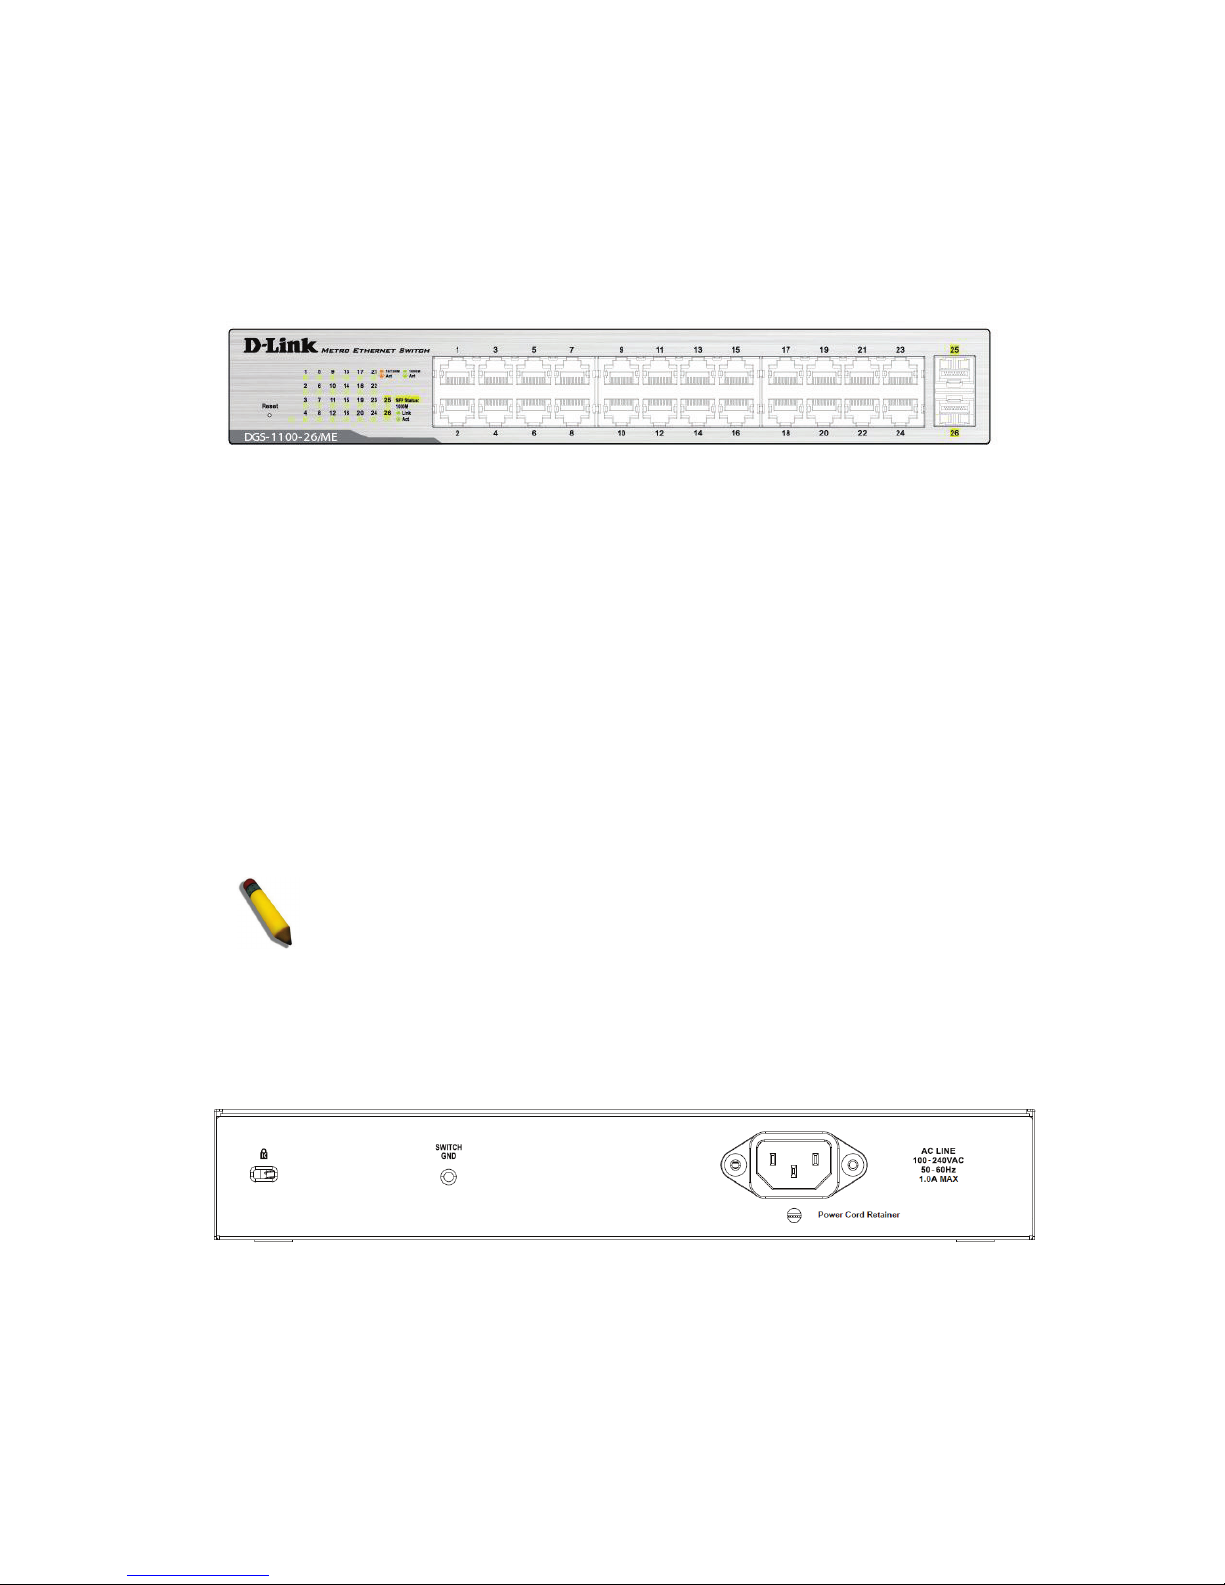
DGS-1100-26/ME ................................................................................................................................................................. 6
Front Panel ........................................................................................................................................................................ 6
Rear Panel ......................................................................................................................................................................... 6
HARDWARE INSTALLATION ................................................................................................................................. 7
Step 1: Unpacking ................................................................................................................................................................. 7
Packing contents of DGS-1100/ME .................................................................................................................................. 7
Step 2: Switch Installation .................................................................................................................................................... 7
Desktop or Shelf Installation ............................................................................................................................................. 7
Rack Installation ............................................................................................................................................................... 8
Step 3 – Plugging in the AC Power Cord .............................................................................................................................. 9
Power Failure .................................................................................................................................................................... 9
Grounding the Switch ....................................................................................................................................................... 9
USING THE COMMAND LINE INTERFACE ......................................................................................................... 11
COMMAND SYNTAX ............................................................................................................................................. 14
BASIC SWITCH COMMANDS ............................................................................................................................... 17
clear screen ...........................................................................................................................................................................18
create account .......................................................................................................................................................................18
delete account .......................................................................................................................................................................18
config account ......................................................................................................................................................................19
show account ........................................................................................................................................................................19
show session .........................................................................................................................................................................20
show switch ..........................................................................................................................................................................20
show config ..........................................................................................................................................................................21
config jumbo_frame .............................................................................................................................................................22
show jumbo_frame ...............................................................................................................................................................23
save ......................................................................................................................................................................................24
reboot ...................................................................................................................................................................................24
reset ......................................................................................................................................................................................25
login .....................................................................................................................................................................................25
logout ...................................................................................................................................................................................26
Page 4

ping ......................................................................................................................................................................................26
create time_range .................................................................................................................................................................26
delete time_range .................................................................................................................................................................27
show time_range ..................................................................................................................................................................28
config telnet auto_logout......................................................................................................................................................28
show telnet ...........................................................................................................................................................................29
config firmware ....................................................................................................................................................................29
show firmware......................................................................................................................................................................29
create iproute ........................................................................................................................................................................30
delete iproute ........................................................................................................................................................................30
config command_prompt .....................................................................................................................................................31
SWITCH PORT COMMANDS ................................................................................................................................ 32
config ports ..........................................................................................................................................................................32
show ports ............................................................................................................................................................................33
LOOPBACK DETECTION COMMANDS ............................................................................................................... 34
enable loopdetect ..................................................................................................................................................................34
disable loopdetect .................................................................................................................................................................34
config loopdetect ..................................................................................................................................................................35
show loopdetect....................................................................................................................................................................36
NETWORK MANAGEMENT (SNMP) COMMANDS ............................................................................................. 37
create snmp community .......................................................................................................................................................38
delete snmp community .......................................................................................................................................................39
show snmp community ........................................................................................................................................................39
create snmp host ...................................................................................................................................................................40
delete snmp host ...................................................................................................................................................................40
show snmp host ....................................................................................................................................................................41
enable snmp traps .................................................................................................................................................................41
disable snmp traps ................................................................................................................................................................42
show snmp traps ...................................................................................................................................................................42
enable snmp authenticate_traps ............................................................................................................................................43
disable snmp authenticate_traps ...........................................................................................................................................43
config snmp system_location ...............................................................................................................................................43
config snmp system_name ...................................................................................................................................................44
config snmp system_contact ................................................................................................................................................44
config snmp linkup_traps .....................................................................................................................................................45
config snmp linkdown_traps ................................................................................................................................................45
config snmp coldstart_traps .................................................................................................................................................46
config snmp warmstart_traps ...............................................................................................................................................46
enable snmp .........................................................................................................................................................................46
disable snmp .........................................................................................................................................................................47
show snmp ...........................................................................................................................................................................47
DOWNLOAD/UPLOAD COMMANDS ................................................................................................................... 49
download ..............................................................................................................................................................................49
upload ...................................................................................................................................................................................50
NETWORK MONITORING COMMANDS .............................................................................................................. 52
show packet ports .................................................................................................................................................................52
show error ports ...................................................................................................................................................................53
Page 5

clear counters .......................................................................................................................................................................53
clear log ................................................................................................................................................................................54
show log ...............................................................................................................................................................................54
enable syslog ........................................................................................................................................................................55
disable syslog .......................................................................................................................................................................55
show syslog ..........................................................................................................................................................................56
config syslog host.................................................................................................................................................................56
show syslog host ..................................................................................................................................................................58
cable diagnostic port ............................................................................................................................................................59
FORWARDING DATABASE COMMANDS ........................................................................................................... 60
create fdb ..............................................................................................................................................................................60
create multicast_fdb .............................................................................................................................................................61
config multicast_fdb ............................................................................................................................................................61
config fdb aging_time ..........................................................................................................................................................62
delete fdb ..............................................................................................................................................................................63
show multicast_fdb ..............................................................................................................................................................63
show fdb ...............................................................................................................................................................................64
config multicast filter ...........................................................................................................................................................65
show multicast filter_mode ..................................................................................................................................................65
clear fdb ...............................................................................................................................................................................65
delete multicast_fdb .............................................................................................................................................................66
BROADCAST STORM CONTROL COMMANDS ................................................................................................. 67
config traffic control ............................................................................................................................................................67
show traffic control ..............................................................................................................................................................68
QOS COMMANDS ................................................................................................................................................. 69
config bandwidth_control ....................................................................................................................................................69
show bandwidth_control ......................................................................................................................................................70
show 802.1p user_priority ....................................................................................................................................................71
config scheduling_mechanism .............................................................................................................................................71
show scheduling_mechanism ...............................................................................................................................................72
config 802.1p default_priority .............................................................................................................................................73
show 802.1p default_priority ...............................................................................................................................................73
PORT MIRRORING COMMANDS ......................................................................................................................... 75
enable mirror ........................................................................................................................................................................75
disable mirror .......................................................................................................................................................................75
config mirror ........................................................................................................................................................................76
show mirror ..........................................................................................................................................................................77
VLAN COMMANDS ............................................................................................................................................... 78
create vlan ............................................................................................................................................................................78
delete vlan ............................................................................................................................................................................79
config vlan ...........................................................................................................................................................................79
show vlan .............................................................................................................................................................................80
enable asymmetric_vlan .......................................................................................................................................................81
disable asymmetric_vlan ......................................................................................................................................................81
show asymmetric_vlan .........................................................................................................................................................82
enable management_vlan .....................................................................................................................................................82
disable management_vlan ....................................................................................................................................................83
Page 6

config management_vlan .....................................................................................................................................................83
show management_vlan .......................................................................................................................................................84
config port_vlan ...................................................................................................................................................................84
show port_vlan .....................................................................................................................................................................85
enable pvid auto_assign .......................................................................................................................................................85
disable pvid auto_assign ......................................................................................................................................................86
show pvid auto_assign .........................................................................................................................................................86
BASIC IP COMMANDS .......................................................................................................................................... 87
config ipif System ................................................................................................................................................................87
show ipif...............................................................................................................................................................................88
IGMP SNOOPING COMMANDS............................................................................................................................ 89
enable igmp_snooping .........................................................................................................................................................90
disable igmp_snooping.........................................................................................................................................................90
show igmp_snooping ...........................................................................................................................................................91
config igmp_snooping ..........................................................................................................................................................91
config igmp_snooping querier .............................................................................................................................................92
create igmp_snooping static_group ......................................................................................................................................93
config igmp_snooping static_group .....................................................................................................................................94
delete igmp_snooping static_group ......................................................................................................................................94
create igmp_snooping multicast_vlan ..................................................................................................................................95
config igmp_snooping multicast_vlan .................................................................................................................................95
delete igmp_snooping multicast_vlan ..................................................................................................................................96
config igmp_snooping multicast_vlan_group ......................................................................................................................97
enable igmp_snooping multicast_vlan .................................................................................................................................97
disable igmp_snooping multicast_vlan ................................................................................................................................98
show igmp_snooping multicast_vlan ...................................................................................................................................98
show igmp_snooping multicast_vlan_group ........................................................................................................................99
show igmp_snooping group .................................................................................................................................................99
show igmp_snooping static_group .....................................................................................................................................100
MLD SNOOPING COMMANDS ........................................................................................................................... 102
enable mld_snooping .........................................................................................................................................................103
disable mld_snooping ........................................................................................................................................................103
config mld_snooping ..........................................................................................................................................................104
config mld_snooping querier .............................................................................................................................................104
create mld_snooping static_group ......................................................................................................................................105
config mld_snooping static_group .....................................................................................................................................106
delete mld_snooping static_group ......................................................................................................................................106
create mld_snooping multicast_vlan ..................................................................................................................................107
config mld_snooping multicast_vlan .................................................................................................................................107
delete mld_snooping multicast_vlan ..................................................................................................................................108
config mld_snooping multicast_vlan_group ......................................................................................................................109
enable mld_snooping multicast_vlan .................................................................................................................................109
disable mld_snooping multicast_vlan ................................................................................................................................110
show mld_snooping multicast_vlan ...................................................................................................................................110
show mld_snooping multicast_vlan_group ........................................................................................................................111
show mld_snooping ...........................................................................................................................................................111
show mld_snooping group .................................................................................................................................................112
Page 7

show mld_snooping static_group .......................................................................................................................................113
TIME AND SNTP COMMANDS ........................................................................................................................... 114
config sntp ..........................................................................................................................................................................114
show sntp ...........................................................................................................................................................................115
enable sntp .........................................................................................................................................................................116
disable sntp .........................................................................................................................................................................116
config time .........................................................................................................................................................................117
config time_zone ................................................................................................................................................................117
config dst ............................................................................................................................................................................118
show time ...........................................................................................................................................................................119
POWER SAVING COMMANDS ........................................................................................................................... 120
config power_saving global ...............................................................................................................................................120
config power_saving port ...................................................................................................................................................121
show power_saving ............................................................................................................................................................121
LLDP COMMANDS .............................................................................................................................................. 123
enable lldp ..........................................................................................................................................................................123
disable lldp .........................................................................................................................................................................123
show lldp ............................................................................................................................................................................124
show lldp remote_ports ......................................................................................................................................................124
config lldp ..........................................................................................................................................................................125
TRAFFIC SEGMENTATION COMMANDS .......................................................................................................... 126
config traffic_segmentation ...............................................................................................................................................126
show traffic_segmentation .................................................................................................................................................126
SAFEGUARD COMMANDS ................................................................................................................................ 128
config safeguard_engine ....................................................................................................................................................128
show safeguard_engine ......................................................................................................................................................128
SPANNING TREE PROTOCOL COMMANDS .................................................................................................... 130
config stp ports ...................................................................................................................................................................130
show stp ports ....................................................................................................................................................................131
config stp trap.....................................................................................................................................................................131
config stp version ...............................................................................................................................................................132
enable stp ...........................................................................................................................................................................132
disable stp ...........................................................................................................................................................................133
show stp .............................................................................................................................................................................133
ZONE DEFENSE COMMANDS ........................................................................................................................... 135
enable zone_defense ..........................................................................................................................................................135
disable zone_defense ..........................................................................................................................................................135
show zone_defense ............................................................................................................................................................136
D-LINK DISCOVERY PROTOCOL COMMANDS ............................................................................................... 137
enable ddp ..........................................................................................................................................................................137
disable ddp .........................................................................................................................................................................137
config ddp report_time .......................................................................................................................................................138
show ddp ............................................................................................................................................................................138
POE COMMANDS ................................................................................................................................................ 140
config poe system ...............................................................................................................................................................140
config poe ports ..................................................................................................................................................................141
show poe system ................................................................................................................................................................142
Page 8

show poe ports ...................................................................................................................................................................142
SURVEILLANCE VLAN COMMANDS ................................................................................................................ 144
enable surveillance_vlan ....................................................................................................................................................144
disable surveillance_vlan ...................................................................................................................................................145
config surveillance_vlan priority .......................................................................................................................................145
config surveillance_vlan aging_time .................................................................................................................................146
config surveillance_vlan oui ..............................................................................................................................................147
show surveillance_vlan global ...........................................................................................................................................148
show surveillance_vlan oui ................................................................................................................................................148
show surveillance_vlan device ...........................................................................................................................................149
VOICE VLAN COMMANDS ................................................................................................................................. 151
enable voice_vlan ...............................................................................................................................................................151
disable voice_vlan ..............................................................................................................................................................152
config voice_vlan priority ..................................................................................................................................................152
config voice_vlan aging_time ............................................................................................................................................153
config voice_vlan oui .........................................................................................................................................................154
config voice_vlan ports ......................................................................................................................................................154
show voice_vlan global ......................................................................................................................................................156
show voice_vlan oui ...........................................................................................................................................................156
show voice_vlan voice_device ...........................................................................................................................................157
show voice_vlan ports ........................................................................................................................................................158
DOS ATTACK PREVENTION COMMANDS ....................................................................................................... 159
config dos_prevention ........................................................................................................................................................159
show dos_prevention ..........................................................................................................................................................160
LINK AGGREGATION COMMANDS .................................................................................................................. 161
create link_aggregation ......................................................................................................................................................161
delete link_aggregation ......................................................................................................................................................162
config link_aggregation .....................................................................................................................................................162
show link_aggregation .......................................................................................................................................................163
LACP COMMANDS ............................................................................................................................................. 164
show lacp ...........................................................................................................................................................................164
config lacp_ports ................................................................................................................................................................165
EEE ....................................................................................................................................................................... 166
config eee ...........................................................................................................................................................................166
show eee .............................................................................................................................................................................167
APPENDIX A - ETHERNET TECHNOLOGY SAMPLE COMMANDS ................................................................ 168
Gigabit Ethernet Technology .............................................................................................................................................168
Fast Ethernet Technology ..................................................................................................................................................168
Switching Technology .......................................................................................................................................................168
APPENDIX B - TECHNICAL SPECIFICATIONS ................................................................................................ 170
Hardware Specifications ....................................................................................................................................................170
Key Components / Performance ....................................................................................................................................170
Port Functions ................................................................................................................................................................170
Physical & Environment ................................................................................................................................................170
Emission (EMI) Certifications .......................................................................................................................................170
Safety Certifications .......................................................................................................................................................170
Features ..............................................................................................................................................................................170
Page 9

L2 Features .....................................................................................................................................................................170
L2 Multicasting ................................................................................................................................................................. 2
VLAN ............................................................................................................................................................................... 2
QoS (Quality of Service) ................................................................................................................................................... 2
Security ............................................................................................................................................................................. 2
Management ...................................................................................................................................................................... 2
Power Saving .................................................................................................................................................................... 2
APPENDIX C – RACK MOUNT INSTRUCTIONS ................................................................................................... 2
Page 10
DGS-1100/ME Metro Ethernet Managed Switch CLI Reference Guide
1
INTRODUCTION
The DGS-1100-16/ME consists of 16-ports 10/100/1000Mbps.
The DGS-1100-18/ME consists of 16-ports 10/100/1000Mbps ports + 2-ports 1000Mbps SFP
The DGS-1100-24/ME consists of 24-ports 10/100/1000Mbps.
The DGS-1100-24P/ME consists of 12-ports 10/100/1000Mbps PoE + 12-ports 10/100/1000Mbps.
The DGS-1100-26/ME consists of 24-ports 10/100/1000Mbps + 2-ports 1000Mbps SFP.
The Switch can be managed through the Telnet management agent. The Command Line Interface (CLI)
can be used to configure and manage the Switch via the Telnet interfaces.
This manual provides a reference for all of the commands contained in the CLI. Configuration and
management of the Switch via the Telnet interfaces is discussed in the Manual. For detailed information
on installing hardware please refer also to the Manual.
Setting the Switch’s IP Address
Each Switch must be assigned its own IP address, which is used for communication with an SNMP
network manager or other TCP/IP application (for example BOOTP, TFTP). The Switch’s default IP
address is 10.90.90.90. You can change the default Switch IP address to meet the specification of your
networking address scheme.
The Switch is also assigned a unique MAC address by the factory.
The Switch’s MAC address can also be found in the Telnet interfaces by entering show switch.
The IP address for the Switch must be set before it can be managed with the Telnet interfaces. The Switch IP
address can be automatically set using BOOTP or DHCP protocols, in which case the actual address assigned
to the Switch must be known.
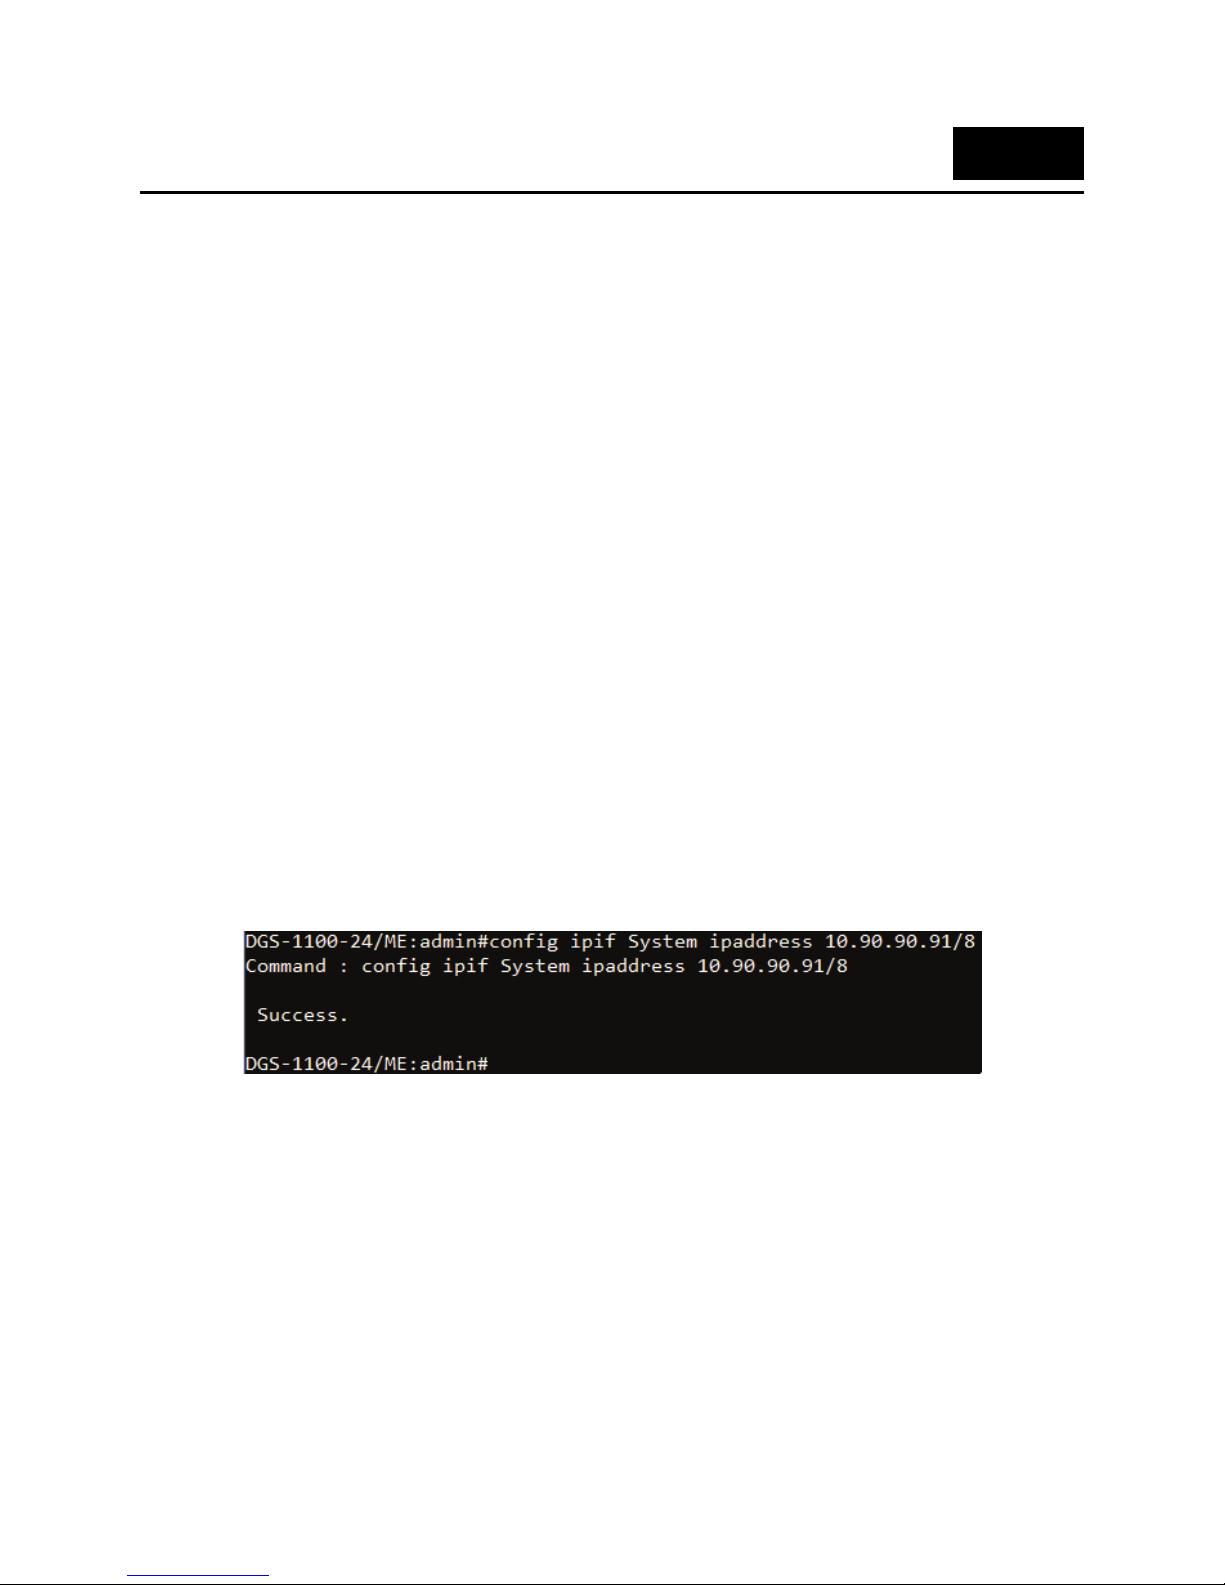
Alternatively, users can enter config ipif System ipaddress xxx.xxx.xxx.xxx/z. Where the x’s represent the IP
address to be assigned to the IP interface named System and the z represents the corresponding number of
subnets in CIDR notation.
The IP interface named System on the Switch can be assigned an IP address and subnet mask which
can then be used to connect a management station to the Switch’s Telnet management agent.
Figure 1–1 Assigning an IP Address
In the above example, the Switch was assigned an IP address of 10.90.90.91 with a subnet mask of
255.0.0.0. The system message Success indicates that the command was executed successfully. The
Switch can now be configured and managed via Telnet, SNMP MIB browser and the CLI using the above
IP address to connect to the Switch.
1
Page 11
DGS-1100/ME Metro Ethernet Managed Switch CLI Reference Guide
2
PRODUCT INTRODUCTION
Thank you and congratulations on your purchase of D-Link DGS-1100/ME Series Switch Products.
D-Link's next generation DGS-1100 Series switches blend plug-and-play simplicity with exceptional
value and reliability for small and medium-sized business (SMB) networking. All models are housed in a
new style rack-mount metal case with easy-to-view front panel diagnostic LEDs.
The brand-new DGS-1100/ME series are green by design with IEEE 802.3az Energy Efficient Ethernet
compliant (abbreviated as EEE) and D-Link Green Technologies. This allows significant power saving
during periods of low data activity. In most environments, switches are idle 90% or more of the time. If
there has been no network traffic over a short period of time, ports on DGS-1100 switch will change to
power saving mode automatically. Once a packet is received, the switch wakes and works immediately,
returning to normal funcationality. By using EEE compliant devices, such as PCs and servers, the
network can save energy without compromising any performance. Even when connecting to legacy
devices which do not support IEEE 802.3az, D-Link Green Technologies can reduce power consumption
by changing the power state of the link.
DGS-1100-16/ME
16-Port 10/100/1000Mpbs Switch
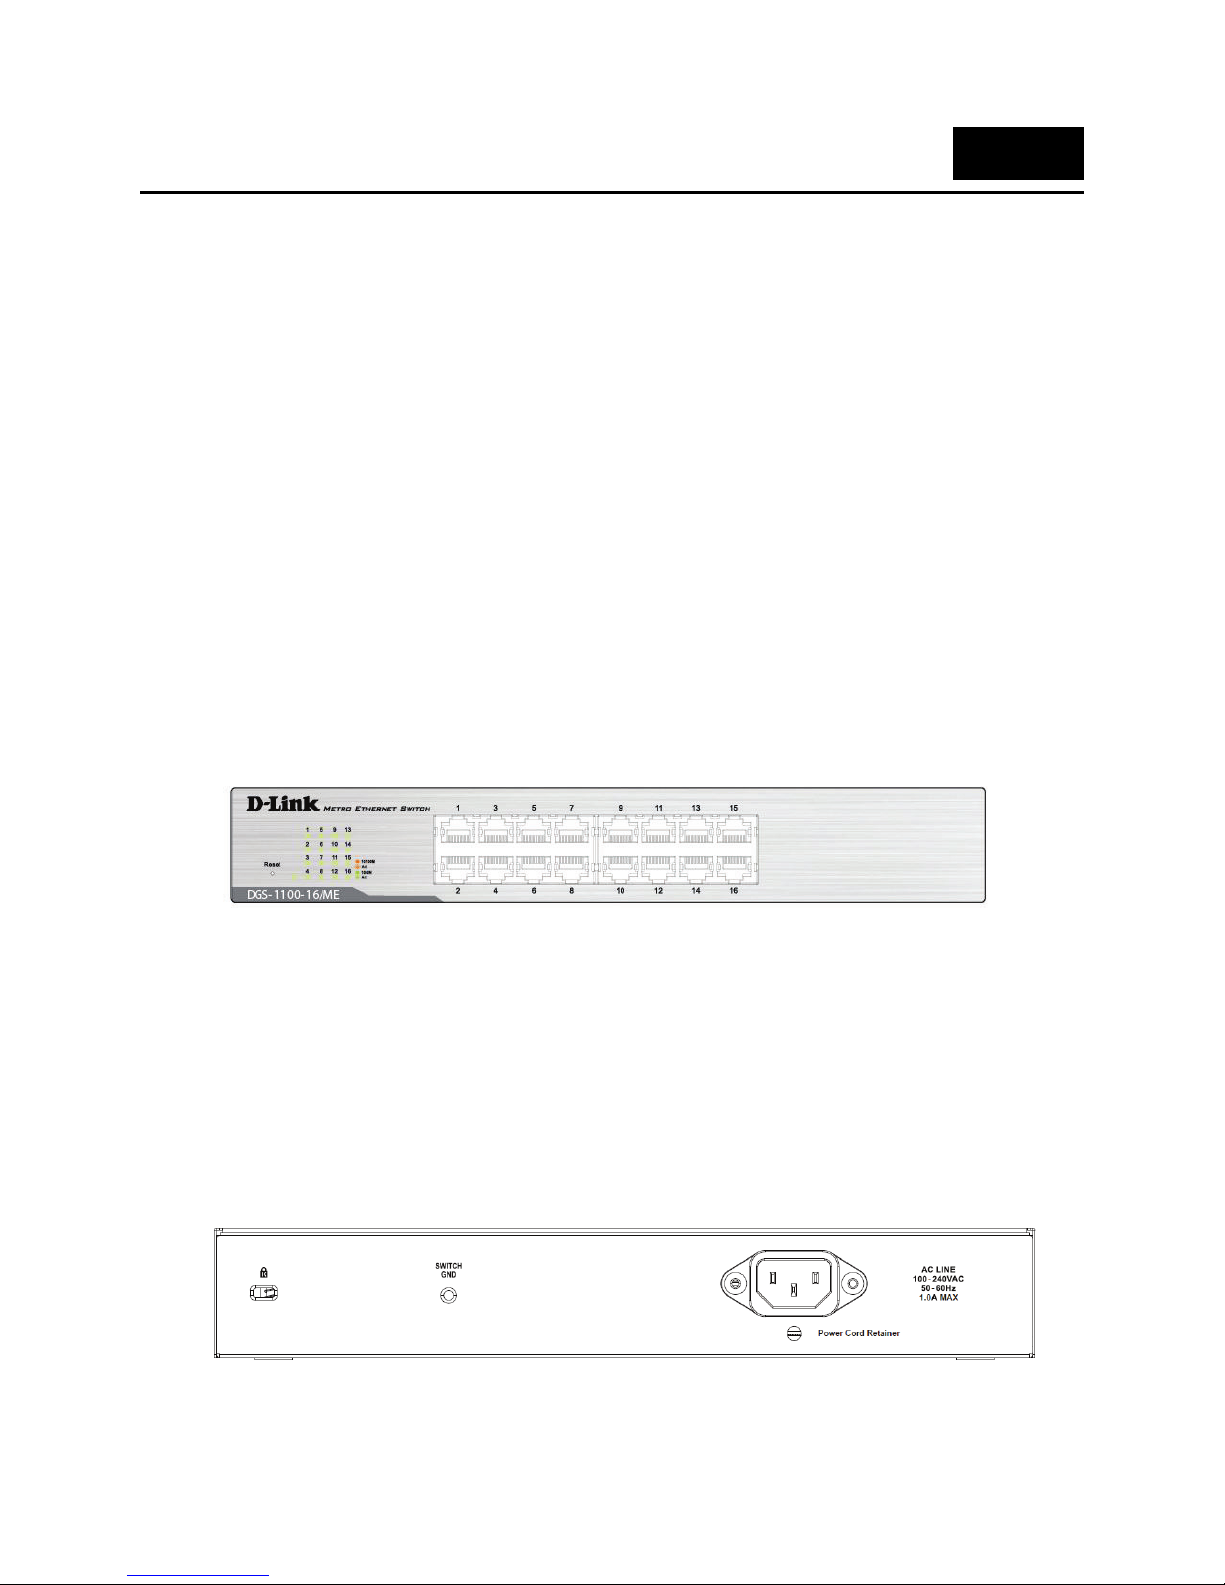
Front Panel
Figure 2-1 - DGS-1100-16/ME Front Panel
Power LED: The Power LED lights up when the Switch is connected to a power source.
Link/Act/Speed LED (Ports 1-16):
Solid Green: When there is a secure 1000Mbps connection at the port.
Blinking Green or Amber: Indicates that the Switch is either sending or receiving data to the port.
Solid Amber: Indicates that the port is running at 10/100Mbps.
Light off: No link.
Reset: By pressing the Reset button until the power LED turns amber, the Switch will change back to
the default configuration and all changes will be lost.
Rear Panel
Figure 2-2 – DGS-1100-16/ME Rear Panel
2
Page 12
DGS-1100/ME Metro Ethernet Managed Switch CLI Reference Guide
Power: The power port is where to connect the AC power cord.
DGS-1100-18/ME
16-Port 10/100/1000Mpbs + 2 Port SFP 1000 Mbps Switch
Front Panel
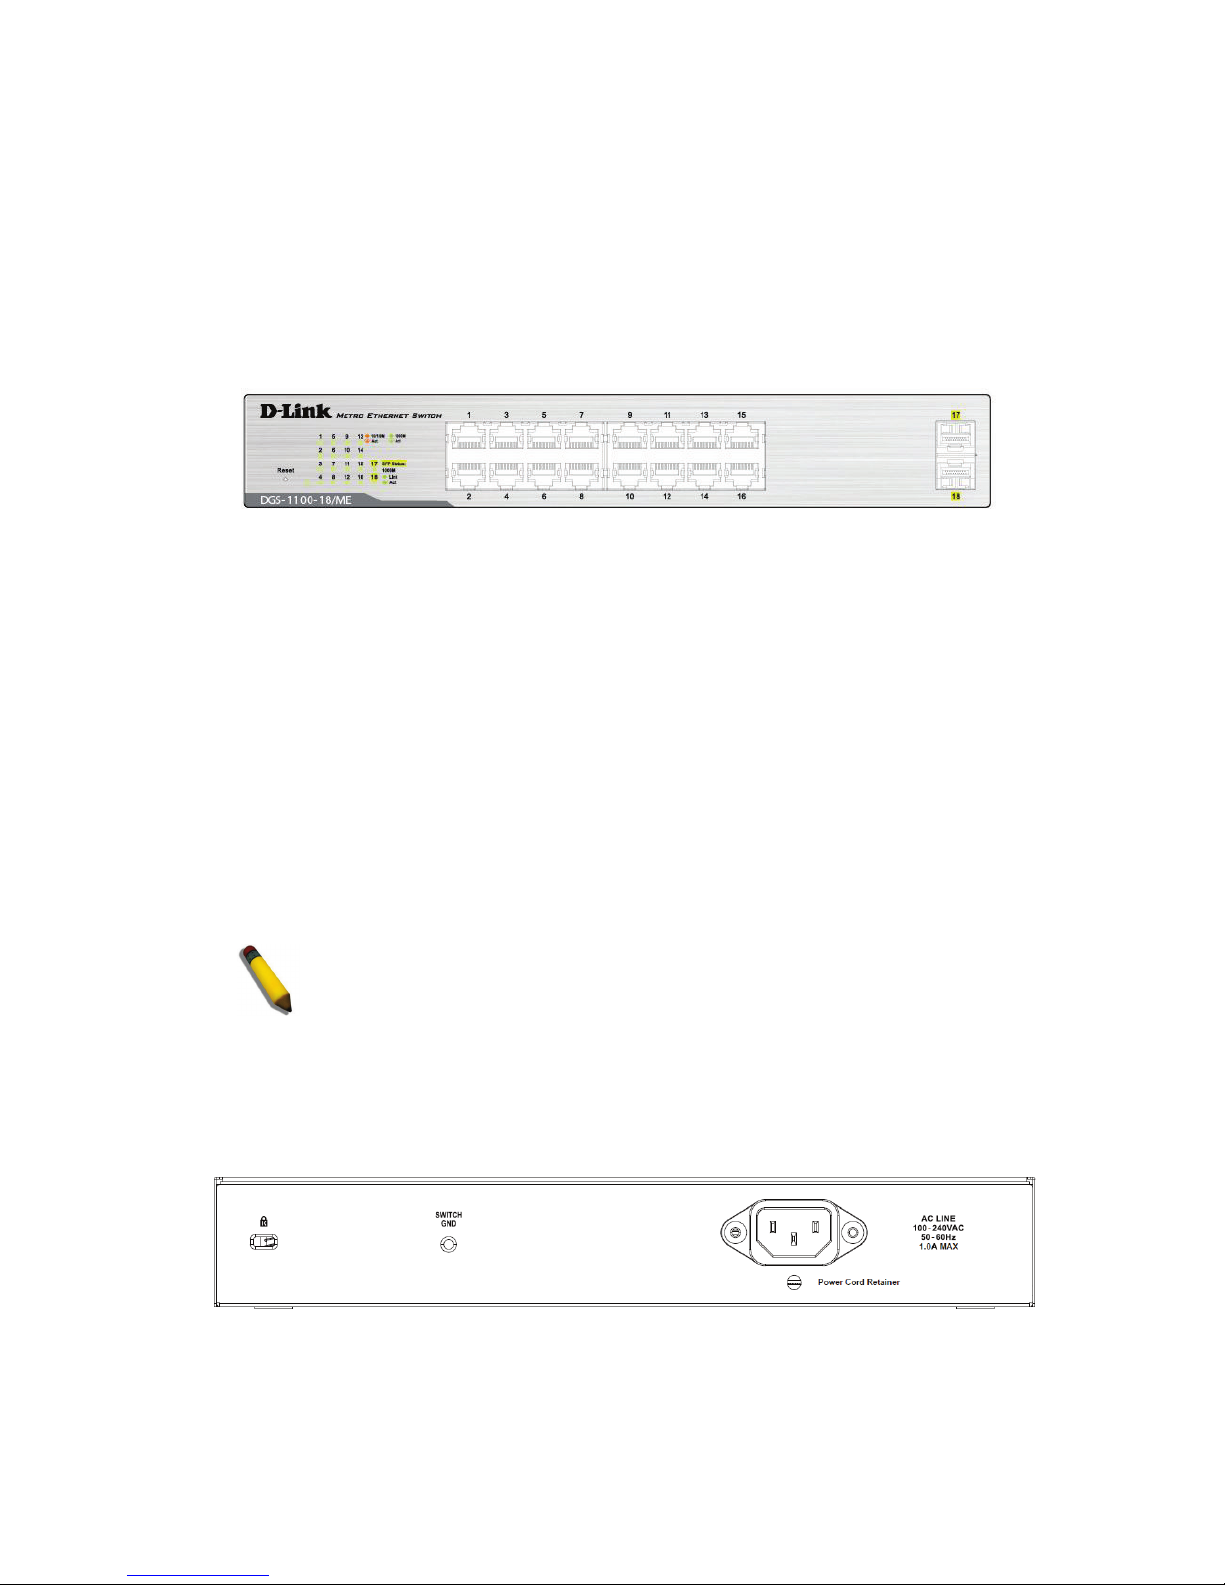
Figure 2-3 - DGS-1100-18/ME Front Panel
Power LED: The Power LED lights up when the Switch is connected to a power source.
Link/Act/Speed LED (Ports 1-16):
Solid Green: When there is a secure 1000Mbps connection at the port.
Blinking Green or Amber: Indicates that the Switch is either sending or receiving data to the port.
Solid Amber: Indicates that the port is running at 10/100Mbps.
Light off: No link.
Link/Act/Speed LED (Ports 17-18):
Solid Green: There is a secure 1000Mbps connection at the port.
Blinking Green: There is reception or transmission occurring at the port.
Light off: No link.
Reset: By pressing the Reset button until the power LED turns amber, the Switch will change back to
the default configuration and all changes will be lost.
NOTE: The MiniGBIC ports should use UL listed Optical Transceiver
product, Rated Laser Class I. 3.3Vdc
Rear Panel
Figure 2-4 – DGS-1100-18/ME Rear Panel
Power: The power port is where to connect the AC power cord.
3
Page 13
DGS-1100/ME Metro Ethernet Managed Switch CLI Reference Guide
DGS-1100-24/ME
24-Port 10/100/1000Mpbs Switch
Front Panel
Figure 2-5 – DGS-1100-24/ME Front Panel
Power LED: The Power LED lights up when the Switch is connected to a power source.
Link/Act/Speed LED (Ports 1-24):
Solid Green: When there is a secure 1000Mbps connection at the port.
Blinking Green or Amber: Indicates that the Switch is either sending or receiving data to the port.
Solid Amber: Indicates that the port is running at 10/100 Mbps.
Light off: No link.
Reset: By pressing the Reset button until the power LED turns amber, the Switch will change back to
the default configuration and all changes will be lost.
Rear Panel
Figure 2-6 – DGS-1100-24/ME Rear Panel
Power: Connect the supplied AC power cable to this port.
4
Page 14
DGS-1100/ME Metro Ethernet Managed Switch CLI Reference Guide
DGS-1100-24P/ME
12-Port 10/100/1000Mpbs PoE + 12-Port 10/100/1000Mpbs Switch
Front Panel
Figure 2-7 – DGS-1100-24P/ME Front Panel
Power LED: The Power LED lights up when the Switch is connected to a power source.
Link/Act/Speed LED (Ports 1-24):
Solid Green: When there is a secure 1000Mbps connection at the port.
Blinking Green or Amber: Indicates that the Switch is either sending or receiving data to the port.
Solid Amber: Indicates that the port is running at 10/100Mbps.
Light off: No link.
PoE Mode (Ports 1-12):
Green: Indicates that PoE mode is active.
Amber: Indicates that there is an issue with the PoE mode activating properly.
Light off: Indicates that PoE mode is not active.
LED Mode Button: Pressing this button will change the LED behavior from Link mode, and PoE Mode
Reset: By pressing the Reset button until the power LED turns amber, the Switch will change back to
the default configuration and all changes will be lost.
Note: The LED behavior for ports 1-12 will switch between Link mode and PoE mode when the PoE
mode is active.
NOTE: This equipment can be connected only to PoE networks without
routing to the outside plant.
Rear Panel
Figure 2-8 – DGS-1100-24P/ME Rear Panel
Power: Connect the supplied AC power cable to this port.
5
Page 15
DGS-1100/ME Metro Ethernet Managed Switch CLI Reference Guide
DGS-1100-26/ME
24-Port 10/100/1000Mpbs + 2-Port SFP 1000 Mbps Switch
Front Panel
Figure 2-9 – DGS-1100-26/ME Front Panel
Power LED: The Power LED lights up when the Switch is connected to a power source.
Link/Act/Speed LED (Ports 1-24):
Solid Green: When there is a secure 1000Mbps connection at the port.
Blinking Green or Amber: Indicates that the Switch is either sending or receiving data to the port.
Solid Amber: Indicates that the port is running at 10/100Mbps.
Light off: No link.
Link/Act/Speed LED (Ports 25-26):
Solid Green: There is a secure 1000Mbps connection at the port.
Blinking Green: There is reception or transmission occurring at the port.
Light off: No link.
Reset: By pressing the Reset button until the power LED turns amber, the Switch will change back to
the default configuration and all changes will be lost.
NOTE: The MiniGBIC ports should use UL listed Optical Transceiver
product, Rated Laser Class I. 3.3Vdc
Rear Panel
Figure 2-10 – DGS-1100-26/ME Rear Panel
Power: Connect the supplied AC power cable to this port.
6
Page 16
DGS-1100/ME Metro Ethernet Managed Switch CLI Reference Guide
3
HARDWARE INSTALLATION
This chapter provides unpacking and installation information for the D-Link Switch.
Step 1: Unpacking
Open the shipping carton and carefully unpack its contents. Please consult the packing list located in the User
Manual to make sure all items are present and undamaged. If any item is missing or damaged, please contact
your local D-Link reseller for replacement.
Packing contents of DGS-1100/ME
• One D-Link DGS-1100/ME Series Switch
• One AC power cord
• Four rubber feet
• Screws and two mounting brackets
• One Multi-lingual Getting Started Guide
• One CD with User Manual
If any item are found missing or damaged, please contact the local reseller for replacement.
Step 2: Switch Installation
For safe switch installation and operation, it is recommended that you:
• Visually inspect the power cord to see that it is secured fully to the AC power connector.
• Make sure that there is proper heat dissipation and adequate ventilation around the switch.
• Do not place heavy objects on the switch.
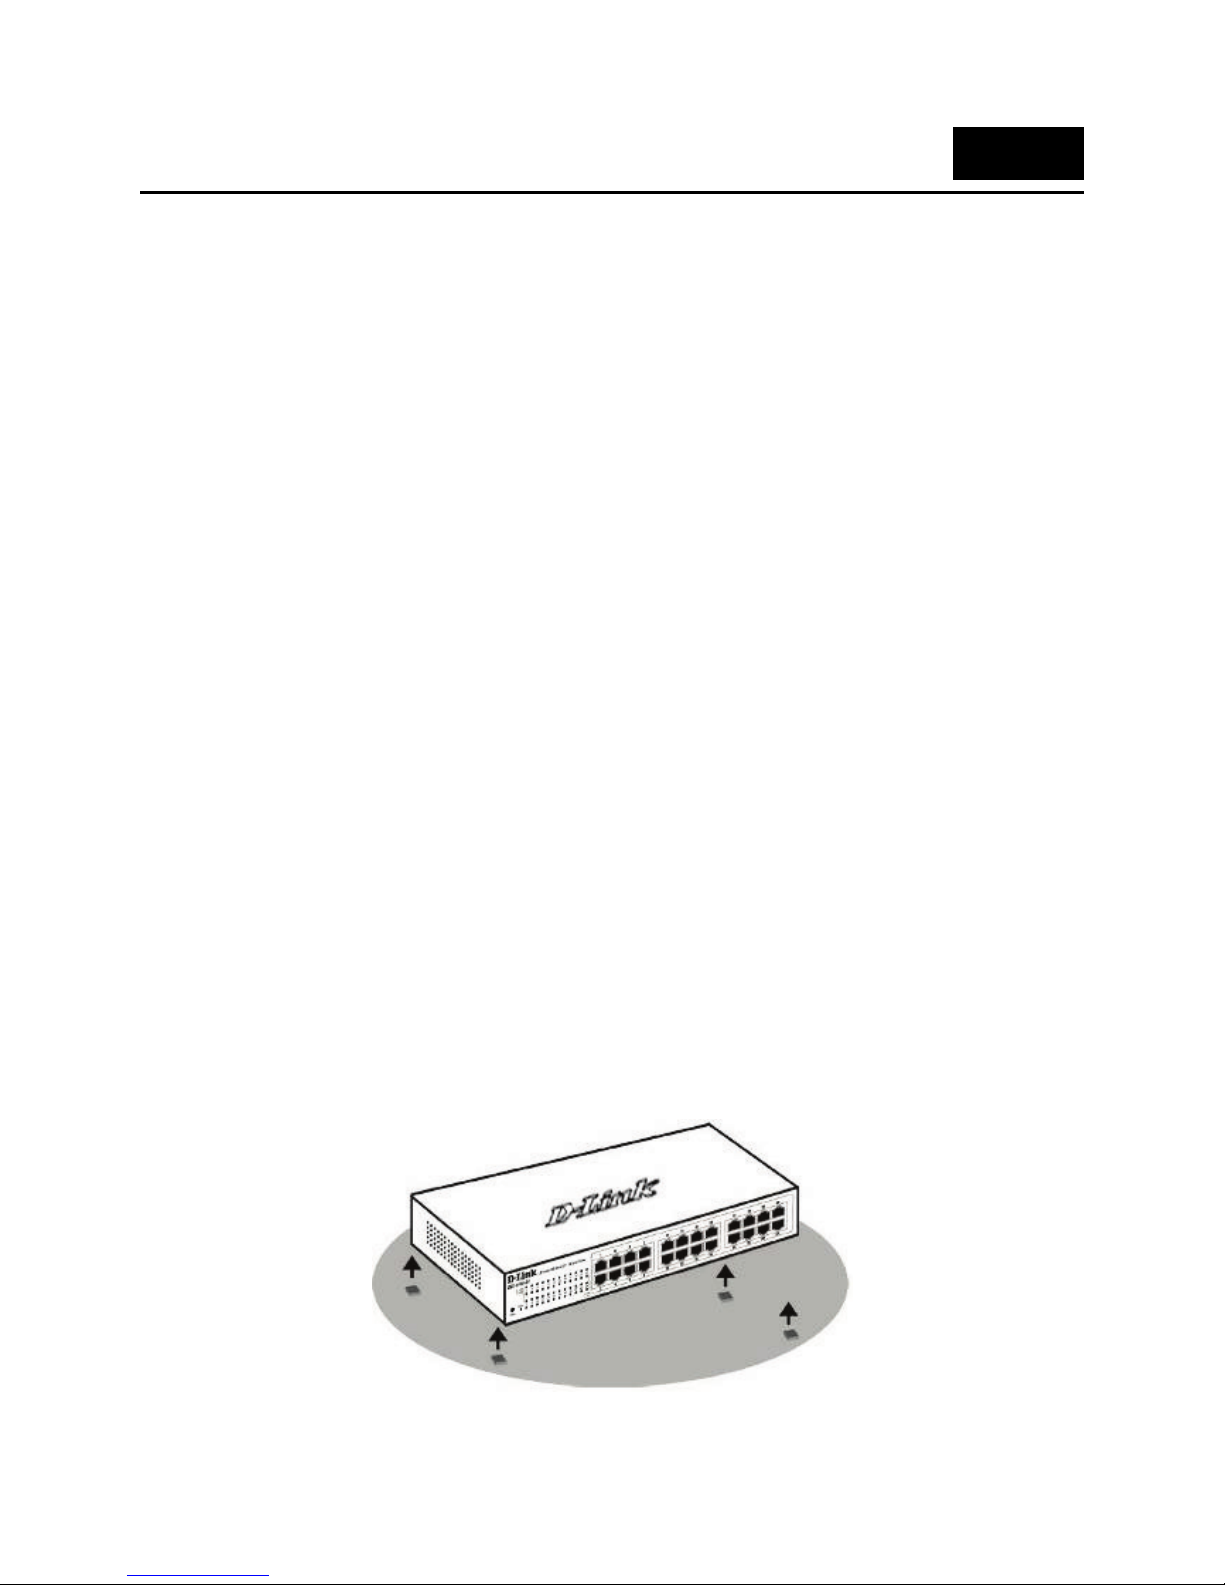
Desktop or Shelf Installation
When installing the switch on a desktop or shelf, the rubber feet included with the device must be attached on
the bottom, at each corner of the device’s base. Allow enough ventilation space between the device and the
objects around it.
7
Page 17
DGS-1100/ME Metro Ethernet Managed Switch CLI Reference Guide
Figure 3-1 – Attach the adhesive rubber pads to the bottom
Rack Installation
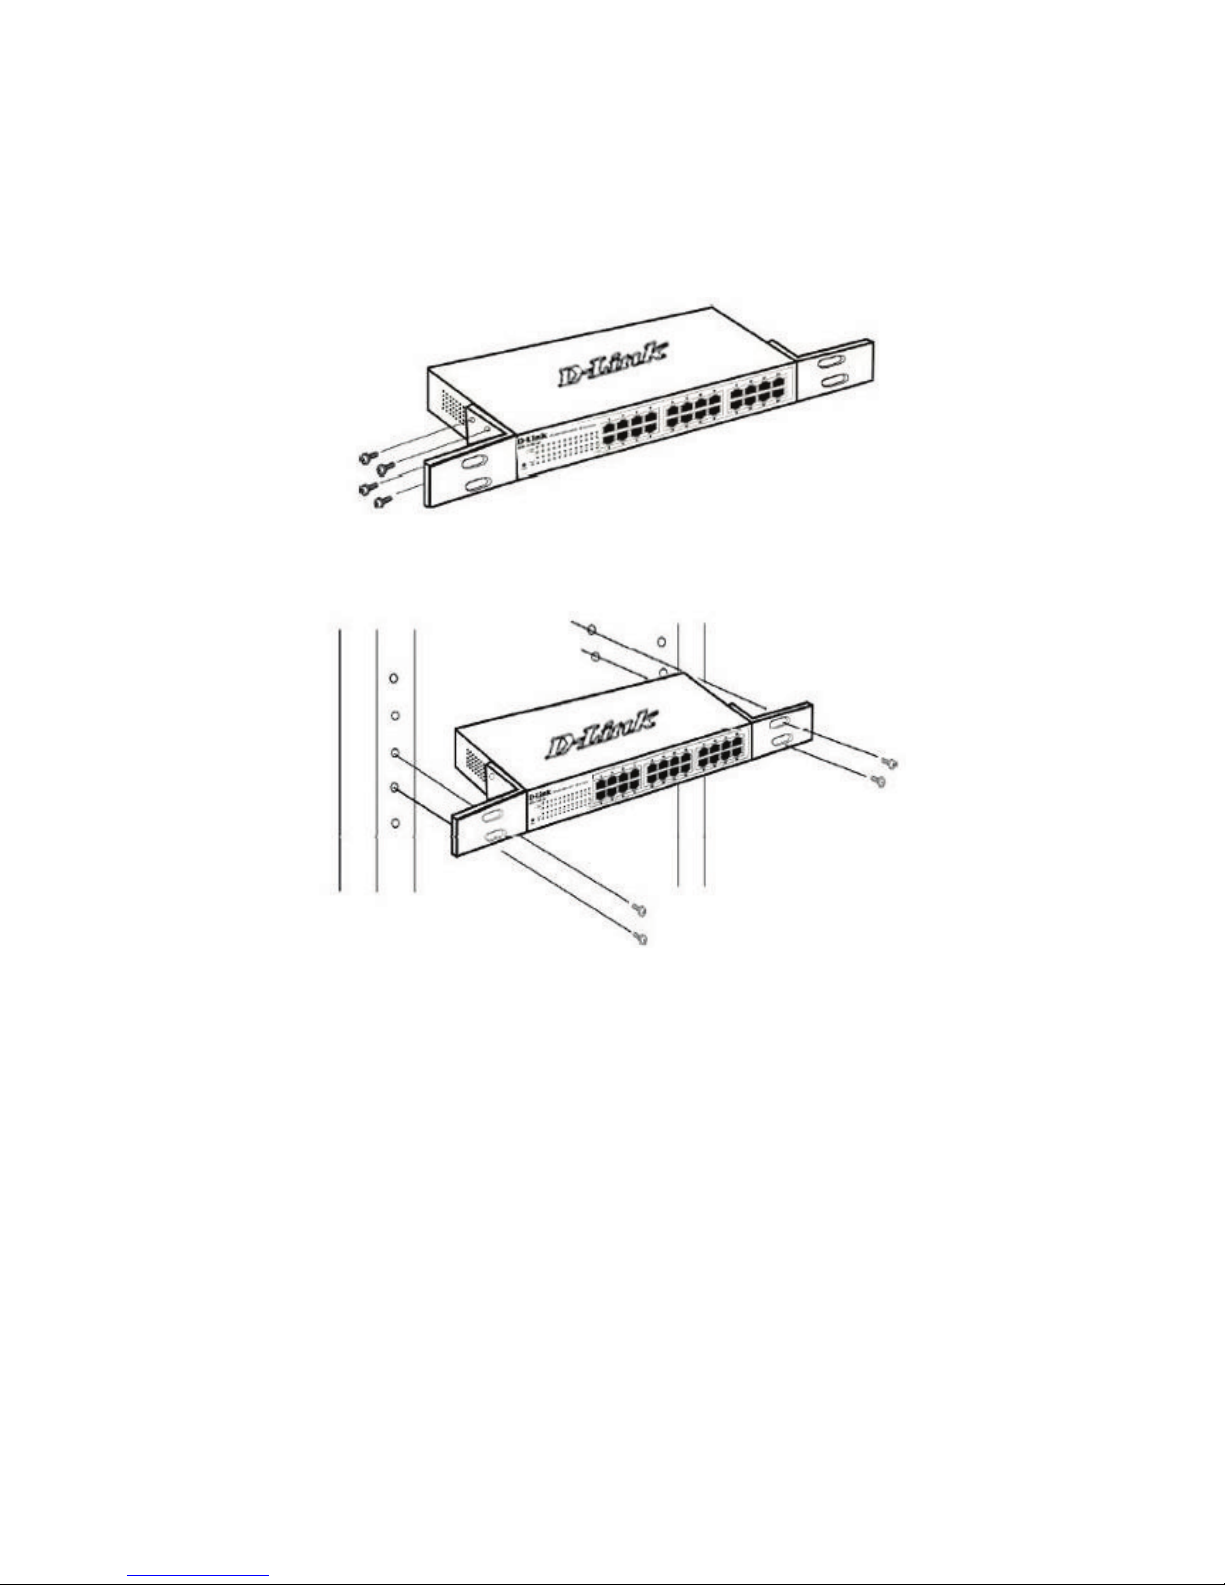
The switch can be mounted in an EIA standard size 11-inch rack, which can be placed in a wiring closet with
other equipment. To install, attach the mounting brackets to the switch’s side panels (one on each side) and
secure them with the screws provided (please note that these brackets are not designed for palm size switches).
Figure 3-2 – Attach the mounting brackets to the Switch
Then, use the screws provided with the equipment rack to mount the switch in the rack.
Figure 3-3 – Mount the Switch in the rack or chassis
Please be aware of following safety Instructions when installing:
A) Elevated Operating Ambient - If installed in a closed or multi-unit rack assembly, the operating ambient
temperature of the rack environment may be greater than room temperature. Therefore, consideration should be
given to installing the equipment in an environment compatible with the maximum ambient temperature (Tma)
specified by the manufacturer.
B) Reduced Air Flow - Installation of the equipment in a rack should be such that the amount of air flow required
for safe operation of the equipment is not compromised.
C) Mechanical Loading - Mounting of the equipment in the rack should be such that a hazardous condition is not
achieved due to uneven mechanical loading.
D) Circuit Overloading - Consideration should be given to the connection of the equipment to the supply circuit
and the effect that overloading of the circuits might have on overcurrent protection and supply wiring.
Appropriate consideration of equipment nameplate ratings should be used when addressing this concern.
E) Reliable Earthing - Reliable earthing of rack-mounted equipment should be maintained. Particular attention
should be given to supply connections other than direct connections to the branch circuit (e.g. use of power
strips)."
8
Page 18
DGS-1100/ME Metro Ethernet Managed Switch CLI Reference Guide
Step 3 – Plugging in the AC Power Cord
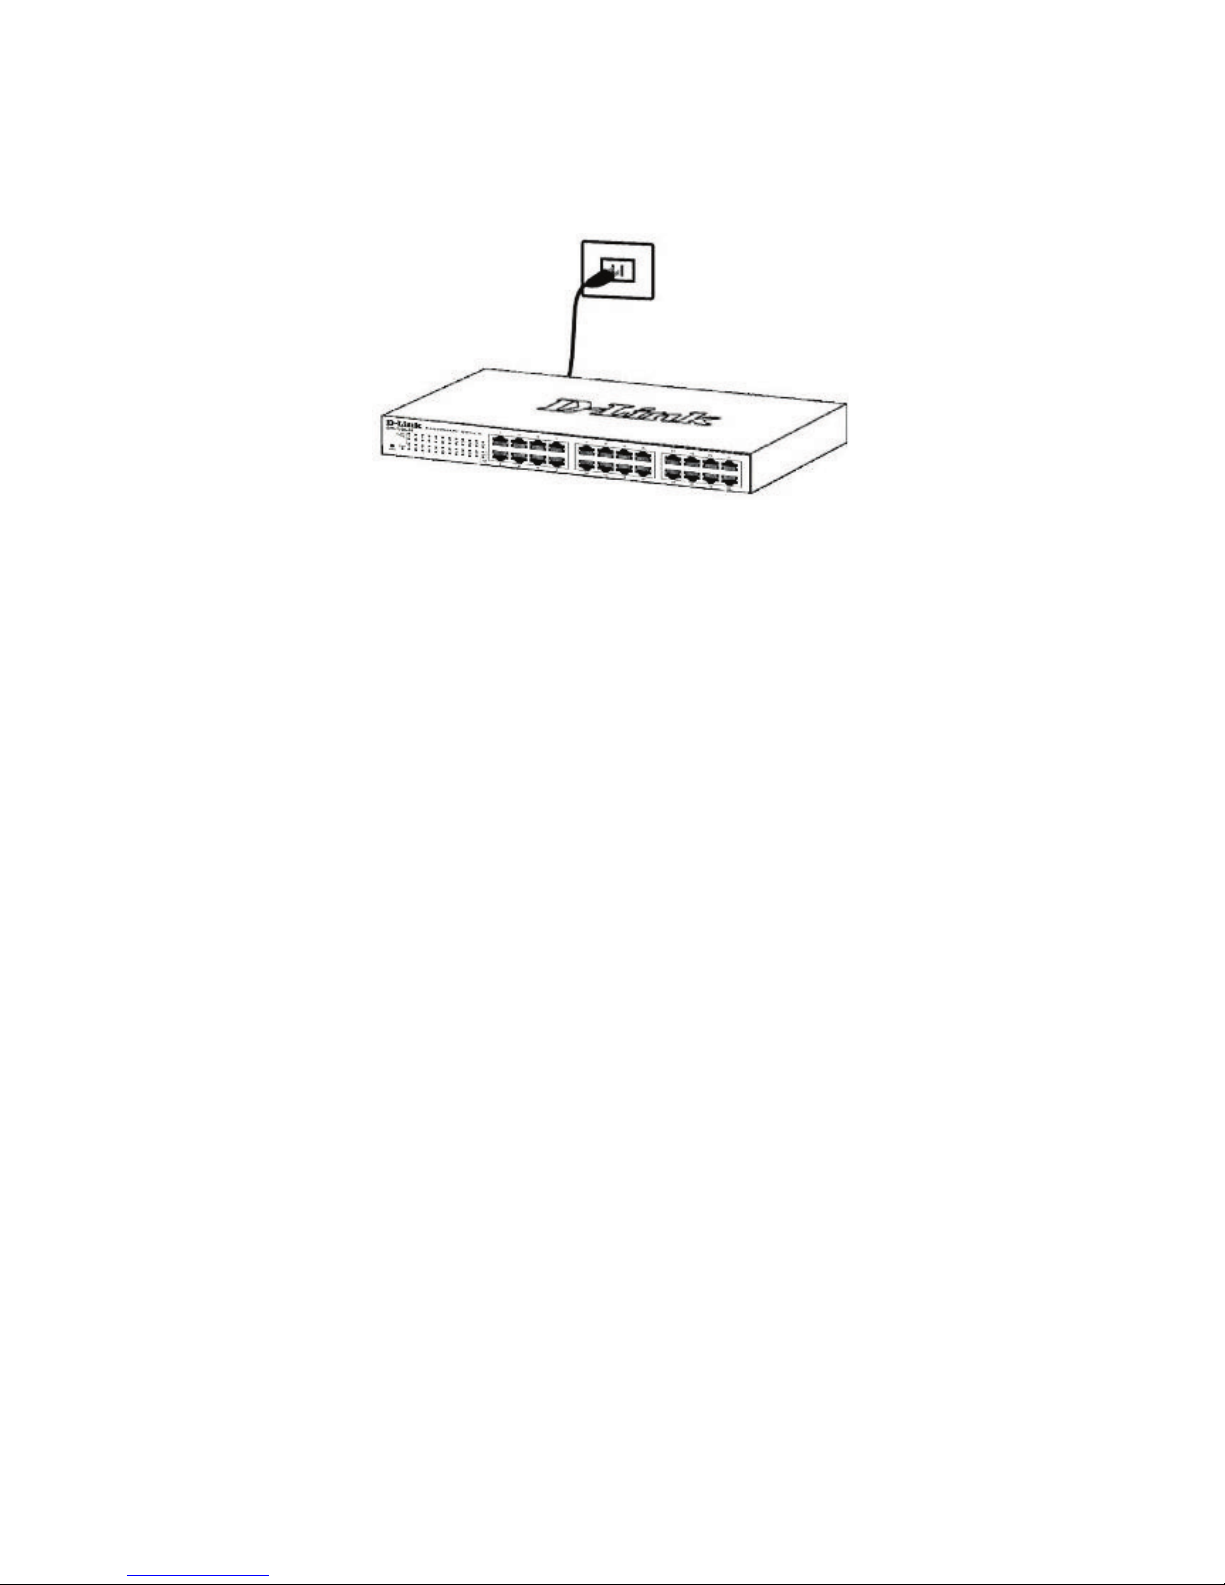
Users may now connect the AC power cord into the rear of the switch and to an electrical outlet (preferably one
that is grounded and surge protected).
Figure 3-4 – Plugging the switch into an outlet
Power Failure
As a precaution, the switch should be unplugged in case of power failure. When power is resumed, plug the
switch back in.
Grounding the Switch
This section describes how to connect the DGS-1100/ME Series Switch to ground. You must complete this
procedure before powering your switch.
Required Tools and Equipment
• Ground screws (included in the accessory kit): One M4 x 6 mm (metric) pan-head screw
• Ground cable (not included in the accessory kit): The grounding cable should be sized according to local and
national installation requirements. Depending on the power supply and system, a 12 to 6 AWG copper conductor
is required for U.S installation. Commercially available 6 AWG wire is recommended. The length of the cable
depends on the proximity of the switch to proper grounding facilities.
• A screwdriver (not included in the accessory kit)
The following steps let you connect the switch to a protective ground:
Step 1: Verify if the system power is off.
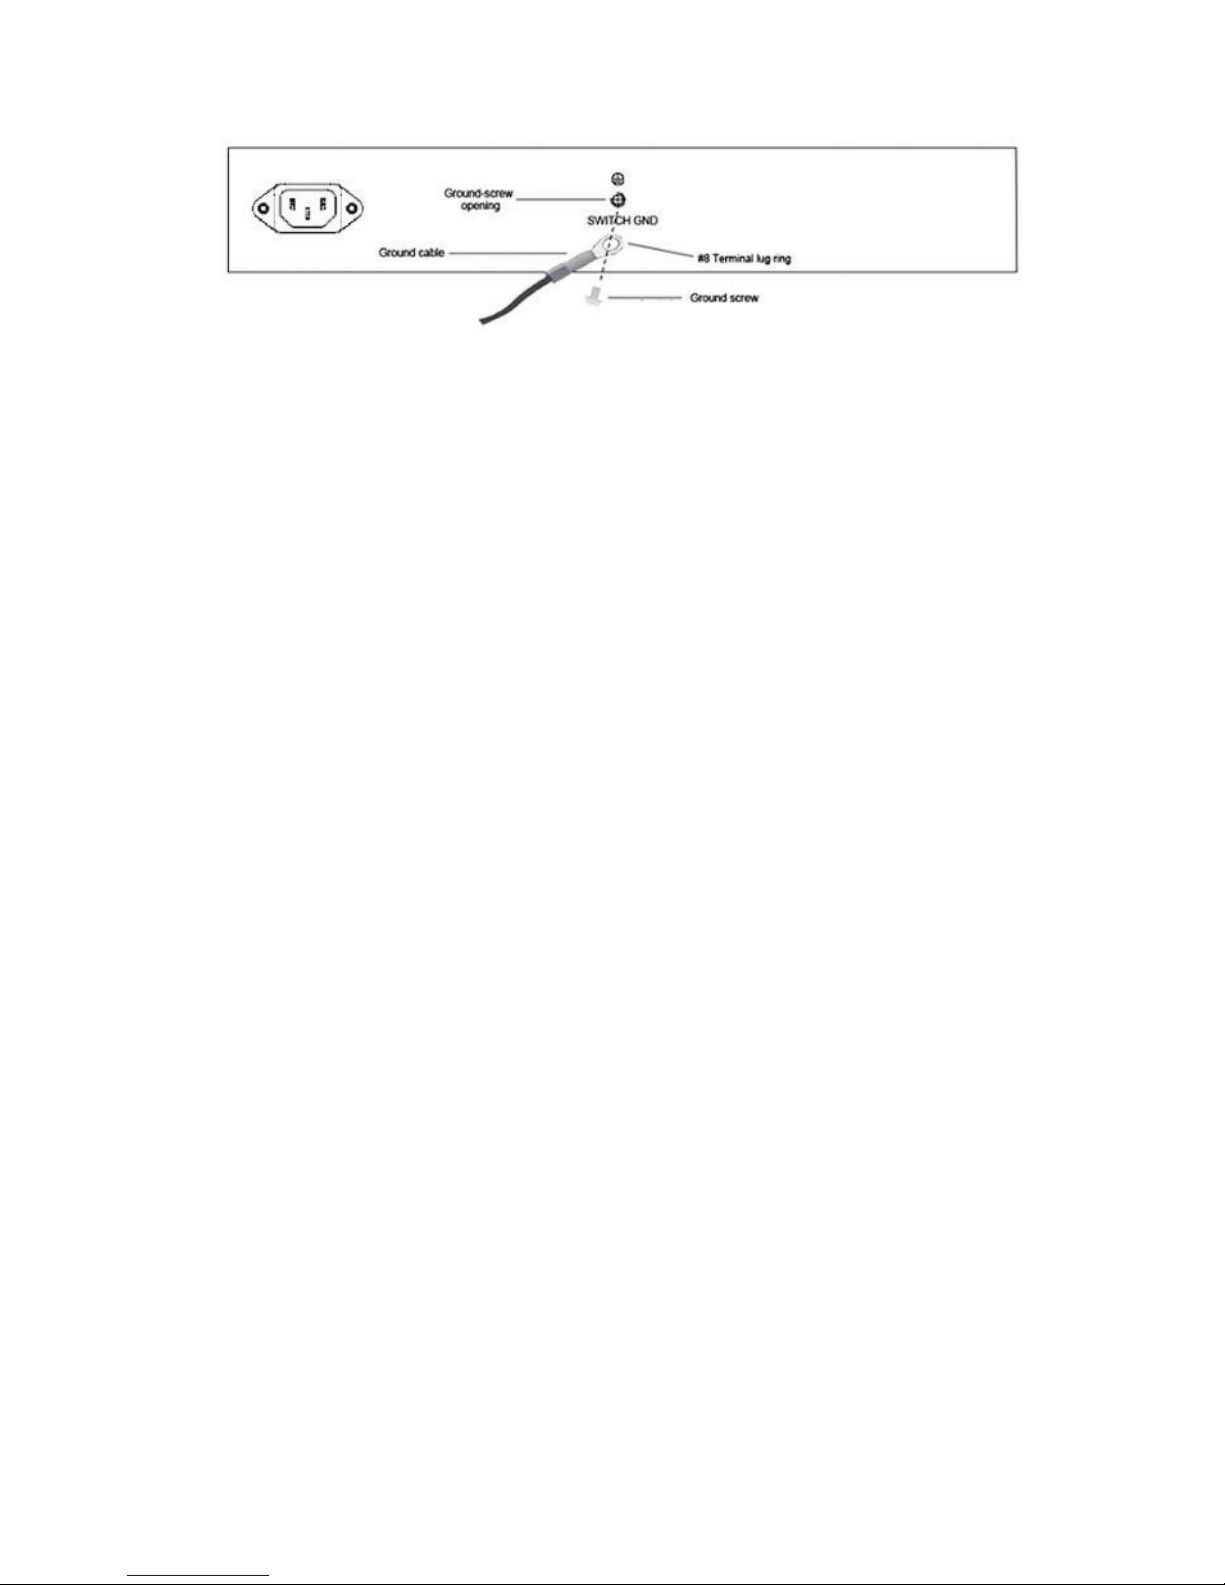
Step 2: Use the ground cable to place the #8 terminal lug ring on top of the ground-screw opening, as seen in
the figure below.
Step 3: Insert the ground screw into the ground-screw opening.
Step 4: Using a screwdriver, tighten the ground screw to secure the ground cable to the switch.
Step 5: Attach the terminal lug ring at the other end of the grounding cable to an appropriate grounding stud or
bolt on rack where the switch is installed.
Step 6: Verify if the connections at the ground connector on the switch and the rack are securely attached.
9
Page 19
DGS-1100/ME Metro Ethernet Managed Switch CLI Reference Guide
Figure 3-5 – Ground cable, screw and #8 terminal lug rings
10
Page 20
DGS-1100/ME Metro Ethernet Managed Switch CLI Reference Guide
4
USING THE COMMAND LINE INTERFACE
The Switch allows a computer or terminal to perform some basic monitoring and configuration tasks by
using the Command Line Interface (CLI) via TELNET protocol.
NOTE: Switch configuration settings are saved to non-volatile RAM using the save command.
The current configuration will then be retained in the Switch’s NV-RAM, and reloaded when the
Switch is rebooted. If the Switch is rebooted without using the save command, the last
configuration saved to NV-RAM is loaded.
The command line functions are accessed over a Telnet interface. Once an IP address for the Switch has
been set, A Telnet program can be used (in VT-100 compatible terminal mode) to access and control the
Switch.
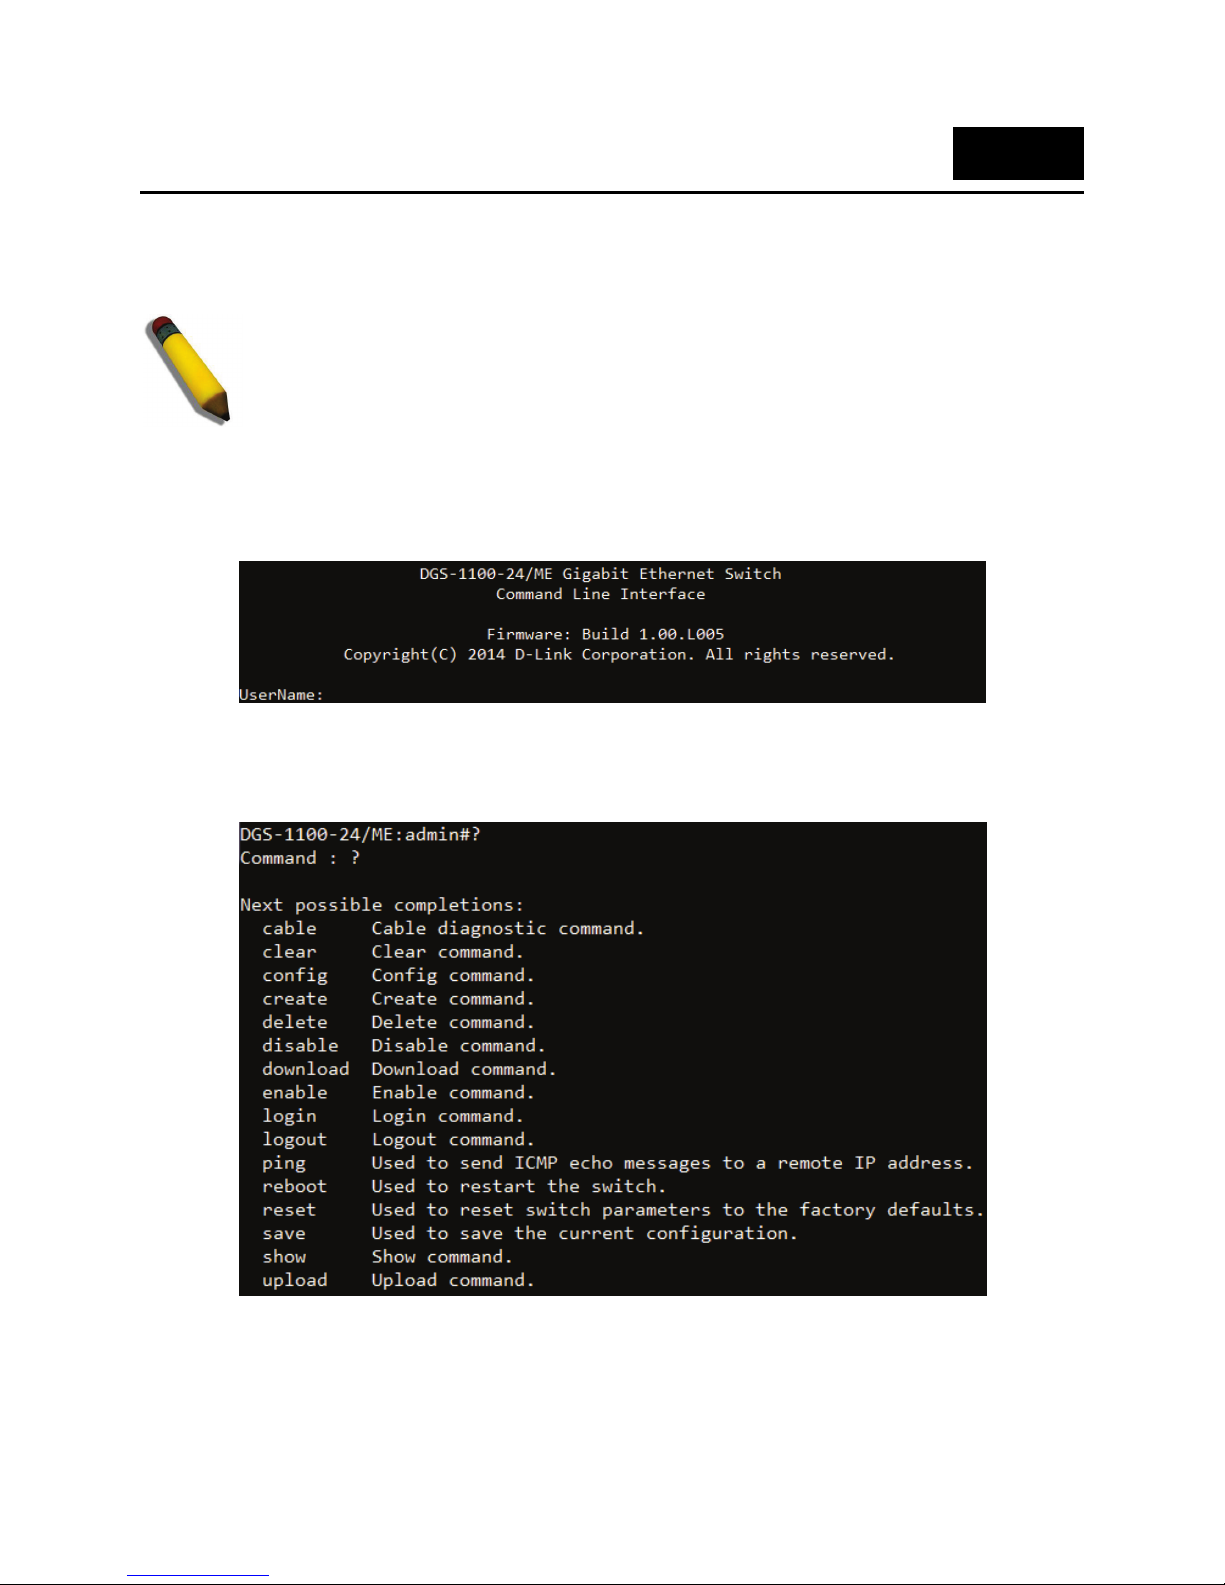
After the Switch reboots and you have to logged in, the console looks like this:
Figure 5–1 Initial Console Screen after Logging In
Commands are entered at the command prompt, DGS-1100-24P/ME:admin#
There are a number of helpful features included in the CLI. Entering the ? command displays a list of all
of the top-level commands.
Figure 5–2 The ? Command
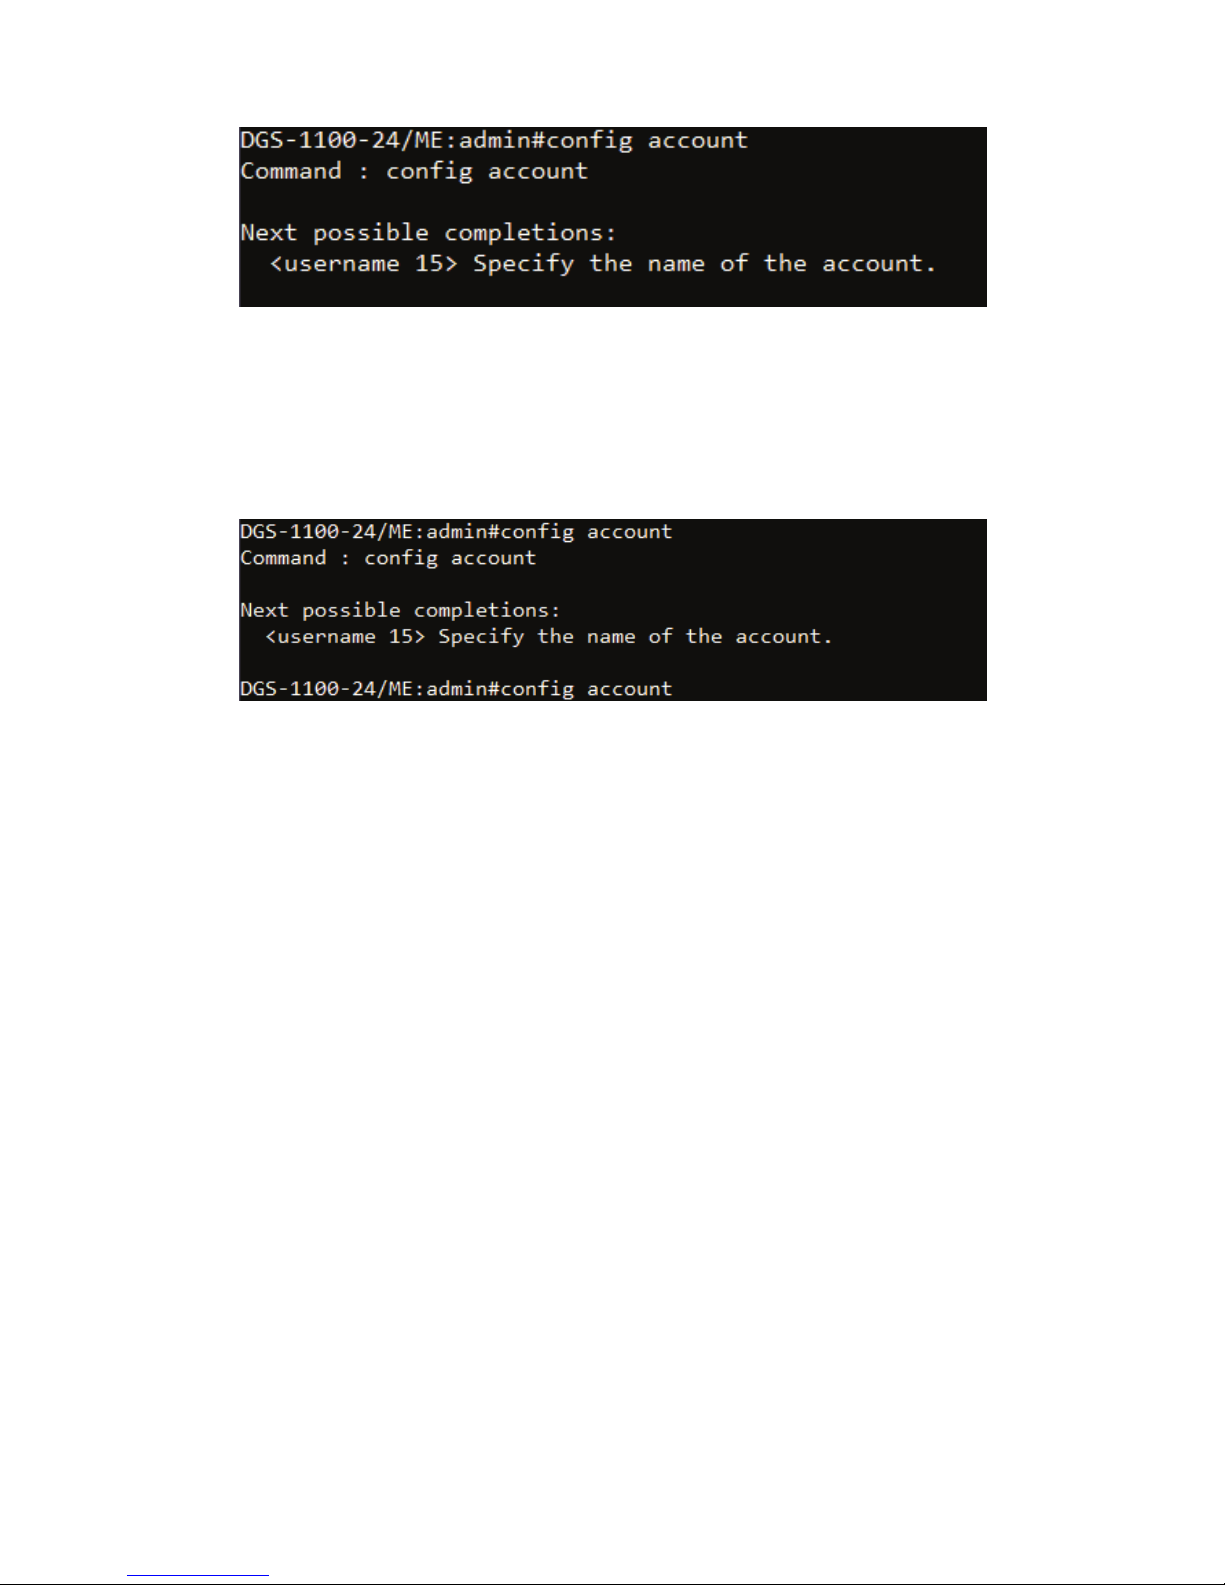
When entering a command without its required parameters, the CLI displays the prompt: command:
config account message and the options listed below.
11
Page 21
DGS-1100/ME Metro Ethernet Managed Switch CLI Reference Guide
Figure 5–3 Example Command Parameter Help
In this case, the command config account was entered with the parameter <username>. The CLI will then
prompt to enter the <username> with the message, command: config account. Every command in the
CLI has this feature, and complex commands have several layers of parameter prompting.
In addition, after typing any given command plus one space, users can see all of the next possible subcommands, in sequential order, by pressing the ? key.
To re-enter the previous command at the command prompt, press the up arrow cursor key. The previous
command appears at the command prompt.
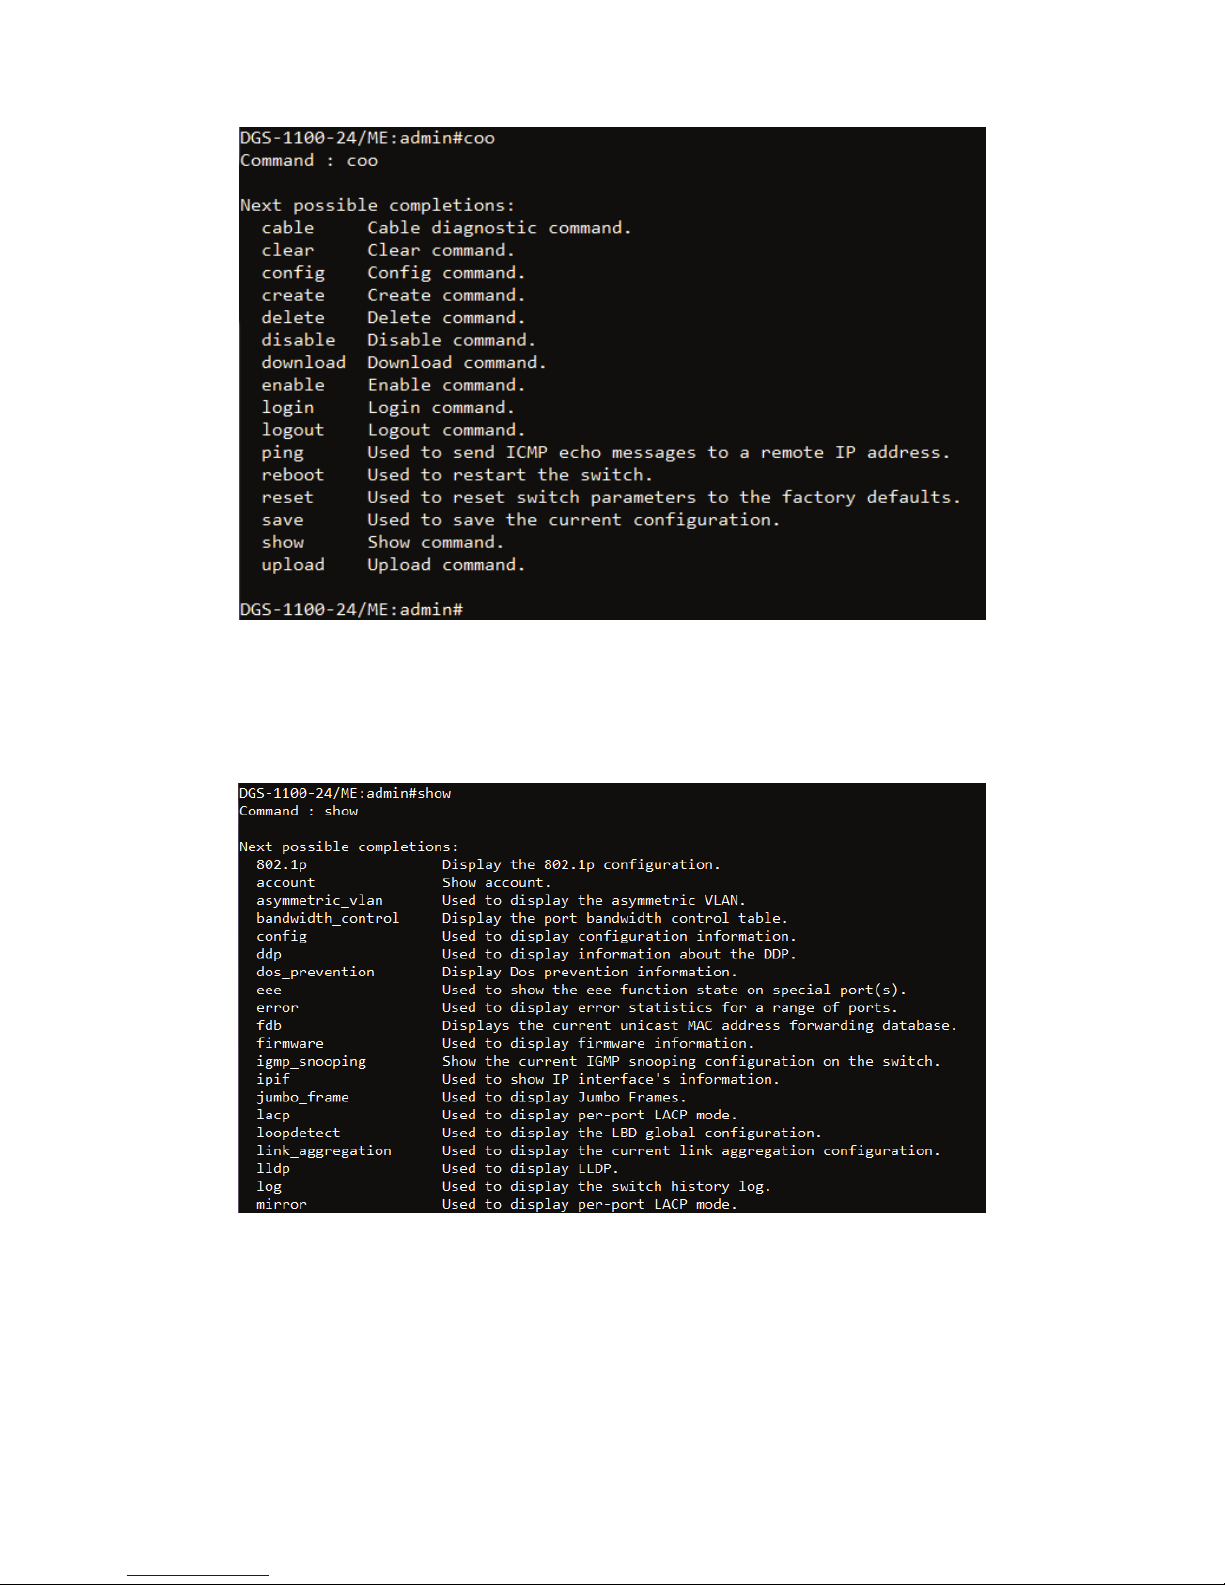
Figure 5–4 Using the Up Arrow to Re-enter a Command
In the above example, the command config account was entered without the required parameter
<username>, the CLI returned the command: config account prompt. The up arrow cursor control key
was pressed to re-enter the previous command (config account) at the command prompt. Now the
appropriate username can be entered and the config account command re-executed.
All commands in the CLI function in this way. In addition, the syntax of the help prompts are the same as
presented in this manual - angle brackets < > indicate a numerical value or character string. The < > can
also indicate a word with a number for character allowed.
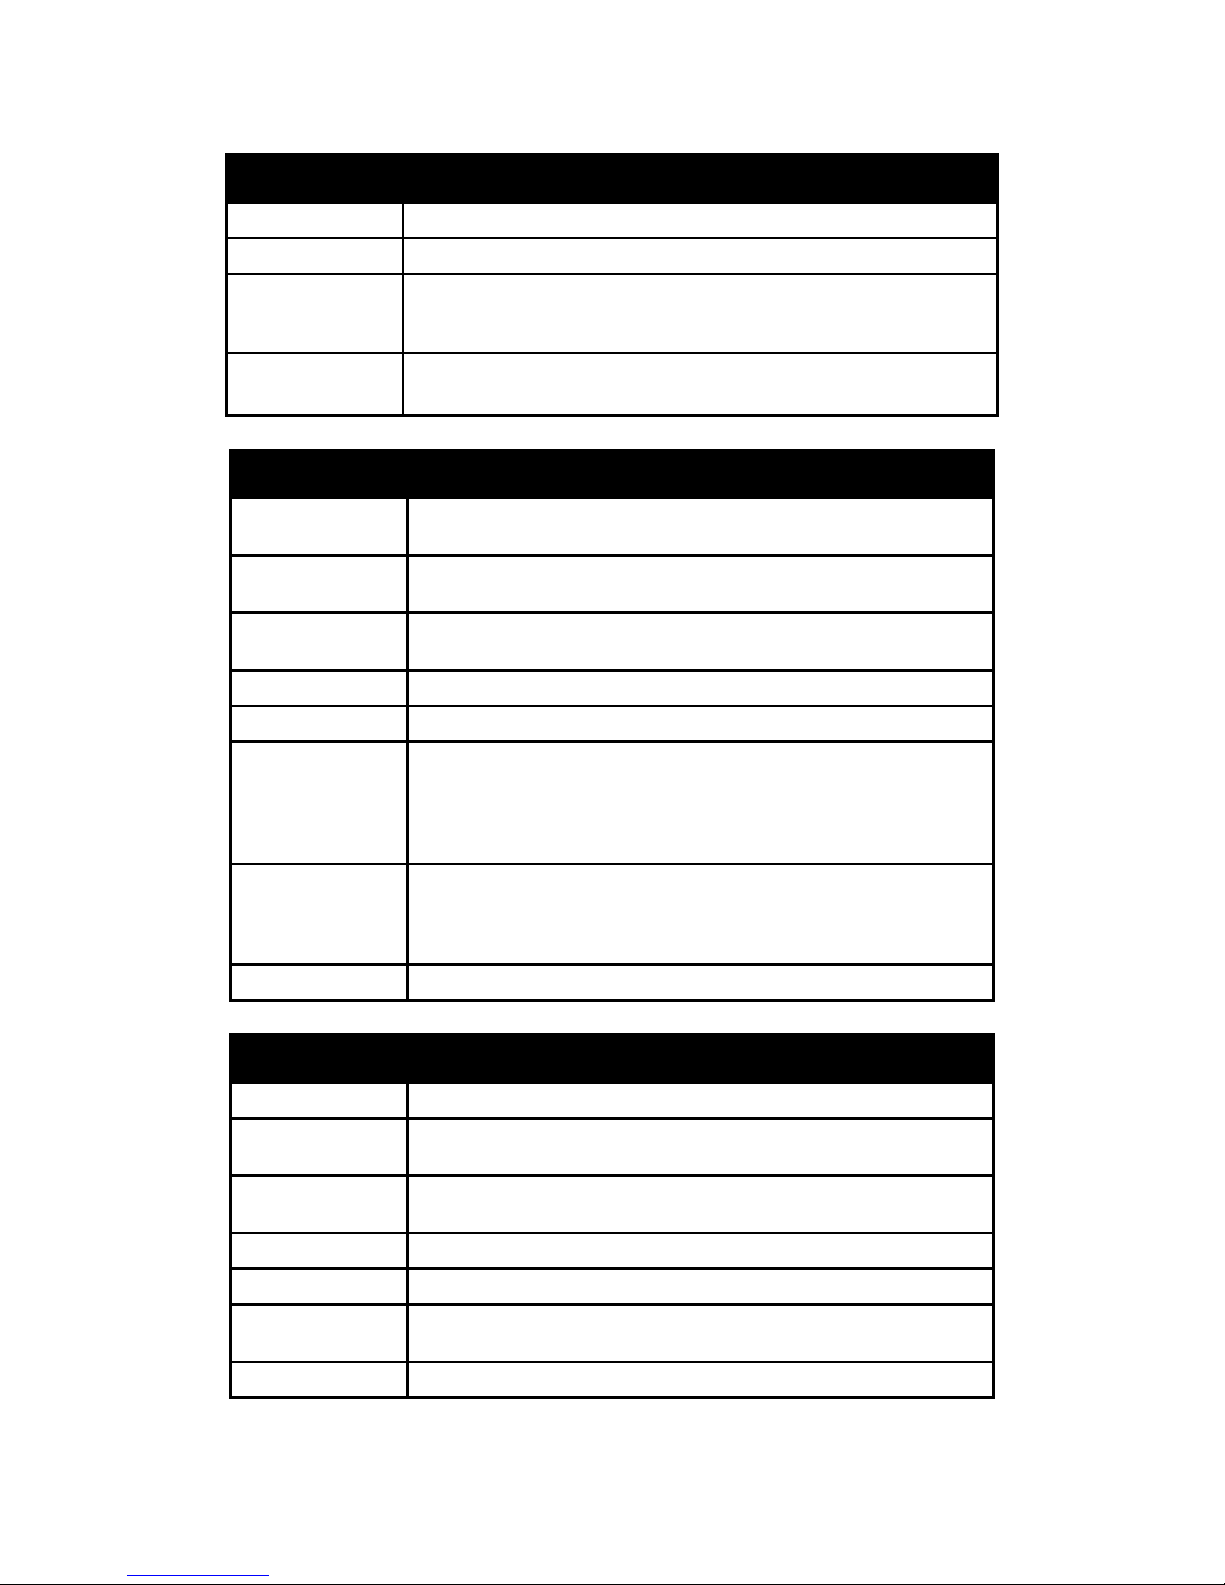
If a command is entered that is unrecognized by the CLI, the top-level commands are displayed under
the Available commands: prompt.
12
Page 22
DGS-1100/ME Metro Ethernet Managed Switch CLI Reference Guide
Figure 5–5 Available Commands
The top-level commands consist of commands such as show or config. Most of these commands
require one or more parameters to narrow the top-level command. This is equivalent to show what? or
config what? Where the what? is the next parameter.
For example, entering the show command with no additional parameters, the CLI will then display all of
the possible next parameters.
Figure 5–6 Next possible completions: Show Command
In the above example, all of the possible next parameters for the show command are displayed. At the
next command prompt in the example, the up arrow was used to re-enter the show command, followed
by the account parameter. The CLI then displays the user accounts configured on the Switch.
13
Page 23

DGS-1100/ME Metro Ethernet Managed Switch CLI Reference Guide
5
COMMAND SYNTAX
The following symbols are used to describe how command entries are made and values and arguments
are specified in this manual. The online help contained in the CLI and available through the Telnet uses
the same syntax.
NOTE: All commands are case-sensitive. Be sure to disable Caps Lock or any other unwanted
function that changes text case.
<angle brackets>
Purpose Encloses a variable or value that must be specified.
Syntax
create account [admin | oper |user] <username 15>
Description In the above syntax example, supply a username in the
<username> space. Do not type the angle brackets.
Example
Command
create account admin newadmin1
[square brackets]
Purpose Encloses a required value or set of required arguments. One value
or argument can be specified.
Syntax
create account [admin | oper |user] <username 15>
Description
In the above syntax example, specify admin, oper or a user level
account to be created. Do not type the square brackets.
Example
Command
create account user newuser1
| vertical bar
Purpose Separates two or more mutually exclusive items in a list, one of
which must be entered.
Syntax
create account [admin | oper | user] <username 15>
Description
In the above syntax example, specify admin, oper, or user. Do not
type the vertical bar.
Example
Command
create account user newuser1
All commands are case-sensitive. Be sure to disable Caps Lock or any other unwanted function that
changes text case.
14
Page 24
DGS-1100/ME Metro Ethernet Managed Switch CLI Reference Guide
{braces}
Purpose Encloses an optional value or set of optional arguments.
Syntax
reboot {force_agree}
Description In the above syntax example, simply to execute “reboot” to reboot
the switch with confirmation. Or, to excute “reboot force_agree” to
reboot the switch without confirmation.
Example
command
reboot
Are you sure you want to proceed with the system reboot?(y/n)
Line Editing Key Usage
Delete Deletes the character under the cursor and then shifts the
remaining characters in the line to the left.
Backspace Deletes the character to the left of the cursor and then shifts the
remaining characters in the line to the left.
Insert Toggle on and off. When toggled on, inserts text and rewrite the
previous text.
Left Arrow Moves the cursor to the left.
Right Arrow Moves the cursor to the right.
Up Arrow Repeats the previously entered command. Each time the up arrow
is pressed, the command previous to that displayed appears. This
way it is possible to review the command history for the current
session. Use the down arrow to progress sequentially forward
through the command history list.
Down Arrow The down arrow displays the next command in the command
history entered in the current session. This displays each command
sequentially as it was entered. Use the up arrow to review previous
commands.
Tab To fill in the keyword if the input is recognizable.
Multiple Page Display Control Keys
Space Displays the next page.
CTRL+c Stops the display of remaining pages when multiple pages are to be
displayed.
ESC Stops the display of remaining pages when multiple pages are to be
displayed.
N Displays the next page.
P Displays the previous page.
Q Stops the display of remaining pages when multiple pages are to be
displayed.
R Refreshes the pages currently displayed.
15
Page 25

DGS-1100/ME Metro Ethernet Managed Switch CLI Reference Guide
a Displays the remaining pages without pausing between pages.
Enter Displays the next line or table entry.
16
Page 26

DGS-1100/ME Metro Ethernet Managed Switch CLI Reference Guide
6
BASIC SWITCH COMMANDS
The Basic Switch commands in the Command Line Interface (CLI) are listed (along with the appropriate
parameters) in the following table.
Command Parameter
clear screen
create account [admin | user] <username 15>
delete account <username 15>
config account <username 15>
show account
show session
show switch
show config current_config
config jumbo_frame ports <portlist> state [enable | disable]
show jumbo_frame
save
reboot {force_agree}
reset [config | system | default] {force_agree}
login
logout
ping <ipaddr> {times <value 1-255> | timeout <sec 1-99>}
create time_range
<string 8> [daily start_time < time hh:mm > end_time<time hh:mm > | weekly
start_weekday <weekday> start_time <time hh:mm > end_weekday <weekday>
end_time <time hh:mm> ]
delete time_range <string 8>
show time_range
config telnet
auto_logout
[2_minutes | 5_minutes | 10_minutes | 15_minutes]
show telnet
config firmware image <1,2> boot_up
show firmware information
create iproute default <ipaddr>
delete iproute default
config
command_prompt
config command_prompt [user_define <string 16> | username | default]
17
Page 27

DGS-1100/ME Metro Ethernet Managed Switch CLI Reference Guide
Each command is listed in detail, as follows:
clear screen
Purpose To clear screen.
Syntax
clear screen
Description
The clear screen command clears the terminal screen.
Parameters None.
Restrictions None.
Example usage:
To create an administrator-level user account with the username ‘dlink’:
DGS-1100-24P/ME:admin#clear screen
Command : clear screen
DGS-1100-24P/ME:admin#
create account
Purpose To create a user account.
Syntax
create account [admin | user] <username 15>
Description
The create account command creates user accounts with different
priority.
After resetting to factory reset, users can press anything to login the
administrator-level user of the Switch. Users must create an adminlevel account before creating user-level account.
Parameters
admin – To create a admin-level user account.
user − To create a user-level user account.
<username 15> − the account username.
Restrictions Only administrator-level users can issue this command.
Example usage:
To create an admin-level user account named ‘dlink’:
DGS-1100-24P/ME:admin#create account admin dlink
Command : create account admin dlink
Success.
DGS-1100-24P/ME:admin#
delete account
Purpose To delete an existing user account.
18
Page 28

DGS-1100/ME Metro Ethernet Managed Switch CLI Reference Guide
Syntax
delete account <username 15>
Description
The delete account command deletes an existing user account.
Users must delete a user-level account before deleting an adminlevel account.
Parameters
<username 15> − the account username.
Restrictions Only administrator-level users can issue this command.
Example usage:
To delete an account named ‘dlink’:
DGS-1100-24P/ME:admin#delete account dlink
Command : delete account dlink
Success.
DGS-1100-24P/ME:admin#
config account
Purpose To change the password for an existing user account.
Syntax
config account <username 15>
Description
The config account command changes the password for a user
account that has been created using the create account command.
The system prompts for the account’s new password, which may be
between 0 and 15 characters.
Parameters
<username 15> − the account username.
Restrictions Only administrator-level users can issue this command.
Example usage:
To configure the user password of ‘admin’ account:
DGS-1100-24P/ME:admin#config account admin
Command : config account admin
Enter an old password:***
Enter a case-sensitive new password:****
Enter the new password again for confirmation:****
Success.
DGS-1100-24P/ME:admin#
show account
Purpose To display information about all user accounts on the Switch.
Syntax
show account
Description
The show account command displays all account usernames and
19
Page 29

DGS-1100/ME Metro Ethernet Managed Switch CLI Reference Guide
their access levels created on the Switch. Up to 2 user accounts can
exist on the Switch at one time.
Parameters None.
Restrictions None.
Example usage:
To display the account that has been created:
DGS-1100-24P/ME:admin#show account
Command : show account
Current Accounts:
Username Access Level
------------------ ------------------user User
admin Admin
DGS-1100-24P/ME:admin#
show session
Purpose To display information about currently logged-in users.
Syntax
show session
Description
The show session command displays a list of all the users that are
logged-
in at the time the command is issued. The information
includes the user’s IP address, the user’s access Level (user or
admin), and the account name on the Switch.
Parameters None.
Restrictions None.
Example usage:
To display the session information:
DGS-1100-24P/ME:admin#show session
Command : show session
Live Time From Level Name
-------------- ----------------------------------- ----------- ----------
00:00:08 10.90.90.100 admin admin
DGS-1100-24P/ME:admin#
show switch
Purpose To display information about the Switch.
Syntax
show switch
20
Page 30

DGS-1100/ME Metro Ethernet Managed Switch CLI Reference Guide
Description
The show switch command displays information about the Switch
settings, including Device Type, MAC Address, IP configuration,
Hardware/Software version, System information, and Switch
Network configuration.
Parameters None.
Restrictions None.
Example usage:
To display the Switch information:
DGS-1100-24P/ME:admin#show switch
Command: show switch
Device Type : DGS-1100-24/ME Gigabit Metro Access Switch
MAC Address : ec-22-80-40-08-f1
IP Address : 10.90.90.90 (Manual)
VLAN Name : VLAN0001
Subnet Mask : 255.0.0.0
Default Gateway : 0.0.0.0
Boot PROM Version : Build 1.00.002
Firmware Version : Build 1.00.L001
Hardware Version : B1
System Name : SWITCH
System Location :
System Contact :
Spanning Tree : Disabled
IGMP Snooping : Disabled
MLD Snooping : Disabled
TELNET : Enabled (TCP 23)
SNMP : Disabled
SNTP : Disabled
DGS-1100-24P/ME:admin#
show config
Purpose To display the current configuration settings of the Switch.
Syntax
show config current_config
Description
The show config command is used to list the current status of the
configuration settings of the Switch.
Parameters
current_config − Display system configuration from the software
database, i.e. the current system setting.
Restrictions None.
Example usage:
To display the configuration:
21
Page 31

DGS-1100/ME Metro Ethernet Managed Switch CLI Reference Guide
DGS-1100-24P/ME:admin#show config current_config
Command : show config current_config
# DGS-1100-24P/ME Gigabit Ethernet Switch
# Configuration
#
# Firmware: Build 1.00.L001
# Copyright(C) 2014 D-Link Corporation. All rights reserved.
#BLOCK_UNKNOWN_MULTICAST#
disable block_unknown_multicast
#MIRROR#
disable mirror
#MULTICAST FILTER#
#VOICE VLAN#
config voice_vlan priority 5
config voice_vlan aging_time 720
config voice_vlan ports list 1-24 mode autountagged
#SURVEILLANCE_VLAN VLAN#
config jumbo_frame
Purpose To configure jumbo frames on the device.
Syntax
config jumbo_frame ports <portlist> state [enable | disable]
Description
The config jumbo_frame command can enable or disable jumbo
frames on the device by ports.
Parameters
<portlist> - A port or range of ports to be configured.
state – Allows the user to enable or disable jumbo frame function
for
the by ports.
Restrictions Only administrator-level users can issue this command.
Jumbo frames will be enabled after saving and restart
ing the
system.
Example usage:
To enable jumbo frames:
DGS-1100-24P/ME:admin#config jumbo_frame ports 1-5 state
enable
22
Page 32

DGS-1100/ME Metro Ethernet Managed Switch CLI Reference Guide
Command: config jumbo_frame ports 1-5 state enable
Success.
DGS-1100-24P/ME:admin#
show jumbo_frame
Purpose To display the jumbo frame configuration.
Syntax
show jumbo_frame
Description
The show jumbo_frame
command displays the jumbo frame
configuration.
Parameters None.
Restrictions None.
Example usage:
To show the jumbo_frames configuration status on the device:
DGS-1100-24P/ME:admin#show jumbo_frame
Command : show jumbo_frame
Maximum Jumbo Frame Size : 9216
Port Jumbo Frame State
------ -------------------------------
1 Disabled
2 Disabled
3 Disabled
4 Disabled
5 Disabled
6 Disabled
7 Disabled
8 Disabled
9 Disabled
10 Disabled
11 Disabled
12 Disabled
13 Disabled
14 Disabled
15 Disabled
16 Disabled
17 Disabled
18 Disabled
19 Disabled
20 Disabled
21 Disabled
23
Page 33

DGS-1100/ME Metro Ethernet Managed Switch CLI Reference Guide
22 Disabled
23 Disabled
24 Disabled
DGS-1100-24P/ME:admin#
save
Purpose To save changes in the Switch’s configuration to non-volatile RAM.
Syntax
save
Description
The save command used to enter the current switch configuration
into non-volatile RAM. The saved switch configuration will be loaded
into the Switch’s memory each time the Switch is restarted.
Parameters None
Restrictions Only administrator-level users can issue this command.
Example usage:
To save the Switch’s current configuration to non-volatile RAM:
DGS-1100-24P/ME:admin#save
Command : save
Success.
DGS-1100-24P/ME:admin#
reboot
Purpose To reboot the Switch.
Syntax
reboot {force_agree}
Description
The reboot command restarts the Switch.
Parameters
force_agree –When force_agree is specified, the reboot command
will be executed immediately without further confirmation.
Restrictions Only administrator-level users can issue this command.
Example usage:
To restart the Switch:
DGS-1100-24P/ME:admin#reboot
Command : reboot
Are you sure you want to proceed with the system reboot?(y/n) y
Please wait, the switch is rebooting...
24
Page 34

DGS-1100/ME Metro Ethernet Managed Switch CLI Reference Guide
reset
Purpose To reset the Switch to the factory default settings.
Syntax
reset [config | system | default] {force_agree}
Description
The reset system command restores the Switch’s configuration to
the factory default settings. Rebooting will clear all entries in the
Forwarding Data Base.
Parameters
config − Specify this keyword and all parameters are reset to default
settings. However, the device will neither save nor reboot.
system − Specify this keyword and all parameters are reset to
default settings. Then the switch will do a factory reset, save, and
reboot.
default − Specify this keyword and all parameters are reset to
default settings except the IP address.
force_agree - W hen force_agree is specified, the reset command
will be executed immediately without further confirmation.
Restrictions Only administrator-level users can issue this command.
Example usage:
To restore all of the Switch’s parameters to their default values:
DGS-1100-24P/ME:admin#reset system
Command : reset system
Are you sure you to proceed with system reset, save and reboot?(y/n) y
Please wait, the switch is rebooting...
login
Purpose To log in a user from the Switch.
Syntax
login
Description
The login command terminates the current user’s session on the
Switch.
Parameters None.
Restrictions None.
Example usage:
To terminate the current user’s Telnet session:
DGS-1100-24P/ME:admin#login
Command : login
Success.
UserName:
25
Page 35

DGS-1100/ME Metro Ethernet Managed Switch CLI Reference Guide
logout
Purpose To log out a user from the Switch.
Syntax
logout
Description
The logout command terminates the current user’s session on the
Switch.
Parameters None.
Restrictions None.
Example usage:
To terminate the current user’s Telnet session:
DGS-1100-24P/ME:admin#logout
ping
Purpose To test the connectivity between network devices.
Syntax
ping <ipaddr> {times <value 0-255> | timeout <sec 1-99> }
Description
The ping
command sends Internet Control Message Protocol
(ICMP) echo messages to a remote IP address. The remote IP
address then ‘echos’ or returns the message. This is used to confirm
connectivity between the Switch and the remote device.
Parameters
<ipaddr> - The IP address of the host.
times <value 0-255> -
The number of individual ICMP echo
messages to be sent. The maximum value is 255. The default is 4.
timeout <sec 1-99> - The time-
out period while waiting for a
response from the remote device. A value of 1 to 99 seconds can be
specified. The default is 1 second.
Restrictions None.
Example usage:
To ping the IP address 10.90.90.100 three times:
DGS-1100-24P/ME:admin#ping 10.90.90.100 times 3 timeout 3
Command : ping 10.90.90.100 times 3 timeout 3
Reply from 10.90.90.100, time=3ms
Reply from 10.90.90.100, time=3ms
Reply from 10.90.90.100, time=2ms
Ping Statistics for 10.90.90.100
Packets: Sent =3, Received =3, Lost =0
DGS-1100-24P/ME:admin#
create time_range
Purpose To configure the time range on the Switch.
26
Page 36

DGS-1100/ME Metro Ethernet Managed Switch CLI Reference Guide
Syntax
create time_range <string 8> [daily start_time < time hh:mm >
end_time<time hh:mm > | weekly start_weekday <weekday>
start_time <time hh:mm > end_weekday <weekday> end_time
<time hh:mm> ]
Description
The create time_range command defines time ranges for access
lists.
Parameters
daily – Specifies the time range will be active on all the days.
weekly – Specifies the time range that will be active from start
weekday to end weekday.
<string 8> – Specifies the time range name. The range of characters
is 1 - 8.
start_time <time hh:mm> – defines the time on which the time range
will start to be active.
end_time < time hh:mm >– defines the time on which the time range
will stop to be active.
start_weekday <weekday> – defines the days of the week on which
the time range will start to be active..
end_weekday <weekday> – defines the days of the week on which
the time range will stop to being active..
Restrictions Only administrator-level users can issue this command.
Example usage:
To create a time range dlink on the Switch:
DGS-1100-24P/ME:admin#create time_range dlink daily start_time 10:10
end_time 12:10
Command : create time_range dlink daily start_time 10:10 end_time 12:10
Success.
DGS-1100-24P/ME:admin#
delete time_range
Purpose To remove a time range configuration on the Switch.
Syntax
delete time_range <string 8>
Description
The delete time_range command removes a time range
configuration.
Parameters
<string 8> – Specifies the time range name. The range of characters
is 1 - 8.
Restrictions Only administrator-level users can issue this command.
Example usage:
To remove a time range setting on the Switch:
27
Page 37

DGS-1100/ME Metro Ethernet Managed Switch CLI Reference Guide
DGS-1100-24P/ME:admin#delete time_range dlink
Command : delete time_range dlink
Success.
DGS-1100-24P/ME:admin#
show time_range
Purpose To display the currently configured access profiles on the Switch.
Syntax
show time_range
Description
The show time_range command displays the time range
configuration.
Parameters None.
Restrictions None.
Example usage:
To display time range settings on the Switch:
DGS-1100-24P/ME:admin#show time_range
Time Range Information
-----------------------------------------Range Name : dlink
Weekdays : Daily
Start Time : 10:10:00
End Time : 12:10:00
Total Entries :1
DGS-1100-24P/ME:admin#
config telnet auto_logout
Purpose To configure the auto log out time on the Switch.
Syntax
config telnet auto_logout [2_minutes | 5_minutes | 10_minutes |
15_minutes]
Description This command is used to configure the auto logout time for idle
connections.
Parameters
2_minutes - Two minutes to set the automatic logout time
5_minutes - Five minutes to set the automatic logout time
10_minutes - Ten minutes to set the automatic logout time
15_minutes - Fifteen minutes to set the automatic logout time
Restrictions Only administrator-level users can issue this command.
Example usage:
Two minutes to set the automatic logout time:
DGS-1100-24P/ME:admin#config telnet auto_logout 2_minutes
Command : config telnet auto_logout 2_minutes
28
Page 38

DGS-1100/ME Metro Ethernet Managed Switch CLI Reference Guide
Success
DGS-1100-24P/ME:admin#
show telnet
Purpose To display information about auto-logout time on the Switch.
Syntax
show telnet
Description
The show telnet command displays auto-logout time on the Switch.
Parameters None.
Restrictions None.
Example usage:
To display the auto-logout time information:
DGS-1100-24P/ME:admin#show telnet
Command : show telnet
Auto-Logout : 5 mins
DGS-1100-24P/ME:admin#
config firmware
Purpose To configure the firmware image boot up.
Syntax
config firmware image <1,2> boot_up.
Description This command is used to configure the firmware image boot up.
Parameters
<1,2> - Image firmware 1 or firmware 2 for boot up.
Restrictions Only administrator-level users can issue this command.
Example usage:
Two minutes to set the automatic logout time:
DGS-1100-24P/ME:admin#config config firmware image 1 boot_up
Command : config firmware image 1 boot_up
Success.
DGS-1100-24P/ME:admin#
show firmware
Purpose Used to display the firmware section information.
Syntax
show firmware information
29
Page 39

DGS-1100/ME Metro Ethernet Managed Switch CLI Reference Guide
Description
The show firmware information command is used to display the
firmware section information.
Parameters
information – To display the firmware information.
Restrictions None.
Example usage:
To display firmware information on the Switch:
DGS-1100-24P/ME:admin# admin#show firmware information
Command : show firmware information
Image ID : 1 (Current) (Next boot up)
Version : 1.00.L005
Size : 1507556 Bytes
Update Time : 2000-01-01 00:54:21
Image ID : 2
Version : 1.00.L004
Size : 1507620 Bytes
Update Time : 2000-01-01 00:06:11
DGS-1100-24P/ME:admin#
create iproute
Purpose Used to create IP route entries to the Switch’s IP routing table.
Syntax
create iproute default <ipaddr>
Description
The
create iproute
command is used to create a default gateway.
Parameters
default – Specifies to create a default gateway.
<ipaddr> − The gateway IP address for the next hop router.
Restrictions Only administrator-level users can issue this command.
Example usage:
To add the default static address 10.90.90.92 to the routing table:
DGS-1100-24P/ME:admin# create iproute default 10.90.90.92
Command : create iproute default 10.90.90.92
Success.
DGS-1100-24P/ME:admin#
delete iproute
Purpose Used to delete an IP route entry from the Switch’s IP routing table.
Syntax
delete iproute default
30
Page 40

DGS-1100/ME Metro Ethernet Managed Switch CLI Reference Guide
Description
The delete iproute command will delete an existing IP route entry
from the Switch’s IP routing table.
Parameters
default – Specifies to delete a default IP route entry.
Restrictions Only administrator-level users can issue this command.
Example usage:
To delete the default Gateway from the routing table:
DGS-1100-24P/ME:admin# delete iproute default
Command : delete iproute default
Success.
DGS-1100-24P/ME:admin#
config command_prompt
Purpose Used to configure the command prompt.
Syntax
config command_prompt [user_define <string 16> | username |
default]
Description
The config command_prompt command will modify the setting of
command prompt.
The current command prompt consists of four parts: “product name”
+ “:” + ”user level” + ”#” (e.g. “DGS-1100-24P/ME:admin#”)
. This
command is used to modify the first part (1. “product name”) with a
string consisting of a maximum of 16 characters, or to be replaced
with the users’ login user name.
When users issue the “reset” command, the current command
prompt will remain in tact. Yet, issuing the “reset system” will return
the command prompt to its original factory default value.
Parameters
<string 16> – Enter the new command prompt string of no more than
16 characters.
username – Enter this command to set the login username as the
command prompt.
default – Enter this command to return the command prompt to its
original factory default value.
Restrictions Only administrator-level users can issue this command.
Example usage:
To modify the command prompt to abc:
DGS-1100-24P/ME:admin#config command_prompt user_define
abc
Command : config command_prompt user_define abc
Success.
abc:admin#
31
Page 41

DGS-1100/ME Metro Ethernet Managed Switch CLI Reference Guide
7
SWITCH PORT COMMANDS
The Switch Port commands in the Command Line Interface (CLI) are listed (along with the appropriate
parameters) in the following table.
Command Parameter
config ports
<portlist> [mdix [normal | cross | auto] | description [add <desc 8> |
clear_description] | flow_control [enable | disable] | learning [enable | disable] |
state [enable | disable] | speed [auto | 100_full | 100_half | 10_full | 10_half]]
show ports <portlist>
Each command is listed in detail, as follows:
config ports
Purpose To configure the Switch’s Ethernet port settings.
Syntax
config ports <portlist> [mdix [normal | cross | auto] |
description [add <desc 8> | clear_description] | flow_control
[enable | disable] | learning [enable | disable] | state [enable |
disable] | speed [auto | 100_full | 100_half | 10_full | 10_half]]
Description
The config ports command configures the Switch’s Ethernet port
settings. Only the ports listed in the <portlist> are affected.
Parameters
<portlist> − A port or range of ports to be configured.
mdix [normal | cross | auto] − Specifies the MDIX setting of the port.
The MDIX setting can be auto, normal or cross.
If set to normal state, the port in MDIX mode, can be connected to
PC NIC using a straight cable. If set to cross state, the port in mdi
mode, can be connected to a port (in mdix mode) on another switch
through a straight cable.
description <desc 8> − Enter and alphanumeric string of no more
that 8 characters to describe a selected port interface.
clear_description – Clear the description for the specified ports.
flow_control [enable|disable] – Enables or disables flow control for
the specified ports.
state [enable | disable] − Enables or disables the specified range of
ports.
speed – Sets the speed of a port or range of ports, with the addition
of one of the following:
• auto − Enables auto-negotiation for the specified range of
ports.
• [10 | 100] − Configures the speed in Mbps for the specified
range of ports.
• [half | full] − Configures the specified range of ports as either
full or half-duplex.
32
Page 42

DGS-1100/ME Metro Ethernet Managed Switch CLI Reference Guide
Restrictions Only administrator-level users can issue this command.
Example usage:
To configure the speed of ports 1-3 to be 100 Mbps, full duplex:
DGS-1100-24P/ME:admin#config ports 1-3 speed 100_full
Command : config ports 1-3 speed 100_full
Success.
DGS-1100-24P/ME:admin#
show ports
Purpose To display the current configuration of a range of ports.
Syntax
show ports <portlist>
Description
The show ports command displays the current configuration
of a
port or range of ports.
Parameters
<portlist> − A port or range of ports whose settings are to be
displayed..
Restrictions None.
Example usage:
To display the configuration of port 5 on the Switch:
DGS-1100-24P/ME:admin#show ports 5
Command : show ports 5
Port State/ Settings Connection Address
MDI Speed/Duplex/FlowCtrl Link Status Learning
------- -------- ------------------------------------ ------------------- --------5 Enabled Auto/Auto/Disabled Link Up Enabled
Auto
Description:
DGS-1100-24P/ME:admin#
33
Page 43

DGS-1100/ME Metro Ethernet Managed Switch CLI Reference Guide
8
LOOPBACK DETECTION COMMANDS
The Loopback Detection commands in the Command Line Interface (CLI) are listed (along with the
appropriate parameters) in the following table.
Command Parameter
enable loopdetect
disable loopdetect
config loopdetect
{ interval_time <value 1-32767> | lbd_recover_time <0, sec 60-1000000> | trap
[ none | loop_detected ] | ports[ port_list <portlist> | all] state [enable | disable]}(1)
show loopdetect [global | ports [portlist <portlist> | all]]
Each command is listed in detail, as follows:
enable loopdetect
Purpose To enable the loop back detection on the Switch.
Syntax
enable loopdetect
Description
The enable loopdetect command enables the loop back detection
on the Switch.
Note: If Spanning Tree protocol is used, loopback detection will not
be available. If Loopback Detection is enabled, the Spanning Tree
protocol will not be available.
Parameters None.
Restrictions Only administrator-level users can issue this command.
Example usage:
To enable the loopback detection feature on the Switch:
DGS-1100-24P/ME:admin#enable loopdetect
Command: enable loopdetect
Success.
DGS-1100-24P/ME:admin#
disable loopdetect
Purpose To disable the loop back detection on the Switch.
Syntax
disable loopdetect
Description
The disable loopdetect command disables the loop back detection
34
Page 44

DGS-1100/ME Metro Ethernet Managed Switch CLI Reference Guide
on the Switch.
Parameters None.
Restrictions Only administrator-level users can issue this command.
Example usage:
To disable the loopback detection feature on the Switch:
DGS-1100-24P/ME:admin#disable loopdetect
Command: disable loopdetect
Success.
DGS-1100-24P/ME:admin#
config loopdetect
Purpose To configure the loop back settings on the Switch.
Syntax
config loopdetect { interval_time <value 1-32767> |
lbd_recover_time <0, sec 60-1000000>] | trap [ none |
loop_detected ] | ports[ port_list <portlist> | all] state [enable |
disable]}(1)
Description
The config loopdetect command configures the
loop back
detection to be enabled or disabled for the specific ports
on the
Switch and configures the loop back detection interval time, recover
time and trap on the Switch..
Parameters
interval_time <value 1-32767> − Specifies the interval time of loop
back detection. The range is between 1 and 32767 seconds.
lbd_recover_time <0,sec 60-10000> − Specifies the recover time of
loop back detection on the switch. The range is between 60 and
10000 seconds.
trap [none | loop_detected] − Specifies the loop back detection trap
is enabled or disabled on the Switch.
port_list <portlist> − A port or range of ports to be configured.
all − All ports settings are to be configured.
[enabled | disabled] − Specifies the loop back detection is enabled or
disabled for the specified ports on the Switch.
Restrictions Only administrator-level users can issue this command.
Example usage:
To enable loop back detection on the Switch:
DGS-1100-24P/ME:admin#config loopdetect ports all state enable
Command: config loopdetect ports all state enable
Success.
DGS-1100-24P/ME:admin#
35
Page 45

DGS-1100/ME Metro Ethernet Managed Switch CLI Reference Guide
To configure loop back detection with interval time 500 on the Switch:
DGS-1100-24P/ME:admin#config loopdetect interval_time 500
Command: config loopdetect interval_time 500
Success.
DGS-1100-24P/ME:admin#
show loopdetect
Purpose To display the loop back detection information on the Switch.
Syntax
show loopdetect [global | ports [portlist <portlist> | all]]
Description
The show loopdetect command displays the loop back detection
information on the Switch.
Parameters
global – Display the global setting of loop back detection.
portlist <portlist> − A port or range of ports to be displayed.
all − All ports settings are to be displayed.
Restrictions None.
Example usage:
To display the loop back detection information on the Switch:
DGS-1100-24P/ME:admin#show loopdetect global
Command: show loopdetect global
LBD Global Settings
--------------------------------------------------Status : Disabled
Interval : 500 sec
Recover Time : 60 sec
Loopback Detection Trap : Disabled
DGS-1100-24P/ME:admin#
36
Page 46
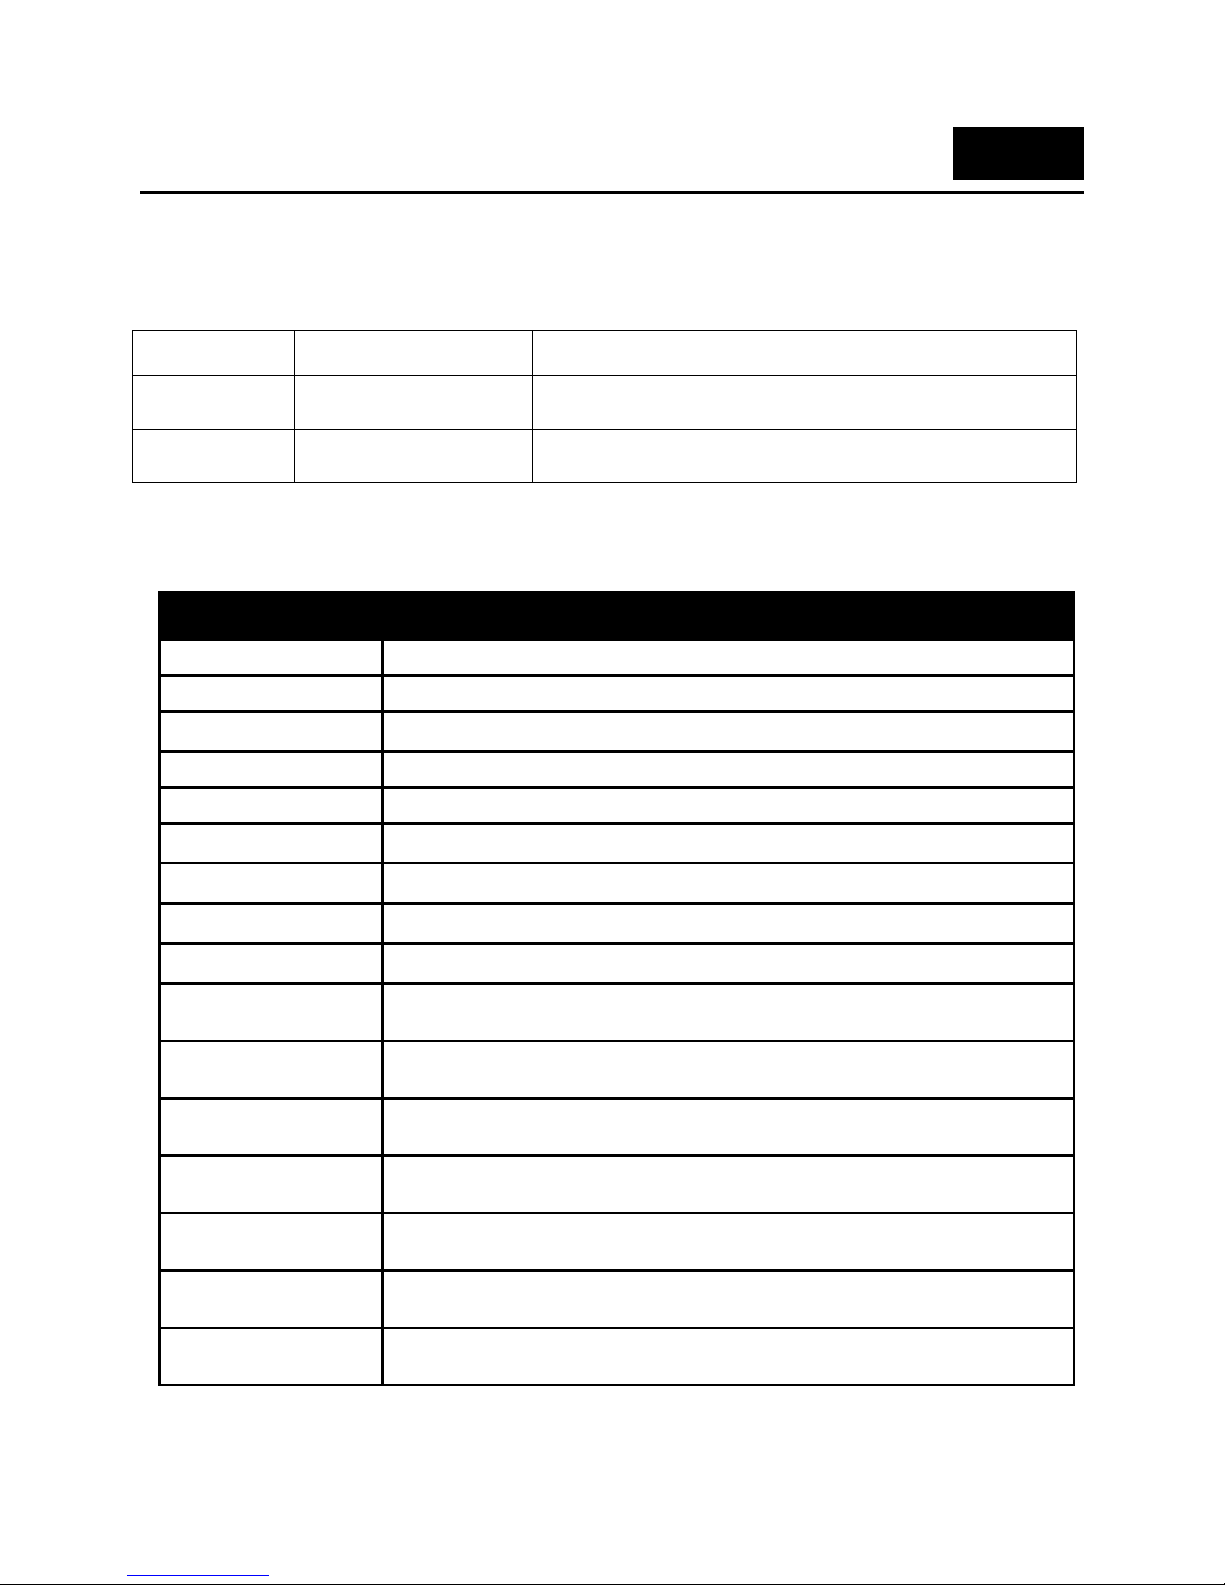
DGS-1100/ME Metro Ethernet Managed Switch CLI Reference Guide
9
NETWORK MANAGEMENT (SNMP) COMMANDS
The Switch supports the Simple Network Management Protocol (SNMP) versions 1 and 2c. Users can
specify which version of the SNMP host wants to use to get the trap from the Switch. The following table
lists the security features of the three SNMP versions:
SNMP Version Authentication Method Description
v1 Community String Community String is used for authentication -
NoAuthNoPriv
v2c Community String Community String is used for authentication -
NoAuthNoPriv
The Network Management commands in the Command Line Interface (CLI) are listed (along with the
appropriate parameters) in the following table.
Command Parameter
create snmp community <string 16> [read_only | read_write]
delete snmp community <string 16>
show snmp community
create snmp host
<ipaddr> [v1 | v2c] <string 16>
delete snmp host
<ipaddr>
show snmp host
enable snmp traps
disable snmp traps
show snmp traps
enable snmp
authenticate_traps
disable snmp
authenticate_traps
config snmp
system_location
<string 16>
config snmp
system_name
<string 32>
config snmp
system_contact
<string 32>
config snmp
linkup_traps
[enable | disable]
config snmp
linkdown_traps
[enable | disable]
37
Page 47

DGS-1100/ME Metro Ethernet Managed Switch CLI Reference Guide
Command Parameter
config snmp
coldstart_traps
[enable | disable]
config snmp
warmstart_traps
[enable | disable]
enable snmp
disable snmp
show snmp global state
Each command is listed in detail, as follows:
create snmp community
Purpose To create an SNMP community string to define the relationship
between the SNMP manager and an SNMP agent.
Syntax
create snmp community <string 16> [read_only | read_write]
Description
The create snmp community command creates
an SNMP
community string and assigns access-limiting characteristics to this
community string. The community string acts like a password to
permit access to the agent on the Switch. One or more of the
following characteristics can be associated with the community
string:
An Access List of IP addresses of SNMP managers that are
permitted to use the community string to gain access to the Switch’s
SNMP agent.
A MIB view that defines the subset of all MIB objects to be
accessible to the SNMP community.
Read/write or read-
only level permission for the MIB objects
accessible to the SNMP community.
Parameters
<string 16> − A string of up to 16 alphanumeric characters that is
used to identify members of an SNMP community. This string is
used like a password to give remote SNMP managers access to MIB
objects in the Switch’s SNMP agent.
[read_only | read_write] –
Specify whether the above community
string will have read only or read and write access to the switch’s
SNMP agent.
Restrictions Only administrator-level users can issue this command.
Example usage:
To create the SNMP community string ‘dlink:’
DGS-1100-24P/ME:admin#create snmp community dlink read_only
Command : create snmp community dlink read_only
Success.
DGS-1100-24P/ME:admin#
38
Page 48

DGS-1100/ME Metro Ethernet Managed Switch CLI Reference Guide
delete snmp community
Purpose To remove a specific SNMP community string from the Switch.
Syntax
delete snmp community <string 16>
Description
The delete snmp community command removes
a previously
defined SNMP community string from the Switch.
Parameters
<string 16> − A string of up to 16 alphanumeric characters that is
used to identify members of an SNMP community to
delete. This
string is used like a password to give remote SNMP managers
access to MIB objects in the Switch’s SNMP agent.
Restrictions Only administrator-level users can issue this command.
Example usage:
To delete the SNMP community string ‘dlink’:
DGS-1100-24P/ME:admin#delete snmp community dlink
Command : delete snmp community dlink
Success.
DGS-1100-24P/ME:admin#
show snmp community
Purpose To display SNMP community strings configured on the Switch.
Syntax
show snmp community
Description
The show snmp community command displays SNMP community
strings that are configured on the Switch.
Parameters None.
Restrictions None.
Example usage:
To display the currently entered SNMP community strings:
DGS-1100-24P/ME:admin#show snmp community
Command : show snmp community
SNMP Community Table
Access Right Community Name
--------------------- --------------------------
read_only public
read_write private
Total Entries: 2
DGS-1100-24P/ME:admin#
39
Page 49

DGS-1100/ME Metro Ethernet Managed Switch CLI Reference Guide
create snmp host
Purpose To create a recipient of SNMP traps generated by the Switch’s
SNMP agent.
Syntax
create snmp host <ipaddr> [v1 | v2c] <string 16>
Description
The create snmp host command creates a recipient of SNMP traps
generated by the Switch’s SNMP agent.
Parameters
<ipaddr> − The IP address of the remote management station to
serve as the SNMP host for the Switch.
v1 – Specifies that SNMP version 1 is to
be used. The Simple
Network Management Protocol (SNMP), version 1, is a network
management protocol that provides a means to monitor and control
network devices.
v2c – Specifies that SNMP version 2c is to be used. The SNMP v2c
supports both centralized and distributed network management
strategies. It includes improvements in the Structure of Management
Information (SMI) and adds some security features.
<string 16> − A string of up to 16 alphanumeric
characters that
identifies the user name of an SNMP community. This string is used
like a password to give remote SNMP managers access to MIB
objects in the Switch’s SNMP agent.
Restrictions Only administrator-level users can issue this command.
Example usage:
To create a SNMP host to receive SNMP messages:
DGS-1100-24P/ME:admin#create snmp host 10.90.90.22 v1 dlink
Command : create snmp host 10.90.90.22 v1 dlink
Success.
DGS-1100-24P/ME:admin#
delete snmp host
Purpose To remove a recipient of SNMP traps generated by the Switch’s
SNMP agent.
Syntax
delete snmp host <ipaddr>
Description
The delete snmp host command deletes a recipient of SNMP traps
generated by the Switch’s SNMP agent.
Parameters
<ipaddr> − The IP address of a remote SNMP manager that
receives SNMP traps generated by the Switch’s SNMP agent.
Restrictions Only administrator-level users can issue this command.
Example usage:
To delete a SNMP host entry:
DGS-1100-24P/ME:admin#delete snmp host 10.90.90.22
Command : delete snmp host 10.90.90.22
40
Page 50

DGS-1100/ME Metro Ethernet Managed Switch CLI Reference Guide
Success.
DGS-1100-24P/ME:admin#
show snmp host
Purpose To display the recipient of SNMP traps generated by the Switch’s
SNMP agent.
Syntax
show snmp host
Description
The show snmp host command is used to display the IP addresses
and configuration information of remote SNMP managers that are
designated as recipients of SNMP traps generated by the Switch’s
SNMP agent.
Parameters None.
Restrictions None.
Example usage:
To display the currently configured SNMP hosts on the Switch:
DGS-1100-24P/ME:admin#show snmp host
Command : show snmp host
SNMP Host Table
Host IP Address SNMP Version Community Name
------------------------- ----------------------- ----------------
10.90.90.22 v2c private
Total Entries : 1
DGS-1100-24P/ME:admin#
enable snmp traps
Purpose To enable SNMP trap support.
Syntax
enable snmp traps
Description
The enable snmp traps command enables SNMP trap support on
the Switch.
Parameters None.
Restrictions Only administrator-level users can issue this command.
Example usage:
To enable SNMP trap support on the Switch:
DGS-1100-24P/ME:admin#enable snmp traps
Command : enable snmp traps
41
Page 51

DGS-1100/ME Metro Ethernet Managed Switch CLI Reference Guide
Success.
DGS-1100-24P/ME:admin#
disable snmp traps
Purpose To disable SNMP trap support on the Switch.
Syntax
disable snmp traps
Description
The disable snmp traps command disables SNMP trap support on
the Switch.
Parameters None.
Restrictions Only administrator-level users can issue this command.
Example usage:
To prevent SNMP traps from being sent from the Switch:
DGS-1100-24P/ME:admin#disable snmp traps
Command : disable snmp traps
Success.
DGS-1100-24P/ME:admin#
show snmp traps
Purpose To display SNMP trap support status on the Switch.
Syntax
show snmp traps
Description
The show snmp traps command displays the SNMP trap support
status currently configured on the Switch.
Parameters None.
Restrictions None.
Example usage:
To view the current SNMP trap support:
DGS-1100-24P/ME:admin#show snmp traps
Command : show snmp traps
Trap Global State : Disabled
Link Up Trap : Disabled
Link Down Trap : Disabled
Coldstart Trap : Disabled
Warmstart Trap : Disabled
Authentication Trap : Disabled
42
Page 52

DGS-1100/ME Metro Ethernet Managed Switch CLI Reference Guide
DGS-1100-24P/ME:admin#
enable snmp authenticate_traps
Purpose To enable SNMP authentication trap support.
Syntax
enable snmp authenticate_traps
Description
The enable snmp authenticate_traps command enables SNMP
authentication trap support on the Switch.
Parameters None.
Restrictions Only administrator-level users can issue this command.
Example usage:
To turn on SNMP authentication trap support:
DGS-1100-24P/ME:admin#enable snmp
authenticate_traps
Command : enable snmp authenticate_traps
Success.
DGS-1100-24P/ME:admin#
disable snmp authenticate_traps
Purpose To disable SNMP authentication trap support.
Syntax
disable snmp authenticate_traps
Description
The disable snmp authenticate_traps command disables SNMP
authentication trap support on the Switch.
Parameters None.
Restrictions Only administrator-level users can issue this command.
Example usage:
To disable the SNMP authentication trap support:
DGS-1100-24P/ME:admin#disable snmp authenticate_traps
Command : disable snmp authenticate_traps
Success.
DGS-1100-24P/ME:admin#
config snmp system_location
Purpose To enter a description of the location of the Switch.
Syntax
config snmp system_location <string 16>
43
Page 53

DGS-1100/ME Metro Ethernet Managed Switch CLI Reference Guide
Description
The config snmp system_location command enters a description
of the location of the Switch. A maximum of 16 characters can be
used.
Parameters
<string 16> - A maximum of 16 characters are allowed.
Restrictions Only administrator-level users can issue this command.
Example usage:
To configure the Switch location for ‘HQ5F’:
DGS-1100-24P/ME:admin#config snmp system_location
HQ5F
Command : config snmp system_location HQ5F
Success.
DGS-1100-24P/ME:admin#
config snmp system_name
Purpose To define the name for the Switch.
Syntax
config snmp system_name <string 32>
Description
The config sysname command defines the name of the Switch.
Parameters
<string 32> - A maximum of 32 characters is allowed.
Restrictions Only administrator-level users can issue this command.
Example usage:
To configure the Switch name as ‘10ME’:
DGS-1100-24P/ME:admin#config snmp system_name
10ME
Command : config snmp system_name 10ME
Success.
DGS-1100-24P/ME:admin#
config snmp system_contact
Purpose To enter the contact information of the Switch.
Syntax
config snmp system_contact <string 32>
Description
The config snmp system_contact command enters the contact
information of the Switch.
Parameters
<string 32> - A maximum of 32 characters is allowed.
Restrictions Only administrator-level users can issue this command.
44
Page 54

DGS-1100/ME Metro Ethernet Managed Switch CLI Reference Guide
Example usage:
To configure the Switch name as ‘10ME’:
DGS-1100-24P/ME:admin#config snmp system_name
10ME
Command : config snmp system_name 10ME
Success.
DGS-1100-24P/ME:admin#
config snmp linkup_traps
Purpose To configure SNMP link up trap support.
Syntax
config snmp linkup_traps [enable | disable]
Description
The config snmp linkup_traps command configures SNMP link up
trap support on the Switch.
Parameters
[enable | disable] – Set the trap support state of the switch.
Restrictions Only administrator-level users can issue this command.
Example usage:
To turn on SNMP link up trap support:
DGS-1100-24P/ME:admin#config snmp linkup_traps enable
Command : config snmp linkup_traps enable
Success.
DGS-1100-24P/ME:admin#
config snmp linkdown_traps
Purpose To configure SNMP link down trap support.
Syntax
config snmp linkdown_traps [enable | disable]
Description
The config snmp linkdown_traps command configures SNMP link
down trap support on the Switch.
Parameters
[enable | disable] – Set the trap support state of the switch.
Restrictions Only administrator-level users can issue this command.
Example usage:
To turn on SNMP link down trap support:
DGS-1100-24P/ME:admin#config snmp linkdown_traps enable
Command : config snmp linkdown_traps enable
Success.
45
Page 55

DGS-1100/ME Metro Ethernet Managed Switch CLI Reference Guide
DGS-1100-24P/ME:admin#
config snmp coldstart_traps
Purpose To configure SNMP cold start trap support.
Syntax
config snmp coldstart_traps [enable | disable]
Description
The config snmp coldstart_traps command configures SNMP cold
start trap support on the Switch.
Parameters
[enable | disable] – Set the trap support state of the switch.
Restrictions Only administrator-level users can issue this command.
Example usage:
To turn on SNMP cold start trap support:
DGS-1100-24P/ME:admin#config snmp coldstart_traps enable
Command : config snmp coldstart _traps enable
Success.
DGS-1100-24P/ME:admin#
config snmp warmstart_traps
Purpose To configure SNMP warm start trap support.
Syntax
config snmp warmstart_traps [enable | disable]
Description
The config snmp warmstart_traps command configures SNMP
warm start trap support on the Switch.
Parameters
[enable | disable] – Set the trap support state of the switch.
Restrictions Only administrator-level users can issue this command.
Example usage:
To turn on SNMP warm start trap support:
DGS-1100-24P/ME:admin#config snmp warmstart_traps enable
Command : config snmp warmstart_traps enable
Success.
DGS-1100-24P/ME:admin#
enable snmp
Purpose To enable SNMP support.
Syntax
enable snmp
Description
The enable snmp command enables SNMP support on the Switch.
46
Page 56

DGS-1100/ME Metro Ethernet Managed Switch CLI Reference Guide
Parameters None.
Restrictions Only administrator-level users can issue this command.
Example usage:
To enable SNMP support on the Switch:
DGS-1100-24P/ME:admin#enable snmp
Command : enable snmp
Success.
DGS-1100-24P/ME:admin#
disable snmp
Purpose To disable SNMP support.
Syntax
disable snmp
Description
The disable snmp command enables SNMP support on the Switch.
Parameters None.
Restrictions Only administrator-level users can issue this command.
Example usage:
To disable SNMP support on the Switch:
DGS-1100-24P/ME:admin#disable snmp
Command : disable snmp
Success.
DGS-1100-24P/ME:admin#
show snmp
Purpose To dispaly SNMP global state.
Syntax
show snmp global state
Description
The show snmp command displays the global state of the Switch.
Parameters None.
Restrictions None.
Example usage:
To view the SNMP global state of the Switch:
DGS-1100-24P/ME:admin#show snmp global state
Command : disable snmp global state
47
Page 57

DGS-1100/ME Metro Ethernet Managed Switch CLI Reference Guide
SNMP State : Disabled
SNMP Trap : Disabled
DGS-1100-24P/ME:admin#
48
Page 58

DGS-1100/ME Metro Ethernet Managed Switch CLI Reference Guide
10
DOWNLOAD/UPLOAD COMMANDS
The Download/Upload commands in the Command Line Interface (CLI) are listed (along with the
appropriate parameters) in the following table.
Command Parameter
download
{ firmware_fromTFTP <ipaddr> <path_filename (64)> image_id <value (1-2)> |
cfg_fromTFTP <ipaddr> <path_filename (64)> [ running_cfg | starup_cfg ] }(1)
upload
{ firmware_toTFTP <ipaddr> <path_filename (64)> image_id <1,2> | cfg_toTFTP
<ipaddr> <path_filename (64)> [ include_password | exclude_password ] }(1)
Each command is listed in detail, as follows:
download
Purpose To download and install a firmware, boot, or switch configuration file
from a TFTP server.
Syntax
download { firmware_fromTFTP <ipaddr> <path_filename (64)>
image_id <value (1-2)> | cfg_fromTFTP <ipaddr>
<path_filename (64)> [ running_cfg | starup_cfg ] }(1)
Description
The download command downloads a firmware, boot, log or switch
configuration file from a TFTP server.
Parameters
firmware_fromTFTP − Downloads and installs firmware on the
Switch from a TFTP server.
<ipaddr> − The IPv4 address of the TFTP server.
<path_filename 64> − The DOS path and filename of the switch
configuration file, up to 64 characters, on the TFTP server. For
example, C:\31xx.had.
image_id <value (1-2)> - The firmware file installs on the image 1 or
2.
cfg_fromTFTP − Downloads a switch configuration file from a TFTP
server.
running_cfg - Indicates the Configuration file is to be downloaded to
the running config.
starup_cfg − Indicates the Configuration file is to be downloaded to
the startup config.
Restrictions Only administrator-level users can issue this command.
Example usage:
To download a firmware file:
DGS-1100-24P/ME:admin#download firmware_formTFTP 10.90.90.45 DGS1100fw_1.00.L001.flash image_id 1
Command : download firmware_formTFTP 10.90.90.45 DGS1100-fw_1.00.L001.flash
image_id 1
49
Page 59

DGS-1100/ME Metro Ethernet Managed Switch CLI Reference Guide
Connecting to Server................... Done.
Download firmware...................... Done.
DGS-1100-24P/ME:admin#
To download a configuration file:
DGS-1100-24P/ME:admin#download cfg_fromTFTP 10.90.90.45 cfg.bin running_cfg
Command : download cfg_fromTFTP 10.90.90.45 cfg.bin running_cfg
Connecting to Server................... Done.
Download configuration............... Done.
DGS-1100-24P/ME:admin#
upload
Purpose To upload the current switch settings to a TFTP server.
Syntax
upload { firmware_toTFTP <ipaddr> <path_filename (64)>
image_id <1,2> | cfg_toTFTP <ipaddr> <path_filename (64)>
[ include_password | exclude_password ] }(1)
Description
The upload command uploads the Switch’s current settings to a
TFTP server.
Note: When upgrading the firmware on the DGS-1100/ME Series
switch, only the image not currently active can be upgraded. All
DGS-1100/ME Series switches come with two images, however only
one can be active at any time. (e.g. If image 1 is currently in use,
only image 2 can be upgraded, and vice versa.)
Parameters
firmware_fromTFTP − Specifies that the Switch’s current firmware
are to be uploaded to the TFTP server.
<ipaddr> − The IPv4 address of the TFTP server. The TFTP server
must be on the same IP subnet as the Switch.
<path_filename 64> − The location of the Switch configuration file on
the TFTP server.
image_id <value (1-2)> - Upload firmware image file ID 1 or 2.
cfg_fromTFTP − Uploads a switch configuration file from a TFTP
server.
include_password - Upload configuration file includes passwords.
exclude_password - Upload configuration file excludes passwords.
Restrictions Only administrator-level users can issue this command.
Example usage:
To upload a firmware file:
DGS-1100-24P/ME:admin#upload firmware_toTFTP 10.90.90.45 firmware.flash
image_id 1
Command : upload firmware_toTFTP 10.90.90.45 firmware.flash image_id 1
Connecting to Server................... Done.
50
Page 60
DGS-1100/ME Metro Ethernet Managed Switch CLI Reference Guide
Upload firmware........................... Done.
DGS-1100-24P/ME:admin#
To upload a configuration file:
DGS-1100-24P/ME:admin#upload cfg_toTFTP 10.90.90.45 cfg.bin include_password
Command : upload cfg_toTFTP 10.90.90.45 cfg.cfg include_password
Connecting to Server................... Done.
Upload configuration................... Done.
DGS-1100-24P/ME:admin#
51
Page 61

DGS-1100/ME Metro Ethernet Managed Switch CLI Reference Guide
11
NETWORK MONITORING COMMANDS
The Network Monitoring commands in the Command Line Interface (CLI) are listed (along with the
appropriate parameters) in the following table.
Command Parameter
show packet ports <portlist>
show error ports <portlist>
clear counters {ports <porlist>}
clear log
show log
{index <value_list> | severity [all | informational | warning ]}
enable syslog
disable syslog
show syslog
config syslog host
[severity [informational | warning | all] | facility [local0 | local1 | local2 | local3 |
local4 | local5 | local6 | local7] | state [enable | disable] | udp_port
<udp_port_number> | ipaddress <ipaddr>]
show syslog host
cable diagnostic [port <portlist> | all]
Each command is listed in detail, as follows:
show packet ports
Purpose To display statistics about the packets sent and received in frames
per second by the Switch.
Syntax
show packet ports <portlist>
Description
The show packet ports command displays statistics about packets
sent and received by ports specified in the port list. The results are
separated into three tables, labeled A, B, and C in the window
below. Table A is relevant to the size of the packets, Table B is
relevant to the type of packets and Table C is relevant to the type of
frame associated with these packets.
Parameters
<portlist> − A port or range of ports whose statistics are to be
displayed.
Restrictions None.
Example usage:
To display the packets analysis for port 5:
52
Page 62

DGS-1100/ME Metro Ethernet Managed Switch CLI Reference Guide
DGS-1100-24P/ME:admin#show packet ports 5
Command : show packet ports 5
Port Number : 5
Frame Type Total
-------------------- -----------
RX Frames 2416
TX Frames 4126
DGS-1100-24P/ME:admin#
show error ports
Purpose To display the error statistics for a port or a range of ports.
Syntax
show error ports <portlist>
Description
The show error ports command displays all of the packet error
statistics collected and logged by the Switch for a given port list.
Parameters
<portlist> − A port or range of ports whose error statistics are to be
displayed.
Restrictions None.
Example usage:
To display the errors of port 5:
DGS-1100-24P/ME:admin#show error ports 5
Command : show error ports 5
Port Number : 5
RX Frames TX Frames
------------------------- ----------------------
Alignment Error 0 FCS Error 0
FCS Error 0 Jabber 0
False Carrier 0 Late Collision 0
Length Out of Range 0 Multiple Collision 0
Fragment 0 Total Collision 0
Jabber 0 Oversize Packet 0
MTU Check Error 0 Single Collision 0
Oversized 0 Excessive Collision 0
RUNT Byte 0
RUNT Frame 0
DGS-1100-24P/ME:admin#
clear counters
Purpose To clear the Switch’s statistics counters.
53
Page 63

DGS-1100/ME Metro Ethernet Managed Switch CLI Reference Guide
Syntax
clear counters {ports <porlist>}
Description
The clear counters
command clears the counters used by the
Switch to compile statistics.
Parameters
<portlist> – Specifies a range of ports to be cleared.
Restrictions Only an administrator-level user can issue this command.
Example usage:
To clear the counters:
DGS-1100-24P/ME:admin#clear counters ports 5
Command : clear counters ports 5
Success.
DGS-1100-24P/ME:admin#
clear log
Purpose To clear the Switch’s history log.
Syntax
clear log
Description
The clear log command clears the Switch’s history log.
Parameters None.
Restrictions Only administrator-level users can issue this command.
Example usage:
To clear the log information:
DGS-1100-24P/ME:admin#clear log
Command : clear log
Success.
DGS-1100-24P/ME:admin#
show log
Purpose To display the Switch history log.
Syntax
show log {index <value
_list> | severity [all | informational |
warning]}
Description
The show log
command displays the contents of the Switch’s
history log.
Parameters
index <value_list> − The number of entries in the h
istory log to
display.
severity [all | informational | warning] − Specifies the severity type to
be displayed.
54
Page 64

DGS-1100/ME Metro Ethernet Managed Switch CLI Reference Guide
Restrictions None.
Example usage:
To display the Switch history log:
DGS-1100-24P/ME:admin#show log index 1-2
Command : show log index 1-2
Index Time Level Description
--------- ------------------- ------------- -----------------------------------------
2 17:55:34 INFO(6) PORT: Giga eth5 link up
1 17:55:31 INFO(6) PORT: Giga eth5 link down
DGS-1100-24P/ME:admin#
enable syslog
Purpose To enable the system log to be sent to a remote host.
Syntax
enable syslog
Description
The enable syslog command enables the system log to be sent to a
remote host.
Parameters None.
Restrictions Only administrator-level users can issue this command.
Example usage:
To enable the syslog function on the Switch:
DGS-1100-24P/ME:admin#enable syslog
Command: enable syslog
Success.
DGS-1100-24P/ME:admin#
disable syslog
Purpose To disable the system log from being sent to a remote host.
Syntax
disable syslog
Description
The disable syslog command disables the system log from being
sent to a remote host.
Parameters None.
Restrictions Only administrator-level users can issue this command.
Example usage:
To disable the syslog function on the Switch:
DGS-1100-24P/ME:admin#disable syslog
55
Page 65

DGS-1100/ME Metro Ethernet Managed Switch CLI Reference Guide
Command: disable syslog
Success.
DGS-1100-24P/ME:admin#
show syslog
Purpose To display the system log global setting.
Syntax
show syslog
Description
The show syslog command used to display the syslog protocol
global state.
Parameters None.
Restrictions None.
Example usage:
To display the syslog function on the Switch:
DGS-1100-24P/ME:admin#show syslog
Command : show syslog
Syslog Global State : Enabled
DGS-1100-24P/ME:admin#
config syslog host
Purpose To configure the syslog protocol to send system log data to a remote
host.
Syntax
config syslog host [severity [informational | warning | all] |
facility [local0 | local1 | local2 | local3 | local4 | local5 | local6 |
local7] | state [enable | disable] | udp_port
[<udp_port_number>] | ipaddress <ipaddr>]]
Description
The config syslog host command configures the syslog protocol to
send system log information to a remote host.
Parameters
severity −
The message severity level indicator. These are
described in the following table (Bold font indicates that the
corresponding severity level is currently supported on the Switch):
Numerical Severity
Code
0 Emergency: system is unusable
1 Alert: action must be taken immediately
2 Critical: critical conditions
3 Error: error conditions
4 Warning: warning conditions
56
Page 66

DGS-1100/ME Metro Ethernet Managed Switch CLI Reference Guide
5 Notice: normal but significant condition
6 Informational: informational messages
7 all: all-level messages
informational − Specifies that informational messages are to be sent
to the remote host. This corresponds to number 6 from the list
above.
warning − Specifies that warning messages are to be sent to the
remote host. This corresponds to number 4 from the list above.
all − Specifies that all message are to be sent to the remote host.
facility − Some of the operating system daemons an
d processes
have been assigned facility values. Processes and daemons that
have not been explicitly assigned a facility may use any of the ‘local
use’ facilities or they may use the ‘user-level’ facility. Those facilities
that have been designated are shown in the following:
Bold font indicates the facility values that the s
witch currently
supports.
Numerical Facility
Code
0 kernel messages
1 user-level messages
2 mail system
3 system daemons
4 security/authorization messages
5 messages generated internally by syslog
6 line printer subsystem
7 network news subsystem
8 UUCP subsystem
9 clock daemon
10 security/authorization messages
11 FTP daemon
12 NTP subsystem
13 log audit
14 log alert
15 clock daemon
16 local use 0 (local0)
17 local use 1 (local1)
18 local use 2 (local2)
19 local use 3 (local3)
20 local use 4 (local4)
21 local use 5 (local5)
22 local use 6 (local6)
23 local use 7 (local7)
local0 − Specifies that local use 0 messages are to be sent to the
remote host. This corresponds to number 16 from the list above.
57
Page 67

DGS-1100/ME Metro Ethernet Managed Switch CLI Reference Guide
local1 − Specifies that local use 1 messages are to be sent to the
remote host. This corresponds to number 17 from the list above.
local2 − Specifies that local use 2 messages are to be sent to the
remote host. This corresponds to number 18 from the list above.
local3 − Specifies that local use 3 messages are to be sent to the
remote host. This corresponds to number 19 from the list above.
local4 − Specifies that local use 4 messages are to be sent to the
remote host. This corresponds to number 20 from the list above.
local5 − Specifies that local use 5 messages are to be sent to the
remote host. This corresponds to number 21 from the list above.
local6 − Specifies that local use 6 messages are to be sent to the
remote host. This corresponds to number 22 from the list above.
local7 − Specifies that local use 7 messages are to be sent to the
remote host. This corresponds to number 23 from the list above.
udp_port <udp_port_number> − Specifies the UDP port number that
the syslog protocol is to be used to send messages to the remote
host. The range of udp port number is 514, 1024-65535.
ipaddress <ipaddr> − Specifies the IPv4 address of the remote host
to which syslog messages are to be sent.
state [enable | disable] − Allows the sending of syslog messages to
the remote host, specified above, to be enabled and disabled.
Restrictions Only administrator-level users can issue this command.
Example usage:
To configure a syslog host:
DGS-1100-24P/ME:admin#config syslog host severity all
Command : config syslog host severity all
Success.
DGS-1100-24P/ME:admin#
show syslog host
Purpose To display the syslog hosts currently configured on the Switch.
Syntax
show syslog host
Description
The show syslog host command displays the syslog hosts that are
currently configured on the Switch.
Parameters None.
Restrictions None.
Example usage:
To show Syslog host information:
DGS-1100-18/ME:admin#show syslog host
Command : show syslog host
Syslog Global State : Enabled
58
Page 68

DGS-1100/ME Metro Ethernet Managed Switch CLI Reference Guide
IP Address : 10.90.90.100
Severity : All
Facility : Local7
UDP port : 514
Status : Disabled
DGS-1100-18/ME:admin#
cable diagnostic port
Purpose To determine if there are any errors on the copper cables and the
position where the errors may have occurred.
Syntax
cable diagnostic [port <portlist> | all]
Description
The cable diagnostic port command is used to determine if there
are any errors on the copper cables and the position where the
errors may have occurred. Cable length is detected as following
range: <50m, 50~80, 80~100, >100m. Deviation is +/-
5 meters,
therefore "No Cable" may be displayed under "Test Result," when
the cable used is less than 5 m in length. The Fault Distance will
show “No Cable”, whether the fiber is connected to the port or not.
Note
: The Cable Diagnostics feature is only supported on the
copper ports on all DGS-1100/ME Series switches.
Parameters
port <portlist> – A port or range of ports to be configured.
all − Specifies all ports on the Switch are to be configured.
Restrictions Only administrator-level users can issue this command.
Example usage:
To determine the copper cables and position of port 11 on the Switch:
DGS-1100-24P/ME:admin#cable diagnostic port 11
Command : cable diagnostic port 11
Port Type Link Status Test Result Cable Length (M)
------ ------------------ -------------------- ----------------- --------------------------
11 1000Base_T Link Up Open 4
DGS-1100-24P/ME:admin#
59
Page 69

DGS-1100/ME Metro Ethernet Managed Switch CLI Reference Guide
12
FORWARDING DATABASE COMMANDS
The Forwarding Database commands in the Command Line Interface (CLI) are listed (along with the
appropriate parameters) in the following table.
Command Parameter
create fdb [name <vlan_name 8> | vlanid <VIDlist 1-4094>] <macaddr> port <port>
create multicast_fdb name <vlan_name 8> <macaddr>
config multicast_fdb name <vlan_name 8> <macaddr> [add | delete] <portlist>
config fdb aging_time <sec 10-10000000>
delete fdb <vlan_name 8> <macaddr>
show multicast_fdb {vlan <vlan_name 8> | vlanid <vidlist 1-4094> | mac_address <macaddr>}
show fdb
{port <port> | vlan <vlan_name 8> | vlanid <vidlist 1-4094> | mac_address
<macaddr> | static | aging_time}
config multicast filter [forward | filter]
show multicast
filter_mode
clear fdb { port <port> | all }
delete multicast_fdb <vlan_name 8> <macaddr>
Each command is listed in detail, as follows:
create fdb
Purpose To create a static entry in the unicast MAC address forwarding table
(database)
Syntax
create fdb [name <vlan_name 8> | vlanid <VIDlist 1-4094>]
<macaddr> port <port>
Description
The create fdb command creates a static e
ntry in the Switch’s
unicast MAC address forwarding database.
Parameters
name <vlan_name 8> − The name of the VLAN on which the MAC
address resides.
vlanid <VIDlist 1-4094> − The VLAN ID on which the MAC address
resides.
<macaddr> − The MAC address to be added to the forwarding table.
port <port> − The port number corresponding to the MAC
destination address. The Switch will always forward traffic to the
specified device through this port.
Restrictions Only administrator-level users can issue this command.
Example usage:
60
Page 70

DGS-1100/ME Metro Ethernet Managed Switch CLI Reference Guide
To create a unicast MAC FDB entry:
DGS-1100-24P/ME:admin#create fdb vlanid 1 22-ff-ff-ff-ff-ff port
2
Command : create fdb vlanid 1 22-ff-ff-ff-ff-ff port 2
Success.
DGS-1100-24P/ME:admin#
create multicast_fdb
Purpose To create a static entry in the multicast MAC address forwarding
table (database).
Syntax
create multicast_fdb name <vlan_name 8> <macaddr>
Description
The create multicast_fdb command creates a static entry in the
multicast MAC address forwarding table (database).
Parameters
name <vlan_name 8> − The name of the VLAN on which the MAC
address resides.
<macaddr> − The MAC address to be added to the forwarding table.
Restrictions Only administrator-level users can issue this command.
Example usage:
To create multicast MAC forwarding:
DGS-1100-24P/ME:admin#create multicast_fdb name VLAN0001
ff-ff-ff-ff-ff-ff
Command : create multicast_fdb name VLAN0001 ff-ff-ff-ff-ff-ff
Success.
DGS-1100-24P/ME:admin#
config multicast_fdb
Purpose To configure the Switch’s multicast
MAC address forwarding
database.
Syntax
config multicast_fdb name <vlan_name 8> <macaddr> [add |
delete] <portlist>
Description
The config multicast_fdb command configures the multicast MAC
address forwarding table.
Parameters
<vlan_name 8> − The name of the VLAN on which the MAC
address resides.
<macaddr> − The MAC address to be configured to the forwarding
table.
add − Specifies that the MAC address is to be added to the
forwarding table. Delete will remove the MAC address from the
forwarding table.
delete − Specifies that the MAC address is to be removed from the
61
Page 71

DGS-1100/ME Metro Ethernet Managed Switch CLI Reference Guide
forwarding table.
<portlist> − A port or range of ports to be configured.
Restrictions Only administrator-level users can issue this command.
Example usage:
To configure multicast MAC forwarding:
DGS-1100-24P/ME:admin#config multicast_fdb name VLAN0001 ff-ff-ffff-ff-ff add 1-8
Command : config multicast_fdb name VLAN0001 ff-ff-ff-ff-ff-ff add 1-8
Success.
DGS-1100-24P/ME:admin#
config fdb aging_time
Purpose To set the aging time of the forwarding database.
Syntax
config fdb aging_time <sec 10-10000000>
Description
The config fdb aging_time command sets the aging time of the
forwarding database. The aging time affects the learning process of
the Switch. Dynamic forwarding table entries, which are made up of
the source MAC addresses and their associated port numbers, are
deleted from the table if they are not accessed within the aging time.
The aging time can be from 10 to 10000000 seconds with a default
value of 300 seconds. A very long aging time can result in dynamic
forwarding table entries that are out-of-date or no longer exist. This
may cause incorrect packet forwarding decisions by the Switch. If
the aging time is too short however, many entries may be aged out
too soon. This will result in a high percentage of received packets
whose source addresses cannot be found in the forwarding table, in
which case the Switch will broadcast the packet to all ports, negating
many of the benefits of having a Switch.
Parameters
<sec 10-10000000> − The aging time for the MAC address
forwarding database value, in seconds.
Restrictions Only administrator-level users can issue this command.
Example usage:
To set the fdb aging time:
DGS-1100-24P/ME:admin#config fdb aging_time 300
Command: config fdb aging_time 300
Success.
DGS-1100-24P/ME:admin#
62
Page 72

DGS-1100/ME Metro Ethernet Managed Switch CLI Reference Guide
delete fdb
Purpose To delete an entry in the Switch’s forwarding database.
Syntax
delete fdb <vlan_name 8> <macaddr>
Description
The delete fdb command deletes an entry in the Switch’s MAC
address forwarding database.
Parameters
<vlan_name 8> − The name of the VLAN on which the MAC
address resides.
<macaddr> − The MAC address to be removed from the forwarding
table.
Restrictions Only administrator-level users can issue this command.
Example usage:
To delete a permanent FDB entry:
DGS-1100-24P/ME:admin#delete fdb VLAN0001 22-ff-ff-ff-ffff
Command : delete fdb VLAN0001 22-ff-ff-ff-ff-ff
Success.
DGS-1100-24P/ME:admin#
show multicast_fdb
Purpose
To display the contents of the Switch’s multicast forwarding
database.
Syntax
show multicast_fdb {vlan <vlan_name 8> | vlanid <vidlist 14094> | mac_address <macaddr>}
Description
The show multicast_fdb command displays the current contents of
the Switch’s multicast MAC address forwarding database.
Parameters
vlan <vlan_name 8> − The name of the VLAN on which the MAC
address resides.
vlanid <vlidlist 1-4094> - The VID of the VLAN on which the MAC
address resides.
mac_address <macaddr> − The MAC address that will be added to
the forwarding table.
Restrictions None.
Example usage:
To display multicast MAC address table:
DGS-1100-24P/ME:admin#show multicast_fdb
Command: show multicast_fdb
VID VLAN NAME Mac Address Egress Port
------- ------------------- -------------------- ----------------
Total Entries: 0
63
Page 73

DGS-1100/ME Metro Ethernet Managed Switch CLI Reference Guide
DGS-1100-24P/ME:admin#
show fdb
Purpose To display the current unicast MAC address forwarding database.
Syntax
show fdb {port <port> | vlan <vlan_name 8> | vlanid <vidlist 14094> | mac_address <macaddr> | static | aging_time}
Description
The show fdb
command displays the current contents of the
Switch’s forwarding database.
Parameters
port <port> − The port number corresponding to the MAC
destination address. The Switch always forwards traffic to the
specified device through this port.
vlan <vlan_name 8> − The name of the VLAN on which the MAC
address resides.
vlanid <vlidlist 1-4094> - The VID of the VLAN on which the MAC
address resides.
mac_address <macaddr> − The MAC address entry in the
forwarding table.
static − Specifies that static MAC addr
ess entries are to be
displayed.
aging_time − Displays the aging time for the MAC address
forwarding database.
Restrictions None.
Example usage:
To display unicast MAC address table:
DGS-1100-24P/ME:admin#show fdb port 3
Command: show fdb port 3
VID VLAN Name MAC Address Port Type
---- ------------------------- -------------------------- ------- ---------------
1 default 00-00-01-01-02-03 3 Permanent
Total Entries : 1
DGS-1100-24P/ME:admin#
To display the aging time:
DGS-1100-24P/ME:admin#show fdb aging_time
Command: show fdb aging_time
Unicast MAC Address Aging Time = 300 sec
DGS-1100-24P/ME:admin#
64
Page 74

DGS-1100/ME Metro Ethernet Managed Switch CLI Reference Guide
config multicast filter
Purpose To configure multicast filtering.
Syntax
config multicast filter [forward | filter]
Description
The config multicast filter command enables filtering of multicast
addresses.
Parameters
forward - Forwards unregistered multicast packets.
filter - Filter unregistered multicast packets.
Restrictions Only administrator-level users can issue this command.
Example usage:
To configure multicast filter
DGS-1100-24P/ME:admin#config multicast filter filter
Command : config multicast filter filter
Success.
DGS-1100-24P/ME:admin#
show multicast filter_mode
Purpose To display multicast filtering settings on the Switch.
Syntax
show multicast filter_mode
Description
The show multicast filter_mode command displays the multicast
filtering settings.
Parameters None.
Restrictions None.
Example usage:
To show multicast filtering settings:
DGS-1100-24P/ME:admin#show multicast filter_mode
Command : show multicast filter_mode
Multicast Filter Mode
--------------------------------------------
Forward_unregistered_groups
DGS-1100-24P/ME:admin#
clear fdb
Purpose To clear FDB entries by ports.
Syntax
clear fdb { port <port> | all }
65
Page 75

DGS-1100/ME Metro Ethernet Managed Switch CLI Reference Guide
Description
The clear fdb command clears FDB entries by ports.
Parameters
port <port> − The port number.
all – Specifies all ports on the Switch.
Restrictions Only administrator-level users can issue this command.
Example usage:
To clear FDB entry of port 2:
DGS-1100-24P/ME:admin#clear fdb port 2
Command : clear fdb port 2
Success.
DGS-1100-24P/ME:admin#
delete multicast_fdb
Purpose To delete an entry in the Switch’s muticast FDB.
Syntax
delete multicast_fdb <vlan_name 8> <macaddr>
Description
The delete multicast_fdb command deletes an entry in the Switch’s
multicast FDB.
Parameters
<vlan_name 8> − The name of the VLAN on which the MAC
address resides.
<macaddr> − The MAC address to be removed from the multicast
forwarding table.
Restrictions Only administrator-level users can issue this command.
Example usage:
To delete a multicast FDB entry:
DGS-1100-24P/ME:admin#delete multicast_fdb VLAN0001
22-ff-ff-ff-ff-ff
Command : delete multicast_fdb VLAN0001 22-ff-ff-ff-ff-ff
Success.
DGS-1100-24P/ME:admin#
66
Page 76

DGS-1100/ME Metro Ethernet Managed Switch CLI Reference Guide
13
BROADCAST STORM CONTROL COMMANDS
The Broadcast Storm Control commands in the Command Line Interface (CLI) are listed (along with the
appropriate parameters) in the following table.
Command Parameter
config traffic control
[ports<portlist> | all] [ broadcast_threshold <value 512-524288>|
multicast_threshold<value 512-524288> | unicast_threshold<value 512-524288>|
no_limit]
show traffic control {ports <portlist>}
Each command is listed in detail, as follows:
config traffic control
Purpose To configure broadcast / multicast / unknown unicast traffic control.
Syntax
config traffic control [ports <portlist> | all]
[broadcast_threshold <value 512-524288> |
multicast_threshold<value 512-524288> |
unicast_threshold<value 512-524288> | no_limit]
Description
The config traffic control
command configures broadcast,
multicast and unknown unicast storm control.
Parameters
<portlist> - A port or range of ports to be configured.
all − Specifies all ports on the Switch are to be configured.
broadcast_threshold – Enables broadcast storm control only.
multicast_threshold – Enables multicast storm control only.
unicast_threshold – Enables unicast storm control only.
no_limit – Disable traffic control measure.
<value 512-524288> − The upper threshold at which the specified
traffic control is switched on. The value is the number of
broadcast/multicast/dlf packets, in Kbps, received by the Switch that
will trigger the storm traffic control measures. The value ranges in
size from 512 to 524288 Kbps. The default setting is no_limit.
Restrictions Only administrator-level users can issue this command.
Example usage:
To configure traffic control and enable broadcast storm control system wide:
DGS-1100-24P/ME:admin#config traffic control ports 3-6 broadcast_threshold
1024
Command : config traffic control ports 3-6 broadcast_threshold 1024
Success.
67
Page 77
DGS-1100/ME Metro Ethernet Managed Switch CLI Reference Guide
DGS-1100-24P/ME:admin#
show traffic control
Purpose To display current traffic control settings.
Syntax
show traffic control {ports<portlist>}
Description
The show traffic control command displays the current storm traffic
control configuration on the Switch.
Parameters
ports <portlist> - A port or range of ports whose settings are to be
displayed.
Restrictions None.
Example usage:
To display traffic control setting:
DGS-1100-24P/ME:admin#show traffic control ports 1-3
Command : show traffic control ports 1-3
Port Type Threshold
----- ----------------- -----------
eth1 None No Limit
eth2 None No Limit
eth3 Broadcast 1M bps
Total Entries: 3
DGS-1100-24P/ME:admin#
68
Page 78

DGS-1100/ME Metro Ethernet Managed Switch CLI Reference Guide
14
QOS COMMANDS
The QoS commands in the Command Line Interface (CLI) are listed (along with the appropriate
parameters) in the following table.
Command Parameter
config
bandwidth_control
<portlist>{rx_rate [no_limit | limit <value 8-524288>] | tx_rate [no_limit | limit
<value 64-524288>]}(1)
show
bandwidth_control
{ports <portlist>}
show 802.1p
user_priority
config
scheduling_mechanism
{ports<porlist>} [sp | wrr]
show
scheduling_mechanism
{ports<portlist>}
config 802.1p
default_priority
{ports <portlist>} [Low|Medium|High|Highest]
show 802.1p
default_priority
{ports <portlist>}
Each command is listed in detail, as follows:
config bandwidth_control
Purpose To configure bandwidth control on the Switch.
Syntax
config bandwidth_control <portlist> {rx_rate [no_limit | limit
<value 8-524288>] | tx_rate [no_limit | limit<value 64524288>]}(1)
Description
The config bandwidth_control
command defines bandwidth
control.
Parameters
<portlist> - A port or range of ports to be configured.
rx_rate - Enables ingress rate limiting
• no_limit – Indicates no limit is defined.
• limit <value 8-524288> – Indicates a range between 8-
524288 kbps.
tx_rate – Enables egress rate limiting.
• no_limit – Indicates no limit is defined.
• limit <value 64-524288>] – Indicates a range between 64-
524288 kbps.
Restrictions Only administrator-level users can issue this command.
69
Page 79

DGS-1100/ME Metro Ethernet Managed Switch CLI Reference Guide
Example usage:
To configure bandwidth control configuration:
DGS-1100-24P/ME:admin#config bandwidth_control 7-9 rx_rate limit 128
tx_rate limit 64
Command : config bandwidth_control 8-9 rx_rate limit 128 tx_rate limit 64
Success.
DGS-1100-24P/ME:admin#
show bandwidth_control
Purpose To display bandwidth control settings on the Switch.
Syntax
show bandwidth_control {ports<portlist>}
Description
The show bandwidth_control command displays bandwidth
control.
Parameters
ports<portlist> – A port or range of ports to be configured.
Restrictions None.
Example usage:
To display the bandwidth control configuration:
DGS-1100-24P/ME:admin#show bandwidth_control
Command : show bandwidth_control
Port RX Rate TX Rate
------ --------------- --------------
eth1 No Limit No Limit
eth2 No Limit No Limit
eth3 No Limit No Limit
eth4 No Limit No Limit
eth5 8K bps No Limit
eth6 8K bps No Limit
eth7 8K bps No Limit
eth8 128K bps 64K bps
eth9 128K bps 64K bps
eth10 No Limit No Limit
eth11 No Limit No Limit
eth12 No Limit No Limit
eth13 No Limit No Limit
eth14 No Limit No Limit
eth15 No Limit No Limit
eth16 No Limit No Limit
eth17 No Limit No Limit
eth18 No Limit No Limit
eth19 No Limit No Limit
70
Page 80

DGS-1100/ME Metro Ethernet Managed Switch CLI Reference Guide
eth20 No Limit No Limit
eth21 No Limit No Limit
eth22 No Limit No Limit
eth23 No Limit No Limit
eth24 No Limit No Limit
Total Entries: 24
DGS-1100-24P/ME:admin#
show 802.1p user_priority
Purpose To display the 802.1p user priority.
Syntax
show 802.1p user_priority
Description
The show 802.1p user_priority command is used to display the
802.1p user_priority on the Switch.
Parameters None.
Restrictions None.
Example usage:
To display the QoS mode on the Switch:
DGS-1100-24P/ME:admin#show 802.1p user_priority
Command : show 802.1p user_priority
Priority-0 -> < Class-1(Medium Queue) >
Priority-1 -> < Class-0(Low Queue) >
Priority-2 -> < Class-0(Low Queue) >
Priority-3 -> < Class-1(Medium Queue) >
Priority-4 -> < Class-2(High Queue) >
Priority-5 -> < Class-2(High Queue) >
Priority-6 -> < Class-3(Highest Queue) >
Priority-7 -> < Class-3(Highest Queue) >
DGS-1100-24P/ME:admin#
config scheduling_mechanism
Purpose To configure the scheduling mechanism for the QoS function.
Syntax
config scheduling_mechanism { ports <portlist> } [sp | wrr]
Description
The config scheduling_mechanism
command configures the
scheduling mechanism for the QoS function. It allows the user to
select between a round robin (WRR) and a strict mechanism for
emptying the priority classes of service of the QoS function. The
Switch contains four hardware priority classes of service. Incoming
packets must be mapped to one of these four hardware priority
classes of service, or queues. This command is used to specify the
rotation by which these four hardware priority queues are emptied.
71
Page 81

DGS-1100/ME Metro Ethernet Managed Switch CLI Reference Guide
The Switch’s default is to empty the four hardware priority queues in
order − from the highest priority hardware queue (class 3) to the
lowest priority hardware queue (class 0). Each queue will transmit all
of the packets in its buffer before allowing the next lower priority
queue to transmit its packets. A lower priority hardware queue will
be pre-empted from emptying its queue if a packet is received on a
higher priority hardware queue. The packet received on the higher
priority hardware queue transmits its packet before allowing the
lower priority hardware queue to resume clearing its queue.
Parameters
ports<portlist> – A port or range of ports to be configured.
sp – Specifies that the highest class of service is the first to be
processed. That is, the highest class of service should finish
emptying before the others begin.
wrr – Specifies that the priority classes of service are to empty
packets in a weighted roundrobin (WRR) order.
Restrictions Only administrator-level users can issue this command.
Example usage:
To configure the traffic scheduling mechanism for each COS queue:
DGS-1100-24P/ME:admin#config scheduling_mechanism sp
Command : config scheduling_mechanism sp
Success.
DGS-1100-24P/ME:admin#
show scheduling_mechanism
Purpose To display the current traffic scheduling mechanisms in use on the
Switch.
Syntax
show scheduling_mechanism {ports<portlist>}
Description
The show scheduling_mechanism command displays the current
traffic scheduling mechanisms in use on the Switch.
Parameters
ports<portlist> – A port or range of ports to be displayed.
Restrictions None.
Example usage:
To show the scheduling mechanism on port 10:
DGS-1100-24P/ME:admin#show scheduling_mechanism
ports 10
Command : show scheduling_mechanism ports 10
WRR:
Low:Medium:High:Highest=1:2:4:8
Port Scheduling Mechanism
------------ ------------------------------------
72
Page 82

DGS-1100/ME Metro Ethernet Managed Switch CLI Reference Guide
eth10 SP
Total Entries: 1
DGS-1100-24P/ME:admin#
config 802.1p default_priority
Purpose To specify default priority handling of untagged packets received by
the Switch.
Syntax
config
scheduling {ports <portlist>} [ Low | Medium | High |
Highest]
Description
The configure 802.1p default_priority
command allows you to
specify default priority handling of untagged packets received by the
Switch. The priority value entered with this command will be used to
determine the hardware priority queues that the packet will be
forwarded to.
Parameters
ports<portlist> – A port or range of ports to be configured.
Low – Set the priority to low mode.
Medium – Set the priority to medium mode.
High – Set the priority to high mode.
Highest – Set the priority to highest mode.
Restrictions Only administrator-level users can issue this command.
Example usage:
To configure the 802.1p default_priority:
DGS-1100-24P/ME:admin#config 802.1p default_priority ports 3-4 Low
Command : config 802.1p default_priority ports 3-4 Low
Success.
DGS-1100-24P/ME:admin#
show 802.1p default_priority
Purpose To display the setting of 802.1p default_priority.
Syntax
show 802.1p default_priority {ports <portlist>}
Description
The show 802.1p default_priority command displays the current
configured default priority settings on the switch.
Parameters
ports<portlist> – A port or range of ports to be displayed.
Restrictions None.
Example usage:
To display the 802.1p default_priority:
DGS-1100-24P/ME:admin#show 802.1p default_priority ports 1-4
73
Page 83

DGS-1100/ME Metro Ethernet Managed Switch CLI Reference Guide
Command : show 802.1p default_priority ports 1-4
Port Default CoS
------------ ------------------
eth1 Medium
eth2 Medium
eth3 Low
eth4 Low
Total Entries: 4
DGS-1100-24P/ME:admin#
74
Page 84

DGS-1100/ME Metro Ethernet Managed Switch CLI Reference Guide
15
PORT MIRRORING COMMANDS
The Port Mirroring commands in the Command Line Interface (CLI) are listed (along with the appropriate
parameters) in the following table.
Command Parameter
enable mirror
disable mirror
config mirror
target <port> source ports <portlist> [both | rx | tx]
show mirror
Each command is listed in detail, as follows:
enable mirror
Purpose Used to enable a previously entered port mirroring configuration.
Syntax
enable mirror
Description
The enable mirror
command, combined with the disable mirror
command below, allows the user to enter a port mirroring
configuration into the Switch, and then turn the port mirroring on and
off without having to modify the port mirroring configuration.
Parameters None.
Restrictions Only administrator-level users can issue this command.
Example usage:
To enable the mirroring feature:
DGS-1100-24P/ME:admin#enable mirror
Command : enable mirror
Success.
DGS-1100-24P/ME:admin#
disable mirror
Purpose Used to disable a previously entered port mirroring configuration.
Syntax
disable mirror
Description
The disable mirror command, combined with
the enable mirror
command above, allows the user to enter a port mirroring
configuration into the Switch, and then turn the port mirroring on and
75
Page 85

DGS-1100/ME Metro Ethernet Managed Switch CLI Reference Guide
off without having to modify the port mirroring configuration.
Parameters None.
Restrictions Only administrator-level users can issue this command.
Example usage:
To disable mirroring configurations:
DGS-1100-24P/ME:admin#disable mirror
Command : disable mirror
Success.
DGS-1100-24P/ME:admin#
config mirror
Purpose To configure a mirror port − source port pair on the Switch.
Syntax
config mirror target <port> source ports <portlist> [both | rx |
tx]
Description
The config mirror target command allows a port to have all of its
traffic also sent to a designated port, where a network sniffer or
other device can monitor the network traffic. In addition, one can
specify that only traffic received by or sent by one or both is mirrored
to the target port.
Parameters
target <port> − Specifies the port that mirrors traffic forwarding.
source ports <portlist> – Specifies the port or ports being mirrored.
This cannot include the target port.
rx – Allows mirroring of packets received by (flowing into) the source
port.
tx – Allows mirroring of packets sent to (flowing out of) the source
port.
both – Allows mirroring of all the packets received or sent by the
source port.
Comment
: The user can define up to 8 source ports and one
destination port. One source port can be configured each time using
one CLI command, so in order to configure multiple source ports,
multiple CLI commands should be used.
Restrictions A target port cannot be listed as a source port. Only administrator-
level users can issue this command.
Example usage:
To set the mirroring ports:
DGS-1100-24P/ME:admin#config mirror target 4 source ports 1-3 both
Command: config mirror target 4 source ports 1-3 both
Success.
76
Page 86

DGS-1100/ME Metro Ethernet Managed Switch CLI Reference Guide
DGS-1100-24P/ME:admin#
show mirror
Purpose To show the current port mirroring configuration on the Switch.
Syntax
show mirror
Description
The show mirror
command displays the current port mirroring
configuration on the Switch.
Parameters None.
Restrictions None.
Example usage:
To display mirror configuration:
DGS-1100-24P/ME:admin#show mirror
Command : show mirror
Current Settings
Mirror status : Enabled
Target Port : 4
Mirrored Port
RX : 1-3
TX : 1-3
DGS-1100-24P/ME:admin#
77
Page 87

DGS-1100/ME Metro Ethernet Managed Switch CLI Reference Guide
16
VLAN COMMANDS
The VLAN commands in the Command Line Interface (CLI) are listed (along with the appropriate
parameters) in the following table.
Command Parameter
create vlan [name <vlan_name 8> tag<vlanid 2-4094> | vlanid <vidlist 2-4094>]
delete vlan [name <vlan_name 8> | vlanid <vidlist 2-4094>]
config vlan
[name <vlan_name 8> [add [tagged | untagged] | delete ] <portlist> | vlanid
<vidlist 1-4094>] [[add [tagged | untagged] | delete ] <portlist> | name
<vlan_name 8>]]
show vlan {name <vlan_name 8> | vlanid <vidlist 1-4094> | ports <portlist>}
enable asymmetric_
vlan
disable
asymmetric_vlan
show asymmetric_vlan
enable
management_vlan
disable
management_vlan
config
management_vlan
vlanid <vlanid 1-4094>
show
management_vlan
config port_vlan <portlist> pvid <vlanid 1-4094>
show port_vlan {port <portlist>}
enable pvid
auto_assign
disable pvid
auto_assign
show pvid auto_assign
Each command is listed in detail, as follows:
create vlan
Purpose To create a VLAN on the Switch.
Syntax
create vlan [name <vlan_name 8> tag<vlanid 2-4094> | vlanid
<vidlist 2-4094>]
78
Page 88

DGS-1100/ME Metro Ethernet Managed Switch CLI Reference Guide
Description
The create vlan command creates a VLAN on the Switch.
Parameters
name <vlan_name 8> − The name of the VLAN to be created. Each
VLAN name can be up to 8 characters.
tag <vlanid 2-4094> − The VLAN ID of the VLAN to be created. The
allowed values range from 2 to 4094.
vlanid <vidlist 2-4094> – The VLAN ID li
st of the VLAN to be
created.
Restrictions Only administrator-level users can issue this command.
Example usage:
To create a VLAN v1, tag 3:
DGS-1100-24P/ME:admin#create vlan name v1 tag 3
Command : create vlan name v1 tag 3
Success.
DGS-1100-24P/ME:admin#
delete vlan
Purpose To delete a previously configured VLAN on the Switch.
Syntax
delete vlan [name <vlan_name 8> | vlanid <vidlist 2-4094>]
Description
The delete vlan command deletes a previously configured VLAN on
the Switch.
Parameters
name <vlan_name 8> − The name of the VLAN to be deleted.
vlanid <vidlist 2-4092> − The VLAN of the VLAN to be deleted.
Restrictions Only administrator-level users can issue this command.
Example usage:
To remove a vlan which VLAN ID is 2:
DGS-1100-24P/ME:admin#delete vlan vlanid 2
Command : delete vlan vlanid 2
Success.
DGS-1100-24P/ME:admin#
config vlan
Purpose To add additional ports to a previously configured VLAN and to
modify a VLAN name.
Syntax
config vlan [name <vlan_name 8> [add [tagged | untagg
ed] |
delete ] <portlist> | vlanid <vidlist 1-4094>]
[[add [tagged |
untagged] | delete ] <portlist> | name <vlan_name 8>]]
79
Page 89

DGS-1100/ME Metro Ethernet Managed Switch CLI Reference Guide
Description
The config vlan command allows the user to add or delete ports to
the port list of a previously configured VLAN. You can specify the
additional ports as tagging, untagging, or forbidden. The default is to
assign the ports as untagged.
Parameters
name <vlan_name 8> − The name of the VLAN to be configured.
vlanid <vidlist > − The ID of the VLAN to which to add ports to.
add − Specifies that ports are to be added to a previously created
vlan.
delete - Specifies that ports are to be deleted from a previously
created vlan.
tagged − Specifies the additional ports as tagged.
untagged − Specifies the additional ports as untagged.
<portlist > − A port or range of ports to be added to or deleted from
the VLAN.
Restrictions Only administrator-level users can issue this command.
Example usage:
To add ports 1-3 as tagged ports to the VLAN ID 1:
DGS-1100-24P/ME:admin#config vlan vlanid 1 add
tagged 1-3
Command : config vlan vlanid 1 add tagged 1-3
Success.
DGS-1100-24P/ME:admin#
show vlan
Purpose To display the current VLAN configuration on the Switch
Syntax
show vlan {name <vlan_name 8> | vlanid <vidlist 1-4094> | ports
<portlist>}
Description
The show vlan command displays summary information about each
VLAN including the VLAN ID, VLAN name, the Tagging/Untagging
status, and the Member/Non-member/Forbidden status of each port
that is a member of the VLAN.
Parameters
name <vlan_name 8> − Specify the VLAN id to be displayed.
vlanid <vidlist 1-4094> − Specify the VLAN id to be displayed.
ports <portlist> − Specify the ports to be displayed.
Restrictions None.
Example usage:
To display the Switch’s current VLAN settings:
DGS-1100-24P/ME:admin#show vlan
Command : show vlan
VID : 1
80
Page 90

DGS-1100/ME Metro Ethernet Managed Switch CLI Reference Guide
VLAN Name : VLAN0001
member Ports : 1-24
Current Tagged Ports : 1-3
Current Untagged Ports : 4-24
Static Tagged Ports : 1-3
Static Untagged Ports : 4-24
VID : 2
VLAN Name : a
member Ports :
Current Tagged Ports :
Current Untagged Ports :
Static Tagged Ports :
Static Untagged Ports :
Total Static VLAN Entries: 2
DGS-1100-24P/ME:admin#
enable asymmetric_vlan
Purpose To enable Asymmetric VLAN on the switch.
Syntax
enable asymmetric_vlan
Description
The enable asymmetric_vlan command, along with the disable
enable asymmetric_vlan command below, is used to enable and
disable Asymmetric VLAN on the Switch
Parameters None.
Restrictions Only administrator-level users can issue this command.
Example usage:
To enable asymettric VLAN on the switch:
DGS-1100-24P/ME:admin#enable asymmetric_vlan
Command: enable asymmetric_vlan
Success.
DGS-1100-24P/ME:admin#
disable asymmetric_vlan
Purpose To disable asymmetric VLAN on the switch.
Syntax
disable asymmetric_vlan
Description
The disable asymmetric_vlan command, along with the enable
asymmetric_vlan command below, is used to disable and enable
asymmetric VLAN on the Switch.
81
Page 91

DGS-1100/ME Metro Ethernet Managed Switch CLI Reference Guide
Parameters None.
Restrictions Only administrator-level users can issue this command.
Example usage:
To disable asymmetric_vlan on the switch:
DGS-1100-24P/ME:admin#disable asymmetric_vlan
Command: disable asymmetric_vlan
Success.
DGS-1100-24P/ME:admin#
show asymmetric_vlan
Purpose To display the asymmetric VLAN status on the Switch.
Syntax
show asymmetric_vlan
Description
The show asymmetric_vlan command displays the a
symmetric
VLAN status on the Switch.
Parameters
None.
Restrictions None.
Example usage:
To display asymmetric VLAN status:
DGS-1100-24P/ME:admin#show asymmetric_vlan
Command: show asymmetric_vlan
Asymmetric VLAN : Enabled
DGS-1100-24P/ME:admin#
enable management_vlan
Purpose To enable the management VLAN on the Switch.
Syntax
enable management vlan
Description
The enable management vlan command enables the management
VLAN on the Switch.
Parameters None.
Restrictions Only administrator-level users can issue this command.
Example usage:
To enable management VLAN on the switch:
DGS-1100-24P/ME:admin#enable management_vlan
Command: enable management_vlan
82
Page 92

DGS-1100/ME Metro Ethernet Managed Switch CLI Reference Guide
Success.
DGS-1100-24P/ME:admin#
disable management_vlan
Purpose To disable the management VLAN on the Switch.
Syntax
disable management_vlan
Description
The disable management_vlan command disables the
management VLAN on the Switch.
Parameters None.
Restrictions Only administrator-level users can issue this command.
Example usage:
To disable management VLAN on the switch:
DGS-1100-24P/ME:admin#disable management_vlan
Command: disable management_vlan
Success.
DGS-1100-24P/ME:admin#
config management_vlan
Purpose To configure the management VLAN on the Switch.
Syntax
config management_vlan <vlanid 1-4094>
Description
The config management vlan command co
nfigures the
management VLAN on the Switch.
Parameters
<vlanid 1-4094> − Specifies the management VLAN ID
on the
Switch.
Restrictions Only administrator-level users can issue this command.
Example usage:
To configure the management VLAN on the switch:
DGS-1100-24P/ME:admin#config management_vlan 1
Command: config management_vlan 1
Success.
DGS-1100-24P/ME:admin#
83
Page 93

DGS-1100/ME Metro Ethernet Managed Switch CLI Reference Guide
show management_vlan
Purpose To display the management VLAN on the Switch.
Syntax
show management_vlan
Description
The show management_vlan command displays the management
VLAN information on the Switch.
Parameters None.
Restrictions None.
Example usage:
To display the management VLAN on the switch:
DGS-1100-24P/ME:admin#show management_vlan
Command: show management_vlan
Management VLAN
VID state
----- --------------
1 Disabled
DGS-1100-24P/ME:admin#
config port_vlan
Purpose To configure the management VLAN on the Switch.
Syntax
config port_vlan <portlist> pvid <vlanid 1-4094>
Description
The config port_vlan command configures the port PVID of VLAN
on the Switch.
Parameters
<portlist> - A port or range of ports to be configured the port PVID.
<vlanid 1-4094> − Specifies the management VLAN ID
on the
Switch.
Restrictions Only administrator-level users can issue this command.
Example usage:
To configure the PVID of VLAN on the switch:
DGS-1100-24P/ME:admin#config port_vlan 5-8 pvid 2
Command: config port_vlan 5-8 pvid 2
Success.
DGS-1100-24P/ME:admin#
84
Page 94

DGS-1100/ME Metro Ethernet Managed Switch CLI Reference Guide
show port_vlan
Purpose To display the port PVID of VLAN on the Switch.
Syntax
show port_vlan {port <portlist>}
Description
The show port_vlan command displays the port PVID of VLAN on
the Switch.
Parameters None.
Restrictions None.
Example usage:
To display the port PVID of VLAN on the switch:
DGS-1100-24P/ME:admin#show port_vlan port 1-10
Command : show port_vlan port 1-10
Port PVID
---------- -------
1 1
2 1
3 1
4 1
5 1
6 1
7 1
8 1
9 1
10 1
Total Entries : 10
DGS-1100-24P/ME:admin#
enable pvid auto_assign
Purpose To enable PVID auto assign of port vlan.
Syntax
enable pvid auto_assign
Description To enable PVID auto assign.
Parameters None.
Restrictions Only administrator-level users can issue this command.
Example usage:
To enable PVID auto_assign:
DGS-1100-24P/ME:admin#enable pvid auto_assign
Command: enable pvid auto_assign
85
Page 95

DGS-1100/ME Metro Ethernet Managed Switch CLI Reference Guide
Success.
DGS-1100-24P/ME:admin#
disable pvid auto_assign
Purpose To disable PVID auto assign of port vlan.
Syntax
disable pvid auto_assign
Description To disable PVID auto assign.
Parameters None.
Restrictions Only administrator-level users can issue this command.
Example usage:
To disable PVID auto_assign:
DGS-1100-24P/ME:admin#disable pvid auto_assign
Command: disable pvid auto_assign
Success.
DGS-1100-24P/ME:admin#
show pvid auto_assign
Purpose To display the setting of PVID auto assign of port vlan.
Syntax
show pvid auto_assign
Description To display the setting of PVID auto assign.
Parameters None.
Restrictions None.
Example usage:
To diplay pvid auto_assign:
DGS-1100-24P/ME:admin#show pvid auto_assign
Command: show pvid auto_assign
PVID Auto-assignment: Disabled
DGS-1100-24P/ME:admin#
86
Page 96

DGS-1100/ME Metro Ethernet Managed Switch CLI Reference Guide
17
BASIC IP COMMANDS
The Basic IP commands in the Command Line Interface (CLI) are listed (along with the appropriate
parameters) in the following table.
Command Parameter
config ipif system
[dhcp {retry_time <retry_time 5-120>} |ipaddress <network_address> | bootp | ipv6
{state [enable|disable] | ipv6address <ip_address>}(1)]
show ipif
Each command is listed in detail, as follows:
config ipif System
Purpose To configure the DHCPv6 client state for the interface.
Syntax
config ipif System [ dhcp {retry_time <retry_time 5-120>} |
ipaddress <network_address> | bootp | ipv6 {state [enable|disable]
| ipv6address <ip_address>}(1)]
Description
The config ipif system command is used to configure an interface’s
parameters.
Parameters
dhcp – Use DHCP to obtain the IPv4 address.
retry_time <retry_time 5-120> - To configure the DHCP retry time on
an interface.
ipaddress - <network_address>: To configure a network address on
an interface. The address should specify a host address and the
length of the network mask. Since an interface can only have one
IPv4 address, the new configured address will overwrite the original.
Bootp - Use BOOTP to obtain the IPv4 address.
ipv6 – To set the IPV6 interface.
state [enable|disable]: To enable or disable the state of the IPV6
interface.
Ipv6address <ip_address>:
IPv6 network address. The address
should specify the host address.
Restrictions Only administrator-level users can issue this command.
Example usage:
To configure the DHCP client state as the System interface:
DGS-1100-24P/ME:admin#config ipif System dhcp
Command: config ipif System dhcp
Success.
DGS-1100-24P/ME:admin#
87
Page 97

DGS-1100/ME Metro Ethernet Managed Switch CLI Reference Guide
show ipif
Purpose To display the configuration of an IP interface on the Switch.
Syntax
show ipif
Description
The show ipif command displays the configuration of an IP interface
on the Switch.
Parameters None.
Restrictions None.
Example usage:
To display IP interface settings:
DGS-1100-24P/ME:admin#show ipif
Command: show ipif
IPv4 Type : DHCP
IPv4 Address : 10.90.90.90
IPv4 mask : 255.0.0.0
Gateway : 0.0.0.0
DHCP retry time : 7
IPv6 state : disabled
IPv6 address : fe80:0:0:0:2e0:95ff:fe66:77d0
DGS-1100-24P/ME:admin#
88
Page 98

DGS-1100/ME Metro Ethernet Managed Switch CLI Reference Guide
18
IGMP SNOOPING COMMANDS
The Switch supports IGMPv1-, IGMPv2-, and IGMPv3 awareness (excluded IGMPv3 source-filtering)
snooping.
The IGMP Snooping commands in the Command Line Interface (CLI) are listed (along with the
appropriate parameters) in the following table.
Command
Parameter
enable igmp_snooping
disable igmp_snooping
show igmp_snooping [vlan_name <vlan_name 8> | vlanid<vidlist 1-4094> | all]
config igmp_snooping
[vlan_name <vlan_name 8> | vlanid <vidlist 1-4094> | all] {fast_leave [enable |
disable] | state [enable | disable]}(1)
config igmp_snooping
querier
[vlan_name <vlan_name 8> | vlanid <vidlist 1-4094> | all] state [enable | disable]
create igmp_snooping
static_group
[vlan_name<vlan_name 8> | vlanid < vidlist 1-4094> ] <ipaddr>
config igmp_snooping
static_group
[vlan_name <vlan_name 8> | vlanid < vidlist 1-4094> ] < ipaddr > [ add | delete]
<portlist>
delete igmp_snooping
static_group
[vlan_name<vlan_name 8> | vlanid < vidlist 1-4094> ] <ipaddr>
create igmp_snooping
multicast_vlan
<vlan_name 8> <vlanid 2-4094>
config igmp_snooping
multicast_vlan
<vlan_name 8> { action [add | delete] [member_port <portlist> | source_port
<portlist> | tag_member_port <portlist >] |state [enable | disable] |
replace_source_ip <ipaddr> } (1)
delete igmp_snooping
multicast_vlan
[name <vlan_name 8>| all]
config igmp_snooping
multicast_vlan_group
<vlan_name 8> [add | delete] ipv4_range <mcast_address_range>
enable igmp_snooping
multicast_vlan
disable igmp_snooping
multicast_vlan
show igmp_snooping
multicast_vlan
{name <vlan_name 8>}
show igmp_snooping
multicast_vlan_group
{name <vlan_name 8>}
show igmp_snooping
group
[all | [vlan_name <vlan_name 8> | vlanid <vidlist 1-4094> | ports <portlist>]
{ipaddress<ipaddr>}]
89
Page 99

DGS-1100/ME Metro Ethernet Managed Switch CLI Reference Guide
Command Parameter
show igmp_snooping
static_group
[all | [vlan_name <vlan_name 8> | vlanid <vidlist 1-4094>]<ipaddr>]
Each command is listed in detail, as follows:
enable igmp_snooping
Purpose To enable IGMP snooping on the Switch.
Syntax
enable igmp_snooping
Description
The enable igmp_snooping command enables IGMP snooping on
the Switch.
If MLD snooping is also enabled, this operation may fail due to the
total number of group entry exceeding the limitation of the group
table.
Parameters None.
Restrictions Only administrator-level users can issue this command.
Example usage:
To enable IGMP snooping on the Switch:
DGS-1100-24P/ME:admin#enable igmp_snooping
Command : enable igmp_snooping
Success.
DGS-1100-24P/ME:admin#
disable igmp_snooping
Purpose To disable IGMP snooping on the Switch.
Syntax
disable igmp_snooping
Description
The disable igmp_snooping command disables IGMP snooping on
the Switch.
Disabling IGMP snooping allows all IGMP and IP
multicast traffic to flood within a given IP interface.
Parameters None.
Restrictions Only administrator-level users can issue this command.
Example usage:
To disable IGMP snooping on the Switch:
DGS-1100-24P/ME:admin#disable igmp_snooping
Command : disable igmp_snooping
Success.
90
Page 100

DGS-1100/ME Metro Ethernet Managed Switch CLI Reference Guide
DGS-1100-24P/ME:admin#
show igmp_snooping
Purpose To display IGMP snooping on the Switch.
Syntax
show igmp_snooping [vlan_name <vlan_name 8> |
vlanid<vidlist 1-4094> | all]
Description
The show igmp_snooping command displays IGMP snooping on
the Switch.
Parameters
vlan_name <vlan_name 8> − Displays the I
GMP Snooping on the
Switch.
vlanid <vidlist 1-4094> − Display the VLAN id for IGMP Snooping on
the switch.
All –
Display all current IGMP Snooping configurations on the
Switch.
Restrictions None.
Example usage:
To display IGMP snooping on the Switch:
DGS-1100-24P/ME:admin#show igmp_snooping vlan_name VLAN0001
Command : show igmp_snooping vlan_name VLAN0001
IGMP Snooping Global State : Disabled
VLAN Name : VLAN0001
Query Interval : 125
Max Response Time : 10
Robustness Value : 2
Last Member Query Interval : 1
Querier State : Disabled
Querier Role : Non-Querier
Querier IP : 0.0.0.0
State : Enabled
Fast Leave : Enabled
Total Entries: 1
DGS-1100-24P/ME:admin#
config igmp_snooping
Purpose To configure IGMP snooping on the Switch.
Syntax
config igmp_snooping [vlan_name <vlan_name 8> | vlanid
<vidlist 1-4094> | all] {fast_leave [enable | disable] | state
[enable | disable]}(1)
91
 Loading...