

Page 1
MAVIC AIR
User Manual
2018.05
v1.2
Page 2
Searching for Keywords
Search for keywords such as “battery” and “install” to find a topic. If you are using Adobe Acrobat
Reader to read this document, press Ctrl+F on Windows or Command+F on Mac to begin a search.
Navigating to a Topic
View a complete list of topics in the table of contents. Click on a topic to navigate to that section.
Printing this Document
This document supports high resolution printing.
Using This Manual
Legend
Warning Important Hints and Tips Reference
Read Before the First Flight
Read the following documents before using the MAVICTM Air:
1. Mavic Air In the Box
2. Mavic Air User Manual
3. Mavic Air Quick Start Guide
4. Mavic Air Disclaimer and Safety Guidelines
5. Mavic Air Intelligent Flight Battery Safety Guidelines
We recommend that you watch all tutorial videos on the ocial DJI
Disclaimer and Safety Guidelines before you y. Prepare for your rst ight by reviewing the Mavic Air
Quick Start Guide and refer to this Mavic Air User Manual for more details.
TM
website and read the Mavic Air
Video Tutorials
Go to the address below or scan the QR code on the right to watch the Mavic Air tutorial
videos, which demonstrate how to use the Mavic Air safely:
http://www.dji.com/mavic-air/info#video
Download the DJI GO 4 App
Be sure to use the DJI GOTM 4 app during ight*. Scan the QR code on the right to
download the latest version. The Android version of DJI GO 4 is compatible with Android
v4.4 and later. The iOS version of DJI GO 4 is compatible with iOS v9.0 and later.
* For increased safety, ight is restricted to a height of 98.4 ft (30 m) and range of 164 ft (50 m) when not connected
or logged into the app during ight. This applies to DJI GO 4 and all apps compatible with DJI aircraft.
Download DJI Assistant 2
Download DJI Assistant 2 at http://www.dji.com/mavic-air/download
2018 DJI All Rights Reserved.
©
2
Page 3

Contents
Using This Manual
Legend 2
Read Before the First Flight 2
Video Tutorials 2
Download the DJI GO 4 App 2
Download DJI Assistant 2 2
Product Prole
Introduction 6
Feature Highlights 6
Preparing the Mavic Air 6
Aircraft Diagram 8
Remote Controller Diagram 8
Activation 9
11
Aircraft
Flight Modes 11
Aircraft LEDs and Status Indicator 12
Return to Home 13
Vision Systems 16
Intelligent Flight Modes 19
Advanced Pilot Assistance Systems 27
Flight Recorder 27
Attaching and Detaching the Propellers 27
Intelligent Flight Battery 28
Gimbal and Camera 32
2
6
Remote Controller
Using the Remote Controller 35
Optimal Transmission Zone 38
Linking the Remote Controller 39
35
2018 DJI All Rights Reserved.
©
3
Page 4

DJI GO 4 App
Equipment 41
Editor 44
SkyPixel 44
Me 44
Controlling the Aircraft with a Mobile Device 44
Flight
Flight Environment Requirements 47
Flight Limits and GEO Zones 47
Preight Checklist 48
Auto Takeoff and Auto Landing 49
Starting/Stopping the Motors 49
Test Flight 50
41
47
Appendix
53
Specications 53
Calibrating the Compass 55
Firmware Updates 57
After-Sales Information 57
2018 DJI All Rights Reserved.
©
4
Page 5

Product Prole
This section introduces the Mavic Air
and lists the components of the aircraft
and remote controller.
2018 DJI All Rights Reserved.
©
5
Page 6
Product Profile
Introduction
The DJI Mavic Air features a new folding design and a fully stabilized 3-axis gimbal camera capable of
shooting 4K video and 12 megapixel photos. DJI signature technologies such as Obstacle Avoidance
and Intelligent Flight Modes like SmartCapture, Panorama, Advanced Pilot Assistance Systems,
QuickShots, ActiveTrackTM, and TapFlyTM make capturing complex shots easy. The Mavic Air boasts a
maximum ight speed of 42.5 mph (68.4 kph) and a maximum ight time of 21 minutes*.
Feature Highlights
Camera and Gimbal: With the Mavic Air, you are able to shoot 4K video at up to 30 frames per second
and capture 12 megapixel photos that look crisp and clear, all stabilized by the onboard 3-axis gimbal.
Flight Controller: The next-generation ight controller has been updated to provide a safer, more reliable
ight experience. The aircraft is able to automatically return to its Home Point when the remote control
signal is lost or the battery level is low. As well as being able to hover indoors at low altitudes, the aircraft
can sense and avoid obstacles on its route, enhancing safety.
HD Video Downlink: DJI’s enhanced Wi-Fi technology is built into the remote controller, offering a
transmission range of up to 2.49 mi (4 km)** and making it possible stream 720p video to your mobile
device.
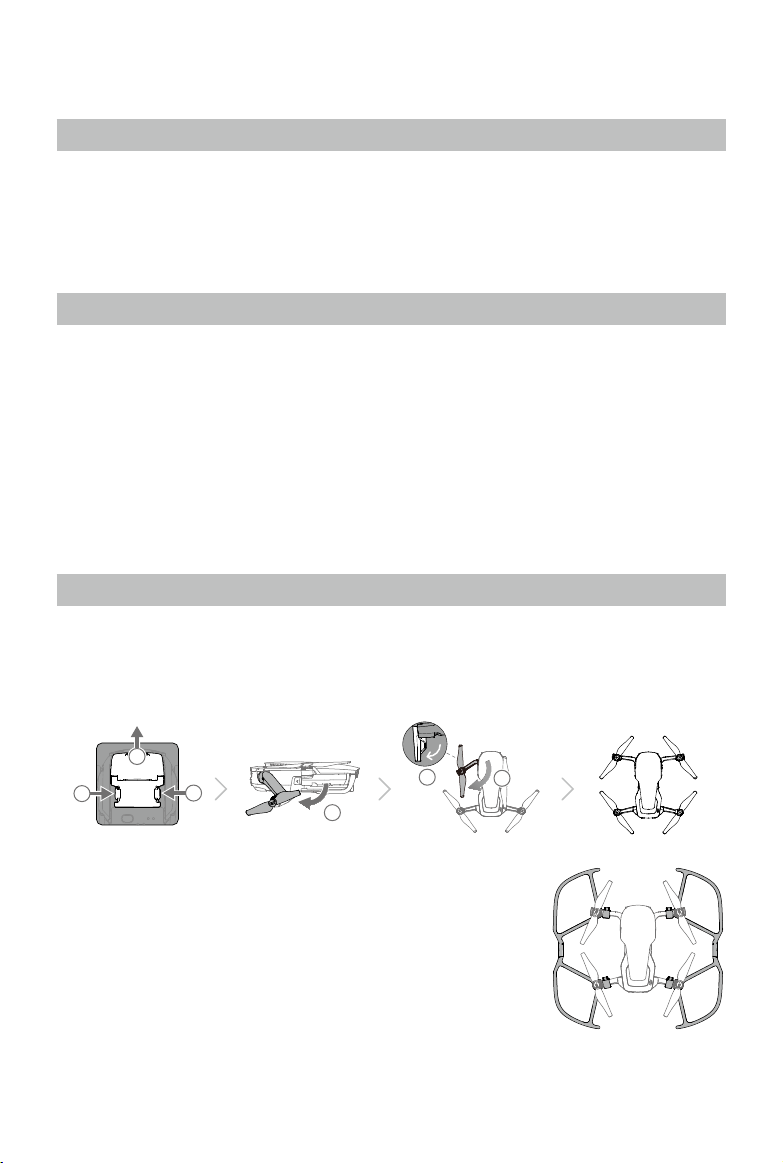
Preparing the Mavic Air
Preparing the Aircraft
1. Remove the gimbal protector from the camera.
2. All aircraft arms are folded before the aircraft is packaged at the factory. First, unfold the rear arms,
then unfold the front arms and the front landing gear.
2
1
3. For safety reasons the propeller guards should be mounted when
using SmartCapture and it is recommended that the propeller guards
are mounted when ying in Beginner mode or indoors. Refer to the
Mavic Air Propeller Guards User Guide to learn more.
* Maximum ight time was tested in windless conditions ying at a consistent
15.5 mph (25 kph). This value should be taken for reference only.
** The remote controller is able to reach its maximum transmission distance (FCC) in a wide open area with no elec-
tromagnetic interference and at an altitude of about 400 ft (120 m).
2018 DJI All Rights Reserved.
©
6
1
3
5
4
Page 7
Mavic Air User Manual
It is recommended that the gimbal protector be attached when the aircraft is not in use. Make
sure the gimbal is horizontal when mounting or removing the gimbal protector.
Ensure the landing gear is properly unfolded before use. Otherwise, the built-in antennas may
be aected causing serious problems to the video link.
When putting the aircraft away after use, be sure to fold the landing gear rst before folding
the aircraft arms.
To enable Beginner mode, go to Camera View in the DJI GO 4 app, tap , and then tap the
Beginner mode switch. Flight altitude, distance, and speed are limited in Beginner mode.
Beginner mode is available when the GPS signal is strong.
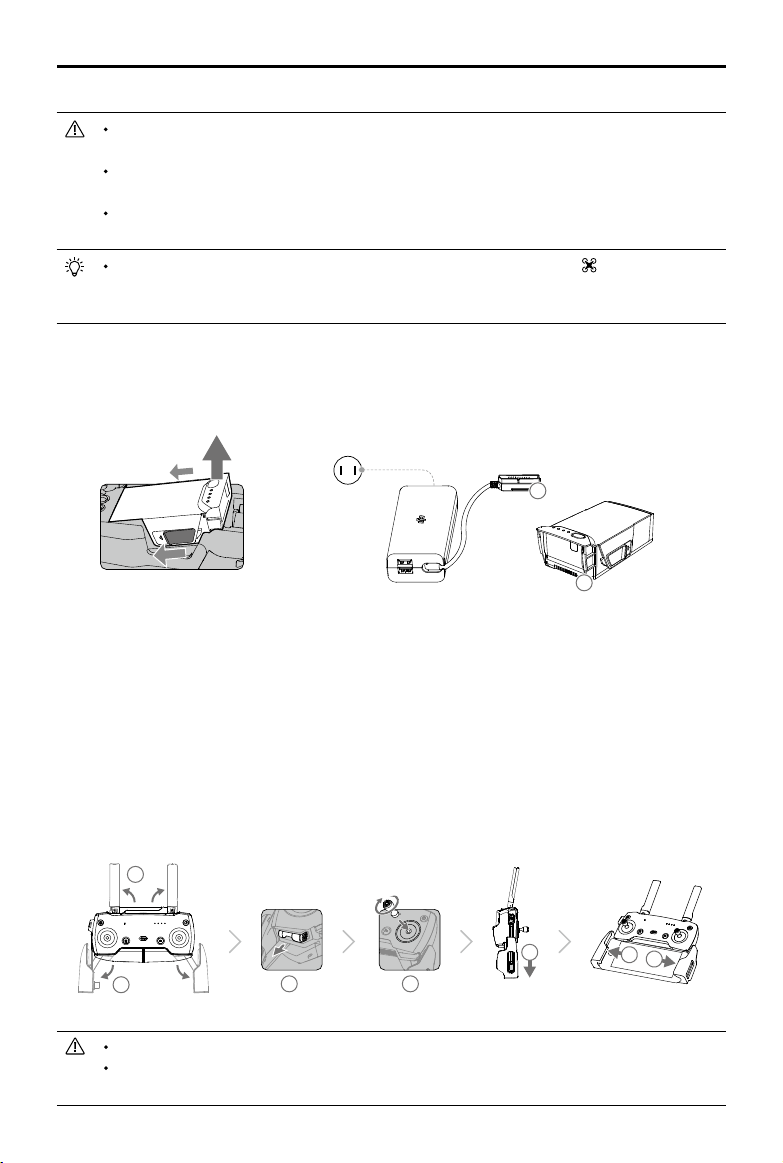
4. All Intelligent Flight Batteries are in Hibernation mode before shipment to ensure safety. Use the
provided AC power adapter to charge and activate Intelligent Flight Batteries for the first time.
Charging the Intelligent Flight Battery fully before each ight is recommended. To charge an Intelligent
Flight Battery after ight, remove it from the aircraft and attach it to the AC power adapter.
Power Outlet
100-240 V
A
A
Preparing the Remote Controller (RC)
1. Unfold the antennas and mobile device clamps.
2. Remove the control sticks from their storage slots on the remote controller and screw them into
place.
3. Choose an appropriate RC cable based on the type of mobile device being used. A cable with
a Lightning connector is connected by default, and Micro USB and USB-C cables are included
in the packaging. Move the cable slider to the end of the slot in the left clamp and connect the
end of the cable to your mobile device. Secure your mobile device by pushing both clamps
inward.
1
2
When using a tablet, use the USB port on the remote controller.
3
4
5
6
7
Do not use the Micro USB and USB ports simultaneously for video linking. Disconnect all
devices from one port before connecting a device to the other port for video linking.
2018 DJI All Rights Reserved.
©
7
Page 8
Mavic Air
User Manual
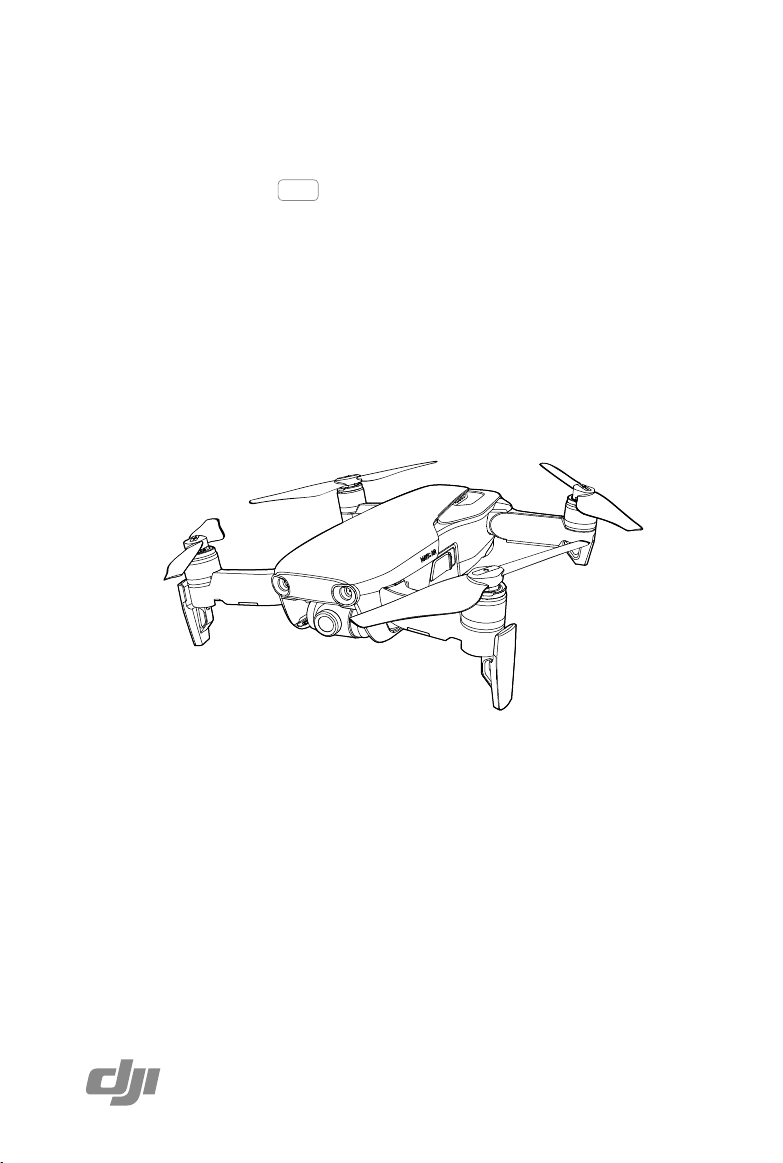
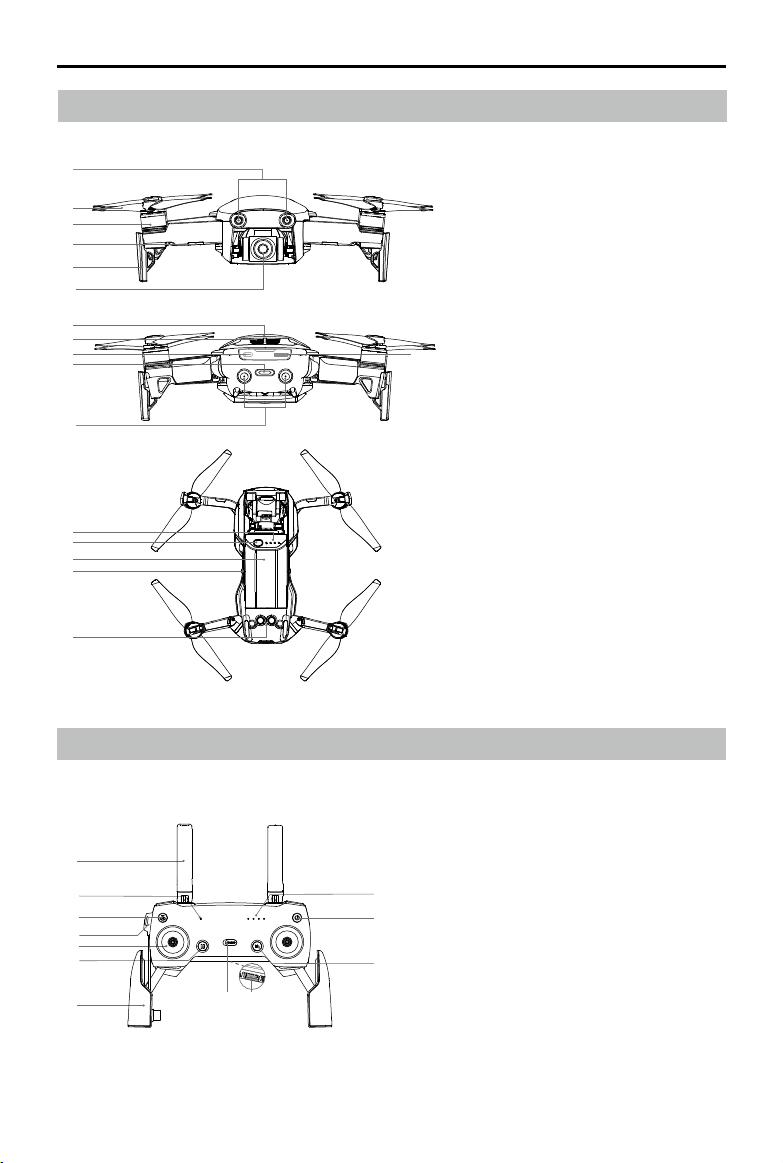
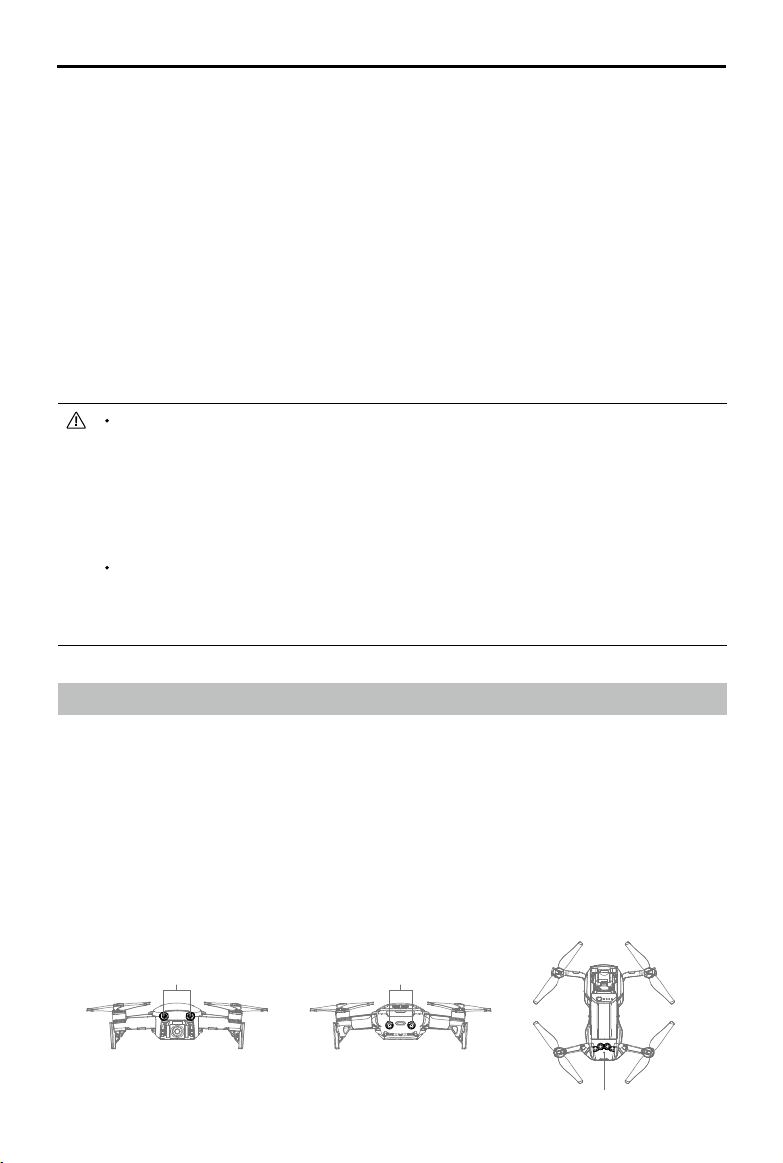
Aircraft Diagram
1
2
3
4
5
6
7
8
9
11
12
13
14
15
16
1. Forward Vision System
2. Propellers
3. Motors
4. Front LEDs
5. Landing Gear (with built-in antennas)
6. Gimbal and Camera
7. GPS Antennas
10
8. Vents
9. USB-C Port
10. Camera microSD Card Slot
11. Aircraft Status Indicator / Function
Button
12. Backward Vision System
13. Battery Level LEDs
14. Power Button
15. Intelligent Flight Battery
16. Battery Latches
17. Downward Vision System
17
Remote Controller Diagram
1
2
3
4
5
6
7
2018 DJI All Rights Reserved.
©
8
8 9
1. Antennas
Relay aircraft control and video signals.
2. Status LED
Displays the remote controller's
12
11
10
system status.
3. Return to Home (RTH) Button
Press and hold the button to initiate
RTH. Press again to cancel RTH.
4. Charging / Main Video Link Port
(Micro USB)
Connect to the AC Power Adapter to
charge the remote controller battery;
connect to a mobile device for video
linking via RC cable.
Page 9
Mavic Air User Manual
5. Control Sticks
Control the orientation and movement of the
aircraft.
6. Flight Pause Button
Press once for emergency braking (when
GPS or Vision System are available).
7. Mobile Device Clamps
Securely mount your mobile device onto the
remote controller.
8. Flight Mode Switch
Switch between P-mode and S-mode.
9. USB / Assistant Video Link Port
Connect to a mobile device for video
downlink via a standard USB cable.
13. Gimbal Dial
Controls the camera's tilt.
14. Record Button
Press to start recording video. Press again to
stop recording.
15. Customizable Button
Performs various functions based on settings
in the DJI GO 4 app.
16. Shutter Button
Press to take a photo. If Burst shooting mode
is selected, a pre-set number of photos will
be taken.
10. Function Button
Performs various functions based on
settings in the DJI GO 4 app.
11. Power Button
Press once to check the current battery
level. Press once, then again and hold to
turn on/o the remote controller.
12. Battery Level LEDs
Display the remote controller’s battery level.
13
14
15
16
Activation
The Mavic Air requires activation before rst time use. Follow the steps below to activate the Mavic Air
using the DJI GO 4 app:
1. Connect your mobile device to the remote controller and then launch DJI GO 4.
2. Log in to the app using your DJI account or register a new DJI account.
3. Power on the aircraft and remote controller.
4. Select “Mavic Air”, select “Connect to the Aircraft’s Wi-Fi” and “Wired Connection”, and then follow
the prompts to establish connection.
5. Tap “Activating Device” after connection is complete, and then follow the prompts to activate your
Mavic Air.
2018 DJI All Rights Reserved.
©
9
Page 10

Aircraft
This section introduces the ight
controller, Forward, Backward and
Downward Vision Systems, and the
Intelligent Flight Battery.
2018 DJI All Rights Reserved.
©
10
Page 11
Aircraft
The Mavic Air contains a ight controller, video downlink system, propulsion system, and an Intelligent
Flight Battery. Refer to the aircraft diagram in the Product Prole section.
Flight Modes
The Mavic Air has two ight modes that users can select, plus a third ight mode that the aircraft falls
back to in certain circumstances:
P-mode (Positioning): P-mode works best when the GPS signal is strong. The aircraft utilizes GPS and
the Vision Systems to locate itself, stabilize, and navigate between obstacles. Intelligent Flight Modes
such as SmartCapture, QuickShots, TapFly, and ActiveTrack are enabled in this mode.
When the Forward and Backward Vision Systems are enabled and lighting conditions are sucient, the
maximum ight attitude angle is 15° and the maximum ight speed is 17.9 mph (28.8 kph).
Note: P-mode requires larger stick movements to achieve high speeds.
S-mode (Sport): In S-mode the aircraft uses GPS only for positioning and the Forward and Backward
Vision Systems are disabled. As such, the aircraft is not able to sense and avoid obstacles and
Intelligent Flight Modes are not available.
Note: In S-mode aircraft responses are optimized for agility and speed making it more responsive to
stick movements.
ATTI mode: The aircraft automatically changes to Attitude mode (ATTI mode) when the Vision Systems
are unavailable or disabled and either the GPS signal is weak or the compass is experiencing
interference. When the Vision Systems are unavailable the aircraft is not able to position itself or autobrake, so potential ight hazards exist when ying in ATTI mode. In ATTI mode, the aircraft is easily
aected by its surroundings. Environmental factors such as wind can result in horizontal shifting, which
may present hazards, especially when ying in conned spaces.
It is strongly recommended that you nd a safe place to land as soon as possible if the aircraft
enters ATTI mode. To reduce the likelihood of the aircraft entering ATTI mode and minimize
hazards if it does enter ATTI mode, avoid ying in areas where the GPS signal is weak and
avoid ying in conned spaces.
The Forward and Backward Vision Systems are disabled in S-mode, which means the aircraft
will not be able to automatically sense obstacles on its route.
The aircraft’s maximum speed and braking distance are signicantly increased in S-mode. A
minimum braking distance of 98.4 ft (30 m) is required in windless conditions.
Descent speed is signicantly increased in S-mode.
The aircraft’s responsiveness is signicantly increased in S-mode, which means a small stick
movement on the remote controller will translate into a large travel distance of the aircraft. Be
vigilant and maintain adequate maneuvering space during ight.
Enable “Multiple Flight Modes” in the DJI GO 4 app to allow switching between S-mode and
P-mode.
Use the Flight Mode switch on the remote controller to switch between Flight Modes.
S-mode is only available with a Mavic Air remote controller. S-mode is disabled when ying
with a mobile device.
2018 DJI All Rights Reserved.
©
11
Page 12
Mavic Air
User Manual
Aircraft LEDs and Status Indicator
The Mavic Air has Front LEDs and an Aircraft Status Indicator as shown in the gure below:
Front LEDFront LED
Aircraft Status Indicator
The Front LEDs show the orientation of the aircraft and the status of some of the functions (refer to
the function sections for more details). The Front LEDs glow solid red when the aircraft is turned on to
indicate the front of the aircraft.
The Aircraft Status Indicator communicates the statuses of the aircraft’s flight control system and
Intelligent Flight Battery. Refer to the table below for more information about the aircraft states indicated
by the Aircraft Status Indicator. The Aircraft Status Indicator also ashes when the Home Point is being
recorded, as described in the Return to Home section.
Aircraft Status Indicator States
Color Blinking/Solid Description of Aircraft State
Normal States
Alternating red,
green, and yellow
Yellow Blinks four times Warming up
Green Blinking slowly P-mode with GPS
Green
Yellow Blinking slowly
Green Blinking quickly Braking
Warning States
Yellow Blinking quickly Remote controller signal lost
Red Blinking slowly Low battery
Red Blinking quickly Critically low battery
Red Blinking IMU error
Red Solid Critical error
Alternating red
and yellow
Blinking
Periodically blinks
twice
Blinking quickly Compass calibration required
Turning on and performing self-diagnostic
tests
P-mode with Forward and Downward Vision
Systems
No GPS, Forward Vision System or
Downward Vision System
2018 DJI All Rights Reserved.
©
12
Page 13
Mavic Air User Manual
Return to Home
The Return to Home (RTH) function brings the aircraft back to the last recorded Home Point. There are
three types of RTH: Smart RTH, Low Battery RTH, and Failsafe RTH. This section describes these three
scenarios in detail.
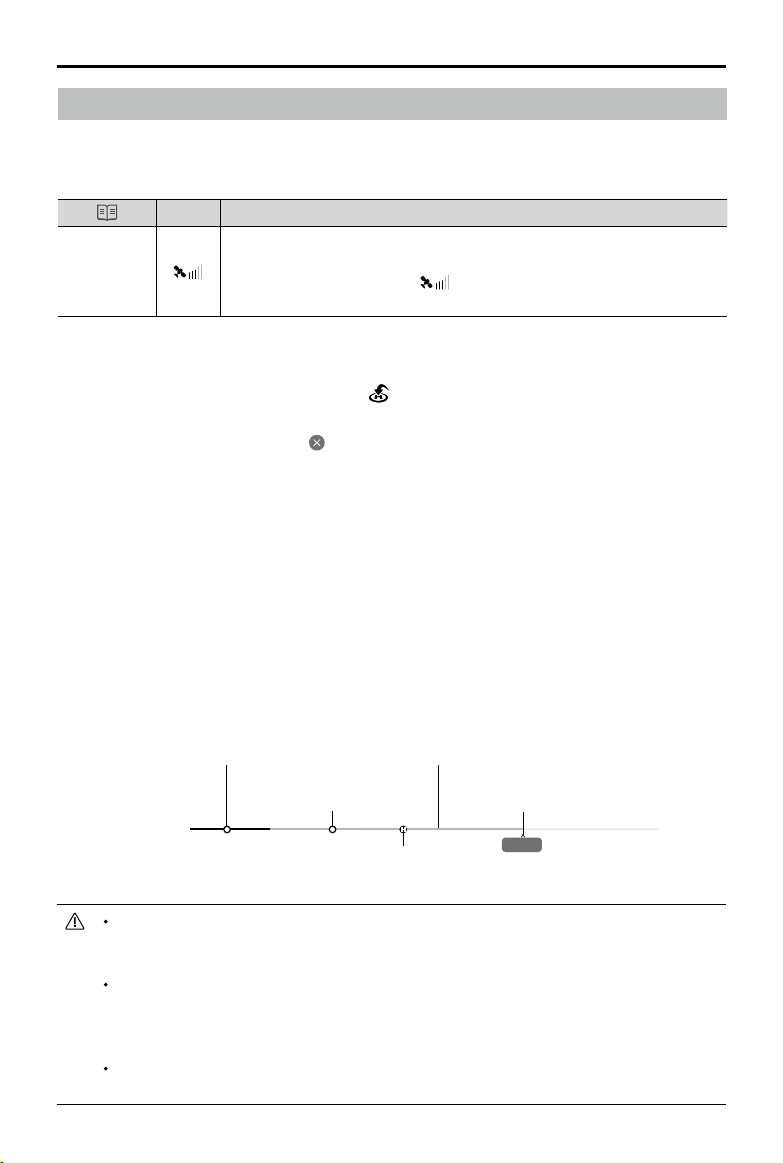
GPS
If a strong GPS signal was acquired before takeoff, the Home Point is
Home Point
the location from which the aircraft launched. The GPS signal strength is
indicated by the GPS icon ( ). The Aircraft Status Indicator will blink
green quickly when the Home Point is recorded.
Smart RTH
If the GPS signal is suciently strong, Smart RTH can be used to bring the aircraft back to the Home
Point. Smart RTH is initiated either by tapping in the DJI GO 4 app (and following the on-screen
instructions) or by pressing and holding the RTH button on the remote controller.
Smart RTH can be exited by tapping in the DJI GO 4 app or by pressing the RTH button on the
remote controller.
Low Battery RTH
Low Battery RTH is triggered when the Intelligent Flight Battery is depleted to a point that may aect the
safe return of the aircraft. Return home immediately or land the aircraft promptly when prompted. DJI GO
4 will display a warning when a low battery level warning is triggered. The aircraft will automatically return
to the Home Point if no action is taken after a ten-second countdown. The user can cancel the RTH
procedure by pressing the RTH button or Flight Pause button on the remote controller.
If the RTH procedure is cancelled following a low battery level warning the Intelligent Flight Battery may not
have enough charge for the aircraft to land safely, which may lead to the aircraft crashing or being lost. The
thresholds for the battery level warnings are automatically determined based on the aircraft’s current altitude
and distance from the Home Point. Low Battery RTH will only be triggered one time during each ight.
Critically low battery level warning
(Red)
Low battery level warning
(Yellow)
Description
Battery level is
sufficient (green)
Remaining flight time
Charge required to
return to Home Point
DJI GO 4 Battery level Indicator Bar
12:29
The colored zones and markers on the DJI GO 4 battery level indicator bar reflect the
estimated remaining flight time. They are automatically adjusted according to the aircraft’s
current location and status.
If the current battery level can only support the aircraft long enough to descend from its
current altitude a critically low battery level warning will be triggered and the aircraft will
descend and land automatically. This procedure cannot be cancelled. If there is danger of
collision occurring, push the throttle up and try to navigate away.
If the battery level is sucient the battery level indicator bar in the DJI GO 4 app displays the
estimated remaining ight time based on current battery level.
2018 DJI All Rights Reserved.
©
13
Page 14
Mavic Air
User Manual
If a battery level warning appears, take action as described in the table below.
RTH and Battery Level Warnings
Warning
Low Battery
Level
Critically Low
Battery Level
Aircraft Status
Indicator
Blinks red slowly
Blinks red quickly Display ashes red Alarm sounds
DJI GO 4 App
Tap “Go-home” to have
the aircraft return to the
Home Point automatically
or “Cancel” to resume
normal ight. If no action
is taken, the aircraft will
automatically y home after
10 seconds.
Remote
Controller
Alarm sounds
continuously
continuously
Remarks/Instructions
Battery level is low. Fly
the aircraft back and land
promptly, then stop the
motors and replace the
battery.
The aircraft will descend
and land automatically.
This procedure cannot be
cancelled. If there is danger
of collision occurring, push
the throttle up and try to
navigate away.
Failsafe RTH
The Forward Vision System allows the aircraft to create a real-time map of its ight route as it ies. If the
Home Point was successfully recorded and the compass is functioning normally, Failsafe RTH will be
automatically activated if the remote control signal is lost for a specied amount of time (three seconds
when using the remote controller and 20 seconds when ying with a mobile device).
When Failsafe RTH is activated the aircraft starts to retrace its original ight route home. If the wireless
control signal is re-established within 60 seconds of Failsafe RTH being activated, the aircraft hovers at
its present location for 10 seconds and waits for pilot commands. The user may tap in the DJI GO 4
app or press the RTH button on the remote controller to cancel Failsafe RTH and retake control. If no pilot
command is given the aircraft ies to the Home Point in a straight line. If the wireless control signal is still
lost 60 seconds after Failsafe RTH was activated the aircraft stops retracing its original ight route and ies
to Home Point in a straight line.
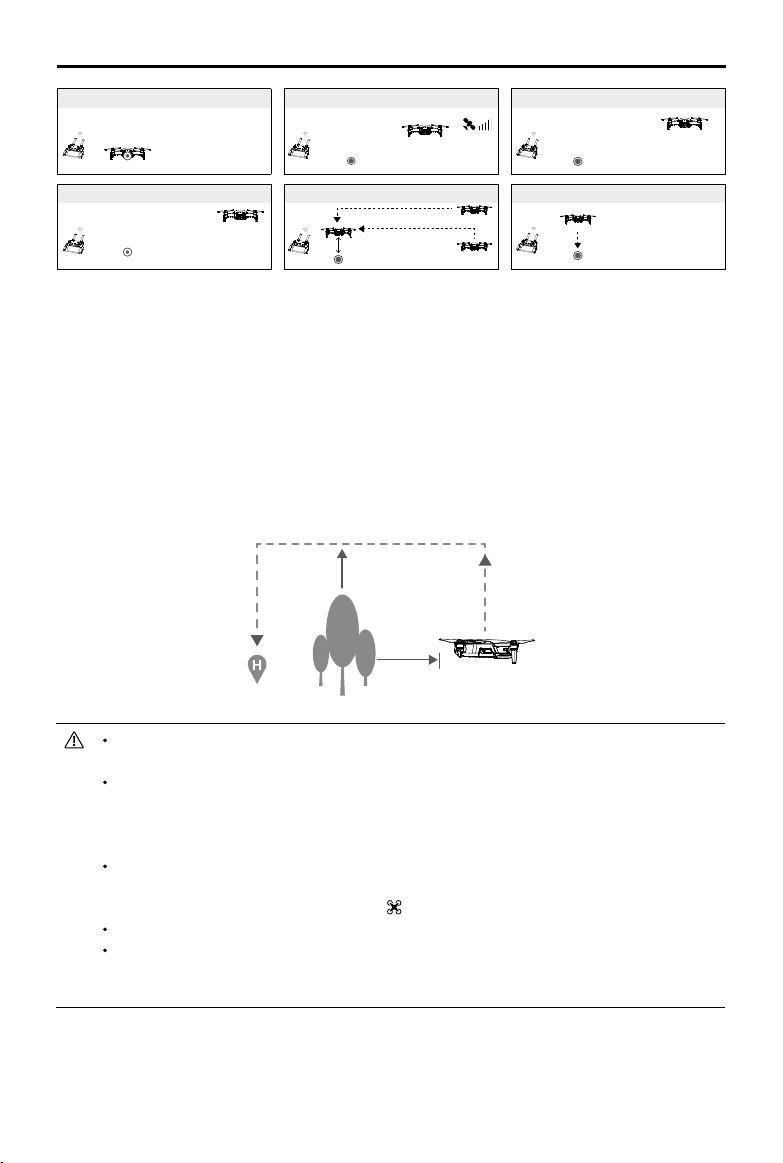
RTH Procedure
Smart RTH, Low Battery RTH, and Failsafe RTH follow this procedure:
1. The aircraft adjusts its orientation.
2. a. If the aircraft is further than 20 m from the Home Point it ascends to the pre-set RTH attitude and
then ies to the Home Point.
b. If the aircraft is between 5 m and 20 m from the Home Point it ies to the Home Point at the
current altitude, unless the current altitude is less than 2.5 m, in which case the aircraft ascends
to 2.5 m and then ies to the Home Point.
c. If the aircraft is less than 5 m from the Home Point it lands immediately.
3. The aircraft lands and stops its motors once it reaches the Home Point.
2018 DJI All Rights Reserved.
©
14
Page 15
Mavic Air User Manual
1 Record Home Point 2 Conrming Home Point
3 Remote Controller Signal Lost
×
4 Signal Lost for Extended Time
×
5
RTH (adjustable altitude)
Height over HP > Failsafe Altitude
×
Elevate to Failsafe Altitude
Failsafe Altitude
Height over HP<=Failsafe Altitude
6 Landing
×
Obstacle Avoidance During RTH
The Mavic Air senses and actively attempts to avoid obstacles during RTH, provided that lighting
conditions are sufficient for the Forward and Backward Vision Systems to operate. The obstacle
avoidance procedure is as follows:
1. The aircraft decelerates when an obstacle is sensed.
2. The aircraft stops and hovers then starts ying backward and ascends vertically until no obstacle is
sensed.
3. The RTH procedure resumes. The aircraft ies to the Home Point at the new altitude.
The aircraft will not be able to return to the Home Point if the GPS signal is weak or if GPS is
unavailable.
In Smart RTH and Low Battery RTH, during the aircraft’s ascent to its RTH altitude, the ascent
is automatic until an altitude of 65 ft (20 m) is reached. Once the altitude is 65 ft (20 m) or
higher, moving the throttle stick commands the aircraft to stop ascending and to y to the
Home Point at its current altitude.
The aircraft will not be able to avoid obstacles during Failsafe RTH if the Forward and
Backward Vision Systems are unavailable. It is important to set a suitable RTH Altitude before
each ight. Launch the DJI GO 4 app, tap and then set the RTH Altitude.
The aircraft cannot avoid obstacles above or beside the aircraft.
During the RTH procedure the aircraft’s speed and altitude can be controlled using the remote
controller or the DJI GO 4 app, but its orientation and direction of ight are controlled by the
ight controller.
2018 DJI All Rights Reserved.
©
15
Page 16
Mavic Air
User Manual
Landing Protection
Landing Protection will activate during Smart RTH.
1. When Landing Protection determines that the ground is suitable for landing, the Mavic Air will land
gently.
2. If Landing Protection determines that the ground is not suitable for landing, the Mavic Air will hover
and wait for pilot conrmation.
3. If Landing Protection is not operational, the DJI GO 4 app will display a landing prompt when the
Mavic Air descends below 0.5 meters. Pull down on the throttle or use the auto landing slider to
land.
Precision Landing
The Mavic Air automatically scans and attempts to match the terrain features underneath during Return
to Home. When the current terrain matches Home Point terrain, the Mavic Air will start landing. The DJI
GO 4 app will show a terrain feature mismatch prompt if matching fails.
Precision Landing performance is subject to the following conditions:
a. The Home Point must be recorded upon takeo and must not be changed during ight,
otherwise the aircraft will have no record of the Home Point’s terrain features.
b. During takeo the aircraft must ascend vertically 7 m before moving horizontally.
c. The Home Point terrain features must remain largely unchanged.
d. The Home Point terrain features must be suciently distinctive.
e. The lighting conditions must not be too light or too dark.
The following actions are available during Precision Landing:
a. Throttle down to accelerate landing.
b. Move the control sticks in any other direction to stop Precision Landing. The Mavic Air will
descend vertically after the control sticks are released.
Vision Systems
The Mavic Air is equipped with Forward, Backward, and Downward Vision Systems that constantly
scan for obstacles in front of and behind the aircraft, allowing it to avoid collisions by going around or
hovering (if lighting conditions are adequate).
The main components of the Forward and Backward Vision Systems are four cameras located on the
nose and the rear side of the aircraft.
The Downward Vision System helps the aircraft maintain its current position. With the help of the
Downward Vision System, the Mavic Air can hover in place more precisely and y indoors or in other
environments where a GPS signal is unavailable. The main components of the Downward Vision System
are two cameras and one 3D infrared module located on the underside of the aircraft.
Forward Vision System Backward Vision System
Downward Vision System
2018 DJI All Rights Reserved.
©
16
Page 17
Mavic Air User Manual
Detection Fields
The detection elds of the Forward, Backward and Downward Vision Systems are depicted below. Note
that the aircraft cannot sense or avoid obstacles that are not within the detection elds.
50°
50°
50°
Camera
Centerline
67°
38°
5°
50°
50°
50°
53°
53°
53°
38°
5°
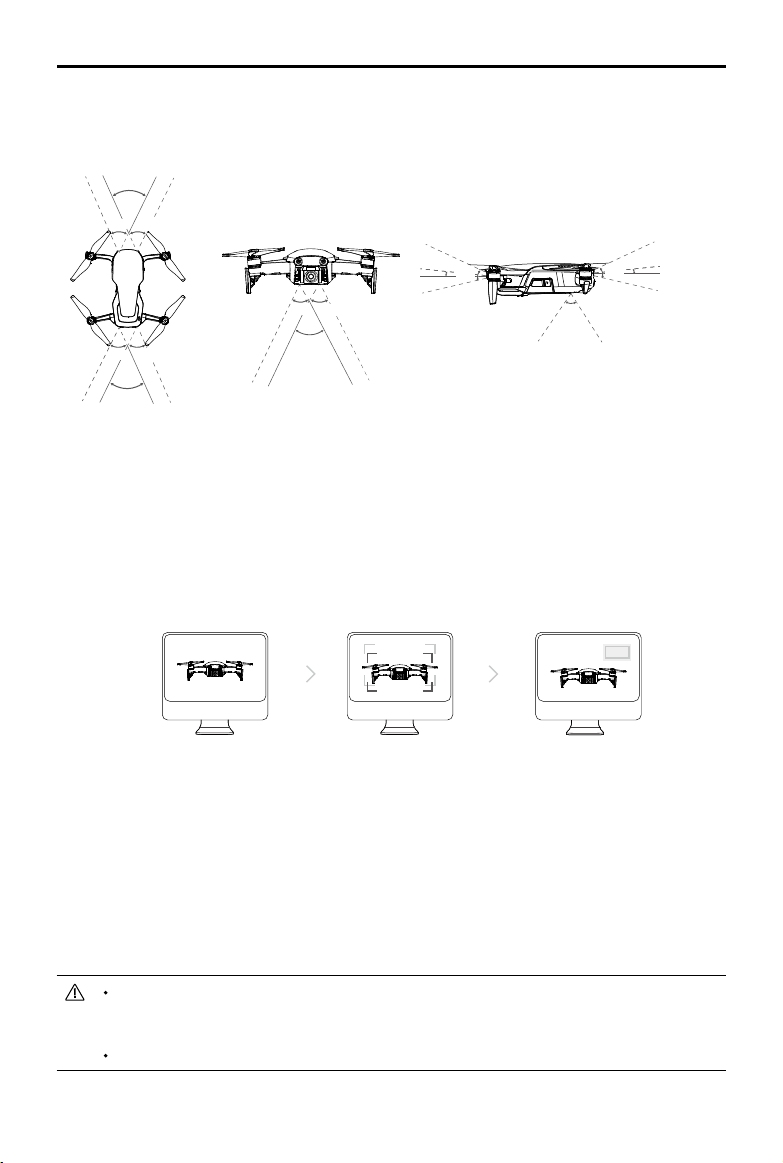
Calibrating Vision System Cameras
The Forward, Backward, and Downward Vision System cameras installed on the aircraft are factorycalibrated, but may require calibration via DJI Assistant 2 or the DJI GO 4 app if the aircraft is subjected
to an impact.
The most accurate way to calibrate the vision systems is by using DJI Assistant 2. Follow the steps
below to calibrate the Forward Vision System cameras, then repeat the steps to calibrate the Backward
and Downward Vision System cameras.
Point the aircraft toward the screen
01
02
Align the boxes
03
Pan and tilt the aircraft
1. Point the aircraft toward the screen.
2. Move the aircraft to align the boxes shown on the screen.
3. Pan and tilt the aircraft as prompted.
When the DJI GO 4 app noties that a vision system calibration is required but a computer is not nearby
a quick calibration can be performed within the app. Tap through “Aircraft Status” > “Vision Sensors” to
start quick calibration.
Quick calibration is a quick x to vision system issues. When possible, connecting the aircraft
to a computer to carry out a full calibration using DJI Assistant 2 is recommended. Only
calibrate when lighting conditions are adequate and on textured surfaces such as grass.
Do not calibrate the aircraft on highly reective surfaces such as marble or ceramic tiles.
2018 DJI All Rights Reserved.
©
17
Page 18
Mavic Air
User Manual
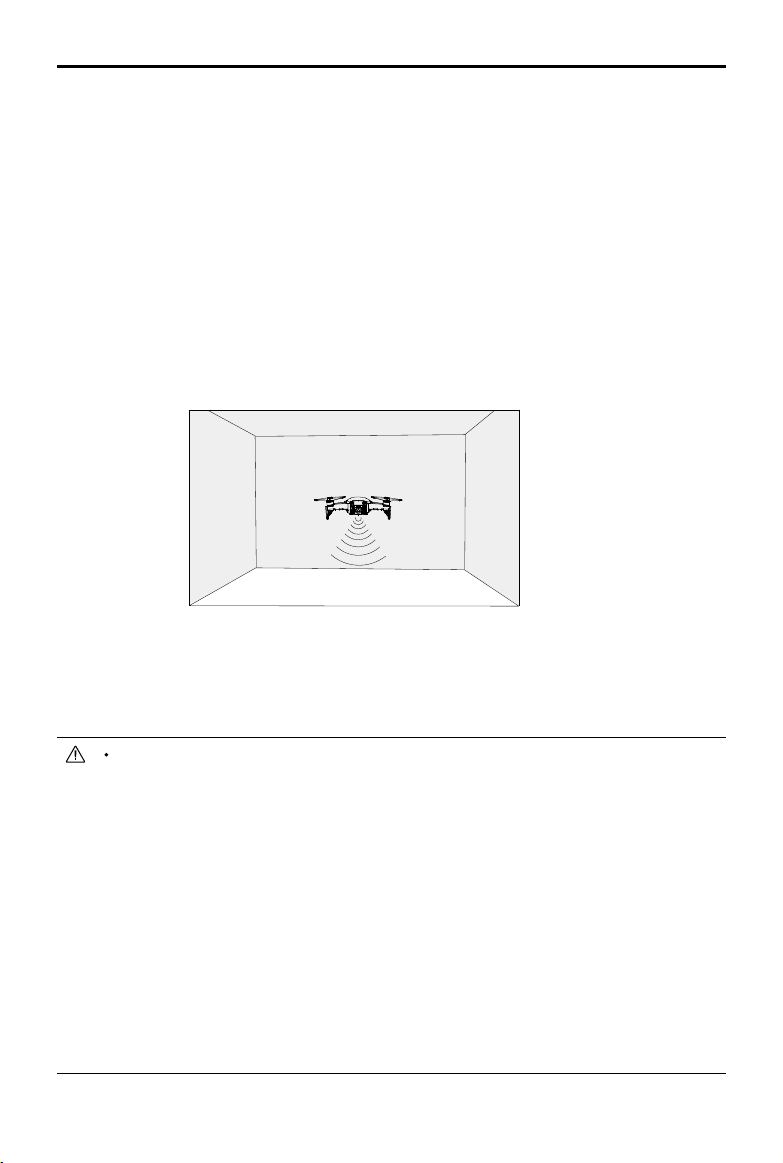
Using the Vision Systems
The Downward Vision System is activated automatically when the aircraft is turned on. No further action
is required. Using the Downward Vision System, the aircraft can hover precisely even without GPS.
The Downward Vision System is typically used in indoor environments where GPS is unavailable. The
Downward Vision System works best when the aircraft is at altitudes of 1.6 to 26 ft (0.5 to 8 m). If
the aircraft’s altitude is above 8 m the Vision Positioning function may be aected, so extra caution is
required.
Follow the steps below to use the Downward Vision System:
1. Ensure the aircraft is in P-mode and place the aircraft on a at surface. Note that the Downward
Vision System cannot work properly on surfaces without clear pattern variations.
2. Turn on the aircraft. The aircraft will hover in place after takeo. The Aircraft Status Indicator will ash
green twice, which indicates the Downward Vision System is working.
Using the Forward and Backward Vision Systems, the aircraft is able to actively brake when obstacles
are detected in front. The Forward and Backward Vision Systems work best when lighting is adequate
and obstacles are clearly marked or textured. The aircraft must y at no more than 17.9 mph (22.8 kph)
to allow for sucient braking distance.
The performance of the Vision Systems is affected by the surface being flown over. The
aircraft automatically changes from to ATTI mode when the Vision Systems are unavailable
or disabled and either the GPS signal is weak or the compass is experiencing interference.
Operate the aircraft with great caution in the following situations:
a. Flying at high speeds below 1.6 ft (0.5 m).
b. Flying over monochrome surfaces (e.g. pure black, pure white, pure red, pure green).
c. Flying over highly reective surfaces.
d. Flying over water or transparent surfaces.
e. Flying over moving surfaces or objects.
f. Flying in an area where the lighting changes frequently or drastically.
g. Flying over extremely dark (< 10 lux) or bright (> 100,000 lux) surfaces or towards bright
sources of light (e.g. towards sunlight).
h. Flying over surfaces without clear patterns or texture.
i. Flying over surfaces with identical repeating patterns or textures (e.g. tiling).
j. Flying over small and ne objects (e.g. tree branches or power lines).
k. Flying at high speeds of over 11.2 mph (18 kph) at 3.3 ft (1 m).
2018 DJI All Rights Reserved.
©
18
Page 19

Mavic Air User Manual
Keep the cameras and sensors clean at all times. Dirt or other debris may adversely aect
their eectiveness.
The Forward, Backward, and Downward Vision Systems may not be able to recognize patterns
on the ground in very dark (< 100 lux) environments.
Intelligent Flight Modes
The Mavic Air supports Intelligent Flight Modes including QuickShots, ActiveTrack, SmartCapture, Tripod
mode, Cinematic mode, TapFly, and Point of Interest. Tap in DJI GO 4 to select an Intelligent Flight
Mode.
QuickShots
QuickShots shooting modes include Dronie, Circle, Helix, Rocket, Boomerang, and Asteroid. The
Mavic Air records a video according to the selected shooting mode and then automatically generates a
10-second video. The video can then be viewed, edited, or shared to social media from the playback
menu.
Dronie: The aircraft ies backward and upward, with the camera locked on your subject.
Circle: The aircraft circles around your subject.
Helix: The aircraft ies upward, spiraling around your subject.
Rocket:
Ensure there is sucient space when using Boomerang: Allow a radius of at least 99 ft (30 m)
Ensure there is sucient space when using Asteroid: Allow at least 132 ft (40) m behind and 164
The aircraft ascends with the camera pointing downward.
Boomerang: The aircraft ies around your subject in an oval path ascending as it ies away from
its starting point and descending as it ies back. The aircraft’s starting point forms one end of the
oval’s long axis, while the other end of its long axis is at the opposite side of the subject from the
starting point.
horizontally around the aircraft and allow at least 33 ft (10 m) above the aircraft. .
Asteroid: The aircraft ies backward and upward and then takes several photos, then ies back
to its starting point. The video generated starts with a panorama of the highest position and then
shows the descent.
ft (50 m) above the aircraft.
Using QuickShots
Ensure that the aircraft is in P-mode and that the Intelligent Flight Battery is suciently charged.
Follow the steps below to use QuickShots:
1. Take o and hover at least 6.6 ft (2 m) above the ground.
2 m
2. In DJI GO 4, tap , then select QuickShots and follow the prompts.
2018 DJI All Rights Reserved.
©
19
Page 20

Mavic Air
ISO
SHUTTEREVWB
CAPACITY
User Manual
3. Select your target subject in Camera View (tap the circle on the subject or drag a box around the
subject) and choose a shooting mode. Tap “GO” to begin recording. The aircraft will y back to its
original position once shooting is nished.
In flight (GPS)
QuickShot
1600 0.31/8000
12
09:29
61%
2.4G
1080P/2420GB
AsteroidDronie HelixCircle Rocket Boomerang
4. Tap to access the video.
QuickShots are only available when the GPS signal is strong.
The aircraft cannot avoid obstacles above or beside the aircraft.
In all QuickShots shooting modes videos are recorded at 30 fps and in Asteroid images are
captured at 1080p. These settings are pre-set and cannot be adjusted.
Exiting QuickShots
Tap in DJI GO 4 or toggle the Flight Mode switch to S-mode to exit QuickShots anytime during
shooting. Press the Flight Pause button on the remote controller for emergency breaking.
ActiveTrack
ActiveTrack allows you to mark and track several moving objects on your mobile device’s screen. No
external tracking device is required. Mavic Air can automatically identify and track people, vehicles and
boats, and use dierent tracking strategies for each.
Using ActiveTrack
Ensure that the aircraft is in P-mode and that the Intelligent Flight Battery is suciently charged. Follow
the steps below to use ActiveTrack:
1. Take o and hover at least 6.6 ft (2 m) above the ground.
2 m
2. In DJI GO 4, tap , then select ActiveTrack.
2018 DJI All Rights Reserved.
©
20
Page 21

Mavic Air User Manual
ISO
SHUTTEREVWB
CAPACITY
3. Tap on the subject you want to track then tap to confirm your selection. If the subject is not
automatically recognized, drag a box around it. The box will turn green when the subject has been
recognized and tracking has begun. If the box turns red, the object could not be identied and you
should try again.
In flight (GPS)
ActiveTrack
1600 0.31/8000
12
09:29
61%
2.4G
1080P/2420GB
Trace
SpotlightParallel
4. The aircraft will automatically avoid obstacles in its ight path. If the aircraft loses track of the subject
because it is moving too fast or is obscured, re-select the subject to resume tracking.
ActiveTrack includes following sub-modes:
Trace
Parallel
Spotlight
The aircraft will not trace a subject
The aircraft tracks the subject
at a constant distance. Use
the roll stick on the remote
controller or the slider in DJI
GO 4 to y in a circle around
the subject.
The aircraft tracks the subject
at constant angle and distance
from the side. Use the roll stick
on the remote control to y in a
circle around the subject.
automatically, but it keeps the
camera pointing at the subject
during ight. The remote controller
can be used to maneuver the
aircraft, but orientation control
is disabled. Using the left stick
and gimbal dial will adjust subject
framing.
2018 DJI All Rights Reserved.
©
21
Page 22

Mavic Air
User Manual
DO NOT use ActiveTrack in areas with people, animals, small or fine objects (e.g. tree
branches or power lines), or transparent objects (e.g. glass or water).
Stay clear of obstacles near the ight path, especially obstacles to the left and right of the
aircraft.
Operate the aircraft manually (press the Flight Pause button or toggle the Flight Mode switch
to S-mode on the remote controller) or tap in DJI GO 4 in an emergency.
Be extra vigilant when using ActiveTrack in any of the following situations:
a. The tracked subject is not moving on a level plane.
b. The tracked subject changes shape drastically while moving.
c. The tracked subject could be out of sight for a long time.
d. The tracked subject is moving on a snowy surface.
e. The tracked subject has a similar color or pattern to its surrounding environment.
f. Available light is too low (< 300 lux) or too high (> 10,000 lux).
You must follow local privacy laws and regulations when using ActiveTrack.
Exiting ActiveTrack
Tap on the screen or toggle the Flight Mode switch to S-mode on the remote controller to exit
ActiveTrack. After exiting ActiveTrack, the aircraft will hover in place, at which point you may choose to
y manually, track another subject, or return to home.
SmartCapture
Deep learning gesture recognition allows you to take selfies, record videos, and control the aircraft
using simple hand gestures. The Mavic Air features brand new modes like GestureLaunch, Follow, and
GestureLand. (Note: Aircraft rmware v1.0.1.0 or higher is required to use SmartCapture; Aircraft rmware
v1.0.2.0 or higher is required to y the aircraft without using the remote controller or DJI GO 4. )
SmartCapture can be selected either by tapping in the DJI GO 4 app and selecting
SmartCapture or by pressing the Function button twice. The rst time you use SmartCapture
select it in the DJI GO 4 app and read the warning prompt carefully. Only use SmartCapture if
you understand the warning.
Only use SmartCapture in open areas with no obstacles, with sucient light, and away from
crowds.
Only use SmartCapture with the propeller guards mounted.
Activating FaceAware and PalmControl
To use SmartCapture rst activate FaceAware and PalmControl:
1. Tap in the DJI GO 4 app and select SmartCapture or press twice on the Function button. When
FaceAware has activated the aircraft will beep twice and the Front LEDs will become solid yellow.
2. Next, use one of the following two methods to activate PalmControl:
a. GestureLaunch: If the aircraft is on the ground you can use
GestureLaunch to command the aircraft to take off and activate
PalmControl. Stand at a distance of 6.6 to 9.8 ft (2 to 3 m) in front
of the aircraft with your palm in front of the aircraft’s nose. Keep
your palm open and your ngers close together. After about two
1.2m
seconds the aircraft will take o automatically and hover at a height
of 3.9 ft (1.2 m). The Front LEDs will blink green slowly to indicate
that PalmControl has been activated.
2018 DJI All Rights Reserved.
©
22
Page 23

Mavic Air User Manual
b. If the aircraft is already airborne, raise and extend your arm and position your palm about 6.6 ft
(2 m) in front of the aircraft's nose. Keep your palm open and your ngers close together. After
about two seconds the Front LEDs will blink green slowly to indicate that PalmControl has been
activated.
If conditions are not suitable for using SmartCapture the Front LEDs will be solid red and a
warning will be displayed in DJI GO 4. If you are not using the app, connect the aircraft to
your mobile device and launch the app to view the warning description.
Once FaceAware and PalmControl have been activated you can control the aircraft in the following
ways. (Stay within 23 ft (7 m) of the aircraft for your gestures to be recognized):
Control Position
Move your palm up or down slowly to control the
aircraft’s altitude. Move your arm left or right to
control the aircraft’s orientation. Move forward or
backward to y forward or backward.
Front LEDs blink green slowly
Control Distance
Raise and extend your other arm and hold your
two palms close together. Move your hands
apart and the aircraft will y away from you, to a
maximum distance of 19.7 ft (6 m). Move your
hands together and the aircraft will fly towards
you, to a minimum distance of 6.6 ft (2 m).
Front LEDs blink green slowly
Follow
Drop your hand towards the floor to activate Follow. Once Follow is
activated, the front LEDs will turn solid green. As you move your body, the
aircraft will follow you automatically. Whilst Follow is active, you can raise
your hand or hands again to use the other SmartCapture features.
Front LEDs solid green
With Follow you can select either Trace to have the aircraft follow you at
a constant distance or Prole to have the aircraft follow you at a constant
angle and distance from the side. (Refer to the ActiveTrack section for more
information about Trace and Prole.) If you are using SmartCapture without
the DJI GO 4 app, Trace or Prole will be selected based on which one you
used last time you used Follow while using SmartCapture with the app. If
you have never used Follow while using SmartCapture with the app, the
default selection (Trace) will be selected.
2018 DJI All Rights Reserved.
©
23
Page 24

Mavic Air
Sele
Make a V gesture with one hand. Once your selfie gesture has been
recognized a two-second countdown will begin. With one second remaining
the aircraft’s Front LEDs will start to blink red slowly, then with one second
remaining they will start to blink red quickly.
Group Sele
Make two or more V gestures at the same time. Once your group selfie
gesture has been recognized a two-second countdown will begin, after
which the aircraft will take the rst of three photos. During the countdown
the Front LEDs will blink red slowly for one second and blink red quickly
for one second. The Front LEDs will then turn o and the aircraft will take a
photo at its current position.
Next, the aircraft will y to a point approximately 16 ft (5 m) away from your group
and ascend and take a photo at a 30° angle. The aircraft will then y to a point
approximately 23 ft (7 m) away from your group and ascend and take a photo at
a 15° angle. Finally, the aircraft will y back to its original position. The Front LEDs
will blink red twice when the aircraft is taking the second and third photos.
User Manual
Only use the group sele feature in areas with a strong GPS signal. The group sele feature is
disabled if there is no GPS signal (e.g. when ying indoors).
Record Videos
Make a frame gesture with your ngers (ensuring at least one hand is above
your nose). Once your frame gesture has been recognized the aircraft’s
Front LEDs will turn off and the camera will start recording. After five
seconds or more have elapsed, making the frame gesture again will stop
the recording.
Front LEDs o
Switching Control
Drop your hand towards the oor. The Front LEDs will turn solid green. The
person who would like to control the aircraft should raise their palm in front
of the aircraft. Once the aircraft is under their control the Front LEDs will
blink green slowly.
Front LEDs blink green slowly
2018 DJI All Rights Reserved.
©
24
Page 25

Mavic Air User Manual
GestureLand
Move your palm down slowly to make the aircraft descend. Continue until
it has descended to its minimum altitude, then continue commanding it to
descend for a further three seconds and it will land automatically and its
motors will stop.
Front LEDs blink green slowly
Exercise caution once you have landed the aircraft using GestureLand, as the aircraft will
continue to respond to hand gestures until you exit SmartCapture. If the aircraft detects
the GestureLaunch gesture before you have exited SmartCapture, the aircraft will take off.
Exercise caution when approaching the aircraft and ensure you do not accidently make the
GestureLaunch gesture.
Exiting SmartCapture
Tap in DJI GO 4 or toggle the Flight Mode switch to S-mode on the remote controller to exit
SmartCapture. If you are using SmartCapture without the DJI GO 4 app, to exit SmartCapture rst land
the aircraft using GestureLand then either power the aircraft o, connect the aircraft to DJI GO 4 and
tap , or connect the aircraft to the remote controller and toggle the Flight Mode switch to S-mode.
The aircraft does not exit SmartCapture automatically. While the aircraft is airborne and after
it has been landed using GestureLand the aircraft will continue to respond to hand gestures
until you manually exit SmartCapture, so caution is required.
When using SmartCapture without the remote controller or the DJI GO 4 app:
a. If no face or palm is detected in the first 60 seconds after takeoff, the aircraft lands
automatically;
b. If the subject is lost during Follow the aircraft ies back to the position the subject was
most recently detected at and waits. If the aircraft detects the subject within 30 seconds
it continues following it. If the subject is not detected within 30 seconds the aircraft lands
automatically.
Tripod Mode
Tap in the DJI GO 4 app to select Tripod mode. In Tripod mode, the maximum flight speed is limited
to 2.2 mph (3.6 kph). Responsiveness to stick movements is also reduced for smoother, more controlled
movements.
Only use Tripod mode where the GPS signal is strong or light conditions are ideal for the
Vision Systems. If the GPS signal is lost and if the Vision Systems are disabled or unavailable,
the aircraft will automatically switch to ATTI mode. In this case, ight speed will increase and
the aircraft will not hover in place. Use Tripod mode carefully.
Cinematic Mode
Tap in the DJI GO 4 app to select Cinematic mode. In Cinematic mode, the aircraft’s braking distance
is extended and its rotation speed is reduced. The aircraft will slow down gently until it stops, keeping
footage smooth and stable even if control inputs are choppy.
2018 DJI All Rights Reserved.
©
25
Page 26

Mavic Air
ISO
SHUTTEREVWB
CAPACITY
User Manual
TapFly
TapFly features four sub-modes, Forward, Backward, Free, and Coordinate. Provided that lighting conditions
are suitable (between 300 and 10,000 lux), the aircraft will automatically avoid obstacles it senses.
Forward: The aircraft will y towards the target with the Forward Vision System sensing obstacles.
Backward: The aircraft will y in the opposite direction of the target with the Backward Vision System
sensing obstacles..
Free: The aircraft will y towards the target. The remote controller can be used to maneuver the
orientation of the aircraft freely.
Coordinate: Tap a specic location on screen. The aircraft will travel to that point at its current altitude,
then hover in place.
Using TapFly
Ensure that the aircraft is in P-mode and that the Intelligent Flight
Battery is sufficiently charged. Follow the steps below to use
TapFly:
1 m
1. Take o and hover at least 3.3 ft (1 m) above the ground.
2. In DJI GO 4, tap , select TapFly, then select a sub-mode and follow the prompts.
3. Tap once on the target and wait for the “GO” button to appear. Tap the “GO” button to conrm the
selection and the aircraft will y to the target automatically. A prompt will appear if the target cannot
be reached. If this is the case, select another target and try again. The target can be changed mid-
ight by tapping the screen.
12
In flight (GPS)
TapFly
1600 0.31/8000
12
09:29
61%
2.4G
1080P/2420GB
GO
Forward
Reverse CoordinateFree
Exiting TapFly
Press the Flight Pause button on the remote controller or pull a control stick in the direction opposite to
the direction of ight and the aircraft will brake and hover in place. Tap the screen to resume TapFly. Tap
or toggle the Flight Mode switch to S-mode to exit TapFly.
DO NOT use TapFly in areas with people, animals, small or ne objects (e.g. tree branches or
power lines), or transparent objects (e.g. glass or water). TapFly Mode may not work properly
when the aircraft is ying over water or snow covered areas.
There may be deviations between expected and actual ight paths selected in TapFly.
The selectable range for the target direction is limited. You cannot make a selection close to
the upper or lower edges of the screen.
2018 DJI All Rights Reserved.
©
26
Page 27

Mavic Air User Manual
Point of Interest
Select a subject, and set the circle radius, ight altitude, and ight speed, and the aircraft will y around
the subject according to these settings.
N
139m
7m/s 1.1m/s 627m
POINT OF INTEREST
34M
612m
Exit
3M/S
Flight Altitude Circle Radius
12M
Stop
Advanced Pilot Assistance Systems
The Advanced Pilot Assistance Systems (APAS) feature is available in P-mode. When APAS is enabled
the aircraft continues to respond to user commands and plans its path according to both control
stick inputs and the ight environment. APAS makes it easier to avoid obstacles and obtain smoother
footage, and gives a better ying experience.
When APAS is enabled, pressing the Flight Pause button on the remote controller or tapping in
the DJI GO 4 app brings the aircraft to a stop. The aircraft will hover for three seconds and await pilot
commands.
To enable APAS, tap
The APAS feature is automatically disabled when using Intelligent Flight Modes and will
resume automatically after exiting from Intelligent Flight Modes.
in the DJI GO 4 app.
APAS
Flight Recorder
Flight data including ight telemetry, aircraft status information, and other parameters is automatically
saved to the aircraft’s internal data recorder. This data can be accessed using DJI Assistant 2.
Attaching and Detaching the Propellers
The Mavic Air uses model 5332S propellers. There are two varieties of 5332S propellers, which are
designed to spin in different directions. The presence or absence of white marks on the propellers
indicates which type they are and therefore which motors they should be attached to.
2018 DJI All Rights Reserved.
©
27
Page 28

Mavic Air
Attach on motors with white marks Attach on motors without white marks
User Manual
Marked Unmarked
Turn the propellers in the indicated direction to mount and tighten.
Attaching the Propellers
Attach the propellers with the white marks to the motors with white marks. Press each propeller down
onto the mounting plate and rotate in the lock direction until it is secured. Attach unmarked propellers to
the motors without marks.
White Marks Unmarked
Detaching the Propellers
Press the propellers down into the mounting plate and rotate them in the unlock direction.
Propeller blades are sharp – handle with care.
Only use original DJI propellers and do not mix propeller types.
Ensure that all propellers are in good condition before each ight. Do not use aged, chipped,
or broken propellers.
Ensure that the propellers and motors are installed rmly and correctly before each ight.
To avoid injury, stand clear of and do not touch propellers or motors when they are spinning.
Place the aircraft in the direction shown in the carrying case during transportation or storage
to avoid damaging the propellers. Do not squeeze or bend the propellers. If propellers
become distorted ight performance will be aected.
Intelligent Flight Battery
The Mavic Air Intelligent Flight Battery is an 11.55 V, 2375 mAh battery with smart charging/discharging
functionality. It should only be charged using an appropriate DJI approved AC power adapter.
Battery Features
1. Battery Level Display: The LED indicators display the current battery level.
2. Auto-Discharging Function: To prevent swelling, the battery automatically discharges to below
65% of the maximum charge when it is idle for more than 10 days. It takes approximately one day
to discharge the battery to 65%. It is normal to feel moderate heat being emitted from the battery
during the discharging process.
3. Balanced Charging: The voltages of the battery cells are automatically balanced during charging.
2018 DJI All Rights Reserved.
©
28
Page 29

Mavic Air User Manual
4. Overcharge Protection: Charging automatically stops when the battery is fully charged.
5. Temperature Detection: The battery will only charge when the temperature is between 41° and 104° F
(5° and 40° C).
6. Overcurrent Protection: The battery stops charging if an excessive current is detected.
7. Overdischarge Protection: Discharging stops automatically to prevent excessive discharge.
8. Short Circuit Protection: The power supply is cut automatically if a short circuit is detected.
9. Battery Cell Damage Protection: The DJI GO 4 app displays a warning message when a damaged
battery cell is detected.
10. Hibernation Mode: The battery will cut the power supply and switch o after 20 minutes of inactivity
to save power. To prevent over discharging the battery will enter Hibernation mode after six hours of
inactivity if the battery level is less than 10%. In Hibernation mode the battery level indicators do not
illuminate. Charging the battery will wake it from hibernation.
11. Communication: Information pertaining to the battery’s voltage, capacity, and current is transmitted
to the aircraft.
Refer to the Mavic Air Intelligent Flight Battery Safety Guidelines before use. Users take full
responsibility for all operations and usage.
Before carrying Intelligent Flight Batteries on an airline ight, they must be discharged to 30%
or lower. This can be done by flying your Mavic Air outdoors until there is less than 30%
charge left or until the Intelligent Flight Battery no longer turns on.
Using the Battery
Press the Power button once, then press again and hold for two seconds to turn the battery on or o.
Battery Level LEDs
LED1
LED2
LED3
LED4
Power Button
Low Temperature Notice
1. Battery capacity is signicantly reduced when ying in low temperature (14° to 41° F (-10° to 5° C))
environments.
2. Batteries cannot be used in extremely low temperature (< 14° F (-10° C)) environments.
3. End the ight as soon as the DJI GO 4 app displays the low battery level warning in low temperature
environments.
4. To ensure optimal performance of the battery, keep the battery temperature above 68° F (20° C).
5. The reduced battery capacity in low temperature environments reduces the aircraft's wind speed
resistance performance, so extra caution is required.
In cold environments, insert the battery into the battery compartment and turn on the aircraft
for approximately 1 to 2 minutes to warm up before taking o.
2018 DJI All Rights Reserved.
©
29
Page 30

Mavic Air
User Manual
Checking Battery Level
The battery level LEDs on the battery display how much charge remains. If the battery is turned o, press
the Power button once and the battery level LEDs will light up to display the current battery level.
Battery Level LEDs
: LED is on. : LED is ashing. : LED is o.
LED1 LED2 LED3 LED4
Battery Level
88% - 100%
75% - 88%
63% - 75%
50% - 63%
38% - 50%
25% - 38%
13% - 25%
0% - 13%
Charging the Battery
The Intelligent Flight Battery must be fully charged before using it for the rst time:
1. Connect the AC power adapter to a power source (100 to 240 V, 50/60 Hz).
2. Attach the Intelligent Flight Battery to the AC power adapter using the battery charging cable with
the battery powered o.
3. The battery level LEDs display the current battery level during charging. The Intelligent Flight Battery
is fully charged when the battery level LEDs all turn o. Detach the AC power adapter when the
battery is full charged.
Power Outlet
AC Power Adapter
Intelligent Flight Battery
Intelligent Flight Battery Charging Time
53 minutes in environments at temperatures between 59° and 104° F (15° and 40° C); 1 hour and 40
minutes in environments at temperatures between 41° and 59° F (5° and 15° C).
DO NOT charge an Intelligent Flight Battery immediately after ight, because its temperature
may be too high. DO NOT charge an Intelligent Flight Battery until it cools down to near room
temperature.
The AC power adapter will stop charging the battery if the battery cell temperature is not
within the operating range (41° to 104° F (5° to 40° C)). The ideal charging temperature is
71.6° to 82.4° F (22° to 28° C).
The optional Battery Charging Hub can charge up to four batteries. Please visit the ocial DJI
Online Store to learn more.
2018 DJI All Rights Reserved.
©
30
Page 31

Mavic Air User Manual
Battery Level LEDs During Charging
: LED is on. : LED is ashing. : LED is o.
LED1 LED2 LED3 LED4
Battery Level
0% - 50%
50% - 75%
75% - 100%
Fully Charged
Battery Protection
The table below shows battery protection mechanisms and corresponding LED patterns.
Battery Protection Mechanisms
LED1 LED2 LED3 LED4 Blinking Pattern Battery Protection Item
LED2 blinks twice per second Overcurrent detected
LED2 blinks three times per
second
LED3 blinks twice per second Overcharge detected
LED3 blinks three times per
second
LED4 blinks twice per second Charging temperature is too low
LED4 blinks three times per
second
Short circuit detected
Over-voltage charger detected
Charging temperature is too
high
In the event of charging temperature protection occurring the battery will resume charging once
the temperature has returned to within the allowable range. If one of the other battery protection
mechanisms activates, to resume charging once the issue has been resolved it is necessary to rst
press the Power button to turn the battery o, unplug the battery from the AC power adapter, and then
plug it back in to resume charging.
DJI does not take any responsibility for damage caused by third-party AC power adapters.
Inserting the Intelligent Flight Battery
Insert the Intelligent Flight Battery into the aircraft’s battery compartment, making sure that it is mounted
rmly and that the battery latches have clicked into place.
click
2018 DJI All Rights Reserved.
©
31
Page 32

Mavic Air
17°
User Manual
Removing the Intelligent Flight Battery
Slide the battery latches on the sides of the Intelligent Flight Battery and it will pop out of the battery
compartment.
Never insert or remove the battery when it is turned on.
Ensure the battery is mounted rmly. The aircraft will not take o if the battery is mounted
incorrectly.
Gimbal and Camera
Gimbal
The Mavic Air’s 3-axis gimbal provides stabilization for the camera, allowing you to capture clear, stable
images and video. The gimbal has a tilt range of -90˚ to +17˚. The tilt range is set to -90˚ to 0˚ by default
and can be adjusted in DJI GO 4 (tap and select “Advanced Settings” > “Extend Gimbal Tilt Limit”).
Other gimbal settings such as Gimbal Mode and Gimbal Auto Calibration can also be selecting by
tapping .
Use the gimbal dial on the remote controller to control camera tilt. Alternatively, in DJI GO 4, go to
Camera View, press and hold on the screen until a blue circle appears, and drag the circle up and down
to control camera tilt. Dragging the circle left and right will control the aircraft’s orientation.
0°
-90°
Gimbal Operation Modes
Two gimbal operation modes are available. Switch between the different operation modes on the
camera settings page of the DJI GO 4 app.
Follow Mode: The angle between the gimbal’s orientation and aircraft’s nose remains constant at all
times.
FPV Mode: The gimbal will synchronize with the movement of the aircraft to provide a first-person
perspective ying experience.
Do not tap or knock the gimbal when the aircraft is powered on. To protect the gimbal during
takeo, always take o from at, open ground.
A gimbal motor error may occur in these situations:
a. The aircraft is placed on uneven ground or the gimbal’s motion is obstructed.
b. The gimbal has been subjected to excessive external force, such as during a collision.
Flying in heavy fog or clouds may make the gimbal wet, leading to temporary failure. The
gimbal will recover full functionality once it dries.
2018 DJI All Rights Reserved.
©
32
Page 33

Mavic Air User Manual
Camera
The onboard camera uses its 1/2.3” CMOS sensor to capture video at up to 4K at 30 fps and 12
megapixel stills. You can record video in either MOV or MP4 formats. Available picture shooting modes
include Single Shot, Burst, Interval, HDR, and various Panorama modes. A live preview of what the
camera is seeing can be monitored on a connected mobile device via the DJI GO 4 app.
Camera microSD Card Slot
The Mavic Air comes with 8 GB of internal storage, and it also supports using a microSD card to store
your photos and videos. A UHS-1 microSD card is required due to the fast read and write speeds
required for high-resolution video data.
microSD Card Slot
Do not remove the microSD card from the aircraft when it is turned on.
To ensure the stability of the camera system, single video recordings are capped at 30
minutes.
2018 DJI All Rights Reserved.
©
33
Page 34

Remote Controller
This section describes the features
of the remote controller and includes
instructions for controlling the aircraft
and the camera.
2018 DJI All Rights Reserved.
©
34
Page 35

Remote Controller
Built into the remote controller is DJI’s enhanced Wi-Fi technology, enabling a maximum transmission
distance of 2.49 miles (4 km)* and downlinking of 720p video from the aircraft to the DJI GO 4 app on
your mobile device. The detachable control sticks make the remote controller easier to store. Maximum
remote controller battery life is approximately 3 hours**. Refer to the remote controller diagram in the
Product Prole section.
Using the Remote Controller
The remote controller is powered by a rechargeable battery that has a capacity of 2970 mAh. Press
the Power button once to check the current battery level. Press once, then again and hold to turn the
remote controller on or o.
Charging the Battery
Use a USB-C cable to connect the USB adapter to the AC power adapter, then plug the USB adapter
into the Charging / Main Video Link port on the remote controller. It takes approximately two and a half
hours to fully charge the remote controller battery.
Power Outlet
AC Power Adapter
USB
Adapter
Controlling the Camera
Shoot videos/photos and adjust the camera’s tilt via the Shutter Button, Record Button, and Gimbal Dial
on the remote controller.
* The remote controller is able to reach its maximum transmission distance (FCC) in a wide open area with no electro-
magnetic interference and at an altitude of about 400 ft (120 m).
** Maximum battery life was tested under laboratory conditions using an iOS device. This value should be taken for ref-
erence only.
2018 DJI All Rights Reserved.
©
35
Page 36

Mavic Air
User Manual
Controlling the Aircraft
The remote controller’s control sticks are used to control the aircraft’s orientation (yaw), forward/
backward movement (pitch), altitude (throttle), and left/right movement (roll). The function that each
control stick movement performs is determined by the choice of control stick mode. Three preprogrammed modes (Mode 1, Mode 2, and Mode 3) are available and custom modes can be dened in
the DJI GO 4 app. The default mode is Mode 2.
In each of the three pre-programmed modes the Mavic Air hovers in place at a constant orientation
when both sticks are centered. Pushing a control stick away from the center position performs the
functions show in the gure below.
Mode 1
Mode 2
Mode 3
Left Stick
Left Stick Right Stick
Forward
Backward
Turn RightTurn Left
Up
Down
Turn RightTurn Left
Forward
Right Stick
Right StickLeft Stick
Up
Down
RightLeft
Forward
Backward
RightLeft
Up
2018 DJI All Rights Reserved.
©
36
Backward
Down
RightLeft
Turn RightTurn Left
Page 37

The gure below explains how to use each control stick, using Mode 2 as an example.
Mavic Air User Manual
Remote
Controller
(Mode 2)
( Indicates Nose Direction)
Aircraft
Remarks
Moving the left stick up or down changes the
aircraft’s altitude. Push the stick up to ascend
and down to descend. The more the stick is
pushed away from the center position, the faster
the aircraft will change altitude. Always push the
stick gently to prevent sudden and unexpected
changes in altitude.
Moving the left stick to the left or right controls
the orientation of the aircraft. Push the stick left to
rotate the aircraft counter-clockwise and right to
rotate the aircraft clockwise. The more the stick is
pushed away from the center position, the faster
the aircraft will rotate.
Moving the right stick up and down changes the
aircraft’s pitch. Push the stick up to fly forward
and down to y backward. The more the stick is
pushed away from the center position, the faster
the aircraft will move.
Moving the right stick to the left or right changes
the aircraft’s roll. Push the stick left to y left and
right to fly right. The more the stick is pushed
away from the center position, the faster the
aircraft will move.
Keep the remote controller away from magnetic materials to avoid it being affected by
magnetic interference.
It is recommended that the control sticks are removed and stored in their storage slots on the
remote controller during transportation or storage to avoid them getting damaged.
2018 DJI All Rights Reserved.
©
37
Page 38

Mavic Air
User Manual
Flight Mode Switch
Toggle the switch to select the desired flight mode.
Choose between P-mode and S-mode.
Position Flight Mode
SPORT
SPORT
P-mode
S-mode
SPORT
RTH Button
Press and hold the RTH button to start the Return-to-Home (RTH) procedure. The aircraft will then
return to the last recorded Home Point. Press this button again to cancel the RTH procedure and regain
control of the aircraft. Refer to the Return to Home section for more information about RTH.
Function Button and Customizable Button
The functions of the Function button and Customizable button are set in the DJI GO 4 app.
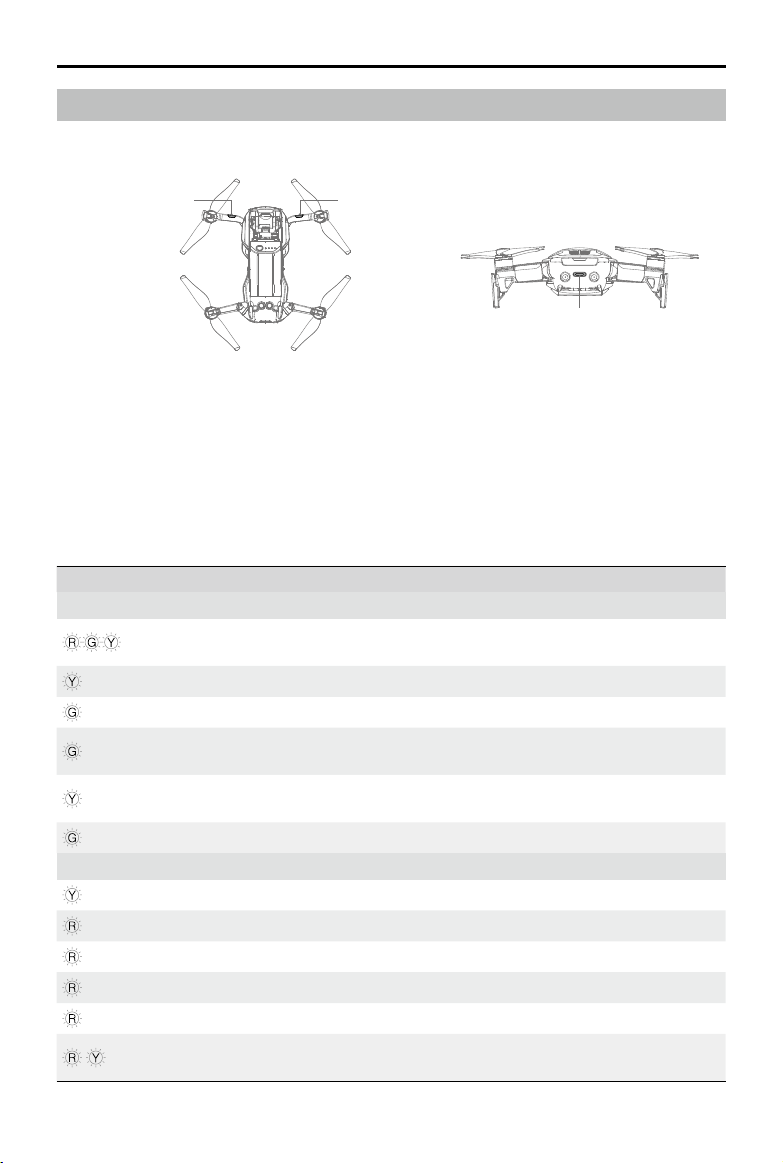
Optimal Transmission Zone
The signal between the aircraft and the remote controller is most reliable when the antennas are
positioned in relation to the aircraft as depicted below.
strong
weak
Ensure that the aircraft is flying within the optimal transmission zone. To maintain optimal transmission
performance, adjust the remote controller and antennas according to the gure above.
2018 DJI All Rights Reserved.
©
38
Page 39

Mavic Air User Manual
Linking the Remote Controller
Remote controllers that are bought together with a Mavic Air are linked before shipment. To link a
remote controller to a Mavic Air, follow the instructions below:
1. Power on the aircraft and the remote controller.
2. Launch DJI GO 4.
3. Select “Connect to the Aircraft’s Wi-Fi” and “Wired Connection”. And then select “Linking the remote
controller”.
4. Press and hold the aircraft’s Function button for two seconds. Release the button upon hearing a
single beep and the Front LEDs blink red.
5. When the status LED on the remote controller turns solid green and the Front LEDs turn solid red,
linking is complete.
Ensure the remote controller is within 1.6 ft (0.5 m) of the aircraft during linking.
2018 DJI All Rights Reserved.
©
39
Page 40

DJI GO 4 App
This section introduces the main
functions of the DJI GO 4 app.
2018 DJI All Rights Reserved.
©
40
Page 41

DJI GO 4 App
ISO
SHUTTEREVWB
CAPACITY
Use this app to control the gimbal, camera, and other aircraft functions. The app features Equipment,
Editor, SkyPixel, and Me sections, which are used for conguring your aircraft, and editing and sharing
your photos and videos with others.
Equipment
Device Menu
If it is not already selected, select Mavic Air from the device menu in the top left corner of the screen.
Function Menu
Tap in the top right corner of the screen to open the Function menu. This menu has ve options:
Scan QR Code: Scan a QR code to connect to an aircraft.
Academy: Use the ight simulator, watch tutorials, and read the product manuals.
Flight Records: Access all your ight records.
GEO zones: Read information about GEO zones.
Find My Drone: Get the map coordinates of your aircraft’s last-recorded location and command the
aircraft to blink its LEDs and make a beeping sound.
Camera View
Enter Camera View by tapping the “GO FLY” button on the Equipment screen with your mobile device
connected to the aircraft.
9 1087654321
09:29
12
61%
2.4G
1080P/2420GB
22
21
In flight (GPS)
GPS
1600 0.31/8000
20
19
18
17
1. System Status Bar
READY TO GO (GPS)
2. Obstacle Detection Status
when obstacles are in detection range.
APAS
139m
7m/s 1.1m/s 627m
612m
16
: This icon indicates aircraft ight status and displays various warning messages.
: Red bars are displayed when obstacles are close to the aircraft. Orange bars are displayed
2018 DJI All Rights Reserved.
©
11
12
13
14
15
41
Page 42

Mavic Air
O
S
T
TEREVWB
User Manual
3. Battery Level Indicator Bar
: The battery level indicator provides a dynamic display of the battery level. The colored zones on
the battery level indicator represent the power levels needed to carry out dierent functions.
4. Flight Mode
: The text next to this icon indicates the current ight mode.
Tap to congure the Flight Controller settings. These settings allow you to modify ight limits and set gain
values.
5. Camera Parameters
Displays camera parameters and the capacity of the internal storage and the microSD card.
IS
HU
1600 0.31/8000
1080P/2420GB
CAPACITY
6. GPS Signal Strength
: Shows the current GPS signal strength. White bars indicate adequate GPS strength.
7. Forward and Backward Vision Systems Status
: Tap into this button to enable or disable features provided by the Forward and Backward Vision
Systems.
8. Wi-Fi Settings
: Tap to enter the Wi-Fi Settings menu.
2.4G
9. Battery Level
61%
: Shows the current battery level. Tap to view the battery information menu, set the various battery
warning thresholds, and view the battery warning history.
10. General Settings
livestream, and adjust ight route display settings.
11. Photo/Video Toggle
12. Gimbal Slider
13. Shoot / Record Button
/ : Tap to start shooting photos or recording video.
2018 DJI All Rights Reserved.
©
42
: Tap to enter the General Settings menu to set units of measurement, enable/disable
: Tap to switch between photo and video recording modes.
: Displays the gimbal tilt angle.
Page 43

Mavic Air User Manual
14. Camera Settings
: Tap to enter the Camera Settings menu.
Tap to set the camera’s ISO, shutter, and auto exposure settings.
Tap to select picture shooting modes. The Mavic Air supports Single Shot, Burst Shot,
Interval Shot, and various Panorama modes. Panorama supports four shooting sub-modes
and can capture and generate 32 megapixel sphere panorama photos.
Tap to enter the General Camera Settings menu.
15. Playback
: Tap to enter the playback page and preview photos and videos as soon as they are captured.
16. Flight Telemetry
D 30M
H 10.0M
HS 10.0M/S
VS 2.0M/S
: Distance between the aircraft and the Home Point.
: Height from the Home Point.
:
Aircraft horizontal speed.
:
Aircraft vertical speed.
17. Map
Tap to view the map.
18. Advanced Pilot Assistance Systems
: Tap to enable/disable the APAS feature. The APAS feature is disabled if the Forward and
APAS
Backward Vision Systems are disabled/unavailable.
19. Intelligent Flight Mode
: Tap to select Intelligent Flight Modes.
20. Smart RTH
: Tap to initiate the Smart RTH procedure and have the aircraft return to the last recorded Home
Point.
21. Auto Takeo/Landing
/ : Tap to initiate auto takeo or landing.
22. Back
: Tap to return to the main menu.
2018 DJI All Rights Reserved.
©
43
Page 44

Mavic Air
User Manual
Editor
An intelligent video editor is built into the DJI GO 4 app. After recording several video clips and
downloading them to your mobile device, go to Editor on the home screen. You can then select a
template and a specied number of clips which are automatically combined to create a short lm that
can be shared immediately.
SkyPixel
View and share the photos and videos in the SkyPixel page.
Me
If you already have a DJI account, you will be able to participate in forum discussions, and share your
creation with the community.
Controlling the Aircraft with a Mobile Device
You can connect a mobile device via Wi-Fi to control the aircraft with DJI GO 4:
1. Power on the aircraft.
2. Press and hold the Function button on the aircraft for four seconds until you hear a double beep,
which indicates that the aircraft has switched to mobile device control.
3. Launch the DJI GO 4 app and tap the icon in the top right corner of the screen. Next, scan the Wi-Fi
QR Code on the aircraft to start the connection procedure.
4. Tap to take o automatically. Put both your thumbs on screen and use the virtual joysticks to
maneuver the aircraft.
When ying with just a mobile device in a wide open area with no electromagnetic interference,
the maximum transmission distance is approximately 328 ft (100 m) at an altitude of 164 ft (50 m).
The Wi-Fi frequency can be set to 2.4 GHz (default) or 5 GHz. On supported mobile devices,
set Wi-Fi to 5 GHz for less interference.
Turn on your mobile device's Wi-Fi and enter the Wi-Fi password shown on the aircraft to
connect to the Mavic Air network if for any reason you cannot scan the QR code.
Linking is required when switching back to Remote Control mode.
To reset the Wi-Fi SSID and password, and to reset the Wi-Fi frequency to 2.4 GHz, press
and hold the aircraft’s Function button for about 6 seconds, until you hear three beeps.
Alternatively, tap “Help” in the DJI GO 4 app, then follow the instructions.
Only y with a mobile device in wide open areas with relatively little electromagnetic
interference. If your connection is adversely aected by interference, y with the remote
controller instead, or move to an area with less interference.
2018 DJI All Rights Reserved.
©
44
Page 45

Mavic Air User Manual
Using Virtual Joysticks
Ensure the mobile device has been connected to the aircraft before using the virtual joysticks. The
illustrations below are based on Mode 2 (left stick controls throttle and yaw, right stick controls pitch
and roll). Tap to enable or disable the virtual joysticks.
In flight (GPS)
09:29
P-GPS
12
61%
Virtual Joysticks
Left Right
The area beyond the white circles is also responsive to control commands.
AE
2018 DJI All Rights Reserved.
©
45
Page 46

Flight
This section describes safe ight
practices and ight restrictions.
2018 DJI All Rights Reserved.
©
46
Page 47

Flight
Once pre-ight preparation is complete, it is recommended that you use the ight simulator in the DJI
GO 4 app to hone your ight skills and practice ying safely. Ensure that all ights are carried out in an
open area. Refer to the Remote Controller and DJI GO 4 App sections for information about using the
remote controller and the app to control the aircraft.
Flight Environment Requirements
1. Do not use the aircraft in severe weather conditions. These include wind speeds exceeding 10 m/s,
snow, rain, and fog.
2. Fly in open areas. Tall structures and large metal structures may aect the accuracy of the on-board
compass and GPS system.
3. Avoid obstacles, crowds, high voltage power lines, trees, and bodies of water.
4. Minimize interference by avoiding areas with high levels of electromagnetism such as locations near
power lines, base stations, electrical substations, and broadcasting towers.
5. Aircraft and battery performance is subject to environmental factors such as air density and
temperature. Be very careful when ying 16404 ft (5000 m) or more above sea level, since battery
and aircraft performance may be reduced.
6. The Mavic Air cannot use GPS within the polar areas. Use the Downward Vision System when ying
in such locations.
Flight Limits and GEO Zones
Abide by all laws and regulations when ying your Mavic Air. Flight limitations are applied by default
in order to help users operate this product safely and legally. Flight limitations include altitude limits,
distance limits, and GEO Zones.
When operating in P-mode, altitude limits, distance limits, and GEO Zones function concurrently to
manage ight safety.
Flight Altitude and Distance Limits
The ight altitude and distance limits may be changed in the DJI GO 4 app. The maximum ight altitude
setting cannot exceed 1640 ft (500 m). Based on these settings, your Mavic Air will y in a restricted
cylinder, as shown below:
Max Flight Altitude
Height of aircraft
when turned on
Max Radius
Home Point
2018 DJI All Rights Reserved.
©
47
Page 48

Mavic Air
GPS Signal Strong Blinking Green
Max Altitude
Max Distance
GPS Signal Weak Blinking Yellow
Max Altitude
Max Distance No limit
User Manual
Flight Limits DJI GO 4 App Aircraft Status Indicator
Aircraft's altitude cannot
exceed the specied value.
Flight distance must be within
the max radius.
Flight Limits DJI GO 4 App Aircraft Status Indicator
Height is restricted to 16 feet (5 meters)
when the GPS signal is weak and
Downward Vision System is activated.
Height is restricted to 98 feet (30 meters)
when the GPS signal is weak and
Downward Vision System is inactivated.
If the aircraft reaches one of the limits, you can still control the aircraft, but you cannot y it any farther.
If the aircraft ies out of the max radius, it will y back within range automatically when the
GPS signal is strong.
For safety reasons, please do not y close to airports, highways, railway stations, railway lines,
city centers, or other sensitive areas. Fly the aircraft only within your line of sight.
Warning: Height
limit reached.
Warning: Distance
limit reached.
Warning:
Height limit
reached.
N/A
N/A
N/A
GEO Zones
All GEO Zones are listed on the DJI official website at http://www.dji.com/flysafe. GEO Zones are
divided into different categories and include locations such as airports, flying fields where manned
aircraft operate at low altitudes, borders between countries, and sensitive locations such as power
plants.
Preflight Checklist
1. Ensure the remote control device, smart device, and Intelligent Flight Battery are fully charged.
2. Ensure the Intelligent Flight Battery is mounted rmly.
3. Ensure the aircraft arms and landing gears are unfolded.
4. Ensure the propellers and propeller guards are in good condition and securely mounted and
tightened.
5. Ensure that there is nothing obstructing the motors and that the motors are functioning normally.
Ensure that the camera lens and Vision System sensors are clean.
6. Ensure the gimbal and camera are functioning normally.
7. Ensure that the DJI GO 4 app is successfully connected to the aircraft.
2018 DJI All Rights Reserved.
©
48
Page 49

Mavic Air User Manual
Auto Takeoff and Auto Landing
Auto Takeo
Use auto takeo only if the Aircraft Status Indicator is blinking green. Follow the steps below to use the
auto takeo feature:
1. Launch the DJI GO 4 app, and tap “GO FLY” to enter Camera View.
2. Complete all steps in the pre-ight checklist.
3. Tap .
4. If conditions are safe for takeo slide the slider to conrm and the aircraft will take o and hover 3.9 ft (1.2 m)
above the ground.
The Aircraft Status Indicator indicates whether the aircraft is using GPS and/or the Downward
Vision System for ight control. Refer to the Aircraft LEDs and Status Indicator section for
more information.
It is recommended to wait until the GPS signal is strong before using the auto takeo.
Auto Landing
Use auto landing only if the Aircraft Status Indicator is blinking green. Follow the steps below to use the
auto landing feature:
1. Tap .
2. If conditions are safe for landing condition slide the slider to conrm and the aircraft will commence
the auto landing procedure. Warnings will appear in the DJI GO 4 app if the aircraft detects that
conditions are not suitable for landing. Be sure to respond promptly.
During the auto landing procedure, auto landing can be aborted immediately by tapping in
the DJI GO 4 app.
Starting/Stopping the Motors
Starting the Motors
A Combination Stick Command (CSC) is used to start the motors. Push both sticks to the bottom
inner or outer corners to start the motors. Once the motors have started spinning, release both sticks
simultaneously.
OR
2018 DJI All Rights Reserved.
©
49
Page 50

Mavic Air
User Manual
Stopping the Motors
There are two methods to stop the motors.
1. Method 1: When the aircraft has landed, push and hold the left stick down. The motors will stop after
three seconds.
2. Method 2: When aircraft has landed, push the left stick down, then conduct the same CSC that was
used to start the motors, as described above. The motors will stop immediately. Release
both sticks once the motors have stopped.
OR
Method 1 Method 2
Stopping Motors Mid-ight
Stopping motors mid-ight will cause the aircraft to crash. The motors should only be stopped midight in an emergency situation such as if a collision has occurred or if the aircraft is out of control and
is ascending/descending very quickly, rolling in the air, or if a motor has stalled. To stop the motors midight use the same CSC that was used to start the motors.
Test Flight
Takeo/Landing Procedures
1. Place the aircraft in an open, at area with the Aircraft Status Indicator facing towards you.
2. Turn on the aircraft and the remote controller.
3. Launch the DJI GO 4 app and enter Camera View.
4. Wait until the Aircraft Status Indicator blinks green quickly indicating that the Home Point has been
recorded and it is now safe to y.
5. Gently push the throttle stick to take o, or use auto takeo.
6. Pull the throttle stick or use auto landing to land the aircraft.
7. Turn o the aircraft and remote controller.
If the Aircraft Status Indicator blinks yellow quickly during ight, the remote control signal has
been lost and the aircraft will activate Failsafe RTH. Refer to the Return to Home section for
more information.
If the Aircraft Status Indicator blinking red slowly or quickly during ight a low battery level
warning or critically low battery level warning has occurred.
Watch the Mavic Air video tutorials to learn more about takeo/landing procedures.
Video Suggestions and Tips
1. The pre-ight checklist is designed to help you y safely and to ensure that you are able to shoot
video during ight. Go through the full pre-ight checklist before each ight.
2. Select the desired gimbal operation mode in the DJI GO 4 app.
3. Only shoot video when ying in P-mode.
2018 DJI All Rights Reserved.
©
50
Page 51

Mavic Air User Manual
4. Always y in good weather and avoid ying in rain or wind.
5. Choose the camera settings that suit your needs. Settings include photo format and exposure
compensation.
6. Perform ight tests to establish ight routes and preview scenes.
7. Push the control sticks gently to keep the aircraft’s movement smooth and stable.
2018 DJI All Rights Reserved.
©
51
Page 52

Appendix
2018 DJI All Rights Reserved.
©
52
Page 53

Appendix
Specifications
Aircraft
Weight
Dimensions (L×W×H) Folded: 168×83×49 mm
Diagonal Length
Max Ascent Speed 2 m/s (P-mode with RC); 4 m/s (S - mode); 2 m/s (P-mode without RC)
Max Descent Speed 1.5 m/s (P-mode with RC); 3 m/s (S -mode); 1 m/s (P-mode without RC)
Max Speed (Near Sea
Level, No Wind)
Max Service Ceiling Above
Sea Level
Max Flight Time
Max Hovering Time
Max Flight Distance
Max Wind Speed
Resistance
Max Tilt Angle
Max Angular Velocity
Operating Temperature 32° to 104° F (0° to 40° C)
GNSS GPS/GLONASS
Operating Frequency 2.4-2.4835 GHz; 5.725-5.850 GHz
Transmitter Power (EIRP)
GPS Hover Accuracy
Range
Internal Storage 8 GB
Gimbal
Stabilization 3-axis (tilt, roll, pan)
Max Control Speed (Tilt) 120°/s
Angular Vibration Range ±0.005°
Controllable Range Tilt: -90° to +0° (default setting); -90° to +17° (extended)
Vision System
Eective Sensing Speed
Altitude Range 0.3 to 26 ft (0.1 to 8 m)
Operating Range 1.6 to 98 ft (0.5 to 30 m)
Operating Environment Surfaces with diuse reection material, size > 20×20 mm and reectivity
430 g
Unfolded: 168×184×64 mm
213 mm (excluding propellers)
17.9 mph (28.8 km/h); P-mode with RC
42.5 mph (68.4 km/h); S-mode
6.7 mph (10 km/h); P-mode without RC
5000 m
21 minutes (0 wind at a consistent 15.5 mph (25 kph))
20 minutes (0 wind)
10 km (0 wind)
22 mph (10 m/s)
35° (S-mode); 25° (P-mode)
250°/s
2.4 GHz:
FCC: <28 dBm; CE: <19 dBm; SRRC: <19 dBm; MIC: <19 dBm
5.8 GHz:
FCC: <31 dBm; CE: <14 dBm; SRRC: <27 dBm
Vertical: ±0.1 m (With Vision Positioning); ±0.5 m (With GPS Positioning)
Horizontal: ±0.1 m (With Vision Positioning); ±1.5 m (With GPS Positioning)
≤ 8 m/s
> 20% (such as wall, trees, humans), adequate lighting (> 15 lux)
2018 DJI All Rights Reserved.
©
53
Page 54

Mavic Air
Directions Forward/Backward/Downward
FOV Forward: Horizontal: 50°, Vertical: 19°
Sensing Range Forward:
Camera
Sensor
Lens 85° FOV, 24 mm (35 mm format equivalent) f/2.8
ISO Range Video: 100 to 3200 (Auto), 100 to 3200 (Manual)
Electronic Shutter Speed 8 to 1/8000 s
Max Image Size 4056×3040
Still Photography Modes Single shot
Video Recording Modes 4K Ultra HD: 3840×2160 24/25/30 p
Video Storage Bitrate 100 Mbps
Supported File System FAT32
Photo JPEG / DNG (RAW)
Video MP4, MOV (MPEG-4 AVC/H.264)
Supported SD Cards microSD (Class 10 or UHS-1 rating required)
Remote Controller
Operating Frequencies 2.4-2.4835 GHz; 5.725-5.850 GHz
Max Transmission Distance
(Unobstructed, free of
interference)
Operating Temperature
Range
User Manual
Backward: Horizontal: 50°, Vertical: 19°
Downward: Front and Back: 67°, Left and Right: 53°
Precision Measurement Range: 0.5-12 m
Detectable Range: 12-24 m
Backward:
Precision Measurement Range: 0.5-10 m
Detectable Range: 10-20 m
1/2.3” CMOS; Eective pixels: 12 megapixels
Shooting Range: 0.5 m to innity
Photo: 100 to 1600 (Auto), 100 to 3200 (Manual)
HDR
Burst shooting: 3 frames
Auto Exposure Bracketing (AEB): 3/5 bracketed frames at 0.7 EV Bias
Interval (2/3/5/7/10/15/20/30/60 s)
Pano: 3×1: 42°×78°, W: 2048×H:3712
3×3: 119°×78°, W: 4096×H:2688
180°: 251°×88°, W: 6144×H:2048
Sphere (3×8+1): 8192×4096
2.7K: 2720×1530 24/25/30/48/50/60 p
FHD: 1920×1080 24/25/30/48/50/60/120 p
HD: 1280×720 24/25/30/48/50/60/120 p
2.4 GHz: FCC: 2.5 mi (4 km); CE/SRRC/MIC: 1.2 mi (2 km)
5.8 GHz: FCC: 2.5 mi (4 km); CE: 0.3 mi (0.5 km); SRRC: 1.6 mi (2.5 km)
32° to 104° F (0° to 40° C)
2018 DJI All Rights Reserved.
©
54
Page 55

Mavic Air User Manual
Transmitter Power (EIRP)
Built-in Battery 2970 mAh
Operating Current/Voltage 1400 mA 3.7 V (Android)
Supported Mobile Device
Size
Supported USB port types Lightning, Micro USB (Type-B), USB-C
Power Adapter
Input 100 to 240 V, 50/60 Hz, 1.4 A
Output Main: 13.2 V 3.79 A
Voltage 13.2 V
Rated Power 50 W
Intelligent Flight Battery
Capacity 2375 mAh
Voltage 11.55 V
Max Charging Voltage 13.2 V
Battery Type LiPo 3S
Energy 27.43 Wh
Net Weight Approx. 140 g
Charging Temperature
Range
2.4 GHz: <26 dBm (FCC), <18 dBm (CE), <18 dBm (SRRC),
<18 dBm (MIC)
5.8 GHz: <30 dBm (FCC), <14 dBm (CE), <26 dBm (SRRC)
750 mA 3.7 V (iOS)
Thickness: 6.5 to 8.5 mm
Max length: 160 mm
USB: 5 V 2 A
5℃ to 40℃
Max Charging Power 60 W
Calibrating the Compass
It is recommended that the compass is calibrated in any of the following situations when ying outdoors:
1. Flying at a location farther than 31 miles (50 km) away from the last ight location.
2. The aircraft has not been own for more than 30 days.
3. A compass interference warning appears in the DJI GO 4 app and/or the Aircraft Status Indicator
blinks alternating red and yellow quickly.
DO NOT calibrate your compass where magnetic interference may occur, such as locations
close to magnetite deposits or large metallic structures such as parking structures, steelreinforced basements, bridges, cars, or scaolding.
DO NOT carry objects (such as cell phones) that contain ferromagnetic materials near the
aircraft during calibration.
It is not necessary to calibrate compass when ying indoors.
2018 DJI All Rights Reserved.
©
55
Page 56

Mavic Air
User Manual
Calibration Procedure
Choose an open area to carry out the following procedure.
1. Tap the System Status Bar in the DJI GO 4 app and select “Calibrate”, then follow the on-screen
instructions.
2. Hold the aircraft horizontally and rotate it 360 degrees. The Aircraft Status Indicator will turn solid
green.
3. Hold the aircraft vertically, with its nose pointing downward, and rotate it 360 degrees around a
vertical axis.
4. If the Aircraft Status Indicator blinks red the calibration has failed. Change your location and try the
calibration procedure again.
The aircraft is able to take o immediately once the calibration has completed successfully.
If you do not take off within three minutes of completing the calibration it is possible that
another compass interference warning will appear while the aircraft is on the ground. If this
happens it indicates that the current location is not suitable for ying the aircraft, due to the
level of magnetic interference.
2018 DJI All Rights Reserved.
©
56
Page 57

Mavic Air User Manual
Firmware Updates
Use DJI GO 4 or DJI Assistant 2 to update aircraft rmware.
Using DJI GO 4
When you connect the aircraft or remote controller to the DJI GO 4 app you will be notied if a new
rmware update is available. To start updating, connect your mobile device to the Internet and follow the
on-screen instructions. Note that you cannot update the rmware if the remote controller is not linked to
the aircraft.
Using DJI Assistant 2
The USB-C port is used when connecting the Mavic Air to a computer to update rmware.
Follow the instructions below to update the rmware through DJI Assistant 2:
1. With the aircraft powered o, connect the aircraft to a computer via the Micro USB port using a
Micro USB cable.
2. Power on the aircraft.
3. Launch DJI Assistant 2 and login with your DJI account.
4. Select “Mavic Air” and click on Firmware Updates on the left panel.
5. Select the rmware version that you wish to update to.
6. Wait for the rmware to be downloaded. The rmware update will start automatically.
7. Reboot the aircraft after the rmware update is complete.
Ensure the aircraft is connected to the computer before powering on.
The firmware update will take around 15 minutes. It is normal that the gimbal goes limp,
aircraft status indicators blink, and the aircraft reboots. Please wait patiently until the update
is complete.
Ensure the computer has access to the Internet.
Before performing an update ensure the Intelligent Flight Battery has at least 50% power and
the remote controller has at least 30% power.
Do not disconnect the aircraft from the computer during an update.
After-Sales Information
Visit https://www.dji.com/support to learn more about after-sales service policies, repair services and
support.
2018 DJI All Rights Reserved.
©
57
Page 58

DJI Support
http://www.dji.com/support
This content is subject to change.
Download the latest version from
http://www.dji.com/mavic-air
If you have any questions about this document, please
contact DJI by sending a message to
is a trademark of DJI.
MAVIC
Copyright © 2018 DJI All Rights Reserved.
DocSupport@dji.com
.
 Loading...