

Page 1
MATRICE 200 V2
Quick Start Guide
v1.0
Page 2
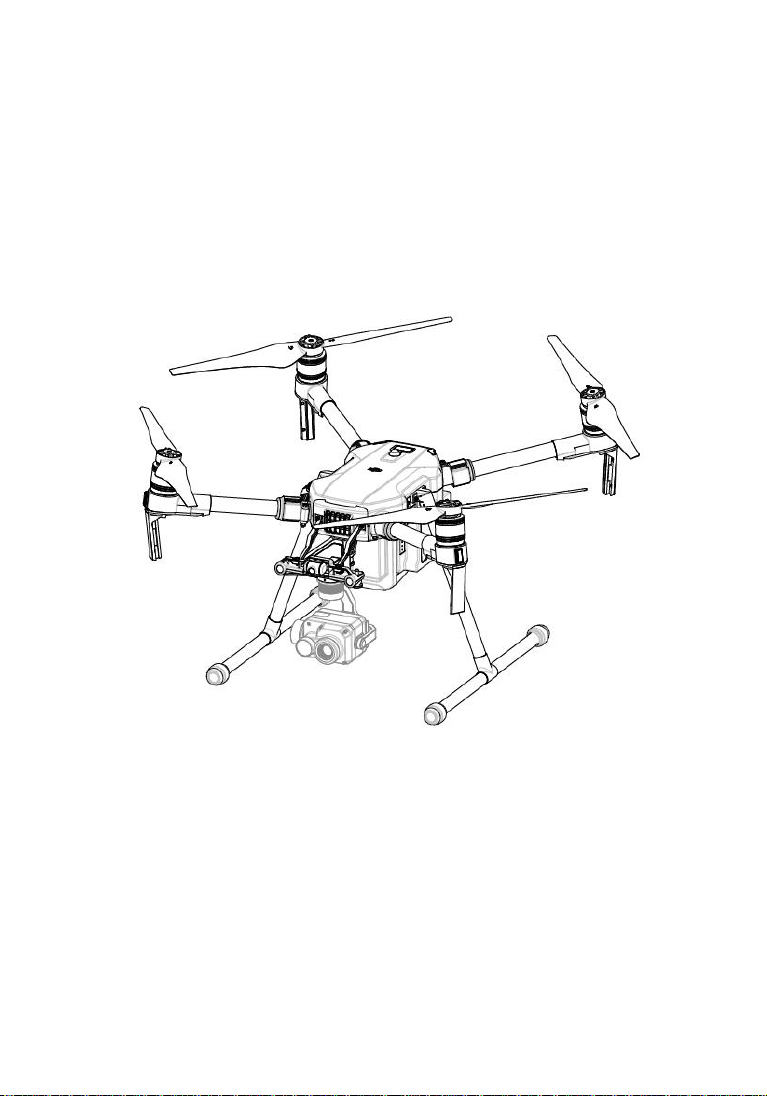
Matrice 200 V2
TM
The DJI
barometers and IMUs for maximum reliability, and smart flight features that make capturing complex shots easy. The aircraft’s visual
sensors* enable enhanced hovering precision even when flying indoors or in environments where GNSS is unavailable. The built-in
AirSense makes you aware of your surrounding airspace to ensure flight safety. Its airframe design gives it an IP43 Ingress Protection
Rating, in accordance with the global IEC 60529 standard. The mechanical design, along with quick-release landing gears and
mounted folding arms, makes it easy to transport, store, and prepare for flight. The safety beacons on both the top and the bottom of
the aircraft allow the aircraft to be identified at night or in low light conditions. An advanced power management system along with dual
batteries ensures power supply and enhances flight safety. Without a payload, the M200 has a flight t ime of up to 38 minutes with
standard batteries (TB55).
The Matrice 200 is compatible with many of DJI’s DGC2.0 connector gimbals.* This manual uses the DJI ZENMUSE
example to demonstrate the Matrice 200’s remarkable functions.
TM
MATRICE
200 V2 (M200 V2) is a powerful industrial-grade flight platform with world-class agility and speed, redundant
TM
XT 2 as an
* The Vision and Infrared Sensing Systems are affected by surrounding conditions. Read the Disclaimer and Safety Guidelines to learn more.
Maximum run-time is tested in a lab environment. Performance may vary depending on local conditions.
Gimbals can be purchased separately from the official DJI website.
DO NOT disassemble the aircraft case, otherwise, it will not be covered by the warranty.
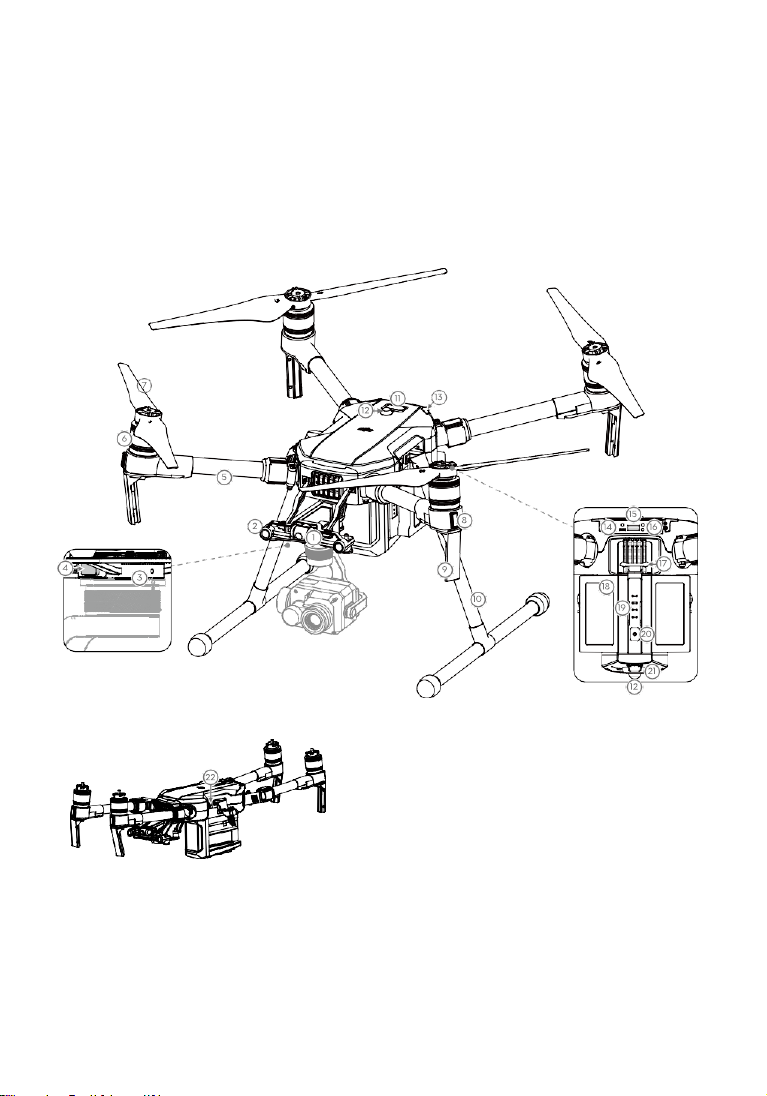
Folded
1. FPV Camera
2. Forward Vision System
3. DJI Gimbal Connector V2.0
(DGC2.0)
4. Gimbal and Camera Detach Button
5. Frame Arms
6. Motors
7. Propellers
8. ESC LEDs
9. Transmission Antennas
10. Landing Gear
11. Upward Infrared Sensor
12. Beacons
13. Aircraft Status Indicators
14. USB Mode Switch
15. USB Port
16. Linking Button and Indicator
17. Battery Remove Button
18. Intelligent Flight Batteries
19. Battery Level Indicators
20. Power Button
21. Downward Vision System
22. microSD Card Slot
Page 3
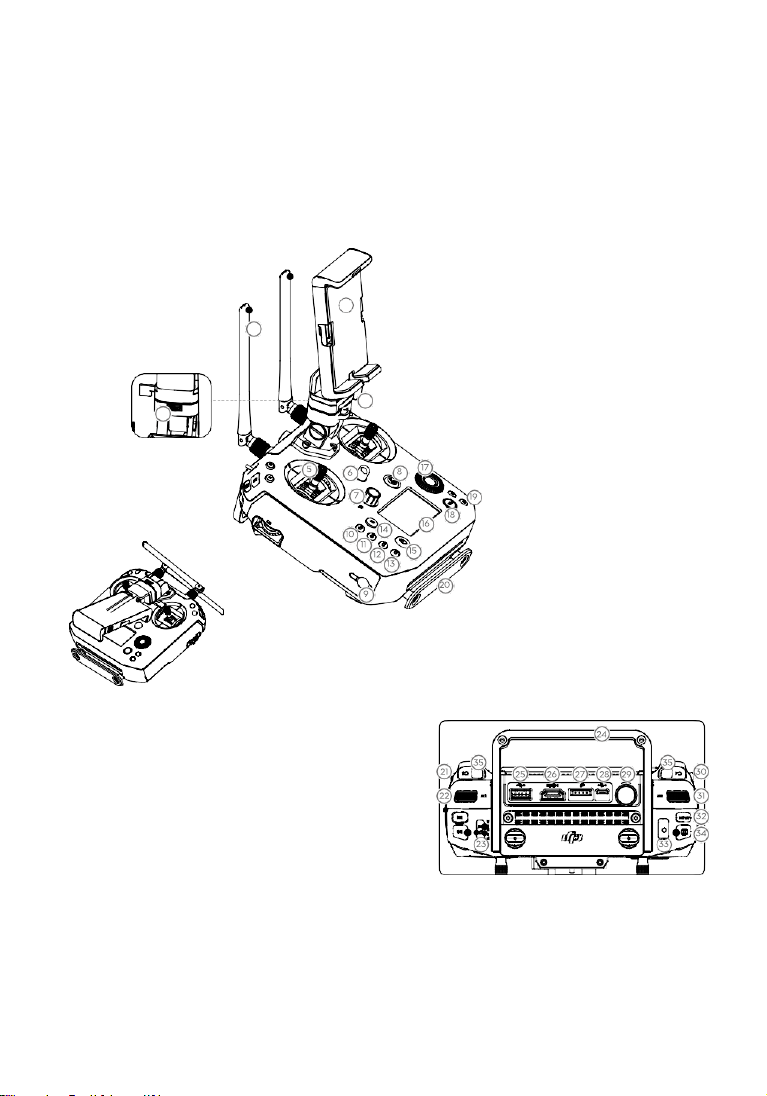
1. Mobile Device Holder
2. Antennas
3. Monitor Mounting Bracket
1
4. USB Port (Reserved Port)
5. Control Sticks
2
6. Strap Hook
7. Focal Adjustment Knob
8. Return-to-Home (RTH) Button
9. Power Port
10. EV Setting Button
3
11. Shutter Setting Button
4
12. Aperture Setting Button
13. ISO Setting Button
14. Pause Button
Cendence S Remote Controller
The Cendence
mi (7 km).* While flying the aircraft, you have a live HD view directly within the DJI Pilot app on your paired device for a precise and
responsive flying experience. Dual frequency* support makes the HD video downlink more stable. In Dual Remote Controller Mode,
two remote controllers control the aircraft and camera separately, even when they are up to 656 feet (200 m) apart.
The remote controller works with a WB37 Intelligent Battery, which can be fully charged via the charging port in about 2 hours and 24
minutes with the standard charger, or with the Intelligent Battery Charging Hub* in about 1 hour and 11 minutes. The maximum run
time of the remote controller is approximately 4 hours.*
TM
S remote controller features DJI’s OCUSYNC
TM
2.0 technology for a maximum transmission distance of up to 4.3
15. Power Button
16. Remote Control Display
17. Camera Settings Dial
18. Customizable Button Setting Menu
19. Customizable Buttons (BA-BH)
20. Support Rig
21. Left Lever
22. Left Dial (Gimbal Pitch)
23. Flight Mode Switch
24. Handle Bar
25. USB Port
(for Mobile Device Connection)
26. HDMI A Port (for Video Output)
Folded
27. CAN Bus Port (Extension Port)
28. Micro USB Port
29. SDI Port (for Video Output)
30. Right Lever
31. Right Dial (Gimbal Pan)
32. AF Button (Autofocus)
33. Record Button
34. Shutter Button
35. Customizable Buttons (C1-C4)
* The remote controller can reach its maximum transmission distance (FCC) in an unobstructed area with no electro-magnetic interference at an altitude of about
400 feet (120 meters). The actual maximum transmission distance may be less than the distance mentioned above due to interference in the operating
environment, and the actual value will fluctuate according to the strength of interference.
To comply with local regulations, the 5.8 GHz frequency is not available in some countries and regions.
For more information about Dual Remote Controller mode, please refer to the user manual.
The Charging Hub can be purchased separately from the official DJI website.
Maximum run time is estimated in a lab environment without supplying power to a smart device or monitor, for reference only.
Page 4
Using Matrice 200
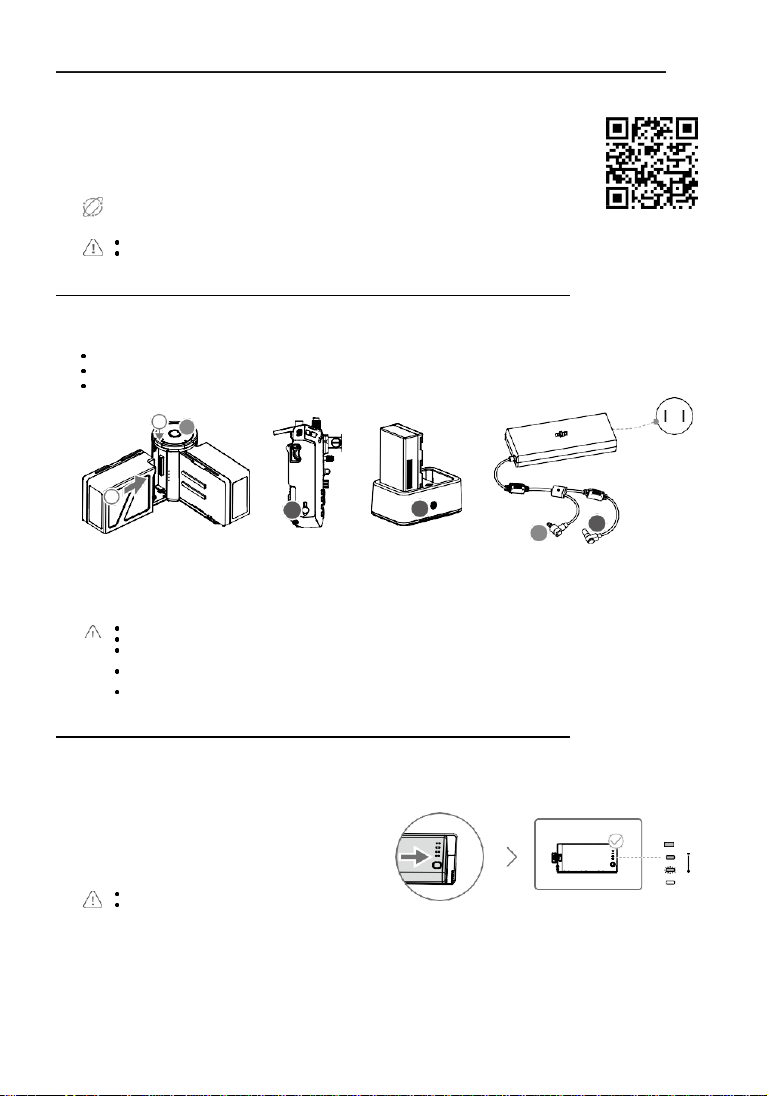
1. Downloading the DJI Pilot App
Search for DJI Pilot in Google Play Store or scan the QR code below to download the app onto
your mobile device.
First-time activation requires your DJI account and an internet connection.
Internet
DJI Pilot supports Android 4.4 or later.
If using a DJI CrystalSky
TM
Monitor, it is recommended to use the built-in DJI Pilot app.
2. Charging the Batteries
Press the release button and open the corresponding charging port cover.
Insert the Intelligent Flight Battery into the charging port to begin charging. Be
sure to press the release button when removing fully charged batteries.
1
2
Using the IN2CH Charging Hub, charging time
is approximately.
TB55: 2 hours and 33 min (two batteries)*
When charging is complete, the LED lights on the Intelligent Flight Battery will turn off, and the LED on the Charging Hub will turn solid green.
A
When charging is complete, the display on the remote controller will show 100%.
The Charging Hub will sound an alert when the battery has been fully charged. The alert can be turned on or off by toggling the switch under the
hub.
Connect the Intelligent Flight Batteries to the aircraft and power them on. If battery temperature is lower than 15° C, the system will auto heat the
batteries to maintain a temperature between 15° and 20° C.
Ensure two Intelligent Flight Batteries are charged and discharged simultaneously to prolong their service life and for a better flight experience.
Charging Time:
2 hours and
24 min*
B
B
Using the WCH2 Charging Hub,
charging time is approximately 1
hour and 11 min (one battery)*
A
3. Preparing the Remote Controller
Mounting the Remote Controller Battery
Put the battery into the Battery Slot, then slide it to the end
until you hear a click.
Press the Battery Release Button before removing the battery.
Press the Battery Level Button once to check the battery level.
DJI Pilot App
Power Outlet
100~240 V
(50Hz/60Hz)
B
*Provided charger
Low
High
Page 5

Mounting the Monitor to the Remote Controller
Ensure that Part B is
unlocked. Connect Part B
to Part A.
Lock the Mounting Bracket. Use a coin or the screwdriver
included to adjust the
tightness of the tilt axis.
Connecting the Mobile Device
Press the button to
release the clamp.
2
1
Place your mobile
device and adjust
the clamp to secure.
Connect your mobile
3
device with a USB cable.
Using the Remote Controller
The Stick Mode is set to Mode 2 by default. In Mode 2, the left stick controls the aircraft’s elevation and heading, and the right
stick controls the aircraft’s forward, backward, and lateral movements. To adjust the FPV camera, press and hold the C2 Button
and rotate the left dial.
Left Stick Right Stick FPV Camera
UP
Down
Turn Left
Turn Right
Forward
Backward
For more information about how to connect and use the remote controller, please refer to the user manual.
You can change the stick mode and customize the C1-C4 and BA-BH buttons’ functions in the DJI Pilot app.
Page 6

Mounting
4. Preparing the Aircraft
Mounting the Landing Gear
Unfolding the Aircraft
Unfold the frame arm, slide the arm lock to the end of the frame arm,
and rotate it about 90° until the silver line lies within the range of the
icon.
3
2
Mounting the Propellers
Propellers without
silver rings should
be installed on
motors without
marks.
the Gimbal and Camera
1
Press the propeller
down onto the
mounting plate and
rotate in the lock
direction until
secure.
Propellers with silver
rings should be
installed on motors
with the same color
marks.
Check that the propellers are
secure before each flight.
Press the gimbal
detach button to
remove the cover.
Make sure to press down the gimbal detach button when rotating the gimbal lock to remove the gimbal and camera. The gimbal lock should be fully
rotated when removing the gimbal for the next installation.
Align the white and red
dots and insert the
gimbal.
Rotate the gimbal lock
to the locked position.
Page 7

Mounting the Intelligent Flight Batteries
Insert a pair of batteries.
Press once to check the battery level.
Press again and hold until the batteries turn on or off.
Only use battery slot B when using one battery to supply power. In this case, the aircraft can only be powered on, but cannot take off. If
for any reason only one battery is available during flight, land the aircraft immediately and replace the batteries as soon as possible.
Make sure to press the Battery Removal button when removing the battery.
Make sure to use the included TB55 batteries. TB50 batteries are not recommended as they may reduce the flight performance.
5. Flight
Toggle the Flight
Mode switch to
P-mode, the safest
flight mode.
If using a CrystalSky Monitor, after the monitor is powered on, wait for a pop-up window that asks for a selection of USB device use, and then
Manual Takeoff
Power on the remote controller,
and aircraft.
select “DJI Pilot”. Otherwise, the app cannot be connected to the remote controller.
Always set an appropriate RTH altitude before takeoff. Refer to the Disclaimer and Safety Guidelines for more details.
OR
A
B
DJI Pilot
App
Launch the DJI
Pilot app.
Ready to Go (GPS)
Before taking off, ensure that the Aircraft Status Bar in the
DJI Pilot app reads ‘Ready to Go (GPS)’ or ‘Ready t o Go
(Vision)’ if flying indoors.
Manual Landing
Pull left stick down (slowly)
until you touch the ground.
Hold for a few seconds to
stop the motors.
High
Low
Combination Stick Command to start/stop the motors Left stick up
Return-to-Home
Press and hold to initiate the RTH procedure. Press again to cancel.
Rotating propellers can be dangerous. DO NOT start the motors in narrow spaces or
when there are people nearby.
Always keep your hands on the remote controller so long as the motor is still
spinning.
After landing, power off the aircraft before turning off the remote controller.
It is important to understand basic flight guidelines for the safety of both
you and those around you.
Refer to the Disclaimer and Safety Guidelines for more information.
(slowly) to take off
To stop the motors mid-flight, press
the RTH button while simultaneously
pulling the left stick to the bottom inner
corner. Stop motors mid-flight will
cause the aircraft to crash. The motor
can only be stopped mid-flight when
the flight controller detects critical error.
GEO Zones
Learn more:
http://flysafe.dji.com/no-fly
Page 8

Specifications
Aircraft (M200 V2)
Dimensions Unfolded, propellers and landing gears included, 883×886×398 mm
Diagonal Wheelbase 643 mm
Max Takeoff Weight 6.14 kg
Hovering Accuracy (P-mode with GPS) Vertical: ±1.64 feet (0.5 m) or ±0.33 feet (0.1 m, Downward Vision System enabled)
Max Angular Velocity Pitch: 300°/s, Yaw: 150°/s
Max Pitch Angle S-mode: 35°; P-mode: 30° (Forward Vision System enabled: 25°); A-mode: 30°
Max Ascent Speed 16.4 ft/s (5 m/s)
Max Descent Speed (vertical) 9.8 ft/s (3 m/s)
Max Speed S-mode/A-mode: 82.8 kph (51.4 mph); P-mode: 61.2 kph (38 mph)
Max Service Ceiling Above Sea Level 9842 feet (3000 m, with 1760S propellers)
Max Wind Resistance 39.4 ft/s (12 m/s)
Max Flight Time (with two TB55 batteries) 38 min (no payload), 24 min (takeoff weight: 6.14 kg)
Supported DJI Gimbals Zenmuse X4S/X5S/X7/XT/XT2/Z30
Supported Gimbal Mounting Single Gimbal, Downward
Ingress Protection Rating IP43
GNSS GPS+GLONASS
Operating Temperature -4° to 122° F (-20° to 50° C)
Remote Controller (GL900A)
Max Transmitting Distance
(unobstructed, free of interference) FCC: 5 mi (8 km); CE/MIC: 3.1 mi (5 km); SRRC: 3.1 mi (5 km)
Power Supply Extended Intelligent Battery (Model: WB37-4920mAh-7.6V)
Output Power 13 W (Without supplying power to monitor)
USB Power Supply iOS: 1 A 5.2 V (max); Android: 1.5 A 5.2 V (max)
Operating Temperature -4° to 122° F (-20° to 50° C)
Downward Vision System
Velocity Range <32.8 ft/s (10 m/s) at the height of 6.56 feet (2 m)
Altitude Range <32.8 feet (10 m)
Operating Range <32.8 feet (10 m)
Operating Environment Surfaces with clear patterns and adequate lighting (> 15 lux)
Ultrasonic Sensor Operating Range 0.33-16.4 feet (0.1-5 m)
Ultrasonic Sensor Operating Environment Non-absorbing material, rigid surface (thick indoor carpeting will reduce performance)
Forward Vision System
Obstacle Sensing Range 2.3-98.4 feet (0.7-30 m)
FOV Horizontal: 60°; Vertical: 54°
Operating Environment Surfaces with clear patterns and adequate lighting (> 15 lux)
Upward Infrared Sensing System
Obstacle Sensing Range 0-16.4 feet (0-5 m)
FOV ±5°
Operating Environment Large, diffuse and reflective obstacles (reflectivity >10%)
Intelligent Flight Battery (TB55-7660mAh-22.8V)
Capacity 7660 mAh
Voltage 22.8 V
Battery Type LiPo 6S
Energy 174.6 Wh
Net Weight (Single One) Approx. 885 g
Operating Temperature -4° to 122° F (-20° to 50° C)
Charging Temperature 41° to 104° F (5° to 40° C)
Max Charging Power 180 W
Charger (Model: IN2C180)
Voltage 26.1 V
Rated Power 180 W
Charging Hub (Model: IN2CH)
Input Voltage 26.1 V
Input Current 6.9 A
Download the latest version from
http://www.dji.com/matrice-200-series-v2
Folded, propellers and landing gears excluded, 722×282×242 mm
Horizontal: ±4.92 feet (1.5 m) or ±0.98 feet (0.3 m, Downward Vision System enabled)
DJI incorporates HDMI
The terms HDMI and HDMI High-Definition Multimedia Interface, and the
HDMI Logo are trademarks or registered trademarks of HDMI Licensing
LLC in the United States and other countries.
TM
technology.
MATRICE and DJI are trademarks of DJI.
Copyright © 2017 DJI All Rights Reserved.
※ This content is subject to change without prior notice.
Printed in China.
Page 9

GL900A
Page 10

GL900A
10mm
KCC Warning Message
“해당무선설비는 운용 중 전파혼신 가능성이 있으므로 인명안전과 관련된 서비스는 할 수
없습니다.”
“해당 무선설비는 운용 중 전파혼신 가능성이 있음”
NCC Warning Message
低功率電波輻射性電機管理辦法
第十二條 經型式認證合格之低功率射頻電機,非經許可,公司、商號或使用者均不得擅自變
更頻率、加大功率或變更原設計之特性及功能。
第十四條 低功率射頻電機之使用不得影響飛航安全及干擾合法通信;經發現有干擾現象時,
應改善至無干擾時方得繼續使用。前項合法通信,指依電信法規定作業之無線電通信。低功率
射頻電機須忍受合法通信或工業、科學及醫療用電波輻射性電機設備之干擾。
Page 11

EU Compliance Statement: SZ DJI TECHNOLOGY CO., LTD. hereby declares that this device is in
compliance with the essential requirements and other relevant provisions of the Directive
2014/53/EU.
A copy of the EU Declaration of Conformity is available online at www.dji.com/euro-compliance
EU contact address: DJI GmbH, Industriestrasse 12, 97618, Niederlauer, Germany
Declaración de cumplimiento UE: SZ DJI TECHNOLOGY CO., LTD. por la presente declara que este
dispositivo cumple los requisitos básicos y el resto de provisiones relevantes de la Directiva
2014/53/EU.
Hay disponible online una copia de la Declaración de conformidad UE en www.dji.com/eurocompliance
Dirección de contacto de la UE: DJI GmbH, Industriestrasse 12, 97618, Niederlauer, Germany
EU-verklaring van overeenstemming: SZ DJI TECHNOLOGY CO., LTD. verklaart hierbij dat dit apparaat
voldoet aan de essentiële vereisten en andere relevante bepalingen van Richtlijn 2014/53/EU.
De EU-verklaring van overeenstemming is online beschikbaar op www.dji.com/euro-compliance
Contactadres EU: DJI GmbH, Industriestrasse 12, 97618, Niederlauer, Germany
Declaração de conformidade da UE: A SZ DJI TECHNOLOGY CO., LTD. declara, através deste
documento, que este dispositivo está em conformidade com os requisitos essenciais e outras
disposições relevantes da Diretiva 2014/53/EU.
Existe uma cópia da Declaração de conformidade da UE disponível online em www.dji.com/eurocompliance
Endereço de contacto na UE: DJI GmbH, Industriestrasse 12, 97618, Niederlauer, Germany
Dichiarazione di conformità UE: SZ DJI TECHNOLOGY CO., LTD. dichiara che il presente dispositivo è
conforme ai requisiti essenziali e alle altre disposizioni rilevanti della direttiva 2014/53/EU.
Una copia della dichiarazione di conformità UE è disponibile online all'indirizzo Web
www.dji.com/euro-compliance
Indirizzo di contatto UE: DJI GmbH, Industriestrasse 12, 97618, Niederlauer, Germany
Déclaration de conformité UE : Par la présente, SZ DJI TECHNOLOGY CO., LTD déclare que cet
appareil est conforme aux principales exigences et autres clauses pertinentes de la directive
européenne 2014/53/EU.
Une copie de la déclaration de conformité UE est disponible sur le site www.dji.com/euro-compliance
Adresse de contact pour l'UE : DJI GmbH, Industriestrasse 12, 97618, Niederlauer, Germany
EU-Compliance: Hiermit erklärt SZ DJI TECHNOLOGY CO., LTD., dass dieses Gerät den wesentlichen
Anforderungen und anderen einschlägigen Bestimmungen der EU-Richtlinie 2014/53/EU entspricht.
Eine Kopie der EU-Konformitätserklärung finden Sie online auf www.dji.com/euro-compliance.
Kontaktadresse innerhalb der EU: DJI GmbH, Industriestrasse 12, 97618, Niederlauer, Germany
Page 12

CAUTION: RISK OF EXPLOSION IF BATTERY IS REPLACED BY AN INCORRECT TYPE. DISPOSE OF USED
BATTERIES ACCORDING TO THE INSTRUCTIONS
Environmentally friendly disposal
Old electrical appliances must not be disposed of together with the residual waste, but
have to be disposed of separately. The disposal at the communal collecting point via
private persons is for free. The owner of old appliances is responsible to bring the
appliances to these collecting points or to similar collection points. With this little
personal effort, you contribute to recycle valuable raw materials and the treatment of
toxic substances.
Umweltfreundliche Entsorgung
Elektro-Altgeräte dürfen nicht mit gewöhnlichem Abfall entsorgt werden und müssen
separat entsorgt werden. Die Entsorgung an kommunalen Sammelstellen ist für
Privatpersonen kostenlos. Die Eigentümer der Altgeräte sind für den Transport zu den
Sammelstellen verantwortlich. Durch diesen geringen Aufwand können Sie zur
Wiederverwertung von wertvollen Rohmaterialien beitragen und dafür sorgen, dass
umweltschädliche und giftige Substanzen ordnungsgemäß unschädlich gemacht werden.
Tratamiento de residuos responsable con el medio ambiente
Los aparatos eléctricos viejos no pueden desecharse junto con los residuos orgánicos, sino
que deben ser desechados por separado. Existen puntos limpios donde los ciudadanos
pueden dejar estos aparatos gratis. El propietario de los aparatos viejos es responsable
de llevarlos a estos puntos limpios o similares puntos de recogida. Con este pequeño
esfuerzo estás contribuyendo a reciclar valiosas materias primas y al tratamiento de
residuos tóxicos.
Mise au rebut écologique
Les appareils électriques usagés ne doivent pas être éliminés avec les déchets résiduels. Ils
doivent être éliminés séparément. La mise au rebut au point de collecte municipal par
l'intermédiaire de particuliers est gratuite. Il incombe au propriétaire des appareils
usagés de les apporter à ces points de collecte ou à des points de collecte similaires. Avec
ce petit effort personnel, vous contribuez au recyclage de matières premières précieuses
et au traitement des substances toxiques.
Smaltimento ecologico
I vecchi dispositivi elettrici non devono essere smaltiti insieme ai rifiuti residui, ma devono
essere smaltiti separatamente. Lo smaltimento da parte di soggetti privati presso i punti
di raccolta pubblici è gratis. È responsabilità del proprietario dei vecchi dispositivi portarli
presso tali punti di raccolta o punti di raccolta analoghi. Grazie a questo piccolo impegno
personale contribuirete al riciclo di materie prime preziose e al corretto trattamento di
sostanze tossiche.
Page 13

Milieuvriendelijk afvoeren
Oude elektrische apparaten mogen niet worden weggegooid samen met het restafval,
maar moeten afzonderlijk worden afgevoerd. Afvoeren via het gemeentelijke
inzamelpunt is gratis voor particulieren. De eigenaar van oude toestellen is
verantwoordelijk voor het inleveren van de apparaten op deze of vergelijkbare
inzamelpunten. Met deze kleine persoonlijke inspanning lever je een bijdrage aan de
recycling van waardevolle grondstoffen en de verwerking van giftige stoffen.
Eliminação ecológica
Os aparelhos elétricos antigos não podem ser eliminados juntamente com os materiais
residuais. Têm de ser eliminados separadamente. A eliminação no ponto de recolha
público através de entidades particulares é gratuita. É da responsabilidade do
proprietário de aparelhos antigos levá-los a estes pontos de recolha ou a pontos de
recolha semelhantes. Com este pequeno esforço pessoal, contribui para a reciclagem de
matérias-primas úteis e para o tratamento de substâncias tóxicas.
 Loading...