

Page 1
DJI GOGGLES
User Guide
2017.05
V1.0
Page 2
Searching for Keywords
Search for keywords such as “battery” and “install” to nd a topic. If you are using Adobe Acrobat
Reader to read this document, press Ctrl+F on Windows or Command+F on Mac to begin a search.
Navigating to a Topic
View a complete list of topics in the table of contents. Click on a topic to navigate to that section.
Printing this Document
This document supports high resolution printing.
Using This Manual
Legends
Warning Important Hints and Tips Reference
Read Before First Usage
Please read the following documents before using the DJITM Goggles:
1. DJI Goggles In the Box
2. DJI Goggles Disclaimer and Safety Guidelines
3. DJI Goggles Quick Start Guide
4. DJI Goggles User Manual
We recommend you check that you have all of the included parts listed in In the Box. Please watch
all the tutorial videos on the ofcial DJI website and read the disclaimer to understand your legal
rights and responsibilities. Prepare for your rst usage by reviewing the Quick Start Guide and refer
to the User Manual for more details. If you have any questions or problems during the installation,
maintenance or use of this product, please contact DJI or a DJI authorized dealer.
Video Tutorials
Please watch the tutorial videos in the link below, which demonstrate how to use the DJI Goggles
safely:
http://www.dji.com/dji-goggles/info#video
Download the DJI Assistant 2
Download DJI ASSISTANTTM 2 at
http://www.dji.com/dji-goggles/info#downloads
DJI Assistant 2 supports Windows 7 (or later) or OS X 10.11 (or later).
2017 DJI All Rights Reserved.
2
©
Page 3

Contents
Using This Manual
Legends
Read Before First Usage
Video Tutorials
Download the DJI Assistant 2
Contents
Product Prole
Introduction
At a Glance
Installation and Wearing
Usage
Operating Control
Connection
Main Screen
Controlling the Aircraft
Video Play
Charging the Goggles
Upgrading Firmware
DJI Assistant 2
DJI GO 4 App
2
2
2
2
2
3
4
4
4
5
6
6
7
11
13
14
15
16
16
16
Cleaning and Maintenance
Cleaning the Goggles
Maintenance of Lenses
Specications
16
16
17
17
2017 DJI All Rights Reserved.
©
3
Page 4
Product Prole
Introduction
DJI Goggles are equipped with high-performance displays and an ultra-low latency video
downlink for use with DJI aircraft, giving you a real-time aerial FPV (First Person View) experience.
Goggles can also be used to play HD videos, bringing you an immersive high-denition viewing
experience.
Their intuitive and functional design makes them easy to operate using only your right hand.
Goggles support head tracking, allowing aircraft and gimbal to be controlled using head
movements. With DJI Intelligent Flight Modes, a whole new way of ying is introduced.
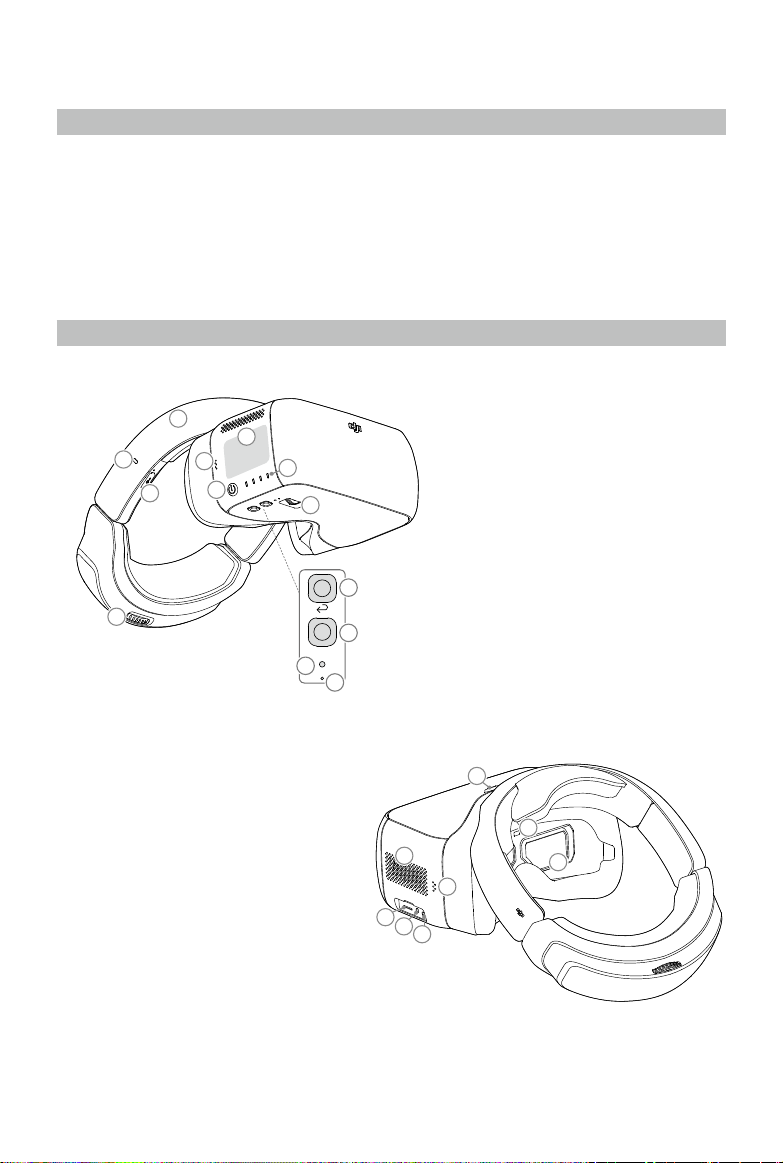
At a Glance
2
3
5
14. Lens
15. Proximity Sensor
16. Headband Buckle
17. Heat Vent
18. Micro SD Card Slot
19. 3.5 mm Audio Port
20. HDMI Type-D Port
21. Speaker
6
4
7
1. Touch Panel
1
8
13
9
10
Fn
11
2. Headband
3. Charging Status Indicator
4. Micro USB Port
5. Headband Knob
6. Speaker
7. Power Button
8. Battery Level Indicators
9. Back Button
10. Function Button
11. Link Button
12. Linking Status Indicator
13. IPD (Interpupillary Distance) Knob
12
16
15
17
21
18
19
20
14
2017 DJI All Rights Reserved.
4
©
Page 5
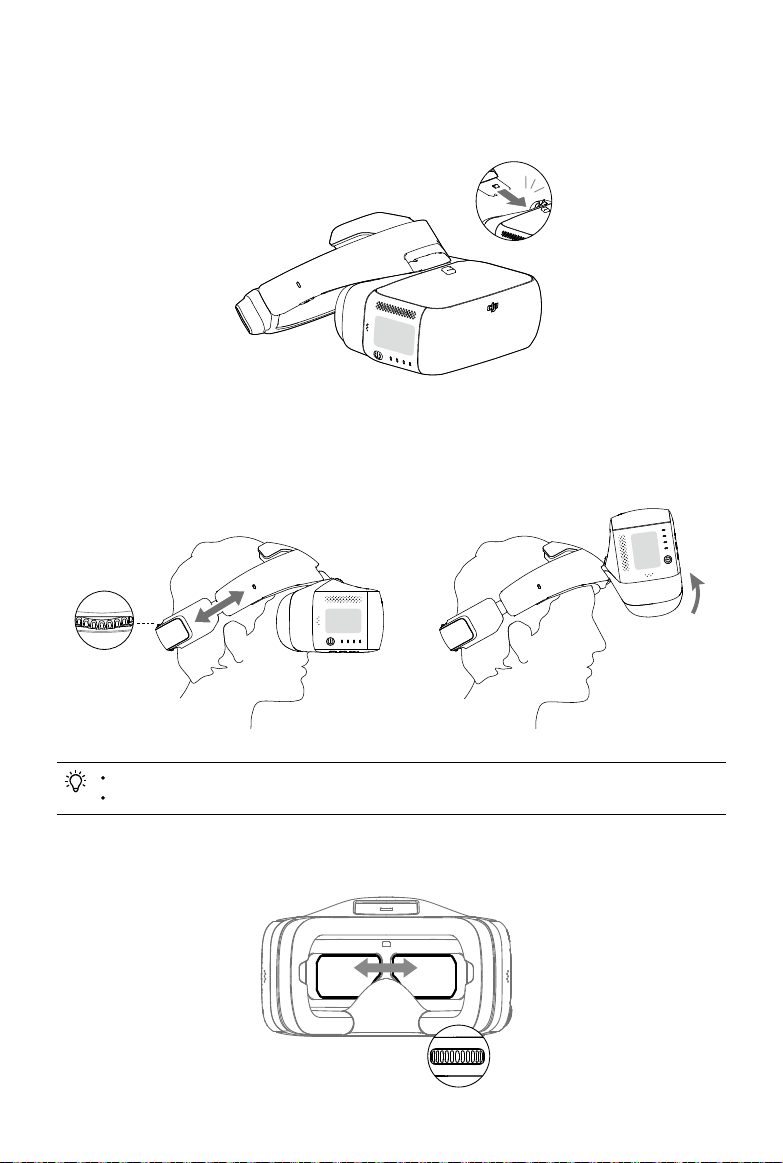
Installation and Wearing
1. Insert the Headband into the slot above the Goggles body until you hear a click. Now check that
it has been securely fastened.
Click
Press the Headband Buckle and move it in the opposite direction to release the Headband.
2. Align the lenses over your eyes and pull the Headband down. Adjust the Headband Knob until
the Goggles t snugly and comfortably on your face and head.
Goggles can be worn over glasses.
When putting the Goggles on, you can ip the Goggles body to see the world outside.
3. Turn the IPD Knob to adjust the distance between the lenses until the images are properly
aligned.
2017 DJI All Rights Reserved.
©
5
Page 6
Usage
Operating Control
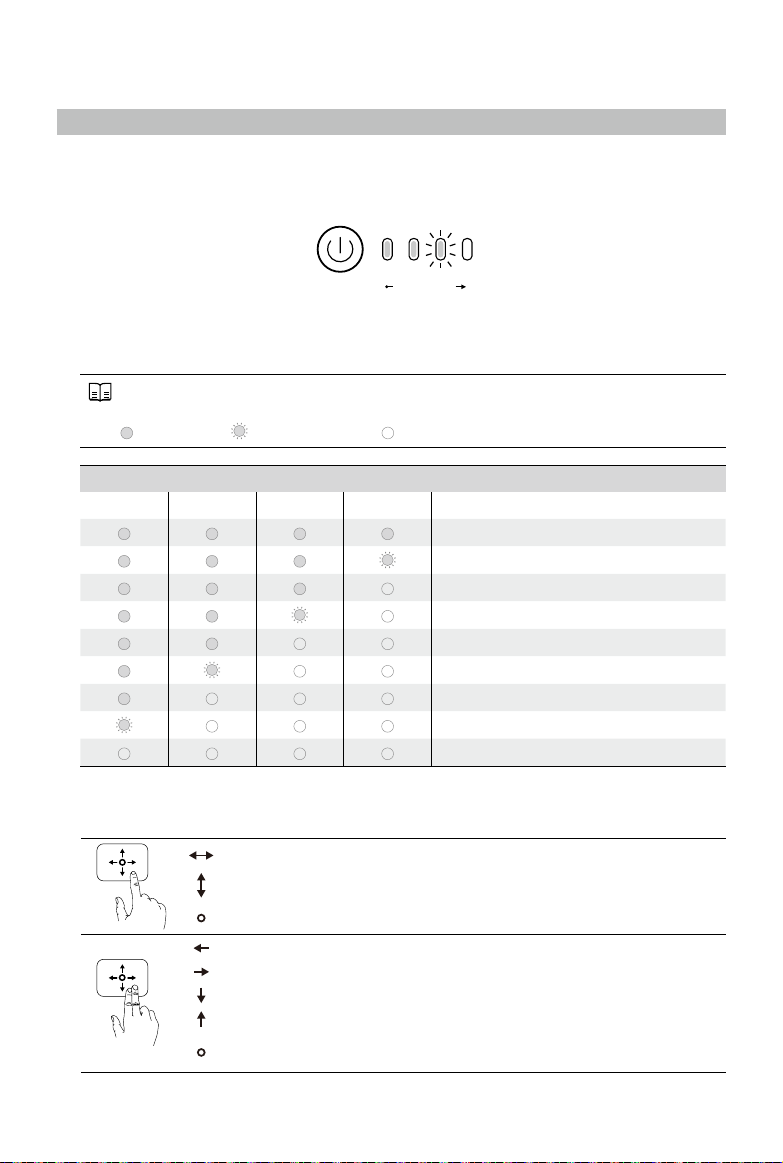
[1] Power Button
Press the power button once, then press it again and hold to turn the Goggles on/off. Battery
level indicators will display the current battery level.
Battery Level
HighLow
[2] Battery Level Indicators
When the battery is powered off, press the power button once to light up the battery level
indicators to display the current battery level.
The battery level indicators will also show the current battery level during charging and
discharging. The indicators are dened below:
LED on LED ashing LED off
Battery Level Indicators
LED1 LED2 LED3 LED4 Battery Level
87.5%~100%
75%~87.5%
62.5%~75%
50%~62.5%
37.5%~50%
25%~37.5%
12.5%~25%
0%~12.5%
=0%
[3] Touch Panel
Use the touch panel with your right hand to control on-screen operations.
Browse the menu and swipe right/left
Browse the menu and swipe up/down
Tap to conrm
Lock the touch panel to make it non-functional
Unlock the touch panel
Enter shortcut menu
Exit shortcut menu
Tap and hold to screenshot, and the image will be saved in the Micro SD
card of the Goggles.*
* Please ensure the Micro SD card is inserted into the Goggles.
2017 DJI All Rights Reserved.
6
©
Page 7

DJI Goggles User Manual
[4] Charging Status Indicator
This indicates the current charging status. The LED will be solid red, yellow or green to reect
low, medium, and high power levels respectively.
Blinking Red Solid Red Solid Yellow Solid Green
Headband abnormal 0~29% 30~89% 90~100%
[5] Back Button
Press this to return to the previous menu, or exit the current Intelligent Flight Mode.
[6] Function Button
For aircraft that support focus (e.g. MAVIC
TM
Pro, PHANTOMTM 4 Pro), press this to show the
focus cursor on the display screen and swipe forward and backward on the touch panel with
one nger to zoom in or out. Move your head then tap the touch panel to dene the focus point.
The Goggles support up to 4x zoom on the Mavic Pro.
Back Button
Fn
Function Button
[7] Link Button
When connected with the aircraft by OCUSYNC
TM
, press the link button with an appropriate tool
to start linking.
[8] Linking Status Indicator
Indicates the linking status of the Goggles and the aircraft. The indicator will be solid red while
linking and will go solid green when linked.
Connection
Goggles support a wide range of DJI aircraft and different uses. Please follow the steps below to
connect.
Mavic Pro
With OCUSYNC, the Goggles can be connected to the Mavic Pro wirelessly.
Toggle the control mode switch of the Mavic Pro to RC mode before linking.
Ensure that the DJI GOTM 4 app is updated to the latest version.
2017 DJI All Rights Reserved.
©
7
Page 8

DJI Goggles User Manual
Standard Mode
Standard Mode is suitable for both single and dual operator aircraft control. In this mode, the pilot
using the remote controller can focus on ight, while the Goggles operator can view the environment
in real-time FPV for more intuitive control. By moving their head, the Goggles wearer can control
aircraft orientation or gimbal movement.
Goggles
√ Live View
Remote Controller
DJI GO 4 App
√ Live View
√ Intelligent Flight Mode
√ Head Tracking
√ Intelligent Flight Mode
If the remote controller and Goggles are operated by the same user, a spotter who is able
to give instructions and warnings is required to ensure safe ying.
In Head Tracking Flight, aircraft yaw can be controlled by both the Goggles and the
remote controller. With Head Tracking Gimbal, the gimbal will only move with the
movement of the Goggles.
Linking Method
1. Ensure both the aircraft and the remote controller are powered on and linked.
2. Put on the Goggles and power on.
3. Press the link button on Goggles or use the touch panel to enter “Tools > Settings > Linking
Settings”, select “Quick Linking” and conrm. The Goggles linking status indicator will go solid
red on standby for linking.
4. Press the link button on the Mavic Pro. Once linked, the Goggles linking status indicator will turn
solid green.
2017 DJI All Rights Reserved.
8
©
Page 9

DJI Goggles User Manual
Coach Mode
Coach Mode is suitable for dual operator aircraft control. In this mode, the pilot using the remote
controller can focus on ight, while the Goggles operator with a slave remote controller can view the
environment in real-time FPV for more intuitive control.
By moving their head, the Goggles wearer can control aircraft orientation or gimbal movement. They
can also control the aircraft with the secondary slave remote controller that is inferior to the priority
control of the primary remote controller. Please note that only the DJI GO 4 app connected with the
primary remote controller and the Goggles can display the live view.
Goggles (secondary)
√ Live View
Remote Controller (primary)
DJI GO 4 App
√ Live View
√ Intelligent Flight Mode
√ Head Tracking
√ Intelligent Flight Mode
Remote Controller (secondary slave)
+2 s
Can't switch ight modes.
No live view, only support settings.
Only the primary remote controller can switch ight modes.
If two operators control the aircraft simultaneously, the commands from the primary
remote controller takes priority of aircraft movements (control sticks and gimbal dial). The
secondary slave remote controller only works if the primary remote controller is not being
operated for more than two seconds, whereas the primary remote controller can always
override it to regain control. The two remote controllers follow the same priority for other
commands.
Linking Method
1. Please ensure that both the aircraft and the primary remote controller are powered on and linked
together.
2. Put on the Goggles and power on.
3. Use the touch panel to enter “Tools > Settings > Linking Settings”.
4. Select “Advanced Linking > Connect one set of Goggles” and confirm. The Goggles linking
status indicator will go solid red to wait for linking.
5. Press the Link button on the Mavic Pro. Once linked, the linking status indicator will turn solid
green.
6. Select “Connect Remote Controller” and conrm in Goggles.
7. Power on the secondary slave remote controller and connect it with the mobile device.
8. Launch the DJI GO 4 app and enter the camera view. Press
, then select “Remote Controller
Linking > Secondary Remote Controller,” for successful linking in a few seconds.
2017 DJI All Rights Reserved.
©
9
Page 10

DJI Goggles User Manual
Multiuser Mode
Multiuser Mode is suitable for dual (or more) aircraft operator control. In this mode, the Goggles
operators with a slave remote controller can view the environment in real-time FPV for more intuitive
control. Please note that only the Goggles will display live view and that the primary Goggles only
support head tracking.
Remote
Controller
(primary slave)
No live view,
only support
settings.
Goggles (primary)
√ Live View
√ Head Tracking
√ Intelligent Flight
Mode
Goggles (secondary)
√ Live View
√ Intelligent Flight Mode
Head Tracking
×
Remote Controller
(secondary slave)
+2 s
Can't switch ight
modes.
No live view, only
support settings.
If the remote controller and Goggles are operated by one person but for two users, a
spotter who is able to instruct and give warning is required for safe ying.
Only the primary remote controller can switch ight modes.
Secondary Goggles do not support head tracking.
If two operators control the aircraft simultaneously, the commands from the primary slave
remote controller takes priority of aircraft movements (control sticks and gimbal dial). The
secondary slave remote controller only works if the primary slave remote controller is not
being operated for more than two seconds, whereas the primary slave remote controller
can always override it to regain control. The two remote controllers follow the same priority
for other commands.
Linking Method
1. Put on the Primary Goggles and power on.
2. Use the touch panel to enter “Tools > Settings > Linking Settings”.
3. Select “Advanced Linking > Connect two sets of Goggles > Primary/Remote Controller” and
conrm. The linking status indicator will go solid red to wait for linking.
4. Press the Link button on the Mavic Pro. Once linked, the linking status indicator will turn solid green.
5. Select whether to connect with the remote controller in the Goggles. Next, power on the primary
slave remote controller and connect it with a mobile device, if required.
6. Launch the DJI GO 4 app and enter the camera view. Press
, then select “Remote Controller
Linking > Primary Remote Controller”. They will link after a few seconds.
7. Repeat the above steps for the secondary pair of Goggles and the slave remote controller.
Please note that you must select “Advanced Linking > Connect two sets of Goggles >
Secondary/Remote Controller” in the Goggles, and then select “Remote Controller Linking >
Secondary Remote Controller” on the mobile device.
2017 DJI All Rights Reserved.
10
©
Page 11

DJI Goggles User Manual
s
VPS 2.5
10˚
m
LIVEVIEW
ISO
F
S
Other DJI Aircraft
The Goggles can also support other DJI aircraft. Ensure that the aircraft is linked with the remote
controller and then connect the Goggles to the Micro USB port or the HDMI port of the remote
controller.
INSPIRETM 2*
PHANTOM 4 Series**
INSPIRE Series
PHANTOM 4 PRO+
PHANTOM 4 ADVANCED+
Micro USB cable HDMI cable
Support Head Tracking, Intelligent Flight
Modes, and Live view.
* For the Inspire 2, if the Goggles are connected with the remote controller via the USB cable, only live view and somatic
control of the focus is supported.
** Please note that the Phantom 4 Pro+/Advanced+ remote controller must have the latest rmware update.
Support only Live view. Aircraft operation is
not supported.
When using an HDMI cable, you can secure the wire clip to the left side of the Goggles
headband, which allows the HDMI cable to pass through the clip recess down your back.
Main Screen
The main screen of the Goggles and functions are described as follows:
1 2 3 4 5 6 7 8 9
IN-FlIGHT (GPS)
FLIGHT MODE GPS
m
VS 2.5
m s
16
HS 10
D
H
200
300
M
m
12
AUTO 720P60
2.8EV0.0
02:36
100%
Vibrations Detected in
Gimbal Pitch Axis
60%
10
11
12
13
1415
2017 DJI All Rights Reserved.
©
11
Page 12

DJI Goggles User Manual
1. Aircraft Status
Indicates aircraft ight status.
2. Flight Mode
Indicates current ight mode.
3. Obstacle Detection Status
Red bars are displayed when obstacles are close to the aircraft. Orange bars are displayed
when obstacles are in detection range.
4. GPS Status
Indicates GPS signal strength.
5. Connection Status
Indicates the connection status of the aircraft and Goggles. Green indicates a healthy signal
connection, yellow indicates a weak or unstable signal connection, and red indicates a
disconnection. The Goggles will automatically attempt to reconnect if disconnected.
6. Touch Panel Lock Status
Indicates the lock status of the touch panel. A locked touch panel will be unresponsive to touch
to avoid accidental control. Swipe forward with two ngers to unlock it.
7. Flight Time
Shows the ight time of the aircraft.
8. Aircraft Battery Level
Shows the current battery level of the Intelligent Flight Battery.
9. Goggles Battery Level
Shows the current battery level of the Goggles.
10. Prompt Message
Shows warning messages. Swipe up or down to select and tap to delete prompts.
11. Intelligent Flight Modes
Tap to select TapFly, ActiveTrack, Terrain Follow, Tripod, and other intelligent ight modes.
12. Tools
Tap to set the settings of the Goggles and select Auto Takeoff/Landing, HDMI video playback,
or ight photos/videos playback.
13. Camera Settings/Shoot/Record Button
Tap to set the ISO, shutter, aperture, and auto exposure values of the camera.
Swipe left or right to switch between Shoot and Record mode. Tap to shoot photos or start/stop
recording video.
14. Camera Parameters and Live View Mode*
Shows the setting parameters of the camera and Live View Mode.
15. Flight Attitude
The triangle indicates the direction the aircraft is facing.
The horizontal level indicates aircraft roll angle.
The scale indicates the tilt angle of the gimbal.
The arc beside the triangle indicates the yaw angle of the gimbal when Head Tracking Gimbal
is enabled.
* Live View Mode of the Goggles interacts with the aircraft’s video recording.
When Live View Mode is in HD mode, video recording automatically switches to 1080p30. When in smooth mode, video
recording automatically switches to 1080p60.
If you change the video recording mode of the aircraft, the live view of Goggles will preferentially synchronize with the
matching format (1080p30 HD or 720p60 smooth mode). Otherwise, it will adjust Live View Mode to 720p30.
2017 DJI All Rights Reserved.
12
©
Page 13

DJI Goggles User Manual
16. Flight Telemetry
Flight Telemetry is the horizontal/vertical distance between the aircraft and the Home Point as
well as the movement speed across the horizontal/vertical distance of the aircraft. When the
aircraft is close to the ground, the altitude will be displayed.
Controlling the Aircraft
The functional support list of the Goggles when connected with different aircraft is shown below.*
Mavic Pro
Head Tracking Flight √ √ × × ×
Head Tracking Gimbal √ √ × × ×
Focus √ √ × √ ×
Auto Takeoff / Return-to-Home √ √ √ × ×
TapFly √ √ √ × ×
ActiveTrack √ √ √ × ×
Terrain Follow √ √ √ × ×
Tripod √ √ × × ×
Cinematic √ × × × ×
Fixed Wing √ × × × ×
* Some functions will be supported later, please pay attention to future updates.
When linked to the Mavic Pro, the remote controller can be used to control the Goggles. 5D
button = Touch Panel; C1 button = Function button; C2 button = Back button. Press the C1
and C2 buttons together to enter the shortcut menu, and press the C2 button to exit. These
remote controller buttons will be used to control the Goggles and their original function will
be disabled. Please y with caution.
Phantom 4 Pro/
Advanced Series
Phantom 4 Inspire 2 Inspire 1 Series
Intelligent Flight Modes
Goggles support DJI Intelligent Flight Modes such as TapFly, ActiveTrack, Terrain Follow, Tripod,
Fixed Wing and more. Please refer to the aircraft user manual for further details.
Use the touch panel to enter “Intelligent Flight Mode” and select the corresponding button to enable
the desired mode. Enable TapFly, ActiveTrack or Fixed Wing in the Goggles as follows:
1. TapFly
a) Use the touch panel to enter “Intelligent Flight Mode > TapFly”.
b) Move your head to control the cursor in the Goggles and then tap the touch panel to conrm
the target direction and wait for the
c) Tap again to conrm the selection and the aircraft will y in that direction.
d) Press the back button on the Goggles to exit the current target direction or TapFly.
2. ActiveTrack
a) Use the touch panel to enter “Intelligent Flight Mode > ActiveTrack”.
b) Move your head to control the cursor in the Goggles and then tap the touch panel to select
the target subject. If the subject is not automatically recognized, move your head from the
upper left corner to the lower right corner to drag a box around it.
The box will turn green when tracking is in progress. If the box turns red, the object could not
be identied and you should try again.
c) Tap again to conrm the selection and the aircraft will track the target subject.
d) Press the back button on the Goggles to exit the current target subject or ActiveTrack.
icon to appear.
2017 DJI All Rights Reserved.
©
13
Page 14

DJI Goggles User Manual
Local Storage
Demo Videos
LIVEVIEW
ISO
F
S
3. Fixed Wing
a) Use the touch panel to enter “Intelligent Flight Mode > Fixed Wing”.
b) When the forward speed of the aircraft is more than 3 m/s, you can select to enter a xed
wing cruise option. Press the function button or tap the touch panel on the Goggles to enter
Fixed Wing Mode.
c) Press the back button on the Goggles to exit Fixed Wing Mode.
Shortcut Menu
Swipe downward with two ngers on the touch panel to enter the shortcut menu. Move the cursor
and tap the touch panel to turn functions on/off.
The Goggles support head tracking, which allows the aircraft to follow head movements:
1. Head Tracking Flight
Move your head to control the aircraft and the gimbal. Turn left and right to control the yaw of the
aircraft, and turn up and down to control the pitch of the gimbal (-90° to 30°).
2. Head Tracking Gimbal
Move your head to control the gimbal. Turn left and right to control the yaw of the gimbal (-30° to
30°), and turn up and down to control the pitch of the gimbal (-90° to 30°).
3. Reset Motion Control
Set the gimbal to the center position or simulate the yaw stick in the mid-point of the remote
controller. Head tracking will center on this point.
You can set the head tracking sensitivity in Tools setting.
When Head Tracking is enabled (especially Head Tracking Flight), the aircraft yaw or
gimbal movement will be affected. Please y with caution and pay attention to control with
the remote controller.
It is recommended you use a 720p60 high frame rate format to ensure a smooth live view
during fast movements.
The functions in the shortcut menu are disabled when using TapFly and ActiveTrack.
Only Head Tracking Flight can be enabled when using Fixed Wing Mode. This head
tracking function should be enabled before entering the xed wing cruise option and your
head is best kept stable at that time.
Video Play
Watch ight videos or HD video content through the Goggles for an immersive viewing experience.
Flight Photos and Videos
Select “Tools > Playback” to enter the playback page for ight photos and videos, or demo videos.
2017 DJI All Rights Reserved.
14
©
IN-FlIGHT (GPS)
FLIGHT MODE GPS
m
VPS 2.5
m s
VS 2.5
m s
HS 10
M
200
D
m
H
300
12
Aircraft Storage
AUTO 720P60
2.8EV0.0
30
02:36
100%
60%
Page 15

DJI Goggles User Manual
Local Storage
Remove the Micro SD card from the aircraft and insert it into the Micro SD Card slot on the Goggles
and then select “Local Storage”.
Aircraft Storage
Select “Aircraft Storage” to preview images stored on the aircraft. When you are browsing photos/
videos, you can swipe up/down to download or delete them.
Playback is only supported by Mavic Pro and Phantom 4 Pro/Advanced series aircraft.
Please ensure the Micro SD card is inserted into the Goggles when downloading photos/
videos. After that, you can browse them in "Local Storage".
When using the Goggles with the Mavic Pro, if a user plays the video from aircraft storage
instead of having a live view, then this video will be displayed on all devices synchronously.
DO NOT play aircraft storage videos during ight to ensure safety.
Video Play
Connect a video source to the Goggles with an HDMI cable and select “Tools > HDMI Input” to
view in HD. You can set the brightness, volume, and zoom.
Charging the Goggles
1. Connect the battery charger to a power outlet (100-240 V, 50/60 Hz).
2. With the Goggles powered off, connect the charging port on the headband to the charger with
the Micro USB cable included.
3. The charging status indicator will go solid red, yellow, and green in that order when charging.
The battery level indicators will blink green, indicating current battery levels.
4. The battery is fully charged when the charging status indicator or battery level indicators turn off.
Disconnect the Goggles from the charger.
Battery Level Indicators While Charging
LED1 LED2 LED3 LED4 Battery Level
0%~25%
25%~50%
50%~75%
75%~100%
Fully Charged
2017 DJI All Rights Reserved.
©
15
Page 16

DO NOT charge the Goggles when it is powered on to ensure safety.
When using a non-standard charger, the maximum output voltage must not exceed 12 V.
The Goggles battery is located in the headband. You can connect the headband individually
to the charger for charging. The battery is fully charged when the charging status indicator
turns off.
A standard charger is recommended for charging. It takes approximately four hours to
fully charge the battery. Other chargers may take longer.
Upgrading Firmware
DJI Assistant 2
Use DJI Assistant 2 to upgrade the Goggles.
1. Power on the Goggles and connect them to a computer with a Micro USB cable.
2. Launch DJI Assistant 2 and login with a registered DJI account.
3. Select “Goggles” and click “Firmware Upgrade” on the left-hand side.
4. Select the rmware version required.
5. DJI Assistant 2 will download and upgrade the rmware automatically.
6. Restart the Goggles after the rmware upgrade is complete.
Use DJI Assistant 2 to upgrade the aircraft and remote controller of the Mavic Pro and the Goggles
simultaneously (only supports connection topology for Standard Mode).
1. Ensure all devices are powered on and that the aircraft is linked with the remote controller.
2. Connect the remote controller to a computer with a Micro USB cable.
3. Launch DJI Assistant 2 and login with a registered DJI account.
4. Select “RC for Mavic Pro” and click “Firmware Upgrade” on the left-hand side.
5. Select the required rmware version.
6. DJI Assistant 2 will download and upgrade the rmware automatically.
7. Restart all devices when the rmware upgrade is complete.
DJI GO 4 App
Use the DJI GO 4 app to upgrade the aircraft and remote controller of the Mavic Pro and the
Goggles simultaneously (only supports connection topology for Standard Mode).
1. Ensure all devices are powered on and that the aircraft is linked with the remote controller.
2. Connect the remote controller with the DJI GO 4 app. A prompt will appear if a new rmware
upgrade is available. To start upgrading, connect a mobile device to the Internet and follow the
on-screen instructions.
3. Restart all devices when the rmware upgrade is complete.
Cleaning and Maintenance
Be sure to unplug the charger from the power outlet before cleaning and ensure that there are no
cables connected.
Cleaning the Goggles
Wipe and clean the surface of the Goggles with a soft clean cloth.
To clean the facial pad, rst drag it from the left or right side to the inside, then detach the other
2017 DJI All Rights Reserved.
16
©
Page 17

parts. Run water over the facial pad, then wipe it with a soft, dry cloth until it is completely dry. Align
the protruding part of the facial pad with the holes on the Goggles body, then press them together
so they are securely attached.
Maintenance of Lenses
Use the cleaning cloth included to wipe the lenses gently.
1. Moisten the cleaning cloth with alcohol or a lens cleaner.
2. Wipe in a circular motion from the center to the outer edges of the lenses.
The lenses are delicate, please clean them gently. DO NOT scratch them as this will
damage the overall viewing experience.
Store the Goggles in a dry room at room temperature to avoid damage to the lenses from
high temperature and humid environments.
Specications
Weight (Typical)
Dimensions
Screen Size 5 inch×2
Screen Resolution 3840×1080 (single screen: 1920×1080)
Refresh Rate 60 Hz
FOV 85° (single screen)
Interpupillary Distance Range 58 – 70 mm
Communication Frequency 2.4 GHz
Max. Transmission Distance Same as the aircraft connected
Live View Modes 1080p30, 720p60, 720p30
Min. Video Downlink Latency
(near eld, free of interference)
I/O Interface
HDMI Supported HDMI 1.4b, HDCP 1.4
Sensors Gyroscope, Accelerometer, Proximity Sensor
Operating Temperature Range 32° to 104° F (0° to 40° C)
Battery Capacity 9440 mAh
Battery Energy 35.44 Wh
Max. Operating Time 6 hrs
Charger
Goggles Body: 495 g
Headband: 500 g
Goggles Body: 195×155×110 mm
Headband (folded): 255×205×92 mm
110 ms (Mavic Pro, 720p60, video format: 720p120)
150 ms (Phantom 4 Pro/Advanced Series, 720p60,
video format: 720p60/720p120)
167 ms (Phantom 4, 720p30, video format: 720p60)
140 ms (Inspire 2+X5S, 720p60, video format: 1080p120)
190 ms (Inspire 2+X4S, 720p60, video format: 1080p60)
Micro USB port, 3.5 mm Audio port, HDMI Type-D port,
Micro SD Card slot
Input: 100-240 VAC, 50/60 Hz, 0.5 A
Output: 5 V
3 A / 9V 2A / 12 V 1.5 A
2017 DJI All Rights Reserved.
©
17
Page 18

DJI Support
http://www.dji.com/support
This content is subject to change.
Download the latest version from
www.dji.com/dji-goggles
If you have any questions about this document, please contact
DJI by sending an email to
DJI is a trademark of DJI.
Copyright © 2017 DJI All Rights Reserved.
DocSupport@dji.com
.
 Loading...