

Page 1

DJI FPV REMOTE CONTROLLER
Quick Start Guide
快速入门指南
快速入門指南
クイックスタートガイド
퀵 스타트 가이드
Kurzanleitung
Guía de inicio rápido
Guide de démarrage rapide
Guida rapida
Snelstartgids
Guia de início rápido
Guia de Início Rápido
Краткое руководство пользователя
v1.0
2019.06
Page 2

Page 3
Contents
Quick Start Guide 2
EN
快速入门指南
CHS
快速入門指南
CHT
JP
クイックスタートガイド
퀵 스타트 가이드 18
KR
DE
Kurzanleitung 22
ES
Guía de inicio rápido 26
FR
Guide de démarrage rapide 30
IT
Guida di avvio rapido 34
NL
Snelstartgids 38
PT
Guia de início rápido 42
PT-BR
Guia de Início Rápido 46
RU
Краткое руководство пользователя 50
6
10
14
Compliance Information 54
1
Page 4
Disclaimer
12
13
14
15
16
17
18
19
EN
Congratulations on purchasing your new DJI™ product. The information in this document
affects your safety and your legal rights and responsibilities. Read this entire document
carefully to ensure proper configuration before use. Failure to read and follow instructions
and warnings in this document may result in serious injury to yourself or others, damage to
your DJI product, or damage to other objects in the vicinity. This document and all other
collateral documents are subject to change at the sole discretion of DJI. Visit www.dji.com
for the latest information for this product.
By using this product, you hereby signify that you have read this disclaimer and warning
carefully and that you understand and agree to abide by the terms and conditions herein.
You agree that you are solely responsible for your own conduct while using this product,
and for any consequences thereof. You agree to use this product only for purposes that are
proper and in accordance with all applicable laws, rules, and regulations, and all terms,
precautions, practices, policies and guidelines DJI has made and may make available.
DJI accepts no liability for damage, injury or any legal responsibility incurred directly or
indirectly from the use of this product. The user shall observe safe and lawful practices
including, but not limited to, those set forth in this document.
Notwithstanding above, your statutory rights under applicable national legislation are not
affected by this disclaimer.
DJI is a trademark of SZ DJI TECHNOLOGY CO., LTD. (abbreviated as "DJI") and its affiliated
companies. Names of products, brands, etc., appearing in this document are trademarks
or registered trademarks of their respective owner companies. This product and document
are copyrighted by DJI with all rights reserved. No part of this product or document shall be
reproduced in any form without prior written consent of or authorization from DJI.
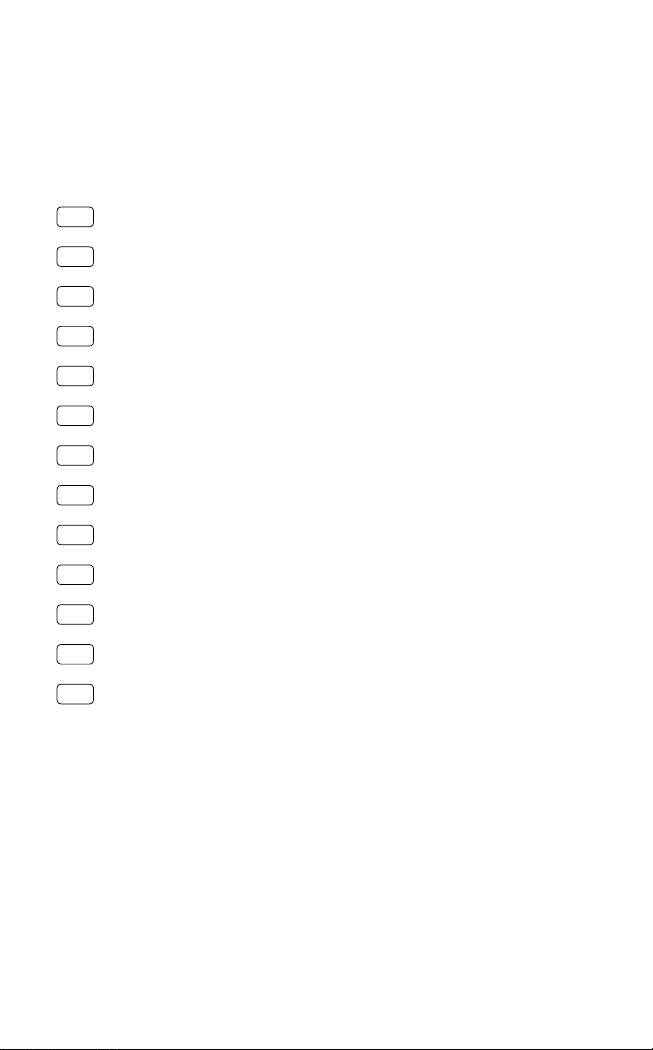
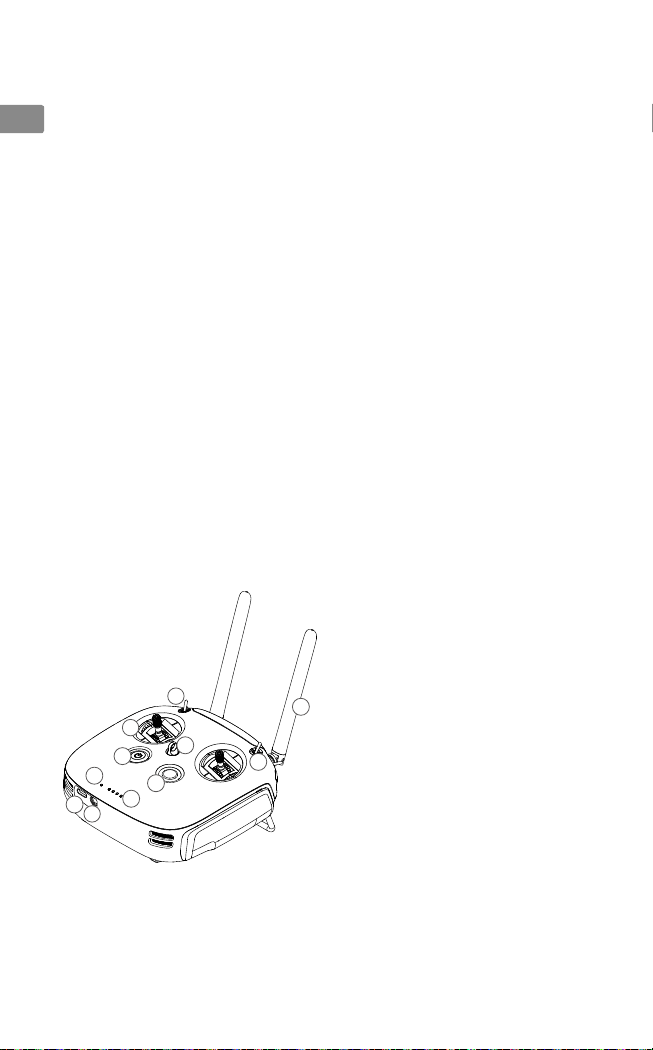
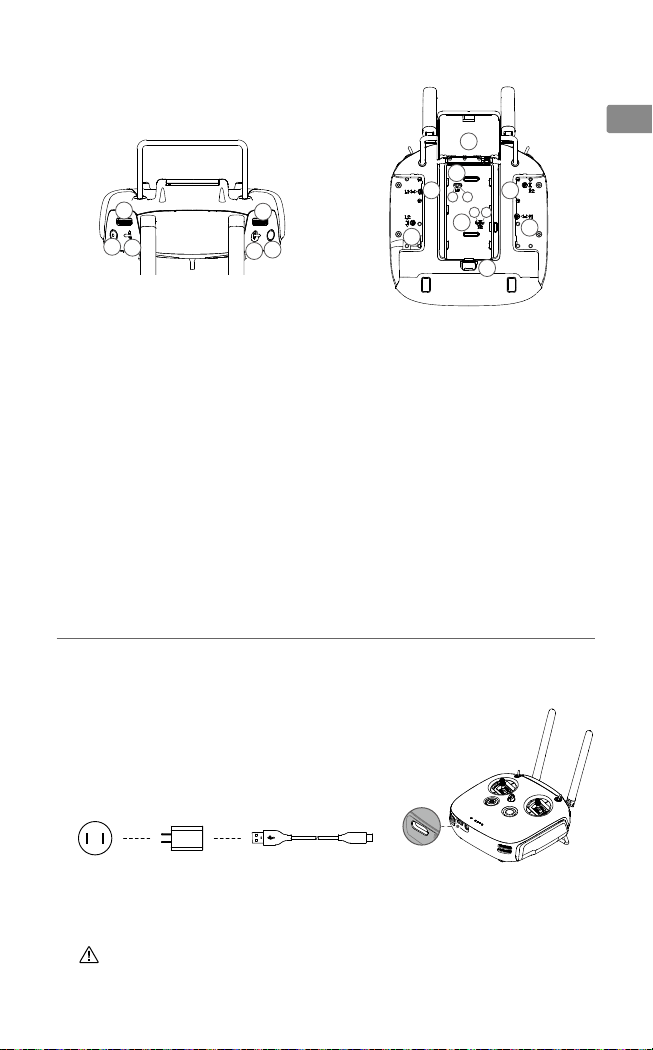
Introduction
The DJI FPV Remote Controller features advanced DJI HDL FPV Transmission technology
with a transmission range of up to 4 km* and latency as low as 7 ms, enhancing the anti-
interference ability and improving the fluency and stability of the video transmission. With
replaceable batteries that can be quickly hot-swapped, the remote controller also features
customizable buttons. Equipped with stick adjustment screws, users can easily adjust the
smoothness of the control sticks to suit their preference.
1. Power Button
2. C Button (customizable)
9
3
1
5
8
7
* The remote controller is able to reach its maximum transmission distance (FCC) in a wide open
area with no electromagnetic interference and at an altitude of approximately 120 m.
2
4
2
6
11
10
3. Control Sticks
4. Lanyard Attachment
5. Status LED
6. Battery Level LEDs
7. Simulator PPM Port
8. USB-C Port
9. SB Switch
10. SC Switch
11. Antennas
Page 5

18
19
20
21
a
b
22
23
24
a
b
24
20
18
12
13
14
15
17
16
19
22
a
b
a
b
21
23
25
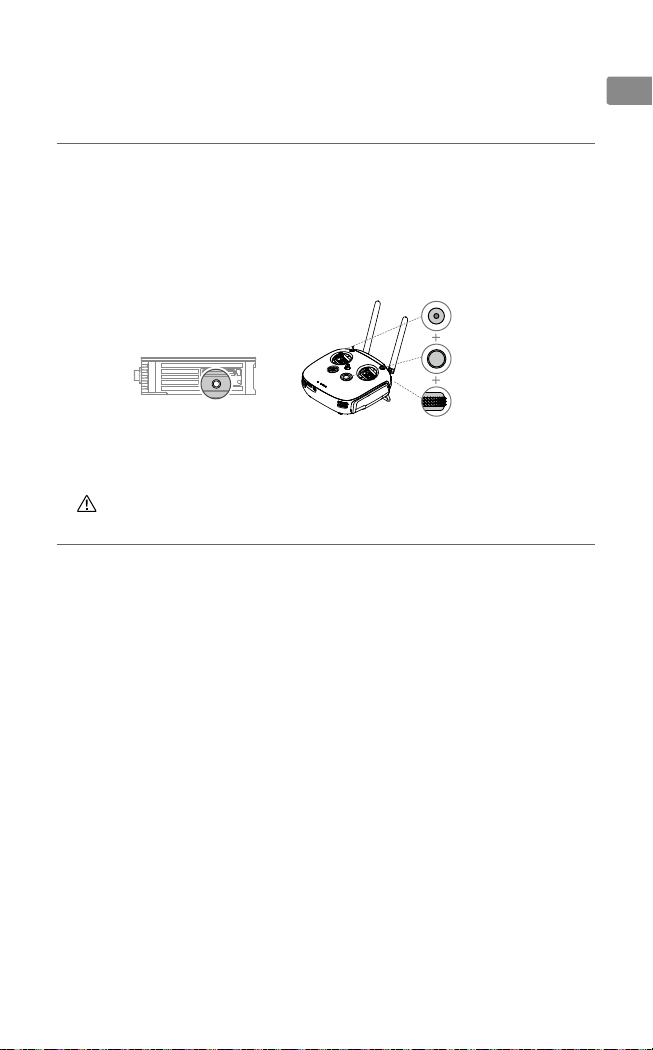
12. Left Dial
13. Record Button
14. SA Switch
15. Right Dial
16. SD Switch
17. Back Button
18. Right Stick Adjustment Screw (Horizontal)
19. Right Stick Adjustment Screw (Vertical)
20. Throttle Stick Adjustment Screws* (Mode 1)
a. Ratchet Throttle Adjustment Screw
b. Smooth Throttle Adjustment Screw
* To choose between a ratchet throttle and a smooth throttle, users must adjust the throttle stick
adjustment screw that corresponds to the current control mode. Depending on the control mode,
the corresponding vertical stick adjustment screw is unavailable.
21. Throttle Stick Adjustment Screws* (Mode 2)
a. Smooth Throttle Adjustment Screw
b. Ratchet Throttle Adjustment Screw
22. Left Stick Adjustment Screw (Vertical)
23. Left Stick Adjustment Screw (Horizontal)
24. Battery Cover
25. Battery Cover Lock
EN
1. Charging the Battery
To activate the battery, fully charge it before using for the first time.
USB Adapter USB-C Cable
100-240 V
It is recommended to use the USB adapter of DJI Goggles RE, RONIN™-S, SPARK™, or
an FCC/CE certified USB adapter that supports Quick Charge 2.0.
Remote ControllerPower Outlet
3
Page 6

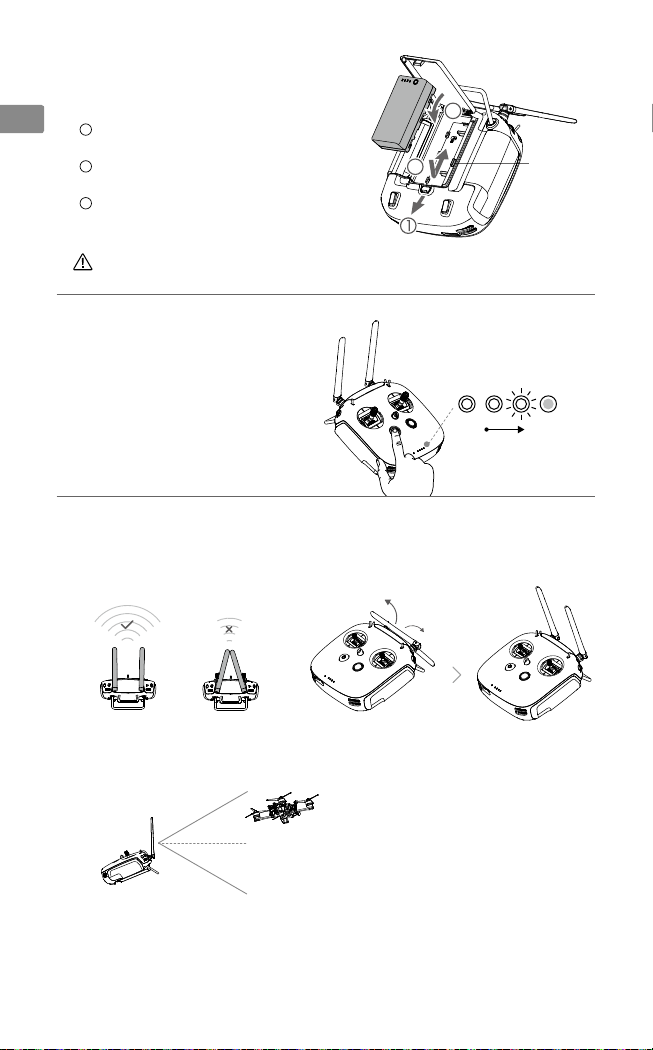
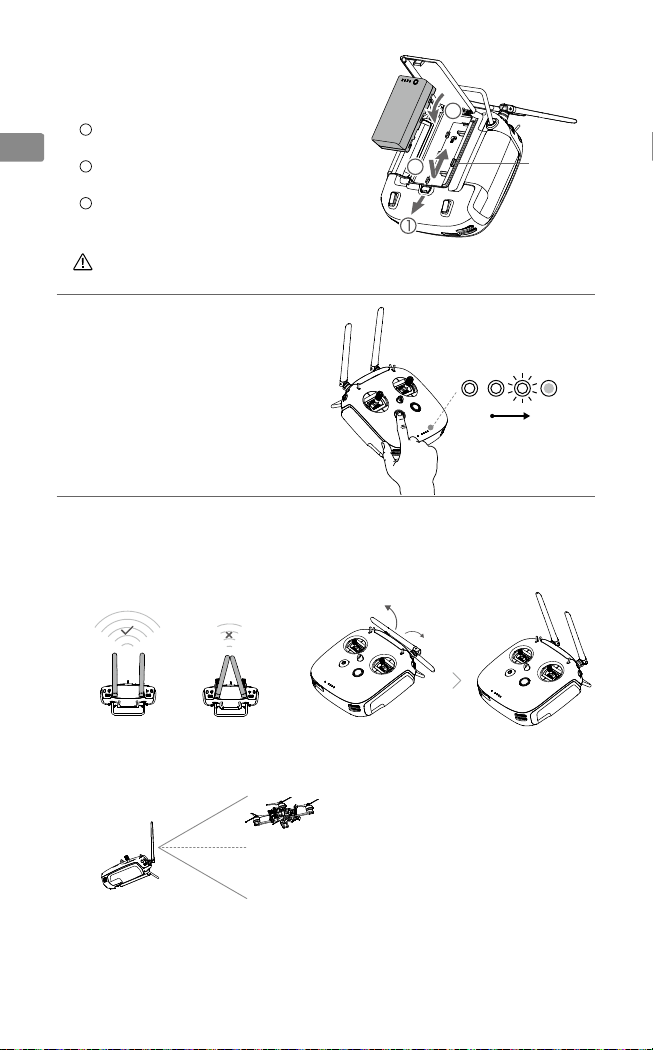
2. Mounting the Battery
EN
1
Slide the battery cover lock on the back
of the remote controller down to open the
cover.
2
Insert the Intelligent Battery into the
compartment. Press the battery into place
and push upward until there is a click.
3
Close the cover.
To remove the Intelligent Battery, open the cover, press and hold the battery release
button, and push the battery downward.
3
2
3. Checking the Battery Level and Power On/O
Press once to check the battery level.
Press once, and press again and hold
for two seconds to turn on or off.
Low High
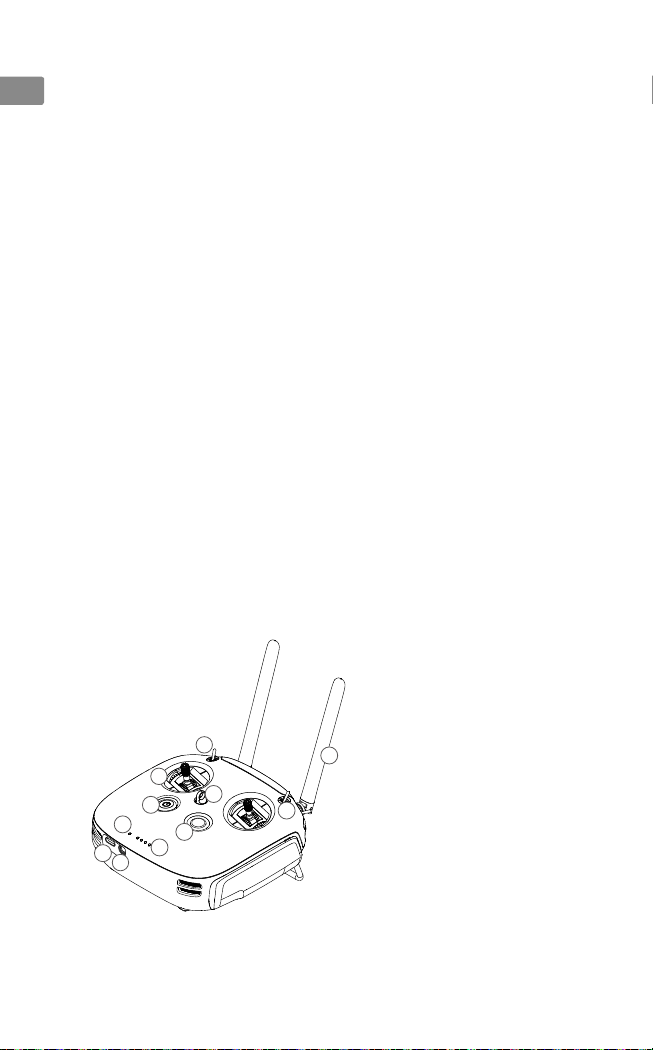
4. Preparing the Antennas
Unfold and adjust the antennas of the remote controller. The signal strength varies
depending on the position of the antennas.
Battery
Release
Button
Strong Weak
Optimal Transmission Range
4
Unfolding the Antennas
Try to keep the aircraft inside the optimal
transmission range. If the signal is weak,
adjust the antennas or fly the aircraft closer.
Page 7
5. Activation
When the remote controller is powered on, connect the USB-C port to your computer and
run DJI ASSISTANTTM 2 for activation.
Download DJI Assistant 2 at https://www.dji.com/fpv/downloads
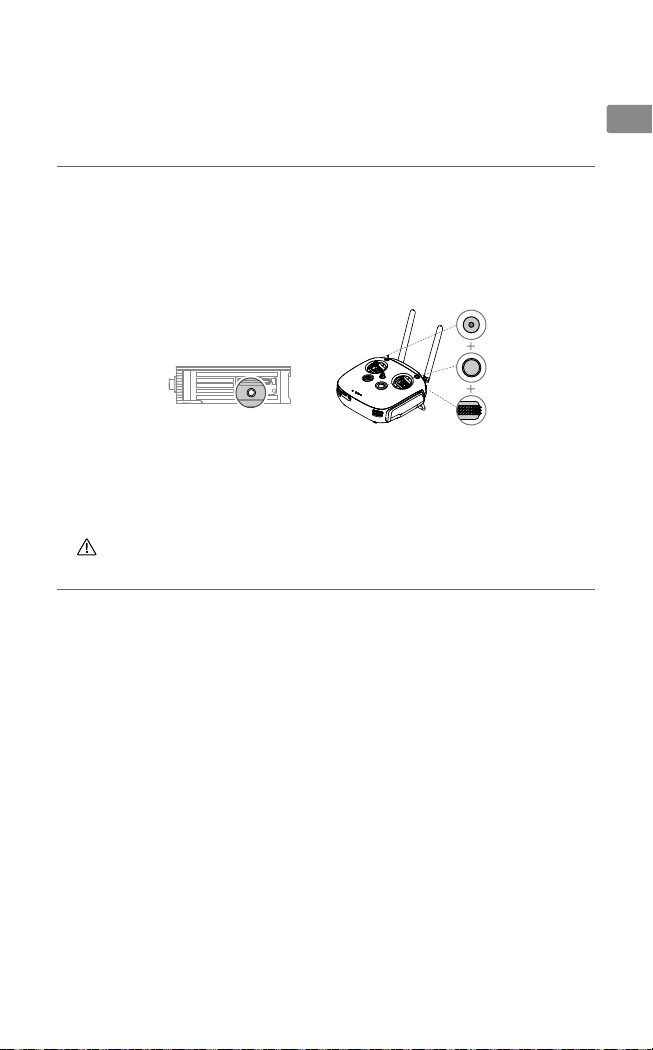
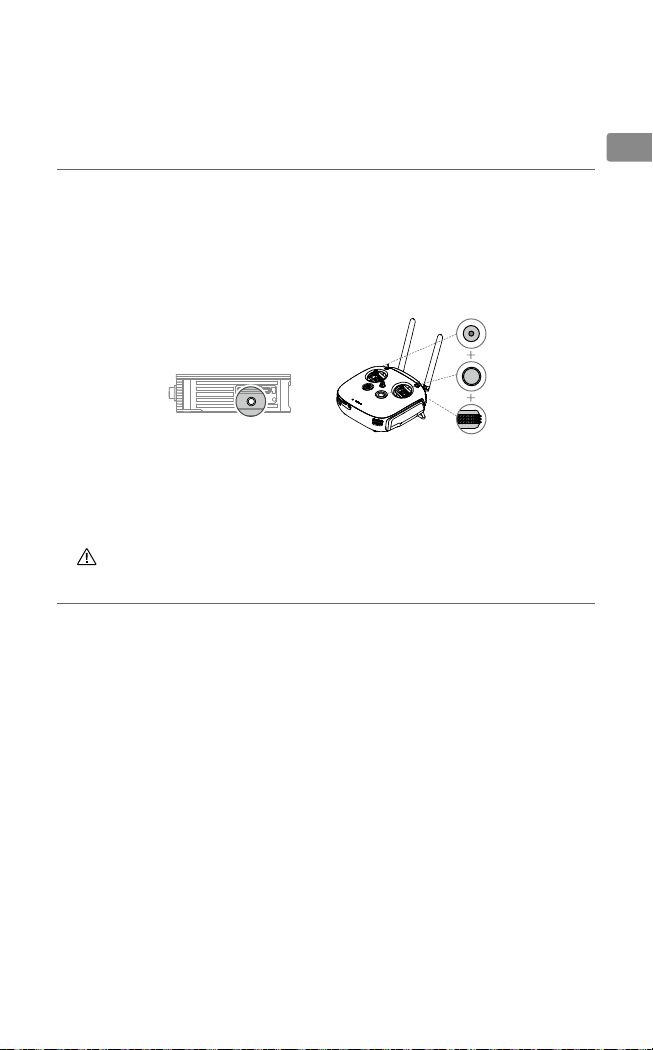
6. Linking
1. Power on the air unit and the DJI FPV Remote Controller.
2. Press the link button on the air unit, and then press the record button, C button, and
right dial on the remote controller simultaneously.*
3. Both the linking status indicators turn solid green when successfully linked.
* When ready to link, the devices will give the following indication:
Air unit: the linking status indicator turns solid red.
Remote controller: the remote controller beeps continually and the status indicator blinks blue.
If you need to use the DJI FPV Goggles and remote controller together, the air unit must be
linked to the goggles before the remote controller.
Specications
Remote Controller
Weight
Operating Frequency
Max. Transmission Distance
(unobstructed, free of interference)
Transmitter Power (EIRP)
Operating Current/Voltage
Operating Temperature
Charging Temperature 5° to 40° C (41° to 104° F)
Remote Controller Intelligent Battery (WB37-4920mAh-7.6V)
Battery Type LiPo 2S
Capacity 4920 mAh
Voltage 7.6 V
Energy 37.39 Wh
765 g
5.725 - 5.850 GHz
FCC/SRRC: 4 km; CE: 0.7 km
FCC: <30 dBm; CE: <14 dBm; SRRC: <19 dBm
0.6 A @ 7.6 V
0° to 40° C (32° to 104° F)
EN
5
Page 8
免责声明
12
13
14
15
16
17
18
19
感谢您购买 DJITM产品。本文所提及的内容关系到您的安全以及合法权益与责任。使用本产品
CHS
之前,请仔细阅读本文以确保已对产品进行正确的设置。不遵循和不按照本文的说明与警告来
操作可能会给您和周围的人带来伤害,损坏本产品或其它周围的物品。本文档及本产品所有相
关的文档最终解释权归大疆 ™ 创新(DJI)所有。如有更新,恕不另行通知。请访问 www.dji.
com 官方网站以获取最新的产品信息。
一旦使用本产品,即视为您已经仔细阅读本免责声明与警告,理解、认可和接受本声明全部条
款和内容。您承诺对使用本产品以及可能带来的后果负全部责任。您承诺仅出于正当目的使用
本产品,并且同意本条款以及大疆创新(DJI)制定的任何相关条例、政策和指引。大疆创新(DJI)
对于直接或间接使用本产品而造成的损坏、伤害以及任何法律责任不予负责。用户应遵循包括
但不限于本文提及的所有安全指引。
即使存在上述规定,消费者权益依然受当地法律法规所保障,并不受本免责声明影响。
DJI 是深圳市大疆创新科技有限公司及其关联公司的商标。本文出现的产品名称、品牌等,均
为其所属公司的商标或注册商标。本产品及手册为大疆创新版权所有。未经许可,不得以任何
形式复制翻印。
简 介
DJI FPV 遥控器采用 DJI FPV 高清低延时数字图传技术,可大幅增强抗干扰能力从而提高图传
的流畅性与稳定性,延时低至 7 ms,配合完备的功能按键可在最大 4 km* 通信距离内完成飞行
器的各种操作和设置。
遥控器电池采用可更换设计,方便日常使用及维护保养。遥控器背部配备摇杆松紧调节螺丝,
无需拆卸即可调节摇杆手感。
1. 电源按键
2. 自定义按键 C
9
3
1
5
8
7
4
2
6
11
10
3. 摇杆
4. 吊带挂钩
5. 遥控器状态指示灯
6. 遥控器电量指示灯
7. 模拟器 PPM 接口
8. USB-C 接口
9. 三档开关 SB
10. 三档开关 SC
11. 天线
* 在开阔无遮挡、无电磁干扰的环境飞行,并且飞行高度为 120 m 左右,在 FCC 标准下遥控器可以达
到最大通信距离。
6
Page 9
24
18
19
20
21
a
b
22
23
24
a
b
20
18
12
13
14
15
17
16
19
22
a
b
a
b
21
23
25
12. 左拨轮
13. 录像按键
14. 三档开关 SA
15. 右拨轮
16. 三档开关 SD
17. 返回按键
18. 右摇杆松紧调节螺丝(左右)
19. 右摇杆松紧调节螺丝(上下)
20. 油门松紧调节螺丝 *(日本手,Mode 1)
a. 棘轮感调节螺丝
b. 顺滑感调节螺丝
* 油门杆的松紧只能由遥控器当前的摇杆操控方式所对应的油门松紧调节螺丝来调节,此时该摇杆对应
的上下方向的松紧调节螺丝无效。
21. 油门松紧调节螺丝 *(美国手,Mode 2)
a. 顺滑感调节螺丝
b. 棘轮感调节螺丝
22. 左摇杆松紧调节螺丝(上下)
23. 左摇杆松紧调节螺丝(左右)
24. 电池仓盖
25. 电池仓盖锁扣
CHS
1. 充 电
首次使用时,务必将电池充满电以激活电池。
USB 充电器 USB-C 连接线
(100-240V)
推荐使用 DJI Goggles RE、RONINTM-S、SPARKTM配备的 USB 充电器或其他支持
QC 2.0 快充并符合 FCC/CE 标准的 USB 充电器。
遥控器交流电源
7
Page 10
2. 安装电池
CHS
1
下滑遥控器背面的电池仓盖锁扣以打开仓盖。
2
将智能电池装入电池仓,并向上推到顶。
3
合上仓盖。
如需取下智能电池,请打开仓盖,按住电池解锁按钮,然后向下推动智能电池将其取出。
3. 检查电量与开启 / 关闭
短按一次检查电量。
短按一次,再长按 2 秒可开启、
关闭遥控器。
4. 调整天线
展开并调整遥控器天线,不同的天线位置接收到的信号强度不同。
2
3
电池解锁
按钮
低 高
强 弱
操控飞行器时,务必使飞行器处于最佳通
信范围内。及时调整操控者与飞行器之间
的方位或距离,以确保飞行器总是位于最
佳通信范围内。
最佳通信范围
8
展开天线
Page 11
5. 激 活
遥控器需在开机状态下通过 USB-C 接口连接至电脑并运行 DJI ASSISTANTTM 2 调参软
件进行激活。
(调参软件下载地址:https://www.dji.com/fpv/downloads)
6. 对 频
1. 开启天空端及遥控器。
2. 先按下天空端的对频按键,再同时按下遥控器的录像按键、自定义按键 C 和右拨轮 。*
3. 对频成功后,天空端和遥控器的对频状态指示灯均绿灯常亮。
* 等待对频时:
天空端 —— 对频状态指示灯红灯常亮
遥控器 —— 响起嘀 - 嘀 ... 的提示音,且状态指示灯蓝色闪烁
若同时使用 DJI FPV 飞行眼镜和遥控器,天空端需先完成与飞行眼镜的对频,再进行和
遥控器的对频。
产品规格
遥控器
重量 765 g
工作频率 5.725 - 5.850 GHz
信号最大有效距离(无干扰、无遮挡) FCC/SRRC:4 km;CE:0.7 km
发射功率(EIRP) FCC:<30 dBm;CE:<14 dBm;SRRC:<19 dBm
工作电流 / 电压 0.6 A @ 7.6 V
工作环境温度 0℃至 40℃
充电环境温度 5℃至 40℃
遥控器智能电池(WB37-4920mAh-7.6V)
电池类型 锂离子电池
容量 4920 mAh
电压 7.6 V
能量 37.39 Wh
CHS
9
Page 12

免責聲明
12
13
14
15
16
17
18
19
感謝您購買
之前,請仔細閱讀本文以確保已對產品進行正確的設定。若未遵循和未按照本文的說明與警
CHT
告來操作,可能會對您和周圍的人造成傷害,損壞本產品或其它鄰近的物品。本文件及本產
品所有相關文件的最終解釋權歸大疆™ 創新(
www.dji.com
一旦使用本產品,即視為您已經仔細閱讀本免責聲明與警告,理解、認可和接受本聲明全部條
款和內容。您承諾對使用本產品及可能帶來的後果負全部責任。您承諾僅出於正當目的使用本
產品,並且同意本條款以及大疆創新(
對於直接或間接使用本產品而造成的損壞、傷害及任何法律責任概不負責。使用者應遵循包括
但不限於本文提及的所有安全指南。
即使存在上述規定,消費者權益依然受當地法律法規所保障,並不受本免責聲明影響。
DJI
為其所屬公司的商標或註冊商標。本產品及手冊之版權為大疆創新所有。未經許可,不得以任
何形式複製翻印。
DJI™
產品。本文所提及的內容關係到您的安全以及合法權益與責任。使用本產品
DJI
)所有。如有更新,恕不另行通知。請前往
官方網站以取得最新的產品資訊。
DJI
)制定的任何相關條例、政策和指南。大疆創新(
是深圳市大疆創新科技有限公司及其附屬公司的商標。本文出現的產品名稱、品牌等,均
簡 介
DJI FPV
遙控器採用
像傳輸的流暢性與穩定性,延時低至
成飛行器的各種操作和設定。
遙控器電池採用可更換設計,方便日常使用及維護保養。遙控器背部配備搖桿鬆緊調節螺絲,
無需拆卸即可調整搖桿手感。
5
8
7
1
3
6
DJI FPV
9
4
2
高清低延時數位影像傳輸技術,可大幅增強抗干擾能力以提高影
7 ms
,配合完備的功能按鍵可在最大
1.
2.
3.
11
4.
5.
6.
10
7.
8. USB-C
9.
10.
11.
電源按鍵
自訂按鍵
搖桿
吊帶掛鈎
遙控器狀態指示燈
遙控器電量指示燈
模擬器
三檔開關
三檔開關
天線
C
PPM
連接埠
SB
4 km*
連接埠
SC
通訊距離內完
DJI
)
*
在開闊無遮蔽、無電磁波干擾的環境飛行,並且飛行高度為
達到最大通訊距離。
10
120 m
左右,在
FCC
標準下遙控器可以
Page 13

24
18
19
20
21
a
b
22
23
24
a
b
20
18
12
13
14
12.
左轉盤
13.
錄影按鍵
14.
15.
16.
17.
18.
19.
20.
*
油門桿的鬆緊只能由遙控器目前的搖桿操控方式所對應的油門鬆緊調節螺絲來調節,此時該搖桿對應
的上下方向的鬆緊調節螺絲無效。
SA
三檔開關
右轉盤
SD
三檔開關
返回按鈕
右搖桿鬆緊調節螺絲(左右)
右搖桿鬆緊調節螺絲(上下)
油門鬆緊調節螺絲*(日本手,
a.
棘輪感調節螺絲
b.
順滑感調節螺絲
16
15
17
Mode 1
19
21.
油門鬆緊調節螺絲*(美國手,
a.
順滑感調節螺絲
b.
棘輪感調節螺絲
22.
左搖桿鬆緊調節螺絲(上下)
23.
)
左搖桿鬆緊調節螺絲(左右)
24.
電池匣蓋
25.
電池匣蓋鎖扣
22
a
b
a
b
21
23
25
Mode 2
1. 充 電
首次使用時,務必將電池充滿電以啟動電池。
CHT
)
交流電源
100-240V
(
USB
充電器
)
DJI Goggles RE、RONINTM-S、SPARK
推薦使用
QC 2.0
快充並符合
FCC/CE
USB-C
標準的
連接線
USB
充電器。
遙控器
TM
USB
配備的
充電器或其他支援
11
Page 14
2. 安裝電池
1
CHT
下滑遙控器背面的電池匣蓋鎖扣以打開匣蓋。
2
將智慧電池裝入電池匣,並向上推到頂。
3
關上匣蓋。
如需取下智慧電池,請打開匣蓋,按住電池解鎖按鈕,然後向下推動智慧電池將其取出。
3. 檢查電量與開啓 / 關閉
短按一次可檢查電量。
短按一次,再長按2秒可開啟、
關閉遙控器。
4. 調整天線
展開並調整遙控器天線,不同的天線位置接收到的訊號強度不同。
3
2
低 高
電池解鎖
按鈕
強 弱
操控航拍機時,務必使航拍機處於最佳通
訊範圍內。適時調整操作者與航拍機之間
的方位或距離,以確保航拍機始終位於最
佳通訊範圍內。
最佳通訊範圍
12
展開天線
Page 15
5. 啟 動
遙控器需在開機狀態下透過
體進行啟動。
(調參軟體下載網址:
USB-C
連接埠連接至電腦並運行
https://www.dji.com/fpv/downloads
6. 配 對
1.
開啟天空端及遙控器。
2.
先按下天空端的配對按鍵,再同時按下遙控器的錄影按鍵、自定義按鍵
3.
配對成功後,天空端和遙控器的配對狀態指示燈均為綠燈常亮。
*
等待配對時:
——
天空端
遙控器
配對狀態指示燈紅燈常亮
——
響起嘀 - 嘀 ... 的提示音,且藍色狀態指示燈閃爍
DJI ASSISTANTTM 2
)
C
調參軟
和右轉盤。
CHT
*
若同時使用
和遙控器的配對。
DJI FPV
飛行眼鏡和遙控器,天空端需先完成與飛行眼鏡的配對,再進行
產品規格
遙控器
重量
運轉頻率
最大訊號有效距離(無干擾、無遮蔽)
發射功率(
運作電流/電壓
操作溫度
充電環境溫度
遙控器智慧電池 (WB37-4920mAh-7.6V)
電池類型 鋰電池
容量
電壓
能量
EIRP
)
765 g
5.725 - 5.850 GHz
FCC/SRRC:4 km;CE:0.7 km
FCC:<30 dBm;CE:<14 dBm;SRRC:<19 dBm
0.6 A @ 7.6 V
0℃ 至 40℃
5℃ 至 40℃
4920 mAh
7.6 V
37.39 Wh
13
Page 16

免責事項
12
13
14
15
16
17
18
19
DJI™
製品をご購入いただきありがとうございます。本書では、ユーザーの安全および法的
権利と責任に関する情報を取り扱っています。ご使用の前に、本書のすべての内容をよくお
読みいただき、確実に適切な設定を行うようにしてください。本書に記載されている指示と
警告に従っていただかなかった場合、ご自身や他の人の重大なけが、または
周辺の他の物の破損につながる恐れがあります。本書およびその他すべての付属書は、
JP
独自の裁量で変更されることがあります。本製品の最新情報については、
DJI
製品および
www.dji.com
確認ください。
本製品を使用することにより、本書の免責事項および警告をよく読み、記載されている利用
規約を理解し、順守することに同意したとみなされます。本製品の使用中の行動とこれに伴
う結果には、ユーザーが全面的に責任を負うことに同意するものとします。適用されるすべ
ての法、規則および規制を順守して本製品を使用するとともに、
DJI
がこれまでに提供した、
また今後提供する資料の全条件、安全上の注意、使用方法、方針およびガイドラインに従う
ことに同意するものとします。
本製品の使用により直接または間接的に発生する損害、傷害、およびその他法的責任に対し
DJI
て、
は一切責任を負いません。ユーザーは、本書の規定をはじめとする(ただしこれに
限定しない)、安全で合法的な使用方法を順守するものとします。
上記にかかわらず、該当する国の法令に基づくお客様の制定法上の権利は、本免責事項の影
響を受けることはありません。
DJIはSZ DJI TECHNOLOGY CO., LTD.
本書に記載されている製品、ブランドなどの名称は、その所有者である各社の商標または登
録商標です。本製品および本書は、不許複製・禁無断転載を原則とする
DJI
からの書面による事前承認または許諾を得ることなく、本製品または文書のいかなる部
(以下「
DJI
」と省略)およびその関連会社の商標です。
DJI
の著作物のため、
分も、いかなる方法によっても複製することは固く禁じられています。
はじめに
DJI FPV
送信機は、最大
ンシーという
DJI HDL FPV
らかさと安定性を向上しています。送信機には、簡単にホットスワップ可能なバッテリーが
付属しており、またカスタムできるボタンも搭載しています。スティック調整ネジを装備し
ているので、ユーザーは好みに合わせて簡単に操作スティックの動きの滑らかさを調整する
ことができます。
4 km*
の伝送範囲(日本国内は
2.5 km)と7 ms
という低いレイテ
高度伝送技術を搭載し、耐干渉性が高まり、動画伝送において滑
DJI
でご
9
11
3
1
5
8
7
*
送信機は、電波干渉のない広くて開けた場所で、高度約
ことができます。
14
4
10
2
6
1.
電源ボタン
2.
ボタンC(カスタム可能)
3.
操作スティック
4.
ストラップ取付口
5.
ステータス
6.
バッテリー残量
7.
シミュレータ
8. USB-C
9. SB
10. SC
11.
アンテナ
120 m
で最大伝送距離(
ポート
スイッチ
スイッチ
LED
PPM
LED
ポート
FCC
)に達する
Page 17

18
19
20
21
a
b
22
23
24
a
b
24
20
18
12
13
14
12.
左ダイヤル
13.
録画ボタン
14. SA
スイッチ
15.
右ダイヤル
16. SD
スイッチ
17.
戻るボタン
18.
右スティック調整ネジ(水平)
19.
右スティック調整ネジ(垂直)
20.
スロットルスティック調整ネジ*(モード1)
a.
ラチェットスロットル調整ネジ
b.
スムーズスロットル調整ネジ
*
ラチェットスロットルとスムーズスロットルを選択するには、ユーザーは現在の操作モードに対応
するスロットルスティック調整ネジを調整する必要があります。操作モードによっては、対応する
垂直スティック調整ネジは使用できません。
1.
バッテリーの充電
15
17
16
19
21.
スロットルスティック調整ネジ
(モード2)
a.
スムーズスロットル調整ネジ
b.
ラチェットスロットル調整ネジ
22.
左スティック調整ネジ(垂直)
23.
左スティック調整ネジ(水平)
24.
バッテリーカバー
25.
バッテリーカバーロック
22
a
b
a
b
21
23
25
バッテリーをアクティベーションするには、最初の使用前にバッ
テリーを完全に充電します。
JP
*
電源コンセント
USB
100~240 V
DJI Goggles RE
Quick Charge 2.0対応FCC/CE
アダプター
(日本未発売)/
USB-C
ケーブル
RONIN™-S/SPARK™のUSB
USB
認定の
アダプターの使用をお勧めします。
送信機
アダプター、または
15
Page 18

2.
バッテリーの取り付け
1
送信機背面にあるバッテリーカバーのロッ
クを下にスライドさせて、カバーを開きま
す。
2
JP
インテリジェントバッテリーを収納部に挿
入します。バッテリーを所定の位置に押し
込み、カチッと音がするまで押し上げます。
3
カバーを閉じます。
インテリジェントバッテリーを取り外すには、カバーを開きバッテリー解除ボタンを押し
たままバッテリーを押し下げます。
3.
バッテリー残量の確認と電源のオン/オフ
ボタンを1回押すと、バッテリー残量
を確認できます。
ボタンを1回押し、次に2秒間長押し
するとオン/オフを切り替えられます。
4.
アンテナの準備
送信機のアンテナを展開して調整します。信号強度はアンテナの位置によって異なり
ます。
3
2
バッテリ
ー解除ボ
タン
低 高
強 弱
機体が最適な伝送範囲から出ないようにし
てください。信号が弱い場合は、アンテナ
を調整するか、機体をもっと近くで飛ばし
てください。
最適な伝送範囲
16
アンテナの展開
Page 19

5.
アクティベーション
送信機の電源が入ったら、
USB-C
ポートをパソコンに接続し、
DJI ASSISTANTTM 2
動してアクティベーションします。
https://www.dji.com/fpv/downloadsからDJI Assistant 2
6.
リンク
1.
エアユニットと
2.
エアユニットのリンクボタンを押し、次に送信機の録画ボタン、Cボタン、右ダイヤ
ルを同時に押します。
3.
正常にリンクされると、両方のリンクステータスインジケータが緑色に点灯します。
*
リンクする準備が整うと、デバイスは次のように表示します。
エアユニット:リンクステータスインジケータが赤く点灯します。
送信機:送信機のビープ音が継続的に鳴り、青色のステータスインジケーターが青色に点滅します。
DJI FPV
トをゴーグルにリンクさせてください。
DJI FPV
送信機の電源を入れます。
*
ゴーグルと送信機を一緒に使用する場合は、送信機をリンクする前にエアユニッ
をダウンロードしてください。
仕様
送信機
重量
動作周波数
最大 伝送距離
(障害物、電波干渉のない場合)
トランスミッター出力(
動作電流/電圧
動作温度
充電温度
送信機インテリジェントバッテリー(
バッテリータイプ
容量
電圧
電力量
765 g
5.650~5.755 GHz
MIC
EIRP)MIC
0.6 A @ 7.6 V
0~40℃
5~40℃
LiPo 2S
4920 mAh
7.6 V
37.39 Wh
2.5 km
(日本):
<30 dBm
(日本):
WB37-4920mAh-7.6V
)
を起
JP
17
Page 20

고지 사항
12
13
14
15
16
17
18
19
DJI™ 신제품을 구매해주셔서 감사합니다. 본 문서의 정보는 사용자의 안전은 물론 법적 권리 및 책임에 영
향을 미칩니다. 제품을 사용하기 전에 전체 문서를 주의 깊게 읽고 구성이 올바른지 확인하십시오. 본 문서의
지침 및 경고 사항을 읽고 따르지 않을 경우 사용자 또는 다른 사람이 심각하게 다치거나 DJI 제품 또는 근처
에 있는 다른 물체가 손상될 수 있습니다. 이 문서 및 기타 모든 부수적인 문서는 DJI의 단독 재량에 따라 변
경될 수 있습니다. 본 제품에 대한 최신 정보는 www.dji.com에서 확인하십시오.
제품을 사용하는 것은 본 고지 사항 및 경고를 주의 깊게 읽었으며 명시된 이용 약관을 이해하고 준수하기로
동의한 것으로 간주합니다. 본 제품 사용 시 사용자의 행위와 그에 따른 결과에 대한 책임은 전적으로 사용자
KR
에게 있다는 것에 동의합니다. 또한, 적용 가능한 모든 법규, 규칙은 물론 DJI에서 제정하고 제공하는 모든 조
건, 예방책, 사례, 정책 및 지침에 따라 적절한 목적으로 본 제품을 사용하는 것에 동의합니다.
DJI는 본 제품의 사용으로 인해 직접 또는 간접적으로 발생한 피해, 부상 또는 모든 법적 책임에 대해 어떠
한 책임도 지지 않습니다. 사용자는 본 문서에 명시된 내용을 포함하여(단, 이에 국한되지 않음) 안전하고 적
법한 사례를 준수해야 합니다.
상기 내용에도 불구하고 해당 국가의 법률에 따른 사용자의 법적 권리는 본 고지 사항의 영향을 받지 않습
니다.
DJI는 SZ DJI TECHNOLOGY CO., LTD.(약어로 “DJI”) 및 해당 자회사의 상표입니다. 본 문서에 표시
된 제품명, 브랜드 등은 해당 소유 회사의 상표 또는 등록 상표입니다. DJI는 본 제품 및 문서의 저작권과 함
께 모든 권리를 보유합니다. 본 제품 또는 문서의 어떠한 부분도 DJI의 서면 허가 또는 동의 없이 어떠한 형
식으로도 복제할 수 없습니다.
소개
DJI FPV 조종기는 최대 4km*의 전송 범위를 자랑하는 고급 DJI HDL FPV 전송 기술과 7ms의 낮은 지연
율이 특징이며, 이는 간섭 방지 능력을 향상시켜 더 원활하고 안정적인 동영상 전송이 가능합니다. 배터리는
핫 스왑으로 빠르게 교체할 수 있으며, 조종기에는 사용자 설정 버튼도 있습니다. 스틱 조절 나사가 장착되어
있어, 사용자는 선호도에 따라 조종 스틱의 감도를 쉽게 조절할 수 있습니다.
1. 전원 버튼
2. 버튼 C(사용자 설정 가능)
9
3
4
1
5
8
7
2
6
11
10
3. 조종 스틱
4. 스트랩 연결부
5. 상태 LED
6. 배터리 잔량 LED
7. 시뮬레이터 PPM 포트
8. USB-C 포트
9. SB 스위치
10. SC 스위치
11. 안테나
* 조종기는 전자기 간섭이 없는 확 트인 넓은 야외에서 비행할 때 약 120m 고도에서 최대 전송 거리(FCC)에 도달
할 수 있습니다.
18
Page 21

24
18
19
20
21
a
b
22
23
24
a
b
20
18
12
13
14
15
17
16
19
22
a
b
a
b
21
23
25
KR
12. 왼쪽 다이얼
KR
13. 녹화 버튼
14. SA 스위치
15. 오른쪽 다이얼
16. SD 스위치
17. 뒤로 버튼
18. 오른쪽 스틱 조정 나사(수평)
19. 오른쪽 스틱 조정 나사(수직)
20. 스로틀 스틱 조정 나사*(모드 1)
a. 래칫 스로틀 조정 나사
b. 부드러운 스로틀 조정 나사
* 래칫 스로틀과 부드러운 스로틀 사이에서 선택하려면 사용자는 현재 제어 모드에 해당하는 스로틀 스틱 조정 나사를
조정해야 합니다. 제어 모드에 따라 해당 수직 스틱 조절 나사를 사용할 수 없습니다.
21. 스로틀 스틱 조정 나사*(모드 2)
a. 부드러운 스로틀 조정 나사
b. 래칫 스로틀 조정 나사
22. 왼쪽 스틱 조정 나사(수직)
23. 왼쪽 스틱 조정 나사(수평)
24. 배터리 커버
25. 배터리 커버 잠금 장치
1. 배터리 충전
배터리를 활성화하려면, 처음 사용하기 전에 배터리를 완전히 충전하십시오.
전원 콘센트
100~240 V
USB 어댑터 USB-C 케이블
조종기
QC 2.0 고속 충전을 지원하는 DJI 고글 RE, RONIN™-S, SPARK™ 또는 FCC/CE 인증 USB 어댑터
사용을 권장합니다.
19
Page 22

2. 배터리 장착
1
조종기의 뒷면에 있는 배터리 커버 잠금 장치를 아
래로 밀어서 커버를 엽니다.
2
인텔리전트 배터리를 배터리 함에 삽입합니다. 배
터리를 제자리에 놓고 딸깍 소리가 날 때까지 위
로 밉니다.
3
KR
커버를 닫습니다.
인텔리전트 배터리를 분리하려면 커버를 열고, 배터리 분리 버튼을 길게 누른 다음 배터리를 아래쪽으로
밉니다.
3. 배터리 잔량 확인 및 전원 켜기/끄기
한 번 눌러 배터리 잔량을 확인합니다.
한 번 누르고 다시 누른 후 2초 동안 길게 눌
러 켜거나 끕니다.
4. 안테나 준비
조종기의 안테나를 펴고 조정합니다. 신호 강도는 안테나의 위치에 따라 다릅니다.
3
2
배터리
분리 버튼
낮음 높음
강함 약함
기체를 최적의 전송 범위 안에서 유지하도록
하십시오. 신호가 약하면 안테나를 조정하거나 더
가까운 곳에서 기체를 조종하십시오.
최적 전송 범위
20
안테나 펴기
Page 23

5. 활성화
조종기가 켜지면 USB-C 포트를 컴퓨터에 연결하고 DJI ASSISTANTTM 2를 작동시킵니다.
https://www.dji.com/fpv/downloads에서 DJI Assistant 2를 다운로드하십시오.
6. 연동
1. 에어 유닛과 DJI FPV 조종기 전원을 켭니다.
2. 에어 유닛의 연동 버튼을 누른 다음, 조종기의 녹화 버튼, 버튼 C, 오른쪽 다이얼을 동시에 누릅니다.*
3. 성공적으로 연결되면 에어 유닛과 조종기의 연동 상태 표시기가 녹색을 유지합니다.
KR
* 연동 준비가 되면 장치는 다음과 같은 표시를 제공합니다.
에어 유닛: 연동 상태 표시기가 빨간색을 유지합니다.
조종기: 조종기가 계속 신호음을 울리고 상태 표시등이 파란색으로 깜박입니다.
고글과 조종기를 함께 사용해야 하는 경우, 에어 유닛을 고글에 먼저 연동하고 조종기를 연동
DJI FPV
해야 합니다
.
사양
조종기
무게
작동 주파수
최대 전송 거리
장애물과 간섭이 없을 시
(
송신기 출력
(EIRP) FCC: <30 dBm, CE: <14 dBm, SRRC: <19 dBm
작동 전류/전압
작동 온도
충전 온도
조종기 인텔리전트 배터리
배터리 유형
용량
전압
에너지
)
(WB37-4920mAh-7.6V)
765 g
5.725~5.850 GHz
FCC/SRRC: 4 km, CE: 0.7 km
0.6 A @ 7.6 V
0~40 °C
5~40 °C
LiPo 2S
4920 mAh
7.6 V
37.39 Wh
KR
21
Page 24

Haftungsausschluss
12
13
14
15
16
17
18
19
Herzlichen Glückwunsch zum Erwerb Ihres neuen DJI™-Produkts. Die hier enthaltenen Informationen
betreffen Ihre persönliche Sicherheit sowie Ihre gesetzlichen Rechte und Verpichtungen. Bitte lesen
Sie das gesamte Dokument aufmerksam durch, um das Produkt für den Betrieb ordnungsgemäß
einrichten zu können. Die Nichtbeachtung der in diesem Dokument enthaltenen Anweisungen und
Warnungen kann zu schweren Verletzungen der eigenen Person oder anderer oder zu Schäden an
Ihrem DJI-Produkt oder anderen Objekten in der näheren Umgebung führen. Dieses Dokument und
alle zugehörigen Dokumente können nach eigenem Ermessen von DJI jederzeit geändert werden.
Aktuelle Informationen zu diesem Produkt nden Sie auf www.dji.com.
Mit dem Gebrauch des Produkts bestätigen Sie, dass Sie diesen Haftungsausschluss inkl.
DE
Warnungen aufmerksam gelesen und den Inhalt verstanden haben und mit den allgemeinen
Geschäftsbedingungen einverstanden sind. Sie stimmen zu, dass Sie beim Gebrauch des Produkts
die alleinige Verantwortung für Ihre Handlungen und alle daraus entstehenden Folgen tragen. Sie
erklären sich damit einverstanden, das Produkt ausschließlich für sachgerechte Zwecke zu nutzen,
die allen geltenden Gesetzen, Regelungen und Vorschriften sowie allen aktuellen wie künftigen
Bedingungen, Schutzmaßnahmen, Praktiken, Richtlinien und Empfehlungen von DJI entsprechen.
DJI übernimmt keine Haftung für Sachschäden oder Personenschäden sowie keine juristische
Verantwortung für Schäden, die direkt oder indirekt mit dem Gebrauch des Produkts in
Zusammenhang stehen. Der Benutzer ist verpflichtet, sichere und gesetzeskonforme Praktiken
anzuwenden, einschließlich, aber nicht beschränkt auf die in diesem Dokument dargelegten.
Unbeschadet des weiter oben gesagten werden Ihre gesetzlichen Rechte unter der anwendbaren
nationalen Gesetzgebung nicht durch diesen Haftungsausschluss berührt.
DJI ist eine Marke von SZ DJI TECHNOLOGY CO., LTD. (kurz: „DJI“) und seiner verbundenen
Unternehmen. Namen von Produkten, Marken, usw., die in diesem Dokument enthalten sind, sind
Warenzeichen oder eingetragene Warenzeichen der jeweiligen Besitzer. Dieses Produkt und dieses
Dokument sind urheberrechtlich geschütztes Eigentum von DJI und alle Rechte sind vorbehalten.
Kein Teil dieses Produkts oder dieses Dokuments darf in irgendeiner Form ohne vorherige
schriftliche Zustimmung oder Genehmigung von DJI reproduziert werden.
Einleitung
Die DJI FPV-Fernsteuerung verfügt über die fortschrittliche DJI HDL FPV-Übertragungstechnologie
mit einer Übertragungsreichweite von bis zu 4 km* und einer Latenz von nur 7 ms, wodurch die
Entstörungsfähigkeit gestärkt und die Flüssigkeit und Stabilität der Videoübertragung verbessert
wird. Neben austauschbaren Akkus, die schnell im laufenden Betrieb ausgetauscht werden können,
verfügt die Fernsteuerung auch über anpassbare Tasten. Ausgestattet mit Einstellschrauben für den
Knüppel können Benutzer die Sensibilität der Steuerknüppel ganz nach ihren Wünschen einstellen.
1. Netztaste
2. C-Taste (Individualisierbar)
9
11
3
1
5
8
7
* Die Fernsteuerung kann ihre maximale Übertragungsreichweite (FCC) auf offenem Gelände ohne
elektromagnetische Störquellen und bei einer Flughöhe von ungefähr 120 m erreichen.
22
4
10
2
6
3. Steuerknüppel
4. Lanyard-Halterung
5. Status-LED
6. Akkuladestands-LED
7. Simulator-PPM-Anschluss
8. USB-C-Anschluss
9. SB-Schalter
10. SC-Schalter
11. Antennen
Page 25

24
18
19
20
21
a
b
22
23
24
a
b
20
18
12
13
14
15
17
16
19
22
a
b
a
b
21
23
25
12. Linkes Rädchen
13. Videoaufnahmetaste
14. SA-Schalter
15. Rechtes Rädchen
16. SD-Schalter
17. Zurücktaste
18. Einstellschraube für den rechten
Steuerknüppel (horizontal)
19. Einstellschraube für den rechten
Steuerknüppel (vertikal)
20. Einstellschrauben für Gashebel* (Modus 1)
a. Einstellschraube für Ratschendrossel
b. Einstellschraube für glatten Gashebel
* Um zwischen einer Ratschendrossel und einem glatten Gashebel umzuschalten, muss der Benutzer die
Einstellschraube des Gashebels einstellen, die dem aktuellen Steuerungsmodus entspricht. Je nach
Steuerungsmodus ist die entsprechende vertikale Einstellschraube möglicherweise nicht verfügbar.
21. Einstellschrauben für Gashebel* (Modus 2)
a. Einstellschraube für glatten Gashebel
b. Einstellschraube für Ratschendrossel
22. Einstellschraube für den linken
Steuerknüppel (vertikal)
23. Einstellschraube für den linken
Steuerknüppel (horizontal)
24. Akkudeckel
25. Akkudeckelverriegelung
1. Laden des Akkus
Laden Sie den Akku vor der ersten Verwendung vollständig auf, um ihn zu aktivieren.
DE
Steckdose
100-240 V
USB-Adapter USB-C-Kabel
Es wird empfohlen, den USB-Adapter von DJI Goggles RE, RONIN™-S, SPARK™ oder einen FCC/
CE-zertifizierten USB-Adapter zu verwenden, der Quick Charge 2.0 unterstützt.
Fernsteuerung
23
Page 26

2. Befestigung des Akkus
1
Schieben Sie die Verriegelung der
Akkuabdeckung auf der Rückseite der
Fernsteuerung nach unten, um die Abdeckung
zu öffnen.
2
Setzen Sie die Intelligent Battery in das Fach
ein. Drücken Sie den Akku ein und schieben
Sie ihn nach oben, bis ein Klicken zu hören ist.
Schließen Sie die Abdeckung.
3
DE
Zum Entfernen der Intelligent Battery öffnen Sie die Abdeckung, drücken die Taste zum Lösen des
Akkus, halten sie gedrückt und drücken den Akku nach unten.
3
2
3. Akkuladestand prüfen und Ein/Ausschalten
Drücken Sie die Taste einmal, um den
Akkuladestand zu überprüfen.
Drücken Sie die Taste einmal und drücken
und halten Sie die Taste dann für zwei
Sekunden lang, um das Gerät ein- oder
auszuschalten.
Niedrig Hoch
4. Vorbereiten der Antennen
Ausklappen und justieren Sie die Antennen der Fernsteuerung. Die Signalstärke hängt von der
Position der Antennen ab.
Akkufreigabetaste
Stark Schwach
Optimale Übertragungsreichweite
24
Ausklappen der Antennen
Das Fluggerät sollte sich immer in innerhalb
der optimalen Sendereichweite befinden.
Stellen Sie bei schwachem Signal die Antennen
ein, oder verringern Sie die Entfernung des
Fluggerätes.
Page 27

5. Aktivierung
Wenn die Fernsteuerung eingeschaltet ist, verbinden Sie den USB-C-Anschluss mit Ihrem
Computer und führen Sie den DJI ASSISTANTTM 2 zur Aktivierung aus.
Sie können den DJI Assistant 2 unter https://www.dji.com/fpv/downloads herunterladen
6. Koppeln
1. Schalten Sie die Lufteinheit und die DJI FPV-Fernsteuerung ein.
2. Drücken Sie auf die Kopplungstaste auf der Lufteinheit und drücken Sie dann gleichzeitig auf die
Videoaufnahmetaste, die C-Taste und den rechten Einsteller der Fernsteuerung.*
3. Beide Kopplungsstatusanzeigen leuchten permanent grün, wenn die Verbindung erfolgreich
hergestellt wurde.
* Wenn die Geräte für die Kopplung bereit sind, werden sie folgende Statusanzeigen haben:
Lufteinheit: Die Kopplungsstatusanzeige leuchtet permanent rot.
Fernsteuerung: Die Fernsteuerung gibt einen Signalton aus und die Statusanzeige blinkt blau.
Wenn Sie die DJI FPV-Goggles und die Fernsteuerung zusammen verwenden müssen, muss die
Lufteinheit vor der Fernsteuerung mit der Brille verbunden werden.
Technische Daten
Fernsteuerung
Gewicht
Betriebsfrequenz
Max. Übertragungsreichweite
(Ohne Hindernisse und Interferenzen)
Sendeleistung (EIRP)
Betriebsstrom/Betriebsspannung
Betriebstemperatur
Ladetemperatur 5 °C bis 40 °C
Intelligent Battery der Fernsteuerung (WB37-4920 mAh-7,6 V)
Akkutyp
Kapazität
Spannung
Energie
765 g
5,725 - 5,850 GHz
FCC/SRRC: 4 km; CE: 0,7 km
FCC: <30 dBm; CE: <14 dBm; SRRC: <19 dBm
0,6 A bei 7,6 V
0 °C bis 40 °C
LiPo 2S
4920 mAh
7,6 V
37,39 Wh
DE
25
Page 28

Renuncia de responsabilidad
12
13
14
15
16
17
18
19
Enhorabuena por la compra de su nuevo producto DJI™. La información incluida en este
documento afecta a su seguridad y a sus derechos y responsabilidades legales. Lea este
documento en su totalidad para garantizar una conguración adecuada antes de su uso. Si no lee
ni sigue correctamente las instrucciones y advertencias de este documento, podría sufrir lesiones
importantes o provocarlas a otras personas; igualmente, podría causar daños en su producto DJI
u otros objetos en las proximidades. Este documento y el resto de documentos colaterales están
sujetos a cambios a entera discreción de DJI. Visite www.dji.com para obtener la información más
reciente sobre este producto.
Al usar este producto, maniesta por la presente que ha leído detenidamente esta renuncia de
responsabilidad y advertencia y que entiende y acepta cumplir con los términos y condiciones
establecidos en este documento. Acepta que usted es el único responsable de su propia conducta
ES
durante el uso de este producto y de cualquier consecuencia derivada de dicho uso. Acepta usar
este producto solo con nes apropiados y de acuerdo con todas las leyes, reglas y normativas
aplicables, así como todos los términos, precauciones, prácticas, políticas y directrices que haya
facilitado y pueda facilitar DJI.
DJI no acepta responsabilidad alguna por daños o lesiones, ni ningún tipo de responsabilidad
legal derivada directa o indirectamente del uso de este producto. El usuario deberá respetar las
prácticas seguras y legales, incluidas, entre otras, las establecidas en este documento.
Sin perjuicio de lo anterior, esta renuncia de responsabilidad no afecta a sus derechos de
conformidad con la legislación nacional vigente.
DJI es una marca comercial de SZ DJI TECHNOLOGY CO., LTD. (abreviado como “DJI”) y sus
liales. Los nombres de productos, marcas, etc., que aparecen en este documento son marcas
comerciales o marcas comerciales registradas de sus respectivas empresas propietarias. Este
producto y el documento están protegidos por los derechos de autor de DJI con todos los derechos
reservados. No se permite la reproducción total ni parcial de este documento o producto en forma
alguna sin el consentimiento previo por escrito o la autorización de DJI.
Introducción
El control remoto DJI FPV cuenta con tecnología avanzada de transmisión HDL FPV de DJI con un
rango de transmisión de hasta 4 km* y una latencia que puede bajar hasta los 7 ms, lo que mejora
la resistencia a las interferencias y la uidez y la estabilidad de la transmisión de vídeo. Con baterías
reemplazables que pueden cambiarse en caliente rápidamente, el control remoto también cuenta
con botones personalizables. Con la ayuda de los tornillos de ajuste de palanca, los usuarios
pueden ajustar fácilmente la uidez de las palancas de control para adaptarlas a sus preferencias.
1. Botón de encendido
2. Botón C (personalizable)
9
11
3
4
1
5
8
7
* El control remoto es capaz de alcanzar su distancia máxima de transmisión (FCC) en una amplia
zona abierta sin interferencias electromagnéticas, y a una altitud de unos 120 metros.
26
2
6
10
3. Palancas de control
4. Anclaje para cordón
5. Indicador led de estado
6. Ledes de nivel de la batería
7. Puerto PPM simulador
8. Puerto USB-C
9. Selector SB
10. Selector SC
11. Antenas
Page 29

24
18
19
20
21
a
b
22
23
24
a
b
20
12
13
14
12. Selector izquierdo
13. Botón de grabación
14. Selector SA
15. Selector derecho
16. Selector SD
17. Botón de retroceso
18. Tornillo de ajuste de la palanca derecha
(horizontal)
19. Tornillo de ajuste de la palanca derecha
(vertical)
20. Tornillos de ajuste de la palanca del
acelerador* (Modo 1)
a. Tornillo de ajuste del acelerador de
retención
15
17
16
18
19
b. Tornillo de ajuste del acelerador suave
21. Tornillos de ajuste de la palanca del
acelerador* (Modo 2)
a. Tornillo de ajuste del acelerador suave
b. Tornillo de ajuste del acelerador de
retención
22. Tornillo de ajuste de la palanca izquierda
(vertical)
23. Tornillo de ajuste de la palanca izquierda
(horizontal)
24. Tapa de la batería
25. Seguro de la tapa de la batería
22
a
b
a
b
21
23
25
* Para elegir entre un acelerador de trinquete y un acelerador suave, los usuarios deben ajustar
el tornillo de ajuste de la palanca del acelerador que corresponde al modo de control actual.
Dependiendo del modo de control, el tornillo de ajuste de palanca vertical correspondiente no está
disponible.
1. Carga de la batería
Para activar la batería, cárguela completamente antes de usarla por primera vez.
ES
Toma de
alimentación
100-240 V
Adaptador USB Cable USB-C
Se recomienda utilizar el adaptador USB de DJI Goggles RE, RONIN™-S, SPARK™ o un
adaptador USB certificado por FCC/CE que admita Quick Charge 2.0.
Control remoto
27
Page 30

2. Montaje de la batería
1
Deslice el seguro de la tapa de la batería
situado en la parte posterior del control
remoto hacia abajo para abrir la cubierta.
Introduzca la Batería Inteligente en el
2
compartimento. Presione la batería en su
lugar y empuje hacia arriba hasta que haga
clic.
3
Cierre la tapa.
ES
Para extraer la Batería Inteligente, abra la cubierta, mantenga pulsado el botón de
extracción de la batería y, a continuación, empuje la batería hacia abajo.
3
2
3. Compruebe el nivel de batería y encendido/apagado
Pulse una vez para comprobar el nivel de
batería.
Presione una vez, y presione nuevamente
y mantenga presionado durante dos
segundos para encender o apagar.
4. Preparación de las antenas
Despliegue y ajuste las antenas del control remoto. La intensidad de la señal varía según la
posición de las antenas.
Botón de
liberación
de batería
Baja Alta
Fuerte Débil
Intervalo de transmisión óptimo
28
Despliegue de las antenas
Intente mantener la aeronave dentro del rango
óptimo de transmisión. Si la señal es débil,
ajuste las antenas o vuele la aeronave más
cerca.
Page 31

5. Activación
Cuando el control remoto esté encendido, conecte el puerto USB-C a su ordenador y ejecute
DJI ASSISTANTTM 2 para la activación.
Descargue DJI Assistant 2 en https://www.dji.com/fpv/downloads
6. Vinculación
1. Encienda la unidad aérea y el control remoto DJI FPV.
2. Presione el botón de enlace en la unidad aérea, y luego presione el botón de grabación, el botón
C y el selector derecho en el control remoto simultáneamente.*
3. Ambosindicadoresdeestadodeenlacesevuelvendecolorverdejocuandosehacompletado
el enlace con éxito.
* Cuando estén listos para enlazarse, los dispositivos darán la siguiente indicación:
Unidad aérea: el indicador de estado de enlace se enciende en rojo fijo.
Control remoto: el control remoto emite pitidos continuamente y el indicador de estado parpadea en azul.
Si necesita usar las DJI Goggles FPV y el control remoto a la vez, la unidad aérea debe
enlazarse a las goggles antes que al control remoto.
Especicaciones
Control remoto
Peso
Frecuencia de funcionamiento
Velocidad Distancia de transmisión
(sin obstrucciones, libre de interferencias)
Potencia del transmisor (PIRE) FCC: <30 dBm; CE: <14 dBm; SRRC: <19 dBm
Corriente/voltaje de funcionamiento
Temperatura de funcionamiento
Temperatura de carga De 5 °C a 40 °C (41 °F a 104 °F)
Batería Inteligente del control remoto (WB37-4920 mAh-7,6 V)
Tipo de batería
Capacidad
Voltaje
Energía
765 g
5.725 - 5.850 GHz
FCC/SRRC: 4 km; CE: 0,7 km
De 0,6 A a 7,6 V
De 0 °C a 40 °C (32 °F a 104 °F)
LiPo 2S
4920 mAh
7.6 V
37,39 Wh
ES
29
Page 32

Clause d’exclusion de responsabilité
12
13
14
15
16
17
18
19
Vous venez d'acquérir un nouveau produit DJI™. Félicitations! Les informations contenues dans ce
document concernent votre sécurité, vos droits et vos obligations. Lisez-le attentivement pour bien
congurer votre appareil avant de l'utiliser. Si vous ne lisez pas et ne respectez pas les instructions
et les mises en garde ci-après, vous exposez les autres et vous-même à des blessures graves et
risquez d'endommager votre produit DJI ou d'autres objets placés à proximité. DJI se réserve le
droit de modier, à sa seule discrétion, le présent document et tous les autres documents connexes.
Pour découvrir les dernières informations sur ce produit, rendez-vous sur www.dji.com/fr.
En utilisant ce produit, vous conrmez que vous avez lu attentivement la présente clause d'exclusion
de responsabilité et que vous comprenez et acceptez de respecter les termes et conditions qui y
sont énoncés. Vous déclarez assumer l'entière responsabilité de votre utilisation du produit ainsi
que toutes les conséquences qui en découlent. Vous vous engagez à utiliser le produit dans un
cadre légal et adapté, conformément aux lois et réglementations en vigueur, dans le respect des
FR
conditions, précautions, pratiques, politiques et consignes publiées par DJI, aujourd'hui et à l'avenir.
DJI décline toute responsabilité quant aux dégâts, aux blessures ou aux problèmes découlant
directement ou indirectement de l'utilisation de ce produit. L'utilisateur s'engage à respecter les
consignes de sécurité et les pratiques légales, y compris, mais sans s'y limiter, celles énoncées
dans le présent document.
Nonobstant ce qui précède, vos droits statutaires en vertu de la législation nationale applicable ne
sont pas affectés par cette clause d'exclusion de responsabilité.
DJI est une marque commerciale de SZ DJI TECHNOLOGY CO., LTD. (« DJI » en abrégé) et de ses
sociétés afliées. Les noms de produits, de marques, etc., apparaissant dans le présent document
sont des marques commerciales ou des marques déposées de leurs détenteurs respectifs. Ce
produit et le présent document sont la propriété de DJI, tous droits réservés. Aucune partie de
ce produit ou du présent document ne peut être reproduite sous quelque forme que ce soit sans
l'autorisation ou le consentement écrit préalable de DJI.
Introduction
La radiocommande DJI FPV est basée sur la technologie avancée de transmission HDL avec une
portée de transmission pouvant atteindre 4 km* et une latence inférieure à 7 ms, renforçant la
capacité anti-interférences et améliorant la uidité et la stabilité de la transmission vidéo. Munie d'une
batterie remplaçable qui peut être rapidement remplacée à chaud, la radiocommande dispose
également de boutons personnalisables. Avec les vis de réglage des joysticks, les utilisateurs
peuvent facilement régler le lissé des joysticks de contrôle en fonction de leurs préférences.
1. Bouton d'alimentation
9
11
3
1
5
8
7
* La radiocommande peut atteindre sa distance de transmission maximale (FCC) dans un espace dégagé et
sans interférences électromagnétiques, et à une altitude d'environ 120 mètres (400 pieds).
30
4
10
2
6
2. Bouton personnalisable C
3. Joysticks de contrôle
4. Attache du cordon
5. Voyant LED
6. Indicateurs de niveau de batterie
7. Port du simulateur PPM
8. Port USB-C
9. Commutateur SB
10. Commutateur SC
11. Antennes
Page 33

24
18
19
20
21
a
b
22
23
24
a
b
20
18
12
13
14
12. Molette gauche
13. Bouton d'enregistrement
14. Commutateur SA
15. Molette droite
16. Commutateur SD
17. Bouton de retour
18. Vis de réglage du joystick droit (horizontal)
19. Vis de réglage du joystick droit (vertical)
20. Vis de réglage du joystick d'accélération*
(mode 1)
a. Vis de réglage de l'accélération en mode
cranté
b. Vis de réglage de l'accélération en mode
continu
* Pour choisir entre une accélération en mode cranté ou continu, les utilisateurs doivent régler la vis de
réglage du joystick d'accélération correspondant au mode de contrôle courant. En fonction du mode de
contrôle, la vis de réglage du joystick vertical correspondante n'est pas disponible.
15
17
16
21. Vis de réglage de l'accélération* (mode 2)
22. Vis de réglage du joystick gauche (vertical)
23. Vis de réglage du joystick gauche
24. Niveau de batterie
25. Verrou du couvercle de la batterie
19
a. Vis de réglage de l'accélération en
mode continu
b. Vis de réglage de l'accélération en
mode cranté
(horizontal)
22
a
b
a
b
21
23
25
1. Recharge de la batterie
Chargez complètement la batterie avant de l'utiliser pour la première fois.
FR
Prise courant
100-240 V
Adaptateur USB Câble USB-C
Il est recommandé d'utiliser l'adaptateur USB de DJI Goggles RE, RONIN™-S, SPARK™ ou un
adaptateur USB certifié FCC / CE prenant en charge Quick Charge 2.0.
Radiocommande
31
Page 34

2. Montage de la batterie
1
Faites glisser vers le bas le couvercle du
compartiment de la batterie, à l'arrière de la
radiocommande, pour ouvrir le couvercle.
Insérez la Batterie Intelligente dans le
2
compartiment. Appuyez sur la batterie pour
la mettre en place et poussez-la vers le haut
jusqu'à ce que vous entendiez un clic.
Refermez le couvercle.
3
3
Bouton de
2
déverrouillage
de la batterie
FR
Pour retirer la Batterie Intelligente, ouvrez le couvercle, appuyez et maintenez le bouton de
déverrouillage de la batterie, puis poussez la batterie vers le bas.
3. Vérication des niveaux de batterie et mise sous/hors
tension
Appuyez une fois sur le bouton
d'alimentation pour vérier le niveau de
charge de la batterie.
Appuyez une fois, puis appuyez de
nouveau pendant deux secondes pour
allumer ou éteindre.
Faible Élevée
4. Préparer les antennes
Dépliez et ajustez les antennes de la télécommande. La force du signal varie en fonction de la
position des antennes.
Fort Faible
Déplier les antennes
Portée de transmission optimale
32
Veillez à ce que l'appareil reste dans la portée
de transmission optimale. Si le signal est faible,
ajustez la position des antennes ou rapprochez
l'appareil.
Page 35

5. Activation
Lorsque la radiocommande est allumée, connectez le port USB-C à votre ordinateur et exécutez
DJI ASSISTANTTM 2 pour l'activation.
Téléchargez DJI Assistant 2 sur https://www.dji.com/fpv/downloads
6. Appairage
1. Mettez l'appareil et la radiocommande sous tension.
2. Appuyez sur le bouton de liaison de l'unité aérienne, puis appuyez simultanément sur le bouton
d'enregistrement, sur le bouton C et sur la molette de droite de la télécommande.*
3. Lesdeuxindicateursd'étatdeliaisondeviennentvertxelorsquelaliaisonestétablie.
* Lorsque vous êtes prêt à vous connecter, les périphériques vous donneront les indications suivantes :
Unité aérienne : l'indicateur d'état de la liaison devient rouge fixe.
Radiocommande : la radiocommande émet un bip sonore continu et le voyant d'état clignote en bleu.
Si vous devez utiliser le casque DJI FPV et la radiocommande en même temps, l'unité aérienne
doit être liée au casque avant la télécommande.
Caractéristiques techniques
Radiocommande
Poids
Fréquence de fonctionnement
Max. Distance de transmission max.
(sans obstacle ni interférence)
Puissance de l’émetteur (EIRP) FCC : <30 dBm ; CE : <14 dBm ; SRRC : <19 dBm
Courant / Tension de fonctionnement
Température de fonctionnement
Plage de températures de charge de 5 à 40 °C (41 à 104 °F)
Batterie Intelligente de la radiocommande (WB37-4920 mAh-7,6 V)
Type de batterie
Capacité
Tension
Énergie
765 g
5,725 à 5,850 GHz
FCC/SRRC : 4 km ; CE : 0,7 km
0,6 A à 7,6 V
de 0 à 40 °C (32 à 104 °F)
LiPo 2S
4920 mAh
7,6 V
37,39 Wh
FR
33
Page 36

Limitazioni di responsabilità
12
13
14
15
16
17
18
19
Congratulazioni per l'acquisto di questo prodotto DJI™. Le informazioni contenute nel presente
documento riguardano la sicurezza, i diritti e le responsabilità legali degli utenti. Leggere
attentamente l'intero documento per configurare correttamente il dispositivo prima dell'uso. La
mancata lettura del presente documento e l'inosservanza delle istruzioni e delle avvertenze in
esso contenute potrebbero determinare lesioni gravi all'utente o ad altre persone, nonché danni
al prodotto DJI o ad altri oggetti che si trovano nelle vicinanze. Il presente documento e tutti i
documenti complementari sono soggetti a modiche a esclusiva discrezione di DJI. Visita il sito
www.dji.com per le informazioni più recenti relative a questo prodotto.
Utilizzando il prodotto, l'utente dichiara di aver letto e compreso le limitazioni di responsabilità e
le avvertenze e di accettare i termini e le condizioni ivi specificati. L'utente riconosce di essere
l'unico responsabile della propria condotta durante l'utilizzo del prodotto e di eventuali relative
conseguenze. L'utente accetta di utilizzare il presente prodotto esclusivamente per scopi leciti e
conformi a tutte le leggi, le normative e i regolamenti applicabili e nel rispetto di tutti i termini, le
precauzioni, le pratiche, le politiche e le linee guida che DJI ha reso o potrebbe rendere disponibili.
IT
DJI declina ogni responsabilità per danni, lesioni o altre responsabilità legali direttamente o
indirettamente imputabili all'utilizzo del presente prodotto. L'utente è tenuto a osservare pratiche di
condotta sicure e legittime, ivi comprese, a titolo esemplicativo, ma non esaustivo, quelle esposte
nel presente documento.
Nonostante quanto indicato, i diritti giuridici dell'utente previsti dalle leggi nazionali applicabili non
sono inuenzati dalla presente limitazione di responsabilità.
DJI è un marchio registrato di SZ DJI TECHNOLOGY CO., LTD. (abbreviato come “DJI”) e delle
sue società afliate. I nomi di prodotti, i marchi e altre informazioni simili menzionati nel presente
documento sono marchi o marchi registrati delle rispettive società proprietarie. Il presente prodotto
e la relativa documentazione sono protetti da copyright di DJI e tutti i diritti sono riservati. Nessuna
parte di questo prodotto o della relativa documentazione potrà essere riprodotta in qualsiasi forma
senza previo consenso o autorizzazione scritta da parte di DJI.
Introduzione
Il radiocomando DJI FPV è dotato dell'avanzata tecnologia di trasmissione DJI HDL FPV,
operativa no a una distanza di 4 km* e con una latenza di soli 7 ms, resistente alle interferenze
e con un'eccellente fluidità e stabilità delle immagini video. Con batterie sostituibili facilmente
intercambiabili, il radiocomando dispone anche di pulsanti personalizzabili. Dotato di viti per la
regolazione degli stick, gli utenti possono facilmente calibrarne la uidità di movimento in base alle
proprie preferenze.
1. Pulsante di accensione
2. Pulsante C (personalizzabile)
9
11
3
1
5
8
7
* Il radiocomando è in grado di raggiungere la massima distanza di trasmissione (FCC) in aree aperte, prive
di interferenze elettromagnetiche e a un'altitudine di circa 120 m.
34
4
10
2
6
3. Stick di controllo
4. Aggancio per laccio da collo
5. LED di stato
6. LED del livello di carica della batteria
7. Porta PPM
8. Porta USB-C
9. Interruttore SB
10. Interruttore SC
11. Antenne
Page 37

24
18
19
20
21
a
b
22
23
24
a
b
20
18
12
13
14
15
17
16
19
22
a
b
a
b
21
23
25
12. Rotella sinistra
13. Pulsante di registrazione
14. Interruttore SA
15. Rotella destra
16. Interruttore SD
17. Pulsante Indietro
18. Vite di regolazione stick destro (orizzontale)
19. Vite di regolazione stick destro (verticale)
20. Viti di regolazione del movimento degli stick*
(Modo 1)
a. Vite di regolazione del movimento a scalare
b. Vite di regolazione del movimento
scorrevole
* Per selezionare il movimento a scalare o il movimento scorrevole, è necessario regolare la vite di
regolazione dello stick relativamente alla modalità di controllo utilizzata. In base alla modalità di controllo
utilizzata, la vite di regolazione verticale dello stick corrispondente non sarà disponibile.
21. Viti di regolazione del movimento degli
stick* (Modo 2)
a. Vite di regolazione del movimento
scorrevole
b. Vite di regolazione del movimento a
scalare
22. Vite di regolazione della levetta sinistra
(verticale)
23. Vite di regolazione della levetta sinistra
(orizzontale)
24. Sportello del vano batteria
25. Fermo di chiusura del vano batteria
1. Carica della batteria
Per attivare la batteria, caricarla completamente prima del primo utilizzo.
IT
Presa di
alimentazione
100 - 240 V
Adattatore USB Cavo USB-C
Si consiglia di utilizzare l'adattatore USB per DJI Goggles RE, RONIN™-S e SPARK™, oppure un
adattatore USB certificato FCC/CE che supporti Quick Charge 2.0.
Radiocomando
35
Page 38

2. Inserimento della batteria
1
Spingere verso il basso il fermo di chiusura
del vano batteria, sul retro del dispositivo, e
rimuovere lo sportello.
2
Inserire la batteria intelligente nel vano
batteria. Premere la batteria in posizione e
spingerla in avanti no a quando non vi è un
clic.
3
Richiudere lo sportello.
Per rimuovere la batteria intelligente, rimuovere lo sportello di protezione, premere sul pulsante di
rilascio della batteria, quindi spingere la batteria verso il basso.
IT
3
2
3. Controllo del livello batteria e accensione/spegnimento
Premere una volta per vericare il livello di
carica della batteria.
Per spegnere il dispositivo, premere un
volta, quindi premere ancora e tenere
premuto per due secondi.
Minimo Massimo
4. Preparazione delle antenne
Aprire e regolare la posizione delle antenne del radiocomando. La potenza del segnale varia in
base alla posizione delle antenne.
Pulsante di
rilascio della
batteria
Forte Debole
Distanza di trasmissione ottimale
36
Apertura delle antenne
Cercare di mantenere il velivolo all'interno di
una distanza di trasmissione ottimale. Se il
segnale è debole, regolare le antenne o ridurre
la distanza del velivolo.
Page 39

5. Attivazione
A radiocomando acceso, collegarlo al computer tramite la porta USB-C e avviare DJI
ASSISTANTTM 2 per iniziarne l'attivazione.
Scaricare DJI Assistant 2 all'indirizzo https://www.dji.com/fpv/downloads
6. Collegamento
1. Accendere il velivolo e il radiocomando DJI FPV.
2. Premere il pulsante di collegamento sull'unità aerea, quindi premere, contemporaneamente, il
pulsante di registrazione, il pulsante C e la rotella destra sul radiocomando.*
3. Se collegati correttamente, entrambi gli indicatori di stato diventeranno verdi.
* Una volta pronti per il collegamento, i dispositivi forniranno la seguente indicazione:
Unità aerea: l'indicatore di stato del collegamento diventa rosso fisso.
Radiocomando: il radiocomando emette un segnale acustico continuo e l’indicatore di stato lampeggia in blu.
Se è necessario utilizzare i DJI FPV Goggles e il radiocomando DJI FPV insieme, l'unità aerea deve
essere collegata agli occhiali prima del radiocomando.
Caratteristiche tecniche
Radiocomando
Peso
Frequenza operativa
Massima distanza di trasmissione
(senza ostacoli né interferenze)
Potenza del trasmettitore (EIRP) FCC: <30 dBm; CE: <14 dBm; SRRC: <19 dBm
Tensione/Corrente operativa
Temperatura operativa
Temperatura di ricarica Tra 5 °C e 40 °C
Batteria intelligente del radiocomando (WB37-4920mAh-7.6V)
Tipo di batteria
Capacità
Tensione
Energia
765 g
5.725 - 5.850 GHz
FCC/SRRC: 4 km; CE: 0,7 km
0,6 A a 7,6 V
Tra 0 °C e 40 °C
LiPo 2S
4920 mAh
7,6 V
37,39 Wh
IT
37
Page 40

Disclaimer
12
13
14
15
16
17
18
19
Gefeliciteerd met de aankoop van uw nieuwe DJI™-product. De informatie in dit document betreft
uw veiligheid en uw wettelijke rechten en plichten. Lees dit hele document zorgvuldig door, zodat
u vóór gebruik de juiste configuratie toepast. Het niet lezen en opvolgen van de instructies en
waarschuwingen in dit document kan leiden tot ernstig letsel bij uzelf of anderen, tot schade aan
het DJI-product of schade aan andere voorwerpen in de omgeving. Dit document en alle overige
documentatie zijn onderhevig aan veranderingen naar goeddunken van DJI. Ga naar www.dji.com
voor de meest recente informatie over dit product.
Door het gebruik van dit product geeft u te kennen dat u deze disclaimer en waarschuwing
zorgvuldig hebt gelezen en dat u begrijpt en ermee akkoord gaat dat u zich dient te houden aan
de hierin gestelde algemene voorwaarden. U gaat ermee akkoord dat u verantwoordelijk bent
voor uw eigen gedrag tijdens het gebruik van dit product, en voor de mogelijke gevolgen daarvan.
U gaat ermee akkoord om dit product uitsluitend voor gepaste doeleinden te gebruiken en in
overeenstemming met alle toepasselijke wetten, regels en voorschriften, en alle voorwaarden,
voorzorgsmaatregelen, gewoonten, beleidsregels en richtlijnen die DJI heeft opgesteld en
beschikbaar heeft gesteld.
DJI aanvaardt geen aansprakelijkheid voor schade, letsel of enige wettelijke verantwoordelijkheid
NL
die direct of indirect voortvloeit uit het gebruik van dit product. De gebruiker dient zich te houden
aan veilige en wettige praktijken, inclusief, maar niet beperkt tot wat in dit document staat uitgelegd.
Desalniettemin worden uw wettelijke rechten conform de toepasselijke nationale wetgeving niet door
deze disclaimer beperkt.
DJI is een handelsmerk van SZ DJI TECHNOLOGY CO., LTD. (afgekort als 'DJI') en haar gelieerde
bedrijven. Namen van producten, merken enz. in dit document zijn handelsmerken of gedeponeerde
handelsmerken van hun respectieve eigenaren. Het copyright voor dit product en dit document rust
bij DJI met alle rechten voorbehouden. Geen enkel onderdeel van dit product of document mag
worden gereproduceerd in welke vorm dan ook zonder voorafgaande, schriftelijke toestemming van
DJI.
Inleiding
De DJI FPV afstandsbediening beschikt over geavanceerde DJI HDL FPV-transmissietechnologie
met een transmissiebereik van maximaal 4 km* met een latentie van slechts 7 ms, voor een
betere storingsbestendigheid en een soepele, stabiele videotransmissie. De batterijen van de
afstandsbediening zijn eenvoudig te verwisselen, en de functieknoppen kunnen worden aangepast.
Met de stelschroeven kunnen gebruikers eenvoudig de soepelheid van de bedieningssticks
aanpassen aan hun voorkeur.
1. Aan-/uitknop
2. Knop C (aanpasbaar)
9
11
3
1
5
8
7
* De afstandsbediening kan de maximale overdrachtsafstand (FCC) bereiken in een groot open gebied
zonder elektromagnetische interferentie, en tot een hoogte van circa 120 m.
38
4
10
2
6
3. Joysticks
4. Bevestiging lanyard
5. Status-led
6. Accuniveau-leds
7. Simulator PPM-poort
8. USB-C-poort
9. SB-schakelaar
10. SC-schakelaar
11. Antennes
Page 41

24
18
19
20
21
a
b
22
23
24
a
b
20
18
12
13
14
15
17
16
19
22
a
b
a
b
21
23
25
12. Linkerdraaiknop
13. Opnameknop
14. SB-schakelaar
15. Rechterdraaiknop
16. SD-schakelaar
17. Terugtoets
18. Stelschroef voor rechterstick (horizontaal)
19. Stelschroef voor de rechterstick (verticaal)
20. Stelschroeven gashendel* (modus 1)
a. Stelschroef gashendel trapsgewijs
b. Stelschroef gashendel traploos
* Om te kiezen voor een trapsgewijze of traploze gasklep, moet de gebruiker de stelschroef voor de
gasklepstick aanpassen die overeenkomt met de huidige bedieningsmodus. Afhankelijk van de
bedieningsmodus is de corresponderende verticale stelschroef voor de stick niet beschikbaar.
21. Stelschroeven gashendel* (modus 2)
a. Stelschroef gashendel traploos
b. Stelschroef gashendel trapsgewijs
22. Stelschroef voor de linkerstick (verticaal)
23. Stelschroef voor linkerstick (horizontaal)
24. Accuniveau
25. Vergrendeling batterijklep
1. De batterij opladen
Laad de batterij volledig op alvorens deze voor de eerste keer te gebruiken.
NL
Stopcontact
100-240 V
USB-adapter USB-C-kabel
Gebruik bij voorkeur de USB-adapter van DJI Goggles RE, RONIN™-S, SPARK™ of een
FCC / CE-gecertificeerde USB-adapter te gebruiken die Quick Charge 2.0 ondersteunt.
Afstandsbediening
39
Page 42

2. De batterij plaatsen
1
Schuif de grendel van het deksel van
het batterijvak aan de achterkant van de
afstandsbediening naar beneden om het
deksel te openen.
2
Plaats de Intelligent Battery in het vak. Druk
de batterij op zijn plaats en duw hem naar
boven totdat deze vastklikt.
Sluit het deksel.
3
Voor het verwijderen van de Intelligent Battery opent u het deksel, houd de batterijontgrendelknop ingedrukt en drukt u de batterij naar beneden.
NL
3. Het laadniveau van de batterij en de aan-/uitschakelaar
Druk eenmaal om het batterijniveau te
controleren.
Druk eenmaal, druk nogmaals en houd
gedurende twee seconden ingedrukt om
in- of uit te schakelen.
3
2
Laag Hoog
4. De antennes voorbereiden
Vouw de antennes van de afstandsbediening open en pas ze aan. De signaalsterkte
varieert afhankelijk van de positie van de antennes.
Batterijontgrendelknop
Sterk Zwak
Optimaal zendbereik
40
De antennes invouwen
Probeer de drone binnen het optimale zendbereik te
houden. Als het signaal zwak is, past u de antennes
aan of laat u de drone dichterbij vliegen.
Page 43

5. Activering
Wanneer de afstandsbediening is ingeschakeld, sluit u de USB-C-poort op uw computer aan en
voert u DJI ASSISTANTTM 2 uit voor activering.
Download DJI Assistant 2 at https://www.dji.com/fpv/downloads
6. Koppelen
1. Schakel de luchteenheid en de DJI FPV afstandsbediening in.
2. Druk op de koppelknop van de luchteenheid en druk vervolgens tegelijkertijd op de opnameknop,
de C-knop en de rechterdraaiknop op de afstandsbediening.*
3. Beide koppelingsstatusindicators worden continu groen als ze zijn gekoppeld.
* Als ze klaar zijn om te worden gekoppeld, geven de apparaten de volgende indicatie:
Luchteenheid: de koppelingsstatusindicator wordt continu rood.
Afstandsbediening: de afstandsbediening piept voortdurend en de statusindicator knippert blauw.
Als u de DJI FPV-bril en afstandsbediening tegelijk wilt gebruiken, moet de luchteenheid
vóór de afstandsbediening aan de bril worden gekoppeld.
Technische gegevens
Afstandsbediening
Gewicht
Gebruiksfrequentie
Max. Zendafstand
(Vrij van obstakels en interferentie)
Zendervermogen (EIRP)
Bedrijfsstroom/-spanning
Bedrijfstemperatuur
Oplaadtemperatuur 5 ° tot 40 °C (41 ° tot 104 °F)
Afstandsbediening Intelligent Battery (WB37-4920mAh-7,6V)
Batterijtype
Capaciteit
Spanning
Vermogen
765 g
5.725 – 5.850 GHz
FCC/SRRC: 4 km; CE: 0,7 km
FCC: <30 dBm; CE: <14 dBm; SRRC: <19 dBm
0,6 A bij 7,6 V
0 ° tot 40 °C (32 ° tot 104 °F)
LiPo 2S
4920 mAh
7,6 V
37,39 Wh
NL
41
Page 44

Exoneração de responsabilidade
12
13
14
15
16
17
18
19
Parabéns por ter adquirido o seu novo produto da DJI™. As informações contidas neste documento
afetam a sua segurança e os seus direitos legais e responsabilidades. Leia este documento
cuidadosamente na íntegra para assegurar uma conguração correta antes da utilização. A não
leitura e o incumprimento das instruções e avisos contidos neste documento podem resultar em
ferimentos graves para si ou terceiros, em danos ao seu produto da DJI ou em danos noutros
objetos que se encontrem nas proximidades. Este e todos os outros documentos de garantia estão
sujeitos a alteração ao critério exclusivo da DJI. Visite www.dji.com para obter as informações mais
recentes sobre este produto.
A utilização deste produto significa que o utilizador leu cuidadosamente esta declaração de
exoneração de responsabilidade e o aviso e que compreende e aceita cumprir os termos e
condições aqui expostos. O utilizador concorda que é o único responsável pela sua conduta
durante a utilização deste produto e pelas possíveis consequências daí resultantes. O utilizador
compromete-se a utilizar este produto apenas para fins que sejam aceitáveis e estejam em
conformidade com todas as leis, regras e regulamentações aplicáveis e ainda todos os termos,
precauções, práticas, políticas e diretrizes que a DJI disponibilize e possa vir a disponibilizar.
A DJI não assume qualquer responsabilidade pelos danos, ferimentos ou quaisquer
responsabilidades legais decorrentes direta ou indiretamente da utilização deste produto. O
utilizador deve observar as práticas seguras e legais, incluindo, entre outras, as apresentadas no
PT
presente documento.
Não obstante o disposto acima, os seus direitos legais ao abrigo da legislação nacional aplicável
não são afetados por esta isenção de responsabilidade.
A DJI é uma marca comercial da SZ DJI TECHNOLOGY CO., LTD. (abreviada como "DJI") e das
respetivas empresas aliadas. Todos os nomes de produtos, marcas, etc., incluídos no presente
documento são marcas comerciais ou marcas comerciais registadas das respetivas empresas
detentoras. Este produto e este documento estão protegidos por direitos de autor pela DJI, com
todos os direitos reservados. Nenhuma parte deste produto ou documento deverá ser reproduzida,
seja de que forma for, sem o consentimento ou autorização prévios, por escrito, da DJI.
Introdução
O telecomando FPV da DJI apresenta uma tecnologia avançada de transmissão HDL FPV da DJI
com uma gama de transmissão de até 4 km* e uma latência tão baixa quanto 7 ms, melhorando a
capacidade de anti-interferência e melhorando a uência e estabilidade da transmissão de vídeo.
Com pilhas substituíveis que podem ser trocadas rapidamente, o telecomando também dispõe de
botões personalizáveis. Equipado com parafusos de ajuste de garra, os utilizadores podem ajustar
facilmente a suavidade dos manípulos de controlo para se adequarem à sua preferência.
1. Botão de alimentação
2. Botão C (personalizável)
3. Manípulos de controlo
9
3
1
5
8
7
* O telecomando pode alcançar a sua distância máxima de transmissão (FCC) numa área ampla e aberta,
sem interferências eletromagnéticas e a uma altitude de cerca de 120 metros.
42
4
10
2
6
4. Fixação de correia
11
5. LED de estado
6. LEDs de nível da bateria
7. Porta PPM do simulador
8. Porta USB-C
9. Interruptor SB
10. Interruptor SC
11. Antenas
Page 45

24
18
19
20
21
a
b
22
23
24
a
b
20
18
12
13
14
15
17
16
19
22
a
b
a
b
21
23
25
12. Botão esquerdo
13. Botão de gravação
14. Interruptor SA
15. Botão direito
16. Interruptor SD
17. Botão Voltar
18. Parafuso de ajuste do manípulo direito
(horizontal)
19. Parafuso de ajuste do manípulo direito (vertical)
20. Parafusos de ajuste do manípulo do acelerador*
(Modo 1)
a. Parafuso de ajuste da borboleta da catraca
b. Parafuso de ajuste do acelerador suave
* Para escolher entre uma borboleta de roquete e um acelerador suave, os utilizadores devem ajustar o
parafuso de ajuste do manípulo de aceleração que corresponde ao modo de controlo atual. Dependendo
do modo de controlo, o parafuso de ajuste do manípulo vertical correspondente não está disponível.
21. Parafusos de ajuste do manípulo do
acelerador* (Modo 2)
a. Parafuso de ajuste do acelerador suave
b. Parafuso de ajuste da borboleta da
catraca
22. Parafuso de ajuste do manípulo esquerdo
(vertical)
23. Parafuso de ajuste do manípulo esquerdo
(horizontal)
24. Tampa da bateria
25. Bloqueio da tampa da bateria
1. Carregamento da bateria
Para ativar a bateria, carregue-a totalmente antes de a utilizar
pela primeira vez.
PT
Tomada elétrica
100-240 V
Adaptador USB Cabo USB-C
Recomenda-se a utilização do adaptador USB dos óculos DJI RE, RONIN™-S, SPARK™ ou um
adaptador USB certificado pela FCC/CE que suporte a Carga Rápida 2.0.
Telecomando
43
Page 46

2. Montagem da bateria
1
Deslize o bloqueio da tampa da bateria na
parte traseira do telecomando para baixo
para abrir a tampa.
2
Insira a bateria inteligente no compartimento.
Pressione a bateria no lugar e empurre para
cima, até ouvir um clique.
3
Feche a tampa.
Para retirar a bateria inteligente, abra a tampa, prima e mantenha o botão de libertação da bateria
premido e, em seguida, empurre a bateria para baixo.
3
2
3. Vericar os níveis da bateria e ligar/desligar a alimentação
PT
Prima uma vez para verificar o nível da
bateria.
Prima uma vez e prima novamente e
mantenha premido durante dois segundos
para ligar ou desligar.
Baixo Alto
4. Preparar as antenas
Desdobre e ajuste as antenas do telecomando. A intensidade do sinal varia consoante a
posição das antenas.
Botão de
libertação
da bateria
Forte Fraco
Alcance de transmissão ideal
44
Desdobrar as antenas
Tente manter a aeronave dentro do intervalo
ideal de transmissão. Se o sinal estiver fraco,
ajuste as antenas ou aproxime a aeronave.
Page 47

5. Ativação
Quando o telecomando estiver ligado, ligue a porta USB-C ao seu computador e execute o DJI
ASSISTANTTM 2 para a ativação.
Transra o DJI Assistant 2 em https://www.dji.com/fpv/downloads
6. Ligação
1. Ligue a unidade de ar e o telecomando DJI FPV.
2. Prima o botão de ligação na unidade de ar e, em seguida, prima o botão gravar, o botão C e o
botão direito do telecomando em simultâneo.*
3. Ambososindicadoresdeestadodaligaçãocamverdesxosquandoligadoscomsucesso.
* Quando estiver pronto para ligar, os dispositivos darão a seguinte indicação:
Unidade de ar: o indicador de estado de ligação fica vermelho fixo.
Telecomando: o controlador remoto emite um sinal sonoro contínuo e o indicador de estado pisca a azul.
Se precisar de utilizar os óculos FPV DJI e o telecomando em conjunto, a aeronave deve ser
ligada aos óculos antes do telecomando.
Especicações
Telecomando
Peso
Frequência de funcionamento
Distância máxima de transmissão
(desobstruída, sem interferências)
Alimentação do transmissor (EIRP) FCC: <30 dBm; CE: <14 dBm; SRRC: <19 dBm
Corrente/tensão de funcionamento
Temperatura de funcionamento
Temperatura de carregamento 0° a 40° C (32° a 104° F)
Bateria inteligente do telecomando (WB37-4920mAh-7,6V)
Tipo de bateria
Capacidade
Tensão
Energia
765 g
5,725 - 5,850 GHz
FCC/SRRC: 4 km; CE: 0,7 km
0,6 A a 7,6 V
0° a 40° C (32° a 104° F)
LiPo 2S
4920 mAh
7,6 V
37,39 Wh
PT
45
Page 48

Isenção de responsabilidade
12
13
14
15
16
17
18
19
Parabéns por ter adquirido o seu novo produto DJI™. As informações contidas neste documento
afetam a sua segurança, os seus direitos legais e as suas responsabilidades. Leia este documento
cuidadosamente e por inteiro para assegurar uma configuração correta antes do uso. A não
observância das instruções e advertências deste documento pode resultar em lesões graves para
si mesmo ou terceiros, danos ao seu produto DJI ou a outros objetos nas proximidades. Este e
todos os outros documentos correlacionados estão sujeitos a alterações a critério exclusivo da DJI.
Visite www.dji.com para obter as informações mais recentes sobre este produto.
A utilização deste produto conrma que o usuário leu cuidadosamente este aviso e advertência, e
que compreende e aceita obedecer aos termos e condições aqui expostos. O usuário concorda
que é o único responsável pela sua conduta durante o uso deste produto e pelas possíveis
consequências dele resultantes. O usuário compromete-se a utilizar este produto apenas para ns
que sejam aceitáveis e estejam em conformidade com todas as leis, regras e regulamentações
aplicáveis, e ainda todos os termos, precauções, práticas, políticas e diretrizes que a DJI
disponibilize e possa vir a disponibilizar.
A DJI não assume qualquer responsabilidade pelos danos, ferimentos ou quaisquer
responsabilidades legais decorrentes direta ou indiretamente da utilização deste produto. O usuário
deve observar as práticas seguras e legais, incluindo, entre outras, as apresentadas no presente
documento.
Não obstante o estabelecido acima, seus direitos legais previstos na legislação federal aplicável
PT-BR
não são afetados por este aviso de isenção.
DJI é uma marca comercial da SZ DJI TECHNOLOGY CO., LTD. (abreviada como “DJI”) e das
respectivas empresas aliadas. Nomes de produtos, marcas, etc. que aparecem neste documento
são marcas comerciais ou marcas registradas de suas respectivas empresas proprietárias. Este
produto e documento são de propriedade da DJI, com todos os direitos reservados. Nenhuma
parte deste produto ou documento deve ser reproduzida de qualquer forma sem o consentimento
prévio por escrito ou autorização da DJI.
Introdução
O controle remoto FPV DJI possui tecnologia avançada de transmissão DJI HDL FPV, com alcance
de transmissão de até 4 km* e latência de até 7 ms, aumentando a capacidade anti-interferência
e melhorando a fluência e a estabilidade da transmissão de vídeo. Com baterias substituíveis
que podem ser rapidamente trocadas, o controle remoto também possui botões personalizáveis.
Equipado com parafusos de ajuste dos pinos, os usuários podem facilmente ajustar a suavidade
dos pinos de controle para atender às suas preferências.
1. Botão liga/desliga
2. Botão C (personalizável)
9
11
3
1
5
8
7
* O controle remoto alcança a sua distância máxima de transmissão em uma área aberta sem interferência
eletromagnética e a uma altitude de aproximadamente 120 metros.
46
4
10
2
6
3. Pinos de controle
4. Acessório para cordão de segurança
5. LED de status
6. LEDs de nível da bateria
7. Entrada do simulador PPM
8. Entrada USB-C
9. Interruptor SB
10. Interruptor SC
11. Antenas
Page 49

24
18
19
20
21
a
b
22
23
24
a
b
20
18
12
13
14
15
17
16
19
22
a
b
a
b
21
23
25
12. Botão de rolagem esquerdo
13. Botão de gravação
14. Interruptor SA
15. Botão de rolagem direito
16. Interruptor SD
17. Botão Voltar
18. Parafuso de ajuste do pino direito (horizontal)
19. Parafuso de ajuste do pino direito (vertical)
20. Parafusos de ajuste do pino de aceleração*
(Modo 1)
a. Parafuso de ajuste da catraca de
aceleração
b. Parafuso de ajuste da aceleração suave
* Para escolher entre um acelerador de catraca e um acelerador suave, os usuários devem ajustar o
parafuso de ajuste do acelerador que corresponde ao modo de controle atual. Dependendo do modo de
controle, o parafuso de ajuste vertical correspondente não estará disponível.
21. Parafusos de ajuste do pino de aceleração*
(Modo 2)
a. Parafuso de ajuste da aceleração suave
b. Parafuso de ajuste da catraca de
aceleração
22. Parafuso de ajuste do pino esquerdo
(vertical)
23. Parafuso de ajuste do pino esquerdo
(horizontal)
24. Tampa da bateria
25. Trava da tampa da bateria
1. Carregando a bateria
Para ativar a bateria, carregue-a totalmente antes de utilizá-la pela
primeira vez.
PT-BR
Tomada elétrica
100-240 V
Adaptador USB Cabo USB-C
Recomenda-se usar o adaptador USB do DJI Goggles RE, RONIN™-S, SPARK™ ou um
adaptador USB com certificação FCC/CE que suporte Quick Charge 2.0.
Controle remoto
47
Page 50

2. Montagem da bateria
1
Deslize para baixo a trava da tampa da
bateria na parte traseira do controle remoto
para abrir a tampa.
2
Insira a Bateria Inteligente no compartimento.
Pressione a bateria no lugar e empurre para
cima até que haja um clique.
3
Feche a tampa.
Para remover a Bateria Inteligente, abra a tampa, pressione e segure o botão de liberação
da bateria e empurre a bateria para baixo.
3
2
3. Vericação dos níveis da bateria e ligar/desligar
PT-BR
Pressione uma vez para verificar o nível
da bateria.
Pressione uma vez, pressione novamente
e segure por dois segundos para ligar ou
desligar.
4. Preparando as antenas
Desdobre e ajuste as antenas do controle remoto. A força do sinal varia dependendo da
posição das antenas.
Botão de
remoção
da bateria
Baixo Alto
Forte Fraco
Alcance ideal de transmissão
48
Desdobrando as antenas
Tente manter a aeronave dentro do alcance
ideal de transmissão. Se o sinal estiver fraco,
ajuste as antenas ou voe próximo da aeronave.
Page 51

5. Ativação
Quando o controle remoto estiver ligado, conecte a entrada USB-C ao seu computador e
execute o DJI ASSISTANTTM 2 para ativação.
Faça o download do DJI Assistant 2 em https://www.dji.com/fpv/downloads
6. Vinculação
1. Ligue a Unidade Aérea e o controle remoto FPV DJI.
2. Pressione o botão de vinculação na Unidade Aérea e, em seguida, pressione o botão de
gravação, o botão C e o botão direito no controle remoto, simultaneamente.*
3. Osindicadoresdestatusdavinculaçãocamverdesquandoconectadoscomêxito.
* Quando estiver pronto para vincular, os dispositivos darão a seguinte indicação:
Unidade Aérea: o indicador de status de vinculação fica vermelho sólido.
Controle remoto: o controle remoto emite um bipe contínuo e a luz do indicador de status pisca em azul.
Se você precisar usar o DJI FPV Goggles e o controle remoto juntos, a Unidade Aérea
deverá ser vinculada aos Goggles antes do controle remoto.
Especicações
Controle remoto
Peso
Frequência de funcionamento
Máx. Distância de transmissão
(sem obstruções, livre de interferências)
Potência do transmissor (EIRP) FCC: < 30 dBm; CE: < 14 dBm; SRRC: < 19 dBm
Corrente/tensão de funcionamento
Temperatura de funcionamento
Temperatura de carregamento 5° a 40° C
Bateria inteligente do controle remoto (WB37-4920 mAh-7,6 V)
Tipo de bateria
Capacidade
Tensão
Energia
765 g
5.725 a 5.850 GHz
FCC/SRRC: 4 km; CE: 0,7 km
0,6 A a 7,6 V
0 a 40 °C
LiPo 2S
4.920 mAh
7,6 V
37,39 Wh
PT-BR
49
Page 52

Отказ от ответственности
12
13
14
15
16
17
18
19
Поздравляем с приобретением нового продукта DJI™! Информация, содержащаяся в этом
документе, касается вашей безопасности, законных прав и обязанностей. Чтобы должным
образом настроить продукт перед его использованием, внимательно ознакомьтесь с полным
содержанием данного документа. Пренебрежение содержимым данного документа и
несоблюдение мер безопасности может привести к серьезным травмам, повреждению продукта
DJI или другого имущества, находящегося поблизости. Компания DJI вправе единолично вносить
изменения в содержание данного и всех сопутствующих документов. Для получения последней
информации по продукту посетите веб-сайт www.dji.com.
Используя данный продукт, вы подтверждаете, что внимательно ознакомились с заявлением
об отказе от ответственности и предупреждением и соглашаетесь выполнять содержащееся
в данном документе пользовательское соглашение. Вы несете полную ответственность
за эксплуатацию данного продукта и все возможные последствия его использования.
Вы соглашаетесь использовать данный продукт только в правомерных целях и в полном
соответствии с применимым законодательством, правилами и предписаниями, а также всеми
условиями, мерами предосторожности, установками, курсами и руководствами, которые были
предоставлены и могут быть предоставлены в будущем компанией DJI.
DJI не несет ответственность за повреждения, травмы или любую юридическую ответственность,
прямо или косвенно вызванную использованием данного продукта. На пользователя возлагается
обязанность соблюдать правила техники безопасности и дозволенные законом практики, в
частности, изложенные в настоящем документе.
Независимо от изложенного выше, данное заявление об отказе от ответственности не влияет на
RU
законные права клиента, гарантируемые применимым национальным законодательством.
DJI – это товарный знак компании SZ DJI TECHNOLOGY CO., LTD. (сокращенно «DJI») и ее
дочерних компаний. Названия продуктов, торговых марок и т.д., содержащиеся в данном
документе, являются товарными знаками или зарегистрированными товарными знаками
соответствующих компаний. Этот продукт и документ DJI охраняются авторским правом. Все
права защищены. Никакая часть данного продукта или документа не может быть воспроизведена
в какой-либо форме без предварительного письменного согласия или разрешения DJI.
Введение
В пульте управления DJI FPV используется современная технология передачи DJI HDL
FPV с дальностью передачи сигнала до 4 км* и задержкой сигнала до 7 мс, что повышает
помехозащищенность и улучшает плавность и стабильность передачи видео. Пульт управления
оснащен аккумуляторами, которые можно быстро заменить, а также настраиваемыми кнопками.
Регулировочные винты позволяют легко настроить плавность хода джойстиков в соответствии с
предпочтениями пользователей.
1.Кнопкапитания
2.КнопкаC(настраиваемая)
9
3
1
5
8
7
*Пультуправленияможетобеспечитьприблизительнуюмаксимальнуюдальностьпередачисигнала(FCC)
приработенаоткрытомпространствебезэлектромагнитныхпомехпривысотеполетаоколо120м.
50
4
10
2
6
3.Джойстики
11
4.Отверстиедляремня
5.Светодиодныйиндикаторсостояния
6.Светодиодныеиндикаторыуровня
зарядааккумулятора
7.ПортPPMсимулятора
8.ПортUSB-C
9.ПереключательSB
10.ПереключательSC
11.Антенны
Page 53

24
18
19
20
21
a
b
22
23
24
a
b
20
18
12
13
14
12.Левоеколесико
13.Кнопказаписи
14.ПереключательSA
15.Правоеколесико
16.ПереключательSD
17.Кнопкавозврата
18.Регулировочныйвинт правого джойстика
(горизонтальный)
19.Регулировочныйвинт правого джойстика
(вертикальный)
20.Регулировочныевинтыджойстика тяги*
(режим1)
a.Регулировочныйвинтпрерывистой
регулировкитяги
б.Регулировочныйвинтплавной
регулировкитяги
*Для выборамежду прерывистой и плавнойрегулировкой тяги необходиморегулировать тот винт
джойстикатяги, который соответствует текущемурежиму управления. В зависимостиот режима
управления,соответствующий регулировочный винтджойстика вертикального движениябудет
недоступен.
15
17
16
21.Регулировочные винты джойстикатяги*
22.Регулировочныйвинт левого джойстика
23.Регулировочныйвинт левого джойстика
24.Крышкаотсекааккумулятора
25.Фиксаторкрышкиотсекааккумулятора
19
(режим2)
a.Регулировочныйвинтплавной
регулировкитяги
б.Регулировочныйвинтпрерывистой
регулировкитяги
(вертикальный)
(горизонтальный)
22
a
b
a
b
21
23
25
1. Зарядка аккумулятора
Полностью зарядите аккумулятор перед первым использованием.
RU
Розетка
100–240В
USB-адаптер КабельUSB-C
Рекомендуетсяиспользовать USB-адаптердля DJIGoggles RE, RONIN™-S,SPARK™или любой
сертифицированныйFCC/CEUSB-адаптер,поддерживающийтехнологиюQuickCharge2.0.
Пультуправления
51
Page 54

2. Установка аккумулятора
1
Сдвиньте фиксатор на обратной стороне
пульта управления вниз, чтобы открыть
крышку.
2
Вставьте аккумулятор Intelligent Battery в
отсек и надавите на него до щелчка.
3
Закройте крышку.
Чтобыснять аккумулятор Intelligent Battery,откройтекрышку,нажмите и удерживайте
кнопкуотсоединенияаккумулятораинадавитенааккумуляторвниз.
3
2
3. Проверка уровня заряда аккумулятора и включение/
выключение питания
Нажмите один раз для проверки уровня
RU
заряда аккумулятора.
Нажмите на кнопку один раз, затем
нажмите снова и удерживайте в
течение двух секунд для включения или
выключения.
Низкий Высокий
4. Подготовка антенн
Разложите и отрегулируйте положение антенн пульта управления. Мощность сигнала зависит
от положения антенн.
Кнопка
отсоединения
аккумулятора
Сильный Слабый
Оптимальная дальность
передачи сигнала
52
Раскладывание антенн
Следите за тем, чтобы дрон оставался в
пределах оптимальной дальности передачи
сигнала. Если сигнал слабый, отрегулируйте
положение антенн или подведите дрон
ближе.
Page 55

5. Активация
При включенном питании пульта управления подключите его через порт USB-C к компьютеру
и запустите приложение DJI ASSISTANTTM 2 для активации.
Загрузите приложение DJI Assistant 2 по ссылке https://www.dji.com/fpv/downloads
6. Сопряжение
1. ВключитевоздушныймодульипультуправленияDJIFPV.
2. Нажмитекнопкусопряжениянавоздушноммодуле,азатемодновременнонажмитекнопку
записи,кнопкуCиправоеколесиконапультеуправления*.
3. Приуспешномсопряженииобаиндикаторасостояниясопряженияначнутнепрерывно
светитьсязеленымцветом.
* Состояниеготовностиустройствобозначаетсяследующимобразом:
Воздушныймодуль:индикаторсостояниясопряжениявоздушногомодулясветитсякраснымцветом.
Пультуправления: пультуправления издает непрерывныйзвуковой сигнал, аиндикатор состояния мигает
синим.
Вслучае необходимости совместногоиспользования очков DJI FPVи пульта управления
необходимовыполнить сопряжение воздушногомодуля с очками досопряжения с пультом
управления.
Технические характеристики
Пульт управления
Масса 765г
Макс.дальностьпередачисигнала
(приотсутствиипрепятствийипомех)
Мощностьпередатчика(ЭИИМ) FCC:<30дБм;CE:<14дБм;SRRC:<19дБм
Рабочийток/напряжение
Диапазонрабочихтемператур
Диапазонтемпературзарядки +5°...+40°C
Аккумулятор Intelligent Battery для пульта управления (WB37-4920 мАч-7,6 В)
Типаккумулятора
Емкость
Напряжение
Энергия
FCC/SRRC:4км;CE:0,7км
0,6Апри7,6В
0...+40°C
Литий-полимерный2S
4920мАч
7,6В
37,39Вт⋅ч
RU
53
Page 56

Compliance Information
FCC Compliance Notice
This device complies with Part 15 of the FCC Rules. Operation is subject to the following two conditions: (1) This device
may not cause harmful interference, and (2) This device must accept any interference received, including interference that
may cause undesired operation.
Any changes or modications not expressly approved by the party responsible for compliance could void the user’s
authority to operate the equipment.
This equipment has been tested and found to comply with the limits for a Class B digital device, pursuant to part 15 of
the FCC Rules. These limits are designed to provide reasonable protection against harmful interference in a residential
installation. This equipment generates, uses and can radiate radio frequency energy and, if not installed and used
in accordance with the instructions, may cause harmful interference to radio communications. However, there is no
guarantee that interference will not occur in a particular installation. If this equipment does cause harmful interference to
radio or television reception, which can be determined by turning the equipment off and on, the user is encouraged to try
to correct the interference by one or more of the following measures:
—Reorient or relocate the receiving antenna.
—Increase the separation between the equipment and receiver.
—Connect the equipment into an outlet on a circuit different from that to which the receiver is connected.
—Consult the dealer or an experienced radio/TV technician for help.
RF Exposure Information
SAR tests are conducted using standard operating positions accepted by the FCC with the device transmitting at its
highest certied power level in all tested frequency bands, although the SAR is determined at the highest certied power
level, the actual SAR level of the device while operating can be well below the maximum value. Before a new model
is a available for sale to the public, it must be tested and certied to the FCC that it does not exceed the exposure
limit established by the FCC, Tests for each product are performed in positions and locations as required by the FCC.
For Handheld operation, this device has been tested and meets the FCC RF exposure guidelines when used with an
accessory designated for this product or when used with an acces sory that contains no metal.
For body worn operation, this Remote Controller (Model: P1RC) has been tested and meets the FCC RF exposure
guidelines when used with an accessory designated for this product.Non‐compliance with the above restrictions may
result in violation of RF exposure guidelines.
ISED Warning
This device contains licence-exempt transmitter(s)/receiver(s) that comply with Innovation, Science and Economic
Development Canada’s licence-exempt RSS(s). Operation is subject to the following two conditions: (1)This device may
not cause interference.(2)This device must accept any interference, including interference that may cause undesired
operation of the device.
L’émetteur/récepteur exempt de licence contenu dans le présent appareil est conforme aux CNR d’Innovation, Sciences
et Développement économique Canada applicables aux appareils radio exempts de licence. L’exploitation est autorisée
aux deux conditions suivantes :(1)L’appareil ne doit pas produire de brouillage; (2)L’appareil doit accepter tout brouillage
radioélectrique subi, même si le brouillage est susceptible d’en compromettre le fonctionnement.
SAR tests are conducted using standard operating positions accepted by the ISED with the device transmitting at its
highest certied power level in all tested frequency bands, although the SAR is determined at the highest certied power
level, the actual SAR level of the device while operating can be well below the maximum value. Before a new model
is a available for sale to the public, it must be tested and certied to the ISED that it does not exceed the exposure
limit established by the ISED, Tests for each product are performed in positions and locations as required by the ISED.
For Handheld operation, this device has been tested and meets the ISED RF exposure guidelines when used with an
accessory designated for this product or when used with an acces sory that contains no metal.
For body worn operation, this Remote Controller (Model: P1RC) has been tested and meets the ISED RF exposure
guidelines when used with an accessory designated for this product.Non‐compliance with the above restrictions may
result in violation of RF exposure guidelines.
Les essais SAR sont effectués à l’aide de positions de fonctionnement standard acceptées par la ISED avec l’appareil
transmettant à son niveau de puissance certié le plus élevé dans toutes les bandes de fréquences testées, bien que
le SAR soit déterminé au niveau de puissance certifié le plus élevé, le SAR réel le niveau de l’appareil pendant le
fonctionnement peut être bien en dessous de la valeur maximale. Avant qu’un nouveau modèle ne soit disponible à la
vente au public, il doit être testé et certié à la ISED qu’il ne dépasse pas la limite d’exposition établie par la ISED, les
essais pour chaque produit sont effectués dans des positions et des emplacements comme exigé par la ISED. Pour le
fonctionnement à main levée, cet appareil a été testé et conforme aux directives d’exposition ISED RF lorsqu’il est utilisé
avec un accessoire désigné pour ce produit ou lorsqu’il est utilisé avec un acces Sory qui ne contient pas de métal.
54
Page 57

Pour le fonctionnement porté par le corps, cette télécommande (modèle: P1RC) a été testée et Directives d’exposition
aux radiofréquences ISED lorsqu’il est utilisé avec un accessoire désigné pour ce produit.
Le non‐respect des restrictions ci‐dessus peut entraîner une violation des directives d’exposition aux RF.
KCC Warning Message
“해당무선설비는 운용 중 전파혼신 가능성이 있으므로 인명안전과 관련된 서비스는 할 수 없습니다 .”
“해당 무선설비는 운용 중 전파혼신 가능성이 있음”
NCC Warning Message
低功率電波輻射性電機管理辦法
第十二條 經型式認證合格之低功率射頻電機,非經許可,公司、商號或使用者均不得擅自變更頻率、加大功率或變更原設
計之特性及功能。
第十四條 低功率射頻電機之使用不得影響飛航安全及干擾合法通信;經發現有干擾現象時,應改善至無干擾時方得繼續使用。
前項合法通信,指依電信法規定作業之無線電通信。低功率射頻電機須忍受合法通信或工業、科學及醫療用電波輻射性電
機設備之干擾。
注意:
1. 應避免影響附近雷達系統之操作。
2. 高增益指向性天線只得應用於固定式點對點系統。
EU Compliance Statement: SZ DJI TECHNOLOGY CO., LTD. hereby declares that this device is in compliance with the
essential requirements and other relevant provisions of the Directive 2014/53/EU.
A copy of the EU Declaration of Conformity is available online at www.dji.com/euro-compliance
EU contact address: DJI GmbH, Industriestrasse 12, 97618, Niederlauer, Germany
Declaración de cumplimiento UE: SZ DJI TECHNOLOGY CO., LTD. por la presente declara que este dispositivo cumple
los requisitos básicos y el resto de provisiones relevantes de la Directiva 2014/53/EU.
Hay disponible online una copia de la Declaración de conformidad UE en www.dji.com/euro-compliance
Dirección de contacto de la UE: DJI GmbH, Industriestrasse 12, 97618, Niederlauer, Germany
EU-verklaring van overeenstemming: SZ DJI TECHNOLOGY CO., LTD. verklaart hierbij dat dit apparaat voldoet aan de
essentiële vereisten en andere relevante bepalingen van Richtlijn 2014/53/EU.
De EU-verklaring van overeenstemming is online beschikbaar op www.dji.com/euro-compliance
Contactadres EU: DJI GmbH, Industriestrasse 12, 97618, Niederlauer, Germany
Declaração de conformidade da UE: A SZ DJI TECHNOLOGY CO., LTD. declara, através deste documento, que este
dispositivo está em conformidade com os requisitos essenciais e outras disposições relevantes da Diretiva 2014/53/EU.
Existe uma cópia da Declaração de conformidade da UE disponível online em www.dji.com/euro-compliance
Endereço de contacto na UE: DJI GmbH, Industriestrasse 12, 97618, Niederlauer, Germany
Dichiarazione di conformità UE: SZ DJI TECHNOLOGY CO., LTD. dichiara che il presente dispositivo è conforme ai
requisiti essenziali e alle altre disposizioni rilevanti della direttiva 2014/53/EU.
Una copia della dichiarazione di conformità UE è disponibile online all'indirizzo Web www.dji.com/euro-compliance
Indirizzo di contatto UE: DJI GmbH, Industriestrasse 12, 97618, Niederlauer, Germany
Déclaration de conformité UE : Par la présente, SZ DJI TECHNOLOGY CO., LTD déclare que cet appareil est conforme
aux principales exigences et autres clauses pertinentes de la directive européenne 2014/53/EU.
Une copie de la déclaration de conformité UE est disponible sur le site www.dji.com/euro-compliance
Adresse de contact pour l'UE : DJI GmbH, Industriestrasse 12, 97618, Niederlauer, Germany
EU-Compliance: Hiermit erklärt SZ DJI TECHNOLOGY CO., LTD., dass dieses Gerät den wesentlichen Anforderungen
und anderen einschlägigen Bestimmungen der EU-Richtlinie 2014/53/EU entspricht.
Eine Kopie der EU-Konformitätserklärung nden Sie online auf www.dji.com/euro-compliance.
Kontaktadresse innerhalb der EU: DJI GmbH, Industriestrasse 12, 97618, Niederlauer, Germany
CAUTION: RISK OF EXPLOSION IF BATTERY IS REPLACED BY AN INCORRECT TYPE. DISPOSE OF USED
BATTERIES ACCORDING TO THE INSTRUCTIONS
Environmentally friendly disposal
Old electrical appliances must not be disposed of together with the residual waste, but have to be disposed of separately.
The disposal at the communal collecting point via private persons is for free. The owner of old appliances is responsible to
bring the appliances to these collecting points or to similar collection points. With this little personal effort, you contribute
to recycle valuable raw materials and the treatment of toxic substances.
55
Page 58

Umweltfreundliche Entsorgung
Elektro-Altgeräte dürfen nicht mit gewöhnlichem Abfall entsorgt werden und müssen separat entsorgt werden. Die
Entsorgung an kommunalen Sammelstellen ist für Privatpersonen kostenlos. Die Eigentümer der Altgeräte sind für den
Transport zu den Sammelstellen verantwortlich. Durch diesen geringen Aufwand können Sie zur Wiederverwertung von
wertvollen Rohmaterialien beitragen und dafür sorgen, dass umweltschädliche und giftige Substanzen ordnungsgemäß
unschädlich gemacht werden.
Tratamiento de residuos responsable con el medio ambiente
Los aparatos eléctricos viejos no pueden desecharse junto con los residuos orgánicos, sino que deben ser desechados
por separado. Existen puntos limpios donde los ciudadanos pueden dejar estos aparatos gratis. El propietario de los
aparatos viejos es responsable de llevarlos a estos puntos limpios o similares puntos de recogida. Con este pequeño
esfuerzo estás contribuyendo a reciclar valiosas materias primas y al tratamiento de residuos tóxicos.
Mise au rebut écologique
Les appareils électriques usagés ne doivent pas être éliminés avec les déchets résiduels. Ils doivent être éliminés
séparément. La mise au rebut au point de collecte municipal par l'intermédiaire de particuliers est gratuite. Il incombe au
propriétaire des appareils usagés de les apporter à ces points de collecte ou à des points de collecte similaires. Avec ce
petit effort personnel, vous contribuez au recyclage de matières premières précieuses et au traitement des substances
toxiques.
Smaltimento ecologico
I vecchi dispositivi elettrici non devono essere smaltiti insieme ai riuti residui, ma devono essere smaltiti separatamente.
Lo smaltimento da parte di soggetti privati presso i punti di raccolta pubblici è gratis. È responsabilità del proprietario
dei vecchi dispositivi portarli presso tali punti di raccolta o punti di raccolta analoghi. Grazie a questo piccolo impegno
personale contribuirete al riciclo di materie prime preziose e al corretto trattamento di sostanze tossiche.
Milieuvriendelijk afvoeren
Oude elektrische apparaten mogen niet worden weggegooid samen met het restafval, maar moeten afzonderlijk worden
afgevoerd. Afvoeren via het gemeentelijke inzamelpunt is gratis voor particulieren. De eigenaar van oude toestellen
is verantwoordelijk voor het inleveren van de apparaten op deze of vergelijkbare inzamelpunten. Met deze kleine
persoonlijke inspanning lever je een bijdrage aan de recycling van waardevolle grondstoffen en de verwerking van giftige
stoffen.
Eliminação ecológica
Os aparelhos elétricos antigos não podem ser eliminados juntamente com os materiais residuais. Têm de ser
eliminados separadamente. A eliminação no ponto de recolha público através de entidades particulares é gratuita. É
da responsabilidade do proprietário de aparelhos antigos levá-los a estes pontos de recolha ou a pontos de recolha
semelhantes. Com este pequeno esforço pessoal, contribui para a reciclagem de matérias-primas úteis e para o
tratamento de substâncias tóxicas.
Thailand Warning message
เครื่องโทรคมนาคมและอุปกรณ์นี้ มีความสอดคล้องตามข้อกำาหนดของ กทช.
部件名称
线路板
外壳
金属部件(铜合金)
内部线材
其他配件
本表格依据 SJ/T 11364 的规定编制。
○:表示该有害物质在该部件所有均质材料中的含量均在 GB/T 26572 规定的限量要求以下。
×:表示该有害物质至少在该部件的某一均质材料中的含量超出 GB/T 26572 规定的限量要求。(产
品符合欧盟 ROHS 指令环保要求)
铅
(Pb)汞(Hg)镉(Cd)
× ○ ○ ○ ○ ○
× ○ ○ ○ ○ ○
× ○ ○ ○ ○ ○
× ○ ○ ○ ○ ○
× ○ ○ ○ ○ ○
有害物质
六价铬
(Cr+6)
多溴联苯
(PBB)
多溴二苯醚
(PBDE)
56
Page 59

Page 60

DJI
Support
DJI
技术支持
DJI
技術支援
DJI
サポート
고객지원
DJI
DJI Support
Asistencia técnica de DJI
Service client DJI
Assistenza DJI
DJI-ondersteuning
Assistência da DJI
Suporte DJI
Техническая поддержка DJI
https://www.dji.com/support
This content is subject to change.
Download the latest version from
https://www.dji.com/fpv
DJI is a trademark of DJI.
Copyright © 2019 DJI All Rights Reserved.
Printed in China.
1HMDRCGS02TY
 Loading...