

Page 1
PHANTOM 2 FPV HUB Kit Instruction V1.0
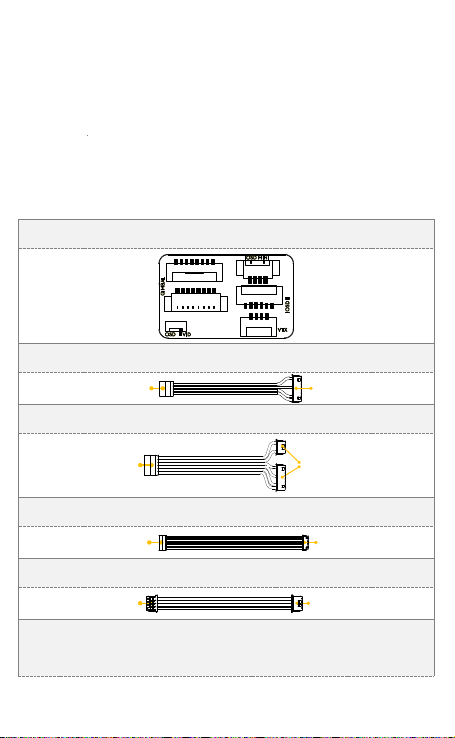
1. FPV HUB, the main connection board used to extend devices.
2. HUB-AVL58 cable, used to connect AVL58 and FPV HUB.
FPV HUB AVL58
3. HUB-iOSD Mark II cable, used to connect iOSD Mark II and FPV HUB.
FPV HUB iOSD Mark II
4. HUB-ZEN cable, used to connect H3-2D gimbal and FPV HUB.
FPV HUB H3-2D
5. HUB-iOSD mini cable, used to connect iOSD mini and FPV HUB.
FPV HUB iOSD mini
6. HUB-VTX cable, used to connect the FPV HUB and other wireless
video transmission module.
PHANTOM 2 FPV HUB kit contains only cables and the FPV HUB to
make connections convenient, easy and thus removing the need to do
soldering when connecting them to an iOSD mini,iOSD Mark II or a DJI
specified wireless video transmission module AVL58. Only 4 cables
require soldering if users opt to use a wireless video transmission that’s
not specified by DJI.
©2013 DJI Innovations. All Rights Reserved.1 |
Page 2
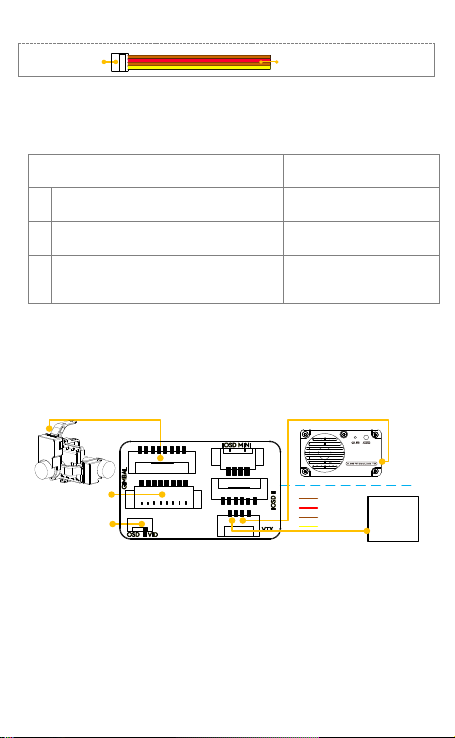
FPV HUB
DJI unspecified wireless
video transmission module
Connections
Collocation
Functions
1
Wireless video transmission module
Video transmitting
2
iOSD mini, Wireless video transmission module
OSD, Video transmitting
3
iOSD MARK II, Wireless video transmission
module
OSD, Video transmitting,
Data record
Micro switch stops at
VID
Connecting with the
8-Pin cable reserved
in PHANTOM 2
HUB-ZEN cable HUB-AVL58 cable
AV L 5 8
TR A NS M IT T E R
DJI
unspecified
wireless video
transmission
module
HUB-VTX cable
GND
VCC
VIDEO_GND
VIDEO
Choose devices collocation used with FPV-HUB according to required
functions.
For wireless video transmission, the ALV58 is recommended for easy
connection, using a HUB-AVL58 cable.
Collocation 1: Wireless video transmission module connected only
1) Stop the Micro switch at VID position if only wireless video
transmission module is connected to the FPV HUB.
2) Wireless video transmission module is alternative to AVL58 or
others unspecified. If using the AVL58, connect it to the FPV HUB
via HUB-AVL58 cable. If using other wireless video transmission
©2013 DJI Innovations. All Rights Reserved.2 |
Page 3

module, connect it to the FPV HUB via HUB-VTX cable according to
GND
GND wire from PHANTOM 2, connect it to the GND port of wireless
video transmission module.
VCC
Power wire from PHANTOM 2 provides 1.5A@12V power. Connect it
to the VCC port of wireless video transmission module.
VIDEO_GND
GND wire of analog video signal, connect it to the VIDEO_GND port
of wireless video transmission module. If the video transmission
module used has only one GND port on the transmitter, it’s alright to
connect both GND and VIDEO_GND to the only GND port.
VIDEO
For analog video output, connect it to the video input port of the
wireless video transmission module.
To the CANBUS Connector
of PHANTOM 2
HUB-iOSD mini cable
Micro switch stops at
OSD
Connecting with the
8-Pin cable reserved
in PHANTOM 2
HUB-ZEN cable
HUB-AVL58 cable
AV L 5 8
TR A NS M IT T ER
HUB-iOSD Mark II cable
To the CAN-BUS
Connector of PHANTOM 2
HUB-VTX cable
DJI unspecified wireless video
transmission module
pins description of the HUB-VTX cable.
Collocation 2&3: iOSD mini/iOSD MARK II and video transmission
module connected
1) It’s alternative to use iOSD mini or iOSD Mark II.
2) Stop the Micro switch at OSD position when iOSD is connected to
©2013 DJI Innovations. All Rights Reserved.3 |
Page 4

the FPV HUB.
3) Please refer to Collocation1 to connect the wireless video
transmission module.
Notes
(1) If using the FPV HUB, the original 4-Pin cable and video cable on
PHANTOM 2 will be spared, please remove and clear them out.
Make sure the video cable is totally cleared without any copper wire
left to prevent short circuit damage.
(2) All the connection operations should be conducted when the
intelligent battery is powered off.
(3) Check whether pins of the connectors on the FPV HUB are straight
and in good condition before connecting. Please and plug and
unplug the connector carefully to avoid damage or short circuit.
(4) It’s not recommended to install the FPV HUB and extended devices
inside the PHANTOM 2 aircraft.
(5) Make sure to install the AVL58 away from the compass to avoid
interference.
(6) FPV HUB is non water-proof, if it is wet, please wash it with alcoholic
cleanser and dry it before use. Otherwise components may be
damaged cause of electrochemical corrosion.
(7) Do not leak any metal, conductive objects into the connector pins of
FPV HUB to prevent short circuit damage.
(8) It’s not recommended to use cables not in the kit to connect devices
©2013 DJI Innovations. All Rights Reserved.4 |
Page 5

to avoid unexpected damage.
(9) Make sure the connection is correct when using wireless video
transmission module unspecified by DJI.
Tips
(1) FPV HUB has a resettable fuse for over circuit precaution. The fuse
will automatically open to prevent damage if the working current of
power consuming devices (except DJI Zenmuse series) goes over 2A
or if VCC and GND short circuited. After the short circuit trouble
issued or the over current load is removed, turn off the power of the
intelligent battery, the fuse will recover after 10secs.
(2) A component will be damaged if PHANTOM 2 has been short circuit
once. In this condition, users still can use the FPV HUB and make the
PHANTOM 2 work well again, ignoring the damaged component.
Declaimer
Please read this disclaimer carefully before using this product. By
using this product, you hereby agree to this disclaimer and signify that
you have read them fully. You agree that you are responsible for your
own conduct and content while using this product, and for any
consequences thereof. DJI accepts no liability for damages or injuries
incurred directly or indirectly caused by abuse or operations failed to
follow this manual of this product.
If you have any questions or concerns regarding you r product, please
contact your dealer or DJI Customer Service.
©2013 DJI Innovations. All Rights Reserved.5 |
 Loading...