

Dirt Devil Whisper-Vac Instruction Manual

A
L
B30”
30”
C
E
K
J
D
F
G
D
STEP 2STEP 1C
STEP 1A
B B
H
STEP 1B
E
H
1 2 3
Installez le
contrepoids
entre deux
sections
Do not let children use or play with
the cleaner. Do not allow swimmers
in the pool during cleaner operation.
Ne laissez pas un enfant utiliser ou jouer
avec l’aspirateur.Il est interdit de se baigner
lorsque l’aspirateur fonctionne.
WARNING
H
ose length should reach farthest point
i
n pool plus 2 additional hose sections.
Le tuyau doit atteindre le point le plus éloigné
du bassin. Ajoutez à cette longueur 2 sections
de tuyau supplémentaires.
In cold water (60 degrees or less),
vacuum will need to be increased to
overcome reduced flexibility of the hose.
lorsque l’eau est froide (moins de 60°F),
l’aspiration doit être augmentée pour compenser
la perte de flexibilité du tuyau.
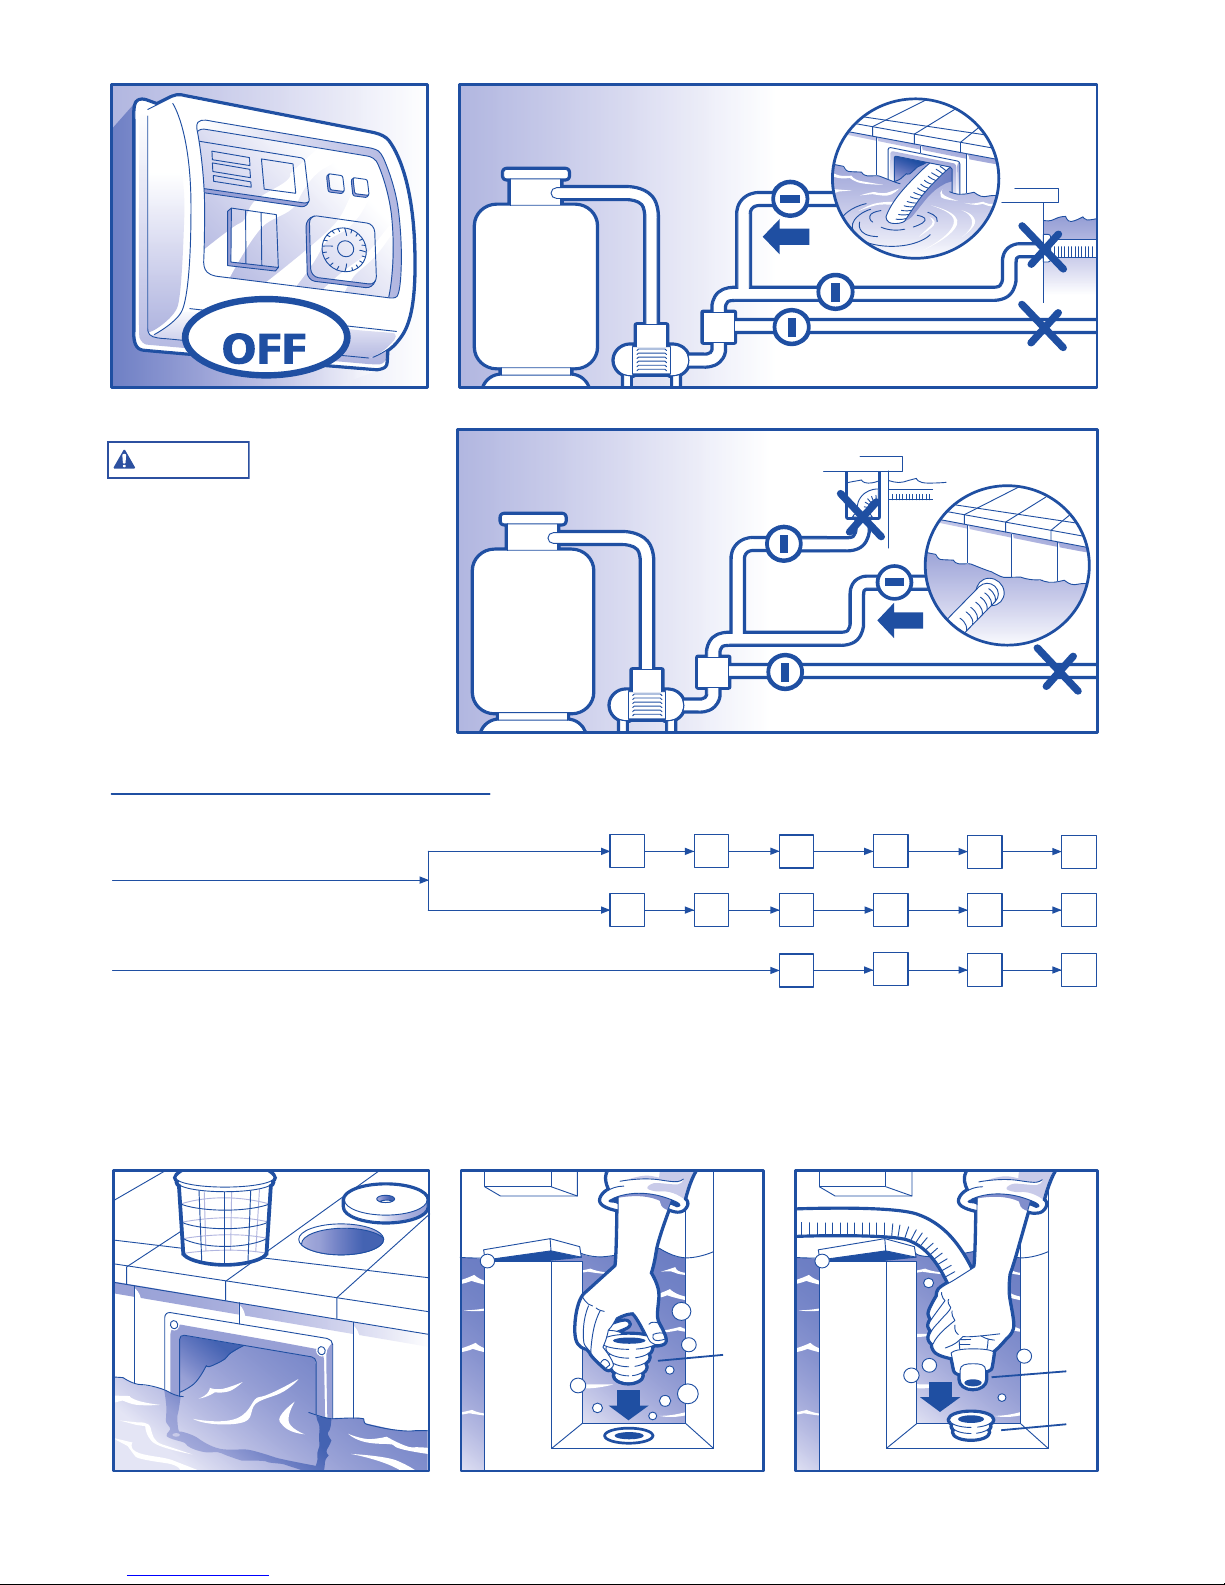
First check the vacuum. Turn pump OFF. Fill hose with water (step 6), connect to skimmer or vacuum fitting (steps 4A, 5A and 7A or step 7C) and
end with Bypass valve (E) and lid (H) as shown below. Turn pump ON. Watch opening in Bypass valve. Once vacuum is correct remove the valve
and store for use in the future. If vacuum is too high and there is no valve on the skimmer to adjust, then the valve can be used between the 2nd
and 3rd hoses as a bypass valve which would provide the correct vacuum to the cleaner. Commencez par vérifier l’aspiration. Coupez le moteur. Remplissez le
tuyau d’eau et connectez-le au skimmer ou à la prise balai d’un côté et au régulateur de pression (E) de l’autre, en terminant par le bouchon (H). Mettez le moteur en marcheet observez l’ouverture du régulateur de pression.
Vacuum too strong.
See troubleshooting
for solutions.
Aspiration trop forte.
Voir solutions Page 4.
Perfect
vacuum
strength.
Aspiration
idéale.
to skimmer or
vacuum fitting
Vers le skimmer ou
la prise-balai
Vacuum too weak.
See troubleshooting
for solutions.
Aspiration trop faible.
Voir solutions Page 4.
Connect hose
to cleaner
Connectez le tuyau
à l’aspirateur
Assemble
Cleaner
Assemblez
l’aspirateur
Install weight
between two
hoses
Include Halo here
Placez l’anneau
pare-échelle ici
STEP 3 S
STEP 4A STEP 5A STEP 7A
O
PTION 1 - SKIMMER CONNECTION
CONNECTION AU SKIMMER
Turn Pump
INSTALLATION 1 - SKIMMER CONNECTION
CONNECTION AU SKIMMER
without basket
sans panier
with vacuum plate
avec skim vac
OPTION 2 - VACUUM FITTING CONNECTION (skip steps 4 & 5)
CONNECTION À LA PRISE-BALAI (sautez étapes 4 et 5)
INSTALLATION 2 - DEDICATED SUCTION LINE APPLICATION (skip steps 4 & 5)
CONNECTION À LA PRISE-BALAI (sautez étapes 4 et 5)
STEP 4 TO 9 INSTALLATION FLOW CHART
SCHÉMA D’INSTALLATION DES ÉTAPES 4 À 9
STEP
4A
STEP
4B
STEP
5B
STEP
5A
STEP
6
STEP
6
STEP
6
STEP
7B
STEP
7A
STEP
7C
STEP
8
STEP
9
STEP
8
STEP
9
STEP
8
STEP
9
F
F
B
When using a dedicated suction line, it is advised to use an IAPMO approved fitting such as the Hayward Vac Lok fitting, part number,
W400AWHP. The fitting is a safety mechanism designed with a spring action cover to hold the hose in place and to close the suction
fitting automatically when not in use.
En utilisant la prise balai, il est recommandé d’utiliser un connecteur IAPMO comme le connecteur Hayward Vac Lok n° W400AWHP.
Valves closed for the cleaning operations
should be re-openned after completion of
the cleaning process.
Les vannes fermés avant le nettoyage devront être
réouvertes à la fin des opérations de nettoyage.
WARNING
 Loading...