

Dirt Devil Wet Dry Owner's Manual
OWNER'S
MANUAL
Please read these instructions
carefully before using.
Let us help you put your
vacuum together or answer
questions:
l-8OO-32l-1l34
(USA).
1-800-661 -6200
(Canada).
-
CONSUMER INFORMATION
THIS VACUUM IS INTENDED FOR HOUSEHOLD USE ONLY.
IMPORTANT SAFETY INSTRUCTIONS
--
SAVE THESE INSTRUCTIONS
When you use an appliance, basic precautions should always be followed, including the following:
READ
ALL INSTRUCTIONS BEFORE USING THIS APPLIANCE
ALWAYS FOLLOW THESE SAFETY INSTRUCTIONS
DO NOT LEAVE CLEANER UNAlTENDED
WARNING - FULLY ASSEMBLE CLEANER BEFORE OPERATING.
WARNING:
TO
REDUCE THE RISK
OF
ELECTRIC SHOCK
OR
INJURY:
Look at your vacuum cleaner and follow all label and marking instructions.
Do not expose
to
gin. Stor4 indoors,
Do
not leave appliance lugged
in.
Unplug from outlet when not in use and before servicing.
DO not allow
to
be use
d!
as a toy. Close attention is necessary when used
by
or
near children.
Y
.,.->r.
Use
onlyas described in this manual. Use on1 Royal$ recommended attachme~ts:
,
:
,
:,
.
,
<.
,
00
not
use with damaped cord or plug.
if
appl
an@
is
not worklng
as
it
should, has been dropped, dakaged,*left outdoors, or dropped into
water,
return
it
to a service center.
cord around sharp edges or corners. do not run appliance
air
from
openings and moving pads
'
''
as ccigarettes, matches, or hot ashes.
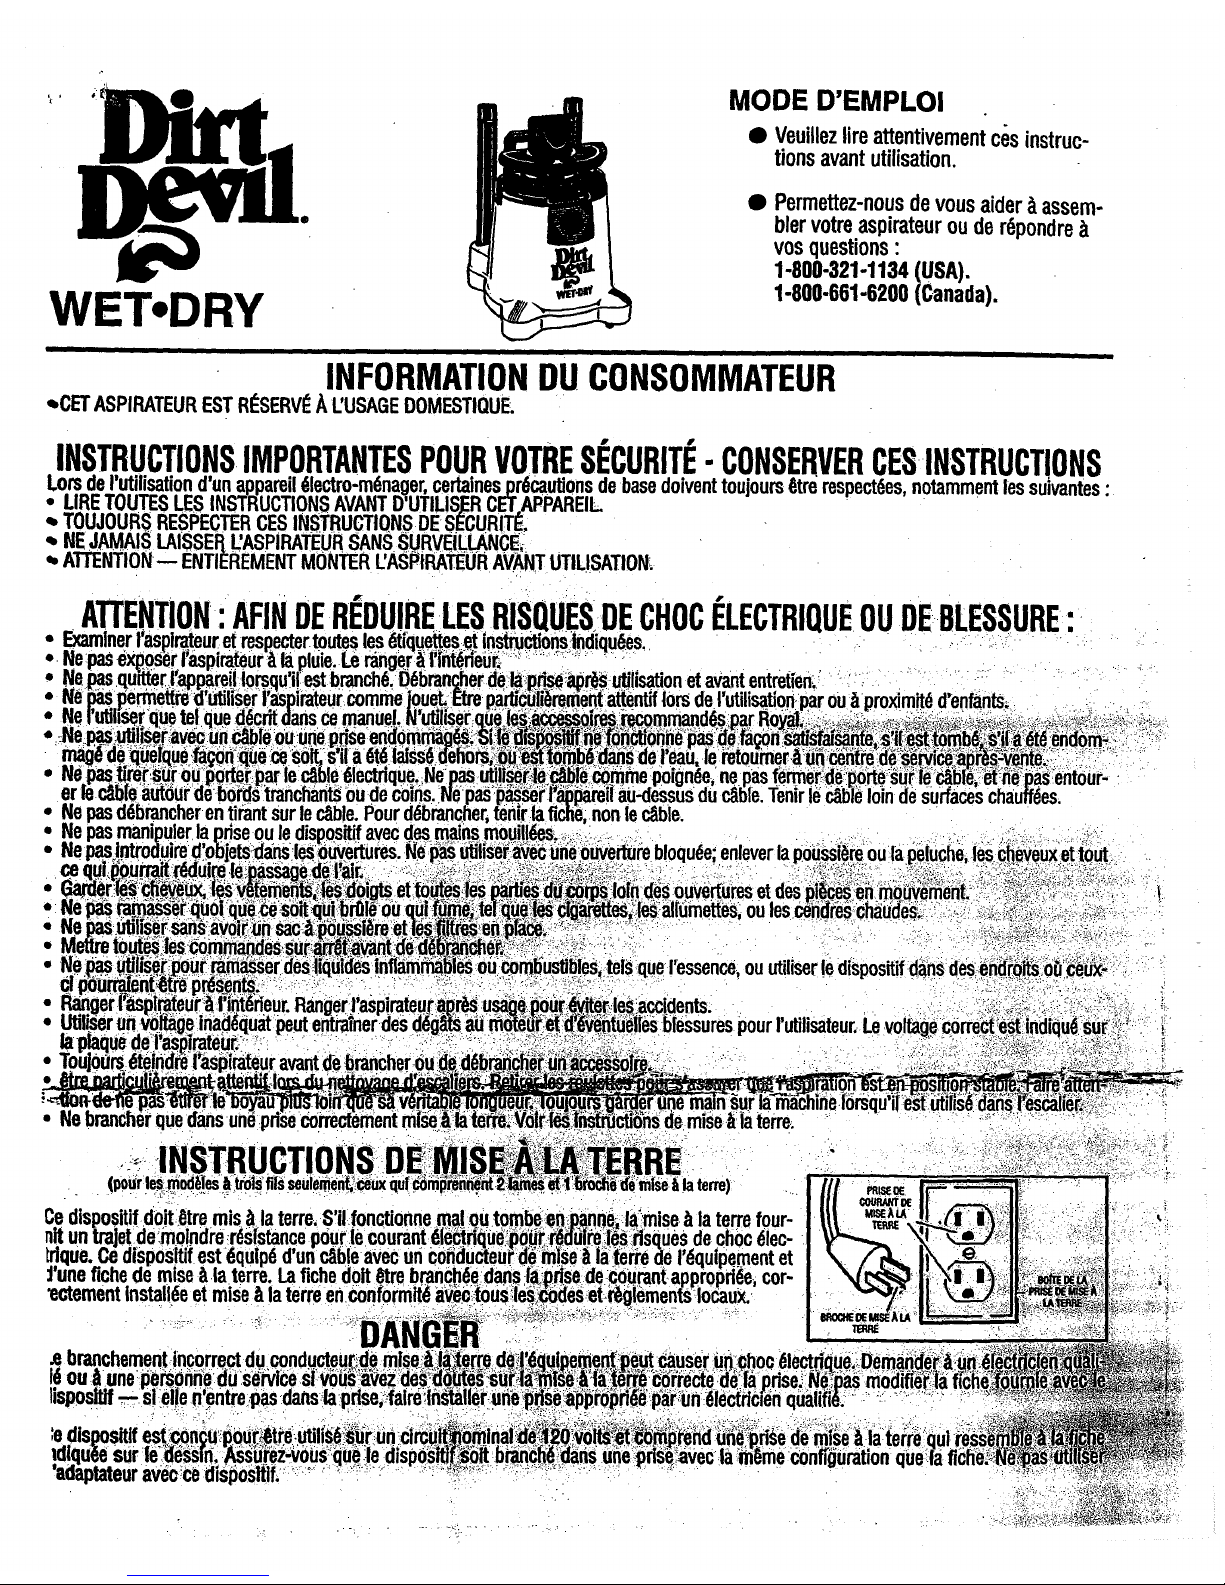
GROUNDING INSTRUCTIONS
(only
for
&wire modeb, those that fitdude 2 blades and 1 grounding pin)
This appliance must be grounded. If
it
should malfunction or breakdown, grounding piovides a path of least
resistance
for electric current to reduce
the
risk of electric shock. This appliance
is
equipped
with
a cord havlng an equlprnent-grounding conductor and grounding plug. The plug niust be plugged into an appropriate
outlet that is properly installed and grounded
in
accordance
with
all local codes and ordinances.
A
I
PROllOrm
I
m
,
,*.
.<
'
,.
'%+3
DANGER
hnpmppr
cqn?@ion
of .the equipment-gmunding ~nductor can
result
In a risk
of
dectric shock. Check with L qualified ilectrician or's
are
in
dopbt$s to
whether
the
&let k properly grounded. Do not modify
the
plug provided
with
the appliance
-If
it
wllrnot
fit
the
o
outlet
tnstalled,
by
a qua@$ electrician:
.,J~,
,c-
li
-
'
+
2,.
i=&,
-5
-
~'%%
>;+--h
'
,..
-
"-,:>r,.>p.;,.,
a,,
.
3'.":.-.
Thk
8pt@i&&
for us8
on
a
nomln~H20-& &"g,ind has a grounding plug&at looks like
the
plug ilf"strated in
he
sktch.
Wid@
su&hat
Mttfe
applianb
IG
conneded
to
an
outlet having the same configurations as the plug. No adapter should be used with this appliance.
,
Y

MODE
D'EMPLOI
.
Veuillez lire attentivement ces instructions avant utilisation.
Permettez-nous de vous aider a assembler votre aspirateur ou de rhpondre
a
vos questions
:
1-800-321-1134
(USA).
INFORMATION
DU
CONSOMMATEUR
CET
ASPIRATEUR EST
R~SERV~
A
L'USAGE DOMESTIQUE.
INSTRUCTIONS IMPORTANTES POUR VOTRE
SECURITE
-
CONSERVER CES INSTRUCTIONS
Lors de I'utilisation d'un appareil4ectro-mhnager, certaines r6cautions de base doivent toujours &re respecthes, notamment les suivantes
:
LIRE
TOUTES
LES
INSTRUCTIONS AVANT
D'UTILIS
R
CR
APPAREL
TouJouRs RESPECTER
cEs
INSTRUCTIONS
DE
$
e
CURITE,
NE
JANlAIS IAISSE CASPIRATEUR SANS SURVEILLANCE,
ATJENTION - ENTl
9
REMENT MONTER L'ASPtRATEUR AVANT UTILISATION.
*-4,
,
.
lNsTRUCTloWs DE:MIs&&&&;TE~E
>,,P>
-<
>">%..
'?
-
*
(poiur
les
mod6les
B
tro1s
fils
seulement'cew quf
cldrn$fen@nt
i'-w
af
'l6loEh6
de
mfse
4
la terre)
Ce dis ositif doit &re
mis
B
la terre.
Sil
fonctionne ma1 ou tombeen anne, ldmise B la terre four-
e,
nit
un jet de moindre Mstance pour le courant 6IeFrique pgr
ndifre
fds ris ues de choc Blec-
trique.
Ce
dispositif est Bquiph d'un cable avec un conducteur de mise B la terre 1 e l'dquipement et
rune fiche de mise
B
la terre.
La
fiche doit &re branchee dans Qrise de courant appropribe, cor-
'ectement installge
et
mise A la terre en conformit6 aveo tous lesmdes et dqlements locaux
-oANd4g#
f
'"
-*
+
R
branchement incorrect du.conductygde mise I$$eq? de. '6~uipemenfgeut.causer
un,~hoc
Ble
16
ou
4
une personne
du
service si vous avez des-ddites.suf? I a3Tse
fi'dabrrb
cdr'recte de
Ca
ris
IisposlW
-
si
elle eeentre
pas
dans
la
pdse, fairehStaller une $lfseaj@td$riQ par un 6leclricen
a
dis
e
estopn
u
pwypd
utiiis6$"r
UII
cireiff' bminai
d#%o
~$~&Q%&~LY
iiWp.ri9e
ldiqu
P
e sur le dess
i
ri.
Assurez-vous que le disposid
f
PA.
$bit
branch4
dans une prise avec la meme
'adaptateur aveo ce dispositif.
"
i
,
-L,+<,
-w,,$&u;,
.
-
1;
Ay
#
&dr.+q
5
"
,
.I)
.
;
8
.>$&&g;+:<
;>,

:
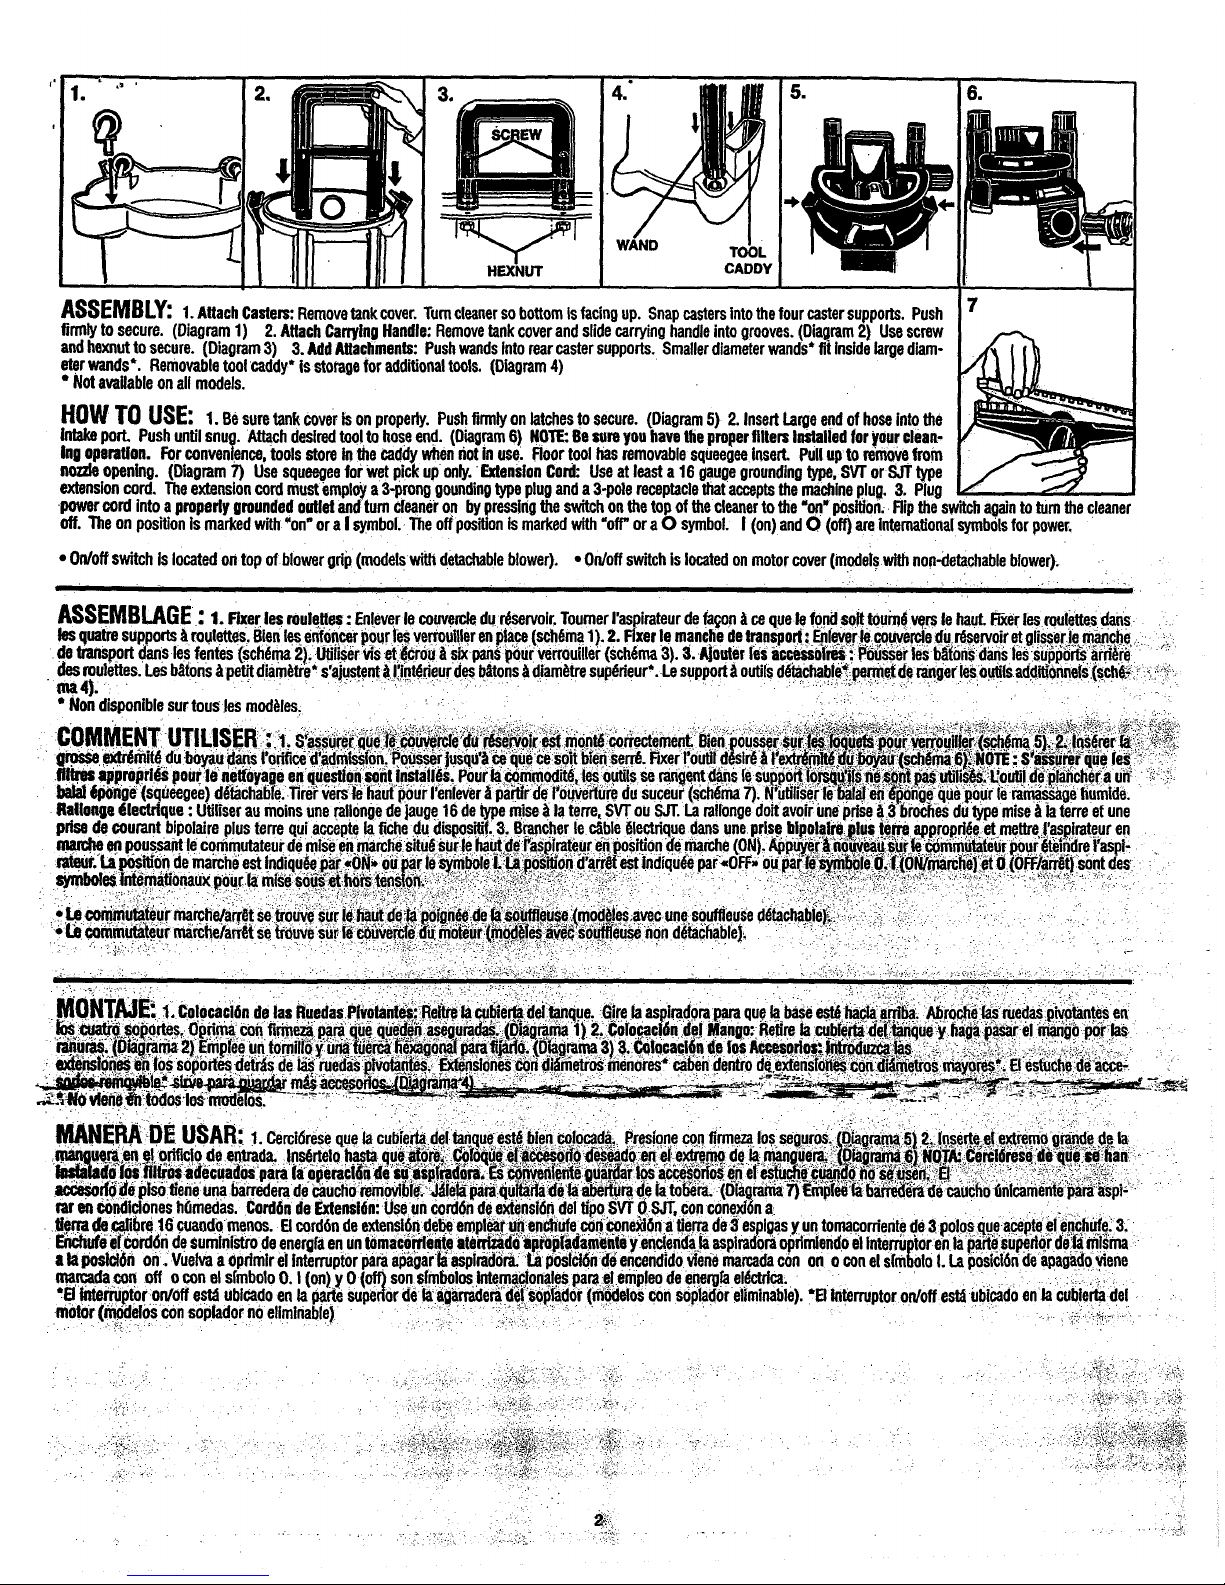
1.
Attach Casters: Remove tank cover. Tum cleaner so bottom is facing up. Snap casters Into the four caster supports. Push
finnly to secure. (Diagram 1)
2.
Attach Carryln~ Handle: Remove tank cover and slide carrying handle into grooves. (Diagram
2)
Use
screw
and hexnut to secure. (Diagram 3) 3. Add Attachments: Push wands into rear caster supports. Smaller diameter wands'
fit
inside large diim-
eter wands'. Removable tool caddy' is storage for addiional tools. (Diagram
4)
Not
avaUable on all models.
HOW
TO
USE:
1.
Be sure tank cover
is
on properly. Push firmly on latches to secure. (Diagram
5)
2.
Insert Large end of hose into the
intake
port Push until snug. Attach desired tool to hose end. (Diigram
6)
NOTE:
Be
sun
you have the pmper filters Installed for your clean-
In0
opmUon. For convenience, tools store
in
the caddy when not in use. floor tool has removable squeegee insert Pull up to
remove
from
nozzle
opening. (Diagram
7)
Use
squeegee for wet pick up only. Extension Cord: Use at least a
16
gauge grounding
type.
SVT
or
SJT
type
extension cord. The ektension cord must employ a 3~rong gounding type plug and a 3-pole receptacle that accepts the machine plug. 3. Plug
power cord into a pmperly ~munded outlet and tum cleaner on by pressing the
switch
on the top of the cleaner to the
%nr
position. flip the switch again to
turn
the cleaner
off.
The on position is marked
with
"ono or a I symbol. The off position
is
marked
with
"off" or a 0 symbol. I (on) and 0 (om are international symbols for power.
Onloff switch Is located on top
of
blower grip (models
with
detachable blower). Odoff switch is located on motor cover (models
with
non-detachable blower).
ASSEMBLAGE
:
I.
Fixer
ies
mulanes : Enlever le couvercte du dse~oir. Toumer
I'as
irateur de fqon ce que
le
fond
soft
tourn6
vqrs
le hut.
Fiicer
les roulettes dans
les
guatre
supports & roulettes. Blen les enfoncer pour
les
verrouiller en place {schema
1).
2.
d
xer le manche de transport : Edpr
le
yuverde du he~oir et gli~serje~my~che,
,
de transport dam les fentes (schhma
2).
Utiliser vis
et
6crou
B.
six pans pour verrouiller (schema 3).
3.
Ajouter ies accersolm : Pousser les bgfons dans les supports aniiiri
des
mulettes.
Les
Mtons B petit diamure* s'ajustent a 1:interieur des bgtons
B.
diimbtre superieur'.
Le
support& outils dBtachabldpermef de ranger
les
outits additionnels (sch&
*
-
"
M
4).
Non dlsponible sur tous les modbles.
r
Abroche
las
wedas
pivotantes en
ue
y
haga
p@r
el mango por las
EL
estuche'de a&
*-
.
-2.
v-s%i
-L-
.-
MANERA
DE
USAR:
I.
Cercldrese que
la
cubierta del tanque este blen colocada. Presione con
firmeza
10s seguros. qigrama
51 2 insefie el extremo grande de la
en
el
qcifido de mbda ln*rtelo
hasb
que dore.
(aoqu0
ei @ccesodo desqdo
en
el
extree de la mangue&rira@
6)
NBDI.
Cercldrese dd
st3
han
Ida
do loo flltros adecuadas para la operaclan de q asplradia.
Ss
cimvenfente guer
los
aaccesorios en el
estu$le
o
no
myn.
El
occesodo de piso tiene una barredera de caucho removible. Ueh
para
qultarla de
la
abertura de
la
tobem. (Ohgrama
7)
Gnph
la
badera de caucho (micameme para aspl-
rar
en
condidones hbmedas. Corddn de Extensidn: Use un cordbn de extensldn del ti~o
SVT 0 SJT.
con conexidn a
tierra
de
&&re
16
cuaodo
menos.
El
cord6n de extensl6n debe emplw
un
enchhufecbn qoneabn a tierra de 3 es lgas y un tomacorriente de 3 polos que acepte
el
enchufe.
3.
brchufe dcorcl6n de suministro de energia en un tornaco@ente atenitado apiapladamente y endendadah asplrad!ra oprimlmdo el Intern tor en
la
patte superior deii mlsma
I
la
pdd6n on . Vuelva a OpMr el Intemptor para &gar
fii
asplrado b posiddadsamdidovtMad6n d do en mada con on 0 con el sh!olo
I.
La
posicl6n de apagado viene
marcada
eon
off o con el slmbolo
0.
I
(on)
y
0
(
son sfmWos kttemactonales para el empleo de energla el8ctrfca.
*El
interruptor onloff esta ublcado en la parfe
supe
or de W agarradera del sophdor
(mWos
con soplador eliminable).
'El
interruptor onloff esta ubicado en
la
cubieka del
motor (modelos con soplador no ellminable)
.a
3
-
 Loading...