

OWNER'S MANUAL
Operating and Servicing
Instructions
Please read these
instructions carefully before
using your Swivel Glide Vision.
Let us help you put your
cleaner together or answer
any questions, call:
1-800-321 -1 134
1-800-661 -6200
For quick reference, please record your vacuum
information below.
Model
Mfg. Code:
(Mfg. code located on the lower backside of cleaner)
#:
(USA)
'
(Canada)
01 998
All
rights reserved #1-690221-033
1 1 I99
CONGRATULATIONS
You are now the proud owner of the Dirt Devila Swivel Glidea Vision, with Power You Can See"!
You'll never buy another bag again with the unique bagless design that includes a see-through
dirt container for retrieving lost items. You'll also enjoy superior cleaning performance with
amps of Maximum Vacuum Power.
Allergen sufferers will benefit with the exclusive Permafilter" with CleanStream" Filtration
located inside the dirt cup and
HEPA exhaust filter that prevent over
99%
of dust and allergens
from escaping the vacuum and re-entering the room. Other features are included that make
vacuuming easier such as the Swivela Casters for easy maneuvering, and tools-on-board for above
floor cleaning.
We are very proud of our products and hope that you are equally satisfied with their quality and
performance.
12
Thank you for your support of Dirt
Devilm products.
Visit our website at www.dirtdevil.com
TABLE OF CONTENTS
Feature Descriptions .Page
How To Assemble .Page
How To Operate .Page
Hose Assembly and Tool Storage
FloorICarpet Cleaning
Above Floor Cleaning
Hands Free Edge Cleaning
Hide-a-Hose
Carpet Settings
How To Transport Cleaner
Dirt Container
&
Removal and Replacement .Page
Filter Removal and Replacement
Belt or Brush Roll Removal and Replaceme~t
Lightbulb Removal and Replacement
Troubleshooting Guide .Page
..................................
....................................
......................................
...................
............................
............................
........................
.Page
.Page
.Page
.Page
....................................
.................................
..............................
PermaFilterTM with CleanStreamTM Filtration
.Page 6
.Page 6
.............................
.........................
...............
......................
I
.Page
.Page
.Page
.................................
4
4
5
5
5
5
5
Page6
6
7
7
8
8
LIMITED
To the consumer, Royal Appliance Mfg. Co. warrants this vacuum cleaner to be free of defects in material or workmanship commencing upon.the date of the original
purchase. Refer to your vacuum cleaner carton for the length of warranty and save your original sales receipt to validate start of warranty penod.
If the vacuum cleaner should become defective within the warranty period, we will repair or replace any defective parts free of charge. The complete machine must be
DreDaid
delivered
sales receipt and your name, address and telephone number. If you are not near a Warranty Station, call the factory for assstance at USA: 1-800-321-1134
DA: 1-800-661-6200. Use only genuine Royal replacement parts.
The warranty does not include unusual wear, damage resulting from accident or unreasonable use of the vacuum cleaner. This warranty does not cover belts, brushes, bags, bulbs or fan damage. This warranty does not cover unauthorized repairs. This warranty gives you specific legal rights and you may also have other rights.
(Other rights may vary from state to state In the USA).
to any ROYAL Authorized Sales & Warranty Service Station. Please include complete description of the problem, day of purchase, copy of original
WARRANTY
1
CANA-
THIS CLEANER IS INTENDED FOR HOUSEHOLD USE ONLY
IMPORTANT SAFETY INSTRUCTIONS
When you
READ ALL INSTRUCTIONS BEFORE USING THE APPLIANCE.
ALWAYS FOLLOW THESE SAFETY INSTRUCTIONS.
BRING CLEANER TO UPRIGHT POSITION WHEN USING THE HOSE AND ATTACHMENTS.
DO NOT LEAVE CLEANER UNATTENDED WHEN PLUGGED IN.
REGULARLY
WARNING: DO NOT USE SHARP OBJECTS TO CLEAN OUTTHE HOSE SINCE THEY COULD CAUSE DAMAGE.
OCCASIONALLY REMOVE BRUSH AND CLEAN DEBRIS FROM END CAPS TO KEEP BRUSH ROTATING SMOOTHLY.
use
an
appliance, basic
CHECKTHE FILTERSTO CLEAN OR REPLACE.
precautions
should
be
followed,
including
the
following:
READ ALL INSTRUCTIONS BEFORE USING THE APPLIANCE.
WARNING: TO REDUCE THE RISK OF FIRE,
ELECTRIC SHOCK OR INJURY:
Do not leave appliance when plugged in. Unplug from outlet when not in use and before servicing.
Do not use outdoors or on wet surfaces. Electrical shock could occur.
Do not allow to be used as a toy. Close attention is necessary when used by or near children.
Use only as described in this manual. Use only manufacturer's recommended attachments.
Do not use with damaged cord or plug. If appliance is not working as it should, has been dropped, damaged, left outdoors,
it
or dropped into water, return
Do not pull or carry by cord, use cord as handle, close a door on cord, or pull cord around sharp edges or corners. Do
not run appliance over cord. Keep cord away from heated surfaces.
Do not unplug by pulling on cord. To unplug, grasp the plug, not the cord.
Do not handle plug or appliance with wet hands.
Do not put any objects into openings. Do not use with any opening blocked; keep free of dust, lint, hair, and anything that
may reduce air flow.
Keep hair, loose clothing, fingers, and all parts of body away from openings and moving parts.
Do not pick up anything that is burning or smoking, such as cigarettes, matches, or hot ashes.
Do not use without dirt container and filters in place.
Turn off all controls before unplugging.
Use extra care when cleaning on stairs.
Do not use to pick up flammable or combustible liquids, such as gasoline, or use in areas where they may be present.
Keep the vacuum cleaner on the floor. Only the hand-held vacuum cleaners may be set on furniture.
Cleaner must be in the upright position to lift the rotating brush off the carpet when doing above floor cleaning.
Do not use an extension cord with this vacuum cleaner.
Store the vacuum cleaner indoors. Put the vacuum cleaner away after use to prevent tripping accidents.
Using improper voltage may result in damage to the motor and possible injury to the user. Proper voltage is listed on the
cleaner plate.
to a service center for inspection. Call 1-800-321-1 134 for the nearest service center.
SAVE
THESE INSTRUCTIONS
WARNING:
To reduce the risk of electric shock, this appliance has a polarized plug (one blade wider than the other). This plug will
fit in a polarized outlet only one way. If the plug does not fit fully in the outlet, reverse the plug. If it still does not fit, contact a qualified electrician to install the proper outlet. Do not change the plug in any way.
Fia.
1
-
FEATURES
Fia
1
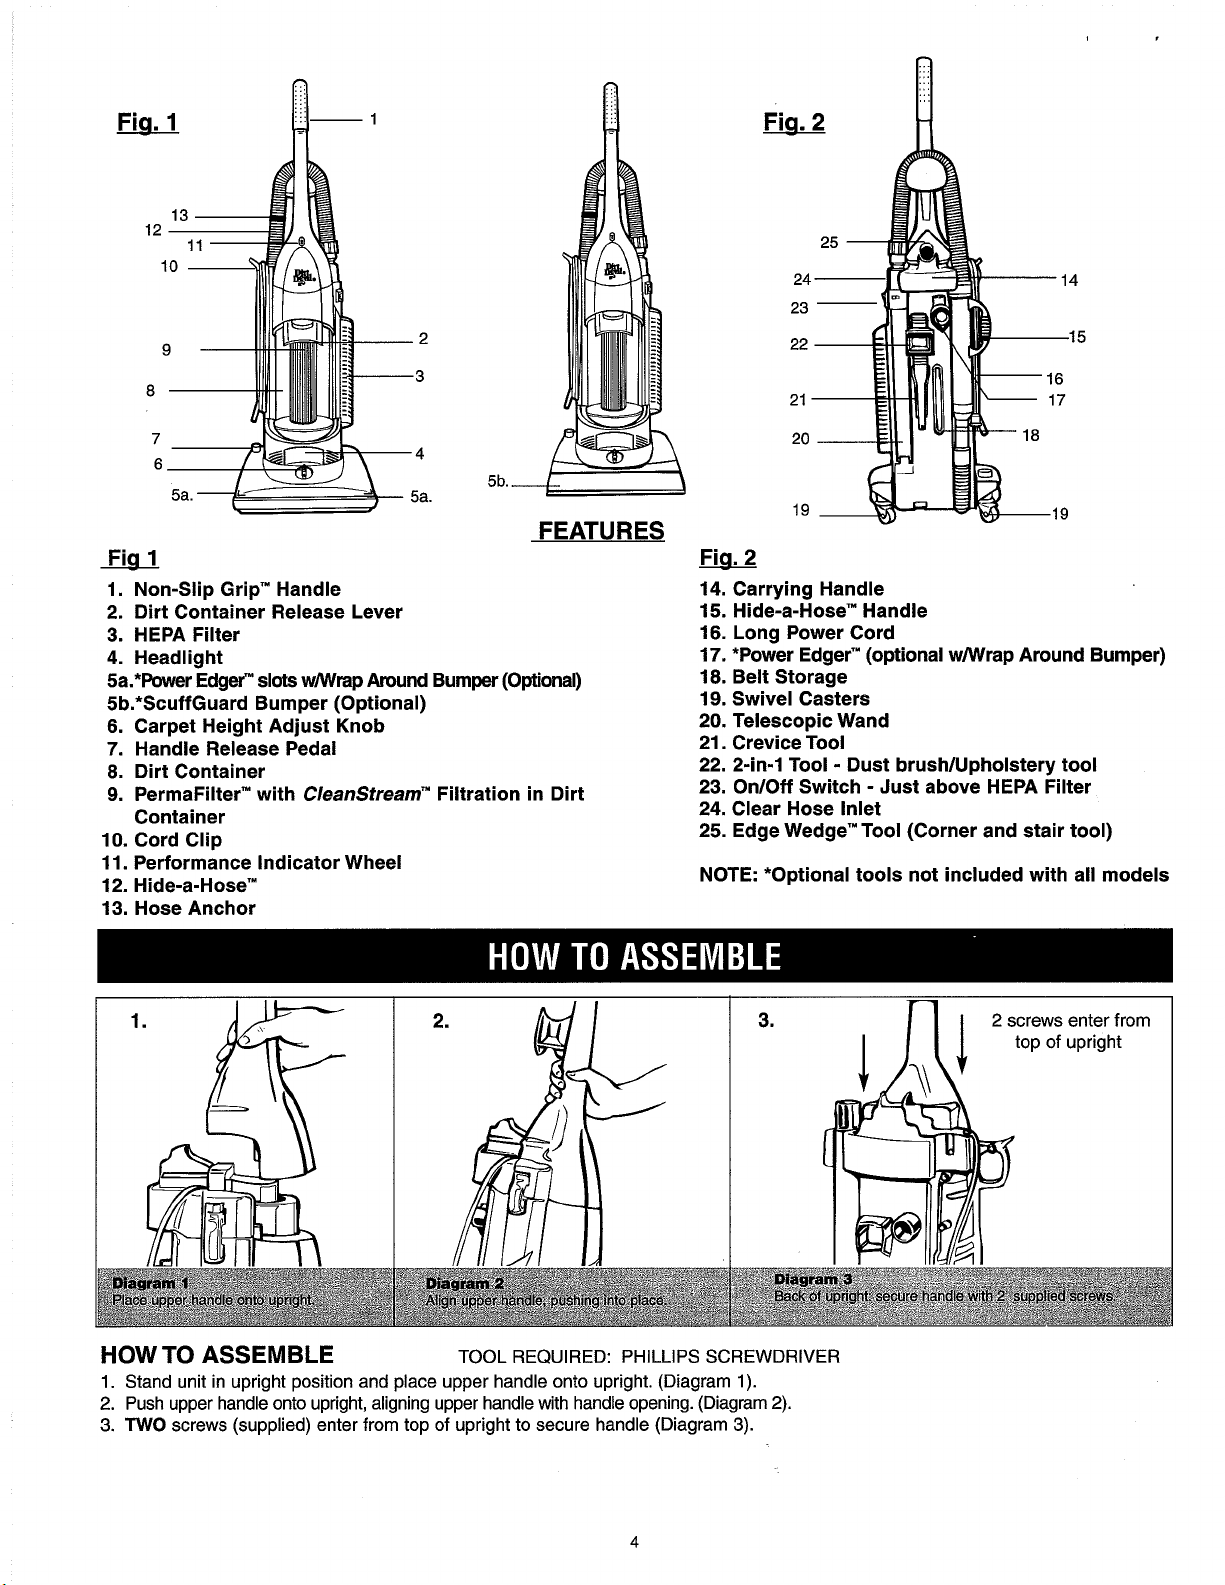
1. Non-Slip Grip'" Handle
2. Dirt Container Release Lever
HEPA Filter
3.
4. Headlight
5a.*Power Edger" slots wMlrap Around Bumper (Optional)
5b.*ScuffGuard Bumper (Optional)
6. Carpet Height Adjust Knob
7. Handle Release Pedal
8. Dirt Container
PermaFilterm with Cleanstream" Filtration in Dirt
9.
Container
10. Cord Clip
11. performance Indicator Wheel
12. Hide-a-Hose'"
13. Hose Anchor
1
Fia.
2
Fia.
2
14. Carrying Handle
15. Hide-a-Hose" Handle
16. Long Power Cord
17. *Power Edger'" (optional
18. Belt storage
19. Swivel Casters
20. Telescopic Wand
21. Crevice Tool
22. 2-in-1 Tool
23. OnIOff Switch
24. Clear Hose Inlet
25. Edge Wedge" Tool (Corner and stair tool)
NOTE: *Optional tools not included with all models
.
.
-
Dust brush/Upholstery tool
-
Just above HEPA Filter
wMlrap Around Bumper)
HOW TO ASSEMBLE
1.
Stand unit in upright position and place upper handle onto upright. (Diagram
2.
Push upper handle onto upright, aligning upper handle with handle opening. (Diagram
3.
TWO
screws (supplied) enter from top of upright to secure handle (Diagram 3).
TOOL REQUIRED: PHILLIPS SCREWDRIVER
1).
2).
\
1
match arrows
with tabs on
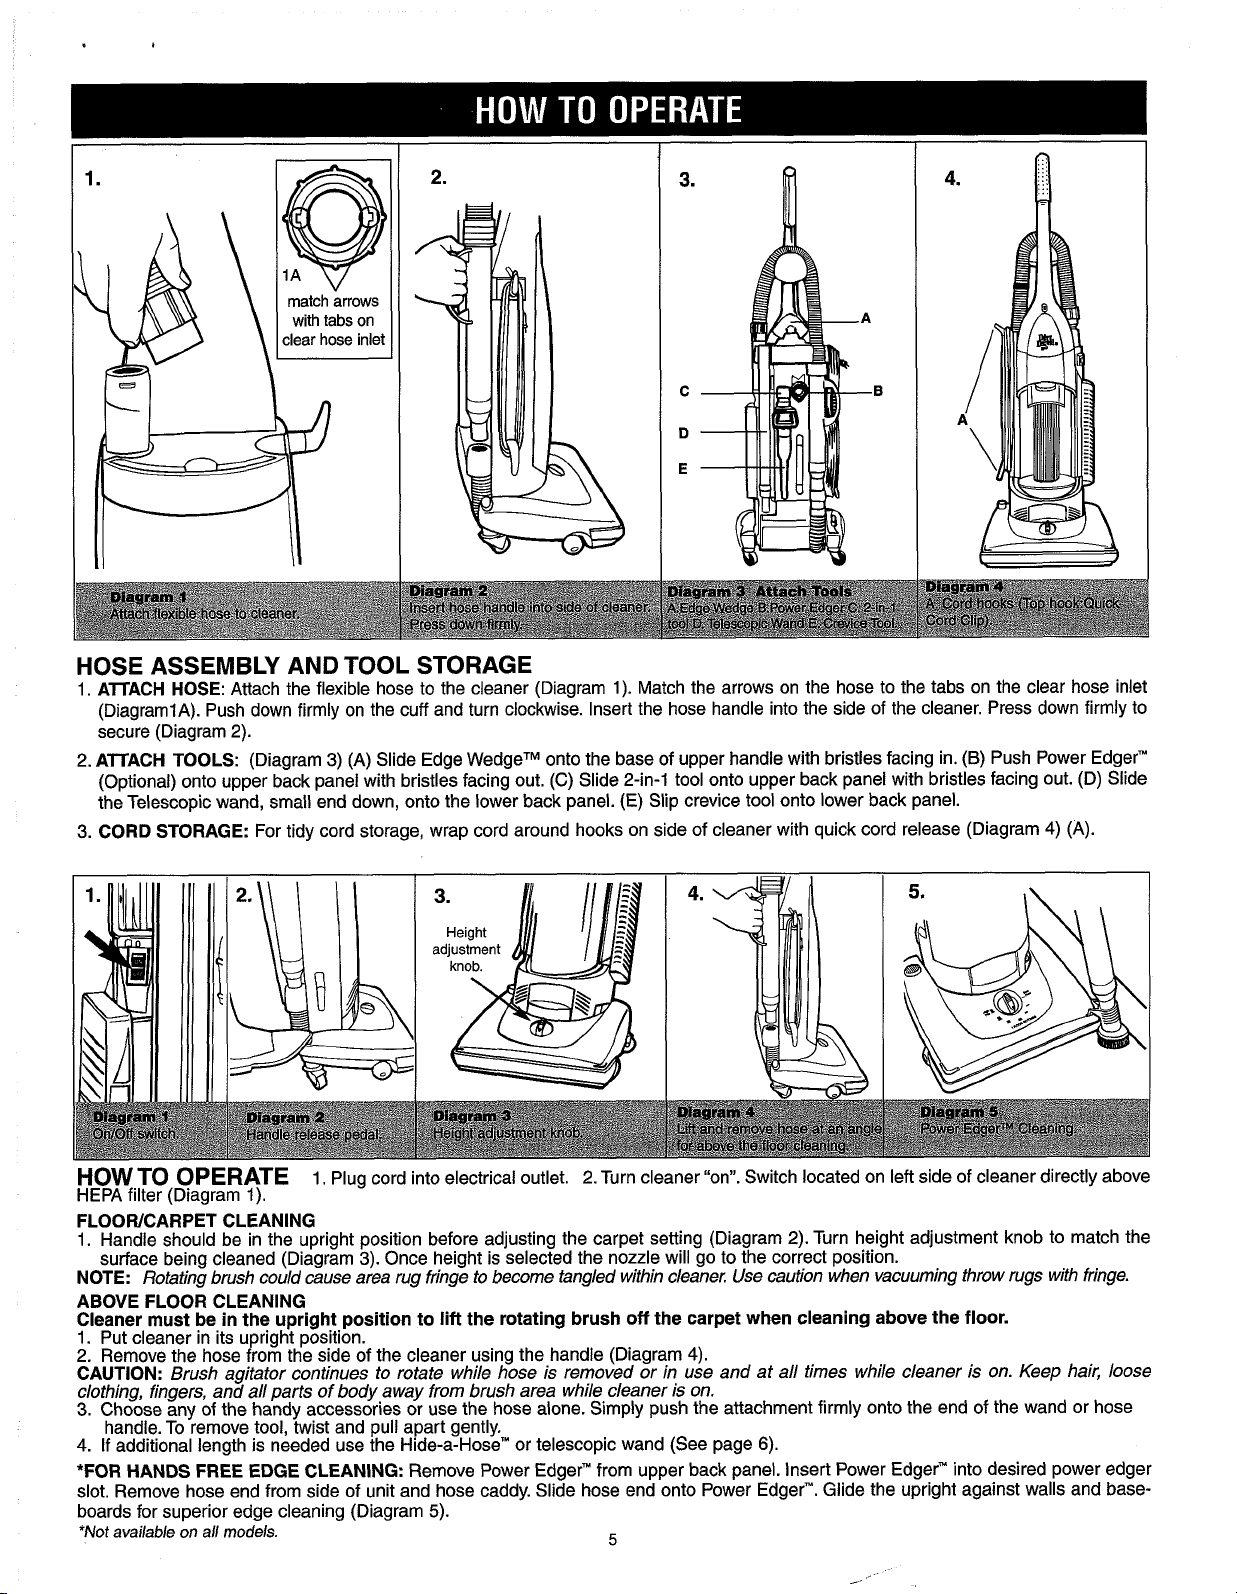
HOSE ASSEMBLY AND TOOL STORAGE
1.
AlTACH HOSE:
(DiagramlA). Push down firmly on the cuff and turn clockwise. Insert the hose handle into the side of the cleaner. Press down firmly to
secure (Diagram 2).
2. AlTACH TOOLS:
(Optional) onto upper back panel with bristles facing out. (C) Slide 2-in-1 tool onto upper back panel with bristles facing out.
the Telescopic wand, small end down, onto the lower back panel.
CORD STORAGE:
3.
Attach the flexible hose to the cleaner (Diagram 1). Match the arrows on the hose to the tabs on the clear hose inlet
(Diagram 3)
For tidy cord storage, wrap cord around hooks on side of cleaner with quick cord release (Diagram
(A)
Slide Edge WedgeTM onto the base of upper handle with bristles facing in.
(E)
Slip crevice tool onto lower back panel.
(B)
Push Power Edger"
4)
(A).
(D)
Slide
HOW TO OPERATE
HEPA filter (Diagram 1).
FLOOWCARPET CLEANING
1. Handle should be in the upright position before adjusting the carpet setting (Diagram
1. Plug cord into electrical outlet. 2. Turn cleaner "on". Switch located on left side of cleaner directly above
2).
Turn height adjustment knob to match the
surface being cleaned (Diagram 3). Once height is selected the nozzle will go to the correct position.
NOTE: Rotating brush could cause area rug fringe to become tangled within cleaner. Use caution when vacuuming throw rugs with fringe.
ABOVE FLOOR CLEANING
Cleaner must be in the upright position to lift the rotating brush off the carpet when cleaning above the floor.
1.
Put cleaner in its upright position.
2. Remove the hose from the side of the cleaner using the handle (Diagram
CAUTION: Brush agitator continues to rotate while hose is removed or in use and at all times while cleaner is on. Keep hair, loose
4).
clothing, fingers, and all parts of body away from brush area while cleaner is on.
3.
Choose any of the handy accessories or use the hose alone. Simply push the attachment firmly onto the end of the wand or hose
handle. To remove tool, twist and pull apart gently.
4.
If additional length is needed use the Hide-a-Hose" or telescopic wand (See page
*FOR HANDS FREE EDGE CLEANING:
Remove Power Edger" from upper back panel. Insert Power Edgerw into desired power edger
6).
slot. Remove hose end from side of unit and hose caddy. Slide hose end onto Power Edger". Glide the upright against walls and baseboards for superior edge cleaning (Diagram
*Not available on all models.
5).
5
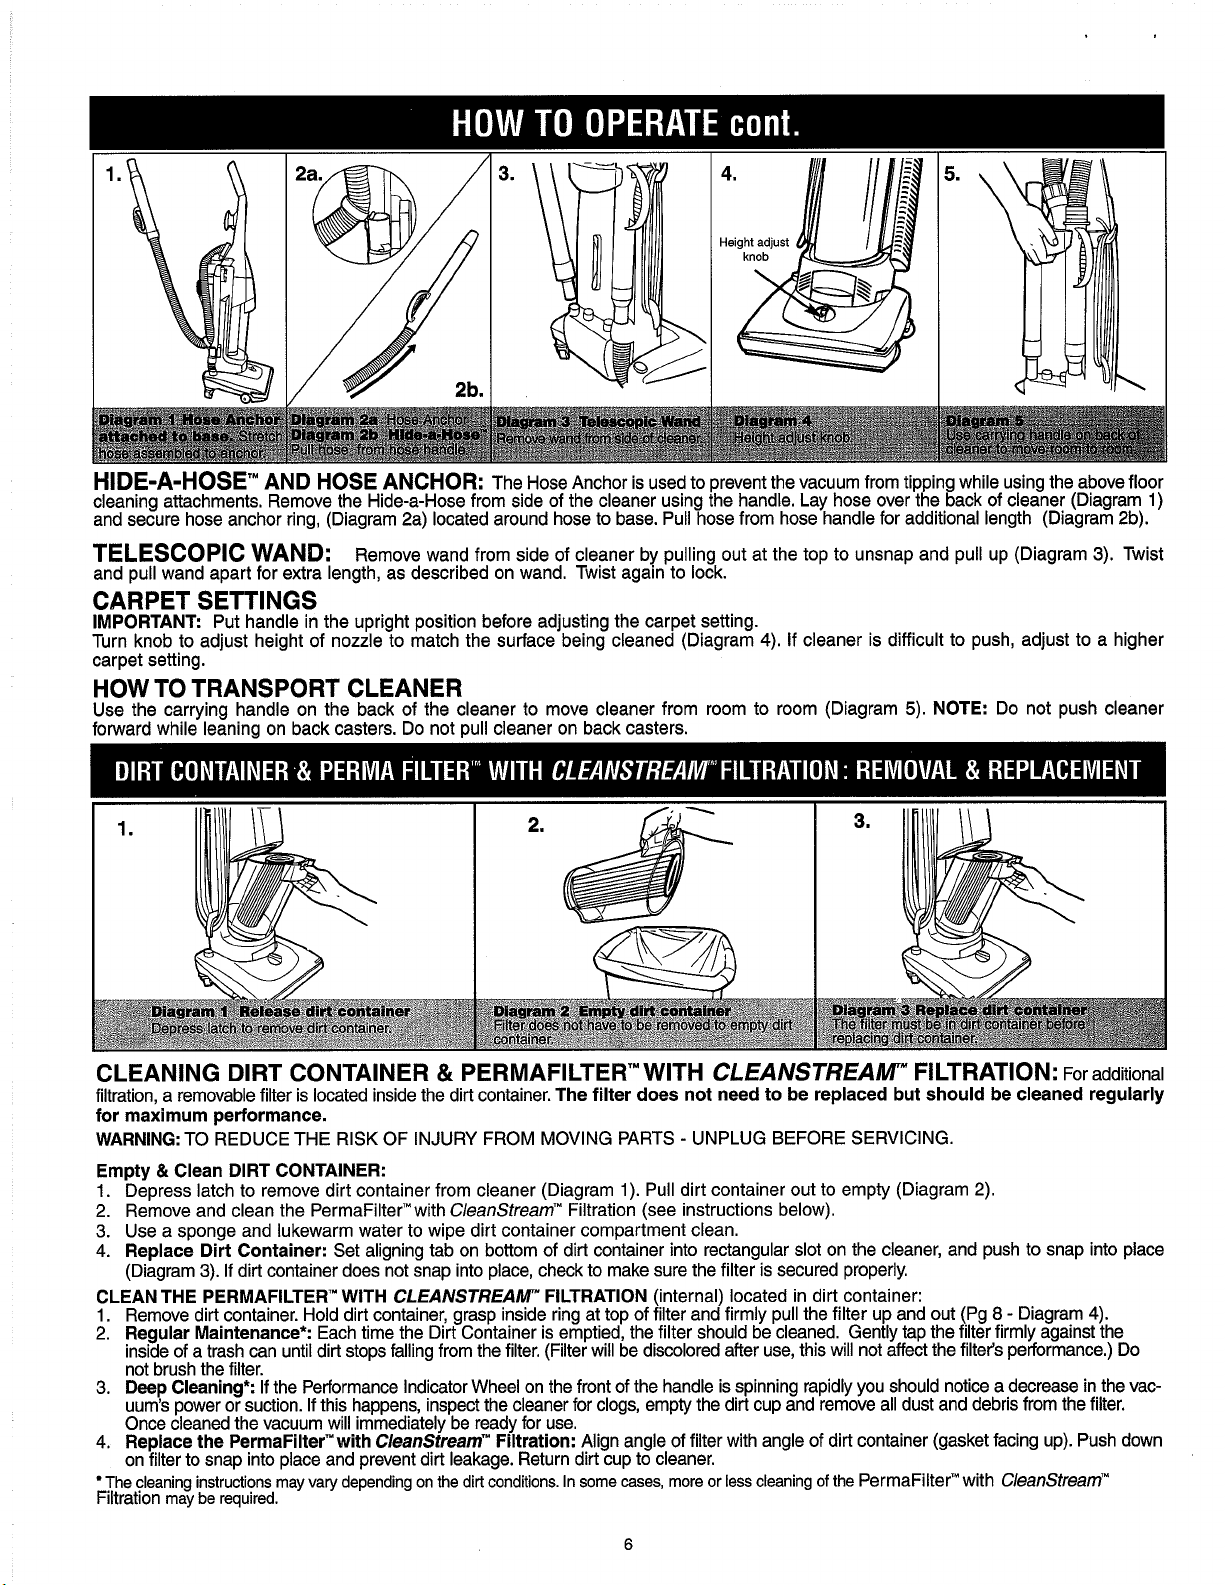
HIDE-A-HOSErM AND HOSE ANCHOR:
cleaning attachments. Remove the Hide-a-Hose from side of the cleaner using the handle. Lay hose over the back of cleaner (Diagram 1)
and secure hose anchor ring, (Diagram 2a) located around hose to base. Pull hose from hose handle for additional length (Diagram 2b).
The Hose Anchor is used to prevent the vacuum from tipping while using the above floor
TELESCOPIC WAND:
and pull wand apart for extra length, as described on wand. Twist again to lock.
Remove wand from side of cleaner by pulling out at the top to unsnap and pull up (Diagram
3).
Twist
CARPET SETTINGS
IMPORTANT:
Turn knob to adjust height of nozzle to match the surface being cleaned (Diagram 4). If cleaner is difficult to push, adjust to a higher
carpet setting.
Put handle in the upright position before adjusting the carpet setting.
HOW TO TRANSPORT CLEANER
Use the carrying handle on the back of the cleaner to move cleaner from room to room (Diagram
forward while leaning on back casters. Do not pull cleaner on back casters.
CLEANING DlRT CONTAINER & PERMAFILTERTM WlTH
filtration, a removable filter is located inside the dirt container.
for maximum performance.
WARNING:
Empty & Clean DIRT CONTAINER:
1.
2. Remove and clean the PermaFilterTMwith
3.
4.
CLEAN THE PERMAFILTER'" WlTH
1. Remove dirt container. Hold dirt container, grasp inside ring at top of filter and firmly pull the filter up and out (Pg
2.
3.
4.
The cleaning instructions may
F~ltrat~on
TO REDUCE THE RISK OF INJURY FROM MOVING PARTS - UNPLUG BEFORE SERVICING.
Depress latch to remove dirt container from cleaner (Diagram 1). Pull dirt container out to empty (Diagram 2).
Use a sponge and lukewarm water to wipe dirt container compartment clean.
Replace Dirt Container:
3).
(Diagram
Regular Maintenance*:
inside of a trash can until dirt stops falling from the filter. (Filter will be discolored after use, this will not affect the filter's performance.) Do
not brush the filter.
Deep Cleaning*:
uum's power or suction. If this happens, inspect the cleaner for clogs, empty the dirt cup and remove all dust and debris from the filter.
Once cleaned the vacuum will immediately be ready for use.
Replace the PermaFilter'"with
on filter to snap into place and prevent dirt leakage. Return dirt cup to cleaner.
If dirt container does not snap into place, check to make sure the filter is secured properly.
If the Performance Indicator Wheel on the front of the handle is spinning rapidly you should notice a decrease in the vac-
may be required.
Set aligning tab on bottom of dirt container into rectangular slot on the cleaner, and push to snap into place
Each time the Dirt Container is emptied, the filter should be cleaned. Gently tap the filter firmly against the
CleanStreaml"
vary
depending on the dirt conditions. In some cases, more or less cleaning of the
CleanStreamW
CLEANSTREAM"
The filter does not need to be replaced but should be cleaned regularly
Filtration (see instructions below).
FILTRATION
Filtration:
Align angle of filter with angle of dirt container (gasket facing up). Push down
(internal) located in dirt container:
CLEANSTREAM"
5).
NOTE:
FILTRATION:
PermaFilterW with
Do not push cleaner
For additional
8
-
Diagram 4).
CleanStfeam'"
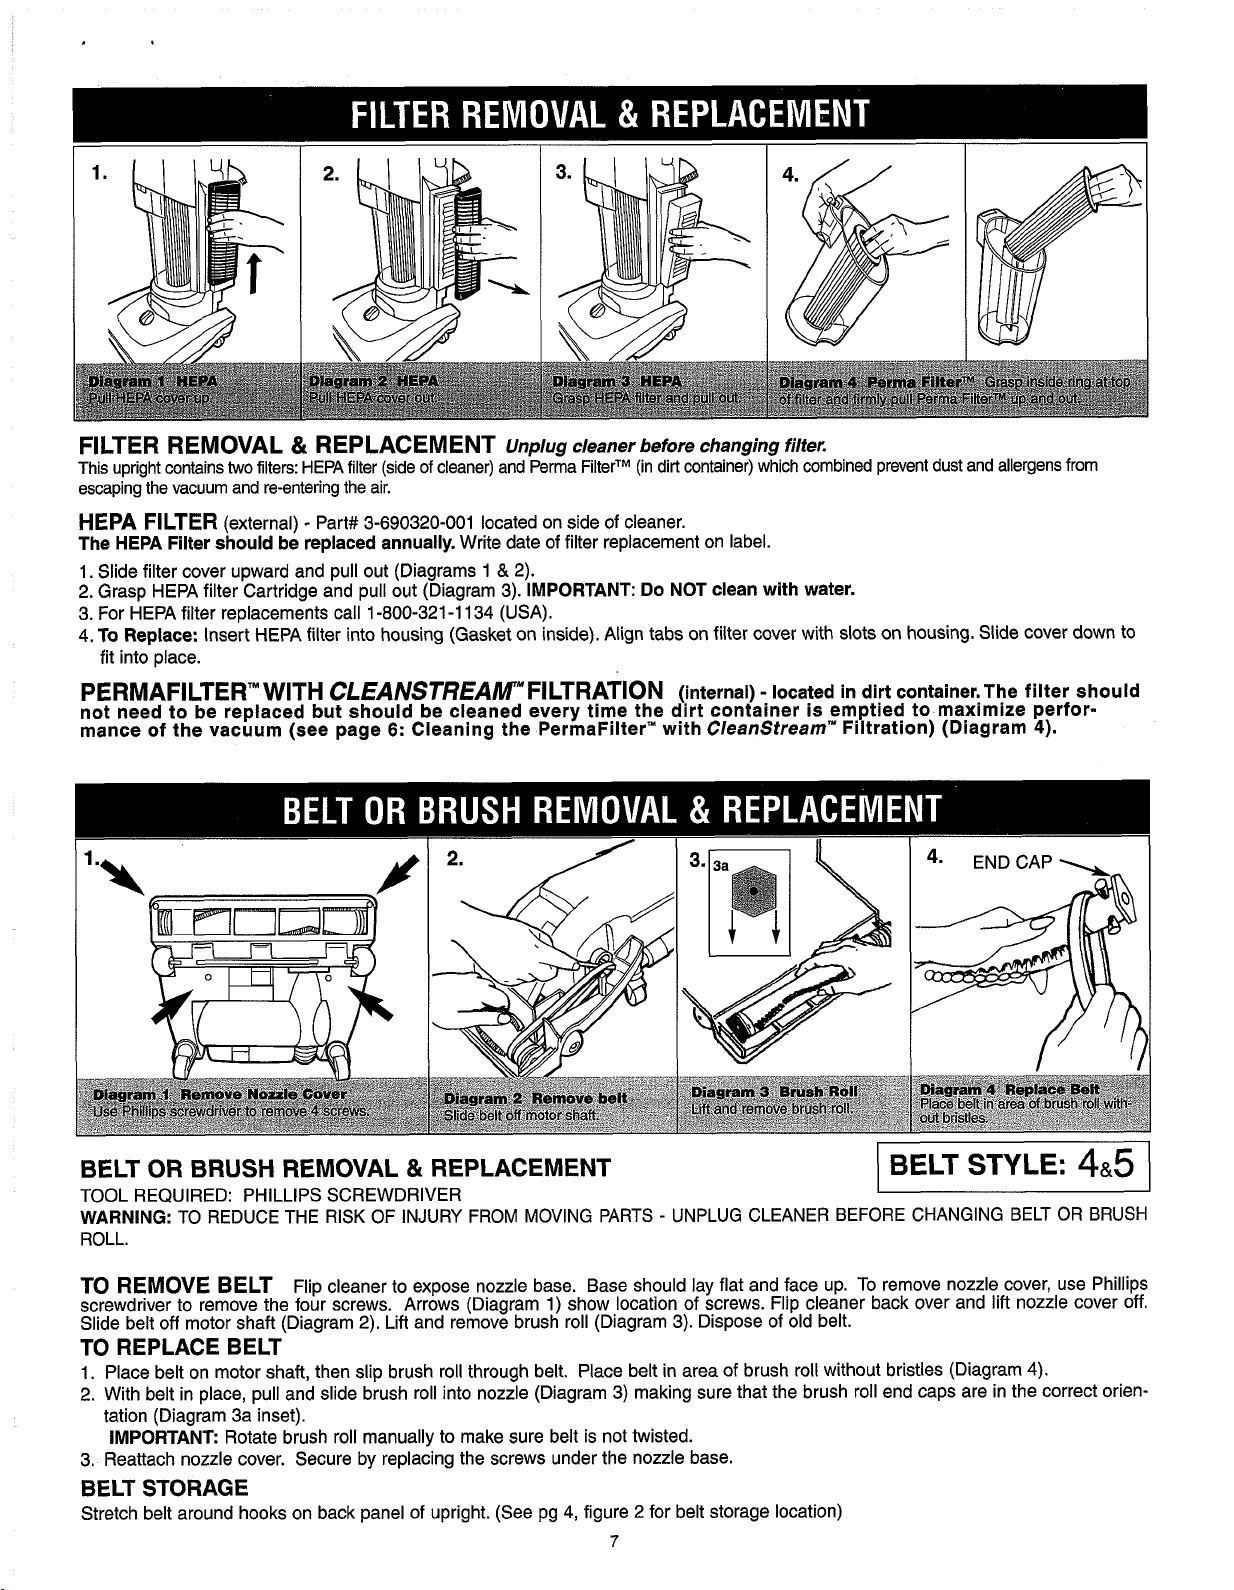
Fl LTE R REMOVAL & REP LACE M E NT
This upright contains two filters: HEPA filter (side of cleaner) and Perma FilterTM (in dirt container) which combined prevent dust and allergens from
escaping the vacuum and re-entering the air.
unplug cleaner before changing filter.
HEPA FILTER
The HEPA Filter should be replaced annually.
1. Slide filter cover upward and pull out (Diagrams 1
2. Grasp HEPA filter Cartridge and pull out (Diagram 3).
3. For HEPA filter replacements call 1-800-321 -1 134 (USA).
4.
To Replace:
fit into place.
PERMAFILTER'" WITH CLEANSTREAWFILTRATION
not need to be replaced but should be cleaned every time the dirt container is emptied to maximize performance of the vacuum (see page
(external) - Part# 3-690320-001 located on side of cleaner.
Write date of filter replacement on label.
&
2).
IMPORTANT: Do NOT clean with water.
Insert HEPA filter into housing (Gasket on inside). Align tabs on filter cover with slots on housing. Slide cover down to
(internal) - located in dirt container.The filter should
6:
Cleaning the PermaFilter" with
Cleanstream"
Filtration) (Diagram
4).
I
BELT OR BRUSH REMOVAL & REPLACEMENT
TOOL REQUIRED: PHILLIPS SCREWDRIVER
WARNING:
ROLL.
TO REMOVE BELT
screwdriver to remove the four screws. Arrows (Diagram 1) show location of screws. Flip cleaner back over and lift nozzle cover off.
Slide belt off motor shaft (Diagram 2). Lift and remove brush roll (Diagram 3). Dispose of old belt.
TO REDUCE THE RISK OF INJURY FROM MOVING PARTS - UNPLUG CLEANER BEFORE CHANGING BELT OR BRUSH
Flip cleaner to expose nozzle base. Base should lay flat and face up. To remove nozzle cover, use Phillips
BELT STYLE:
4e5
TO REPLACE BELT
1. Place belt on motor shaft, then slip brush roll through belt. Place belt in area of brush roll without bristles (Diagram 4).
2. With belt in place, pull and slide brush roll into nozzle (Diagram 3) making sure that the brush roll end caps are in the correct orientation (Diagram 3a inset).
IMPORTANT:
3. Reattach nozzle cover. Secure by replacing the screws under the nozzle base.
Rotate brush roll manually to make sure belt is not twisted.
BELT STORAGE
Stretch belt around hooks on back panel of upright. (See pg 4, figure 2 for belt storage location)
7
I
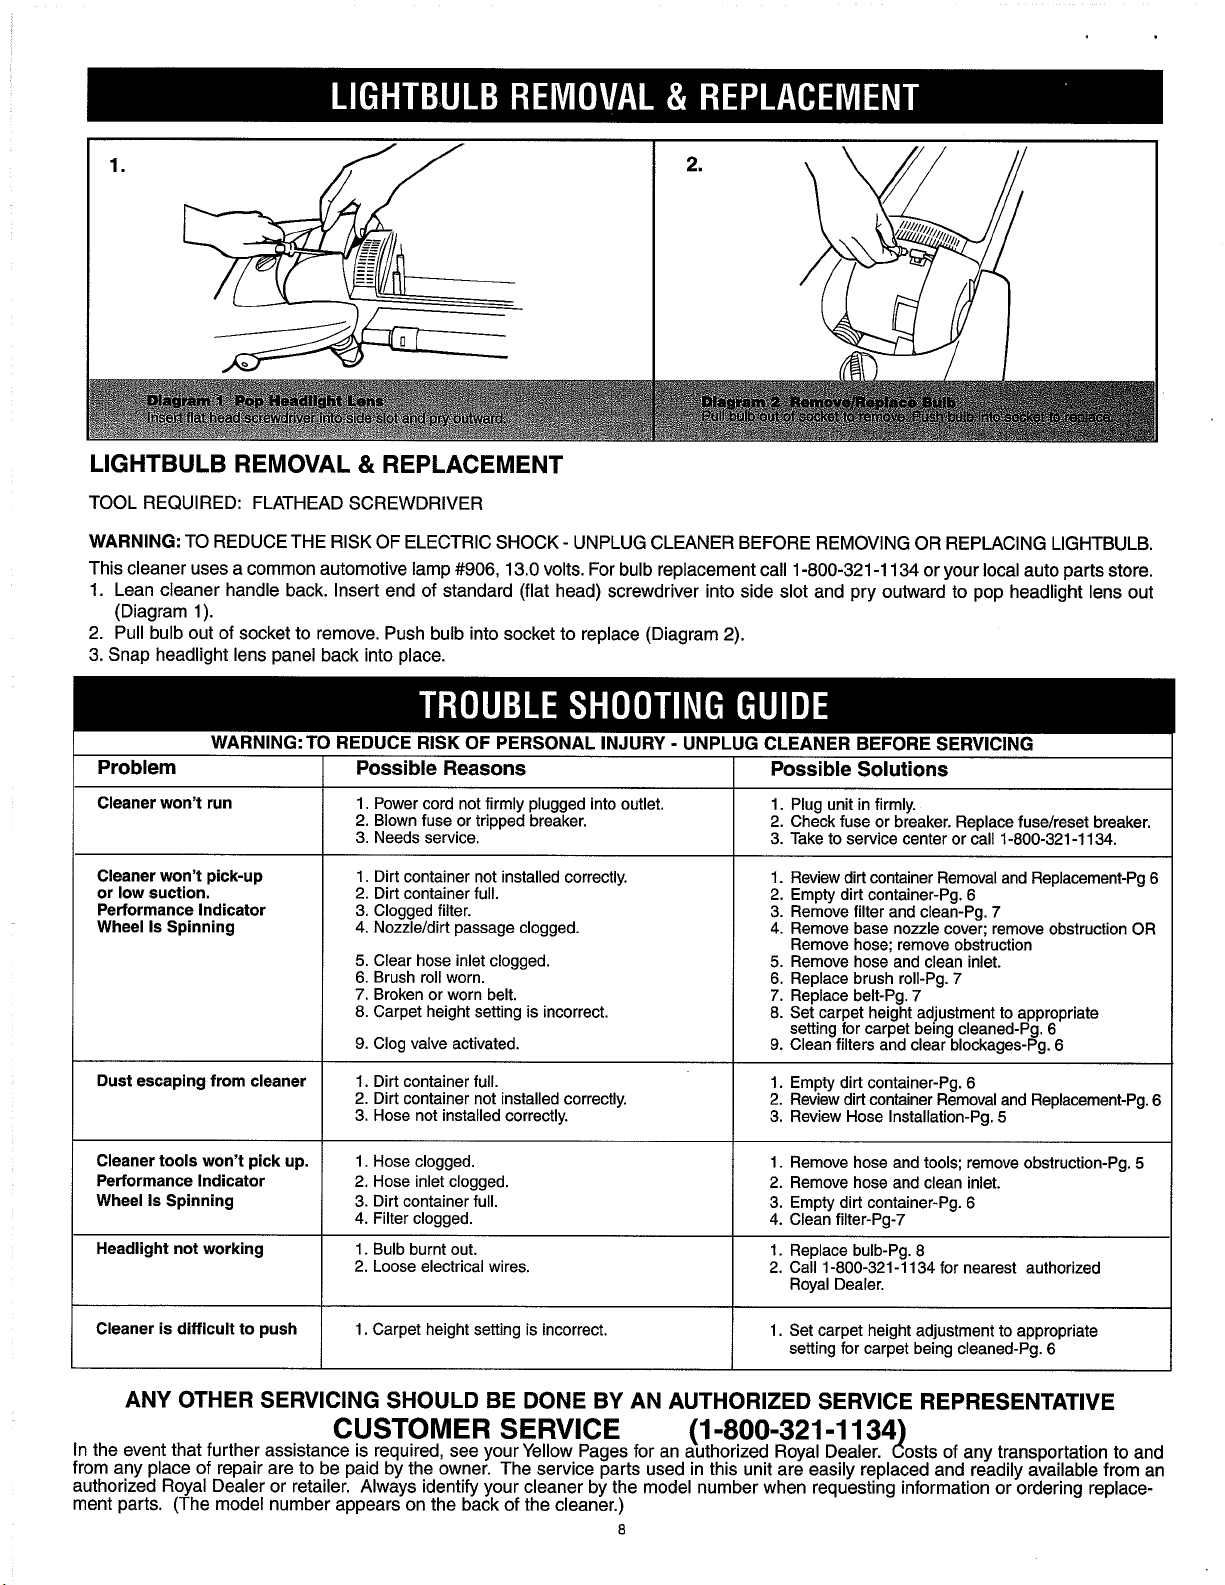
LIGHTBULB REMOVAL & REPLACEMENT
TOOL REQUIRED: FLATHEAD SCREWDRIVER
WARNING:
TO REDUCETHE RISK OF ELECTRIC SHOCK - UNPLUG CLEANER BEFORE REMOVING OR REPLACING LIGHTBULB.
This cleaner uses a common automotive lamp #906, 13.0 volts. For bulb replacement call 1-800-321 -1 134 or your local auto parts store.
1. Lean cleaner handle back. Insert end of standard (flat head) screwdriver into side slot and pry outward to pop headlight lens out
(Diagram 1).
2. Pull bulb out of socket to remove. Push bulb into socket to replace (Diagram 2).
3. Snap headlight lens panel back into place.
WARNING: TO REDUCE RISK OF PERSONAL INJURY - UNPLUG CLEANER BEFORE SERVICING
Problem
Cleaner won't run
Cleaner won't pick-up
or low suction.
Performance lndicator
Wheel Is Spinning
Dust escaping from cleaner
I
Possible Reasons
1. Power cord not firmly plugged into outlet.
2. Blown fuse or tripped breaker.
3. Needs service.
1.
Dirt container not installed correctly.
2.
Dirt container full.
3. Clogged filter.
4. Nozzleldirt passage clogged.
5.
Clear hose inlet clogged.
6.
Brush roll worn.
7. Broken or worn belt.
8. Carpet height setting is incorrect.
9.
Clog valve activated.
1.
Dirt container full.
2. Dirt container not installed correctly.
3. Hose not installed correctly.
Possible Solutions
1. Plug unit in firmly.
2. Check fuse or breaker. Replace fuseheset breaker.
3. Take to service center or call 1-800-321 -1 134.
1.
Review dirt container Removal and Replacement-Pg
2. Empty dirt container-Pg.
3. Remove filter and clean-Pg. 7
4. Remove base nozzle cover; remove obstruction OR
Remove hose; remove obstruction
5.
Remove hose and clean inlet.
6.
Replace brush roll-Pg. 7
7. Replace belt-Pg.
8. Set carpet height adjustment to appropriate
setting for carpet being cleaned-Pg.
9.
Clean filters and clear blockages-Pg.
1. Empty dirt container-Pg.
2. Review dirt container Removal and Replacement-Pg.
3. Review Hose Installation-Pg.
6
7
6
6
6
5
6
6
Cleaner tools won't pick up.
Performance lndicator
Wheel Is Spinning
Headlight not working
Cleaner is difficult to push
1. Hose clogged.
2. Hose inlet clogged.
3. Dirt container full.
4. Filter clogged.
1.
Bulb burnt out.
2.
Loose electrical wires.
1. Carpet height setting is incorrect.
1. Remove hose and tools; remove obstruction-Pg.
2. Remove hose and clean inlet.
3. Empty dirt container-Pg.
4. Clean filter-Pg-7
1.
Replace bulb-Pg. 8
2. Call 1-800-321 -1 134 for nearest authorized
Royal Dealer.
1. Set carpet height adjustment to appropriate
setting for carpet being cleaned-Pg.
6
6
5
ANY OTHER SERVICING SHOULD BE DONE BY AN AUTHORIZED SERVICE REPRESENTATIVE
In the event that further assistance is required, see your Yellow Pages for an a'uthorized Royal Dealer. Costs of any transportation to and
CUSTOMER SERVICE
from any place of repair are to be paid by the owner. The service parts used in this unit are easily replaced and readily available from an
authorized Royal Dealer or retailer. Always identify your cleaner by the model number when requesting information or ordering replacement parts. (The model number appears on the back of the cleaner.)
8
(1
-800-321 -1 1341

MANUAL DEL USUARIO
lnstrucciones para el funcionamiento
y
el servicio
G3
Por favor lea bien estas
instrucciones antes de usar su
aspiradora Swivel Glide
Vision.
Dejenos ayudarle a ensamblar
su aspiradora o a contestarle
cualquier duda, llame al:
1-800-321 -1 1 34 (EE.UU.)
1-800-661 -6200
Para tener 10s datos a la mano, por favor Ilene la
informacion sobre
Modelo
Cbdigo del Fabricante:
(El codigo del fabricante se localiza en la parte inferior,
atras de la aspiradora)
#:
su
aspiradora a
(Canada)
continuation.
0
1998
Derechos reservados
#
1-690221 -033
1
1/99

FELICITACIONES
Ahora usted es el feliz propietario de la aspiradora Dirt Devil Swivel Glide Vision,
con el poder para ver iPower You Can See"! Usted nunca mis comprari otra
bolsa gracias a1 disefio sin bolsa que incluye un recepticulo para polvo
transparente que le permite ver 10s objetos perdidos. Tambien disfrutarh de un
12
desempefio de limpieza superior con
amps de Mixima Potencia de Aspiraci6n.
Los que padecen alergias se beneficiarin con el filtro exclusivo PermaFilterTM que
tiene el sistema de Filtraci6n CleanStreamTM ubicado dentro del recepticulo para
polvo
y
el filtro HEPA en el escape evitan que mis del99% del polvo y agentes
alergdnicos escapen de la aspiradora y regresen a1 ambiente del cuarto. Cuenta
con otras caracteristicas que facilitan la limpieza como las Ruedas Giratorias que
permiten una maniobra sencilla y 10s accesorios porthtiles para la limpieza arriba
del piso.
Estamos muy orgullosos de nuestros productos y esperamos que quede
absolutamente satisfecho de la calidad y del desempeiio.
Le agradecemos su preferencia por 10s productos Dirt DevilB.
Visite nuestro sitio de la web en www.dirtdevil.com
Piezas
Como Ensamblar
Como Operar
Como transportar la aspiradora
Quitado y Reemplazo del Recipiente para Polvo y del
PermaFilterTM con sistema de filtracion
Remocion y reemplazo de 10s filtros
Remocion y reemplazo de la banda o del cepillo rotatorio
Remocion y reemplazo del foco
Guia para la deteccion y solucion de problemas
Para el consurnidor, Royal Appliance Mfg. Co. garantiza esta aspiradora contra defectos de rnateria prima o de rnano de obra, a partir de la fecha de la cornpra original. Vea en la caja del ernpaque la duracion de la garantia y guarde su recibo de cornpra original para validar el inicio del periodo de garantia.
Si la aspiradora se descornpone dentro del periodo de la garantia, repararemos o reernplazarernos las partes defectuosas sin cargo alguno. Se debe enviar todo el
aparato con porte paaado con anticipacidn a cualquier Estacion de Servicio de Ventas y Garantia autorizada por Royal. Por favor incluya la descripcion cornpleta del
problerna, el dia de cornpra, copia del recibo original de cornpra y su nornbre, direccion y nlirnero telefonico. Si no se encuentra cerca de una Estacion de Garantia,
llarne a la fabrica para que le asistan en EE.UU.: 1-800-321-1134
La garantia no incluye el desgaste inusual, 10s daiios que resulten de accidentes o del uso no razonable de la aspiradora. Esta garantia no cubre el daiio a las bandas,
cepillos, bolsas, focos ni al ventilador. Esta garantia no cubre reparaciones no autorizadas. Esta garantia le otorga derechos especificos legales y puede tener tarnbikn
otros derechos. (Otros derechos pueden variar de estado a estado en 10s EE.UU.)
..........................................
.................................
....................................
Montaje de manguera y almacenamiento de accesorios
Limpieza del pisolalfombra
Limpieza por encima del piso
Limpieza de bordes a manos libres
Hide-a-Hose
Graduacion de alfombra
..................................
........................
......................
.................
.........................
.......................
CleanStreamm
...................
......
......................
..........
1
CANADA: 1-800-661-6200. Use linicamente piezas de repuesto genuinas de Royal.
Pagina4
.Pagina 4
.Pagina
..
.Pagina
.Pagina
.Pagina
.Pagina
.Pagina
.Pagina
.Pagina
.Pagina
.Pagina
...
.Pagina
.Pagina
.Pagina
5
5
5
5
5
6
6
6
6
7
7
8
8
Ill

ESTA ASPIRADORA ES SOLO PARA US0 DOMESTIC0
INSTRUCCIONES DE SEGURIDAD IMPORTANTES
Cuando se use un aparato electrico, deben tomarse ciertas precauciones basicas de seguridad, incluyendo las siguientes:
LEATODAS LAS INSTRUCCIONES ANTES DE USAR EL APARATO.
SIEMPRE SlGA ESTAS INSTRUCCIONES DE SEGURIDAD.
PONGA LA ASPIRADORA EN POSICION VERTICAL CUANDO USE LA MANGUERAY LOS ACCESORIOS.
NO DEJE LA ASPIRADORA DESATENDIDA CUANDO ESTE CONECTADA.
REVISE REGULARMENTE LOS FILTROS PARA SACUDIRLOS 0 REEMPLAZARLOS.
ADVERTENCIA: NO USE OBJETOS AFILADOS PARA SACAR OBJETOS DE LA MANGUERAYA QUE PODRIAN
DANARLA.
OCASIONALMENTE QUITE EL CEPlLLO Y LlMPlE LAS TAPAS DE LOS EXTREMOS PARA PERMlTlR QUE EL
CEPILLO GlRE UNIFORMEMENTE.
LEATODAS LAS INSTRUCCIONES ANTES DE USAR EL APARATO.
ADVERTENCIA: PARA EVITAR PELIGRO DE INCENDIO,
0
DESCARGAS ELECTRICAS
No deje la aspiradora conectada. Desconectela del tomacorriente cuando no la use y antes de darle servicio.
No la use a la intemperie ni en superficies humedas, ya que podria ocasionar una descarga electrica.
No permita que jueguen con ella. Se necesita supervision cuando la usa un nifio o cuando se usa donde hay nifios.
Usela solo de la manera descrita en este manual. Utilice solo 10s accesorios recomendados por el fabricante.
No use la aspiradora si la clavija o el cordon estan daiiados. Si la aspiradora no funciona como debiera o se ha
caido, dafiado o se dejo a la intemperie, o se cay6 al agua, llevela a un centro de servicio para que la revisen. Llame
al 1-800-321 -1 134 para localizar el centro de servicio mas cercano.
No la jale ni la cargue del cordon, ni use el cordon como mango, ni cierre la puerta sobre el cordon, ni pase el cordon
alrededor de bordes o esquinas filosas. No ruede la aspiradora sobre el cordon. Mantenga el cordon alejado de
superficies calientes.
No desconecte la aspiradora jalando el cordon. Para desconectarla, hagalo tomando del enchufe, no del cordon.
No toque el enchufe ni la aspiradora con las manos mojadas.
No coloque objetos en las aberturas. No la utilice con las aberturas obstruidas; mantengalas libres de polvo, pelusa,
cabellos o cualquier cosa que reduzca el paso de aire.
Mantenga el cabello, la ropa suelta, 10s dedos y todas las partes del cuerpo lejos de las aberturas y las partes moviles.
No aspire nada que este quemandose o que este desprendiendo hum0 como podrian ser cigarrillos, cerillos o
cenizas calientes.
No la use sin la bolsa para polvo nilo sin 10s filtros en su lugar.
Apague todos 10s controles antes de desconectarla.
Tenga mucho cuidado cuando aspire escaleras.
No la utilice para aspirar liquidos inflamables o combustibles como por ejemplo gasolina ni la use en areas donde
estos puedan encontrarse presentes.
Mantenga la aspiradora en el piso. Solamente las aspiradoras de mano se pueden usar en 10s muebles.
La aspiradora debe estar en posicion vertical para levantar el cepillo rotatorio de la alfombra cuando se aspire arriba del piso.
No use extension de cordon con esta aspiradora.
Guarde la aspiradora en interiores. Coloque la aspiradora en su lugar para evitar tropezones.
El utilizar un voltaje incorrect0 puede dafiar el motor y causar lesiones al usuario. El voltaje apropiado esta inscrito en
la ~laca de la as~iradora.
LESIONES:
'
GUARDE ESTAS INSTRUCCIONES
ADVERTENCIA:
Para reducir el riesgo de descargas electricas, esta aspiradora tiene un enchufe polarizado (una paletilla mas ancha que
la otra). Este enchufe entrara en un tomacorriente polarizado, solo de una manera. Si el enchufe no entra completamente
en el tomacorriente, inviertalo. Si ah asi no entra, consulte a un electricista calificado para instalar el tomacorriente
apropiado. No cambie el enchufe de ninguna
manera.

n
...
Fia.
1
Fia
1
1.
Mango que no se resbala Non-Slip GripTM
2.
Palanca de
3.
Filtro HEPA
4.
Lampara frontal
5a *Ranuras
(Optional)
5b *Tope Scuff GuardTM (Opcional)
6.
Boton de graduacion de espesor de alfombra
7.
Pedal liberador del mango
8.
Recipiente para polvo
9.
PermaFilterm con Sistema de Filtracion
CleanStreamm en Recipiente para Polvo
10.
Sujetador de Cordon
11.
Rueda lndicadora de DesempeAo
12.
Accesorio Hide-a-HoseTM
13.
Anclaje de Manguera
liberation
Power
...
... ...
del recipiente para polvo
Edger'" conTope Envohrente
1
PIEZAS
Fia.
2
Fia.
2
14.
Mango transportador
15.
Mango Hide-a-HoseTM
16.
Cordon electric0 largo
17.
*Power Edgerm (con Tope Envolvente Opcional)
18.
Alojamiento para banda
19.
Ruedas giratorias
20.
Extension telescopica
21.
Accesorio para areas dificiles
22.
Accesorio 2 en
23.
lnterruptor de
arriba del filtro HEPA
24.
Entrada transparente para manguera
25.
Accesorio Edge WedgeTM (accesorio para
esquinas
NOTA: *"Los accesorios opcionales no vienen
incluidos en todos
1
-
cepillo para polvolpara tapiz
Encendido(On)/ApagadoTMOff)
y
escaleras)
10s modelos"
-
COMO
1. Coloque la unidad en posicion vertical
2. Oprima el mango sobre la parte superior, alinee el mango superior con la apertura del mango. (Diagrama 2).
3.
ENSAMBLAR
DOS
tornillos (que se proveen) entran en la parte superior de la unidad vertical para fijar el mango (Diagrama 3).
HERRAMIENTA REQUERIDA: DESTORNILLADOR DE CRUZ
y
coloque el mango en la parte superior de la unidad vertical. (Diagrama 1).

\
ranuras
A;l
:;
con
las salientes
de la entrada
transparente
manguera
MONTAJE DE MANGUERA Y ALMACENAMIENTO DE ACCESORIOS
1. FlJE LA MANGUERA: Fije la manguera flexible a la aspiradora (Diagrama 1). Haga coincidir las flechas de la manguera con las
lengiietas en la entrada transparente para la manguera (Diagrama 1A). Presione firmemente en el muiion y gire en el sentido de las
manecillas del reloj. lnserte el
2.
FlJE LOS ACCESORIOS: (Diagrama
(B)
Presione el Power EdgerN (Opcional) en el panel trasero inferior con las cerdas hacia afuera.
el panel trasero superior con las cerdas hacia afuera. (D) Deslice la extension telescopica, con el extremo pequefio hacia abajo, en
el panel trasero inferior.
3.
ALMACENAMIENTO DEL CORDON: Para guardar ordenadamente, enrolle el cordon alrededor del gancho a un costado de la aspi-
radora con el liberador rapido de cordon (Diagrama 4) (A).
mufion en el costado de la aspiradora. Presione firmemente para asegurarla en su lugar (Diagrama 2).
3)
(A) Deslice el Edge Wedge" en la base del mango superior con las cerdas hacia adentro.
(E)
Deslice el accesorio para areas dificiles en el panel trasero inferior.
(C).
Deslice el accesorio 2 en 1 en
1.
COMO OPERAR
izquierda de la aspiradora, justo arriba del filtro HEPA (Diagrama 1).
LlMPlEZA DEL PISOIALFOMBRA
1. El mango debe estar en posicion vertical antes de ajustar el espesor de alfombra (Diagrama
coincida con la superficie que se va a limpiar (Diagrama
NOTA:
alfombras con flecos.
LlMPlEZA POR ENCIMA DEL PISO
La aspiradora debe estar en posicion vertical para levantar el cepillo giratorio de la alfombra cuando se limpie por encima del piso.
1. Coloque la aspiradora en posicion vertical.
2.
PRECAUCION:
dida. Mantenga el cabello, la ropa suelta, 10s dedos
encendida.
3.
4.
*PARA LlMPlEZA DE BORDES A MANOS LIBRES: Quite el Power Edger" del panel trasero superior. lnserte el Power Edger" en la ranura
deseada para el Power Edger. Quite el extremo de la manguera del costado de la unidad y del estuche de la manguera. Deslice la manguera en el
Power EdgerTM. Deslice su aspiradora vertical contra las paredes
*No vieneen to.dos 10s modelos
El cepillo en rotacion podria hacer que 10s flecos de la alfombra se enredaran dentro de la aspiradora. Sea precavido cuando aspire
Quite la manguera del costado de la aspiradora por medio del mango (Diagrama 4).
El agitador de cepillo continuara girando cuando se retire o use la manguera y siempre que la aspiradora este encen-
Seleccione cualquiera de 10s accesorios manuales o utilice solo la manguera. Simplemente inserte el accesorio con firmeza en el extremo
de la extension o del mution. Para quitar el accesorio, gire
Si se requiere mayor longitud, use la Hide-a-Hose" o la extension telescopica (Vea la pagina
Enchufe el cordon a un tomacorriente.
3).
y
todas /as partes del cuerpo lejos del area del cepillo cuando la aspiradora este
y
y
2.
Encienda la aspiradora por medio del interruptor ubicado en la parte
2).
Una vez que la altura haya sido ajustada, la boquilla ira a la posicion correcta.
jale con suavidad.
las bases de 10s bordes para una limpieza de bordes superior (Diagrama
E5
Gire el bot6n para ajustar la altura para que
6).
5).

HIDE-A-HOSE'" Y ANCLAJE DE MANGUERA:
do se usan 10s accesorios de limpieza por encima del suelo. Quite la Hide-a-HoseTM del costado de la aspiradora usando el mango. Coloque la
manguera
manguera. Jale la manguera del mango de la misma para tener una extension adicional (Diagrama 2b).
EXTENSION TELESCOPICA:
hacia arriba (Diagrama 3). Gire
sobre la parte posterior de la aspiradora (Diagrama
y
jale la extension para tener una longitud extra, como se describe en la extension. Gire de nuevo para bloquear.
Quite la extension del costado de la aspiradora jalando de la parte superior para desengancharla y jalarla
1)
EI
Anclaje de Manguera se usa para evitar que la aspiradora se voltee cuan-
y
asegure el anillo del anclaje de manguera, (Diagrama 2a) ubicado alrededor de la
GRADUACION DE ALFOMBRA
IMPORTANTE:
de la boquilla de acuerdo con la superficie que se va a aspirar (Diagrama
mas aha.
Ponga el mango en la posicion de operacion (vertical) antes de ajustar la graduacion de alfombra. Gire el boton para graduar la altura
4).
Si es diiicil empujar la aspiradora, cambie a una graduacion de alfombra
COMO TRANSPORTAR LA ASPIRADORA
Por medio del mango transportador en la parte posterior de la aspiradora lleve la misma de un cuarto a otro (Diagrama
hacia adelante mientras este recargada sobre las ruedas traseras. No jale la aspiradora cuando esta este solamente sobre las ruedas traseras.
5).
NOTA:
No empuje la aspiradora
LlMPlEZA DEL REClPlENTE PARA POLVO Y DEL PERMAFILTER" CON SISTEMA DE FlLTRAClON CLEANSTREAM"
Para una filtracion adicional, un filtro removible esta colocado dentro del recipiente para polvo. El filtro no necesita ser reemplazado per0 debe ser
limpiado regularmente para obtener un rendimiento maximo.
ADVERTENCIA:
ANTES DE DARLE SERVICIO.
Vacie y Limpie el RECEPTACULO PARA POLVO:
1.
Oprima el pestillo para sacar el receptaculo para polvo de la aspiradora. Jale el receptaculo para polvo para vaciarlo (Diagrarna
2.
Quite y limpie el PermaFilterTM con sistema de Filtracion CleanStrearnTM (vea las instrucciones a continuacion).
3.
Limoie el cornoartimiento del receotaculo para oolvo con una esoonia v aaua tibia.
4. ~uelva a colocar el ~ece~taculo para POI~~:' Alinee la saliente en la p&e inferior del receptaculo para polvo en la ranura rectangular de la aspi-
radora, y haga presion para abrocharla en su lugar (Diagrama 3). Si el recipiente para polvo no hace un ruido al entrar en su lugar, verifique para
asegurarse que el filtro esta colocado apropiadarnente.
LlMPlE EL PERMAFILTER" CON SISTEMA DE FlLTRAClON CLEANSTREAM"
1.
Quite el recipiente para polvo. Sujetelo, tome la parte interior del aro en la parte superior del filtro y tire firmernente el filtro hacia arriba y hacia
afuera (Pag.
2.
Mantenimiento Regular*: Cada vez que se vacia el Recipiente para Polvo, debe limpiarse el filtro. Golpee ligeramente el
filtro firmemente contra la parte interior de un basurero hasta que la suciedad deje de salir.
afectara su funcion.) No cepille el filtro.
3.
Limpieza Profunda*: Si la Rueda lndicadora de Desernpeiio en la parte frontal de la rnanivela esta girando, usted debe
notar una disrninucion en el poder de succion de la aspiradora. Si esto sucede, compruebe que la aspiradora no esta obstruida, vacie el recipiente para polvo
4. Vuelva a colocar el PerrnaFilter" con sistema de Filtracion CleanStream'": Alinee el hgulo del filtro con el Angulo del recept6culo para popolvo (la junta
de cara arriba). Haga presion sobre el
*Las instrucciones sobre la lirnpieza podrian variar dependiendo de las condiciones de suciedad. En algunos casos, mas o menos limpieza del
PerrnaFilter con sistema de filtracion CleanStreamW puede ser requerida.
PARA REDUCIR EL RIESGO DE UNA LESION CAUSADA POR PARTES EN MOVlMlENTO - DESCONECTE
.
,-
(interno) situado en el recipiente para polvo:
8
-
Diagrama 4).
(El
filtro estara decolorado despues del uso, esto no
y
quite todo el polvo y basura del filtro. Una vez que la aspiradora se haya limpiado, estara lista inmediatamente para ser usada.
filtro
para abrocharlo en su lugar y &r que hap fuga de polvo. Vuelva a colocar la cop
para
LA
ASPIRADORA
1).
poh en la aspiradora.

REMOCION Y REEMPLAZO DE LOS FILTROS
Esta aspiradora vertical contiene dos filtros: el filtro HEPA (a un costado de la aspiradora) y el Perma Filter'" (en el receptaculo para polvo) que combinados,
evitan que el polvo y 10s agentes alergenicos escapen de la aspiradora y vuelvan a pasar al aire.
Desconecte
la
aspiradora
antes
de
cambiar
el
filtro.
FILTRO HEPA
la fecha del reemplazo del filtro en la etiqueta.
1.
Deslice la cubierta del filtro hacia arriba y jalelo hacia afuera (Diagramas 1 y 2).
2. Sujete el cartucho del filtro HEPA y jalelo hacia afuera (Diagrama 3). IMPORTANTE: NO
3. Para repuestos del filtro HEPA llame al 1-800-321-1 134 (EE.UU.).
4.
Para reemplazar: inserte el filtro HEPA dentro de la carcaza (sello en la parte interior). Alinee las lengiietas de la cubierta del filtro con las ranuras de la
carcaza. Deslice la cubierta hacia abajo para acomodarla en su lugar.
PERMAFILTER" CON SISTEMA DE FlLTRAClON CLEANSTREAM" (interno) situado en el recipiente para polvo. El filtro no
necesita ser reemplazado per0 debe ser limpiado cada vez que se vacie el recipiente para polvo para obtener
un rendimiento maximo de la aspiradora. (Vea la pagina 6: Limpieza del PermaFilter" con sistema de Filtracion
CleanStreamm) (Diagrama
(externo) No. de Parte Royal 3-690320-001 ubicado en el costado de la aspiradora. El filtro HEPA debe ser reemplazado una vez al aiio. Escriba
lo limpie
4)
con
agua.
REMOCION Y REEMPLAZO DE
HERRAMIENTA REQUERIDA: DESTORNILLADOR DE CRUZ
ADVERTENCIA: PARA REDUCIR EL RIESGO DE LESION DEBIDO A LAS PARTES EN MOVlMlENTO
ASPIRADORA ANTES DE CAMBIAR LA BANDA 0 EL CEPILLO ROTATOR10
PARA QUITAR LA BANDA
superficie de cara arriba. Para retirar la cubierta de la boquilla, use un destornillador de cruz para quitar 10s cuatro tornillos. Las
flechas (Diagrama
la banda del eje del motor (Diagrama 2). Levante y quite el cepillo rotatorio (Diagrama 3). Deseche la banda usada.
1)
muestran la ubicacion de 10s tornillos. Incline la aspiradora hacia atras y levante la cubierta de la boquilla. Quite
LA
BANDA 0 DEL CEPlLLO ROTATOR10
Acueste la aspiradora para dejar expuesta la base de la boquilla. La base debe quedar sobre la
EST~LO
DE
-
DESCONECTE
BANDA.
LA
4&
PARA REEMPLAZAR LA BANDA
1.
Coloque la banda en el eje del motor y despues deslice el cepillo rotatorio a traves de la banda. Coloque la banda en la zona del
cepillo rotatorio donde no haya cerdas (Diagrama 4).
2.
Con la banda en su lugar, jale y deslice el cepillo rotatorio en la boquilla (Diagrama 3) asegurandose que las tapas de 10s extremos
del cepillo rotatorio esten en la orientacion correcta (Diagrama 3a).
IMPORTANTE: Gire manualmente el cepillo rotatorio para asegurarse que la banda no este torcida.
3. Coloque de nuevo la cubierta de la boquilla.
Fijela colocando de nuevo 10s tornillos debajo de la base de la boquilla.
ALMACENAMIENTO DE BANDA
Estire la banda alrededor de 10s ganchos en el panel posterior de la aspiradora. (Vea la pagina 4, figura 2 para ubicar el lugar del
almacenamiento de la banda)

REMOCION Y REEMPLAZO DEL FOCO
HERRAMIENTA REQUERIDA: DESTORNILLADOR PLAN0
ADVERTENCIA:
QUITAR
0
Esta aspiradora usa un foco comun para automovil
proveedor local de repuestos para automovil.
1. Incline el mango de la aspiradora hacia atras. lnserte el extremo del destornillador (destornillador plano) dentro de la ranura lateral
y
haga palanca para sacar el lente del foco (Diagrama 1).
2. Jale el foco hacia afuera del receptaculo para quitarlo. lnserte el foco nuevo en el receptaculo (Diagrama 2).
3. Coloque a presion el panel del lente del
Problema
La aspiradora no funciona
La aspiradora no recoge o
presenta
La rueda indicadora de
desernpeiio est6 girando
bajo poder de succion
PARA REDUCIR EL RIESGO DE DESCARGAS ELECTRICAS - DESCONECTE LA ASPIRADORA ANTES DE
CAMBIAR EL FOCO.
#
906, 13.0 voltios. Para repuestos del foco llame al 1-800-321-1 134 o llame a su
fbco en su lugar.
i
LA
ASPIRADORA ANTES DE DARLE SERVlClO
Causas Posibles
1.
El cordon no esta conectado firmemente al tomacorriente.
2.
El fusible esta fundido o se desconecto el cortacircuitos.
3.
Necesita servicio.
1.
El recipiente para polvo no esta instalado correctamente.
2.
El recipiente para polvo esta Ileno.
3.
El filtro esta tapado.
4.
Boquilldpasaje de polvo bloqueado.
5.
La entrada transparente para la manguera estl tapada.
6.
El cepillo rotatorio esta gastado.
7.
La banda esta rota o gastada.
8.
La graduacion de aha de alfombra es incorrecta.
3.
Valvula
de taponamientos activada.
Soluciones Posibles
1.
Conecte la unidad firmemente.
2.
Revise el fusible o el cortacircuitos. Reemplace el
fusible/vuelva a conectar el cortacircuitos.
3.
Llevela al centro de se~icio o lame al
1.
Revise la remoci6n y el reernplazo del recipiente para
POIVO
-
2.
3.
4.
5.
6. Reemplace el cepillo rotatorio-Pag.
7.
8.
9.
Pdg. 6
Vacie el recipiente para polvo - Pkg.
Quite el filtro y limpielo-Pag.
Quite la cubierta de la base; despeje la obstruccion
Quite la manguera; despeje la obstruccion.
Quite la manguera y limpie la entrada
Reemplace la banda-Pag.
Gradue la altura de alfombra de acuerdo al tip0 de
alfombra que va a aspirar-Pag.
Limpie
10s
fikros y despeje
7.
7.
6.
las obstrucciones - Pag.
l-8OO-32I-ll34.
6
7.
0
6
ale polvo de la aspiradora
I--
Los accesorios de la
aspiradora no recogen
No funciona la larnpara frontal
Es dificil hacer rodar la aspiradora
1.
El recipiente para polvo esta Ileno.
2.
El recipiente para polvo no esta instalado correctamente
3.
La manguera no esta instalada correctamente.
1.
La manguera esta tapada.
2.
La entrada para la manguera esta tapada.
3.
El recipiente para polvo esta Ileno.
4.
El filtro esta tapado.
1.
El foco esta fundido.
2.
Los cables ekctricos estan flojos.
1.
La graduacion de altura de alfombra es incorrecto.
1.
Vacie el recipiente para polvo - Pag.
2.
Revise la remocidn y el reemplazo del recipiente para
polvo
-
3.
1.
2.
3.
4.
1.
2.
1.
Pag. 6.
Revise la instalacion de la manguera - Pag. 5.
Quite la manguera y 10s accesorios; despeje la
obstrucci6n-Pag.
Quite la manguera y despeje la entrada.
Vacie el recipiente para polvo - Pag. 6.
Limpie el filtro - Pag
Reemplace el foco-Pag.
Llame al
Royal autorizado mas cercano.
Gradue la altura de alfombra de acuerdo al tip0 de
alfombra aue va a as~irar-Paa.
5.
7.
1-800-321-1134
8.
para consultar al Distribuidor
6
6
CUALQUIER OTRO SERVlClO DEBE SER REALIZADO POR UN REPRESENTANTE AUTORIZADO DE SERVlClO
En caso de necesitar mavor avuda, busaue en la Seccion Amarilla un Distribuidor Roval autorizado. Los aastos de transDorte desde v hacia cualauier
SERVlClO
centro de reparacion ~oires~onsabilidad del duefio. Las partes de servicio usadas en esta unidad son fikilmente reemplazables y ficiles de con'seguir en
un Distribuidor Royal o de un vendedor al menudeo de productos Royal autorizado. Cuando solicite
identifique su aspiradora mediante el modelo y nlimero de serie (el nlimero de modelo se encuentra en la parte posterior de la aspiradora).
AL
CLIENTE
E8
(1 -800-321 -1 134)
information
o haga un pedido de partes, siempre

RETRAIT ET REMPLACEMENT DE L'AMPOULE
OUTlL
NECESSAIRE
AVERTISSEMENT
CAMPOULE.
Cet aspirateur utilise une ampoule automobile regulibre de 13,O volts
ampoule de rechange.
1. Incliner
le manche de I'aspirateur vers I'arriere. Inserer I'extr6mit6 d'un tournevis
I'exterieur pour extraire la lentille du phare (Schema 1).
2. Tirer I'ampoule hors de la douille pour I'enlever. Pousser la nouvelle ampoule dans la douille pour concr6tiser le remplacement (Schema 2).
3.
Remettre la lentille du phare en place.
Caspirateur ne marche pas
Caspirateur ne ramasse pas
ou I'aspiration est faible
La roue indicatrice de
performance est en train de
tourner
:
TOURNEVIS
:
POUR
REDUIRE
ATETE
PLATE
LES RISQUES
1.
La fiche n'est pas bien ins6r6e dans la prise.
2.
Fusible saute ou rupteur dBclench6.
3.
A
besoin de service.
1.
Le vide-poussihre n'est pas bien install6
2.
Le vide-poussihre est plein.
3.
Le filtre est encrasse.
4.
Le suceur/passage des salet6s est encrass6.
5.
Le raccord transparent du tuyau est encrass6.
6.
Le rouleau de brosse est us6.
7.
La courroie est cass6e ou usee.
8.
Le r6glage de hauteur pour le tapis n'est pas exact.
9.
Clapet d'obstruction activ6.
DELECTROCUTION,
N"
906. Appeler le 1-800-661-6200 ou votre magasin de pieces auto pour obtenir une
DEBRANCHER
A
CASPIRATEUR AVANT DENLEVER OU DE REMPLACER
t&e plate regulier dans la fente laterale et exercer une pression vers
1.
Bien inserer la fiche dans la prise.
2.
VBrifier le fusible ou le rupteur. Remplacer le
fusiblelrecaler le rupteur.
3.
Transporter au centre de service
1-800-661-6200.
1.
Revoir "Retrait et remise en place du
vide-poussihre"
Vider le vide-poussihre - Page
2.
3.
Retirer et nettoyer le filtre - Page
4.
Enlever le wuvercle du suceur et enlever I'obstruction
Enlever le tuyau et enlever I'obstruction.
5.
Enlever le tuyau et nettoyer le raccord.
6.
Remplacer le rouleau de brosse - Page
7.
Remplacer la courroie - Page
8.
R6gler I'ajustement de hauteur du tapis au r6glage
appropri6 pour le tapis
9. Nettoyer les filtres et Bliminer les obstructions-Pg.
-
Page
B
ou
appeler le
6.
6.
7.
7.
nettoyer - Page
7.
6.
OU
6
1.
1.
be la poussiere s'echappe
de I'aspirateur
Les outiis de l'aspirateur ne
ramassent pas
-
--
Le phare ne marche pas
Caspirateur est difficile
pousser
TOUT AUTRE SERVICE DOlT
Si I'on a besoin
sont
a
lant. Toujours identifier I'aspirateur par le numero de modele lorsqu'on demande des informations ou lorsqu'on commande des pieces de rechange. (Le num6ro du modele est
indique au dos de I'aspirateur).
d7assistance,supplementaire,
la charge du propr16taire. Les pieces de service utilisees dans cette unite se remplacent facllement et sont disponibles chez un distributeur Royal agree ou chez un detail-
Le vide-poussihre est plein.
2.
Le vide-poussihre n'est pas bien install6.
3.
Le tuyau n'est pas install6 correctement.
1
1.
Le tuyau est bouch6.
2.
Le raccord du tuyau est encrass6.
3.
Le vide-poussihre est plein.
4.
Le filtre est encrass6.
1.
Campoule est grill6e.
2.
Les dbles Blectriques sont desserres.
1.
Le r6glage de hauteur du tapis est inexact.
ETRE
SERVICE A LA
EFFECTUE
CLIENTELE
PAR UN
(1 -800-661-6200)
REPRESENTANT
voir les Pages Jaunes pour repbrer un distributeuragh3 Royal. Les coDts de transporfvers I'endroit des reparations et le retour
Vider le vide-poussihre - Page
Revoir " Retrait et remise en place du
2.
vide-poussi8re"
3.
Revoir I'installation du tuyau - Page
1.
Enlever le tuyau et les outils; enlever I'obstruction - Page
2.
Enlever le tuyau et nettoyer le raccord.
3.
Vider le vide-poussihre - Page
4.
Nettoyer le filtre - Page
1.
Remplacer I'ampoule - Page
Appeler le
2.
distributeur agree Royal le plus proche.
1.
Mettre I'ajustement de hauteur du tapis au
r6glage appropri6 pour le tapis
-
Page
1-800-661-6200
AGREE
6.
6.
7.
pour le
5.
6.
8.
B
nettoyer - Page
DU SERVICE
5.
6.

RETRAIT ET REMPLACEMENT DES FlLTRES
Cet aspirateur vertical comprend deux filtres: un filtre HEPA (sur le c8te de I'aspirateur) et un filtre Perma Filter" (dans le vide-poussiere) qui ensemble
empbchent la salete et les allergenes de s'echapper de I'aspirateur et de revenir dans I'air.
Debrancher I'aspirateur avant de chanaer un filtre.
FILTRE HEPA
Le filtre HEPA doit &re remplace une fois par an. lnscrire la date de remplacement du filtre sur I'etiquette.
1.
Glisser le couvercle du filtre HEPA vers le haut et le sortir (Schemas 1 et 2).
2. Saisir la cartouche du filtre HEPA et la sortir (Schema 3).
3. Composer le 1-800-661-6200 (Etats-Unis) pour obtenir des filtres HEPA de rechange.
4.
Pour remettre le filtre en place : lnserer le filtre HEPA dans le boitier (avec le joint d'etancheite tourne vers I'interieur). Aligner les languettes du couvercle
du filtre avec les fentes du boitier. Glisser le couvercle vers le bas pour le verrouiller en place.
PERMAFILTER" AVEC LE SYSTEME DE FILTRATION CLEANSTREAM"
saire de remplacer le filtre mais
page
6
:
(externe) "N de piece Royal 3-690320-001 situe sur le cBte de I'aspirateur.
IMPORTANT: Ne PAS la nettoyer
il
nettoyer le PermaFilterW avec le systeme de filtration CleanStreamm) (Schema
faut le nettoyer chaque fois que le vide-poussiere est vide pour optimiser I'efficacite de I'aspirateur. (voir
(interne) situe dans le vide-poussiere.
a
I'eau.
II
n'est pas neces-
4)
RETRAIT ET REMPLACEMENT DE LA COURROIE OU DE LA BROSSE
OUTlL N~CESSAIRE : TOURNEVIS CRUCIFORME
AVERTISSEMENT: POUR
PIECES
EN MOUVEMENT,'DEBRANCHER L'ASPIRATEUR AVANT DE CHANGER
POUR ENLEVER LA COURROIE
haut. Pour enlever le couvercle du suceur, utiliser un tournevis cruciforme pour enlever les quatre vis. Les fleches (Schema 1) indiquent I'emplacement
des vis. Remettre le suceur
enlever le rouleau de brosse (SchBma 3). Jeter I'ancienne courroie.
REDUIRE
a
LES RISQUES DE BLESSURES DUES A DES
Retourner I'aspirateur de maniere h exposer le dessous du suceur. La base doit 6tre a plat et pointer vers le
I'endroit et soulever le couvercle du suceur. Glisser la courroie hors de I'arbre du moteur (Schema 2). Soulever et
I
MODELE DE
LA
COURROIE OU LE ROULEAU DE BROSSE.
COURROIE
:
&51
POUR REMETTRE LA COURROIE EN PLACE
1. Mettre la courroie sur I'arbre du moteur et glisser le rouleau de brosse a travers la courroie. Placer la courroie autour de la partie du rouleau de brosse
sans poils (Schema
2. Une fois'la courroie installee, tendre le rouleau de brosse et le glisser dans le suceur (Schema 3) en veillant a I'orientation des couronnes d'extremite
du rouleau de brosse (Schema 3a en medaillon).
IMPORTANT: Tourner le rouleau de brosse
3. Remettre le couvercle du suceur en place. Fixer en inserant les vis sous le suceur.
4).
a
la main pour s'assurer que la courroie n'est pas tordue.
RANGEMENT DE LA COURROIE
Etirer la courroie autour des crochets situes sur le panneau arriere de I'aspirateur (voir I'emplacement du dispositif de rangement de la courroie a la
page
4,
figure
2).

SYSTEME CACHE-TUYAU HIDE-A-HOSE ET
a
destinee
du c6te de I'aspirateur en utilisant le manche. Mettre le tuyau
(Schema 2a) se trouvant autour du tuyau
BATON TELESCOPIQUE
Tourner et etirer le baton pour obtenir de la longueur additionnelle, tel que decrit sur le biton. Tourner de nouveau pour bloquer.
eviter que I'aspirateur ne bascule lors de I'utilisation des accessoires de nettoyage des endroits en hauteur. Retirer le systeme Hide-a-Hosem
a
la base.Tirer le tuyau du manche du tuyau pour plus de longueur (Schema 2b).
:
Enlever le baton du c6t6 de I'aspirateur en le tirant par le haut pour le degager et tirer vers le haut (Schema 3).
PIECE
a
I'arriere de I'aspirateur (Schema 1) et fixer I'anneau de la piece d'ancrage du tuyau
D'ANCRAGE DE TUYAU:
La piece dancrage du tuyau est
REGLAGES
IMPORTANT:
Tourner le bouton pour ajuster la hauteur du suceur en fonction de la surface
hauteur de tapis plus elevee.
POUR LES TAPIS
Mettre le manche en position verticale avant d'ajuster le reglage du tapis.
a
nettoyer (Schema 4). Si I'aspirateur est difficile a pousser, utiliser une
TRANSPORT DE L'ASPIRATEUR
Utiliser la poignee de transport a I'arriere de I'aspirateur pour deplacer I'aspirateur d'une piece a I'autre (Schema
I'aspirateur vers I'avant sur les roulettes arriere. Ne pas tirer I'aspirateur sur les roulettes arriere.
5).
REMARQUE
:
Ne pas pousser
NETTOYAGE DU VIDE-POUSSIERE ET DU PERMAFILTER'" AVEC LE SYSTEME DE FILTRA-
TION CLEANSTREAM'":
mais
il
faut le nettoyer r6gulierement pour une aspiration optimale.
AVERTISSEMENT: POUR
AVANT L'ENTRETIEN.
Vidage et nettoyage du
1.
Appuyer sur le loquet pour degager le vide-poussiere de I'aspirateur (Schema 1). Sortir le vide-poussiere pour le vider (Schema
2. Retirer et nettoyer le PermaFilterm avec le systeme de filtration Cleanstream" (consulter les instructions ci-dessous).
3. Utiliser une Bponge et de I'eau tiede pour essuyer le compartiment du vide-poussiere.
4. Pour remettre le vide-poussiere en place: Mettre la patte d'alignement se trouvant sous le vide-poussiere dans la fente rectangulaire formbe dans
I'aspirateur et enfoncer le vide-poussibre pour le verrouiller en place (Schema 3). Si le vide-poussiere ne s'emboite pas correctement, verifier que le filtre soit bien en place (voir Page
REDUIRE
VIDE-POUSSIERE
pour filtrer plus, un filtre amovible se trouve dans le vide-poussiere.
LES RISQUES DE BLESSURES DUES A DES
:
8
-Schema 4).
PIECES
EN MOUVEMENT, DEBRANCHER L'ASPIRATEUR
NElTOYER LE PERMAFILTER" AVEC LE SYSTEME DE FILTRATION CLEANSTREAM'"
1.
Retirer le vide-poussiere. Le tenir, tirer fermement le filtre par I'anse du haut et le sortir (Page 4 -
2.
Entretien regulier*:
n'y ait plus de poussiere dans le filtre. (Apres utilisation, le filtre sera decolore mais restera efficace). Ne pas brosser le filtre.
3.
Nettoyage en profondeur* :si la roue indica!rice de performance situee au devant de la poignee tourne, cela signifie une diminution de puissance de I'aspirateur ou une succion. Si cela se produit,
I'aspirateur est de nouveau pr6t a fonctionner.
4.
Rernplacer le PermaFilter'* avec le systeme de filtration CleanStream": Aligner I'angle du filtre avec celui du vide-poussiere (avec le joint d'etancheite tourne vers le haut). Appuyer sur le filtre pour le verrouiller en place et empgcher toute fuite de poussiere. Remettre le vide-poussiere dans
I'aspirateur.
*
Les instructions de nettoyage peuvent varier selon les conditions de salete. Dans certains cas,
avec le systeme de filtration CleanStream".
il
faut nettoyer le filtre chaque fois que le vide-poussiere est vide.Taper doucement le filtre sur le rebord d'une poubelle jusqu'a ce qu'il
debaucher
I'aspirateur en vidant le vide-poussiere et en retirant saletes et debris du filtre. Une fois le filtre nettoye,
II
n'est pas necessaire de remplacer le filtre
2).
(interne) - sit& dans le vide-poussiere.
Schema 4).
il
faudra nettoyer plus ou moins bien le PermaFilterm

Aligner les
flkhes avec les
paitessitu&s
ramrd
sur le
transparent du
tuyau
AlTACHER LE TUYAU
1.
transparent du tuyau (Schema IA). Bien enfoncer la manchette et la tourner dans le sens des aiguilles d'une rnontre. lnserer le manche du tuyau dans
le cBte de I'aspirateur. Appuyer ferrnement pour fixer (Schema 2).
INSTALLER LES OUTILS
2.
I'interieur. (B) Glisser le Power EdgePc(en option) sur le panneau arriere superieur avec ses poils tournes vers I'exterieur.
le panneau arriere superieur avec ses poils tournes vers I'exterieur. (D) Glisser le baton telescopique sur le panneau arriere inferieur en mettant son
extrbrnite plus petite en bas.
RANGEMENT DU
3.
de cordon (Schema 4) (A).
UTILISATION
I'interrupteur "onloff" situe sur le c6te gauche de I'aspirateur, juste au dessus du filtre HEPA (Schema 1).
NElTOYAGE DES PLANCHERS ET TAPIS
1. Le rnanche doit 6tre en position verticale lors du reglage de la hauteur (Schema 2). Tourner le bouton de reglage de la hauteur pour ajuster la hauteur
du suceur en fonction de la surface
REMARQUE
de I'aspirateur sur des tapis pourvus de franges.
NElTOYAGE AU-DESSUS DU PLANCHER
L'aspirateur doit etre en position verticale pour soulever la brosse en rotation du tapis lorsque I'on nettoie au-dessus du plancher.
1. Mettre I'aspirateur en position verticale.
2. Enlever le tuyau du cBt6 de I'aspirateur au rnoyen du manche (Schema 4).
ATTENTION:
:
Les franges de tapis peuvent sJemm6er dans le rouleau de brosse de I'aspirateur lorsque celui-ci tourne. Etre prudent lors du passage
L'agitateur a brosse continue a tourner tandrs que le tuyau est enleve ou en train d'gtre utilise, eta tout moment lorsque
:
Attacher le tuyau flexible a I'aspirateur (Schema
:
(Schema 3) : (A) Glisser I'outil Edge WedgeMC sur la base de la partie superieure du rnanche avec ses poils tournes vers
(E)
lnserer I'outil pour fentes dans le panneau arribre inferieur.
CABLE
DE
:
Pour un bon rangement du cordon, I'enrouler autour des crochets sur le c6t6 de I'aspirateur avec le relichement rapide
I.
CASPIRATEUR
a
nettoyer (Schema 3). Une fois la hauteur choisie, le suceur se mettra dans la position souhaitee.
Brancher le clble dans une prise electrique. 2. Allumer I'aspirateur en appuyant sur
1).
Aligner les flbches se trouvant sur le tuyau aux pattes situees sur le raccord
(C)
Glisser I'outil2-en-1 sur
le nettoyeur de tapis est en marche. Ne pas mettre les cheveux, les vgtements Isches, les doigts ou toute autre partre du corps dans
la zone de la brosse lorsque le nettoyeur est en marche.
3. Choisir I'un des accessoires pratiques ou utiliser seulernent le tuyau. Sirnplement pousser I'accessoire ferrnement sur I'extremite du baton ou du
manche du tuyau. Pour enlever I'outil, tourner et degager avec soin.
4. Si plus de longueur est necessaire, utiliser le cache-tuyau Hide-a-HoseMC ou le baton telescopique (voir page
*NETTOYAGE DES BORDS SANS LES MAINS
edger souhaitee. Retirer I'extremite du tuyau du c6te du dispositif et du support d'outils. Glisser I'extrernite du tuyau sur le Power EdgePC. Glisser
I'aspirateur le long des murs et des plinthes pour obtenir un nettoyage superieur des bords (Schema
*Non
disponible sur tous les mod6les.
:
Retirer le Power EdgePG du panneau arriere superieur. lnserer le Power EdgePC dans la fente power
5).
5
6).

Schema
1
1
Schema
2
H
Schema
1. Manche antiglisse Non-SlipMC
2. Levier de deblocage du vide-poussiere
3. Filtre
4. Phare
5a.*Gliirs
5b.*Pare-Chocs ScuffGuardT" (Optionnel)
6.
7. Pedale de deblocage du manche
8.
9. PermaFiltePC avec la filtration CleanStreanPc dans
10. Bride du cordon
11. Roue indicatrice de performance
12. Systeme cache-tuyau Hide-a-HoseMC
13. Piece d'anchage de tuyau
1
HEPA
avec
PDwer
(Optionnel)
Bouton de reglage de la hauteur
Vide-poussiere
le vide-poussiere
PareChocs
qui s'encadre
Schema
14. Poignee de transport
15. Manche cache-tuyau Hide-a-HoseMC
16.
17. Outil
18.
19. Roulettes orientables
20. BZiton telescopique
21. Outil pour fentes
22. Outil2-en-1
23. lnterrupteur MarchetArrSt ("On10ff
24. Raccord de tuyau transparent
25.
REMARQUE: "Les accessoires optionnels ne sont
pas inclus avec
2
Long ciible electrique
Power
Edge (optionnel
s'encadre)
Compartiment a courroies
-
brosse d'epoussetage
a
et outil
juste au dessus du filtre HEPA
Outil Edge WedgP (outil pour wins
mobilier
tous les modeles
avec
lnserer les 2 vis
le PareChocs qui
")
-
et
escaliers)
a
OUTlL
ASSEMBLAGE
1. Mettre I'unite en position verticale et mettre la partie superieure du manche sur I'aspirateur (Schema 1).
2.
Enfoncer la partie superieure du manche dans I'aspirateur tout en I'alignant avec I'ouverture du manche (Schema
3. Les
DEUX
vis (fournies) doivent &re inserees a partir du haut de I'aspirateur pour fixer le manhhe (Schema 3).
NECESSAIRE : TOURNEVlS CRUCIFORME
2).

CET ASPIRATEUR N'EST
DESTINE
QU'A L'USAGE DOMESTIQUE.
INSTRUCTIONS IMPORTANTES POUR VOTRE
Lors
de
I'utilisation
&re
respectees,
LIRE TOUTES LES INSTRUCTIONS AVANT D'UTILISER L'APPAREIL.
TOUJOURS
PLACER L'ASPIRATEUR EN POSITION VERTICALE LORS DE L'UTILISATION DU TUYAU ET DES ACCESSOIRES.
NE JAMAIS LAISSER L'ASPIRATEUR SANS SURVEILLANCE LORSQU'IL EST
VERIFIER
AVERTISSEMENT : NE
POURRAIT L'ENDOMMAGER.
ENLEVER LA BROSSE ET NETTOYER LES
AFIN QUE LA BROSSE PIVOTE UNIFORMEMENT.
RESPECTER
REGULIEREMENT
LIRETOUTES LES INSTRUCTIONS
AVERTISSEMENT : AFIN DE
D'INCENDIE. DE CHOC
Ne pas quitter I'appareil 16squ1il est branch6 Debrancher de la prise lorsqu'il n'est pas utilise et avant entretien.
Ne pas utiliser dehors ou sur des surfaces humiges. Un choc electrique pourrait se produire.
Ne pas permettre qu'il soit utilise cornme joue!. Etre particulierement attentif lors de I'utilisation par des enfants ou
Ne I'utiliser que tel que decrit dans ce manuel. N'utiliser que les accessoires recommandes par le fabricant.
Ne pas utiliser si le cordon d'alimentation ou la fiche est endommage(e). Si cet aspirateur ne fonctionne pas comme
si on I'a fait tomber, s'il a et6 endommage ou bien encore si on I'a laisse tomber dans I'eau,
pour le faire inspecter. Appeler le numero sans frais 1-800-321-1134 pour obtenir I'adresse du centre de service le plus proche.
Ne pas tirer sur le cible electrique ou porter I'aspirateur par le cable. Ne pas utiliser le cible comme poignee, ne pas fermer de porte
sur le cible, et ne pas entourer le cible autour de bords tranchants ou de coins. Ne pas passer I'appareil au dessus du cable. Tenir le
a
cible
Ne pas debrancher en tirant sur le csble. Pour debrancher, tenir la fiche, non le cible.
Ne pas manipuler la prise ou le dispositif avec des mains mouillees.
Ne pas introduire d'objets dans les ouvertures. Ne pas utiliser avec une ouverture bloquee
poussiere, de peluche, de cheveux, et de tout ce qui pourrait affecter le passage de I'air.
Garder les cheveux, les vGtements, les doigts et toutes les parties du corps loin des ouvertures et des pieces en mouvement.
Ne pas utiliser I'aspirateur sans avoir le vide-poussiere et les filtres en place.
Mettre tous les commandes sur arrBt avant de debrancher.
Etre particulierement attentif lors du nettoyage d'escaliers.
des endroits 00 ceux-ci pourraient Gtre presents.
Ne pas utiliser de rallonge electrique avec cet aspirateur.
distance des surfaces chauffees.
Ne pas ramasser quoi que ce soit qui brDle ou qui fume, tel que les cigarettes, les allumettes, ou les cendres chaudes.
Ne pas utiliser I'aspirateur pour ramasser des liquides inflammables ou combustibles, tels que I'essence, ou utiliser le dispositif dans
Maintenir I'aspirateur
Caspirateur doit Btre en position verticale pour soulever la brosse pivotante du tapis lorsque I'on nettoie au-dessus du plancher.
Ranger I'aspirateur
Cemploi d'une tension incorrecte peut endommager
indiquee sur la plaque de I'aspirateur.
d'un
appareil
notamment
CES
LES FILTRES ET LES NETTOYER OU LES REMPLACER.
JAMAIS
electro-menager,
les
suwantes
INSTRUCTIONS
UTILISER
D'OBJETS
DEBRIS
:
DE
SECURITE.
A
DES
certaines precautions de
ARETE
VIVE
CHAPEAUX
AVANT
POUR
D'EXTREMITE
D'UTILISER CE DISPOSKIF.
REDUIRE
ELECTRIQUE
a
mBme
le
sol. Seuls les aspirateurs tenus en main peuvent Gtre utilises sur du mobilier.
a
I'interieur. Ranger I'aspirateur apres usage pour eviter les accidents.
le
moteur et potentiellernent blesser I'utilisateur. La tension adequate est
BRANCHE.
NETTOYER
DE
LES RISQUES
OU DE BLESSURE
le
;
maintenir celles-ci exemptes de
SECURITE
base
doivent
LE
TUYAU
TEMPS A AUTRES
rapporter a un centre de service
toujours
CAR
CECI
a
leur proximite.
il
le
devrait,
:
CONSERVER CES INSTRUCTIONS
I
Afin de reduire le risque de choc electrique, cet appareil est muni d'une fiche polarisee (avec une lame plus large que
I'autre). Cette fiche ne peut se placer que d'une seule fa~on dans une prise polarisee. Si la fiche ne rentre pas
completement dans la prise, tourner la fiche. Si elle ne rentre toujours pas, prendre contact avec un electricien
professionnel afin de faire installer une prise appropriee. Ne pas modifier la fiche de quelque maniere que ce soit.
AVERTISSEMENT
:
I

Vous Ctes dCsormais le fier propridtaire d'un Dirt Devil Swivel Glide Vision avec le
dispositif Power You Can SeeTM! Vous n'achhterez plus jamais un autre sac poussihre avec
cette conception sans sac unique qui inclut un vide-poussihre transparent permettant de
rCcupCrer les objets perdus. Vous apprCcierez Cgalement une
supCrieure avec
12
amphres de puissance d'aspiration maximum.
puissance
de nettoyage
Les personnes sujettes
a
des allergies apprbcieront I'exclusif PermaFilterm avec le systhme
de filtration Cleanstream", situC dans le vide-poussihre, et I'exclusif filtre d'bvacuation
HEPA qui permet de retenir plus de
99%
poussihre et les empCche de se disperser
des poussihres et des allerghnes dans le vide-
nouveau dans
I'air. Parmi les autres carac-
tCristiques qui facilitent I'aspiration: les roulettes orientables pour faciliter les manoeu-
vres et les outils incorporCs pour nettoyer au-dessus du sol.
Nous sommes extrcmement fiers de nos produits et espCrons que, tout comme nous, vous
Ctes satisfaits de leur qualit6 et de leur performance.
Merci pour votre support des produits Dirt Devil.
Visitez
notre site web au www.dirtdevil.com.
TABLE
Pieces
Assemblage
Utilisation de I'aspirateur
Transport de I'aspirateur
Vide-poussiere et PermaFilter'" avec la filtration CleanStreamTM
Retrait et remplacement des filtres
Retrait et remplacement de la courroie ou du rouleau de brosse . .Page
Retrait et remplacement de I'ampoule
Guidededepannage
..............................................
.........................................
...............................
Assemblage du tuyau et rangement des outils
Nettoyage des planchers et tapis
Nettoyage au-dessus du plancher
Nettoyage des bords sans les mains
Cache-tuyau
Reglages pour les tapis
.......................................
.............................
...............................
...................................
DES
MATIERES
............
......................
......................
...................
..
........................
.....................
Page4
Page4
.Page
.Page
.Page
.Page
.Page
Page6
.Page 6
.Page 6
.Page 6
.Page
.Page 8
Page8
5
5
5
5
5
7
7
Royal Appliance Mfg. Co. garantit au consommateur que cet aspirateur est exempt de tout vice de materiau ou de fabrication a compter de la date d'achat originale.
Consultez le carton d'emballage de I'aspirateur pour determiner la duree de la garantie et conservez I'original de votre reFu d'achat pour justifier la date d'entree en
vigueur de la garantie.
Si I'aspirateur
plet
doit etre livre, port pave,
copie du rey qachat original, ainsi que vos noms, adresse et numero de telephone. S'il n'y a pas de point de vente dans votre region, appelez I'usine, au 1-800321-1134 aux ETATS-UNIS et au 1-800-661-6200 au CANADA. N'utilisez que des pieces de rechange Royal authentiques.
La
garantie ne couvre pas I'usure inhabituelle, ni les deteriorations dues
les brosses, les sacs, les ampoules ou le ventilateur. Cette garantie ne couvre pas les reparations non autorisees.,Cette garantie vous confere des droits juridiques
precis,
fait defaut durant la periode couverte par la garantie, nous reparerons ou remplacerons toutes pieces defectueuses gratuitement. Caspirateur au com-
mais vous pouvez egalement disposer d'autres droits (ces derniers variant d'un Etat
a
n'importe quel point de vente et de service ROYAL agree. Veuillez inclure une description detaillee du probleme, la date d'achat, une
a
un accident ou a un usage abusif de I'aspirateur. Elle ne couvre pas non plus les courroies,
a
I'autre au sein des Etats-Unis).

MANUEL DU
Notice d'utilisation et
d'entretien
PROPRIETAIRE
Veuillez lire ces instructions avec
soin avant d'utiliser votre Swivel
Glide Vision.
Permettez-nous de vous aider
a
assembler votre aspirateur ou de
repondre
appelant le
1-800-321 -1 134
1-800-661 -6200
Consignez les renseignements concernant votre aspirateur
ci-dessous pour pouvoir les retrouver rapidement.
I
No
de modele
Code de fab.
(Le code de fabrication se trouve sur le c6t6 infirieur anikre de I'aspirateur.)
a
vos questions en
:
(E.u.)
(Canada)
:
:
Espaiiol
"2
$
-
pagina
El
01 998
Tous droits reserves
No
1 -690221
-033
1 1/99
 Loading...