

Page 1
1 2 3
7
4 5 6
2
3
5
6
4
1
Thank you for selecting this delicate wireless colour weather station with colour display.
Utmost care has gone into the design and manufacture of the clock. Please read the
instructions carefully according to the version you purchased and keep the manual well
for future reference.
OVERVIEW
MAIN UNIT
5. [ CHANNEL / + ] key
- In normal mode, press to switch between Channel 1~8 of outdoor sensors.
- In normal mode, press and hold for 2 seconds to enter auto-cycle mode of Channel
1~8 temperature readings.
- During auto-cycle mode, press once to return to normal mode.
- In setting mode, press to increase the setting values.
6. [ MEM / - ] key
- In normal mode, press to check maximum and minimum temperature reading.
- During max or min record is displayed, press and hold for 2 seconds to erase the
current records.
- In setting mode, press to decrease the setting values.
7. [ INDEX ] key
- In normal mode, press to toggle the between dew point and heat index
8. LCD display
9. Battery compartment
- Accommodates 3 x AAA batteries for backup.
10. Power jack
11. Wall mount hole
12. [ HISTORY ] key
- In normal mode, press to view the past 24 hour weather records.
13. [ HI / LO / AUTO ] sliding switch
- Slide to the [ HI ] position for brighter backlight.
- Slide to the [ LO ] position for dim backlight.
- Slide to the [ AUTO ] position for Auto backlight that depends on the environment
brightness.
14. [ SENSOR ] key
- Press once to enter sensor receiving mode.
15. [ BARO ] key
- In normal mode, press to switch baro pressure unit
- In normal mode, press and hold for 2 seconds to enter rel/abs mode
16. [ RESET ] key
- Press once to perform overall function reset.
- In case of malfunction, the unit may require reset.
17. [ °C / °F ] key
- In normal mode, press to switch between °C /°F format.
18. Extend wall mount holder
- To mount the main unit in horizontal viewing angle
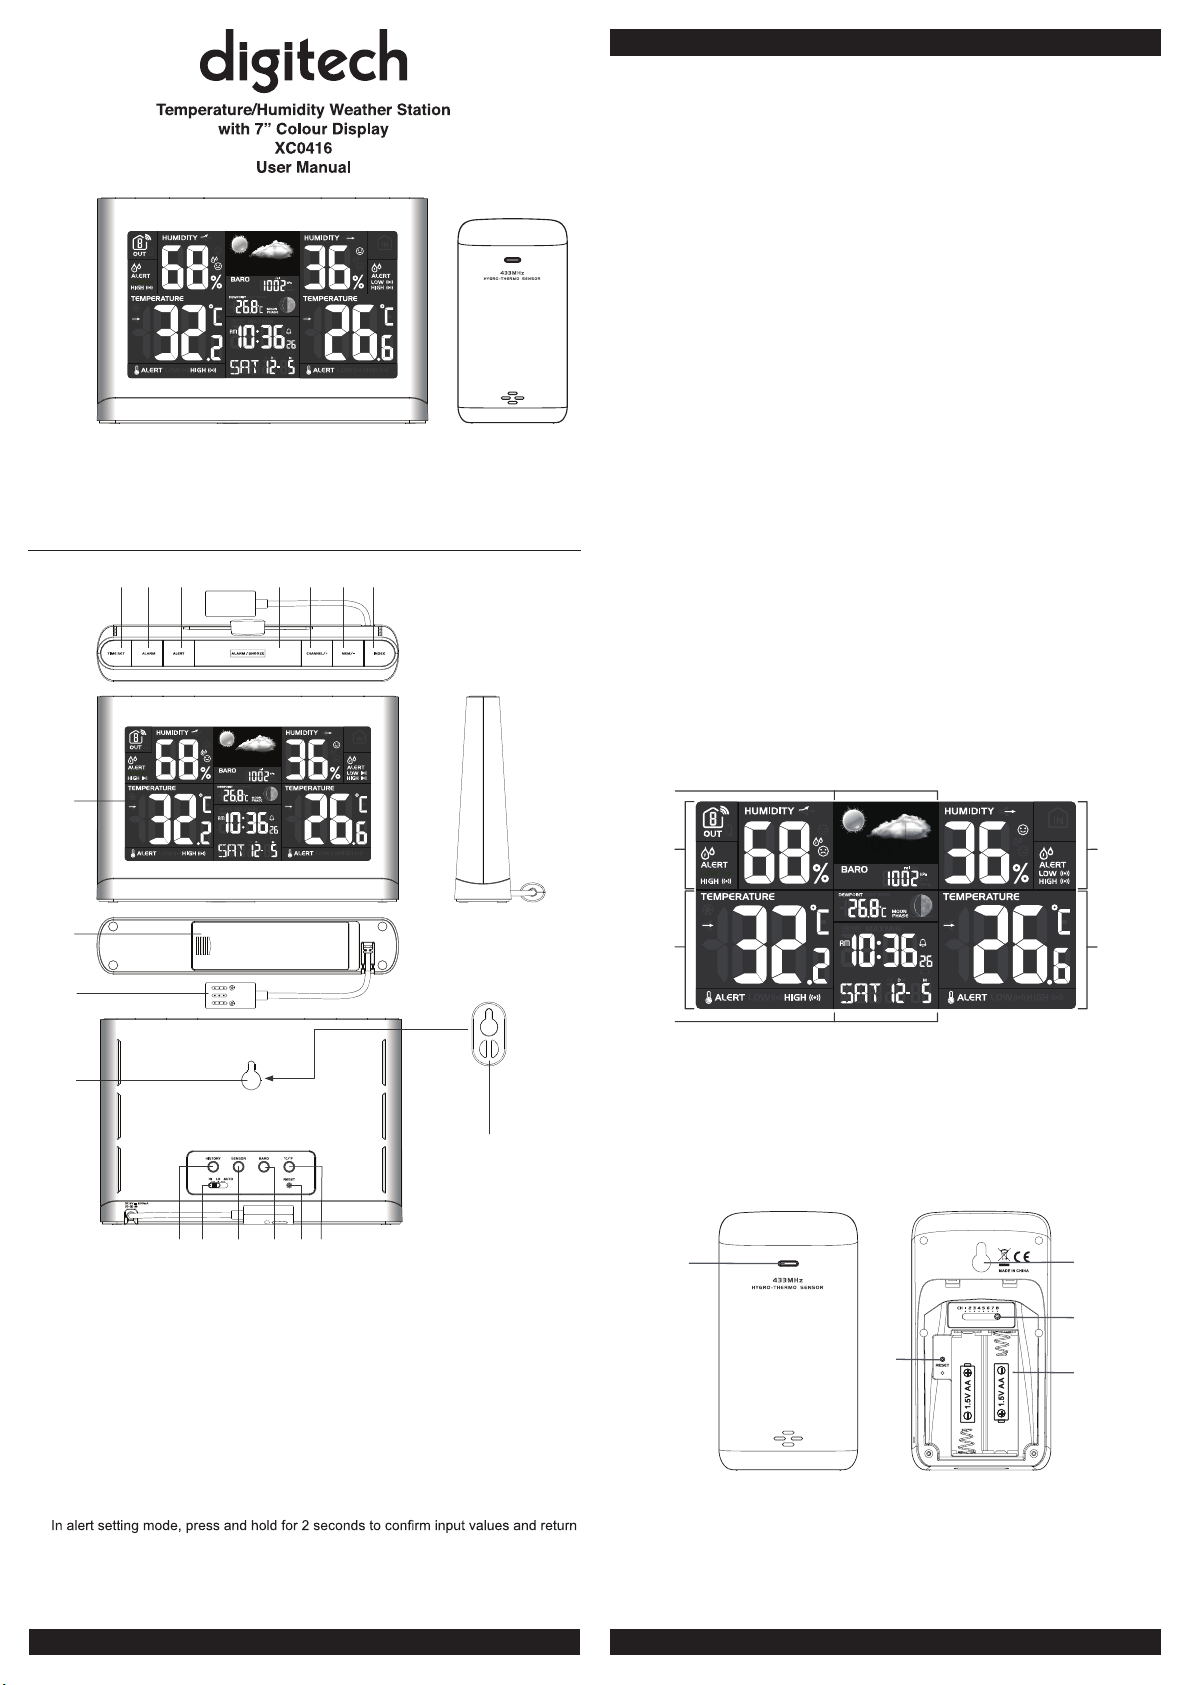
LCD DISPLAY
8
9
10
11
1. [ TIME SET ] key
- In normal mode, press and hold for 2 seconds to enter time setting mode.
- In time setting mode, press to step next setting of time and calendar.
2. [ ALARM ] key
- In normal mode, press to show the alarm time and turn on/off the alarm.
- In normal mode, press and hold for 2 seconds to enter alarm setting mode.
- In alarm setting mode, press to step next setting of alarm.
- When alarm is sounding, press to stop the current alarm.
- In alert setting mode, press to toggle the HI / LO alert on/off.
3. [ ALERT ] key
- In normal mode, press and hold for 2 seconds to enter temperature alert setting
mode.
- In alert setting mode, press once to switch between setting options.
to normal mode.
4. [ ALARM / SNOOZE ] key
- When alarm is sounding, press to stop the current alarm and enter snooze.
- When alarm is sounding, press and hold for 2 seconds to stop the current alarm, the
clock will sound again in the next day.
12
13 14 15 16 17
18
1. Weather forecast and baro reading section
2. Outdoor humidity section
3. Outdoor temperature section
4. Time, calendar and weather index display section
5. Indoor humidity section
6. Indoor temperature section
WIRELESS HYGRO-THERMO SENSOR
1
2
1. Transmission status LED
2. [ RESET ] key
3. Wall mounting holder 5. Battery compartment
4. [ CHANNEL ] slide switch
- Assign the sensor to Channel 1,2,3,4,5,6,7 or 8.
- Accommodates 2 x AA size batteries.
3
4
5
Page 2
GETTING STARTED
WIRELESS SENSOR
1. Remove the battery door.
2. Insert 2 x AA size batteries into the battery compartment. Make sure you insert
them the right way according to the polarity information marked on the battery
compartment.
3. Close the battery door.
Note:
- Once the channel is assigned to a Wireless Hygro-Thermo sensor, you can only
change it by removing the batteries or resetting the unit.
- Avoid placing the sensor in direct sunlight, rain or snow.
MAIN UNIT
1. Plug the power adapter to power up the main unit.
2. Once the main unit power up, it will enter normal time mode.
Note:
- You can using AAA batteries for backup purpose, remove the battery door and
install 3 new AAA size batteries as per the polarity information marked on the battery
compartment, then close the battery door.
- If no display appears on the LCD after installing the batteries, press the [ RESET ] key
by using a metal wire.
- To avoid the wireless sensor and main unit pairing fail, please power up the sensor(s)
rst, and then press [ RESET ] key in main unit after sensor setup.
- You may not receive the signal immediately. Due to the atmospheric disturbance, the
best reception often occurs during night time.
WIRELESS SENSOR SIGNAL RECEIVING
1. In normal mode, press [ SENSOR ] key once to start receiving the sensor signal of
current on displaying channel. The signal icon will ash.
For example, when CH 1 is displayed, pressing [ SENSOR ] key will start receive for
CH 1 only.
2. The signal icon will ash until the reception succeeded. If no signal is received within
5 minutes the icon will disappear.
Receiving wireless signal after manual reset or the [
SENSOR ] key is pressed
When waiting for signals, “--” will display in the readings
eld
Good wireless sensor signal
3. If the signal for Ch 1~8 has discontinued and
does not recover within 1 hour, the signal icon
will disappear. The temperature and humidity will
display “Er” for the corresponding channel.
4. If the signal does not recover within 48 hours, the
“Er” display will become permanent you need to
replace the batteries of “Er” channel’s sensors and
then press [ SENSOR ] key to pair up the sensors
of each “Er” channels again.
Note:
After replacing the batteries of the wireless sensor or the unit fails to receive wireless
sensor signal of a specied channel. During the failed channel is displaying, press
[ SENSOR ] key to manually receive that sensor signal again.
VIEW CHANNEL OF MULTIPLE WIRELESS SENSORS
1. In normal mode, press [ CHANNEL / + ] key to switch the display between CH 1~8.
2. In normal mode, press and hold [ CHANNEL / + ] key for 2 seconds to enter autocycle mode, after a bi sounds, it will alternately displays the channels at 4 second
intervals.
3. During auto-cycle mode, press [ CHANNEL / + ] key once to stop auto-cycle and
display the current channel.
4. Using auto-cycle mode will only display the communicated channels. For example,
when CH 1 and 6 have received the signal from the corresponding sensor, holding [
CHANNEL / + ] key for 2 seconds will only toggle the readings of CH 1 and 6. Other
channels will be neglected.
CH 1 CH 6 CH 1
TIME AND CALENDAR SETTING
1. In normal mode, press and hold [ TIME SET ] key for 2 seconds to enter date and
time setting mode.
2. Press [ CHANNEL / + ] or [ MEM / - ] key to adjust the setting.
3. Press [ TIME SET ] key to enter the next setting
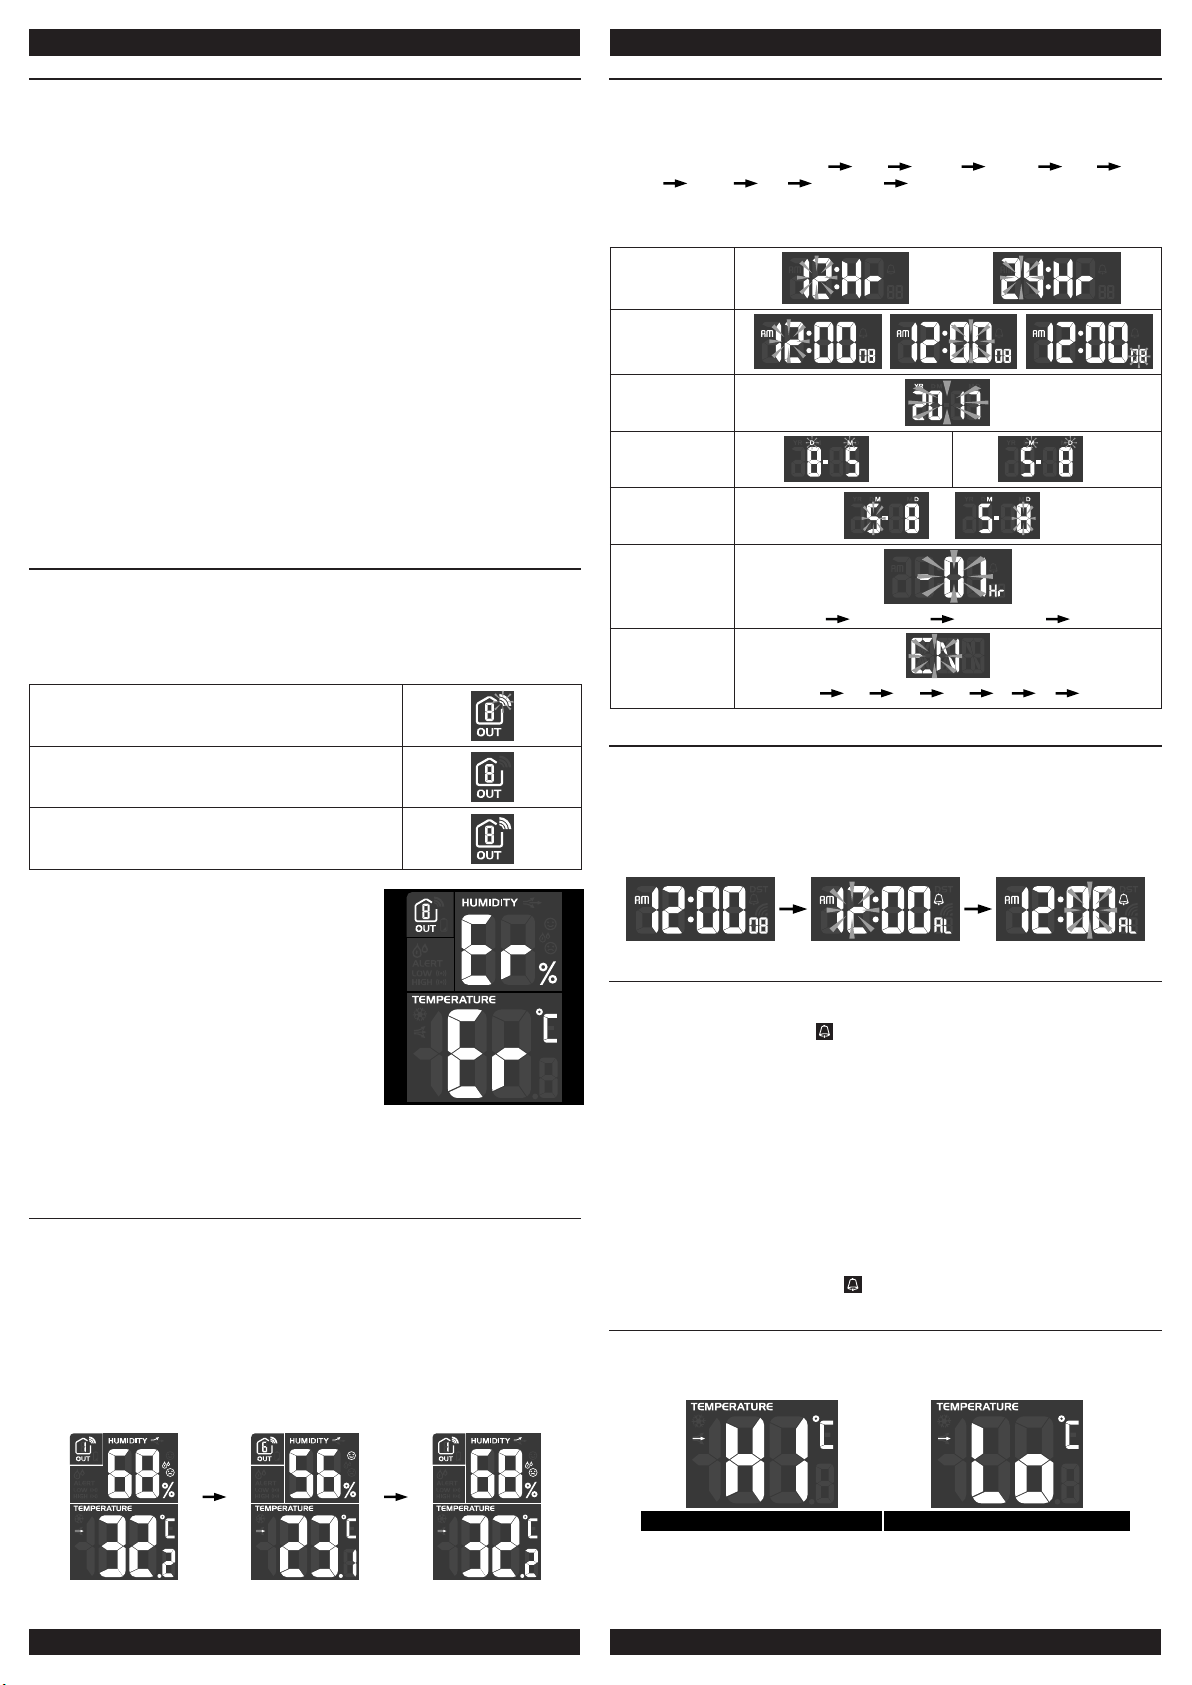
4. The setting sequence: 12/24H hour minute second year DM/
MD month day time offset language
5. When you complete the setting, press [ TIME SET ] key or leave the unit for 60
seconds to return to normal mode.
12/24H setting
Hour/Minute/
Second setting
Year setting
Month/Day
setting
Month/day
setting
Time offset
setting
D/M M/D
M/ D
00H 01H...23H -23H...-01H 00H
Language
setting
ALARM TIME SETTING AND DISPLAY
1. In normal time mode, press and hold [ ALARM ] key for 2 seconds until the alarm
hour digit ashes to enter alarm time setting mode.
2. Press [ CHANNEL / + ] or [ MEM / - ] key to change the value. Press and hold the
key for quick-adjust.
3. Repeat the above operations to set the alarm time in this order: Hour → Minute.
4. When you complete the setting of Minute, Press [ ALARM ] key or leave the unit for
60 seconds to return to normal mode.
USING ALARM AND SNOOZE FUNCTION
1. Set the desired alarm time as described in the above section.
2. Or press “ALARM” key to display the alarm time, press it again to turn on alarm
function with the alarm icon “ ” displayed on the LCD.
3. When clock reach the alarm time, alarm sound will start.
Where it can be stopped by following operation:
a) Auto-stop after 2 minutes alarming if without any operation and the alarm will activate
again in the next day.
b) By pressing [ ALARM / SNOOZE ] key to enter snooze that the alarm will sound again
after 5 minutes.
c) By pressing and hold [ ALARM / SNOOZE ] key for 2 seconds to stop the alarm and
will activate again in the next day
d) By pressing [ ALARM ] key to stop the alarm and the alarm will activate again in the
next day.
Note:
- The snooze could be used continuously in 24 hours.
- During the snooze, the alarm icon “ ” will keep ashing.
TEMPERATURE FUNCTIONS
1. Press [ °C / °F ] key to switch between °C /°F temperature unit.
2. When the temperature is below -40°C or above 70°C, “Lo” or “Hi” will be displayed
respectively.
EN FR DE ES IT NL RU
Above 70°C Below -40°C
Page 3
TEMPERATURE AND HUMIDITY TREND
The temperature and humidity trend indicator shows the trends of changes in the
forthcoming few minutes. Arrows indicate a rising, steady or falling trend.
Arrow indicator
Trend Rising Steady Falling
COMFORT INDICATION
The comfort indication is a pictorial indication based on indoor air temperature
and humidity in an attempt to determine comfort level.
Too cold Comfortable Too hot
Note:
- Comfort indication can vary under the same temperature, depending on the humidity.
- There is no comfort Indication when temperature is below 0°C(32°F) or over 60°C
(140°F).
THE SNOW ICON
When the outdoor temperature is 3°C or below, the
ashing snow icon will appear in outdoor section.
WEATHER FORECAST
The device contains sensitive pressure sensor built-in with sophisticated and proven
software that predicts weather for the next 12 ~ 24 hours within a 30 to 50 km (19-31
miles) radius.
Sunny / Clear Slightly Cloudy Cloudy
Note:
Heat index is only calculated when temperature is 27° C (80° F) or above, and based
solely from the temperature and humidity measured from the outdoor wireless sensors.
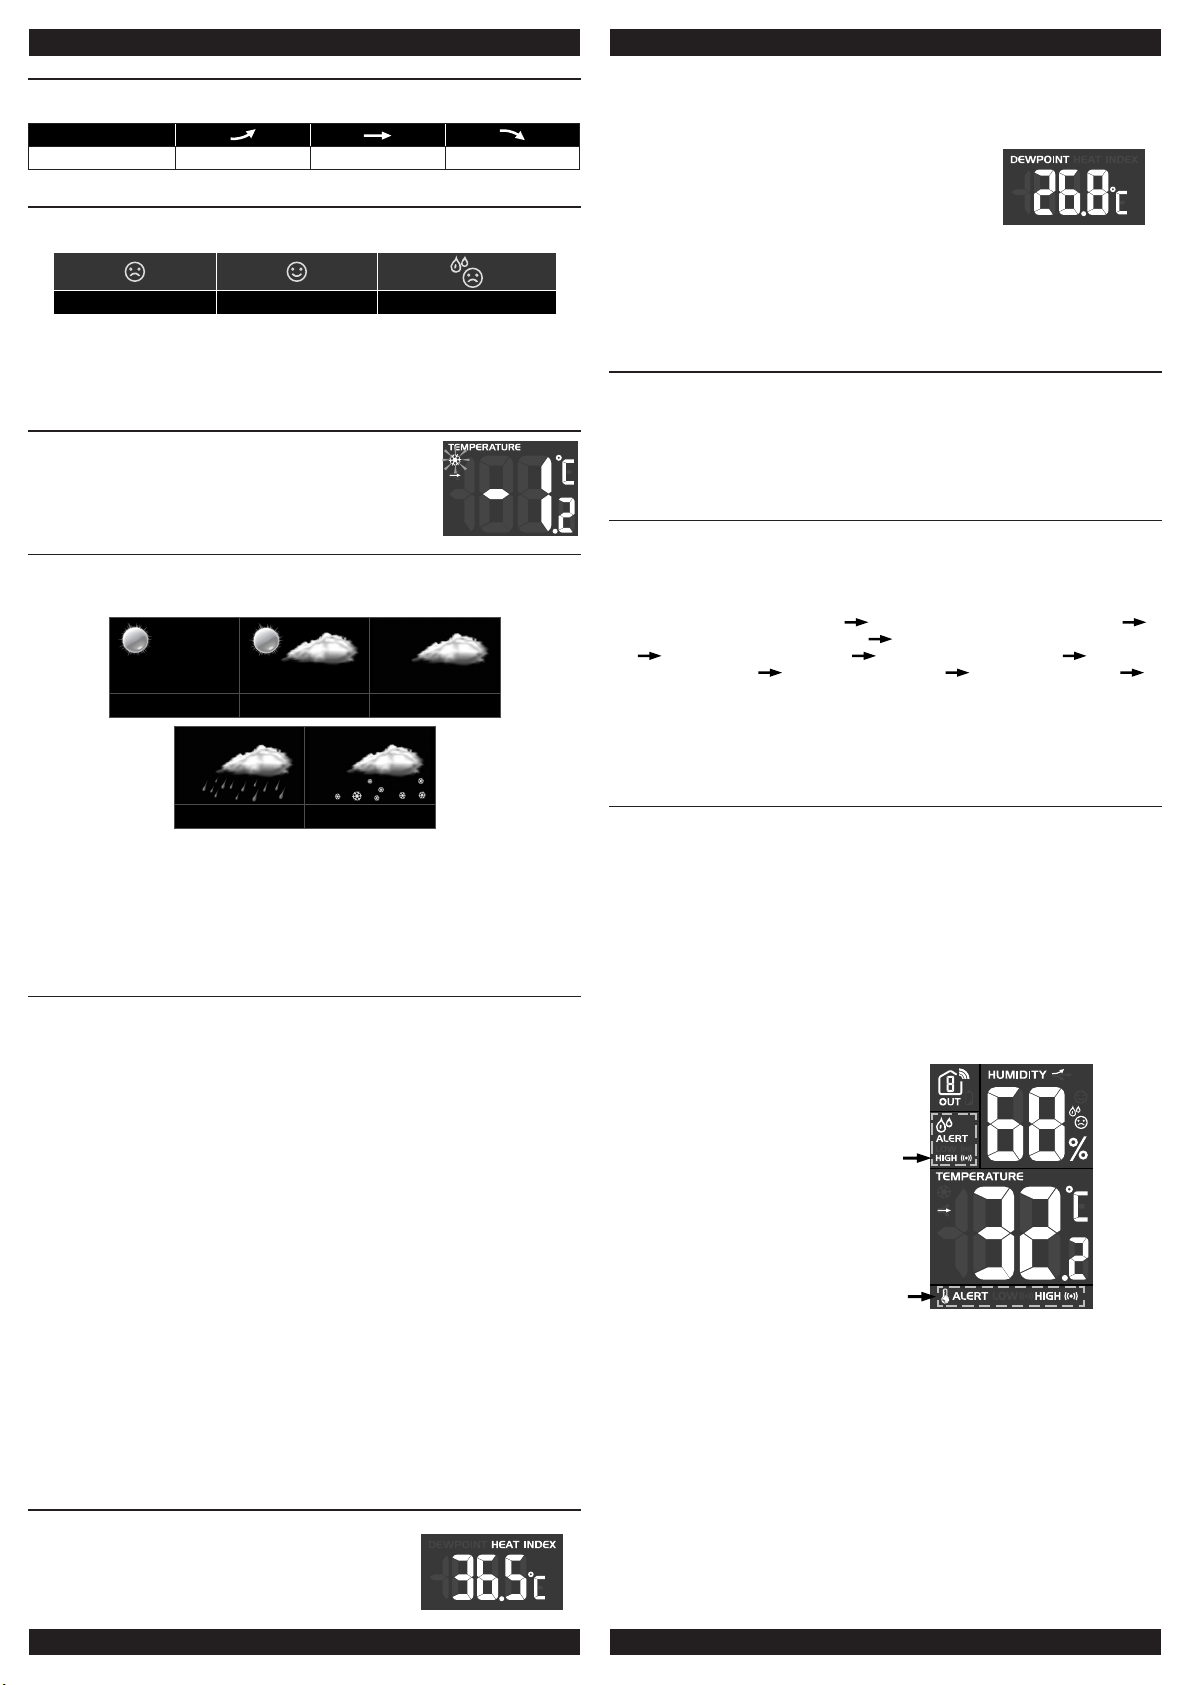
TO VIEW DEW POINT
Press the [ INDEX ] key repeatedly to show DEW POINT
value.
Note:
The dew point is the temperature below which the water vapor in air at constant
barometric pressure condenses into liquid water at the same rate at which it evaporates.
The condensed water is called dew when it forms on a solid surface. The dew point
temperature is calculated from the outdoor temperature and humidity measured at the
outdoor wireless sensors.
HISTORY DATA (WEATHER RECORDS IN THE PAST 24 HOURS)
The main unit will record past 24 hours weather data automatically that included past
indoor and outdoor temperature & humidity, Baro, and Dew point / heat index records.
1. Press the [ HISTORY ] key to check past 1 hour history records.
2. Press [ HISTORY ] key repeatedly to show past 2, 3, 4 , 5.......24 history weather
records.
MAX/MIN RECORD
The main unit preserves the MAX/MIN weather data records since the last manual reset.
1. In normal mode, press [ MEM / - ] key once to show the current channel’s maximum
temperature.
2. Press [ MEM / - ] key repeatedly to show the MAX/MIN reading in this order: current
channel’s maximum temperature current channel’s minimum temperature
current channel’s maximum humidity current channel’s minimum humidity
indoor maximum temperature indoor minimum temperature indoor
maximum humidity indoor minimum humidity maximum baro reading
minimum baro reading
3. When the MAX/MIN records are shown, the display will return to normal mode after
leaving the unit for 6 seconds.
4. To erase the MAX/MIN records of indoor or current channel, press and hold [ MEM
/ - ] key for 2 seconds when the unit is displaying MAX/MIN records.
Rainy Snowy
Note:
1. The weather forecast is meant for the next 12 - 24 hours, it may not necessarily
reect the current situation.
2. The weather icon will ash on display when the rainstorm comes.
3. The SNOWY weather forecast is not based on the atmospheric pressure, but based
on the outdoor temperature. When the outdoor temperature is below -3°C (26°F),
the SNOWY weather indicator will be displayed on the LCD.
BAROMETRIC/ATMOSPHERIC PRESSURE
TO SELECT THE DISPLAY MODE
Press and hold the [ BARO ] key for 2 seconds to toggle between:
ABSOLUTE the absolute atmospheric pressure of your location
RELATIVE the relative atmospheric pressure based on the sea
TO SET RELATIVE ATMOSPHERIC PRESSURE VALUE
1. Press and hold the [ BARO ] key for 2 seconds until ABSOLUTE or RELATIVE icon
ashes.
2. Press [ CHANNEL / + ] key or [ MEM / - ] key to switch to RELATIVE mode.
3. Press the [ BARO ] key once again until the RELATIVE atmospheric pressure digit
ashes.
4. Press [ CHANNEL / + ] key or [ MEM / - ] key to change the value.
5. Press the [ BARO ] key to save and exit the setting mode.
Note:
- The default relative atmospheric pressure value is 1013 hPa (29.92 inHg), which
refers to the average atmospheric pressure.
- When you change the relative atmospheric pressure value, the weather indicators will
change along with it.
- The relative atmospheric pressure is based on the sea level, but it will change with the
absolute atmospheric pressure change.
TO SELECT THE MEASUREMENT UNIT FOR THE BAROMETER
1. Press the [ BARO ] key to enter unit setting mode.
2. Use the [ BARO ] key to change the unit between inHg / mmHg / hPa.
3. Press the [ BARO ] key to conrm.
HEAT INDEX / DEW POINT
TO VIEW HEAT INDEX
Press the [ INDEX ] key repeatedly to show HEAT INDEX
value.
ALERT SETTING AND DISPLAY
The unit can setup temperature HI/LO alert for indoor and up to 8 outdoor
channels.
1. In normal mode, press and hold [ ALERT ] key for 2 seconds to enter alert setting
mode and the “IN” icon will ash. Press [ CHANNEL / + ] or [ MEM / - ] key again to
choose outdoor channel.
2. Press [ ALERT ] key to switch between channel, temperature HI, temperature LO,
humidity HI and humidity LO alert setting.
3. Press [ CHANNEL / + ] or [ MEM / - ] key to modify the value by 0.1 °C/°F for
temperature or 1% for humidity, you can also press and hold to quick adjust the
value.
4. When setting temperature Hi or Lo value, press [ ALARM ] key to toggle the alarm
on/off of the regarding HI / LO alert.
5. When nished, press and hold [ ALERT ] key for 2 seconds or without pressing keys
for 60 seconds to return normal mode.
High humidity alert on
High temperature alert on
Note:
- You cannot enter conicting HI / LO values in the setting. For example, if the HI
temperature alert value is 40°C, you cannot enter more than 39.9°C for the LO alert,
and so forth.
- When the alert is triggered, the alarm will sound and the alarm icon on the display will
ash. Press [ ALARM / SNOOZE ], [ ALARM ] or [ ALERT ] key to stop the alarm
sound. If you ignore the alarm, it will stop after 2 minutes.
- When auto-cycle mode, if any alarm is triggered the display will switch to the regarding
channel. You can press [ ALARM / SNOOZE ], [ ALARM ] or [ ALERT ] key or leave
the unit for 2 minutes to stop the alarm. The display will return to auto-cycle mode
afterwards.
Page 4
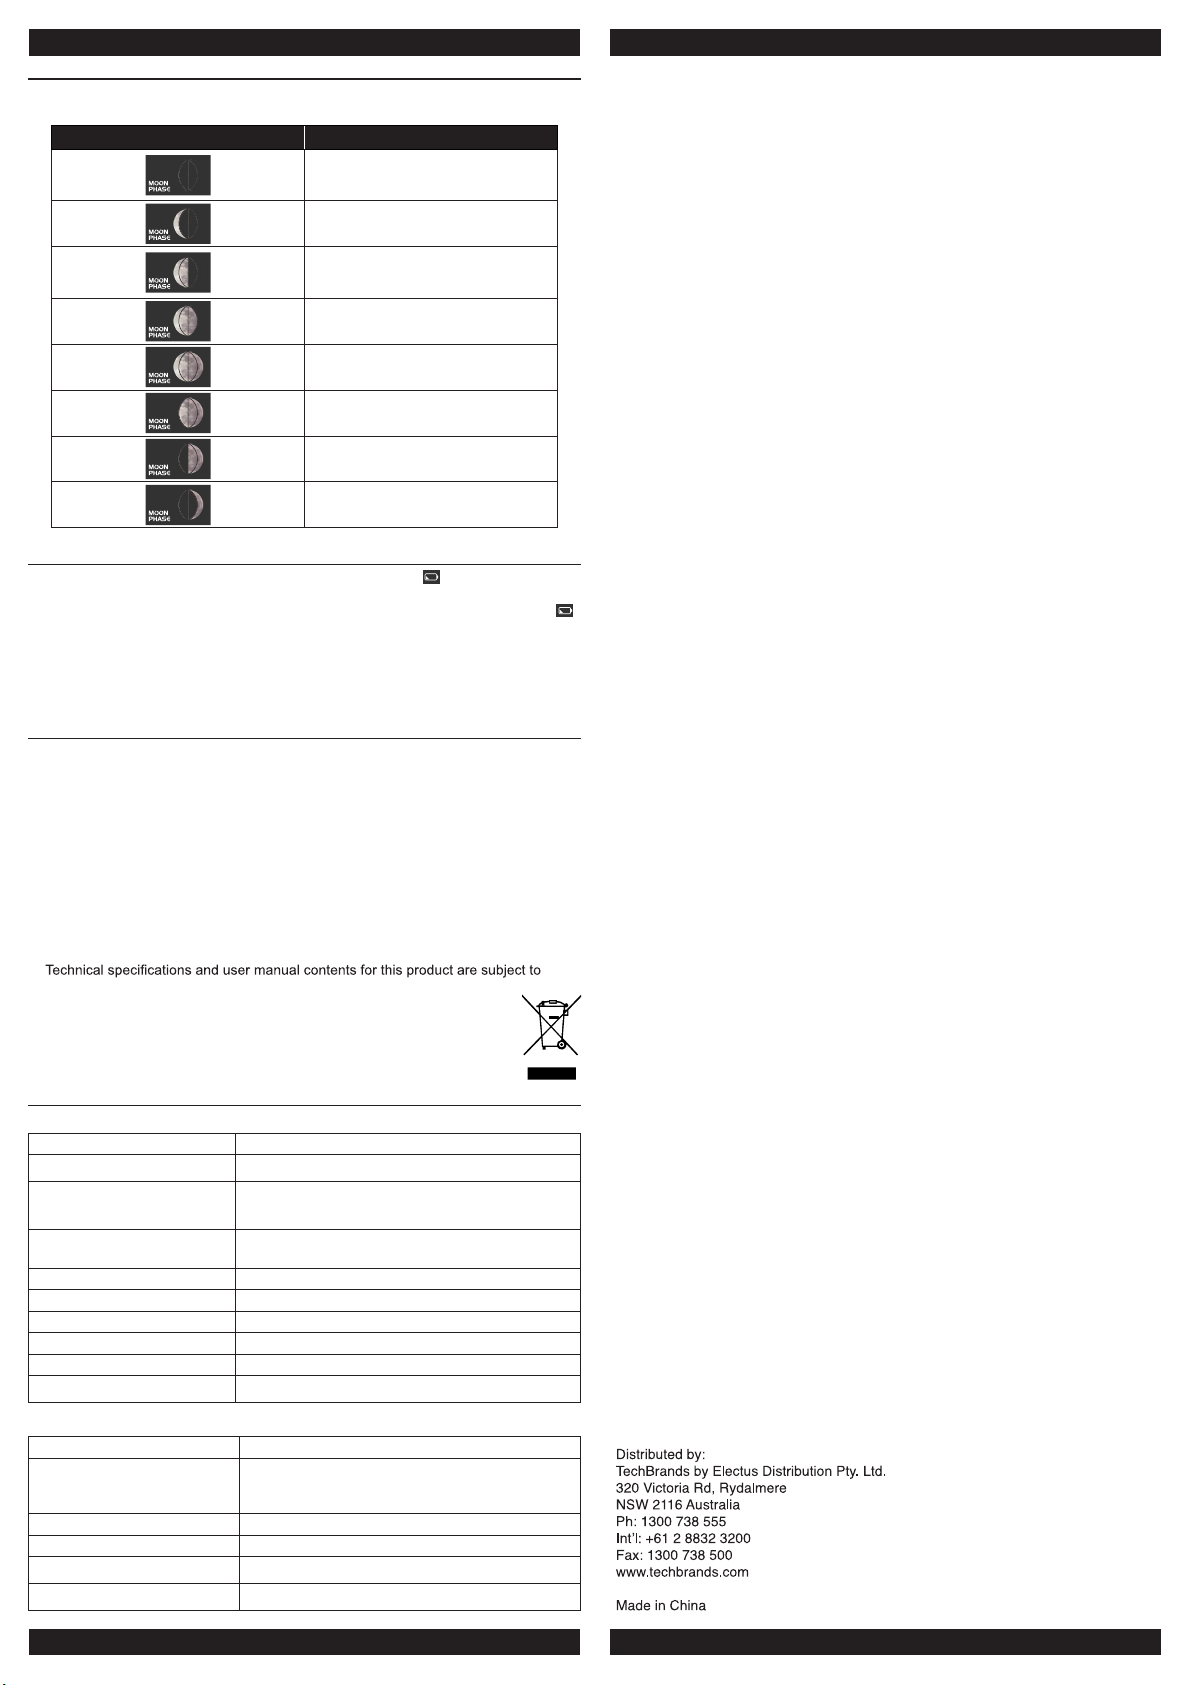
MOON PHASE
The main unit can show the Southern hemisphere moon phase status, below is the table
which illustrate how the moon will appear on the main unit
Northern hemisphere
LOW BATTERY ICON
If the main unit or sensor is low in battery, the low battery icon “
will only appear when the corresponding channel is displayed.
For example, the sensor of CH 1 is low in battery. When CH 1 is displayed, the icon “
” will show.
Not:
The batteries in main unit are only for backup purpose, the battery life cannot maintain
for long time usage.
Moon Phase
New Moon
Waxing Crescent
First quarter
Waxing Gibbous
Full Moon
Waning Gibbous
Third quarter
Waning Crescent
” will display. The icon
IMPORTANT NOTE
- Read and keep these instructions.
- Do not subject the unit to excessive force, shock, dust, temperature or humidity.
- Do not cover the ventilation holes with any items such as newspapers, curtains etc.
- Do not immerse the unit in water. If you spill liquid over it, dry it immediately with a
soft, lint-free cloth.
- Do not clean the unit with abrasive or corrosive materials.
- Do not tamper with the unit’s internal components. This invalidates the warranty.
- The socket outlet shall be installed near the equipment and shall be easily accessible.
- Only use fresh batteries. Do not mix new and old batteries.
- Do not dispose old batteries as unsorted municipal waste. Collection of such waste
separately for special treatment is necessary.
- Attention! Please dispose of used unit or batteries in an ecologically safe manner.
change without notice.
SPECIFICATIONS
MAIN UNIT
Dimensions (W x H x D) 202 x 138 x 38mm
Main power DC 5V, 500mA adaptor
Backup battery
Barometer range
Operating temperature range -5°C to 50°C ( 23°F to 122°F )
Display temperature range -40°C to 70°C (-40°F to 158°F)
Display humidity range RH 1% to 99 %
Resolution of temperature 1 decimal place of °C / °F
Resolution of humidity 1%
Number of sensors support Up to 8 units
3 x AAA size 1.5V batteries
(Alkaline battery recommended)
540 to 1100hPa, 405 to 825mmHg, 15.95 to
32.49inHg
WIRELESS SENSOR
Dimensions (W x H x D) 61 x 113.6 x 39.5mm
Main power
Operating temperature range -40°C to 60°C ( -40°F to 140°F )
Operating humidity range RH 1% to 99 %
RF frequency 433MHz
RF transmission range 30 meters
2 x AA size 1.5V batteries
(Lithium battery recommended for low temperature
environment)
 Loading...