

Page 1

Please read this manual carefully and completely before
operating the unit, and retain this manual for future
reference.
PLASMA TV
OWNER`S MANUAL
MODEL: PH-4210D
Page 2
2 Plasma TV
THIS SYMBOL INDICATES THAT HIGH VOLTAGE IS PRESENT
INSIDE. IT IS DANGEROUS TO MAKE ANY KIND OF CONTACT
WITH ANY INSIDE PART OF THIS PRODUCT.
WARNING : To reduce the risk of electric shock do not remove cover or back.
No user-serviceable parts inside refer service to qualified service personnel.
RISK ELECTRIC SHOOK
DO NOT OPEN
WARNING
Safety of operators has been taken into consideration at the design and manufacture
phase, but inappropriate operation may cause electric shock or fire. To prevent the product
from being damaged, the following rules should be observed for the installation, use and
maintenance of th product. Read the following safety instruction before starting the operation.
The User Manual uses the following symbols to ensure a safe operation and prevent
any damage to operators or properties:
THIS SYMBOL INDICATES THAT THERE ARE IMPORTANT
OPERATING AND MAINTENANCE INSTRUCTIONS IN THE
LITERATURE ACCOMPANYING THE APPLIANCE.
FCC STATEMENT
This equipment has been tested and found to comply with the limits for a Class B digital
device, pursuant to Part 15 of the FCC Rule. These limits are designed to provide
reasonable protection against harmful interference in a residential installation.
This equipment generates, use and can radiate radio frequency energy and, if not
installed and used in accordance with the instructions, may cause harmful interference
to radio communications. However ,there is no guarantee that interference with not occur
in a particular installation. If this equipment does cause harmful interference to radio or
television reception, which can be determined by turning the equipment off and on, the
user is encourage to try to correct the interference by one or more of the following
measures:
*Reorient or relocate the receiving antenna.
*Increase the separation between the equipment and receiver.
*Connect the equipment into an outlet on a circuit different from that to which the receiver
is connected.
*Consult the dealer or an experienced radio/TV technician for help.
This device compiles with Part 15 of the FCC Rules. Operation is subject to the following
two conditions: (1) This device may be not cause harmful interference, and (2) this device
must accept any interference received, including interference that may cause undesired
operation.
FCC CAUTION:
To assure continued compliance and possible undesirable interference, the provided ferrite
cores must be used when connecting this plasma display to video equipment; and maintain
at least 40cm spacing to other peripheral device.
CANADIAN NOTICE:
This Class B digital apparatus compiles with Canadian ICES-003.
Page 3

Owner s Manual 3
IMPORTANT SAFETY INSTRUCTIONS
Read all of the instructions before using this appliance. When using this
appliance, always exercise basic safety precautions, including the following:
1)Save these Instructions ---the safety and operating instructions should be
retained for future reference.
2)All warning on the appliance and in the operating instructions should be followed.
3)Cleaning --- Unplug from the wall outlet before cleaning. Do not use liquid
cleaners or aerosol cleaners. Use only dry cloth for cleaning.
4)Attachments ---do not use attachments not recommended by the manufacturer
as they may cause hazards.
5)Water and moisture -- do not place this product near water, for example, near a
bathtub, wash bowl, kitchen sink, laundry tub, in a wet basement, or near a
swimming pool.
6)Accessories ---do not place this unit on an unstable cart, stand,
tripod, bracket, or table. Use only with a cart, stand, tripod, bracket,
or table recommend by the manufacture, or sold with the unit.
7)Ventilation ---Slots and openings in the cabinets and the back or
bottom are provided for ventilation. These openings must not be
blocked. In a built in installation such a bookcase or rack do not
install product unless proper ventilation is provided.
8)Power Source ---this TV should be operated only from the type of power source
indicated on the rating label. If you are not sure of the type of power supply to your
home, consult your appliance dealer or local power company.
9)Do not defeat the safety purpose of the polarized or grounding-type plug. A
polarized plug has two blades with one wider than the other. A grounding type plug
has two blades and a third grounding prong. The wide blade or the third prong are
provided for your safety. If the provided plug does not fit into your outlet, consult an
electrician for replacement of the obsolete outlet. To prevent electric shock, ensure
the grounding pin on the AC cord power plug is securely connected.
10)Power cord protection ---Power supply cords should be routed so that they are
not likely to be walked on or pinched by items placed upon or against them. Pay
particular attention to cords or plugs, convenience receptacle, and the point where
they exit from the appliance.
11)Lighting precaution ---for added protection for this product during a lighting
storm or when it is left unattended for long period of time, unplug it from the wall
outlet and disconnect the antenna or cable system. This will prevent damage to the
product due to lighting and power line surges.
12)Never push objects of any kind into this product through openings as they may
touch dangerous voltage point or short out parts that could result in a fire or electric
shock. Avoid spilling liquid of any kind on the product.
13)Servicing ---do not attempt to service the product by yourself, as opening or
removing covers may expose you to dangerous voltage or other hazards. Refer all
servicing to authorized service personnel.
14)Unplug this unit from the wall outlet and refer servicing to qualified service
personnel under the following conditions:
a. When the power supply cord or plug is damaged or frayed.
S3126A
PORTABLE CART WARNING
(symbol provided by RETAC)
Page 4

4 Plasma TV
b.If liquid has been spilled, or objects have been fallen into the unit.
c.If the unit has been exposed to rain or water.
d.If the unit does not operate normally by following the operating instructions.
Adjust only those controls that are covered by the operating instructions, as
improper adjustment of other controls may result in damage and will often
require extensive work by a qualified technician to restore the unit to its normal
operation.
e.If the unit has been dropped or damaged in any way.
f.When the unit exhibits a distinct change in performance; this indicates a need
for service.
15)Heat --- The product should be situated away heat sources such as radiators, heat
registers, stoves, or other products (Including amplifiers) that product heat.
16)Overloading ---Do not overload wall outlets and extension cord as this can result
in a risk of fire or electric shock.
Page 5

Owner s Manual 5
Warning..............................................................2
Safety Instructions............................................ 3-4
Introduction
Controls...........................................................6
Connection Options...........................................7
R ...........................8
Installing Batteries............................................8
Installation
Installation instructions....................................9
VCR Setup
................................... .......... 10
External A/V Source Setup...............................11
DVD Setup.....................................................11
DTV Setup
Monitor Out Setup...........................................12
PC Setup.......................................................13
Install the Speakers........................................14
Install the Stand.............................................15
Install the Stand to the Plasma........................ 15
Operation
Turning the TV On
Choose the Menu Language
Choose the Input Source
Basic Function
Operation Menu..........................................17
Sound Mode................................................17
Picture Mode...............................................17
Sleep Timer.................................................17
System Menu
Channel Type
CATV Type
Automatic Scan
Fine Tune
Color System ..................... ...........................19
Skip ..............................................................19
emote Control Key Functions
.......................................... .......... 10
Cable TV Setup
.....................................................12
Turning on the TV .......................................16
........................16
.............................16
................................................18
....................................................18
..............................................18
......................................................19
Prog. Switch.......................................................19
Picture Quality adjust
Picture Quality Adjust
Sound Adjustment
Sound Adjust
Adjustment Setup
Adjustment Setup ...............................................22
Function Setup
Function Setup...................................................23
Menu Menu Language Option ..............................23
Menu Time out Option.........................................23
Menu Background Option....................................23
Auto Off.............................................................23
BlueScreen .......................................................23
Close Caption....................................................24
Parental............................................................24
Time Setup............................................................25
Clock Setting ....................................................26
Off/On time .......................................................26
Rimind Time/Remind Prog. .................................26
Lock Menu Options
Lock Setup........................................................27
Preset Prog. ....................................................27
Prog. Num .......................................................28
.........................................20
......................................................21
Calendar Display and Check ...............................23
Change Password..............................................27
Tuning Lock .....................................................27
Source Lock.................................................... 28
Child Lock....................................................... 28
Max Volume.....................................................28
Unlock............................................................ 28
Screen Menu Options............................................. 28
Auto Adjustment ................................................29
Setting Picture Format .......................................29
Screen Position ................................................29
Troubleshooting Checklist...................................... 30
Maintenance......................................................... 31
Product Specifications........................................... 32
Warranty ...............................................................33
Setup and Operation Checklist
(See pages 10~15 for available connection and operational setup options.)
1. Unpack TV and all accessories.
2. Connect all external video and audio equipment. See pages 10 ~ 13.
3.Install the speakers and stand. see pages 14~16 .
4. Install batteries in remote control. See page 8.
5. Turn TV on. See page 16
6. Turn video source equipment on.
Page 6
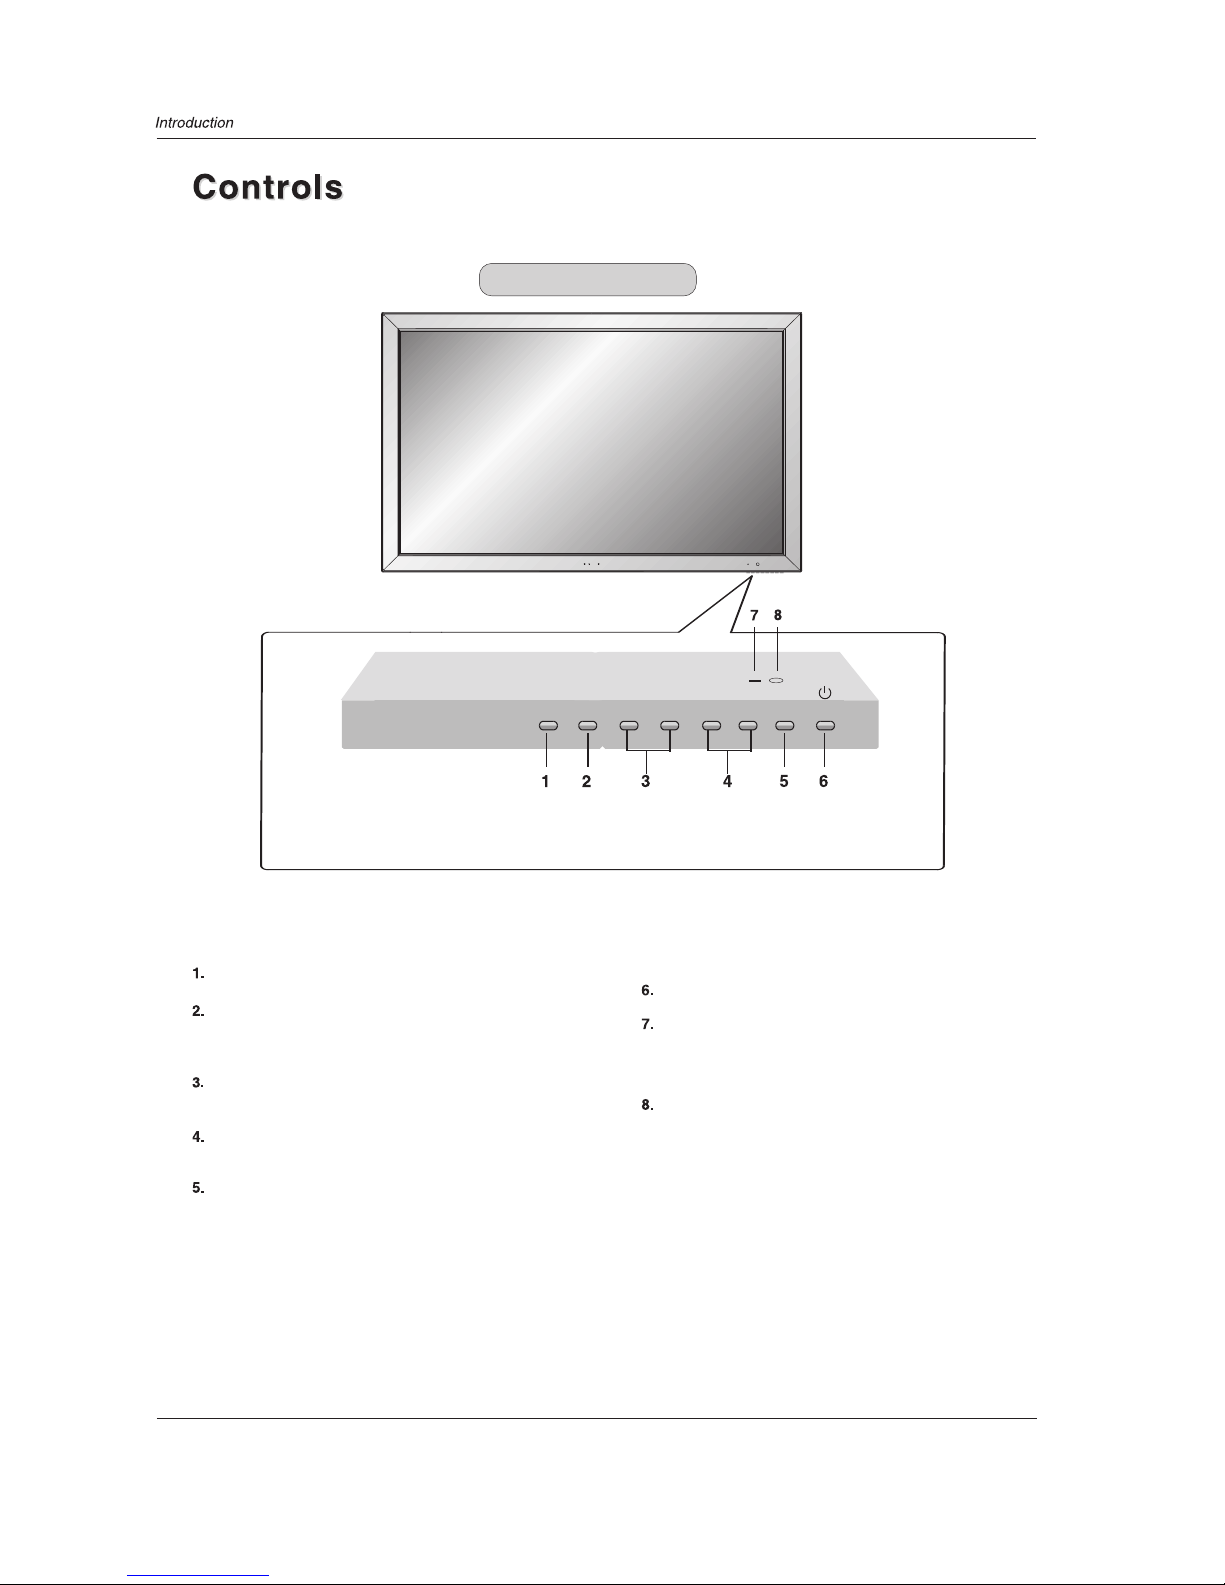
EXIT INPUT MENU
Signal source selection
Down/Up. Sel ct desired option on MENU or tune
to the desired channel.
e
VOLUME Buttons
MENU Button
Power On/Off Button
Remote Control Sensor
illuminates red in standby mode,illuminates blue when
the display is turned on
Power Standby Indicator
Menu enter / exit
6 Plasma TV
VOL- VOL+
Front panel controls
CH- CH+
Page 7
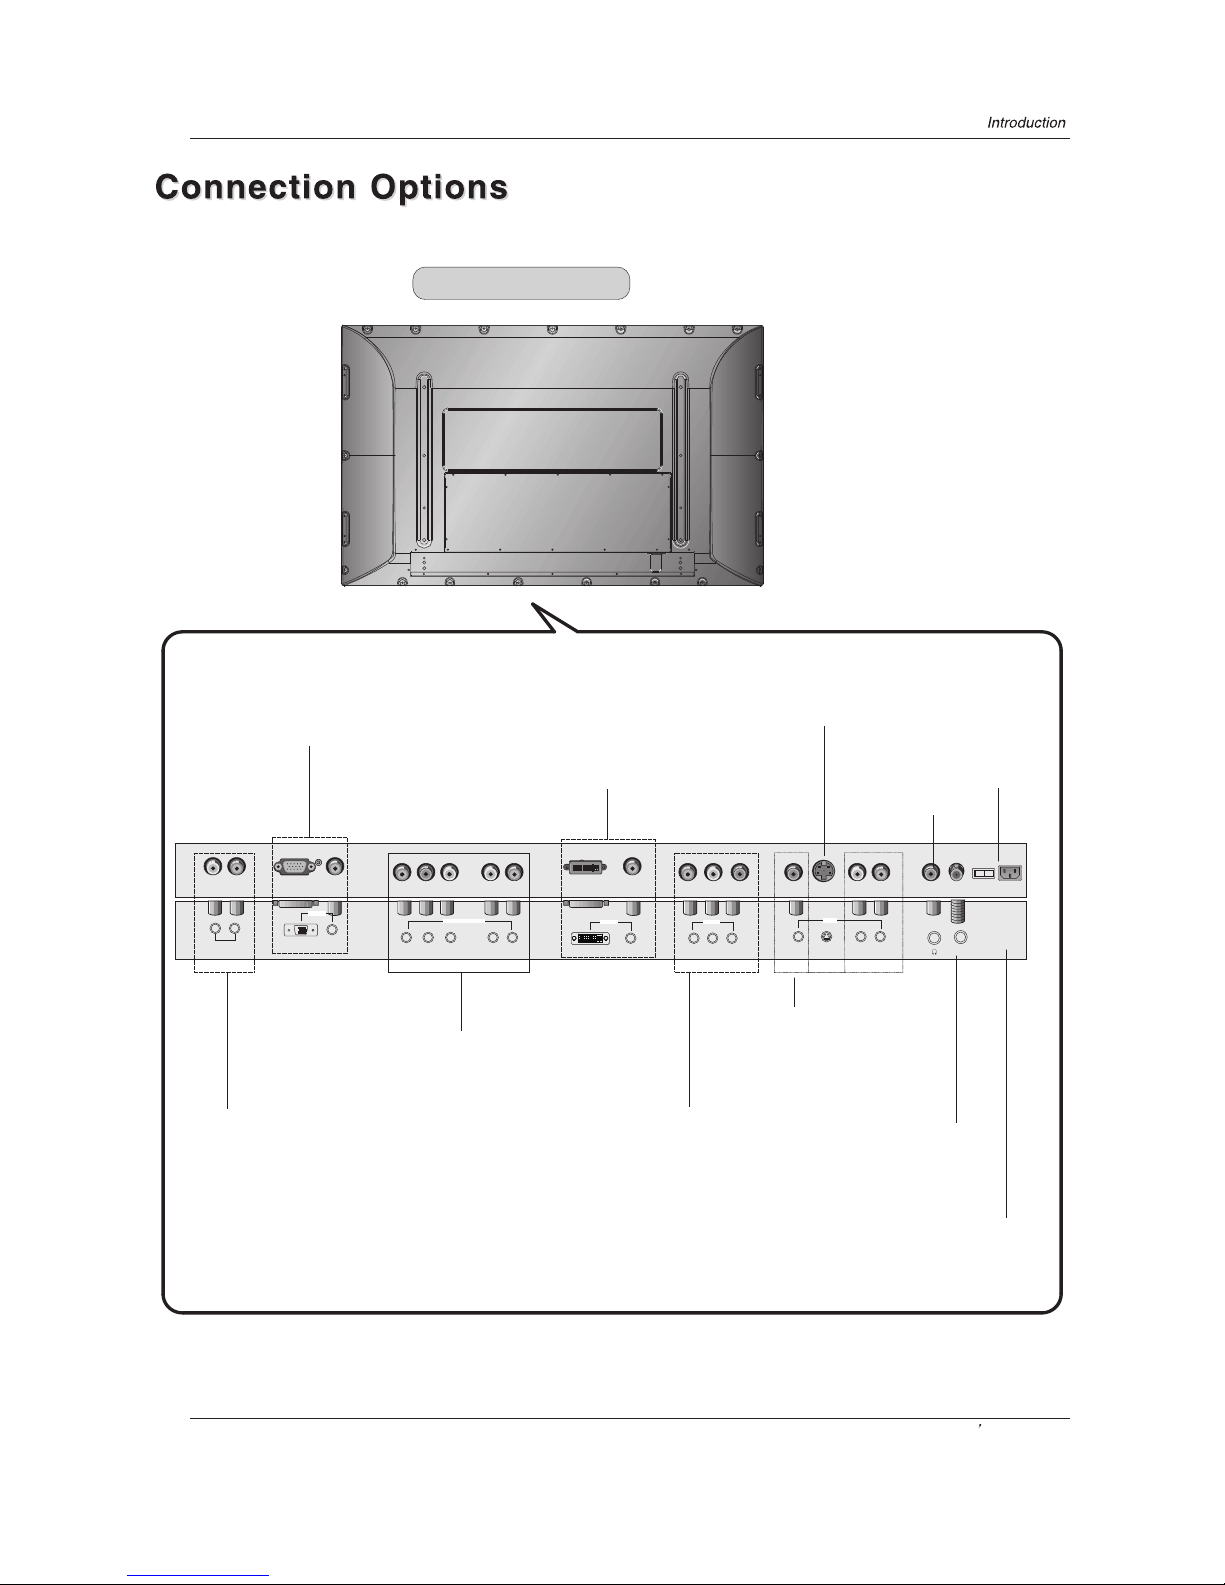
AC-INPUT
DVI
VGA
L-AUDIO-R
AV IN
S-VIDEO VIDEO
L-AUDIO-R
AV OUT
VIDEO AUDIO
DVI IN
AUDIO
VGA IN
COMPONENT IN
Pr/Cr Pb/Cb Y L-AUDIO-R
L
R
AUDIO OUT
VGA Input/Audio input
DVD/DTV Input
Connect a component video/audio
device to these jacks
DVI Input/Audio input
connect your cable/PC
through the input
Audio/Video Input
Connect audio/video
output from an external
device to these jacks
S-Video Input
Power Cord Socket
This TV operates on AC power. The voltage is
indicated on the specifications page. Never
attempt to operate the TV on DC power
Earphone port
Power On/Off
Owner s Manual 7
External audio/
video output
AUDIO output
Antenna Input
Connect cable or antenna signals to
the TV, either directly or through your
cable box.
Real panel controls
ANT IN
ON OFF
Page 8
When using the remote control. Aim it towards the remote sensor on the TV.
3
2
1
8 Plasma TV
Installing Batteries
Open the battery compartment cover on the back side and install
the batteries matching correct polarity (+ with +, - with -).
Install two 1.5V AA batteries. Don`t mix old or used batteries with
new ones.Replace cover.
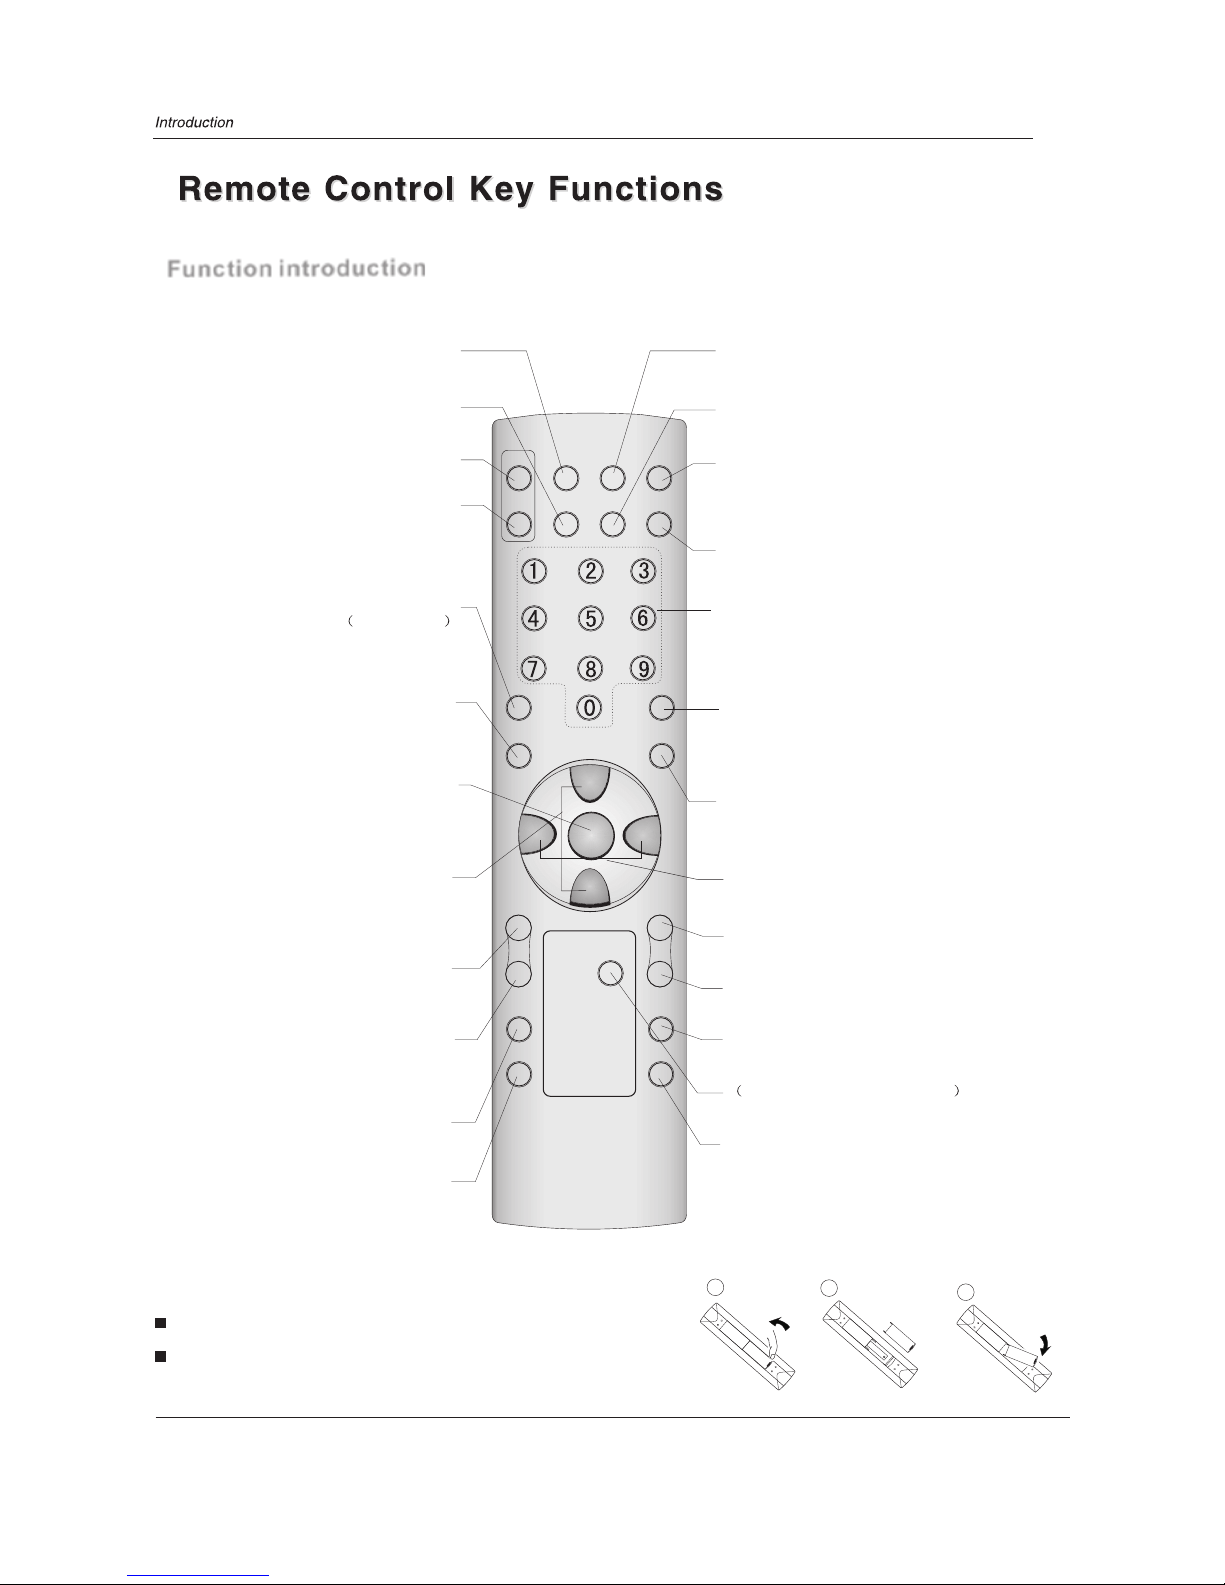
Function introduction
INPUT
Select the source input mode.
-
MTS/SAP
EXIT
ARC
CALENDAR
DNR
MUTE
INPUT
CH+
CC
MUTE
Switches the sound on or off
POWER
Turns your TV or any other programmed
equipment on or off, depending on mode.
Digits
Program direct option(when edit program,
every press can set different sign by turns among
the digits and sign on top of them)
Q.VIEW
Switch from the current channel to the
previous channel viewed.
MENU
Brings up the main menu to the screen.
POWER
LOCK
AVC
VOL-
display
Display of current channel
signals, program and systems
EXIT
Clears all on-screen displays and returns to
TV viewing from any menu.
P.STD
Selects a factory preset picture mode
depending on the viewing environment.
ARC
Changes the aspect ratio.
FREEZE
Freezes the currently-viewed picture.
CC(Closed Caption)
CHANNEL UP/DOWN
Selects available channels programmed
with channel Scan.
MTS/SAP
Selects MTS sound: Mono, Stereo, and
SAP in Analog mode. Change the audio
Menu Language in DTV mode.
S.STD
Selects the audio style appropriate for
the program.
VOLUME UP/DOWN
Increases/decreases the sound level.
LOCK
. Press to enter the Lock Set menu
AVC
Automatic Volume Control
FAVORITE
no available
MENU
Q.VIEW
CH-
VOL+
P.STD
S.STD
RATING
DISPLAY
SLEEP
AUTO
PC FREEZE
DNR
Digital noise reduction
SLEEP
Press this key to set sleeptimer.
CALENDAR
PC
Select PC source
AUTO
Auto adjust for PC
RATING
set the parental control.
Page 9

VIDEO
INPUT POWER
PC
AUTO
DVI
MUTE
EXIT
AVC
DISPLAY
DNR
MENU
/
LOCK
CALENDAR
CC
RATING
FREEZE
SURROUND
ARC
ENTER
SAVING
SLEEP
P.STD
S.STD
VOL+
VOL-
M4X12 x8Screws
4 Standx1
Brace pole x2
M5X16 x4Screws
Owner s Manual 9
GROUNDING
Ensure that you connect the earth ground wire to prevent possible electric
shock. If grounding methods are not possible, have a qualified electrician
install a separate circuit breaker. Do not try to ground the unit by connecting
it to telephone wires, lightening rods, or gas pipes.
- The TV can be installed in various ways such as on a wall, or on a desktop etc.
- The TV is designed to be mounted horizontally.
Ensure that the following accessories are included with your plasma display. If an accessory is missing, please contact the
dealer where you purchased the product.
Short-circuit
Breaker
Power
Supply
Speaker unit(X2)
(2.5MX2)
Connection cord
Connecting block X4
ST4X16
Screw(x16)
Audio/Video
Cord
HDMI to DVI
Adaptor
Audio Cord
Page 10
10 Plasma TV
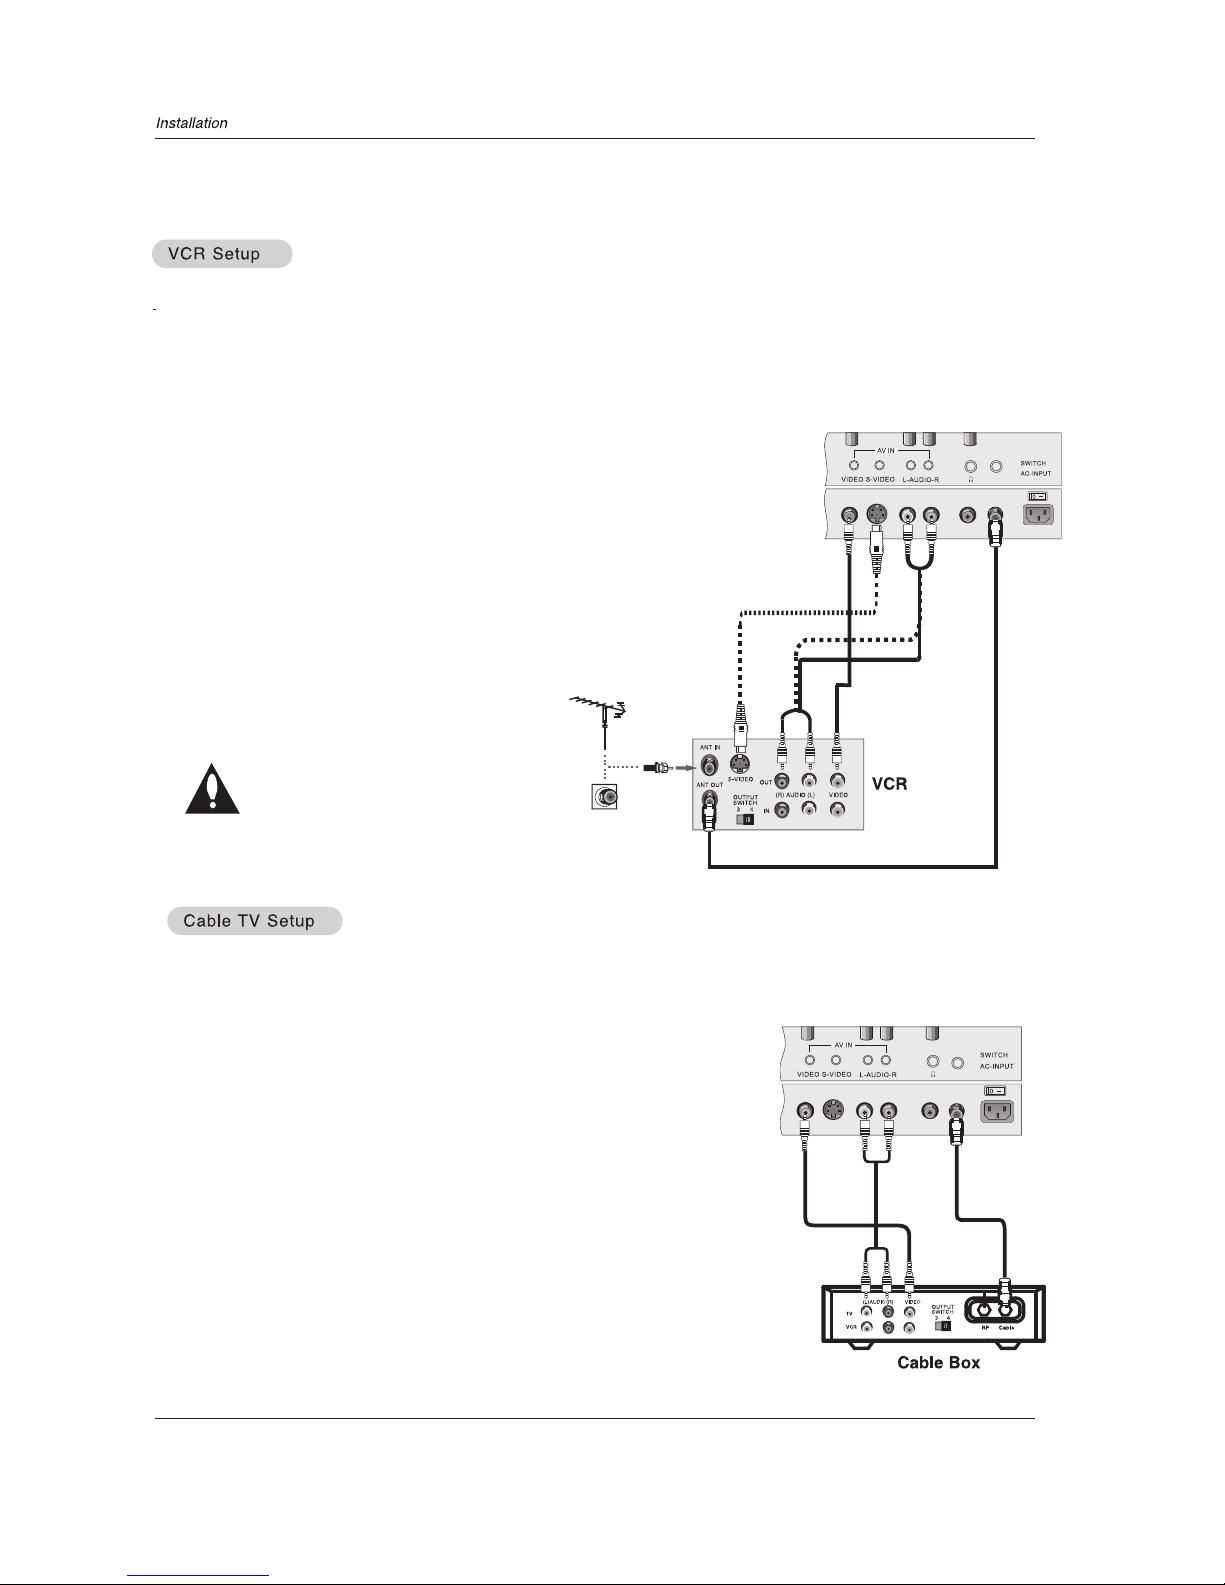
Do not leave a still picture from a VCR on the screen for an extended period. If the 4:3 format is used, the fixed images on the
sides of the screen may remain visible on the screen if this format is used day after day. This is known as burn-in, and it
is an uneven wear of the screen area. Reduce contrast when displaying fixed images on the screen for long periods.
- To avoid picture noise (interference), leave an adequate distance between the VCR and TV
Do not connect both Video and
S-Video at the same time.
If you connect both Video
and the S-Video cables, only the
S-Video will work. Do not connect
S-Video if you want to use the
Video connection.
1. Connect the audio and video cables from the
VCR's output jacks to the input jacks,
as shown in the figure.
When connecting the to VCR, match
the jack colors (Video = yellow, Audio Left = white,
and Audio Right = red).
If you connect an S-VIDEO output from VCR to
the S-VIDEO input, the picture quality is
improved; compared to connecting a regular
VCR to the Video input.
2. Insert a video tape into the VCR and press
PLAY on the VCR. (Refer to the VCR owner`s
manual.)
3. Select the input source by the INPUT button
on the remote control.
TVTV
- After subscribing to a cable TV service from a local provider you can watch cable TV programming. The cannot
display TV programming unless a TV tuner device or cable TV converter box is connected to the .
- For further information regarding cable TV service, contact your local cable TV service provider(s).
TV
TV
2. If you have a cable box, connect the audio and video cables from the
cable box's output jacks to the TV`s AV IN input jacks, as shown in the figure.
When connecting the TV to a Cable Box, match the jack colors
(Video = yellow, Audio Left = white, and Audio Right = red).
(If you have a digital cable box please refer to page 12 , for DTV setup)
3. Select the input source by using the INPUT button on the
remote control. (If connected to AV IN, select AV1/S-VIDEO input source)
4. Select your desired channel with the remote control for cable box.
ANT IN
ANT IN
1. Connect the co-axial cable from your wall jack to the
antenna in of the TV for direct cable programming.
(Co-axial)
Page 11
Owner s Manual 11
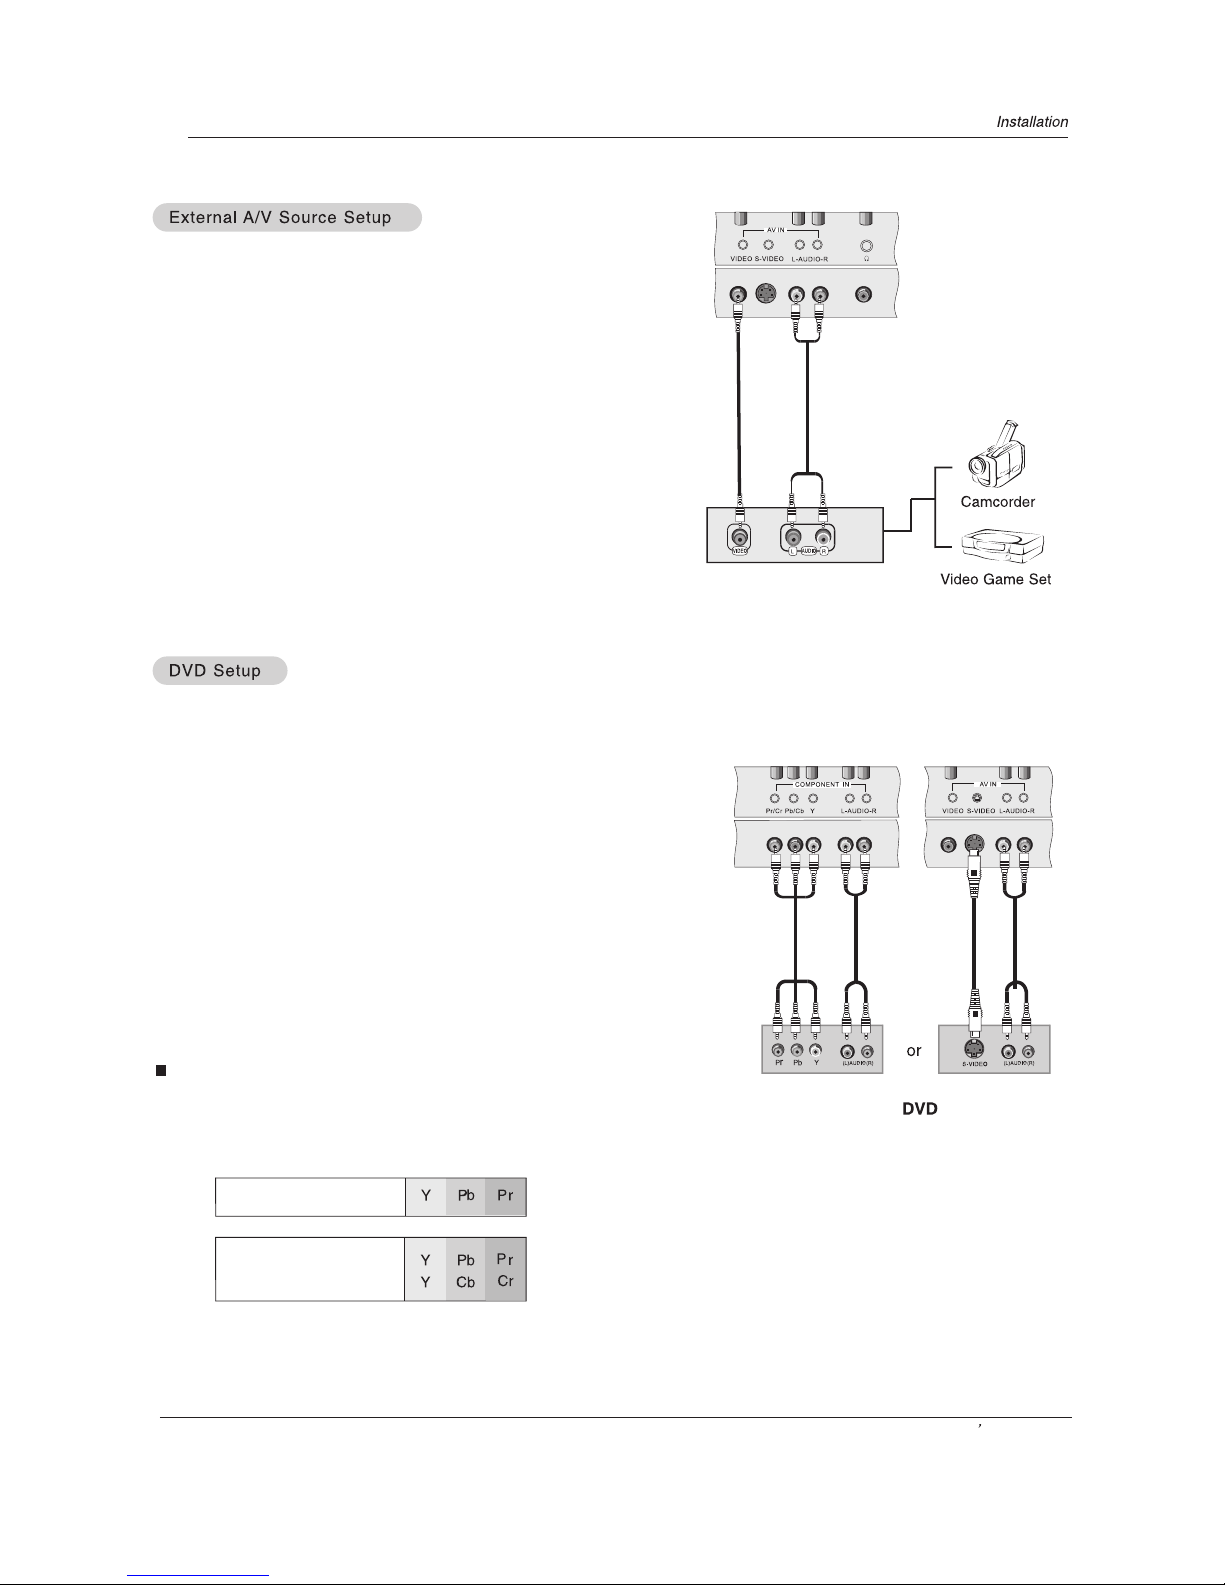
How to connect
Connect the audio and video cables from the external
equipment's output jacks to the TV`s AV IN input jacks, as shown in
the figure.
When connecting the TV to external equipment, match the
jack colors (Video = yellow, Audio Left = white, and Audio
Right = red).
How to use
1. Select the input source by using the INPUT button on
the remote control.
2. Operate the corresponding external equipment. Refer to
external equipment operating guide.
How to connect
1. Connect the DVD video outputs (Y, Pb, Pr) to the COMPONENT
(Y, Pb, Pr) IN jacks on the and connect the DVD
audio outputs to the AUDIO INPUT jacks on the , as
shown in the figure.
2. If your DVD only has an S-Video output jack, connect this to the
S-VIDEO input on the and connect the DVD audio
outputs to the AUDIO INPUT jacks on the , as shown
in the figure.
NOTE: If your DVD player does not have component video output,
use S-Video .
How to use
1. Turn on the DVD player, insert a DVD.
2. Use the INPUT button on the remote control
to select YPbPr/YCbCr . (If connected to S-VIDEO,
select the AV1/S-VIDEO external input source.)
3. Refer to the DVD player's manual for operating instructions.
Component Input ports
To get better picture quality, connect a DVD player to the component
input ports as shown below.
TV
TV
TV
or composite(AV)
Video output ports
on DVD player
Component ports
on the TV
Page 12

12 Plasma TV
- To watch digitally broadcast programs, purchase and connect a digital set-top box.
Digital Set-top Box
How to connect
Use the COMPONENT (Y, Pb, Pr)IN jacks, VGA or DVI IN port for
video connections, depending on your set-top box connections available.
Then, make the corresponding audio connections.
How to use
1. Turn on the digital set-top box. (Refer to the owner`s manual for the digital
set-top box.)
2. Use INPUT on the remote control to select YPbPr/YCbCr, VGA, or DVI source.
TV`s
Signal
480i
480p
720p
1080i
1080p
YPbPr/YCbCr
Yes
Yes
Yes
Yes
Yes
VGA
Yes
Yes
Yes
Yes
No
DVI
No
Yes
Yes
Yes
No
The has a special signal output capability which allows
you to hook up a second TV or TV.
Connect the second TV or TV to the `s AV OUT.
See the Operating Manual of the second or TV for further
details regarding that device`s input settings.
NOTE
YPbPr/YCbCr, VGA, DVI input sources cannot be used for monitor out.
TV
TV
TV
Page 13

Owner s Manual 13
How to connect
1. To get the best picture quality, adjust the PC
graphics card as required.
2. Use the `s VGA IN or DVI (Digital Visual
Interface) IN port for video connections, depending
on your PC connector.
If the graphic card on the PC does not output
analog or digital RGB simultaneously, connect
only one of either VGA IN or DVI IN to display the PC
on the .
If the graphic card on the PC does output analog
or digital RGB simultaneously, set the display to
either VGA or DVI; (the other mode is set to Plug
and Play automatically by the display.)
3. Then, make the corresponding audio connection. If
using a sound card, adjust the PC sound as required.
TV
TV
How to use
1. Turn on the PC
2. Turn on the display by pressing the POWER button on the 's remote control.
3. Use INPUT on the remote control to select VGA, or DVI source.
4. Check the image on your . There may be noise associated with the resolution, vertical pattern, contrast or
brightness in PC mode. If noise is present, change the PC mode to another resolution, change the refresh rate to another rate
or adjust the brightness and contrast on MENU until the picture is clear. If the refresh rate of the PC graphic card can not
be changed, change the PC graphic card or consult the manufacturer of the PC graphic card.
NOTES:
Use a DVI cable.
Avoid keeping a fixed image on the 's screen for a long periods. The fixed image may become
permanently imprinted on the screen. Use a screen saver when possible.
The synchronization input form Horizontal and Vertical frequencies are separate.
.
TV
TV
DVI to HDMI connecting
HDMI
Device with HDMI jack
HDMI to DVI
Adaptor
(supported)
HDMI to
cable
HDMI
(no supported)
How to connect
1. Use the TV`s DVI port for HDMI to DVI adaptor connection,
then use the HDMI to HDMI cable for the HDMI to DVI adaptor
connection.
2. Connect the audio and video cables from the external
equipment's output jacks to the TV`s audio jacks, as shown in
the figure.
How to use
1. Turn on the device. (Refer to the owner`s manual for device.)
2. Use INPUT on the remote control to select DVI source.
Audio cable
(supported)
Page 14

Нв¹ТСпЙщЖчК¹УГЛµГч
1Face the Plasma screen upside down on a clean blanket and pay attention not to indent the casing.
Lay the two speaker aside of the Plasma.
2. Fix 4 ST4X16 screws to the speaker.
3.Lean the speaker against the plasma screen, ensuring that the screw holes on the connecting block are in
Line with the screw holes on the plasma screen then hold the speaker in place.
4. Fix the speaker to the plasma screen with ST4X16 screws.
5. Connect the speaker to the speaker terminal of plasma screen: Nip the speaker terminal and insert the
connecting cable into the terminal slot. Release the speaker terminal and ensure that the white
connecting cable is inserted in the terminal slot marked red and black connecting cable is inserted in the
black terminal slot, and that anode and cathode poles are correctly connected.
(See Figure )
Installing the Speakers
14 Plasma TV
ST4X16 screw
RL
EXT SPEAKER
ST4X16 screw
Page 15

Installing the Stand
Installing the Stand to the Plasma
Owner s Manual 15
Insert the supporting bracket with 8 M4x12 screws to
the installation holes on the bottom of the soleplate.
Fasten the Supporting bracket and the Soleplate
as shown in figure.
Face the Plasma screen upside down on a clean blanket and pay attention not to indent the casing.
Lay down the stand and put it to responding position of the Plasma screen ,and make sure the brace pole is towards the hole of
the Plasma.
Affix the 2 Plasma brace poles to the unit on the back of the plasma display with 4 M5X16 screws.
Page 16

16 Plasma TV
Turning on the TV just after installation.
1. Connect power cord correctly to the television.
2. Press the SWITCH button on back of the TV. The TV is powered up and set in to standby mode.
Press the POWER button on the remote control or button on the TV and then the TV will turn on.
1. If the TV was turned off with the SWITCH button on the TV
Press the SWITCH button on the TV to turn the TV on.
2. If the TV was turned off with the remote control and then the ON/OFF switch on the back of the TV.
Press the SWITCH button on the back of TV and then press the POWER button on the remote control to turn
the TV on.
NOTE
If the unit is not used for an extended period, disconnect the power plug from the wall power outlet.
TV
Turning on the TV
Choose the Menu Language
When you start using your set for the first time, you must select the Menu Language which will be used for displaying
menus and indications.
Menu Language English
OSD Timeout 15seconds
Menu Background Translucent
Calendar
Auto Off Off
BlueScreen Off
Close Caption Off
Parental
B
C
A
1 Press MENU and then use VOL+/- button to select the
FUN. Menu.
2 Press CH+/-button to select Menu Language.
3 Select a particular Menu Language by pressing VOL+/- button
repeatedly. You can choose one of three Menu Languages.
(English, French, Spanish)
4 When you are satisfied with your choice, press the EXIT button to
return to normal viewing.
Choose the Input Source
- This changes the picture source so that you can watch your TV, cable TV, VCR, DVD, or any other devices that
are connected to your TV.
1. Press INPUT button on the remote control and the Scoure menu will appear on the screen.
2. Press CH+/-button for each option and then press VOL+/- button to confirm.
Note:
If AV1 and S-Video are inserted at the same time, priority will be given to S-Video.
Source
TV
AV1/S-Video
YPbPr/YCbCr
VGA
DVI
In this manual, the OSD (On Screen Display) may be vary from what is dispayed on your set.
What is shown in this manual is an example to help you with the operartion of your set.
Page 17

Operation Menu
1.Press MENU button to open the main menu. Press VOL+/- button to select the PIC., SOU., ADJ., SYS. , FUN. or TIME menu.
2.Press CH+/- button to select submenu, and press VOL+/- button to increase/decrease the value or select the setup.
4.The setup time in display will disappear automatically when the latest preset time expiries. MENU display time can
be set to 5,10,15,20,25,30 and 40 seconds.
5.Press EXIT button to exit any menu if MENU is on display.
Sound Mode
Press S.STD button on the remote control to display the menu, and then use CH+/- button to select
the desired mode, press VOL+/- to confirm.
Basic Functions
3.Press MENU to return to the main menu.
(This feature can also be changed from the sound menu function screen)
Owner s Manual 17
SOU.Mode
Music
Standard
Theater
Custom
Picture Mode
Press P.STD button on the remote controller for menu display, and then use CH+/- button to select
the desired mode, press VOL+/- to confirm.
Sleep Timer
Every press of the SLEEP button, the timer will be set in the following sequence:
Sleep 0Min Sleep 5Min Sleep 15Min Sleep 30Min Sleep 60Min Sleep 90Min Sleep 120Min Sleep 0Min
If remaining time of set timer is to be displayed, press the SLEEP button once.
(This change can also be made from Picture menu adjustment screen)
PIC.Mode
Vivid
Standard
Mild
Custom
Standard:
Vivid:
Mild:
Custom:
normal mode.
for watching high speed footage and sharp images.
for softening the image and smoothing overall picture.
picture effect which you favorite.
Normal sound with moderate bass and treble setting.
.
Enables extra bass and treble to enhance the movie experience.
Custom:
Standard:
Music:
Theater:
A spare setting that can be adjusted to personal tastes.
Adjust the sound to best suit music programs
Page 18

This TV set has three methods to set channels: Automatic search, manual search, and fine tune.
In this section, how to use the remote control to set channels is explained. You can also use the
buttons on the TV set to set channel.
System Menu
Color Sys. AUTO
Sound Sys. M/N
Fine Tune 49.75MHz
Skip Off
Channel Type Cable
CATV Type STD
Auto Scan
B
C
A
1 Press MENU button and then use VOL+/- button to select the SYS. Menu.
2 Press CH+/- buttons to select "Channel Type" item.
3 Press VOL+ button to select Cable or Air item.
Note : the tuning menu can only be
operated in normal TV mode.
Channel Type
B
C
A
18 Plasma TV
Automatic Scan
1 Press MENU button and then use VOL+/- button to select the SYS. Menu.
2 Press CH+/- buttons to select "Auto Scan" item.
3 Press VOL+ button to ensure automatic search function work.
4 Press MENU button to stop automatic search function.
After the search has finished, all available channels
will be automatically preset in order.
When Air is selected, the TV will detect antenna signals and will search
for antenna TV channels available in your local area.
When Cable is selected, the TV will detect cable company supplied
signals and will search for cable TV channels available in your area.
Make sure that registration with your cable TV provider and connection
of equipment are completed.
When Air and Cable are selected, the TV will detect the antenna
signals and cable company supplied signals, and search for the
antenna TV and cable TV channels available in your area.
Color Sys. AUTO
Sound Sys. M/N
Fine Tune 49.75MHz
Skip Off
Channel Type Cable
CATV Type STD
Auto Scan
CATV Type
1 Press MENU button and then use VOL+/- button to select the SYS. Menu.
2 Press CH+/- buttons to select "CATV Type" item.
3 Press VOL+ button to select STD, IRC or HRC item.
Before your television can begin memorizing the available channels, you must specify the
type of signal source that is connected to the TV (i.e., an antenna or a cable system).
Note: STD, HRC and IRC identify various types of cable TV systems.
Contact your local cable company to identify the type of cable system
that exists in your particular area.
Page 19

Color System
B
C
A
Usually this should be set in the auto position. However if the color displayed
on the screen is incorrect, you can manually select the correct color system.
Press MENU and then VOL+/- button, till the picture menu shown on the
right will display on the screen.
Press CH+/- buttons to select "Color Sys.", then press the VOL-/+ buttons
to select the correct color system. In general, you can set it to "AUTO".
After the channels are preset, you can skip some programs to select your favorite preset channels only.
1. Press CH+/- button or Direct-digit buttons to select a channel.
2.Press MENU and then use VOL+/- button to select the SYS. Menu.
3.Press CH+/- buttons to select "Skip" item.
4. press VOL+/- button to set Skip as On.
5. When you are satisfied with your choice, press the MENU button to return to
the previous menu or press EXIT button to return to TV viewing.
1. Use Direct-digit buttons to select the number of the channel to
be recovered.
2. Do the above steps again.
3. Press VOL+/- button to set Skip as Off.
Skip
B
C
A
If you want to recover the skipped channel
System Menu
Owner s Manual 19
Color Sys. AUTO
Sound Sys. M/N
Fine Tune 49.75MHz
Skip Off
Channel Type Cable
CATV Type STD
Auto Scan
Color Sys. AUTO
Sound Sys. M/N
Fine Tune 49.75MHz
Skip Off
Channel Type Cable
CATV Type STD
Auto Scan
Fine Tune
B
C
A
If the picture and/or sound are poor, try using the fine tune feature.
Do not use this feature unless reception is poor.
1 Repeat step 1-2, then press CH+/- buttons to select "Fine Tune" item.
2 Press VOL+/- buttons repeatedly to carry out fine tune, until the best
picture and sound are obtained, then release the button.
Color Sys. AUTO
Sound Sys. M/N
Fine Tune 49.75MHz
Skip Off
Channel Type Cable
CATV Type STD
Auto Scan
Page 20

Picture Quality Adjustment
Picture Quality Adjustment
The TV menu gives you an overview of MENU you can select to adjust picture quality.
Note: Depending on the input signal, one or more menu items may not be selectable.
Contrast
Brightness
This will adjust the light output of the complete picture, which will
mainly affect the darker areas of the picture.
Color
This will adjust the saturation level of the colors to suit your personal preference.
Hue (selectable in NTSC mode only)
Allows you to select the color mix (Hue) of the picture.
Sharpness
This will adjust the sharpness of fine details in the picture.
DNR (Digital Noise Reduction )
Automatically filters out and reduces the image noise and improves picture
quality when receiving weak video signals.
This will adjust the intensity of brighter parts of the picture but keep
the dark parts unchanged.
Select Auto/Off/Weak/Medium /Strong according to the image noise of the broadcast signal.
1 Press MENU and then use VOL+/- button to select the PIC. Menu.
2 Press CH+/-button to select the desired items.
3 Press VOL+/- button to adjust the setting.
4 When you are satisfied with your choice, press the MENU button to return to
the previous menu or press EXIT button to return to TV viewing.
Mode Custom
Contrast
Brightness
Color
Hue
Sharpness
DNR Auto
B
C
A
50
50
50
0
50
Note:
When Custom mode is not selected, the Custom mode can be entered automatically if Contrast, Brightness,
Color, Hue and Sharpness parameters are adjusted.
20 Plasma TV
Page 21

Sound adjustment
Sound Adjust
1. Press MENU button and then use VOL+/- button to select the SOU.menu.
2. Press CH+/- button for desired option.
3. After your option is selected, press VOL+/- button to adjust.
Repeat step 2 and 3 until desired sound has been achieved.
If there is no selction made during the standard display time , the MENU will
disappear. If the MENU or EXIT button is pressed , MENU display will disappear
in sequence or immediately.
4.
Volume 50
Balance 0
SOU.Mode Personal
Treble 50
Bass 70
Surround Off
AVC Off
Woofer Off
B
C
A
Note:
1. Select Balance to balance right and left sound channels of the TV. The intermediate value is 0. When the indication value of
Balance increases toward+50, sound of the right speaker is stronger and the left speaker becomes weaker. When the indication
value of Balance decreases toward -50, sound out of the right speaker is weaker and left speaker becomes stronger.
2.When Personal mode is not selected, the Personal mode will be entered automatically if Treble or Bass parameters are adjusted.
Sound adjustment
Owner s Manual 21
Sound can be adjusted for any input as follows:
Volume
This will adjust the sound output level.
Balance
This will adjust the output of the right and left speakers to obtain the best
stereo reproduction for your listening position.
SOU. Mode
This select the modes for sound reproduction dependent on the broadcast signals or signals from external inputs received.
Press CH+/- button to Select SOU.Mode,
press VOL+/- button to select the Music Standard Theater or Personal.
Treble
This will adjust the treble output level.
Bass
This will adjust the bass output level.
Surround
The surround sound feature expands the audio listening field wider and deeper to create exceptional sound quality
from the TV`s speakers.
Press CH+/- button to Select Surround,
press VOL+/- button to set Surround as Off or On
AVC (Automatic Volume Control)
Each broadcasting station has its own signal conditions, and so it is not easy for you to adjust the volume every time the
channel is changed. This feature lets you automatically adjust the volume of the desired channel and reduces the volume
differences between channels and programs, providing a more constant overall level.
This will also reduce the dynamics of sound.
Press CH+/- button to Select AVC,
press VOL+/- button to set AVC as Off or On
Woofer
Woofer is a speaker that complements front speaker`s reproduction capability of low-pitched sound.
Press CH+/- button to Select Woofer,
press VOL+/- button to set Woofer as Off or On
Page 22

Adjustment Setup
Adjustment Setup
When VGA DVI input mode is set
VGA/DVI:
Display Mode Full Screen
Adjust
RGB
Reset
Auto Sync.
Color Temper. Standard
Black Stretch On
B
C
A
1. Press MENU button on the remote controller and then use the
VOL+/- to select the ADJ.menu.
2.
3. Press the VOL+ button and then use CH+/- button for desired
adjust parameter option.
4. Press VOL+/-for desired adjust parameter option until a satisfactory
value is achieved. When VGA signals are received, the automatic
mode is used for parameter adjustment.
Note:
Adjust, RGB and Reset are functional only under VGA and DVI mode, and Auto Sync is functional only in VGA mode.
Adjustment Setup
Press CH+/- to enter MENU of picture position setup MENU
H Size
H Position
V Size
V Position
Phase Adjust
B
C
A
Red
Green
Blue
B
C
A
0
0
0
0
0
0
0
0
Not selectable
22 Plasma TV
In VGA and DVI input mode , H Position and V Position can be used to
adjust the picture position.
Display Mode
Adjust
RGB
Reset
Auto sync
parameters in VGA mode. (Not available in DVI)
( After the operation, Complete will be on the right of the option.)
Color temperature
This will increase or decrease Warm (red) and Cold (blue) colors to suit
personal preferences.
Select Cold to give the white colors a blue tint, Standard to give the white
colors a neutral tint, Warm to give the white colors a red tint.
This will adjust the picture aspect ratio.
Under the VGA signal, there are Full Screen , one to one and 4:3
modes for selction under Display mode.
Under the AV1or S-Video signal, there are Full Screen, Vertical Zoom,
Half Zoom, Panorama and 4:3 Modes to select for Display Mode.
Under the DVI signal, there are Full Screen and 4:3 Modes
to select for Display Mode .
This is used for adjusting H Position and V Position as well as
relative parameters in VGA and DVI modes.(Phase Adjust is not
available in DVI)
This is used for the adjustment of the numerical value of red, green and
blue in VGA/DVI mode.
This is used to reset the defecult setting parameters (After the operation,
Complete will be on the right of the option)
This is used for adjustment of picture location frequency and phase
Page 23

Function Setup
Function Setup
It is possible to select Menu Language, OSD translucency, position and screen display of the MENU as follows:
1. Press MENU button once, and then use VOL+/- button until the following menu appears on the screen:
Menu Language English
OSD Timeout 15seconds
Menu Background Translucent
Calendar
Auto Off Off
BlueScreen Off
Close Caption Off
Parental
AV1
B
C
A
2. Press the VOL+ button and then use CH+/- button on the remote controller to enter MENU of system setup.
3. Press CH+/- to select desired option on MENU.
4. Press VOL+/- to adjust selected option.
Menu Language Option
Repeat step 3 and 4 to select English, Francais or Espanol as the MENU Language.
OSD Timeout Option
Repeat step 3 and 4 to select menu display time to 5,10,15, 20, 25, 30 or 40 seconds.
Menu Background Option
Repeat step 3 and 4 to select OSD background as Translucent or Opaque.
Function Setup
Owner s Manual 23
Auto Off
Repeat step 3 and 4 to select On/Off. If On is selected, and there is no signal to the TV for 2 minutes , Auto Off will
be on the screen and for 3 minutes the TV will be in standby condition . If Off is selected , and there is no signal to the
TV for 3 minutes without any operation , no signal will be on the screen .
Calendar Display and Check
Repeat step 3 and press VOL+/- button to enter calendar menu as follows:
Enter Calendar menu, press VOL+/- and CH+/- button to
adjust or check the date.
BlueScreen
Repeat step 3 and 4 to select blue Screen between off or on.
Page 24

Parental Guidance
24 Plasma TV
Closed Caption
Closed captioning is a process which displays the audio portion of a television program
as written words which then appear as subtitles on the television screen. Closed
captions allow viewers to read the dialogue and narration of television programs.
Using Closed Captions
Captions are the subtitles of the dialogue and narration of television programs.
For some programs, program dialogue can be arranged into captions in
advance. Its possible to caption live programs by using a process called real-time
captioning, which creates captions instantly. Real-time captioning is normally
done by professional reporters using a machine shorthand system and computer
for translation into English.
Captioning is an effective system for the hearing-impaired, and it can also aid
in teaching language skills.
1. Press the MENU button and then use VOL+/- button to select the Fun. menu.
2. Press CH+/- to select Close Caption.
3. Press the VOL+ button to select available caption items.
(Off/CC1/CC2/CC3/CC4/TX1/TX2/TX3/TX4/XDS.)
4. Press EXIT button to return to TV viewing.
Menu Language English
OSD Timeout 15seconds
Menu Background Translucent
Calendar
Auto Off Off
BlueScreen Off
Close Caption Off
Parental
B
C
A
TEXT
The term for the captions that appear in a large black frame that almost cover
the entire screen; usually these messages are provided by the broadcaster.
Parental Control can be used to block specific channels, ratings and
other viewing sources.
The Parental Control Function is used to block program viewing
based on the ratings sent by the broadcasting station.
The default setting is to allow all programs to be viewed.
It is also possible to block all program viewing for a time period.
To use this function, the following must be done :
1. Set ratings and categories to be blocked.
2. Specify a password
3. Enable the lock
Rating and categories
Rating guidelines are provided by broadcast stations. Most television
programs and television movies can be blocked by TV Rating and/or
Individual Categories. Movies that have been shown at the theaters or
direct-to-video movies use the Movie Rating System (MPAA) only.
Menu Language English
OSD Timeout 15seconds
Menu Background Translucent
Calendar
Auto Off Off
BlueScreen Off
Close Caption Off
Parental
B
C
A
1. Press CH+/- to select Parental.
2. Press the VOL+ button to enter Parental submenu.
The TV is set up with the initial password 0-0-0-0. If the password in the
Lock Set menu is changed, and the security default password is 9-4-4-3
The password here will also change. (Password See p27 )
Parental Control Off
Unrated Program Block Off
Parental Guide
MPAA Rating
Parental
Page 25

Ratings for Movies previously shown in theaters:
Movie Ratings :
NR (Permits all programs)
G (General audience)
PG (Parental guidance suggested)
PG-13 (Parents strongly cautioned)
R (Restricted)
NC-17 (No one 17 and under admitted)
X (Adult only)
If you set PG-13 : G and PG movies will be available , PG-13, R,
NC-17 and X will be blocked.
Ratings for Television programs including made-for-TV movies :
TV-Y (All children)
TV-Y7 (Children 7 years older)
TV-G (General audience)
TV-PG (Parental guidance suggested)
TV-14 (Parents strongly cautioned)
TV-MA (Mature audience only)
TV Rating Children:
ALL (Age) (applies to TV-Y, TV-Y7)
FV (Fantasy Violence) (applies to TV-Y7)
TV Rating General:
ALL (Age) (applies to TV-G, TV-PG, TV-14, TV-MA)
D (Dialogue - sexual dialogue) (applies to TV-PG, TV-14)
L (Language - adult language) (applies to TV-PG, TV-14, TV-MA)
S (Sex - sexual situations) (applies to TV-PG, TV-14, TV-MA)
V (Violence) (applies to TV-PG, TV-14, TV-MA)
Parental
Continue
Parental Control Off
Unrated Program Block Off
Parental
Rating ALL V S L D
TV-Y V
TV-Y 7 V V
TV-G V
TV-P G V V V V V
TV-1 4 V V V V V
TV-M A V V V V
G V
PG V
PG-13 V
R V
NC17 V
X V
Note: If some option is locked, the options of the same level will also be locked and the screen display Lock .
TV Rating Limits and Movie Rating Limits can only be used when Parental Control is set to Custom.
Owner s Manual 25
Parental Guide
MPAA Rating
Parental Guide
MPAA Rating
Page 26

Time Setup
If Off-time or On-time is intended in AV1/S-Video/YPbPr/YCbCr/VGA , follow the instructions as below:
Clock 12:30
Off Time 20:30
On Time 17:30
On CH 000
Remind Time 19:00
Remind CH 000
B
C
A
Indication will appear on the screen 1 minute prior to
the shut down of the set
Off Time
Time Setup
Note:
If Clock is set, the time you set for Off Time and On Time will be a point
of time, Otherwise, if Clock is not set, the time you set for Off Time and
On Time will be a period of time, And it will account time when you set
automatically .
Note:
The Sleep Time and Off Time can not be set as simultaneously .
If both time are set , the later setup will be in operation.
The clock will only work if the TV set is turned on or in standby.
When the set is disconnect from the power supply or is turned off by
the main power on the rear panel, the clock loses power and will need
to be reset when the power is reconnected.
1 Press MENU button and then VOL+/- button to select the TIME menu.
2 Press CH+/- button to select "Clock",press VOL +/- button to select hour
or minute position, then press the digital buttons to set the value of hour or minute.
Clock Setting
Off/On Time
Using on/off time function, the TV set can automatically turn on to a preset channel or shut down at a preset time.
1 Press CH+/- button to select "On Time", press VOL+/-button to select hour or minute position; then press the digit
buttons to set the value of both hours or minutes.
2 Press CH+/- button to select "On CH", then press the digit buttons to select your desired channel.
3 Repeat step 1-2 to set "Off Time".
Remind Time/Remind CH
1 Press MENU and then VOL+/- button to call up the TIME menu on the screen.
2 Press CH+/- button to select "Remind Time", then press VOL+/- button to select hour or minute position;
then press the digit buttons to set the value of hour or minute.
3 Press CH+/- button to move the cursor to "Remind CH".
Then press the digit buttons to set the desired channel.
26 Plasma TV
Page 27

Lock Setup
Lock Set
PassWord
Tuning Lock Off
Preset CH Off
CH Num 1
Source Lock
Child Lock Off
Max Volume 100
UnLock
Change Password
Note:
The initial password is 0000, and the security default password is 9443. If Unlock is activated, the password
setup cannot be changed.
Lock Menu Options
Lock Menu Options
- The TV has the function of security default lock. Password needs to be entered when the program lock mode is to be set.
Press CH+/- to select Tuning Lock and VOL+/- to set it as On/Off. (To set as On, some operation such as search will be
no available. When to enter the SYS. menu, the "Tuner Lock" will appear on the screen). If you want to operate SYS. menu,
you need to enter the Lock menu to set Tuning Lock as Off or operate UnLock item.
Tuning Lock
Preset CH
Preset CH is used for setting up start signal source. Press CH+/- button to select Preset CH. Press VOL+/-
button, sources can be swapped in TV/AV1/SVideo/YPbPr/VGA/DVI/Off mode. After setup, the selected source will be
displayed when the TV is turned on again.
Owner s Manual 27
Press LOCK button on remote control, Password will appear on the screen. If password is correctly entered, the LOCK menu
will be displayed. If the password is not correctly entered, you will be required to reenter the password and the cursor will
remain onscreen.
Press EXIT to exit the window. If the preset OSD time is exceeded, the menu will disappear automatically.
To change the default password: Press CH+/- button and select
Password. Press VOL+/- or ENTER button, the screen will display
Old Pw.----, which will remain on the screen if a wrong password
is entered. If correct password is entered, the screen will
display New Pw.----. Enter the new password, and the screen will display
Confirm----. If the same password is entered correctly twice, the old
password will be changed. If the same password is not correctly entered
twice, the screen will display New Pw.----, and you will be required to start over.
Page 28

Source Lock
Source Lock is used to hinder external input modes, such as AV, S -Video and VGA. Press CH+/- button to select
the option, and press VOL+/- button to display Source Lock menu.
Source Lock
AV1 Off
S-Video Off
YPbPr/YCbCr Off
VGA Off
DVI Off
Child Lock
Max Volume
Unlock
Press CH+/- button to select Unlock mode.
Press VOL+/- button to unlock all set modes, will set all lock options to OFF, and the maximum volume returns to 100.
Channel number is used for setting up a preset channel at power on. Press CH+/- button to select CH Num. Press VOL+/- button,
to select channel number.(The item is not available except with a TV signal.)
CH Num(channel number)
28 Plasma TV
Press CH+/- button to select desired option. Press VOL+/- button to set up the
mode of Source Lock. If a Source Lock is set on, the screen will display
a blue background with the mute mode activated, and LOCK will be shown on the
screen. In Lock On mode, when screen is blank, icon Lock will be always
displayed on the screen. If lock mode is to be verified, enter Source Lock sub
menu and set relative mode off or select Unlock mode in the Lock Menu.
Press CH+/- button to select Child Lock. Press VOL+/- button to set On or Off mode. If lock on mode is set,
if buttons on TV are pressed, the screen will display Child Lock. This display can be turned off by pressing the EXIT
button, or 5 seconds later after the latest key press, the display will disappear automatically.
The Child Lock mode can be stopped by entering Lock Set menu to set Child Lock OFF or active Unlock.
Press CH+/- button to select Max Volume. Press VOL+/- button for adjustment between 0 100. If a certain value is set,
when volume is being adjusted, the sound value cannot exceed maximum the volume value. If current volume is over
Max Volume, when Lock Set menu is set, current volume will become set maximum volume. If current
volume is below maximum volume, customer set volume will be applied.
Page 29

- RGB (PC) mode only; This function doesn`t work in RGB-DTV mode.
- Automatically adjusts picture position and minimizes image shaking.
- After adjustment, if the image is still not correct, your TV may need further adjustment.
- The Auto sync is not active in DVI mode.
1. Press MENU button and then use VOL+/- button to select the ADJ. Menu.
2. Press CH+/- button to select Auto Sync.
3. Press VOL+/- button to run Auto Sync.
When Auto Sync has finished, a better quality image should be shown on screen.
If the position of the image is still not correct, try Auto adjustment again.
4. In RGB (PC) mode, if the image needs to be adjusted more after using Auto
Sync, you can try Auto Sync again.
Note: Use Reset instead of Auto sync in 480P,720P,1080i.
Press the ARC button repeatedly to select the desired picture format.
4:3 mode
Choose 4:3 mode when you want to view a picture with an original 4:3 aspect ratio, with black bars appearing at both the
left and right sides.
Full screen( correspond with 16:9)
Choose Full screen when you want to adjust the picture horizontally, in a linear proportion to fill the entire screen.
Vertical Zoom
Choose Vertical Zoom when you want to adjust the picture the picture vertically, that is without any back bars.
Note:
The setting of aspect ratio is respective of each different signal source , that means different aspect ratios can be saved
in each different source
- Caution: If a 4:3 or one to one fixed image is on the screen for a long time, it may remain visible. This is called burn-in.
- Set every aspect ratio for Video, Component 480i sources.
- Use 4:3, or 16:9 for other RGB-PC and DVI-PC sources.
- Horizon is not available for Component (480p,720p,1080i), DTV (480p,720p,1080i) sources.
- This function works in the following modes:
RGB-PC, RGB-DTV (480p,720p,1080i), DVI-DTV (480p,720p,1080i), COMPONENT(480p,720p,1080i).
1. Press MENU button and then use VOL+/- button to select the ADJ. Menu.
2. Press CH+/- button to select Adjust.
3. Press VOL+/- button or enter button to enter the sub menu.
4. Press CH+/- button to select one option and then press VOL+/- to adjust.
5. Press MENU or EXIT to exit it.
Display Mode Full screen
Reset
Color Temper. Standard
Black Stretch On
Adjust
RGB
Auto Sync.
B
C
A
Owner s Manual 29
Page 30

Check whether the TV is turned on from both front button and
the back switch.
Is the power cord inserted into wall power outlet?
Test the wall power outlet, plug another product`s power cord into the
outlet where the TV`s power cord was plugged in.
No picture &
No sound
Press the VOL+ button.
Is the sound muted? Press MUTE button.
Picture OK &
No sound
Check to see if there is any object between the TV and the remote
control causing obstruction.
Are batteries installed with correct polarity (+ to +, - to -)?(Refer to p.8)
Correct remote operating mode set: VCR, etc.?
Install new batteries. (Refer to p.8)
The remote control
doesn`s work
This is normal, the image is muted during the display startup process. Please
contact your service center, if the picture has not appeared after five minutes.
Picture appears slowly
after switching on
Select Color Temperature in the ADJ menu and press the VOL+/- button.
Keep a sufficient distance between the TV and the VCR.
Activate any function to restore the brightness of the picture.
No or poor color
or poor picture
Check for local interference such as an electrical appliance or power tool.
Horizontal/vertical bars
or picture shaking
Adjust Balance in the SOU. menu. (Refer to p.21)
No output from one of
the speakers
A change in ambient humidity or temperature may result in an unusual noise
when the plasma display is turned on or off and does not indicate a fault with it..
Unusual sound from
inside the TV
30 Plasma TV
Page 31

- Early malfunctions can be prevented. Careful and regular cleaning can extend the amount of running time you will have your
new TV. Be sure to turn the power off and unplug the power cord before you begin any cleaning.
1. Here`s a great way to keep the dust off your screen for a while. Wet a soft cloth in a mixture of lukewarm water and
a little fabric softener or dish washing detergent. Wring the cloth until it`s almost dry, and then use it to wipe the screen.
2. Make sure the excess water is off the screen, and then let it air-dry before you turn on your TV.
To remove dirt or dust, wipe the cabinet with a soft, dry, lint-free cloth.
Please be sure not to use a wet cloth.
If you expect to leave your TV dormant for an extended period of time (such as a vacation), unplug
the power cord to protect against possible damage from lightning or power surges.
Owner s Manual 31
The PDP Manufacturing Process: Minute colored /bright/dark dots may present on the screen.
The Plasma Panel (the display device of this product) is composed of 0.9 to 2.2 million cells. A few cell defects may normally
occur in the PDP manufacturing process or appear over time. Minute, non-conforming pixels visible on the screen do not
indicate a defective panel, and fall within acceptable operational standards. This is indicative of PDP technology and is not a
sufficient cause for the set to be exchanged or returned. Our production technology will minimize these cell defects as best
possible during the manufacture and operation of this product.
Page 32

Dimensen(WXHXD)
Unit::inches/mm
41.5 x25.7 x3.4 /1055x654x86 " " "
66.2/30
PH-4210D
Speakers
Impedance
Input
consumption
8
2x7W
~100-240 Volts , 50/60Hz
Size(WxHxD)
(inches/mm)
Weight
(pounds/kg)
4.3x21.9x2.4/110x556x62
2x5.5/2x2.5
The specifications shown above may be changed without notice for quality improvement.
Weight (pounds / kg)
Resolution
Power requirement
Color System
Operating Temperature Range
Operating Humidity Range
Maximum Elevation
MODEL
1024x768(Dot)
32 Plasma TV
(main compoment)
51.6 x28.7 x10.6 /1310x730x270 " " "
(Stand and speaker included)
Page 33

What PWW will do:
Pay an authorized PWW Service Center the labor charges to repair your television.
Pay an authorized PWW Service Center for the new, or at our option, refurbished- replacement parts
required to repair your television.
How to obtain service:
Call the PWW Customer Support line documented on the warranty card, or visit
to locate the nearest authorized PWW Service Center.
For televisions with screen sizes 30 or less you will be requested to bring your unit in to the authorized
service center and pick up when repairs are complete.
For televisions with screen sizes 32 and above you may request home service from an authorized
PWW Service Center provided that your television is located within the geographic territory covered by
an authorized PWW Service Center. If in-home service is not available in your area, you must take
your television to the Service Center location at your own expense, or pay for the cost that the
Service Center may charge to transport your television to and from your home.
Proof of purchase in the form of a bill of sale or receipted invoice, which is evidence that the product is
within the warranty period, must be presented to obtain warranty service.
This warranty does not cover:
Removing LCD / PDP sets from custom wall mounts or cabinetry. All in-home service requests for
LCD/PDP televisions requires that the unit be dismounted and accessible for the service technician
prior to their arrival. Technicians are not responsible for remounting the LCD/PDP set upon completion
of repairs. All costs and fees associated with mounting and unmounting units will be the sole
responsibility of the customer.
Physical or cosmetic damages.
Ordinary adjustments as outlined in the owners manual that can be performed by the customer.
Damage to equipment not properly connected to the product.
Any cost incurred in shipping the product for repair.
Signal reception problems caused by external antenna, cable systems or interference.
Incompatibility due to a change in TV/CATV broadcast systems after the product was sold.
Batteries.
Images burnt on to the screen.
Initial installation and related adjustments.
Power surge and / or lightning protection.
This warranty is void:
If the original proof of purchase cannot be supplied.
Damaged through misuse, negligence or abuse.
Modified or repaired by anyone other than authorized PWW service center.
Damaged because it is improperly connected to any other equipment.
Used in a commercial application or rental.
PWW Service Corp is not liable for any claim made by a third party or made by you for a third party.
This warranty is not transferable and only applies to the original purchase, and only in the original country of
purchase. Any implied warranties, including the warranty of merchantability, are limited in duration to the
period of this expressed warranty and no warranty whether expressed or implied shall apply to the product
thereafter. Under no circumstance shall PWW be liable for any loss or consequential damage arising out of
the use of this product. This warranty gives specific legal right. However, you may have other rights that may
vary from state/province to state/province. Some state/province do not allow limitations on implied
warranties or exclusions of consequential damage. Therefore these restrictions may not apply to you.
www.pwwservice.com
"
"
PWW LIMITED WARRANTY FOR PDP/LCD TELEVISION PRODUCTS
PWW warrants this product to be free from manufacturing defects in material and workmanship
under normal use for the period indicated on the warranty card.
Please retain your original proof of purchase and go to to register your
product.
www.pwwservice.com
Owner s Manual 33
Page 34

V0.1
0090506987A
 Loading...