

Page 1
Operators Manual
D3973 Rev C
Fort Atkinson, Wisconsin USA
Digi-Star International
Pannigen, The Netherlands
www.digi-star.com
June 3, 2014
Page 2

LINKS
Follow the link below to a video on Digi-Star’s web site showing
how to use Moisture TrackerTM.
digi-star.com/solutions/2-13/Moisture_Tracker
To activate the Moisture Tracker
TM
software license, see page 30
for a direct link to Digi-Star’s software license activation page and
instruction.
For Moisture Sensor v2.00
D3973-US Moisture Tracker Operators Rev C SAC
2 Moisture Tracker
TM
Operators Manual D3973 Rev C
Page 3

CONTENTS
LINKS .......................................................................................2
MOISTURE TRACKERTM FEATURES......................................4
SAFETY ....................................................................................4
DEVICE OVERVIEW ................................................................5
OPERATION ...........................................................................10
Install USB Drive ................................................................10
Updating Data Using USB Drive ........................................10
Managing On-Board Data ..................................................10
Cleaning Probe Head and Grate ........................................10
Turn On Moisture Tracker
MAIN MENU ...........................................................................12
MOISTURE MEASUREMENT ................................................13
Notes on Taking Moisture Measurements .........................14
Farmer Settings..................................................................15
Set Date and Time .........................................................16
Set Measurement Count ................................................17
Set Power Down Time ...................................................18
Set Screen Dim Time .....................................................18
Set Defogger Level ........................................................19
Calibrate Sensor ............................................................20
Enter New Calibration Code ..........................................22
Set Worker Operating Mode ..........................................23
Set Worker Options .......................................................24
Diagnostics ....................................................................25
PREVIOUS READINGS .........................................................25
ABOUT THIS DEVICE ............................................................26
SET LANGUAGE ....................................................................28
MOISTURE TRACKERTM INFORMATION..............................29
Batteries .............................................................................29
Low Battery ....................................................................29
Charging Battery Pack ...................................................29
Repair Parts ......................................................................29
HOW TO UPDATE MOISTURE TRACKER
SOFTWARE (HAND-HELD DEVICE) ....................................30
LICENSE ................................................................................33
TM
Device ....................................11
TM
3Moisture TrackerTM Operators ManualD3973 Rev C
Page 4

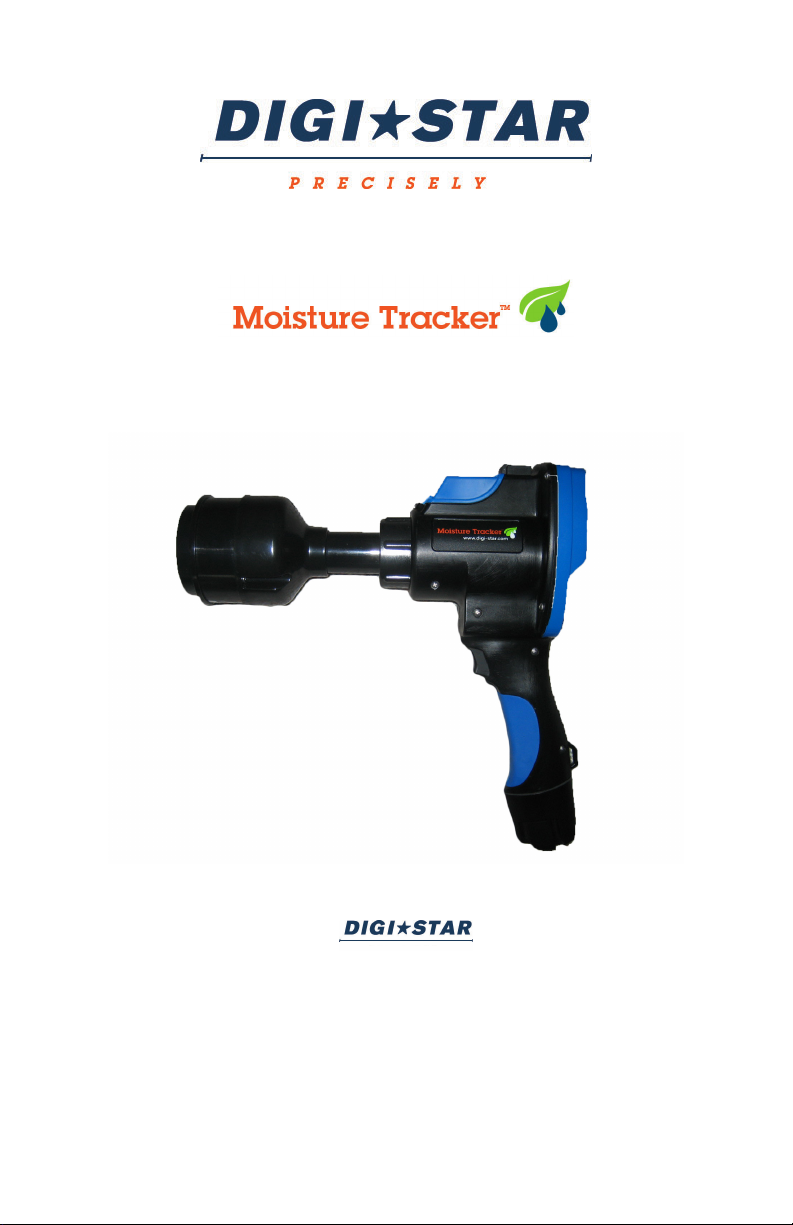
MOISTURE TRACKERTM FEATURES
Moisture Tracker
ents fed to livestock and therefore dry matter can be determined.
A photometer in this device measures light reected from ingredient sample and determines moisture. Then a set of readings is
averaged and results displayed for user and stored for transfer to
a PC.
TM
determines percentage of moisture in ingredi-
SAFETY
This SAFETY ALERT SYMBOL indicates important safety
messages in the manual. When you see this symbol, be alert to
the possibility of PERSONAL INJURY and carefully read the message that follows.
Indicated an imminent hazardous situation that, if
not avoided, will result in serious injury or death.
Indicates a potentially hazardous situation that, if
not avoided, could result in death or serious injury, and includes
hazards that are exposed when guards are removed.
Indicates a potentially hazardous situation that, if
not avoided, may result in minor or moderate injury.
The functioning and operational safety of this device can only be
ensured if user observes usual safety precautions as well as spe-
cic safety guidelines stated in these operating guidelines:
IMPORTANT: Before connecting device to electrical supply, en-
sure the operating voltage stated on power adapter corresponds
to voltage supplied to adapter.
• Transmitter controls, maintenance and repair work must only
be carried out by a qualied technician.
• If there is any reason to assume the product cannot be used
without risk, it must be marked to prevent further use.
4 Moisture Tracker
TM
Operators Manual D3973 Rev C
Page 5
Do not take moisture measurements from open
face of a feed bunk over 8 feet high due to risk of silage collapse.
Do not stand closer than three times (3X) the height of the face.
Take samples from loader bucket or small pile after it has
been moved a safe distance from the silage face.
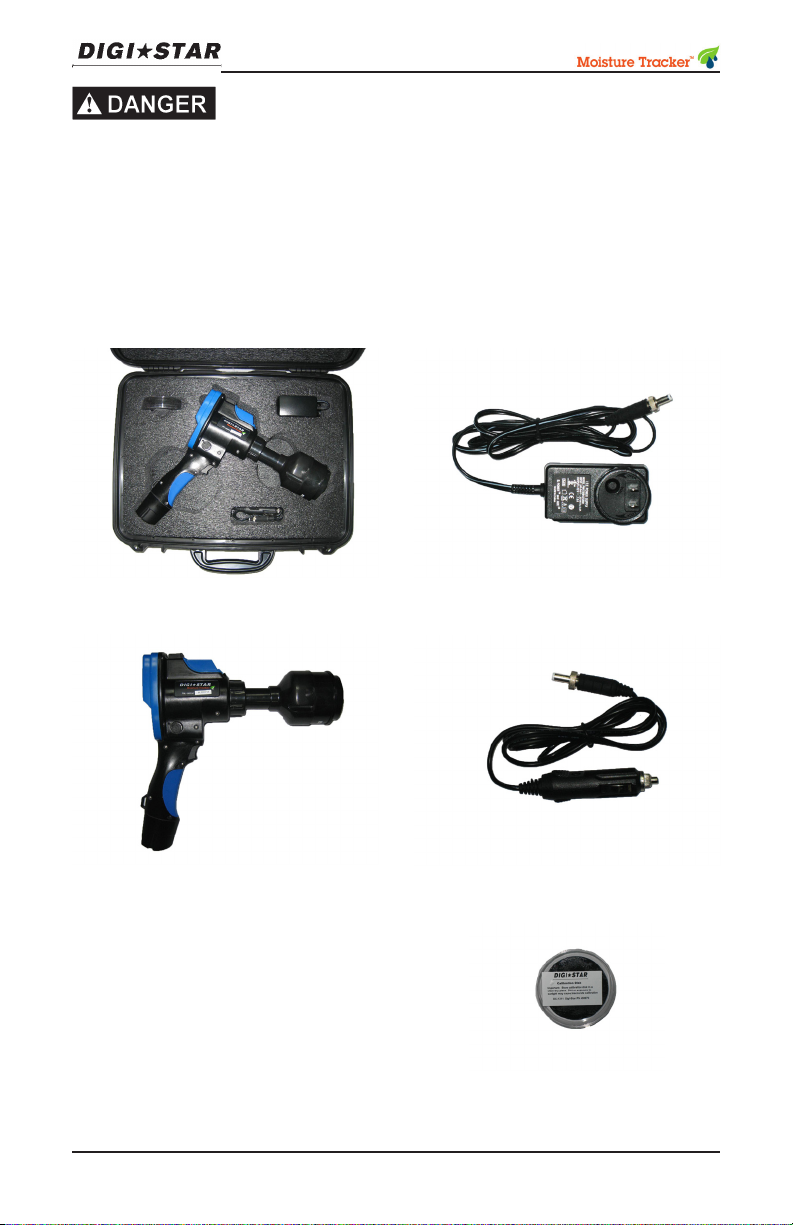
DEVICE OVERVIEW
The following items are included with the Moisture TrackerTM:
Case 115VAC Charger
Moisture Tracker
TM
with USB Memory Device
12VDC Charger
Calibration Disk
5Moisture TrackerTM Operators ManualD3973 Rev C
Page 6
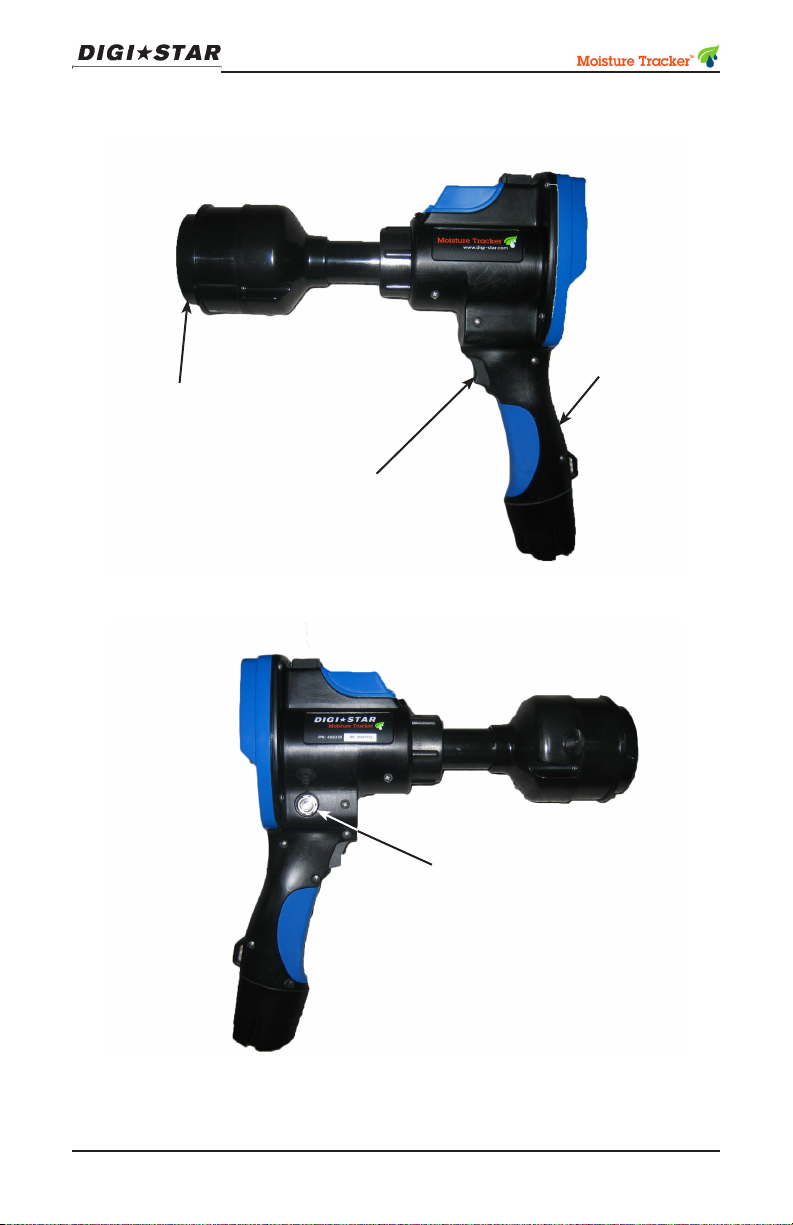
Probe Grate
Battery
in handle
Trigger
Charging Port
6 Moisture Tracker
TM
Operators Manual D3973 Rev C
Page 7
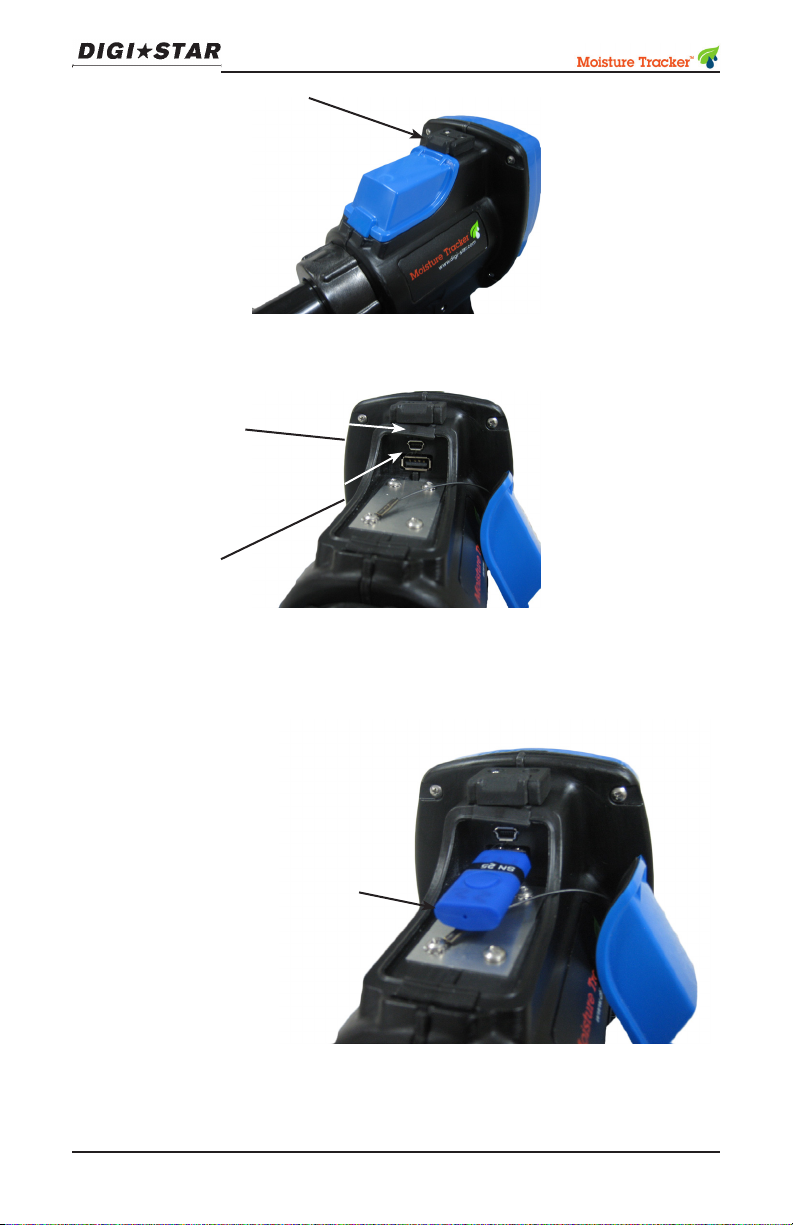
Slide lock back to open
USB drive cover
This port for
factory use
USB drive
port for data
transfer
USB drive contains the Moisture Tracker
TM
PC Software,
and this operators manual in
PDF format.
7Moisture TrackerTM Operators ManualD3973 Rev C
Page 8
8 Moisture Tracker
TM
Operators Manual D3973 Rev C
Page 9

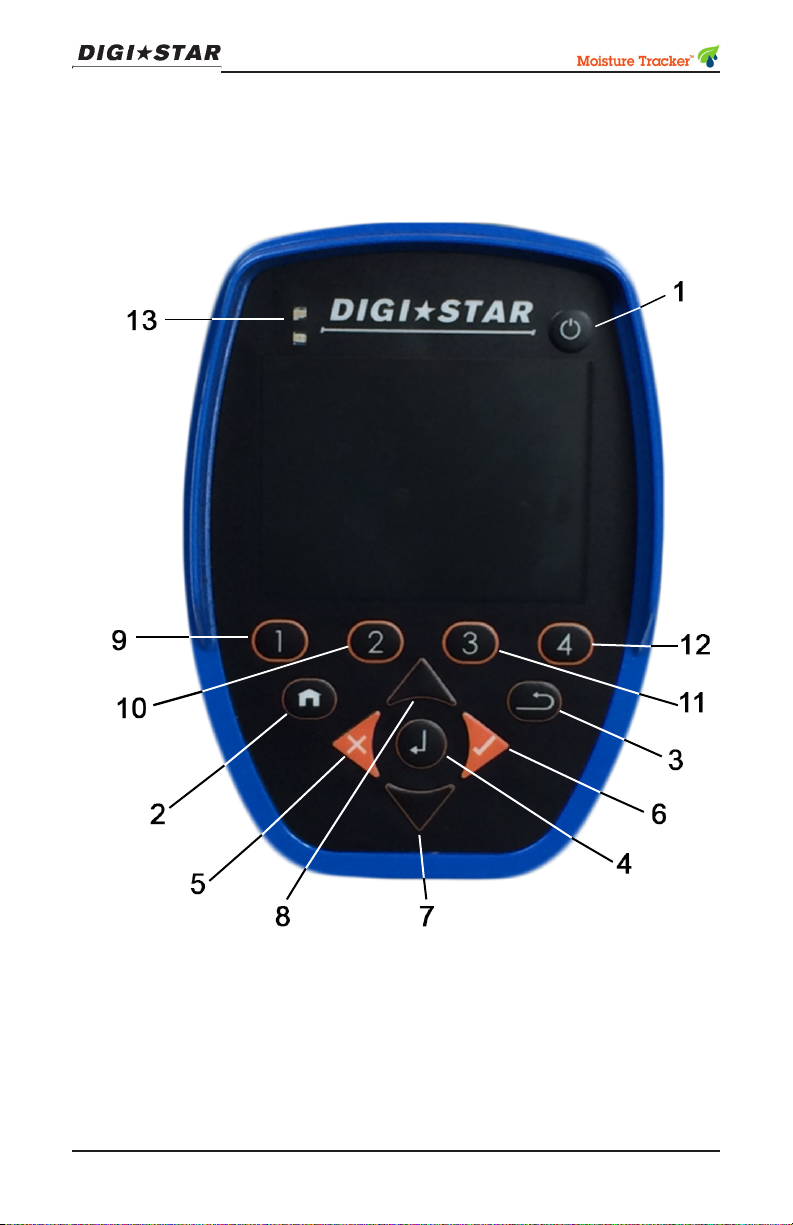
Number
Description Function/Use
/Operation
1 Power Button Turns Moisture TrackerTM on/off
2 Home Press to return to Main Menu screen
3 Back Press to return to previous display
mode screen
4 Select/Enter Press to select highlighted item- De-
vice Display Mode changes according to highlighted menu option; also
can be used in place of trigger
5
Left
Arrow/Reject
6
Right
Arrow/Accept
7
Down Arrow
Press and release to scroll left; also
used to delete or reject
Press to scroll right; also used to
accept
Press to scroll down
8
9
10
11
12
13 Indicator LEDs Indicate system responses and
Up Arrow
Preset 1
Preset 2
Preset 3
Preset 4
Press to scroll up
Press to select ingredient assigned
to Preset 1 and proceed directly to
measurement
Press to select ingredient assigned
to Preset 2 and proceed directly to
measurement
Press to select ingredient assigned
to Preset 3 and proceed directly to
measurement
Press to select ingredient assigned
to Preset 4 and proceed directly to
measurement
errors
9Moisture TrackerTM Operators ManualD3973 Rev C
Page 10
OPERATION
Install USB Drive
Before turning on device, install USB drive in USB port. See page
11. USB drive is required when software les need updating and
data collection. Using the removable drive, data is downloaded to
a PC for analysis using Digi-Star software. Note: Turn Moisture
TrackerTM off before removing USB drive.
Updating Data Using USB Drive
(See page 30 for full procedure)
To update data, ingredient calibrations, software and rmware:
1. Load updates onto a USB drive from Moisture TrackerTM soft-
ware loaded on a PC.
2. Insert the USB drive with updates into Moisture Tracker
3. Power up device and it will automatically update software and
data les.
TM
.
Managing On-Board Data
To manage on-board data, the USB containing the data must
be removed from the Moisture Tracker
with Moisture Tracker
TM
software loaded.
TM
and plugged into a PC
Cleaning Probe Head and Grate
• To clean probe head of debris that may cause measurement
interference, remove probe grate by grasping grate in hand
and turn counter clockwise to release.
• Wash grate with water or wipe clean using a damp towel.
• Clean window using a clean microber cloth dampened with
water or methanol. Do not use window cleaner and a rag.
Avoid excess liquid in this area.
• Reinstall grate positioning it over probe head and twist clock-
wise to attach, a slight click will occur once grate is seated
properly.
10 Moisture Tracker
TM
Operators Manual D3973 Rev C
Page 11
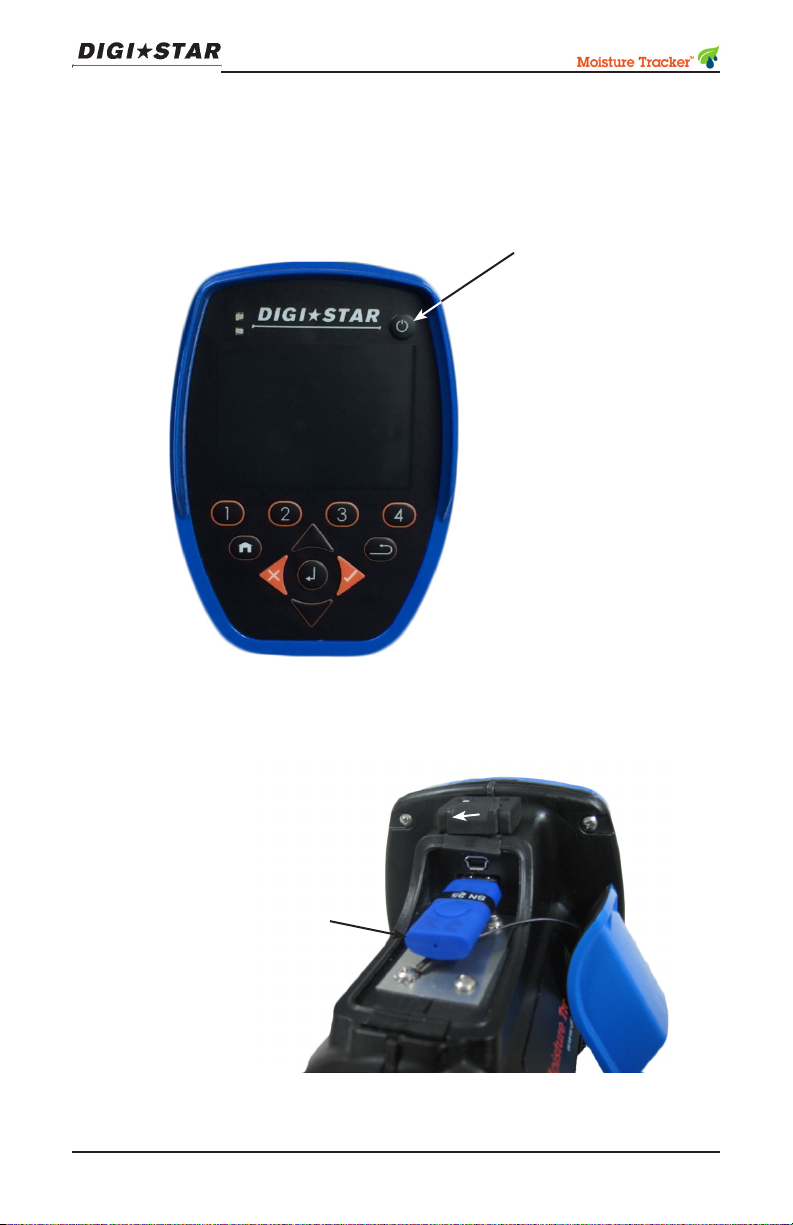
Turn On Moisture Tracker
To turn on Moisture TrackerTM, depress the Power button for 2
seconds.
TM
Device
Power Button
USB drive connected
to USB port
11Moisture TrackerTM Operators ManualD3973 Rev C
Page 12

MAIN MENU
1
2
3
4
5
Reach Main Menu home display by pressing . Use
and arrows then button for menus. See page 8 and
9.
1. Menu Icon
F=Farmer
W=Worker
2. Menu Title
3. Battery Charge (4 Bars=full)
4. Date and Time
5. Charger plugged in-no
measurements allowed.
Main menu continued
12 Moisture Tracker
TM
Operators Manual D3973 Rev C
Page 13

MOISTURE MEASUREMENT
Select Measurement press
Information on farms and ingre-
dients are rst entered into the
Moisture TrackerTM software on
a PC, then downloaded to the
device by means of a USB drive.
Select farm; shows ingredient list
for that farm.
Select ingredient using and
arrows, press
13Moisture TrackerTM Operators ManualD3973 Rev C
Page 14

See Notes below.
Press Trigger or
Number of trigger presses necessary for a moisture measurement
is controlled by the Set Measurement Count screen. Default is 20.
Trigger pulls are counted and
screen displays ingredient being
measured. In this case, corn
silage.
Results are displayed and information stored in USB drive for
later uploading to PC. Press any
key will return to the ingredient
screen.
Note: The previous days DM
measurement (if available) will
show below the ingredient.
Notes on Taking Moisture Measurements
• USB Drive must be in device to save measurements.
• Prior to taking rst measurement, ensure probe grating is in
place and free of debris interfering with light transmission.
• Press probe head into ingredient using moderate pressure to
make uniform contact with probe grating.
• Watch Video on Digi-Star.com or contact Dig-Star technical
support for addition information on taking moisture measurements.
14 Moisture Tracker
TM
Operators Manual D3973 Rev C
Page 15

Farmer Settings
• For initial setup of the Moisture TrackerTM, go to main
menu by pressing the
key.
• At Main Menu press
arrow to select Settings.
• Press select Set Oper-
ating Mode.
• Press
Select Farmer
15Moisture TrackerTM Operators ManualD3973 Rev C
Page 16

At Settings press and select
Set Password then
• Press or , or
press to enter a pass-
word of 4 characters minimum.
• Press X to erase any characters.
• When nished,press
return
then
IMPORTANT: Write down your
password below.
Set Date and Time
16 Moisture Tracker
________________________
After initial farmer setup, Main
Menu shows an F icon in top left
hand corner.
To Set Date and Time select
Settings,press
TM
Operators Manual D3973 Rev C
Page 17

Set Measurement Count
Select Set Date And Time
• Press or arrows to
move yellow triangle.
• Press or arrows to
change the month, day and
time, then
Select Set Measurement Count
then
Number of Measurements is
number of times trigger is depressed when taking a moisture
reading. Press or
arrows to set number of readings
to 20, press
NOTE: Set Number of Measurements higher for better accuracy
on inconsistent forage.
17Moisture TrackerTM Operators ManualD3973 Rev C
Page 18

Set Power Down Time
Set Screen Dim Time
Select Set Power Down Time
Press
• Power Down Time is time
device takes to power down
after no user input.
• Use or arrows to
change time, press
NOTE: Device won’t power
down if set to zero.
Select Set Screen Dim Time
press
18 Moisture Tracker
Screen Dim Time is time device
takes to dim screen after no user
input. Use or arrows to
set time,press
NOTE: Device won’t power
down if set to zero.
TM
Operators Manual D3973 Rev C
Page 19

Set Defogger Level
Select Set Defogger Level
press
• Set Defogger Level to prevent moisture from condensing on probe glass. Periodically check the sensor glass
for condensation, especially
in cold temperatures. If
condensation is found on the
sensor glass, increase the
Defogger level
• Use or arrows to
change level, to match ingre-
dient category, press to
save.
19Moisture TrackerTM Operators ManualD3973 Rev C
Page 20

Calibrate Sensor
For accurate measurements, the device must be calibrated using
the calibration disk supplied with the device. Each calibration disk
has a 6 digit number on the disk. Use this number during the calibration sequence shown on page 21.
IMPORTANT: Before calibrating, insure that device glass
is clean and grate is free of
debris.
If while taking a measurement
this screen appears, then a
calibration is strongly suggested.
• Press to start calibration procedure shown on
page 21.
OR
• Press and to continue with measurements.
20 Moisture Tracker
TM
Operators Manual D3973 Rev C
Page 21

Select Calibrate Sensor press
NOTE: Sensor calibration is
also a main menu option.
• Make sure the six digit Code
number at the bottom right
hand corner of the screen
matches the code number
on the calibration disk. See
page 22 to set code in the
device.
To check Calibration
• Place target calibration disk
directly in front of probe
grate.
• Hold disk steady during calibration, press 1
• If calibration is successful a
pass calibration screen will
display. Device is now ready
for use.
• Check calibration of device
once per day or if air temperature changes +/- 10o F
from previous calibration.
• For best accuracy, put the
device outside for 30 minutes
(to acclimate the device) with
power on.
• Keep calibration disk clean
and out of sun.
21Moisture TrackerTM Operators ManualD3973 Rev C
Page 22

• If a warning appears, verify
cleanliness of probe head.
• Press 2 while holding
white disk against probe
grate until calibration is complete.
• If calibration is successful, a
pass calibration screen will
display. Device is now ready
for use.
• Press to return to Main
Menu.
Enter New Calibration Code
For new device or if a new calibration disk is purchased; the device calibration code must match to the calibration disk code.
22 Moisture Tracker
• Press 3 on Calibrate
screen will display this
screen.
• Press or to move yellow pointer.
• Press or to change
numbers.
• Press
• Press to return to Main
Menu.
TM
Operators Manual D3973 Rev C
Page 23

Set Worker Operating Mode
• From Farmer Main Menu
select Settings
• Press
• Use or select Set
Operating Mode
• Press
Select Worker then
Press
NOTE: To set worker options see
page 24.
IMPORTANT: A password is re-
quired to return to Farmer mode.
See page 16.
• A worker icon shows in upper
left corner.
• Allows worker to take and
store measurements. Worker
can not change any settings.
23Moisture TrackerTM Operators ManualD3973 Rev C
Page 24

Set Worker Options
• From Farmer Main Menu
Select Set Worker Option
• Press
• Press or to select
• Press to check box
• Press to uncheck box
24 Moisture Tracker
TM
Operators Manual D3973 Rev C
Page 25

Diagnostics
Select Diagnostics press
• Press and arrows
to view information.
• Press 2 highlights calendar icon at bottom of screen.
• Use or to show farm
and ingredient information.
• Press 1 to go back
PREVIOUS READINGS
Use or arrow keys
select Previous Readings, press
• Use or arrow keys
select farm, press
• Press to view all farms
25Moisture TrackerTM Operators ManualD3973 Rev C
Page 26

Note: All DM readings taken
after software version v1.97
will only show 1 digit after the
decimal point.
ABOUT THIS DEVICE
All previous measurements are
displayed for that farm. Use
or arrows to scroll screen
• Press and hold 1, after a
warning, delete highlighted
row.
• Press and hold 2, after a
warning, deletes all measurements from a selected day.
• Press and hold 3, after a
warning, deletes all measurements for this farm.
Select About this Device, press
26 Moisture Tracker
Information example, press
for Main Menu.
TM
Operators Manual D3973 Rev C
Page 27

• Press to save device
1
information to USB drive.
• Press to cancel
• Press to highlight OK
• Press
Device information is stored on
USB drive.
• Press
• Press
27Moisture TrackerTM Operators ManualD3973 Rev C
Page 28

SET LANGUAGE
Select Set Language, press
• Press or to select
language.
• Press
To return to previous screen.
• Press or to select
Denir o Idioma
• Press
28 Moisture Tracker
TM
Operators Manual D3973 Rev C
Page 29

MOISTURE TRACKERTM INFORMATION
Batteries
Moisture TrackerTM uses a rechargeable battery pack located in
trigger handle. To remove or change batteries, use a Phillips head
screwdriver to unscrew the cover.
IMPORTANT: Only use a battery pack supplied by Digi-Star.
Part number 408985
Low Battery
• The battery icon will begin blinking red when battery voltage is
critical (< 10%). The indicator LEDs will also ash.
• Charge battery before next use.
Charging Battery Pack
NOTE: Batteries will not charge below 32o F (0o C) or above
113o F (45o C)
• IMPORTANT: Use only AC or DC charger supplied with the
device.
• Plug AC battery charger into a 115VAC outlet.
• DC battery charger uses a 12VDC outlet.
• Charger cord connects to charging port on side of device.
• A complete charge may take up to 12 hours if device is fully
discharged.
• When fully charged, unplug the device. The displayed battery
charge level shows 4 bars.
Repair Parts
405483 USB Memory Drive (Blank)
408305 Probe Cover Grate
408883 Cig. Lighter Adapter (12VDC)
408884 AC Power Adapter
408962 USB Latch Body Cover
408963 USB Latch Tab
408970 Calibration Disk
408985 Battery Pack 7.2V NIMH
409093 USB Cover Assy.
29Moisture TrackerTM Operators ManualD3973 Rev C
Page 30

HOW TO UPDATE MOISTURE TRACKER
TM
SOFTWARE (HAND-HELD DEVICE)
There are 3 parts to the Moisture TrackerTM software that can re-
quire periodic software updates:
1. Moisture TrackerTM Software Graphic User Interface
2. Moisture TrackerTM Calibrat ion List
List of ingredient that can be
measured
3. MoistureCompute DLL Software that converts NIR
readings to moisture content
Update Software
1. Remove the USB drive
from the Moisture Tracker
hand-held device.
2. Insert the USB drive into a
port on the PC.
TM
30 Moisture Tracker
3. Start Moisture Tracker
program on a PC.
4. Select “Help” and “Hand
Held Updates” from the
drop down menu.
TM
Operators Manual D3973 Rev C
TM
Page 31

Update Calibration List
and DLL
5. Select latest software
revision.
6. Select “Download”.
7. Verify “Download Com
plete” message.
8. Select “Help” and “Check
For Calibration Updates”
from the drop-down menu.
9. Follow the menu, update
the calibration list and
MoistureCompute if
required.
NOTE: The calibration list and
the MoistureCompute DLL may
have been automatically updated upon startup. See settings
menu.
31Moisture TrackerTM Operators ManualD3973 Rev C
Page 32

Insert USB Memory
Stick in Hand-Held
Unit
10. Select “Safely Remove
Hardware”
11. Select “Eject Mass Storage”
12. Remove USB drive.
13. Insert USB drive into Mois
ture TrackerTM hand-held
device.
14. Power Moisture TrackerTM
on and it automatically loads
the new software into mem-
ory while starting up.
32 Moisture Tracker
15. Select “About this Device”
in the main menu to check
the software revision.
TM
Operators Manual D3973 Rev C
Page 33

LICENSE
A temporary license is included with the Moisture TrackerTM. A 1
year license is included with the initial purchase and must be activated using the Digi-Star website below.
For rst time Moisture TrackerTM software activation:
1. The link below leads to Digi-Star’s software activation site.
digi-star.com/store/mt_activate.php
2. At this site, Enter the 16 digit ID number found on the Moisture
TrackerTM in the “About this Device” menu.
ID#____:____:____;____:____:____:____:____
3. Click on “Activate and Download License” and follow the direction on the site to download the license to the USB drive and
put the USB drive into the Moisture TrackerTM and turn on.
All rights reserved. Reproduction of any part of this manual in any form whatsoever without Digi-Star’s express written permission is forbidden. The contents of this manual are
subject to change without notice. All efforts have been made to assure the accuracy of the
contents of this manual. However, should any errors be detected, Digi-Star would greatly
appreciate being informed of them. The above notwithstanding, Digi-Star can assume no
responsibility for errors in this manual or their consequence.
© Copyright! 2014 Digi-Star, Fort Atkinson (U.S.A.).
33Moisture TrackerTM Operators ManualD3973 Rev C
Page 34

This Page Intentionally Blank
34 Moisture Tracker
TM
Operators Manual D3973 Rev C
 Loading...