

Page 1
Instruction Manual
Read this manual carefully before using your weigh scale
IHOR
ZON
XL
D3813
Page 2

2
Page 3

3
Conte
nts
Getting Started 4
Operation 5
Setup Menu 6
Installation 9
Horizon Browser 10
Tips 13
Care, maintenance and storage 14
FCC notice 14
Warranty 15
Contact 16
Page 4

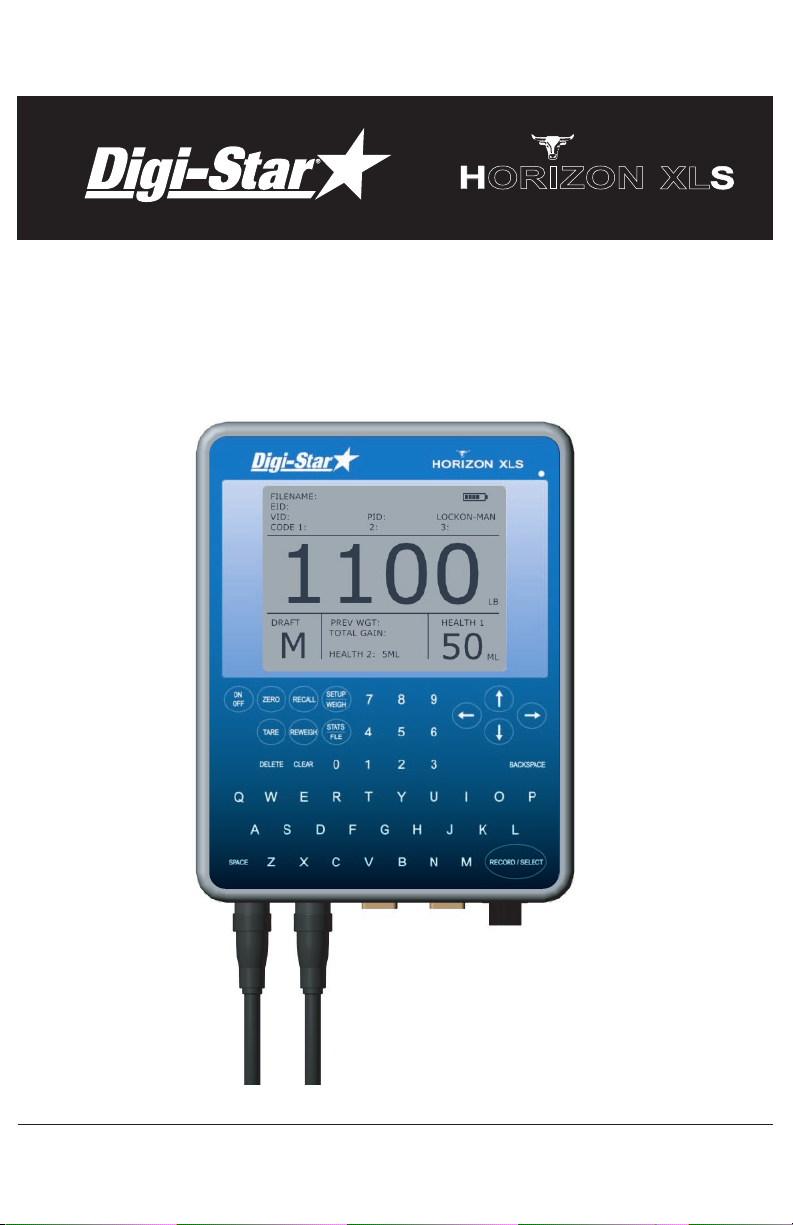
Getting Started
Display
Weighing
There are 4 display screens:
1. Weigh
2. Setup
3. Statistics
4. File List
These are selected using the SETUP / WEIGH key and STATS / FILE key
There are 3 Weigh Modes:
1. Fine
2. Lock-on (normal)
3. Fast lock-on
There are 3 Record Modes:
1. Manual record
2. Auto record
3. Off
There are 3 types of lock on algorithm
1. Static - for weighing static loads
2. Start 10lb - for weighing livestock. Starts weighing at 10lb
3. Start 20lb - for weighing livestock. Starts weighing at 20lb.
Record
ing
Lock-On
4
Th
e indicator records up to 16,000 records in up to 99 files.
The recorded data consists of the EID, Weight, Weight Gain, Date
and Time. Optional recorded data includes VID, PID, 3 condition
codes and 2 health modes.
The scale requires an EID number or VID number to record with the
weight. If an EID scanner is not used a VID can be entered using
the keypad.
Page 5

5
Turn on using the ON/OFF key.
Select the weigh mode (lock-on), record mode (manual record),
algorithm mode (10lb start or 20lb start for livestock) and
load bar settings from the setup menu. Turn auto zero on.
BAR ERROR displays when no load bars are detected.
When in record mode, select an existing file from the file list or
create a new file.
In manual record, when the animal stands on the platform, scan the
EID tag or enter the VID number. Use the left or right direction keys to
select VID, PID and codes 1 to 3 if you wish to enter data in these
fields. When the weight is locked on and all data is entered, press the
record key.
In auto record, when the animal stands on the platform, scan the
EID tag. Release the animal after the weight has locked on and the
scale will automatically record the data as the animal leaves the
platform. If data is entered using the keypad while in auto record,
i.e entering a VID, PID, or codes, the scale resorts to manual record
for that animal and the record key needs to be pressed.
The RECALL key recalls the last weight.
The REWEIGH key reweighs the animal without changing the EID and
other data.
The CLEAR key clears all data from the screen.
In the STATS screen use the SELECT key to select which column to sort.
Use the BACKSPACE key to change the sort direction.
In the WEIGH screen you can change draft direction by using the
direction keys to highlight DRAFT and then using the SPACE key to
change the draft direction.
The indicator can record data when no loadbars are connected.
Operat
ion
Page 6

Setup Menu
6
Press the SETUP key and use the direction keys to scroll through the
setup menu. Use the RECORD/SELECT key to change a setting or to
save a setting.
SET DATE FORMAT: MM/DD/YY or DD/MM/YY
SET DATE/TIME: Enter the date and time and press RECORD
SET DRAFT INDICATO R: ARROWS (< ^ >), NUMBERS (1,2,3) or
LETTERS (L,M,H)
SET DRAFT TYPE: By WEIGHT, by WEIGHT GAIN or OFF
DRAFT L1< VAL UE: Enter a value
DRAFT H3>VALUE: Enter a value
i.e. Weights under value L1< draft left,
weights over value H3> draft right and
weights in between L1< and H3> draft in
the middle M2^.
HEALTH MODE: HEALTH 1 ON, HEALTH 2 ON,
HEALTH 1+2 ON or OFF
SET HEALTH 1 TYPE: Enter the name of the drench/vaccine
HEALTH 1 ML/220LB: Press the select key to display either fixed
dose or dose by weight. Enter the fixed
dose size or dose rate
SET HEALTH 2 TYPE: Enter the name of the drench/vaccine
HEALTH 2 ML/220LB: Press the select key to display either fixed
dose or dose by weight. Enter the fixed
dose size or dose rate
WEIGHING MODE: FINE, LOCKON or FAST LOCKON
WEIGHT RECORD: MANUAL, AUTO or OFF
AUTO ZERO: ON or OFF
WEIGHT GAIN: TOTAL GAIN or GAIN PER DAY
Page 1 of 3
Page 7

7
Page 2 of 3
COM POR
T 1 MODE: Select OFF, or
REAL TIME WEIGHT sends weight data
when the weight is recorded,
REAL TIME EID + WGT sends EID and
weight data when the weight is recorded,
PROFILE UPLOAD RAW sends raw data
continuously,
PROFILE UPLOAD KG sends weight data
continuously,
EID READ/PC CONNECT for an EID reader
or for uploading data to a PC
COM 1 BAUD RATE: Match to the PC or reader
COM 1 POWER: Select OFF. For supplying power through
the RS232 connection.
COM PORT 2 MODE: EID READ / PC CONNECT currently is the
only selection
COM 2 BAUD RATE: Select 9600 for most readers
COM 2 POWER: Select ON to power the reader
TEXT HIGHLIGHT MODE: SHADED NORMAL, BLACKOUT INVERSE,
FLASH INVERSE
LOADBAR MODEL: Select a preset load bar or create a custom
setting
mV/V SETTING: In custom setting enter the mV/V load
cell rating
LOADBAR FULL SCALE: In custom setting enter the suggested
rating on the loadbar
LOADBAR mV: Displays loadbar output in mV/V
AUTO CALIBRATION: If calibration is required, enter the known
weight and press select to start. Place the
weight on the bar and press select. The
indicator will calibrate to the known weight.
Set the weighing mode and algorithm
before auto calibration.
ALGORITHM MODE: START 10LB for weighing livestock
START 20LB for weighing livestock
STATIC for static loads
BACKLIGHT MODE: ON, OFF or AUTO
TA RE WEIGHT: Enter the container weight
Page 8

8
Page 3 of 3
ID MODE: EID ONLY, VID ONL
Y, EID + VID or
NO ID QUICK WEIGH
ENABLE AUTO VID: OFF or ON
AUTO VID START: Enter VID starting code i.e. 0001
ENABLE PID: YES or NO
PID DEFAULT: Enter the Premise Identity
ENABLE CODE 1: YES or NO
CODE 1 DEFAULT: If the code is common for the weighing
session, enter the text and this will be
recorded with each weight. If the code
varies for each weight then leave this blank.
Default codes can be used for recording
additional fixed dose health medication.
ENABLE CODE 2: YES or NO
CODE 2 DEFAULT: Enter common text or leave blank
ENABLE CODE 3: YES or NO
CODE 3 DEFAULT: Enter common text or leave blank
WEIGHING UNITS: KG or LB
BLUETOOTH POWER: OFF or ON
BT BAUD RATE: Select 9600 typically
BLUETOOTH SEARCH: Turn on the bluetooth EID reader.
Press select on the indicator to search for
the bluetooth reader. The bluetooth reader
will be added to the list of BLUETOOTH
KNOWN TAR GETS.
SELECT READER: Press select to select the reader
PA SS KEY: Enter the bluetooth reader pass key
CONNECT TO READER: Press select to connect to the reader
PC DISCOVERY: Press select so the PC can discover the
indicator
BROWSER INTERFACE: Select ON to connect to the PC
Page 4 of 4
Page 9

Installation
9
1.
Ensure the weighing site is level, sheltered from wind and the
weighing platform does not touch the surrounding alleyway.
2. The indicator is supplied with an adjustable bracket.
The bracket has 2 assembly positions to allow different pivot angles.
Use the rear hole if the bracket is mounted at eye height.
Use the front hole if the bracket is mounted at chest height.
For external use it is recommended to mount the bracket at eye
height and to position the screen so it is out of sunlight.
3. The bracket can be mounted to a horizontal or vertical rail using
the U bolts supplied, or it can be screwed directly to a wall or post.
4. Mount the bracket to a rigid structure that doesn't move when the
platform is loaded. This makes the indicator easier to operate.
4. Connect the loadbar connector to the indicator.
5. Connect the external 12v power pack if required.
6. It is recommended to check the calibration of the system using
a known weight.
Rear hole
Front hole
Page 10

Horizon Browser
10
The Horizon browser allows you to transfer files between the indicator
and a computer.
Load the CD supplied.
Double click on HB.exe to install.
Accept the default settings.
To download a file from the indicator, connect the null modem cable
supplied, to either com1 or com2 on the indicator and to either com1
or com2 on the computer. In the indicator setup menu select
EID READ / PC CONNECT for the indicator com port and a baud rate
of 9600. If using com2 on the indicator, ensure com1 is set to OFF.
On the computer start the Horizon Browser (for Vista see note 1)
and under File, Port Settings, select the com port connected to on
the computer (see note 2) and a baud rate of 9600.
Press the 'Retrieve File Information From Indicator' key.
The indicator files will be displayed.
(If no files are displayed and a coms timeout box appears, either the
indicator is turned off or the wrong coms port setting has been
selected)
Select which files to download.
Next to the 'Download Selected Files' key, select the filename to
download to either by typing a file location on the computer or by
using the browse key to setup a file name and type.
Press the 'Download Selected Files' key.
The Horizon Browser will create either Access Database or Excel CSV
files (see note 3).
Installation
Dow
nloading
Page 11

11
Horizon Browser cont
Note 1 - In Vista, under Programs, right click on the Horizon Browser
and select Run as Administrator.
Note 2 - To see what com port is being used on the computer, go to
the Device Manager (press Start, Settings, Control Panel, System,
Hardware, Device Manager) and Ports.
Note 3 - In some CSV spreadsheets to display the EID number, right
click on the EID column, select Format Cells and change Categories
to Number with no decimal places.
Page 12

12
To upload a file from the computer, connect the null modem cable
as when downloading.
Turn the indicator on.
On the computer start the Horizon Browser and select the com port
setup as when downloading.
Press the 'Upload CSV file' key and select which files to upload by
using the browse key.
(The data format in the CSV file needs to match the format of a
downloaded file or an error box will appear. Use a downloaded file
as a template).
Press the 'Upload CSV to Indicator' key.
On the indicator press the recall key to display the uploaded file.
Use the USB adapter when there is no serial port on the computer.
To install the serial cable USB adapter, put the driver disk in the
computer, in My Computer open the disk, select the USB232 folder,
then select the HL340 folder, then double click on HL340.exe and
press install driver. Connect the USB adapter and note which port it
is connected to.
To change the port number on the computer go to Device Manager,
select Ports, right click on CH340 and under Properties, Port Settings,
Advanced, change the port to another available port.
Horizon browser connects to ports 1 - 9.
Uploading
USB A
dapter
Page 13

13
Tips
To impr
ove weighing accuracy ensure:
The animal isn't handled during weighing.
The operator isn't touching the chute.
The chute isn't touching another animal or part of the race.
The loadbars and underside of platform are free from dirt.
The indicator will auto zero when the animal leaves the platform.
Ensure that the chute is free during this time.
Always zero after clearing or moving the platform.
Back up the indicator files to computer using the Horizon Browser.
Tak e a record of the loadbar settings after auto calibration and any
other specific settings.
In auto VID start, enter the starting VID as 0001 rather than 1.
If an EID is recorded twice in 24 hours, it is classed as a duplicate EID
and the indicator will display a warning box.
In data only mode (no loadbars connected) previous weight and
weight gain are displayed as 0.
If a file name is changed, the new file needs to be selected for the
indicator to record to.
To edit the last record, press recall, change the data and press record.
Turn the coms power off if not in use.
The ID mode NO ID QUICK WEIGH is useful for quickly drafting or
collecting statistics on a group of animals.
Weighing
Operation
Page 14

Care, Maintenance and Storage
The indicator can run on either the internal rechargeable
batteries or the 12v power adaptor. Use only the supplied
Franmar power adaptor to power and charge the indicator.
The power adaptor is rated for indoor use only. Charge at
temperatures between 0 to 30 C (32 to 86 F). Charge time is
4 hours. Run time is 8 hours at 24 C with the back light on.
Operating temperature is between -10 to 40 C (14 to 104 F).
If operating below O C ensure the battery is fully charged.
The indicator is environmentally sealed and water proof to IP66.
Do not submerge in water. Do not tamper with or remove the
case screws, this will void the warranty.
Store the indicator in a clean, dry place, out of direct sunlight.
Storage temperature is between -10 to 35 C (14 to 95 F).
Store above 0 C for optimum battery performance.
The lens has a scratch resistant coating however take care when
cleaning. Clean the LCD lens and keypad lightly with a soft clean
cloth and a glass cleaner suitable for use on polycarbonate plastic.
This device complies with part 15 of the FCC rules for
class A digital devices. It can generate, use and radiate
radio frequency energy, and if not used in accordance
with the instructions may cause harmful interference
to radio communications. In a residential area it may
cause harmful interference, which will be required to
be corrected by the user at the their own expense.
FCC N
otice
14
Page 15

15
Warra
nty
Horizon warrants that the product you have purchased is free from defects in materials
or workmanship under normal use during the limited warranty period.
The warranty period starts on the date of purchase from Horizon or an authorized
Horizon agent. Please keep the dated sales receipt for proof of purchase as you may
be required to provide proof of purchase as a condition of receiving warranty service.
The indicator is entitled to a 2-year limited warranty. The rechargeable batteries are
entitled to a 1-year limited warranty. The battery warranty does not cover changes in
battery charge capacity and is limited to defects in materials or workmanship resulting
in battery failure.
During the limited warranty period, Horizon will repair or replace the defective
component or product. All components removed under this warranty become the
property of Horizon. The replacement component will take on either the remaining
warranty period of the removed component or a ninety (90) day limited warranty for
the spare part, whichever is longer. The replacement component maybe manufactured
from new or used materials equivalent to new in performance and reliability.
Horizon reserves the right to improve or modify products from time to time without
assuming obligation to modify products previously manufactured.
Horizon is not responsible for damage that occurs as a result of (1) failure to follow
the instructions that came with the product; (2) accident, misuse, abuse or other
external causes; (3) voltage surge or lightning strike; (4) modification, tampering or
service by an unauthorized service provider.
Horizon is not liable for any damages or personal injury caused by the product or the
failure of the product to perform, including any damage or loss of data on the product
or computer.
The maximum liability of Horizon under this limited warranty is limited to the lesser of
the cost of repair or the replacement of the product.
In the event of the product requiring servicing under the terms of the warranty,
contact your authorized dealer. The product is to be returned to the service center
at the expense of the purchaser.
These conditions constitute the complete and exclusive warranty and supersede all
other warranties, representations or conditions relating to this product.
c Horizon 2008 All rights reserve
d Issue 1
Page 16

16
Digi-Star LLC
790 West Rockwell Avenue
Fort Atkinson
WI 53538
Tol l free 800 225-7695
www.digi-star.com
 Loading...