

Page 1
EZ4600
Operators Manual
HELLO
Ft. Atkinson, Wisconsin USA
Panningen, The Netherlands
www.digi-star.com
D3716-US REV A April 14, 2008
Page 2

EZ4600
Table of Contents
FEED MANAGEMENT SOFTWARE.............................................................. 4
CAB CONTROL (WIRELESS)........................................................................ 5
BEFORE CHARGING BATTERY OR WELDING .......................................... 6
INDICATOR OVERVIEW................................................................................ 7
OPERATION................................................................................................... 9
TURN ON INDICATOR............................................................................... 9
DATA TRANSFER........................................................................................ 10
DATAKEY MODE...................................................................................... 10
RF DATALINK MODES ............................................................................ 10
INDICATOR DATA FORMATS ................................................................. 11
LOADING AND FEEDING............................................................................ 11
COMPLETE LOADS MODE......................................................................... 11
STARTING A RECIPE .............................................................................. 11
RESIZE RECIPE WEIGHT ....................................................................... 12
LOADING RECIPE.................................................................................... 13
UNLOADING TO PENS............................................................................ 14
RECIPE AND PEN LIST MODE................................................................... 15
STARTING A RECIPE .............................................................................. 15
LOADING RECIPE.................................................................................... 16
UNLOADING PENS.................................................................................. 16
ADVANCED COMMANDS ........................................................................... 17
UNLOAD PARTIAL PENS ........................................................................ 17
GO BACK TO SKIPPED INGREDIENT.................................................... 17
CHANGE FEEDING NUMBER ................................................................. 18
USE ARROW KEYS RECIPE OR PENS LIST......................................... 18
CLEAR INDICATOR MEMORY ................................................................ 19
RE-USE RECIPE AND PEN DATA .......................................................... 19
ADD A PEN TO PEN LIST........................................................................ 20
HOLD ........................................................................................................ 21
PRINTING..................................................................................................... 21
BACKLIGHT INTENSITY.......................................................................... 21
COMMONLY USED DIRECT ACCESS NUMBERS .................................... 22
PRE-ALARM ............................................................................................. 22
AUTO INGREDIENT / MANUAL PEN ADVANCE.................................... 22
AUTO ADVANCE...................................................................................... 23
TOLERANCE ............................................................................................ 23
PEN TOLERANCE.................................................................................... 23
DELAY TIME............................................................................................. 23
DRIVE RATIO ........................................................................................... 24
SCALE ID OR TRUCK ID ......................................................................... 24
RADIO NUMBER ...................................................................................... 25
RESIZE OPTION ...................................................................................... 25
CHANGE TIME ......................................................................................... 26
CHANGE DATE ........................................................................................ 26
2 D3716
Page 3

Operators Manual
DIRECT ACCESS NUMBERS LIST .............................................................27
MENU 1. BASIC FEATURES IN MOST INDICATORS ............................27
MENU 2. CLOCK, PRINTER, COMMUNICATIONS & ESTIMATED
WEIGHT FEATURES ................................................................................ 27
MENU 3. SCALE CALIBRATION SETTINGS........................................... 28
MENU 4. PRESET. BATCHING & ROTATION COUNTER FEATURES . 28
CALIBRATION........................................................................................... 29
TROUBLESHOOTING ..................................................................................30
INSTALLATION............................................................................................. 32
INDICATOR MOUNTING .......................................................................... 32
LOAD CELL DIRECTION.......................................................................... 32
CABLE CONNECTION.............................................................................. 33
CONNECT LOAD CELLS TO J-BOX........................................................ 34
CHANGE SETUP AND CALIBRATION NUMBERS ................................. 34
OPTIONAL EQUIPMENT.............................................................................. 35
ROTATION COUNTER SENSOR............................................................. 35
TRANSMITTER/RECEIVER...................................................................... 35
REMOTE INDICATORS............................................................................ 35
D3716 3
Page 4
EZ4600
FEED MANAGEMENT SOFTWARE
A full featured WindowsR based system that
offers powerful features that are easy to use.
Entry level system easily upgraded.
Based on features of TMR Tracker
Remote site monitoring software.
Works with email service to connect
Tracker to remote location
Front-end tool for beef feeding customers
to enter ingredient, recipe, corral and
wagon information.
For additional information go to www.digi-star.com
4 D3716
Page 5
Operators Manual
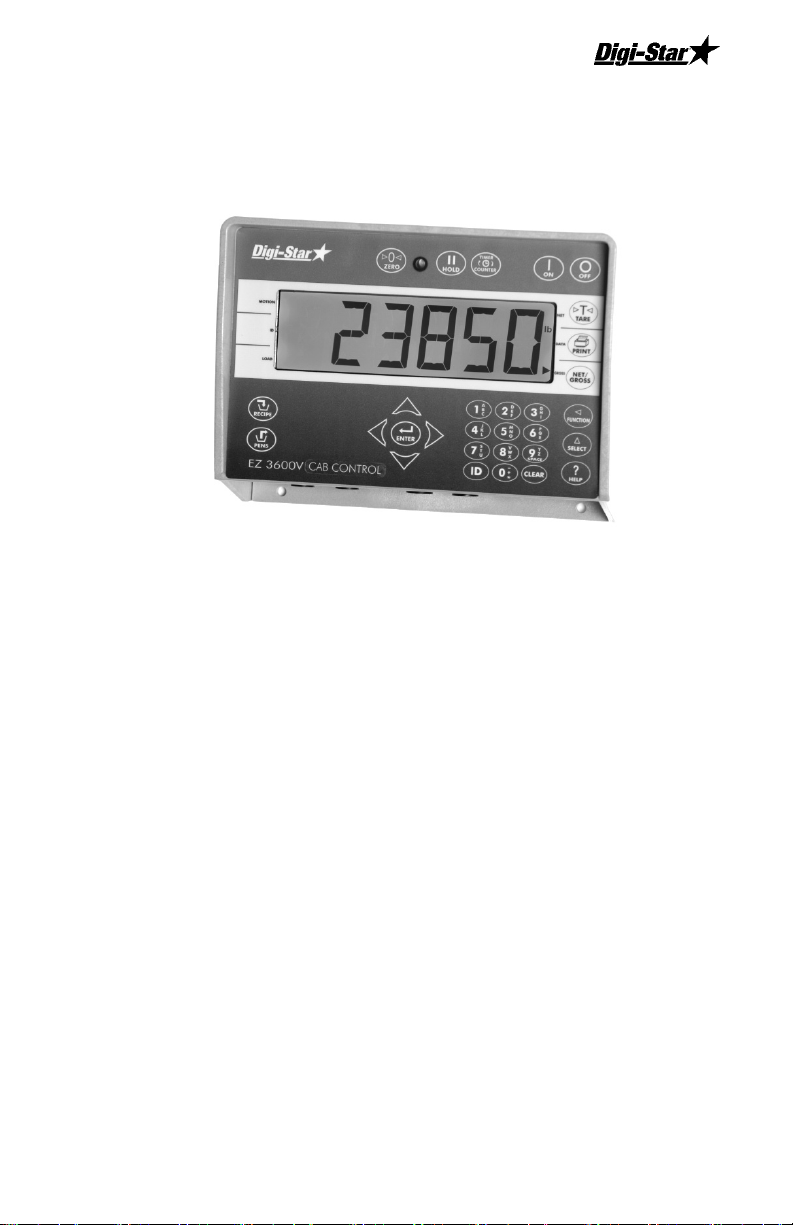
CAB CONTROL (WIRELESS)
Features
• Wireless remote with full key control of indicator on mixer
• Mount remote in easy view of loading
• Improves loading accuracy
Functions
• Communicates with multiple mixers
• Easily call-up recipes without leaving loader
Specification
• Internally mounted 2.4 GHz radios
• Up to 1000 foot range
• 24 channels
• 12 or 24 volt DC system
For additional information go to www.digi-star.com
D3716 5
Page 6
EZ4600
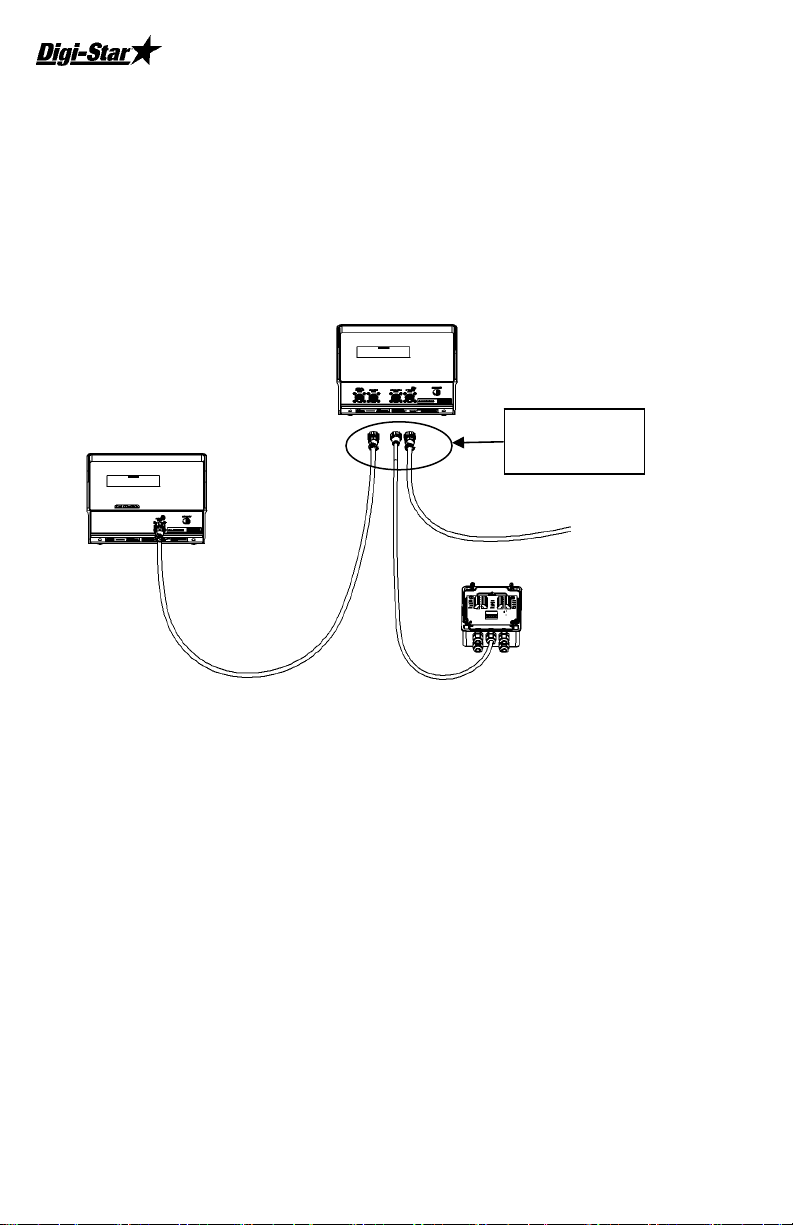
BEFORE CHARGING BATTERY OR
WELDING
Important Precaution
Disconnect all indicator leads before charging battery or welding.
Damage may occur to indicator and load cells.
Scale Indicator
Remote Indicator
Optional
Disconnect
all cords
J-Box
6 D3716
Page 7
Operators Manual
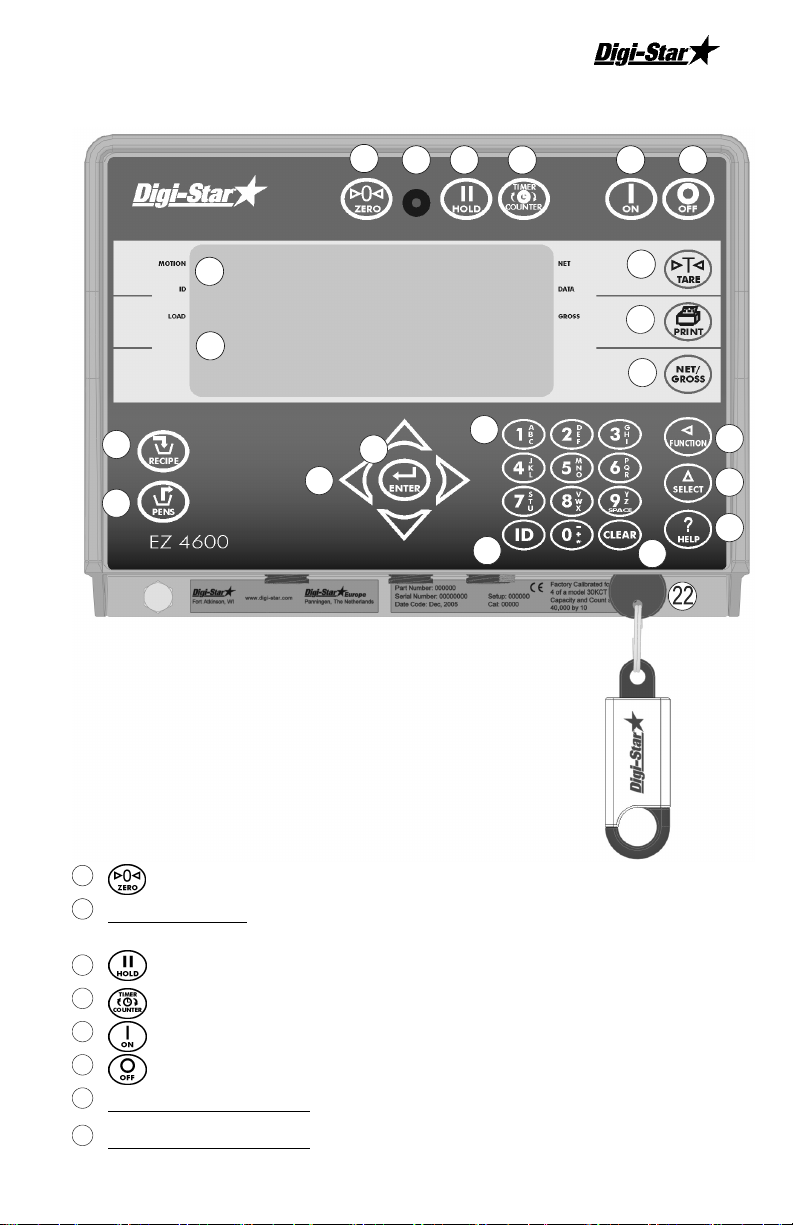
INDICATOR OVERVIEW
7
8
12
17
15
Note: See page 32-34 for
installation instructions
1
16
3
2
4
5 6
9
10
11
18
13
14
19
20
21
1
-press and hold for 3 seconds to zero balance indicator.
2
Pre-Alarm Light – Flashes and alarm sounds when weight is within
preset limit. See page 22
3
– holds displayed weight when moving machine.
4
– not used.
5
– - turns indicator on, press quickly 2 times to run self test.
6
- turns indicator off.
7
Upper Display Window – Displays current actions.
8
Lower Display Window – Lists 3 lines (i.e. ingredients, recipes, pens).
D3716 7
Page 8

EZ4600
9
- temporary zero (Net Mode).
10
- records to memory or prints displayed weight.
11
- toggles between Net and Gross weights.
12
- selects recipes in memory.
13
- enter user number and feeding number. Any number can be used
for user until number assigned by management software.
14
–Clear (backspace).
15
– press in List Mode to begin pen unloading. See page 16
16
– accepts change or proceeds to next item.
17
Directional Arrows - moves through list of information.
18
Keypad – inputs numbers or letters as required.
19
– performs the task displayed by select.
20
– displays additional tasks.
21
– press for additional information.
DataKey – Used for data transfer between computer and indicator.
Serial/Printer Port – optional, to communicate with computer and other
digital input/output devices.
Remote Port – optional, for remote display.
Load Cell Port– for J-Box cord.
Power Port – for power cord.
DataKey Port– for DataKey insertion. Turn DataKey to upload/download
data.
Serial Number Plate – Serial Number of indicator.
8 D3716
Page 9
Operators Manual
O
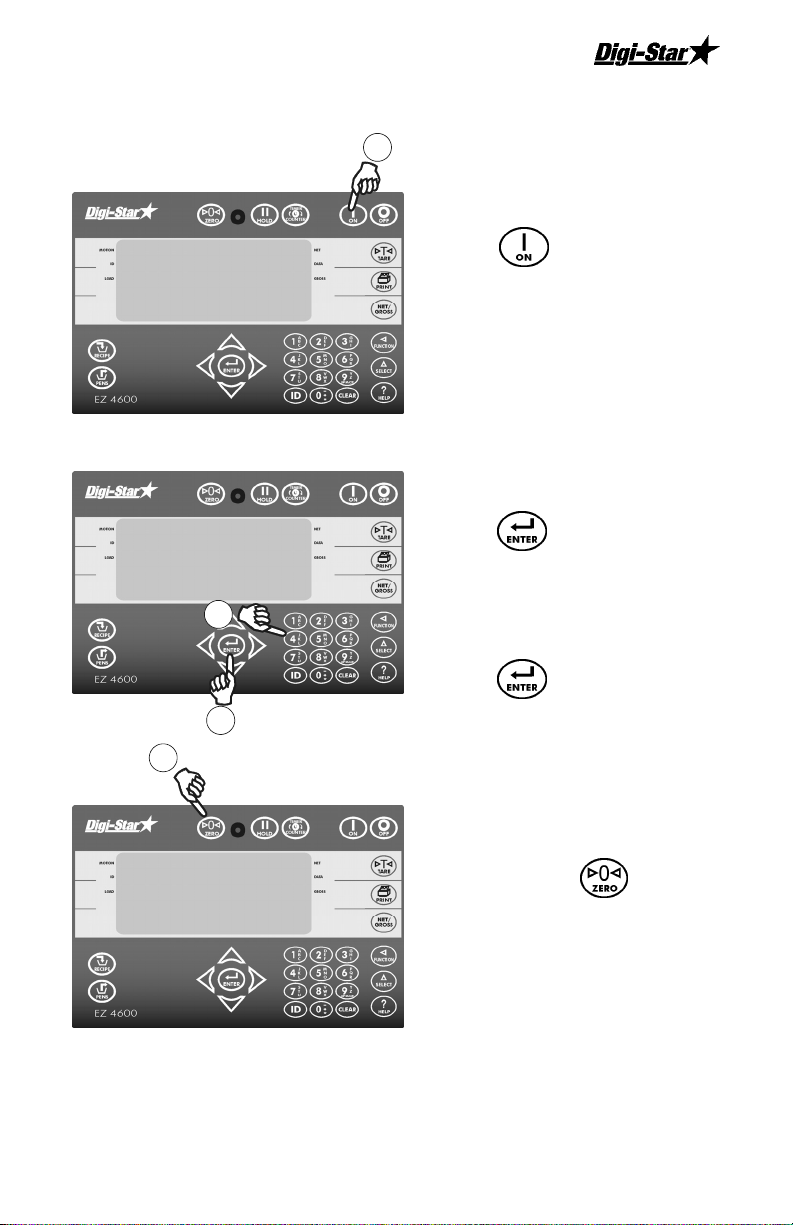
OPERATION
Turn on indicator
HELL
Digi-star
Feed delivery system
1
1. Press .
1. Enter ID Number if required.
ENTER user id
ENTER ID NUMBER ON KEYPAD
PRESS ID KEY TO USE SCALE
1
10:41A 2JL07
PRESS RECIPE TO LOAD
2. Press .
1
2
0
1. Enter Feeding Number (only req’d
st
time in loads mode).
1
2. Press .
1. Press and hold for 3 seconds
to zero balance indicator.
D3716 9
Page 10
EZ4600
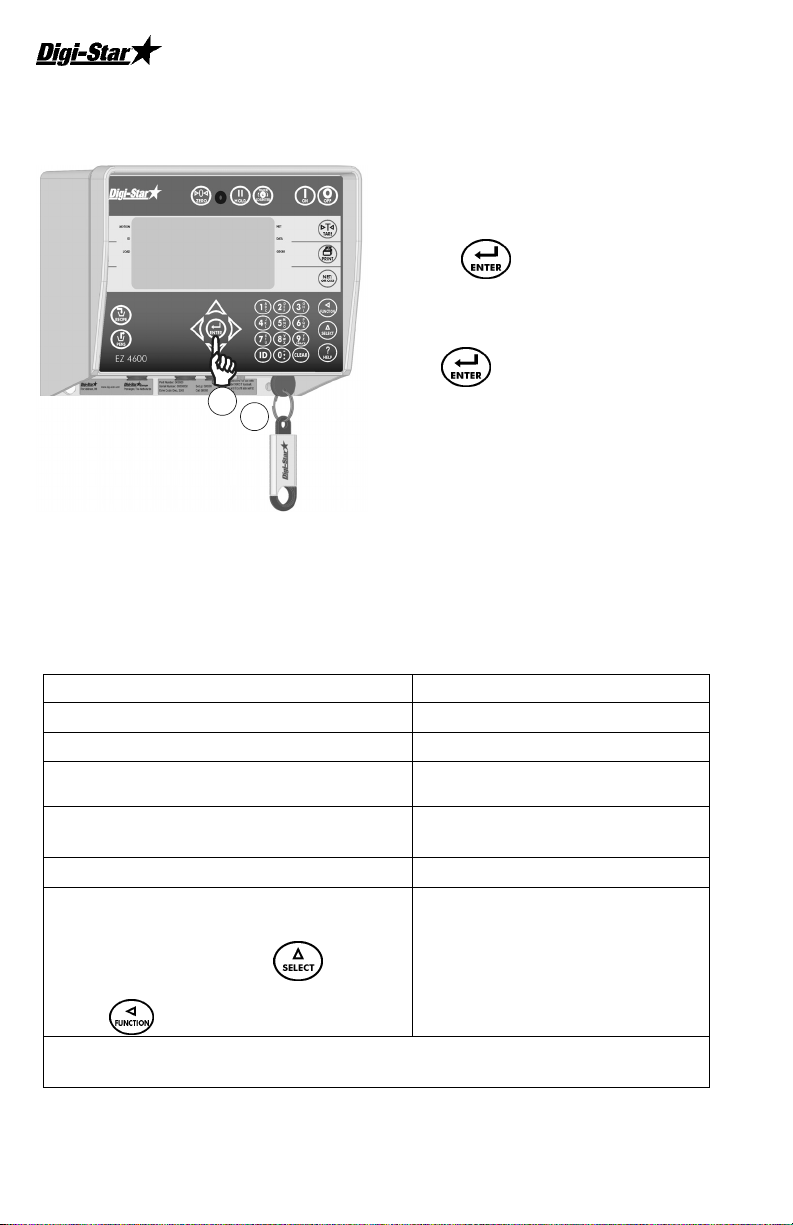
DATA TRANSFER
DataKey Mode
2
1
RF DataLink Modes
Operation Message
DataLink connects with indicator
DataLink sends data to indicator
Indicator receives data
Data compete, indicator sends data to
DataLink
Data sending
To send data to PC if operator does
not complete all feeding at end of
feeding schedule. Press until
display shows message (right column),
press to select
The indicator marks uncompleted data as completed and sends feeding
data to DataLink.
Note: After sending, uncompleted data erased.
To upload data:
1. Insert DataKey turn clockwise.
2. Press .
Note: If indicator displays
uncompleted data in memory,
press to overwrite
uncompleted data.
Remove DataKey when transfer
complete.
To download data:
Insert DataKey, turn clockwise,
indicator automatically sends data to
DataKey. Remove DataKey.
←PC→
DL←IN
ALL FEED LINES RECIVED -PRESS
RECIPE KEY TO CONTINUE
←PC→
DL→OUT
EZ→PC
10 D3716
Page 11
Operators Manual
k
-
Indicator Data Formats
Complete Loads Mode: Each load built by PC software. It assigns pens to a
recipe and builds exact load for pens.
Recipe and Pen List Mode: PC software sends recipe data and pen data in
two different fields. Operator selects recipe to build and pen deliveries.
LOADING AND FEEDING
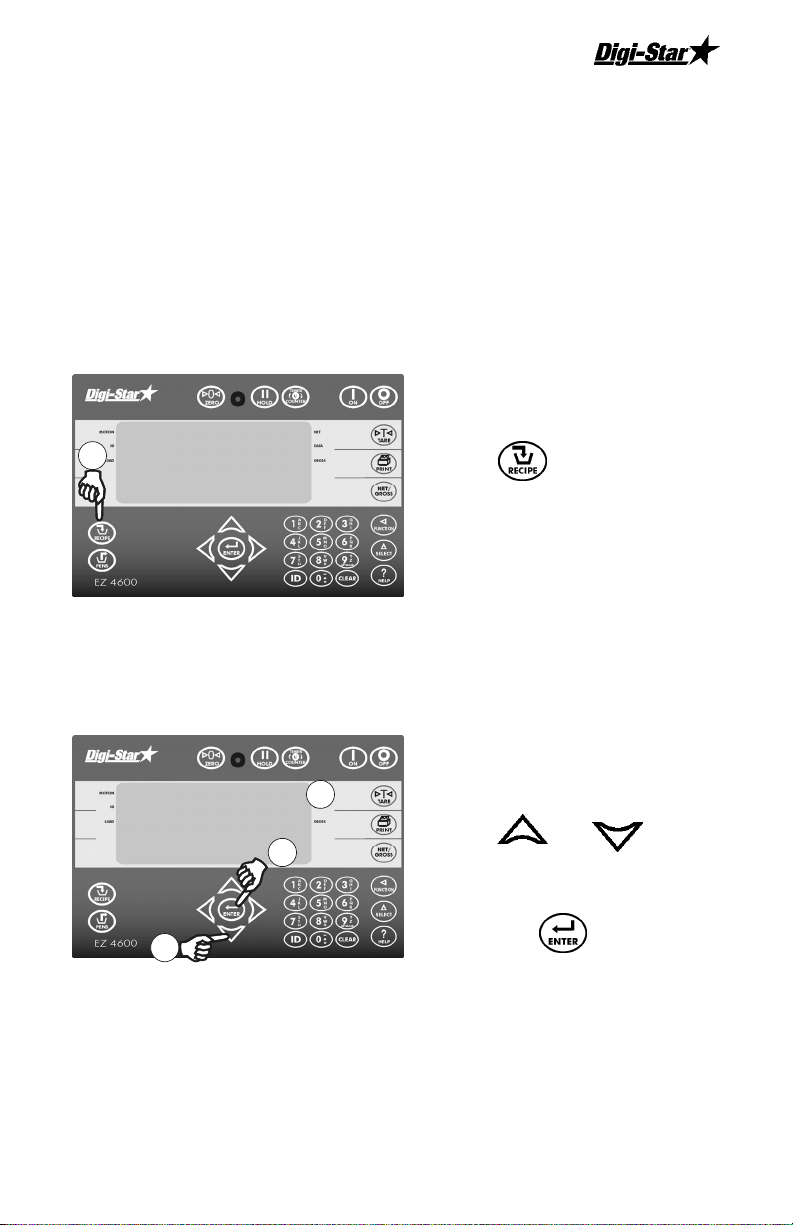
COMPLETE LOADS MODE
Starting A Recipe
1
0
10:41A 2JL07
PRESS RECIPE TO LOAD
1
3
Milk- 6
Fresh- 5
Mil
1
Feeding 1
1. Press .
1. Indicator scrolls feeding number,
first recipe and pen number.
Recipes listed below.
2. Press
desired recipe.
and to find
3. Desired recipe in upper display
line, press .
2
D3716 11
Page 12

EZ4600
Resize Recipe Weight
23000
Enter number of animals
To feed pen 6
Animal 230 preset 20643
1
Indicator gives option to resize pen
load weight.
1. Enter a new weight or keep original
weight.
2. Press .
2
Note: Press to resize by
number of
Note: Press to accept pen
values without resizing.
Note: If indicator warns resized
amount is over capacity, press
to override.
head in pen.
12 D3716
Page 13

Operators Manual
f
Loading Recipe
2
Alfal
Fd- 1 ctr- 000 ing alfa
2n-0-rec milk pre-2760
6 o use advance to log
1
3
Displayed when in load or unload mode.
Line 1:
feeding number: FD-2
number of rotations during pen delivery: CTR-000 (RC option only)
pen name: PEN-1
Line 2:
zone number: ZN-1
name of recipe: REC-PREFRE
call weight of pen: PRE-1200
Line 3:
gross weight: G-10000
Instruction data: USE ADVNCE TO LOG
1. First ingredient weight flashes in
upper display, load ingredient.
2. Weight approaches zero, alarm will
flash and sound.
3. a. Manual Advance: Weight
reached, press to accept.
Press again to start next
ingredient.
or
3. b. Auto Advance: When preset
weight reached, indicator
advances to next ingredient.
D3716 13
Page 14

EZ4600
s
Unloading to Pens
Start deliverie
Pen 6 pre- 20640
1
Note: Do not press .
Note:
If different pen needed press
or to find desired pen.
Press for pen delivery.
Ingredients loaded, indicator displays
first pen to unload.
1. Manually advancing, press
st
for 1
pen. When weight reached
press to accept. Press
again to start next pen.
or
1. b. Auto Advance: When preset
weight reached, indicator
advances to next pen.
Last pen complete, indicator
displays: “Recipe Complete”
14 D3716
Page 15

Operators Manual
RECIPE AND PEN LIST MODE
Starting a Recipe
1. Press : .
2
Recipe - ri
R1 - 25000 TOt 5000
R2 – 20000 tot – 18000
R3 – 20000 tot - 10000
1
3
4
25000
Enter amount to be loaded
25000 tot - 50000
6
5
2. Display reads:
Example:
Line 1:
Line 2: R1 - 25000 TOT- 50000
Line 3: R2 - 20000 TOT-18000
Line 4: R3 - 20000 TOT- 10000
3
3. Press
recipe, to start.
Indicator will display: RESIZE, then the
resize weight.
4. Display reads:
Example:
Line 1: 25000
Line 2: Enter load amount
Line 3: (No Data)
Line 4: R1 - 25000 TOT- 50000
5. Enter the amount to build in this
load.
6. Press ..
Recipe R1
and to select
D3716 15
Page 16

EZ4600
Loading Recipe
2
Alfalf
3
Unloading Pens
4
Pen 1
5
3
1. First ingredient and weight flash in
upper display. Begin loading
ingredient.
2. Weight reached, alarm will flash
1
and sound.
3. a. Manual Advance: Weight
reached, press .
Press to start next
ingredient.
or
3. b. Auto Advance: When preset
weight reached, indicator
advances to next ingredient.
1. When ingredient loading complete,
display reads “Recipe Complete”.
Press . Indicator displays
unloading pens.
2. Press or to select
desired pen.
6
1
16 D3716
2
3. Press .
4. Pen and weight displayed, begin
unloading to pen.
5. a. Manual Advance: Weight
reached, press to accept.
Press again to start next
pen.
or
5. b. Auto Advance: When preset
weight reached, indicator
advances to next pen.
6. When unloading is complete
press to start next recipe.
Page 17

Operators Manual
ADVANCED COMMANDS
Unload Partial Pens
1
Go Back To Skipped
Ingredient
1. Press to advance to next
pen without finishing current pen.
Note: If pen tolerance is set and
feeding stopped before preset weight
reached, alarm sounds, indicator
displays:
Pen Underfed – Press Print
To remove pen from list-
Press on to keep pen
See page 23 for Pen Tolerance setup.
1. Press or to move
back.
2. Press .
2
1
D3716 17
Note: Ingredient weight changed
more than 4 display counts cannot
restart that ingredient.
Example: If minimum display change
is 10 lbs/kgs, more than 40 lbs/kgs,
cannot restart that ingredient.
Page 18

EZ4600
Change Feeding Number
4
2
5
3
1
Use Arrow Keys Recipe or
Pens List
Press advance
Ing-cluhay pre- 2850
Ing-cornsi pre- 9690
Ing-311pel pre- 3140
1
1
1. Press .
2. Enter user number.
3. Press .
4. Enter feeding number (1-9).
5. Press .
1. Press or to move list
three lines at a time.
18 D3716
Page 19

Operators Manual
r
e
Clear Indicator Memory
4
3
On=Clea
Digi-star
Feed delivery system
Re-Use Recipe and Pen
Data
3
1. Press .
2. Press and hold .
1
3. Press continue holding
indicator reads:
On=Clear Clear=Reuse Net=exit.
Release .
4. Press to erase feeding
memory.
2
3
1. Indicator .
1
2. Press and hold .
3. Press continue holding
Clear=reus
Digi-star
Feed delivery system
indicator scrolls:
On=Clear Clear=Reuse Net=exit.
Release .
Note: When re-using data stored in indicator, it takes recipe and pen
information and removes completed weights loaded or unloaded and marks
them undone. It will not accumulate data day to day. Download data to
DataKey before re-using recipe and pen data stored.
Note: For continuous re-use, set D.A.N. 466 to on. See page 29.
D3716 19
3
4
2
4. Press again to re-use recipe
and pen data.
Page 20

EZ4600
Add a Pen to Pen List
calf
1. Enter pen name or number.
10:29a 08aug07
Press recipe to load
2
Recipe calf
Calf select recipe
Clsups
drycow
2
1
Enter amount to be
unloaded
2
3
3000
2. Press .
3. Press .
1
1. Press or to find
desired recipe.
2. Press .
1. Enter amount to unload to pen.
2. Press .
1. Enter number of animals / pen.
2. Press .
1
Enter zone 0-9
2
20 D3716
1
1. If zones are active display reads:
“Enter Zone 0-9”
2. Press .
Page 21

Operators Manual
6
Hold
Hold mode prevents displayed
weight from changing while moving.
HOLD
1
Feed 1- ctr 000 Pen
2n-0-rec-milk pre
20640
2
PRINTING
Backlight Intensity
1. Press .
2. Press indicator normal.
If weight added in hold mode,
press to cancel hold.
1. Reference technical manual D3648
at www.digi-star.com.
1. Press until dimmer is
displayed.
2. Press . to reduce backlight
2
1
D3716 21
intensity by 60%.
Press again for full
intensity.
Page 22

EZ4600
COMMONLY USED DIRECT ACCESS
NUMBERS
Pre-Alarm
Select weight or percentage method,
enter value to activate early warning
indicator reaching preset.
11:38a 08aug07
Press recipe to load
Press pens to deliver
4
1
Auto Ingredient / Manual
Pen Advance
Ingredients automatically advance
pens manually advance.
11:38a 08aug07
Press recipe to load
Press pens to deliver
1
4
401
461
3
1
2
3
1. Enter 401 and press .
2. Press again to change
between WEIGHT and PERCENT.
3. Press .
4. Enter Pre-Alarm value.
Press .
1. Enter 461 and press .
2. Press , choose on/off.
3. Press .
22 D3716
2
1
Page 23

Operators Manual
Auto Advance
Allows hands free operation of programmed recipes. When auto advance
feature activated, indicator automatically advances to next ingredient once
tolerance, and delay time requirements met.
Tolerance
11:38a 08aug07
Press recipe to load
Press pens to deliver
2
442
1
1. Enter 442 and press .
Press again to choose
desired percentage. Percentage
settings:
OFF, 0.5, 1 - 5, 7, or 10.
1
2. Press .
Pen Tolerance
Available in List Mode Only.
4
2
462
1
3
1
Delay Time
Changes time indicator waits before
automatically advancing to next
ingredient.
2
443
11:38a 08aug07
Press recipe to load
Press pens to deliver
1
1
1. Enter 462 and press .
Press again to choose weight
or percent.
2. Press , screen will display
“pentol”.
3. Enter weight or percentage
desired.
4. Press .
1. Enter 443 and press .
Press again to select delay
time (In seconds: Manual, 1, 2, 3,
5, 7, 10, 20, 30, or 60).
2. Press .
Note: Set to Manual prevents
automatic advance.
D3716 23
Page 24

EZ4600
Drive Ratio
Drive ratio is number of turns seen
by sensor divided by number of
mixing rotations.
2
422
11:38a 08aug07
Press recipe to load
Press pens to deliver
1
1
Scale ID or Truck ID
Each indicator has scale ID.
108
11:38a 08aug07
Press recipe to load
Press pens to deliver
3
1
1
1. Enter 422 and press to enter
drive ratio value.
2. Press .
1. Enter 108 and press .
2. Press to erase old ID, enter
new ID.
3. Press .
Note: TMR Tracker or Diet
Manager, software ID must match.
2
24 D3716
Page 25

Operators Manual
Radio Number
3
231
11:38a 08aug07
Press recipe to load
Press pens to deliver
2
1
1
2
Resize Option
Make weight change to pen unload
weight or recipe load size.
448
11:38a 08aug07
Press recipe to load
Press pens to deliver
2
1
1
1. Enter 231 and press .
2. Press to erase number,
enter new number.
3. Press .
Note: Do not use same number for
two different indicators.
1. Enter 448 and press ,
press again choose on/off.
2. Press .
D3716 25
Page 26

EZ4600
Change Time
11:36:53
11:38a 08aug07
Press recipe to load
Press pens to deliver
3
2
Change Date
080807
11:38a 08aug07
Press recipe to load
Press pens to deliver
2
4
1
1
3
1
1. Enter 202 and press .
2. Press to move cursor.
3. Press sets time.
4. Press .
1. Enter 204 and press .
2. Press to move cursor. Format
ddmmyy, set date.
3. Press .
1
26 D3716
Page 27

Operators Manual
DIRECT ACCESS NUMBERS LIST
Enter D.A.N. press displays setting name, allows value change.
Press to save setting.
SETTING/
DISPLAY
D.A.N
NO.
OPTIONS
(BOLD=DEFAULT)
DESCRIPTION
MENU 1. BASIC FEATURES IN MOST INDICATORS
LANGUAGE
{langag}
TR HOLD
{ tr hld}
SCALE ID SETUP
{scalid}
English(
(
French (
Dutch(
101
107
108 NEW EZ
Italian (
Portuguese (
Spanish (
Danish (
(
(
ON/OFF
ENGLSH)
NEDERL)
FRANCS)
DEUTSH)
ITAL)
ESPAN)
DANSK)
MAGYAR)
VESTA)
Select language to be displayed
PORT)
Display gross weight if TR key is
held for 3 seconds.
Identity of scale location (truck id
or Mixer number).
MENU 2. CLOCK, PRINTER, COMMUNICATIONS &
ESTIMATED WEIGHT FEATURES
TIME FORMAT
{time f}
1 TIME
{time)
DATE FORMAT
{date f}
DATE
{date}
SCALE NUMBER
SCL NO
201
202 XX:XX:XX
203
204 Enter XXXXXX
231
24 HR
AM/PM
1-mm-dd
2-mm/dd/yy
3-mm/dd/yyyy
4-dd-mm
5-dd/mm/yy
6-dd/mm/yyyy
7-ddmoyy
8-ddmoyyyy.
Select time format -AM/PM or 24
hour
Select key changes time,
function key chooses hh:mm:ss.
Select date format
Select key changes date function key chooses mm/dd/yy .
Select scale number for cab
control communication
.
D3716 27
Page 28

EZ4600
SETTING/
DISPLAY
REMOTE
DISPLAY RMDISP
D.A.N
NO.
234
OPTIONS
(BOLD=DEFAULT)
DESCRIPTION
Select type of remote display
MENU 3. SCALE CALIBRATION SETTINGS
DISPLAY UNIT
{lb-kg}
MIMIC TYREL
{tc1300}
303
321
LB/KG
OFF/ON
Display pounds -lb or kilograms kg
If ON -records preset weights like
a TYREL TCX-1300 indicator.
Indicator Tracks gross weight
while batching.
MENU 4. PRESET. BATCHING & ROTATION
COUNTER FEATURES
Select weight or percentage
method, then enter a value to
activate an early warning that
indicator is reaching the preset.
ALARM BUZZER -allows user to
turn off alarm horn.
Select time or mixer revolutions
to decrement mix timer/counter.
Enter the number of input pulses
that equal 1 mixer revolution.
Select batch 1-amount/animal
2-percent/load
3- amount/load
Select tolerance weight
percentage to accept ingredient.
Select seconds to delay before
advancing to next ingredient.
If ON -operator must enter user
ID to use indicator.
If ON -operator can change
recipe size.
If ON -prevents auto-advancing if
preset exceeds tolerance
Select feed zone for recipe
deliveries.
If ON -displays all incomplete
recipes or enable if indicator is
stationary mixer/batch when
using Datalink.
PRE ALARM
{p mthd} & {p-alm} ..
BUZZER
{buzzer)
TIMER/
COUNTER
{tmrctr)
DRIVE RATIO
{dratio}
ENTRY METHOD
E MTHD
TOLERANCE
{toler)
INGR. ADVANCE
DELAY
{delay)
FORCE USER ID
{userid}
RESIZE RECIPE
{resize}
TOLER OVER
LOCK
{overlk}
FEED ZONE
{fdzone}
UNDONE
RECIPES
{undn 1}
401
404
421
422
441
442
443
446
448
453
454
455
WEIGHT
PERCNT
1-4, ON/OFF
REV
TIME
0001.00
1,2,3
OFF,.5,1-5,7,10
MANUAL, 1-
3,5,7, 10,20,30,60
ON/OFF
ON/OFF
ON/OFF
ALL, 1-9
ON/OFF
28 D3716
Page 29

Operators Manual
SETTING/
DISPLAY
AUTO START
PENS
{autpen)
MANUAL PEN
ADVANCE
{manpen)
PEN TOL
{t mthd} & {pentol}
PEN WEIGHT
{pen wt}
DOUBLE KEY
PRESS PREV
{dbkey}.
RECIPE REMAIN
ACTIVE
(RE-USE)
SETUP NUMBER
SETUP
CALIBRATION
NUMBER
CAL
D.A.N
NO.
458
461
462
OPTIONS
(BOLD=DEFAULT)
ON/OFF
ON/OFF
WEIGHT
PERCNT
LOAD
463
GROSS
NET
465
466
ON/OFF
ON/OFF
CALIBRATION
871
872
DESCRIPTION
If ON -starts pens list after recipe
is loaded in list mode format.
If ON -overrides automatic
advance for pens.
Select weight or percentage
method, then enter pen
tolerance.
Select method for displaying pen
Weight -net, load, or gross.
Select method ignores double
pressing of keys when advancing
ingr. While loading mixer.
Select ON to reuse recipes.
Quick entry method selects
weigh method 1-4lbs, 5-8 kg,
gain 1-9, display counts 1-9 and
capacity *1000
Weight displayed at 0.4mV/V for
these load cells
D3716 29
Page 30

EZ4600
TROUBLESHOOTING
30 D3716
Page 31

Operators Manual
D3716 31
Page 32

EZ4600
INSTALLATION
Indicator Mounting
Rail Mounting
Included
Rail Mount (Standard), Wing Mount w/ hardware, RAM Mount Kit w/
hardware kit.
Load Cell Direction
Wing Mount
Optional
RAM Mount
Optional
Observe direction of arrow on load cell when installing load cell.
32 D3716
Page 33

Operators Manual
Cable Connection
See Figure 1
Remote Indicator
(Optional)
Indicator Connection Diagram
J-Box
Connection
Scale
Indicator
Power Cord
Pin To 12VDC Power Supply
1 Red +Terminal
2 Black -Terminal
3 Orange Alarm Out
4 Blue
Remote Input
See
Figure 2.
J-Box
DataKey Insertion
Digital Input/
Output Connection
Remote Indicator
Connection
Power Cord
Connection
Figure 1. Bottom Panel Cable Connections
D3716 33
Page 34

EZ4600
Connect Load Cells To J-Box
Connect load cell
wires to terminal
blocks.
Wire Color Key
Color Description
1 White Signal +
2 Green Signal 3 Red Excitation +
4 Black Excitation 5 Shield Shield
Tighten nuts
J-Box Cable
Load cell cable
Figure 2. J-Box Connections
Connect to Indicator
bottom panel.
See Figure 1
Change Setup and Calibration Numbers
1. Enter 871 and press .
2
146040
3
1
1
34 D3716
2. Indicator shows
show a 6 digit number. Enter new
number.
3. Press .
Follow same procedure changes
calibration number except use 872.
SETUP briefly then
Page 35

Operators Manual
OPTIONAL EQUIPMENT
Rotation Counter Sensor
Transmitter/Receiver
Remote Indicators
Use with EZ3600 or EZ4600
indicators equipped with rotation
counter port. Sensor allows
operator to program indicator to
count auger or PTO rotations for
accurate mix.
Transmitter (shown) with factory
installed receiver in indicator. Use to
zero indicator from remote location.
Operating range about 90 feet.
RD440 small remote display with 1”
high numbers
RD2400V backlit remote display
with 1.7” high numbers
RD4000 LED remote display with 4”
high numbers
D3716 35
 Loading...