

Page 1
D3715-GB Rev E
May 11
HELLO
EZ3600V
User manual
Ft. Atkinson, Wisconsin USA
Panningen, the Netherlands
www.digi-star.com
Page 2

Table of cont ent s
TABLE OF CONTENTS
FEED MANAGEMENT SOFTWARE ............................................................................................... 1
CAB CONTROL (WIRELESS) ........................................................................................................ 2
SAFETY DURING USE................................................................................................................... 3
Check system before use ............................................................................................................ 3
Cleaning ...................................................................................................................................... 3
Charging battery and welding ...................................................................................................... 3
OVERVIE W WEIGHING INDIC ATOR ............................................................................................. 4
OPERATION ................................................................................................................................... 6
Switching on the weighing indicator ............................................................................................. 6
USING EZ3600(V) AS A DATA TRANSFER UNIT .......................................................................... 7
DATA TRANSFER .......................................................................................................................... 8
USB mode ................................................................................................................................... 8
DataLink modes .......................................................................................................................... 8
Weighing indicator data formats .................................................................................................. 8
LOADING AND FEEDING IN COMPLETE LOAD MODE ............................................................... 9
Loading recipes ........................................................................................................................... 9
Resizing recipe weight ................................................................................................................. 9
Feeding groups ......................................................................................................................... 10
LOADING AND FEEDING IN RECIPE AND GROUP LI ST MODE ............................................... 11
Loading the recipe ..................................................................................................................... 11
Resizing recipe weight ............................................................................................................... 11
Feeding groups ......................................................................................................................... 12
ADVANCED FUNCTIONS ............................................................................................................ 13
Partially feeding groups ............................................................................................................. 13
Return to the skipped ingredient ................................................................................................ 13
Changing the feeding cycle number .......................................................................................... 13
Clearing the indicator memory ................................................................................................... 14
Re-using recipe / group data ..................................................................................................... 14
Adding a group to group list ....................................................................................................... 14
EZ3600(V) FRONT PANEL PROGRAMMING .............................................................................. 16
PROGRAMMING RECIPES ......................................................................................................... 17
Changing the programming method .......................................................................................... 17
Changing ingredient names ....................................................................................................... 17
Printing an ingredient name ....................................................................................................... 18
Programming a new recipe ........................................................................................................ 18
Changing ingredient amounts in the recipe ................................................................................ 19
Deleting recipe .......................................................................................................................... 20
Calling up a recipe ..................................................................................................................... 20
PRINTING RECIPES .................................................................................................................... 21
Printing a single recipe .............................................................................................................. 21
Printing all the recipes ............................................................................................................... 21
LOADING AND DOSING OUT RECIPES ..................................................................................... 22
Loading recipe according to amount per animal ........................................................................ 22
Dosing out recipe ...................................................................................................................... 23
ADDITIONAL FUNCTIONS ........................................................................................................... 24
Holding the displayed amount ................................................................................................... 24
Printing ...................................................................................................................................... 24
Backlight intensit y ...................................................................................................................... 24
Deleting accumulative ingredient amounts ................................................................................ 25
COMMONLY USED DIRECT ACCESS NUMBERS ...................................................................... 26
Pre-alarm .................................................................................................................................. 26
Automatically advancing ingredients .......................................................................................... 26
Tolerance .................................................................................................................................. 26
Group tolerance ......................................................................................................................... 27
D3715-GB Rev E EZ3600 User' s manual
Page 3

Table of cont ent s
Delay time ................................................................................................................................. 27
Automatically advancing to next ingredient / Manually advancing to next group ........................ 28
Drive ratio .................................................................................................................................. 28
Weighing indicator ID / feed mixer ID ........................................................................................ 28
Radio number ............................................................................................................................ 29
Changing the recipe amount on the weighing indicator .............................................................. 29
Setting the ti me ......................................................................................................................... 29
Setting the date ......................................................................................................................... 30
TMR Tracker or Front Pan el programmi ng ................................................................................ 30
LIST WITH DIRECT ACCESS NUMBERS .................................................................................... 31
TROUBLE SHOOTING ................................................................................................................. 34
INSTALLATION ............................................................................................................................ 36
Mounting the indicator ............................................................................................................... 36
Load cell direction ..................................................................................................................... 36
Connecting the cables ............................................................................................................... 37
Connecting load cells to J-Box .................................................................................................. 38
Changing setup and calibration numbers................................................................................... 38
OPTIONAL EQUIPMENT .............................................................................................................. 39
Rotation counter sensor ............................................................................................................ 39
Transmitter/receiver .................................................................................................................. 39
Remote displays ........................................................................................................................ 39
APPENDIX A1: EC DECLARATION OF CONFORMITY
All rights reserv ed. Reproduction of any par t of this manual in any form whatsoever without Digi-Star’s express written permission is forbi dden. The
contents of this manual are subject to change witho ut notice. All effo rts have bee n made to assure t he accurac y of the contents of this m anual. Ho wever,
should any errors be detected, Digi-Star would greatly appreciate being informed of them. The above notwithstanding, Digi-Star can assume no
responsibility for any errors in this manual or their consequence.
© Copyright! 2008 Digi-Star, Fort Atkinson (U.S.A.).
D3715-GB Rev E EZ3600 User' s manual
Page 4

1
A full featured Windows® based system that offers powerful and easy to
FEED MANAGEMENT SOFTWARE
use features.
>>For additional information, see
www.digi-star.com
Feed managem ent software
D3715-GB Rev E EZ3600 User's manual
Page 5
2
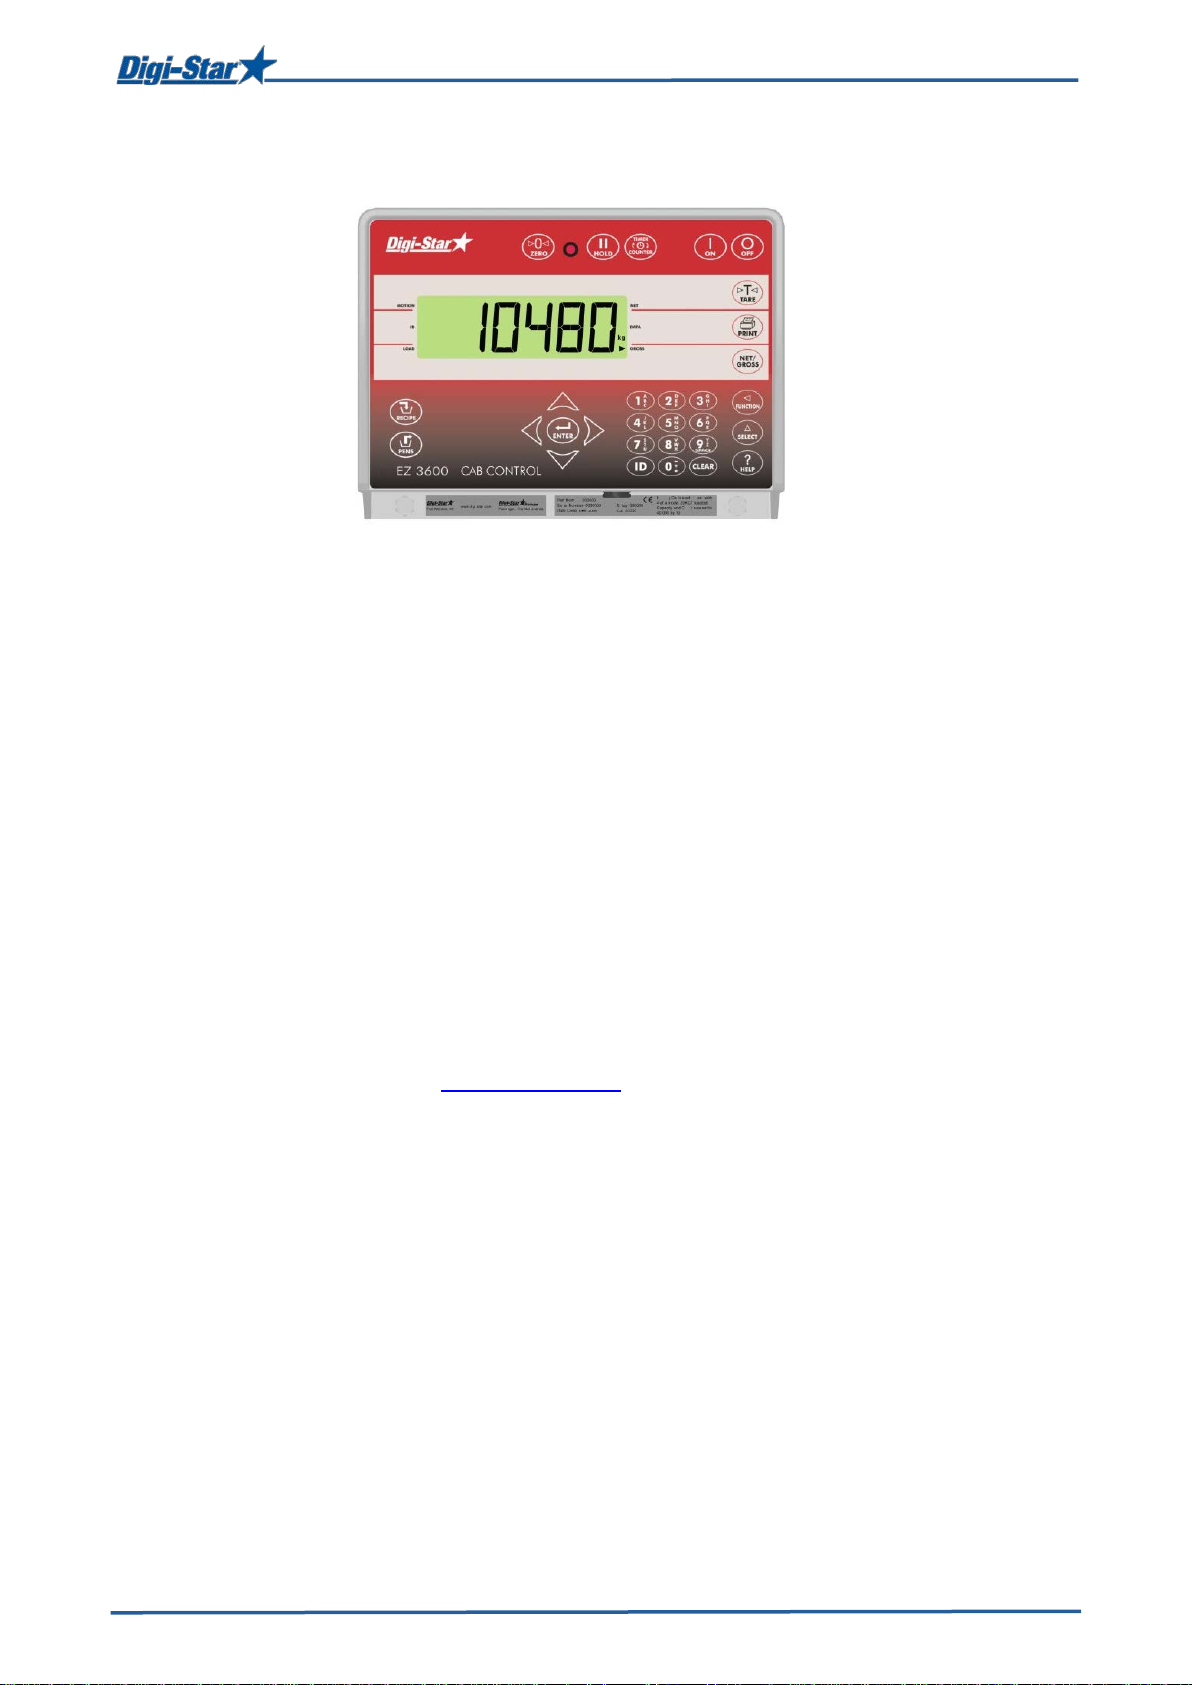
Cab control (wireless)
CAB CONTROL (WIRELESS)
Features
• Wireless remote operation in front loader with full key control of the weighing indicator
mounted on the feed mixer.
• Thanks to Cab Control the weight can be easily readout in your front loader.
• Ingredients can be loaded more accurately.
Functions
• Communicates with several feed mixers
• Easily call-up recipes without leaving the front loader.
• Manual advance when loading ingredients.
Specifications
• Built-in wireless 2.4 GHz radios
• Range up to 1000ft (300m)
• 24 channels
• 12 or 24 Vdc systems
>>For additional information, see
www.digi-star.com
D3715-GB Rev E EZ3600 User's manual
Page 6
3
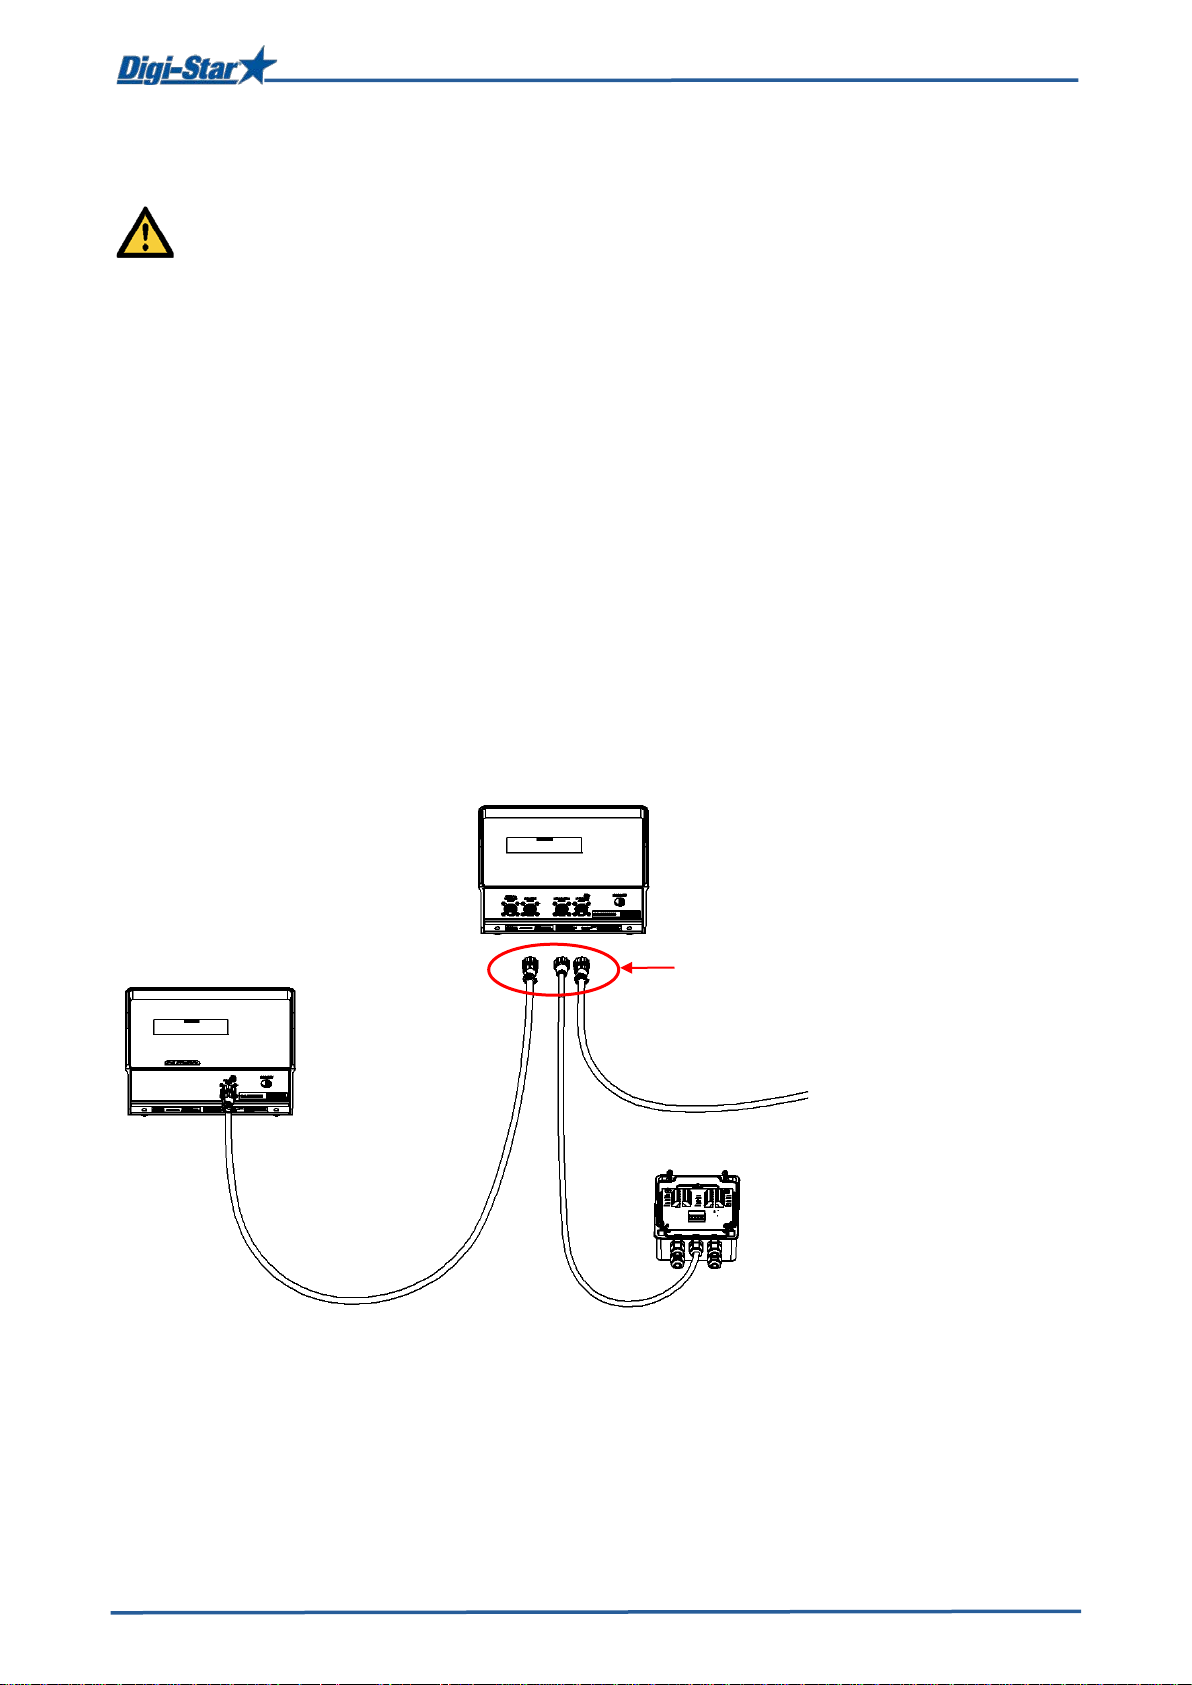
Disconnect all cables
Remote display
(optional)
J-Box
Weighing indicator
Safety durin g use
SAFETY DURING USE
Caution
Check system before use
Before you are going to use the Digi-Star weighing system you need to check the proper working
of the system by charging all weighing points with a known weight.
Digi-Star cannot be held responsible for deviations and problems arising from incorrect use of the
weighing indicator, incorrect calibration or settings. Furthermore Digi-Star cannot be held
responsible for deviations and problems arising from technical problems to the system.
Cleaning
Do not use running water (high pressure cleaners, hoses) to clean the indicator.
Charging battery and welding
During welding you need to remove the weighing bars to avoid damaging. If this is not possible,
you need to place the “ground” clip as close to the welding point as possi ble, in order to avoid that
current can flow through the weighing bars.
Digi-Star cannot be held responsible for problems arising from welding or charging of the battery.
D3715-GB Rev E EZ3600 User's manual
Page 7
4
1 2 3 4 5 6 7 8 9
10
11
12
13
14
15
16
17
18
19
20
21
>>See pages 36, 37 and 38 for installation instructions.
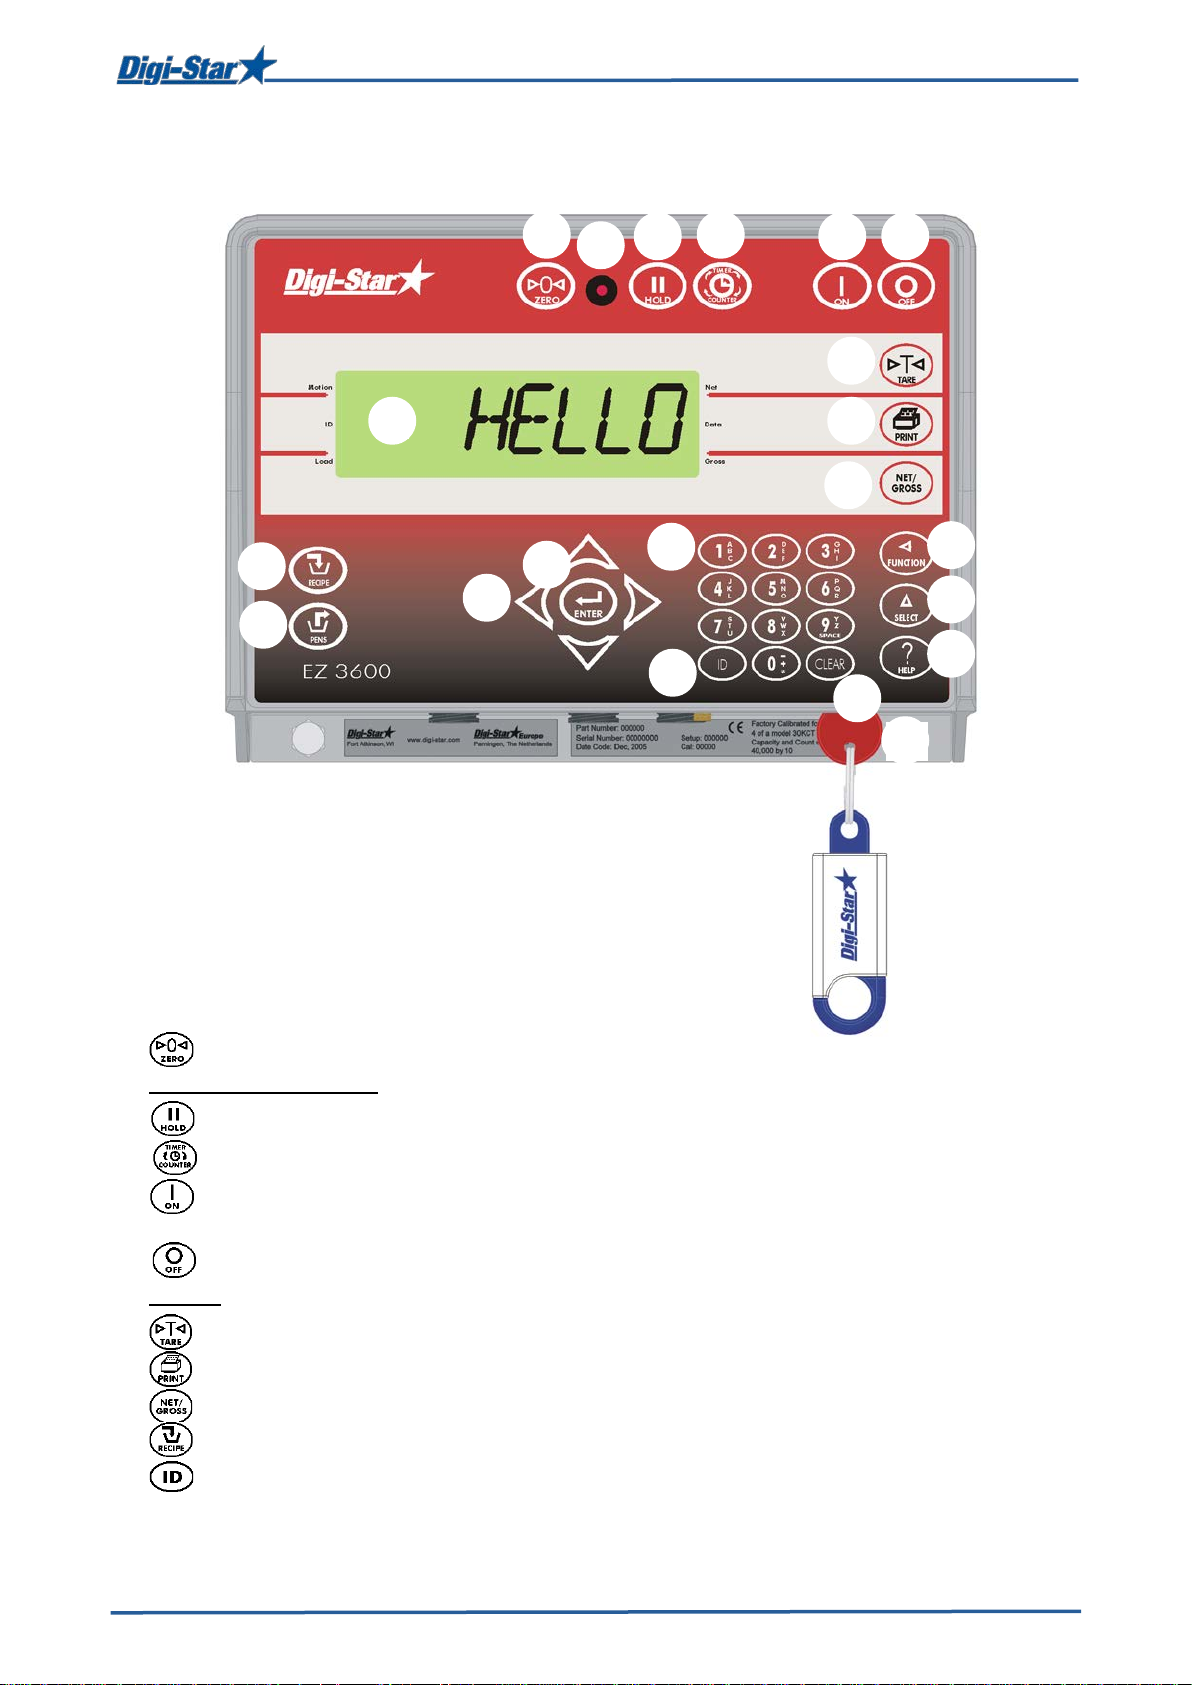
OVERVIEW WEIGHING INDICATOR
Overview weighing indic at or
1. – press and hold for 3 seconds to zero balance the weighing indicator.
2. Warni ng light pre-alarm – light flashes and alarm sounds when weight is within preset limit.
3. – t o hold displayed weight when moving the machine.
4. – to set mixing time
5. – to switch on weighing indicator . Press this key while the weighing indicator is on to run
the self test.
6. – to switch off weighing indicator.
7. Display – to display actual values and settings.
8. – to temporarily zero the weighing indicator [Net mode].
9. – to register or print the displayed weight.
10. – to toggle between net and gross weights.
11. – to select recipes.
12. – to enter user and feed cycle numbers. Any user number can be entered as long as this
number has not been assigned by the management software.
D3715-GB Rev E EZ3600 User's manual
Page 8
5
22
23
24
25
26
27
27
Overview weighing indic at or
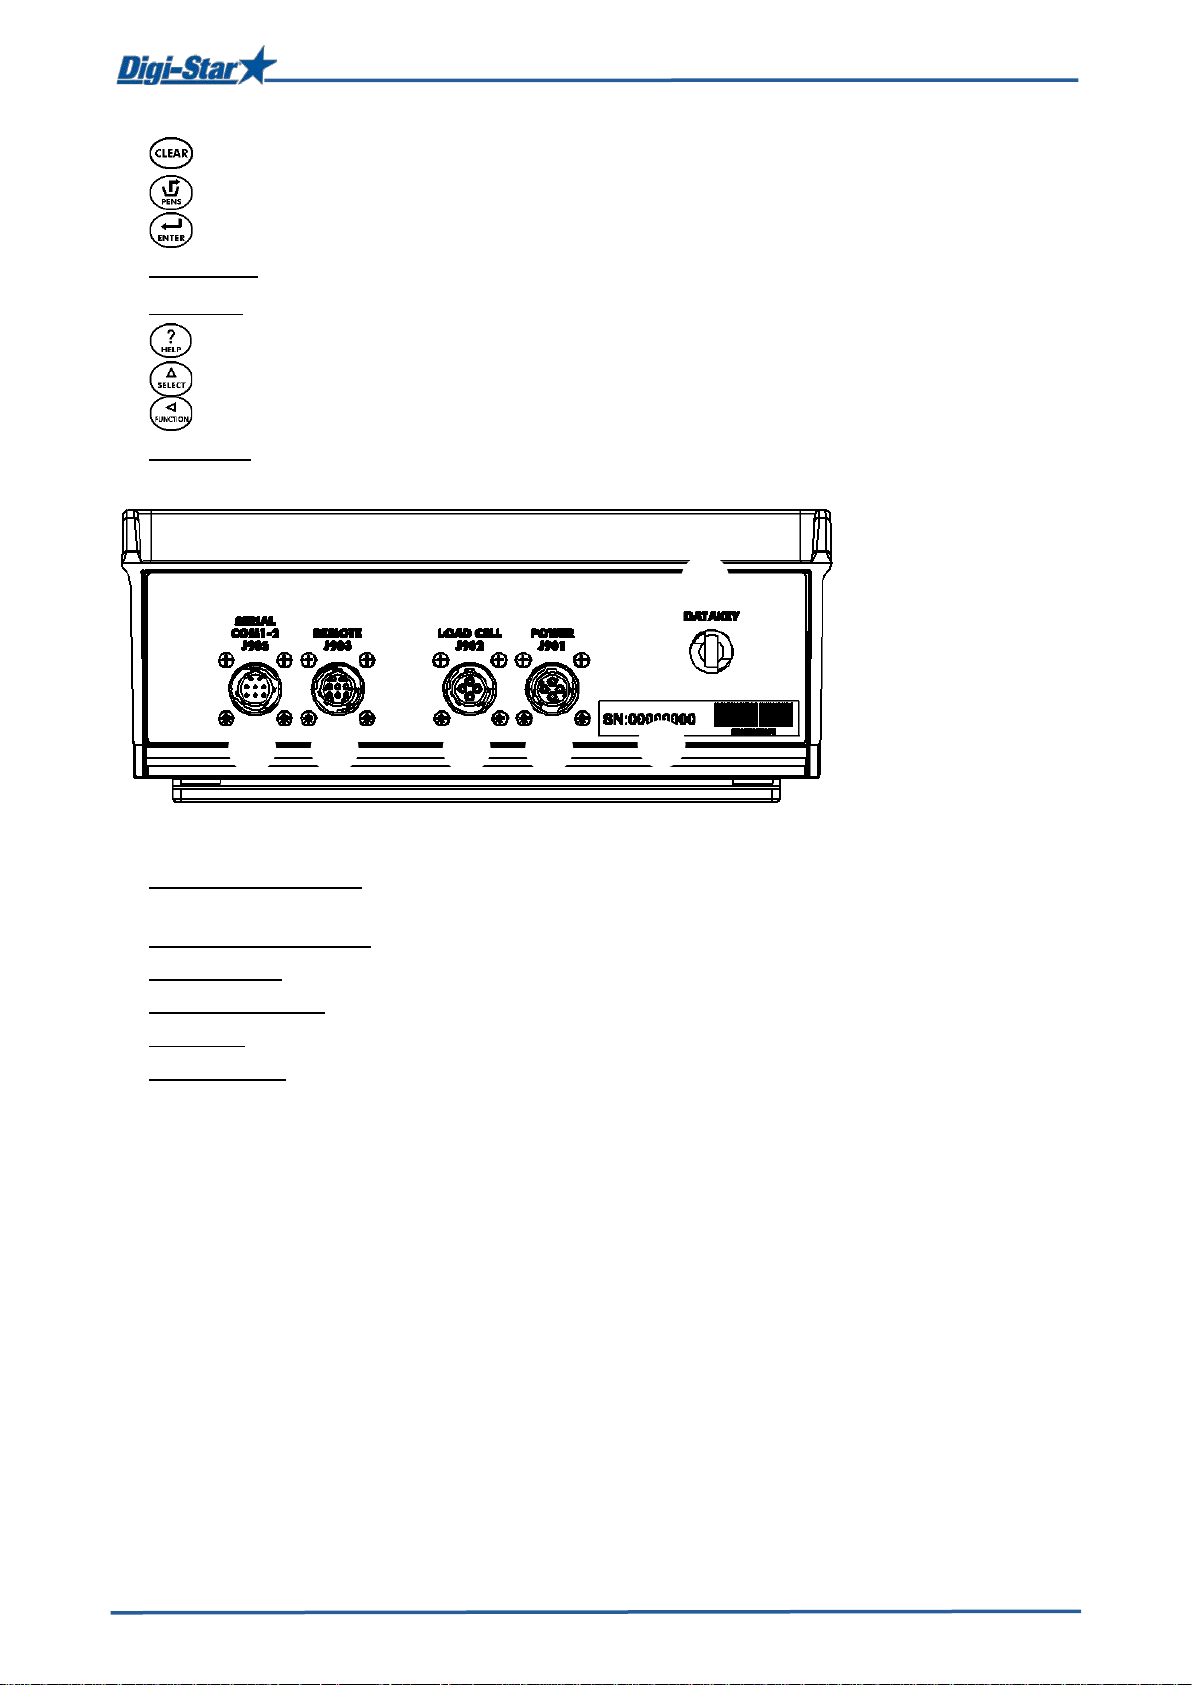
13. – to clear <Backspace>
14. – to start dosing out recipe for groups [List mode]. See page 12.
15. – to confirm modification or select the next item.
16. Arrow keys – to scroll through a list of i nform ation.
17. Keyboard – to enter numbers and letters.
18. – to display extra information.
19. – to display extra tasks.
20. – to perform the selected task.
21. USB stick – to transfer data from computer to weighing indicator and vice versa.
22. Serial port/printer port – communication with inputs and outputs of the computer and other
digital devices (optional).
23. Port for remote display – to connect the remote display (optional).
24. Load cell port – to connect the J-Box cable.
25. Power supply port – to connect the power supply cable.
26. USB port – to insert the USB stick to upload/download data.
27. Serial number
>>See pages 36, 37 and 38 for installation instructions.
D3715-GB Rev E EZ3600 User's manual
Page 9

6
Press .
user
1 2 3
4
OPERATION
Switching on the weighing indicator
1.
2. Enter the user number, if required.
3. Press .
Operation
4. Press and hold for 3 seconds to zero
balance the weighing indicator.
D3715-GB Rev E EZ3600 User's manual
Page 10

7
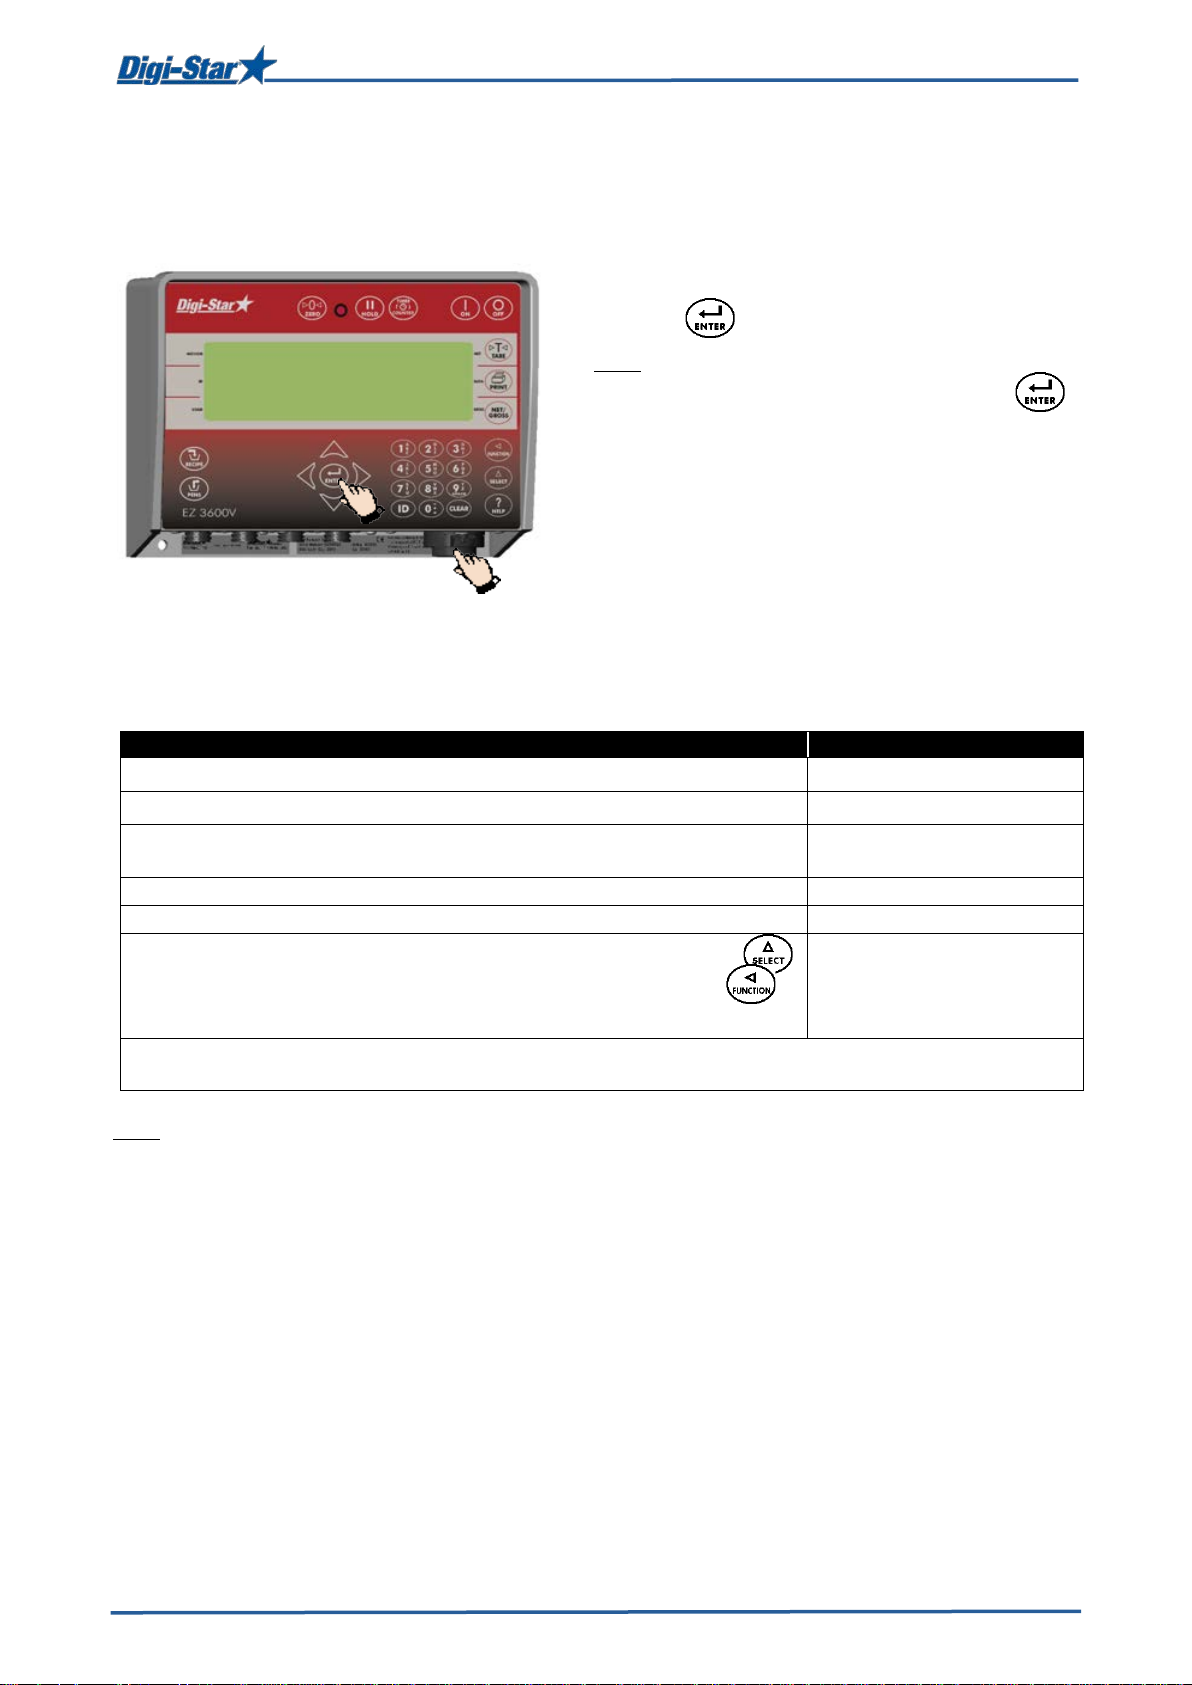
Using EZ3600(V) as a data tr ansfer unit
USING EZ3600(V) AS A DATA TRANSFER UNIT
Recipes can be programmed using the TMR Tracker software and sent to the EZ3600(V) unit via
USB stick or DataLink. When running in “PC” mode it is not possible to program a recipe using the
front panel.
To set unit to PC programmable see page 30 TMR Tracker or Front Panel programming.
D3715-GB Rev E EZ3600 User's manual
Page 11
8
Insert the USB stick in the weighing indicator.
Operation
Displayed message
DataLink sends data to the weighing indicator
The weighing indicator gives a message that all data has been
received.
Weighing indicator connects with DataLink
←PC→
Weighing indicator sends complete data to DataLink
DL→OUT
The weighing indicator marks uncompleted recipes as being completed and sends data of the
completed recipes to DataLink.
Complete load mode
Each load is prepared by the TMR Tracker software. In this mode
groups are assigned to recipes and an accurate load is prepared.
Recipe and group list
The TMR Tracker s oftware sends the recipe and group data in two
dose outs per group.
1
2
DATA TRANSFER
USB mode
Data transfer
1.
2. Press to upload data.
Note: If the weighing indicator displays
uncompleted recipes in the memory, press
to overwrite this data. Remove USB stick after
data has been transferred.
To download data of completed recipes:
Insert the USB stick in the weighing indicator.
The weighing indicator automatically sends data
to the USB stick.
DataLink modes
DataLink connects with the weighing indicator ←PC→
To send data to the PC, if not all recipes have been fed. Press
until a message [right column] appears on the display. Press
to select this.
Note: After data has been sent, uncompleted recipes will be deleted.
Weighing indicator data formats
Data can be sent to the weighing indicator in two different modes:
Remove the USB stick.
DL←IN
new data
EZ→PC
mode
D3715-GB Rev E EZ3600 User's manual
separate lists. The operator selects the recipe to be prepared and the
Page 12
9
Press
The weighing indicator displays recipe, group
If the RESIZE function is activated, the recipe
rec 1
Feed 1
RESIZE
1 2 1 3 1
2
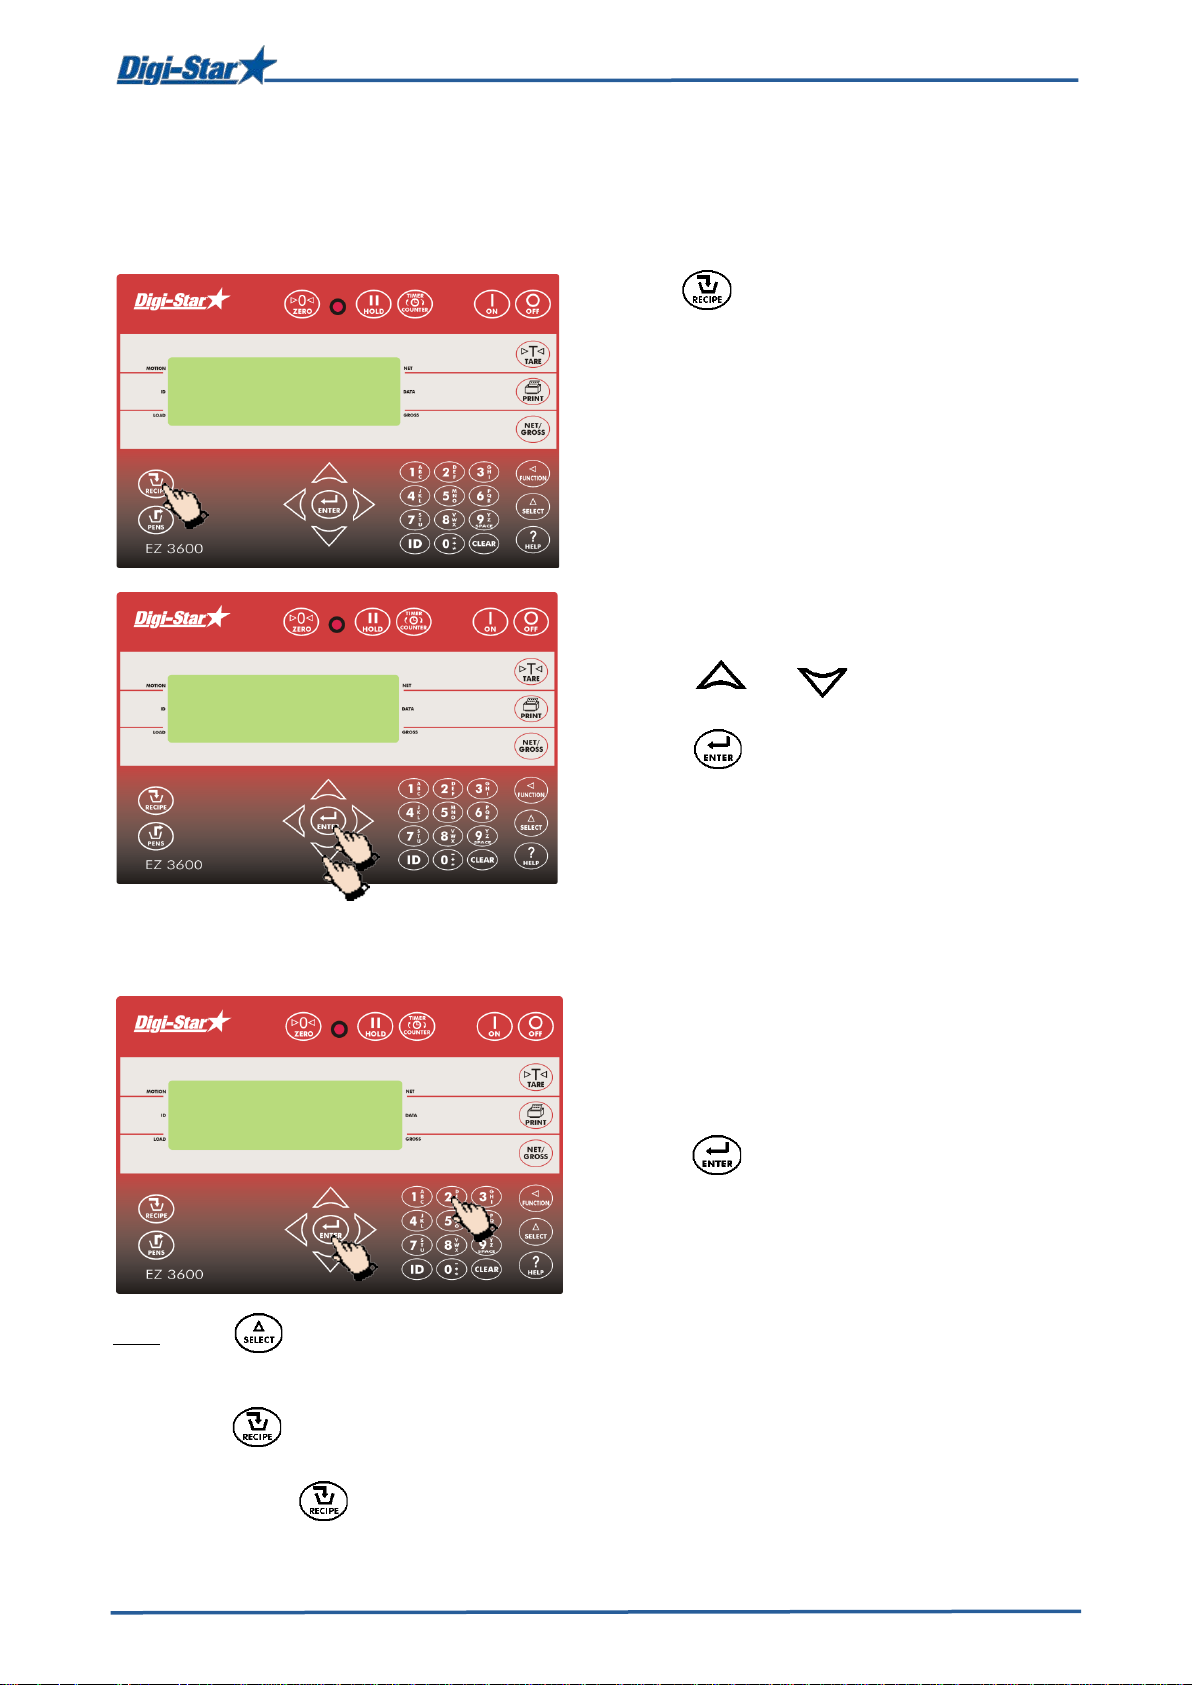
Loading and f eeding in complete load mode
LOADING AND FEEDING IN COMPLETE LOAD MODE
Loading recipes
1.
1.
number and feeding number in succession.
Resizing recipe weight
2. Press and to select the required
recipe.
3. Press to start the recipe selected.
amount for the group(s) can be adjusted.
1. Enter the new recipe amount or keep the
original amount.
2. Press . The weighing indicator
recalculates the recipe.
Note: Press to change the number of animals instead of the recipe amount. After the number
of animals has been changed, the weighing indicator will automatically adjust the recipe
amount.
Press to accept the recipe amounts of the group(s) without adjusting them.
If the weighing indicator indicates that the resized recipe exceeds the capacity of the feed
mixer, press to ignore this message.
D3715-GB Rev E EZ3600 User's manual
Page 13
10
The first ingredient and the corresponding
As soon as the amount starts to approach
zero the alarm light starts flashing and you
When the ingredients have been loaded, the
Recipe complete.
corn
GROUP 1
1
3 2 1
Note: To load the ingredients in a different order, press or to select the required
ingredient. Press to start loading this ingredient.
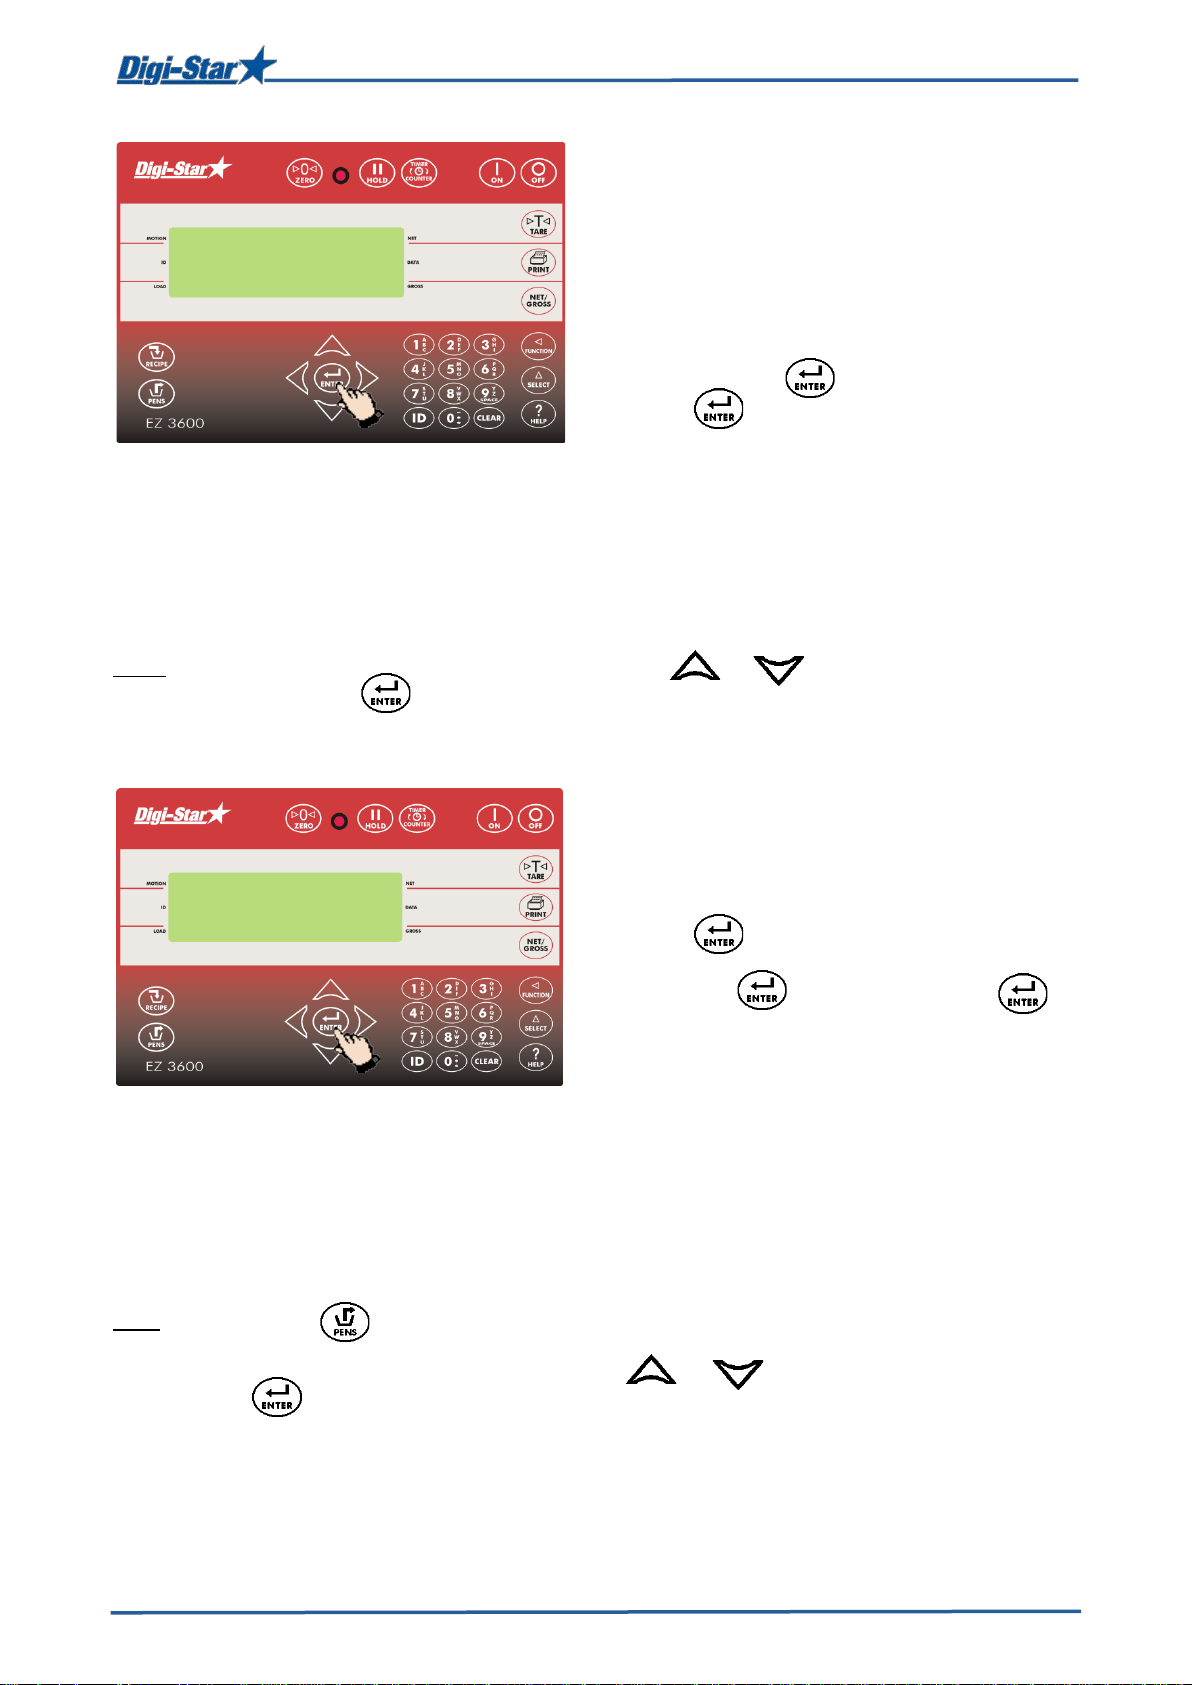
Feeding groups
Loading and f eeding in complete load mode
1.
amount will flash on the display.
2.
will hear an alarm signal.
3. a) Manually advance next ingredient: When
the ingredient amount to be loaded has been
reached, press to accept this amount.
Press again to advance to the next
ingredient.
b) Automatically advance next ingredient:
When the ingredient amount to be loaded has
been reached, the weighing indicator will
automatically advance to the next ingredient.
Note: See pages 26, 27 and 28 for settings.
Note: Do not press .
To feed the groups in a different order, press or to select the required group.
Press to start feeding this group.
weighing indicator will show the first group to be
fed.
1. a) Manual advance:
Press to select the group to be fed.
When the amount to be fed has been dosed
out, press to accept this. Press
again to advance to the next group,
or
b) Automatic advance:
When the amount to be fed has been dosed
out, the weighing indicator will automatically
advance to the next group.
After the last group has been fed, following
message will appear on the display:
D3715-GB Rev E EZ3600 User's manual
Page 14

11
1. Press .
If the RESIZE function has been activated, the
1. The first ingredient and the corresponding
b) Automatically advance next ingredient: When the ingredient amount to be loaded has been
See pages 26, 27 and 28 for settings.
dry
RESIZE
corn
3 2 1 1 2 1 2 3 4
Loading and f eeding in recipe and pen lis t m ode
LOADING AND FEEDING IN RECIPE AND GROUP LIST MODE
Loading the recipe
2. On the display appears, for example:
RECIPE DRY COW TOT - 2500
3. Press and to select the required
recipe.
4. Press to start loading the selected
recipe.
Resizing recipe weight
recipe amount can be adjusted.
1. Enter the new recipe amount or keep the
original amount.
2. Press . The recipe is recalculated.
Note: If the weighing indicator indicates that the resized recipe exceeds the capacity of the feed
mixer, press to ignore this message.
amount will flash on the display.
2. As soon as the amount starts to approach
zero the alarm light starts flashing and you
will hear an alarm signal.
3. a) Manually advance next ingredient: When
the ingredient amount to be loaded has been
reached, press to accept this amount.
Press again to advance to the next
ingredient, or …
reached, the weighing indicator will automatically advance to the next ingredient.
Note: To load the ingredients in a different order, press or to select the required
ingredient. Press to start loading this ingredient.
D3715-GB Rev E EZ3600 User's manual
Page 15

12
1. After the last ingredient has been loaded,
group 1
1 2 4
Feeding groups
Loading and f eeding in recipe and pen lis t m ode
Recipe complete will appear on the display.
Press . The weighing indicator shows
the groups to be fed.
2. Press or to select the required
group.
3. Press .
4. The weighing indicator shows the group to be
fed and the corresponding recipe amount.
Feeding can be started.
5. a) Manually advance: When the recipe
amount to be fed has been dosed out,
press to accept this. Press again
to advance to the next group.
or
b) Automatically advance: When the recipe
amount to be fed has been dosed out, the
weighing indicator will automatically advance
to the next group to be fed.
6. When the group(s) have been fed, press
to select the recipe for the next group to be
fed.
See pages 26, 27 and 28 for settings.
D3715-GB Rev E EZ3600 User's manual
Page 16

13
1. Press to advance to next group without
1. Press or to return to the skipped
1. Press .
1
1 2 1
2/4
3/5
ADVANCED FUNCTIONS
Partially feeding groups
Return to the skipped ingredient
Advanced functions
finishing feeding the current group.
Note: If you have set the group tolerance and
feeding is stopped before the preset recipe
amount is reached, an alarm will sound and the
weighing indicator displays:
PEN underfed – Press Print
to remove this pen from list -
Press On to keep pen
To set group tolerance, see page 27.
Changing the feeding cycle number
ingredient.
2. Press
Note: If the ingredient amount has changed by
more than 4 counts, this ingredient can no
longer be selected.
2. Enter user number.
3. Press .
4. Enter feeding number (1-9).
5. Press .
D3715-GB Rev E EZ3600 User's manual
Page 17

14
1. Press .
1
4
2/3
3
1
2/3
3
CLEAR
Reuse
4
1
calf
2
3
Clearing the indicator memory
Re-using recipe / group data
Advanced functions
2. Press and hold .
3. Press , while holding . The
weighing indicator will successively show:
On=erase Clear=Reuse Net=Exit
Release .
4. Press .
1. Press .
2. Press and hold .
3. Press , while holding . The
weighing indicator will successively show:
On=erase Clear=Reuse Net=Exit.
Release .
4. Press again to re-use recipe and group
Note: The weighing indicator re-uses the recipe and group information stored in the weighing
indicator. The loaded ingredient amounts and fed recipe amounts will be removed. Download
the complete data to the USB stick, before re-using the recipe and stored group data.
For continuous re-use, set number 466 from the list with direct access number (D.A.N.-list) to
ON. See page 33.
Adding a group to group list
data.
1. Enter group name or number.
D3715-GB Rev E EZ3600 User's manual
2. Press .
3. Press to add the group.
Page 18

15
5
4
6/8
7/9
Rec 1
3000
10
12
zone 1
11
Advanced functions
4. Press or t o select the required
recipe.
5. Press .
6. Enter the recipe amount to be fed to the
group.
7. Press .
8. Enter the number of animals in this group.
9. Press .
10. If you work with zones, the following will
appear on the display:
Enter zone 0-9
11. Enter the required zone.
12.
Press .
D3715-GB Rev E EZ3600 User's manual
Page 19

16
EZ3600(V) Front panel programming
EZ3600(V) FRONT PANEL PROGRAMMING
Recipes can be programmed using the EZ3600(V) front panel.
To set front panel programming see page 30 TMR Tracker or Front Panel programming.
D3715-GB Rev E EZ3600 User's manual
Page 20

17
1. Enter 441 and press .
1. Repeatedly press , until
is
1 2 3
4
2
1/3
Programmin g recipes
PROGRAMMING RECIPES
The ingredients in a recipe can be entered in three different ways:
1. Amount per animal (standard setting)
Enter the amount of ingredient per animal per recipe. For example, 9 kg silage and 8 kg corn.
Depending on the number of animals to be fed, the weighing indicator will calculate the total
amount of the ingredients to be prepared: For example, with 100 animals this will be 900 kg silage
and 800 kg corn.
2. Percentage (%) per ingredient
Enter the amount of ingredient per recipe as a percentage (%). For example, 55% silage and 45%
corn. The weighing indicator will calculate the total amount to be prepared per ingredient: For
example, with a total weight of 1000Kg this will be 550 kg silage and 450 k g corn. Attention; the
total must be 100%.
3. Amount per ingredient
Enter the required total amount of ingredient per recipe. For example, 2500 kg silage and 2000 kg
corn.
Changing the programming method
[E-mthd]
E mthd
Changing ingredient names
The standard ingredient names can be changed as required:
ingrnm
2. Press repeatedly to select the required
programming method for blends.
1 = Amount per animal
2 = Percentage (%) per ingredient
3 = Amount per ingredient
3. Press to confirm the selected
programmin g method.
iNGRNM
displayed.
2. Press .
3. Press to select the ingredient to be
changed.
4. Press to change the name. EDIT will
briefly be displayed, followed by a flashing
cursor.
D3715-GB Rev E EZ3600 User's manual
Page 21

18
1. Repeatedly press , until
is
1. Press and hold until the weighing
5
6 8 9
1
A
3 1 1
4
3 2 2
Programmin g recipes
5. Press repeatedly to delete an
ingredient.
corn
Printing an ingredient name
ingrnm
6. Press x 1 to enter the number 1; Press
2x is A, 3x is B and 4x is C. Use this method
to enter all the letters of the alphabet using
the numeric keyboard.
7. When you have entered a letter or number,
wait briefly before entering the next number or
letter.
8. Press to confirm.
9. Press to return to normal weighing
mode.
displayed.
2. Press .
3. Press to print all ingredients and the
total amounts loaded per ingredient.
B
C
iNGRNM
Programming a new recipe
Rec_
indicator emits a high pitched signal and
PROGRM is displayed. The first programmed
recipe or rec__ will be displayed.
2. Press or,
3. Enter the required recipe number.
4. Press to confirm the entered recipe
number.
D3715-GB Rev E EZ3600 User's manual
Page 22

19
6. Press to select the displayed
10. Press to confirm the entered recipe.
1. Press and hold until the weighing
6/8
7
5
10
13
1/2
3
corn
22.00
Programmin g recipes
5. Use and to run through the list
with ingredients.
ingredient.
7. Enter the required ingredient amount*.
8. Press to confirm the entered amount.
9. Repeat steps 5 thru 8 for the other
ingredients in the recipe to be programmed.
* With the programming method Percentage (%) per ingredient ent er 75%, for example, as 75.00
and 5.75% as 5.75.
11. The weighing indicator calculates and
displays the total amount of the recipe (TOTAL).
12. Repeat steps 1 thru 11 for the other recipes
totAl
Changing ingredient amounts in the recipe
to be programmed.
13. Press to quit program mode.
indicator emits a high pitched signal and
PROGRM is displayed.
D3715-GB Rev E EZ3600 User's manual
Rec_
2. Press repeatedly until the recipe
number to be changed is displayed.
3. Press to select this recipe.
Page 23

20
Note: It is only possible to change ingredient amounts. To add new ingredients to the recipe, first
1. Press and hold until the weighing
1. Press repeatedly until
is
5 9 6/8 4 5
3/4
1/2
1 2 4
3
Programmin g recipes
4. The first ingredient name is displayed,
followed by AMOUNT.
5. Enter the new amount.
corn
delete the recipe, then program it again.
Deleting recipe
Rec_
6. Press to save the new amount and
continue with the following ingredient.
7. Repeat steps 5 and 6 for the other
ingredients in the recipe.
8. Press to save the changed recipe.
9. Press .
indicator emits a high pitched signal and
PROGRM and the first recipe number are
displayed in succession.
2. Press repeatedly until the required
recipe number is displayed.
Calling up a recipe
accum
3. Press and hold until press zero to
delete recipe – press net/gross to quit are
displayed.
4. Press to delete this recipe.
5. Press to return to normal weighing
mode.
accum
displayed.
2. Press repeatedly until the required
recipe is displayed.
3. Press to display the various
ingredients in the selected recipe.
4. Press to return to normal weighing
mode.
D3715-GB Rev E EZ3600 User's manual
Page 24

21
1. Press to display the first recipe.
3
2
1
1
4
2/3
PRINTING RECIPES
Printing a single recipe
Note: The serial port (optional) must be installed in order to print.
1. Press repeatedly until the required
recipe is displayed.
2. Press to print this recipe.
Printing recipes
Rec_
Printing all the recipes
Rec_
3. Press to return to normal weighing
mode.
2. Press to print this recipe.
3. Press again to print all the recipes
saved in the memory.
4. Press to return to normal weighing
mode.
D3715-GB Rev E EZ3600 User's manual
Page 25

22
1. Press repeatedly until the recipe to be
4.
is displayed.
5. A flashing number will be displayed. Change
1
6
5
8
4
7
1
2
3
LOADING AND DOSING OUT RECIPES
Loading recipe according to amount per animal
loaded is displayed.
2. Press to start the recipe selected.
Loading and f eeding reci pes
Rec_
animal
3. The weighing indicator displays load recipe.
ANIMAL
Note: If you work using a percentage per
ingredient or an amount per ingredient, the total
amount TOTamt will be displayed.
this number into the number of animals to be
fed.
corn
6. Press .
7. The weighing indicator displays the name
and amount of the ingredient to be loaded.
As soon as the ingredient is loaded, the
weighing indicator will count down to zero.
8. Press to advance to the next
ingredient.
(To set automatic advance, see page 33).
D3715-GB Rev E EZ3600 User's manual
Page 26

23
comple
9
3
4
Dosing out recipe
3000
Loading and f eeding reci pes
9. After the final ingredient has been loaded
recipe complete total loaded xxx KG will be
displayed.
1. The display shows the total amount of
loaded recipe.
2. As soon as dosing out starts the weighing
indicator will count down to zero.
3. Press to temporarily set the weighing
indicator to 0. This function can be used to
see how much has been dosed out per
group, if several groups are being fed.
4. Press to read out the remaining
weight at any time.
D3715-GB Rev E EZ3600 User's manual
Page 27

24
Reference: technical manual D3648 on
1. Press , until
appears on the
1/2
1
2
dimmer
HOLD
Additional functions
ADDITIONAL FUNCTIONS
Holding the displayed amount
In Hold mode the displayed weight remains on the display while moving the feed mixer.
1. Press to hold the displayed weight.
2. Press to return to normal mode.
If an ingredient is loaded while the weighing
indicator is in Hold mode, press to exit
hold mode.
Printing
Note: The serial port (optional) must be installed to print data.
Backlight intensity
www.digi-star.com
dimmer
display.
2. Press . to reduce the backlight intensity
by 60%.
Press again to return to full intensity.
D3715-GB Rev E EZ3600 User's manual
Page 28

25
1. Repeatedly press , until
is
4. Press and hold . Press .The
4-5 4 6
2
1
Corn
3
Deleting accumulative ingredient amounts
2. Press . PRGRAM will briefly flash on the
ingrnm
3. Press or y u to select the required
Additional functions
INGRnm
displayed.
display, followed by the first ingredient.
recipe.
Zero
following text is displayed: press print to
reprint- press zero to delete accumulation —
press nET/GROSS to quit.
5. Press to delete the total amount for
corn.
6. Press .
D3715-GB Rev E EZ3600 User's manual
Page 29

26
1. Enter 401.
1. Enter 442.
1/5
2/3
4/6
401
1
2/3
4
442
Commonly used direct access numbers
COMMONLY USED DIRECT ACCESS NUMBERS
Pre-alarm
[P-ALM]
Message when the preset amount to be loaded is almost reached.
2. Press .
3. Press again to select WEIGHT or PERCNT.
4. Press .
5. Enter the pre-alarm value in weight or
percent.
6. Press .
Automatically advancing ingredi ent s
When automatically advancing to next ingredient, the weighing indicator will automatically advance
to the next ingredient as soon as the current ingredient has been loaded, taking the set tolerance
and delay time into account.
Tolerance
[TOLER]
Tolerance is a percentage of the desired ingredient amount. When reaching the Desired amount
minus Tolerance, the weighing indicator will accept the loaded amount and automatically advance
to the next ingredient, depending on the delay time.
2. Press .
3. Press , until the desired percentage
(tolerance) appears on the display:
OFF, 0.5, 1 - 5, 7, or 10.
4. Press .
D3715-GB Rev E EZ3600 User's manual
Page 30

27
1. Enter 462.
1/5 2 3
4/6
462
1
2
3
4
443
Group tolerance
[T MTHD] & [PENTOL]
Only available in group list mode.
Delay time
[DELAY]
Enter the time that the weighing indicator should wait before advancing to the next ingredient to be
loaded.
Commonly used direct access numbers
2. Press .
3. Press again to select WEIGHT or PERCENT.
4. Press . On the display appears: pentol.
5. Enter the required value in weight or percent.
6. Press .
1. Enter 443.
2. Press .
3. Press , until the required delay time
(seconds) appears on the display:
MANUAL, 1, 2, 3, 5, 7, 10, 20, 30, or 60].
4. Press .
Note: If automatically advancing to the next
ingredient is not required, set this setting to
MANUAL.
D3715-GB Rev E EZ3600 User's manual
Page 31

28
461
1. Enter 108.
1
2
3
4
422
1
2
3
4
108
3
1 2 3
4
461
Automatically advancing to next ingredi ent / M anually advancing to next group
[MANPEN]
Automatically advancing to next ingredient; manually advancing to next group.
Drive ratio
Commonly used direct access numbers
1. Enter
2. Press .
3. Press to select ON or OFF.
4. Press .
.
[DRATIO]
Drive ratio is the number of revolutions of the power take-off of the feed mixer divided by the
number of revolutions of the mixer in the feed mixer.
1. Enter 422.
2. Press .
3. Enter the required drive ratio.
4. Press .
Weighing indicator ID / feed mixer ID
[SCALEID]
Each weighing indicator has a unique ID number.
2. Press .
3. Press to delete the old ID number.
Enter the new ID number.
4. Press .
Note: The TMR Tracker software ID number
must correspond with the ID number of the feed
D3715-GB Rev E EZ3600 User's manual
mixer.
Page 32

29
1. Enter 231.
1 2 3
4
231
3
1
2/3
4
448
1 2 3
11:38:59
4
5
Radio number
[SCL NO]
The radio number is used in combination with the Cab control option.
Changing the recipe amount on the weighing indicat or
Commonly used direct access numbers
2. Press .
3. Press to delete the number and enter
the new number.
4. Press .
Note: Do not use the same number for two
different weighing indicators.
[RESIZE]
When starting a recipe the total recipe weight can be changed or the number of animals in a group
can be adjusted.
1. Enter 448.
2. Press .
3. Press again to select ON or OFF.
4. Press .
Setting the time
[TIME]
1. Enter 202.
D3715-GB Rev E EZ3600 User's manual
2. Press .
3. Press to move the cursor.
4. Press to set the time.
5. Press .
Page 33

30
1. Enter 204.
1. Enter 439.
1
2
3
110408
4 5 1
2/3
4
progrm
Setting the date
[DATE]
2. Press .
3. Press to move the cursor.
4. Press to set the date.
5. Press .
TMR Tracker or Front Panel programming
Commonly used direct access numbers
[progrm]
2. Press .
3. Press again to select pc (Programming
using TMR Tracker software) or scale(Front
panel programming).
4. Press .
D3715-GB Rev E EZ3600 User's manual
Page 34

31
Setting
Access
Options [displayed]
ENGLSH
]
1-mm-dd
WEIGHING
REMOTE DISPLAY
List with direct access number s
LIST WITH DIRECT ACCESS NUMBERS
1. Enter the direct access number and press to go directly to the setting concerned.
2. Press to change the setting.
3. Press to store the setting.
[display]
MENU 1. BASIC FUNCTIONS IN MOST WEIGHING INDICATORS
LANGUAGE
[LANGAG]
WEIGHING
INDICATOR
ID SETUP
[SCALID]
MENU 2. TIME, PRINT, COMMUNIC ATION & WEIGHING FUNCTIONS
TIME FORMAT
[TIME F]
Nº
(bold=default)
English
Dutch
French
German
101
Italian
Portuguese
Spanish
Danish
Hungarian
Vesta
108 NEW EZ
201
24 HR
AM/PM
[
[NEDERL]
[FRANCS]
[DEUTSH]
[ITAL]
[PORT]
[ESPAN]
[DANSK
[MAGYAR]
[VESTA]
Description
]
Settings and texts will appear in
this language on the display.
Identity number of the weighing
indicator [feed mixer number].
Time format:
AM/PM or 24 hour
1 TIME
[TIME]
DATE FORMAT
[DATE F]
DATE
[DATE]
INDICATOR NR.
[SCL NO]
[RMDISP]
202 XX:XX:XX
2-mm/dd/yy
3-mm/dd/yyyy
203
4-dd-mm
5-dd/mm/yy
6-dd/mm/yyyy
7-ddmmyy
8-ddmmyyyy
204 Enter XXXXXX.
231
234
Use Select and Function key to
set the time
Date format.
Use Select and Function key to
set the date
Weighing indicator number to
communicate with the Cab
control.
Type of remot e display.
D3715-GB Rev E EZ3600 User's manual
Page 35

32
Setting
[display]
Access
Options [displayed]
(bold=default)
DISPLAY UNIT
lb-kg
warning indicating that the weighing
SIREN
input impulses (PTO
, the operator can
advance to the next ingredient when
List with direct access number s
MENU 3. CALIBRATION SETTINGS WEIGHING INDICATOR
[
]
MENU 4. PRESET, RECIPE & COUNTER FUNCTIONS
PREALARM
[P MTHD] & [P-ALM]
[BUZZER]
TIMER/COUNTER
[TMRCTR]
DRIVE RATIO
[DRATIO]
Nº
303
401
404
421
422
LB/KG
WEIGHT
PERCNT
1-4, ON/OFF
REV.
TIME
0001.00
Description
Display in lb or kg.
Select WEIGHT or PERCNT and
enter a value to activate an early
indicator is reaching the preset
amount.
Switching the loud alarm signal ON
or OFF.
Determination of the recipe mixing
time based on time or on the
number of mixing auger revolutions.
The number of
revolutions), which correspond with
one single revolution of the mixing
auger.
TOLERANCE
[TOLER]
INGR. ADVANCEDELAY
[DELAY]
USER ID
[USERID]
RESIZING RECIPE.
[RESIZE]
RECIPE TOTAL
[RECTOT]
TOLERANCE OVERLOCK
[OVERLK]
442
443
446
448
451
453
OFF, 5,1-5,7,10
MANUAL, 1-3,5,7,
10,20,30,60
ON/OFF
ON/OFF
ON/OFF
ON/OFF
The to l eranc e (percentage of the
ingredient amount) to accept the
ingredient.
The number of seconds the
weighing indicator should wait
before automatically advancing to
the next ingredient.
If this setting is ON, the operator
should enter the user ID to use the
weighing indicator.
If this setting is ON
adjust the recipe amount.
Displayed total weight of the recipe
to be loaded.
If this setting is ON, the weighing
indicator does not automatically
exceeding the set tolerance.
FEED ZONE
[FDZONE]
D3715-GB Rev E EZ3600 User's manual
454
ALL, 1-9
The feed zone of the groups to be
fed.
Page 36

33
Setting
[display]
Access
Options [displayed]
(bold=default)
list will
DOUBLE KEY PRESS PREV
List with direct access number s
UNCOMPLETED RECIPES
[UNDN I]
AUTOSTAR T GROUPS
[AUTPEN]
MANUALLY ADVANCING
TO NEXT GROUP[MANPEN]
GROUP TOLERANCE
[T MTHD] & [PENTOL]
DISPLAYED WEIGHT
DURING FEEDING
[PEN WT]
[DBLKEY].
Nº
455
458
461
462
463
465
ON/OFF
ON/OFF
ON/OFF
WEIGHT
PERCNT
LOAD
GROSS
NET
ON/OFF
Description
If this setting is ON, the weighing
indicator displays all uncompleted
recipes.
If this setting is ON, the group
automatically appear on the display
after loading the ingredients.
If this setting is ON, the operator
should manually advance to the
next group(s) to be fed.
Select WEIGHT or PERCNT and
enter of group tolerance.
The method of displaying during
feeding: net, load or gross weight.
Select if a double key press should
be ignored during loading and
feeding.
RECIPE REMAINS ACTIVE
[RE-USE]
SETUP NUMBER
[SETUP]
CALIBRATION NUMBER
[CAL]
466
ON/OFF
CALIBRATION
871
872
Select ON to re-use recipes.
The unit of weight (1-4lbs or 5-8
kg), the gain (1-9), the sensitivity
(display counts 1-9) and the
capacity * 1000 can be entered
using direct number entry.
Displayed amount at 0.4mV/V for
these load cells.
D3715-GB Rev E EZ3600 User's manual
Page 37

34
START
YES
NO
Switch the weighing indicator on?
Is the value displayed on
the weighing indicator
Bad connection
NO
Put your weight on each
YES
The weighing indicator is
Check all J-Box and
NO
YES
Are all values positive?
is mounted upside down).
Does the weighing indicator
The weighing indicator is probably
Repair or replace
Does the J-Box have a bad connection
See next page
NO
YES
Check for loose connections.
Is there moisture
NO
Remove the cover from the J-Box.
NO
YES
YES
YES
YES
Dry out the J-Box
If the value is unstable or,
TROUBLE SHOOTING
Trouble shoot ing
Does the weighing indicator
load cell.
respond to your weight?
(negative values indicate
that the load cell concerned
weigh you approx. the same
over all load cells?
[± RANGE] flashes on the display,
disconnect the J-Box cable f rom the
load cell cables for
loose contacts, cuts or
pinched, flat spots.
weighing indicator.
Is the value still unstable?
probably defective.
Test another weighing
indicator to be sure.
Note: Be aware of electrical
interference that might
affect the weighing
indicator, such as mobile
phones, CB radios, radio
towers, electrical motors
etc. Make sure load cell
cables are not attached to
hydraulic lines or
reservoirs.
Check the power supply cable for
bad connections/contacts. Move the
power supply cable.
Bad battery
Replace the battery. A weak battery
may t e st good if it is tested with no
load on the battery.
Bad power supply cable
Make sure the red wire is connected
to the + (positive side) and the black
wire to the - (negative side).
When using a multimeter to check
the voltage, do you measure
between pin 1 (positive) and pin 2
(negative)?
The meter should show a value
between
10.5 and 14.5 Vdc. If using
a tractor power supply cable, the
black wire is connected to the + and
the white wire to the -.
Bad weighing indicator
Try another weighing indicator;
even a different model or setup
should function.
not set-up and calibrated correctly.
Check the decal on the bottom of
the weighing indicator. It shows the
type of load cells, for which the
weighing indicator was calibrated.
By pressing the ON key while the
weighing indicator is switched on,
the setup (SETUP) and calibration
number (CAL) will appear
successively on the display.
Ensure these numbers correspond
with the numbers on the decal on
the bottom of the weighing
indicator. Contact your dealer for
additional information.
the J-Box.
D3715-GB Rev E EZ3600 User's manual
inside the J-Box?
Watch your indicator display while
moving cables and wires and pressing
on the circuit board inside the J-Box.
You will see if there is a loose
connection or bad solder joint.
or loose wires?
(use a hairdryer).
Check cable strain reliefs
for tightness.
Do cables have drip loops?
Is lid gasket damaged?
Page 38

35
CONTINUED
Disconnect all wires of the load cell cables
YES
NO
Zero balance the weighing indicator.
Note: Connect the load cells to the J-Box one at the time;
Replace the J-Box;
Reconnect one load cell to the terminals in the
Note the value displayed on the weighing
Zero balance the weighing indicator and stand
Note: If the weighing indicator responded to your weight, the J-Box is
Repeat previous steps for the other load cells.
Disconnect the first load cell and zero balance the weighing indicator.
If you hang your weight over a connected load cell after zero
Do not expect that all load cells
from the terminals in the J-Box;
Leave the weighing indicator switched on
while disconnecting and reconnecting the
wires. It will not damage the load cells and
weighing indicator if wires are shorted during
this step. Is the value displayed on the
weighing indicator stable?
Trouble shoot ing
(press and hold ZERO for 3 seconds).
The value 0 appears on the display of the
weighing indicator.
Be aware of electrical interference that might
affect the weighing indicator, such as mobile
phones, CB radios, radio towers, electrical
motors etc.
indicator with the load cell connected.
or hang with your weight over the connected
load cell. Note the weight increase;
A weighing indicator with only one connected
load cell will give a too high readout.
Remember to note all readouts of these load
cells.
This will get a reading for each load cell. While performing this test,
only one load cell connected at a time.
watch for any other symptoms such as erratic/unstable readout,
flashing of [± RANGE] on the display, negative value, etc.
If the readout appears abnormal with any load cell connected, this
load cell is probably bad.
J-Box; the displayed value of each load cell depends on the type of
load cell and the weight over the load cell.
Usually this value should be positive and stable.
OK. If the weighing indicator did not respond, either the load cell or
the J-Box is bad. Try the other load cells.
If the weighing indicator still shows no response, the J-Box is bad.
Replace the J-Box.
Connect the second load cell. Note the displayed value.
Zero balance the weighing indicator and stand or hang your weight
over the connected load cell. Note the weight increase.
give the same readout at the moment you
connect them. Usually load cells give readout
values that vary by hundreds, even
thousands. Especially when there is more
D3715-GB Rev E EZ3600 User's manual
weight on one load cell.
balancing the weighing indicator, the displayed value is probably three
or four times your weight. The readout values of your weight over
each load cell should be similar.
Bad load cells give an unstable readout, [± RANGE] flashes on the
display or the displayed value is lower or higher than three times the
average of the other load cells.
Any difference could be an indication of a bad load cell
or a structural problem.
Page 39

36
Rail mounting
Wing mount
RAM mount
INSTALLATION
Mounting the indicator
included
included
Installation
optional
Figure 1: Mounting the weighing indicator
Rail mounting [standard] and wing mount included.
RAM mount (option) included in RAM mount kit.
Load cell direction
Observe direction of arrow when installing load cell.
D3715-GB Rev E EZ3600 User's manual
Page 40

37
Remote display (optional)
See figure 4: J-Box connections
Power supply cable
See figu re 1
Weighing indicator
Digital
input/output
connection
(optional)
Remote display
connection
(optional)
Power supply
cable connection
J-Box connection
USB port
Pin
to 12Vdc power supply**
1
Red
+ 12VDC
2
Black
Earth/Mass
3
Orange
Relay output
4
Blue
Remote input
the standard Digi-Star cable.
Connecting the cables
Installation
**The wire colours in this table only apply for
Figure 2: Connection diagram of weighing indicator
Figure 3: Bottom panel cable connections
D3715-GB Rev E EZ3600 User's manual
Page 41

38
1. Enter 871.
change the calibration CAL number.
Tighten nuts
Load cell cable
J-Box cable
Connect to bottom panel of weighing
1/3
2
SETUP
4
3
Connection of wires from
Wire colours
Pin
Colour
Description
1
Red
Excitation +
2
Green
Signal -
3
White
Signal +
4
Black
Excitation -
4
Transparent
Shield
J-Box with 4 load cell
Connecting load cells to J-Box
load cell cable to terminals.
connections
Installation
Changing setup and calibration numbers
[SETUP] & [CAL]
Figure4: J-Box connections
2. Press .
3. Weighing indicator briefly shows SETUP
followed by a six digit number. Enter the
new number.
4. Press
.
Use 872 and follow the same procedure to
indicator. See figure 3.
D3715-GB Rev E EZ3600 User's manual
Page 42

39
To be used in combination with the
EZ3600 or EZ4600 weighing indicator,
The sensor allows the operator to
program the weighing indicator to count
Transmitter (shown left) with factory installed receiver in weighing
RD440 small remote display with 2,5 cm high digits.
LED
Rotating
Sensor
3 mm
OPTIONAL EQUIPMENT
Rotation counter sensor
shaft
Max. gap (approx.)
Transmitter/receiver
Optional equi pment
which is equipped with a rotation counter
port (option).
the mixing auger or PTO rotations for an
accurate mixing of ingredients.
Remote displays
indicator.
Can be used to manually advance from a distance during loading
ingredients and feeding groups.
The system can also be used to zero balance the weighing indicator from
a distance.
Operating range is approx. 50 m.
RD2400V backlit remote display with 4,3 cm high
digits.
RD4000 LED remote display 10 cm high digits.
D3715-GB Rev E EZ3600 User's manual
Page 43

A1
APPENDIX A1: E C Declaration of conformity
APPENDIX A1: EC DECLARATION OF CONFORMITY
Application of Council Directive(s) 2004/108/EEC
Manufacturer's Name Digi-Star, LLC
Manufacturer's Address 790 West Rockwell Avenue, Fort Atkinson, WI 53538
European Representative Name Digi-Star Europe B.V.
European Representative Address J.F. Kennedylaan 235, 5981 WX Panningen (NL)
Model name EZ2400, EZ2400V, EZ3400, EZ3400V, EZ3600, EZ3600V, EZ4600, SW2600EID,
SW4600EID, RD2400V, CAB CONTROL 2400\2400V\3400\3400V\3600\3600V
Conformance to:
EN 61326 - electrical equipment for measurement, control and laboratory use (see Report
Number 307245.)
EN 55011 - for Class B ISM equipment for industrial, scientific, and medical equipment (see
Report Number 307245).
Beginning serial Nº: 1001
Year of Manufacture: 2008
We, the undersigned, hereby declare that the equipment specified above conforms to the above
Directive(s).
Manufacturer Legal representative in Europe
Signature Signature
Name: Kevin Klubertanz Name: Wim de Wit
Position: Director of Engineering Position: Managing Director
Place: Fort Atkinson, WI U.S.A. Place: Panningen, the Netherlands
Date : 15 March 2008 Date: 15 March 2008
D3715-Rev E EZ3600 User's manual
 Loading...