

Page 1
NW
'7_-
,© Z
---F
oo
ND
WF--
(/3(/?
w_Z
C3W
)F--
-W
7(/)
@
0 •
','o
a
jo©
),< a_
-z W
.) ,_ rr
-_D
rJ3 W
L
€_
7
DEWALT Industrial Tool Co., 701 Joppa Road, Baltimore, MD 21286
(AUG08) Part No. 662802-00 DWM120 Copyright©2008 DEWALT
The following are trademarks for one or more DEWALT power tools: the yellow and black color
scheme; the "D" shaped air intake grill; the array of pyramids on the handgrip; the kit box configura-
tion; and the array of lozenge-shaped humps on the surface of the tool.
f \
Definitions: Safety Guidelines
The definitions below describe the level of severity for each signal word. Please read the
manual and pay attention to these symbols.
_ DANGER: Indicates an imminently hazardous situation which, if not avoided, will result
in death or serious injury.
_ WARNING: Indicates a potentially hazardous situation which, if not avoided, could
result in death or serious injury.
_ CAUTION: Indicates a potentially hazardous situation which, if not avoided, may
result in minor or moderate injury.
CAUTION: Used without the safety alert symbol indicates a potentially hazardous
situation which, if not avoided, may result in property damage.
\ j
IF YOU HAVE ANY QUESTIONS OR COMMENTS ABOUT THIS OR ANY DEWALTTOOL,
CALL US TOLL FREE AT: 1-800-4-DEWALT (1-800-433-9258).
WARNING: To reduce the risk of injury, read the instruction manual.
General Power Tool Safety Warnings
_ ARNING! Read all safety warnings and instructions Failure to follow the warnings
and instructions may result in electric shock, fire and/or serious injury,
SAVE ALL WARNINGS AND INSTRUCTIONS
FOR FUTURE REFERENCE
The term "power tool" in the warnings refers to your mains-operated (corded) power tool or
battery-operated (cordless) power tooL
1) WORK AREA SAFETY
a) Keep work area clean and well lit. Cluttered or dark areas invite accidents.
b) Do not operate power tools in explosive atmospheres, such as in the presence
of flammable liquids, gases or dust. Power tools create sparks which may ignite the
dust or fumes.
c) Keep children and bystanders away while operating a power tooL Distractions can
cause you to lose control
2) ELECTRICAL SAFETY
a) Power tool plugs must match the outlet. Never modify the plug in any way. Do not
use any adapter plugs with earthed (grounded) power tools. Unmodified plugs and
matching outlets will reduce risk of electric shock.
b) Avoid body contact with earthed or grounded surfaces such as pipes, radiators,
ranges and refrigerators. There is an increased risk of electric shock if your body is
earthed or grounded.
c) Do not expose power tools to rain or wet conditions. Water entering a power tool
will increase the risk of electric shock.
d) Do not abuse the cord. Never use the cord for carrying, pulling or unplugging the
power tooL Keep cord away from heat, oil, sharp edges or moving parts. Damaged
or entangled cords increase the risk of electric shock.
e) When operating a power tool outdoors, use an extension cord suitable for
outdoor use. Use of a cord suitable for outdoor use reduces the risk of electric shock.
f) ff operating a power tool in a damp location is unavoidable, use a ground fault
circuit interrupter (GFCl) protected supply. Use of a GFCI reduces the risk of electric
shock.
3) PERSONAL SAFETY
a) Stay alert, watch what you are doing and use common sense when operating a
power tool. Do not use a power tool while you are tired or under the influence of
drugs, alcohol or medication. A moment of inattention while operating power tools
may result in serious personal injury.
b) Use personal protective equipment. Always wear eye protection. Protective
equipment such as dust mask, non-skid safety shoes, hard hat, or hearing protection
used for appropriate conditions will reduce personal injuries.
c) Prevent unintentional starting. Ensure the switch is in the off position before
connecting to power source and/or battery pack, picking up or carrying the tool
Carrying power tools with your finger on the switch or energising power tools that have
the switch on invites accidents.
d) Remove any adjusting key or wrench before turning the power tool on. A wrench
or a key left attached to a rotating part of the power tool may result in personal injury.
e) Do not overreach. Keep proper footing and balance at all times. This enables better
control of the power tool in unexpected situations.
f) Dress properly. Do not wear loose clothing or jewellery. Keep your hair, clothing
and gloves away from moving parts. Loose clothes, jewellery or long hair can be
caught in moving parts.
g) ff devices are provided for the connection of dust extraction and collection
facilities, ensure these are connected and properly used. Use of dust collection can
reduce dust-related hazards.
4) POWER TOOL USE AND CARE
a) Do not force the power tooL Use the correct power tool for your application. The
correct power tool will do the job better and safer at the rate for which it was designed.
b) Do not use the power tool if the switch does not turn it on and off. Any power tool
that cannot be controlled with the switch is dangerous and must be repaired.
c) Disconnect the plug from the power source and/or the battery pack from the
power tool before making any adjustments, changing accessories, or storing
power tools. Such preventive safety measures reduce the risk of starting the power
tool accidentally.
d) Store idle power tools out of the reach of children and do not allow persons
unfamiliar with the power tool or these instructions to operate the power tool
0
Power tools are dangerous in the hands of untrained users.
e) Maintain power tools. Check for misalignment or binding of moving parts,
breakage of parts and any other condition that may affect the power tool's
operation, ff damaged, have the power tool repaired before use. Many accidents
are caused by poorly maintained power tools.
f) Keep cutting tools sharp and clean. Properly maintained cutting tools with sharp
cutting edges are less likely to bind and are easier to control
g) Use the power tool, accessories and tool bits etc., in accordance with these
instructions taking into account the working conditions and the work to be
performed. Use of the power tool for operations different from those intended could
result in a hazardous situation.
5) SERVICE
a) Have your power tool serviced by a qualified repair person using only identical
replacement parts. This will ensure that the safety of the power tool is maintained.
Additional Safety Rules - Portable Band Saws
• Hold tool by insulated gripping surfaces when performing an operation where the
cutting tool may contact hidden wiring. Contact with a "live" wire will make exposed
metal parts of the tool "live" and shock the operator.
• Keep hands away from cutting area and blade. Keep one hand on the main handle and
the other hand on the front handle to prevent loss of control which could result in personal
injury.
• Always make sure the portable band saw is clean before using.
• Always cease operation at once ffyou notice any abnormality whatsoever.
• Always be sure all components are mounted properly and securely before using tooL
• Always handle the band saw blade with care when mounting or removing it.
• Always keep your hands out of the line of the band saw blade.
• Always wa# until the motor has reached full speed before starting a cut.
• Always keep handles dry, clean, and free of oil and grease. Hold the tool firmly when in
use.
Always be alert at all times, especially during repetitive, monotonous operations. Always
be sure of position of your hands relative to the blade.
Never remove work stop.
Stay clear of end pieces that may fall after cutting off. They may be hot, sharp and/or
heavy, Serious personal injury may result.
An extension cord must have adequate wire size (AWG or American Wire Gauge)
for safety. The smaller the gauge number of the wire, the greater the capacity of the
cable, that is 16 gauge has more capacity than 18 gauge. An undersized cord will cause
a drop in line voltage resulting in loss of power and overheating. When using more than
one extension to make up the total length, be sure each individual extension contains at
least the minimum wire size. The following table shows the correct size to use depending
on cord length and nameplate ampere rating, ff in doubt, use the next heavier gauge. The
smaller the gauge number, the heavier the cord.
Minimum Gauge for Cord Sets
Volts Total Length of Cord in Feet (meters)
Ampere Rating
More Not More
Than Than
0 6
6 10
10 12
12 16
WARNING: ALWAYS use safety glasses. Everyday eyeglasses are NOT safety glasses.
Also use face or dust mask if cutting operation is dusty, ALWAYS WEAR CERTIFIED
SAFETY EQUIPMENT:
• ANSI Z87.1 eye protection (CAN/CSA Z94.3),
• ANSI $12.6 ($3.19) hearing protection,
• NIOSH/OSHA/MSHA respiratory protection.
_ WARNING: Some dust created by power sanding, sawing, grinding, drilling, and other
construction activities contains chemicals known to the State of California to cause cancer,
birth defects or other reproductive harm. Some examples of these chemicals are:
• lead from lead-based paints,
• crystalline silica from bricks and cement and other masonry products, and
• arsenic and chromium from chemically-treated lumber.
Your risk from these exposures varies, depending on how often you do this type of work.
To reduce your exposure to these chemicals: work in a well ventilated area, and work with
approved safety equipment, such as those dust masks that are specially designed to filter
out microscopic particles.
• Avoid prolonged contact with dust from power sanding, sawing, grinding, drilling,
and other construction activities. Wear protective clothing and wash exposed
areas with soap and water. Allowing dust to get into your mouth, eyes, or lay on the skin
may promote absorption of harmful chemicals.
WARNING: Use of this tool can generate and/or disburse dust, which may cause serious
and permanent respiratory or other injury, Always use NIOSH/OSHA approved respiratory
protection appropriate for the dust exposure. Direct particles away from face and body.
,& WARNING: Always wear proper personal hearing protection that conforms to ANSI
$12.6 ($3.19) during use. Under some conditions and duration of use, noise from this
product may contribute to hearing loss.
• The label on your tool may include the following symbols. The symbols and their definitions
are as follows:
V...................... volts
Hz.................... hertz
min .................. minutes
.... ............... direct current
(_) .................... Class I Construction
(grounded)
[] .................... Class II Construction
(double insulated)
.../min .............per minute
SFPM .............. surface feet per minute
120V 25 (7.6) 50 (15.2) 100 (30.5) 150 (45.7)
240V 50 (15.2) 100 (30.5) 200 (61.0) 300 (91.4)
18
18
16
14
A ................ amperes
W............... watts
no .............. no load speed
............... earthing terminal
BPM........... beats per minute
RPM .......... revolutions per minute
AWG
16
16
16
12
............. alternating current
............. alternating or direct current
.............. safety alert symbol
16 14
14 12
14 12
Not Recommended
SAVE THESE INSTRUCTIONS FOR FUTURE USE
COMPONENTS (FIG. 1, 2)
A. Multi-position bail handle I. Speed wheel
B. Sight light J. Rubber bumpers
C. Trigger switch K. Hang hook
D. Main handle L. Pulley
E. Work stop M. Blade guard
R Guide rollers N. Rubber tires
G. Blade tracking adjustment O. Blade
H. Blade tension lever R Sight light switch
ASSEMBLY
Blades
This portable band saw is setup for use with .020" (0.5 mm) thick, 1/2" (12.5 mm) wide and
44-7/8" (1140 mm) long blades. DO NOT use .025 (.64 mm) thick blades.
_ CAUTION: The use of any other blade or accessory might be hazardous. DO NOT use
any other type of accessory with your band saw. Blades used on stationary band saws are of
different thickness. Do not attempt to use them on your portable unit.
Blade Selection
In general, first consider the size and shape of the work, and the type of material to be cut.
Remember, for the most efficient cutting, the coarsest tooth blade possible should be used in a
given application, because the coarser the tooth, the faster the cut. In selecting the appropriate
number of teeth per inch of the band saw blade, at least two teeth should contact the work
surface when the blade is rested against the workpiece. As a rule of thumb, soft materials
usually require coarse tooth blades, while hard materials require fine tooth blades. Where a
smoother finish is important, select one of the finer tooth blades.
Select the appropriate band saw blade according to the material type, dimensions, and
number of teeth. See Blade Description chart.
Page 2
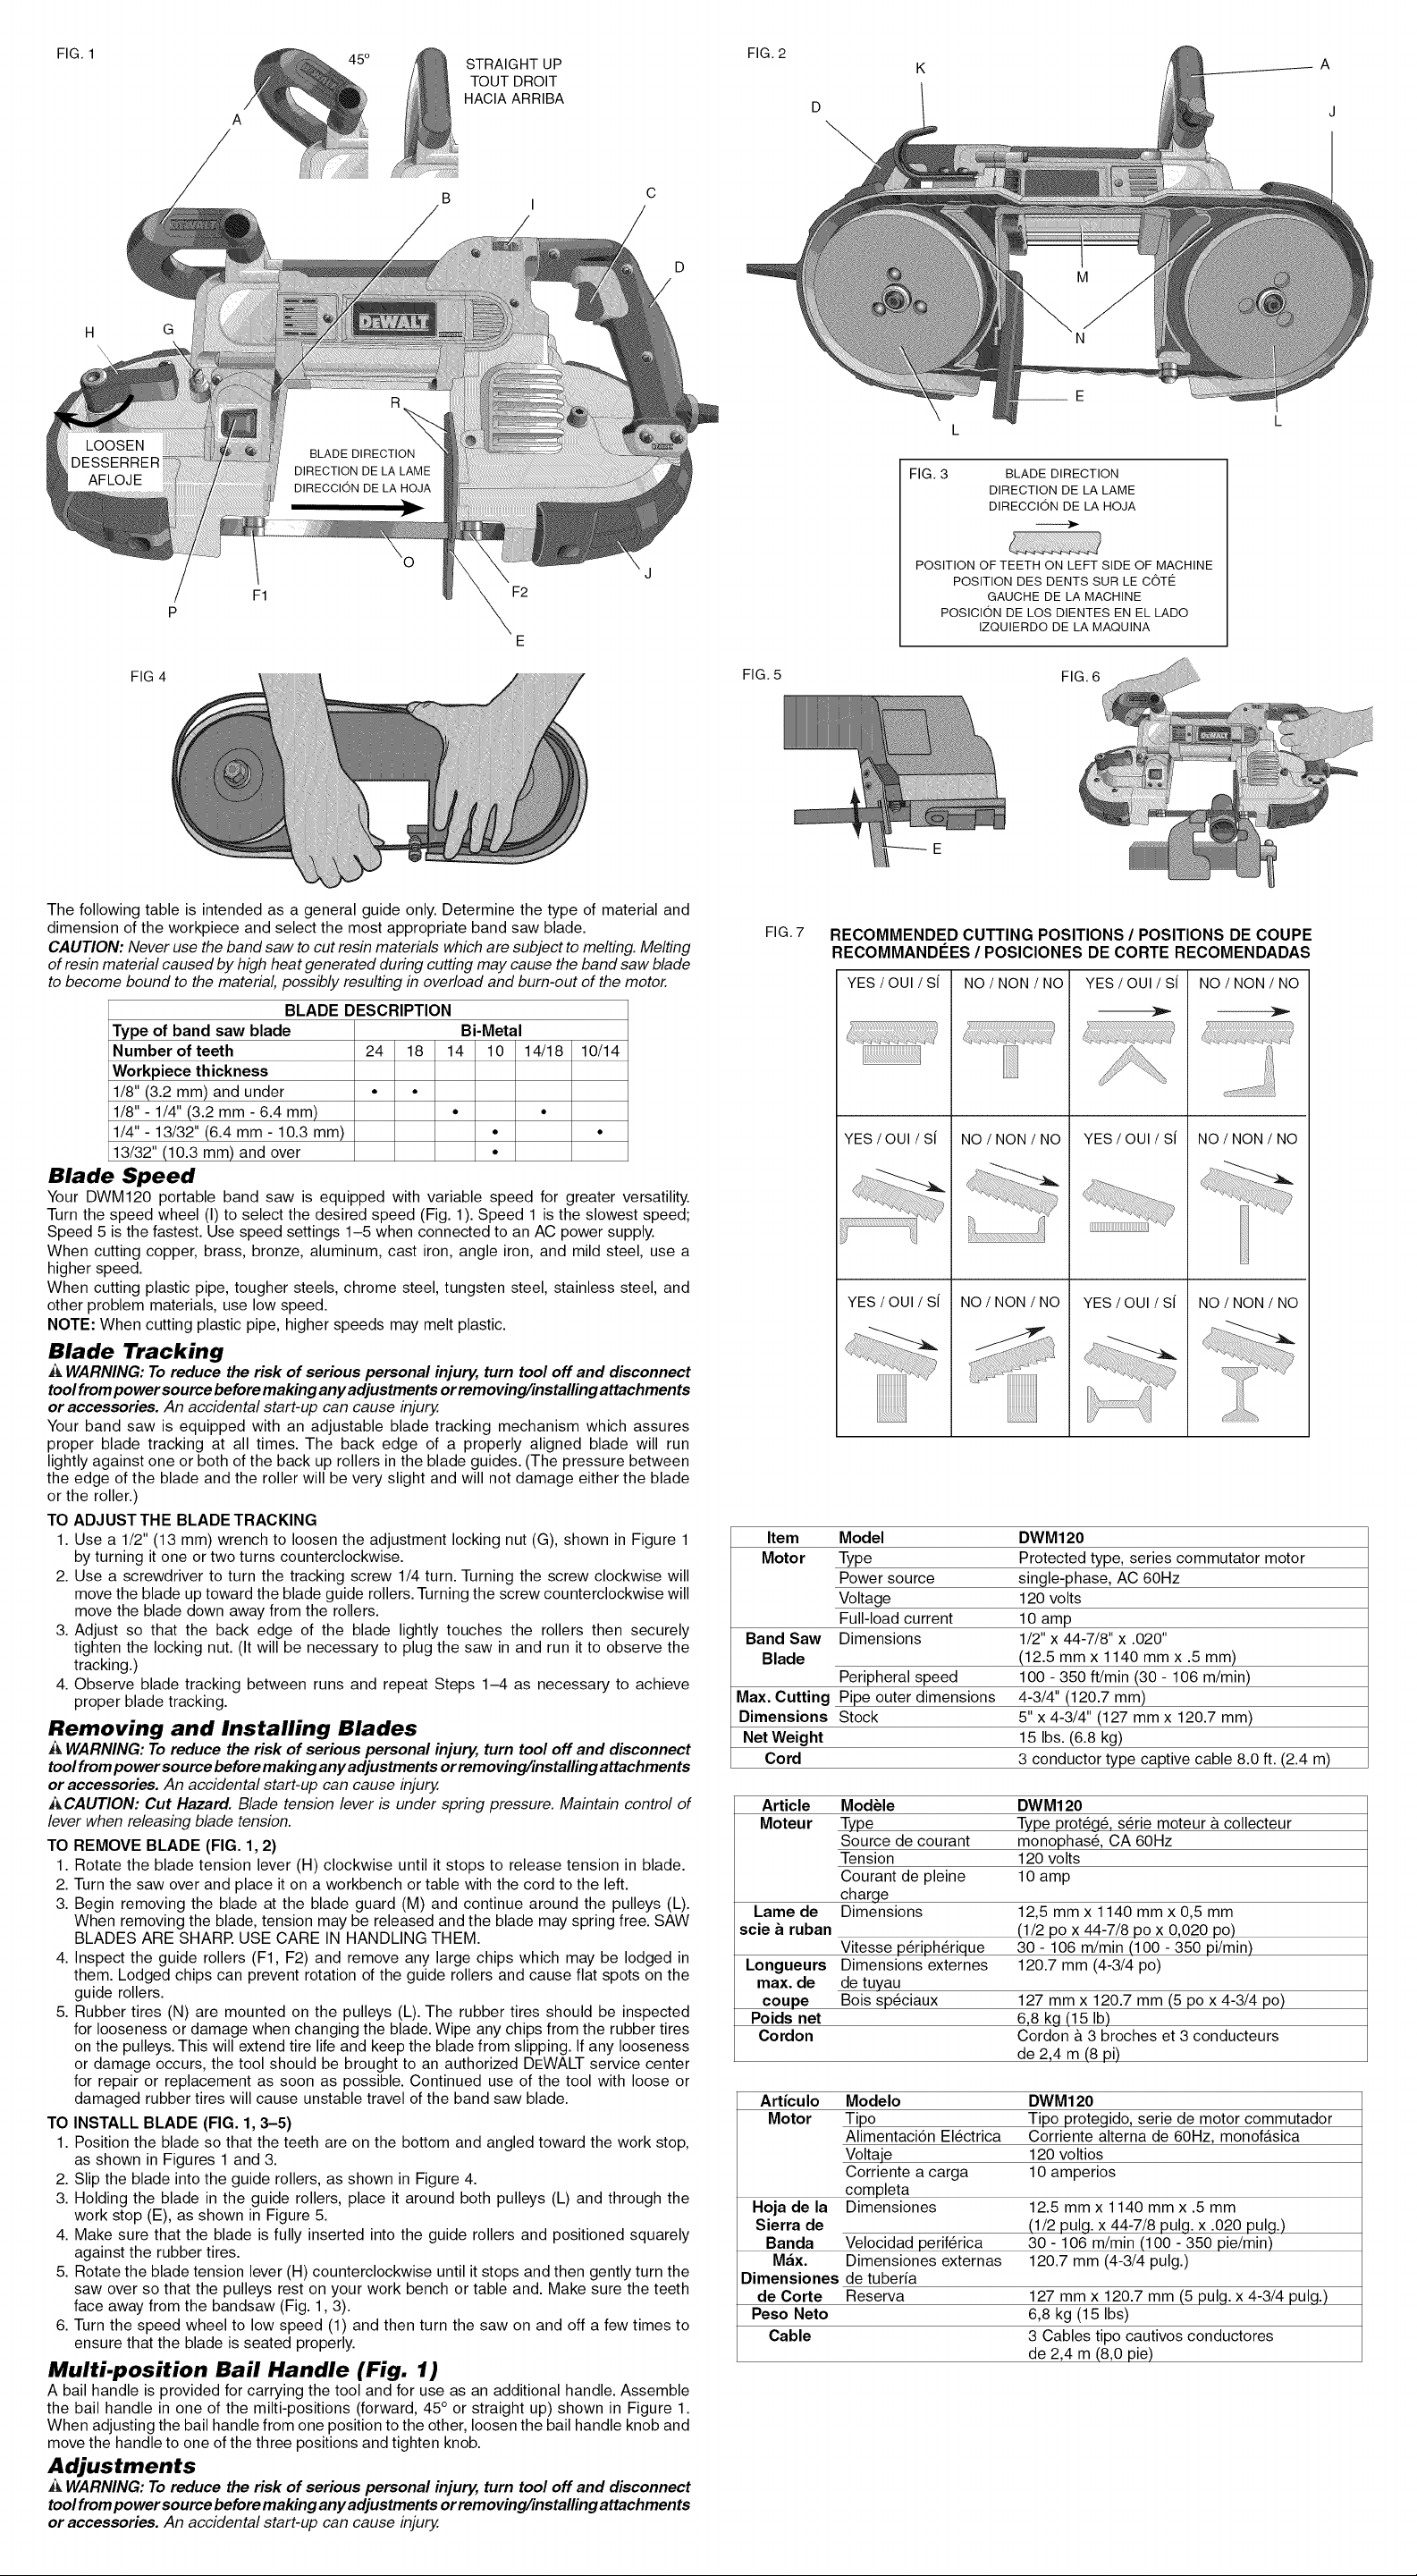
FIG. 1
45o
A
STRAIGHT UP
TOUT DROIT
HACIA ARRIBA
B I
FIG. 2
K
A
J
H
LOOSEN
AFLOJE
FIG 4
G
R
BLADE DIRECTION
DIRECTION DE LA LAME
DIRECCION DE LA HOJA
F1
FIG. 3
POSITION OF TEETH ON LEFT SIDE OF MACHINE
F2
POSICION DE LOS DIENTES EN EL LADO
FIG. 5
BLADE DIRECTION
DIRECTION DE LA LAME
DIRECCION DE LA HOJA
POSITION DES DENTS SUR LE COTt_
GAUCHE DE LA MACHINE
IZQUIERDO DE LA MAQUINA
FIG. 6
The following table is intended as a general guide only. Determine the type of material and
dimension of the workpiece and select the most appropriate band saw blade.
CAUTION: Never use the band saw to cut resin materials which are subject to melting. Melting
of resin material caused by high heat generated during cutting may cause the band saw blade
to become bound to the material, possibly resulting in overload and burn-out of the motor.
BLADE DESCRIPTION
Type of band saw blade
Number of teeth
24 18 14 10 14/18 10/14
Bi-Metal
Workpiece thickness
1/8" (3.2 mm) and under
1/8" - 1/4" (3.2 mm - 6.4 mm)
1/4" - 13/32" (6.4 mm - 10.3 mm)
13/32" (10.3 mm) and over
Blade Speed
Your DWM120 portable band saw is equipped with variable speed for greater versatility.
Turn the speed wheel (I) to select the desired speed (Fig. 1). Speed 1 is the slowest speed;
Speed 5 is the fastest. Use speed settings 1-5 when connected to an AC power supply.
When cutting copper, brass, bronze, aluminum, cast iron, angle iron, and mild steel, use a
higher speed.
When cutting plastic pipe, tougher steels, chrome steel, tungsten steel, stainless steel, and
other problem materials, use low speed.
NOTE: When cutting plastic pipe, higher speeds may melt plastic.
Blade Tracking
A WARNING: To reduce the risk of serious personal injury, turn tool off and disconnect
toolfrom power source before making any adjustments or removing/installing attachments
or accessories. An accidental start-up can cause injury.
Your band saw is equipped with an adjustable blade tracking mechanism which assures
proper blade tracking at all times. The back edge of a properly aligned blade will run
lightly against one or both of the back up rollers in the blade guides. (The pressure between
the edge of the blade and the roller will be very slight and will not damage either the blade
or the roller.)
TO ADJUST THE BLADE TRACKING
1. Use a 1/2" (13 mm) wrench to loosen the adjustment locking nut (G), shown in Figure 1
by turning it one or two turns counterclockwise.
2. Use a screwdriver to turn the tracking screw 1/4 turn. Turning the screw clockwise will
move the blade up toward the blade guide rollers. Turning the screw counterclockwise will
move the blade down away from the rollers.
3. Adjust so that the back edge of the blade lightly touches the rollers then securely
tighten the locking nut. (It will be necessary to plug the saw in and run it to observe the
tracking.)
4. Observe blade tracking between runs and repeat Steps 1-4 as necessary to achieve
proper blade tracking.
Removing and Installing Blades
J_ WARNING: To reduce the risk of serious personal injury, turn tool off and disconnect
toolfrom power source before making any adjustments or removing/installing attachments
or accessories. An accidental start-up can cause injury.
i_CAUTION: Cut Hazard. Blade tension lever is under spring pressure. Maintain control of
lever when releasing blade tension.
TO REMOVE BLADE (FIG. 1,2)
1. Rotate the blade tension lever (H) clockwise until it stops to release tension in blade.
2. Turn the saw over and place it on a workbench or table with the cord to the left.
3. Begin removing the blade at the blade guard (M) and continue around the pulleys (L).
When removing the blade, tension may be released and the blade may spring free. SAW
BLADES ARE SHARR USE CARE IN HANDLING THEM.
4. Inspect the guide rollers (F1, F2) and remove any large chips which may be lodged in
them. Lodged chips can prevent rotation of the guide rollers and cause flat spots on the
guide rollers.
5. Rubber tires (N) are mounted on the pulleys (L). The rubber tires should be inspected
for looseness or damage when changing the blade. Wipe any chips from the rubber tires
on the pulleys. This will extend tire life and keep the blade from slipping. If any looseness
or damage occurs, the tool should be brought to an authorized DEWALT service center
for repair or replacement as soon as possible. Continued use of the tool with loose or
damaged rubber tires will cause unstable travel of the band saw blade.
TO INSTALL BLADE (FIG. 1,3-5)
1. Position the blade so that the teeth are on the bottom and angled toward the work stop,
as shown in Figures 1 and 3.
2. Slip the blade into the guide rollers, as shown in Figure 4.
3. Holding the blade in the guide rollers, place it around both pulleys (L) and through the
work stop (E), as shown in Figure 5.
4. Make sure that the blade is fully inserted into the guide rollers and positioned squarely
against the rubber tires.
5. Rotate the blade tension lever (H) counterclockwise until it stops and then gently turn the
saw over so that the pulleys rest on your work bench or table and. Make sure the teeth
face away from the bandsaw (Fig. 1,3).
6. Turn the speed wheel to low speed (1) and then turn the saw on and off a few times to
ensure that the blade is seated properly.
Multi-position Bail Handle (Fig. 1)
A bail handle is provided for carrying the tool and for use as an additional handle. Assemble
the bail handle in one of the milti-positions (forward, 45° or straight up) shown in Figure 1.
When adjusting the bail handle from one position to the other, loosen the bail handle knob and
move the handle to one of the three positions and tighten knob.
Adjustments
_ WARNING: To reduce the risk of serious personal injury, turn tool off and disconnect
toolfrom power source before making any adjustments or removing/installing attachments
or accessories. An accidental start-up can cause injury.
FIG. 7
RECOMMENDED CUTTING POSITIONS / POSITIONS DE COUPE
RECOMMAND#ES / POSlClONES DE CORTE RECOMENDADAS
YES/OUI/S( NO/NON/NO YES/OUI/S( NO/NON/NO
YES/OUI / S(
YES/OUI / S(
Item Model
Motor Type
Power source
Voltage
Full-load current
Band Saw Dimensions
Blade
Peripheral speed
Max. Cutting
Dimensions
Pipe outer dimensions
Stock
Net Weight
Cord
Article
Moteur
Lame de
scie a ruban
Longueurs
max. de
coupe
Poids net
Cordon
Articulo
Motor
Hoja de la
Sierra de
Banda
Max.
Dimensiones
de Corte
Peso Neto
Cable
ModUle
Type
Source de courant
Tension
Courant de pleine
charge
Dimensions
Vitesse p_riph6rique
Dimensions externes
de tuyau
Bois sp_ciaux
Modelo
Tipo
Alimentaci6n El_ctrica
Voltaie
Corriente a carga
completa
Dimensiones
Velocidad perif_rica
Dimensiones externas
de tuberia
Reserva
NO/NON/NO
NO/NON/NO
DWM120
Protected type, series commutator motor
single-phase, AC 60Hz
(12.5 mm x 1140 mm x .5 mm)
4-3/4" (120.7 mm)
5" x 4-3/4" (127 mm x 120.7 mm)
3 conductor type captive cable 8.0 ft. (2.4 m)
DWM120
Type prot6g_, s6rie moteur & collecteur
monophas6, CA 60Hz
120 volts
10 amp
12,5 mmx 1140 mm x 0,5 mm
(1/2 pox 44-7/8 pox 0,020 po)
30 - 106 m/min (100 - 350 pi/min)
120.7 mm (4-3/4 po)
127 mm x 120.7 mm (5 pox 4-3/4 po)
6,8 kg (15 Ib)
Cordon &3 broches et 3 conducteurs
de 2,4 m (8 pi)
m_D,-
YES / OUI / S(
YES/OUI / S(
NO/NON/NO
NO/NON/NO
120 volts
10 amp
1/2" x 44-7/8" x .020"
100 - 350 ft/min (30 - 106 m/min)
15 Ibs. (6.8 kg)
DWM 120
Tipo protegido, serie de motor commutador
Corriente alterna de 60Hz, monofasica
120 voltios
10 amperios
12.5 mm x 1140 mm x .5 mm
(1/2 pulg. x 44-7/8 pulg. x .020 pulg.)
30 - 106 m/min (100 - 350 pie/min)
120.7 mm (4-3/4 pulg.)
127 mm x 120.7 mm (5 pulg. x 4-3/4 pulg.)
6,8 kg (15 Ibs)
3 Cables tipo cautivos conductores
de 2,4 m (8,0 pie)
Page 3
WORKSTOPADJUSTMENT
Tosupportlargeworkpieces,theworkstopshouldbeloweredfollowingthesesteps:
1.Loosenthetwoscrews(R),showninFigure1,withthehexwrenchprovided.
2.Movetheworkstop(E)tothedesiredposition(Fig5).
3.Securelytightenscrews(R).
OPERATION
Motor
Be sure your power supply agrees with the voltage marked on the nameplate. 120 Volts AC
60 Hz means alternating current only. Voltage decrease of more than 10% will cause loss
of power and overheating. All DEWALT tools are factory-tested. If this tool does not operate,
check the power supply line for blown fuses and the plug and receptacle for proper contact.
There are certain applications for which this tool was designed.
This band saw is designed to cut various types of material up to 4-3/4" (120.7 mm) diameter or
5" (127 mm) x 4-3/4" (120.7 mm) rectangular shape at 90°.
WARNING: Thoroughly remove any oil or grease from the workpiece before securing in a
vise or other clamping device. If the workpiece is not secure, # may come loose during the
cutting and/or cause breakage, which may result in serious personal injury.
_ WARNING: Never connect the power tool unless the available AC power is of the same
voltage as that specified on the nameplate of the tooL Never connect this power tool to a DC
power source.
i_ WARNING: Laceration Hazard. If the power cord is connected to the power source with
the trigger switch turned ON the power tool will start suddenly and could cause a serious
accident.
Trigger Switch
To start the tool, squeeze the trigger switch (C).To turn the tool off, release the switch.
Cutting
_ WARNING: To reduce the risk of serious personal injury, turn tool off and disconnect
toolfrom power source before making any adjustments or removing/installing attachments
or accessories. An accidental start-up can cause injury.
Refer to Figure 7 for recommended cutting positions for various materials.
NOTE: Select and use a band saw blade that is most appropriate for the material being cut.
See BLADE DESCRIPTION.
This portable band saw may be hung using the hang hook (K). Hang tool on a pipe vice or
other suitable, stable structure. (Fig. 2)
1. Mount the material to be cut solidly in a vise or other clamping device.
Z&WARNING: Never attempt to use this tool by resting it upside down on a work surface and
bringing the material to the tooL Always securely clamp the workpiece and bring the tool to
the workpiece, securely holding the tool with two hands as shown in Figure 6.
2. If additional light is needed, a sight light (B) can be activated using the sight light switch
(P) as shown in Figure 1. If replacement is required, return to an authorized service
center or other qualified service personnel, always using identical replacement parts.
Z&WARNING: To reduce the risk of electric shock, DO NOT use the tool if LED lens is
broken.
3. Bring the work stop (E) into contact with the workpiece. Turn the saw ON.
4. When saw reaches desired rotation speed, slowly and gently tilt the main body of the
tool to bring the band saw blade into contact with the workpiece. Do not apply additional
pressure in excess of the weight of the main body of the tool. Carefully avoid bringing the
band saw blade suddenly and heavily into contact with the upper surface of the workpiece.
This will cause serious damage to the band saw blade. To obtain maximum service life
of the band saw blade, ensure there is no sudden impact at the beginning of the cutting
operation.
5. As shown in Figure 6, straight cutting can be accomplished by keeping the band saw
blade aligned with the side surface of the motor housing. Any twisting or cocking of the
blade will cause the cut to go offline and decrease the life of the blade.
CAUTION: During cutting, if the band saw becomes locked or jammed in the workpiece
material, release the switch immediately to avoid damage to the band saw blade and
motor.
6. The tool's own weight provides the most efficient downward cutting pressure. Added
operator pressure slows the blade and reduces blade life.
7. End pieces, which would be heavy enough to cause injury when they drop, after cut-off,
should be supported. Safety shoes are strongly recommended. End pieces may be hot.
8. Hold the saw firmly in both hands so that the saw does not fall against clamped or
supported material when the cut is completed. DO NOT MAKE ANY SPEED CHANGES
UNLESS TOOL HAS BEEN TURNED OFF.
Tips for Better Cutting
The following recommendations should be used as a guide. Results may vary with the
operator and the particular material being cut.
• Never twist the band saw blade during cutting operation.
• Never use liquid coolants with portable band saws. Use of liquid coolants will cause build-
up on tires and reduce performance.
• If excessive vibration occurs during the cut, turn the bandsaw off and adjust the speed
slightly. Ensure that the material being cut is is securely clamped down. If vibration
continues, change the band saw blade.
MAINTENANCE
A WARNING: To reduce the risk of serious personal injury, turn tool off and disconnect
toolfrom power source before making any adjustments or removing/installing attachments
or accessories. An accidental start-up can cause injury.
Lubrication
Self-lubricating bearings are used in the tool and periodic relubrication is not required. In the
unlikely event that service is ever needed, take your tool to an authorized service location.
Cleaning
A WARNING: Blow dirt and dust out of all air vents with dry air at least once a week.
Wear proper ANSI Z87.1 (CAN/CSA Z94.3) eye protection and proper NIOSH/OSHA/MSHA
respiratory protection when performing this.
_ WARNING: Never use solvents or other harsh chemicals for cleaning the non-metallic
parts of the tool. These chemicals may weaken the materials used in these parts. Use a
cloth dampened only with water and mild soap. Never let any liquid get inside the tool; never
immerse any part of the tool into a liquid.
Repairs
To assure product SAFETY and RELIABILITY, repairs, maintenance and adjustments
(including brush inspection and replacement) should be performed by a DEWALT factory
service center, a DEWALT authorized service center or other qualified service personnel.
Always use identical replacement parts.
ACCESSORIES
A WARNING: Since accessories, other than those offered by DEWALT, have not been tested
with this product, use of such accessories with this tool could be hazardous. To reduce the
risk of injury, only DEWALT, recommended accessories should be used with this product.
Recommended accessories for use with your tool are available at extra cost from your local
dealer or authorized service center. If you need assistance in locating any accessory, please
contact DEWALT Industrial Tool Co., 701 East Joppa Road, Baltimore, MD 21286, call
1-800-4-DEWALT (1-800-433-9258) or visit our website www.dewalt.com.
Three Year Limited Warranty
DEWALT will repair, without charge, any defects due to faulty materials or workmanship for
three years from the date of purchase. This warranty does not cover part failure due to normal
wear or tool abuse. For further detail of warranty coverage and warranty repair information,
visit www.dewalt.com or call 1-800-4-DEWALT (1-800-433-9258). This warranty does not
apply to accessories or damage caused where repairs have been made or attempted by
others. This warranty gives you specific legal rights and you may have other rights which vary
in certain states or provinces.
In addition to the warranty, DEWALT tools are covered by our:
1YEAR FREE SERVICE
DEWALT will maintain the tool and replace worn parts caused by normal use, for free, any
time during the first year after purchase.
90 DAY MONEY BACK GUARANTEE
If you are not completely satisfied with the performance of your DEWALT Power Tool, Laser,
or Nailer for any reason, you can return it within 90 days from the date of purchase with a
receipt for a full refund - no questions asked.
LATIN AMERICA: This warranty does not apply to products sold in Latin America. For
products sold in Latin America, see country specific warranty information contained either in
the packaging, call the local company or see website for warranty information.
FREE WARNING LABEL REPLACEMENT: If your warning labels become illegible or are
missing, call 1-800-4-DEWALT for a free replacement.
DWM120 VADIADLESPEEDDA.DSAW
V ,' _| , _ , '
TO REDUCE THE RISE OF iNJURY, USER MUST READ iNSTRUCTiON MANUAL. ALWAYS USE PROPER
EYE ANp RESPIRATORY PROTECTION. PARA DiSMiNUiR EL RIESG_ DE LESIONES, EL USUARIO
DEBERALEER EL MANUAL DE JNSTRUCC[ONES. SJEMPRE SE DERERA LLEVAR LA PROTECCiON
APROPIADA PARA LA VISTA Y PARA LAS VIAS RESPIRATORIAS. AEIN DE MINIMISED LES MSQUES
DE RLESSURES, L'UTiLJSATEUR BOlT TUUJOURS LME LE GUIDE R'UTiLiSATiON. it, FAUT TOUJOURS
PORTER BE L'EQUJPEMENT DE PROTECTION OCULAiRE ET RERPJRATQiRE APPROPRJE.
BEWALT INOUSTRIAL TOOL CO., BALTIMORE, MB 212N_ USA PATENTS PENOiNO
FOR SERVICE iNFORMATION, CALL I..800-4-DEWALT WWW.DEWALT.com
5" (127rflra) DEEP CUT
SER.
F Ddfinitions : lignes directrices en
matidre de sdcuritd
Les d6finitions ci-dessous d6crivent le niveau de danger pour chaque mot-indicateur
employ& Veuillez lire le mode d'emploi et porter une attention particuli_re & ces
symboles.
ADANGER : indique une situation dangereuse imminente qui, si elle n'est pas
evitee, causera la mort ou des blessures graves.
_&AVERTISSEMENT : indique une situation potentiellement dangereuse qui, si elle
n'est pas evit6e, pourrait se solder par un deces ou des blessures graves.
_,ATTENTION : indique une situation potentiellement dangereuse qui, si elle n'est pas
evitee pourrait se solder par des blessures mineures ou moderees.
ATTENTION : utilise sans le symbole d'alerte a la securite, indique une situation
potentiellement dangereuse qui, si elle n'est pas evitee pourrait se solder par des
dommages _ la propriete.
POUR TOUT COMMENTAIRE OU QUESTION RELATIF ,&,CET OUTIL OU TOUT AUTRE
OUTIL DEWALT, COMPOSEZ GRATUITEMENT LE • 1-800-4-DEWALT (1-800-433-9258).
AVERTISSEMENT Pour reduire tout risque de dommage corporel, lire le manuel de
I'utilisateur.
Directives de sdcuritd relatives aux outils dlectriques
en gdndral
A AVERTISSEMENT ! Lire routes les directives et consignes de securite. Tout
manquement aux directives et consignes pose des risques de choc electrique,
d'incendie et/ou de blessure grave.
CONSERVER TOUTES CES DIRECTIVES
ET CONSIGNES A TITRE DE REFERENCE
Le terme _,outil electrique _ dans ces directives se rapporte a votre outil electrique alimente
sur secteur (avec ill) ou par piles (sans ill).
1) S#OURIT# - AIRE DE TRAVAIL
a) Maintenir I'aire de travail propre et bien eclairee. Les lieux encombres ou sombres
sont propices aux accidents.
b) Ne pas faire fonctionner un outil electrique clans une atmosphere explosive, en
presence par exemple de poussieres, gaz ou liquides inflammables. Les outils
electriques peuvent produire des etincelles qui pourraient enflammer toute emanation
ou poussiere ambiante.
c) Tenir les enfants, ou toute autre personne, _ I'ecart pendant I'utilisation d'un outil
electrique. Toute distraction pourrait faire perdre la maftrise de I'appareil.
2) SI_CURITI_ - I_LECTRICITI_
a) La fiche electrique de I'outil dolt correspondre a la prise murale. Ne jamais
modifier la fiche en aucune fa_on. Ne jamais utiliser de fiche d'adaptation avec un
outil electrique mis a la terre. L'utilisation de fiches d'origine et de prises appropriees
reduira les risques de choc electrique.
b) E:viter tout contact corporel avec des elements mis a la terre comme tuyaux,
radiateurs, cuisinieres ou refrigerateurs. Les risques de choc electrique augmentent
Iorsque le corps est mis a la terre.
c) Ne pas exposer les outils electriques a la pluie ou a I'humidite. Toute penetration
d'un outil electrique par un liquide augmente les risques de choc electrique.
d) Ne pas utiliser le cordon de fa_on abusive. Ne jamais utiliser le cordon pour
transporter, tirer ou debrancher un outil electrique. Proteger le cordon de
la chaleur, de I'huile et de tout bord tranchant ou piece mobile. Les cordons
endommages ou emm61es augmentent les risques de choc electrique.
e) Lors de I'utilisation d'un outil electrique a I'exterieur, n'utiliser que des rallonges
con_ues pour I'exterieur. L'utilisation d'une rallonge con_ue pour I'exterieur reduit les
risques de choc electrique.
f) Si I'utilisation d'un outil electrique en milieu humide est inevitable, utiliser une
alimentation protegee par un disjoncteur de fuites a la terre (DDFT). L'utilisation
d'un DDFT reduit les risques de choc electrique.
3) SI_CURITI_ PERSONNELLE
a) Rester constamment vigilant et faire preuve de jugement pendant I'utilisation
d'un outil electrique. Ne pas utiliser d'outil electrique en cas de fatigue ou sous
I'influence de drogues, d'alcool ou de medicaments. Tout moment d'inattention
pendant I'utilisation d'un outil electrique pose des risques de blessure grave.
b) Utiliser un equipement de protection individueL Porter systematiquement des
lunettes de protection. Le fait de porter un equipement de protection tel que masque
antipoussieres, chaussures antiderapantes, casque de securite ou protecteurs auditifs
Iorsque la situation le requiert, reduira les risques de dommages corporels.
c) Prevenir tout demarrage accidenteL S'assurer que I'interrupteur est en position
d'arr6t avant de brancher I'outil et/ou de le connecter a un bloc-piles, et avant
de le saisir ou de le transporter. Transporter un outil le doigt sur I'interrupteur, ou
brancher un outil electrique alors que I'interrupteur est en position de marche, invite les
accidents.
d) Retirer toute cle de reglage avant de demarrer I'outil. Une cle laissee sur une piece
rotative d'un outil electrique pose des risques de blessure.
e) Ne pas effectuer de travaux hors de portee. Les pieds doivent rester bien ancres
au sol afin de maintenir son equilibre en tout temps. Cela permet de mieux
mMtriser I'outil electrique dans les situations imprevues.
f) Porter des v6tements appropries. Ne pas porter de v6tements amples ni de
bijoux. Maintenir cheveux, v6tements et gants eloignes des pieces mobiles.
V6tements amples, bijoux ou cheveux longs risquent de rester coinces dans ces pieces
mobiles.
g) Lorsqu'un dispositif de connexion a un systeme de depoussierage ou
d'elimination est fourni, s'assurer qu'il est connecte et utilise correctement.
L'utilisation d'aspirateurs peut reduire les risques engendres par les poussieres.
4) UTILISATION ET ENTRETIEN DES OUTILS I_LECTRIQUES
a) Ne pas forcer un outil electrique. Utiliser I'outil approprie au travail en cours.
L'outil approprie effectuera un meilleur travail, de fa_on plus s_re eta la vitesse pour
laquelle il a ete con_u.
b) Ne pas utiliser un outil electrique dont I'interrupteur est defectueux. Tout appareil
dont I'interrupteur est defectueux est dangereux et doit 6tre repare.
c) Debrancher la fiche du secteur et/ou le bloc-piles de I'outil electrique avant de
faire tout reglage ou changement d'accessoire, ou avant de ranger ce dernier.
Ces mesures preventives reduisent les risques de demarrage accidentel de I'appareil.
d) Apres usage, ranger les outils electriques hors de la portee des enfant& et ne
permettre a aucune personne n'etant pas familiere avec un outil electrique (ou
son manuel d'instruction) d'utiliser ce dernier. Les outils peuvent 6tre dangereux
entre les mains des novices.
e) Entretenir les outils electriques. Wrifier les pieces mobiles pour s'assurer
qu'elles sont bien alignees et tournent librement, qu'elles sont en bon etat et ne
sont affectees d'aucune condition susceptible de nuire au bon fonctionnement
de I'outil. En cas de dommage, faire reparer I'outil electrique avant toute nouvelle
utilisation. Bien des accidents sont causes par des outils mal entretenus.
f) Maintenir toute lame aiguisee et propre. Les outils de coupe bien entretenus et
affDtes sont moins susceptibles de se coincer et sont plus faciles a contr&ler.
g) Utiliser un outil electrique, ses accessoires, m#ches, etc., conformement aux
presentes directives en tenant compte des conditions de travail et du travail
effectuer. L'utilisation d'un outil electrique pour toute operation autre que celle pour
laquelle il a ete con_u est dangereuse.
5) SERVICE
a) Faire entretenir les outils electriques par un reparateur qualifie en utilisant
seulement des pieces de rechange identiques. Cela permettra d'assurer I'integrite
de I'outil electrique et la securite de I'utilisateur.
R_gles de s_curit_ additionnelles - Scies a ruban
portables
• Tenir I'outil par les surfaces isolees prevues a cet effet pendant route utilisation
ob I'outil coupant pourrait entrer en contact avec des ills electriques caches. Tout
contact avec un fil sous tension met les parties metalliques exposees de I'outil sous
tension et electrocute I'utilisateur.
• E:loigner les mains des zones et organes de coupe Tenir la poignee principale d'une
main et la poignee avant de I'autre pour eviter toute perte de contr&le de Ibutil et reduire
ainsi tout risque de dommages corporels.
• S'assurer systematiquement que la scie a ruban portable est propre avant toute
utilisation.
• Arr6ter systematiquement toute operation si une anormalite quelconque est decelee.
• S'assurer systematiquement que tousles composants sont installes correctement et
solidement avant toute utilisation de IbutiL
• Prendre systematiquement des precautions lots de I'installation et du retrait de la lame de
la scie a ruban.
Page 4

• Eloigner systematiquement les mains de la ligne de coupe de la scie a ruban.
• Attendre systematiquement que le moteur tourne a plein regime avant d'entamer une
coupe.
• Maintenir les poignees propres et seches, exempts d'huile ou de graisse. Maintenir Ibutil
fermement pendant son utilisation.
• Rester constamment vigilant, particulierement lots d'operations rep6titives et monotones.
Rester systematiquement conscient de la position des mains par rapport a la lame.
• Nejamais retirer la butee de coupe.
• Se proteger de la chute de tout rebus pendant la coupe. IIs pourraient 6tre brDlants,
coupants et/ou Iourds et poser des risques de dommages corporels serieux.
• Pour la securite de I'utilisateur, utiliser une rallonge de calibre adequat (AWG,
American Wire Gauge [calibrage americain normalise des ills electriques]). Plus
le calibre est petit, et plus sa capacite est grande. Un calibre 16, par exemple, a plus
de capacite qu'un calibre 18. Eusage d'une rallonge de calibre insuffisant causera une
chute de tension entrafnant perte de puissance et surchauffe. Si plus d'une rallonge est
utilisee pour obtenir une certaine Iongueur, s'assurer que chaque rallonge presente au
moins le calibre de fil minimum. Le tableau ci-dessous illustre les calibres a utiliser selon
la Iongueur de rallonge et I'intensite nominale indiquee sur la plaque signaletique. En cas
de doute, utiliser le calibre suivant. Plus le calibre est petit, plus la rallonge peut supporter
de courant.
Calibre minimum pour rallonge
Volts Longueur totale du cordon
Intensit6 nominale
Plus de
0
6
10
12
_AVERTISSEMENT : Porter SYSTEMATIQUEMENT des lunettes de protection. Les
lunettes courantes NE sont PAS des lunettes de protection. Utiliser aussi un masque
antipgussieres si la decoupe doit en produire beaucoup. PORTER SYSTEMATIQUEMENT
UN EQUIPEMENT DE PROTECTION HOMOLOGUE.
• Protection oculaire ANSI Z87.1 (CAN/CSA Z94.3 •
• Protection auditive ANSI $12.6 (S3.19) ;
• Protection des voies respiratoires NIOSH/OSHA/MSHA.
_AVERTISSEMENT : Les scies, meules, ponceuses, perceuses ou autres outils de
construction peuvent produire des poussieres contenant des produits chimiques reconnus
par I'Etat californien pour causer cancers, malformations congenitales ou 6tre nocifs au
systeme reproducteur. Parmi ces produits chimiques, on retrouve :
• le plomb dans les peintures a base de plomb ;
• la silice cristallisee dans les briques et le ciment ou autres articles de ma_onnerie ; et
• I'arsenic et le chrome dans le bois ayant subi un traitement chimique.
Le risque associe a de telles expositions varie selon la frequence a laquelle on effectue ces
travaux. Pour reduire toute expos#ion a ces produits •travailler dans un endroit bien aere,
en utilisant du materiel de securite homologue tel un masque antipoussieres specialement
congu pour filtrer les particules microscopiques.
• Limiter tout contact prolonge avec los poussieres provenant du pon_age, sciage,
moulage, portage ou toute autre activite de construction. Porter des v#tements
de protection et nettoyer a I'eau savonneuse los parties du corps exposees. Le fait
de laisser la poussiere pen6trer dans la bouche, les yeux ou la peau peut promouvoir
I'absorption de produits chimiques dangereux.
A AVERTISSEMENT : Cet outil peut produire et/ou repandre de la poussiere susceptible de
causer des dommages serieux et permanents au systeme respiratoire. Toujours utiliser un
appareil respiratoire antipoussieres homologue par le NIOSH ou I'OSHA. Diriger les
particules dans le sens oppose au visage et au corps.
_AVERTISSEMENT : Pendant I'utilisation, porter systematiquement une protection
auditive individuelle adequate homologuee ANSI $12.6 ($3.19). Sous certaines
conditions et suivant la Iongueur d'utilisation, le bruit emanant de ce produit pourrait contribuer
une perte de I'ou'fe.
• L'etiquette apposee sur votre outilpeut inclure les symboles suivants. Les symboles et leur
definition sont definis ci-apres :
V................. volts
Hz............... hertz
min ............. minutes
.... .......... courant continu
@ ............... Construction de classe I
[] ............... Construction de classe II
RPM ........... rotations ou alternance
Pas plus de
6
10
12
16
(mis a la terre)
(a double isolation)
par minute
120V 7,6 (25) 15,2 (50) 30,5 (100)
240V 15,2 (50) 30,5 (100) 61,0 (200)
5,5 (18) 4,9 (16) 4,9 (16)
5,5 (18) 4,9 (16) 4,3 (14)
4,9 (16) 4,9 (16) 4,3 (14)
4,3 (14) 3,7 (12)
en m_tres (en pieds)
45,7 (150)
91,4 (300)
AWG
4,3 (14)
3,7 (12)
3,7 (12)
Non recommand6
A ................ amperes
W............... watts
"_ ............. courant alternatif
_, ............. courant alternatif ou continu
no .............. vitesse a vide
............... borne de terre
J_,.............. symbole d'alerte a la securite
BPM........... coups par minute
.../min ........ par minute
PLPM ......... Pied lineaire par minute
CONSERVER CES CONSIGNES
POUR UTILISATION ULTERIEURE
DESCRIPTION (FIG. 1, 2)
A. Poign6e 6trier multi-position
B. Eclairage
C. G&chette
D. Poign6e principale
E. But6e de coupe
E Galets de guidage
G. R6glage d'alignement de lame
H. Levier de r6glage de tension de lame
I. R6gulateur de vitesse
J. Pare-chocs en caoutchouc
K. Crochet
L. Poulie
M. Protege-lame
N. Pneus en caoutchouc
O. Lame
P. Interrupteur
MONTAGE
Lames
Cette scie & ruban portable a _t_ congue pour _tre utilis6e avec des lames de 0,5 mm
(0,020 pc) d'6paisseur, 12,5 mm (1/2 pc) de largeur et 1140 mm (44-7/8 pc) de Iongueur. NE
PAS utiliser de lames de 0,64 mm (0,025 pc) d'6paisseur.
AATTENTION : L'utilisation de toute autre lame ou tout autre accessoire comporte des
risques. NE PAS utiliser tout autre type d'accessoire avec votre scie a ruban. Les lames
utilisees sur des scies a ruban fixes sont d'epaisseurs differentes. Ne pas tenter de les utiliser
sur votre outil portable.
S_lection de la lame
De fagon g6n6rale, consid6rez d'abord la taille et la forme de la piece &travailler ainsi que
le type de mat6riau & couper. Rappelez-vous que, pour une coupe optimale, il est conseill6
d'utiliser la denture de scie la plus grosse possible pour une application donn6e, car plus la
denture est grosse, plus la coupe est rapide. Lorsque vous choisissez le nombre appropri6 de
dents par pouce sur la lame de scie & ruban, deux dents au minimum devraient se trouver en
contact avec la surface de la piece & travailler Iorsque la lame s'y appuie. En r_gle g6n6rale,
les mat6riaux tendres requi_rent des lames & grosse denture, alors que les mat6riaux durs,
des lames & denture fine. Lorsqu'un fini plus lisse est requis, choisissez une lame & denture
plus fine.
Choisissez la lame de scie & ruban appropri6e selon le type de mat6riau et ses dimensions,
et le nombre de dents. Se reporter au tableau Description des lames.
Le tableau suivant ne se veut _tre qu'un guide g6n6ral. D6terminer le type de mat6riau, les
dimensions de la piece & travailler puis choisir la lame de scie & ruban la plus appropri6e.
ATTENTION : Ne jamais utiliser la scie a ruban pour couper des materiaux en resine, car
ceux-ci pourraient fondre. La fonte du materiau en resine causee par la forte chaleur generee
lots de la coupe peut faire que la lame de la scie aruban reste collee au materiau, et provoquer
surchauffe et grillage du moteur.
DESCRIPTION DES LAMES
Type de lame de scie h ruban Bim6tallic ue
Nombre de dents 24 18 14 10 14/18 10/14
I_paisseur de la piece
12galou inf6rieur & 3,2 mm (1/8 pc) • •
3,2 - 6,4 mm (1/8 pc - 1/4 pc) • •
6,4 mm - 10.3 mm (1/4 pc - 13/32 pc) • •
12galou sup6rieur & 10,3 mm (13/32 pc) •
Vitesse de lame
La scie & ruban portable DWM120 est 6quip6e d'un variateur de vitesse pour plus de
flexibilit6. Tournez le r6gulateur de vitesse (I) pour choisir la vitesse d6sir6e (fig. 1).La vitesse
1 est la plus lente, la vitesse 5, la plus rapide. Utilisez les param_tres de vitesse 1 &5 Iorsque
vous _tes connect6 sur un bloc d'alimentation CA.
Pour couper le cuivre, le laiton, le bronze, I'aluminium, la fonte, les corni_res et I'acier doux,
utilisez une vitesse 61ev6e.
Pour couper les tuyaux en plastique, les aciers plus durs, I'acier au chrome, I'acier au
tungst_ne, I'acier inoxydable, et tout autre mat6riau d61icat, utilisez une vitesse r6duite.
REMARQUE : Lorsqu'on d6coupe des tuyaux en plastique, une vitesse 61ev6epourrait faire
fondre le plastique.
Alignement de lame
J_AVERTISSEMENT : Pour reduire tout risque de dommages corporels graves, arr6ter et
debrancher I'outil avant tout reglage ou avant de retirer ou installer toute piece ou tout
accessoire. Tout demarrage accidentel comporte des risques de dommages corporels.
Votre scie & ruban est 6quip6e d'un m6canisme de r6glage d'alignement de lame
pour garantir un alignement de lame correct et constant. Le bord ant6rieur d'une lame
correctement align6e courra 16g_rement le long de I'un ou des deux galets de support sur
les guides pour lame. (La pression entre le bord de la lame et le galet sera tr_s 16g_re et
n'endommagera ni la lame nile galet.)
RI_GLAGE D'ALIGNEMENT DE LAME
1. Utilisez une cl6 de 13 mm (1/2 pc) pour desserrer 1'6crou de r6glage d'alignement (G),
comme illustr6 en figure 1, en lui donnant un ou deux tours vers la gauche.
2. Utilisez un tournevis pour visser la vis de r6glage d'un quart de tour. Faire tourner la vis
vers la droite rapprochera la lame des galets de guidage de lame. Faire tourner la vis vers
la gauche 61oignera la lame des galets.
3. Ajustez de fagon & ce que le bord ant6rieur de la lame touche 16g_rement les galets puis
resserrez fermement 1'6crou de verrouillage. (11sera n6cessaire de brancher la scie et de
la mettre en marche pour en v6rifier I'alignement.)
4. V6rifiez I'alignement de lame & chaque essai, et r6p6tez les 6tapes 1 & 4 autant que
n6cessaire pour obtenir I'alignement de lame correct.
Retrait et installation des lames
_AVERTISSEMENT : Pour reduire tout risque de dommages corporels graves, arr6ter et
debrancher I'outil avant tout reglage ou avant de retirer ou installer toute piece ou tout
accessoire. Tout demarrage accidentel comporte des risques de dommages corporels.
J_ATTENTION : Risques de coupure. Le levier de reglage de tension de lame est maintenu
sous tension grace a un ressort. Maintenir le contr61e du levier Iorsque la tension de la lame
est rel&chee.
POUR RETIRER LA LAME (FIG. 1,2)
1. Faites tourner & fond le levier de r6glage de tension de lame (H) vers la droite pour
rel&cher la tension sur la lame.
2. Inversez la scie sur un 6tabli ou une table avec son cordon sur la gauche.
3. Commencez & retirer la lame au niveau du protege-lame (M) et continuez autour des
poulies (L). Lorsqu'on essaie de retirer la lame, la tension peut se rel&cher et causer une
brusque lib6ration de la lame. LES LAMES DE SCIE SONT ACC:RC:ES. MANIEZ-LES
AVEC PRO:CAUTION.
4. Inspectez les galets de guidage (F1, F2) et retirez tout large d6bris qui pourrait s'y _tre
log& Ces d6bris peuvent emp_cher la rotation des galets de guidage et y occasionner
des m6plats.
5. Les pneus en caoutchouc (N) sont install6s sur les poulies (L). V6rifiez les pneus en
caoutchouc pour tout desserrement ou dommage Iorsque vous changez la lame. Eliminez
tout d6bris sur les pneus en caoutchouc des poulies. Cela allongera leur dur6e de vie
et pr6viendra la lame de glisser. En cas de desserrement ou de dommages, apportez
I'outil dans un centre de r6paration DEWALT pour le faire r6parer ou remplacer, le plus
rapidement possible. Le fait de continuer d'utiliser I'outil avec des pneus en caoutchouc
desserr6s ou endommag6s rendra le d6placement de la lame de scie & ruban instable.
POUR INSTALLER LA LAME (FIG. 1,3 h 5)
1. Positionnez la lame de fagon & ce que les dents soient en bas et inclin6es vers la but6e
de coupe, comme illustre en figures 1 et 3.
2. Ins6rez la lame dans les galets de guidage, comme illustr6 en figure 4.
3. En maintenant la lame dans les galets de guidage, installez-la autour des deux poulies
(L) et au travers de la but6e de coupe (E), comme illustr6 en figure 5.
4. Assurez-vous que la lame est pleinement ins6r6e dans les galets de guidage et
parfaitement positionn6e contre les pneus en caoutchouc.
5. Faites tourner & fond le levier de r6glage de tension de lame (H) vers la gauche, puis
inversez d61icatement la scie de fagon & ce que les poulies soient appuy6es sur 1'6tabli
ou latable. Assurez-vous que les dents soient en sens inverse par rapport & la scie ruban
(fig. 1,3).
6. Ajustez le r6gulateur de vitesse sur la vitesse r6duite (1) puis arr_tez et remettez la scie
en marche plusieurs fois pour vous assurer que la lame est correctement install6e.
Poignde dtrier multi-position (Fig. 1)
I'outil est 6quip6 d'une poign6e 6trier suppl6mentaire pour son transport ou son utilisation.
Installez la poign6e 6trier en choisissant I'une des multi-positions (avant, 45°, droite), comme
illustr6 en figure 1. Pour changer la position de la poign6e 6trier, desserrez le bouton de la
poign6e 6trier et placez la poign6e dans I'une des trois positions puis resserrez le bouton.
R_glages
_,AVERTISSEMENT : Pour reduire tout risque de dommages corporels graves, arr6ter
et debrancher I'outil avant tout reglage ou avant de retirer ou installer toute piece
ou tout accessoire. Tout demarrage accidentel comporte des risques de dommages
corporels.
RI_GLAGE DE LA BUTI_E DE COUPE
Pour 6tayer de larges pi_ces, abaissez la but6e de coupe en suivant les 6tapes ci-apr_s :
1. desserrez les deux vis (R), comme illustr6 en figure 1, & I'aide de la cl6 hexagonale
fournie & cet effet.
2. Placez la but6e de coupe (E) dans la position d6sir6e (fig. 5).
3. Resserrez fermement les vis (R).
FONCTIONNEMENT
Moteur
Assurez-vous que le courant utilis6 correspond &celui recommand6 sur la plaque signal6tique.
120 volts CA, 60 Hz veut dire courant alternatif seulement. Une baisse de tension de plus
de 10% causera perte de puissance et surchauffe. Les outils DEWALT sont test6s en usine.
Si I'outil ne marche pas, v6rifiez le bon fonctionnement du secteur, des fusibles, de la fiche
et de la prise.
Cet outil a 6t6 congu pour certaines applications.
La scie & ruban a 6t6 congue pour couper divers types de mat6riaux jusqu'& un diam_tre de
120.7 mm (4-3/4 pc) ou une forme rectangulaire de 127 mm (5 pc) x 120.7 mm (4-3/4 pc),
&un angle de 90°.
AAVERTISSEMENT : Eliminer toute trace d'huile ou de graisse sur la piece a travailler
avant de I'arrimer dans un etau ou tout autre dispositif de serrage. Si la piece n'est pas bien
arrimee, elle pourrait glisser pendant la coupe et/ou causer des dommages materiels ou
corporels.
i&AVERTISSEMENT : Ne jamais brancher Ibutil electrique a moins que I'alimentation CA
soit de la tension specifiee sur plaque signaletique de Ibutil. Ne jamais brancher cet outil sur
une alimentation en courant continu (CC).
•&AVERTISSEMENT: Danger de laceration. Si le cordon est branche sur le secteur Iorsque
la g&chette est en position de MARCHE, Ibutil demarrera soudainement et pourra causer
un accident grave.
G_chette
Pour mettre I'outil en marche, appuyez sur la g&chette (C). Pour arr_ter I'outil, rel&cher la
g&chette.
Coupe
_AVERTISSEMENT : Pour reduire tout risque de dommages corporels graves, arr6ter
et debrancher I'outil avant tout reglage ou avant de retirer ou installer toute piece
ou tout accessoire. Tout demarrage accidentel comporte des risques de dommages
corporels.
Se reporter & la figure 7 pour voir les positions de coupe recommand6es pour diff6rents
mat6riaux.
REMARQUE : Choisissez et utilisez la lame de scie & ruban la plus appropri6e au mat6riau
&d6couper. Se reporter & la section DESCRIPTION DES LAMES.
Cette scie & ruban portable peut _tre suspendue gr&ce au crochet (K). Accrochez I'outil & un
6tau & tube ou toute autre structure stable ad6quate, (fig. 2).
1. Arrimez solidement le mat6riau & couper & I'aide d'un 6tau ou tout autre dispositif de
serrage.
AAVERTISSEMENT : N'utilisez jamais I'outil pose sur une surface de travail en amenant le
materiau a I'outil. Arrimez systematiquement la piece et amenez au contraire I'outil a la piece,
en maintenant solidement I'outil a deux mains, comme illustre en figure 6.
2. Si 1'6clairage est insuffisant, un 6clairage (B) suppl6mentaire peut _tre activ6 & I'aide de
I'interrupteur (P), comme illustr6 en figure 1. Pour tout remplacement, renvoyez I'outil &
un centre de r6paration agr66 ou tout autre personnel de r6paration qualifi6, en utilisant
syst6matiquement des pi_ces de rechange identiques.
_ AVERTISsEMENT : Pour reduire tout risque de choc electrique, NE PAS utiliser I'appareil
Iorsque la lentille de protection du DEL est brisee.
3. Mettez la but6e de coupe (E) en contact avec la piece & travailler. Mettez la scie en
MARCHE.
Page 5

4.Lorsquelascieatteintlavitessederotationd_sirCe,inclinezlentementetfermementle
corpsdeI'outilpourmettrelalamedelascie&rubanencontactaveclapiece.12vitez
d'appliquer toute pression autre que celle cr_e par le poids du corps principal de I'outil.
Evitez soigneusement de mettre soudainement et abruptement la lame de la scie &
ruban en contact avec la surface sup_rieure de la piece. Cela pourrait endommager
sCrieusement la lame de la scie & ruban. Pour allonger la durCe de vie de la lame de la
scie & ruban, _vitez systCmatiquement tout impact soudain au d_but de toute operation
de coupe.
5. Comme illustr6 en figure 6, des coupes droites peuvent 6tre effectuCes en maintenant la
lame de la scie & ruban align_e avec la surface latCrale du boftier du moteur.Toute torsion
ou inclinaison de la lame fera d_raper la coupe et rCduira la durCe de vie de la lame.
_ATTENTION : Pendant la coupe, si la scie a ruban se bloque ouse coince dans le
materiau de lapiece, rel_chez immediatement la g&chette pour eviter d'endommager la lame
de la scie a ruban et son moteur.
6. Le propre poids de I'outil produit la pression de coupe la plus efficace. Toute pression
additionnelle de I'op_rateur freine la lame et rCduit sa durCe de vie.
7. Les extr_mitCs de pi_ces assez Iourdes pour causer des dommages corporels en
tombant, doivent 6tre _tay_es. Des souliers de sCcurit6 sont fortement recommand_s.
Les extrCmitCs de piece peuvent 6tre brt]lantes.
8. Maintenez la scie fermement &deux mains pour qu'elle ne tombe pas contre le matCriau
arrim_ ou support6 Iorsque la coupe est termin_e. NE CHANGEZ JAMAIS LA VlTESSE
,_,MOINS QUE L'OUTIL SOIT ARR#T#.
Conseils pour am_liorer les coupes
Les recommandations suivantes doivent vous servir de guide. Les r_sultats peuvent varier
selon I'op_rateur et le mat_riau particulier & d_couper.
• Ne d_formez jamais la lame de la scie & ruban pendant I'op_ration de coupe.
• N'utilisez jamais de r_frig_rants fluides avec les scies & ruban portables. I'utilisation
de ces derniers pourrait laisser un d_pCt sur les pneus et affecter les performances de
I'outil.
• En cas de vibrations excessives pendant la coupe, arrCtez la scie et ajustez I_g_rement
sa vitesse. Assurez-vous que le mat_riau & d_couper est fermement arrim& Si le
probl_me persiste, changez la lame de la scie & ruban.
MAINTENANCE
AAVERTISSEMENT : Pour reduire tout risque de dommages corporels graves, arr_ter
et debrancher I'outil avant tout reglage ou avant de retirer ou installer toute piece
ou tout accessoire. Tout demarrage accidentel comporte des risques de dommages
corporels.
Lubrification
Des roulements auto-lubrifiants sont utilis_s dans cet appareil et aucune lubrification
p_riodique n'est n_cessaire. Dans I'_ventualit_ peu probable ot_ une maintenance s'av_rerait
n_cessaire, amenez I'outil dans un centre de r_paration agr_&
Entretien
_AVERTISSEMENT : enlever les saletes et la poussiere hors des events au moyen d'air
comprime sec, au moins une fois par semaine. Porter une protection oculaire conforme
la norme ANSI Z87.1 (CAN/CSA Z94.3) et une protection des voies respiratoires conforme
aux normes NIOSH/OSHA/MSHA au cours de cette t&che de nettoyage.
_AVERTISSEMENT : ne jamais utiliser de solvants ni d'autres produits chimiques puissants
pour nettoyer les pieces non metalliques de I'outil. Ces produits chimiques peuvent affaiblir
les materiaux utilises dans ces pieces. Utiliser un chiffon humecte uniquement d'eau et de
savon doux. Ne jamais laisser de liquide penetrer dans I'outil et n'immerger aucune partie de
I'outil dans un liquide.
R_parations
Pour assurer la SI2CURITI 2 et la FIABILITI 2 du produit, les r_parations, I'entretien et les
rCglages (y compris I'inspection et le remplacement des balais) doivent _tre rCalis_s par
un centre de rCparation en usine DEWALT, un centre de rCparation autoris6 DEWALT
ou par un personnel d'entretien qualifi& Toujours utiliser des pi_ces de rechange
identiques.
Accessoires
_AVERTISSEMENT : puisque les accessoires autres que ceux offerts par DEWALT n'ont
pas ete testes avec ce produit, leur utilisation pourrait s'averer dangereuse. Pour reduire le
risque de blessures, utiliser exclusivement les accessoires DEWALT recommandes avec ce
produit.
Les accessoires recommand_s pour utilisation avec I'outil sont disponibles, & un cot]t
suppl_mentaire, aupr_s du distributeur ou du centre de rCparation autoris6 de votre rCgion.
Pour toute demande d'assistance pour trouver un accessoire, veuillez contacter DEWALT
Industrial Tool Co., 701 East Joppa Road, Baltimore, MD 21286, €:tats-Unis, composer le
1-800-4-DEWALT (1 800 433-9258) ou visiter notre site Web & www.dewalt.com.
Garantie limit_e de trois ans
DEWALT r_parera, sans frais, tout produit d_fectueux caus_ par un d_faut de materiel ou de
fabrication pour une p_riode de trois ans & compter de la date d'achat. La pr_sente garantie
ne couvre pas les pi_ces dont la d_fectuosit6 a _t6 caus_e par une usure normale ou I'usage
abusif de I'outil. Pour obtenir de plus amples renseignements sur les pi_ces oules rCparations
couvertes parlaprCsente garantie,visiterlesitewww.dewalt.com oucomposerle 1800433-9258
(1 800 4-DEWALT). Cette garantie ne s'applique pas aux accessoires et ne vise pas les
dommages causes par des rCparations effectuCes par un tiers. Cette garantie conf_re des
droits I_gaux particuliers & I'acheteur, mais celui-ci pourrait aussi b_nCficier d'autres droits
variant d'un _tat ou d'une province & I'autre.
En plus de la prCsente garantie, les outils DEWALT sont couverts par notre :
CONTRAT D'ENTRETIEN GRATUlT D'UN AN
DEWALT entretiendra I'outil et remplacera les pi_ces us_es au cours d'une utilisation normale
et ce, gratuitement, pendant une p_riode d'un an & compter de la date d'achat.
GARANTIE DE REMBOURSEMENT DE 90 JOURS
Si I'acheteur n'est pas enti_rement satisfait, pour quelque raison que ce soit, du rendement de
I'outil _lectrique, du laser ou de la cloueuse DEWALT, celui-ci peut le retourner, accompagn_
d'un requ, dans les 90 jours & compter de la date d'achat pour obtenir un remboursement
intCgral, sans aucun probl_me.
AM#RIQUE LATINE : Cette garantie ne s'applique aux produits vendus en Am_rique latine.
Pour ceux-ci, veuillez consulter les informations relatives & la garantie sp_cifique pr_sente
dans I'emballage, appeler I'entreprise locale ou consulter le site Web pour les informations
relatives & cette garantie.
REMPLACEMENT GRATUIT DES I_TIQUETTES D'AVERTISSEMENT : Si les _tiquettes
d'avertissement deviennent illisibles ou sont manquantes, composer le 1-800-4-DEWALT
pour en obtenir le remplacement gratuit.
f
DWM120 VAD,ABLESPEEDDA,OSAW
TO REDUCE THE RiSK OF iNJURY, USER MUST REAR iNSTRUCTiON MANUAL. ALWAYS USE PROPER
EYE AN O RESP RATORY PROTECT ON PARA D SM NU R EL R ESG_ DE LEO ONES, EL USUAR O
OEBERA LEER EL MANUAL DE iNSTRUCCiONES. SiEMPRE SE DEBERA LLEVAR LA PROTECCION
APROPIAUA PARA IA VISTA Y PARA LAS VIAC RESPiRATORIAC. AFIN RE MiNiMISER LEO RiSQUES
DE BLECSURES, L'UTILJSATEUR gRiT TOUJOURC LJRE LE GUIDE D'UTILJSATJON, IL EAU T TOUJOURC
PORTER DE L'EUDJPEMENT DE PROTECTION OCULAiRE ET RESPJRATOJRE APPROPRIE.
BEWALT iNDUSTRiAL TOOL CO., BALTIMORE, MB 21286 USA PATENTS PENDING
OR SERVJl;E iNFORMATiON, CALL 1-800,4-O_WALT _w.O_WALT.co m
Definiciones: Normas de seguridad
Las siguientes definiciones describen el nivel de gravedad de cada palabra de serial.
Lea el manual y preste atenciCn a estos simbolos.
_PELIGRO: indica una situacidn de peligro inminente que, si no se evita, provocara
la muerte o lesiones graves.
AADVERTENClA: indica una situacidn de peligro potencial que, si no se evita, podria
provocar la muerte o lesiones graves.
AATENClON: indica una situacidn de peligro potencial que, si no se evita,
posiblemente provocarfa lesiones leves o moderadas.
ATENCION: cuando se utiliza sin el sfmbolo de alerta de seguridad indica una situacidn
de peligro potencial que, si no se evita, puede provocar da#os en la propiedad.
SI TIENE ALGUNA PREGUNTA O ALGON COMENTARIO QUE HACER CON RESPECTO
A ESTA O CUALQUIER OTRA HERRAMIENTA DEWALT, LL,&MENOS SIN CARGO AL:
1-800-4-DEWALT (1-800-433-9258).
_ ADVERTENCIA: Para reducir el riesgo de lesidn, lea el manual de instrucciones.
Advertencias Generales de Seguridad para
Herramientas Eldctricas
5"(127mm) DEEP CUT
SED,
./"
CONSERVE TODAS LAS ADVERTENCIAS E
INSTRUCCIONES PARA CONSULTAS FUTURAS
El uso del termino "maquina herramienta" en las advertencia, se refiere a su maquina
herramienta ya sea operada por la red de suministro (con cable de alimentacidn) o a baterfa
(inalambrica).
1) SEGURIDAD EN EL AREA DE TRABAJO
a) Mantenga su #rea de trabajo limpia y bien iluminada. Los accidentes abundan en
las areas de trabajo desordenadas u oscuras.
b) No opere mgquinas herramienta en ambientes explosivos, tales cored en
presencia de liquidos, gases o polvos inflamables. Las herramientas electricas
producen chispas que pueden inflamar el polvo o los gases
c) No use mgquinas herramienta en presencia de nihos u otras personas
circunstantes. Las distracciones pueden hacerle perder el control.
2) SEGURIDAD ELI_CTRICA
a) Los enchufes de las maquinas herramienta deben poder acoplarse a la toma
de corriente. Jamas modifique el enchufe de ninguna manera. No emplee
adaptadores de enchufe con maquinas herramienta conectadas a tierra. Los
enchufes no modificados y las tomas de corriente que correspondan al enchufe
reduciran el riesgo de descarga electrica.
b) Evite el contacto corporal con superficies conectadas a tierra, tales como
tuberias, radiadores, cocinas y refrigeradores. Existe un mayor riesgo de descarga
electrica cuando su cuerpo esta conectado a tierra.
c) No exponga maquinas herramienta a condiciones Iluviosas o h#medas. Si entra
agua a la maquina herramienta, aumentara el riesgo de descarga electrica.
d) No abuse del cable. Jamas transporte, arrastre o desenchufe la maquina
herramienta por el cable. Mantenga el cable alejado de fuentes de calor, ace#e,
bordes afilados o piezas en movimiento. Los cables dai_ados o enredados aumentan
el riesgo de descarga electrica
e) Cuando opere una herramienta electrica afuera, use un alargador de exterior. El
uso de un alargador de exterior reduce el riesgo de descarga electrica.
f) Si no es posible evitar el uso de una herramienta electrica en un sitio h#medo,
utilice una alimentacion electrica protegida con un interruptor de circuito de
falla sin conexion a tierra (GFCl). El uso de un GFCI reduce el riesgo de descarga
electrica.
3) SEGURIDAD PERSONAL
a) Mantengase alerta, fijese en Io que esta haciendo y utilice su sentido com#n
cuando opere una maquina herramienta. No utilice una maquina herramienta si
esta cansado o bajo la influencia de drogas, alcohol o medicamentos. Sd/o hace
falta un momento de distraccidn durante la operacidn de maquinas herramienta para
causar lesiones corporales serias.
b) Use equipo de proteccion personal Utilice siempre proteccion ocular. Equipo
de proteccidn personal tales como mascara antipolvo, calzado de seguridad anti-
derrapante, cascos o proteccidn auditiva, usados para las condiciones apropiadas,
reducira la posibilidad de sufrir lesiones corporales.
c) Prevenga puestas en marcha accidentales. Verifique que el interruptor este
apagado antes de enchufar la maquina herramienta y/o bateria, al recoger o
transportar la herramienta. El sujetar una maquina herramienta con el dedo en el
conmutador o enchufar maquinas herramienta con el conmutador encendido se presta
para que ocurran accidentes.
d) Retire toda Ilave de ajuste antes de encender la maquina herramienta. Si se
deja alguna Ilave en una pieza giratoria de la maquina herramienta, podrfa provocar
lesiones..
e) No se sobreextienda. Mantengase siempre bien apoyado y equilibrado. Estopermite
tener un mayor control de la maquina herramienta en situaciones inesperadas.
f) Vistase debidamente. No se ponga ropa suelta o joyas. Mantenga su pelo, ropa y
guantes alejados de piezas moviles. La ropa suelta, las joyas y el pelo largo pueden
quedar atrapados en las piezas mdviles.
g) Si la maquina herramienta viene con alg#n dispositivo de conexion para la
extraccion y coleccion de polvo, aseg#rese que este sea debidamente conectado
y utilizado. El uso de dispositivos de recoleccidn de polvo, puede reducir riesgos
asociados al polvo.
4) USO Y CUlDADO DE LA MAQUlNA HERRAMIENTA
a) No fuerce la maquina herramienta. Use la maquina herramienta correcta para su
aplicacion. La maquina herramienta apropiada hara un trabajo mejor y mas seguro si
se usa de la forma para la cual fue disei_ada.
b) No use la maquina herramienta si el conmutador no puede encenderla y apagarla.
Cualquier maquina herramienta que no pueda ser controlada con el conmutador es
peligrosa y debe ser reparada.
c) Desenchufe la maquina herramienta de la toma de corriente y/o de la unidad de
alimentacion antes de ajustarla, cambiar de accesorio o guardarla. Estas medidas
de seguridad preventiva reducen el riesgo de poner en marcha la maquina herramienta
accidentalmente.
d) Guarde su maquina herramienta fuera del alcance de ni#os cuando no la este
usando y no permita que personas que no esten familiarizadas con la maquina
herramienta o estas instrucciones la usen. Las maquinas herramienta son
peligrosas en manos de personas no capacitadas.
e) Mantenga su maquina herramienta. Revise la maquina herramienta para verificar
que no este mal alineada, que sus piezas moviles no esten trabadas o rotas y
que no exista otra condicion que pudiera afectar su operaciCn. Si esta da_ada,
haga reparar la maquina herramienta antes de utilizarla. Muchos accidentes son
causados pot usar maquinas herramienta que no han sido bien mantenidas.
f) Mantenga sus herramientas de cortes afiladas y limpias. Las herramientas de corte
debidamente mantenidas y afiladas tienen mends probabilidades de trabarse y son
mas faciles de controlar
g) Use la mbquina herramienta, sus accesorios, etc., en cumplimiento con estas
instrucciones tomando en cuenta las condiciones de trabajo y el trabajo a
realizar. El uso de una maquina herramienta para operaciones fuera de aquellas para
las que fue disefiada podrfa resultar en una situacidn peligrosa.
5) SERVlClO
a) Haga reparar su mbquina herramienta por un tecnico de reparacion calificado,
utilizando solo repuestos originales. Esto garantizar# la seguridad de la mbquina
herramienta.
Reglas de Seguridad Adicionales - Sierras de Banda
Portdtiles
• Sujete la herramienta por las superficies aislantes si Ileva a cabo una operaciCn en
que la herramienta puede tocar un conductor oculto. El contacto con un conductor
activo provocara que las piezas metalicas de la herramienta conduzcan electricidad y que
el operador reciba una descarga electrica.
• Mantenga las manos alejadas del area y de la hoja de corte. Mantenga una mano
sobre el mango principal y la otra sobre el mango delantero para evitar perder el control
Io cual podrfa resultar en lesiones corporales.
• Aseg#rese siempre de que la sierra de banda portatil este limpia antes de utilizarla.
• Detenga siempre la operacidn de inmediato si nota cualquier anormalidad.
• Aseg#rese siempre que todas las piezas esten debida y firmemente montadas antes de
utilizar la herramienta.
• Maneje siempre la hoja de la sierra de banda con cuidado cuando la monte o retire de la
sierra.
• Mantenga siempre las manos alejadas de la trayectoria de la hoja de la sierra de banda.
• Espere siempre a que el motor haya alcanzado su velocidad completa antes de iniciar el
corte.
• Mantenga las empufiaduras secas, limpias, libres de aceite y grasa. Sostenga la
herramienta con firmeza cuando la use.
• Este alerta en todD momento, especialmente durante operaciones repetitivas y mondtonas.
Este siempre seguro de la posicidn de sus manos en relacidn a la hoja.
• Jambs retire el tope.
• Mantengase alejado de los extremos que pudieran caerse una vez que sean cortados.
Pueden estar calientes o ser afilados y/o pesados. Puede resultar en lesiones corporales
serias.
• Los hilos del alargador deben ser de un calibre apropiado (AWG o Calibre
Americano de Hilos) para su seguridad. Mientras menor sea el calibre de/hi/o, mayor
la capacidad del cable. Es decir, un hilo calibre 16 tiene mayor capacidad que uno de 18.
Un cable de un calibre insuficiente causara una cafda en la tensidn de la Ifnea dando
por resultado una perdida de energfa y sobrecalentamiento. Cuando se utilice mas de un
alargador para completar el largo total, aseg#rese que los hilos de cada alargador tengan
el calibre mfnimo. La tabla siguiente muestra el tamafio correcto a utilizar, dependiendo de
la Iongitud del cable y del amperaje nominal de la placa de identificacidn. Si tiene dudas
sobre cual calibre usar, use un calibre mayor. Cuanto mas pequefio es el n#mero del
calibre, mas resistente es el alargador.
_ ADVERTENCIA! Lea todas las advertencias e instrucciones de seguridad. Elignorar las advertencias e instrucciones puede provocar una descarga electrica,
incendio y/o lesidn grave.
Page 6

Calibre minimo para juegos de cables
Capacidad nominal
en amperios
Desde Hasta
0 6
6 10
10 12
12 16
_ADVERTENCIA: SIEMPRE use lentes de seguridad. Los anteojos de uso diario NO son
lentes de seguridad. Utilice ademas una mascara para la cara o guardapolvo si la operaci6n
de corte genera demasiado polvo. SIEMPRE USE EQUIPO DE SEGURIDAD
CERTIFICADO:
• ANSI Z87.1 protecci6n ocular (CAN/CSA Z94.3),
• ANSI $12.6 ($3.19) protecci6n auditiva,
• Protecci6n respiratoria NIOSH/OSHA/MSHA.
i_ADVERTENCIA: Algunas partfculas de polvo generadas al lijar, serrar, esmerilar y
taladrar con herramientas electricas, as[ como al realizar otras actividades de construcci6n,
contienen qufmicos que el Estado de California sabe que pueden producir cancer, defectos
congenitos u otras afecciones reproductivas. Ejemplos de estos qufmicos son:
• plomo de algunas pinturas,
• polvo de sflice proveniente de ladrillos y cemento y otros productos de albahilerfa, y
• Arsenico y cromo proveniente de madera tratada qufmicamente..
El peligro derivado de la exposici6n a estos materiales varfa en funci6n de la frecuencia
con que se realice este tipo de trabajo. Para reducir su exposici6n a estos qufmicos: trabaje
en una zona bien ventilada y Ilevando equipos de seguridad aprobados, como mascarillas
antipolvo especialmente disehadas para filtrar partfculas microsc6picas.
• Evite el contacto prolongado con polvo generado por el lijado, serruchado, pulido
y taladrado mecanico y otras actividades de construccion. Vista ropas protectoras
y lave las areas de la piel expuestas con agua y jabon. Si permite que el polvo se
introduzca en su boca o sus ojos, o que quede sobre lapiel, puede favorecer la absorci6n
de qufmicos peligrosos.
_ADVERTENClA: La utilizaci6n de esta herramienta puede generar polvo o dispersarlo,
Io que podrfa causar lesiones graves y permanentes al sistema respiratorio, as[ como otras
problemas. Siempre use protecci6n respiratoria aprobada por NIOSH (Instituto Nacional
de Seguridad y Salud en el Trabajo) u OSHA (Administraci6n de Seguridad y Salud en el
Trabajo) apropiada para la exposici6n al polvo. Dirija las partfculas en direcci6n contraria a
la cara y el cuerpo.
AADVERTENClA: Siempre utilice proteccion auditiva apropiada mientras utilice la
herramienta, en conformidad con ANSI S12.6 ($3.19). En determinadas condiciones y con
utilizaciones prolongadas, el ruido generado por este producto puede favorecer la perdida
de audici6n.
• La etiqueta de su herramienta puede incluir los siguientes sfmbolos. Los sfmbolos y sus
definiciones son los siguientes:
V................ voltios
Hz.............. hertz
min ............ minutos
.... ......... corriente directa
@ .............. Construccidn Clase I
(con conexidn a tierra)
[] .............. Construccidn Clase II
(con aislamiento doble)
RPM .......... revoluciones o reciprocidad
por minuto
Voltios
120V 7,6 (25)
240V 15,2 (50)
Largo total del cable en metros (en pies)
15,2 (50)
30,5 (100)
AWG
18
18
16
14
A .................. amperios
W................. vatios
"_................ corriente alterna
............... corriente alterna o directa
no ................ velocidad sin carga
................. terminal a tierra
_&................ sfmbolo de alerta de seguridad
.../min .......... por minuto
BPM ............. golpes por minuto
PSPM .......... Pies de superficie por minuto
16
16
16
12
30,5 (100) 45,7 (150)
61,0 (200) 91,4 (300)
16 14
14 12
14 12
No recomendado
GUARDE ESTAS INSTRUCCIONES PARA
FUTURAS CONSULTAS
COMPONENTES (FIG. 1, 2)
A. Mango de posiciones mOltiples
B. Luz
C. Gatillo
D. Mango principal
E. Tope
F. Rodillos de guia
G. Ajuste de la hoja
H. Palanca de tensi6n de la hoja
I. Rueda de velocidad
J. Parachoques de goma
K. Gancho para colgar
L. Polea
M. Protector de la hoja
N. Llantas de goma
O. Hoja
P. Interruptor de luz
ENSAMBLAJE
Hojas
Esta sierra de banda portatil esta configurada para ser utilizada con hojas de 0,5 mm (0,020
pulg.) de grosor, 12,5 mm (1/2 pulg.) de ancho y 1140 mm (44-7/8 pulg.) de largo. NO USE
hojas con grosores de 0,64 mm (0,25).
iL4TENCION: El uso de cualquier otro tipo de hoja o accesorio podrfa ser peligroso. NO
utilice ning#n otto tipo de accesorio con su sierra de banda. Las hojas utilizadas en sierras
de banda estacionarias son de diferentes espesores. No intente utilizarlas con su unidad
portatil.
Seleccidn de la Hoja
En general, considere primero el tama_o y laforma de la pieza de trabajo y el tipo de material
a ser cortado. Recuerde que para realizar cortes mas eficientes, se deberia utilizar la hoja
con los dientes mas gruesos posibles en una aplicaci6n dada pues mientras mas grueso el
diente, mas rapido el corte. En la selecci6n del nt]mero apropiado de dientes por milimetro
para las hojas de sierras de banda, fijese que al menos dos dientes deben entrar en contacto
con la superficie de la pieza de trabajo cuando se descansa la hoja contra la pieza de trabajo.
Como regla general, los materiales blandos generalmente requieren hojas con dientes
gruesos mientras que los materiales duros requieren hojas de dientes mas finos. Cuando
requiera un acabado mas suave, seleccione una de las hojas de dientes mas finos.
Seleccione la hoja para su sierra de banda de acuerdo al tipo de material, las dimensiones y
el nt]mero de dientes. Vea el cuadro Descripcion de la hoja.
La siguiente tabla es para ser utilizada s61o como una guia general. Determine el tipo de
material y la dimensi6n de la pieza de trabajo y seleccione la hoja para sierras de banda
mas apropiada.
ATENClON: Jambs utilice la sierra de banda para cortar materiales de resina que pudieran
derretirse. El material de resina derretido por el calor generado durante el corte podrfa hacer
que la hoja de la sierra de banda se adhiriera al material, posiblemente sobrecargandola y
quemando su motor.
DESCRIPCl0N DE LA HOJA
Tipo de hoja de la sierra de banda
Ndmero de dientes
Espesor de la pieza de trabajo
3,2 mm (1/8 pulg.) y menor
3,2 - 6,4 mm (1/8 pulg. - 1/4 pulg.)
6,4 mm - 10.3 mm (1/4 pulg. - 13/32 pulg.)
10,3 mm (13/32 pulg.) y mayor
24 18 14 10 14/18 10/14
Bi-Metal
Velocidad de la Hoja
Su sierra de banda portatil DWM120 viene con velocidad variable para una mayor versatilidad.
Gire la rueda de velocidad (I) para seleccionar la velocidad deseada (Fig. 1). La velocidad 1
es la mas lenta; la velocidad 5 es lamas rapida. Use las velocidades desde la 1 a la 5, cuando
est6 conectado a una alimentaci6n de corriente alterna.
Cuando corte cobre, lat6n, bronce, aluminio, fierro fundido, fierro angular o acero dulce, use
una velocidad mayor.
Cuando corte tuberia de plastico, aceros mas duros, acero al cromo, acero al tungsteno,
acero inoxidable y otros materiales complicados, use una velocidad baja.
NOTA: Cuando corte tuberia de plastico, las velocidades mayores pueden derretirlo.
Ajuste de la Hoja
_L4DVERTENCIA: Para reducir el riesgo de lesion personal seria, apague la herramienta
y desconectela de la alimentacion electrica antes de hacer algOn ajuste o remover/
instalar anexos o accesorios. Un encendido accidental puede provocar lesiones.
Su sierra de banda viene con un mecanismo de ajuste de la hoja, el cual garantiza un
ajuste apropiado de la hoja en todo momento. El horde posterior de una hoja alineada
apropiadamente, operara ligeramente rozando contra uno o ambos rodillos de respaldo en
las guias de la hoja. (La presi6n entre el horde de la hoja y el rodillo sera muy ligera y no
daSarA ni la hoja ni el rodillo.)
PARA AJUSTAR LA HOJA
1. Utilice una Ilave de 13 mm (1/2 pulg.) para aflojar la tuerca de seguridad (G) del ajuste,
como se muestra en la Figura 1, girando una o dos vueltas en sentido contrario alas
manillas del reloj.
2. Use un atornillador para girar el tornillo de ajuste en 1/4 de vuelta. AI girar el tornillo en el
mismo sentido de las manillas del reloj, la hoja se movera hacia arriba hasta los rodillos
guia de la hoja. AI girar el tornillo en el sentido contrario alas manillas del reloj, la hoja
se movera hacia abajo alejandose de los rodillos.
3. Realice el ajuste de manera tal que el borde de la hoja toque ligeramente los rodillos,
luego apriete bien la tuerca de seguridad. (Sera necesario conectar la sierra y operarla
para observar el ajuste.)
4. Observe el ajuste de la hoja en cada operaci6n y repita los Pasos 1 a 4 como sea
requerido para Iograr un ajuste apropiado de la hoja.
Instalacidn y desinstalacidn de las hojas
_4DVERTENCIA: Para reducir el riesgo de lesion personal seria, apague la
herramienta y desconectela de la alimentaci6n electrica antes de hacer algOn ajuste
o remover/instalar anexos o accesorios. Un encendido accidental puede provocar
lesiones.
AATENCl6N: Riesgo de cortadura. La palanca de tensi6n de la hoja esta bajo presi6n de
resorte. Mantenga el control de la palanca cuando libere la tensi6n de la hoja.
PARA DESlNSTALAR LA HOJA (FIG. 1,2)
1. Gire la palanca de tensi6n de la hoja (H) en direcci6n alas manillas del reloj hasta que
se detenga para relajar la tensi6n de la hoja.
2. De vuelta la sierra y p6ngala sobre una banca o mesa de trabajo con el cable a la
izquierda.
3. Para desinstalarla, empiece por el protector de la hoja (M) y siga alrededor de las poleas
(L). Cuando retire la hoja, la tensi6n puede ser liberada y la hoja puede saltar de su
lugar. LAS HOJAS DE SIERRAS SON FILUDAS. TENGA CUIDADO CUANDO LAS
MANEJE.
4. Revise los rodillos de guia (F1, F2) y retire cualquier pieza grande que pudiera
encontrarse atrapada en ellos. Las piezas atrapadas pueden prevenir la rotaci6n de los
rodillos guia y causar Areas planas en los rodillos de guia.
5. Las Ilantas de goma (N) estan montadas en las poleas (L). Las Ilantas de goma deberian
ser revisadas para confirmar que no estan sueltas ni daSadas cuando se cambie la
hoja. Limpie cualquier astilla que encuentre en las Ilantas de goma de las poleas. Esto
aumentara la duraci6n de las Ilantas y evitara que la hoja se resbale. Si se sueltan o
daSan, la herramienta deberia ser Ilevada a un centro de servicio autorizado DEWALT
para ser reparada o cambiada Io antes posible. El uso continuo de la herramienta
con Ilantas de goma sueltas o daSadas causara que la hoja de la sierra de banda se
desestabilice al desplazarse.
PARA INSTALAR LA HOJA (FIG. 1,3-5)
1. Coloque la hoja de modo que los dientes queden debajo y angulados hacia el guia del
material, como Io muestran las Figura 1 y 3.
2. Deslice la hoja en los rodillos de guia, como Io muestra la Figura 4.
3. Sostenga la hoja en los rodillos de guia y col6quela alrededor de ambas poleas (L) y
luego por el guia del material (E), como Io muestra la Figura 5.
4. Asegt]rese que la hoja est6 completamente insertada en los rodillos de guia y
posicionados en angulo recto contra las Ilantas de goma.
5. Gire la palanca de tensi6n de la hoja (H) en direcci6n contraria alas manillas del reloj y
luego suavemente voltee la sierra de tal forma que las poleas reposen sobre su banco o
mesa de trabajo y. Asegt]rese que los dientes miren en direcci6n opuesta a la sierra de
banda (Fig. 1,3).
6. Coloque la rueda de velocidad en la velocidad baja (1) y luego encienda y apague la
sierra unas pocas veces, para asegurarse que la hoja esta debidamente asentada.
Mango de posiciones mbltiples (Fig. 1)
Un mango viene con su herramienta para transportarla y para ser usado como un mango
adicional. Ensamble el mango en una de las posiciones mt]ltiples (hacia adelante, a 45°
o hacia arriba) mostradas en la Figura 1. Cuando cambie el mango de una posici6n a
otra, afloje el bot6n del mango y mueva el mango a una de las tres posiciones y apriete el
bot6n.
Ajustes
_L4DVERTENCIA: Para reducir el riesgo de lesion personal seria, apague la
herramienta y desconectela de la alimentaci6n electrica antes de hacer algOn ajuste
o remover/instalar anexos o accesorios. Un encendido accidental puede provocar
lesiones.
AJUSTE DEL TOPE
Para poder soportar pieza de trabajo grandes, el tope debe ser bajado siguiendo los
siguientes pasos:
1. Afloje los dos tornillos (R) que aparecen en la Figura 1, con la Ilave hexagonal incluida.
2. Mueva el tope (E) a la posici6n deseada (Fig. 5).
3. Ajuste firmemente los tornillos (R).
OPERACI(_N
Motor
Aseg_rese de que su alimentaci6n el6ctrica sea la requerida en la placa nominal. "120
Volts AC 60 Hz" significa que s61o puede utilizarse corriente alterna. Una reducci6n de
voltaje superior al 10% provocara p6rdida de potencia y sobrecalentamiento. Todas las
herramientas DEWALT vienen probadas de fabric& Siesta herramienta no funciona, revise
la linea de alimentaci6n el6ctrica para verificar que no se hayan saltado fusibles y que el
enchufe y receptaculo tengan el contacto debido.
Existen ciertas aplicaciones para las cuales esta herramienta fue diseSada.
Esta sierra de banda ha sido diseSada para diversos tipos de material, de un diametro
maximo de 120.7 mm (4-3/4 pulg.) 6 de una dimensi6n m_ima de 127 mm (5 pulg.) x
120.7 mm (4-3/4 pulg.) para piezas rectangulares de 90°.
I_LDVERTENClA: Limpie meticulosamente todo aceite y toda grasa que tenga la pieza de
trabajo antes de fijarla en un torno u otro dispositivo de sujecidn. Si la pieza de trabajo no
esta bien sujeta, puede soltarse durante el corte y romperse, Io cual podrfa causar graves
lesiones corporales.
i_,ADVERTENClA: Jambs conecte la maquina herramienta si la corriente alterna disponible
no es del mismo voltaje al especificado en la placa de identificacidn de la herramienta.
Jambs enchufe esta herramienta en una fuente de corriente directa.
ikADVERTENClA: Peligro de Laceracidn. Si el cable de alimentacidn esta conectado a la
alimentacidn de corriente y el gatillo esta encendido, la maquina herramienta podrfa
encenderse repentinamente y causar un accidente grave.
Gatillo
Para encender la herramienta, apriete el gatillo (C). Para apagar la herramienta, libere el
gatillo.
Corte
_4DVERTENCIA: Para reducir el riesgo de lesion personal seria, apague la
herramienta y desconectela de la alimentacion electrica antes de hacer algOn ajuste
o remover/instalar anexos o accesorios. Un encendido accidental puede provocar
lesiones.
Refi6rase a la Figura 7 para ver posiciones de corte recomendadas para diferentes mate-
riales.
NOTA: Seleccione y utilice la hoja para sierras de banda que sea mas apropiada para el
material a cortar. Yea la DESCRIPClON DE LA HOJA.
Esta sierra de banda portatil debe ser colgada con el gancho para colgar (K). Cuelgue la
herramienta de una abrazadera de caSeria u otra estructura adecuada y estable. (Fig. 2)
1. Monte el material a ser cortado en un torno u otro dispositivo de sujeci6n.
AADVERTENClA: Nunca intente usar estar herramienta colocandola sobre una superficie
y trayendo el material hacia la herramienta. Siempre sujete firmemente la pieza de trabajo y
traiga la herramienta hacia la pieza de trabajo, sujetando firmemente la herramienta con
ambas manos, como Io muestra la Figura 6.
2. Si requiere luz adicional, puede activar la luz (B) con el interruptor de la luz (P), como Io
muestra la Figura 1. Si es necesario hacer un reemplazo, Ileve la herramienta a un centro
de servicio autorizado o a otro personal de servicio calificado, usando siempre repuestos
originales.
A ADVERTENCIA: Para reducir el riesgo de descarga electrica, NO utilice la herramienta
si el lente LED se ha roto.
3. Coloque el tope (E) en contacto con la pieza de trabajo. Encienda la sierra.
4. Cuando la sierra alcance la velocidad de rotaci6n deseada, incline lenta y suavemente el
cuerpo principal de la herramienta para que la hoja de la sierra entre en contacto con la
pieza de trabajo. No aplique una presi6n adicional superior al peso del cuerpo principal
de la herramienta. Evite hacer contacto entre la hoja y la superficie superior de la pieza
en forma brusca y repentina. Esto causara daSos serios a la hoja de la sierra de banda.
Para un maximo de duraci6n de la hoja de la sierra de banda, asegt]rese que no haya
un impacto repentino al inicio del corte.
5. Como aparece ilustrado en la Figura 6, puede hacer cortes rectos si mantiene la hoja
de la sierra en linea con la superficie lateral de la caja protectora del motor. Si la hoja se
tuerce o inclina, el corte se saldra de su linea y la hoja durara menos.
iL4TENCl6N: Durante el corte, si la sierra de banda se bloquea o atora en el material de la
pieza de trabajo, apague inmediatamente el interruptor para evitar dahar la hoja de la sierra
y el motor.
6. El peso mismo de la herramienta, ofrece la presi6n mas eficiente de corte hacia abajo.
Si el operador aSade mas presi6n, la hoja ira mas lentamente y durara menos.
Page 7

7.Losextremos,quepodrianserIosuficientementepesadoscomoparacausarlesiones
cuandosecaiganluegodelcorte,deberianserdebidamenteapoyadas.Serecomienda
utilizarcalzadodeseguridad.Laspiezasextremaspuedenestarcalientes.
8.Sostengafirmementelasierraconambasmanosparaquelasierranosecaigacontrael
materialsujetooapoyadocuandosecompleteelcorte.NOREALICECAMBIOSALA
VELOOIDADANOSERQUELAHERRAMIENTAHAYASlDOAPAGADA.
Consejos para un corte mejor
Las siguientes recomendaciones deberian ser utilizadas como guia. Los resultados pueden
variar dependiendo del operador y del material en particular que se esta cortando.
• Jamas tuerza la hoja de la sierra durante el corte.
• Jamas utilice refrigerantes liquidos en conjunto con las sierras de banda portatiles. El
uso de refrigerantes liquidos puede causar una acumulaciOn en las Ilantas y entorpecer
el desempe_o.
• Si ocurre una vibraci6n excesiva durante el corte, apague la sierra y ajuste ligeramente
la velocidad. Asegt]rese que el material que se esta cortando esta firmemente sujeto. Si
la vibraci6n sigue, cambie la hoja de la sierra.
MANTENIMIENTO
J_ADVERTENCIA: Para reducir el riesgo de lesion personal seria, apague la herramienta
y desconectela de la alimentacion electrica antes de hacer alg#n ajuste o remover/
instalar anexos o accesorios. Un encendido accidental puede provocar lesiones.
Lubricacidn
La herramienta incorpora cojinetes autolubricantes, por Io que no requiere lubricaci6n
peri6dica. En el desafortunado caso de necesitarse el servicio, Ileve su herramienta a un
centro de servicio autorizado.
Limpieza
_ADVERTENCIA: Sople la suciedad y el polvo de todos los conductos de ventilacidn con
aire seco al menDs una vez per semana. Use la adecuada proteccidn para los Dies ANSI
Z87.1 (CAN/CSA Z94.3) y la adecuada proteccidn respiratoria NIOSH/OSHA/MSHA cuando
realice esta operacidn.
AADVERTENClA: Nunca utilice solventes u otros productos qufmicos abrasives para limpiar
las piezas no metalicas de la herramienta. Estos productos qufmicos pueden debilitar los
materiales plasticos utilizados en estas piezas. Utilice un paho humedecido sdlo con agua y
jabdn neutro. Nunca permita que penetre Ifquido dentro de la herramienta y nunca sumerja
las piezas de la herramienta en un Ifquido.
Reparaciones
Para garantizar la SEGURIDAD y la CONFIABILIDAD, las reparaciones, el mantenimiento y
los ajustes (incluida la inspecciOn y reemplazo de cepillos) deben ser realizados por un centro
de mantenimiento de fabrica de DEWALT, un centro de mantenimiento DEWALT autorizado u
otro personal de mantenimiento calificado. Utilice siempre piezas de repuesto id_nticas.
Compra de accesorios
AADVERTENCIA: Debido a que con este producto no se han probado otros accesorios que
no sean los que ofrece DEWALT, el use de dichos accesorios con esta herramienta podrfa
ser peligroso. Para reducir el riesgo de lesiones, con este producto deben usarse sdlo los
accesorios DEWALT recomendados.
Los accesorios que se recomiendan para utilizar con la herramienta estan disponibles a
un costo adicional en su distribuidor local oen un centro de mantenimiento autorizado. Si
necesita ayuda para Iocalizar algt]n accesorio, pOngase en contacto con DEWALT Industrial
Tool Co., 701 East Joppa Road, Baltimore, MD 21286, Ilame al 1-800-4-DEWALT (1-800-433-
9258) o visite nuestro sitio web www.dewalt.com.
PARA REPARACl0N Y SERVIClO DE SUS
HERRAMIENTAS ELI_CTRICAS, FAVOR DE DIRIGIRSE
AL CENTRO DE SERVIClO MAS CERCANO
CULIACAN, SIN
Blvd.Emiliano Zapata 5400-1 Poniente
Col. San Rafael
GUADALAJARA, JAL
Av.La Paz #1779 - Col. Americana Sector Juarez
MEXICO, D.F.
Eje Central Lazaro Cardenas No. 18
Local D,Col. Obrera
MERIDA, YUC
Calle 63 #459-A - Col. Centro
MONTERREY, N.L.
Av. Francisco I. Madero 831 Poniente - Col. Centro
PUEBLA, PUE
17 Norte #205 - Col. Centro
QUERETARO, QRO
Av. San Roque 274 - Col. San Gregorio
SAN LUlS POTOSl, SLP
Av. Universidad 1525 - Col. San Luis
TORREON, COAH
Blvd. Independencia, 96 Pte. - Col. Centro
VERACRUZ, VER
ProlongaciOn Diaz MirOn #4280 - Col. Remes
VILLAHERMOSA, TAB
ConstituciOn 516-A - Col. Centro
PARA OTRAS LOCALIDADES:
Si se encuentra en M_xico, por favor Ilame al (55) 5326 7100
Si se encuentra en U.S., por favor Ilame al
1-800-433-9258 (1-800 4-DEWALT)
Pdliza de Garantia
IDENTIFICACION DEL PRODUCTO:
Sello o firma del Distribuidor.
Nombre del producto: Mod./Cat.:
Marca: Nt]m. de serie:
(Datos para ser Ilenados por el distribuidor)
Fecha de compra y/o entrega del producto:
Nombre
y domicilio del distribuidor donde se adquiri6 el producto:
(667) 717 89 99
(33) 3825 6978
(55) 5588 9377
(999) 928 5038
(818) 375 23 13
(222) 246 3714
(442) 2 17 63 14
(444) 814 2383
(871) 716 5265
(229) 921 7016
(993) 312 5111
AMI_RICA LATINA: Esta garanfia no se aplica a los productos que se venden en America
Latina. Para los productos que se venden en America Latina, debe consultar la informaciOn
de la garantia especifica del pais que viene en el empaque, Ilamar a la compaSia local o
visitar el sitio Web a fin de obtener esa informaciOn.
REEMPLAZO GRATUlTO DE LAS ETIQUETAS DE ADVERTENClA: Si sus etiquetas de
advertencia se tornan ilegibles o faltan, Ilame al 1-800-4-DEWALT para que se le reemplacen
gratuitamente.
DWlVi120VARIABLE SPEED BAND SAW
TO REDUCE THE RiSK OF INJURY, USER MUST READ INSTRUCTION MANUAL ALWAYS USE PROPER
EYE ANp RESPIRATORY PROTECTION. PARA DiSMiNUIR EL RiESGp DE LESiONES, EL USUt&RiO
OEOERA LEER EL MANUAL DE JNSTRUCCJ_NES, SJEMPRE SE DEOERA LLEVAR LA PROTECCJON
APROPIAOA PARA LA VISTA Y PARA LAS VIAS RESPMATORIAS. AEIN BE MINIMiSER LES MSQUES
DE RLESSURES, L'UTiLISATEUR DOlT TOUJOURS NRE LE GUIDE D'DTILJSATIUN. IL EAUT TOUJOURS
PORTER OR L'EQUJPEMENT DE PROTECTION OCULAJRE ET OESPJRATUJRE APPRQPRJE.
O_WALT INDUSTRML TOOL CO., BALTIMORE, MO 21286 USA PATENTS PENOING
FOR SERVICE iNFORMATiON, CALL 1-800-4-BEWALT www.O_WALT.com
\ J
5" (127mm) BEEP CUT
$ER.
ESPEClFICAClONES
DWM 120
TensiOn de alimentaciOn:
Consumo de corriente:
Frecuencia de alimentaciOn:
Potencia nominal:
RotaciOn sin carga:
120 V AC ('x,)
10A
60 Hz
580 W
30 - 106 m/min
(100- 350 ft/min)
SOLAMENTE PARA PROPOSITO DE MEXICO:
IMPORTADO POR: DEWALT S.A. DE C.V.
BOSQUES DE CIDROS, ACCESO RADIATAS NO.42
3A. SECCION DE BOSQUES DE LAS LOMAS
DELEGACION CUAJIMALPA,
05120, MEXICO, D.R
TEL. (52) 555-326-7100
R.RC.: BDE810626-1 W7
Para servicio y ventas consulte /...... ",
"HERRAMIENTAS ELECTRICAS" ECCI_
en la secci6n amarilla. AM!,!,!,!LA
Este producto esta garantizado por un aSo a partir de la fecha de entrega, contra cualquier
defecto en su funcionamiento, asi como en materiales y mano de obra empleados para su
fabricaci6n. Nuestra garantia incluye la reparaci6n o reposici6n del producto y/o componentes
sin cargo alguno para el cliente, incluyendo mano de obra, asi como los gastos de
transportaci6n razonablemente erogados derivados del cumplimiento de este certificado.
Para hacer efectiva esta garanfia debera presentar su herramienta y esta p61iza sellada por
el establecimiento comercial donde se adquiri6 el producto, de no contar con _sta, bastara
la factura de compra.
EXOEPOIONES.
Esta garanfia no sera valida en los siguientes casos:
• Cuando el producto se hubiese utilizado en condiciones distintas alas normales;
• Cuando el producto no hubiese sido operado de acuerdo con el instructivo de uso que
se acompaSa;
° Cuando el producto hubiese sido alterado o reparado por personas distintas a las
enlistadas al final de este certificado.
Anexo encontrara una relaci6n de sucursales de servicio de fabrica, centros de servicio
autorizados y franquiciados en la Rept]blica Mexicana, donde podra hacer efectiva su
garantia y adquirir partes, refacciones y accesorios originales.
Garantia limitada de tres a_os
DEWALT reparar_t sin cargo cualquier defecto ocasionado por materiales defectuosos o mano
de obra, durante tres aSos a partir de la fecha de compra. Esta garanfia no cubre fallas en las
piezas que resulten del desgaste normal de la herramienta o de su utilizaci6n inadecuada.
Para obtener informaci6n detallada sobre la cobertura de la garanfia y sobre reparaciones,
visite nuestra pagina Web www.dewalt.com o Ilame al 1-800-4-DEWALT (1-800-433-9258).
Esta garanfia no se extiende a los accesorios o a los daSos causados por terceros al intentar
realizar reparaciones. Esta garantia le concede derechos legales especificos; usted goza
tambi_n de otros derechos que varian segt]n el estado o provincia.
Ademas de la garantia, las herramientas DEWALT estan cubiertas por nuestro:
SERVlClO GRATUlTO DE 1 AND
DEWALT realiza el mantenimiento de la herramienta y reemplaza las piezas gastadas tras
el uso normal, sin costo alguno, en cualquier momento durante el primer aSo despuOs de
la compra.
GARANT|A DE REEMBOLSO DE DINERO DE 90 D|AS
If you are not completely satisfied with the performance of your DEWALT Power Tool, Laser,
or Nailer for any reason, you can return it within 90 days from the date of purchase with a
receipt for a full refund - no questions asked.
 Loading...