

Desa GMC11FD, GMC13FD, GM102WC, GMC12UD, GMC8CU Assembly And Installation Instructions Manual
...
For more information, visit www.desatech.com
For more information, visit www.desatech.com
Firebox
Perimeter Brass
Trim included
with these
Mantels
GMC11FD, GMC12UD, GMC13FD,
GM102WC, GMC8CU and GMC10CF
Cabinet Mantel
ASSEMBLY AND INSTALLATION INSTRUCTIONS
Shown with Optional Hearth Base
Note:
Your mantel may differ slightly from illustrations.
WARNING: Carefully remove each mantel piece one at a time from shipping carton. Do not try to lift all of the
WARNING ICON G 001
parts out of the box at once. This may damage mantel pieces.
IMPORTANT:
bling or installing mantel kit.
This mantel is only approved for use with DESA Heating
Products 32" fireboxes or 32" fireplace systems. Do not use
mantel with any other product. Several optional accessories are available for this mantel kit. Contact dealer to purchase optional accessories.
This mantel kit contains the following pieces:
Item Part No.
Hardware Package 101472-01
Brass Trim Kit 102753-01
Trim Kit Hardware 102865-01
The hardware package contains the following*:
Qty. Item
13 #8 x 1 1/4" Screws
6 1" Finishing Nails
*Extra hardware may be included.
Tools required
•#2 Phillips screw driver •Pencil
•Flat head screw driver •Drill
•Measuring tape
Read entire instruction sheet before assem-
If any of these pieces are missing or damaged, contact the dealer where
you purchased this kit or DESA Heating Products at 1-866-672-6040
for referral information. For touch-up of the GM102W series mantel
use Sherwin Williams SW1095 semi-gloss enamel paint.
WARNING: Use care when finishing an unfinished
WARNING ICON G 001
mantel. Do not finish mantel pieces near running
heater or open flame. Vapors from most finishing
products are highly flammable. Follow manufacturer’s
guidelines when using finishing products.
IMPORTANT:
outside of mantel to remove any dirt or oils. This will prevent
blemishes from appearing under the stain. Stain mantel according to
manufacturer’s instructions. Apply sanding sealer.
IMPORTANT:
oil base undercoat to the mantel before painting. This will seal the
wood. After undercoat dries completely, lightly sand and apply an
oil base top coat. If you do not apply an oil base undercoat and
topcoat, the wood grain will bleed through the paint.
If you are staining an unfinished mantel, sand entire
If you are painting an unfinished mantel, apply an
2
UNPACKING MANTEL
WARNING: Carefully remove each mantel piece
WARNING ICON G 001
one at a time from shipping carton. Do not try to lift all
of the parts out of the box at once. This may damage
mantel pieces.
1. Carefully remove packaging materials, header, right front, and
left front one at a time from shipping carton.
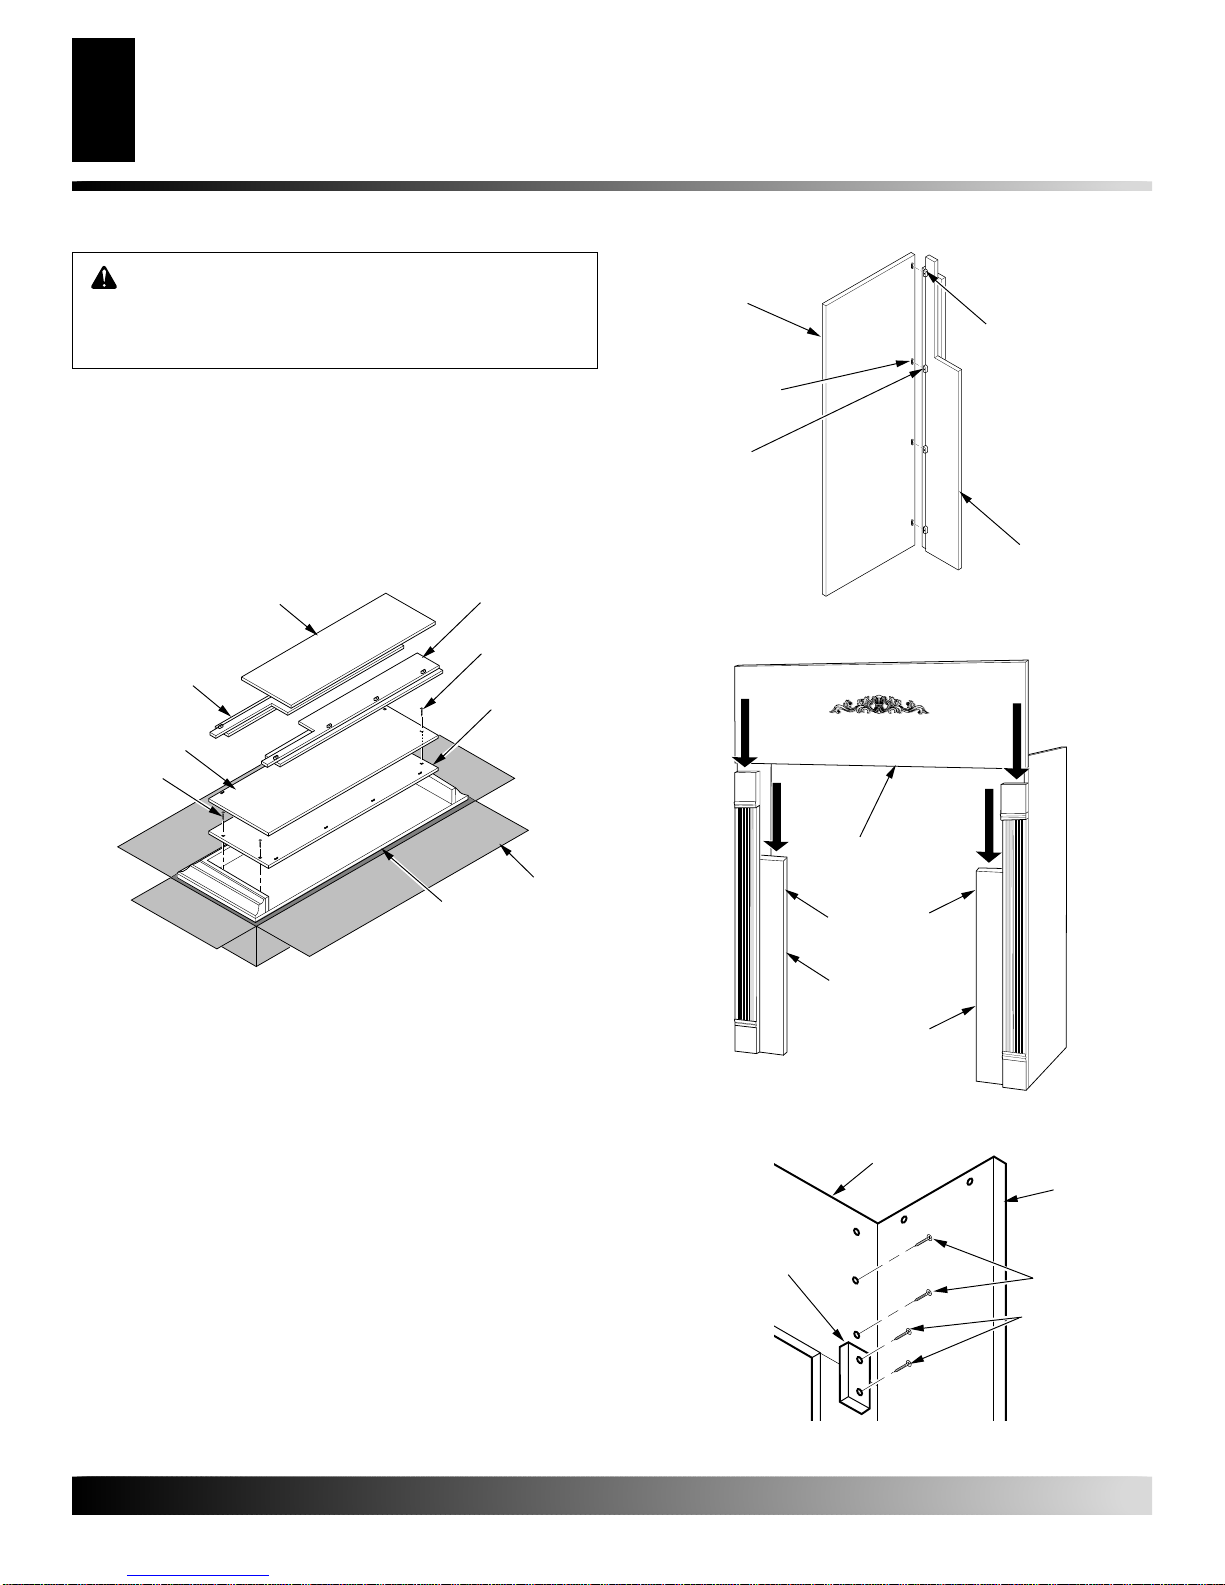
2. Remove 2 screws attaching left side to right side (see Figure
1). Remove one side from shipping carton. Discard screws.
Remove 2 screws attaching other side to top. Discard screws.
Remove other side from shipping carton.
3. Remove top from shipping carton.
Right Side
Male
Twistlock
Fastener
Screw
Female
Twistlock
Fastener
Right Front
Header
Left Front
Side
Screw
Figure 1 - Removing Mantel Pieces from Shipping Carton
Right Front
Screw
Side
Top
Shipping
Carton
ASSEMBLING MANTEL
1. If you must install mantel flush with wall, baseboard will
prevent proper installation of mantel. Either alter baseboard to
fit mantel or remove baseboard.
2. Insert male twistlock fasteners (located on right side) in female
twistlock fasteners (located on right front) (see Figure 2).
Tighten screws of twistlock fasteners one-half turn with flat
head screwdriver. Repeat for left side. This will lock the
fasteners together.
3. Rest header on face boards of right and left sides (see Figure 3).
Push sides together to eliminate gaps with header. Push down on
header to ensure a tight fit (see Figure 4). Attach header to right
side with two 1 1/4" screws. Repeat for other side (see Figure 4).
Figure 2 - Attaching Mantel Right Front to Mantel Right Side
Header
Side
Face Boards
Left
Side
Right
Side
Figure 3 - Installing Header
Header
Side
Mounting
Block
1
1
/4"
Wood
Screws
For more information, visit www.desatech.com
For more information, visit www.desatech.com
Figure 4 - Attaching Header
108122-01D
 Loading...