

Denver Orus E-Times City 8000HM-X7, Orus E8100 Instructions For Use And Maintenance Manual

1/61
E8100
INSTRUCTIONS FOR USE AND MAINTENANCE
MODE D'EMPLOI ET D'ENTRETIEN
MANUALE D’USO E MANUTENZIONE
2/61
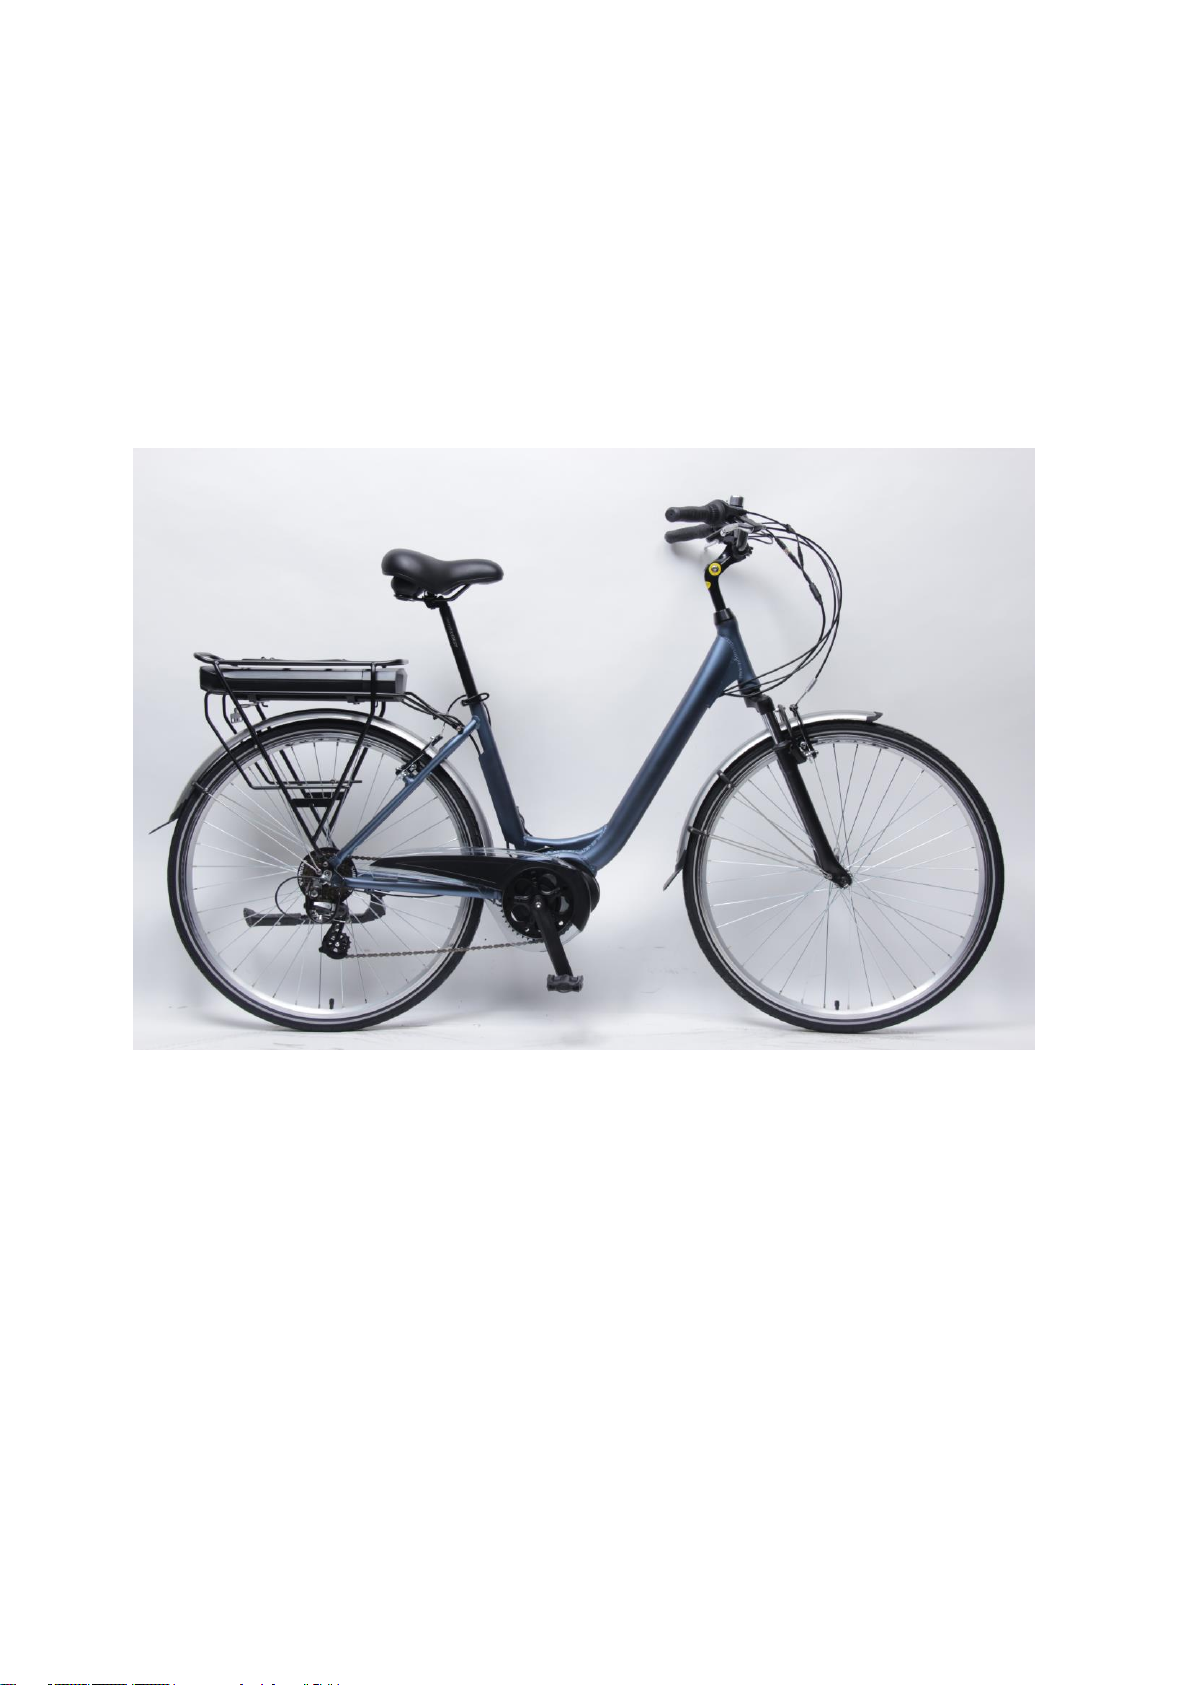
USER’S MANUAL FOR
E-Times City 8000HM-X7 (E-8100)

3/61
Congratulations on your purchase, of this E-Times City 8000HM-X7, it has been carefully designed and
manufactured according to the latest international quality standards, including:
EN 14764-2005
EN 15194-2009
ISO 4210
Please read this instruction manual carefully and thoroughly before riding.
It contains important information on safety, and maintenance.
It is the owner’s responsibility to read this manual before riding.
Should any original component prove defective in terms of workmanship within its warranty period, we will
replace it. Warranty period for the electric bikes is as follows.
Frames and Forks: - 5 years
Electrical Components: - 2 years with proper care and maintenance
All other components: - 2 years
This warranty does not include labors and transportation charges. The company cannot accept any responsibility
for consequential or special damage. This warranty applies only to the original retail purchaser who must have a
proof of purchase in order to validate any claim. This warranty applies only in the case of defective components
and does not cover the effects of normal wear, nor damage caused by accident, abuse, excessive loads, neglect,
improper assembly, improper maintenance or the addition of any item inconsistent with the original intended
use of the bicycle.
No bicycle is indestructible and no claims can be accepted for damage caused by improper use, competition use,
stunt riding, ramp jumping and leaping or similar activities. Claims must be submitted through your retailer. Your
statutory rights are not affected.
The company reserves the right to change or amend any specification without notice. All information and
specifications within this brochure are correct at time of printing.
Ⅰ. Conditions for riding
This E-Times City 8000HM-X7 is designed for riding on road or riding on a paved surface where the tyres do
not lose ground contact. It must be properly maintained according to the instructions found within this book;
The maximum weight of the rider and load must to be less than 100kg.
4/61
Safe cycling and safety tips:
Before you ride your pedal electric assistance bicycle always make sure it is in a safe operating condition.
Particularly check that your:
• Nuts, bolts, quick-release and parts refastened tight and not worn or damaged.
• Riding position is comfortable.
• Brakes are operating effectively.
• Steering is free with no excessive play.
• Wheels run true and hub bearings are correctly adjusted.
• Wheels are properly secured and locked to frame/fork.
• Tyres are in good condition and inflated to correct pressure.
• Pedals are securely tightened to pedal cranks.
• Gears are correctly adjusted.
• All reflectors are in position.
WARNING WHEELS: Every six months, your pedal electric assistance bicycle should be
professionally checked to ensure that it is in correct and safe working order. It is the responsibility
of the rider to ensure all parts are in working order prior to riding. It is very important to check the
rim wear monthly and monitor the rim wear line, if these grooves become invisible, the rim is past
its safe working life. A severely worn rim is very dangerous and must be replaced. Adjust the brake
shoes accordingly to make the clearance at 1-1.5mm from the track of rim.
REGULAR ATTENTION MUST BE PAID TO THE SPOKE TENSION.
Warning: You are warned that you assume the risk for personal injury, damage
or losses if you breach the above conditions and, the warranty will be void
automatically.
5/61
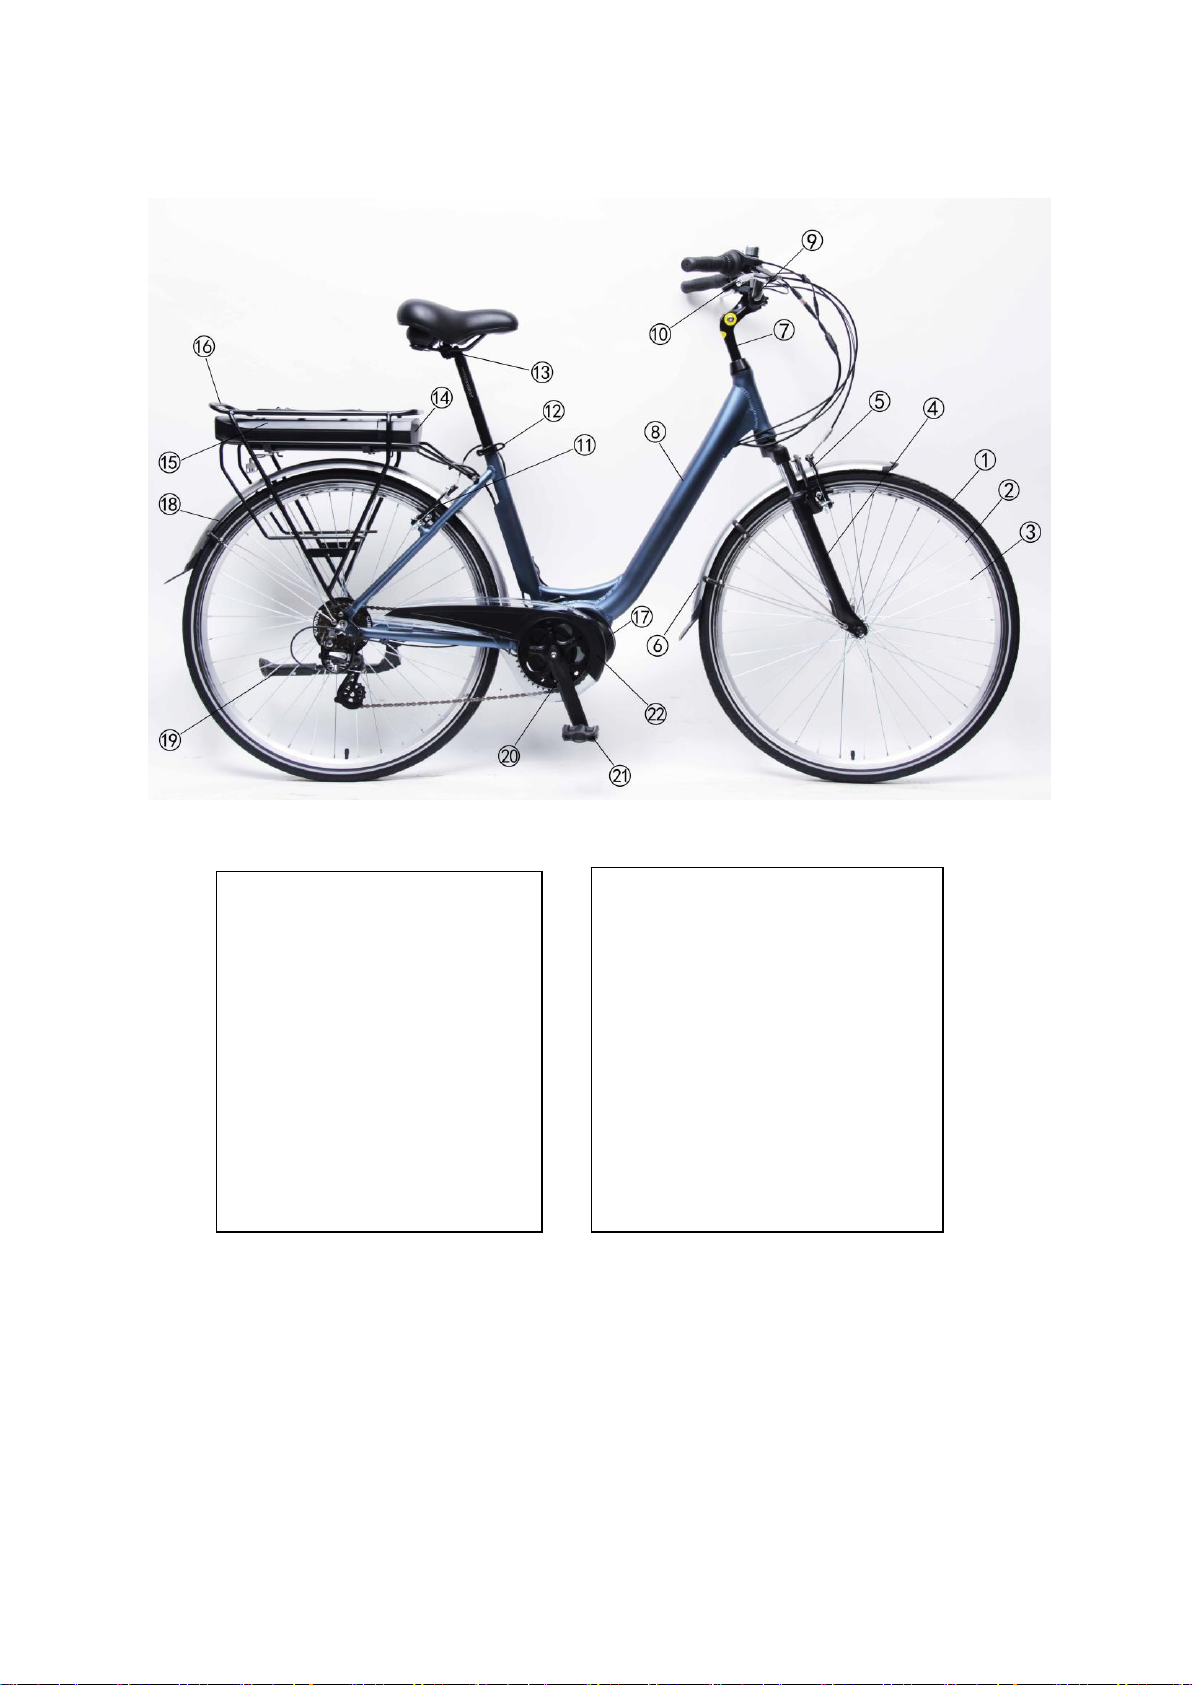
Ⅱ. Name of pedal electric assistance bicycle components E-Times City 8000HM-X7 (E-8100)
(Fig 1)
Assembly Instruction
THIS PRODUCT MUST BE ASSEMBLED BY A QUALIFIED TECHNICIAN AND SHOULD NOT BE ATTEMPTED BY ANY
ONE WHO IS NOT TRAINED.
1. Tyre & tubes
2. Rims
3. Spokes
4. Front fork
5. Front brake
6. Front mudguard
7. Handlebar & stem
8. Frame
9. Display unit
10. Brake levers
11. Rear brake
12. Seat clamp
13. Saddle & seat post
14. Controller box
15. Battery pack
16. Rear carrier
17. Motor & torque sensor, controller
18. Rear mudguard
19. Kick stand
20. Cranks & chain wheel
21. Pedals
22. Chain cover

6/61
Ⅲ. MANUAL FOR E-Times City 8000HM-X7
The rider must pedal forward to obtain any assistance from the motor. This is an important safety feature. This
electric pedal assistance bikes will provide assistance up to 25 Km/h, after that the motor will cut out. You may
go faster but must do so under your own effort without the electric assistance.
To start the bike, turn on the main switch on the side of the battery, the LCD on the handlebar panel will light up.
The motor will not work until you pedal a full revolution of the chain wheel. This feature protects the motor and
controller from damage and extends the service life of the electric components.
Contents
1. Structure of an electric assistance bike
2. Important safety cautions
3. Operation
4. Battery installation & usage.
5. LCD and function
6. Using and maintaining the battery
7. Using and maintaining the charger
8. Using and maintaining the electric middle motor.
9. Maintaining the controller.
10. Maintaining the power-off control of the brake lever
11.. Simple troubleshooting
12. Electric circuit diagram and specifications
13. Main technical specification sheet
1. Structure of electric bikes (See partⅠ.Fig 1.)
2. Important safety cautions:
• We strongly advise wear an approved helmet, which meets local standards.
• Obey local road rules when riding on public roads.
• Be aware of traffic conditions
• The rider must be over 14 years old.
• Have your bike serviced only by authorized bicycle shops.
• Regular servicing will ensure a better and safe riding performance.
• Do not exceed more than 100kg load on bicycle, including rider himself.
• Never have more than one rider on the bicycle.
• Ensure regular maintenance is carried out on the bike according to this owner’s manual
• Do not open or attempt maintenance on any electrical components yourself. Contact your local bicycle
specialist for qualified service and maintenance when needed.
• Never jump, race, perform stunts or abuse your bicycle.
• Never ride under the influence of intoxicating drugs or alcohol.
• We strongly recommend using lights, when riding in the dark, fog or poor visibility.
7/61
• When cleaning this bike, please wipe the surface with a piece of soft cloth. For very dirty area, you can wipe
it with a little neutral soap and water.
Warning: do not wash this electric bike direct with spraying water, especially pressure washers.
Avoid water. If the water enters electric components as this may result in damage of the electric
components.
3. Operation
Your new electric assistance bicycle is a revolutionary transport means, applying aluminum frame, Li-ion battery,
a super high efficiency electric middle motor and controller with electric pedal assistance system, to support
normal pedaling. The above-mentioned equipment will ensure safe riding with excellent function and
performance. It is important for you to note the following guidelines to ensure getting the best excellent
experience from your electric bicycle.
Checklist before riding
3.1.1 Please ensure tyres fully inflated as indicated on the tyre wall, before riding.
Remember, performance of the bike is directly related to the weight of the rider and baggage/load, together
with the stored energy in the battery;
3.1.2 Charge overnight, prior to riding the next day;
3.1.3 Apply chain oil periodically and clean if dirty or gummed up, using a degreaser, then wipe clean and oil
bicycle chain again.
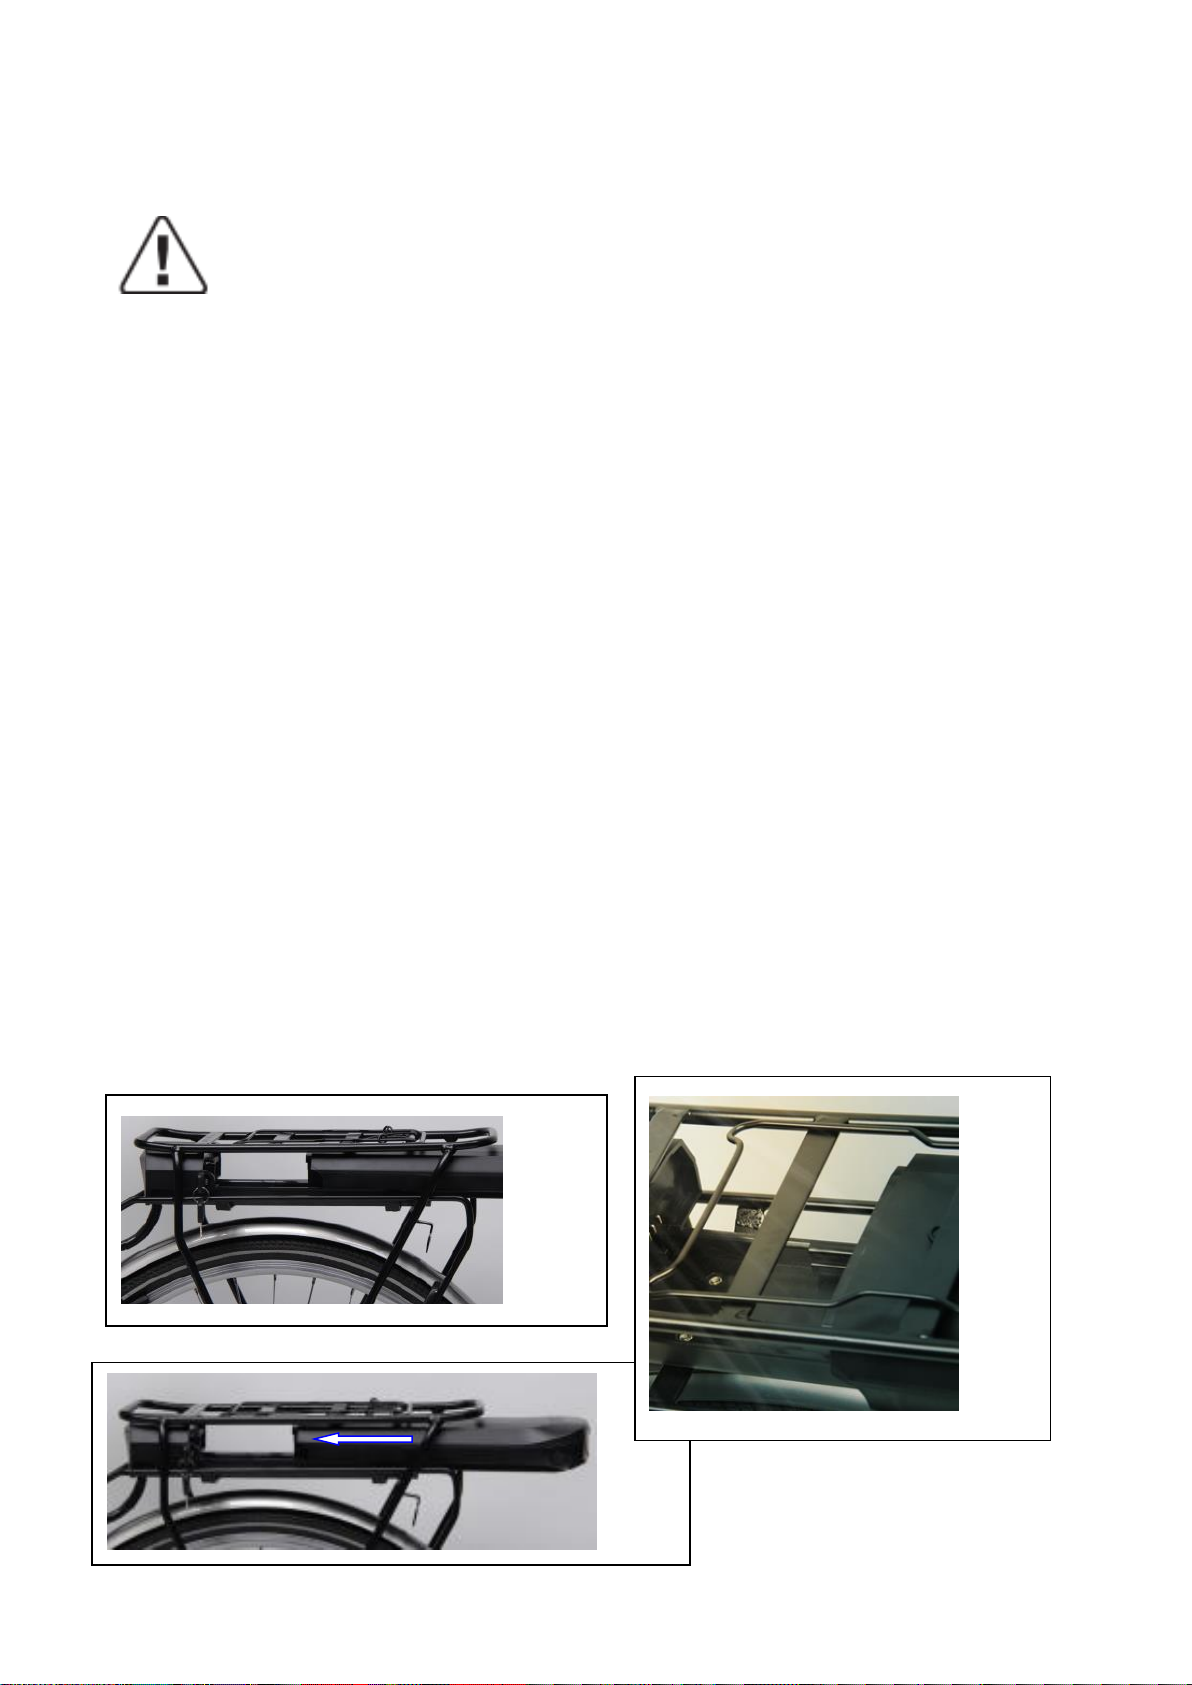
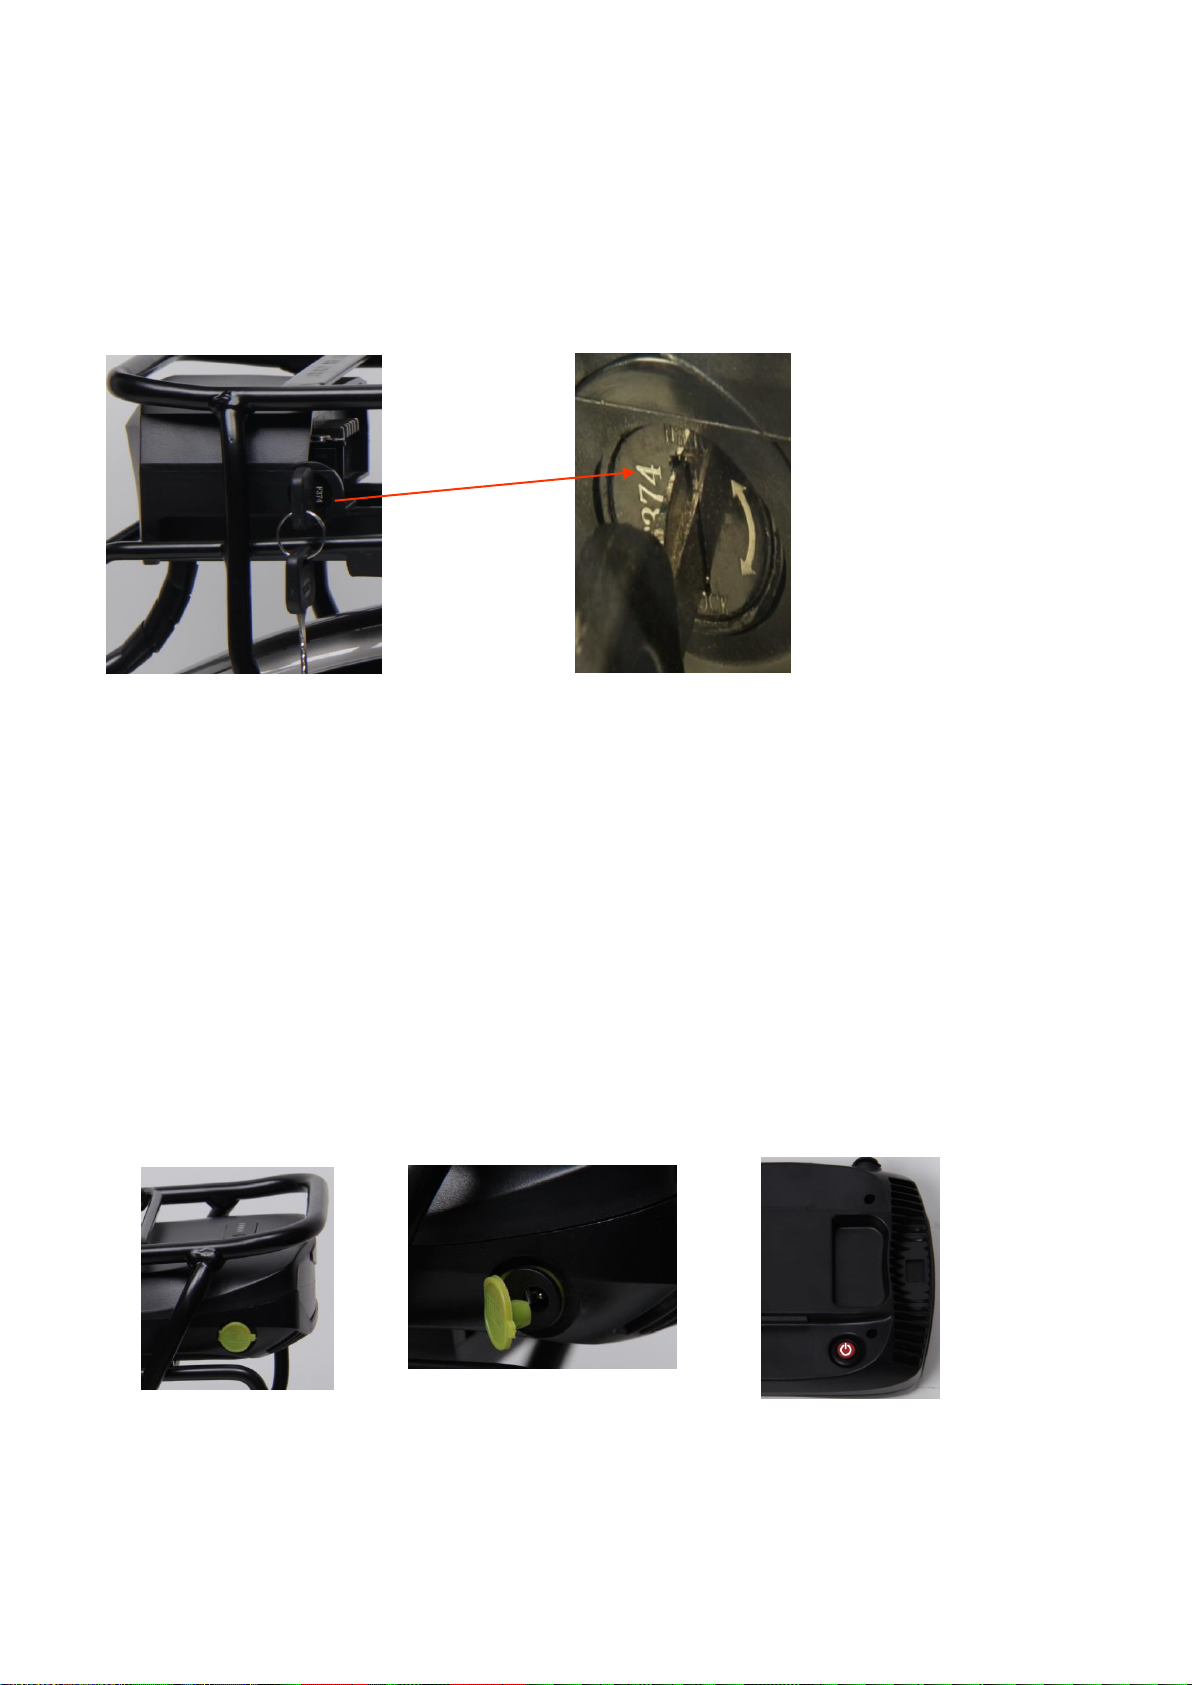
4. Battery installation & usage.
The electric bikes have the battery positioned within the rear carrier (the battery pack is directly connected to
the controller box in the front (fig 2).
The slider of battery is fixed on carrier by bottom screws (Fig 2.1).
Then the battery case is locked by the key (fig3 & 4) see the operation details below.
(Fig.2)
(Fig3)
(Fig 2.1)
8/61
Firstly, please put the battery case along this slider horizontally (as Fig 3), then push it into and ensure a snug fit.
Second, make sure the battery pack is firmly pushed into the controller housing and its connector is securely
inserted inside the controller box.
Notice the battery lock (Fig.4.1,4.2)
(Fig4.1,4.2)
From the initial position turn it to the right according to the arrow guide, then lock it. On the contrary, you can
unlock it.
Battery charger
If an AC outlet is available within reach of your bike, you can charge your bike directly with the battery.
Still attached to the bike. The charging port is covered by a plastic cap, with a yellow arrow for notice (Fig 4.3).
Please open it then you charge the battery directly (Fig 4.4). Removing the battery is useful for charging in a
location where the bicycle may not fit or when no reachable AC power supply exists at the place where the bike
is parked. Before removing the battery from the bike, you need to do as following steps:
* make sure the switch is off, the button is returned back (Fig4.5).
* Press the key and turn to left to unlock the battery. (refer Fig 4.2)
* Remember to take off and care about the key after you withdraw the battery from the carrier!!!
(Fig4.3)
(Fig4.4)
(Fig4.5)

9/61
5. LCD and Function:
Speed mode
Lamp
Battery indicator
PAS level
Mileage mode
Mileage information
Speed display
ERROR code
Brake
10/61
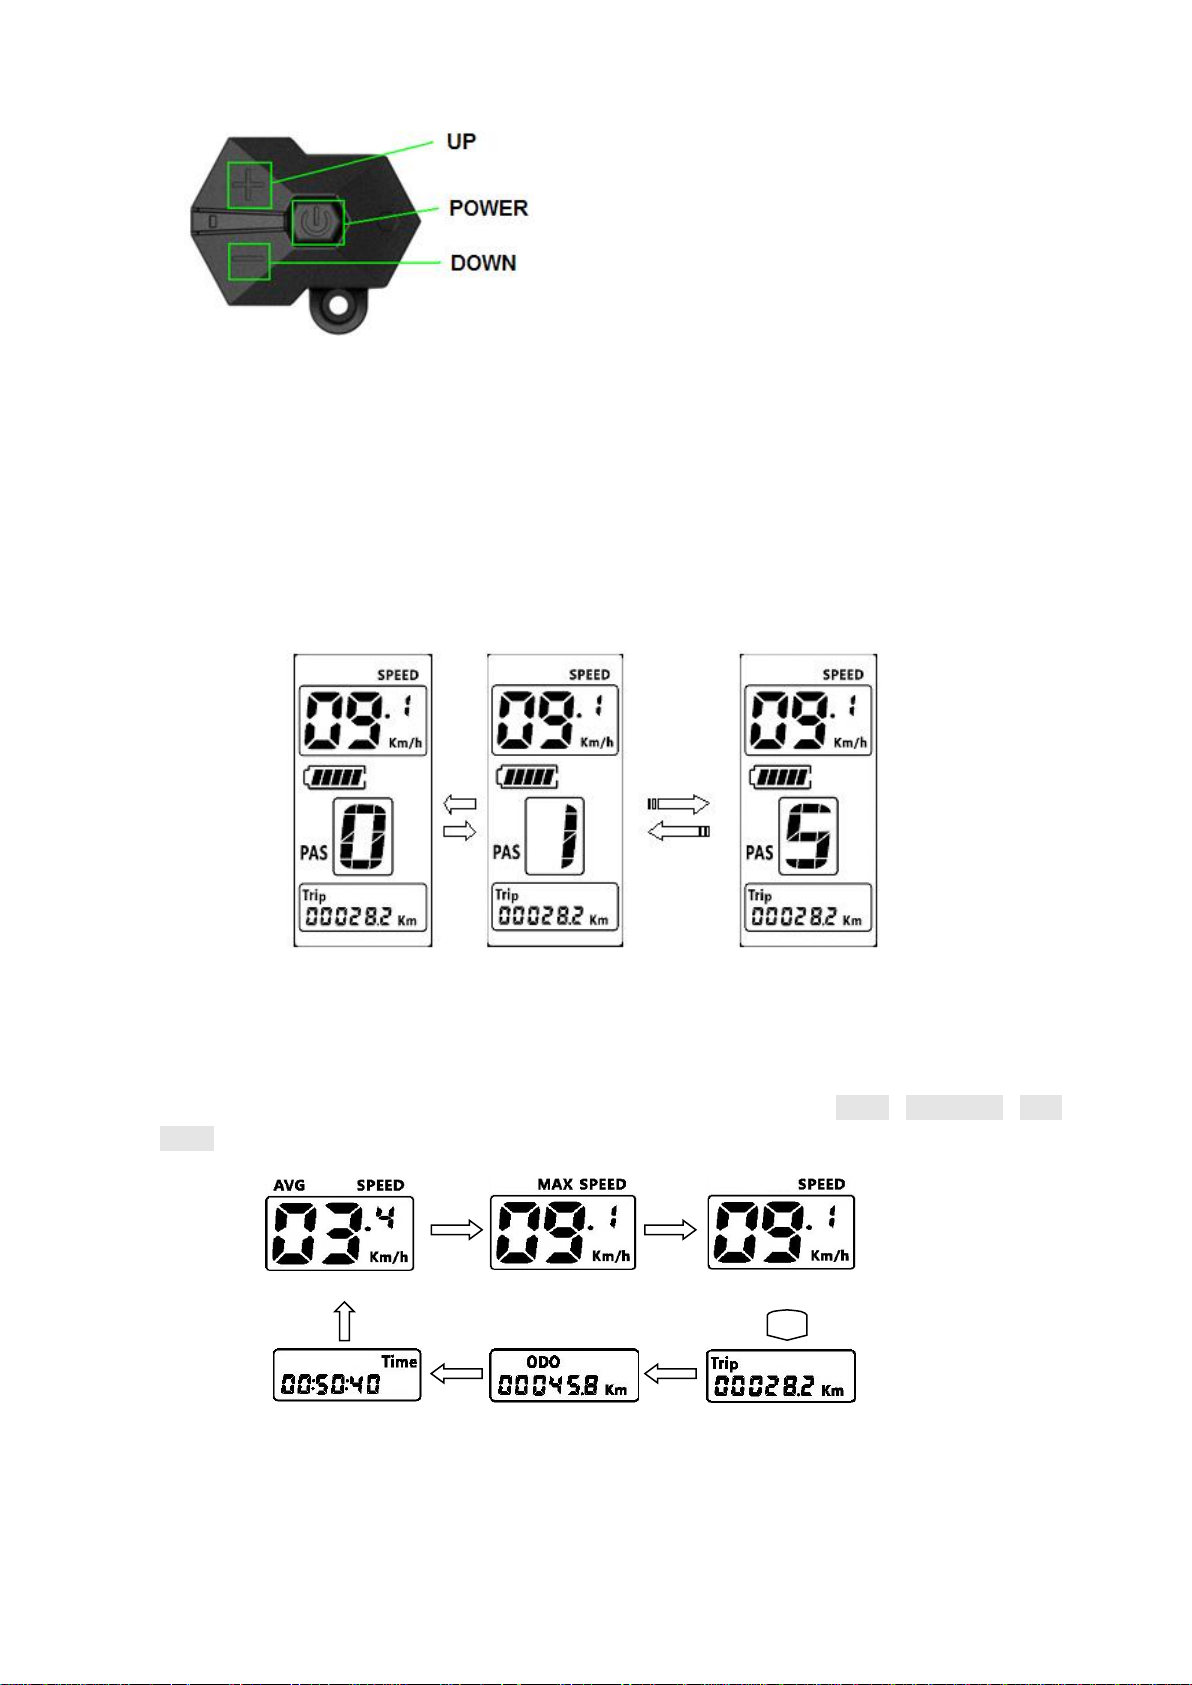
5.1 Power On/Off
Press and hold Power button for 1 second can turn on/off the display. The Display can automatically shut
down when there is no operation & ride for 5 minutes.
5.2 Assist level operating
Short press UP/DOWN button can change the assist level. Top assist level is 5, 0 for neutral. Level
quantities can be adjusted according to the customer requirements.
Assist operating
5.3 Speed mode switch& Mileage mode switch
Short press POWER button can change the speed mode & the mileage mode, Speed->AVG Speed->MAX
Speed->Trip->ODO-> Time.
Speed mode switch& Mileage mode switch
Time
ODO
Trip
MAX speed
Speed
AVG speed
11/61
*If there is no operation for 5 seconds, display will return Speed (Real-Time) display automatically.
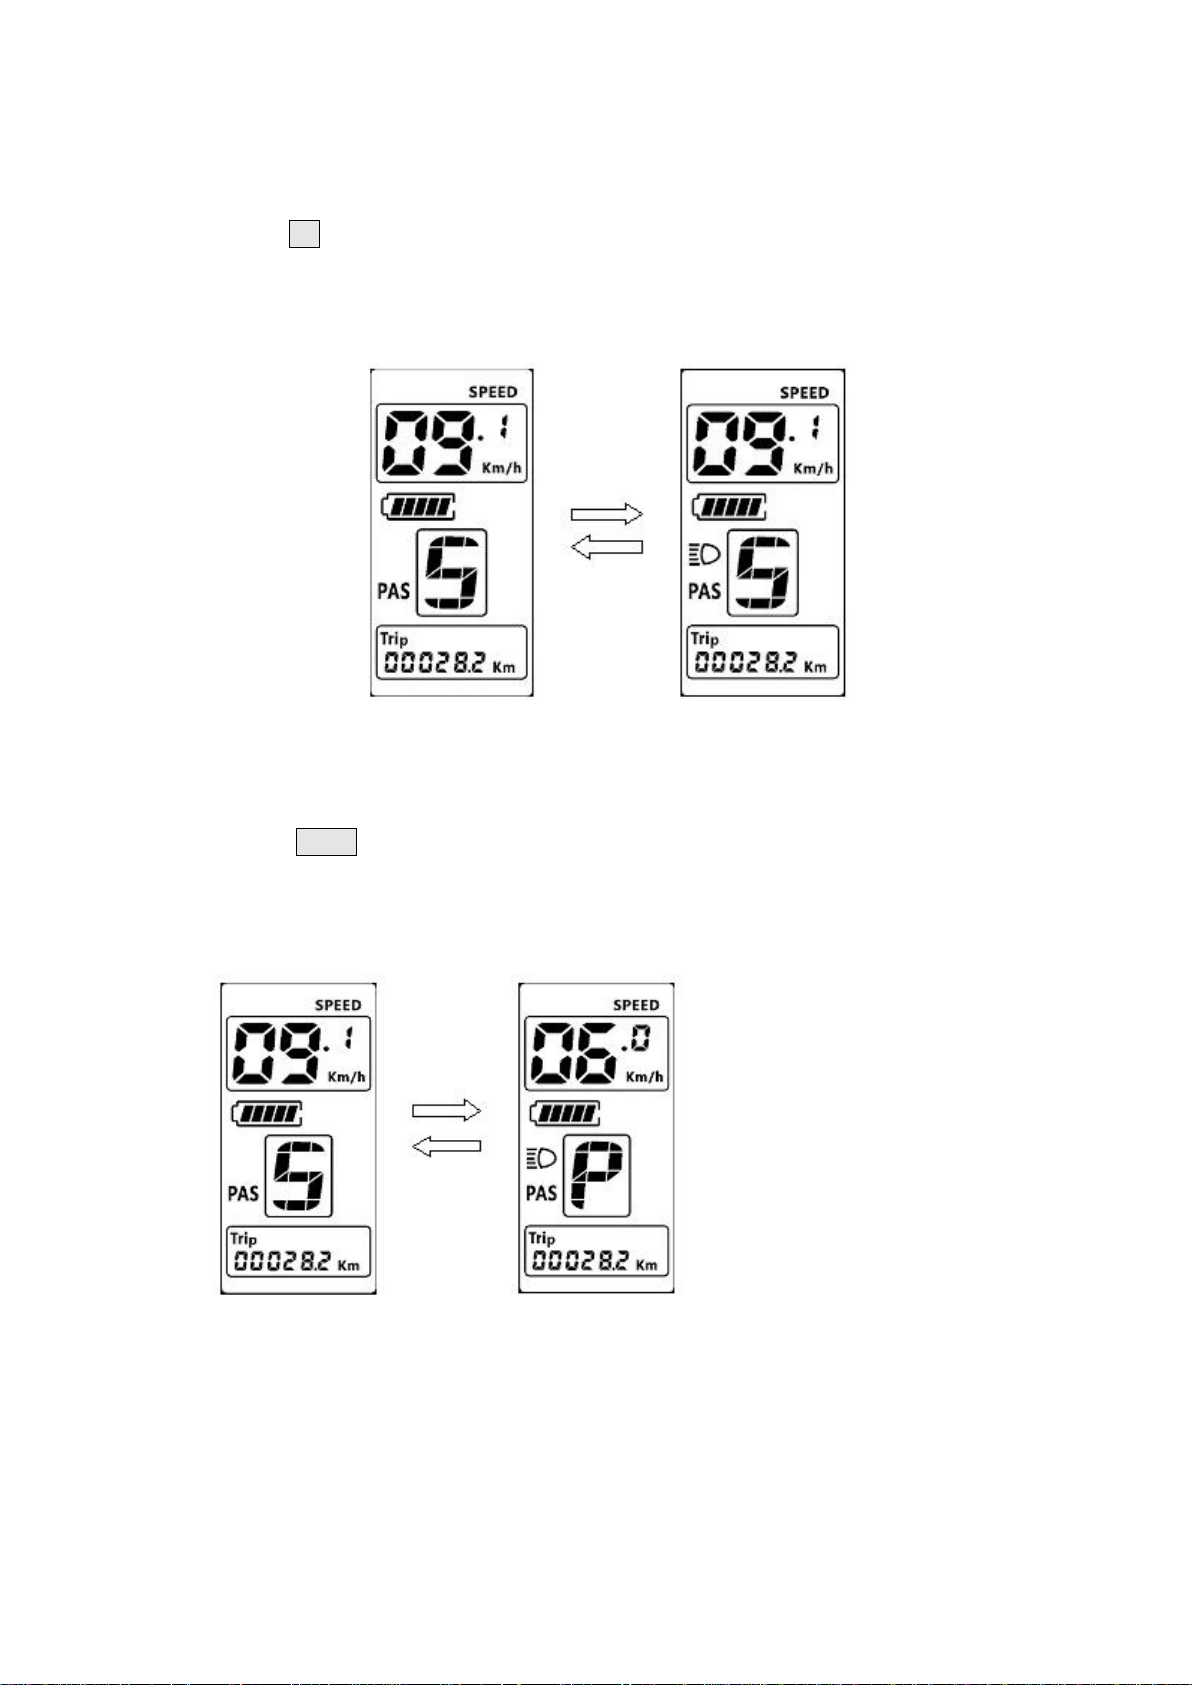
5.4 Headlight/backlight On/Off
Press and hold UP button for 1 second can turn on/off the headlight/backlight.
The motor does not work when the battery voltage is low. Display still can keep the headlight on for a
while when E-bike is in riding.
5.5 “6km/h” walk
Press and hold DOWN button for 2 seconds can get into walk mode, speed display 6 km/h, out of the
mode when release the button.
12/61
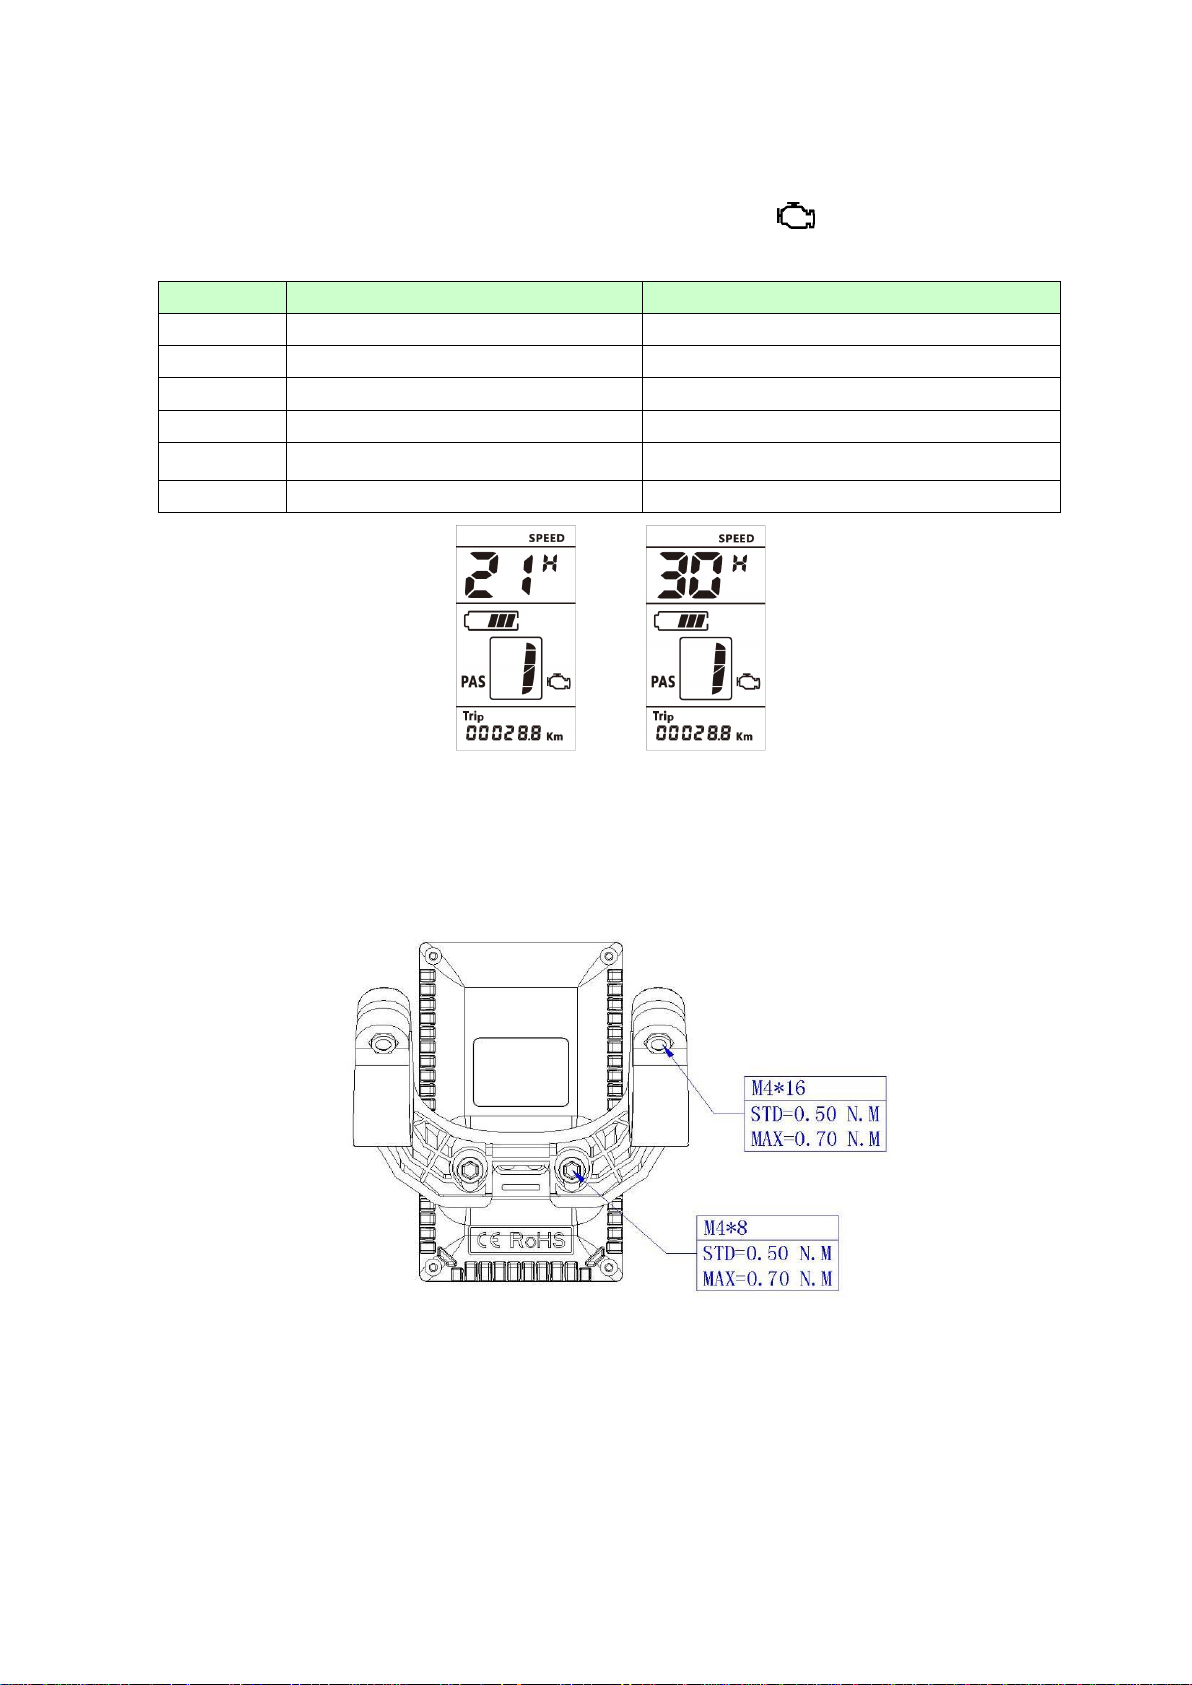
5.6 Error Code define
800S can give warning message when E-bike exist error, LCD display icon and the error code in
speed position, error code is from 01 E~07 E, the definition see the table below.
Error Code
Error description
Handle
0x21
Current abnormal
0x22
Throttle error
Check the connection of throttle.
0x23
Motor phase lost
0x24
Hall error
Check the hall connection
0x25
Brake error
Check the brake connection.
0x30
Controller communication error
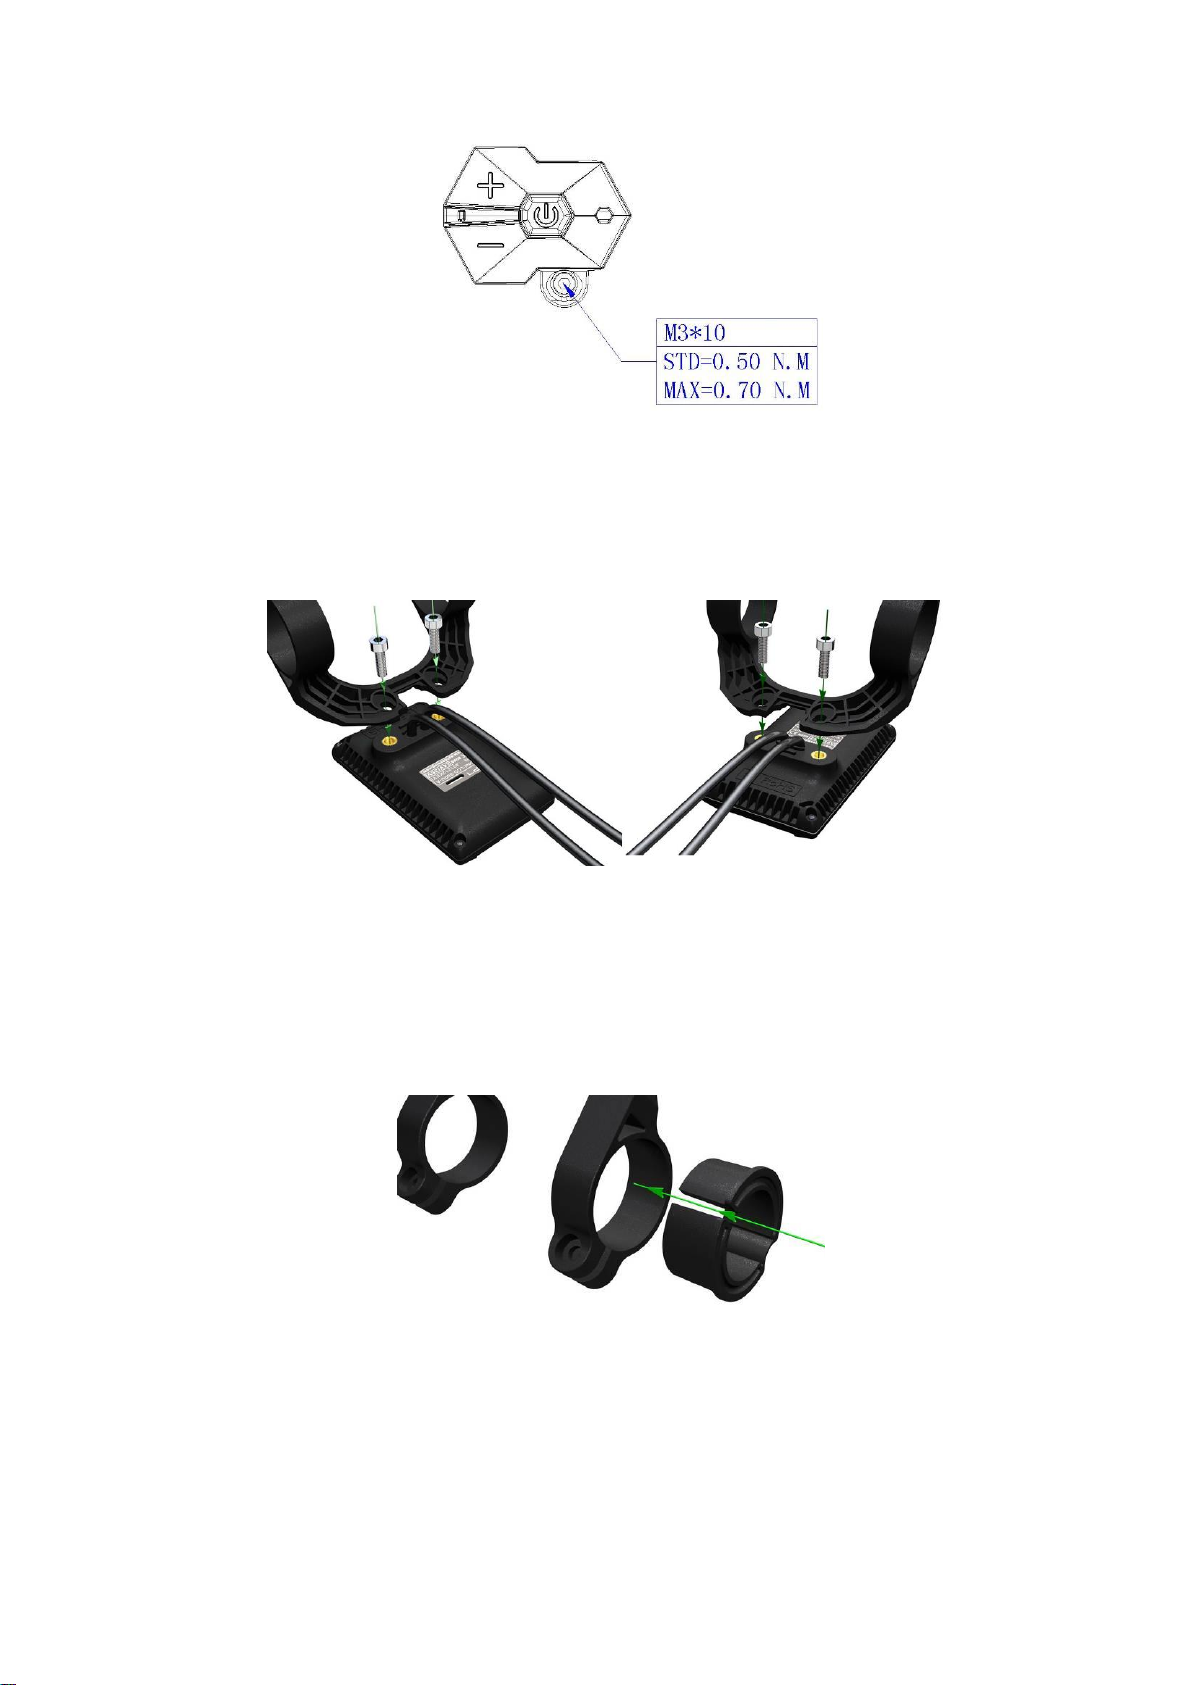
1 Assembly instructions
Please pay attention to the screw’s torque value, damaged caused by excessive torque is not within the
scope of the warranty.
13/61
There are 2 directions for the clamp installation, forward or backward.
Different assembly methods will need different cable length.
Clamps suit for 3 sizes of handlebar, 31.8mm, 25.4mm, 22.2mm, there are transfer rings for 25.4mm and
22.2mm, transfer rings must be assembled with the special directions, pay attention to the green arrow
below.
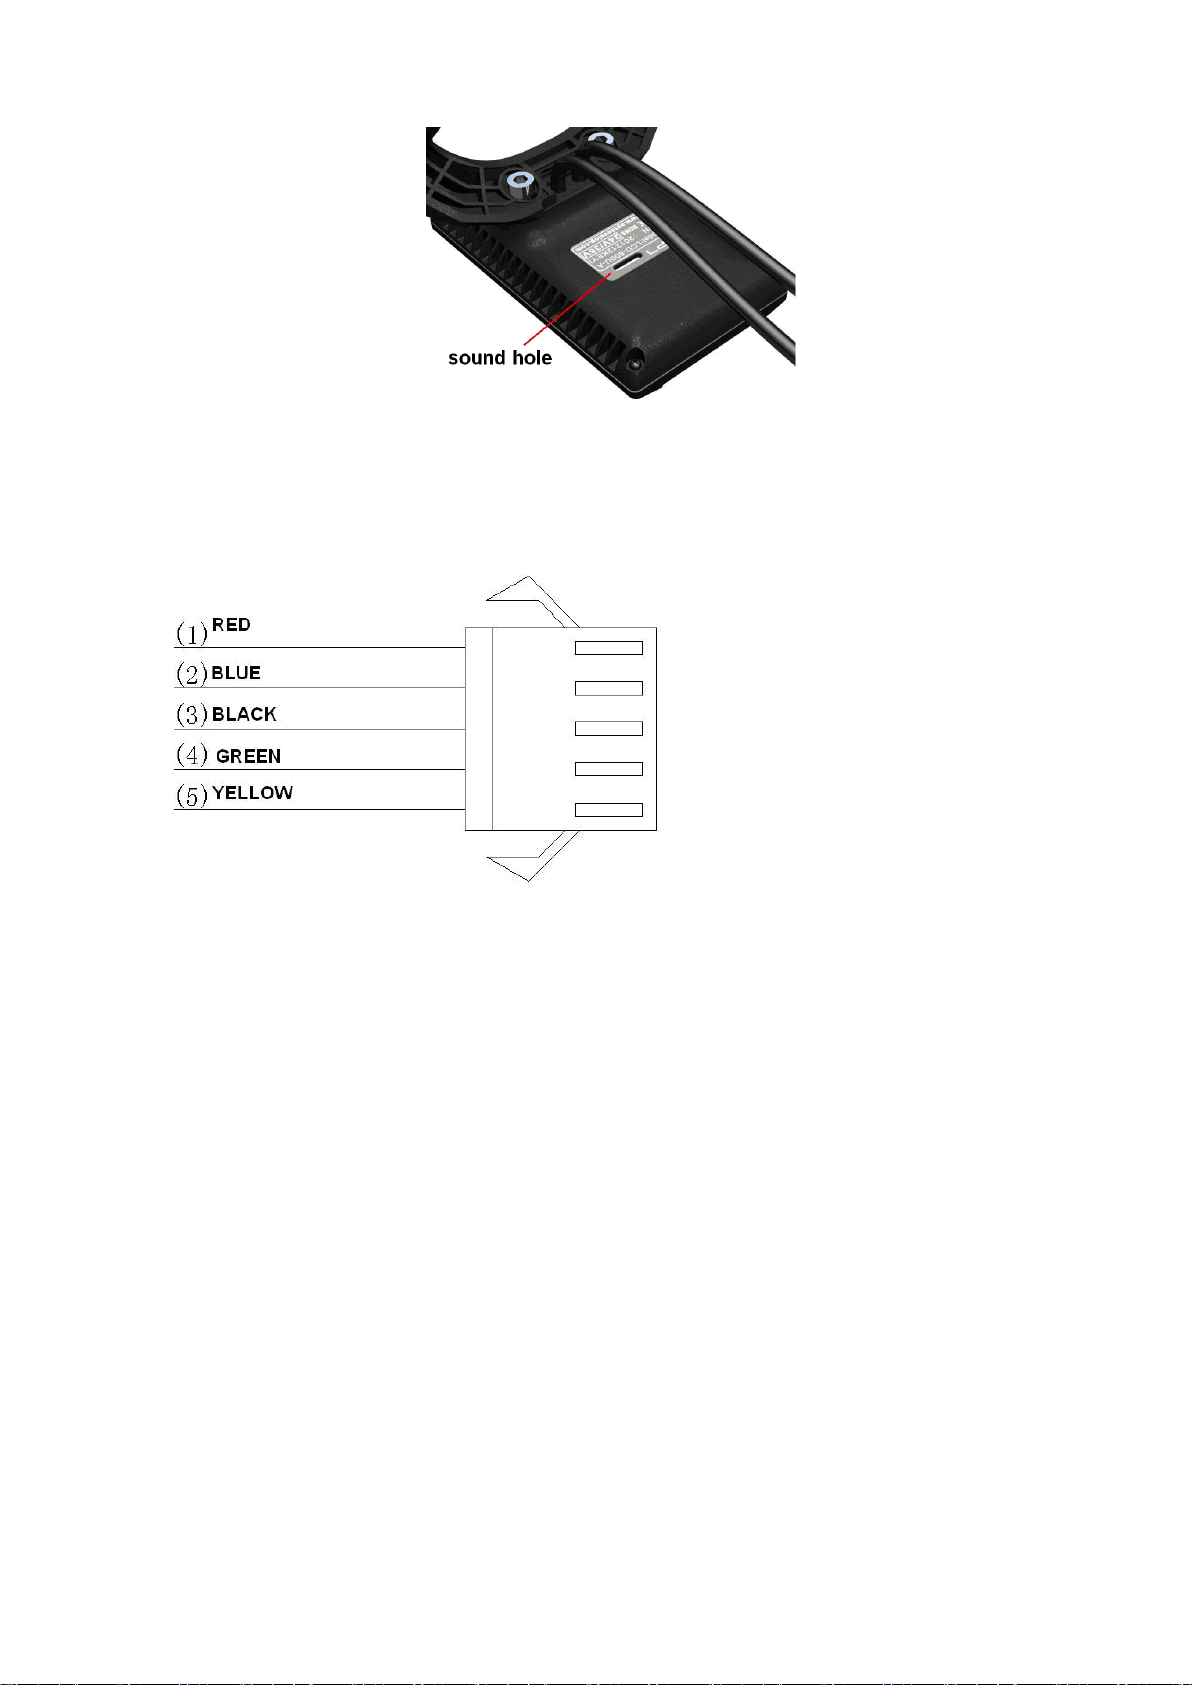
2 Warning
There is waterproof membrane inside the sound hole. Don’t insert sharp object into the hole, it will cause
waterproof failure.
Sun exposure may cause high temperature indicate, this is not display’s failure.
14/61
3 Output wire instructions
1、 Red wire : Anode(24v/36v)
2、 Blue wire : Power cord to the controller
3、 Black wire : GND
4、 Green wire : RxD (controller -> display)
5、 Yellow wire : TxD (display -> controller)
6. Using and Maintaining the Battery.:
Advantages of Li-ion battery. This electric assistance bicycles are supplied with high quality Li-ion batteries,
which are light and create no pollution to the environment, as a typical green energy source. As well as the
above features, the Li-ion batteries have the following advantages:
• charging without memory effect
• big electric energy capacity, small volume, light in weight, with large current output, suitable for high
power vehicles.
• long life
• a wide working range of temperature: -10°C to +40°C
To ensure a longer battery life and protecting it from damage, please use and maintain it according to the
guideline below:
15/61
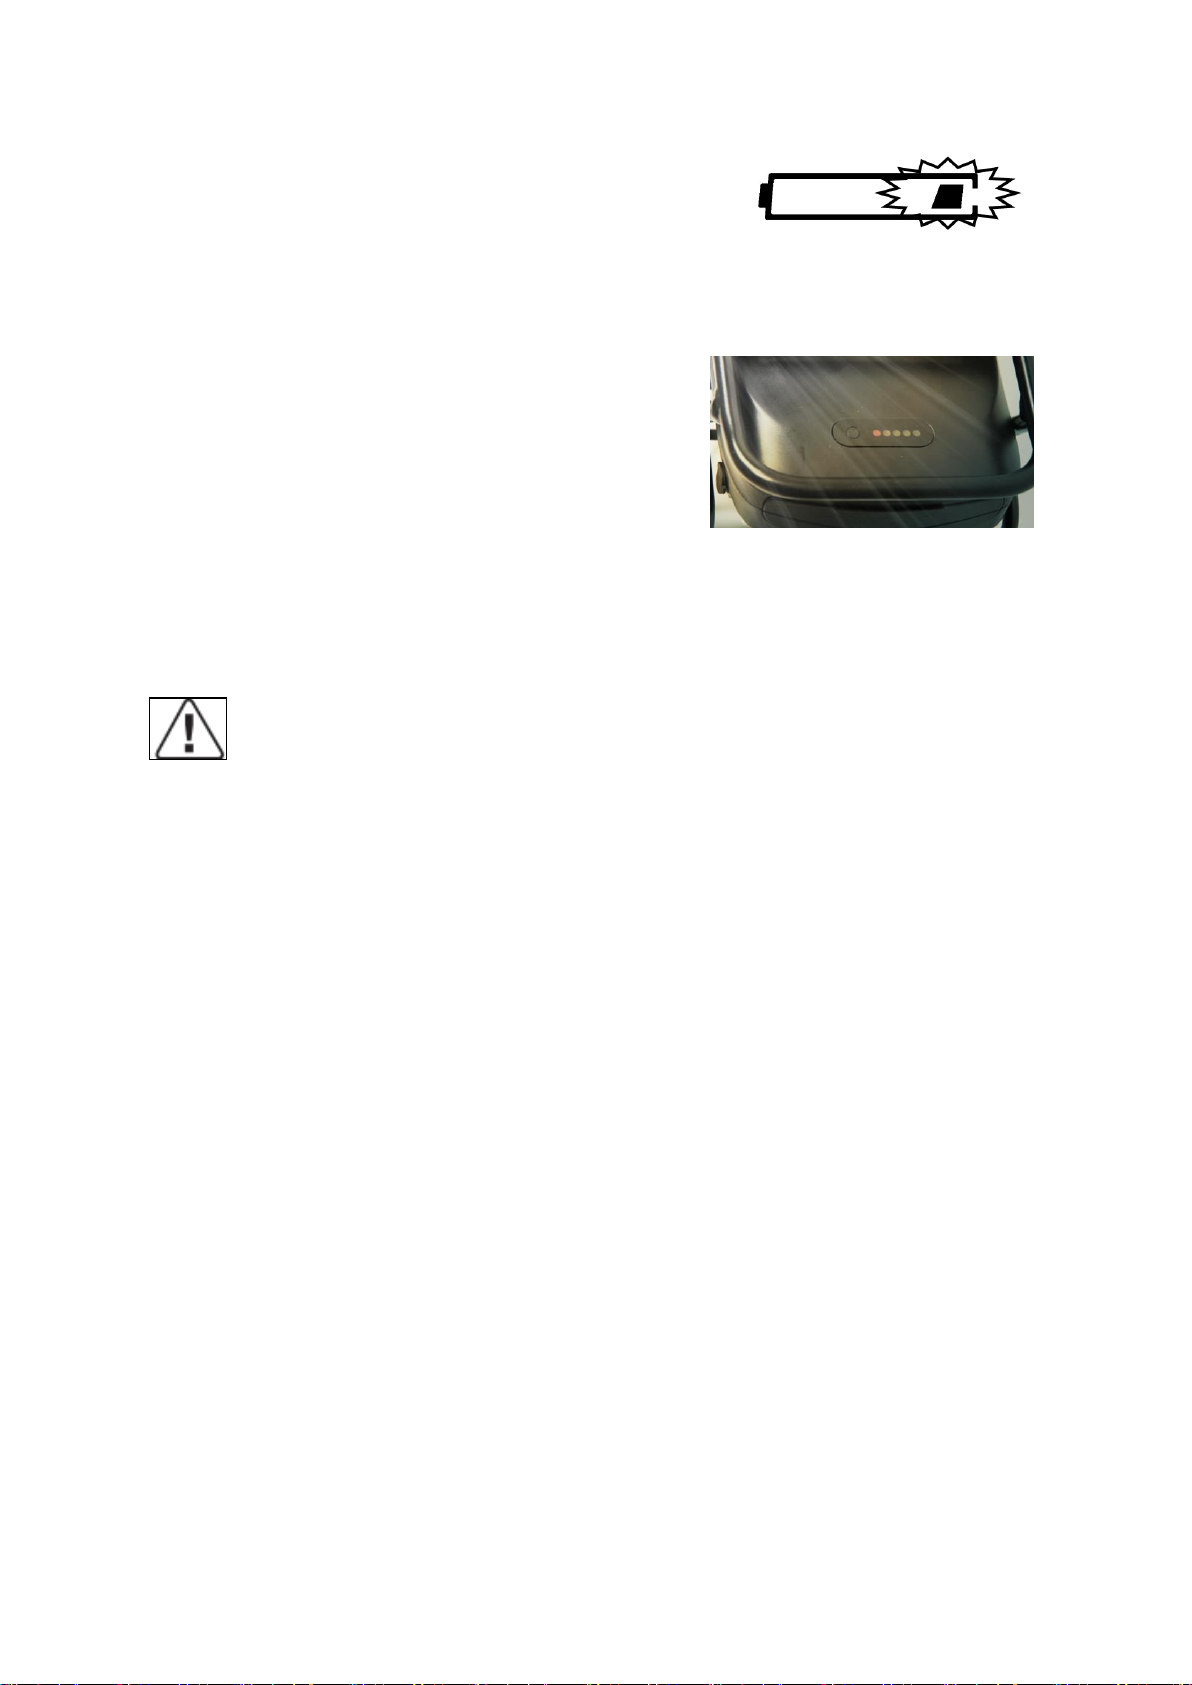
6.1 During your riding, when you find the power decreased
to one segment on the LCD. (See the Fig 16) , the battery must
be charged in short time!
6.2. Remember to charge the battery full before you will ride for
a long trip!
Press the button on the end of battery case, when the right side
4 lights are all green color, it shows the battery is full of power,
when the second green light is off, it means you need to charge it.
(Fig 16.1) Notice: the red light (near the on/off) means that
battery must be recharged.
6.3 If the bike is ridden less frequently or stored for quite a long time, it must be fully charged every 3
months.
Warning:
1) The battery life may be reduced after long storage without regular charging as instructed above, due to
natural discharge;
2) Never use any metals directly to connect the two poles of the battery, otherwise, the battery will be
damaged due to short circuit.
3) Never put the battery near to fire or heat source.
4) Never strongly shake, punch and toss the battery.
5) When the battery pack is removed from the bike, keep it out of reach of children, to avoid any
unexpected accident.
6) The battery is forbidden to be disassembled.
7. Using and maintaining the battery charger.
Before charging the battery, please read the owner’s manual and the charger manual accompanied with
your bike, if any. Also, please note the following points regarding battery charger.
* Do not use this charger in an environment of explosive gas and corrosive substances.
* Never shake, punch or toss the battery charger, to protect it from damage.
* Always protect the battery charger from rain and moisture!
* This battery charger should be normally used under temperature, ranged between 0°C to +40°C
* The charger is for bidden to be disassembled.
(Fig 16)
(Fig16.1)

16/61
* You should only use the charger provided with the electric bike, otherwise damage could occur to your
battery and void the guarantee.
* When charging, both battery and charger should be minimum 10cm away from the wall, or under a
condition of ventilation for cooling. Place nothing around the charger, while in use!
Procedure for charging.
Please charge the bike battery according to the following procedure:
7.1 The battery can be charged by the AC, the switch is not necessary to be turned on.
7.2 Insert the charger output plug into the battery securely and then, plug the main cable of the charger
into a reachable AC outlet;
7.3 When charging, the LED on the charger will become red, showing the charging is on. When it becomes
green, you can finish charging the battery.
7.4 To finish charging, you must disconnect the charger input plug first from the AC outlet, and after that,
disconnect the charger output plug from the battery pack. Finally, close the cover on the charging socket of
the battery pack and check the socket, is covered
8. Using and maintaining the electric middle motor.
8.1 Our intelligent e-bikes are programmed to start with the electric assistance after rotation of the chain
wheel.
8.2 Do not use the bike in flood waters or thunderstorm. Do not immerse the electric parts in water.
Otherwise, the electric components may be damaged.
8.3 Avoid any impact towards the motor, otherwise, the casting alloy aluminum cover and body may break.
8.4 Make regular checks on the screws on both sides of the motor; fasten them even if they are just a little
bit loose.
8.5 It is necessary to check the cable connection to the motor.
9. Maintaining the controller.
For our electric bikes the controller is usually equipped inside the battery pack holder.
It is very important to take care of this electronic component, according to the following guideline:
9.1 Pay attention to protect from ingress of water and immersion in water, which may damage the
controller.
Note: If you think water may have got into the control box, please switch off the power immediately and
pedal without electric assistance. You can pedal with electric assistance as soon as the controller has dried
out.

17/61
9.2 Pay attention to protect from any strong shaking and punching, which may damage this controller
9.3 The controller should be used in normal working temperature range from -15°C to +40°C.
Warning: Do not open the controller box. Any attempt to open the controller box, modify or
adjust the controller will void the warranty. Please ask your local dealer or authorized service
specialist to repair your bike.
10. Maintaining the power-off control of the brake lever*
This is a very important component for riding with safety. First, you should pay attention to protect it from
impact and avoid any damage. Second, make regular check on all bolts and nuts, and fasten them securely.
11. Simple trouble shooting.
The information below is for purpose of explanation, not as a recommendation for users to carry out repair.
Any remedy outlined must be carried out by a competent person who is aware of the safety issues and
sufficiently familiar with electrical maintenance.
Trouble Description
Possible Causes
Trouble shooting
After the main battery
switched on, the motor
does not generate
assistance when pedaling.
1)the motor cable (waterproof
connection joint) is loose; 2) brake
lever did not return well, which keeps
the switch in “power off” position; 3)
battery fuse is broken; 4) the speed
sensor
is too far away from the magnetic ring
on the B.B.axle; 5) the connection
between the sensor and the
controller is loosen or not connected
well.
First of all, please check the battery if it is
empty. If yes, charge the battery immediately. 1)
check if the connection is securely fixed. If
loose, joint them tightly. 2) make the brake lever
come back to its normal position with care,
without braking; 3) open the battery pack top,
and check if the fuse is broken. If yes, please
visit your vendor or authorized service for
installing a new fuse; 4) adjusting the distance
between the magnetic ring and the sensor, to
make sure the distance is within 3mm; 5) fix
tight the connection between the sensor and
the controller.
The distance per charge
becomes short (Note:
performance of the bike
battery is directly related
to weight of the rider and
any baggage/load / wind
/ road / constant
braking ).
1) charging time is not enough; 2) the
environment temperature is so low
that it affects the battery working. 3)
frequently going uphill, or riding with
head wind, or on poor road condition,
4) the tyres have low pressure (to be
inflated); 5) frequently braking and
starting. 6) battery has been stored
without using for quite a long time.
1) please charge the battery according the
instruction (chapter 7.3); 2) in winter or under
0°C, you’d better store the battery inside the
house; 3) it will be normal if the riding
conditions are improved as regular; 4) pump the
tyres and ensure tyres are fully inflated to 45psi
for your bike; 5) it becomes normal when the
riding situation will be better. No worry about
such a trouble; 6) make regular charging

18/61
according to this instruction manual (refer to
Chapter 6.3) If the above has no effect, please
contact your vendor or authorized service.
After plugging the power
outlet, no charger
indicator LCD is lit.
1) trouble from the power outlet;
2) poor contact between charger input
plug and power outlet;
3) the temperature is too low.
1) check and repair the power outlet.
2) check and insert the power outlet tightly. 3)
charge it in house.
If the above has no effect, please contact your
vendor or authorized service
After charging over 4-5
hours, the charger
indicator LCD is still red,
while the battery is still
above not full (Note: it is
very important to charge
your bike strictly
according to this
instruction stated in
Chapter 7, to avoid any
trouble and damage
occurred to your bike.
1) environment temperature is 40°C
and above.
2) environment temperature is under
0°C.
3) failed to charge bike after riding,
resulting in over discharge.
4) the output voltage is too low to
charge the battery.
1) charge the battery in an area under 40°C, or
according to this instruction chapter 7;
2). charge the battery inside the house, or
according to this instruction chapter 7;
3) please well maintain the battery according to
the Chapter 6.3 to avoid natural over-discharge;
4) no charging when the power supply is lower
than 100V.
If the above has no effect, please contact your
vendor or authorized service.
There is no speed/KM
show on the LCD
The magnetic ball point on the wheel
spoke is in too far away distance from
the wheel speed sensor (fixed to frame
chain stay or front fork), which make
the sensor cannot get any signals of
the revolving wheel.
Check the distance between the magnetic ball
point and the wheel speed sensor, and make
sure the distance should within 5mm.
12. Diagram and specification.
We reserve the right, without further notice, makes modifications to the product. For further advice, please
contact your vendor.

19/61
 Loading...