

Denver DMB-107HD User Manual


Important safety instructions to be kept with the product
p
Please read attentively
To prevent fire and electric shock, do not expose this receiver to
rain or moisture. In order to avoid any possible risk of electric shock,
never attempt to open the unit. In case of breakdown, reparation
should be made by qualified technicians. No part of this unit should be
re
aired by users.
WARNING!
Presence of dangerous tension inside apparatus! Do not open. Risk of electric
shock!No part should be repaired by users. The maintenance of the receiver
should be carried out exclusively by qualified persons.
If the power cord is damaged, it must be replaced or repaired by the manufacturer, its
after-sales service, qualified electrician or persons of similar qualification in order to avoid
possible danger.
The product must be installed in accordance with national regulations.
The used batteries must be disposed of safely. Throw them in collection bins provided is
prohibited (inquire after your retailer for more details) in order to protect the environment.
Proper Installation
- Place the receiver on a flat, firm and stable surface. Do not put it on a carpet or rug.
- Do not place the receiver on top of another device, such as an amplifier. This may lead
to overheating.
- Do not put anything above the unit (for example, CDs or magazines).
Sufficient Ventilation
- Place the receiver in a well-ventilated location to prevent accumulation of internal heat.
Allow a gap of at least 10cm to the rear and the top of the unit, as well as a space of 5cm
to both sides to avoid overheating.
- Do not obstruct any ventilation openings with items such as newspapers, tablecloths,
curtains, etc.
Protecting the Receiver from High Temperatures, Humidity, Water and Dust
- The receiver should not be exposed to dripping water or splashing.
- No objects filled with liquids, such as vases, shall be placed on the unit.
- Do not place any objects that might damage your unit near it (e.g. liquid filled objects or
candles).
- Do not place any source of flames such as lit candles on the receiver.
- This receiver is to be used in a temperate climate and should not be used in a tropical
climate.
Electricity Supply
- Please unplug the receiver in case of prolonged non-use.
- If the power cord is damaged, it must be replaced or repaired by the manufacturer, its
after-sales service, qualified electrician or similar qualifications to those to avoid possible
danger.

- This device must be connected to a 240V ~ 50Hz electrical network.
- The plug must remain readily accessible after the installation of the product.
Welcome Section
Congratulations on choosing to buy a DENVER product. By doing so you now have the
assurance and peace of mind that comes with purchasing a product made by one of the
leading manufactory. All products brought to you by DENVER are manufactured to the
highest standards of performance and safety, and, as part of our philosophy of customer
service and satisfaction, are backed by our comprehensive 1 Years Warranty.
Main features:
z Slim size (230mm)
z MPEG-2, MPEG-4(H.264) decoding
z USB2.0 for software update , music ,image and recording
z 256 color OSD;
z LCN(Logical Channel Number) supported;
z Parental control
z Favorite lists
z Timer
z EPG/TXT/SUBTITLE supported
z Digital sound through optical output(S/PDIF)
z PVR ready supported

1. INSTALLATION OF STB .............................................................................................. 2
1.1 FRONT PANEL ................................................................................................................. 2
REAR PANEL ................................................................................................................... 2
1.2
CONNECTION .................................................................................................................. 3
1.3
REMOTE .......................................................................................................................... 4
1.4
2. MAIN MENU ................................................................................................................. 5
3. EDIT CHANNEL ........................................................................................................... 5
3.1
TV CHANNEL LIST .......................................................................................................... 5
DELETE ALL .................................................................................................................... 7
3.2
4. INSTALLATION ............................................................................................................ 7
4.1 AUTO SCAN .................................................................................................................... 7
MANUAL SCAN ................................................................................................................ 7
4.2
AERIAL ADJUSTMENT ..................................................................................................... 8
4.3
LCN ................................................................................................................................ 8
4.4
5. SYSTEM SETUP .......................................................................................................... 8
5.1 LANGUAGE .................................................................................................................... 8
TV SYSTEM .................................................................................................................. 9
5.2
LOCAL TIME SETTING................................................................................................... 9
5.3
TIMER SETTING ............................................................................................................ 9
5.4
PARENTAL LOCK ........................................................................................................ 10
5.5
OSD SETTING ............................................................................................................ 10
5.6
FAVORITE ................................................................................................................... 10
5.7
6. TOOLS ........................................................................................................................ 10
6.1 INFORMATION ............................................................................................................... 11
LOAD FACTORY SETTING ............................................................................................. 11
6.2
SW UPDATE BY OTA ................................................................................................... 11
6.3
UPDATE BY USB .......................................................................................................... 11
6.4
USB DEVICE ................................................................................................................. 11
6.5
REMOVE USB DEVICE SAFELY..................................................................................... 11
6.6
7. GAME ......................................................................................................................... 12
8. REC(RECORD) ........................................................................................................... 12
8.1
RECORD MANAGER ...................................................................................................... 12
DVR HDD INFORMATION ............................................................................................. 12
8.2
HDD FORMAT ............................................................................................................... 13
8.3
DVR CONFIGURATION ................................................................................................. 13
8.4
JUMP ............................................................................................................................. 13
8.5
9. OTHER FUNCTIONS INTRODUCTION ..................................................................... 13
9.1
PROGRAM INFORMATION .............................................................................................. 13
FAVORITE LIST .............................................................................................................. 13
9.2
PROGRAM GUIDE ......................................................................................................... 14
9.3
VOLUME CONTROL ....................................................................................................... 14
9.4
RECORD PROGRAM .................................................................................................... 14
9.5
10. TECHNICAL SPECIFICATION ................................................................................. 15
11. TROUBLESHOOTING .............................................................................................. 16
1
1. Installation of STB
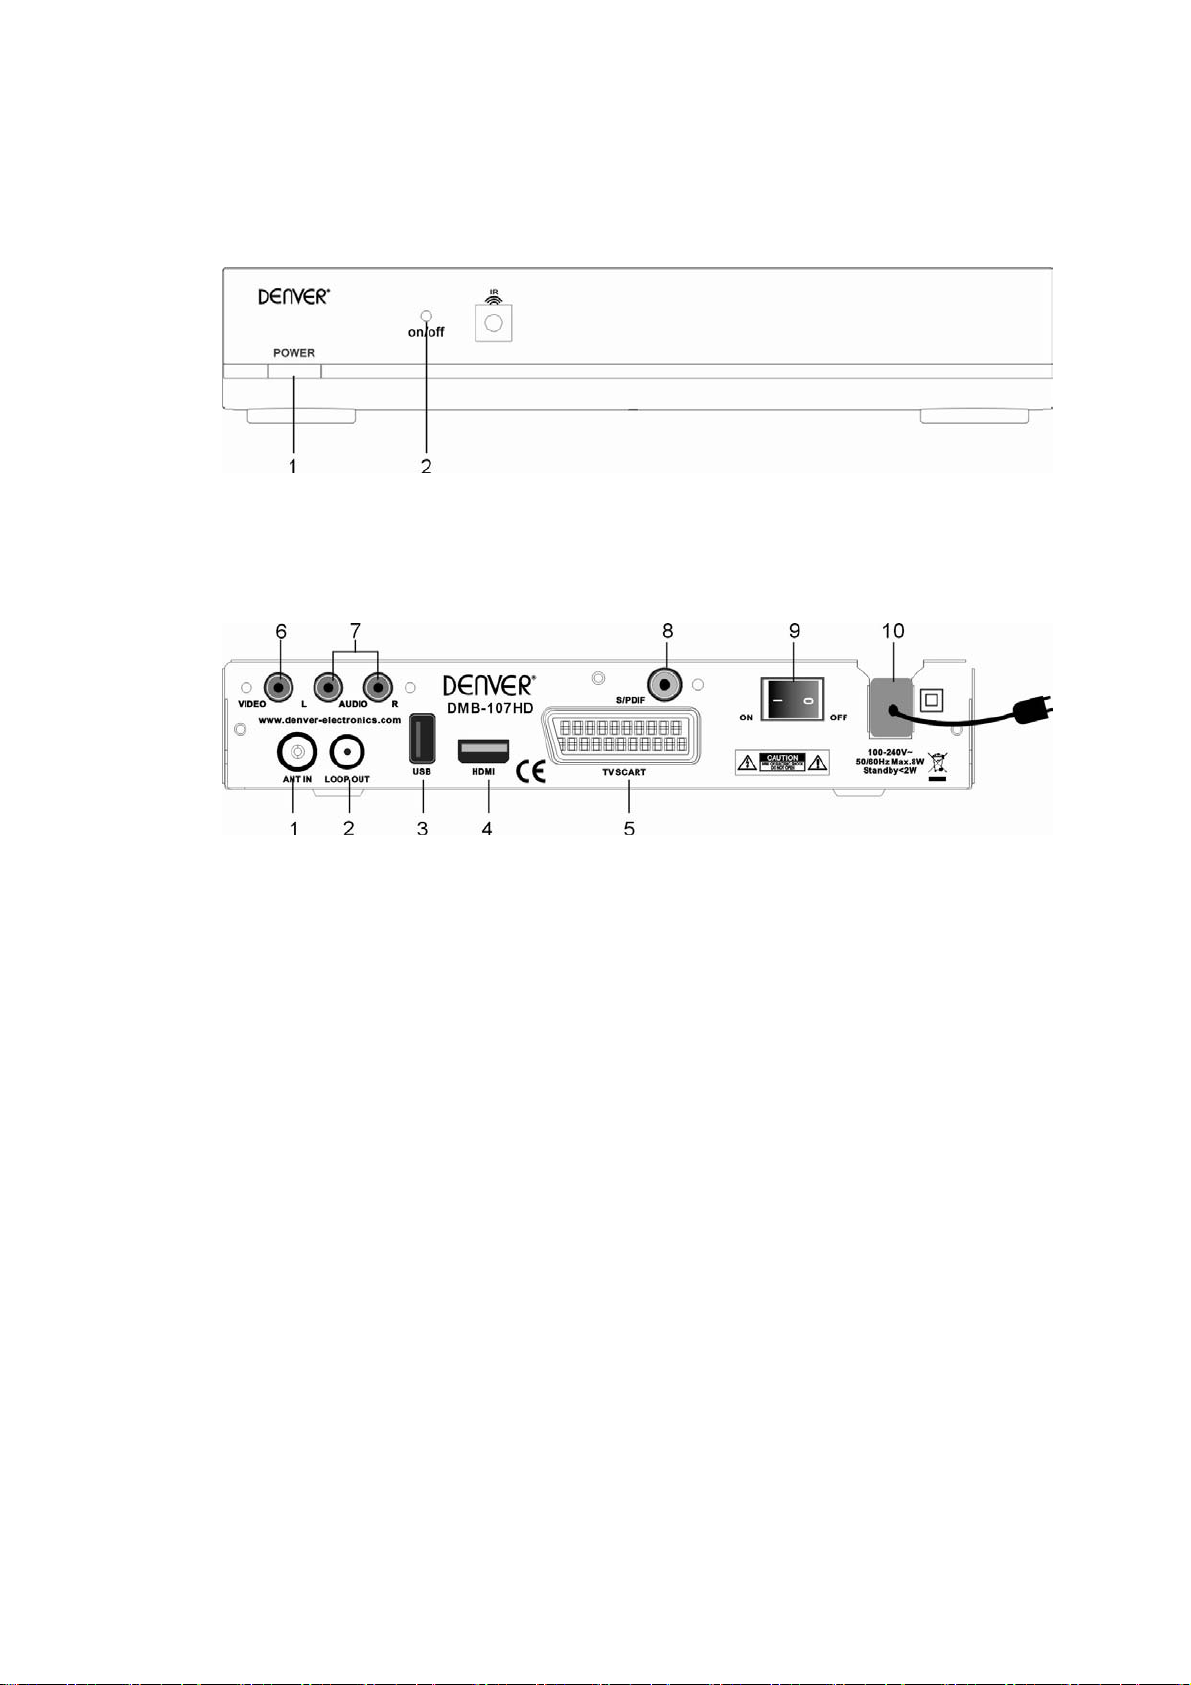
1.1 Front Panel
(1) Power: Switch between
(2) on/off:
Power lamp, red color in Standby mode, green color in active mode
Standby mode and active mode.
1.2 Rear Panel
1. ANT IN
Connect antenna here.
2. LOOP OUT
To connect to TV.
3. USB
4. HDMI
Connecting to the HDMI input on the TV set.
5.TV SCART Connector
Use this connector to connect your receiver to your video recorder using a SCART
cable. Your video signal will now be looped through your receiver to your TV set.
6. VIDEO
This connector has a constant video signal for additional VCR-connections.
7. AUDIO Right and Left
These connectors give you the possibility to connect the audio signal to an external
amplifier, or the audio input of your TV.
8. S/PDIF
Digital audio signal output
11. Power ON/OFF Switch
12.Power Cord
2
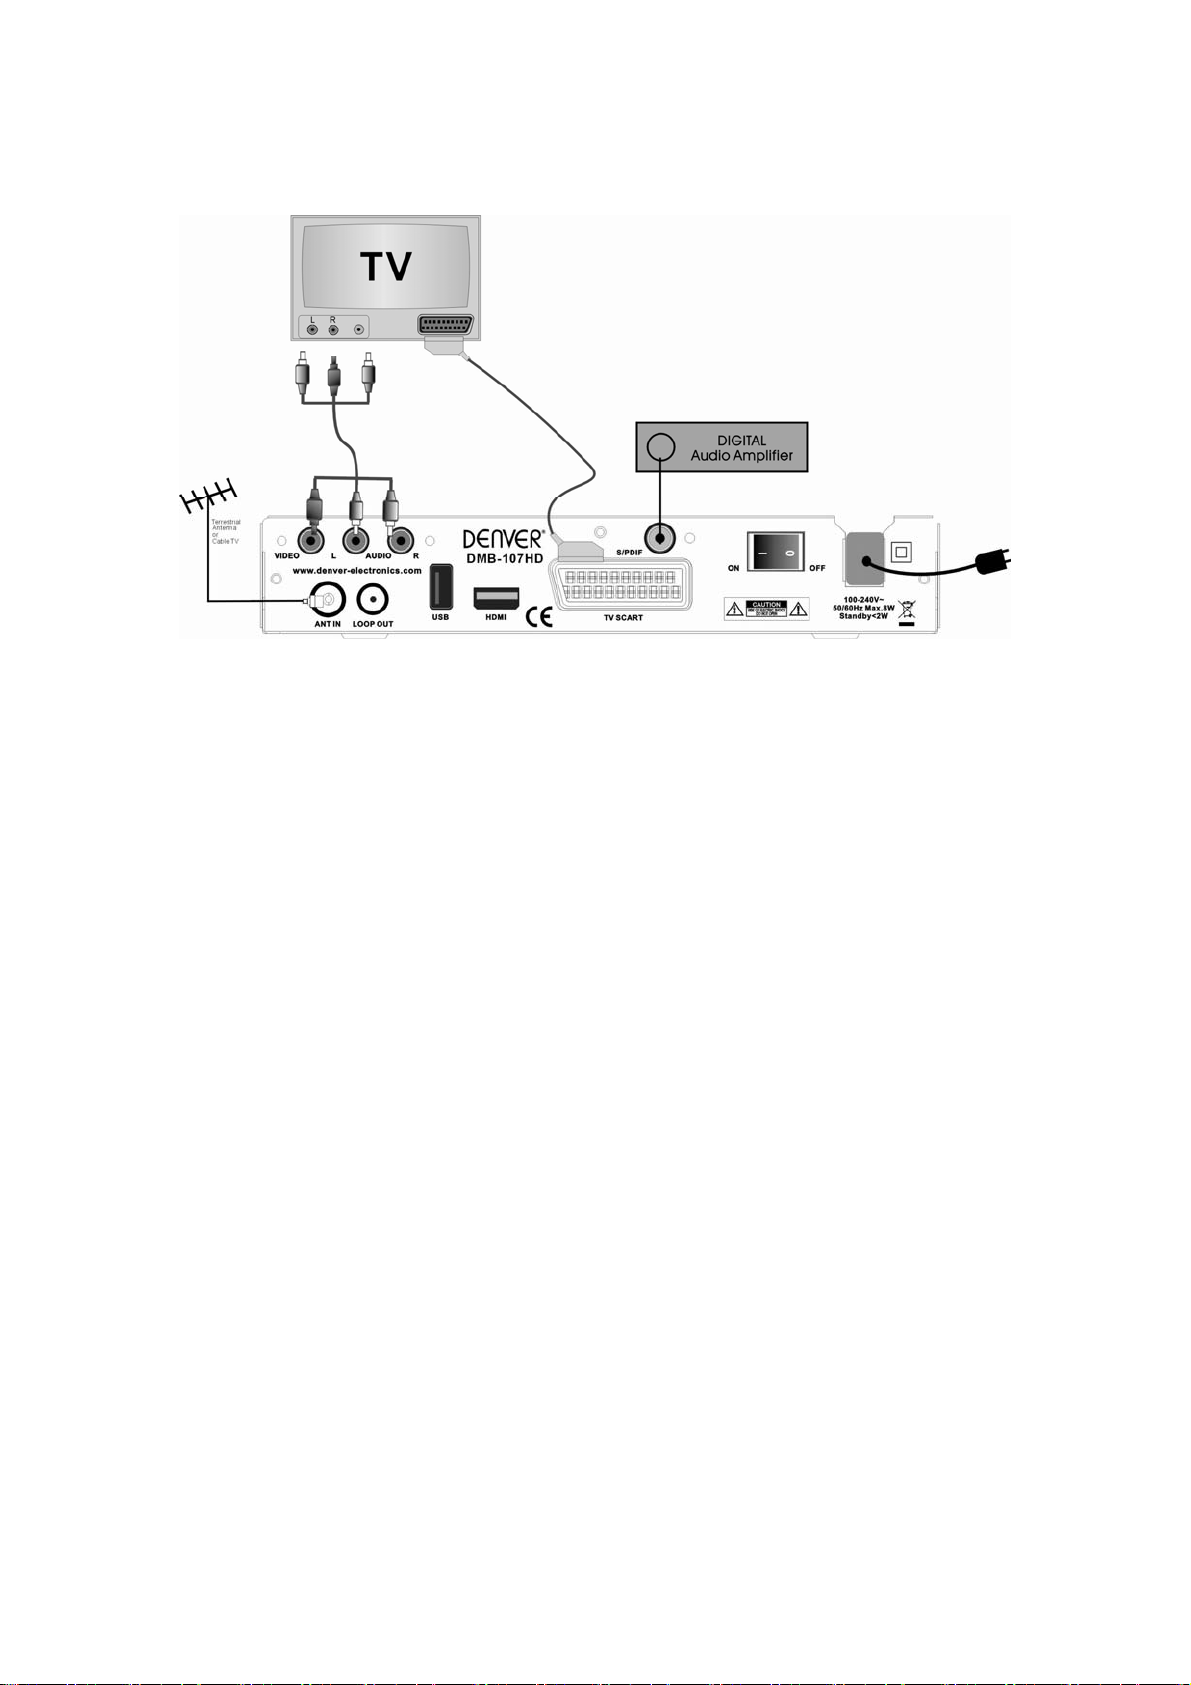
1.3 Connection
Note: Before connect this STB to other devices, please close all devices’ power.
1.3.1 Connecting to Terrestrial Antenna
To receive the broadcast signal, the terrestrial antenna cable should be connected to the
ANT IN connector at the back of the receiver.
1.3.2 Connecting to TV
1. Connect the Audio Left ,Right and VIDEO RCA connectors at the back of the receiver
to the Audio Left,Right IN and VIDEO connectors on your TV set.
2. Connect the HDMI connector at the back of the receiver to the HDMI connector on
your TV set.
1.3.3 Connecting to Digital Audio Amplifier
Connect OPTICAL connector at the back of your receiver to appropriated input of your
Digital Audio
3

1.4 Remote
: Switch between operation and standby modes.
: Press to temporarily cut off the sound.
0-9: Enter number or select a channel number to watch.
TV/R: Switch between TV and Radio mode.
MENU: Displays the main menu.
EXIT: Return to the previous menu or escape from the item
OK: Confirm.
: Move cursor up/down/left/right, page up/down,
Volume +/-.
FAV: Press to display the TV favorite list.
EPG: Shows the EPG (Electronic Program Guide) only
when menu is off.
V+/V-: Volume+/-.
AUDIO: Display the Audio Select window.
:
Fast playing.
:
Play previous item.
:
Play next item.
■
Stop.
:
Play / Pause.
●
Records a live program.
INFO: Shows information of the current channel.
FIND: Display FIND menu to find the channels.
P+/P-: Page up or down in menu list.
Switches to Last channel viewed.
RCL:
PAUSE:
SUB:
channel supports.
TEXT:
Slow playing.
Freeze/Resume picture.
Show the list of subtitled languages the current.
Shows current service’s Teletext on OSD.
:
4
 Loading...