

Denver DHD-250 User Manual

DR 619

CONTENTS
Safety precautions 2
Important safety instructions 3
Basic information 5
Befor you start 6
Remote control function 7
Panel 8
Connection 10
Advanced playback 13
Using the setup menu 16
Recording options 20
Editing 23
Hdd recording 25
Hdd editing 26
Trouble shooting guide 27
Specification 28
1

SAFETY PRECAUTIONS
The lightning flash with an arrowhead symbol within an equilateral triangle is
intended to alert the presence of uninsulated “dangerous voltage” within the
product’s enclosure that may be of sufficient magnitude to constitute a risk of electric
shock persons.
The exclamation point within an equilateral triangle is intended to alert the user
to presence of important operating and maintenance (servicing) instructions in the
literature accompanying the appliance.
WARNING:
To reduce the risk of fire or electric shock, do not expose this apparatus to dripping or
Warning
RISK OF ELECTRIC SHOCK
DO NO T OPEN
CLASS I
LASER PRODUCT
splashing . And that no objects filled with liquids, such as vases, shall be placed on the
apparatus. The unit has dangerous high-voltage fittings inside, and do open the cover.
Repairs should only be done by qualified maintenance personnel.
CAUTION :
This unit is equipped with the laser system. Do not attempt to open the enclosure to avoid
exposure to direct laser radiation. The visible will radiate out when the enclosure is
opened or the interlock device is released. Do not stare at the laser beam.
FCC NOTE:
This equipped has been tested and found to comply with the limits for a Class B digital device, pursuant
to Part 15 of the FCC Rules. These limits are designed to provide reasonable protection against harmful
interference in a residential installation. This equipment generates, uses and can radiate radio
frequency energy and, if not installed and used in accordance with the instructions, may cause harmful
interference to radio communications, However, there is no guarantee that interference will not occur in
a particular in saltation. If this equipment does cause harmful interference to radio or television
reception, which can be determined by turning the equipment off and on, the user is encouraged to
correct the interference by one or more of the following measures.
Reorient or relocate the receiving antenna.
Increase the separation between the equipment and receiver.
Connect the equipment into an outlet on a circuit different from
that to which the receiver is connected .
Consult the dealer or an experienced radio/TV technician for help.
FCC CAUTION:
To assure continued compliance, follow the attached installation instructions and use only shielded
cables when connecting to other devices, Also, any changes or modifications not expressly approved by
the party responsible for compliance could void the user’s authority to operate this equipment.
WARNING:
Changes or modifications made to this equipment, not expressly approved by us or parties authorized by
us will void all the manufacture warranties.
2

IMPORTANT SAFETY INSTRUCTIONS
1. Read these instructions.
2. keep these instructions.
3. Heed all warnings.
4. follow all instructions.
5. Do not use this apparatus near water.
6. Clean only with dry cloth.
7. Do not block any ventilation openings. Install in accordance with the manufacturer instructions.
8. Situate this product away from heat sources, such as radiators, heat registers, stores, or other products
(including amplifiers) that produce heat.
9. Do not defeat the safety purpose of the polarized or grounding-type plug. A polarized plug has two
blades with one wider than the other. A grounding type plug has two blades and a third grounding prong.
The wide blade of the third prong are provided for your safety. If the provided plug does not fit into your
outlet, please consult an electrician for replacement of the obsolete outlet.
10. Protect the power cord from being walked on or pinched particularly at plugs, convenience
receptacles, and the point where they exit from the apparatus.
11. Only use attachments/accessories specified by the manufacturer.
12. Unplug this apparatus during lighting storms or when unused for a long time.
13. Refer all servicing to qualified service personnel. Servicing is required when the apparatus has been
damaged in any way, such as power-supply cord or plug is damaged, liquid has been spilled or objects
have fallen into the apparatus, the apparatus has been exposed to rain or moisture, does not operate
normally, or has been dropped.
On Power Sources:
1 The recorder is not disconnected from the AC power source as long as it is connected to the wall outlet,
even if the recorder itself has been turned off.
2 If you are not going to use the recorder for a long time, be sure to disconnect the recorder from the
wall outlet. To disconnect the AC power cord, grasp the plug itself; never pull the cord.
3 Before disconnecting the AC power cord, check that the recorder hard disk is not operating
(recording or dubbing) on the front panel display.
4 The unit plug should be kept in easy-to-plug/unlug status in daily life for convenient use.
On Recording:
Make trial recordings before making the actual recording.
On Compensation for Lost Recordings:
We are not liable and will not compensate for any lost recordings or relevant losses, including when
recordings are not made due to reasons including recorder failure, or when the contents of a recording
are lost or damaged as a result of recorder failure or repair undertaken to the recorder. We will not restore,
recover, or replicate the recorded contents under any circumstances.
3

IMPORTANT SAFETY INSTRUCTIONS
About the Hard Disk Drive:
The hard disk has a high storage density, which enables long recording durations and quick access to the
written data. However, it can easily be damaged by shock, vibration or dust, and should be kept away
from magnets. To avoid losing important data, observe the following precautions:
1 Do not use the recorder in a place subject to extreme changes in temperature (temperature gradient
less than 10 C/hour).
2 Do not apply a strong shock to the recorder.
3 Do not place the recorder in a location subject to mechanical vibrations or in an unstable location.
4 Do not place the recorder on top of a heat source, such as a VCR or AV amplifier (receiver).5 Do not
move the recorder with its AC power cord connected.
5 Do not move the recorder for one minute after you have unplugged the AC power cord. After one
minute, move the recorder without shock or vibration.
6 Do not disconnect the AC power cord while the power is on.
7 Do not attempt to change the hard disk. This may result in a malfunction.
Should the hard disk be damaged, you cannot recover lost data. The hard disk is only a temporary
storage space.
On Placement:
Place the recorder in a location with adequate ventilation to prevent heat build-up in the recorder.
1 Do not place the recorder on a soft surface such as a rug that might block the ventilation holes.
2 Do not place the recorder in a confined space such as a bookshelf or similar unit.
3 Do not place the recorder in a location near heat sources, or in a place subject to direct sunlight,
excessive dust, or mechanical shock.
4 Do not place the recorder in an inclined position. It is designed to be operated in a horizontal
position only.
5 Keep the recorder and discs away from equipment with strong magnets, such as microwave
ovens, or large loudspeakers.
6 Do not place heavy objects on the recorder.
7 To prevent fire or shock hazard, do not place objects filled with liquids, such as vases, on the
apparatus.
Note:
Television programs, films, video tapes, discs, and other materials may be copyrighted. Unauthorized
recording of such material may be contrary to the provisions of the copyright laws. Also, use of this
recorder with cable television transmission may require authorization from the cable television
transmitter and/or program owner.
4

BASIC INFORMATION
INTRODUCTION
Welcome!
Your DVD recorder both records DVD±RWs/DVD±Rs and plays prerecorded DVD.
As a DVD recorder, the unit is capable of recording great mass of AV input signals, such as a TV
program, ordinary VCD or DVD player’s signals, DV camcorder recordings, etc. You can quickly
access your recordings in the index Picture Screen when playing the recorded disc. Plus, the recordings
you make on the recorder will play on some DVD players and DVD-ROM drivers. You’ll soon marvel at
this unit’s powerful recording functions:
It is better than the CD-R/RW recorders. Of course, it is more better than the tape recorders.
As a DVD player, this unit almost has all the functions of the ordinary DVD Player. We believe you will
be surprised by the clearer picture and more graceful sound of this player.
Read this manual carefully to understand the banausic and funny functions, then enjoy your new DVD
recorder.
Features
Utilizing MPEG-II Real-Time encoding and decoding technology, capable of directly recording TV
and external program sources on DVD±R, DVD±RW discs.
Capable of recording your favorite video tapes into DVD.
Built-in DV (i. LINK/IEEE1394) input jack enables fully digital high fidelity recording of digital
video camcorder signals.
Progressive scan outputs to produce stabler and clearer pictures without flicker.
Built-in 5.1CH Dolby Digital surround decoder, separate 5.1CH outputs, 2CH Dolby outputs,
optical and coaxial output for digital audio.
24bit audio DAC to produce perfect acoustic fidelity.
With normal DVD playback function, capable of playing DVD, SVCD, VCD, CD, MP3, JPEG,
DVD±R and DVD±RW discs.
Recorded discs play on normal DVD players.
Single-side discs DVD±R/DVD±RW (4.7GB) are capable for 6 hours video recording.
Supporting5 recording modes: HQ, SP, LP, EP and SLP
OTR function enables one-touch recording, convenient to select the length of recording.
Title index pictures of recorded disc (DVD±RW) are freely selectable.
Multi-dubbing, multi-angle,multi-subtitle for selection.
Built- in TV tuner with TV recorded function enables automatically channels scanning.
With AV terminal, S-Video on the front and rear panels, DV (i. LINK/IEEE 1394) and antenna input
terminals, convenient to record various program sources.
With composite video, component/progressive-scan video output terminals and TV antenna output
terminals, convenient to connect with various TV sets.
Intelligent preset timing recording function enables 20 recording tasks to prevent you from missing
any wonderful programs.
Recording and output system is optional between PAL/NTSC system .
Software intelligent upgrading function.
Double SCART sockets: one for inputting or decoding, another for outputting.
5
BEFOR YOU START
NOTE:
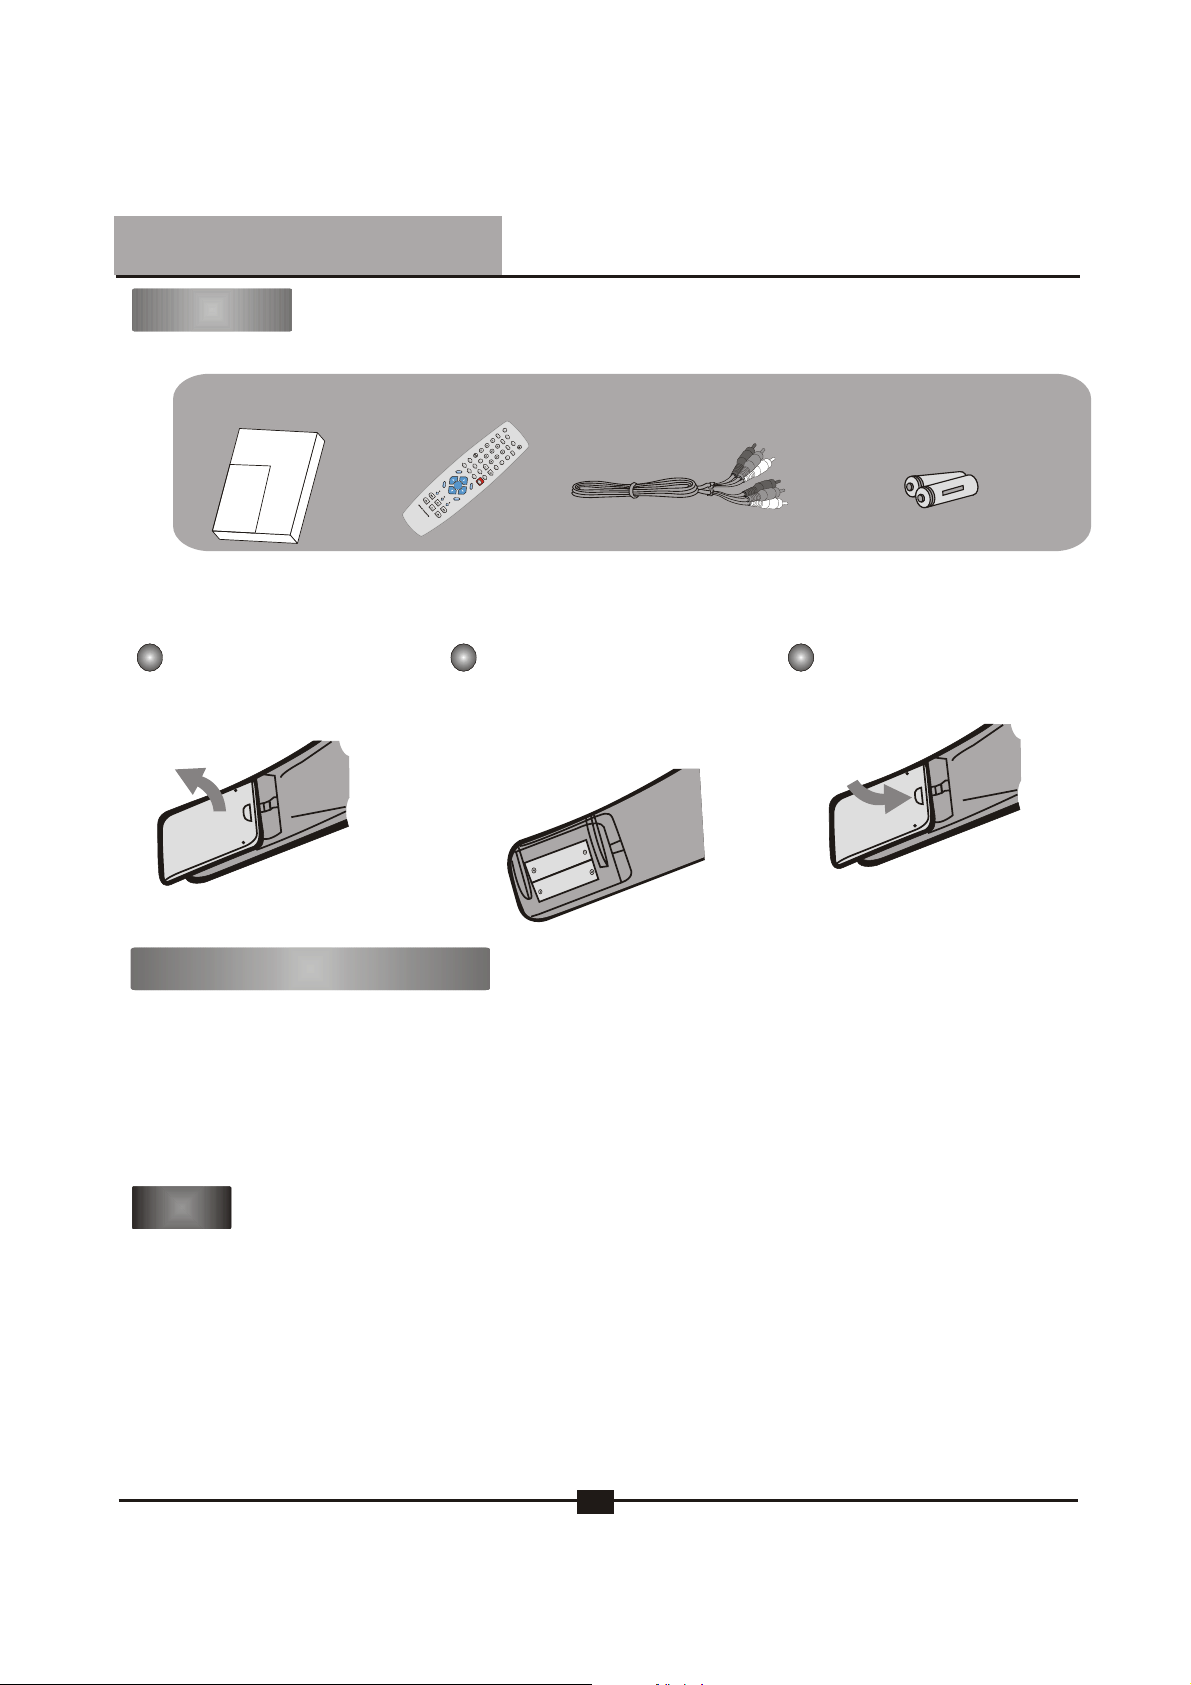
Accessories
Please confirm that the following accessories are in the box when you open it.
Operation Instruction
•••••• •••••
Remote Controller
S
t
a
n
d
b
y
S
S
o
u
u
r
b
c
t
e
i
t
l
e
TV
A
n
g
l
e
Op
e
n
/
H
C
D
l
o
D
s
e
D
V
D
Z
R
o
e
o
G
p
m
e
o
a
t
o
t
A
u
I
d
n
io
f
A
o
B
M
C
u
H
Clea
t
T
e
T
it
le
im
r
e
r
T
ime
R
e
c
S
m
h
if
o
t
d
e
R
e
c
o
r
d
R
e
t
u
E
r
n
nt
M
e
e
n
r
u
S
e
t
u
p
V
O
L
R
7
0
9
E
1
Audio/Video Cable
Putting the batteries in the remote controller
•
Open the battery
compartment cover on the
back of the remote controllerl.
•
Insert two AAA/1.5V
batteries into
the battery compartment
following the indications
(+, -) inside the
compartment.
Using the remote controller
AAA Dry Cell Batteries
•
Close the cover.
Keep in mind the following when using the remote controller :
Make sure that there are no obstacles between the remote controller and the remote sensor on
the unit.
Remote operation may become unreliable if strong sunlight or fluorescent light is shining on the
unit's remote sensor.
Remote controllers for different devices can interfere with each other. Avoid using remote
controller for other equipment located close to this unit.
Replace the batteries when you notice a fall off in the operating range of the remote.
Use the batteries correctly to avoid possible leakage and corrosion. Do not touch the liquid with
bare hands should leakage occur. Observe the following:
1 Do not use a new battery with an old battery, or batteries of different manufacturers.
2 Do not attempt to recharge the batteries.
3 If you do not intend to use the remote for an extended period of time, remove the batteries.
4 If battery leakage occurs, wipe out any liquid inside the battery compartment, and insert new
batteries.
5 Do not expose the remote sensor (marked on the front panel) to strong light, such as direct
sunlight or lighting apparatus. The recorder may not respond to the remote.
6 Please comply with governmental regulations or environmental public instruction's rules that
apply in your country or area.
6
REMOTE CONTROL FUNCTION
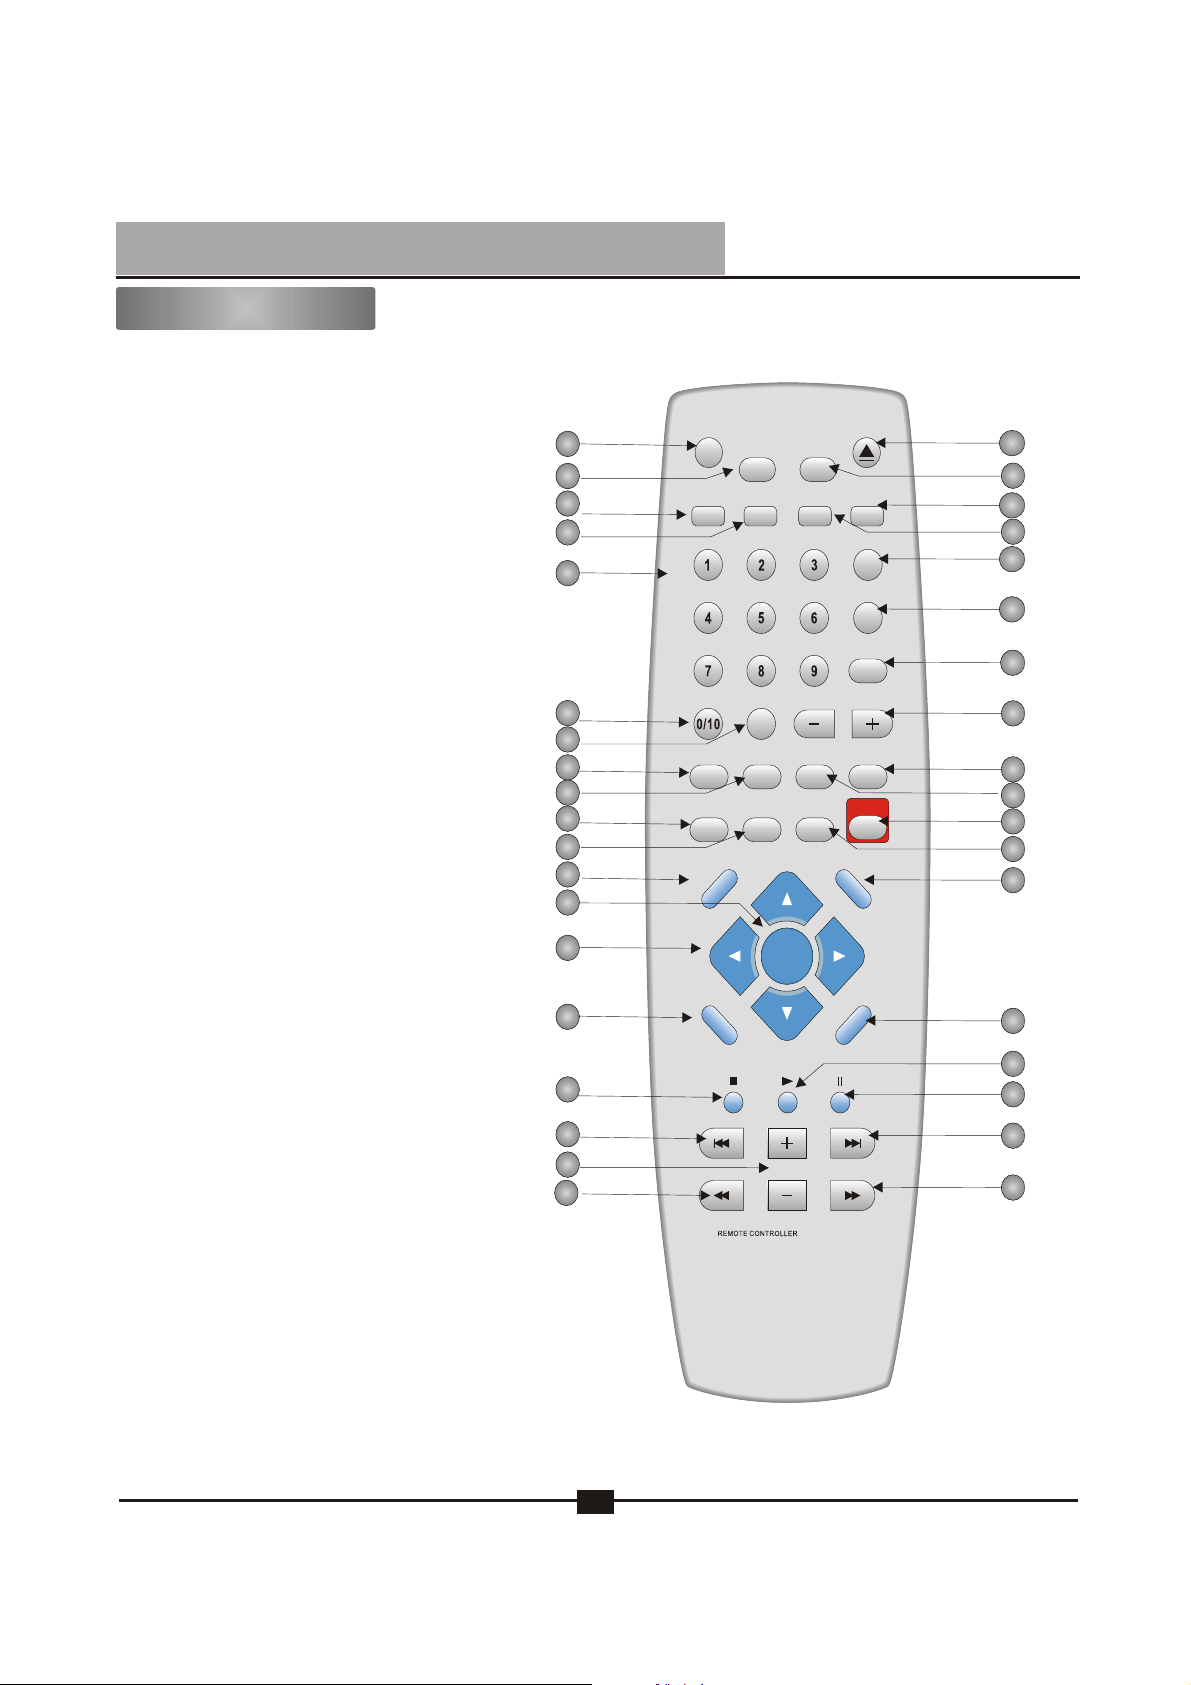
REMOTE CONTROL
1.Standby
2.Subtitle
3.Source
4.TV
5.1~9 Numeric Button
6.0 or 10+
7.Goto
8.Repeat
9.A-B
10.Info
11.Clear
12.Title
13.Enter
Direction
14.
15.Return
16.Stop
17.Previous
Volume+/-
18.
19.Fast Backward
20.Open/Close
21.Angle
22.DVD
23.HDD
24.Zoom
25.Audio
26.Mute
27.Channel+/-
28.Recmode
29.Timer
30.Record
31.Time Shift
32.Menu
33.Setup
34.Play
35.Pause
36.Next
37.Fast Forward
1
2
3
4
5
6
7
8
9
10
11
12
13
14
15
16
17
18
19
Standby Open/Close
TV
Goto
A-B
Clear
Enter
VOL
Angle
HDD
TimerRepeat
TimeShift
R709
DVD
Zoom
Audio
Mute
CH
Recmode
Record
Menu
SetupReturn
E
1
Subtitle
Source
Info
Title
20
21
22
23
24
25
26
27
28
29
30
31
32
33
34
35
36
37
7

PANEL
REC/ON
REC/OFF
CH+ CH-
FRONT FACEPLATE CONTROL
VIDEO IN L AUDIO I N R
S-VIDEO IN
1
S-VEDIO INPUT
1
VIDEO INPUT
2
3
LEFT/RIGHT AUDIO INPUT
2
3
DV IN
4
5
8
STOP BUTTON
PREVIOUS BUTTON
9
NEXT BUTTON
10
REC/OFF
CH+
11
6
7
10
9
8
12
13
14
15
15 RECORD OFF BUTTON
4
Dv1394 INPUT
5
DISC DOOR
6
OPEN/CLOSE BUTTON
7
PLAY/PAUSE BUTTON
CHANNEL+ BUTTON
11
RECORD ON BUTTON
12
CHANNEL- BUTTON
13
SOURCE SELECT BUTTON
14
88
 Loading...