

Page 1
DVD VIDEO PLAYER
DVD-700
OPERATING INSTRUCTIONS
BEDIENUNGSANLEITUNG
ISTRUZIONI PER L’USO
MODE D’EMPLOI
GEBRUIKSAANWIJZING
INSTRUCCIONES DE FUNCIONAMIENTO
BRUKSANVISNING
Page 2
WARNING
*PRINTED ON THE BACK
: TO REDUCE THE RISK OF FIRE OR ELECTRIC SHOCK, DO NOT EXPOSE THIS
APPLIANCE TO RAIN OR MOISTURE.
CAUTION
RISK OF ELECTRIC SHOCK
DO NOT OPEN
CAUTION
TO REDUCE THE RISK OF ELECTRIC SHOCK, DO NOT REMOVE
COVER (OR BACK). NO USER SERVICEABLE PARTS INSIDE.REFER
SERVICING TO QUALIFIED SERVICE PERSONNEL.
:
The lightning flash with arrowhead symbol, within an
equilateral triangle, is intended to alert the user to the
presence of uninsulated “dangerous voltage” within the
product’s enclosure that may be of sufficient magnitude
to constitute a risk of electric shock to persons.
The exclamation point within an equilateral triangle is
intended to alert the user to the presence of important
operating and maintenance (servicing) instructions in
the literature accompanying the appliance.
PRECAUTIONS
Laser Safety
This unit employs a laser. Only a qualified service person should remove the cover or attempt to service this device, due to possible
eye injury.
CAUTION: USE OF CONTROLS OR ADJUSTMENTS OR PERFORMANCE OF PROCEDURES OTHER THAN THOSE SPECI-
CAUTION: VISIBLE AND INVISIBLE LASER RADIATION WHEN OPEN AND INTERLOCK DEFEATED. DO NOT STARE INTO
LOCATION:
FIED HEREIN MAY RESULT IN HAZARDOUS RADIATION EXPOSURE.
BEAM.
Nonuse periods - Turn the unit off when it is not in use. Unplug the unit from the household AC outlet if it is
not to be used for a long time. Unplug the unit during lightning storms.
–2–
EN
Page 3

PRECAUTIONS
Use only discs marked DVD or disc with this DVD player.
Power Supply
The main power supply is engaged when the main plug is
plugged in a 220-240V, 50Hz AC outlet. To operate the unit,
press the ON/STANDBY button to turn on the unit.
Warning
To avoid fire or electric shock, do not expose this unit to rain
or moisture.
WARNING:
LIVE PARTS INSIDE.
DO NOT REMOVE ANY SCREWS.
Dew Warning
Moisture condensation may occur inside the unit when it is
moved from a cold place to a warm place, or after heating a
cold room or under conditions of high humidity. Do not use the
DVD Player at least for 2 hours until its inside is dry.
CautionImportant
1) Do not attempt to open the cabinet.There are no parts
you can service inside. Refer all servicing to qualified service personnel.
2) Slot and openings in the cabinet and at the side or bottom are provided for ventilation. To ensure reliable operation and to protect the unit from overheating these opening must not be blocked or covered. Avoid enclosed
spaces such as book cases unless proper ventilation is
provided.
3) Keep the unit away from the radiator heat sources.
4) Avoid using near strong magnetic fields.
5) Do not push objects of any kind into this through the cabinet slot as they could touch current carrying parts or
short circuit parts resulting in a fire or electric shock.
6) Never spill liquid of any kind on this unit.
If liquid is spilled into the unit, consult qualified service
engineer.
7) Use this unit in a horizontal (flat) position only.
8) This equipment is in Stand-by mode when it turns off
whilst the power cord is connected.
9) Keep the set free from moisture,water and dust.
10) Handle the power cord carefully. Hold the plug when
unplugging the code.
11) All the safety cautions and operating instructions should
be read before the DVD player is operated.
12) Use caution not to pinch your finger in the disc slot.
13) Do not put heavy objects on the AC power cord.
14) Keep the AC power cord away from heat appliances.
15) Be sure to remove a disc and unplug the AC power cord
from the outlet before carrying the DVD player.
16) Do not put any pressure to the DVD player when carrying.
17) Do not use the DVD player outdoors.
English
Declaration of Conformity
We declare under our sole responsibility that this product, to
which this declaration relates, is in conformity with the following standards:
EN60065, EN 55013, EN55020, EN61000-3-2 and
EN61000-3-3. Following the provisions of 73/23/EEC,
89/336/EEC and 93/68/EEC Directive.
–3–
EN
Page 4

TABLE OF CONTENTS
■
PRECAUTIONS . . . . . . . . . . . . . . . . . . . . . . . . . . . . . . 2
Laser Safety . . . . . . . . . . . . . . . . . . . . . . . . . . . . . . . . . 2
Important. . . . . . . . . . . . . . . . . . . . . . . . . . . . . . . . . . . . 3
Power Supply . . . . . . . . . . . . . . . . . . . . . . . . . . . . . . . . 3
Warning. . . . . . . . . . . . . . . . . . . . . . . . . . . . . . . . . . . . . 3
Dew Warning. . . . . . . . . . . . . . . . . . . . . . . . . . . . . . . . . 3
Caution . . . . . . . . . . . . . . . . . . . . . . . . . . . . . . . . . . . . . 3
Declaration of Conformity . . . . . . . . . . . . . . . . . . . . . . . 3
■
INTRODUCTION . . . . . . . . . . . . . . . . . . . . . . . . . . . . . . 5
About Copyright. . . . . . . . . . . . . . . . . . . . . . . . . . . . . . . 5
Supplied Accessories . . . . . . . . . . . . . . . . . . . . . . . . . . 5
Symbols Used in this Manual. . . . . . . . . . . . . . . . . . . . . 5
■
ABOUT THE DISCS . . . . . . . . . . . . . . . . . . . . . . . . . . . 6
Playable Discs. . . . . . . . . . . . . . . . . . . . . . . . . . . . . . . . 6
Disc Types. . . . . . . . . . . . . . . . . . . . . . . . . . . . . . . . . . . 6
■
FEATURES . . . . . . . . . . . . . . . . . . . . . . . . . . . . . . . . . . 7
■
FUNCTIONAL OVERVIEW . . . . . . . . . . . . . . . . . . . . . . 8
FRONT PANEL . . . . . . . . . . . . . . . . . . . . . . . . . . . . . 8
REMOTE CONTROL . . . . . . . . . . . . . . . . . . . . . . . . . 8
Tour of the remote control . . . . . . . . . . . . . . . . . . . . . . . 9
Display . . . . . . . . . . . . . . . . . . . . . . . . . . . . . . . . . . . . 11
Displays During Operation . . . . . . . . . . . . . . . . . . . . . . 11
Loading the Batteries. . . . . . . . . . . . . . . . . . . . . . . . . . 11
■
CONNECTIONS . . . . . . . . . . . . . . . . . . . . . . . . . . . . . 12
Description - rear panel . . . . . . . . . . . . . . . . . . . . . . . . 12
Connection to an audio system . . . . . . . . . . . . . . . . . . 13
Connection to a TV (for video) . . . . . . . . . . . . . . . . . . . 14
■
PLAYING A DISC . . . . . . . . . . . . . . . . . . . . . . . . . . . . 15
Basic Playback . . . . . . . . . . . . . . . . . . . . . . . . . . . . . . 15
General Features. . . . . . . . . . . . . . . . . . . . . . . . . . . . . 15
Brightness of the Front Display . . . . . . . . . . . . . . . . . . 15
Pause . . . . . . . . . . . . . . . . . . . . . . . . . . . . . . . . . . . . . 15
Disc Menus . . . . . . . . . . . . . . . . . . . . . . . . . . . . . . . . . 15
Title Menu . . . . . . . . . . . . . . . . . . . . . . . . . . . . . . . . . . 15
CALLING UP A MENU SCREEN DURING
PLAYBACK . . . . . . . . . . . . . . . . . . . . . . . . . . . . . . . 15
Step by Step Playback. . . . . . . . . . . . . . . . . . . . . . . . . 16
Resume. . . . . . . . . . . . . . . . . . . . . . . . . . . . . . . . . . . . 16
Fast Forward / Reverse Search . . . . . . . . . . . . . . . . . . 16
Slow Forward / Slow Reverse . . . . . . . . . . . . . . . . . . . 16
Zoom. . . . . . . . . . . . . . . . . . . . . . . . . . . . . . . . . . . . . . 16
Track . . . . . . . . . . . . . . . . . . . . . . . . . . . . . . . . . . . . . . 17
Title / Chapter Search . . . . . . . . . . . . . . . . . . . . . . . . . 17
Time Search . . . . . . . . . . . . . . . . . . . . . . . . . . . . . . . . 17
Repeat . . . . . . . . . . . . . . . . . . . . . . . . . . . . . . . . . . . . 17
REPEAT TITLE / CHAPTER. . . . . . . . . . . . . . . . . . . 17
REPEAT TRACK . . . . . . . . . . . . . . . . . . . . . . . . . . . 17
A-B REPEAT . . . . . . . . . . . . . . . . . . . . . . . . . . . . . . 18
Program (CD) . . . . . . . . . . . . . . . . . . . . . . . . . . . . . . . 18
Random Playback (CD) . . . . . . . . . . . . . . . . . . . . . . . . 18
MP3 / JPEG / WMA Playback . . . . . . . . . . . . . . . . . . . 19
Slide Show Mode (JPEG) . . . . . . . . . . . . . . . . . . . . . . 20
On-Screen Information. . . . . . . . . . . . . . . . . . . . . . . . . 20
Track Selection . . . . . . . . . . . . . . . . . . . . . . . . . . . . . . 20
Random Playback (MP3 / JPEG / WMA) . . . . . . . . . . . 20
Program (MP3 / JPEG / WMA). . . . . . . . . . . . . . . . . . . 21
Audio Language . . . . . . . . . . . . . . . . . . . . . . . . . . . . . 21
Stereo Sound Mode. . . . . . . . . . . . . . . . . . . . . . . . . . . 21
Subtitle Language . . . . . . . . . . . . . . . . . . . . . . . . . . . . 22
Camera Angle . . . . . . . . . . . . . . . . . . . . . . . . . . . . . . . 22
Changing the On-Screen Display . . . . . . . . . . . . . . . . . 22
Marker Setup Screen. . . . . . . . . . . . . . . . . . . . . . . . . . 23
Virtual Surround . . . . . . . . . . . . . . . . . . . . . . . . . . . . . 23
■
DVD SETUP . . . . . . . . . . . . . . . . . . . . . . . . . . . . . . . . 24
Language Setting . . . . . . . . . . . . . . . . . . . . . . . . . . . . 24
Display Setting. . . . . . . . . . . . . . . . . . . . . . . . . . . . . . . 24
Audio Setting. . . . . . . . . . . . . . . . . . . . . . . . . . . . . . . . 25
Ratings Control . . . . . . . . . . . . . . . . . . . . . . . . . . . . . . 25
RATING LEVEL . . . . . . . . . . . . . . . . . . . . . . . . . . . . 25
IF YOU FORGET THE PASSWORD . . . . . . . . . . . . . 25
CONTROL LEVELS . . . . . . . . . . . . . . . . . . . . . . . . . 25
■
MAINTENANCE . . . . . . . . . . . . . . . . . . . . . . . . . . . . . 27
■
TROUBLESHOOTING GUIDE. . . . . . . . . . . . . . . . . . . 28
■
SPECIFICATIONS . . . . . . . . . . . . . . . . . . . . . . . . . . . . 29
■
PIN CONNECTION . . . . . . . . . . . . . . . . . . . . . . . . . . . 30
–4–
EN
Page 5
INTRODUCTION
+10
3
2
SEARCH
MODE
OPEN /
CLOSE
9
ZOOM
DISPLAY
8
AUDIO
0
TOP MENU
SETUP
PLAY
SKIP
5
6
1
A-B REPEAT
REPEAT
7
CLEAR
SUBTITLE
MODE
ANGLE
RETURN
MENU
STOP
4
VIRTUALPOWER
STILL / PAUSE
ENTER
A NOTE ABOUT RECYCLING
This product’s packaging materials are recyclable and can be reused. Please dispose of any materials in accordance with your
local recycling regulations.
Batteries should never be thrown away or incinerated but disposed of in accordance with your local regulations concerning
chemical wastes.
The serial number of this product may be found on the back of the DVD player. No others have the
same serial number as yours. You should record the number and other vital information here and
retain this book as a permanent record of your purchase to aid identification in case of theft. Serial
numbers are not kept on file.
Date of Purchase
Dealer Purchase from
Dealer Address
Dealer Phone No.
Model No.
Serial No.
About Copyright
Unauthorized copying, broadcasting, public performance and lending of discs are prohibited.
This product incorporates copyright protection technology that is protected by method claims of certain U.S.
patents and other intellectual property rights owned by Macrovision Corporation and other rights owners. Use of
this copyright protection technology must be authorized by Macrovision Corporation, and is intended for home
and other limited viewing uses only unless otherwise authorized by Macrovision Corporation. Reverse engineering or disassembly is prohibited.
Apparatus Claimas of U. S. Patent Nos, 4,631,603, 4,577,216, 4,819,098, and 4,907,093 licensed for limited
viewing uses only.
English
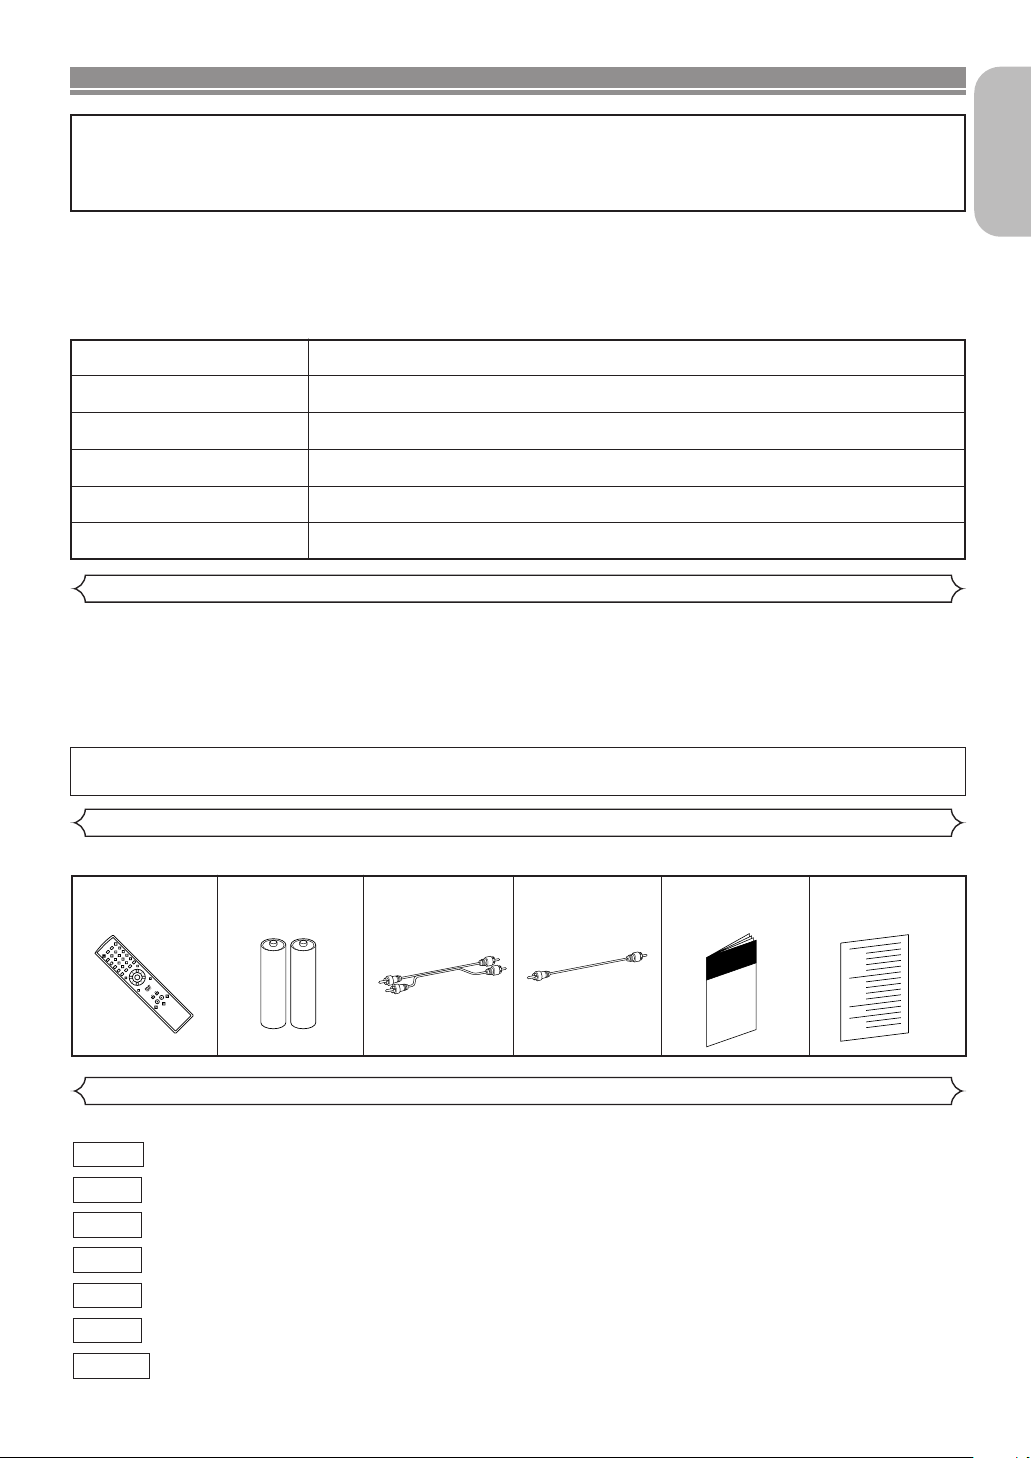
Supplied Accessories
Please check to make sure the following items are included with the main unit in the carton.
Remote
control
• • • • • • • •
“AA” (R6P)
1
batteries
• • • • • •
Audio
cable
2
(approx. 3 feet
(100 cm) long)
• • • • • • • • •
Video
1
cable
(approx. 3 feet
(100 cm) long)
• • • • • • • • •
Operating
Instruction
1
• • • •
1
Symbols Used in this Manual
The following symbols appear below in some headings and notes in this manual, with the following meanings:
: Description refers to playback of DVD video discs.
: Description refers to playback of audio CDs.
CD
: Description refers to playback of discs formatted with MP3.
: Description refers to playback of video CDs.
: Description refers to viewing of JPEG discs.
: Description refers to playback of discs formatted with WMA.
: Description refers to the items to be set in the QUICK mode.
–5–
DVD-V
MP3
VCD
JPEG
WMA
QUICK
Service Station
• • • • • • • • • • •
List
1
EN
Page 6
ABOUT THE DISCS
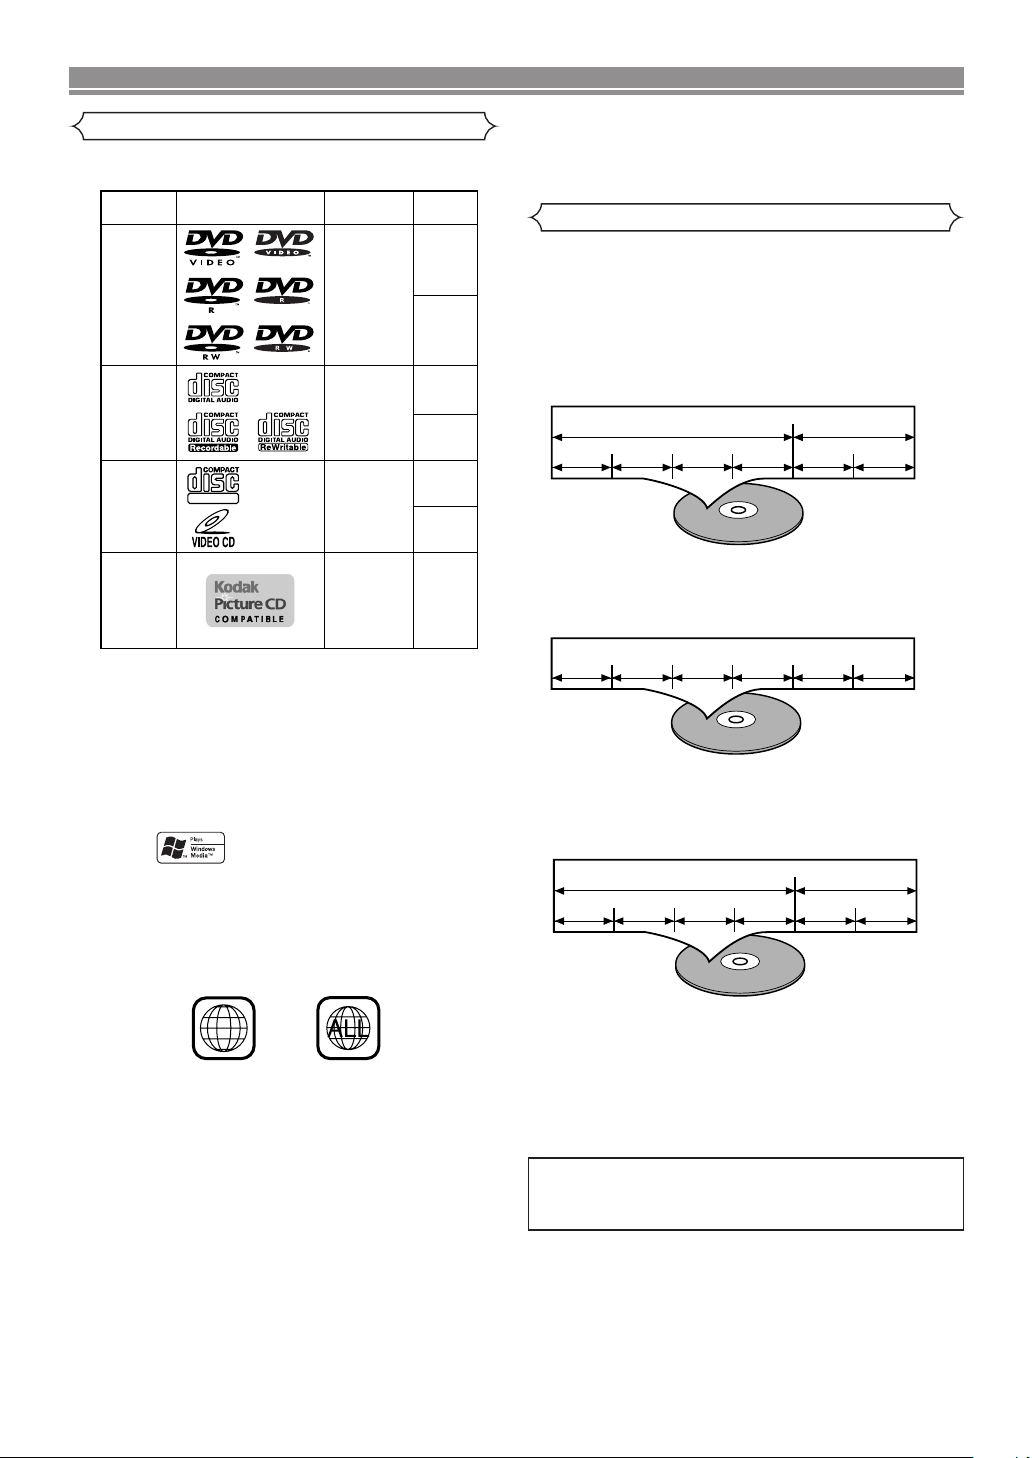
2
Example
Title 1 Title 2
Chapter 1 Chapter 2 Chapter 1 Chapter 2Chapter 3 Chapter 4
Example
Track 1 Track 2 Track 3 Track 4 Track 5 Track 6
Example
Group 1 Group 2
Track 1 Track 2 Track 1 Track 2Track 3 Track 4
DVD video
(NOTE 1)
DVD-R
DVD-RW
(NOTE 2)
CD
CD-R
CD-RW
(NOTE 3)
Video
CD
Picture CD
Digital video
(MPEG2)
Sound
and
Pictures
Digital audio
MP3
WMA
(NOTE 4)
Digital picture
(JPEG)
JPEG
Mark (logo)
Usable
discs
Recorded
signals
Disc Size
12 cm
12 cm
12 cm
8 cm
8 cm
NOTE 1: Some DVD video discs do not operate as described in
this manual due to the intentions of the discs’
producers.
NOTE 2: Playing DVD-R and DVD-RW discs
DVD-R and DVD-RW discs on a DVD recorder can be
played.
Discs that have not been finalized cannot be played.
Depending on the disc’s recording status, the disc may
not be accepted or may not be played normally (the
picture or sound may not be smooth, etc.).
NOTE 3: Some CD-R/CD-RW discs may incompartible because
of scratches and stains on the disc, the recording
condition,or the characteristics of the recorder.
NOTE 4: Windows Media and the Windows logo are
trademarks or registered trademarks of
Microsoft Corporation in the United States
and/or other countries.
12 cm
8 cm
(Singles)
DIGITAL VIDEO
Playable Discs
The following discs can be played back on this
DVD player.
Disc Types
[
DVD-Video
Data on a DVD is divided into sections called "titles," and
subsequently into subsections called "chapters," each of
which is given a title or chapter number. Playback conditions
are preset on some DVD video discs, and these playback
conditions take priority over user operations on this player. If
a function you selected does not function as desired, refer to
the manual accompanying the disc.
]
This player conforms to the PAL colour system. Also you can
play discs recorded with the NTSC system via a PAL system
TV set.
¡Some discs include region codes as shown below.
¡The number inside the symbol refers to a region of the
world, and a disc encoded in a specific region format can
only be played back on DVD players with the same region
code.
[
AUDIO CD, VIDEO CD
]
Data on an audio CD or a video CD is divided into sections
called “tracks,” each of which is given a track number.
[
MP3, JPEG, WMA
]
Data on an MP3 disc is divided into sections called "groups,"
and subsequently into subsections called "tracks," each of
which is given an album or track number.
ABOUT THE PBC FUNCTION OF VIDEO CD
This unit conforms to ver.1.1 and ver.2.0 of the Video CD
standard, with PBC function.
Ver.1.1 (without PBC function): You can enjoy playback picture
as well as music CD.
Ver.2.0 (with PBC function): While using a Video CD with PBC,
“PBC” appears on the screen and the display.
What is PBC? “PBC” stands for the Playback Control. You
can play interactive software using menu screens. Refer to
the instructions accompanying the Video CD.
NOTE:
When you play Video CDs with PBC function, you cannot
choose a specified track and set Repeat.
To play Video CDs without PBC, refer to page 15.
–6–
EN
Page 7

FEATURES
¡Dolby Digital sound
This player can handle Dolby Digital surround sound
having 5.1 channels when connected to a Dolby
Digital decoder.
¡Still/fast/slow/step playback
Various playback modes are available including still
pictures, fast forward/reverse, slow motion and step
frames.
¡Random playback for audio CD, MP3, JPEG, and
WMA
This player can shuffle the order of tracks and play
them in random order.
¡Programme playback for audio CD, MP3, JPEG,
and WMA
You can programme the order of tracks and play
them in any desired order.
¡DVD menus in a desired language
You can display DVD menus in a desired language, if
available on a DVD.
¡Auto standby
When the screen saver programme is activated for
35 minutes, the power is automatically turned off.
¡Subtitles in a desired language
You can select a desired language for the display
subtitles, if that language is available on a disc.
¡Selecting a camera angle
You can select the desired camera angle, if a disc
contains sequences recorded from different angles.
¡Choices for audio language and sound mode
You can select the desired audio language and
sound mode, if different languages and modes are
available on a disc.
¡Parental lock
You can set the control level to limit playback of discs,
which may not be suitable for children.
¡Automatic detection of discs
This player automatically detects if a loaded disc is a
DVD, audio CD, Video CD, MP3, JPEG, or WMA.
¡Playing an MP3 disc
You can enjoy MP3 files which have been recorded
on CD-R/RW recorder.
¡Direct Search
You can search for the desired title, chapter, and
track using the numeric buttons during playback or in
the stop mode.
¡On-screen display
Information about the current operation can be displayed on a TV screen, allowing you to confirm the
currently active functions (such as programme playback), on the TV screen using the remote control.
¡DTS (Digital Theater System)
When you connecte a DTS decoder, you can enjoy
5.1-channel surround sound developed by the Digital
Theater System Co. This reproduces the original
sound as truthfully as possible.
¡Search
Chapter search:Searching for chapters is possible.
Title search: Searching for titles is possible.
Track search: Searching for tracks is possible.
Time search: Searching for time is possible.
¡Repeat
Chapter: Repeated playback of a chapter of the
Title: Repeated playback of a title of the
Track: Repeated playback of a track of the
Disc
(audio CD/video CD):
(MP3/JPEG/WMA)
A-B: The part between A and B designated
Group: Repeated playback of the folder of the
¡Zoom
A 2-time and 4-time magnified screen can be displayed.
¡Marker
The part designated by user can be called back.
¡Resume Play
User can resume playback from the part at which
playback was stopped even if the power was
switched off.
¡Component Video Out Jacks
Jacks located on the back of the DVD Player which
are used to send high-quality video to a TV via
Component Video In Jacks.
¡Dimmer
The brightness of the display can be varied.
¡Bit rate indication
¡DRC (Dynamic range control)
You can control the range of sound volume.
¡MPEG sound
This player can play discs that supports MPEG
audio, and the DVD player is connected to a MPEG
decoder.
¡Playing a disc in Video Recording Format
The unit can play discs recorded in the Video
Recording Format.
¡Displaying a JPEG picture (NOTES 1)
Kodak Picture CDs can be played. Still images stored
in JPEG format on CD-R/RW discs can also be
played.
¡Reproducing WMA data (NOTES 2)
You can enjoy WMA files which have been recorded
on CD-R/RW discs.
“Kodak Picture CD
Eastman Kodak Company.
disc being played is possible.
disc being played is possible.
disc being played is possible.
Repeated playback is possible.
: Repeated playback is possible.
by the user is possible.
MP3/JPEG/WMA disc being played is
possible.
COMPATIBLE
” is trademark of
English
English
“WMA” (Windows Media Audio) is a new audio
codec developed by Microsoft® in the United
States of America.
–7–
EN
Page 8
16
17
18
19
21
8
10
7
23
6
1
31
3
28
29
27
26
9
25
5
11
4
30
20
12
22
24
1 2
3
4
5
61578
9
11
10
1214
13
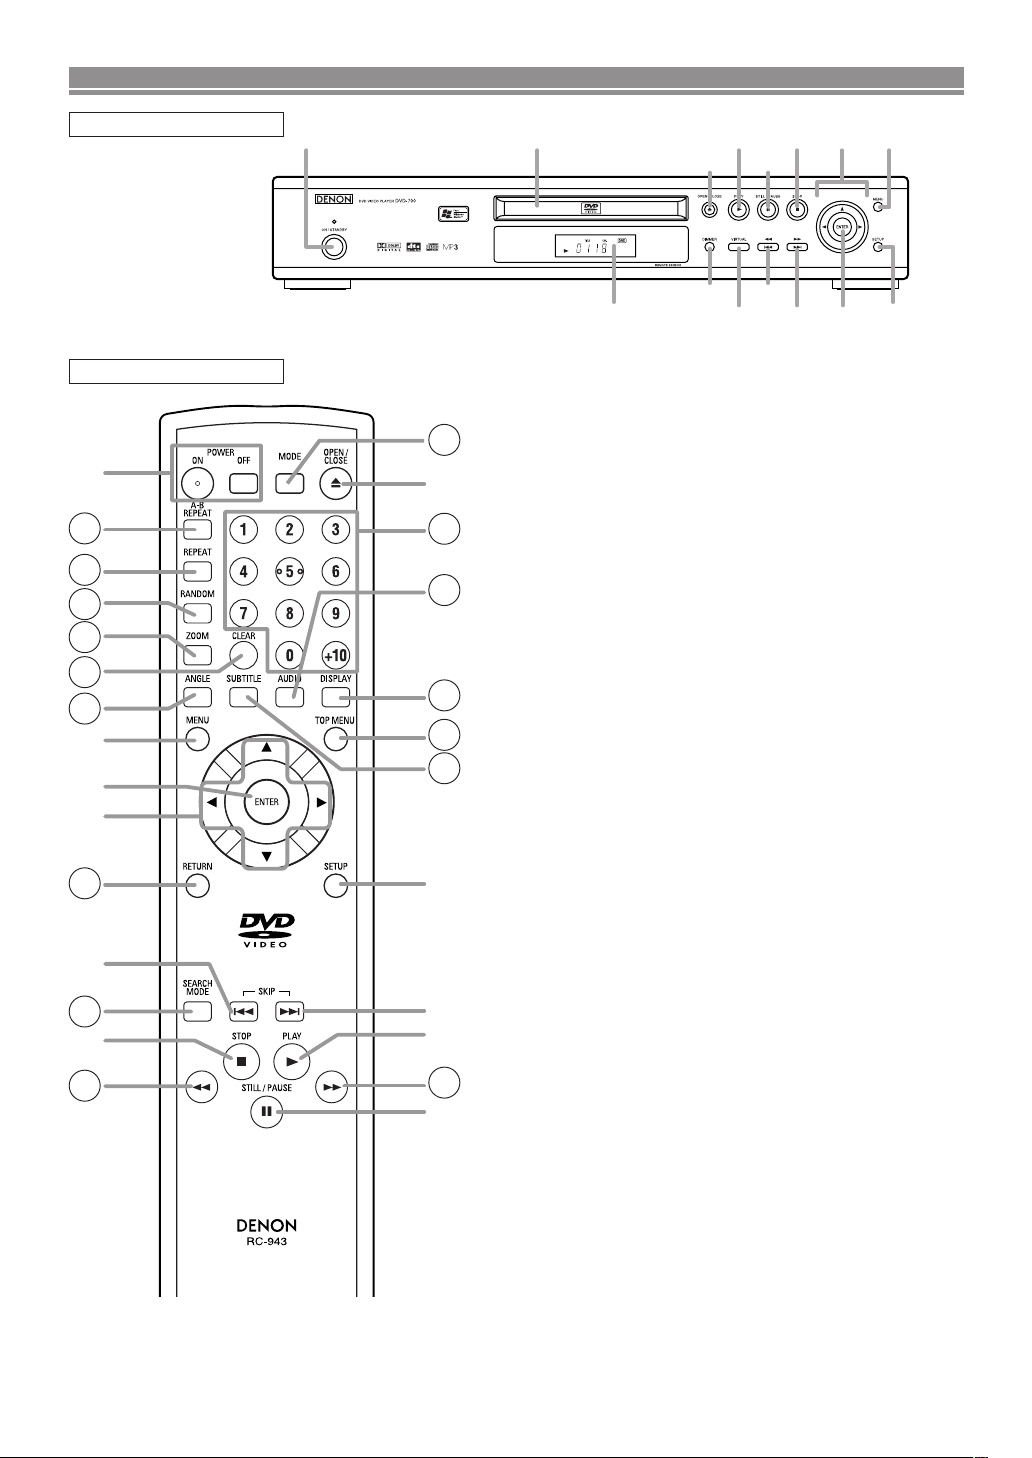
FUNCTIONAL OVERVIEW
FRONT PANEL
REMOTE CONTROL
1. ON/STANDBY, (POWER ON/OFF) Buttons [page 15]
2. Disc loading tray
3. OPEN/CLOSE Button [page 15]
4. PLAY Button [page 15]
5. STILL/PAUSE Button [page 15]
6. STOP Button [page 15]
7. Cursor Buttons [page 15]
Use when making settings while watching the display on
a TV screen.
8.
MENU Button [page 15]
9. SETUP Button [page 24]
10. ENTER Button [page 15]
11. G (SKIP UP/FWD) Button [page 17]
Plays back from the beginning of the next chapter or
track. Hold down to fast forward playback.
12. H (SKIP DOWN/REV) Button [page 17]
Plays back from the beginning of the current chapter or
track. Hold down to fast reverse playback.
13. VIRTUAL Button [page 23]
14. DIMMER Button [page 15]
15. Display, Remote Sensor Window
16. A-B REPEAT Button [page 18]
17. REPEAT Button [page 17]
18. RANDOM Button [pages 18, 20]
19. ZOOM Button [page 16]
20. CLEAR Button [page 17]
21. ANGLE Button [page 22]
Press to change the camera angle and see the same
sequence being played back from a different angle.
22. RETURN Button [page 21]
23. SEARCH MODE Button [page 17]
24. h (FR SEARCH) Button [page 16]
25. g (FF SEARCH) Button [page 16]
26. SUBTITLE Button [page 22]
Press to select a desired subtitle language.
27. TOP MENU Button [page 15]
28. DISPLAY Button [page 20]
29. AUDIO Button [page 21]
Press to select a desired audio language or sound mode.
30. Numeric Buttons [page 17]
31. MODE Button [page 20]
The buttons with circled numbers can only be
operated with the remote control.
–8–
–8–
EN
Page 9
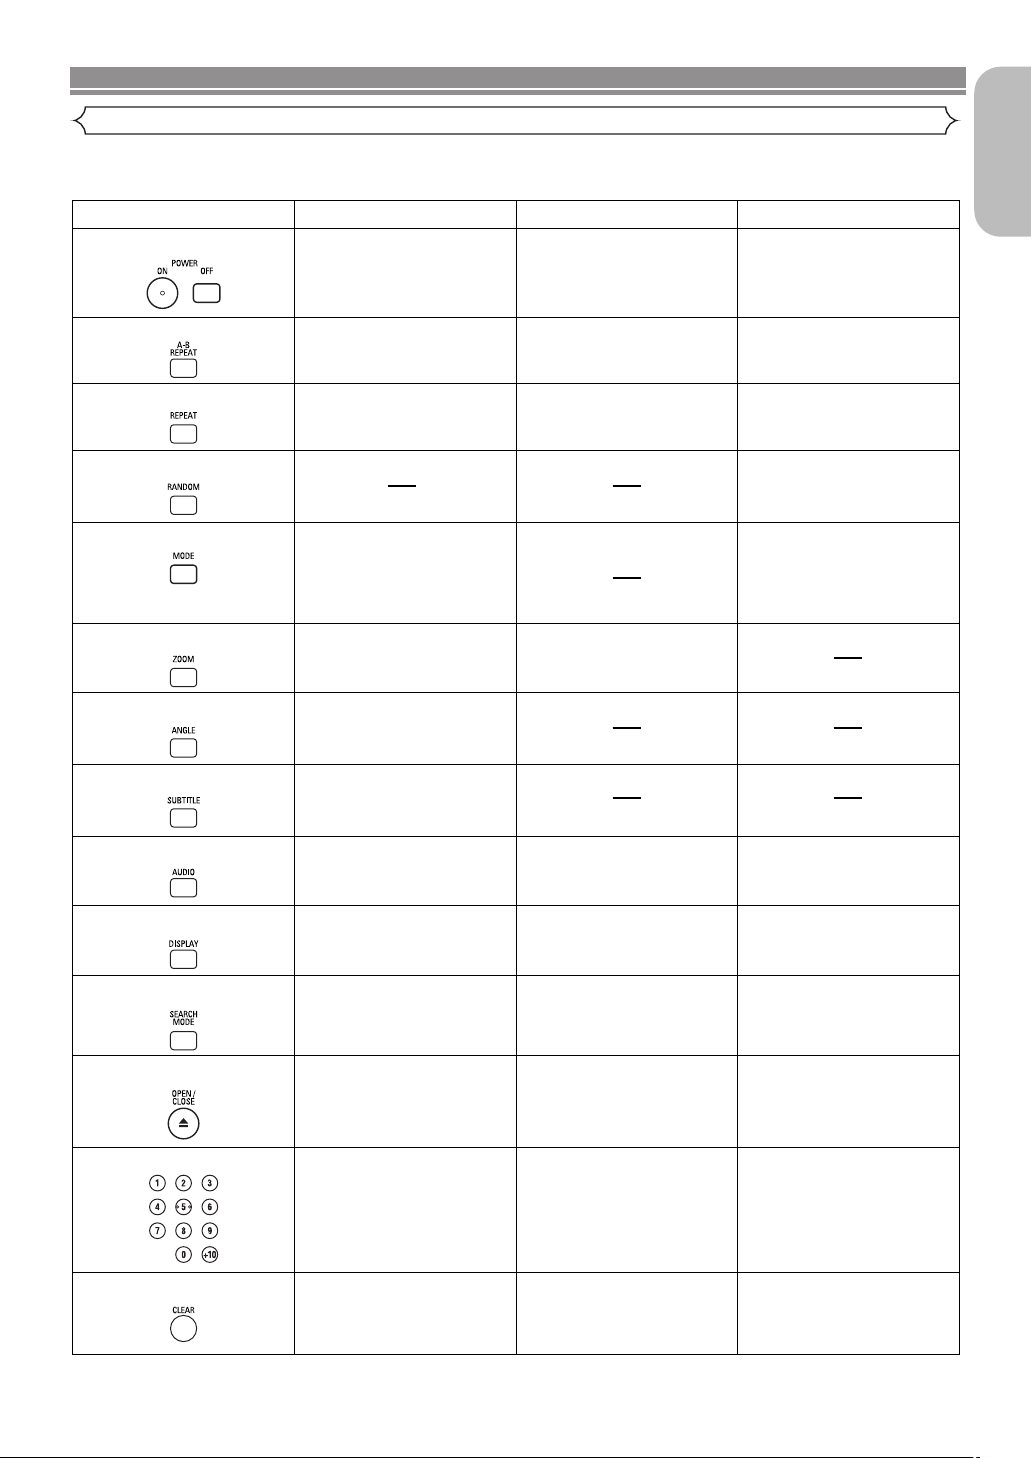
POWER
A-B REPEAT Button
REPEAT Button
MODE Button
SUBTITLE Button
DVD
• Press this to switch the
power between on and
standby.
• Press this to switch the
power between on and
standby.
• Press this to switch the
power between on and
standby.
• Marks a segment between A
and B for reprated playback.
• Marks a segment between A
and B for reprated playback.
• Marks a segment between A
and B for reprated playback.
• Allows you to repeat play
back of a Title or Chapter.
• Allows you to repeat play
back of a Track or Disc.
• Allows you to repeat play
back of a Track or Disc.
RANDOM Button
• Allows you to shuffle the
playing order of tracks.
ZOOM Button
• To activate the 3D sound
(Virtual surround system).
• Allows you to programme a
specific order or random
playback.
• To activate 3D sound
(virtual surround system).
• To magnify part of the
picture (x2/x4).
• To magnify part of the
picture (x2).
ANGLE Button
• Accesses various camera
angles on the disc.
• Accesses various subtitles
on the disc.
AUDIO Button
DISPLAY Button
• Accesses various audio
functions on the disc.
• To select STEREO,
L-CH or R-CH.
• To select STEREO,
L-CH or R-CH.
• Displays the current
disc mode.
• Displays the current
disc mode.
• Displays the current
disc mode.
• To search for a chapter, title,
or time.
• To rapidly return to a
location on disc.
OPEN/CLOSE Button
• To search for a track or time.
• To rapidly return to
a location on the disc.
• To search for a track or time.
• To rapidly return to
a location on the disc.
SEARCH MODE Button
NUMERIC Buttons
CLEAR Button
• To open or close
the disc tray.
• To open or close
the disc tray.
• To open or close
the disc tray.
• To select chapter directly. • To select tracks directly.• To select tracks directly.
• Clear the makers. • Clear the markers.
• Clear the makers.
• Removes status No. in
program input.
VCD CD
FUNCTIONAL OVERVIEW
Tour of the remote control
Buttons on the remote control work in different ways for DVD, VCD and CD:
Refer to the following table for correct use.
English
–9–
EN
Page 10
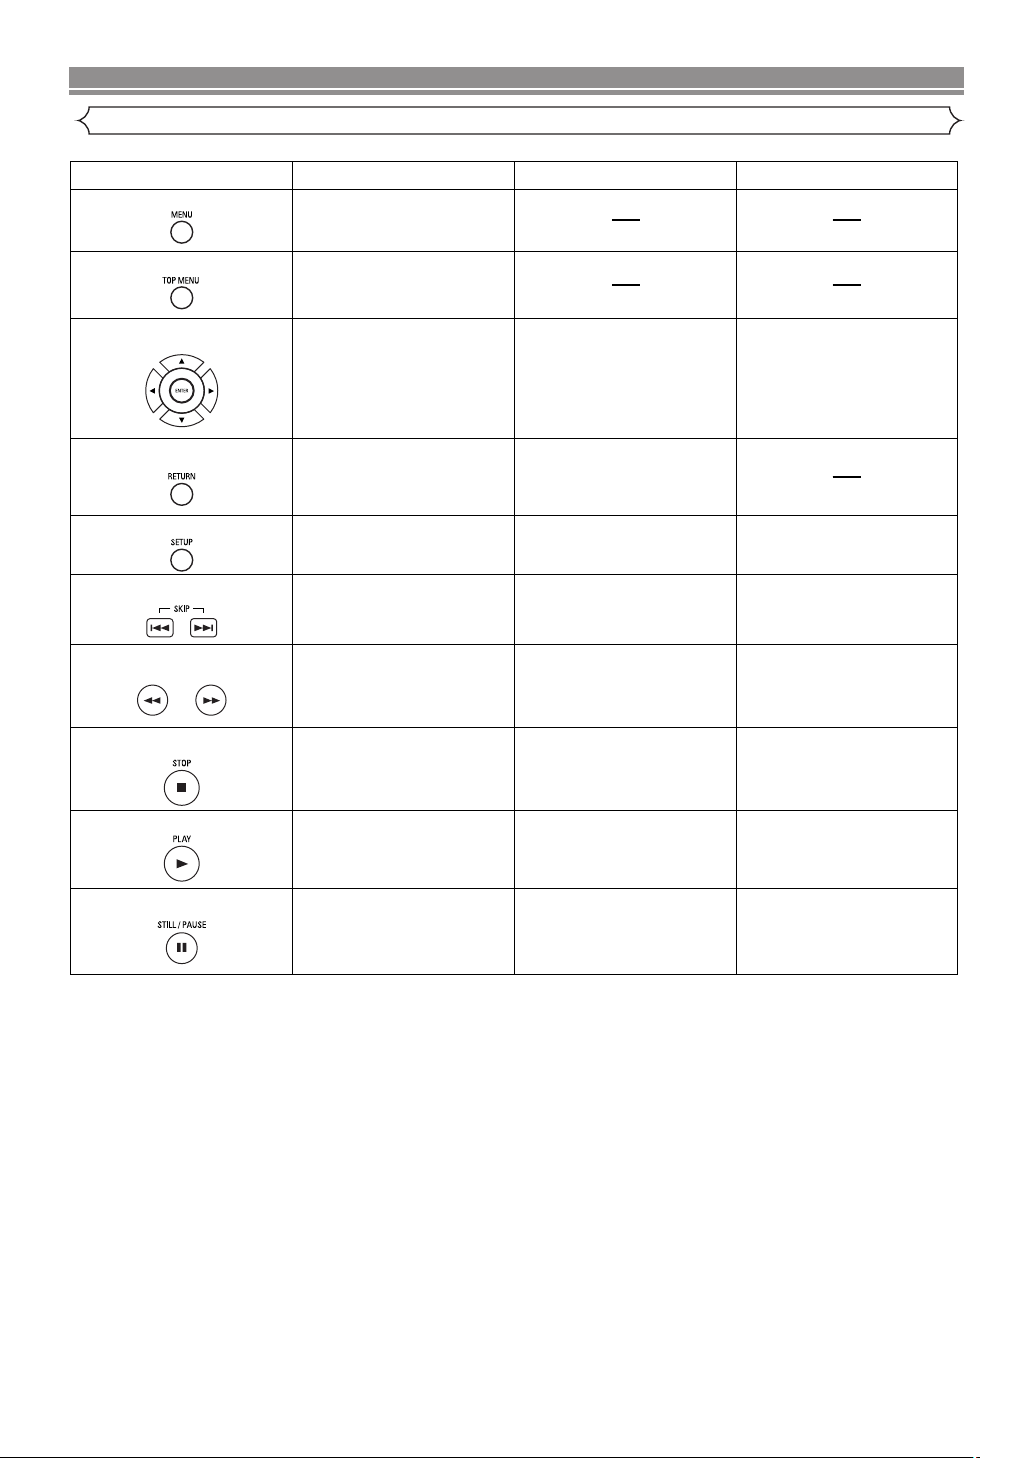
FUNCTIONAL OVERVIEW
DVD VCD CD
MENU Button
TOP MENU Button
ENTER, CURSOR Buttons
RETURN Button
SEARCH Buttons
• Brings up the Menu
on a disc.
• Brings up the Top Menu
on a disc.
• Moves the cursor and
determines its position.
• Moves the cursor and
determines its position.
SETUP Button
• Returns to a previous menu. • Returns to the previous
menu.
• Brings up the DVD player’s
Setup menu.
• Brings up the DVD player’s
Setup menu.
• Brings up the DVD player’s
Setup menu.
SKIP Buttons
• To skip Chapters.
• Allows you to search
forward/backward through
a disc (x2. x8. x50. x100).
• Allows you to search
forward/backward through
a disc (x2. x8. x30).
STOP Button
PLAY Button
• To stop playback. • To stop playback.
• To begin disc play. • Begin disc play.
• To stop playback.
• To begin disc play.
STILL/PAUSE Button
• Moves the cursor and
determines its position.
• To skip Tracks.• To skip Tracks.
• Allows you to search
forward/backward through
a disc (x16).
• To pause disc play.
• Advances playback one
frame at a time.
• Pause disc play.
• Advances playback one
frame at a time.
• To pause disc play.
Tour of the remote control
–10–
EN
Page 11
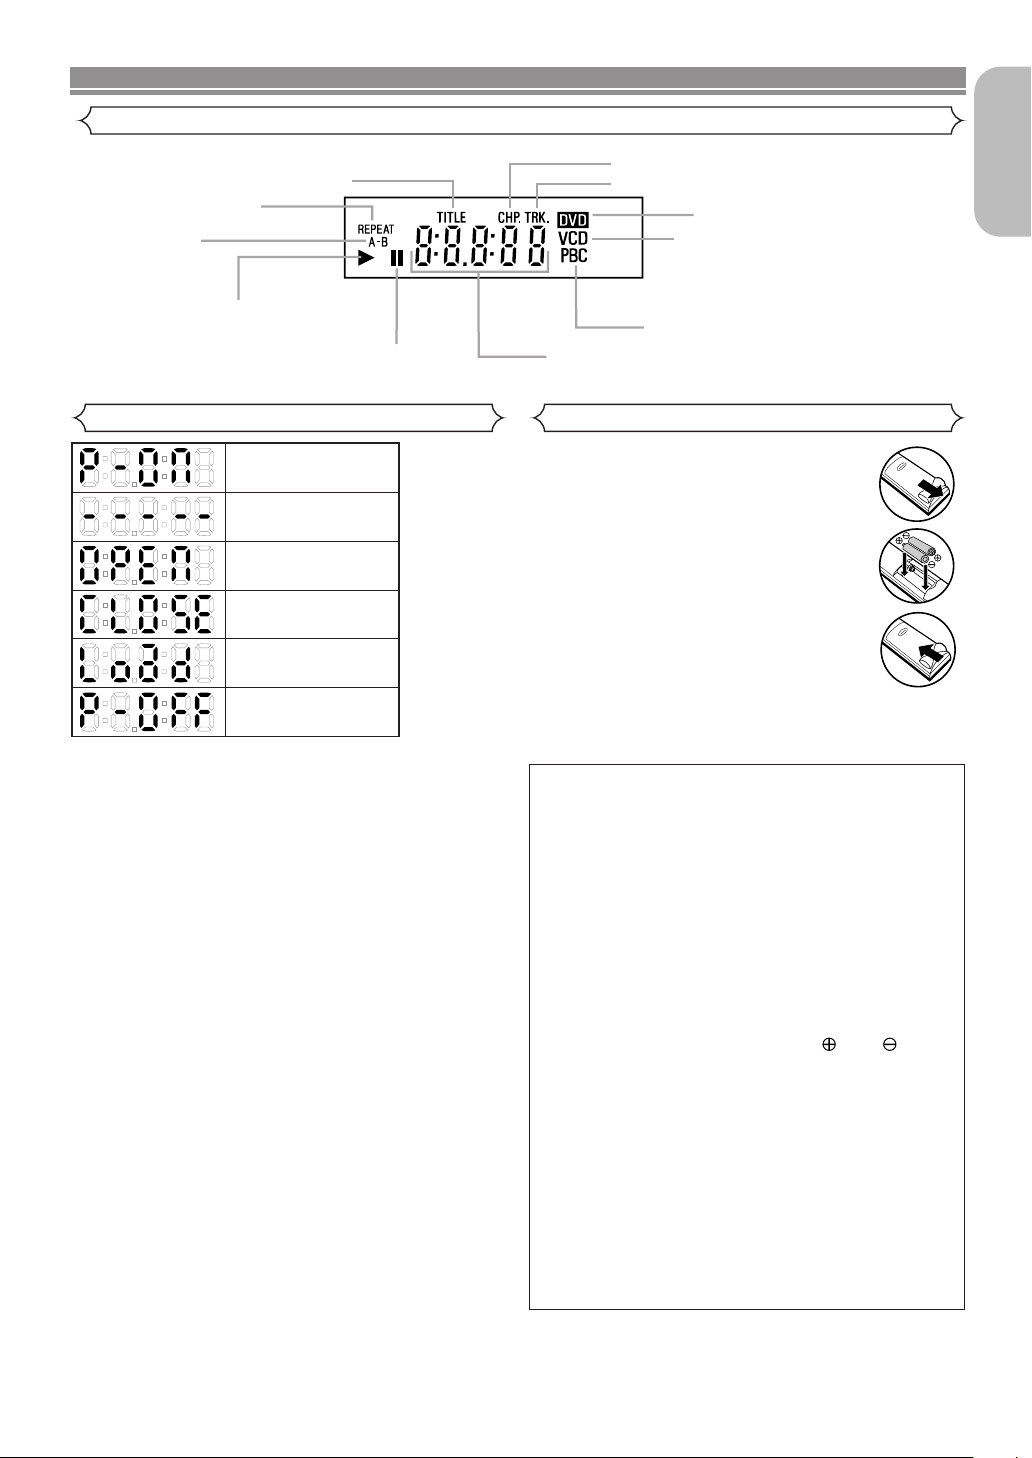
FUNCTIONAL OVERVIEW
Lights when the inserted
disc is being played back.
CD:
Lights up when a CD is inserted
on the tray.
VCD:
Lights up when a Video CD is
inserted on the tray.
Lights up when a DVD
is inserted on the tray.
Lights up when playback control is
activated.
Lights when playback
of the inserted disc comes
is paused.
Lights when the repeat chapter
function is on.
Lights when the repeat track function is on.
Lights when
the A-B repeat
function is on.
Lights when
the repeat function is on.
Lights when repeat
title function is on.
Displays how long the current title or track has been
played back. When the chapter or track switches, the
number of the new title, chapter or track is displayed.
Power on
No disc inserted
Tray open
Tray closed
Loading the Disc
Power off
Display
English
Displays During Operation
Loading the Batteries
1. Open the battery compartment cover.
2. Insert two “AA” (R6P) batteries, with
each one oriented correctly.
3. Close the cover.
NOTES
• Do not mix alkaline and manganese batteries.
• Do not mix old and new batteries.
Cautions on Batteries
• Use “AA” (R6P) batteries in this remote control unit.
• Replace the batteries with new ones approximately
once a year, though this depends on the frequency
with which the remote control unit is used.
• If the remote control unit does not operate from
close to the main unit, replace the batteries with
new ones, even if less than a year has passed.
• The included battery is only intended for verifying
operation. Replace it with a new battery as soon as
possible.
• When inserting the batteries, be careful to do so in
the proper direction, following the and marks
in the remote control unit’s battery compartment.
• To prevent damage or battery fluid leakage:
• Do not use a new battery with an old one.
• Do not use two different types of batteries.
• Do not short-circuit, disassemble, heat or dispose
of batteries in flames.
• Remove the batteries when not planning to use the
remote control unit for a long period of time.
• If the batteries should leak, carefully wipe off the
fluid from the inside of the battery compartment,
and then insert new batteries.
–11–
EN
Page 12
CONNECTIONS
1
2354 6
AV1
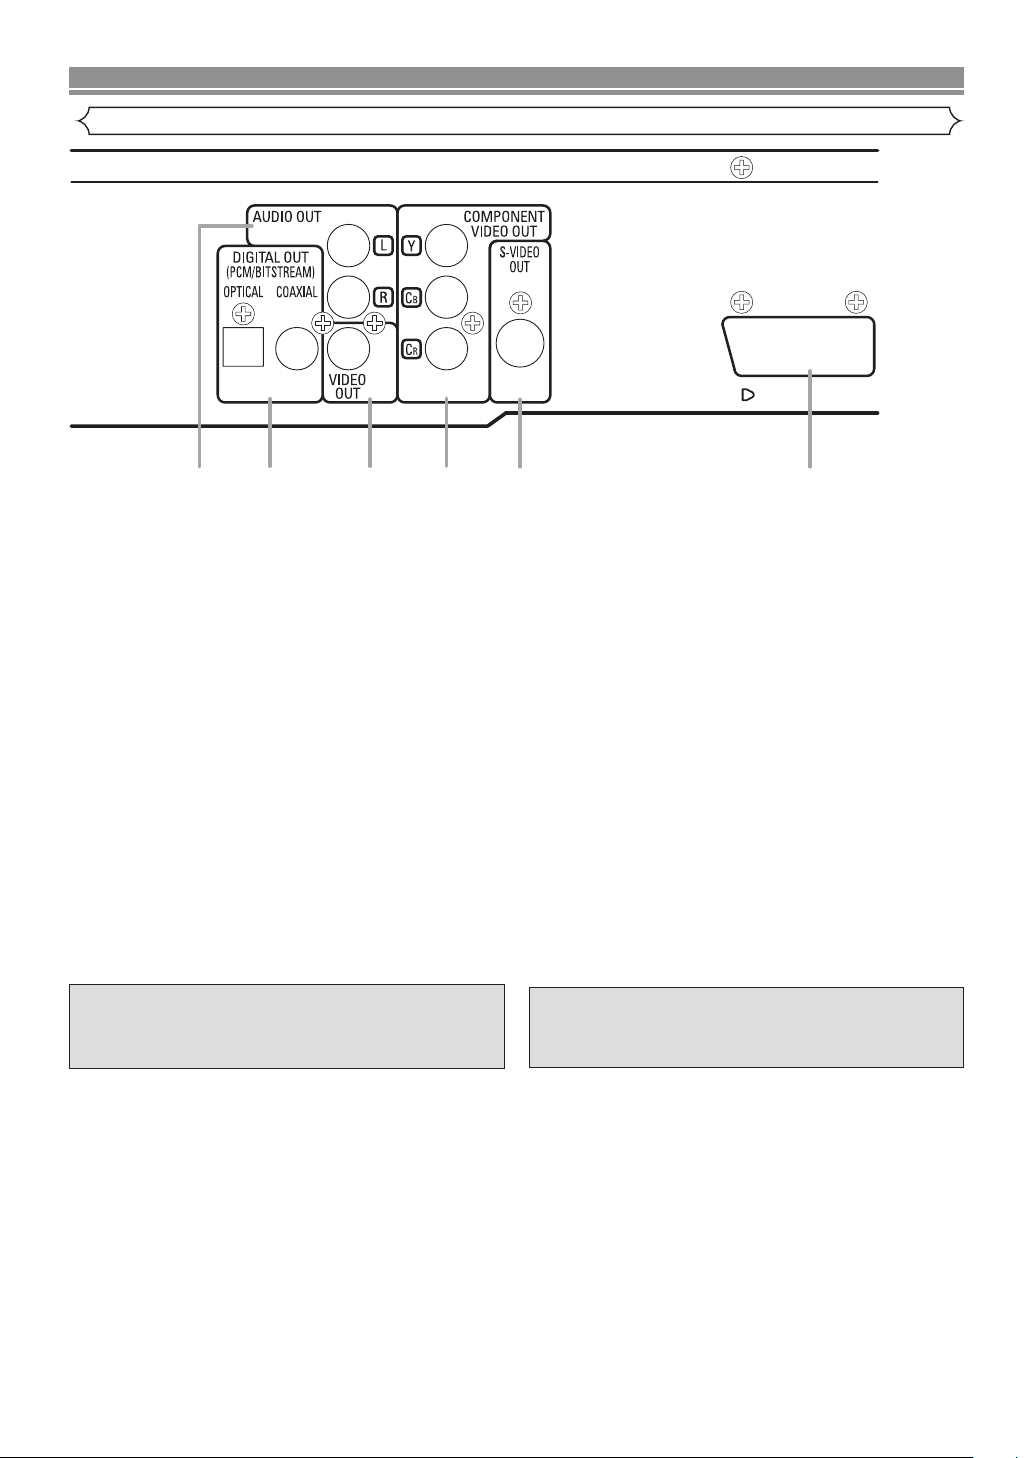
Description - rear panel
1. DIGITAL OUT JACKS:
Use either an optical or coaxial digital cable to connect to a compatible Dolby Digital receiver. Use to connect to a Dolby
Digital decoder or DTS decoder.
2. AUDIO OUT JACKS
Connect to the Audio input jacks of A/V-compatible TV or wide screen TV, Stereo system.
3. VIDEO OUT JACKS
Use a video cable to connect one of the jacks to the Video input on your A/V-compatible TV or wide screen TV, Stereo
system.
4. COMPONENT VIDEO OUT JACKS
Use these jacks if you have a TV with Component Video in jacks. These jacks provide CR, CBand Y video. Along with SVideo, Component Video provides the best picture quality.
5. S-VIDEO OUT JACK
Use the S-Video cable to connect this jack to the S-Video jack on your A/V-compatible TV or wide screen TV for a higher
quality picture.
6. AV1 JACK
Connect to the 21-pin scart jack of a TV.
NOTES
• Be sure not to use both AV1 jack and component Video jacks for video output at the same time.
• When changing the VIDEO OUT setting (SCART or COMPONENT), use a VIDEO jack or an S-VIDEO jack to connect to
the TV. If the setting is changed, for example, to COMPONENT while AV1 jack is used to connect to the TV, the distorted
video signal may be output.
Manufactured under license from Dolby
Laboratories. “Dolby” and the double-D symbol
are trademarks of Dolby Laboratories.
“DTS” and “DTS Digital Out” are trademarks of
Digital Theater Systems, Inc.
–12–
EN
Page 13
CONNECTIONS
The following show examples of connections commonly used to connect the DVD player to a TV and other
components.
Notes
¡Be sure to switch off the power to all components in the system before connecting another component.
¡Refer to the Instruction Manuals for your TV, stereo system and any other components to be connected to the
DVD player.
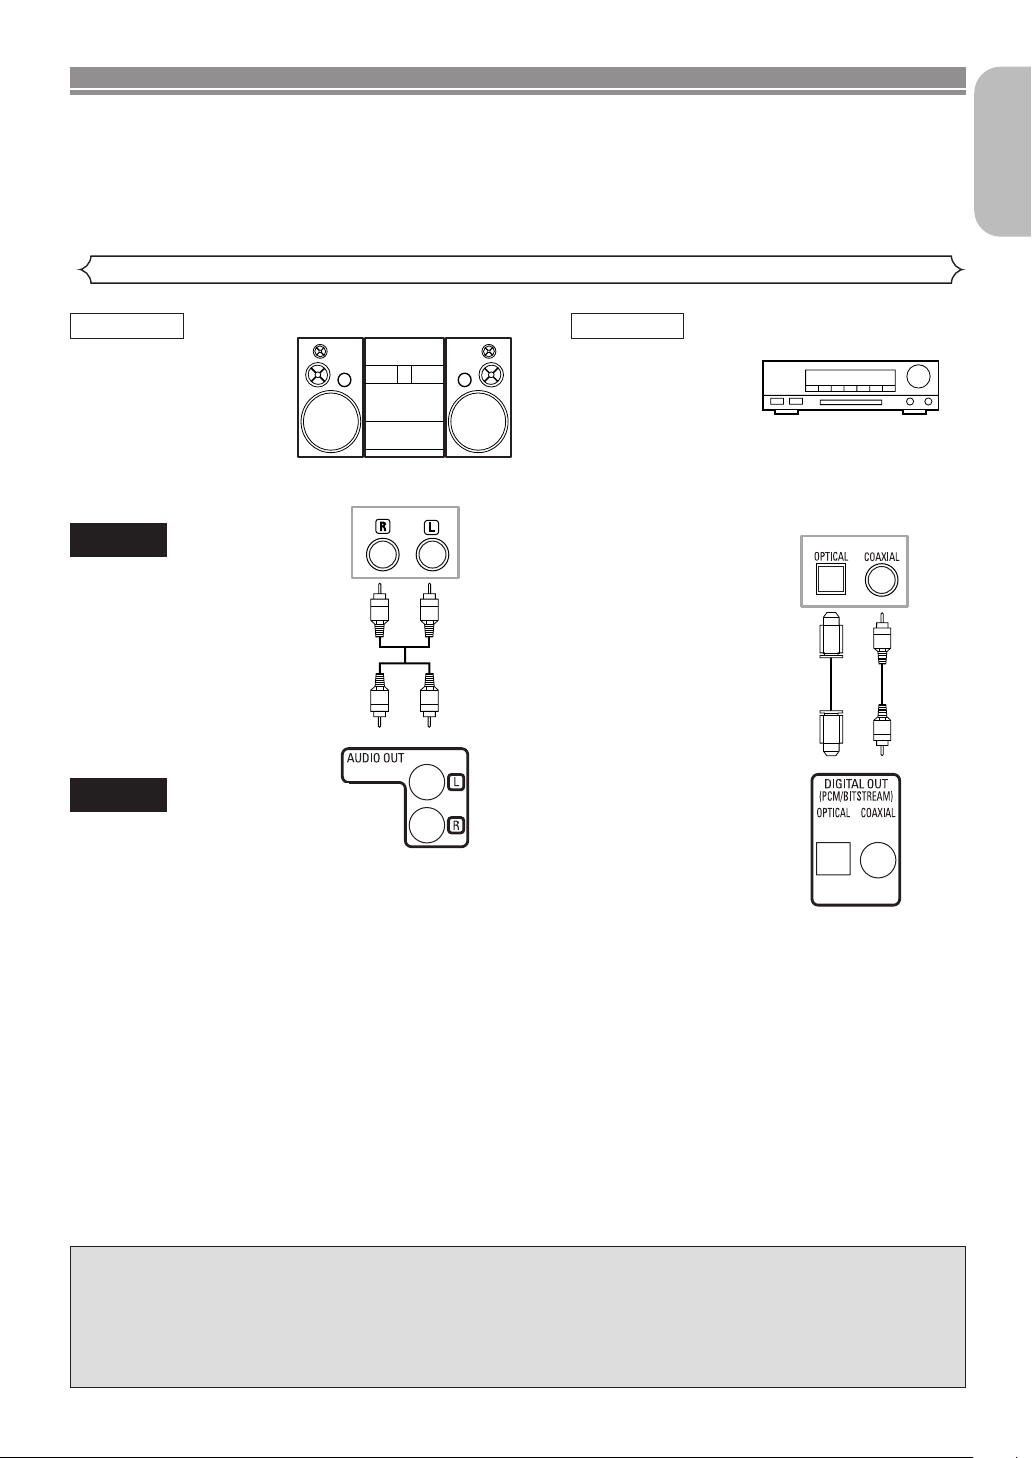
Connection to an audio system
Method 1 Method 2
Dolby Digital decoder,
Stereo system
DTS decoder or
MPEG decoder
English
AUDIO
Audio Input Jacks
Digital Audio Input
Jacks
DVD
Analogue Audio Out
Digital Audio Out
• Method 1 DVD Player + Stereo system
• Method 2 DVD Player + Dolby Digital decoder, DTS decoder or MPEG decoder
NOTES
• If Dolby Digital audio will be output, connect to a Dolby Digital decoder, and set Dolby Digital audio output to on in the setup
mode. (See page 25)
• If DTS audio will be output, connect to a DTS decoder, and set DTS audio output to ON in the setup mode. (See page 25)
If output MPEG audio, connect to a MPEG decoder, and set MPEG to ON for audio output in the setup mode.
•
•
Unless connected to a Dolby Digital decoder, a DTS decoder or an MPEG decoder, set Dolby Digital, DTS and MPEG to off for
audio output in the setup mode. Playing a DVD using incorrect settings may generate noise distortion, and may also damage
the speakers. (See page 25)
• The audio source on a disc in the 5.1 channel Dolby Digital surround format cannot be recorded as digital sound by an MD
or DAT deck.
Set Dolby Digital, DTS and MPEG to OFF for audio output in the setup mode for method 1 only. Playing a DVD using incorrect
•
settings may generate noise distortion, and may also damage the speakers. (Refer to page 25 to set ON for Dolby Digital, DTS
and MPEG)
(See page 25)
Optical cable (not supplied)
• The optical cable (not supplied) may be damaged if bent at sharp angles. Ensure cables are coiled in loops with a diameter of 15 cm or more when storing them.
• Use a cable which is 3m or shorter.
• Insert cable plugs firmly into the connectors when making connections.
• If a plug has minor scratches or is dirty, clean it with a soft cloth before inserting it into a connector.
–13–
EN
Page 14

CONNECTIONS
Connection to a TV (for video)
TV
DVD
Basic
Audio
LR
Analogue
Audio out
Method 1 Method 2
Good
picture
VIDEO IN
AV Cable
Video out
S-Video
Cable
Better
picture
S-VIDEO IN
S-Video out
Euro
audio/video
Cable
21-pin Scart jack
AV1 out
Method 3
Best picture
Video
Cable
or
Component Video out
COMPONENT
VIDEO IN
CBYCR
• Method 1 DVD Player + TV with Video Input Jack
• Method 2 DVD Player + TV with S-Video Input Jack
• Method 3 DVD Player + TV with AV1 Jack or DVD Player + TV with Component Video Jacks
NOTES
• Connect the DVD player directly to a TV. If the A/V cables are connected to a VCR, the picture may be distorted due to the
copy protection system.
• S-Video output connector
The video signals are divided into colour (C) and brightness (Y) signals, achieving a clearer picture.
If the TV is equipped with an S-Video input connector, we recommend connecting it to the this product’s S-Video output
connector using a commercially available S-Video connection cord.
HOW TO CONNECT TO A TV WITHOUT AUDIO/VIDEO INPUT JACKS
If your TV does not have RCA type audio and video input jacks it is still possible to connect this DVD
player to your TV’s 75-ohm coaxial antenna terminal using an optional Stereo Audio/Video RF Modulator. Connect the
audio and video outputs of the DVD player to the audio and video inputs on the RF Modulator, and then connect the
coaxial output of the RF Modulator (usually marked “TO TV”) to the 75 ohm coaxial antenna terminal on your TV.
Follow the instruction supplied with the RF Modulator for more details.
If your TV’s 75 ohm coaxial antenna terminal is already occupied by an antenna or cable box connection, remove that
cable from your TV’s antenna terminal and reconnect it to the coaxial antenna input terminal of the RF Modulator
(usually marked “ANT IN”), and then connect the RF modulator to your TV’s antenna
terminal as described above.
NOTE
• The picture quality from DVD discs will not be as good if the DVD player is connected to the TV’s antenna terminal
through an RF Modulator.
–14–
EN
Page 15
PLAYING A DISC
Basic Playback
VCDCDDVD-V
Getting started
• Switch on the power of the TV, amplifier and any other
components which are connected to the DVD.
• Make sure the TV and audio receiver (commercially available) are set to the correct channel.
1
Press the POWER ON button.
• “P-ON” will appear briefly on the display panel.
2
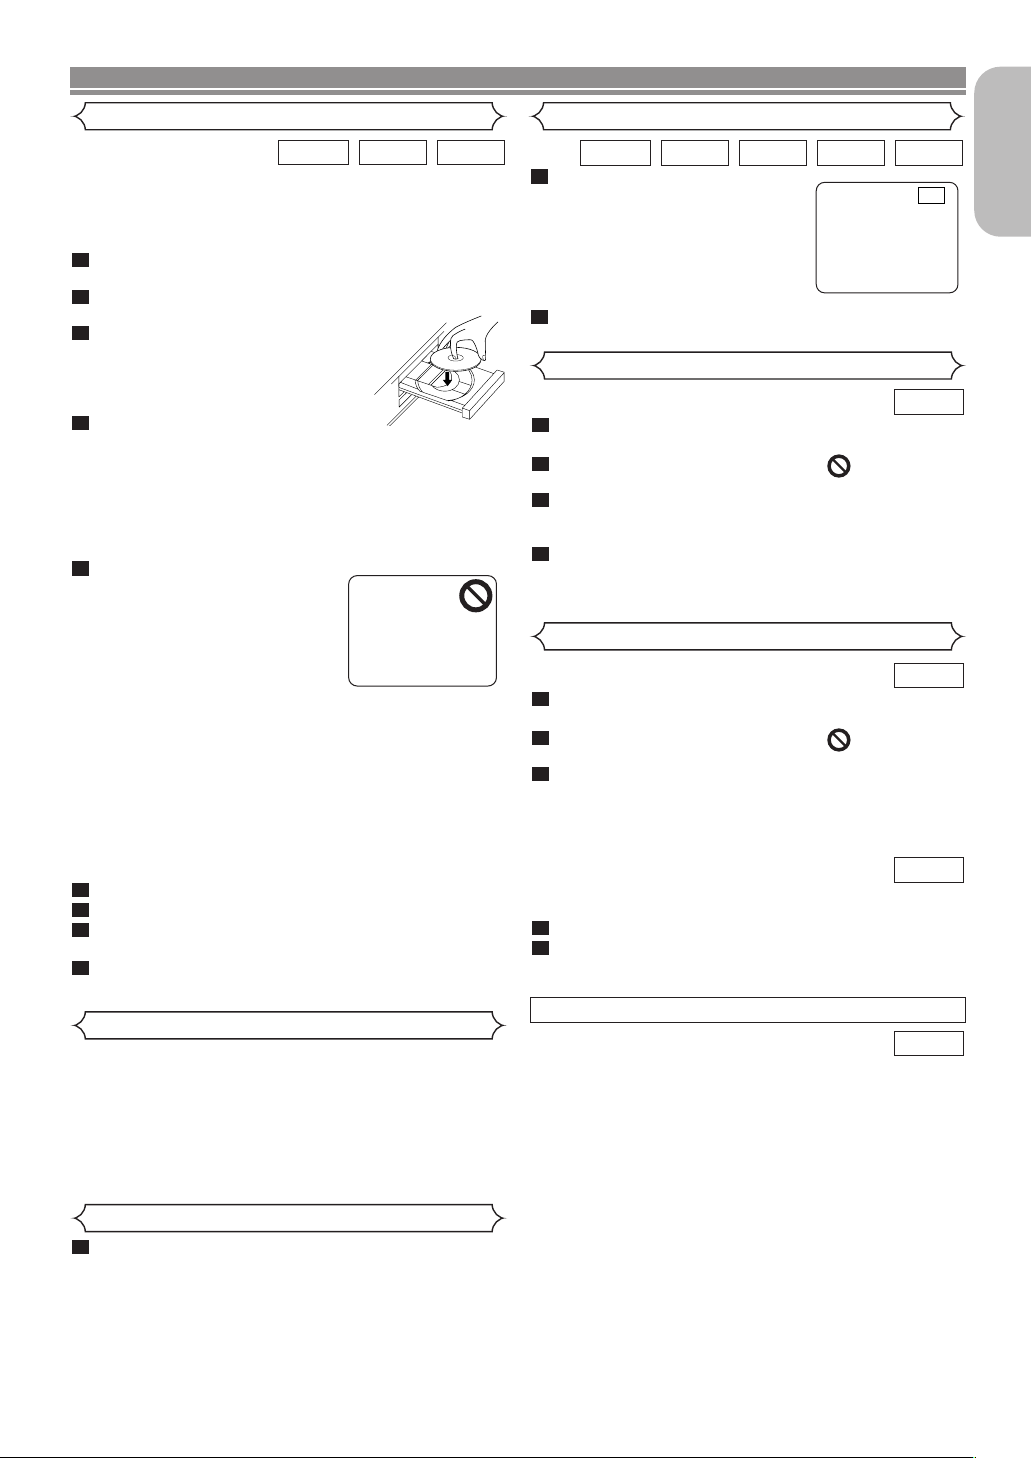
Press the OPEN/CLOSE button to open disc loading tray.
3
Place the disc on the tray, with
the label facing up.
4
Press the PLAY button.
• The tray will close automatically, and playback will then
start from the first chapter or the first track of the disc. If
playback does not start automatically, press the PLAY
button.
• When you play back a DVD or Video CD on which a
title menu has been recorded, this menu may appear
on the screen. In this case, refer to “DISC MENU” or
“TITLE MENU”.
5
Press the STOP button to stop
playback.
NOTES:
• A “prohibited icon” may appear at
the top-right on the TV screen
during operation, warning that a
prohibited operation has been
encountered by the DVD player or
the disc.
• With DVDs that use some titles for playback of programme signals, playback may start from the second
title, or it may skip these titles.
• During the playback of two layered disc, pictures may
stop for a moment. This happens when the 1st layer
switches to the 2nd layer. This is not a malfunction.
• The operation may vary when you play back DVDs with
disc menus or Video CDs with PBC. Refer to the manual accompanying the disc for details.
Cancelling PBC (for playback of a Video CD)
1
Insert a Video CD. (Playback will start automatically.)
2
Press the STOP button.
3
Enter a track number of your choice with the
numeric buttons.
4
PBC is now cancelled and playback of the Video CD will
start.
General Features
DVDs or Video CDs may contain menus to navigate the disc
and access special features. Press the appropriate numeric
keys or use the cursor buttons ( L / K / B / s ) to highlight
your selection in the DVD main menu and press the ENTER
button to confirm.
NOTE:
• Unless otherwise stated, all operations described are
based on remote control use. Some operations can be
carried out using the menu bar on the TV screen.
Pause
WMAMP3VCDCDDVD-V
1
During playback, press the
STILL/PAUSE button.
• Playback will pause and sound
will be muted.
2
To continue playback, press the PLAY button.
F
Disc Menus
DVD-V
1
Press the MENU button.
• The DVD main menu will appear.
2
If the feature is not available, the symbol may
appear on the TV screen.
3
If disc menu is available on the disc, audio language, subtitle options, chapters for the title and
other options will appear for selection.
4
Press the cursor buttons ( L / K / B / s ) to select
an item, and the ENTER button to confirm the
selection.
Title Menu
DVD-V
1
Press the TOP MENU button.
• The title menu will appear.
2
If the feature is not available, the symbol may
appear on the TV screen.
3
Press the cursor buttons ( L / K / B / s ) to select
an item, and the ENTER button to confirm the
selection.
• Playback will begin at the selected Title.
VCD
With a Video CD containing a title menu, you can select
desired titles from the menu.
1
The title menu will appear.
2
Press the numeric button to select the menu.
• Playback will start.
CALLING UP A MENU SCREEN DURING PLAYBACK
DVD-V
• Press the MENU button to call up the DVD main menu.
• Press the TOP MENU button to call up the title menu.
NOTE:
• Contents of menus and corresponding menu operations may vary between discs. Refer to the manual
accompanying the disc for details.
English
Brightness of the Front Display
1
Press the DIMMER button on the front panel to
select the desired brightness of the front display.
(Bright, Dim, or OFF)
• “Bright” has been selected as the factory default.
NOTE:
• The brightness of the front display can be adjusted
from the SETUP menu. Details are on page 24.
–15–
EN
Page 16

PLAYING A DISC
Step by Step Playback
1
During playback, press the
STILL/PAUSE button.
• Playback will pause and sound
will be muted.
2
The disc advances by one frame each time the
STILL/PAUSE button is pressed.
3
To exit step by step playback, press the PLAY but-
ton.
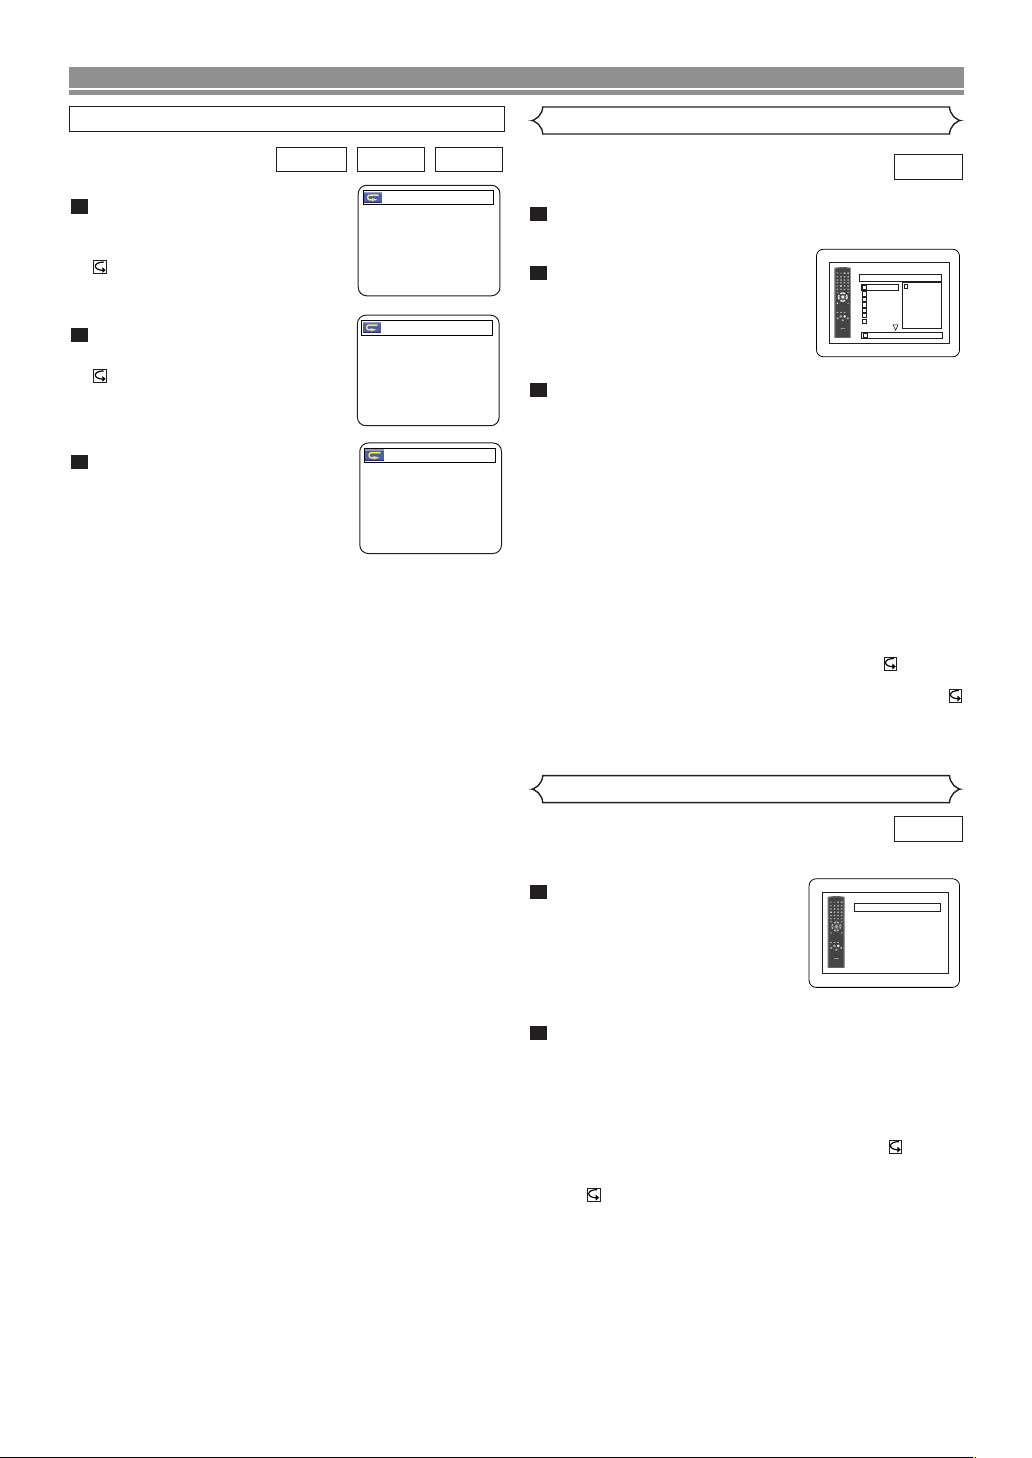
Resume
1
During playback,
press the STOP button.
• A resume message will appear on
the TV screen.
2
Press the PLAY button.Playback will resume from
the point at which playback was stopped.
• To cancel resume, press the STOP button twice.
NOTES:
• Resume playback takes a little longer to start compared to the normal playback.
• Some Video CDs with PBC function resume playback
from the beginning of the track.
• The resume information stays on even when the power
is turned off.
Resume ON
Press 'PLAY' to play from here.
To play the beginning,
press 'STOP' first and then 'PLAY'.
Slow Forward / Slow Reverse
VCDDVD-V
1
F
During playback, press the
STILL/PAUSE button.
2
Press the ggor hhbutton.
•
Slow motion playback will begin and the sound will be
muted.
3
Press the ggor hhbutton
repeatedly to select the
required speed: 1/16, 1/8, 1/2
of the normal playback.
• If you are using the SKIP H
hh
button on the front panel,
press and hold it for more than
1.5 sec (the longer you hold it,
the slower the speed will be)
.
When you reach the desired
speed, release the button.
4
To return to normal playback, press the PLAY button.
DVD-V
D
Button
1/16
1/8
1/2
VCDCDDVD-V
Zoom
VCDDVD-V
The Zoom function allows you to enlarge
the video image and to pan through the enlarged image.
1
Press the ZOOM button during playback.
• Playback will continue.
2
Press the ZOOM button repeatedly to select the
required zoom factor: x2, x4 or OFF.
[x2] [x4]
Fast Forward / Reverse Search
WMAMP3VCDCDDVD-V
1
During playback, press the ggor hhbutton
repeatedly to select the required forward or reverse
speed: x2, x8, x50, x100.
x2, x8, or x30.)
• If you are using the SKIP
panel, press and hold it for more than 1.5 sec (the
longer you hold it, the faster the speed will be). When
you reach the desired speed, release the button.
• For audio CDs, the speed is fixed at x16.
• For MP3 and WMA discs, the speed is fixed at x8.
Button
Button
2
2
To return to normal playback, press the PLAY but-
ton.
(For video CDs, the speed is
GG gg
8
button on the front
50
100
NOTES:
–16–
3
Use the cursor buttons ( L / K / B / s ) to move
the zoomed picture across the screen.
4
To exit zoom mode, press the ZOOM button to
OFF.
• The zoom function does not work while the disc menu
is shown.
• x4 zoom is not available on some discs.
• For Video CDs, the zoom is fixed at x2.
EN
Page 17
VCD ( )
without PBC
Function
VCD ( )
without PBC
Function
PLAYING A DISC
VCD ( )
without PBC
Function
Track
CD
There are three ways to begin playback on an Audio CD,
Video CD, MP3 and WMA from a specific Track.
By using the Numeric buttons
1
Press the numeric buttons to enter the desired
Track number.
• Playback will start at the selected track.
• For single digit tracks (1-9), press a single number (e.g.
for track 3, press 3).
To play track 26, press +10, 2, 6 on the numeric button.
•
By using the SEARCH MODE button
1
Press the SEARCH MODE button.
• The track search display appears.
2
Within 30 seconds, select a desired track number using
the numeric buttons. For single digits, press “0” first.
• Playback will start from the selected track.
By using the SKIP buttons
During playback, press the
track. Press it repeatedly to skip to subsequent tracks. Press
the
track. Press it repeatedly to return to previous tracks
HH
SKIP
• The
• If a SKIP button is pressed while playback is paused,
button to return to the beginning of the current
track number will appear briefly on the DVD display
panel.
the playback will be paused again after skipping to the
next track.
SKIP
GG
NOTE:
• The
SKIP HGbuttons do not function when playback
is stopped.
(Audio CD/Video CD)
HH GG
button to move to the next
WMAMP3
__/ 15
.
Title / Chapter Search
DVD-V
By using the SEARCH MODE buttons
1
Press the SEARCH MODE button
once for Chapter search, and
twice for Title search during
playback.
2
Enter the desired chapter/title number with the
numeric buttons.
SKIP
HH GG
GG
button to move to the next
By using the SKIP buttons
During playback, press the
chapter. Press it repeatedly to skip to subsequent chapters.
Press the
rent chapter. Press it repeatedly to return to the previous chapter
.
SKIP
HH
button to return to the beginning of the cur-
/2
Time Search
CDDVD-V
1
During playback, press the
SEARCH MODE button three times (Audio CD/Video
CD: twice) to display the Time Search on the TV
screen.
2
Within 30 seconds, enter a
_:__:__ 1:23:45
desired disc time with the
numeric buttons.
• Playback will start at the specified
time.
3
Press the CLEAR button to erase the incorrect
input.
Repeat
• The REPEAT button only during playback.
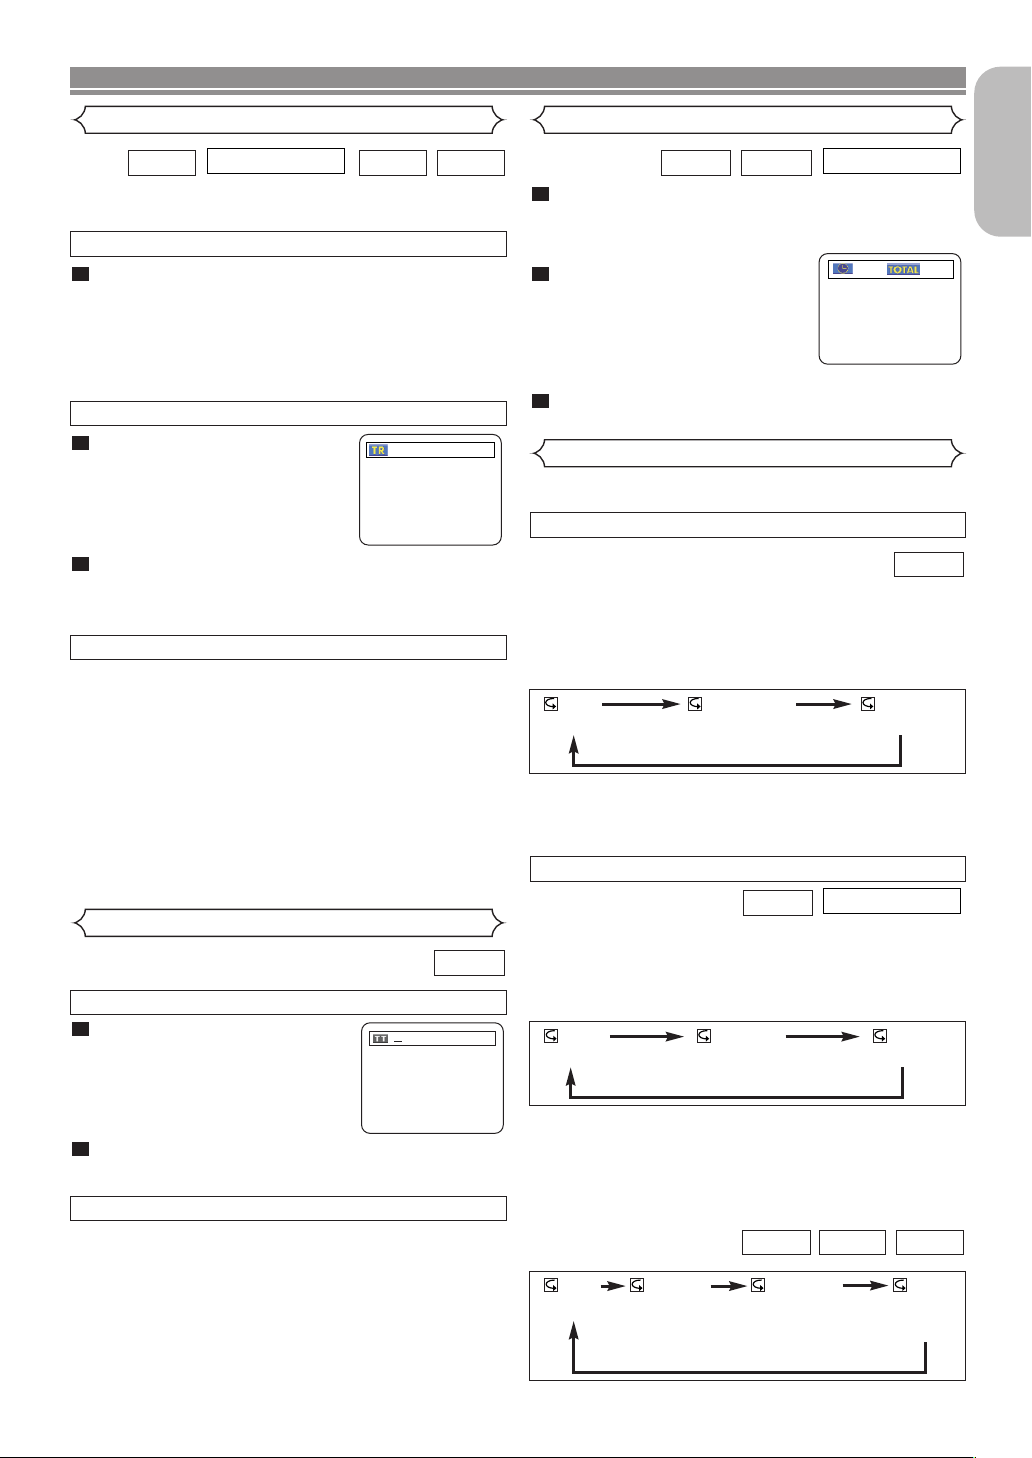
REPEAT TITLE / CHAPTER
DVD-V
To activate the repeat function, press the
REPEAT button during playback.
• The repeat mode changes as described below each time
you press the button.
CHAPTER TITLEOFF
(repeat off)
(current chapter repeat) (current title repeat)
NOTES:
• Repeat Title/Chapter is not available with some scenes.
• The REPEAT setting will be cleared when moving to
another title or chapter.
REPEAT TRACK
CD
To activate the repeat function, press the REPEAT button during
playback.
• The repeat mode changes as described below each time
the button is pressed.
TRACK ALLOFF
(repeat off)
(current track repeat) (entire disc repeat)
NOTES:
•
The REPEAT setting will be cleared when moving to another
track
.
•
Repeat playback does not function during A-B repeat playback.
•
Repeat playback is not available when you play Video CDs with
PBC.
WMAJPEGMP3
GROUP
(current folder
repeat)
(entire disc
repeat)
(repeat off)
TRACK ALLOFF
(current track
repeat)
English
–17–
EN
Page 18
PLAYING A DISC
A-B REPEAT
VCDCDDVD-V
1
Press the A-B REPEAT button
at your
chosen starting point.
• A- appears briefly on the TV
screen.
2
Press the A-B REPEAT button
again at your chosen end point.
• A-B appears briefly on the TV
screen, and the repeat sequence
begins.
3
To exit the sequence, press the
A-B REPEAT button.
NOTES:
• The A-B repeat section can only be set within the current
title (for DVDs) or current track (for audio CDs/video CDs).
• A-B Repeat does not work with some scenes on DVDs.
To cancel the A point which was set, press the CLEAR button.
•
• A-B Repeat playback does not function during title, chapter, track or all repeat playback.
A -
A - B
OFF
Programming
CD
You may determine the order in which tracks will play.
1
In the stop mode, press the MODE button.
• The PROGRAM screen will
appear.
2
Press the cursor buttons
(▲ or ▼) to select a track,and
then press the ENTER button.
• Press the CLEAR button to erase
the most recently entered programme.
3
Press the PLAY button to play the programmed
tracks.
NOTES:
•
While the programme is being played back, the STOP button works
as follows.
Press the STOP button once and then the PLAY button again,
•
playback will restart from the point where the STOP button
was pressed. (Programme continued)
Press the STOP button twice and then the PLAY button again,
•
playback will restart from the track in the usual way.
(Programme cleared)
• Up to 99 programmes can be entered.
• If you wish to repeat the current track in the programme,
press the REPEAT button repeatedly until TRACK
appears during playback. If you wish to repeat the entire
programme press the REPEAT button repeatedly until
ALL appears during playback.
• Refer to page 21 for programme playback of MP3, WMA,
and JPEG discs.
PROGRAM
CD [AUDIO] TOTAL 0:03:30
1 3:30
1 3:30
2 4:30
3 5:00
4 3:10
5 5:10
6 1:30
7 2:30
1/1
1/2
1 3:30
Random Playback
CD
This shuffles the playing order of tracks instead of playback
them in the original sequence.
1
In the stop mode, press the
RANDOM or MODE button
twice.
RANDOM screen appears
• The
2
Press the PLAY button to start random playback.
.
NOTES:
• If you wish to repeat the current track in the random selection, press the REPEAT button repeatedly until TRACK
appears during playback. If you wish to repeat the entire
random selection, press the REPEAT button repeatedly
until ALL appears during playback.
• Refer to page 20 for random playback of MP3, WMA, and
JPEG.
RANDOM
CD [AUDIO] TOTAL 0:45:55
RANDOM PROGRAM
--no indication--
–18–
EN
Page 19

PLAYING A DISC
MP3 / JPEG / WMA Playback
WMAJPEGMP3
This DVD player can reproduce images and sounds from
data recorded in MP3, JPEG and WMA formats on CD-ROM,
CD-R and CD-RW discs.
The DVD player can also reproduce JPEG files stored on
Kodak picture CDs.
The user can enjoy picture images on the television set by
reproducing picture CDs.
* Picture CD is a service to convert photographs taken by a
conventional film camera into digital data and write the data
on a CD.
For details of Picture CD, contact a shop that offers this service of Kodak Inc.
Information on MP3, JPEG and WMA discs
• A file with an “.mp3 (MP3)” extension is called an “MP3 file”.
• A file with a “.jpg (JPG)” or “.jpeg (JPEG)” extension is
called a “JPEG file”.
The DVD player can play an image file conforming to the
Exif* specification.
* This is a file format, Exchangeable Image File format,
established by the Japanese Electronic Industry
Development Association (JEIDA).
• A file with a “.wma (WMA)” extension is called a “WMA
file”.
• Files whose extensions are other than “.mp3 (MP3)”, “.jpg
(JPG)”, “.jpeg (JPEG)” and “.wma (WMA)” will not be listed in the MP3, JPEG, or WMA menu.
• If the file is not recorded in the MP3, JPEG or WMA format,
noise may be produced even if the file extension is either
“.mp3 (MP3) ”, “.jpg (JPG)”, “.jpeg (JPEG)” or “.wma (WMA)”.
When a disc with MP3,JPEG or WMA files is inserted in the
DVD player, the track menu will appear on the TV screen,
and the number of tracks is displayed on the front panel.
1
Place the disc in the tray with the label facing up.
For discs on which MP3, JPEG or WMA tracks are
recorded:
• An MP3, JPEG or WMA track menu screen appears.
• The “ ” symbol is shown on the top of the group name.
• The “ ” symbol is shown on the top of MP3 files.
• The “ ” symbol is shown on the top of JPEG files.
• The “ ” symbol is shown on the top of WMA files.
• If the picture extends beyond the borders of the screen, a
down arrow “L” appears, indicating that the user can view
the rest of the picture on the next page. If an up arrow “K”
appears, it indicates that the user can view the rest of the
picture on the previous page. The current page number
and the number of total pages are shown on the right of
the down arrow “L”.
• The system can recognize up to 255 groups (or folders)
and up to 256 tracks. (This applies to the case where
mixed MP3, JPEG and WMA files are recorded.)
• If no MP3, JPEG or WMA files are found in the group, the
group is not displayed.
• The DVD player can reproduce data recorded as per ISO
9660 Level 1, Level 2 or Joliet on the disc.
• It can also play a disc on which data has been recorded in
multiple-sessions.
• For more details of recording systems, see the instruction
manual for the CD-R / CD-RW drive or the writing software.
Applicable MP3 file Remarks
Sampling frequency
Type
Applicable JPEG file Remarks
Size of
image
Applicable WMA file Remarks
Sampling frequency
Bit rate 48–192kbps
Type WMA version 8
44.1kHz
48kHz
MPEG1
audio layer 3
Upper limit:
6300×5100 dots
Lower limit:
32×32 dots
44.1kHz
48kHz
• It is prohibited to record
MP3 sound on a digital
device when connection is
made digitally.
• MP3 files recorded at a
fixed bit rate of 112 kbps or
higher are recommended.
• A JPEG image that extends
beyond the screen is
reduced so that it will be
displayed within the screen.
• Those frequencies are
applicable to WMA version
8 only, not to WMA version
9.
• Ensure that the copyright
function is set to off when
preparing a WMA disc.
• A prohibition “disable” symbol will appear if the user
attempts to run a non-reproducible file such as one that
is copyright-protected.
For JPEG or Kodak picture CDs:
• A JPEG or Kodak Picture CD menu appears.
• If all menu items cannot be displayed in the screen scope,
a prompt symbol “G” appears at the right bottom of the
screen, indicating that the user can view remaining items
on the next page. If another prompt symbol “H” appears,
it indicates that the user can view other items on the previous page. The track number of the currently highlighted
item and the total tracks are shown at the centre bottom of
the screen.
• If a prompt symbol “G” is shown at the right bottom, use
the SKIP G button to view the next page. If another
prompt symbol “H” is shown at the left bottom, use the
SKIP H button to view the previous page.
• It may take some time until all menu items are displayed
on the menu screen.
1
For JPEG, press the cursor buttons (K/L), or for
Kodak Picture CD, press the cursor buttons (
B / K / L), select a desired group or track to be
s /
played,and then press the PLAY or ENTER button.
• If an MP3 or WMA file is selected, reproduction will start
from the selected track and go to the next one in turn.
• If a JPEG or Kodak picture CD file is selected, an image
will be reproduced from the selected track and after that
the next one on the disc will be reproduced.
A track is displayed for five seconds and then the next
track is displayed.
Every press on the cursor button B will rotate the image
clockwise by 90 degrees when an image is displayed.
A press on the cursor button s will rotate the image
counter clockwise by 90 degrees.
• If a group is selected, press the cursor button K/L to
select a desired group,and then press the B, PLAY or
ENTER button to select a track.
If you press the PLAY or ENTER button, reproduction of
the picture will start.
English
–19–
EN
Page 20

PLAYING A DISC
Notes on MP3, JPEG and WMA:
• Select “FIRST PLAY” and press the PLAY button to play
back from the top of the disc in the order of tracks and
groups.
• The ninth and deeper hierarchies cannot be played.
• The name of a group and track can be displayed with up
to 25 characters. Alphabets, numerals, underscore, asterisk or space may not be displayed. Unrecognizable characters will be replaced with asterisks.
• Un-reproducible groups or tracks may be displayed
depending on the recording conditions.
• If the TOP MENU button is pressed when a file list is displayed, “FIRST PLAY” will be highlighted.
2
Press the STOP button, to stop playback.
Notes on Kodak picture CD:
• A press on the STOP button will highlight the previously
displayed track on the menu screen.
Press the STOP button again or press the TOP MENU
button, and the menu screen displays Tracks 1 to 6, where
Track 1 is highlighted.
Slide Show Mode
JPEG
You can switch to the slide show mode during playback.
1
Press the MODE button during playback.
• The slide show mode screen will appear.
• The slide show mode cannot be switched when it is
stopped, or from the file list screen or the Picture CD
menu screen.
2
Press the ENTER button.
• The slide show mode will change.
1 The entire image appears in one time.
2 The image appears gradually and then disappears.
3
Press the MODE button to exit.
On-Screen Information
WMAJPEGMP3
You can check each file during playback.
1
Press the DISPLAY button.
• The name of the file currently in
play will be displayed.
TRACK 01
Track Selection
WMAJPEGMP3
1
Press the SEARCH MODE button during playback.
• The FILE LIST will appear.
2
Select a desired track using the cursor buttons
(L/K/B/s).
• Press the Bbutton when you want to go to the next
hierarchy.
s
• Press the
vious hierarchy.
3
Press the PLAY button to start playing
NOTES:
•
Press the SEARCH MODE button to exit.
• Some selections may require additional time to be recognized.
• During playback, a desired track can be directly searched.
Just type in the TRACK number with the numeric buttons.
• If the entered TRACK number is not available, the “disable”
symbol appears and the direct search mode is cancelled.
• Playback cannot be started from a desired time count.
• Pressing the SKIP button G or H will play the next or
previous file.
• The SEARCH button is not effective for Picture CDs.
button when you want to return to the pre-
Random Playback
WMAJPEGMP3
1
Press the RANDOM or MODE
button while playback is
stopped.
2
Press the PLAY button to play the tracks in random
order.
• Random play starts.
• For a disc containing mixed MP3, JPEG and WMA
files, random play of those files will be performed.
RANDOM
CD [DATA] TOTAL 0:45:55
RANDOM PROGRAM
--no indication--
2
Press the DISPLAY button again to show the track
number, the elapsed time, the repeat status, and
the playback status at the top of the screen.
<Example: MP3>
• will be displayed when repeat
play has been selected.
T - indicates Track repeat
G - indicates Group (folder)
repeat
A - indicates Disc repeat
3
Press the DISPLAY button again to exit.
• During programme or random playback, the playback
status will be displayed when you press the DISPLAY
button. Press the DISPLAY button again to exit.
TR 1/36 0:01:15
–20–
EN
Page 21

PLAYING A DISC
1.ENG DolbyD 5.1CH 48k/3
2.FRE DolbyD 5.1CH 48k/3
3.JPN DolbyD 5.1CH 48k/3
HELLO
Bon jour
Programming
WMAJPEGMP3
This feature allows you to programme an mp3 disc to play in
a desired sequence.
1
Press the MODE button while
playback is stopped.
• The PROGRAM screen will
appear.
2
Press the K or L button to
select a group, and then press
the ENTER button.
• The track selection screen
appears.
3
Press the K or L button to
select a track, and then press
the ENTER button to save it in
a program.
• Press the CLEAR button to
erase the incorrect input.
• The programmed track is displayed in the right-hand screen.
• If the entire programme cannot be displayed at once on
the screen, “
• Pressing the
belong to the hierarchy one- level higher than the cur-
L” appears to go to the next page.
s button will show a list of folders that
rently selected folder.
4
Press the PLAY button to start programmed play-
back.
• Programmed play starts.
NOTES:
• Press the CLEAR button to the last- programmed entry
will be deleted.
• Press the RETURN button.The STOP screen will be
displayed together with the programme contents in
memory.
• To stop programmed play, press the STOP button.
Another press on the STOP button will reset the subsequent information.
• The programme setting will be cancelled when the
power is switched off or the disc tray is opened.
• Up to 99 tracks can be set in a programme.
• If a disc that contains mixed MP3, JPEG and WMA files
is inserted, programme setting allows 99 tracks for free
combination of MP3, JPEG and WMA files.
• If eight or more tracks have been set in a programme,
the user can switch the right part of the screen with the
SKIP button H or G.
PROGRAM
MY COLLECTION
ABC
DEF
GHI
JKL
1/1
ABC
PROGRAM
ABC
DEF
GHI
JKL
MNO
1/2
DEF
PROGRAM
ABC TOTAL 0:03:30
DEF
GHI
JKL
MNO
1/2
DEF
DEF
1/1
Audio Language
DVD-V
The DVD player allows you to select
a language during DVD disc playback (if multi language
available).
1
Press the AUDIO button during playback.
2
Press the AUDIO button repeatedly to select your
desired language.
NOTES:
• Pressing the AUDIO button cycles the sound mode
through MAIN, SUB, MAIN + SUB.
• DVD-RW discs recorded with dual sound (two languages) can be played back in either sound mode of
MAIN, SUB or MAIN + SUB.
• The sound mode cannot be changed during playback
of discs not recorded with dual sound.
•
Pressing the AUDIO button may not work on some DVDs
with multiple audio languages (e.g. DVDs which allow
audio language setting on the disc menu).
Stereo Sound Mode
VCDCD
1
Press the AUDIO button repeatedly during playback to select between STEREO, L-CH or R-CH.
STEREO - both right and left channels are active (stereo)
L-CH - only left channel is active
R-CH - only right channel is active
STEREO
Both right and left channels
are active (stereo).
English
L-CH
R-CH
Only the left channel
is active.
Only the right channel
is active.
NOTES:
• If the Virtual Surround setting is ON, the sound mode will
be fixed to STEREO, and can not be changed.
• Stereo sound mode will not be changed when playing DTS CD.
–21–
EN
Page 22

PLAYING A DISC
Subtitle Language
DVD-V
The DVD player allows you to select
a subtitle language during DVD disc playback (if available).
1
Press the SUBTITLE button during playback.
2
Press the SUBTITLE button repeatedly to select
your desired subtitle language.
• The selected language will be displayed on the display
bar at the top of the screen.
3
To turn off subtitles, press the SUBTITLE button
repeatedly until OFF appears.
1.ENG/6
Subtitle 1
2.FRE/6
OFF
Subtitle 2
OFF
NOTES:
• Some discs allow audio language setting/subtitle language
setting from the disc menu. (The operation varies between
discs, so refer to the instructions accompanying the disc.)
•
If the desired language is not shown after pressing the
SUBTITLE button several times, the disc does not have subtitles
in that language.
• If you choose a Language that has a 3 letter language
code, the code will be displayed every time you change the
Subtitle language setting. If you choose any other language, ‘---’ will be displayed instead. (Refer to page 26.)
Camera Angle
DVD-V
Some DVD discs contain scenes which have been shot simultaneously from various angles. You can change the camera angle
when the ( ) mark appears on the screen.
1
Press the ANGLE button during playback.
• The selected angle will be displayed on the display bar
at the top of the screen.
2
Press the ANGLE button repeatedly to select the
desired angle
.
1 / 8
Angle 1
Changing the On-Screen Display
DVD-V
You can check information about the
current disc by pressing the DISPLAY button on the remote
control.
1
Press the DISPLAY button during
playback to show current Chapter
• The elapsed and remaining playing time of the current chapter
will be displayed.
2
Press the DISPLAY button again to show the current
.
9/49 0:00:00 -0:00:00
Title.
• The elapsed and remaining playing time of the current
title will be displayed.
3
Press the DISPLAY button a third time.
• The BIT RATE and the current repeat setting will be
displayed.
• If you are playing a two layer
disc, the layer number will also
be displayed ( L0: Layer 0 is playing. L1: Layer 1 is playing).
4
Press the DISPLAY button a
T
IIII
fourth time to remove the display.
WMAJPEGMP3VCDCD
1
Press the DISPLAY button during playback.The
current Track will be displayed on the TV screen.
• The elapsed and remaining playing time of the current
track will be displayed.
2
Press the DISPLAY button again to show the cur-
rent Total Track time.
• The elapsed and remaining playing time of the current
track will be displayed.
3
Press the DISPLAY button a third time to remove the
display.
2 / 8
8 / 8
Angle 2
Angle 8
–22–
EN
Page 23

PLAYING A DISC
VCD ( )
without PBC
Function
Marker Setup Screen
CDDVD-V
Use markers to memorize
your favourite places on a disc.
1
Press the SEARCH MODE
button four times (Audio
CD/Video CD: three times) during playback.
•
The display screen and Markers will
appear on the TV screen.
2
Press the s or B button to select 1, 2, 3, 4, 5, 6, 7,
8, 9, or 10 and ensure that “- : - - : - -” appears in the
display.
3
When you reach the desired point, press the
ENTER button.
• The Title or Track and elapsed playing time will appear
in the TV screen.
4
To return to the Marker later, press the SEARCH
MODE button four times
(CD, VCD: three times)
ing playback and the s or B button to choose the
desired marker, and then press the ENTER button.
NOTES:
• All Markers will be erased if the disc tray is opened the
power switched off or AC selected in step and you
subsequently press the ENTER button.
• To clear a marker, using the s or B button, position
the cursor on to the marker number to be cleared and
press the CLEAR button.
• You can mark up to 10 points.
5
Press the SEARCH MODE or RETURN button to
exit.
1 2 3 4 5 6 7 8 9 10 AC
-- --:--:--
2
Virtual Surround
You can enjoy a stereophonic visual
sound space with your existing 2channel stereo system.
1
Press the VIRTUAL button on
the front panel or press the
MODE button during playback
2
dur-
Press the
(Natural effect), 2 (Emphasized effect) or OFF.
3
Press the RETURN button to exit.
NOTE
• Select Virtual Surround OFF or adjust the volume down
if the sound is distorted.
VIRTUAL or ENTER
(for CD play only):
WMAMP3VCDCDDVD-V
English
OFF
.
button to set it 1
–23–
EN
Page 24

DVD SETUP
On the Setup menu, QUICK mode and CUSTOM mode are availale. QUICK mode consists of
setting menus often needed, and you can make all settings required in CUSTOM mode.
You can make the settings of the items with mark in QUICK mode.
Language Setting
Language options are not available with some discs.
1
Press the SETUP button in the STOP mode.
2
Press the B button to select
press the ENTER button.
• CUSTOM mode will appear.
3
Press the s or B button to select LANGUAGE, and then the
ENTER button to confirm.
4
Press the K or L button to select the items below,
and then press the ENTER button.
DIALOG
SUBTITLE
DISC MENU
(Default: ORIGINAL)
• Sets the audio language.
(Default: OFF)
• Sets the subtitle language.
(Default: ENGLISH)
• Sets the language for DVD
Menus.
CUSTOM, and then
LANGUAGE
DIALOG ORIGINAL
SUBTITLE OFF
DISC MENU ENGLISH
OSD ENGLISH
LANGUAGE
DIALOG
ORIGINAL
ENGLISH
FRENCH
SPANISH
GERMAN
ITALIAN
SWEDISH L
LANGUAGE
SUBTITLE
OFF
ENGLISH
FRENCH
SPANISH
GERMAN
ITALIAN
SWEDISH L
LANGUAGE
DISC MENU
ENGLISH
FRENCH
SPANISH
GERMAN
ITALIAN
SWEDISH
DUTCH L
QUICK
3
Press the s or B button to select DISPLAY, and then press
the ENTER button to confirm.
4
Press the K or L button to select
the items below, and then press the ENTER button.
TV ASPECT
TER BOX)
PANEL DISPLAY
BRIGHT)
ANGLE ICON
DISPLAY
TV ASPECT
PANEL DISPLAY BRIGHT
ANGLE ICON ON
AUTO POWER OFF ON
VIDEO OUT SCART
(Default: 4:3 LET-
QUICK
• Press the K or L button for an
item selection, and then press the
ENTER button.
•
Select 4:3 LETTER BOX for black
bars on the top and bottom of the
screen.
• Select 4:3 PAN - SCAN for a full height picture with both sides
trimmed.
•
Select 16:9 WIDE if a wide-screen TV is connected to the
DVD player.
DISPLAY
TV ASPECT
4:3 LETTER BOX
4:3 PAN & SCAN
16
:9 WIDE
(Default:
• Press the K or L button
for an
item among BRIGHT, DIM and
AUTO DIM, and then press the
ENTER button.
• This adjusts the brightness of the
display panel.The factory default is BRIGHT.
• When AUTO DIM is selected, the display dims only during playback.
DISPLAY
PANEL DISPLAY
BRIGHT
DIMMER
AUTO
(Default: ON)
• Press the ENTER button repeatedly to turn Angle marks ON or
OFF.
DISPLAY
TV ASPECT
PANEL DISPLAY BRIGHT
ANGLE ICON ON
AUTO POWER OFF ON
VIDEO OUT SCART
4:3 LETTER BOX
4:3 LETTER BOX
OSD
(Default: ENGLISH)
• Sets the language for the OnScreen display.
5
Press the K or L button to select a setting, and
QUICK
LANGUAGE
OSD
ENGLISH
FRANÇAIS
ESPAÑOL
DEUTSCH
ITALIANO
SVENSK
NEDERLANDS
then press the ENTER button.
•
If OTHERS is selected in the AUDIO, SUBTITLE or DISC
MENU screen, enter a four-digit number as the code for the
desired language. (Refer to the language code list below).
•
Only the languages supported by the disc can be selected.
6
Press the SETUP button to exit.
NOTE:
• Language Setting for Dialogues and Subtitles is not available with some discs. In this case, use the AUDIO and
SUBTITLE buttons.
Details are on pages 21 and 22.
Display Setting
You can change certain aspects of the DVD display screens, on-screen
messages and the front panel display of the DVD player.
1
Press the SETUP button in the STOP mode.
2
Press the B button to select CUSTOM, and then
press the ENTER button.
•
CUSTOM mode will appear.
–24–
AUTO POWER OFF
• Press the ENTER button repeatedly to turn Auto Power ON or
OFF.
• This feature will turn the DVD play-
(Default: ON)
DISPLAY
TV ASPECT
4:3 LETTER BOX
PANEL DISPLAY BRIGHT
ANGLE ICON ON
AUTO POWER OFF ON
VIDEO OUT SCART
er to off automatically after 35
minutes of no use.
VIDEO OUT
(Default:
• Press the ENTER button repeatedly to turn SCART or COMPONENT.
• Select SCART for video output
SCART)
DISPLAY
TV ASPECT
4:3 LETTER BOX
PANEL DISPLAY BRIGHT
ANGLE ICON ON
AUTO POWER OFF ON
VIDEO OUT SCART
from AV1 OUT jack.
• Select COMPONENT for video
output from COMPONENT VIDEO OUT jack.
5
Press the SETUP button to exit.
NOTES:
•
Be sure to press the SETUP button, or the setting will not work.
• You can also choose an item by pressing the numeric buttons.
• Be sure not to use both AV1 jack and Component Video jacks
for video output at the same time.
• When changing the VIDEO OUT setting (SCART or COMPONENT), use a VIDEO jack or an S-VIDEO jack to connect
to the TV. If the setting is changed, for example, to COMPONENT while AV1 jack is used to connect to the TV, the
distorted video signal may be output.
EN
Page 25

DVD SETUP
Audio Setting
Choose the appropriate Audio settings for your equipment as it
only affects playback of DVD discs on the DVD player.
1
Press the SETUP button in STOP mode.
2
Press the B button to select CUSTOM, and then
press the ENTER button.
• CUSTOM mode will appear.
3
Press the s or B button to
select AUDIO, and then the
ENTER button to confirm.
4
Press the K or L button to select the below items,
and then press the ENTER button.
DRC (Dynamic Range Control)
(Default: OFF)
• To compress the range of sound
volume.
DOLBY DIGITAL
(Default: ON)
QUICK
Set to ON when the player is connected to Dolby Digital Decoder.
(ON: Outputs Dolby Digital)
(OFF: Converts Dolby Digital to
PCM)
DTS (Default: ON)
ON: Outputs DTS sound
Set to ON when the unit is connected to a DTS Decoder.
LPCM SELECT
• Set the output for a DVD recorded in PCM 96 kHz (96 kHz or 48
kHz).
MPEG (Default: OFF)
ON: Output MPEG sound
Set to ON when the unit is connected to an MPEG Decoder.
When playing a disc with copyright Protection
• If you select OFF, copyright protection will be activated
and sound will be down sampled to 48kHz.
5
Press the SETUP button to exit.
(Default: OFF)
AUDIO
DRC
DOLBY DIGITAL ON
DTS ON
LPCM SELECT OFF
MPEG OFF
AUDIO
DRC
DOLBY DIGITAL ON
DTS ON
LPCM SELECT OFF
MPEG OFF
AUDIO
DRC
DOLBY DIGITAL ON
DTS ON
LPCM SELECT OFF
MPEG OFF
AUDIO
DRC
DOLBY DIGITAL ON
DTS ON
LPCM SELECT OFF
MPEG OFF
AUDIO
DRC
DOLBY DIGITAL ON
DTS ON
LPCM SELECT OFF
MPEG OFF
AUDIO
DRC
DOLBY DIGITAL ON
DTS ON
LPCM SELECT OFF
MPEG OFF
OFF
OFF
OFF
OFF
OFF
OFF
Ratings Control
Ratings Control limits playback of discs with unsuitable audience
ratings. A four digit code entered by the user will unlock the
parental lock.
This feature allows you to prevent discs with objectionable
scenes from being played by your children.
RATING LEVEL
Rating Level allows you to set the rating level of your DVD discs.
Playback will stop if the disc’s ratings exceed the level you set.
1
Press the SETUP button in the STOP mode.
2
Press the B button to select CUSTOM, and then
press the ENTER button.
3
Press the s or B button to select RATING, and
then press the ENTER button.
4
Enter your four-digit password
,and then press the ENTER
button.
5
Press the K or L button to select RATING LEVEL, and then
press the ENTER button.
6
Press the K or L button to select the desired level.
7
Press the SETUP button to exit.
NOTES:
• When doing this for the first time, enter any 4 digits (except for 4737).That number will be used
as the password from the second time onward.
To change the password, press the K or L button to select
•
CHANGE at step , and then press the ENTER button. Enter the
5
four-digit pass-word, and then press the ENTER button.
• With some DVDs, it may be difficult to find if they are compatible with parental lock.Be sure to check if the parental lock
function operates in the way that you have set.
• Record the password in case you forget it.
IF YOU FORGET THE PASSWORD
1
Press 4, 7, 3, 7 in step 4.
•
The password will be cleared and the rating level will be set to
ALL.
2
Repeat steps 5-7 to re-establish the parental lock.
CONTROL LEVELS
• ALL
Parental lock is cancelled.
• Level 8
DVD software of any grade (adult/general/children) can
be played back.
• Levels 7 to 2
Only DVD software intended for general use and children can be played back.
• Level 1
Only DVD software intended for children can be played back,
with those intended for adult and general use prohibited.
RATINGS
Please enter a 4-digit password.
RATINGS
RATING LEVEL ALL
CHANGE
RATINGS
RATING LEVEL
ALL
8
7
6
5
4
3
English
–25–
EN
Page 26

DVD SETUP
Languag
Abkhazian 4748
Afar 4747
Afrikaans 4752
Albanian 6563
Amharic 4759
Arabic 4764
Armenian 5471
Assamese 4765
Aymara 4771
Azerbaijani 4772
Bashkir 4847
Basque 5167
Bengali; Bangla 4860
Bhutani 5072
Bihari 4854
Bislama 4855
Breton 4864
Bulgarian 4853
Burmese 5971
Byelorussian 4851
Cambodian 5759
Catalan 4947
Chinese [CHI] 7254
Corsican 4961
Croatian 5464
Czech 4965
Danish [DAN] 5047
Dutch [DUT] 6058
English [ENG] 5160
Esperanto 5161
Estonian 5166
Faroese 5261
Fiji 5256
Finnish [FIN] 5255
French [FRE] 5264
If you choose a Language that has a 3-letter language code, the code will be displayed every time you change the Audio or Subtitle language
setting on pages 21 and 22. If you choose any other language, ‘---’ will be displayed instead. (3-letter language codes are written in brackets.)
e
A-B
C-E
F-H
Code Languag e Code Language Code Language Code
Frisian 5271
Galician 5358
Georgian 5747
German [GER] 5051
Greek [GRE] 5158
Greenlandic 5758
Guarani 5360
Gujarati 5367
Hausa 5447
Hebrew 5569
Hindi 5455
Hungarian [HUN] 5467
Icelandic [ICE] 5565
Indonesian 5560
Interlingua 5547
Interlingue 5551
Inupiaq 5557
Irish [IRI] 5347
Italian [ITA] 5566
Japanese [JPN] 5647
Javanese 5669
Kannada 5760
Kashmiri 5765
Kazakh 5757
Kinyarwanda 6469
Kirghiz 5771
Kirundi 6460
Korean [KOR] 5761
Kurdish 5767
Laotian 5861
Latin 5847
Latvian; Lettish 5868
Lingala 5860
Lithuanian 5866
Macedonian 5957
Malagasy 5953
I-K
L-N
Malay 5965
Malayalam 5958
Maltese 5966
Maori 5955
Marathi 5964
Moldavian 5961
Mongolian 5960
Nauru 6047
Nepali 6051
Norwegian [NOR] 6061
Occitan 6149
Oriya 6164
Oromo (Afan) 6159
Panjabi 6247
Pashto; Pushto 6265
Persian 5247
Polish 6258
Portuguese [POR] 6266
Quechua 6367
Rhaeto-Romance 6459
Romanian [RUM] 6461
Russian [RUS] 6467
Samoan 6559
Sangho 6553
Sanskrit 6547
Scots Gaelic 5350
Serbian 6564
Serbo-Croatian 6554
Sesotho 6566
Setswana 6660
Shona 6560
Sindhi 6550
Singhalese 6555
Siswat 6565
Slovak 6557
Slovenian 6558
O-R
S
Somali 6561
Spanish [SPA] 5165
Sudanese 6567
Swahili 6569
Swedish [SWE] 6568
Tagalog 6658
Tajik 6653
Tamil 6647
Tatar 6666
Telugu 6651
Thai 6654
Tibetan 4861
Tigrinya 6655
Tonga 6661
Tsonga 6665
Turkish [TUR] 6664
Turkmen 6657
Twi 6669
Ukrainian 6757
Urdu 6764
Uzbek 6772
Vietnamese 6855
Volapuk 6861
Welsh 4971
Wolof 6961
Xhosa 7054
Yiddish 5655
Yoruba 7161
Zulu 7267
T
U-Z
–26–
EN
Page 27

MAINTENANCE
Cleaning the Cabinet
• Use a soft cloth slightly moistened with a mild detergent solution. Do not use a solution containing alcohol, spirits,
ammonia or abrasives.
Cleaning Discs
• When a disc becomes dirty, clean it with a cleaning cloth. Wipe the disc from the centre out. Do not wipe in a circular
motion.
• Do not use solvents such as benzene, thinner, commercially available cleaners, detergent, adrasive cleaning agents or
antistatic spray intended for analogue records.
Cleaning the disc lens
• If the player still does not perform properly when it is operated while referring to the relevant sections and to the “TROUBLESHOOTING GUIDE” in these Operating Instruction, the optical laser pickup unit may be dirty. Consult your dealer or
an Authorized Service Centre for inspection and cleaning of the optical laser pickup unit.
Disc Handling
• Use discs which have the following logos on them.
(Optical audio digital discs.)
• Handle the discs so that fingerprints and dust do not adhere to the surfaces of the discs.
• Always store the disc in its protective case when it is not used.
• Note that discs with special shapes (heart-shaped discs, hexagonal discs, etc.) cannot be
played on this product. Do not attempt to play such discs, as they may damage the player.
DIGITAL VIDEO
English
Make your contribution to the environment!!!
• Used up batteries do not belong in the dust bin.
You can dispose of them at a collection point for used up batteries or special waste. Contact your local council for details
•
.
–27–
EN
Page 28

TROUBLESHOOTING GUIDE
If the DVD player does not perform properly when operated as instructed in these Operating Instructions, check the player,
consulting the following checklist.
Problem Solution
No power –Check if the AC power cord is properly connected.
–Unplug the cord once, and wait for 5-10 seconds.Then plug it in
again
No sound or picture –Check if the TV is switched on.
–Check the video connection
–Check the VIDEO/AUDIO cable connections to the TV
(See Connecting to a TV)
–DTS sound cannot be produced with an analogue connection.
Distorted picture –Sometimes a small amount of picture distortion may appear.
This is not a malfunction.
–Connect the player directly to the TV.
Completely distorted picture or –Connect the DVD player directly to the TV.
black/white picture with DVD –Make sure the disc is compatible with the DVD player.
No sound or distorted sound –Adjust the volume.
–Check that the speakers are connected correctly.
No audio at digital output –Check the digital connections.
–Check if the audio format of the selected audio language matches
your receiver’s capabilities.
Picture freezes momentarily –Check the disc for fingerprints/scratches and
during playback clean with a soft cloth wiping from centre to edge.
–Clean the disc
Disc can’t be played –Clean the disc
–Ensure the disc label is facing up.
–Check if the disc is defective by trying another disc.
–Cancel the parental lock or change the control level.
–Insert a correct disc that plays on this player.
No return to start-up screen when –Reset the player by switching the player off, and then on again.
disc is removed
The player does not respond to –
the remote control –Reduce the distance to the player.
Buttons do not work or player stops –To completely reset the player, unplug the AC
responding cord from the AC outlet for 5-10 seconds.
Player does not respond to some –Operations may not be permitted by the disc.
operating commands during playback Refer to the instructions of the disc.
DVD player cannot read –Use a commonly available cleaning CD/DVD to
CDs/DVDs clean the lens before sending the DVD player for repair.
Angle does not switch –The angle cannot be switched for DVDs which do not contain
Playback does not start when the title is selected –Check the “PARENTAL” setting.
The password for a rating level has been forgotten –Enter the default password “4737”, and then your forgotten pass
No DTS audio at the analogue outputs –Use a DIGITAL AUDIO OUT jack when outputting the DTS audio.
Aim the remote control directly at the sensor on the front of the player.
–Replace the batteries in the remote control.
–Re-insert the batteries with their polarities (+/– signs) as indicated.
multiple angles. In some cases multiple angles are only recorded
for specific scenes.
word will be cleared
NOTES:
Some functions are not available in specific modes, but this is not a malfunction. Read the description in these Operating
Instructions for details on correct operations.
• Playback from a desired track and random playback are not available during programme playback.
–28–
EN
Page 29

SPECIFICATIONS
SIGNAL SYSTEM
PAL color
APPLICABLE DISCS
(1) DVD-Video discs
1-layer 12cm single-sided discs, 2-layer 12cm single-sided
discs, 2-layer 12cm double-sided discs (1 layer per side)
1-layer 8cm single-sided discs, 2-layer 8cm single-sided
discs, 2-layer 8cm double-sided discs (1 layer per side)
(2) DVD-R/DVD-RW
(3) Compact discs (CD-DA, Video CD)
12cm discs, 8cm discs
(4) CD-R/CD-RW
S-VIDEO OUTPUT
Y output level: 1Vp-p (75Ω/ohms)
C output level: 0.3Vp-p
Output connectors: S connectors, 1 set
VIDEO OUTPUT
Output level: 1Vp-p (75Ω/ohms)
Output connector: Pin jacks, 1 set
COMPONENT OUTPUT
Y output level: 1Vp-p (75Ω/ohms)
CB output level: 0.7Vp-p (75Ω/ohms)
CR output level: 0.7Vp-p (75Ω/ohms)
Output connector: Pin jacks, 1 set
AUDIO/VIDEO
21-pin scart jack
AUDIO OUTPUT
Output level: 2Vrms
2-channel (FL, FR) output connector: Pin jack, 1 set
AUDIO OUTPUT PROPERTIES
(1) Frequency response
1 DVDs (linear PCM) : 4Hz to 22kHz (48kHz sampling)
2 CDs :4Hz to 20kHz
(2) S/N ratio : 115dB
Total harmonic distortion
(3)
(4) Dynamic range :DVD : 100dB
:4Hz to 44kHz (96kHz sampling)
:1kHz CD: 0.003%
CD : 98dB
DIGITAL AUDIO OUTPUT
Optical digital output: Optical connector, 1 set
Coaxial digital output: Pin jack, 1 set
POWER SUPPLY
AC 220-240V, 50Hz
POWER CONSUMPTION
15W (Standby: 1W)
MAXIMUM EXTERNAL DIMENSIONS
435 (width) x 75 (height) x 220 (depth) mm
(17-3/32” x 2-61/64” x 8-21/32”) (including protruding parts)
MASS
2.2kg (4.85lbs)
REMOTE CONTROL UNIT
RC-943
TYPE
Infrared pulse
POWER SUPPLY
DC 3V, 2 R6P/AA batteries
English
–29–
EN
Page 30

PIN CONNECTION
135
7
9
2
46
8
10
1214
16
1820
11
13
15
1719
21
Contacts, signal levels and impedances
Contact 1
Audio Output (Right): 2.0Vrms/01kΩ
Contact 3
Audio Output (Left): 2.0Vrms/01kΩ
Contact 4
Audio, Ground
Contact 5
RGB, Ground (Blue)
Contact 7
RGB Output (Blue): 0.7Vp-p/75Ω
Contact 8
Function Select Switching Control
L : 0.0~2.0V DC Power Off
M: 4.5~7.0V DC Wide-Screen Mode(16:9)
H: 9.5~12.0V DC Normal Mode (4:3)
Contact 9
RGB, Ground (Green)
Contact 11
RGB Output (Green): 0.7Vp-p/75Ω
Contact 13
RGB, Ground (Red)
Contact 14
RGB Switching Control, Ground
Contact 15
RGB Output (Red): 0.7Vp-p/75Ω
Contact 16
RGB Switching Control
H:13.3V DC RGB Mode
Contact 17
Video Output Signal, Ground
Contact 18
Video Input Signal, Ground
Contact 19
Video Output (CVBS): 1.0Vp-p/75Ω
Contact 21
Common Ground (shielding)
–30–
EN
Page 31

WARNUNG:
UM DAS RISIKO VON FEUER UND ELEKTRISCHEN SCHLÄGEN ZU REDUZIEREN,
SETZEN SIE DIESES GERÄT NIEMALS REGEN ODER FEUCHTIGKEIT AUS.
VORSICHT!
STROMSCHLAGGEFAHR!
NICHT ÖFFNEN!
VORSICHT:
UM DIE STROMSCHLAGGEFAHR ZU REDUZIEREN, NEHMEN SIE
KEINE ABDECKUNGEN (ODER DIE RÜCKWAND) AB. IM INNEREN
DES GERÄTES BEFINDEN SICH KEINE VOM ANWENDER ZU
WARTENDEN TEILE. ÜBERLASSEN SIE DIE WARTUNG DEM
QUALIFIZIERTEN WARTUNGSPERSONAL.
Das Blitzzeichen einem gleichseitigen Dreieck soll den
Anwender davor warnen, dass nicht isolierte
„gefährliche Spannung“ innerhalb des Gehäuses dieses
Produktes anliegt, die ausreichend hoch ist, um eine
Stromschlaggefahr für Personen darzustellen.
Das Ausrufungszeichen in einem gleichseitigen Dreieck
soll den Anwender auf wichtige Bedienungs- und
Wartungsinstruktionen in der mit diesem Gerät mitgelieferten Literatur hinweisen.
VORSICHTSMASSNAHMEN
Laser-Sicherheit
Dieses Gerät verwendet einen Laser. Nur qualifiziertes Wartungspersonal sollte Abdeckungen abnehmen und Wartungen an diesem
Gerät ausführen, da es anderenfalls zu Verletzungen des Sehvermögens kommen kann.
VORSICHT: DIE VERWENDUNG VON REGLERN ODER EINSTELLUNGEN BZW. DIE AUSFÜHRUNG VON ANDEREN ALS IN
VORSICHT: SICHTBARE LASERSTRAHLUNG KANN AUSTRETEN, WENN DAS GERÄT GEÖFFNET ODER DER
ANBRINGUNGSORT:
DIESER ANLEITUNG AUFGEFÜHRTEN VORGÄNGEN KANN ZU GEFÄHRLICHER STRAHLUNG FÜHREN.
VERRIEGELUNGSMECHANISMUS DEAKTIVIERT WIRD. VERMEIDEN SIE DEN LASERSTRAHL.
* AUFGEDRUCKT AUF DER RÜCKSEITE
Perioden ohne Verwendung – Schalten Sie das Gerät aus, wenn es nicht verwendet wird. Ziehen Sie den
Netzstecker von der Netzdose ab, wenn das Gerät für längere Zeit nicht verwendet werden soll. Trennen Sie
das Gerät auch während eines Gewitters vom Netz ab.
–2–
GE
Page 32

VORSICHTSMASSNAHMEN
Wichtig
Verwenden Sie nur mit DVD markierte Disks in diesem DVDPlayer.
Stromversorgung
Die erforderliche Nennspannung (Wechselstrom) beträgt 220
V-240 V, 50 Hz. Um dieses Gerät zu betreiben, ist die STANDBY-Taste zu drücken.
Warnung
Um Feuer und elektrische Schläge zu vermeiden, dieses
Gerät niemals Regen oder Feuchtigkeit aussetzen.
WARNUNG:
INNERE BAUTEILE STEHEN UNTER SPANNUNG, KEINE SCHRAUBEN LOSDREHEN.
Warnung vor Kondensation
Es kann zu Feuchtigkeitskondensation im Inneren des
Gerätes kommen, wenn Sie dieses von einem kalten Ort an
einen warmen Ort bringen bzw. wenn Sie einen kalten Raum
aufwärmen oder hohe Feuchtigkeitsbedingungen
vorherrschen. Verwenden Sie den DVD-Player nicht für mindestens zwei Stunden, bis das Innere trocken ist.
Vorsi ch t
1) Niemals das Gehäuse öffnen. Im Inneren befinden sich
keine Bauteile, die Sie selbst warten können. Sämtliche
Wartungsarbeiten müssen qualifizierten
Kundendiensttechnikeren überlassen werden.
2) An der Geräteseite und an der Unterseite befinden sich
Öffnungen und Schlitze, die der Ventilation dienen. Um
einen zuverlässigen Betrieb des Gerätes zu gewährleisten und das Gerät vor Überhitzung zu schützen, dürfen
die Ventilationsschlitze nicht blockiert werden. Aufstellorte
wie Bücherregale sind zu vermeiden, außer wenn ausreichende Ventilation gewährleistet ist.
3) Das Gerät muß von Wärmequellen ferngehalten werden.
4) Die Aufstellung im Bereich von starken Magnetfeldern ist
zu vermeiden.
5) Führen Sie niemals Objekte irgendwelcher Art durch die
Belüftungsschlitze des Gehäuses in das Gerät ein, da
diese anderenfalls Strom führende Teile berühren oder
Kurzschlüsse und darauf resultierende Stromschläge
verursachen können.
6) Niemals irgendwelche Flüssigheiten auf dem Gerät verschütten. Falls dennoch Flüssigkeit in das Gerät eindringen sollte, suchen Sie bitte einen qualifizierten
Kundendiensttechniker auf.
7) Das Gerät darf nur in horizontaler Position aufgestellt
werden.
8) Dieses Gerät befindet sich im Bereitschaftsmodus, wenn
es ausgeschaltet wird, das Netzkabel aber
angeschlossen ist.
9) Halten Sie das Gerät von Feuchtigkeit. Wasser und Staub
fern.
10) Gehen Sie das Kabel am Stecker, wenn Sie den Stecker
herausziehen.
11) Alle Sicherheitshinweise und Bedienungsanleitungen sollten vor der Inbetriebnahme des DVD-Players sorgfältig
durchgelesen werden.
12) Achten Sie darauf, dass Sie Ihre Finger nicht im DiscFach einklemmen.
13) Stelle Sie keinerlei schweren Gegenstände auf dem
Wechselstrom-Netzkabel ab.
14) Halten Sie das Wechselstrom-Netzkabel von allen
Wärmequellen fern.
15) Stellen Sie sicher, dass Sie eine eventuell eingelegte Disc
entnehmen und das Wechselstrom-Netzkabel aus der
Wandsteckdose ziehen, bevor Sie den DVD-Player transportieren.
16) Üben Sie beim Transport des DVD-Players keinen Druck
auf das Gerät aus.
17) Verwenden Sie den DVD-Player nur in geschlossenen
Räumen.
Konformitätserklärung
Wir erklären unter unserer eigenen Verantwortung, dass
dieses Produkt, auf welche diese Deklaration zutrifft, den folgenden Standards entspricht:
EN60065, EN55013, EN55020, EN61000-3-2 und EN61003-3. Die Anforderungen der folgenden Richtlinien werden
eingehalten: 73/23/EEC, 89/336/EEC und 93/68/EEC.
Deutsch
–3–
GE
Page 33

INHALTSVERZEICHNIS
■
VORSICHTSMASSNAHMEN . . . . . . . . . . . . . . . . . . . . 2
Laser-Sicherheit . . . . . . . . . . . . . . . . . . . . . . . . . . . . . . 2
Wichtig . . . . . . . . . . . . . . . . . . . . . . . . . . . . . . . . . . . . . 3
Stromversorgung. . . . . . . . . . . . . . . . . . . . . . . . . . . . . . 3
Warnung . . . . . . . . . . . . . . . . . . . . . . . . . . . . . . . . . . . . 3
Warnung vor Kondensation . . . . . . . . . . . . . . . . . . . . . . 3
Vorsicht. . . . . . . . . . . . . . . . . . . . . . . . . . . . . . . . . . . . . 3
Konformitätserklärung . . . . . . . . . . . . . . . . . . . . . . . . . . 3
■
EINLEITUNG . . . . . . . . . . . . . . . . . . . . . . . . . . . . . . . . 5
Über das Urheberrecht . . . . . . . . . . . . . . . . . . . . . . . . . 5
Mitgeliefertes Zubehör . . . . . . . . . . . . . . . . . . . . . . . . . . 5
Im Handbuch verwendete Symbole . . . . . . . . . . . . . . . . 5
■
ÜBER DIE DISCS . . . . . . . . . . . . . . . . . . . . . . . . . . . . . 6
Wiederzugebende Discs . . . . . . . . . . . . . . . . . . . . . . . . 6
Disc-Typen . . . . . . . . . . . . . . . . . . . . . . . . . . . . . . . . . . 6
■
MERKMALE . . . . . . . . . . . . . . . . . . . . . . . . . . . . . . . . . 7
■
FUNKTIONSÜBERSICHT . . . . . . . . . . . . . . . . . . . . . . . 8
BEDIENFELD . . . . . . . . . . . . . . . . . . . . . . . . . . . . . . 8
FERNBEDIENUNG . . . . . . . . . . . . . . . . . . . . . . . . . . 8
Beschreibung der Fernbedienung . . . . . . . . . . . . . . . . . 9
Display . . . . . . . . . . . . . . . . . . . . . . . . . . . . . . . . . . . . 11
Anzeigen während des Betriebs. . . . . . . . . . . . . . . . . . 11
Einsetzen der Batterien . . . . . . . . . . . . . . . . . . . . . . . . 11
■
ANSCHLÜSSE . . . . . . . . . . . . . . . . . . . . . . . . . . . . . . 12
Beschreibung - Rückseite . . . . . . . . . . . . . . . . . . . . . . 12
Anschluss an ein Audiosystem. . . . . . . . . . . . . . . . . . . 13
Anschluss an einen Fernseher (für Video) . . . . . . . . . . 14
■
WIEDERGABE EINER DISC. . . . . . . . . . . . . . . . . . . . 15
Generelle Wiedergabe. . . . . . . . . . . . . . . . . . . . . . . . . 15
Allgemeine Merkmale . . . . . . . . . . . . . . . . . . . . . . . . . 15
Helligkeit des Displays. . . . . . . . . . . . . . . . . . . . . . . . . 15
Pause . . . . . . . . . . . . . . . . . . . . . . . . . . . . . . . . . . . . . 15
Disc-Menüs . . . . . . . . . . . . . . . . . . . . . . . . . . . . . . . . . 15
Titelmenü . . . . . . . . . . . . . . . . . . . . . . . . . . . . . . . . . . 15
AUFRUF EINES MENÜBILDSCHIRMS
WÄHREND DER WIEDERGABE . . . . . . . . . . . . . . . 15
Einzelbildwiedergabe. . . . . . . . . . . . . . . . . . . . . . . . . . 16
Fortsetzung . . . . . . . . . . . . . . . . . . . . . . . . . . . . . . . . . 16
Schnellvorlauf/Schnellrücklauf . . . . . . . . . . . . . . . . . . . 16
Zeitlupe vorwärts/Zeitlupe rückwärts . . . . . . . . . . . . . . 16
Zoom. . . . . . . . . . . . . . . . . . . . . . . . . . . . . . . . . . . . . . 16
Titelsuche . . . . . . . . . . . . . . . . . . . . . . . . . . . . . . . . . . 17
Titel-/Kapitelsuche . . . . . . . . . . . . . . . . . . . . . . . . . . . . 17
Zeitpunktsuche . . . . . . . . . . . . . . . . . . . . . . . . . . . . . . 17
Wiederholung . . . . . . . . . . . . . . . . . . . . . . . . . . . . . . . 17
TITEL-/KAPITELWIEDERHOLUNG . . . . . . . . . . . . . 17
TITELWIEDERHOLUNG . . . . . . . . . . . . . . . . . . . . . 17
A-B-WIEDERHOLUNG . . . . . . . . . . . . . . . . . . . . . . 18
Programm (CD) . . . . . . . . . . . . . . . . . . . . . . . . . . . . . . 18
Zufallswiedergabe (CD) . . . . . . . . . . . . . . . . . . . . . . . . 18
MP3-/JPEG-/WMA-Wiedergabe . . . . . . . . . . . . . . . . . . 19
Dia-Show-Modus (JPEG). . . . . . . . . . . . . . . . . . . . . . . 20
Bildschirm-Informationen (OSD). . . . . . . . . . . . . . . . . . 20
Spurauswahl . . . . . . . . . . . . . . . . . . . . . . . . . . . . . . . . 20
Zufallswiedergabe (MP3/JPEG/WMA) . . . . . . . . . . . . . 20
Programm (MP3/JPEG/WMA) . . . . . . . . . . . . . . . . . . . 21
Audiosprache. . . . . . . . . . . . . . . . . . . . . . . . . . . . . . . . 21
Stereo-Modus . . . . . . . . . . . . . . . . . . . . . . . . . . . . . . . 21
Untertitelsprache . . . . . . . . . . . . . . . . . . . . . . . . . . . . . 22
Kamerawinkel . . . . . . . . . . . . . . . . . . . . . . . . . . . . . . . 22
Änderung der Bildschirmanzeige . . . . . . . . . . . . . . . . . 22
Markierungs-Einrichtungsbildschirm . . . . . . . . . . . . . . . 23
Virtual Surround . . . . . . . . . . . . . . . . . . . . . . . . . . . . . 23
■
DVD-EINRICHTUNG . . . . . . . . . . . . . . . . . . . . . . . . . . 24
Spracheinstellung . . . . . . . . . . . . . . . . . . . . . . . . . . . . 24
Display-Einstellung . . . . . . . . . . . . . . . . . . . . . . . . . . . 24
Audio-Einstellung. . . . . . . . . . . . . . . . . . . . . . . . . . . . . 25
Kindersicherung. . . . . . . . . . . . . . . . . . . . . . . . . . . . . . 25
EINSTUFUNG . . . . . . . . . . . . . . . . . . . . . . . . . . . . . 25
WENN SIE DAS PASSWORT VERGESSEN HABEN
SICHERUNGSSTUFEN . . . . . . . . . . . . . . . . . . . . . . 25
■
WARTUNG . . . . . . . . . . . . . . . . . . . . . . . . . . . . . . . . . 27
■
ANLEITUNG ZUR FEHLERSUCHE. . . . . . . . . . . . . . . 28
■
TECHNISCHE DATEN. . . . . . . . . . . . . . . . . . . . . . . . . 29
■
STIFTBELEGUNG . . . . . . . . . . . . . . . . . . . . . . . . . . . 30
. . 25
–4–
GE
Page 34

EINLEITUNG
+10
3
2
SEARCH
MODE
OPEN /
CLOSE
9
ZOOM
DISPLAY
8
AUDIO
0
TOP MENU
SETUP
PLAY
SKIP
5
6
1
A-B REPEAT
REPEAT
7
CLEAR
SUBTITLE
MODE
ANGLE
RETURN
MENU
STOP
4
VIRTUALPOWER
STILL / PAUSE
ENTER
ÜBER DAS RECYCLING
Das Verpackungsmaterial dieses Produktes ist für das Recycling geeignet und kann wieder verwendet werden. Bitte entsorgen
Sie alle Materialien in Abhängigkeit von Ihren örtlichen Vorschriften über das Recycling.
Die Batterien dürfen nicht verbrannt und auch nicht in den Hausmüll geworfen; bitte geben Sie die Batterien gemäß örtlichen
Bestimmungen an den Sammelstellen oder Sondermüllplätzen ab.
Die Seriennummer dieses Produktes ist an der Rückseite des DVD-Players angegeben. Kein
anderes Gerät weist die gleiche Seriennummer wie Ihr DVD-Player auf. Sie sollten dieser
Seriennummer und andere wichtige Informationen hier eintragen und dieses Buch als permanente
Bestätigung für Ihren Kauf aufbewahren, um bei Diebstahl eine Identifikation zu gestatten. Die
Seriennummern werden nicht aufbewahrt.
Kaufdatum
Fachhändler
Anschrift des Fachhändlers
Telefonnummer des Fachhändlers
Modellnummer
Seriennummer
Über das Urheberrecht
Nicht autorisiertes Kopieren, Ausstrahlen, öffentliche Darbietung und Verleih der Disks ist verboten.
Dieses Produkt schließt Technologie zum Schutz des Urheberechts ein, die durch eine in bestimmten USPatenten und anderem intellektuellen Eigentumsrechten der Macrovision Corporation enthaltene Methode
geschützt ist. Die Verwendung dieser Technologie zum Schutz des Urheberrechts muss von der Macrovision
Corporation autorisiert werden, und gilt nur für die Heimdarbietung und andere begrenzte Verwendungen, wenn
nicht anders von der Macrovision Corporation genehmigt. Rückwärtsentwicklung (Reverse Engineering) oder
Disassembly ist verboten.
Geräteansprüche der US-Patent-Nr. 4,631,603, 4,577,216, 4,819,098 und 4,907,093, nur für eingeschränkte
Betrachtungszwecke lizenziert.
Mitgeliefertes Zubehör
Überprüfen Sie und stellen Sie sicher, dass folgende Teile mit der Haupteinheit im Karton mitgeliefert wurden:
Fernbedienung• 1
Zwei Mignon-Batterien
„AA“ (R6P)
• • • • • • • • •
2
Audio-Kabel
• •
1
Video-Kabel
Bedienungsanleit
• • •
1
ung
• • • • • • • • • • • •
Liste der
Kundendienste
1
1
Deutsch
(etwa 100 cm
(3 Fuss) lang)
(etwa 100 cm
(3 Fuss) lang)
Im Handbuch verwendete Symbole
Die nachfolgend aufgeführten Symbole erscheinen in manchen Überschriften und Hinweisen in dieser Anleitung und weisen
die folgenden Bedeutungen auf!
: Die Beschreibung bezieht sich auf die Wiedergabe von DCD-Videodiscs.
: Die Beschreibung bezieht sich auf die Wiedergabe von Audio-CDs.
CD
: Die Beschreibung bezieht sich auf die Wiedergabe von MP3- Discs.
MP3
: Die Beschreibung bezieht sich auf die Wiedergabe von Video-CDs.
: Die Beschreibung bezieht sich auf die Wiedergabe von JPEG-Discs.
: Die Beschreibung bezieht sich auf die Wiedergabe von Discs im WMA-Format.
: Die Beschreibung bezieht sich auf Elemente im QUICK-Modus.
–5–
DVD-V
VCD
JPEG
WMA
QUICK
GE
Page 35

ÜBER DIE DISCS
2
Beispiel
Titel 1 Titel 2
Kapitel 1 Kapitel 2 Kapitel 1 Kapitel 2Kapitel 3 Kapitel 4
Beispiel
Spur 1 Spur 2 Spur 3 Spur 4 Spur 5 Spur 6
Beispiel
Gruppe 1 Gruppe 2
Spur 1 Spur 2 Spur 1 Spur 2Spur 3 Spur 4
DVD-video
(HINWEIS 1)
DVD-R
DVD-RW
(HINWEIS 2)
CD
CD-R
CD-RW
(HINWEIS 3)
Video-CD
Picture CD
Digital-Video
(MPEG2)
Töne
und
Bilder
Digital-Audio
MP3
WMA
(HINWEIS 4)
Digitales Bild
(JPEG)
JPEG
Kennzeichen (Logo)
Unterstützte
Discs
Aufgezeichnete
Signale
Disc
-Abmessung
12 cm
12 cm
12 cm
8 cm
8 cm
HINWEIS 1
: Mit Absicht von Disc-Produzenten funktionieren manche
DVD-Videodiscs nicht so wie in diesem Handbuch
beschrieben.
HINWEIS 2
: Wiedergabe von DVD-R- und DVD-RW-Discs
DVD-R- und DVD-RW-Discs von einem DVD-Recorder
können wiedergegeben werden.
Discs, deren Aufnahme nicht abgeschlossen wurde,
können nicht wiedergegeben werden.
Abhängig vom Disc-Aufnahmezustand könnten Discs nicht
akzeptiert oder nicht normal (mit mangelhafter Bild- oder
Soundqualität) wiedergegeben werden.
HINWEIS 3
: Manche CD-R-/CD-RW-Discs könnten wegen Kratzer oder
Flecken auf der Disc, der Aufnahmekondition oder der
Eigenschaften des Aufnahmegerätes nicht vereinbar sein.
HINWEIS 4
: Windows Media und das Windows-Logo sind
Warenzeichen oder eingetragene
Warenzeichen der Microsoft Corporation in
den USA und/oder in anderen Ländern.
12 cm
8 cm
(Singles)
DIGITAL VIDEO
Wiederzugebende Discs
Folgende Discs können auf dem DVD-Player
wiedergegeben werden:
Disc-Typen
[DVD-Video]
Die Daten auf einer DVD sind in Abschnitte unterteilt, die als
„Titel“ bezeichnet werden, welche wiederum in als „Kapitel“ bezeichnete Unterabschnitte unterteilt sind, dem jeweils eine Titeloder Kapitelnummer zugeordnet ist. Die Wiedergabebedingungen
sind auf manchen DVD-Video-Discs voreingestellt, und diese
Wiedergabebedingungen weisen Vorrang vor den
Anwenderoperationen an diesem Player auf. Falls eine von Ihnen
gewählte Funktion nicht wie gewünscht abläuft, dann sehen Sie
bitte in der mit der Disc mitgelieferten Anleitung nach.
[AUDIO-CD, VIDEO-CD]
Die auf einer Audio-CD oder Video-CD aufgezeichneten Daten
sind in als “Spur” bezeichnete Abschnitte unterteilt, von welchen
jeder eine Spurnummer aufweist.
Dieser Player entspricht dem PAL-Farbsystem. Sie können
auch im NTSC-System aufgenommene Discs über ein PALSystem-Fernsehgerät wiedergeben lassen.
Manche Discs enthalten Regionencodes wie unten gezeigt.
¡
¡
Die Nummer innerhalb des Symbols bezieht sich auf die
Region auf der Welt, und eine Disc, die mit einem spezifischen
Regionalcode codiert ist, kann nur auf einem DVD-Player mit
dem gleichen Regionalcode wiedergegeben werden.
[MP3, JPEG, WMA]
Die Daten auf einer MP3-Disc sind in Abschnitte unterteilt, die
"Gruppen" genannt werden und diese sind wiederum in
Unterabschnitte unterteilt, die mit "Spur" bezeichnet sind, von
denen jede Gruppe und jede Spur eine Nummer erhält.
ÜBER DIE PBC-FUNKTION DER VIDEO-CDs
Dieses Gerät entspricht der Version 1.1 und 2.0 des VideoCD-Standards mit PBC-Funktion.
Version 1.1 (ohne PBC-Funktion):Sie können die Wiedergabe
von Bildern und auch von Musik-CDs genießen.
Version 2.0 (mit PBC-Funktion): Während eine Video-CD mit
PBC-Funktion verwendet wird, erscheint „PBC“ auf dem
Bildschirm und auf dem Display.
Was ist PBC? "PBC" steht für Playback Control
(Wiedergabesteuerung). Sie können damit interaktive Software
unter Verwendung von Menübildschirmen wiedergeben.
Beachten Sie die mit der Video-CD mitgelieferte Anleitung.
HINWEIS:
Während Sie eine Video-CD mit PBC-Funktion wiedergeben,
können Sie keinen spezifischen Titel wählen und keine
Wiederholung einstellen.
Um Video-CDs ohne PBC-Funktion wiederzugeben, beachten
Sie bitte Seite 15.
–6–
GE
Page 36

MERKMALE
¡Dolby-Digital-Sound
Dieser Player kann Dolby Digital-Surroundsound mit
5.1 Kanälen verarbeiten, wenn er an einen DolbyDigital-Decoder angeschlossen ist.
¡ Standbild-/Zeitraffer-/Zeitlupe-/Einzelbild-
Wiedergabe
Verschiedene Wiedergabemodi stehen zur Verfügung,
einschließlich Standbilder, schneller Vorlauf/Rücklauf,
Zeitlupe und Einzelbildwiedergabe.
¡Zufallswiedergabe für Audio-CDs, MP3, JPEG
und WMA
Dieser Player kann die Reihenfolge der Titel verändern,
um diese in zufälliger Reihenfolge wiederzugeben.
¡Programmierte Wiedergabe für Audio-CDs, MP3,
JPEG und WMA
Sie können die Reihenfolge der Titel programmieren, um
diese in der gewünschten Reihenfolge wiederzugeben.
¡DVD-Menüs in einer gewünschten Sprache
Sie können die DVD-Menüs in einer gewünschten
Sprache anzeigen lassen, falls diese auf einer DVD
zur Verfügung steht.
¡Automatische Bereitschaft
Wenn das Bildschirmschonerprogramm 35 Minuten lang
aktiviert ist, wird das Gerät automatisch ausgeschaltet.
¡Untertitel in einer gewünschten Sprache
Sie können eine gewünschte Sprache für die
Anzeige der Untertitel wählen, wenn diese Sprache
auf einer Disc zur Verfügung steht.
¡Wahl eines Kamerawinkels
Sie können den gewünschten Kamerawinkel auswählen,
sofern eine Disc Sequenzen enthält, die aus unterschiedlichen Kamerawinkeln aufgezeichnet wurden.
¡Wahl der Audiosprache und des Soundmodus
Sie können die gewünschte Audiosprache und den
Soundmodus auswählen, sofern verschiedene
Sprachen und Modi auf der Disc vorhanden sind.
¡Kindersicherung
Sie können die Einstufung so einstellen, dass die
Wiedergabe von Discs, die für Kinder nicht geeignet
sind, nicht möglich ist.
¡Automatische Feststellung von Discs
Dieser Player erkennt automatisch, ob es sich bei der eingelegten Disc um eine DVD, Audio-CD, Video-CD oder eine
Disc im Format MP3, JPEG oder WMA handelt.
¡Wiedergabe einer MP3-Disc
Sie können sich auch an MP3-Dateien erfreuen, die
auf einer CD-R/RW-Disc aufgezeichnet sind.
¡Direktsuche
Sie können den gewünschten Titel, das gewünschte Kapitel
oder die gewünschte Spur während der Wiedergabe oder im
Stoppmodus mit den Zifferntasten suchen.
¡Bildschirmanzeige
Die Informationen über den gegenwärtigen Betrieb können
auf dem Bildschirm des Fernsehempfängers angezeigt
werden, wodurch Sie die aktivierten Funktionen (wie zum
Beispiel die programmierte Wiedergabe) unter
Verwendung der Fernbedienung auf dem Bildschirm des
Fernsehempfängers bestätigen können.
¡DTS (Digital Theater System)
Wenn Sie einen DTS-Decoder anschließen, können Sie
sich an dem von Digital Theater System Co. entwickelten
5.1-Kanal-Surroundsystem erfreuen, das den
Originalsound so originalgetreu wie möglich wiedergibt.
¡Suchlauf
Kapitelsuche: Eine Suche nach dem vom Anwender
Titelsuche: Eine Suche nach dem vom Benutzer
Spursuche: Eine Suche nach der vom Benutzer
Zeitpunktsuche:
¡Wiederholung
Kapitel:
Titel:
Spur:
Disc
(Audio-CD/Video-CD):
(MP3/JPEG/WMA):
A-B:
Gruppe: Eine Wiederholte Wiedergabe des
¡Zoom
Eine 2-fache oder 4-fache Vergrößerung auf dem
Bildschirm ist möglich.
¡Markierung
Der vom Anwender spezifizierte Abschnitt kann
abgerufen werden.
¡Fortsetzung der Wiedergabe
Der Anwender kann die Wiedergabe ab dem Teil fortsetzen, an dem die Wiedergabe gestoppt wurde,
auch wenn die Stromversorgung dazwischen ausgeschaltet wurde.
¡Komponentenvideo-Ausgangsbuchsen
Die Buchse befinden sich auf der Rückseite des
DVD-Players und werden dazu verwendet, qualitativ
hochwertige Videosignale über die
Komponentenvideo-Eingangsbuchsen zu einem
Fernseher zu versenden.
¡Dimmer
Die Helligkeit des Displays kann variiert werden.
¡Bitratenanzeige
¡
DRC (Dynamic range control = Dynamikbereichsregelung)
Sie können den Bereich der Soundlautstärke regeln.
¡MPEG-Sound
Dieser Player kann auch eine Disc handhaben, die
MPEG-Audio unterstützt, wenn der DVD-Player an
einen MPEG-Decoder angeschlossen ist.
¡Wiedergabe einer Disc im Videoaufnahmeformat
Dieses Gerät kann eine in Videoaufnahmeformat
aufgenommene Disc handhaben.
¡Anzeige eines JPEG-Bildes (HINWEISE 1)
Es können Kodak Picture CDs und im JPEG-Format gespeicherte Standbilder auf CD-R/RW wiedergegeben werden.
¡Wiedergabe von WMA-Dateien (HINWEISE 2)
Sie können sich an der Wiedergabe von WMADateien erfreuen, die auf CD-R/RW-Discs aufgenommen worden sind.
“Kodak Picture CD
Warenzeichen der Eastman Kodak Company.
“WMA” (Windows Media Audio) ist ein von
Microsoft® in den USA entwickelter neuer
Audiocode.
spezifizierten Kapitel ist möglich.
spezifizierten Titel ist möglich.
spezifizierten Spur ist möglich.
Eine Suche nach dem vom Benutzer
spezifizierten Zeitpunkt ist möglich.
Eine wiederholte Wiedergabe eines Kapitels
der wiederzugebenden Disc ist möglich.
Eine wiederholte Wiedergabe eines Titels
der wiederzugebenden Disc ist möglich.
Eine wiederholte Wiedergabe einer Spur
der wiederzugebenden Disc ist möglich.
Eine Wiederholte Wiedergabe ist möglich.
Eine Wiederholte Wiedergabe ist möglich.
Eine wiederholte Wiedergabe des vom
Anwender spezifizierten Abschnittes zwischen A und B ist möglich.
Ordners auf der wiederzugebenden
MP3/JPEG/WMA-Disc ist möglich.
COMPATIBLE
” ist ein
Deutsch
–7–
GE
Page 37

16
17
18
19
21
8
10
7
23
6
1
31
3
28
29
27
26
9
25
5
11
4
30
20
12
22
24
FUNKTIONSÜBERSICHT
1 2
3
4
5
61578
9
11
10
1214
13
BEDIENFELD
FERNBEDIENUNG
Die Tasten mit den eingekreisten Nummern können nur auf der Fernbedienung betätigt werden.
1. Ein-/Bereitschaftstaste (POWER ON/OFF) [Seite 15]
2. Disc-Ladefach
3. Öffnungs-/Schließtaste (OPEN/CLOSE) [Seite 15]
4. Wiedergabetaste (PLAY) [Seite 15]
5. Standbild-/Pausetaste (STILL/PAUSE) [Seite 15]
6. Stopptaste (STOP) [Seite 15]
7. Cursortasten [Seite 15]
Verwenden Sie diese Tasten für die Durchführung von Einstellungen,
während Sie die Anzeige auf einem Fernsehbildschirm beobachten.
8.
Menütaste (MENU) [Seite 15]
9. Einrichtungstaste (SETUP) [Seite 24]
10. Eingabetaste (ENTER) [Seite 15]
11. Taste für Sprung vorwärts/Schnellvorlauf G (SKIP
UP/FWD) [Seite 17]
Drücken Sie diese Taste, um bei der Wiedergabe zum Beginn des
nächsten Kapitels oder Titels zu springen. Halten Sie diese Taste
gedrückt, um die schnelle Vorwärtswiedergabe zu betätigen.
12. Taste für Sprung rückwärts/Schnellrücklauf H
(SKIP DOWN/REV) [Seite 17]
Drücken Sie diese Taste, um bei der Wiedergabe zum Beginn des
gegenwärtigen Kapitels oder Titels zu springen. Halten Sie diese Taste
gedrückt, um die schnelle Rückwärtswiedergabe zu betätigen.
13. VIRTUAL-Taste [Seite 23]
14. Abblendtaste (DIMMER) [Seite 15]
15. Display, Fenster für den Fernbedienungssensor
16. A-B-Wiederholungstaste (A-B REPEAT) [Seite 18]
17. Wiederholungstaste (REPEAT) [Seite 17]
18. Zufallswiedergabe-Taste (RANDOM) [Seiten 18, 20]
19. Zoomtaste (ZOOM) [Seite 16]
20. Löschtaste (CLEAR) [Seite 17]
21. Blickwinkeltaste (ANGLE) [Seite 22]
Drücken Sie diese Taste, um den Kamerawinkel zu ändern,
damit Sie die wiederzugebende Sequenz aus einem anderen
Blickwinkel betrachten können.
22. Rückkehrtaste (RETURN) [Seite 21]
23. Suchmodustaste (SEARCH-MODE) [Seite 17]
24. Taste für schnellen Suchlauf rückwärts h (FR
SEARCH) [Seite 16]
25. Taste für schnellen Suchlauf vorwärts g (FF
SEARCH) [Seite 16]
26. Untertiteltaste (SUBTITLE) [Seite 22]
Drücken Sie diese Taste, um eine gewünschte
Untertitelsprache auszuwählen.
27. Hauptmenütaste (TOP MENU) [Seite 15]
28. Displaytaste (DISPLAY) [Seite 20]
29. Audio-Taste (AUDIO) [Seite 21]
Drücken Sie diese Taste, um die gewünschte Audiosprache
oder den Soundmodus auszuwählen.
30. Zifferntasten [Seite 17]
31. Betriebsartentaste (MODE) [Seite 20]
–8–
–8–
GE
Page 38

POWER
Botón A-B REPEAT
Botón REPEAT
Botón MODE
Botón SUBTITLE
DVD
• Pulse este interruptor
para encender la unidad
o apagarla.
• Pulse este interruptor
para encender la unidad
o apagarla.
• Pulse este interruptor
para encender la unidad
o apagarla.
• Marca un segmento para
repetir entre los puntos A y B.
• Marca un segmento para
repetir entre los puntos A y B.
• Marca un segmento para
repetir entre los puntos A y B.
• Le permite repetir la
reproducción de un título
o capítulo.
• Le permite repetir la
reproducción de una pista
o disco.
• Le permite repetir la
reproducción de una pista
o disco.
Botón RANDOM
• Le permite mezclar el orden
de reproducción de las pistas.
Botón ZOOM
• Activación del sonido 3D
(Sistema Virtual surround).
• Le permite programar un
orden específico o una
reproducción aleatoria.
• Activación del sonido 3D
(Sistema Virtual surround).
• Ampliación de parte de
la imagen (x2/x4).
• Ampliación de parte de
la imagen (x2).
Botón ANGLE
• Accede a diferentes ángulos
de cámara en un disco.
• Accede a diferentes
subtítulos en un disco.
Botón AUDIO
Botón DISPLAY
• Accede diferentes funciones
en un disco.
• Selecciona los modos
ESTÉREO, L-CH o R-CH.
• Selecciona los modos
ESTÉREO, L-CH o R-CH.
• Muestra el modo de
disco actual.
• Muestra el modo de
disco actual.
• Muestra el modo de
disco actual.
• Búsqueda de capítulo,
título o tiempo.
• Regresa de forma rápida a
una ubicación del disco.
Botón OPEN/CLOSE
• Busca una pista o tiempo.
• Regresa de forma rápida a
una ubicación del disco.
• Busca una pista o tiempo.
• Regresa de forma rápida a
una ubicación del disco.
Botón SEARCH MODE
Botones NUMÉRICOS
Botón CLEAR
• Abre o cierra la bandeja
del disco.
• Abre o cierra la bandeja
del disco.
• Abre o cierra la bandeja
del disco.
• Selecciona directamente
un capítulo.
• Selecciona directamente
una pista.
• Selecciona directamente
una pista.
• Borra los marcadores. • Borra los marcadores.
• Borra los marcadores.
• Elimina el estado Nº en la
entrada del programa.
VCD CD
FUNKTIONSÜBERSICHT
Beschreibung der Fernbedienung
Die Tasten auf der Fernbedienung funktionieren unterschiedlich für DVD, VCD und CD.
Beachten Sie die folgende Tabelle zur richtigen Verwendung:
Deutsch
–9–
GE
Page 39

FUNKTIONSÜBERSICHT
DVD VCD CD
MENU-Taste
TOP MENU-Taste
ENTER-, CURSOR-Taste
RETURN-Taste
SEARCH-Tasten
• Zeigt das Menü einer Disc
an.
• Zeigt das Hauptmenü einer
Disc an.
• Bewegt den Cursor und
bestimmt dessen Position.
• Bewegt den Cursor und
bestimmt dessen Position.
SETUP-Taste
• Kehrt zu einem
vorhergehenden Menü
zurück.
• Kehrt zu einem vorherigen
Menü zurück.
• Zeigt das Setup-Menü des
DVD-Players an.
• Zeigt das Setup-Menü des
DVD-Players an.
• Zeigt das Setup-Menü des
DVD-Players an.
SKIP-Tasten
• Zum Überspringen von
Kapiteln.
•
Ermöglicht Ihnen den Suchlauf
vorwärts/rückwärts durch eine
Disc (x 2, x 8, x 50, x 100).
•
Ermöglicht Ihnen den Suchlauf
vorwärts/rückwärts durch eine
Disc (x 2, x 8, x 30).
STOP-Taste
PLAY-Taste
• Stoppt die Wiedergabe. • Stoppt die Wiedergabe.
• Startet die Wiedergabe der
Disc.
• Startet die Wiedergabe der
Disc.
• Stoppt die Wiedergabe.
• Startet die Wiedergabe der
Disc.
STILL/PAUSE-Taste
• Bewegt den Cursor und
bestimmt dessen Position.
•
Zum Überspringen von Titeln.
•
Zum Überspringen von Titeln.
• Ermöglicht Ihnen den
Suchlauf vorwärts/rückwärts
durch eine Disc (x 16).
• Schaltet die Wiedergabe der
Disc auf Pause.
• Schaltet die Wiedergabe um
ein Einzelbild weiter.
• Schaltet die Wiedergabe
der Disc auf Pause.
• Schaltet die Wiedergabe um
ein Einzelbild weiter.
• Schaltet die Wiedergabe der
Disc auf Pause.
Beschreibung der Fernbedienung
–10–
GE
Page 40

FUNKTIONSÜBERSICHT
Leuchtet, wenn die eingelegte
Disc wiedergegeben wird.
CD:
Leuchtet auf, wenn eine CD in das
Disc-Ladefach eingelegt ist.
VCD:
Leuchtet auf, wenn eine Video-CD
in das Disc-Ladefach eingelegt ist.
Leuchtet auf, wenn eine DVD in
das Disc-Ladefach eingelegt ist.
Leuchtet auf, wenn die
Wiedergabesteuerung aktiviert ist.
Leuchtet auf, wenn die
eingelegte Disc zu einer
Pause kommt.
Leuchtet, wenn die Kapitelwiederholungsfunktion
eingeschaltet ist.
Leuchtet, wenn die Spurwiederholungsfunktion
eingeschaltet ist.
Leuchtet, wenn die
A-B-Wiederholungsfunktion
eingeschaltet ist.
Leuchtet, wenn die
Wiederholungsfunktion
eingeschaltet ist.
Leuchtet, wenn die
Titelwiederholungsfunktion
eingeschaltet ist.
Zeigt an, wie lange ein gegenwärtiger Titel oder Track
wiedergegeben wurde. Wenn ein Kapitel oder eine
Spur umgeschaltet wurde, wird die Nummer eines
neuen Titels, eines neuen Kapitels oder einer neuen
Spur angezeigt.
Gerät eingeschaltet
Keine Disc eingelegt
Disc-Ladefach geöffnet
Disc-Ladefach geschlossen
Einlegen der Disc
Gerät ausgeschaltet
Display
Deutsch
Anzeigen während des Betriebs
Einsetzen der Batterien
1. Öffnen Sie den Batteriefachdeckel.
2. Setzen Sie zwei „AA“-Batterien (R6P)
mit der richtigen Polung ein.
3. Schließen Sie den Deckel.
HINWEISE
•
Verwenden Sie keine Alkali- und Mangan-Batterien gleichzeitig.
Verwenden Sie keine alten mit neuen Batterien gleichzeitig.
•
Vorsichtsmaßnahmen hinsichtlich der Batterien
•
Verwenden Sie in dieser Fernbedienung „AA“-Batterien
(R6P).
•
Tauschen Sie die Batterien etwa einmal jährlich gegen neue
Batterien aus. Dies ist jedoch von der Häufigkeit abhängig, mit
der Sie die Fernbedienung verwenden.
•
Falls die Fernbedienung selbst in der Nähe der Haupteinheit
nicht funktioniert, tauschen Sie die Batterien gegen neue aus,
selbst wenn das Jahr noch nicht vorüber ist.
Die beigefügten Batterien sind nur zur Überprüfung des
•
Betriebs vorgesehen. Tauschen Sie diese so bald wie möglich
gegen neue aus.
Wenn Sie die Batterien einlegen, beachten Sie sorgfältig die
•
richtige Ausrichtung der Polungen entsprechend der - und
-Markierungen im Batteriefach der Einheit.
Um Beschädigungen oder ein Austreten der
•
Batterieflüssigkeit zu vermeiden:
• Verwenden Sie keine alten und neuen Batterien gleichzeitig.
• Verwenden Sie keine zwei Batterien unterschiedlichen Typs
gleichzeitig.
• Schließen Sie die Batterien nicht kurz, zerlegen Sie sie
nicht, setzen Sie sie keine Wärme aus und entsorgen Sie sie
nicht in Feuer.
•
Entfernen Sie die Batterien, wenn Sie die Fernbedienung über
einen längeren Zeitraum nicht verwenden wollen.
•
Wenn die Batterien undicht wurden, wischen Sie die
Flüssigkeit sorgfältig aus dem Batteriefach und legen Sie
neue Batterien ein.
–11–
GE
Page 41

ANSCHLÜSSE
1
2354 6
AV1
Beschreibung - Rückseite
1. Digital-Ausgangsbuchsen (DIGITAL OUT):
Verwenden Sie entweder ein digitales Lichtleiter- oder ein Koaxialkabel, um einen kompatiblen Dolby Digital-Receiver
anzuschließen. Verwenden Sie die Buchsen auch zum Anschluss eines Dolby-Digital- oder DTS-Decoders.
2. Audio-Ausgangsbuchsen (AUDIO OUT):
Schließen Sie hier die Audio-Eingangsbuchsen eines AV-kompatiblen Fernsehers, eines Breitbildfernsehgerätes oder
einer Stereoanlage an.
3. Video-Ausgangsbuchsen (VIDEO OUT):
Schließen Sie hier mithilfe eines Videokabels die Video-Eingangsbuchsen Ihres AV-kompatiblen Fernsehers, Ihres
Breitbildfernsehgerätes oder Ihrer Stereoanlage an.
4. KOMPONENTENVIDEO-AUSGANGSBUCHSEN:
Verwenden Sie diese Buchsen, wenn Sie über ein Fernseher mit Komponentenvideo-Eingangsbuchsen verfügen. Diese
Buchsen liefern Cr-, Cb- und Y-Videosignale. Zusammen mit S-Video liefert Komponentenvideo die beste Bildqualität.
5. S-Video-Ausgangsbuchsen (S-VIDEO OUT):
Schließen Sie hier mithilfe eines Videokabels die S-Video-Buchse Ihres AV-kompatiblen Fernsehers oder
Breitbildfernsehgerätes für eine höhere Bildqualität an.
6. AV1-Buchse:
Schließen Sie diese Buchse an die 21-polige Scartbuchse eines Fernsehers an.
HINWEISE
• Stellen Sie sicher, dass Sie die AV1-Buchse und die Komponentenvideo-Buchsen für den Video-Ausgang nicht gleichzeitig
verwenden.
• Verwenden Sie bei der Änderung der VIDEO OUT-Einstellung (SCART oder COMPONENT) eine VIDEO-Buchse oder eine
S-VIDEO-Buchse, um den Fernseher anzuschließen. Wenn die Einstellung beispielsweise auf COMPONENT geändert
wird, während die AV1-Buchse für den Anschluss eines Fernsehers verwendet wird, wird unter Umständen ein gestörtes
Videosignal ausgegeben.
Hergestellt unter der Lizenz von Dolby
Laboratories. “Dolby” und das doppel-D-Symbol
sind Warenzeichen von Dolby Laboratories.
“DTS” und “DTS Digital Out” sind Warenzeichen
von Digital Theater Systems, Inc.
–12–
GE
Page 42

ANSCHLÜSSE
Der folgende Abschnitt stellt allgemein gebräuchliche Anschlüsse dar, wie sie für den Anschluss des DVDPlayers an einen Fernseher oder an andere AV-Komponenten verwendet werden.
Hinweise
¡Stellen Sie sicher, dass alle Komponenten des Systems ausgeschaltet sind, bevor Sie eine weitere
Komponente anschließen.
¡Beachten Sie bitte das Bedienungshandbuch Ihres Fernsehers, Ihrer Stereoanlage und irgendeiner anderen
Komponente, die an den DVD-Player angeschlossen werden sollen.
Anschluss an ein Audiosystem
Verfahren 1 Verfahren 2
Dolby-Digital-Decoder,
DTS-Decoder
oder
MPEG-Decoder
AUDIO
AudioEingangsbuchsen
Stereoanlage
Digitale AudioEingangsbuchsen
Deutsch
DVD
• Verfahren 1 DVD-Player + Stereoanlage
• Verfahren 2 DVD-Player + Dolby-Digital-Decoder, DTS-Decoder oder MPEG-Decoder
HINWEISE
• Schließen Sie bei der Ausgabe von Dolby-Digital-Audio Sie einen Dolby-Digital-Decoder an und schalten Sie Dolby Digital
im Einstellmodus für den Audioausgang ein. (Siehe Seite 25.)
• Schließen Sie bei der Ausgabe von DTS-Audio einen DTS-Decoder an und schalten Sie DTS im Einstellmodus für den
Audioausgang ein. (Siehe Seite 25.)
• Schließen Sie bei der Ausgabe von MPEG-Audio Sie einen MPEG-Decoder an und schalten Sie MPEG im Einstellmodus
für den Audioausgang ein. (Siehe Seite 25.)
• Wenn kein Dolby-Digital-Decoder, kein DTS-Decoder, oder kein MPEG-Decoder vorhanden ist, schalten Sie den
Audioausgang für Dolby Digital, DTS und MPEG im Einstellmodus aus. Die Wiedergabe einer DVD mit inkorrekten
Einstellungen könnte Verzerrungen verursachen und sogar die Lautsprecher beschädigen. (Siehe Seite 25)
• Die Audiosignale einer Disc im 5.1-Kanal-Dolby-Digital-Surround-Format können von einem MD- oder DAT-Deck nicht digital
aufgezeichnet werden.
• Schalten Sie nur beim Verfahren 1 Dolby Digital, DTS und MPEG im Einstellmodus für den Audioausgang aus. Die
Wiedergabe einer DVD mit inkorrekten Einstellungen könnte Verzerrungen verursachen und sogar die Lautsprecher beschädigen. (Beachten Sie Seite 25 zur Aktivierung von Dolby Digital, DTS und MPEG.)
Analoger
Audioausgang
Digitaler
Audioausgang
Hinweise zum Lichtleiterkabel (nicht mitgeliefert)
• Das optische Kabel (nicht mitgeliefert) könnte beschädigt werden, wenn es in scharfen Winkeln gebogen wird. Stellen Sie
deshalb sicher, dass Kabel bei der Aufbewahrung in einem Durchmesser von 15 cm oder mehr aufgerollt werden.
• Verwenden Sie Kabel, die 3 m lang oder kürzer sind.
• Führen Sie beim Anschluss die Stecker des Kabels fest in die Steckverbinder ein.
• Wenn ein Stecker Verschmutzungen aufweist, reinigen Sie ihn, bevor Sie ihn in den Steckverbinder einführen.
–13–
GE
Page 43

ANSCHLÜSSE
Anschluss an einen Fernseher (für Video)
Verfahren 1 Verfahren 2 Verfahren 3
Gute
Bildqualität
VIDEO IN
TV
Basis-Audio
LR
Bessere
Bildqualität
S-VIDEO IN
Beste Bildqualität
21-pin Scart jack
Videokabel
COMPONENT
VIDEO IN
CBYCR
AV-Kabel S-Video-
Kabel
Euro-Audio/Videokabel
oder
DVD
Analoger
Videoausgang
S-Video-Ausgang
AV1-Ausgang
Audioausgang
• Verfahren 1 DVD-Player + Fernseher mit Videoeingangsbuchse
• Verfahren 2 DVD-Player + Fernseher mit S-Video-Eingangsbuchse
• Verfahren 3 DVD-Player + Fernseher mit AV1-Buchse oder DVD-Player + Fernseher mit Komponentenvideo-Buchsen
HINWEISE
• Schließen Sie den DVD-Player direkt am Fernseher an. Wenn die Audio-/Video-Kabel am Videorecorder angeschlossen
sind, könnten die Bilder durch das Kopierschutzsystem verzerrt werden.
• S-Video-Ausgangsanschluss
TDie Videosignale werden in Farbsignale (C) und Helligkeitssignale (Y) aufgeteilt, um eine klareres Bild zu erzielen.
Falls der Fernseher mit einem S-Video-Eingangsanschluss ausgestattet ist, empfehlen wir Ihnen, den S-VideoAusgangsanschluss dieses Gerätes mit einem handelsüblichen S-Video-Anschlusskabel anzuschließen.
Komponentenvideo-
Ausgang
ANSCHLUSS AN EINEN FERNSEHER OHNE AUDIO-/VIDEO-EINGANGSBUCHSEN
Falls Ihr Fernseher nicht über Cinch-Audio- und -Video-Eingangsbuchsen verfügt, können Sie trotzdem diesen DVDPlayer an die 75 Ohm-Koaxial-Antennenanschlüss Ihres Fernsehers anschließen, indem Sie einen im Fachhandel
erhältlichen Stereo-Audio-/Video-HF-Modulator verwenden. Schließen Sie die Audio- und Video-Ausgänge des DVDPlayers an die Audio- und Video-Eingänge des HF-Modulators an, und verbinden Sie danach den Koaxial-Ausgang
des HF-Modulators (normalerweise mit „TO TV“ markiert) mit dem 75 Ohm-Koaxial-Antennenanschluss Ihres
Fernsehers. Für weitere Einzelheiten befolgen Sie die mit dem HF-Modulator mitgelieferte Anleitung.
Falls der 75 Ohm-Koaxial-Antennenanschluss Ihres Fernsehers bereits durch einen Antennen- oder Kabelanschluss
belegt ist, entfernen Sie dieses Kabel vom Antennenanschluss des Fernsehers und schließen Sie es am KoaxialAntennen-Eingangsanschluss des HF-Modulators an (normalerweise mit „ANT IN“ bezeichnet), und schließen Sie
danach den HF-Modulator gemäß obiger Beschreibung am Antennenanschluss Ihres Fernsehers an.
HINWEIS
• Die Bildqualität von DVD-Discs ist nicht so gut, wenn der DVD-Player über einen HF-Modulator am
Antenneneingang des Fernsehers angeschlossen ist.
–14–
GE
Page 44

WIEDERGABE EINER DISC
Generelle Wiedergabe
VCDCDDVD-V
Vorbereitung
•
Schalten Sie die Stromversorgung am Fernseher, am Verstärker und an
den anderen am DVD-Player angeschlossenen Komponenten ein.
•
Stellen Sie sicher, dass am Fernseher und am Audioempfänger
(handelsübliches Gerät) der richtige Kanal eingestellt ist.
1
Drücken Sie die POWER ON-Taste.
• Auf dem Display wird kurz “P-ON” angezeigt.
2
Drücken Sie die OPEN/CLOSE-Taste, um das
Disc-Ladefach zu öffnen.
3
Legen Sie die Disc mit der
beschrifteten Seite nach oben in
das Disc-Ladefach ein.
4
Drücken Sie die PLAY-Taste.
• Das Disc-Ladefach schließt sich automatisch und die
Wiedergabe startet ab dem ersten Kapitel oder ab der
ersten Spur der Disc. Sollte die Wiedergabe nicht
automatisch beginnen, drücken Sie die PLAY-Taste.
•
Wenn Sie eine DVD oder Video-CD mit aufgezeichnetem
Titelmenü wiedergeben lassen, erscheint dieses in der Regel
auf dem Bildschirm. Beachten Sie in diesem Fall den
Abschnitt “DISC-MENÜ” oder “TITEL-MENÜ”.
5
Drücken Sie die STOP-Taste,
um die Wiedergabe zu stoppen.
HINWEISE:
Oben rechts auf dem Bildschirm könnte
•
während der Bedienung ein “Verbotssymbol”
erscheinen, um davor zu warnen, dass beim
DVD-Player oder bei der Disc eine unerlaubte
Funktion aufgetreten ist.
•
Bei DVDs, auf denen manche Titel für Wiedergabe-Programmsignale
verwendet werden, könnte die Wiedergabe ab dem zweiten Titel
beginnen, oder solche Titel könnten übersprungen werden.
•
Die Bedienungsweise kann sich unterscheiden, wenn Sie DVDs mit
einem Disc-Menü oder Video-CDs mit PBC wiedergeben.
Einzelheiten dazu finden Sie in der mitgelieferten Anleitung der Disc.
PBC abbrechen (für die Wiedergabe einer Video-CD)
1
Legen Sie eine Video-CD ein. (Die Wiedergabe startet
automatisch.)
2
Drücken Sie die STOP-Taste.
3
Geben Sie die gewünschte Nummer mit den
Ziffern-Tasten ein.
4
PBC wird abgebrochen und die Wiedergabe der Video-CD startet.
Allgemeine Merkmale
DVDs oder Video-CDs können Menüs enthalten, damit Sie
auf der Disc navigieren und spezielle Funktionen abrufen
können. Drücken Sie die betreffende Zifferntaste oder verwenden Sie die Cursortasten ( L / K / B / s ), um Ihre
Auswahl auf dem DVD-Hauptmenü hervorzuheben, und
drücken Sie dann die ENTER-Taste zur Bestätigung.
HINWEIS:
• Wenn nicht anders angegeben, basieren alle
Bedienungen auf der Verwendung der Fernbedienung.
Manche Bedienungen können unter Verwendung der
Menüleiste auf dem Bildschirm durchgeführt werden.
Helligkeit des Displays
1
Drücken Sie die DIMMER-Taste auf dem
Bedienfeld, um die gewünschte Helligkeit des
Displays auszuwählen. (Hell, Dunkel oder AUS)
• Als Werkseinstellung wurde “Hell” gewählt.
HINWEIS:
•
Die Helligkeit des Displays kann mit dem SETUP-Menü
eingestellt werden. Einzelheiten dazu finden Sie auf Seite 24.
Pause
WMAMP3VCDCDDVD-V
1
Drücken Sie während der
Wiedergabe die STILL/PAUSE-Taste.
•
Die Wiedergabe schaltet auf Pause
und der Ton wird ausgeblendet.
2
Zur Fortsetzung der
F
Wiedergabe drücken Sie die PLAY-Taste.
Disc-Menüs
DVD-V
1
Drücken Sie die MENU-Taste.
• Das DVD-Hauptmenü erscheint.
2
Wenn ein Funktionsmerkmal nicht verfügbar ist,
könnte das Symbol auf dem Bildschirm
erscheinen.
3
Wenn auf der Disc ein Disc-Menü vorhanden ist,
erscheinen Audiosprache, Untertiteloptionen, Kapitel
des Titels und andere Optionen zur Auswahl.
4
Drücken Sie die Cursortasten ( L / K / B / s ), um
ein Menü-Element auszuwählen, und dann die
ENTER-Taste zur Bestätigung der Auswahl.
Titelmenü
DVD-V
1
Drücken Sie die TOP-MENU-Taste.
• Das Titelmenü erscheint.
2
Wenn ein Funktionsmerkmal nicht verfügbar ist, könnte das Symbol auf dem Bildschirm erscheinen.
3
Drücken Sie die Cursortasten ( L / K / B / s ), um
ein Menü-Element auszuwählen, und dann die
ENTER-Taste zur Bestätigung der Auswahl.
• Die Wiedergabe beginnt bei dem ausgewählten Titel.
VCD
Bei einer Video-CD, die ein Menü enthält, können Sie die
gewünschten Titel aus dem Menü auswählen.
1
Das Titelmenü erscheint.
2
Drücken Sie die Zifferntaste zur Auswahl aus dem Menü.
• Die Wiedergabe startet.
AUFRUF EINES MENÜBILDSCHIRMS WÄHREND DER WIEDERGABE
DVD-V
• Drücken Sie die MENU-Taste zum Abrufen des DVD-
Hauptmenüs.
• Drücken Sie die TOP-MENU-Taste zum Abrufen des
Titelmenüs.
HINWEIS:
• Die Inhalte der Menüs und die betreffenden
Menübedienungen können sich von Disc zu Disc unterscheiden. Einzelheiten dazu finden Sie in der der Disc
beigefügten Anleitung.
Deutsch
–15–
GE
Page 45

WIEDERGABE EINER DISC
Einzelbildwiedergabe
1
Drücken Sie während der
Wiedergabe die STILL/PAUSE-
Taste.
•
Die Wiedergabe schaltet auf Pause
und der Ton wird ausgeblendet.
2
Die Disc schaltet bei jedem Drücken der
STILL/PAUSE-Taste um ein Einzelbild weiter.
3
Zum Beenden der Einzelbildwiedergabe drücken
Sie die PLAY-Taste.
Fortsetzung
1
Drücken Sie während der
Wiedergabe die STOP-Taste.
• Die Fortsetzungsmeldung
erscheint auf dem Bildschirm.
2
Drücken Sie die PLAY-Taste, und die Wiedergabe
startet ab der Stelle, an der die Wiedergabe
gestoppt wurde.
• Um die Fortsetzung abzubrechen, drücken Sie zweimal
die STOP-Taste.
HINWEISE:
• Die Wiedergabefortsetzung benötigt im Vergleich zur
normalen Wiedergabe etwas länger zum Starten.
• Manche Video-CDs mit PBC-Funktionen setzen die
Wiedergabe ab dem Beginn der Spur fort.
• Die Fortsetzungs-Informationen bleiben selbst dann
eingeschaltet, wenn die Stromversorgung ausgeschaltet wird.
FORTFAHREN
'PLAY' drücken, um von hier mit der
Wiedergabe fortzufahren.
Erst 'STOP' und dann 'PLAY' drücken,
um mit der Wiedergabe von vorn zu
beginnen.
Zeitlupe vorwärts/Zeitlupe rückwärts
VCDDVD-V
1
F
VCDCDDVD-V
Drücken Sie während der Wiedergabe die
STILL/PAUSE-Taste.
2
Drücken Sie die Taste ggoder hh.
•
Die Zeitlupe beginnt und der Ton wird ausgeblendet.
3
Drücken Sie während der
Wiedergabe mehrmals die Taste
gg
oder hhzur Auswahl der
gewünschten Geschwindigkeit:
1/16, 1/8, 1/2 der normalen
Wiedergabegeschwindigkeit.
•
Wenn Sie die SKIP-Taste H oder
die Taste hhauf dem Bedienfeld
verwenden, halten Sie die Taste
länger als 1,5 Sekunden gedrückt
(je länger Sie die Taste gedrückt
halten, desto langsamer wird die Geschwindigkeit). Lassen
Sie die Taste los, wenn Sie die gewünschte Geschwindigkeit
erreicht haben.
4
Zur Rückkehr zur normalen Wiedergabe drücken Sie
die PLAY-Taste.
DVD-V
D
Taste
1/16
1/8
1/2
Zoom
VCDDVD-V
Mit der Zoomfunktion können Sie das Videobild vergrößern
und sich durch das vergrößerte Bild bewegen.
1
Drücken Sie während der Wiedergabe die ZOOM-Taste.
• Die Wiedergabe wird fortgesetzt.
2
Drücken Sie mehrmals die ZOOM-Taste, um den gewünschten Zoom-Faktor auszuwählen: x 2, x 4 oder AUS.
[x2] [x4]
Schnellvorlauf/Schnellrücklauf
WMAMP3VCDCDDVD-V
1
Drücken Sie während der Wiedergabe mehrmals die
Taste ggoder hhzur Auswahl der gewünschten
Wiedergabegeschwindigkeit in Vorwärts- oder
Rückwärtsrichtung: x 2, x 8, x 50, x 100. (Bei VideoCDs liegen die Geschwindigkeiten bei x 2, x 8 oder
x 30.)
• Wenn Sie die SKIP-Taste GGoder die Taste ggauf
dem Bedienfeld verwenden, halten Sie die Taste länger
als 1,5 Sekunden gedrückt (je länger Sie die Taste
gedrückt halten, desto höher wird die Geschwindigkeit).
Wenn Sie die gewünschte Geschwindigkeit erreicht
haben, lassen Sie die Taste los.
• Bei Audio-CD ist die Geschwindigkeit auf x 16 fixiert.
•
Bei MP3 und WMA ist die Geschwindigkeit auf x 8 fixiert.
Taste
Taste
2
2
Zur Rückkehr zur normalen Wiedergabe drücken
Sie die PLAY-Taste.
8
50
100
HINWEISE:
–16–
3
Drücken Sie die Cursortasten ( L / K / B / s ), um das
vergrößerte Bild über den Bildschirm zu bewegen.
4
Um den Zoom-Modus zu beenden, drücken Sie die
ZOOM-Taste bis auf AUS.
• Die Zoomfunktion funktioniert nicht, während das DiscMenü angezeigt wird.
•
Der Zoomfaktor x 4 ist auf manchen Discs nicht verfügbar.
•
Bei Video-CDs ist der Zoom fest auf x 2 eingestellt.
GE
Page 46

VCD
( )
ohne
PBC-Funktion
VCD
( )
ohne
PBC-Funktion
WIEDERGABE EINER DISC
VCD
( )
ohne
PBC-Funktion
Titelsuche
CD
Es gibt drei Wege, um mit der Wiedergabe einer Audio-CD, VideoCD, MP3 und WMA bei einer spezifischen Spur zu beginnen.
Durch die Verwendung der Zifferntasten
1
Drücken Sie Zifferntasten zur Eingabe der gewünschten Spurnummer.
• Die Wiedergabe beginnt bei der ausgewählten Spur.
• Für einstellige Spurnummern (1-9) drücken Sie eine
einzelne Zahl (z. B. 3 für die Spur 3).
Zur Wiedergabe von Spur 26 drücken Sie auf den
•
Zifferntasten +10, 2 und 6.
Durch die Verwendung der SEARCH-MODE-Taste
1
Drücken Sie die SEARCH-MODE-Taste.
• Die Spursuche-Anzeige erscheint.
2
Wählen Sie innerhalb von 30 Sekunden mit den
Zifferntasten die gewünschte Spurnummer. Für einstellige Zahlen drücken Sie zuerst die "0".
• Die Wiedergabe beginnt ab der ausgewählten Spur.
Durch die Verwendung der SKIP-Tasten
Um zur nächsten Spur weiterzuschalten, drücken Sie während der
Wiedergabe die SKIP-Taste GG. Drücken Sie die Taste mehrmals, um
nachfolgende Spuren zu überspringen. Drücken Sie die SKIP-Taste
HH
, um zum Beginn der gegenwärtigen Spur zurückzuspringen.
Drücken Sie die Taste mehrmals, um zu den vorherigen Spuren
zu springen.
•
Auf dem DVD-Display wird kurz die Spurnummer angezeigt.
•
Falls irgendeine SKIP-Taste gedrückt wird, während die
Wiedergabe auf Pause geschaltet ist, bleibt die Wiedergabe
nach dem Sprung zur nächsten Spur unterbrochen.
HINWEIS:
• Die SKIP-Tasten
wenn die Wiedergabe gestoppt wurde.
HG
stehen nicht zur Verfügung,
(Audio-CD/Video-CD)
WMAMP3
__/ 15
HH GG
Titel-/Kapitelsuche
DVD-V
Durch die Verwendung der SEARCH-MODE-Tasten
1
Drücken Sie während der
Wiedergabe einmal die SEARCH-
MODE-Taste zur Kapitelsuche und
zweimal zur Titelsuche.
2
Geben Sie die gewünschte Kapitel-/Titelnummer
mit den Zifferntasten ein.
Durch die Verwendung der SKIP-Tasten
Um zum nächsten Kapitel weiterzuschalten, drücken Sie
während der Wiedergabe die SKIP-Taste GG. Drücken Sie die
Taste mehrmals, um nachfolgende Kapitel zu überspringen.
Drücken Sie die SKIP-Taste HH, um zum Beginn des gegenwärtigen Kapitels zurückzuspringen. Drücken Sie die Taste
mehrmals, um zu den vorherigen Kapiteln zu springen.
/2
HH GG
Zeitpunktsuche
CDDVD-V
1
Drücken Sie während der Wiedergabe dreimal die
SEARCH-MODE-Taste (Audio-CD/Video-CD: zweimal),
um die Zeitpunktsuche auf dem Bildschirm anzeigen zu
lassen.
2
Wählen Sie innerhalb von 30
_:__:__ 1:23:45
Sekunden mit den Zifferntasten den
gewünschten Zeitpunkt auf der Disc.
• Die Wiedergabe beginnt ab dem
ausgewählten Zeitpunkt.
3
Drücken Sie zum Löschen einer
Fehleingabe die CLEAR-Taste.
Wiederholung
• Die REPEAT-Taste steht nur während der Wiedergabe
zur Verfügung.
TITEL-/KAPITELWIEDERHOLUNG
DVD-V
Um die Wiederholungsfunktion zu aktivieren, drücken Sie
während der Wiedergabe die REPEAT-Taste.
• Der Wiederholungsmodus ändert sich bei jedem Drücken
der Taste wie unten dargestellt:
KAPITEL TITELAUS
(Wiederholung
aus)
(gegenwärtiges Kapitel
wiederholen)
(gegenwärtigen
Titel wiederholen)
HINWEISE:
• Bei manchen Szenen steht die Titel/Kapitelwiederholung nicht zur Verfügung).
• Die WIEDERHOLUNGS-Einstellung wird beim
Umschalten auf einen anderen Titel oder ein anderes
Kapitel gelöscht.
TITELWIEDERHOLUNG
CD
Um die Wiederholungsfunktion zu aktivieren, drücken Sie
während der Wiedergabe die REPEAT-Taste.
• Der Wiederholungsmodus ändert sich bei jedem Drücken
der Taste wie unten dargestellt:
TRACK ALLEAUS
(Wiederholung
aus)
(gegenwärtige Spur
wiederholen)
(gesamte Disc
wiederholen)
HINWEISE:
•
Die WIEDERHOLUNGS-Einstellung wird beim Umschalten zu
einer anderen Spur gelöscht.
Die Wiedergabewiederholung funktioniert nicht während der A-B-
•
Wiedergabewiederholung.
•
Die Wiedergabewiederholung steht während der Wiedergabe
einer Video-CD mit der PBC-Funktion nicht zur Verfügung.
WMAJPEGMP3
GRUPPE
(gesamten Ordner
wiederholen)
(gesamte Disc
wiederholen)
(Wiederhol
ung aus)
SPUR ALLEAUS
(gegenwärtige
Spur wiederholen)
Deutsch
–17–
GE
Page 47

WIEDERGABE EINER DISC
A-B-WIEDERHOLUNG
VCDCDDVD-V
1
Drücken Sie die A-B REPEAT-Taste
bei dem gewählten Startpunkt.
• A- erscheint kurz auf dem
Bildschirm.
2
Drücken Sie nochmals die A-B
REPEAT-Taste bei dem
gewählten Endpunkt.
• A-B erscheint kurz auf dem
Bildschirm und die
Wiederholungsfolge beginnt.
3
Um die Folge zu verlassen, drücken Sie die A-B REPEAT-Taste.
HINWEISE:
•
Der A-B-Wiederholungsabschnitt kann nur auf dem gegenwärtigen Titel (auf DVDs) oder der gegenwärtigen Spur (bei
Audio-CDs/Video-CDs) eingestellt werden.
•
Bei manchen Szenen auf DVDs steht die A-B-Wiederholung
nicht zur Verfügung.
Um den eingestellten A-Punkt zu löschen, drücken Sie die
•
CLEAR-Taste.
•
Die A-B-Wiedergabewiederholung funktioniert nicht während
der Titel-, Spur- oder Gesamt-Wiederholung.
A -
A - B
AUS
Programm (CD)
CD
Sie können die Reihenfolge, mit der die Titel wiedergegeben
werden, bestimmen.
1
Drücken Sie im Stopp-Modus die MODE-Taste.
• Der PROGRAMM-Bildschirm
erscheint.
2
Drücken Sie die Cursortasten
(▲ oder ▼), um eine Spur
auszuwählen, und dann die
ENTER-Taste.
• Drücken Sie die CLEAR-Taste zum Löschen des zuletzt eingegebenen Programms.
3
Drücken Sie die PLAY-Taste zur Wiedergabe der
programmierten Spuren.
HINWEISE:
• Während das Programm wiedergegeben wird, funktioniert
die STOP-Taste wie folgt:
•
Wenn Sie einmal die STOP-Taste und dann nochmals die
PLAY-Taste drücken, startet Wiedergabe wieder dort, wo die
STOP-Taste gedrückt wurde. (Das Programm wird fortgesetzt.)
•
Wenn Sie zweimal die STOP-Taste und dann nochmals die
PLAY-Taste drücken, startet die Wiedergabe wieder auf die
normale Weise ab der Spur. (Das Programm wird gelöscht.)
• Es können bis zu 99 Programme eingegeben werden.
• Falls Sie die gegenwärtige Spur im Programm wiederholen
wollen, drücken Sie mehrmals die REPEAT-Taste, bis
SPUR während der Wiedergabe erscheint. Falls Sie das
gesamte Programm wiederholen wollen, drücken Sie
mehrmals die REPEAT-Taste, bis ALLE während der
Wiedergabe erscheint.
• Informationen über die programmierte Wiedergabe von
MP3, WMA und JPEG finden Sie auf Seite 21.
PROGRAMM
CD [AUDIO] GESAMT 0:03:30
1 3:30
1 3:30
2 4:30
3 5:00
4 3:10
5 5:10
6 1:30
7 2:30
1/1
1/2
1 3:30
Zufallswiedergabe (CD)
CD
Damit wird die Wiedergabereihenfolge der Spuren anstelle
der Wiedergabe in der Originalreihenfolge gemischt.
1
Drücken Sie im Stopp-Modus
zweimal die RANDOM- oder
MODE-Taste.
•
Der ZUFÄLLIG-Bildschirm
erscheint.
2
Drücken Sie die PLAY-Taste, um die
Zufallswiedergabe zu starten.
HINWEISE:
• Falls Sie die gegenwärtigen Spur in der Zufallsauswahl
wiederholen wollen, drücken Sie mehrmals die REPEAT-
Taste, bis SPUR während der Wiedergabe erscheint.
Falls Sie die gesamte Zufallsauswahl wiederholen wollen,
drücken Sie mehrmals die REPEAT-Taste, bis ALLE
während der Wiedergabe erscheint.
• Informationen über Zufallswiedergabe von MP3, WMA und
JPEG finden Sie auf Seite 20.
ZUFÄLLIG
CD [AUDIO] GESAMT 0:45:55
ZUFÄLLSPROGRAMM
--KEINE ANZEIGE--
–18–
GE
Page 48

WIEDERGABE EINER DISC
MP3 / JPEG / WMA-Wiedergabe
WMAJPEGMP3
Dieser DVD-Player kann Bilder und Töne von Daten im MP3-,
JPEG- und WMA-Format auf CD-ROM-, CD-R- und CD-RWDiscs reproduzieren.
Der DVD-Player kann auch auf einer Kodak Picture CD gespeicherte JPEG-Dateien wiedergeben.
Der Benutzer kann sich an der Abbildung der Bilder auf seinem
Fernseher durch die Reproduktion von Picture CDs erfreuen.
* Picture CD ist ein Service, der die mit einer konventionellen
Kamera aufgenommenen Bilder in Digitaldaten konvertiert
und die Daten auf einer CD aufzeichnet.
Einzelheiten über Picture CD erfahren Sie in einem Geschäft,
das diesen Entwicklungsservice von Kodak Inc. anbietet.
Informationen über MP3-, JPEG- und WMA-Discs
• Eine Datei mit der Erweiterung “.mp3” (MP3) wird “MP3-
Datei” genannt.
• Eine Datei mit der Erweiterung “.jpg” (JPG) oder “.jpeg
(JPEG)” wird “JPEG-Datei” genannt.
Der DVD-Player kann Bilddateien handhaben, die der
Exif*-Spezifikation entsprechen.
* Dieses Exif-Dateiformat (Exchangeable Image File) wurde
von der JEIDA, einem Verband der japanischen
Elektronikindustrie eingeführt.
• Eine Datei mit der Erweiterung “.wma” (WMA) wird “WMA-
Datei” genannt.
• Dateien mit anderen Erweiterungen als “.mp3 (MP3)”,
“.jpg (JPG)”, “.jpeg (JPEG)” und “.wma (WMA)” werden im
MP3-, JPEG- oder WMA-Menü nicht aufgeführt.
• Falls die Datei nicht im MP3-, JPEG- oder WMA-Format
aufgenommen wurde, könnten selbst dann Störungen
erzeugt werden, wenn die Dateierweiterung “.mp3 (MP3)”,
“.jpg (JPG)”, “.jpeg (JPEG)” oder “.wma (WMA)” ist.
Wenn eine Disc mit MP3-, JPEG- oder WMA-Dateien in den DVDPlayer eingelegt wird, erscheint das Titelmenü auf dem Bildschirm
und die Anzahl der Titel wird auf dem Bedienfeld angezeigt.
1
Platzieren Sie die Disc mit der beschrifteten Seite
nach oben auf dem Disc-Ladefach.
Bei Discs, auf denen MP3-, JPEG- oder WMA-Titel
aufgezeichnet wurden:
• erscheint ein MP3-, JPEG- oder WMA-Titelmenü;
• wird über dem Gruppennamen das Symbol “ ” angezeigt;
• wird über MP3-Dateien das Symbol “ ” angezeigt;
• wird über JPEG-Dateien das Symbol “ ” angezeigt;
• wird über WMA-Dateien das Symbol “ ” angezeigt;
•
erscheint, wenn sich das Bild über die Grenzen des
Bildschirms ausdehnt, ein Pfeil nach unten “L”, der anzeigt,
dass der Benutzer den weiteren Teil des Bildes auf der nächsten Seite betrachten kann. Wenn ein Pfeil nach oben “K”
erscheint, wird damit angezeigt, dass der Benutzer einen
weiteren Teil auf der vorherigen Seite betrachten kann. Die
gegenwärtige Seitennummer und die Anzahl der Seiten wird
rechts neben dem Pfeil nach unten “L” angezeigt.
• kann das System bis zu 255 Gruppen (oder Ordner) und
bis zu 256 Titel (Tracks) erkennen. (Dies bezieht sich auf
den Fall, wenn MP3-, JPEG- und WMA-Dateien gemischt
aufgezeichnet wurden.)
• wird, falls in einer Gruppe keine MP3-, JPEG- oder WMA-
Dateien gefunden werden, die Gruppe nicht angezeigt;
• kann der DVD-Player Daten, die entsprechend ISO 9660
Level 1, Level 2 oder Joliet auf der Disc aufgezeichnet
wurden, reproduzieren;
• kann der DVD-Player zudem Discs handhaben, deren
Daten in einer Multisession aufgezeichnet wurden.
• Weitere Einzelheiten über Aufzeichnungssysteme finden Sie
im Bedienungshandbuch des CD-R-/CD-RW-Laufwerks
oder der Brennersoftware.
Anwendbare MP3-Datei Bemerkungen
•
Abtastfrequenz
Ty p
Anwendbare JPEG-Datei Bemerkungen
Bildgröße
Anwendbare WMA-Datei Bemerkungen
Abtastfrequenz
Bitrate 48–192 kbps
Ty p
44,1 kHz
48 kHz
MPEG1
Audio-Layer 3
Obere Grenze:
6300 x 5100 Punkte
Untere Grenze:
32 x 32 Punkte
44,1 kHz
48 kHz
WMA-Version 8
Es ist verboten, MP3-Sound auf
einem digitalen Gerät aufzuzeichnen, wenn die Verbindung
digital ausgeführt wird.
Empfohlen werden MP3-Dateien,
•
die mit einer fixierten Bitrate von
112 kbps oder höher aufgezeichnet wurden.
•
Ein JPEG-Bild, das über den
Bildschirm hinausreicht, wird
reduziert, so dass es innerhalb des
Bildschirms angezeigt werden kann.
Diese Frequenzen sind nur für die
•
WMA-Version 8, und nicht für die
WMA-Version 9 anwendbar.
Stellen Sie sicher, dass die
•
Copyright-Funktion abgeschaltet ist, wenn eine WMA-Disc
vorbereitet wird.
Wenn der Benutzer versucht,
•
eine nicht zu reproduzierende
Datei z. B. mit Kopierschutz zu
starten, wird ein Verbotssymbol
angezeigt.
Bei Discs mit JPEG oder Kodak Picture CDs:
• Es erscheint ein JPEG- oder ein Kodak Picture CD-Menü.
•
Falls nicht alle Menü-Elemente innerhalb der
Bildschirmgrenzen angezeigt werden können, erscheint ein
Anforderungssymbol “G” unten rechts auf dem Bildschirm
und zeigt an, dass der Anwender die restlichen MenüElemente auf der nächsten Seite betrachten kann. Wenn ein
anderes Anforderungssymbol “H” erscheint, wird damit
angezeigt, dass der Benutzer andere Menü-Elemente auf der
vorherigen Seite anzeigen lassen kann. Die Titelnummer des
gegenwärtig hervorgehobenen Menü-Elements und die Anzahl
der Titel werden unten in der Mitte des Bildschirms angezeigt.
•
Wenn unten rechts ein Anforderungssymbol “G” angezeigt wird,
verwenden Sie bitte die SKIP-Taste G, um die nächste Seite
anzeigen zu lassen. Wenn unten links ein anderes
Anforderungssymbol “H” angezeigt wird, verwenden Sie bitte
die SKIP-Taste H, um die vorherige Seite anzeigen zu lassen.
• Es kann etwas dauern, bis alle Menü-Elemente auf dem
Menübildschirm angezeigt werden.
1
Für JPEG drücken Sie die Cursortasten (K/L),
oder für Kodak Picture CDs die Cursortasten (
B / K / L), um eine gewünschte Gruppe oder den
gewünschten Titel auszuwählen, und drücken Sie
dann die PLAY- oder ENTER-Taste.
•
Falls eine MP3- oder WMA-Datei ausgewählt wurde, startet die
Wiedergabe von der ausgewählten Spur aus und setzt sich dann
mit der nächsten Spur in der Reihenfolge fort.
•
Falls eine JPEG- oder Kodak Picture CD-Datei ausgewählt
wurde, wird zunächst von der ausgewählten Spur und dann von
der nächsten in der Reihenfolge ein Bild wiedergegeben.
Eine Spur wird fünf Sekunden lang angezeigt, und dann wird die
nächste Spur angezeigt.
Durch jedes Drücken der Cursor-Taste B wird das Bild während
der Anzeige um 90 Grad im Uhrzeigersinn gedreht.
Durch jedes Drücken der Cursor-Taste s wird das Bild während
der Anzeige um 90 Grad gegen den Uhrzeigersinn gedreht.
•
Wenn eine Gruppe ausgewählt wurde, drücken Sie die
Cursortasten K/L, um die gewünschte Gruppe auszuwählen,
und dann die PLAY- oder ENTER-Taste zur Auswahl einer Spur.
Wenn Sie die PLAY- oder ENTER-Taste drücken, startet die
Wiedergabe des Bildes.
–19–
Deutsch
s /
GE
Page 49

WIEDERGABE EINER DISC
Hinweise zu MP3, JPEG und WMA:
• Wählen Sie “WIEDERGABE” und drücken Sie die PLAY-
Taste zur Wiedergabe der Disc von oben in der
Reihenfolge der Spuren und Gruppen.
• Die neunte oder tiefere Hierarchie kann nicht
wiedergegeben werden.
Der Name der Gruppe und der Spur kann bis zu 25 Zeichen
•
lang angezeigt werden. Alphabete, unterstrichene Ziffern,
Sterne oder Leerzeichen könnten nicht angezeigt werden.
Unerkannte Zeichen werden durch Sterne ersetzt.
•
Nicht wiederzugebende Gruppen oder Spuren können je
nach Aufnahmebedingungen angezeigt werden.
•
Falls während der Anzeige einer Dateiliste die TOP MENU-Taste
gedrückt wird, wird “ERSTE WIEDERGABE” hervorgehoben.
2
Um die Wiedergabe zu stoppen, drücken Sie die
STOP-Taste.
Hinweise zu Kodak Picture CDs:
• Beim Drücken der STOP-Taste wird die zuvor angezeigte
Spur auf dem Menübildschirm hervorgehoben.
Wenn Sie nochmals die STOP-Taste oder die TOP MENUTaste drücken, zeigt der Menübildschirm die Titel 1 bis 6
an, wobei der Titel 1 hervorgehoben wird.
Dia-Show-Modus (JPEG)
JPEG
Sie können während der Wiedergabe auf den Dia-ShowModus umschalten.
1
Drücken Sie während der Wiedergabe die MODE-Taste.
• Der Dia-Show-Bildschirm erscheint.
• Beim Stoppen der Wiedergabe, im DateilistenBildschirm oder im Bild-CD-Menübildschirm kann nicht
auf den Dia-Show-Modus umgeschaltet werden.
2
Drücken Sie die ENTER-Taste.
• Der Dia-Show-Bildschirm ändert sich.
1 Das Gesamtbild erscheint sofort.
2 Das Bild wird langsam ein- und ausgeblendet.
3
Drücken Sie zum Beenden die MODE-Taste.
Spurauswahl
WMAJPEGMP3
1
Drücken Sie während der Wiedergabe die
SEARCH-MODE-Taste.
• Die DATEILISTE erscheint.
2
Wählen Sie mit den Cursortasten (L/K/B/s) den
gewünschten Titel aus.
• Drücken Sie die Taste B, wenn Sie zur nächsten
Hierarchie gelangen wollen.
s
• Drücken Sie die Taste
Hierarchie gelangen wollen.
3
Um die Wiedergabe zu starten, drücken Sie die
, wenn Sie zur vorherigen
PLAY-Taste.
HINWEISE:
• Drücken Sie zum Beenden die SEARCH-MODE-Taste.
• Manche Auswahloptionen könnten zusätzliche Zeit zur
Erkennung benötigen.
• Während der Wiedergabe kann ein gewünschter Titel
direkt gesucht werden. Geben Sie lediglich die SPURNummer mit den Zifferntasten ein.
• Sollte die eingegebene SPUR-Nummer nicht vorhanden
sein, erscheint das “Deaktiviert”-Symbol, und der
Direktsuche-Modus wird abgebrochen.
• Die Wiedergabe kann nicht ab einem gewünschten
Zeitpunkt gestartet werden.
• Das Drücken der SKIP-Taste G oder H führt zu einer
Wiedergabe der nächsten oder vorherigen Datei.
• Bei Picture CD funktioniert die SEARCH-Taste nicht.
Zufallswiedergabe (MP3/JPEG/WMA)
WMAJPEGMP3
1
Drücken Sie die RANDOM-
oder MODE-Taste, während die
Wiedergabe gestoppt ist.
ZUFÄLLIG
CD [DATEN] GESAMT 0:45:55
ZUFÄLLSPROGRAMM
--KEINE ANZEIGE--
Bildschirm-Informationen (OSD)
WMAJPEGMP3
Sie können während der Wiedergabe jede Datei überprüfen.
1
Drücken Sie die DISPLAY-Taste.
• Der Name der gegenwärtig
wiederzugebenden Datei wird
angezeigt.
2
Drücken Sie nochmals die DISPLAY-Taste, um die
Spurnummer, die abgelaufene Zeit, den
Wiederholungsstatus und den Wiedergabestatus
oben am Bildschirm anzeigen zu lassen.
• wird angezeigt, wenn die
Wiederholungswiedergabe ausgewählt wurde.
zeigt eine Spurwiederholung an.
T-
G - zeigt eine Gruppen-(Ordner)-
Wiederholung an.
A - zeigt eine Disc-Wiederholung an.
3
Drücken Sie zum Beenden nochmals die DISPLAY-Taste.
• Während der programmierten oder der
Zufallswiedergabe wird, wenn Sie die DISPLAY-Taste
drücken, jeder Wiedergabestatus angezeigt. Drücken
Sie zum Beenden nochmals die DISPLAY-Taste.
TRACK 01
<Beispiel: MP3>
TR 1/36 0:01:15
–20–
2
Drücken Sie die PLAY-Taste zur Wiedergabe der
Spuren in Zufallsreihenfolge.
• Die Zufallswiedergabe startet.
• Auf einer Disc, die gemischt MP3-, JPEG- und WMADateien enthält, wird die Zufallswiedergabe dieser
Dateien durchgeführt.
GE
Page 50

WIEDERGABE EINER DISC
1.ENG
DolbyD MULTI-KANAL 48k/3
2.FRE
DolbyD MULTI-KANAL 48k/3
3.JPN
DolbyD MULTI-KANAL 48k/3
HELLO
Bon jour
Programm (MP3/JPEG/WMA)
WMAJPEGMP3
Damit können Sie die Wiedergabe einer MP3-Disc in der von
Ihnen gewünschten Reihenfolge programmieren.
1
Drücken Sie, während die
Wiedergabe gestoppt ist, die
MODE-Taste.
• Der PROGRAMM-Bildschirm
erscheint.
2
Drücken Sie zur Auswahl einer
Gruppe die Tasten K oder L
und dann die ENTER-Taste.
• Ein Spur-Auswahlbildschirm
erscheint.
3
Drücken Sie zur Auswahl einer
Spur die Tasten K oder L, und
dann die ENTER-Taste, um diese
Spur im Programm zu speichern.
• Zum Löschen einer Fehleingabe
drücken Sie die CLEAR-Taste.
• Der programmierte Titel wird auf der rechten
Bildschirmseite angezeigt.
• Falls das gesamte Programm nicht auf einmal am
Bildschirm angezeigt werden kann, erscheint “
Umschalten auf die nächste Seite.
• Das Drücken der Taste
eine Stufe höheren Ebene in der Hierarchie an.
4
Um die programmierte Wiedergabe zu starten,
s zeigt die Ordnerliste der um
drücken Sie die PLAY-Taste.
• Die programmierte Wiedergabe startet.
HINWEISE:
• Um den zuletzt eingegebenen Programmteil zu
löschen, drücken Sie die CLEAR-Taste.
• Drücken Sie die RETURN-Taste, und der STOPBildschirm zeigt den Programminhalt des Speichers an.
• Um die programmierte Wiedergabe zu stoppen, drücken Sie die STOP-Taste. Ein nochmaliges Drücken der
STOP-Taste stellt die nachfolgende Information zurück.
• Die Programmeinstellung wird gelöscht, wenn das Gerät
ausgeschaltet oder das Disc-Ladefach geöffnet wird.
• Es können bis zu 99 Titel in ein Programm aufgenommen werden.
• Wenn eine Disc eingelegt wird, die gemischt MP3-,
JPEG- und WMA-Dateien enthält, ist die
Programmierung einer Kombination von bis zu 99
MP3-, JPEG- und WMA-Dateien möglich.
• Falls acht oder mehr Titel in einem Programm
eingestellt wurden, kann der Benutzer mit den SKIPTasten H oder G auf den richtigen Teil auf dem
Bildschirm umschalten.
PROGRAMM
MY COLLECTION
ABC
DEF
GHI
JKL
1/1
ABC
PROGRAMM
ABC
DEF
GHI
JKL
MNO
1/2
DEF
PROGRAMM
ABC GESAMT 0:03:30
DEF
GHI
JKL
MNO
1/2
DEF
L” zum
DEF
1/1
Audiosprache
DVD-V
Der DVD-Player ermöglicht Ihnen während der Wiedergabe
einer DVD-Disc die Auswahl einer Sprache (sofern mehrere
Sprachen vorhanden sind).
1
Drücken Sie während der Wiedergabe die AUDIO-Taste.
2
Drücken Sie mehrmals die AUDIO-Taste zur
Auswahl der gewünschten Sprache.
HINWEISE:
•
Das Drücken der AUDIO-Taste schaltet den Sound-Modus
zyklisch durch HAUPT, SUB und HAUPT + SUB.
DVD-RW-Discs, die mit doppeltem Sound (zwei Sprachen)
•
aufgenommen worden sind, können entweder im Sound-Modus
HAUPT, SUB oder HAUPT + SUB wiedergegeben werden.
Der Sound-Modus kann während der Wiedergabe von
•
Discs, die nicht mit doppeltem Sound aufgenommen sind,
nicht geändert werden.
•
Das Drücken der AUDIO-Taste könnte bei manchen DVDs
mit mehreren Audio-Sprachen nicht funktionieren
(beispielsweise bei DVDs, welche die Einstellung der
Audiosprache im Disc-Menü ermöglichen).
Stereo-Modus
VCDCD
1
Drücken Sie während der Wiedergabe mehrmals
die AUDIO-Taste, um zwischen STEREO, L. KAN.
oder R. KAN. zyklisch umzuschalten.
STEREO - Sowohl der rechte als auch der linke Kanal ist aktiv (stereo).
L. KAN. - Nur der linke Kanal ist aktiv.
R. KAN. - Nur der rechte Kanal ist aktiv.
STEREO
Sowohl der rechte als auch
der linke Kanal ist aktiv (stereo).
Deutsch
L-CH
R-CH
Nur der linke Kanal ist aktiv.
Nur der rechte Kanal ist aktiv.
HINWEISE:
•
Wenn die Virtual-Surround-Einstellung eingeschaltet ist, ist der
Sound-Modus auf STEREO fixiert und kann nicht geändert werden.
• Der Stereo-Modus wird während der Wiedergabe von DTSCDs nicht geändert.
–21–
GE
Page 51

WIEDERGABE EINER DISC
Untertitelsprache
DVD-V
Während der Wiedergabe einer DVD-Disc (falls verfügbar) ermöglicht
der DVD-Player die Auswahl einer Sprache für die Untertitel.
1
Drücken Sie während der Wiedergabe die
SUBTITLE-Taste.
2
Drücken Sie zur Auswahl der gewünschten
Untertitelsprache mehrmals die SUBTITLE-Taste.
• Die ausgewählte Sprache wird an der Anzeigeleiste
oben am Bildschirm angezeigt.
3
Um die Untertitel auszuschalten, drücken Sie
mehrmals die SUBTITLE-Taste, bis AUS erscheint.
1.ENG/6
Untertitel 1
2.FRE/6
AUS
HINWEISE:
• Manche Discs ermöglichen die Einstellung der Audio/Untertitel-Sprache im Disc-Menü. (Die Bedienung unterscheidet sich je nach Discs. Beachten Sie deshalb die der
Disc beigefügte Anleitung.)
• Falls die gewünschte Sprache nach mehrmaligem Drücken
der SUBTITLE-Taste nicht angezeigt wird, ist diese
Sprache auf der Disc nicht vorhanden.
• Wenn Sie eine Sprache auswählen, die einen 3-stelligen
Sprachcode besitzt, wird dieser Code bei jedem
Umschalten der Untertitel-Spracheinstellung angezeigt.
Bei der Auswahl einer anderen Sprache wird "---"
angezeigt. (Siehe Seite 26.)
Untertitel 2
AUS
Kamerawinkel
DVD-V
Manche DVD-Discs enthalten Szenen, die gleichzeitig aus verschiedenen Kamerawinkeln aufgenommen wurden. Sie können
den Kamerawinkel ändern, wenn das Symbol ( ) auf dem
Bildschirm erscheint.
1
Drücken Sie während der Wiedergabe die ANGLE-
Taste.
• Der ausgewählte Kamerawinkel wird an der
Anzeigeleiste oben am Bildschirm angezeigt.
2
Drücken Sie zur Auswahl des gewünschten
Kamerawinkels mehrmals die ANGLE-Taste.
1 / 8
Winkel 1
Änderung der Bildschirmanzeige
DVD-V
Durch Drücken der DISPLAY-Taste können Sie die
Informationen über die gegenwärtige Disc überprüfen.
1
Drücken Sie während der
Wiedergabe die DISPLAY-
Taste, um das gegenwärtige
Kapitel anzuzeigen.
• Die abgelaufene und die
verbleibende Wiedergabezeit des
gegenwärtigen Kapitels wird
angezeigt.
2
Drücken Sie nochmals die DISPLAY-Taste, um die
gegenwärtigen Spur anzeigen zu lassen.
• Die abgelaufene und die verbleibende Wiedergabezeit
der gegenwärtigen Spur wird angezeigt.
3
Drücken Sie die DISPLAY-Taste ein drittes Mal.
• Die BITRATE und die gegenwärtige
Wiederholungseinstellung wird angezeigt.
• Wenn Sie eine 2 Layer-Disc wiedergeben lassen, wird
auch die Layer-Nummer
angezeigt (L0: Layer 0 wird
wiedergegeben; L1: Layer 1 wird
wiedergegeben.)
4
Drücken Sie die DISPLAY-
Taste ein viertes Mal, um die
Anzeige zu entfernen.
1
Drücken Sie während der Wiedergabe die
DISPLAY-Taste, und die gegenwärtige Spur wird
auf dem Bildschirm angezeigt.
• Die abgelaufene und die verbleibende Wiedergabezeit
der gegenwärtigen Spur wird angezeigt.
2
Drücken Sie nochmals die DISPLAY-Taste, um die
gegenwärtigen Gesamt-Spuren anzeigen zu
lassen.
• Die abgelaufene und die verbleibende Wiedergabezeit
der gegenwärtigen Gesamt-Spuren wird angezeigt.
3
Drücken Sie die DISPLAY-Taste ein drittes Mal,
um die Anzeige zu entfernen.
9/49 0:00:00 -0:00:00
T
IIII
WMAJPEGMP3VCDCD
2 / 8
8 / 8
Winkel 2
Winkel 8
–22–
GE
Page 52

WIEDERGABE EINER DISC
VCD
( )
ohne
PBC-Funktion
Markierungs-Einrichtungsbildschirm
CDDVD-V
Durch Markierungen können Sie bevorzugte Stellen einer
Disc wiederfinden.
1
Drücken Sie viermal die
SEARCH-MODE-Taste (bei
Audio-CD/Video-CD: drei Mal).
•
Der Anzeigebildschirm und die
Markierungen erscheinen auf dem
Bildschirm.
2
Drücken Sie die Tasten s oder B zur Auswahl von 1,
2, 3, 4, 5, 6, 7, 8, 9 oder 10, und stellen Sie sicher,
dass “- : - - : - -" auf dem Display erscheint.
3
Wenn die gewünschte Stelle erreicht ist, drücken
Sie die ENTER-Taste.
• Der Titel oder die Spur und die abgelaufene
Wiedergabezeit werden auf dem Bildschirm angezeigt.
4
Um später zu der Markierung zurückzukehren,
drücken Sie während der Wiedergabe vier Mal die
SEARCH-MODE-Taste (bei CD, VDC: drei Mal).
HINWEISE:
• Ein Öffnen des Disc-Ladefachs, ein Ausschalten des
Gerätes oder die Auswahl von AC unter Schritt und
ein Drücken der ENTER-Taste löscht alle
Markierungen.
• Um eine einzelne Markierung zu löschen, positionieren
Sie den Cursor mit den Tasten s oder B auf die zu
löschende Markierungsnummer und drücken die
CLEAR-Taste.
• Sie können bis zu 10 Stellen markieren.
5
Drücken Sie zum Beenden die SEARCH-MODE-
oder die RETURN-Taste.
1 2 3 4 5 6 7 8 9 10 AC
-- --:--:--
2
Virtual Surround
WMAMP3VCDCDDVD-V
Sie können sich bei Ihrem existierenden 2-Kanal-Stereosystem
an einem stereophonisch visuellen Raum erfreuen.
1
Drücken Sie die VIRTUAL-Taste
auf dem Bedienfeld oder die
MODE-Taste während der
Wiedergabe.
2
Drücken Sie die VIRTUAL- oder ENTER-Taste, um
“1” (natürliche Wirkung), “2” (erweiterte Wirkung)
oder AUS einzustellen.
3
Drücken Sie zum Beenden die RETURN-Taste.
HINWEIS (NUR FÜR CD):
• Sollte die Tonwiedergabe verzerrt sein, schalten Sie
Virtual Surround auf AUS oder drehen Sie die
Lautstärke zurück.
AUS
Deutsch
–23–
GE
Page 53

DVD-EINRICHTUNG
Im Setup-Menü stehen der QUICK- und der CUSTOM-Modus zur Verfügung. Der QUICK-Modus
besteht aus den Einstellungsmenüs, die oft gebraucht werden, und im CUSTOM-Modus können
alle Einstellungen durchgeführt werden.
Die Einstellungen der Menüelemente, die mit markiert sind, können im QUICK-Modus
QUICK
durchgeführt werden.
3
Spracheinstellung
Bei manchen Discs stehen keine Sprachoptionen zur Verfügung.
1
Drücken Sie im STOP-Modus die SETUP-Taste.
2
Drücken Sie zur Auswahl von CUSTOM die Taste B und
dann die ENTER-Taste.
• Der CUSTOM-Modus erscheint.
3
Drücken Sie zur Auswahl von
SPRACHE die Tasten s oder
B, und dann die ENTER-Taste
zur Bestätigung.
4
Drücken Sie zur Auswahl der Menü-Elemente unten
SPRACHE
DIALOGE ORIGINAL
UNTERTITEL AUS
DISC. MENÜ ENGLISCH
OSD DEUTSCH
die Tasten K oder L, und dann die ENTER-Taste.
DIALOGE (Standard: ORIGINAL)
•
Zur Einstellung der Audio-Sprache.
SPRACHE
DIALOGE
ORIGINAL
ENGLISCH
FRANZÖSUSCH
SPANISCH
DEUTSCH
ITALIENISCH
SCHWEDISCH L
UNTERTITEL (Standard: AUS)
• Zur Einstellung der UntertitelSprache.
SPRACHE
UNTERTITEL
AUS
ENGLISCH
FRANZÖSUSCH
SPANISCH
DEUTSCH
ITALIENISCH
SCHWEDISCH L
DISC. MENÜ (Standard: ENGLISCH)
• Zur Einstellung der Sprache des
DVD-Menüs.
SPRACHE
DISC. MENÜ
ENGLISCH
FRANZÖSUSCH
SPANISCH
DEUTSCH
ITALIENISCH
SCHWEDISCH
HOLLÄNDISCH L
OSD
(Standard: ENGLISH)
• Zur Einstellung der Sprache für
die Bildschirmanzeige.
5
Drücken Sie zur Auswahl einer Einstellung die Tas-
QUICK
SPRACHE
OSD
ENGLISH
FRANÇAIS
ESPAÑOL
DEUTSCH
ITALIANO
SVENSK
NEDERLANDS
ten K oder L und dann die ENTER-Taste.
•
Wenn ANDERE auf dem AUDIO-, UNTERTITEL- oder
DISC-MENÜ-Bildschirm ausgewählt wurde, geben Sie den
vierstelligen Code für die gewünschte Sprache ein.
(Beachten Sie hierzu die unten angeführte Sprachenliste.)
•
Es können nur die von der Disc unterstützten Sprachen
ausgewählt werden.
6
Drücken Sie zum Beenden die SETUP-Taste.
HINWEIS:
• Die Spracheinstellung für Dialog und Untertitel steht bei
manchen Discs nicht zur Verfügung. Verwenden Sie in
einem solchen Fall die AUDIO- und SUBTITLE-Tasten.
Einzelheiten dazu finden Sie auf Seiten 21 und 22.
Display-Einstellung
Bestimmte Aspekte der DVD-Anzeigebildschirme, Bildschirmmeldungen und des Displays auf dem Bedienfeld des DVD-Players
können geändert werden.
1
Drücken Sie im STOP-Modus die SETUP-Taste.
2
Drücken Sie zur Auswahl von CUSTOM die Taste B
und dann die ENTER-Taste.
Der CUSTOM-Modus erscheint.
•
–24–
Drücken Sie zur Auswahl von
ANZEIGE die Tasten s oder B,
und dann die ENTER-Taste zur
Bestätigung.
4
Drücken Sie zur Auswahl der
ANZEIGE
BILDFORMAT
ANZEIGE
KAMERAWINKEL AN
ABSCHALTUNG AN
VIDEO AUS SCART
Menü-Elemente unten die Tasten K oder L und dann
die ENTER-Taste.
BILDFORMAT (Standard: 4:3
LETTERBOX)
QUICK
• Drücken Sie zur Auswahl eines
Menü-Elements die Tasten Koder
ANZEIGE
BILDFORMAT
4:3 LETTER BOX
4:3 PAN & SCAN
16
:9 BREIT
L und dann die ENTER-Taste.
• Wählen Sie 4:3 LETTERBOX für
schwarze Streifen oben und unten am Bildschirm aus.
• Wählen Sie 4:3 PAN - SCAN für die volle Bildhöhe mit
abgeschnittenen Seiten aus.
• Wählen Sie 16:9 BREIT aus, falls am DVD-Player ein Breitbild-Fernsehgerät angeschlossen ist.
ANZEIGE (Standard: HELL)
•
Drücken Sie zur Auswahl von HELL,
DUNKEL und AUTO die Tasten K
oder L und dann die ENTER-Taste.
•
Damit wird die Helligkeit des Bedienfeld-Displays mit der Werkseinstellung HELL eingestellt.
•
Wenn AUTO ausgewählt wurde, wird das Display nur bei der
Wiedergabe dunkel.
KAMERAWINKEL (Standard: AN)
•
Drücken Sie mehrmals die ENTER-
Taste, um das Kamerawinkelsymbol
auf AN oder AUS zu schalten.
ABSCHALTUNG (Standard: AN)
•
Drücken Sie mehrmals die ENTER-
Taste, um die Abschaltung auf AN
oder AUS zu schalten.
• Damit wird der DVD-Player nach
35 Minuten ohne Bedienung automatisch ausgeschaltet.
VIDEO AUS (Standard: SCART)
•
Drücken Sie mehrmals die ENTER-
Taste, um SCART oder COMPONENT einzuschalten.
•
Wählen Sie SCART für den
Videoausgang von der AV1 OUTBuchse.
•
Wählen Sie COMPONENT für den Videoausgang von der
COMPONENT VIDEO OUT-Buchse.
5
Drücken Sie zum Beenden die SETUP-Taste.
HINWEISE:
•
Stellen Sie sicher, dass Sie die SETUP-Taste drücken; anderenfalls funktioniert die Einstellung nicht.
• Sie können den Auswahlpunkt auch durch Drücken der Zifferntasten auswählen.
• Stellen Sie sicher, dass Sie die AV1-Buchse und die Komponentenvideo-Buchsen für den Video-Ausgang nicht gleichzeitig verwenden.
• Verwenden Sie bei der Änderung der VIDEO OUT-Einstellung (SCART oder COMPONENT) eine VIDEO-Buchse oder
eine S-VIDEO-Buchse, um den Fernseher anzuschließen.
Wenn die Einstellung beispielsweise auf COMPONENT
geändert wird, während die AV1-Buchse für den Anschluss
eines Fernsehers verwendet wird, wird unter Umständen
ein gestörtes Videosignal ausgegeben.
ANZEIGE
ANZEIGE
HELL
DUNKEL
AUTO
ANZEIGE
BILDFORMAT
ANZEIGE
KAMERAWINKEL AN
ABSCHALTUNG AN
VIDEO AUS SCART
ANZEIGE
BILDFORMAT
ANZEIGE
KAMERAWINKEL AN
ABSCHALTUNG AN
VIDEO AUS SCART
ANZEIGE
BILDFORMAT
ANZEIGE
KAMERAWINKEL AN
ABSCHALTUNG AN
VIDEO AUS SCART
4:3 LETTER BOX
HELL
4:3 LETTER BOX
HELL
4:3 LETTER BOX
HELL
4:3 LETTER BOX
HELL
GE
Page 54

DVD-EINRICHTUNG
Audio-Einstellung
Wählen Sie die geeigneten Audio-Einstellungen für Ihre Anlage,
da diese nur während der Wiedergabe von DVD-Discs auf dem
DVD-Player wirksam ist.
1
Drücken Sie im STOP-Modus die SETUP-Taste.
2
Drücken Sie zur Auswahl von CUSTOM die Taste
B und dann die ENTER-Taste.
• Der CUSTOM-Modus erscheint.
3
Drücken Sie zur Auswahl von
AUDIO die Tasten s oder B,
und dann die ENTER-Taste zur
Bestätigung.
4
Drücken Sie zur Auswahl der Menü-Elemente unten
die Tasten K oder L, und dann die ENTER-Taste.
DRC (Dynamic Range Control =
Dynamikbereichsregelung)
(Standard: AUS)
• Sie können den Bereich der
Soundlautstärke regeln.
DOLBY DIGITAL (Standard: AN)
QUICK
Stellen Sie diese Option auf AN,
wenn der Player an einen DolbyDigital-Decoder angeschlossen ist.
(AN: Ausgang mit Dolby Digital)
(AUS: Dolby Digital zu PCM konvertiert)
DTS (Standard: AN)
AN: Ausgang mit DTS-Sound
Stellen Sie diese Option auf AN,
wenn der Player an einen DTSDecoder angeschlossen ist.
LPCM (Standard: AUS)
• Stellen Sie hier den Ausgang für
DVDs ein, die in PCM 96 kHz
(96 kHz oder 48 kHz) aufgenommen wurden.
MPEG (Standard: AUS)
AN: Ausgabe im MPEG-Sound
Stellen Sie diese Option auf AN,
wenn der Player an einen MPEGDecoder angeschlossen ist.
Bei der Wiedergabe von Discs mit Kopierschutz.
• Wenn Sie AUS auswählen, wird der Kopierschutz
aktiviert und der Sound auf 48 kHz herabgetaktet.
5
Drücken Sie zum Beenden die SETUP-Taste.
AUDIO
DRC AUS
DOLBY DIGITAL AN
DTS AN
LPCM AUS
MPEG AUS
AUDIO
DRC AUS
DOLBY DIGITAL AN
DTS AN
LPCM AUS
MPEG AUS
AUDIO
DRC AUS
DOLBY DIGITAL AN
DTS AN
LPCM AUS
MPEG AUS
AUDIO
DRC AUS
DOLBY DIGITAL AN
DTS AN
LPCM AUS
MPEG AUS
AUDIO
DRC AUS
DOLBY DIGITAL AN
DTS AN
LPCM AUS
MPEG AUS
AUDIO
DRC AUS
DOLBY DIGITAL AN
DTS AN
LPCM AUS
MPEG AUS
Kindersicherung
Die Kindersicherung begrenzt die Wiedergabe von Discs mit Einstufungen für unpassende Zielgruppen. Das vom Anwender eingegebene
vierstellige Passwort gibt die Kindersicherung frei.
Diese Funktion ermöglicht Ihnen zu verhindern, dass Discs mit anstößigen Szenen von Ihren Kindern wiedergegeben werden können.
EINSTUFUNG
Hiermit können Sie Ihre DVD-Discs einstufen.
Die Wiedergabe stoppt, falls die Einstufung der Disc die von
Ihnen eingestellte Einstufung überschreitet.
1
Drücken Sie im STOP-Modus die SETUP-Taste.
2
Drücken Sie zur Auswahl von CUSTOM die Taste
B und dann die ENTER-Taste.
3
Drücken Sie zur Auswahl von EINSTUFUNG die
Tasten s oder B und dann die ENTER-Taste.
4
Geben Sie Ihr vierstelliges
Passwort ein und drücken Sie
die ENTER-Taste.
5
Drücken Sie zur Auswahl von EIN-
SICHERUNG
Eingabe des Passwortes.
STUFUNG die Tasten K oder L
und dann die ENTER-Taste.
6
Drücken Sie zur Auswahl der
gewünschten Einstufung die
Tasten K oder L.
7
Drücken Sie zum Beenden die SETUP-Taste.
HINWEISE:
•
Wenn Sie das Passwort das erste Mal eingeben, geben Sie eine beliebige 4-stellige Zahl (ausgenommen 4737) ein. Diese eingegebene
Zahl wird ab der zweiten Eingabe als Passwort verwendet.
• Drücken Sie unter Schritt zur Auswahl von ÄNDERN die
Tasten K oder L und dann die ENTER-Taste. Geben Sie das
vierstellige Passwort ein und drücken Sie die ENTER-Taste.
•
Bei manchen DVDs könnte es schwierig sein herauszufinden,
ob diese die Kindersicherung unterstützen. Prüfen Sie, ob die
Kindersicherung so funktioniert, wie Sie sie eingestellt haben.
• Notieren Sie sich Ihr Passwort, falls Sie es vergessen.
5
SICHERUNG
EINSTUFEN ALLE
ÄNDERN
SICHERUNG
EINSTUFEN
ALLE
8
7
6
5
4
3
WENN SIE DAS PASSWORT VERGESSEN HABEN
1
Drücken Sie unter Schritt 4 die Zahlen 4, 7, 3, 7.
Das Passwort wird gelöscht und die Einstufung auf ALLE gestellt.
•
2
Wiederholen Sie die Schritte 5-7, um die Kindersicherung
wieder einzustellen.
SICHERUNGSSTUFEN
• ALLE
Die Kindersicherung ist aufgehoben.
• Stufe 8
DVD-Software beliebiger Einstufung (Erwachsene/allgemein/Kinder) kann wiedergegeben werden.
• Stufen 7 bis 2
Nur DVD-Software für eine allgemeine Verwendung und
für Kinder kann wiedergegeben werden.
• Stufe 1
Nur für Kinder vorgesehene DVD-Software kann
wiedergegeben werden, und die Wiedergabe von für
Erwachsene und für eine allgemeine Verwendung
vorgesehene DVD-Software ist nicht gestattet.
–25–
Deutsch
GE
Page 55

DVD-EINRICHTUNG
Sprache Code Sprache Code Sprache Code Sprache Code
Abchasisch 4748
Afar 4747
Afrikaans 4752
Albanisch 6563
Amharisch 4759
Arabisch 4764
Armenisch 5471
Aserbaidschanisch 4772
Assamesisch 4765
Aymara 4771
Baschkiri 4847
Baskisch 5167
Bengali;Bangla 4860
Bhutanisch 5072
Biharisch 4854
Bislama 4855
Bretonisch 4864
Bulgarisch 4853
Burmesisch 5971
Chinesisch [CHI] 7254
Dänisch [DAN] 5047
Deutsch [GER] 5051
Englisch [ENG] 5160
Esperanto 5161
Estländisch 5166
Färöisch 5261
Fidschi 5256
Finnisch [FIN] 5255
Französisch [FRE] 5264
Friesisch 5271
Galizisch 5358
Georgisch 5747
Griechisch [GRE] 5158
Grönländisch 5758
Guarani 5360
Wenn Sie eine Sprache auswählen, die einen 3-stelligen Sprachcode besitzt, wird dieser Code bei jeder Änderung der auf Seiten 21 und 22
beschriebenen Audio- oder Untertitelsprach-Einstellung angezeigt. Wenn Sie eine andere Sprache gewählt haben, wird an Stelle des Codes
"---" angezeigt. (Der 3-stellige Sprachcode ist in der Liste oben in Klammern aufgeführt.)
A-B
C-E
F-H
Gujarati 5367
Haussa 5447
Hebräisch 5569
Hindi 5455
Holländisch [DUT] 6058
Indonesisch 5560
Interlingua 5547
Interlingue 5551
Inupiak 5557
Irisch [IRI] 5347
Isländisch [ICE] 5565
Italienisch [ITA] 5566
Japanisch [JPN] 5647
Javanesisch 5669
Jiddisch 5655
Kambodschanisch 5759
Kannada 5760
Kaschmiri 5765
Katalanisch 4947
Kasachisch 5757
Kinyarwanda 6469
Kirgisisch 5771
Kirundi 6460
Koreanisch [KOR] 5761
Korsisch 4961
Kroatisch 5464
Kurdisch 5767
Laotisch 5861
Latein 5847
Lettländisch;Lettisch 5868
Lingala 5860
Litauisch 5866
Malagassisch 5953
Malayalam 5958
Malayisch 5965
Maltesisch 5966
I-K
L-N
Marathi 5964
Maori 5955
Mazedonisch 5957
Moldawisch 5961
Mongolisch 5960
Nauru 6047
Nepalesischi 6051
Norwegisch [NOR] 6061
Okzitan 6149
Oriya 6164
Oromo (Afan) 6159
Pandschabi 6247
Pashto;Pushto 6265
Persisch 5247
Polnisch 6258
Portugiesisch [POR] 6266
Quechua 6367
Rätoromanisch 6459
Rumänisch [RUM] 6461
Russisch [RUS] 6467
Samoanisch 6559
Sangho 6553
Sanskrit 6547
Schottisch, Gälisch 5350
Schwedisch [SWE] 6568
Serbisch 6564
Serbo-Kroatisch 6554
Sesotho 6566
Setswana 6660
Shona 6560
Sindhi 6550
Singalesisch 6555
Siswati 6565
Slowakisch 6557
Slowenisch 6558
Somalisch 6561
O-R
S
Spanisch [SPA] 5165
Suaheli 6569
Sudanesisch 6567
Tadschikisch 6653
Tagalog 6658
Tamil 6647
Tatarisch 6666
Telugu 6651
Thai 6654
Tibetanisch 4861
Tigrinya 6655
Tongan 6661
Tschechisch 4965
Tsongan 6665
Türkisch [TUR] 6664
Turkmenisch 6657
Twi 6669
Ungarisch [HUN] 5467
Ukrainisch 6757
Urdu 6764
Usbekisch 6772
Vietnamesisch 6855
Volapuk 6861
Walisisch 4971
Weißrussisch 4851
Wolof 6961
Xhosa 7054
Yoruba 7161
Zulu 7267
T
U-Z
–26–
GE
Page 56

WARTUNG
Reinigung des Gehäuses
• Verwenden Sie ein weiches, mit einer milden Reinigungslösung angefeuchtetes Tuch. Verwenden Sie keine Lösung, die
Alkohol, Lösungsmittel, Ammoniak oder Scheuermittel enthält.
Reinigung von Discs
• Wenn eine Disc schmutzig wird, reinigen Sie diese mit einem Reinigungstuch. Wischen Sie die Disc von der Mitte nach
außen ab. Reiben Sie nicht in kreisförmigen Bewegungen.
• Verwenden Sie keine Lösungsmittel wie Benzin, Verdünner, handelsübliche Reiniger, Reinigungslösungen,
Scheuermittel oder für analoge Schallplatten vorgesehene Antistatiksprays.
Reinigung der Disc-Linse
• Falls der Player immer noch nicht richtig funktioniert, wenn er entsprechend den Anleitungen bedient wird und die
“FEHLERSUCHANLEITUNG” in diesem Handbuch durchgeführt wurde, könnte der Laser-Abtastkopf schmutzig sein.
Wenden Sie sich zur Reinigung der Laser-Abtasteinheit an Ihren Händler oder an ein autorisiertes Kundendienst-Center.
Disc-Handhabung
• Verwenden Sie Discs mit folgenden Logos:
(Optische Audio-Digital-Discs)
• Handhaben Sie die Discs so, dass keine Fingerabdrücke oder Staub auf der Oberfläche haften bleibt.
• Bewahren Sie die Discs immer in ihrem Schutzgehäuse auf, wenn Sie sie nicht verwenden.
• Beachten Sie, dass Discs mit speziellen Formen (herzförmige Discs, sechseckige Discs
o. Ä.) auf diesem Player nicht wiedergegeben werden können. Versuchen Sie nicht,
solche Discs wiedergeben zu lassen, denn sie könnten den Player beschädigen.
DIGITAL VIDEO
Deutsch
Tragen Sie zum Schutz der Umwelt bei!!!
• Verbrauchte Batterien gehören nicht in die Mülltonne.
Sie können diese an einem Sammelpunkt für verbrauchte Batterien oder Sondermüll entsorgen. Wenden Sie sich hin-
•
sichtlich der Einzelheiten an Ihre Gemeindeverwaltung.
–27–
GE
Page 57

ANLEITUNG ZUR FEHLERSUCHE
Wenn der DVD-Player nicht richtig funktioniert, obwohl er wie in diesem Bedienungshandbuch beschrieben bedient wurde,
überprüfen Sie den Player anhand der folgenden Prüfliste.
Problem Lösung
Keine Stromversorgung –Prüfen Sie, ob das Netzkabel richtig angeschlossen ist.
–Ziehen Sie den Netzstecker, warten Sie 5-10 Sekunden und steck-
en Sie ihn dann wieder ein.
Weder Ton noch Bild –Prüfen Sie, ob der Fernseher eingeschaltet ist.
–Prüfen Sie den Video-Anschluss.
–Prüfen Sie den VIDEO-/AUDIO-Kabelanschluss zum Fernseher
(siehe Anschluss an einen Fernseher).
–Mit einem Analoganschluss kann kein DTS-Sound erzeugt werden.
Verzerrtes Bild –Manchmal kann eine geringe Bildstörung auftreten.
Dies ist keine Fehlfunktion.
–Schließen Sie den Player direkt am Fernseher an.
Vollständig verzerrtes oder –Schließen Sie den DVD-Player direkt am Fernseher an.
Schwarzweiß-Bild bei DVD –Stellen Sie sicher, dass die Disc vom DVD-Player unterstützt wird.
Kein Ton oder verzerrter Ton –Stellen Sie die Lautstärke ein.
–Prüfen Sie, ob die Lautsprecher richtig angeschlossen sind.
Kein Audio am Digitalausgang –Prüfen Sie den Digitalanschluss.
–Prüfen Sie, ob die ausgewählte Audio-Sprache den Leistungen
Ihres Empfängers entspricht.
Das Bild bleibt während der –Prüfen Sie die Disc auf Fingerabdrücke/Kratzer und reinigen Sie
Wiedergabe kurz stehen sie mit einem weichen Tuch, indem Sie von der Mitte zur
Außenkante hin wischen.
–Reinigen Sie die Disc.
Die Disc kann nicht wiedergegeben werden –Reinigen Sie die Disc.
–Stellen Sie sicher, dass die beschriftete Seite nach oben zeigt.
–Prüfen Sie, ob die Disc defekt ist, indem Sie eine andere Disc testen.
–Schalten Sie die Kindersicherung aus oder ändern Sie die Einstufung.
–Legen Sie eine ordnungsgemäße Disc ein, die auf diesem Player
wiedergegeben werden kann.
Keine Rückkehr zum Start-Bildschirm, –Stellen Sie den Player zurück, indem Sie ihn aus- und
nachdem die Disc entfernt wurde dann wieder einschalten.
Der Player reagiert nicht auf die Fernbedienung –
Tasten funktionieren nicht und der –Ziehen Sie für 5-10 Sekunden den Netzstecker,
Player reagiert nicht um den Player komplett zurückzustellen.
Der Player reagiert während der Wiedergabe –
nicht auf manche Bedienungsbefehle Beachten Sie die Anleitung der Disc.
Der DVD-Player kann CVDs/DVDs nicht lesen –
Der Kamerawinkel schaltet sich nicht um –Der Kamerawinkel kann bei DVDs, die keine mehrfache Aufnahme
Die Wiedergabe startet nicht, –Prüfen Sie die “SICHERUNG” der Kindersicherung.
wenn der Titel ausgewählt wurde
Das Passwort für die Einstellung der –Geben Sie das Standardpasswort "4737" ein.
Einstufung wurde vergessen Damit wird das vergessene Passwort gelöscht.
Kein DTS-Audio am Analogausgang –Verwenden Sie eine Digitalausgangsbuchse DIGITAL AUDIO OUT
Richten Sie die Fernbedienung direkt auf den Sensor an der
Vorderseite des Players.
–Verringern Sie die Distanz zum Player.
–Tauschen Sie die Batterien in der Fernbedienung aus.
–Legen Sie die Batterien wieder mit der gekennzeichneten Polung
(Zeichen +/-) ein.
Die Bedienungsarten könnten bei der betreffenden Disc nicht zulässig sein.
Verwenden Sie zur Reinigung der Linse eine handelsübliche CD/DVD-
Reinigungsdisc, bevor Sie den DVD-Player zur Reparatur einsenden.
von Kamerawinkeln enthalten, nicht umgeschaltet werden. In
manchen Fällen wurden mehrere Kamerawinkel nur für bestimmte
Szenen aufgenommen.
für den Ausgang von DTS-Audio.
HINWEISE:
Manche Funktionen stehen in bestimmten Modi nicht zur Verfügung, dies ist aber keine Fehlfunktion. Lesen Sie in dieser
Bedienungsanleitung die Beschreibung der Einzelheiten zur korrekten Bedienung nach.
Die Wiedergabe eines gewünschten Titels oder die Zufallswiedergabe steht während der programmierten Wiedergabe nicht zur Verfügung.
•
–28–
GE
Page 58

TECHNISCHE DATEN
SIGNALSYSTEM
PAL-Farbsystem
UNTERSTÜTZTE DISCS
(1) DVD-Videodiscs
1 Layer 12 cm einseitige Discs, 2 Layer 12 cm einseitige
Discs, 2 Layer 12 cm doppelseitige Discs (ein Layer pro Seite)
1 Layer 8 cm einseitige Discs, 2 Layer 8 cm einseitige Discs,
2 Layer 8 cm doppelseitige Discs (ein Layer pro Seite)
(2) DVD-R/DVD-RWs
(3) Compact Discs (CD-DAs, Video-CDs)
12 cm-Discs, 8 cm-Discs
(4) CD-Rs/CD-RWs
S-VIDEO-AUSGANG
Y-Ausgangspegel: 1 Vss (75 Ω/Ohm)
C-Ausgangspegel: 0,3 Vss
Ausgangsanschlüsse: S-Steckverbinder, 1 Satz
VIDEO-AUSGANG
Ausgangspegel: 1 Vss (75Ω/Ohm)
Ausgangsanschlüsse: Steckerbuchsen, 1 Satz
KOMPONENTEN-AUSGANG
Y-Augangspegel: 1Vp-p (75 Ω/Ohm)
CB-Ausgangspegel: 0,7 Vp-p (75Ω/Ohm)
R-Ausgangspegel: 0,7 Vp-p (75Ω/Ohm)
C
Ausgangsanschluss: Pin-Buchsen, 1 Satz
AUDIO/VIDEO
21-polige Scart-Buchse
AUDIO-AUSGANG
Ausgangspegel: 2 V rms
2-Kanal (FL, FR)-Ausgangsanschluss: Steckerbuchse, 1 Satz
AUDIO-AUSGANGSEIGENSCHAFTEN
(1) Frequenzgang
1 DVDs (linear PCM) :
2 CDs : 4 Hz bis 20 kHz
(2) Signal-/Rauschspannungsabstand : 115 dB
(3) Gesamtklirrfaktor : 1 kHz CD: 0,003%
(4) Dynamikbereich : DVD: 100 dB
4 Hz bis 22 kHz (48 kHz-Abtastrate)
:
4 Hz bis 44 kHz (96 kHz-Abtastrate)
CD: 98 dB
DIGITALER AUDIO-AUSGANG
Optischer Digitalausgang: Optischer Steckverbinder, 1 Satz
Koaxialer Digitalausgang: Steckerbuchse, 1 Satz
STROMVERSORGUNG
Wechselstrom 220-240 V, 50 Hz
LEISTUNGSAUFNAHME
15 W (Bereitschaft: 1 W)
MAXIMALE ÄUSSERE ABMESSUNGEN
435 (Breite) x 75 (Höhe) x 220 (Tiefe) mm
(17-3/32” x 2-61/64” x 8-21/32”)(einschließlich vorstehender Teile)
GEWICHT
2,2 kg(4,85lbs)
FERNBEDIENUNG
RC-943
TYP
Infrarot-Impuls
STROMVERSORGUNG
Gleichstrom 3 V, 2 R6P/AA-Batterien
Deutsch
–29–
GE
Page 59

STIFTBELEGUNG
135
7
9
2
46
8
10
1214
16
1820
11
13
15
1719
21
Kontakte, Signalpegel und Impedanzen
Kontakt 1
Audio-Ausgang (rechts): 2,0 V effekt/01kOhm
Kontakt 3
Audio-Ausgang (links): 2,0 V effekt/01kOhm
Kontakt 4
Audio, Erdung
Kontakt 5
RGB, Erdung (blau)
Kontakt 7
RGB-Ausgang (blau): 0,7 Vs-s/75 Ohm
Kontakt 8
Funktionswahl-Umschaltsteuerung
L: 0,0~2,0V Gleichstrom Stromversorgung ausgeschaltet
M: 4,5~7,0V Gleichstrom Breitbild-Modus (16:9)
H: 9,5~12,0V Gleichstrom Normaler Modus (4:3)
Kontakt 9
RGB, Erdung (grün)
Kontakt 11
RGB-Ausgang (grün): 0,7 Vs-s/75 Ohm
Kontakt 13
RGB, Erdung (rot)
Kontakt 14
RGB-Umschaltsteuerung, Erdung
Kontakt 15
RGB-Ausgang (rot): 0,7 Vs-s/75 Ohm
Kontakt 16
RGB-Umschaltsteuerung
H:13,3V Gleichstrom RGB-Modus
Kontakt 17
Video-Ausgangssignal, Erdung
Kontakt 18
Video-Eingangssignal, Erdung
Kontakt 19
Video-Ausgang (CVBS): 1,0 Vs-s/75 Ohm
Kontakt 21
Gemeinsame Erdung (Abschirmung)
–30–
GE
Page 60

Printed in China
511 4075 007
16-11, YUSHIMA 3-CHOME, BUNKYOU-KU, TOKYO 113-0034, JAPAN
Telephone: (03) 3837-5321
E57E2ED/E57E5ED/E57E7ED
0VMN03750
★★★★★
 Loading...