

Page 1

DIRECT DRIVE
MANUAL TURNTABLE SYSTEM
DP-A100
Owner’s Manual
Manuel de l’Utilisateur
Manual del usuario
Page 2
ESPAÑOLFRANCAISENGLISH
SAFETY PRECAUTIONS
n
IMPORTANT SAFETY
FCC INFORMATION (For US customers)
CAUTION
RISK OF ELECTRIC SHOCK
DO NOT OPEN
CAUTION:
TO REDUCE THE RISK OF ELECTRIC SHOCK, DO NOT REMOVE
COVER (OR BACK). NO USER-SERVICEABLE PARTS INSIDE.
REFER SERVICING TO QUALIFIED SERVICE PERSONNEL.
The lightning flash with arrowhead symbol, within an equilateral
triangle, is intended to alert the user to the presence of
uninsulated “dangerous voltage” within the product’s enclosure
that may be of sufficient magnitude to constitute a risk of
electric shock to persons.
The exclamation point within an equilateral triangle is intended
to alert the user to the presence of important operating
and maintenance (servicing) instructions in the literature
accompanying the appliance.
WARNING:
TO REDUCE THE RISK OF FIRE OR ELECTRIC SHOCK, DO NOT
EXPOSE THIS APPLIANCE TO RAIN OR MOISTURE.
INSTRUCTIONS
1. Read these instructions.
2. Keep these instructions.
3. Heed all warnings.
4. Follow all instructions.
5. Do not use this apparatus near water.
6. Clean only with dry cloth.
7. Do not block any ventilation openings.
Install in accordance with the manufacturer’s instructions.
8. Do not install near any heat sources such as radiators, heat registers,
stoves, or other apparatus (including amplifiers) that produce heat.
9. Do not defeat the safety purpose of the polarized or grounding-type plug. A
polarized plug has two blades with one wider than the other. A grounding
type plug has two blades and a third grounding prong. The wide blade or the
third prong are provided for your safety. If the provided plug does not fit into
your outlet, consult an electrician for replacement of the obsolete outlet.
10. Protect the power cord from being walked on or pinched particularly at
plugs, convenience receptacles, and the point where they exit from the
apparatus.
11. Only use attachments/accessories specified by the manufacturer.
12. Use only with the cart, stand, tripod, bracket, or table
specified by the manufacturer, or sold with the apparatus.
When a cart is used, use caution when moving the cart/
apparatus combination to avoid injury from tip-over.
13. Unplug this apparatus during lightning storms or when
unused for long periods of time.
14. Refer all servicing to qualified service personnel.
Servicing is required when the apparatus has been damaged in any way,
such as power-supply cord or plug is damaged, liquid has been spilled or
objects have fallen into the apparatus, the apparatus has been exposed to
rain or moisture, does not operate normally, or has been dropped.
15. Batteries shall not be exposed to excessive heat such as sunshine, fire or
the like.
CAUTION:
To completely disconnect this product from the mains, disconnect the plug
from the wall socket outlet.
The mains plug is used to completely interrupt the power supply to the unit
and must be within easy access by the user.
PRECAUTION:
Pour déconnecter complètement ce produit du courant secteur, débranchez
la prise de la prise murale.
La prise secteur est utilisée pour couper complètement l’alimentation de
l’appareil et l’utilisateur doit pouvoir y accéder facilement.
PRECAUCIÓN:
Para desconectar completamente este producto de la alimentación eléctrica,
desconecte el enchufe del enchufe de la pared.
El enchufe de la alimentación eléctrica se utiliza para interrumpir por completo
el suministro de alimentación eléctrica a la unidad y debe de encontrarse en
un lugar al que el usuario tenga fácil acceso.
1. PRODUCT
This product complies with Part 15 of the FCC Rules. Operation is subject
to the following two conditions: (1) this product may not cause harmful
interference, and (2) this product must accept any interference received,
including interference that may cause undesired operation.
2. IMPORTANT NOTICE: DO NOT MODIFY THIS PRODUCT
This product, when installed as indicated in the instructions contained
in this manual, meets FCC requirements. Modification not expressly
approved by DENON may void your authority, granted by the FCC, to use
the product.
3. NOTE
This product has been tested and found to comply with the limits for
a Class B digital device, pursuant to Part 15 of the FCC Rules. These
limits are designed to provide reasonable protection against harmful
interference in a residential installation.
This product generates, uses and can radiate radio frequency energy and,
if not installed and used in accordance with the instructions, may cause
harmful interference to radio communications. However, there is no
guarantee that interference will not occur in a particular installation. If this
product does cause harmful interference to radio or television reception,
which can be determined by turning the product OFF and ON, the user
is encouraged to try to correct the interference by one or more of the
following measures:
• Reorient or relocate the receiving antenna.
• Increase the separation between the equipment and receiver.
• Connect the product into an outlet on a circuit different from that to
which the receiver is connected.
• Consult the local retailer authorized to distribute this type of product or
an experienced radio/TV technician for help.
For Canadian customers:
This Class B digital apparatus complies with Canadian ICES-003.
Cet appareil numérique de la classe B est conforme à la norme NMB-003 du
Canada.
I
Page 3
ENGLISHFRANCAISESPAÑOL
NOTES ON USE / OBSERVATIONS RELATIVES A L’UTILISATION / NOTAS SOBRE EL USO
n
WARNINGS AVERTISSEMENTS ADVERTENCIAS
• Avoid high temperatures.
Allow for sufficient heat dispersion when
installed in a rack.
• Handle the power cord carefully.
Hold the plug when unplugging the cord.
• Keep the unit free from moisture, water, and
dust.
• Unplug the power cord when not using the unit
for long periods of time.
• Do not obstruct the ventilation holes.
• Do not let foreign objects into the unit.
• Do not let insecticides, benzene, and thinner
come in contact with the unit.
• Never disassemble or modify the unit in any way.
• Ventilation should not be impeded by covering
the ventilation openings with items, such as
newspapers, tablecloths or curtains.
• Naked flame sources such as lighted candles
should not be placed on the unit.
• Observe and follow local regulations regarding
battery disposal.
• Do not expose the unit to dripping or splashing
fluids.
• Do not place objects filled with liquids, such as
vases, on the unit.
• Do not handle the mains cord with wet hands.
• When the switch is in the OFF position, the
equipment is not completely switched off from
MAINS.
• The equipment shall be installed near the
power supply so that the power supply is easily
accessible.
• Eviter des températures élevées.
Tenir compte d’une dispersion de chaleur
suffisante lors de l’installation sur une étagère.
• Manipuler le cordon d’alimentation avec
précaution.
Tenir la prise lors du débranchement du cordon.
• Protéger l’appareil contre l’humidité, l’eau et la
poussière.
• Débrancher le cordon d’alimentation lorsque
l’appareil n’est pas utilisé pendant de longues
périodes.
• Ne pas obstruer les trous d’aération.
• Ne pas laisser des objets étrangers dans
l’appareil.
• Ne pas mettre en contact des insecticides, du
benzène et un diluant avec l’appareil.
• Ne jamais démonter ou modifier l’appareil d’une
manière ou d’une autre.
• Ne pas recouvrir les orifices de ventilation avec
des objets tels que des journaux, nappes ou
rideaux. Cela entraverait la ventilation.
• Ne jamais placer de flamme nue sur l’appareil,
notamment des bougies allumées.
• Veillez à respecter les lois en vigueur lorsque
vous jetez les piles usagées.
• L’appareil ne doit pas être exposé à l’eau ou à
l’humidité.
• Ne pas poser d’objet contenant du liquide, par
exemple un vase, sur l’appareil.
• Ne pas manipuler le cordon d’alimentation avec
les mains mouillées.
• Lorsque l’interrupteur est sur la position OFF,
l’appareil n’est pas complètement déconnecté du
SECTEUR (MAINS).
• L’appareil sera installé près de la source
d’alimentation, de sorte que cette dernière soit
facilement accessible.
• Evite altas temperaturas.
Permite la suficiente dispersión del calor cuando
está instalado en la consola.
• Maneje el cordón de energía con cuidado.
Sostenga el enchufe cuando desconecte el
cordón de energía.
• Mantenga el equipo libre de humedad, agua y
polvo.
• Desconecte el cordón de energía cuando no
utilice el equipo por mucho tiempo.
• No obstruya los orificios de ventilación.
• No deje objetos extraños dentro del equipo.
• No permita el contacto de insecticidas, gasolina
y diluyentes con el equipo.
• Nunca desarme o modifique el equipo de
ninguna manera.
• La ventilación no debe quedar obstruida por
haberse cubierto las aperturas con objetos como
periódicos, manteles o cortinas.
• No deberán colocarse sobre el aparato fuentes
inflamables sin protección, como velas
encendidas.
• A la hora de deshacerse de las pilas, respete la
normativa para el cuidado del medio ambiente.
• No exponer el aparato al goteo o salpicaduras
cuando se utilice.
• No colocar sobre el aparato objetos llenos de
líquido, como jarros.
• No maneje el cable de alimentación con las
manos mojadas.
• Cuando el interruptor está en la posición OFF, el
equipo no está completamente desconectado de
la alimentación MAINS.
• El equipo se instalará cerca de la fuente de
alimentación de manera que resulte fácil acceder
a ella.
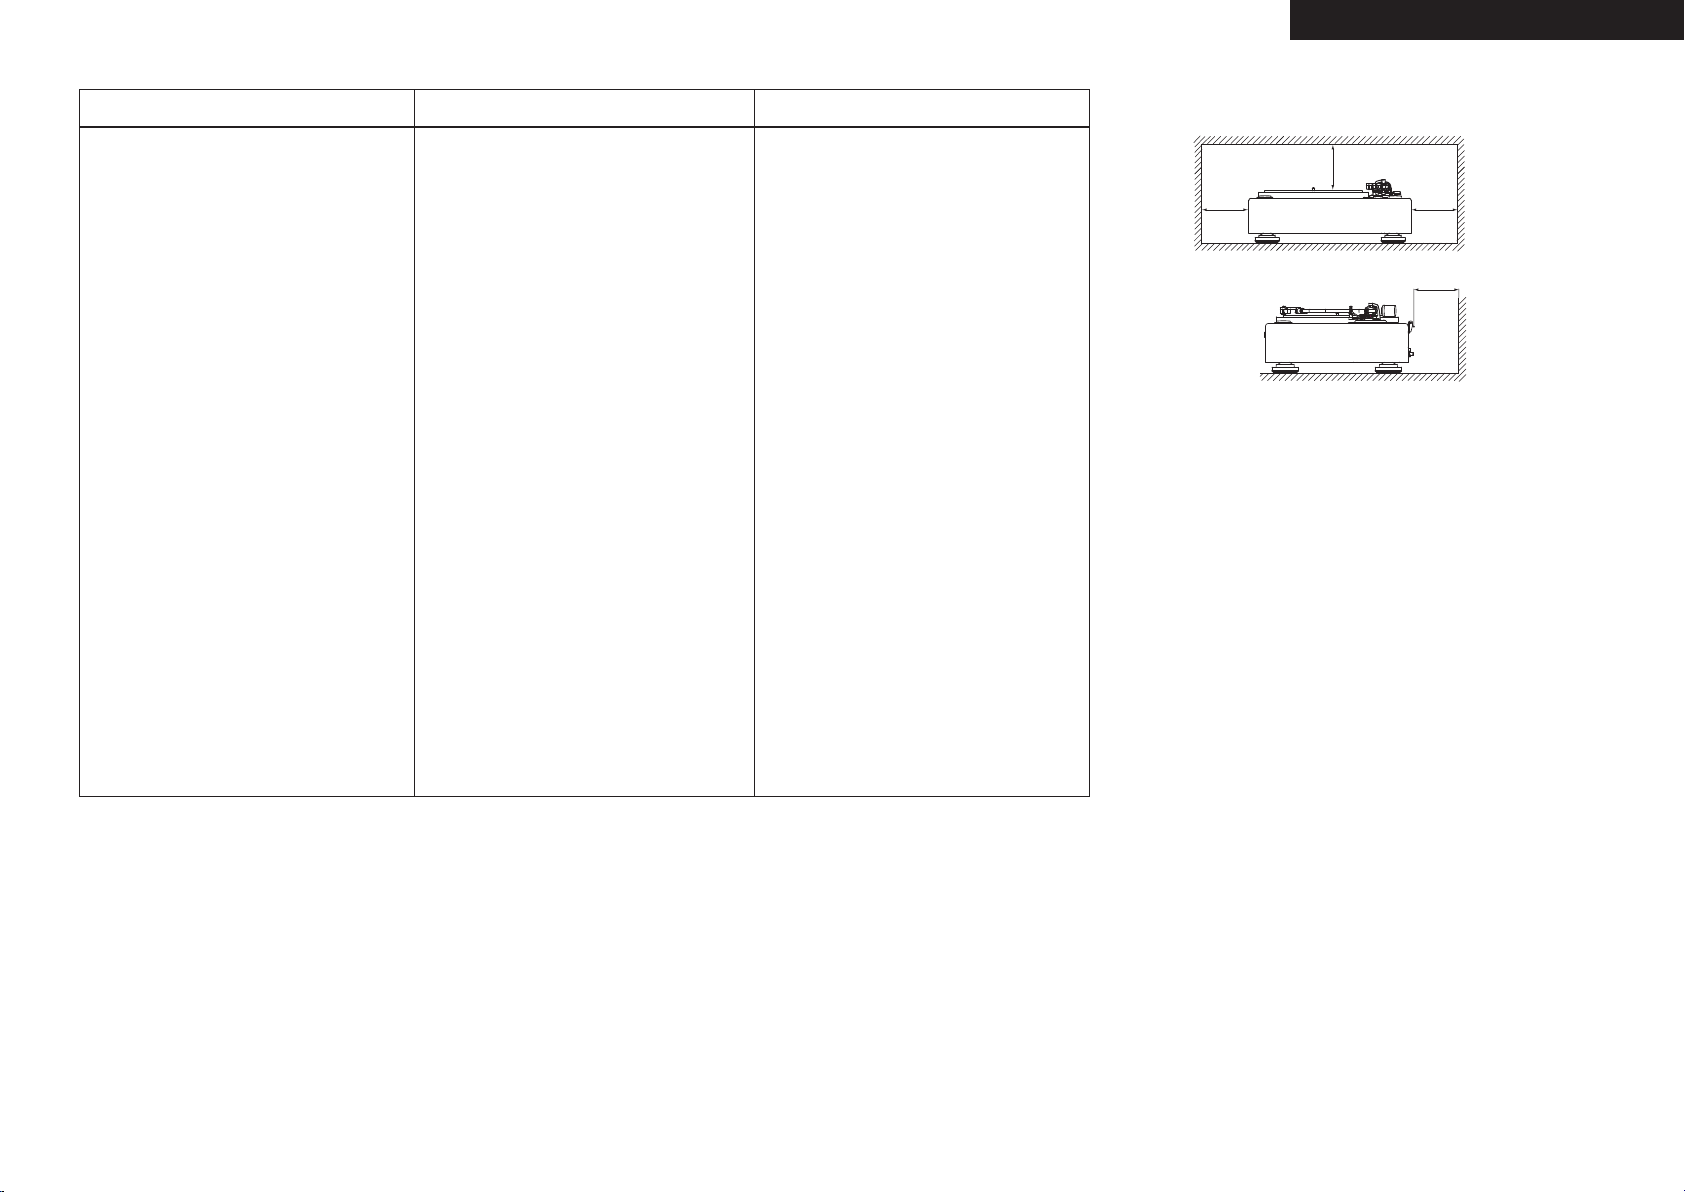
n CAUTIONS ON INSTALLATION
PRÉCAUTIONS D’INSTALLATION
EMPLAZAMIENTO DE LA INSTALACIÓN
z
z
zFor proper heat dispersal, do not install this unit in a confined
space, such as a bookcase or similar enclosure.
• More than 0.3 m (12 in.) is recommended.
• Do not place any other equipment on this unit.
zPour permettre la dissipation de chaleur requise, n’installez
pas cette unité dans un espace confiné tel qu’une bibliothèque
ou un endroit similaire.
• Une distance de plus de 0,3 m (12 po) est recommandée.
• Ne placez aucun matériel sur cet appareil.
zPara la dispersión del calor adecuadamente, no instale este
equipo en un lugar confinado tal como una librería o unidad
similar.
• Se recomienda dejar más de 0,3 m (12 pulg.) alrededor.
• No coloque ningún otro equipo sobre la unidad.
z
z
Wall
Paroi
Pared
II
Page 4
ENGLISH
Getting started
Thank you for purchasing this DENON product. To ensure proper operation, please read these owner’s manual carefully before using the product.
After reading them, be sure to keep them for future reference.
Contents
Getting started ·······································································1
About this manual ········································································1
Accessories ···················································································· 1
Features ·························································································2
Cautions on handling ···································································· 2
Maintenance ·················································································· 2
Stylus life (DL-A100) ····································································· 2
Cleaning the stylus tip ··································································2
Note on lubricating········································································2
Part names and functions ·················································3
Preparations ·············································································4
Assembly ·······················································································4
Mounting the turntable ·································································4
Mounting the counterweight ························································ 4
Mounting the cartridge ································································· 4
Connecting the lead wires ····························································4
Mounting the head shell ·······························································5
Mounting the dust cover ······························································5
Adjustments ··················································································5
Adjusting the height of the insulators ·········································· 5
Adjusting the height of the tone arm ············································ 5
Adjusting the stylus pressure and anti-skating ····························· 6
About this manual
n Symbols
v
NOTE
n Illustrations
Note that the illustrations in these instructions are for explanation
purposes and may differ from the actual unit.
This symbol indicates a reference page on which
related information is described.
This symbol indicates a supplementary information
and tips for operations.
This symbol indicates points to remember operations
or function limitations.
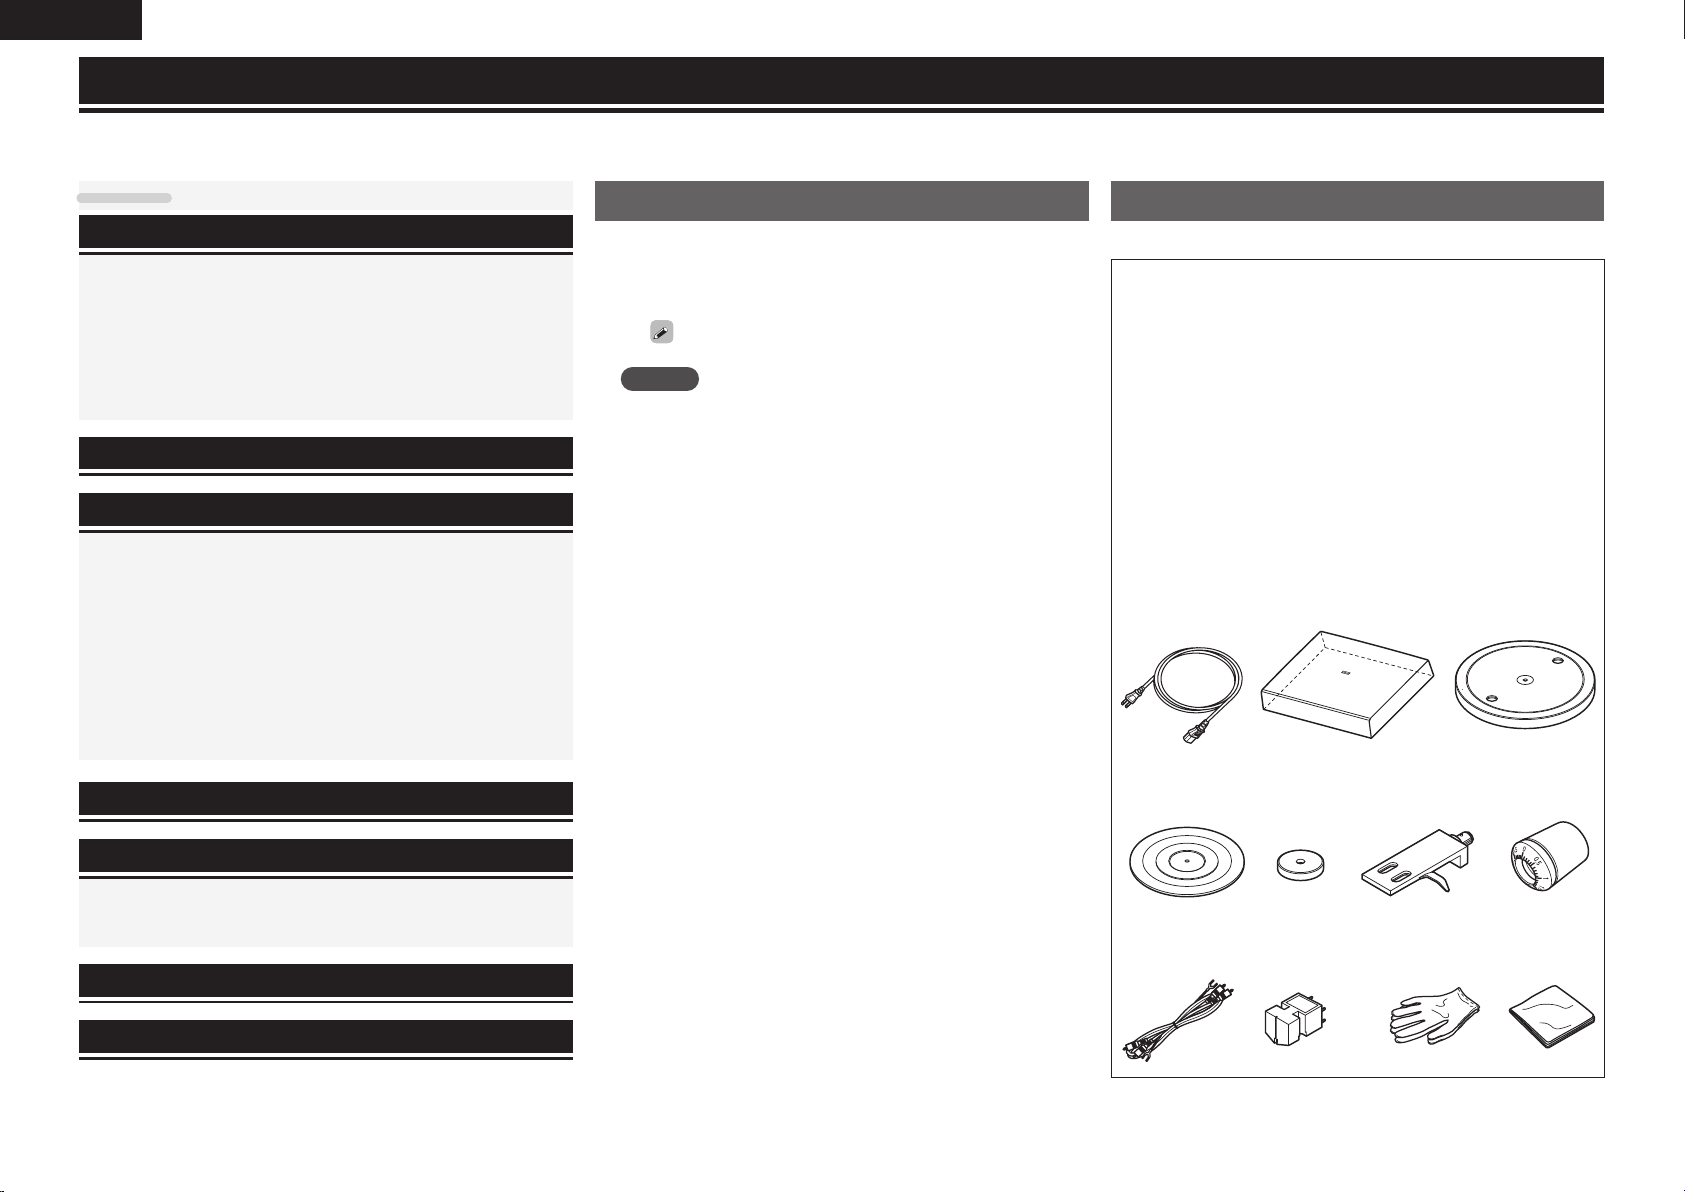
Accessories
Check that the following parts are supplied with the product.
q Owner’s manual ...................................................................... 1
w Service network list ................................................................. 1
e Power cord (Cord length: Approx. 6.2 ft / 1.9 m) .................... 1
r Dust cover .............................................................................. 1
t Turntable ................................................................................. 1
y Turntable sheet. ...................................................................... 1
u 45 rpm adaptor ........................................................................ 1
i Head shell
(Lead wires, Screws, Nuts, Nylon washers, Cartridge spacer
included) .................................................................................. 1
o Counterweight ......................................................................... 1
Q0 Audio cable (length: about 5.2 ft / 1.6 m) ................................1
Q1 Stereo MC cartridge(DL-A100)
(Data sheet, Stylus cover, Stylus cleaning brush included) .....1
Q2 Gloves ..................................................................................... 1
Q3 Wiping cloth ............................................................................ 1
e t
r
Connections ·············································································6
Operation···················································································7
Turning power on··········································································7
Playback ························································································ 7
Stopping playback ········································································· 7
Troubleshooting·····································································8
Specifications ··········································································9
1
Q0
y
u o
i
Q1 Q2 Q3
Page 5

Features
Cautions on handling
Maintenance
ENGLISH
Getting Started
Getting Started
Cabinet with natural wood exterior in dark brown
with gloss fi nish
The cabinet is made with natural wood veneer overgrazed like
Japanese lacquerware, with rich, glossy fi nish.
Stereo MC cartridge DL-A100 included
DL-103 was launched for Japan broadcasting Corporation in 1964,
and continued to be standard cartridge during 50 years. DL-A100 is
reproduction of engineering reference model of DL-103.
Hybrid double-layered large turntable for stable
rotation
The die-cast aluminum turntable is 331 mm in diameter. Silicon
rubber covers the entire rear surface for deadening treatment to
absorb howl.
Quartz lock servo and direct-drive system for
stable rotation
The player includes a quartz lock servo system that controls
rotation speed by detecting the interval of optical pulses from a
slit in the motor. Stable control of reduced wow and fl utter and
high accurate rotation with little eccentricity are achieved.
Universal-type tone arm and lathe machinedaluminum head shell
A tone arm on a large die-cast aluminum base whose height can be
adjusted within 6 mm assures smooth and accurate tracing.
The combination of the tone arm and lathe machined-aluminum
head shell suppresses undesirable resonance that would affect
sound quality, as well as taking best advantage of the characteristics
of the cartridge.
• Before turning the power switch on
Check once again that all connections are correct and that there are
no problems with the connection cables.
• When going on vacation or leaving home for long periods of time, be
sure to unplug the power cord from the power outlet.
• About Condensation
If there is a major difference in temperature between the inside of
the unit and the surroundings, condensation (dew) may form on
the operating parts inside the unit, causing the unit not to operate
properly.
If this happens, let the unit sit for an hour or two with the power
turned off and wait until there is little difference in temperature
before using the unit.
• Moving the unit
Turn off the power and unplug the power cord from the power
outlet. Next, disconnect the connection cables to other system units
before moving the unit.
• About Care
Clean the cabinet and dust cover with the included wiping cloth.
Follow the instructions when using a chemical cleaner.
Benzene, paint thinner or other organic solvents as well as insecticide
may cause material changes and discoloration if brought into contact
with the unit, and should therefore not be used.
• Extrior fi nish
The cabinet has a dark brown glossy fi nish. As fi ne scratches may be
prominent, use the included wiping cloth to clean the surface.
• Lubricating
The motor does not require lubricating. Do not lubricate the player.
Stylus life (DL-A100)
The stylus has service life of about 2000 hours. It depends on the
operating conditions. If the stylus tip is worn, high-frequency sound
will be rough and distorted. To avoid damaging valuable records,
replace the cartridge without delay.
Cleaning the stylus tip
The stylus tip is very delicate and requires suffi cient care. Remove
dust from the stylus tip with a soft brush (included with the cartridge).
Note on lubricating
The motor does not require lubricating. Do not lubricate the player.
Doing so may damage the player.
and functions
Part names
Preparations
Connections
Operations Troubleshooting Specifi cations
Ample insulator
The cabinet is well insulated to absorb any vibration.
2
Page 6

ENGLISH
Part names and functions
For buttons not explained here, see the page indicated in parentheses ( ).
Q2
Q1
Q0
o
i
u
y
q POWER switch ·············································· (7)
w SPEED button ··············································· (7)
e Insulator ························································ (5)
r START/STOP button ···································· (7)
t Lock nut ························································· (5)
y Tone arm ·······················································(5)
Q1Q0
Q4
6
Q3
u Armrest ························································· (5)
i Lifter lever ·················································(6, 7)
o ANTI-SKATING knob ···································· (6)
Q0 Stylus pressure adjustment ring ················ (6)
Q1 Counterweight ·············································· (6)
Q2 Dust cover ·····················································(5)
Q3 Arm height adjustment ring ························ (5)
Q4 Arm height lock knob ·································· (5)
t
q
w
r
e
u i o
3
Page 7

Preparations
54mm
Assembly
Before use, attach the included parts to the main unit.
Turn the power off when assembling.
Turntable sheet
Mounting the counterweight
Insert the counterweight onto the shaft at the back of the tone arm
and screw it in.
• Mount with the stylus pressure adjustment ring towards the front.
Mount the head shell so that the stylus tip is positioned
2
about 54 mm from the edge of the head shell’s mount
surface, and fasten the screw.
54mm: This is the distance at which the stylus tip traces the
left and right channels with optimum balance according to the
positioning of the turntable and tone arm. (overhang value)
ENGLISH
Getting Started
and functions
and functions
Part names
Part names
Preparations
Preparations
Turntable
Magnet ring
Counterweight
Head shell
Center spindle
Mounting the turntable
Mount the turntable on the Center spindle.
1
Mount the turntable sheet.
2
NOTE
Take care not to scratch the magnet ring on the rear of the turntable.
Mounting the cartridge
Attach the head shell to the cartridge loosely.
1
Nylon washer
Cartridge
NOTE
Use the included screws, nuts, and nylon washers.
If the lead wire on the head shell is disconnected, connect the tip of
the lead wire to the terminal, as shown below.
Nut
Screw
Terminal
Red(R)
White(L)
Tip
Green(ER)
Lead wire
Blue(EL)
Head shell mount
surface
54mm
NOTE
Mount the cartridge with no tilt or floating so that the stylus tip can
trace the groove on a record correctly.
tilt
floating
Connecting the lead wires
• Connect the lead wires to the terminals on the cartridge.
• Use tweezers for this task.
Name of terminals
of a cartridge
L (left channel)
EL (left-channel grounding)
R (right channel)
ER (right-channel grounding)
Color of the lead
wire
White
Blue
Red
Green
Connections
Operations Troubleshooting Specifications
White (L)
Blue (EL)
Red (R)
Green (ER)
4
Page 8

ENGLISH
Assembly
Mounting the head shell
To protect the stylus tip, attach the stylus cover to the cartridge.
Insert the head shell to the end of a tone arm with the
1
guide pin facing upward.
Turn the lock nut in the direction of the arrow to
2
secure the head shell.
Lock nut
Guide pin
Mounting the dust cover
Dust cover
Hinge retainer
section
Hinge
R
L
GNDPHONO OUT
Mount the hinge retainer section of the dust cover onto
the hinges.
• Insert fully in the direction of the arrow.
• When removing the dust cover, open the dust cover fully then pull
out in the direction opposite the arrow.
• Hold the dust cover near the hinge retainer sections when mounting
and removing it.
• Use the included gloves when mounting and removing the dust
cover.
AC IN
Adjustments
Turn the power off when making the adjustments.
START/STOP
Tone arm
Turntable Insulator
Turntable sheet
POWER
Counterweight
6
Stylus pressure adjustment ring
Arm height lock knob
ANTI-SKATING knob
Arm height adjustment ring
Lifter lever
Armrest
Adjusting the height of the insulators
Turn the insulators to adjust their height so that the
turntable is placed level.
Turning an insulator foot clockwise increases height, and turning it
counterclockwise decreases it.
SPEED
Head shell
Adjusting the height of the tone arm
This adjustment is for the stylus tip of the cartridge so that it will trace
the groove of a record correctly. Adjust the height of the tone arm
so that it will be parallel to the record when the stylus is placed on a
record.
Adjust it for the cartridge or head shell to be used.
When the included head shell and cartridge are to be used, adjust
the arm height adjustment ring to “0”.
Place the stylus tip on a record, and check that the
1
tone arm is parallel to the record.
If it is not parallel, perform steps 2 to 5.
Return the tone arm to the armrest.
2
Turn the arm height x knob fully counterclockwise.
The lock of the arm height adjustment ring is released.
3
Turn the arm height adjustment ring so that the tone
4
arm will be parallel to the record.
Parallel
Arm height
adjustment ring
Turn the arm height x knob fully clockwise.
The arm height adjustment ring is fixed.
5
The tone arm will not be parallel to the record with some cartridges.
For such a cartridge, insert the included cartridge spacer between the
head shell and cartridge, then adjust the height so that the tone arm
will be parallel to the record.
Using a commercial level allows more accurate adjustment.
5
Page 9

ENGLISH
Adjusting the stylus pressure and anti-skating
Adjust the stylus pressure for the cartridge to be used. Anti-skating
adjustment is for negating the affect of centrifugal force on the stylus
tip caused by rotation of a record during playing.
Set the ANTI-SKATING knob to “0”.
1
Lower the lifter lever and move the tone arm over
2
the turntable.
• For a cartridge with a removable stylus cover, remove the stylus
cover.
Turn the counterweight so that the tone arm will be
3
parallel to the turntable when the head shell is gently
released from holding status.
To protect the stylus tip, turn the counterweight slowly and
move it in the direction of the arrow.
Parallel
Counterweight
Adjustments
Holding the counterweight with a nger so that it
5
does not move, turn the stylus pressure adjustment
ring so that it’s “0” mark is lined up with the black
line of the tone arm's rear shaft.
Turn the stylus pressure
adjustment ring only.
Turn the counterweight in the direction of arrow
6
and set to the appropriate stylus pressure for the
cartridge.
• The appropriate stylus pressure for the included cartridge is 2.5 g.
Set to “2.5”.
• For the appropriate stylus pressure for the cartridge to be used,
refer to the operation manual for the cartridge.
Turn the ANTI-SKATING knob and set to the same
7
value as for the cartridge’s stylus pressure.
For the cartridge of the stylus pressure of 3.0 g or more, set
to “3”.
The proper anti-skating value can be achieved.
T
I
A
N
K
G
S
-
I
3
T
N
A
Setting reference point
0
2
1
Connections
NOTE
• Do not plug in the power cord until all connections have been
completed.
• When making connections, also refer to the operating instructions of
the other components being connected.
• Be sure to connect the left and right channels properly (left with left,
right with right).
• Do not bundle power cords together with connection cables. Doing
so can result in noise.
R L GND
PHONO OUT
L
R
Audio cable
AC IN
AC IN
Power supply outlet
(AC 120 V, 60 Hz)
Amplifier
PHONO IN
L
R
L
R
SIGNAL
GND
Getting Started
and functions
Part names
Preparations
Preparations
Connections
Connections
Operations Troubleshooting Specifications
• If the cartridge to be used is too light or too heavy, the tone arm will
not be level. For such a cartridge, use an optional counterweight
(sold separately) made by our company. For details, consult your
nearest repair outlet.
Return the tone arm to the armrest.
4
NOTE
Take care not to damage the stylus tip with the turntable sheet.
6
Page 10

ENGLISH
Operation
POWER
Turntable
6
START/STOP
Tone arm
Head shell
SPEED
Turning power on
Press POWER to set it to “hON”.
The “33”
If the player is not to be used for extended period, be sure to
disconnect the power cord.
indicator
on the surface of
SPEED
lights in amber.
Playback
Place a record on the turntable.
For EP (“doughnut”) records, use the included 45 rpm adapter.
1
Set the record’s playing speed, using SPEED.
2
Each time SPEED is pressed, the “45” or “33” indicator on
SPEED lights alternately.
• “45” indicator (green): The turntable rotates at 45 rpm.
• “33” indicator (amber): The turntable rotates at 33-1/3 rpm.
Press START/STOP .
3
The turntable starts turning.
Raise the lifter lever and holding the head shell’s
4
nger catch move the tone arm to the beginning of
the selection you want to play.
Lower the lifter lever.
The tone arm lowers the stylus tip slowly onto the record and
5
playback starts.
Stopping playback
Raise the lifter lever slowly.
The tone arm raises and the stylus tip removed from the record.
1
Return the tone arm by holding the head shell’s
2
nger catch to the armrest.
Lower the lifter lever.
3
Fix the tone arm to the armrest.
4
Press START/STOP.
5
The rotation of the turntable stops.
NOTE
To protect the stylus tip of the cartridge, attach the stylus cover when
the player is not to be used.
NOTE
• Be careful not to scratch the record.
Lifter lever
• During playback, pay special attention to the points described below.
• Do not touch the tone arm or turntable.
• Do not turn the power off.
• Do not apply vibration or shock to the player.
• To change the record, replace it after the turntable stops.
• Do not try to stop the turntable forcibly while it is rotating. The inside
of the turntable may become hot and it may cause malfunction or
fire.
7
Page 11

Troubleshooting
If a problem should arise, first check the following:
1. Are the connections correct?
2. Is the set being operated as described in the owner’s manual?
3. Are the other components operating properly?
If this unit does not operate properly, check the items listed in the table below. Should the problem persist,
there may be a malfunction.
In this case, disconnect the power immediately and contact your store of purchase.
Symptom Cause Solution Page
The stylus tip does
not come down to
the record.
No sound is
produced.
A wall of static is
heard.
The record skips.
The sound is
scratchy.
The sound is
distorted.
The arm does not
move in the middle.
The sound is weak or
too strong.
• The tone arm height is not
adjusted correctly.
• The stylus pressure is not
adjusted correctly.
• Weight balance of the arm is
not adjusted.
• The cartridge and a head shell
are not connected correctly.
• Audio cables are not connected
to the amplifier correctly.
• Adjustment or switching on the
amplifier is not correct.
• The ground wire of an audio
cable is not connected to the
amplifier.
• The plug of an audio cable is
not connected to the amplifier
correctly.
• The head shell is not secured
with the lock nut.
• The stylus pressure is not at
the adequate value.
• The record is warped or
scratched.
• The stylus or record is dirty.
• The stylus is worn.
• The arm is touching something.
• The record is scratched.
• The amplifier’s cartridge setting
(MC/MM) is not set correctly.
• Adjust it correctly.
• Adjust it correctly.
• Adjust it correctly.
• Check the connections.
• Check the connections.
• Check the settings on the
amplifier.
• Check the connections.
• Check the connections.
• Check the mounting.
• Adjust it correctly.
• Check the record.
• Remove any dirt.
• Replace the cartridge.
• Check the arm.
• Check the record.
• Set the cartridge settings to
the cartridge to be used (MC/
MM) on the amplifier.
5
6
5, 6
4
6
–
6
6
5
6
–
2
2
–
–
–
ENGLISH
Getting Started
and functions
Part names
Preparations
Connections
Operations Troubleshooting Specifications
Operations
Troubleshooting
8
Page 12

ENGLISH
W
Specifications
n Turntable section
Driving system: Servo system direct drive
Speed: 33–1/3rpm, 45rpm
Wow & flutter: Less than 0.1 % WRMS
Starting time: Specified speed within 0.3 sec (for 33 rpm)
Turntable: Aluminum die-cast, 331 mm (13-1/32”) in diameter
Motor: Direct-drive motor
Speed control system: Quartz control
Load characteristics: 0 % with the stylus pressure 80 g (2.8 oz)
Speed deviation: Within ± 0.003 %
n Tone arm section
Arm form: Static balance S-shaped pipe arm
Effective arm length: 244 mm (9-39/64”)
Overhang: 14 mm (35/64”)
Tracking error: within 3°
Arm height adjustable range: about 6 mm (15/64”)
Stylus pressure variable range: 0 to 4.0 g (0.14 oz)
One step 0.1 g
Suitable cartridge empty weight: 4 to 10 g (0.14 oz to 0.35 oz)
Head shell weight: 18 g (0.63 oz, including screws, nuts, nylon washers)
Cartridge spacer weight: 0.25 g (0.01 oz, 1 sheet)
n Total
Power supply: AC 120 V, 60 Hz
Power consumption: 10 W
Maximum external dimensions: With dust cover closed:
490 (W) ×213 (H) × 405 (D) mm (19-19/64” x 8-25/64” x 15-15/16”)
With dust cover open:
490 (W) ×515 (H) × 465 (D) mm (19-19/64” x 20-9/32” x 18-5/16”)
Weight: 15.7 kg (0.55 oz)
n Cartridge (DL-A100)
Power generation method: Moving coil (MC) type
Output voltage: 0.3 mV (1 kHz 50 mm/sec horizontally)
Channel balance: within 1 dB (1 kHz)
Channel separation: more than 25dB (1 kHz)
Impedance: 40 Ω ± 20 %
Compliance: 5 × 10⁻⁶ cm/dyne (used 100 Hz record)
Stylus tip: 0.2 mm (1/64”) square solid diamond
Stylus pressure: 2.5 g ± 0.3 g (0.09 oz ± 0.01 oz)
Frequency response: 20 Hz to 45 kHz
Weight: 8.8 g (0.31 oz)
Load resistance: more than 100 Ω (40 Ω when a transformer is used)
Maximum external dimensions: 15 (W) × 15 (H) × 26.8 (D) mm (19/32” x 19/32” x 1-1/16”)
zFor purposes of improvement, specifications and design are subject to change without notice.
9
Page 13

Page 14

www.denon.com
Printed in China 5411 10576 004D
D&M Holdings Inc.
 Loading...