


HARD DISC DRIVE MOUNTING KIT
ハードディスクドライブマウンティングキット
BU5502
Owner’s Manual
Bedienungsanleitung
Manuel de l’Utilisateur
Manuale delle istruzioni
Manual del usuario
Gebruiksaanwijzing
Bruksanvisning
غᏮངಖ༚
取扱説明書

CAUTION:
USE OF CONTROLS OR ADJUSTMENTS OR PERFORMANCE OF PROCEDURES OTHER THAN THOSE SPECIFIED
HEREIN MAY RESULT IN HAZARDOUS RADIATION EXPOSURE.
THIS PRODUCT SHOULD NOT BE ADJUSTED OR REPAIRED BY ANYONE EXCEPT PROPERLY QUALIFIED SERVICE
PERSONNEL.
This device complies with Part 15 of the FCC Rules. Operation is subject to the following two conditions: (1) This
device may not cause harmful interference, and (2) this device must accept any interference received, including
interference that may cause undesired operation.
This Class B digital apparatus meets all requirements of the Canadian Interference-Causing Equipment Regulations.
Cet appareil numérique de la classe B respecte toutes les exigences du Règlement sur le matériel brouilleur du
Canada.
A NOTE ABOUT RECYCLING:
This product’s packaging materials are recyclable and can be reused. Please dispose of any materials
in accordance with the local recycling regulations.
When discarding the unit, comply with local rules or regulations.
Batteries should never be thrown away or incinerated but disposed of in accordance with the local
regulations concerning chemical waste.
This product and the accessories packed together constitute the applicable product according to the
WEEE directive except batteries.
HINWEIS ZUM RECYCLING:
Das Verpackungsmaterial dieses Produktes ist für zum Recyceln geeignet und kann wieder verwendet werden. Bitte
entsorgen Sie alle Materialien entsprechend der örtlichen Recycling-Vorschriften.
Beachten Sie bei der Entsorgung des Gerätes die örtlichen Vorschriften und Bestimmungen.
Die Batterien dürfen nicht in den Hausmüll geworfen oder verbrannt werden; bitte geben Sie die Batterien gemäß
örtlichen Bestimmungen an den Sammelstellen oder Sondermüllplätzen ab.
Dieses Produkt zusammen mit den Zubehörteilen ist das geltende Produkt der WEEE-Direktive, davon ausgenommen
sind die Batterien.
UNE REMARQUE CONCERNANT LE RECYCLAGE:
Les matériaux d’emballage de ce produit sont recyclables et peuvent être réutilisés. Veuillez disposer de tout matériau
conformément aux réglements de recylage locaux.
Lorsque vous mettez cet appareil au rebut, respectez les lois ou réglementations locales.
Les piles ne doivent jamais être jetées ou incinérées, mais mises au rebut conformément aux réglements locaux
concernant les déchets chimiques.
Ce produit et les accessoires emballés ensemble sont des produits conformes à la directive DEEE sauf pour les
piles.
NOTA RELATIVA AL RICICLAGGIO:
I materiali di imballaggio di questo prodotto sono riutilizzabili e riciclabili. Smaltire i materiali conformemente alle
normative locali sul riciclaggio.
Per smaltire l’unità, osservare la normativa in vigore nel luogo di utilizzo.
Non gettare le batterie, né incenerirle, ma smaltirle conformemente alla normativa locale sui rifiuti chimici.
Questo prodotto e gli accessori inclusi nell’imballaggio sono applicabili alla direttiva RAEE, ad eccezione delle
batterie.
ACERCA DEL RECICLAJE:
Los materiales de embalaje de este producto son reciclables y se pueden volver a utilizar. Disponga de estos materiales
siguiendo los reglamentos de reciclaje de su localidad.
Cuando se deshaga de la unidad, cumpla con las reglas o reglamentos locales.
Las pilas nunca deberán tirarse ni incinerarse. Deberá disponer de ellas siguiendo los reglamentos de su localidad
relacionados con los desperdicios químicos.
Este producto junto con los accesorios empaquetados es el producto aplicable a la directiva RAEE excepto pilas.
EEN AANTEKENING WAT BETREFT HET RECYCLEREN:
Het inpakmateriaal van dit product is recycleerbaar en kan opnieuw gebruikt worden. Er wordt verzocht om zich van
elk afvalmateriaal te ontdoen volgens de plaatselijke voorschriften.
Volg voor het wegdoen van de speler de voorschriften voor de verwijdering van wit- en bruingoed op.
Batterijen mogen nooit worden weggegooid of verbrand, maar moeten volgens de plaatselijke voorschriften
betreffende chemisch afval worden verwijderd.
Op dit product en de meegeleverde accessoires, m.u.v. de batterijen is de richtlijn voor afgedankte elektrische en
elektronische apparaten (WEEE) van toepassing.
EN KOMMENTAR OM ÅTERVINNING:
Produktens emballage är återvinningsbart och kan återanvändas. Kassera det enligt lokala återvinningsbestämmelser.
När du kasserar enheten ska du göra det i överensstämmelse med lokala regler och bestämmelser.
Batterier får absolut inte kastas i soporna eller brännas. Kassera dem enligt lokala bestämmelser för kemiskt avfall.
Denna apparat och de tillbehör som levereras med den är de som uppfyller gällande WEEE-direktiv, med undantag
av batterierna.
Declaration of Conformity
We declare under our sole responsibility that this product, to which this declaration relates, is in conformity with the
following standards:
EN55013, EN55020, EN61000-3-2 and EN61000-3-3 Following the provisions of 2004/108/EC Directive.
DENON EUROPE
Division of D&M Germany GmbH
An der Landwghr 19, Nettetal,
D-41334 Germany
I
ENGLISH
We greatly appreciate your purchase of this product.
The BU5502 Hard Disc Drive Mounting Kit is designed specifically to
mount the DENON BU5503 Hard Disc to the DN-HS5500 Professional
Media & Controller.
Accessories
Check that the following parts supplied with the product.
q Owner’s Manual ...................................................................... 1
w Mounting Kit ............................................................................ 1
e Screws (M3 x 6 mm, Black) ....................................................2
r Screws (M3 x 4 mm) ............................................................... 4
t Hex. Head Screws (M3 x 6 mm) ............................................. 4
y Hex. wrench ............................................................................ 1
u Service Station List ..................................................................1
i Service Station List (For Japan only) .......................................1
Mounting Procedure
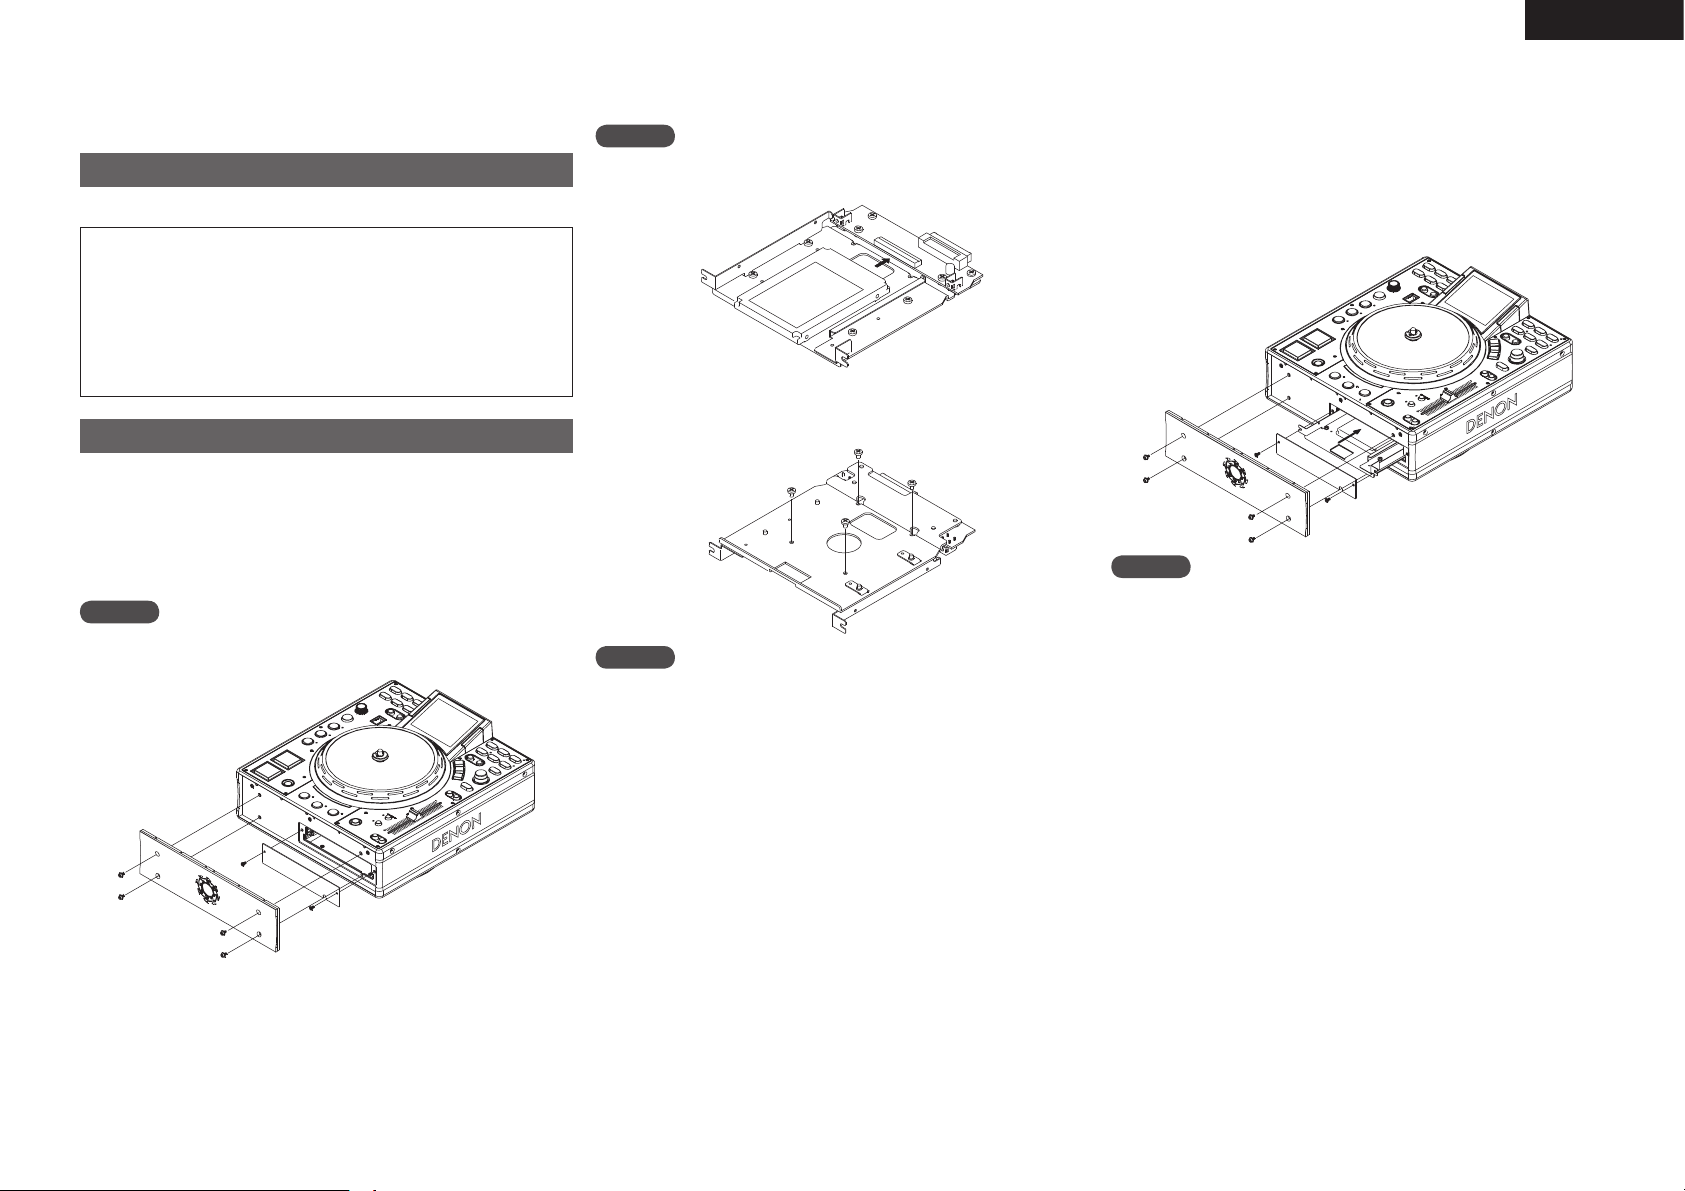
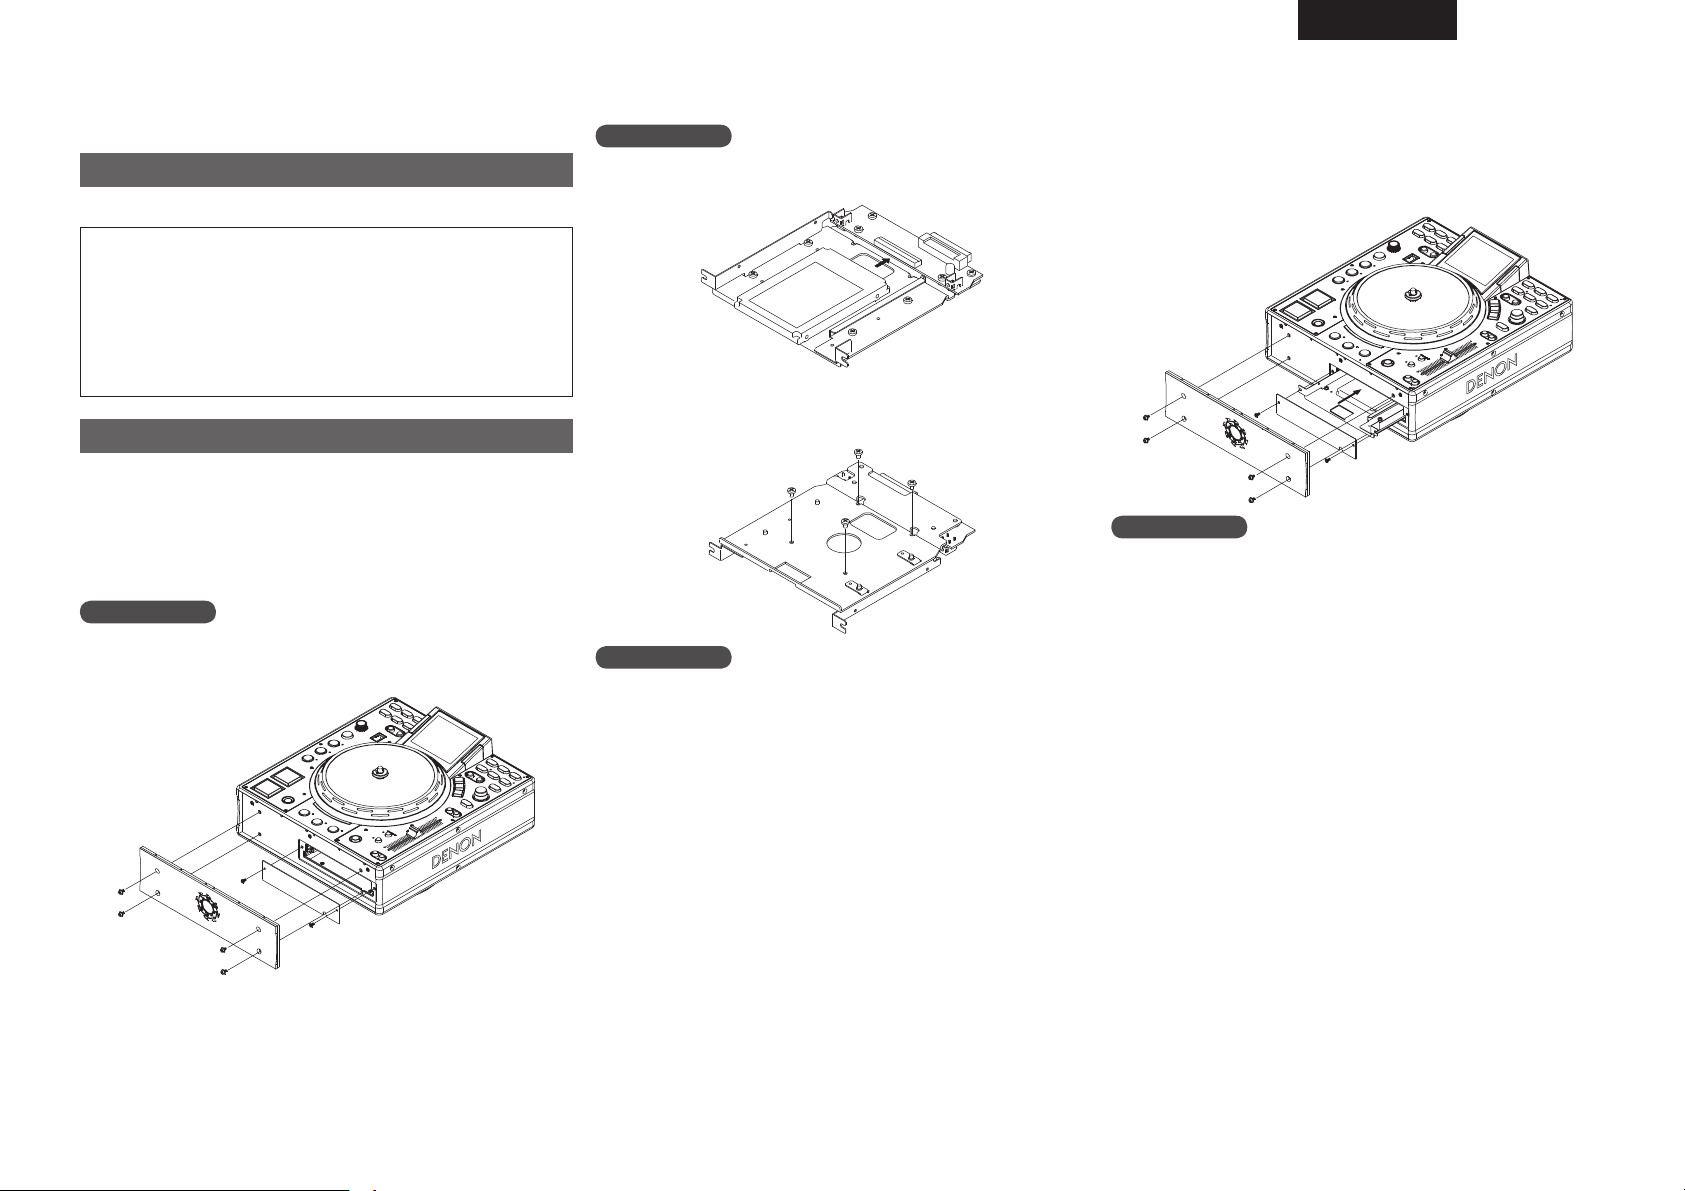
1. Turn the DN-HS5500’s power switch off and unplug the power
cord from the power outlet.
2. Remove the four screws (hexagonal head screws) fastening the
DN-HS5500’s front panel, then remove the front panel.
3. Remove the two screws fastening the plate under where the front
panel was mounted, then remove the plate.
NOTE
Do not put your fingers or other objects into the hole left when the plate
is removed or inside the unit. Doing so could lead to malfunction.
4. Line up the connector terminal of the hard disc drive (BU5503)
to the connector attached to the mounting kit, then press in the
direction of the arrow on the diagram to attach.
NOTE
Check carefully that the connector is properly lined up before pressing
on the hard disc drive.
5. Holding the hard disc and mounting kit, turn them over, then fasten
the hard disc drive to the mounting kit using the four included
screws (M3 x 4 mm).
NOTE
The hard disc drive can easily be damaged by shocks. Handle it
carefully so as not to drop it, etc.
Do not touch the circuit boards, connectors or other parts on the
mounting kit.
6. Holding the mount section of the mounting kit, insert the mounting
kit’s metal sheet into the hollow in the rail in the DN-HS5500’s
opening and push inside.
7. Fasten the plate that was removed above to the DN-HS5500
together with the mounting kit using the two included screws (M3
x 6 mm), as shown in the diagram.
8. Mount the front panel that was removed above to the DN-HS5500
using the four screws (M3 x 6 mm hexagonal head screws)
included with the DN-HS5500.
NOTE
Be sure to format the hard disc drive after mounting it.
For instructions on formatting, see “Initialization” in section A9, Utility
of the DN-HS5500’s owner’s manual.
The hard disc drive is now mounted on the DN-HS5500 and will
operate.
Handle the set in which the hard disc drive is installed with sufficient
care.

DEUTSCH
Wir wissen Ihre Entscheidung für dieses Produkt sehr zu schätzen.
Das BU5502 Hard Disc Drive Mounting Kit wurde eigens dafür
entwickelt, die DENON BU5503 Hard Disc an den DN-HS5500
Professional Media & Controller anzuschließen.
Zubehör
Überprüfen Sie, ob folgende Teile mitgeliefert sind.
q Bedienungsanleitung ............................................................... 1
w Montagesatz ............................................................................1
e Schrauben (M3 x 6 mm, schwarz) ...........................................2
r Schrauben (M3 x 4 mm) .......................................................... 4
t Sechskantschrauben (M3 x 6 mm) ..........................................4
y Inbusschlüssel ......................................................................... 1
u Liste der Service-Stationen .....................................................1
i Liste der Service-Stationen (Nur für Japan) ............................. 1
Montage
1. Schalten Sie den DN-HS5500 aus und ziehen Sie den Netzstecker
aus der Steckdose.
2. Entfernen Sie die vier Sechskantschrauben der Frontplatte des DN-
HS5500 und anschließend die Frontplatte selbst.
3. Entfernen Sie die beiden Schrauben des Blechs unterhalb der
Frontplatte und entfernen Sie anschließend dieses Blech.
HINWEIS
Greifen Sie nicht mit Ihren Fingern oder anderen Gegenständen in die
durch die Entfernung des Blechs entstandene Öffnung oder in das
Gerät. Das kann zu Funktionsstörungen führen.
4. Richten Sie die Anschlussleiste der Festplatte (BU5503) an
dem Steckverbinder des Montagesatzes aus und drücken Sie
anschließend in die Richtung des dargestellten Pfeils, um die
Verbindung herzustellen.
HINWEIS
Überprüfen Sie sorgfältig, dass der Steckverbinder korrekt ausgerichtet
ist, bevor Sie ihn mit der Festplatte verbinden.
5. Halten Sie die Festplatte und den Montagesatz, drehen Sie sie
um und befestigen Sie anschließend die Festplatte mit den vier
mitgelieferten Schrauben (M3 x 4 mm) am Montagesatz.
HINWEIS
Die Festplatte kann durch Stöße leicht beschädigt werden. Behandeln
Sie sie vorsichtig und lassen sie z.B. nicht fallen.
Berühren Sie die Platinen, Steckverbinder oder andere Teile des
Montagesatzes nicht.
6. Halten Sie das Anbauteil des Montagesatzes, führen Sie die
Metallplatte des Montagesatzes in die Aussparung der Schiene in
der Öffnung des DN-HS5500 und drücken Sie sie hinein.
7. Befestigen Sie das zuvor abmontierte Blech mit den beiden
mitgelieferten Schrauben (M3 x 6 mm) am DN-HS5500 zusammen
mit dem Montagesatz, wie abgebildet.
8. Montieren Sie das zuvor abmontierte Blech mit den vier mit dem
DN-HS5500 mitgelieferten Schrauben (Sechskantschrauben M3 x
6 mm) am DN-HS5500.
HINWEIS
Formatieren Sie die Festplatte nach dem Einbau.
Informationen zur Formatierung finden Sie unter “Initialisierung” in
Abschnitt A9, Funktionsmerkmal, der Bedienungsanleitung des DNHS5500.
Die Festplatte ist nun mit dem DN-HS5500 verbunden und kann in
Betrieb genommen werden.
Behandeln Sie das Gerät, in das die Festplatte eingebaut wurde, mit
entsprechender Sorgfalt.
FRANCAIS
Nous vous remercions d’avoir acheté ce produit.
Le BU5502 Hard Disc Drive Mounting Kit a été spécialement conçu
pour installer le BU5503 Hard Disc DENON dans le DN-HS5500
Professional Media & Controller.
Accessoires
Vérifiez que tous les éléments suivants sont fournis.
q Manuel de l’Utilisateur ............................................................1
w Kit de support ..........................................................................1
e Vis (M3 x 6 mm, noires) ..........................................................2
r Vis (M3 x 4 mm) ......................................................................4
t Vis Tête hexagonale (M3 x 6 mm) ...........................................4
y Clé hex. ...................................................................................1
u Liste de points SAV .................................................................1
i Liste de points SAV (Japon uniquement) ................................1
Procédure de montage
1. Mettez l’interrupteur du DN-HS5500 sur off et débranchez le câble
d’alimentation de la prise.
2. Retirez les quatre vis (à tête hexagonale) du panneau avant du DN-
HS5500 puis ôtez le panneau.
3. Retirez les deux vis de la plaque située sous le panneau avant et
ôtez-la.
REMARQUE
Ne mettez pas vos doigts ou n’insérez pas d’objets à l’intérieur
de l’appareil une fois la plaque retirée. Cela pourrait causer des
dysfonctionnements.
4. Insérez la connectique du disque dur (BU5503) dans le connecteur
du kit de support, puis poussez dans la direction de la flèche sur le
schéma pour les connecter.
REMARQUE
Veillez à ce que la connectique soit correctement insérée et alignée
avant de pousser sur le disque dur.
5. Maintenez le disque dur et le kit support, retournez l’ensemble
et vissez les deux éléments avec les quatre vis fournies (M3 x 4
mm).
REMARQUE
Le disque dur est très sensible aux chocs. Manipulez-le soigneusement
afin d’éviter de l’abîmer etc.
Ne touchez pas les circuits intégrés, les connectiques ou les autres
éléments du kit support.
6. Saisissez le kit par son support, insérez la plaque de métal dans le
rail vide à l’intérieur du DN-HS5500 et insérez le kit à l’intérieur.
7. Vissez la plaque du DN-HS5500 avec le kit support en utilisant les
deux vis (M3 x 6 mm), comme sur le schéma.
8. Vissez le panneau avant que vous avez retiré à l’étape deux au
DN-HS5500 à l’aide des quatre vis (M3 x 6 mm à tête hexagonale)
fournies avec le DN-HS5500.
REMARQUE
Veillez à formater le disque dur avant de l’installer.
Pour plus d’informations sur le formatage, reportez-vous à la partie
“Initialisation” de la section A9 du manuel de l’utilisateur de l’Utilitaire
DN-HS5500.
Le disque dur est maintenant installé dans le DN-HS5500 et est prêt
à l’emploi.
L’ensemble contenant le disque dur est à manipuler avec beaucoup
de soin.