

Page 1

CD DRIVE & MOUNTING KIT
CDドライブ&マウンティングキット
BU5501
Owner’s Manual
Bedienungsanleitung
Manuel de l’Utilisateur
Manuale delle istruzioni
Manual del usuario
Gebruiksaanwijzing
Bruksanvisning
غᏮངಖ༚
取扱説明書
Page 2
ITALIANO ESPAÑOL NEDERLANDS SVENSKAENGLISH DEUTSCH FRANCAIS
SAFETY PRECAUTIONS
n
CAUTION
RISK OF ELECTRIC SHOCK
DO NOT OPEN
CAUTION:
TO REDUCE THE RISK OF ELECTRIC SHOCK, DO NOT REMOVE
COVER (OR BACK). NO USER-SERVICEABLE PARTS INSIDE.
REFER SERVICING TO QUALIFIED SERVICE PERSONNEL.
The lightning flash with arrowhead symbol, within an equilateral
triangle, is intended to alert the user to the presence of
uninsulated “dangerous voltage” within the product’s enclosure
that may be of sufficient magnitude to constitute a risk of electric
shock to persons.
The exclamation point within an equilateral triangle is intended
to alert the user to the presence of important operating
and maintenance (servicing) instructions in the literature
accompanying the appliance.
IMPORTANT TO SAFETY
WARNING:
To reduce the risk of fire and electric shock, this apparatus
should not be exposed to rain or moisture and objects filled
with liquids, such as vases, should not be placed on this
apparatus.
European models
$-"44
-"4&3
130%6$5
U.S.A., Canada models
IMPORTANT SAFETY
INSTRUCTIONS
READ BEFORE OPERATING EQUIPMENT
This product was designed and manufactured to meet strict quality and safety
standards. There are, however, some installation and operation precautions
which you should be particularly aware of.
1. Read these instructions.
2. Keep these instructions.
3. Heed all warnings.
4. Follow all instructions.
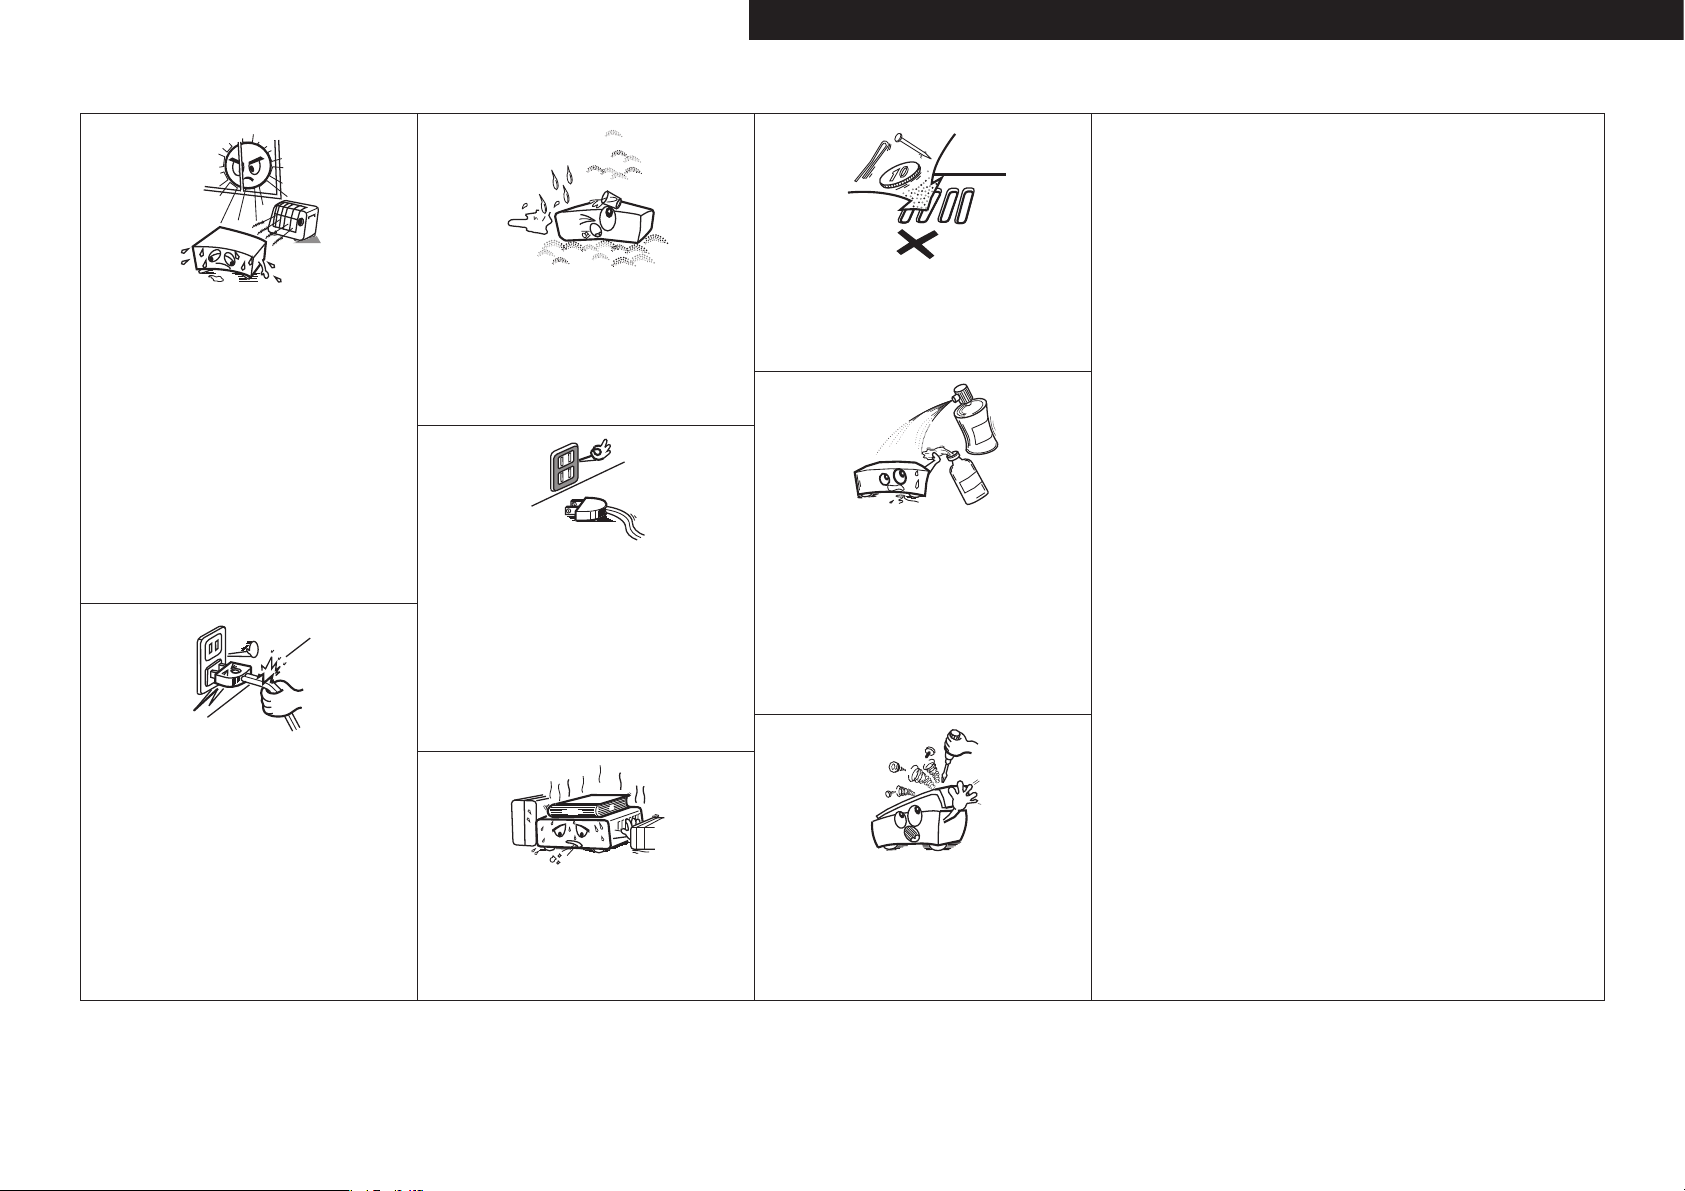
5. Do not use this apparatus near water.
6. Clean only with dry cloth.
7. Do not block any ventilation openings. Install in accordance with the
manufacture’s instructions.
8. Do not install near any heat sources such as radiators, heat registers, stoves,
or other apparatus (including amplifiers) that produce heat.
9. Do not defeat the safety purpose of the polarized or grounding-type plug. A
polarized plug has two blades with one wider than the other. A grounding
type plug has two blades and a third grounding prong. The wide blade or the
third prong are provided for your safety. If the provided plug does not fit into
your outlet, consult an electrician for replacement of the obsolete outlet.
10. Protect the power cord from being walked on or pinched particularly at
plugs, convenience receptacles, and the point where they exit from the
apparatus.
11. Only use attachments/accessories specified by the manufacturer.
12. Use only with the cart, stand, tripod, bracket, or
table specified by the manufacturer, or sold with the
apparatus.
When a cart is used, use caution when moving the cart/
apparatus combination to avoid injury from tip-over.
Marking sign is located on bottom of the unit.
I
13. Unplug this apparatus during lightning storms or when unused for long
periods of time.
14. Refer all servicing to qualified service personnel. Servicing is required when
the apparatus has been damaged in any way, such as power-supply cord
or plug is damaged, liquid has been spilled or objects have fallen into the
apparatus, the apparatus has been exposed to rain or moisture, does not
operate normally, or has been dropped.
Additional Safety Information!
Marked terminals are HAZARDOUS LIVE and that the external wiring
15.
connected to those terminal requires installation by an instructed
person or the use of ready-made leads or cords.
Page 3
NOTE ON USE / HINWEISE ZUM GEBRAUCH / OBSERVATIONS RELATIVES A L’UTILISATION / NOTE
n
SULL’USO / NOTAS SOBRE EL USO / ALVORENS TE GEBRUIKEN / OBSERVERA ANGÅENDE ANVÄNDNINGEN
• Do not let foreign objects into the unit.
Lassen Sie keine fremden Gegenstände in das Gerät kommen.
•
• Ne pas laisser des objets étrangers dans l’appareil.
• Non inserite corpi estranei all’interno dell’unità.
• No deje objetos extraños dentro del equipo.
• Laat geen vreemde voorwerpen in dit apparaat vallen.
• Se till att främmande föremål inte tränger in i apparaten.
• Do not let insecticides, benzene, and thinner come in
contact with the unit.
• Lassen Sie das Gerät nicht mit Insektiziden, Benzin oder
Verdünnungsmitteln in Berührung kommen.
• Ne pas mettre en contact des insecticides, du benzène et
un diluant avec l’appareil.
• Assicuratevi che l’unità non entri in contatto con insetticidi,
benzolo o solventi.
• No permita el contacto de insecticidas, gasolina y diluyentes
con el equipo.
• Voorkom dat insecticiden, benzeen of verfverdunner met dit
toestel in contact komen.
• Se till att inte insektsmedel på spraybruk, bensen och
thinner kommer i kontakt med apparatens hölje.
• Never disassemble or modify the unit in any way.
• Versuchen Sie niemals das Gerät auseinander zu nehmen
oder zu verändern.
• Ne jamais démonter ou modifier l’appareil d’une manière ou
d’une autre.
• Non smontate né modificate l’unità in alcun modo.
• Nunca desarme o modifique el equipo de ninguna manera.
• Dit toestel mag niet gedemonteerd of aangepast worden.
• Ta inte isär apparaten och försök inte bygga om den.
• Avoid high temperatures.
Allow for sufficient heat dispersion when installed in a rack.
• Vermeiden Sie hohe Temperaturen.
Beachten Sie, dass eine ausreichende Belüftung gewährleistet
wird, wenn das Gerät auf ein Regal gestellt wird.
• Eviter des températures élevées.
Tenir compte d’une dispersion de chaleur suffisante lors de
l’installation sur une étagère.
• Evitate di esporre l’unità a temperature elevate.
Assicuratevi che vi sia un’adeguata dispersione del calore
quando installate l’unità in un mobile per componenti audio.
• Evite altas temperaturas.
Permite la suficiente dispersión del calor cuando está
instalado en la consola.
• Vermijd hoge temperaturen.
Zorg er bij installatie in een audiorack voor, dat de door
het toestel geproduceerde warmte goed kan worden
afgevoerd.
• Undvik höga temperaturer.
Se till att det finns möjlighet till god värmeavledning vid
montering i ett rack.
• Handle the power cord carefully.
Hold the plug when unplugging the cord.
• Gehen Sie vorsichtig mit dem Netzkabel um.
Halten Sie das Kabel am Stecker, wenn Sie den Stecker
herausziehen.
• Manipuler le cordon d’alimentation avec précaution.
Tenir la prise lors du débranchement du cordon.
• Manneggiate il cavo di alimentazione con attenzione.
Tenete ferma la spina quando scollegate il cavo dalla presa.
• Maneje el cordón de energía con cuidado.
Sostenga el enchufe cuando desconecte el cordón de
energía.
• Hanteer het netsnoer voorzichtig.
Houd het snoer bij de stekker vast wanneer deze moet
worden aan- of losgekoppeld.
• Hantera nätkabeln varsamt.
Håll i kabeln när den kopplas från el-uttaget.
• Keep the unit free from moisture, water, and dust.
• Halten Sie das Gerät von Feuchtigkeit, Wasser und Staub
fern.
• Protéger l’appareil contre l’humidité, l’eau et la poussière.
• Tenete l’unità lontana dall’umidità, dall’acqua e dalla
polvere.
• Mantenga el equipo libre de humedad, agua y polvo.
• Laat geen vochtigheid, water of stof in het apparaat
binnendringen.
• Utsätt inte apparaten för fukt, vatten och damm.
• Unplug the power cord when not using the unit for long
periods of time.
• Wenn das Gerät längere Zeit nicht verwendet werden soll,
trennen Sie das Netzkabel vom Netzstecker.
• Débrancher le cordon d’alimentation lorsque l’appareil n’est
pas utilisé pendant de longues périodes.
• Scollegate il cavo di alimentazione quando prevedete di non
utilizzare l’unità per un lungo periodo di tempo.
• Desconecte el cordón de energía cuando no utilice el equipo
por mucho tiempo.
Neem altijd het netsnoer uit het stopkontakt wanneer het
•
apparaat gedurende een lange periode niet wordt gebruikt.
• Koppla loss nätkabeln om apparaten inte kommer att
användas i lång tid.
* (For apparatuses with ventilation holes)
• Do not obstruct the ventilation holes.
• Decken Sie den Lüftungsbereich nicht ab.
• Ne pas obstruer les trous d’aération.
• Non coprite i fori di ventilazione.
• No obstruya los orificios de ventilación.
• De ventilatieopeningen mogen niet worden beblokkeerd.
• Täpp inte till ventilationsöppningarna.
ENGLISHDEUTSCHFRANCAISITALIANOESPAÑOLNEDERLANDSSVENSKA
CAUTION:
• The ventilation should not be impeded by covering the ventilation openings with items,
such as newspapers, tablecloths, curtains, etc.
• No naked flame sources, such as lighted candles, should be placed on the unit.
• Observe and follow local regulations regarding battery disposal.
• Do not expose the unit to dripping or splashing fluids.
• Do not place objects filled with liquids, such as vases, on the unit.
ACHTUNG:
• Die Belüftung sollte auf keinen Fall durch das Abdecken der Belüftungsöffnungen durch
Gegenstände wie beispielsweise Zeitungen, Tischtücher, Vorhänge o. Ä. behindert
werden.
• Auf dem Gerät sollten keinerlei direkte Feuerquellen wie beispielsweise angezündete
Kerzen aufgestellt werden.
• Bitte beachten Sie bei der Entsorgung der Batterien die örtlich geltenden
Umweltbestimmungen.
• Das Gerät sollte keiner tropfenden oder spritzenden Flüssigkeit ausgesetzt werden.
• Auf dem Gerät sollten keine mit Flüssigkeit gefüllten Behälter wie beispielsweise Vasen
aufgestellt werden.
ATTENTION:
• La ventilation ne doit pas être gênée en recouvrant les ouvertures de la ventilation avec des
objets tels que journaux, rideaux, tissus, etc.
• Aucune flamme nue, par exemple une bougie, ne doit être placée sur l’appareil.
• Veillez à respecter les lois en vigueur lorsque vous jetez les piles usagées.
• L’appareil ne doit pas être exposé à l’eau ou à l’humidité.
• Ne pas poser d’objet contenant du liquide, par exemple un vase, sur l’appareil.
ATTENZIONE:
• Le aperture di ventilazione non devono essere ostruite coprendole con oggetti, quali
giornali, tovaglie, tende e così via.
• Non posizionate sull’unità fiamme libere, come ad esempio candele accese.
• Prestate attenzione agli aspetti legati alla tutela dell’ambiente nello smaltimento delle
batterie.
• L’apparecchiatura non deve essere esposta a gocciolii o spruzzi.
• Non posizionate sull’unità alcun oggetto contenente liquidi, come ad esempio i vasi.
PRECAUCIÓN:
• La ventilación no debe quedar obstruida por haberse cubierto las aperturas con objetos
como periódicos, manteles, cortinas, etc.
• No debe colocarse sobre el aparato ninguna fuente inflamable sin protección, como velas
encendidas.
• A la hora de deshacerse de las pilas, respete la normativa para el cuidado del medio
ambiente.
• No exponer el aparato al goteo o salpicaduras cuando se utilice.
• No colocar sobre el aparato objetos llenos de líquido, como jarros.
WAARSCHUWING:
• De ventilatie mag niet worden belemmerd door de ventilatieopeningen af te dekken met
bijvoorbeeld kranten, een tafelkleed, gordijnen, enz.
• Plaats geen open vlammen, bijvoorbeeld een brandende kaars, op het apparaat.
• Houd u steeds aan de milieuvoorschriften wanneer u gebruikte batterijen wegdoet.
• Stel het apparaat niet bloot aan druppels of spatten.
• Plaats geen voorwerpen gevuld met water, bijvoorbeeld een vaas, op het apparaat.
OBSERVERA:
• Ventilationen bör inte förhindras genom att täcka för ventilationsöppningarna med föremål
såsom tidningar, bordsdukar, gardiner osv.
• Inga blottade brandkällor, såsom tända ljus, får placeras på apparaten.
• Tänk på miljöaspekterna när du bortskaffar batterier.
• Apparaten får inte utsättas för vätska.
• Placera inte föremål fyllda med vätska, t.ex. vaser, på apparaten.
II
Page 4
ITALIANO ESPAÑOL NEDERLANDS SVENSKAENGLISH DEUTSCH FRANCAIS
CAUTION:
To completely disconnect this product from the
mains, disconnect the plug from the wall socket
outlet.
The mains plug is used to completely interrupt the
power supply to the unit and must be within easy
access by the user.
VORSICHT:
Um dieses Gerät vollständig von der
Stromversorgung abzutrennen, ziehen Sie bitte
den Stecker aus der Wandsteckdose.
Der Netzstecker wird verwendet, um
die Stromversorgung zum Gerät völlig zu
unterbrechen; er muss für den Benutzer gut und
einfach zu erreichen sein.
PRECAUTION:
Pour déconnecter complètement ce produit du
courant secteur, débranchez la prise de la prise
murale.
La prise secteur est utilisée pour couper
complètement l’alimentation de l’appareil et
l’utilisateur doit pouvoir y accéder facilement.
ATTENZIONE:
Per scollegare completamente questo prodotto dalla
rete di alimentazione elettrica, scollegare la spina
dalla relativa presa a muro.
La spina di rete viene utilizzata per interrompere
completamente l’alimentazione all’unità e deve
essere facilmente accessibile all’utente.
PRECAUCIÓN:
Para desconectar completamente este producto
de la alimentación eléctrica, desconecte el
enchufe del enchufe de la pared.
El enchufe de la alimentación eléctrica se utiliza
para interrumpir por completo el suministro de
alimentación eléctrica a la unidad y debe de
encontrarse en un lugar al que el usuario tenga
fácil acceso.
WAARSCHUWING:
Om de voeding van dit product volledig te
onderbreken moet de stekker uit het stopcontact
worden getrokken.
De netstekker wordt gebruikt om de stroomtoevoer
naar het toestel volledig te onderbreken en moet
voor de gebruiker gemakkelijk bereikbaar zijn.
FÖRSIKTIHETSMÅTT:
Koppla loss stickproppen från eluttaget för att helt
skilja produkten från nätet.
Stickproppen används för att helt bryta
strömförsörjningen till apparaten, och den måste
vara lättillgänglig för användaren.
• DECLARATION OF CONFORMITY
We declare under our sole responsibility that this
product, to which this declaration relates, is in
conformity with the following standards:
EN60065, EN55013, EN55020, EN61000-3-2 and
EN61000-3-3.
Following the provisions of 73/23/EEC, 2004/108/EC
and 93/68/EEC Directive.
• ÜBEREINSTIMMUNGSERKLÄRUNG
Wir erklären unter unserer Verantwortung, daß dieses
Produkt, auf das sich diese Erklärung bezieht, den
folgenden Standards entspricht:
EN60065, EN55013, EN55020, EN61000-3-2 und
EN61000-3-3.
Entspricht den Verordnungen der Direktive 73/23/ EEC,
2004/108/EC und 93/68/EEC.
• DECLARATION DE CONFORMITE
Nous déclarons sous notre seule responsabilité que
l’appareil, auquel se réfère cette déclaration, est
conforme aux standards suivants:
EN60065, EN55013, EN55020, EN61000-3-2 et
EN61000-3-3.
D’après les dispositions de la Directive 73/23/EEC,
2004/108/EC et 93/68/EEC.
• DICHIARAZIONE DI CONFORMITÀ
Dichiariamo con piena responsabilità che questo
prodotto, al quale la nostra dichiarazione si riferisce, è
conforme alle seguenti normative:
EN60065, EN55013, EN55020, EN61000-3-2 e
EN61000-3-3.
In conformità con le condizioni delle direttive 73/23/
EEC, 2004/108/EC e 93/68/EEC.
QUESTO PRODOTTO E’ CONFORME
AL D.M. 28/08/95 N. 548
• DECLARACIÓN DE CONFORMIDAD
Declaramos bajo nuestra exclusiva responsabilidad que
este producto al que hace referencia esta declaración,
está conforme con los siguientes estándares:
EN60065, EN55013, EN55020, EN61000-3-2 y
EN61000-3-3.
Siguiendo las provisiones de las Directivas 73/23/ EEC,
2004/108/EC y 93/68/EEC.
• EENVORMIGHEIDSVERKLARING
Wij verklaren uitsluitend op onze verantwoordelijkheid
dat dit produkt, waarop deze verklaring betrekking heeft,
in overeenstemming is met de volgende normen:
EN60065, EN55013, EN55020, EN61000-3-2 en EN61000-
3-3.
Volgens de bepalingen van de Richtlijnen 73/23/EEC,
2004/108/EC en 93/68/EEC.
• ÖVERENSSTÄMMELSESINTYG
Härmed intygas helt på eget ansvar att denna produkt
vilken detta intyg avser, uppfyller följande standarder:
EN60065, EN55013, EN55020, EN61000-3-2 och
EN61000-3-3. Enligt stadgarna i direktiv 73/23/EEC,
2004/108/EC och 93/68/EEC.
A NOTE ABOUT RECYCLING:
This product’s packaging materials are recyclable and can be reused. Please dispose of any materials
in accordance with the local recycling regulations.
When discarding the unit, comply with local rules or regulations.
Batteries should never be thrown away or incinerated but disposed of in accordance with the local
regulations concerning battery disposal.
This product and the supplied accessories, excluding the batteries, constitute the applicable product
according to the WEEE directive.
HINWEIS ZUM RECYCLING:
Das Verpackungsmaterial dieses Produktes ist zum Recyceln geeignet und kann wieder verwendet werden. Bitte
entsorgen Sie alle Materialien entsprechend der örtlichen Recycling-Vorschriften.
Beachten Sie bei der Entsorgung des Gerätes die örtlichen Vorschriften und Bestimmungen.
Die Batterien dürfen nicht in den Hausmüll geworfen oder verbrannt werden; bitte entsorgen Sie die Batterien gemäß
der örtlichen Vorschriften.
Dieses Produkt und das im Lieferumfang enthaltene Zubehör (mit Ausnahme der Batterien!) entsprechen der WEEEDirektive.
UNE REMARQUE CONCERNANT LE RECYCLAGE:
Les matériaux d’emballage de ce produit sont recyclables et peuvent être réutilisés. Veuillez disposer des matériaux
conformément aux lois sur le recyclage en vigueur.
Lorsque vous mettez cet appareil au rebut, respectez les lois ou réglementations en vigueur.
Les piles ne doivent jamais être jetées ou incinérées, mais mises au rebut conformément aux lois en vigueur sur la
mise au rebut des piles.
Ce produit et les accessoires inclus, à l’exception des piles, sont des produits conformes à la directive DEEE.
NOTA RELATIVA AL RICICLAGGIO:
I materiali di imballaggio di questo prodotto sono riutilizzabili e riciclabili. Smaltire i materiali conformemente alle
normative locali sul riciclaggio.
Per lo smaltimento dell’unità, osservare le normative o le leggi locali in vigore.
Non gettare le batterie, né incenerirle, ma smaltirle conformemente alla normativa locale sui rifiuti chimici.
Questo prodotto e gli accessori inclusi nell’imballaggio sono applicabili alla direttiva RAEE, ad eccezione delle batterie.
ACERCA DEL RECICLAJE:
Los materiales de embalaje de este producto son reciclables y se pueden volver a utilizar. Disponga de estos materiales
siguiendo los reglamentos de reciclaje de su localidad.
Cuando se deshaga de la unidad, cumpla con las reglas o reglamentos locales.
Las pilas nunca deberán tirarse ni incinerarse. Deberá disponer de ellas siguiendo los reglamentos de su localidad
relacionados con los desperdicios químicos.
Este producto junto con los accesorios empaquetados es el producto aplicable a la directiva RAEE excepto pilas.
EEN AANTEKENING MET BETREKKING TOT DE RECYCLING:
Het inpakmateriaal van dit product is recycleerbaar en kan opnieuw gebruikt worden. Er wordt verzocht om zich van
elk afvalmateriaal te ontdoen volgens de plaatselijke voorschriften.
Volg voor het wegdoen van de speler de voorschriften voor de verwijdering van wit- en bruingoed op.
Batterijen mogen nooit worden weggegooid of verbrand, maar moeten volgens de plaatselijke voorschriften
betreffende chemisch afval worden verwijderd.
Op dit product en de meegeleverde accessoires, m.u.v. de batterijen is de richtlijn voor afgedankte elektrische en
elektronische apparaten (WEEE) van toepassing.
OBSERVERA ANGÅENDE ÅTERVINNING:
Produktens emballage är återvinningsbart och kan återanvändas. Kassera det enligt lokala återvinningsbestämmelser.
När du kasserar enheten ska du göra det i överensstämmelse med lokala regler och bestämmelser.
Batterier får absolut inte kastas i soporna eller brännas. Kassera dem enligt lokala bestämmelser för kemiskt avfall.
Denna apparat och de tillbehör som levereras med den uppfyller gällande WEEE-direktiv, med undantag av
batterierna.
III
Page 5
ENGLISHDEUTSCHFRANCAISITALIANOESPAÑOLNEDERLANDSSVENSKA
CAUTION:
1. Handle the power supply cord carefully
Do not damage or deform the power supply cord. If it is damaged
or deformed, it may cause electric shock or malfunction when used.
When removing from wall outlet, be sure to remove by holding the
plug attachment and not by pulling the cord.
2. Do not open the rear cover
In order to prevent electric shock, do not open the top cover.
If problems occur, contact your DENON DEALER.
3. Do not place anything inside
Do not place metal objects or spill liquid inside the system.
Electric shock or malfunction may result.
NOTE:
This CD player uses the semiconductor laser. To allow you to enjoy
music at a stable operation, it is recommended to use this in a room
of 5 °C (41 °F) –35 °C (95 °F).
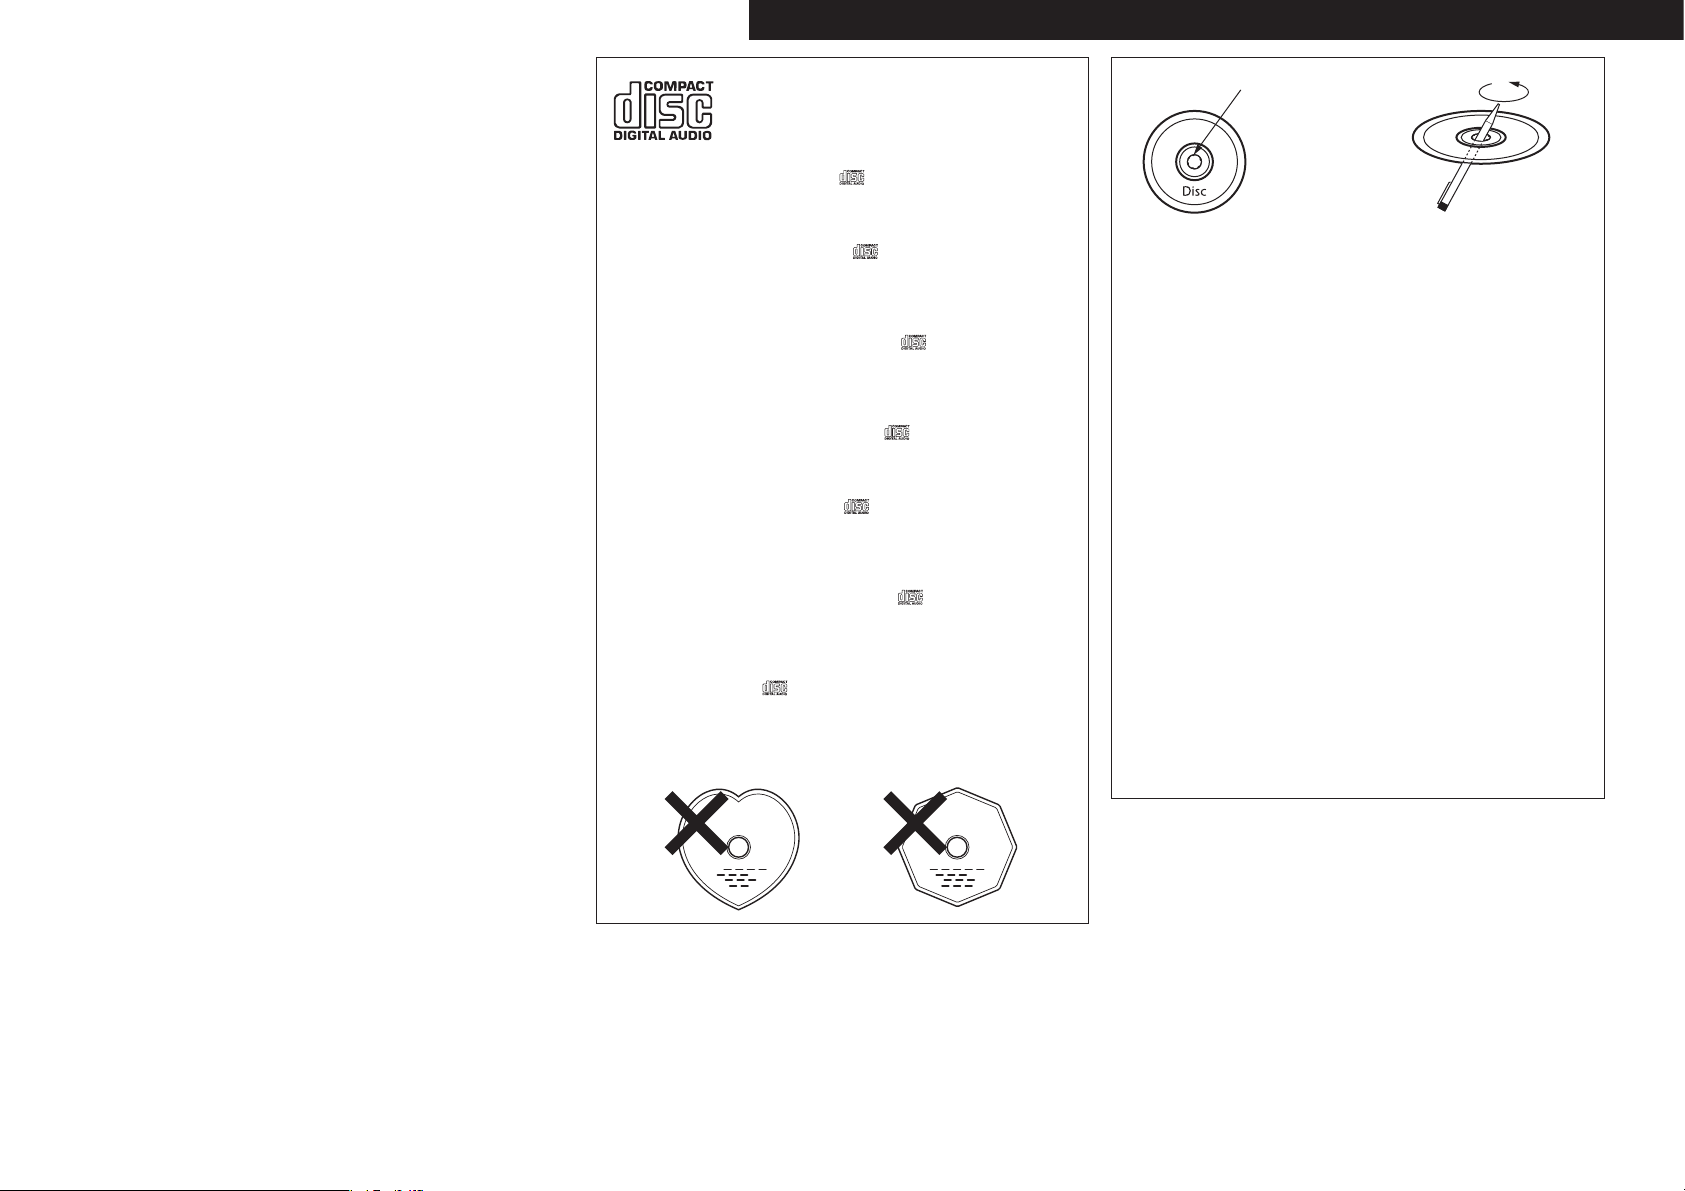
• Use compact discs that include the mark.
CD’s with special shapes (heart-shaped CD’s, octagonal CD’s etc.) cannot be
played on this set.
Attempting to do so may damage the set. Do not use such CD’s.
• Benutzen Sie Compact Discs, die das Zeichen tragen.
Speziell geformte CD’s (herzförmige CDs, achteckige CDs, usw.) können auf
dieser Anlage nicht abgespielt werden.
Der Versuch derartige CDs abzuspielen kann die Anlage beschädigen.
Verzichten Sie auf die Benutzung solcher CDs.
• Utiliser des disques compacts portant le logo .
Des CD avec des formes spéciales (CD en forme de coeur, des CD
octogonaux, etc.) ne peuvent pas être lus sur cet appareil.
Le fait de l’essayer, risque d’endommager le lecteur. Ne pas utiliser de tels
CD.
• Utilizzare compact disc contrassegnati con .
Non è possibile eseguire in questa unità CD con forme speciali (CD a forma
di cuore, ottagonali, ecc.), poiché possono danneggiare il prodotto. Non
utilizzare tali CD.
• Use discos compactos con la marca .
En este equipo no es posible reproducir CDs con formas especiales (CDs
con forma de corazón, CDs octagonales, etc.).
Si intenta hacerlo, el equipo podrá resultar dañado. No use este tipo de
CDs.
• Gebruik compact discs voorzien van het logo .
CD’s met speciale vormen (bijv. CD’s in de vorm van een hart, achthoekige
CD’s, enz.) kunnen met dit toestel niet worden afgespeeld.
Wanneer u dit toch probeert, zal u het toestel beschadigen. Speel dergelijke
CD’s dus niet af.
• Använd CD-skivor med -märket.
Specialformade CD-skivor (hjärtformade, åttkantiga, m m) går inte att spela
på den här apparaten.
Utrustningen kan skadas om du försöker göra detta. Använd inte CD-skivor
av denna typ.
Residue
Rückstand
Résidu
Residuo
Residuos
Oneffenheid
Plastrester
• The disc may not play normally if there is residue along the edges of the
center hole.
• When using new discs in particular, use a pen, etc., to remove the
residue.
• Die Disk kann nicht normal abgespielt werden, wenn sich ein Rückstand
entlang der Mittellochenden befindet.
• Insbesondere, wenn Sie neue Disks benutzen, dann entfernen Sie mit
einem Stift, etc. den Rückstand.
• Le disque peut ne pas être lu normalements s’il y a un résidu le long des
bord du trou central.
• Lors de l’utilisation de nouveaux disques en particulier, utiliser un stylo à
bille, etc., pour enlever le résidu.
• Il disco non viene eseguito in modo corretto se sono presenti residuo ai
bordi del foro centrale.
• Quando si utilizzano dischi nuovi, utilizzare una penna o uno strumento
simile, per rimuovere i residui.
• El disco no puede ser reproducido normalmente debido a la terminación
deficiente de los bordes del agujero central.
• Para quitar estos residuos de material, especialmente cuando vaya a re-
producir discos nuevos, utilice un bolígrafo, o algo similar.
• Het is mogelijk dat de disc niet normaal wordt weergegeven als de randen
van het middengat van de schijf oneffenheden vertonen.
• Verwijder vooral bij gebruik van nieuwe discs de oneffenheden met een
pen of iets dergelijks.
• Det kan uppstå fel vid CD-avspelningen om det finns plastrester kvar i
mitthålet.
• Tänk på att bort dessa med en penna, e d, särskilt om CD-skivan är ny.
IV
Page 6
ENGLISH
We greatly appreciate your purchase of this product.
The BU5501 CD Drive & Mounting Kit is designed specifically for
mounting to the DN-HS5500 Professional Media & Controller.
Accessories
Check that the following parts supplied with the product.
q Owner’s Manual ...................................................................... 1
w CD Drive & Mounting Kit .........................................................1
e Screws (M3 x 6 mm, Black) ....................................................2
r Hex. Head Screws (M3 x 6 mm) ............................................. 4
t Plate ........................................................................................1
y Front panel ..............................................................................1
u Hex. wrench ............................................................................1
i Service Station List .................................................................. 1
o Service Station List (For Japan only) .......................................1
NOTE
Be sure to download the firmware from the website shown below and
update the product’s firmware version.
www.denondj.com
The functions describe in these handling instructions will not operate
unless the firmware is updated.
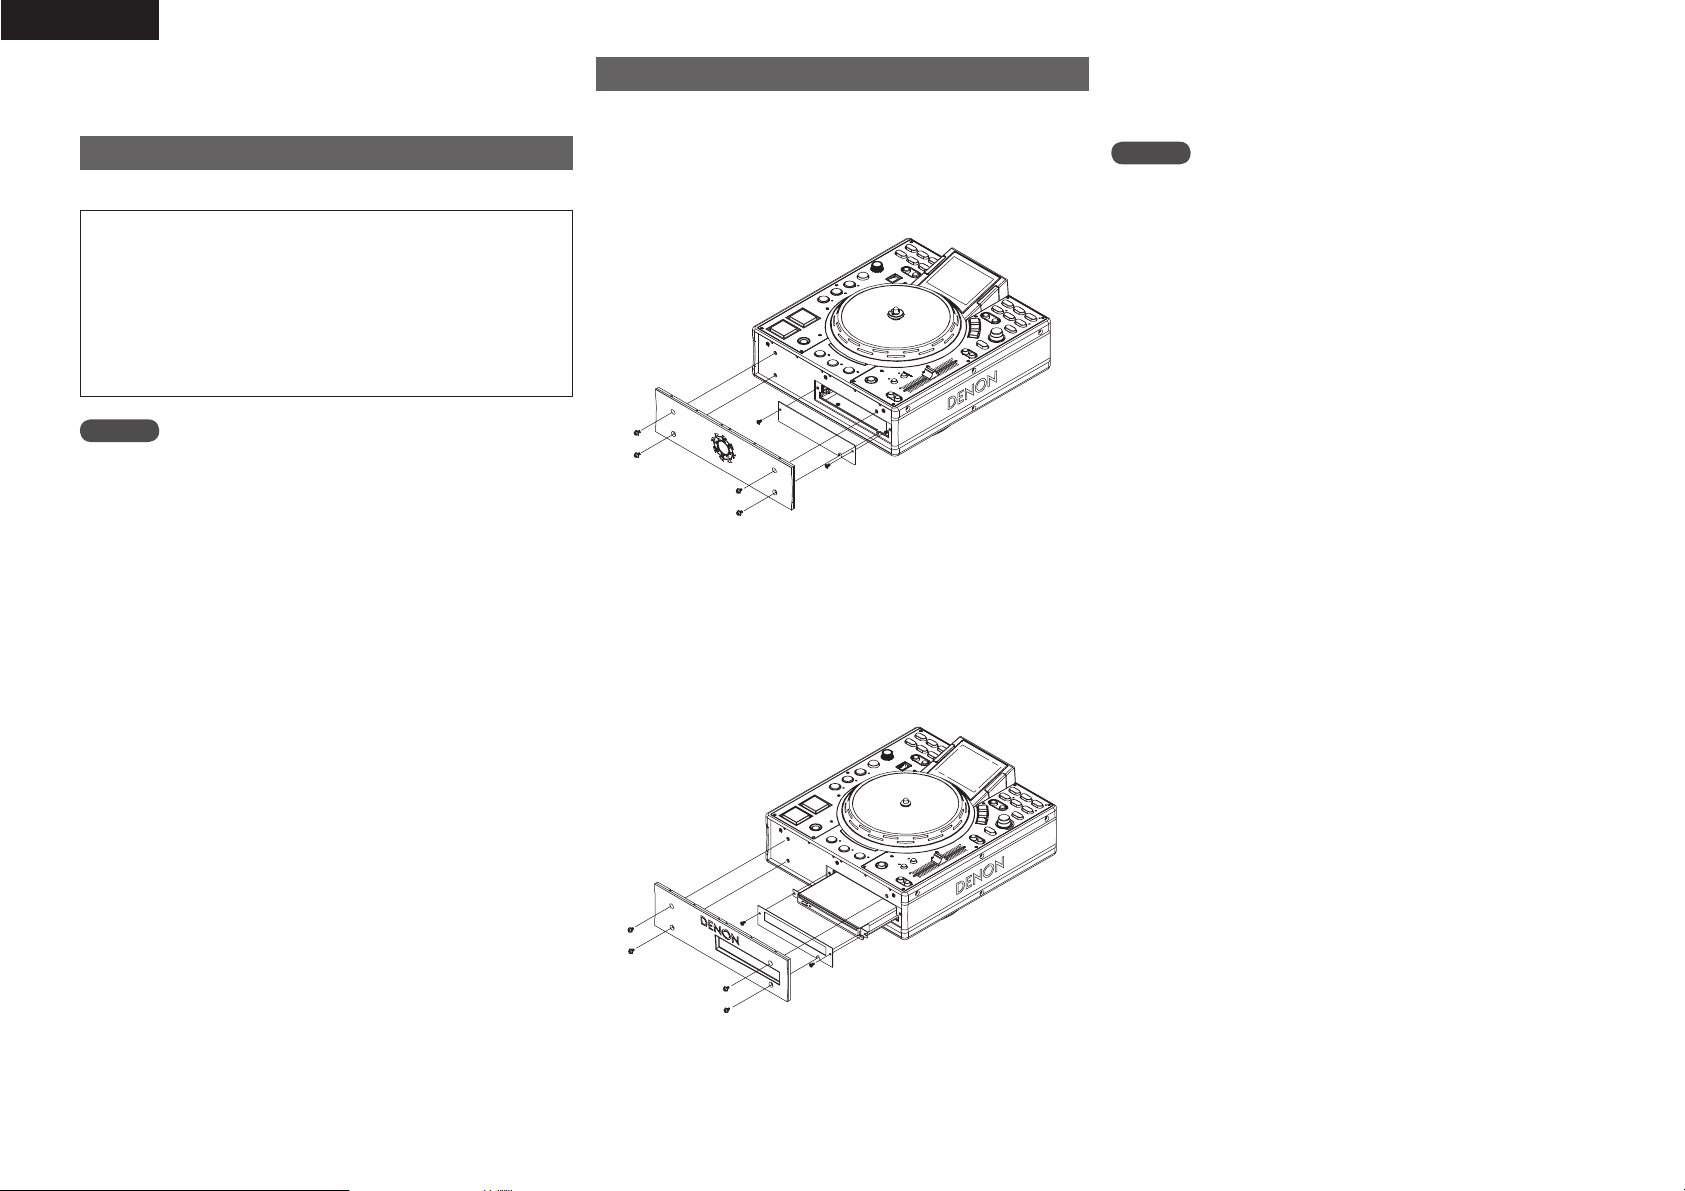
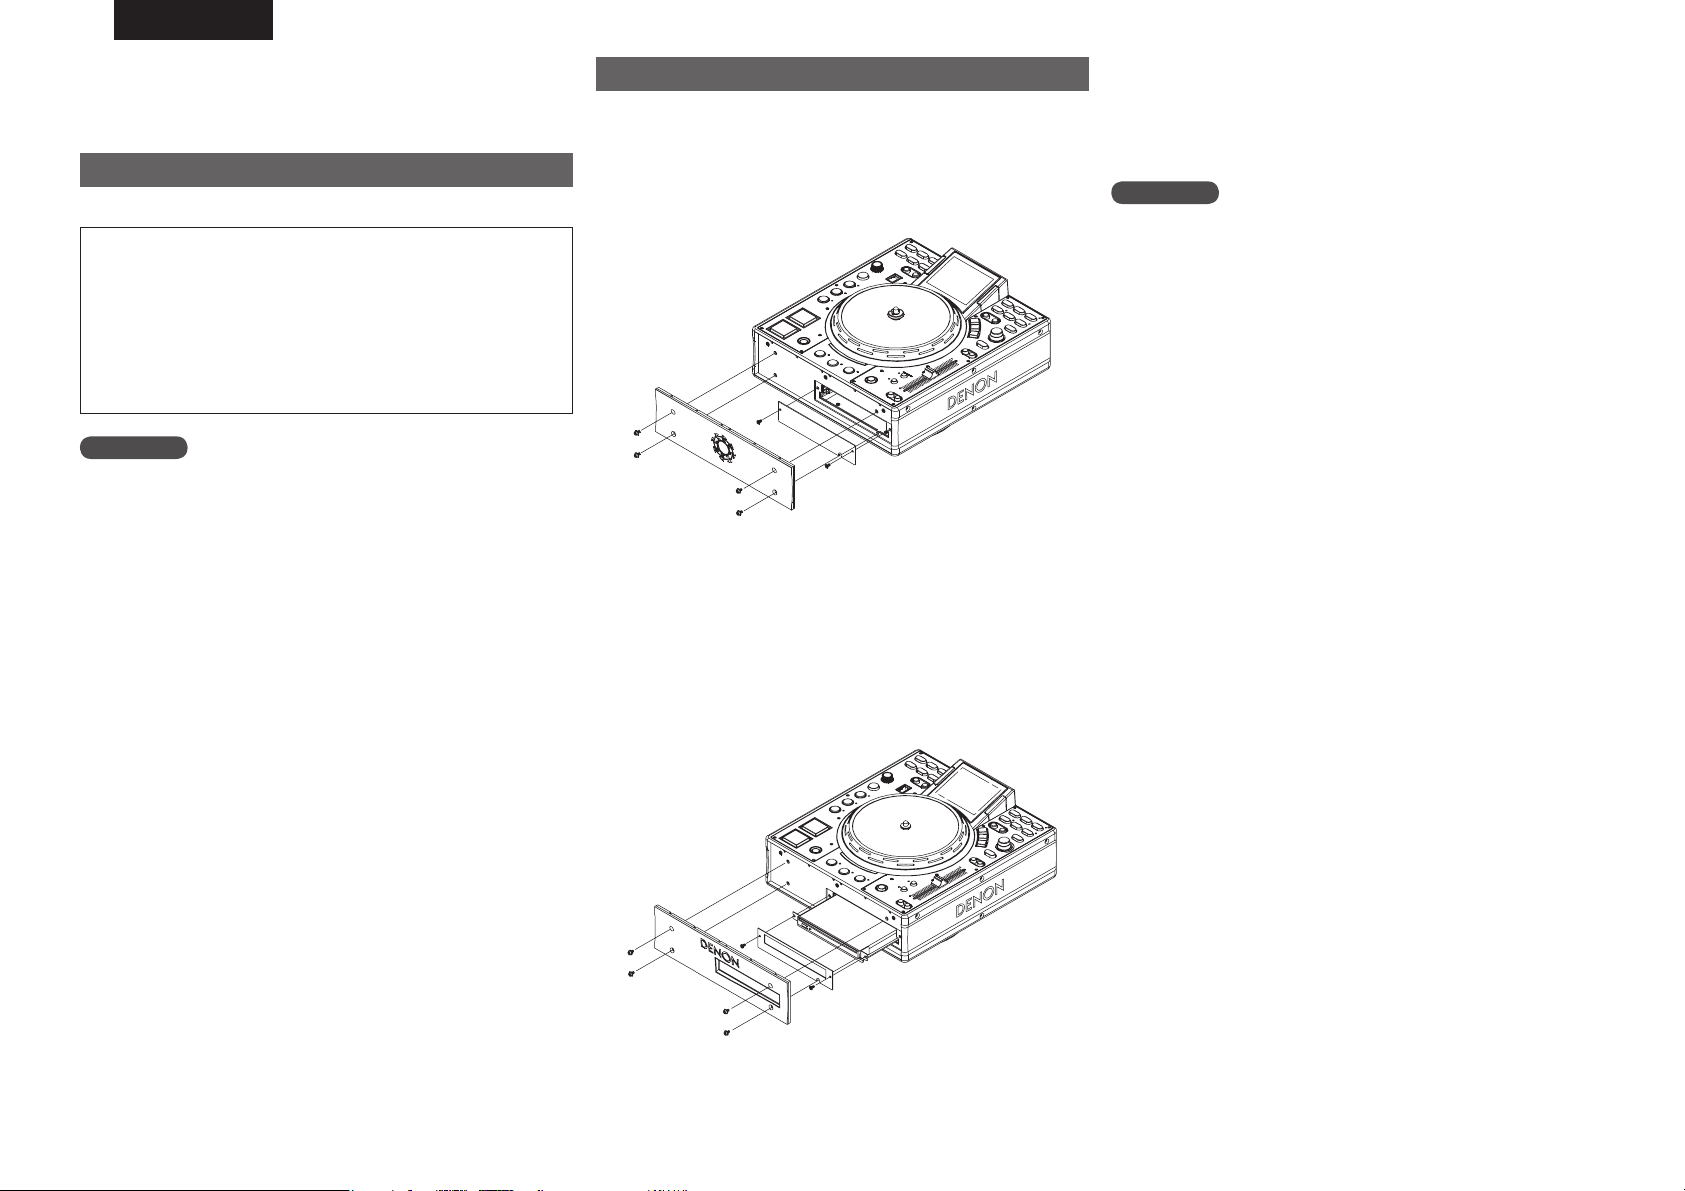
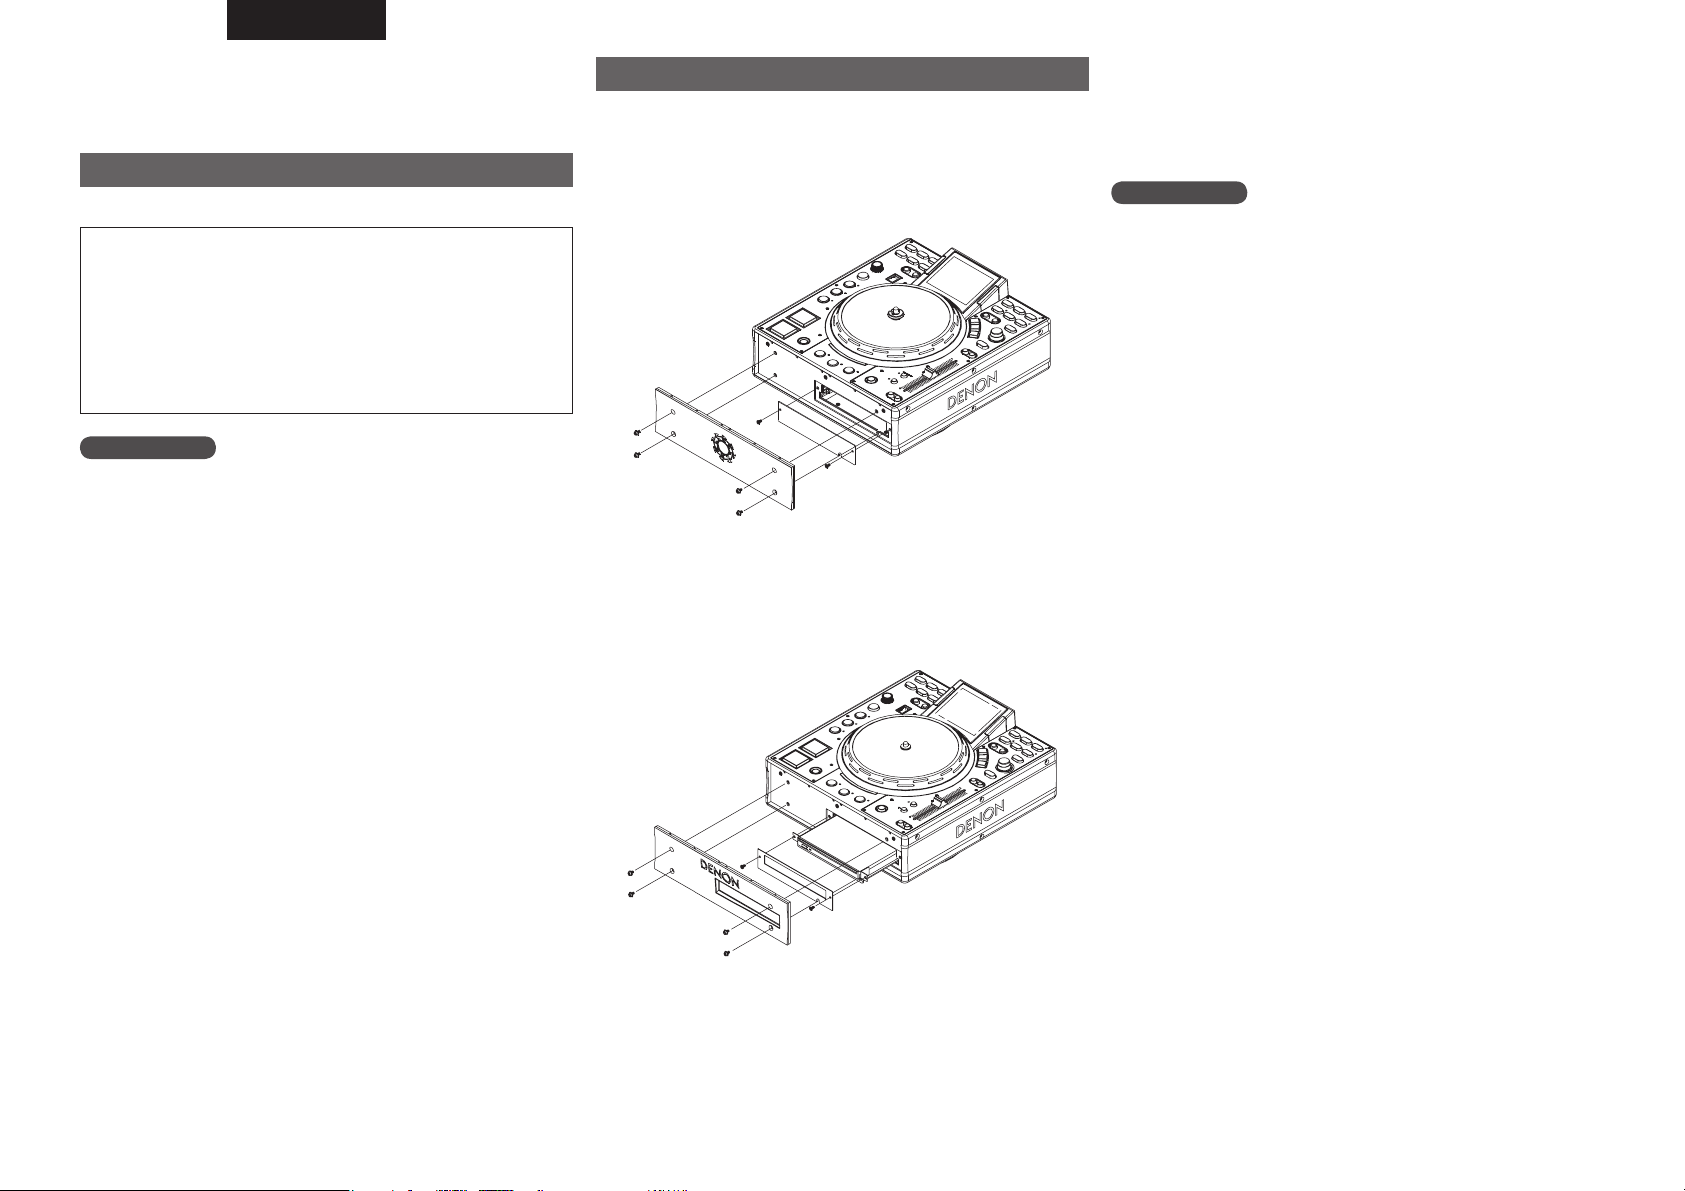
Mounting Procedure
1. Turn the DN-HS5500’s power switch off and unplug the power
cord from the power outlet.
2. Remove the four screws (hexagonal head screws) fastening the
DN-HS5500’s front panel, then remove the front panel.
3. Remove the two screws fastening the plate under where the front
panel was mounted, then remove the plate.
4. Holding the mount section of the mounting kit, insert the mounting
kit’s metal sheet into the hollow in the rail in the DN-HS5500’s
opening and push inside.
5. Fix the included plate to the DN-HS5500 together with the mounting
kit using the two included screws (M3 x 6 mm), as shown on the
diagram.
6. Mount the included front panel to the DN-HS5500 using the four
screws (M3 x 6 mm hexagonal head screws) included with the DNHS5500.
The CD drive is now mounted on the DN-HS5500 and will operate.
Handle the set in which the CD drive is installed with sufficient care.
Refer to this manual for instructions on operating the CD, to the DNHS5500’s manual for instructions on other operations.
NOTE
• When handling the CD Drive & Mounting Kit, hold the metallic part
at the tip and do not touch the circuit boards or terminals.
Doing so could damage the set.
• CD drives can easily be damaged by shocks. When handling the CD
drive, be very careful not to drop it, etc.
• When the DN-HS5500’s front panel is removed, do not put your
fingers or other objects into the set through the opening. Doing so
could damage the set.
Page 7
ENGLISH
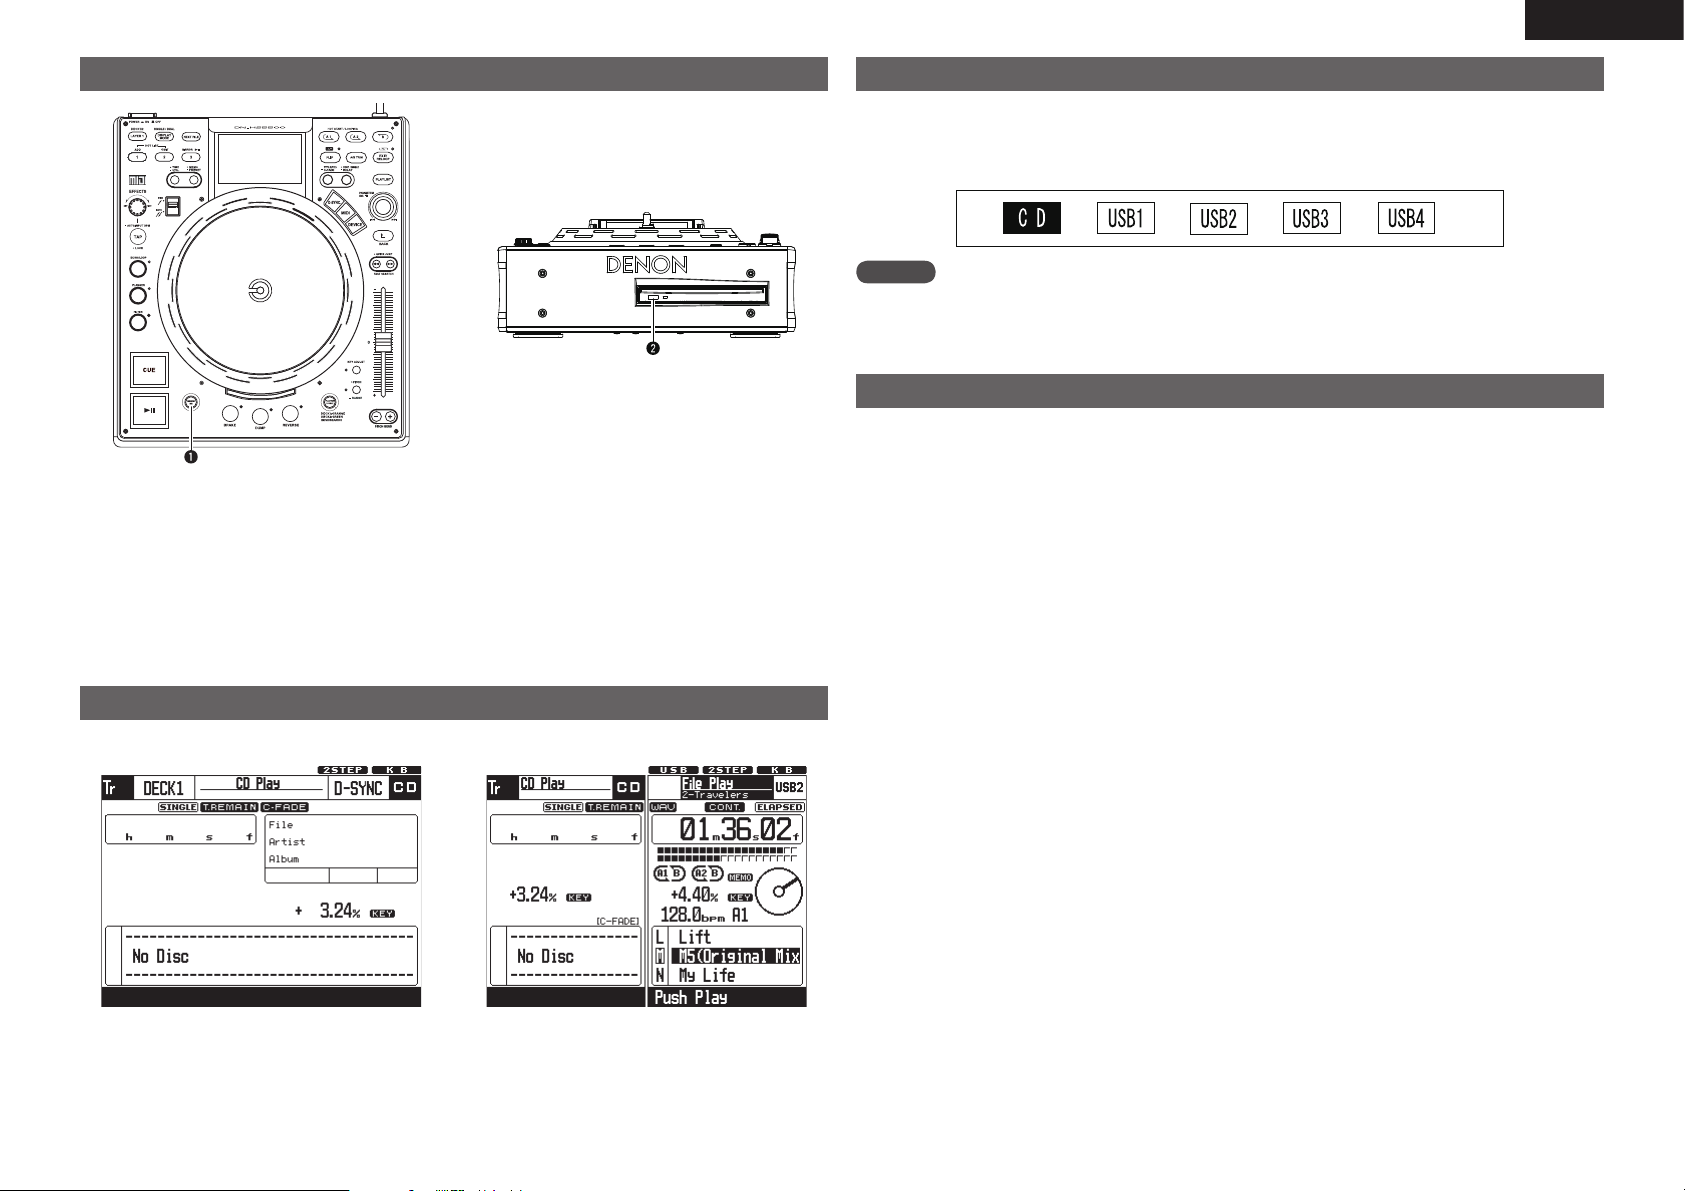
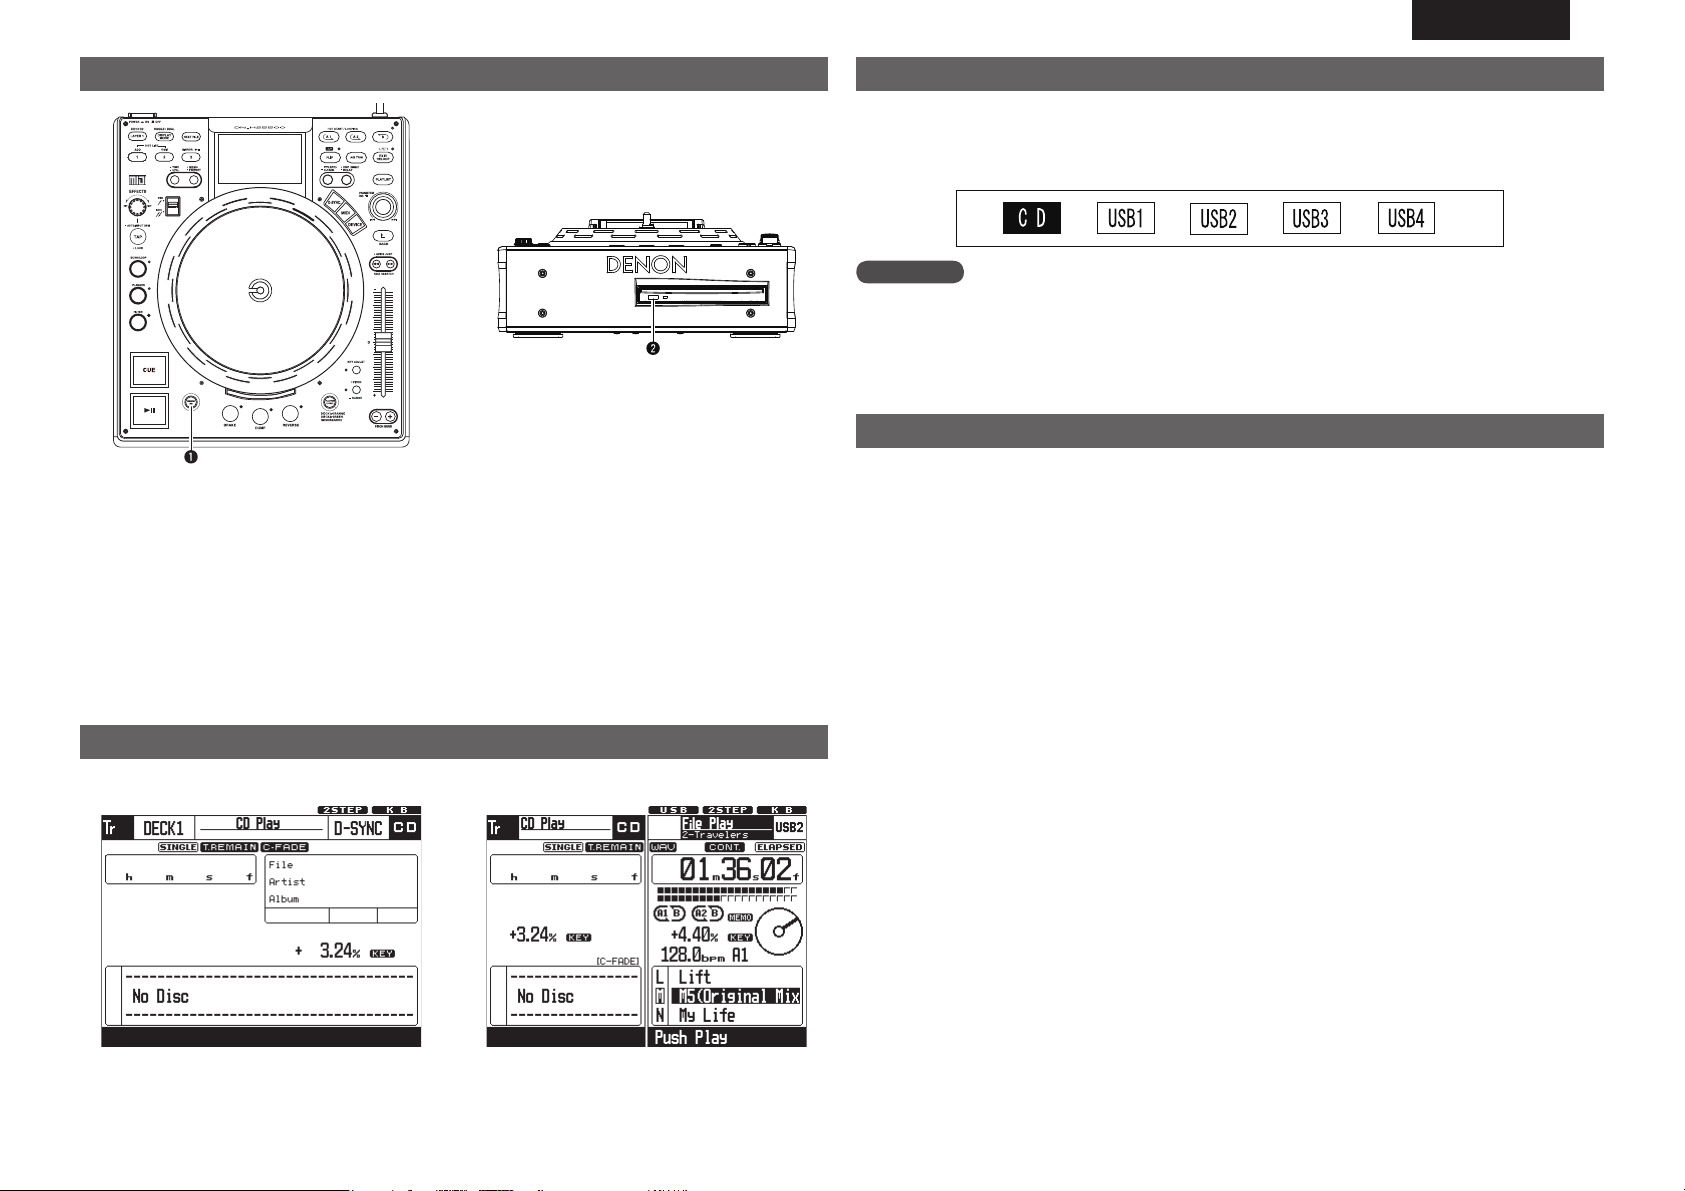
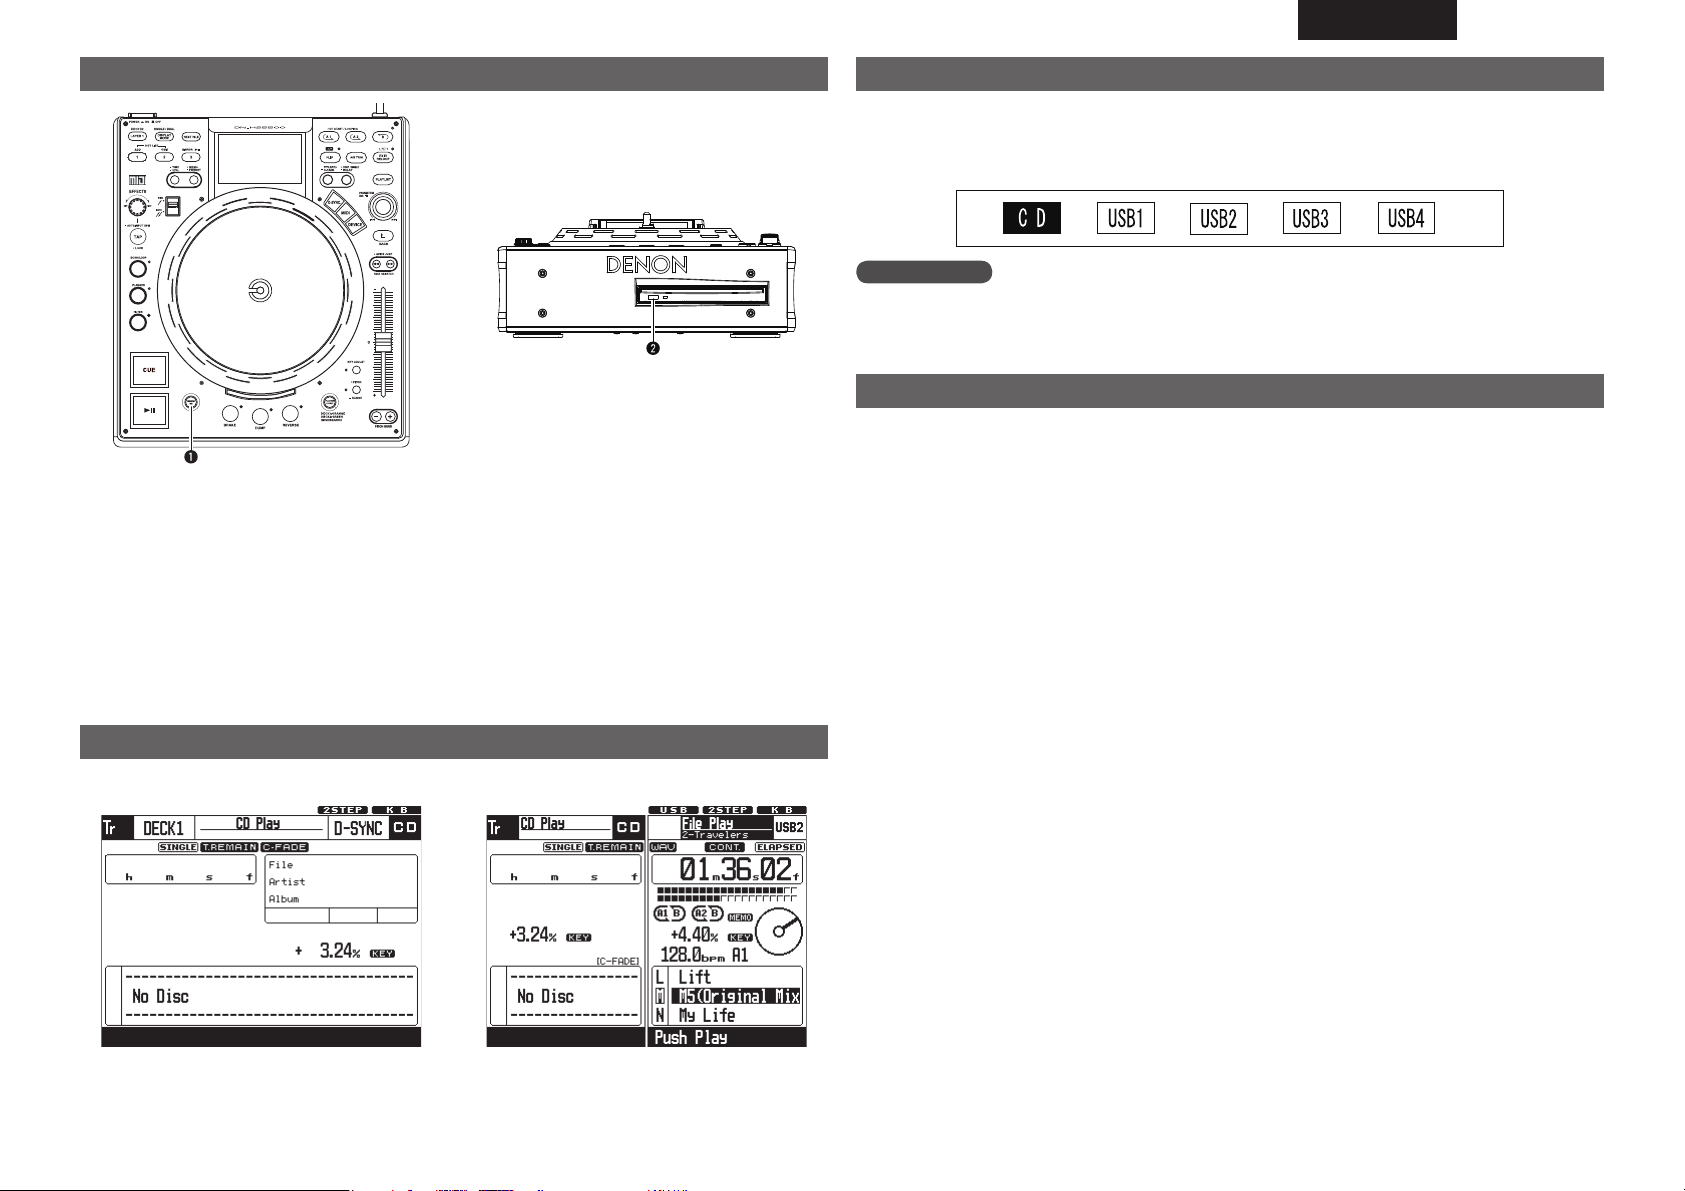
Operation when CD is selected
q MIRROR MIX button
When the selected device is “CD” and the
mirror mix mode is turned off, the disc loaded
in the CD drive is ejected when the Mirror Mix
button is pressed.
If the CD is playing, ejection is locked.
For cases other than the above, see page 6, 7 of
the main unit’s manual.
w EJECT button
When the button is pressed, the disc loaded in
the CD drive is ejected.
If the CD is playing, ejection is locked.
For other buttons, see page 6, 7 of the main
unit’s manual.
Display when CD is selected
If CD is selected and no disc is loaded, the display is as shown below.
Device selection
For operating instructions, see page 13 of the main unit’s manual.
When the included CD drive is connected and the power is started up, “HDD” switches to “CD” on the
device selection screen.
Use of the CD drive is enabled when “CD” is selected.
NOTE
• When CD is selected on one of the decks, CD cannot be selected on the other deck.
• The CD drive cannot be used if it is connected after the power is turned on.
Playing CDs
Use this procedure to play CDs on the DN-HS5500.
CD-DA discs can be played.
b MP3 files recorded on CD-R and other such discs cannot be played.
n Loading the disc
• When the CD is inserted into the disc loading slot, the standby mode is set at the first track on the disc.
CUE button lights when the standby mode is set.
The
• With the auto cue function, the standby mode is set at the point where the sound starts.
The setting can be changed at “Auto Cue” in the presettings (see page 34 of the main unit’s manual).
n Selecting the track
• Turn the PARAMETERS knob.
• When the
SINGLE PLAY LOCK:
This function disables track selection during playback, preventing tracks from being selected or playback
stopped accidentally.
To cancel, press the
See “Top Panel E2
PARAMETERS knob is pressed in while turning it, the tracks switch in units of 10.
•
CONT./SINGLE, -Relay button.
•
CONT./SINGLE, -Relay button” on page 7 of the main unit’s manual.
Full display mode Dual display mode
For a description of the screen, see page 8, 9 of the main unit’s manual.
Page 8
ENGLISH
Making memos
Creating memos for CDs
• A total of up to 5000 memos can be stored, one memo per track.
If for example a disc contains 22 tracks, 22 memos can be stored.
NOTE
The track memo function’s memory system handles 1000 memos
as one package. (1000 memos as 5 packages) With this memory
system, the memory is erased in units of packages, so if one memo
is deleted, the memory number remains and the memory space does
not increase. For this reason, the number of memos that can actually
be stored decreases.
If 5000 memos have been stored, the “Memo Full!” message is
displayed. When this happens, it is necessary to delete 1 package of
memory (1000 memos), starting from the oldest memos.
b The “MEMO” indicator flashes when a disc for which there is
memo data is loaded. The indicator lights when a track for which
there is memo data is selected.
The following data is stored:
a) CUE point
b) A1/B1 and A2/B2 points
c) Playing speed, pitch on/off and cue adjust on/off settings
d) BPM data (CUE, A1 and A2)
• The A1, A2, B1 and B2 points can be on different tracks within the
same disc.
If the CD memo data memory is full when you try to set a memo ...
•
If the memory is full, the “Memo Full” and “Delete 1000?”
messages appear.
In this case, you must delete the 1000 oldest memos from the
memory to free up space.
To free up space, press the
1000?” is displayed.
When the
asking you to reconfirm that you want to delete the memos
(“Delete OK?”) is displayed, 1000 memos are deleted.
For operating instructions, refer to page 25 of the main unit’s manual.
PARAMETERS button is pressed while the message
PARAMETERS button when “Delete
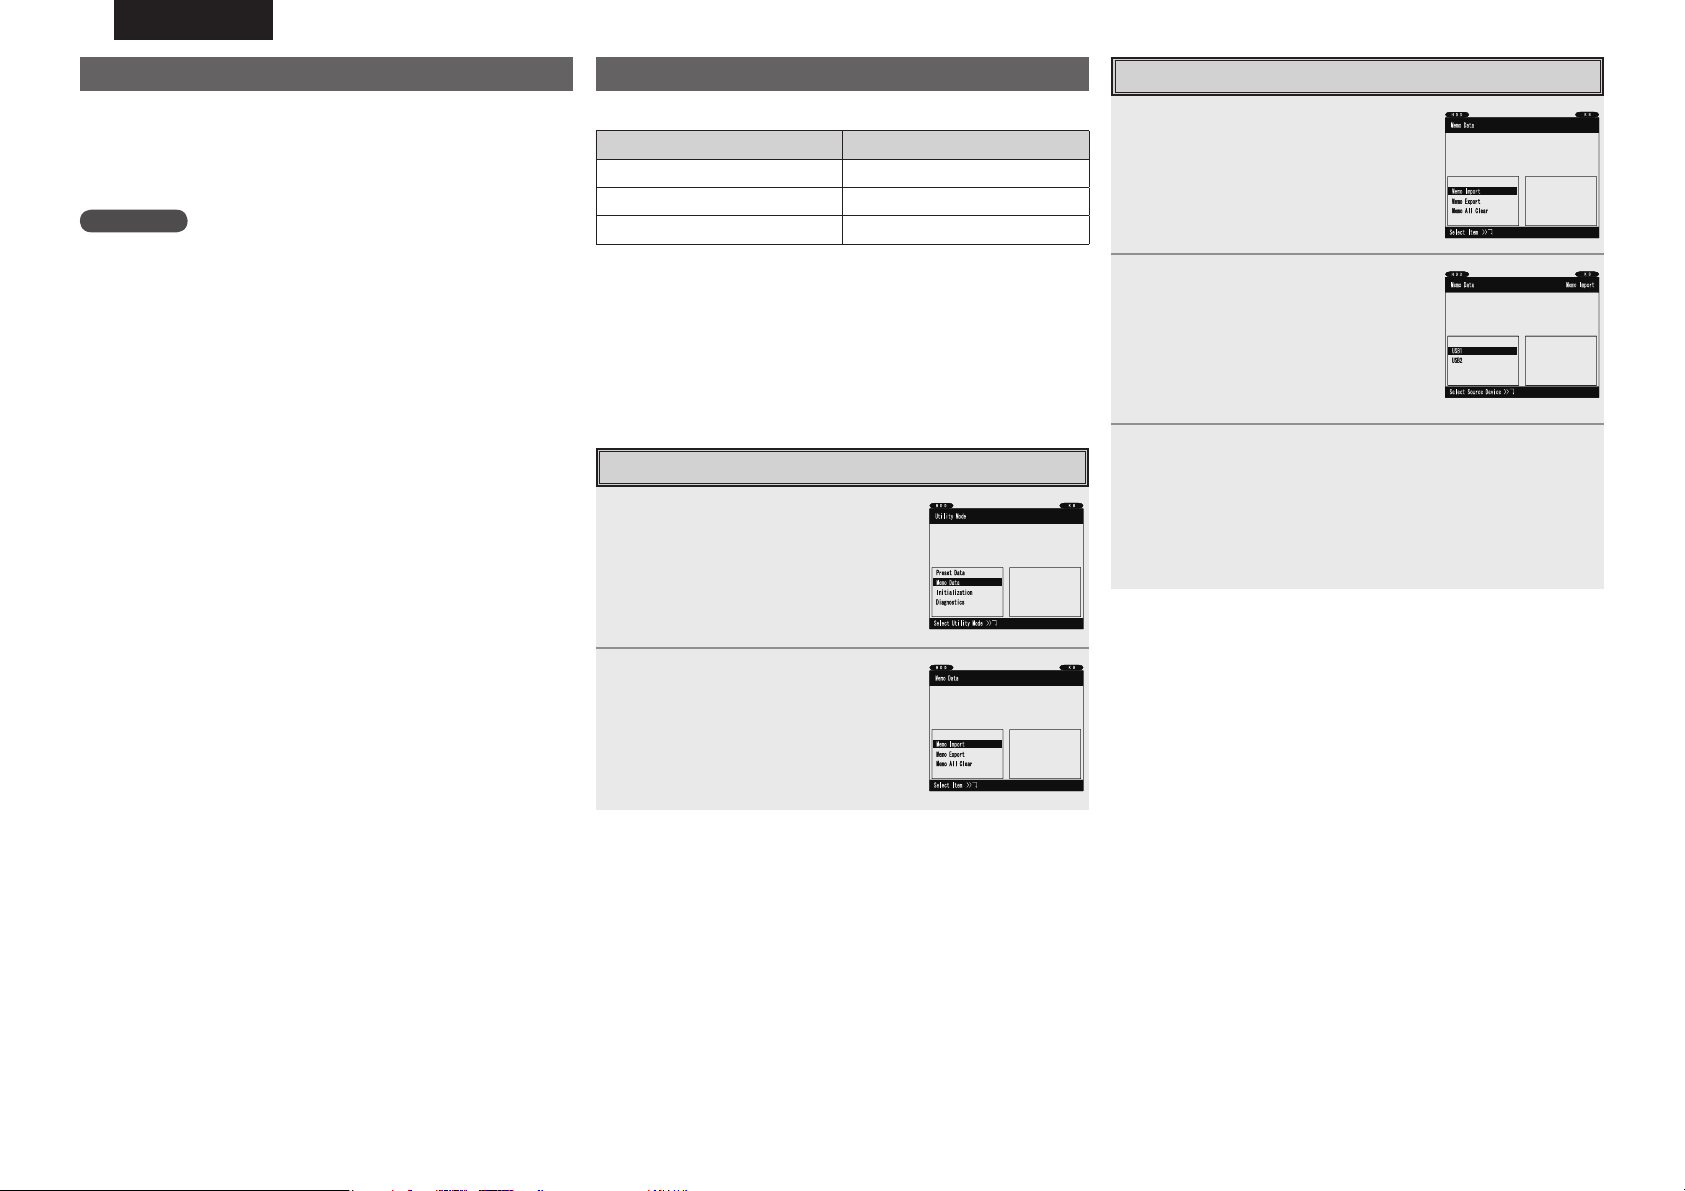
Utilities
Some names have been changed
New Old
Preset Data Import/Export
Preset Import File Import
Preset Export File Export
For operating instructions, refer to page 31 of the main unit’s manual.
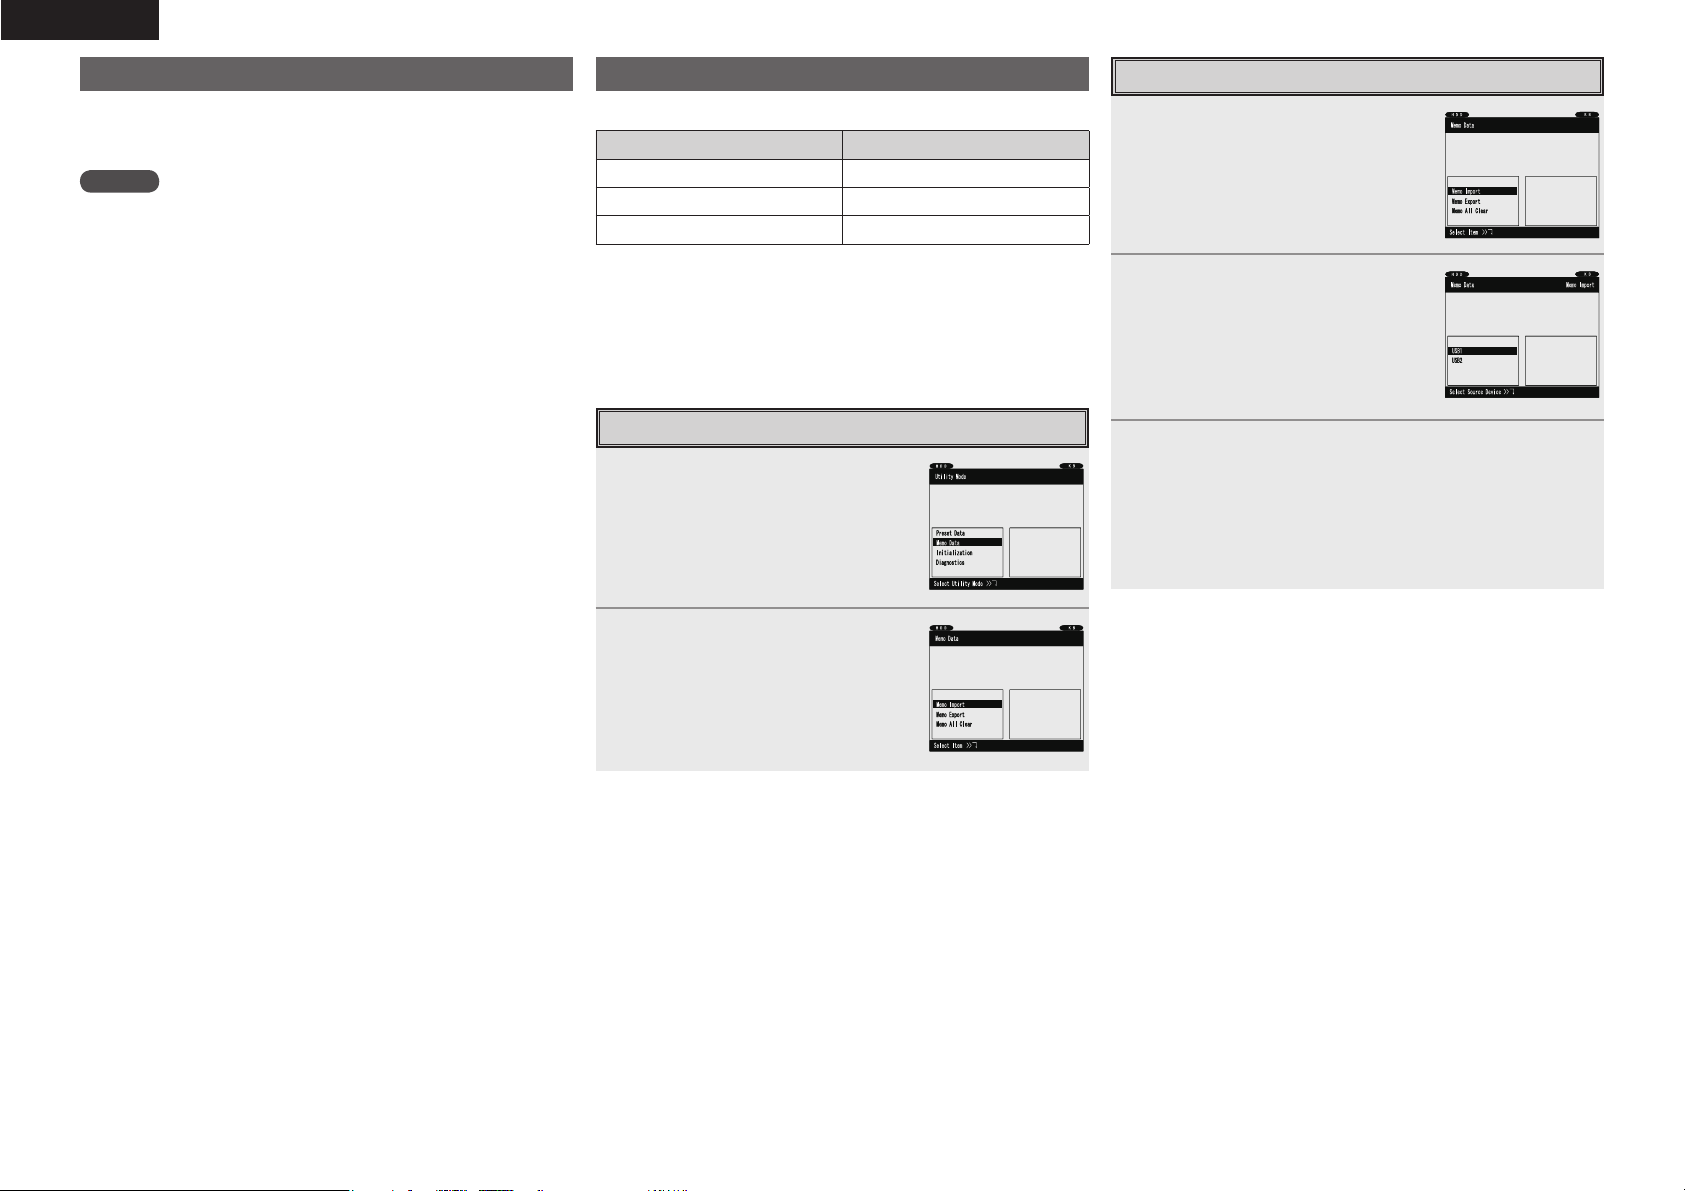
“Memo Data” has been added
n Memo Data
Use this procedure to store CD memo data onto devices and import
it from devices, as well as to delete the internal CD memo data.
Memo Data mode
While the top menu in the utilities
mode is displayed, turn the
PARAMETERS knob and select
“MEMO Data”.
Press the PARAMETERS button to
set.
The “Memo Data” items are displayed.
Memo Import
While the top menu in the memo
mode is displayed, turn the
PARAMETERS knob and select
“MEMO Import”.
b The set is set to the Memo Import mode.
Select the device from which the
memo data is to be imported.
A message for confirming that you want
to overwrite the internal data appears.
Select the setting item.
When “OK” is selected:
Importing is executed. When it is completed, the set returns to
as it was in step .
When “Cancel” is selected:
The set returns to as it was in step .
Page 9
ENGLISH
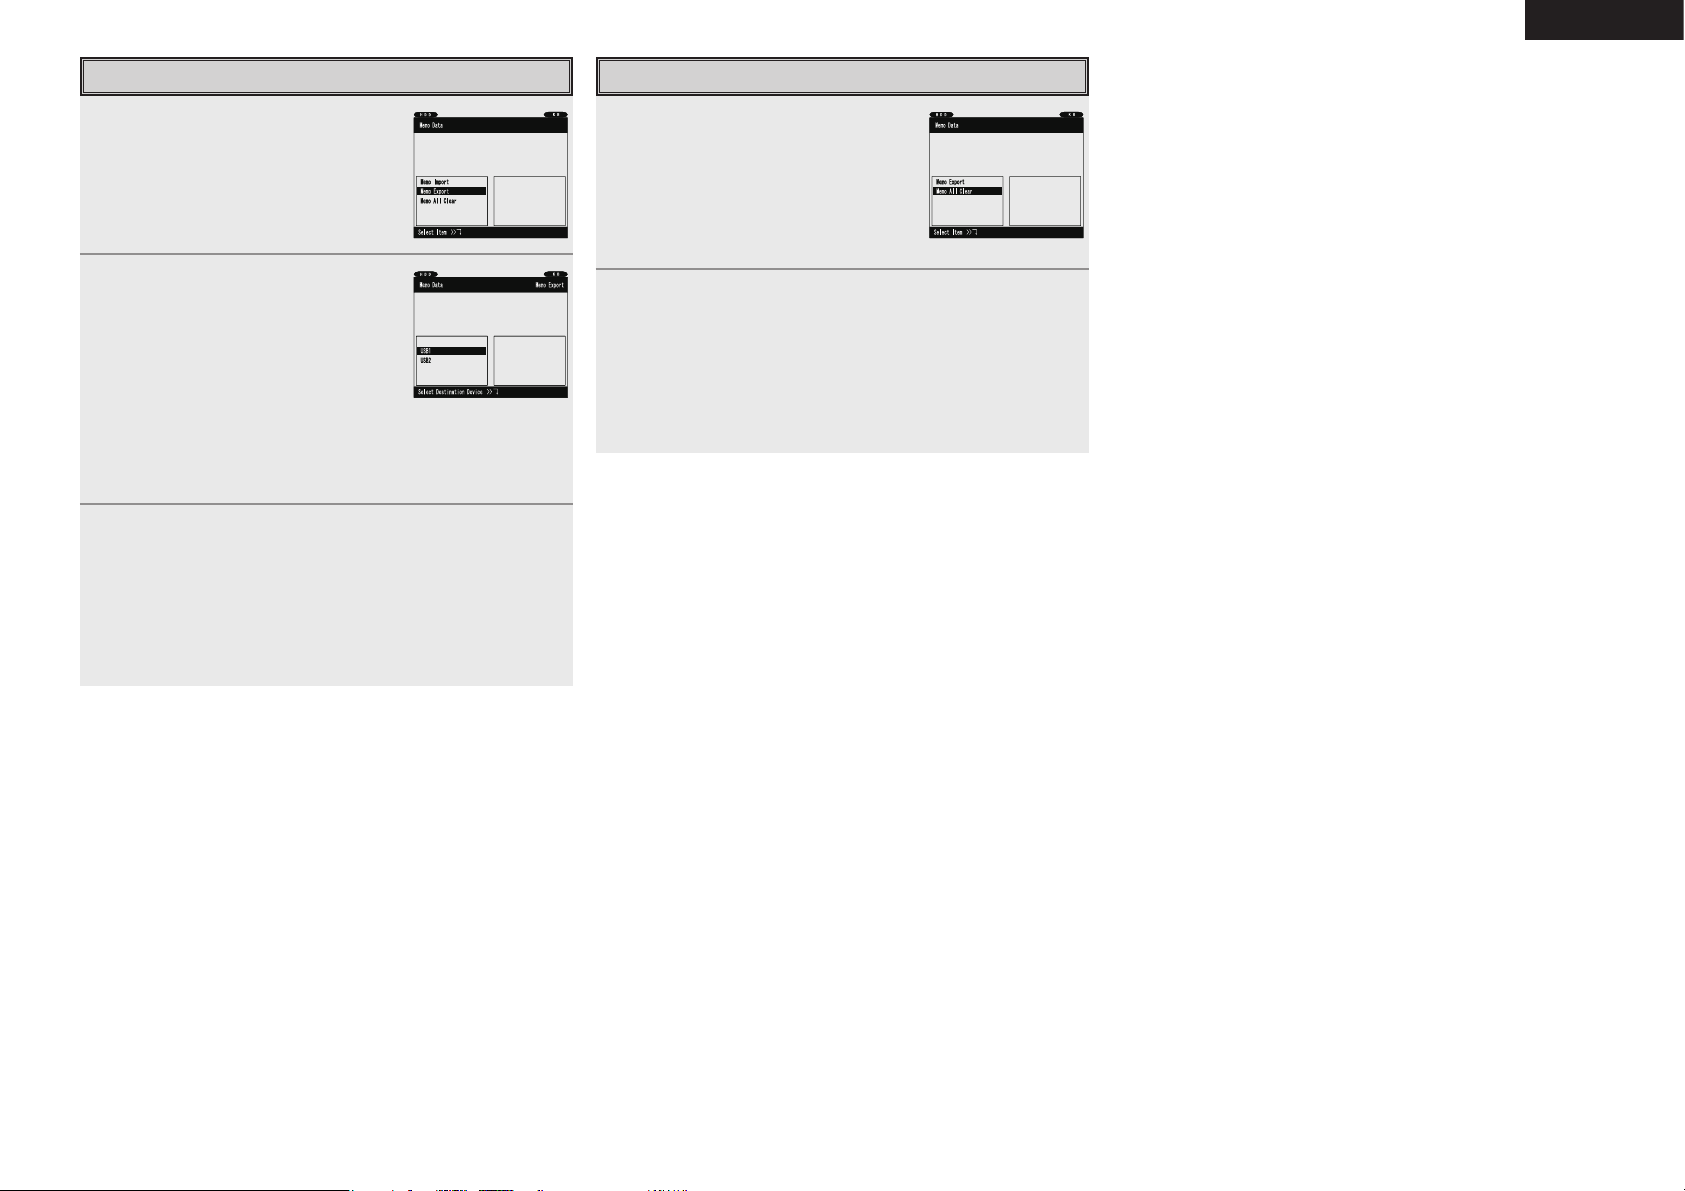
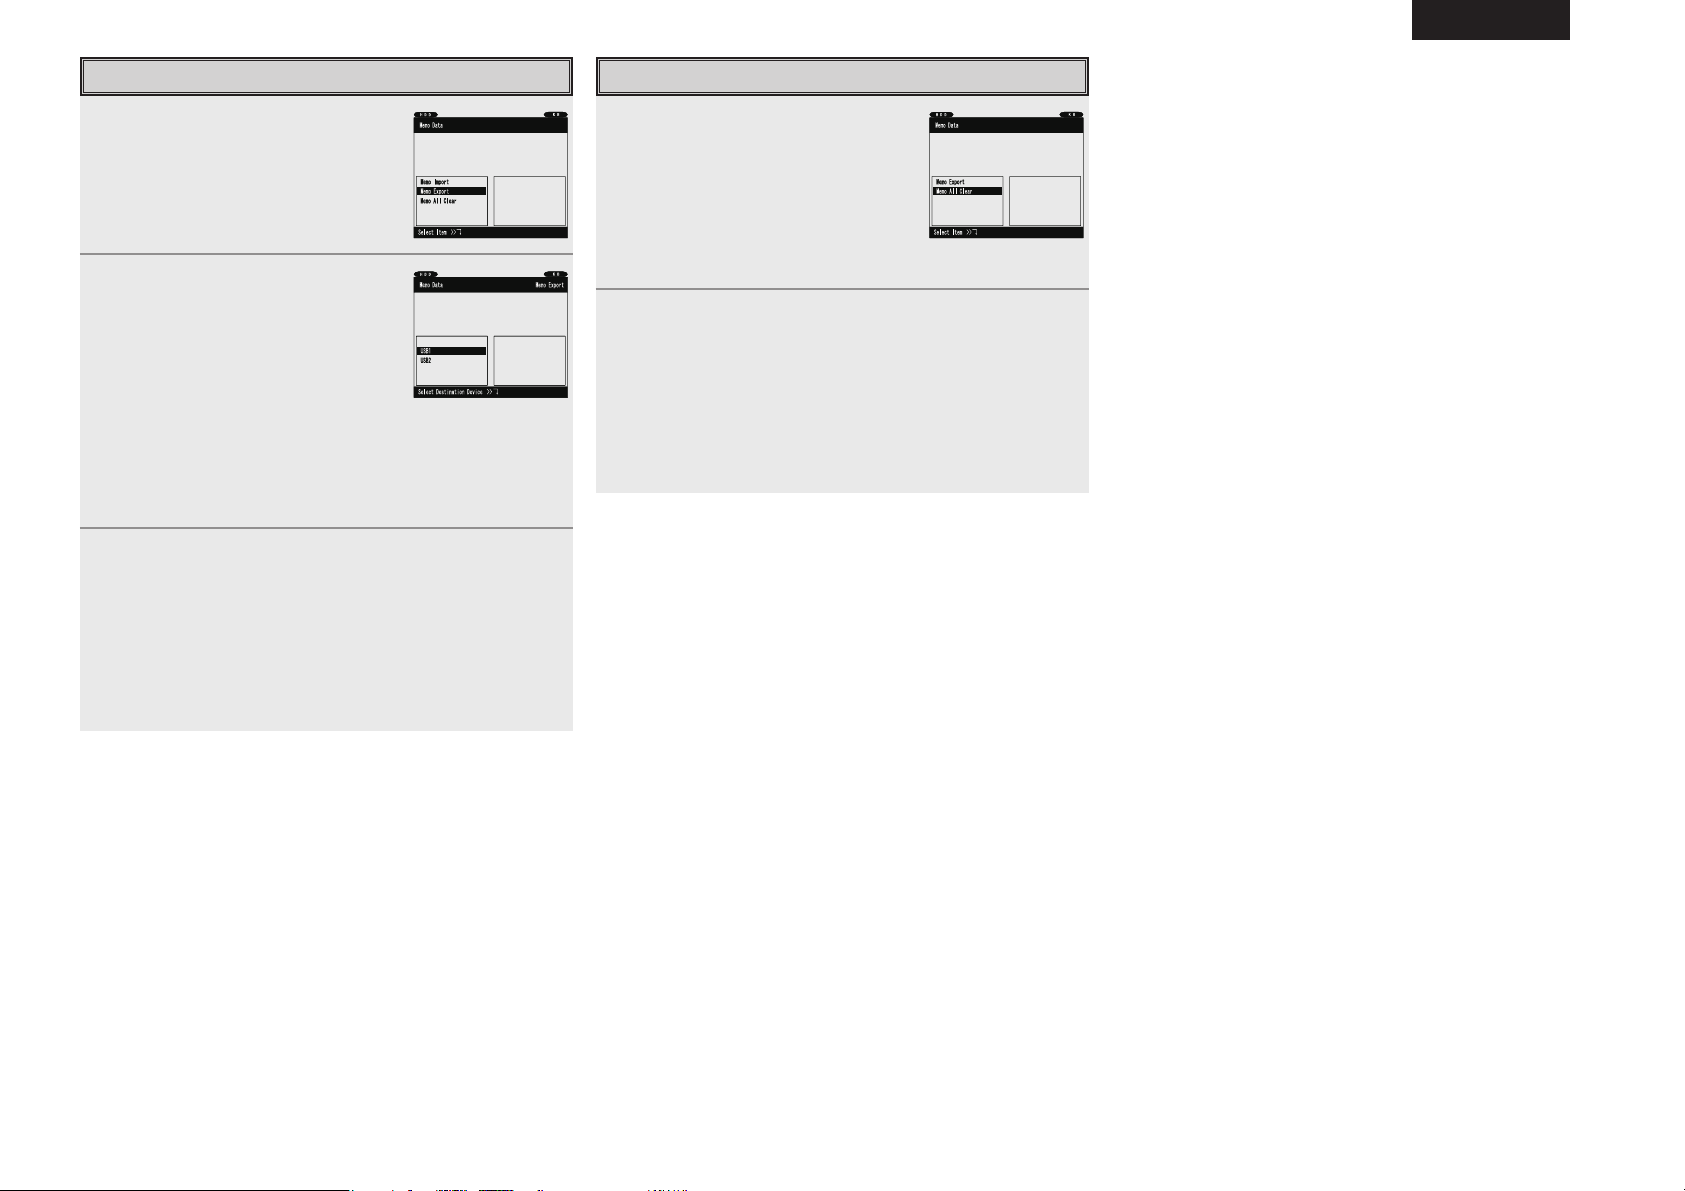
Memo Export
While the top menu in the memo
mode is displayed, turn the
PARAMETERS knob and select
“MEMO Export”.
b The set is set to the Memo Export mode.
Select the device to which the
memo data is to be exported.
If there is no memo data on the external
USB memory device:
Exporting is executed.
If there is already memo data on the
external USB memory device:
A message for confirming that you want to overwrite the data
appears.
To step .
Select the setting item.
When “OK” is selected:
Exporting is executed. A progress bar is displayed so you can
watch the progress. When exporting is completed, the set
returns to as it was in step .
When “Cancel” is selected:
The set returns to as it was in step .
Memo All Clear
While the top menu in the memo
mode is displayed, turn the
PARAMETERS knob and select
“MEMO All Clear”.
A message for confirming that you want
to clear the data appears.
To step .
Select the setting item.
When “OK” is selected:
Clearing of all the memo data is executed. A progress bar is
displayed so you can watch the progress. When clearing is
completed, the set returns to as it was in step .
When “Cancel” is selected:
The set returns to as it was in step .
Page 10
DEUTSCH
Wir wissen Ihre Entscheidung für dieses Produkt sehr zu schätzen.
Das CD-Laufwerk mit Einbaurahmen BU5501 wurde speziell für
den Einbau in den Professional Media & Controller DN-HS5500
entworfen.
Zubehör
Überprüfen Sie, ob folgende Teile mitgeliefert sind.
q Bedienungsanleitung ............................................................... 1
w CD-Laufwerk mit Einbaurahmen .............................................1
e Schrauben (M3 x 6 mm, schwarz) ........................................... 2
r Sechskantschrauben (M3 x 6 mm) .......................................... 4
t Aufsatz ....................................................................................1
y Frontplatte ...............................................................................1
u Inbusschlüssel ......................................................................... 1
i Liste der Service-Stationen .....................................................1
o Liste der Service-Stationen (Nur für Japan) .............................1
HINWEIS
Laden Sie die Firmware von der unten aufgeführten Website herunter
und aktualisieren Sie die Firmwareversion des Produkts.
www.denondj.com
Die in dieser Anleitung beschriebenen Funktionen funktionieren nur,
wenn die Firmware aktualisiert wurde.
Montage
1. Schalten Sie den DN-HS5500 aus und ziehen Sie den Netzstecker
aus der Steckdose.
2. Entfernen Sie die vier Sechskantschrauben der Frontplatte des DN-
HS5500 und anschließend die Frontplatte selbst.
3. Entfernen Sie die beiden Schrauben des Blechs unterhalb der
Frontplatte und entfernen Sie anschließend dieses Blech.
4. Halten Sie das Anbauteil des Montagesatzes, führen Sie die
Metallplatte des Montagesatzes in die Aussparung der Schiene in
der Öffnung des DN-HS5500 und drücken Sie sie hinein.
5. Befestigen Sie den im Lieferumfang enthaltenen Aufsatz mit
dem Einbaurahmen mittels der zwei im Lieferumfang enthaltenen
Schrauben (M3 x 6 mm) wie in der Abbildung gezeigt am DNHS5500.
6. Montieren Sie die mitgelieferte Frontplatte am DN-HS5500 mithilfe
der vier mit dem DN-HS5500 mitgelieferten Schrauben (M3 x 6
mm Sechskantschrauben).
Das CD-Laufwerk ist nun in das DN-HS5500 integriert und einsatzbereit.
Behandeln Sie das Gerät, in das das CD-Laufwerk eingebaut wurde,
mit Sorgfalt.
Anleitungen zur Bedienung des CD-Laufwerks finden Sie in diesem
Handbuch, Anweisungen zu anderen Bedienvorgängen finden Sie im
Handbuch des DN-HS5500.
HINWEIS
• Halten Sie beim Umgang mit dem CD-Laufwerk mit Einbaurahmen
Metallteile am Rand fest und berühren Sie die Schaltkreise und
Anschlüsse nicht.
Andernfalls kann das Gerät beschädigt werden.
• CD-Laufwerke können sehr leicht durch Stöße beschädigt werden.
Gehen Sie sorgfältig mit dem CD-Laufwerk um, lassen Sie es nicht
fallen usw.
• Stecken Sie bei abgenommener Vorderseite des DN-HS5500 keine
Finger oder andere Fremdkörper in die Öffnung. Andernfalls kann
das Gerät beschädigt werden.
Page 11
DEUTSCH
Bedienung, wenn “CD” ausgewählt wurde
q Taste MIRROR MIX
Wenn als Gerät “CD” ausgewählt und der
Mirror-Mix-Modus deaktiviert wurde, wird die in
das CD-Laufwerk eingelegte CD ausgeworfen,
wenn die Mirror-Mix-Taste gedrückt wird.
Wenn die CD abgespielt wird, kann sie nicht
ausgeworfen werden.
Konsultieren Sie für alle anderen außer
den oben genannten Fällen Seite 6, 7 der
Bedienungsanleitung des Hauptgeräts.
w Taste EJECT
Wenn die Taste gedrückt wird, wird die CD im
Laufwerk ausgeworfen.
Wenn die CD abgespielt wird, kann sie nicht
ausgeworfen werden.
Eine Beschreibung der anderen Tasten finden
Sie auf Seite 6, 7 in der Bedienungsanleitung
des Hauptgeräts.
Geräteauswahl
Die Anweisungen zur Bedienung finden Sie auf Seite 13 in der Bedienungsanleitung des Hauptgeräts.
Wenn das CD-Laufwerk angeschlossen wurde und das Gerät eingeschaltet wird, schaltet “HDD” im
Geräteauswahlbildschirm auf “CD” um.
Die Verwendung des CD-Laufwerks wird aktiviert, wenn “CD” ausgewählt wurde.
HINWEIS
• Wenn “CD” auf einem der Decks ausgewählt wird, kann “CD” nicht auf dem anderen Deck ausgewählt
werden.
• Das CD-Laufwerk kann nicht verwendet werden, wenn es angeschlossen wird, nachdem das Gerät
eingeschaltet wurde.
Wiedergabe von CDs
Gehen Sie wie folgt vor, um CDs auf dem DN-HS5500 wiederzugeben.
CD-DA-Discs können wiedergegeben werden.
b MP3-Dateien, die auf CD-Rs und ähnliche Datenträger gebrannt wurden, können nicht wiedergegeben
werden.
n Einlegen der CD
• Wenn die CD in das CD-Fach eingelegt wird, wird der Standby-Modus auf den ersten Titel auf der CD
gesetzt. Die Taste
• Mit der Auto-Cue-Funktion wird der Standby-Modus auf den Punkt gestellt, an dem der Ton beginnt.
Die Einstellung kann unter “Auto Cue” in den Optionen geändert werden (siehe Seite 34 in der
Bedienungsanleitung des Hauptgeräts).
CUE leuchtet auf, wenn der Standby-Modus aktiviert wurde.
Display, wenn “CD” ausgewählt wurde
Wenn “CD” ausgewählt wird und keine CD eingelegt wurde, sieht das Display folgendermaßen aus.
Vollbildmodus Doppelbildmodus
Eine Beschreibung des Bildschirms finden Sie auf Seite 8, 9 in der Bedienungsanleitung des Hauptgeräts.
n Auswahl der Spur
• Drehen Sie am PARAMETERS-Knopf.
• Titel können durch Drücken und gleichzeitiges Drehen des
übersprungen werden.
SINGLE PLAY LOCK:
Mit dieser Funktion wird die Trackauswahl während der Wiedergabe deaktiviert, so dass Tracks nicht
ungewollt ausgewählt oder wiedergegeben werden können.
Drücken Sie die
Weitere Informationen finden Sie unter “Oberes Bedienfeld E2
7 in der Bedienungsanleitung des Hauptgeräts.
•
CONT./SINGLE, -Relay-Taste, um diese Funktion wieder aufzuheben.
PARAMETERS-Knopfes in 10er-Schritten
•
CONT./SINGLE, -Relay-Taste” auf Seite
Page 12
DEUTSCH
Erstellen von Memos
Erstellen von Memos für CDs
• Es können bis zu 5000 Memos gespeichert werden. Pro Spur kann
ein Memo gespeichert werden.
Wenn z. B. eine CD aus 22 Spuren besteht, können 22 Memos gespeichert
werden.
HINWEIS
Das Speichersystem für Spurmemos behandelt 1000 Memos als ein
Paket. (1000 Memos als 5 Pakete) In diesem Speichersystem wird
der Speicher als Paket gelöscht, d. h. wenn ein Memo gelöscht wird,
bleibt die Anzahl der Memos gleich und es wird kein Speicherplatz
freigegeben. Aus diesem Grund sinkt die Anzahl der Memos, die
tatsächlich gespeichert werden können.
Wenn 5000 Memos gespeichert wurden, wird die Meldung “Memo
Full!” angezeigt. In diesem Fall muss ein Speicherpaket (1000 Memos)
gelöscht werden, angefangen bei den ältesten Memos.
b Die Anzeige “MEMO” blinkt, wenn eine CD eingelegt wird, für
die Memodaten vorhanden sind. Die Anzeige “MEMO” leuchtet,
wenn ein Titel ausgewählt wird, für den Memodaten vorhanden
sind.
Folgende Daten werden gespeichert:
a) CUE-Punkt
b) Punkte A1/B1 und A2/B2
c) Einstellungen zur Wiedergabegeschwindigkeit, Pitch ein/aus und
Cue-Anpassung ein/aus
d) BPM-Daten (CUE, A1 und A2)
• Die Punkte A1, A2, B1 und B2 können auf verschiedenen Spuren
auf der gleichen CD liegen.
• Wenn der CD-Memodatenspeicher voll ist, während Sie versuchen,
ein Memo zu speichern …
Wenn der Speicher voll ist, werden die Meldungen “Memo Full”
und “Delete 1000?” angezeigt.
In diesem Fall müssen Sie die 1000 ältesten Memos aus dem
Speicher löschen, um Speicherplatz freizugeben.
Drücken Sie die
angezeigt wird, um Speicherplatz freizugeben.
Wenn die
Bestätigungsmeldung für das Löschen der Memos (“Delete OK?”)
angezeigt wird, werden 1000 Memos gelöscht.
Die Anweisungen zur Bedienung finden Sie auf Seite 25 in der
Bedienungsanleitung des Hauptgeräts.
PARAMETERS-Taste, wenn “Delete 1000?”
PARAMETERS-Taste gedrückt wird, während die
Dienstprogramme
Einige Bezeichnungen wurden geändert
Neu Alt
Preset Data Import/Export
Preset Import File Import
Preset Export File Export
Die Anleitungen zur Bedienung finden Sie auf Seite 31 in der
Bedienungsanleitung des Hauptgeräts.
“Memo Data” wurde hinzugefügt
n Memo Data
Gehen Sie wie folgt vor, um CD-Memodaten auf Geräten zu
speichern, sie von Geräten zu importieren oder interne CDMemodaten zu löschen.
Memodatenmodus
Drehen Sie im Hauptmenü im
Dienstprogrammmodus den
PARAMETERS-Knopf und wählen
Sie “MEMO Data” aus.
Drücken Sie den PARAMETERS-
Knopf, um die Option aufzurufen.
Die Option “Memo Data” wird angezeigt.
Memo Import
Drehen Sie im Hauptmenü im
Memomodus den
PARAMETERS-
Knopf und wählen Sie “MEMO
Import” aus.
b Der Modus “Memo Import” wird für das
Gerät aktiviert.
Wählen Sie das Gerät aus, von dem
Memodaten importiert werden
sollen.
Eine Meldung zur Bestätigung, dass die
internen Daten überschrieben werden
sollen, wird angezeigt.
Wählen Sie eine Option aus.
Wenn “OK” ausgewählt wird:
Die Daten werden importiert. Nach dem Abschluss des Vorgangs
kehrt das Gerät zum Zustand in Schritt zurück.
Wenn “Cancel” ausgewählt wird:
Das Gerät kehrt zum Zustand in Schritt zurück.
Page 13
DEUTSCH
Memo Export
Drehen Sie im Hauptmenü im
Memomodus den
Knopf und wählen Sie “MEMO
Export” aus.
b Der Modus “Memo Export” wird für das
Gerät aktiviert.
Wählen Sie das Gerät aus, auf das
Memodaten exportiert werden
sollen.
Wenn keine Memodaten auf dem externen
USB-Speichergerät vorhanden sind:
Die Daten werden exportiert.
Wenn bereits Memodaten auf dem externen USB-Speichergerät
vorhanden sind:
Eine Meldung zur Bestätigung, dass die Daten überschrieben
werden sollen, wird angezeigt.
Fahren Sie mit Schritt fort.
Wählen Sie eine Option aus.
PARAMETERS-
Wenn “OK” ausgewählt wird:
Die Daten werden exportiert. Es wird ein Fortschrittsbalken
angezeigt, auf dem Sie den Verlauf beobachten können. Nach
dem Abschluss des Exportvorgangs kehrt das Gerät zum
Zustand in Schritt zurück.
Wenn “Cancel” ausgewählt wird:
Das Gerät kehrt zum Zustand in Schritt zurück.
Alle Memos löschen
Drehen Sie im Hauptmenü im
Memomodus den
Knopf und wählen Sie “MEMO
All Clear” aus.
Eine Meldung zur Bestätigung, dass
die Daten gelöscht werden sollen, wird
angezeigt.
Fahren Sie mit Schritt fort.
Wählen Sie eine Option aus.
PARAMETERS-
Wenn “OK” ausgewählt wird:
Alle Memodaten werden gelöscht. Es wird ein Fortschrittsbalken
angezeigt, auf dem Sie den Verlauf beobachten können. Nach
dem Abschluss des Löschvorgangs kehrt das Gerät zum Zustand
in Schritt zurück.
Wenn “Cancel” ausgewählt wird:
Das Gerät kehrt zum Zustand in Schritt zurück.
Page 14
FRANCAIS
Nous vous remercions d’avoir acheté ce produit.
Le lecteur CD et le kit de support BU5501 sont conçus spécialement
pour le montage du dispositif de commande média professionnel DNHS5500.
Accessoires
Vérifiez que tous les éléments suivants sont fournis.
q Manuel de l’Utilisateur ............................................................1
w Lecteur CD et kit de support ................................................... 1
e Vis (M3 x 6 mm, noires) ..........................................................2
r Vis Tête hexagonale (M3 x 6 mm) ........................................... 4
t Plaque ......................................................................................1
y Panneau avant .........................................................................1
u Clé hex. ...................................................................................1
i Liste de points SAV ................................................................. 1
o Liste de points SAV (Japon uniquement) ................................1
REMARQUE
Veillez bien à télécharger le micrologiciel depuis le site Web indiqué
ci-dessous et mettre à jour la version du micrologiciel du produit.
www.denondj.com
Les fonctions décrites dans ces instructions d’utilisation ne peuvent
être exécutées tant que le micrologiciel n’est pas mis à jour.
Procédure de montage
1. Mettez l’interrupteur du DN-HS5500 sur off et débranchez le câble
d’alimentation de la prise.
2. Retirez les quatre vis (à tête hexagonale) du panneau avant du DN-
HS5500 puis ôtez le panneau.
3. Retirez les deux vis de la plaque située sous le panneau avant et
ôtez-la.
4. Saisissez le kit par son support, insérez la plaque de métal dans le
rail vide à l’intérieur du DN-HS5500 et insérez le kit à l’intérieur.
5. Fixez la plaque du DN-HS5500 avec le kit support en utilisant les
deux vis (M3 x 6 mm), comme sur le schéma.
6. Vissez le panneau avant au DN-HS5500 à l’aide des quatre vis (M3
x 6 mm à tête hexagonale) fournies avec le DN-HS5500.
Le lecteur CD est maintenant installé dans le DN-HS5500 et est prêt
à l’emploi.
L’ensemble contenant le lecteur CD est à manipuler avec beaucoup
de soin.
Reportez-vous au mode d’emploi pour le fonctionnement du CD, au
mode d’emploi du DN-HS5500 pour les autres opérations.
REMARQUE
• Lors de la manipulation du lecteur CD et du kit de support, tenez
la pièce métallique par l’extrémité et ne touchez pas les cartes de
circuit imprimé ou les bornes.
Vous risqueriez d’endommager le dispositif.
• Le lecteur CD est très sensible aux chocs. Lors de la manipulation du
lecteur CD, veillez à ce qu’il ne tombe pas, etc.
• Une fois le panneau avant du DN-HS5500 retiré, ne mettez pas vos
doigts ou n’insérez pas d’objets dans l’ouverture du dispositif. Vous
risqueriez d’endommager le dispositif.
Page 15
FRANCAIS
Opération lorsque “CD” est sélectionné
q Touche MIRROR MIX
Lorsque le dispositif sélectionné est “CD” et
que le mode Mirror Mix est désactivé, le disque
chargé dans le lecteur CD est éjecté au moment
où la touche Mirror Mix est enfoncée.
Pendant la lecture du CD, le mode d’éjection est
bloqué.
Dans d’autres cas que celui mentionné ci-
dessus, voir la page 6, 7 du manuel de l’unité
principale.
w Touche EJECT
Le CD chargé dans le lecteur CD est éjecté dès
qu’on appuie sur la touche.
Pendant la lecture du CD, le mode d’éjection est
bloqué.
Pour les autres touches, voir la page 6, 7 du
manuel de l’unité principale.
Affichage lorsque “CD” est sélectionné
Si le CD est sélectionné et qu’aucun disque n’est chargé, l’affichage est indiqué comme ci-dessous.
Sélection du dispositif
Pour obtenir des instructions de fonctionnement, voir la page 13 du manuel de l’unité principale.
Lorsque que le lecteur CD inclut est connecté et l’alimentation est activée, “HDD” bascule vers “CD” sur
l’écran de sélection du dispositif.
L’utilisation du lecteur CD est possible une fois que “CD” est sélectionné.
REMARQUE
• Lorsque CD est sélectionné sur une des platines, le CD ne peut être sélectionné depuis une autre.
• Le lecteur CD ne peut être utilisé s’il est connecté seulement après la mise en marche.
Lecture de CD
Suivez cette procédure pour lire les CD sur le DN-HS5500.
Les CD-DA peuvent être lus.
b Les fichiers MP3 enregistrés sur un CD-R ou d’autres disques du même type ne peuvent pas être lus.
n Chargement du disque
• Le disque passe automatiquement en mode de préparation à la lecture à partir de la première piste dès
qu’on introduit le CD dans la fente de chargement. La touche
est configuré.
• Avec la fonction Auto Cue, le mode de veille est réglé au démarrage du son.
Le réglage peut être changé à “Auto Cue” dans les préréglages (voir page 34 du manuel de l’unité
principale).
n Sélection de la piste
• Faire tourner la molette PARAMETERS.
• En appuyant sur la molette
de 10.
SINGLE PLAY LOCK:
Cette fonction désactive la sélection de fichiers en cours de lecture, afin d’éviter la sélection ou
l’interruption accidentelle de la lecture des fichiers.
Pour annuler ce fichier, appuyer sur la touche
Reportez-vous à “Panneau supérieur E2 touche
l’unité principale.
PARAMETERS en la tournant à la fois, les pistes (fichiers) basculent par unité
•
CONT./SINGLE, -Relay.
•
CONT./SINGLE, -Relay” à la page 7 du manuel de
CUE s’allume lorsque le mode de veille
Mode affichage complet Mode affichage double
Pour obtenir une description de l’écran, voir la page 8, 9 du manuel de l’unité principale.
Page 16

FRANCAIS
Création de mémos
Création de méos pour CD
• Un total de 5000 mémos peut être stockés, un par piste.
Si, par exemple, un disque contient 22 pistes, il est possible de
stocker 22 mémos.
REMARQUE
Le système de mémoire de fonction mémo de piste traite 1000
mémos en un seul ensemble. (1000 mémos par package de 5) Avec
ce système de mémoire, la mémoire est supprimée par unités de
packages, donc si un mémo est supprimé, le numéro de mémoire
reste et l’espace de mémoire n’augmente pas. C’est pourquoi le
nombre de mémos pouvant être réellement stockés réduit.
Si 5000 mémos ont été stockés, le message “Memo Full!” s’affiche.
Lorsque cela se produit, il est nécessaire de supprimer 1 package de
mémoire (1000 mémos), à commencer par les plus anciens.
b Lorsqu’un disque dont les données de mémos sont chargées, le
voyant “MEMO” clignote. Le voyant s’allume lorsqu’une piste
avec des données de mémos est sélectionnée.
La donnée suivante est stockée:
a) Point CUE
b) Points A1/B1 et A2/B2
c) Réglages de la vitesse de lecture, d’activation/désactivation de
pas d’enregistrement et de repère
d) Donnée BPM (CUE, A1 et A2)
• Les points A1, A2, B1 et B2 peuvent se trouver sur différentes
pistes sur le même disque.
• Si la mémoire de données mémos du CD est plein lorsque vous
essayez de régler un mémo ...
Si la mémoire est pleine, le message “Memo Full” ou “Delete
1000?” messages apparaît.
Dans ce cas, vous devez supprimer les 1000 mémos les plus
anciens de la mémoire pour libérer de l’espace.
Pour libérer de l’espace, appuyez sur la touche
message “Delete 1000?” s’affiche.
Lorsque la touche
vous demandant de confirmer à nouveau que vous souhaitez
supprimer les mémos (“Delete OK?”) s’affiche, 1000 mémos sont
supprimés.
Pour obtenir des instructions de fonctionnement, reportez-vous à la
page 25 du manuel de l’unité principale.
PARAMETERS est enfoncée alors le message
PARAMETERS si le
Utilités
Certains noms ont été changés
Nouveau Ancien
Preset Data Import/Export
Preset Import File Import
Preset Export File Export
Pour obtenir des instructions de fonctionnement, reportez-vous à la
page 31 du manuel de l’unité principale.
“Memo Data” a été ajouté
n Memo Data
Suivez cette procédure pour stocker les données de mémos du CD
et importer depuis les dispositifs, de même que pour supprimer les
données mémo internes du CD.
Mode données de mémos
Pendant que le menu supérieur du
mode utilités est afché, veuillez
tourner la molette
et sélectionnez “MEMO Data”.
Appuyer sur la touche
pour sélectionner.
Les éléments “Memo Data” s’affichent.
PARAMETERS
PARAMETERS
Memo Import
Pendant que le menu supérieur du
mode mémo est afché, veuillez
tourner soit la molette
PARAMETERS
et sélectionnez “MEMO Import”.
b Le dispositif est réglé sur le mode Memo
Import.
Sélectionnez le dispositif depuis
lequel la donnée mémo est
importée.
Un message de confirmation de votre
choix d’écraser les données internes
apparaît.
Sélectionner l’élément de réglage.
Lorsque “OK” est sélectionné:
L’importation s’exécute. Une fois terminée, le dispositif revient
à son état initial à l’étape .
Lorsque “Cancel” est sélectionné:
Le dispositif revient où il était dans l’étape .
Page 17

FRANCAIS
Memo Export
Pendant que le menu supérieur du
mode mémo est afché, veuillez
tourner la molette
et sélectionnez “MEMO Export”.
b Le dispositif est réglé sur le mode Memo
Export.
Sélectionnez le dispositif vers
lequel la donnée mémo est
exportée.
Lorsqu’il n’y a pas de donnée mémo sur
le dispositif de mémoire USB externe:
L’exportation s’exécute.
Lorsqu’il y a déjà une donnée mémo sur le dispositif de
mémoire USB externe:
Un message de confirmation de votre choix d’écraser les
données apparaît.
Vers étape .
Sélectionner l’élément de réglage.
PARAMETERS
Lorsque “OK” est sélectionné:
L’exportation s’exécute. Une barre de progression est affichée,
ainsi vous pouvez voir l’avancement. Une fois l’exportation
terminée, le dispositif revient à l’étape .
Lorsque “Cancel” est sélectionné:
Le dispositif revient où il était dans l’étape .
Effacer tous les mémos
Pendant que le menu supérieur du
mode mémo est afché, veuillez
tourner soit la molette
et sélectionnez “MEMO All Clear”.
Un message de confirmation de votre
choix d’effacer les données apparaît.
Vers étape .
Sélectionner l’élément de réglage.
PARAMETERS
Lorsque “OK” est sélectionné:
La suppression de toutes les données mémos s’exécute.
Une barre de progression est affichée, ainsi vous pouvez voir
l’avancement. Une fois la suppression terminée, le dispositif
revient à l’étape .
Lorsque “Cancel” est sélectionné:
Le dispositif revient où il était dans l’étape .
Page 18

ITALIANO
Siamo molto grati per l’acquisto di questo prodotto.
L’unità per CD e kit di montaggio BU5501 è progettata in maniera
specifica per l’installazione sul controller e lettore professionale DNHS5500.
Accessori
Controllare che i seguenti componenti siano in dotazione col prodotto.
q Manuale delle istruzioni ...........................................................1
w Unità CD e kit di montaggio ....................................................1
e Viti (M3 x 6 mm, Nero) ............................................................ 2
r Hex. Capo Vite (M3 x 6 mm) ................................................... 4
t Piastra ...................................................................................... 1
y Pannello Frontale ..................................................................... 1
u Chiave inglese esagonale ........................................................ 1
i Elenco dei centri di Assistenza Tecnica ................................... 1
o Elenco dei centri di Assistenza Tecnica
(esclusivamente per il Giappone) ............................................ 1
NOTA
Assicurarsi di eseguire il download del firmware dal sito Internet
indicato di seguito e di aggiornare la versione del firmware.
www.denondj.com
Le funzionalità descritte in questo manuale d’uso non funzionano se il
firmware non è aggiornato.
Montaggio
1. Spegnere l’interruttore di alimentazione di DN-HS5500 e scollegare
il filo di alimentazione dalla presa di corrente.
2. Togliere le quattro viti (capo vite esagonali) che fissano il pannello
frontale DN-HS5500, quindi rimuovere il pannello frontale.
3. Togliere le due viti che fissano la piastra al di sotto del pannello
frontale, quindi rimuovere la piastra.
4. Afferrando il monte sezione del kit di montaggio, aprire e spingere
per inserire il foglio metallico del kit di montaggio nella cavità del
binario all’interno del DN-HS5500.
5. Fissare la piastra fornita in dotazione all’unità DN-HS5500 assieme
al kit di montaggio utilizzando le due viti in dotazione (M3 x 6 mm),
come illustrato nella figura.
6. Montare il pannello frontale incluso al DN-HS5500 utilizzando
le quattro viti (capo vite esagonali, M3 x 6 mm) incluse con DNHS5500.
L’unità per CD è ora installata sull’unità DN-HS5500 e pronta per
l’uso.
Maneggiare con cura l’unita sulla quale è installata l’unità per CD.
Fare riferimento a questo manuale per le istruzioni sul funzionamento
del CD; fare invece riferimento al manuale dell’unità DN-HS5500 per
istruzioni sulle altre operazioni.
NOTA
• Quando si maneggia l’unità per CD e kit di montaggio, tenere la parte
metallica afferrandone la punta, evitando di toccare la scheda dei
circuiti o i terminali.
In caso contrario, l’unità potrebbe subire danni.
• Le unità per CD possono facilmente essere danneggiate da scosse o
urti in genere. Quando si maneggia l’unità per CD, prestare particolare
attenzione per evitare cadute ecc.
• Quando il pannello anteriore dell’unità DN-HS5500 è rimosso, non
inserire le dita o altri oggetti all’interno dell’apertura. In caso contrario,
l’unità potrebbe subire danni.
Page 19

ITALIANO
Operazioni con CD selezionato
q Pulsante MIRROR MIX
Quando il dispositivo selezionato è “CD” e la
modalità Mirror Mix è disattivata, il disco caricato
nell’unità per CD viene espulso non appena si
preme il pulsante Mirror Mix.
Se il CD è in riproduzione, l’espulsione è
bloccata.
Per tutti gli altri casi, fare riferimento alle pagine
6, 7 del manuale dell’unità principale.
w Pulsante EJECT
Quando si preme questo pulsante, il disco
caricato nell’unità per CD viene espulso.
Se il CD è in riproduzione, l’espulsione è
bloccata.
Per gli altri pulsanti, fare riferimento alle pagine
6, 7 del manuale dell’unità principale.
Display con CD selezionato
Se CD è selezionato e non è stato caricato alcun disco, il display appare come descritto di seguito.
Selezione di un dispositivo
Per le istruzioni sul funzionamento, fare riferimento a pagina 13 del manuale dell’unità principale.
Quando l’unità per CD in dotazione è collegata e l’alimentazione è accesa, “HDD” passa a “CD” sulla
schermata di selezione del dispositivo.
L’utilizzo dell’unità per CD viene abilitato quando si seleziona “CD”.
NOTA
• Quando CD è selezionato su uno dei deck, non può essere selezionato anche sull’altro.
• L’unità per CD non può essere utilizzata se viene collegata dopo l’accensione dell’alimentazione.
Riproduzione di CD
Per riprodurre CD con l’unità DN-HS5500, procedere come segue.
Possono essere riprodotti dischi CD-DA.
b Non è possibile riprodurre file MP3 registrati su dischi CD-R e affini.
n Caricamento del disco
• Quando il CD è inserito nella fessura di caricamento disco, la modalità standby viene impostata alla
prima traccia del disco. Il pulsante
• Con la funzione automatica Auto Cue, la modalità standby viene impostata sul punto di partenza del
suono.
La configurazione può essere cambiata a “Auto Cue” nelle preimpostazioni (fare riferimento a pagina
34 del manuale dell’unità principale).
n Selezione traccia
• Ruotare la manopola PARAMETERS.
• Quando la manopola
in gruppi di dieci.
SINGLE PLAY LOCK:
Questa funzionalità disabilita la selezione delle tracce durante la riproduzione, evitando la selezione
accidentale di tracce o l’interruzione imprevista della riproduzione.
Per annullare, premere il pulsante
Fare riferimento a “Pannello superiore E2 – pulsante
dell’unità principale.
PARAMETERS viene premuta e ruotata contemporaneamente, le tracce scorrono
CUE lampeggia quando è impostata la modalità standby.
•
CONT./SINGLE, -Relay.
•
CONT./SINGLE, -Relay” a pagina 7 del manuale
Modalità a schermo intero Modalità a doppio schermo
Per la descrizione dello schermo, fare riferimento alle pagine 8, 9 del manuale dell’unità principale.
Page 20

ITALIANO
Creazione di promemoria
Creazione di promemoria per CD
• È possibile memorizzare fino ad un totale di 5000 promemoria, uno
per traccia.
Ad esempio, per un disco contenente 22 tracce, è possibile impostare
22 promemoria.
NOTA
Il sistema di memorizzazione di promemoria tracce gestisce 1000
promemoria come un unico pacchetto. (1000 promemoria come 5
pacchetti) Con questo sistema di memorizzazione, la memoria viene
cancellata in unità pacchetto, quindi quando si elimina un promemoria,
il numero di memoria resta lo stesso e lo spazio in memoria non
aumenta. Per questo motivo, il numero di promemoria che possono
essere effettivamente memorizzati si riduce.
Se sono stati memorizzati 5000 promemoria, il messaggio “Memo
Full!” viene visualizzato. In questo caso, è necessario cancellare 1
pacchetto di memoria (1000 promemoria), a partire dai promemoria
meno recenti.
b L’indicatore “MEMO” lampeggia quando è caricato un disco
per il quale esistono dei dati promemoria. L’indicatore si illumina
quando viene selezionata una traccia per la quale sono presenti
dati promemoria.
Vengono memorizzati i seguenti dati:
a) Punto CUE
b) Punti A1/B1 e A2/B2
c) Impostazioni di velocità di riproduzione, pitch sì/no e regolazione
cue sì/no
d) Dati BPM (CUE, A1 e A2)
• I punti A1, A2, B1 and B2 possono trovarsi su diverse tracce
all’interno dello stesso disco.
• Se la memoria dei dati promemoria del CD è piena quando si prova
ad impostare un promemoria ...
Quando la memoria è piena, vengono visualizzati i messaggi
“Memo Full” e “Delete 1000?”.
In questo caso, è necessario cancellare i 1000 promemoria meno
recenti dalla memoria per liberare spazio.
Per liberare spazio, premere il pulsante
visualizzato “Delete 1000?”.
Quando il pulsante PARAMETERS viene premuto in concomitanza
con la visualizzazione del messaggio che chiede di riconfermare la
cancellazione dei promemoria (“Delete OK?”), 1000 promemoria
vengono cancellati.
Per le istruzioni sul funzionamento, fare riferimento a pagina 25 del
manuale dell’unità principale.
PARAMETERS quando è
Utilità
Alcune denominazioni sono state modificate
Nuovo Vecchio
Preset Data Import/Export
Preset Import File Import
Preset Export File Export
Per le istruzioni sul funzionamento, fare riferimento a pagina 31 del
manuale dell’unità principale.
“Memo Data” è stato aggiunto
n Memo Data
Utilizzare questa procedura per memorizzare dati promemoria CD
su dispositivi e importarli da dispositivi e per cancellare la memoria
interna dei dati promemoria CD.
Modalità dati promemoria
Quando è visualizzato il menu
superiore nella modalità utilità,
ruotare la manopola
e selezionare “MEMO Data”.
Premere il pulsante PARAMETERS
per impostare.
Vengono visualizzate le voci “Memo
Data”.
PARAMETERS
Memo Import
Quando è visualizzato il menu
superiore nella modalità promemoria,
ruotare la manopola
PARAMETERS
e selezionare “MEMO Import”.
b L’unità viene impostata nella modalità
Memo Import.
Selezionare il dispositivo da cui si
vogliono importare i dati
promemoria.
Viene visualizzato un messaggio di
conferma per la sovrascrittura dei dati
interni.
Selezionare la voce di impostazione.
Quando viene selezionato“OK”:
Viene eseguita l’importazione. Quando l’importazione è completa,
l’unità torna allo stato indicato al punto .
Quando viene selezionato”Cancel”:
L’unità torna allo stato indicato al punto .
Page 21

ITALIANO
Memo Export
Quando è visualizzato il menu
superiore nella modalità promemoria,
ruotare la manopola
e selezionare “MEMO Export”.
b L’unità viene impostata nella modalità
Memo Export.
Selezionare il dispositivo su cui si
vogliono esportare i dati
promemoria.
Quando non ci sono dati promemoria sul
dispositivo di memoria USB esterno:
Viene eseguita l’esportazione.
Quando dati promemoria sono già presenti sul dispositivo
di memoria USB esterno:
Viene visualizzato un messaggio di conferma per la sovrascrittura
dei dati.
Al punto .
Selezionare la voce di impostazione.
PARAMETERS
Quando viene selezionato”OK”:
Viene eseguita l’esportazione. Viene visualizzata una barra di
avanzamento che consente di osservare l’avanzamento del
processo. Quando l’esportazione è completa, l’unità torna allo
stato indicato al punto .
Quando viene selezionato”Cancel”:
L’unità torna allo stato indicato al punto .
Azzeramento totale promemoria
Quando è visualizzato il menu
superiore nella modalità promemoria,
ruotare la manopola
e selezionare “MEMO All Clear”.
Viene visualizzato un messaggio di
conferma per l’azzeramento dei dati.
Al punto .
Selezionare la voce di impostazione.
PARAMETERS
Quando viene selezionato”OK”:
Viene eseguito l’azzeramento totale dei dati promemoria. Viene
visualizzata una barra di avanzamento che consente di osservare
l’avanzamento del processo. Quando l’azzeramento è completo,
l’unità torna allo stato indicato al punto .
Quando viene selezionato”Cancel”:
L’unità torna allo stato indicato al punto .
Page 22

ESPAÑOL
Apreciamos enormemente que haya adquirido este producto.
El juego de instalación y la unidad de CD BU5501 están diseñados
específicamente para instalar el DN-HS5500 Professional Media &
Controller.
Accesorios
Verifique que se suministran las siguientes piezas con el producto.
q Manual del usuario ..................................................................1
w Unidad de CD & Juego de instalación ..................................... 1
e Tornillos (M3 x 6 mm, Negro) .................................................. 2
r Tornillos con cabeza Hexagonal (M3 x 6 mm) .........................4
t Placa ........................................................................................1
y Panel delantero ........................................................................1
u Llave inglesa hexagonal ........................................................... 1
i Lista de las estaciones de servicio .......................................... 1
o Lista de las estaciones de servicio (Para Japón solamente) .... 1
NOTA
Asegúrese de descargar el firmware del sitio web que se muestra
abajo para descargar la versión del firmware del producto.
www.denondj.com
Las funciones descritas en estas instrucciones de manipulación no se
podrán utilizar a menos que actualice el firmware.
Procedimiento de instalación
1. Apague el interruptor del DN-HS5500 y desconecte el cable de
alimentación de la toma de corriente de alimentación.
2. Quite los cuatro tornillos (tornillos con cabeza hexagonal) que
sujetan el panel delantero del DN-HS5500, después quite el panel
delantero.
3. Quite los dos tornillos que sujetan la placa de abajo donde se
instaló el panel delantero, después quite la placa.
4. Sujete la sección de instalación del juego de instalación, inserte la
lámina de metal del juego de instalación en el hueco del riel en la
abertura del DN-HS5500 y empuje hacia adentro.
5. Fije la placa incluida en el DN-HS5500 junto con el juego de
instalación utilizando los dos tornillos suministrados (M3 x 6 mm),
como se muestra en el diagrama.
6. Instale el panel delantero incluido en el DN-HS5500 utilizando
los cuatro tornillos (tornillos con cabeza hexagonal M3 x 6 mm)
incluidos con el DN-HS5500.
La unidad de CD se encuentra ya instalada en el DN-HS5500 y
funcionará correctamente.
Utilice con suficiente cuidado el sistema en el cual instalará la unidad
de CD.
Consulte este manual para leer las instrucciones relacionadas con el
funcionamiento del CD y para las instrucciones relacionadas con otras
operaciones consulte el manual del DN-HS5500.
NOTA
• Al manipular la unidad de CD y el juego de instalación, sujete la
parte metálica localizada en la punta y no toque los circuitos o los
terminales.
De lo contrario podría averiar el sistema.
• Las unidades de CD se pueden dañar fácilmente debido a impactos.
Al manipular la unidad de CD, tenga mucho cuidado de no dejarla
caer, etc.
• Al quitar el panel delantero del DN-HS5500, no coloque sus dedos
u otros objetos en el sistema a través de la apertura. De lo contrario
podría averiar el sistema.
Page 23

ESPAÑOL
Operación al seleccionar un CD
Selección de dispositivo
Para las instrucciones de operación, consulte la página 13 del manual de la unidad principal.
Al conectar la unidad de CD incluida y al activar la alimentación, “HDD” cambia a “CD” en la pantalla de
selección de dispositivo.
Se podrá utilizar la unidad de CD cuando se haya seleccionado “CD”.
NOTA
• Al seleccionar CD en uno de los decks, no se puede seleccionar CD en otro deck diferente.
• La unidad de CD no se puede utilizar si se conecta después de haber activado la alimentación.
Reproducción de CDs
Utilice este procedimiento para reproducir CDs en el DN-HS5500.
Se pueden reproducir discos CD-DA.
q Botón MIRROR MIX
Cuando el dispositivo seleccionado sea “CD”
y se encuentre desactivado el modo de mezcla
tipo espejo, el disco cargado en la unidad de CD
saldrá expulsado en el momento de pulsar el
botón Mirror Mix.
Si se encuentra reproduciendo un CD, se bloquea
la expulsión.
En casos diferentes al mencionado anteriormente,
consulte
principal.
las páginas
6, 7 del manual de la unidad
w Botón EJECT
Al pulsar el botón, se expulsa el disco cargado
en la unidad de CD.
Si se encuentra reproduciendo un CD, se bloquea
la expulsión.
Para otros botones, consulte las páginas 6, 7 del
manual de la unidad principal.
b No se pueden reproducir archivos MP3 grabados en un CD-R y en otros discos similares.
n Inserción del disco
• Al insertar el CD en la ranura de inserción de discos, se establece el modo en espera en la primera pista
• Con la función de cue automático, el modo en espera se establece en el punto en el cual inicia el
El ajuste se puede cambiar a “Auto Cue” en los ajustes preestablecidos (consulte la página 34 del
n Selección de la pista
• Gire la perilla PARAMETERS.
• Al pulsar la perilla
Visualización al seleccionar CD
Si ha seleccionado CD y no se encuentra ningún disco cargado, la visualización será como la que se muestra abajo.
del disco. El botón
sonido.
manual de la unidad principal).
CUE se ilumina cuando se establece el modo en espera.
PARAMETERS mientras la gira, las pistas cambian en unidades de 10.
SINGLE PLAY LOCK:
Esta función deshabilita la selección de pista durante la reproducción para prevenir que se seleccionen
pistas o que se detenga la reproducción accidentalmente.
Para cancelar, pulse el botón
Consulte “Panel principal E2 botón
principal.
•
CONT./SINGLE, -Relay.
•
CONT./SINGLE, -Relay” en la página 7 del manual de la unidad
Modo de visualización completa Modo de visualización doble
Para la descripción de la pantalla, consulte las páginas 8, 9 del manual de la unidad principal.
Page 24

ESPAÑOL
Realización de memos
Creación de memos para CDs
• Se pueden guardar hasta un total de 5000 memos, un memo por
pista.
Si por ejemplo un disco contiene 22 pistas, se pueden guardar 22
memos.
NOTA
El sistema de memoria de la función memo de pista administra 1000
memos como un solo paquete. (1000 memos como 5 paquetes)
Con este sistema de memoria, la memoria se borra en unidades de
paquetes, de tal modo que al borrar un memo, el número de memoria
permanece y el espacio de la memoria no se incrementa. Por esta
razón, el número de memos que se puede guardar en realidad
disminuye.
Si se almacenan 5000 memos, se visualizará el mensaje “Memo Full!”.
Cuando esto suceda, es necesario borrar 1 paquete de memoria (1000
memos), comenzando con los memos más antiguos.
Cuando se carga un disco para el cual existen datos memo, el
b
indicador “MEMO” parpadea. El indicador se ilumina al seleccionar
una pista para la cual existe un dato memo.
Se almacenarán los siguientes datos:
a) Punto CUE
b) Puntos A1/B1 y A2/B2
c) Los ajustes de velocidad de reproducción, activación/desactivación
de pitch y activación/desactivación de cue
d) Datos BPM (CUE, A1 y A2)
• Los puntos A1, A2, B1 y B2 pueden estar en diferentes pistas
dentro del mismo disco.
• Si la memoria de los datos memo de CD se encuentra llena cuando
intenta establecer un memo ...
Si la memoria está llena, aparece el mensaje “Memo Full” y
“Delete 1000?”.
En este caso, debe borrar los 1000 memos más antiguos de la
memoria para liberar espacio.
Para liberar espacio, pulse el botón
visualice “Delete 1000?”.
Al pulsar el botón
confirmar que desea borrar los memos (“Delete OK?”), se borrarán
1000 memos.
Para las instrucciones de operación, consulte la página 25 del manual
de la unidad principal.
PARAMETERS mientras se le solicita volver a
PARAMETERS cuando se
Utilidades
Algunos nombres han cambiado
Nuevo Anterior
Preset Data Import/Export
Preset Import File Import
Preset Export File Export
Para las instrucciones de operación, consulte la página 31 del manual
de la unidad principal.
“Memo Data” ha sido agregado
n Memo Data
Utilice este procedimiento para almacenar datos memo de CD en
los dispositivos y para importarlos de los dispositivos, así como
también para borrar los datos memo internos del CD.
Modo de datos memo
Mientras se visualiza el menú
principal en el modo de utilidades,
gire la perilla
seleccione “MEMO Data”.
Pulse el botón PARAMETERS para
establecer.
Se visualizarán los elementos de “Memo
Data”.
PARAMETERS y
Memo Import
Mientras se visualiza el menú
principal en el modo memo, gire la
perilla
PARAMETERS y seleccione
“MEMO Import”.
b El sistema se ajusta en el modo Memo
Import.
Seleccione el dispositivo del cual se
van a importar los datos memo.
Aparecerá un mensaje para confirmar que
desea sobrescribir los datos internos.
Seleccione el elemento de ajuste.
Al seleccionar “OK”:
La importación se ejecutará. Cuando finalice, el sistema regresa
como si estuviera en el paso .
Al seleccionar “Cancel”:
El sistema regresa como si estuviera en el paso .
Page 25

ESPAÑOL
Memo Export
Mientras se visualiza el menú
principal en el modo memo, gire la
perilla
“MEMO Export”.
b El sistema se establece en el modo Memo
Export.
Seleccione el dispositivo al cual se
van a exportar los datos memo.
Si no existen datos memo en el dispositivo
de memoria USB externo:
La exportación se ejecutará.
Si ya existen datos memo en el dispositivo
de memoria USB externo:
Aparecerá un mensaje para confirmar que desea sobrescribir los
datos.
Al paso .
Seleccione el elemento de ajuste.
PARAMETERS y seleccione
Al seleccionar “OK”:
La exportación se ejecutará. Se visualizará una barra de progreso
de tal modo que pueda observar el progreso. Al finalizar la
exportación, el sistema regresa como si estuviera en el paso .
Al seleccionar “Cancel”:
El sistema regresa como si estuviera en el paso .
Borrar todos los memos
Mientras se visualiza el menú
principal en el modo memo, gire la
perilla
“MEMO All Clear”.
Aparecerá un mensaje para confirmar que
desea borrar los datos.
Al paso .
Seleccione el elemento de ajuste.
PARAMETERS y seleccione
Al seleccionar “OK”:
Se ejecutará el borrado de todos los datos memo. Se visualizará
una barra de progreso de tal modo que pueda observar el
progreso. Cuando finalice el borrado, el sistema regresa como
si estuviera en el paso .
Al seleccionar “Cancel”:
El sistema regresa como si estuviera en el paso .
Page 26

NEDERLANDS
Dank u voor het vertrouwen dat u in dit product heeft gesteld.
Het BU5501 CD-station & Montagepakket werd speciaal ontworpen
voor montage op de DN-HS5500 Professional Media & Controller.
Accessoires
Controleer eerst of alle hieronder vermelde onderdelen met het
product zijn meegeleverd.
q Gebruiksaanwijzing .................................................................. 1
w CD-station & Montagepakket .................................................. 1
e Schroeven (M3 x 6 mm, zwart) ............................................... 2
r Zeskantschroeven (M3 x 6 mm) .............................................. 4
t Plaat ......................................................................................... 1
y Voorpaneel ..............................................................................1
u Inbussleutel .............................................................................1
i Lijst van servicecentra .............................................................1
o Lijst van servicecentra (alleen voor Japan) .............................. 1
OPMERKING
Download de firmware van de onderstaande website en update de
firmwareversie van het product.
www.denondj.com
De functies die in deze handleiding worden beschreven, zullen niet
werken zonder een update van de firmware.
Installatieprocedure
1. Zet de DN-HS5500 uit en trek de stekker uit het stopcontact.
2. Verwijder de vier schroeven (zeskantschroeven) waarmee het
voorpaneel van de DN-HS5500 is bevestigd en verwijder daarna
het voorpaneel.
3. Verwijder de twee schroeven waarmee de plaat is bevestigd die
achter het voorpaneel zat, en verwijder daarna de plaat.
4. Houd de montagebeugel vast bij het bevestigingsdeel en steek de
metalen plaat in de gleuf van de rail in het gat in de DN-HS5500 en
schuif het geheel naar binnen.
5. Maak de inbegrepen plaat vast aan de DN-HS5500 samen met het
montagepakket door middel van de twee bijgevoegde schroeven
(M3 x 6 mm) zoals wordt getoond op de afbeelding.
6. Bevestig het meegeleverde voorpaneel aan de DN-HS5500 met
behulp van de vier schroeven (M3 x 6 mm zeskantschroeven) van
de DN-HS5500.
Het CD-station is nu gemonteerd op de DN-HS5500 en kan functioneren.
Behandel het apparaat waarin het CD-station is gemonteerd met de
nodige voorzichtigheid.
Raadpleeg deze handleiding voor aanwijzingen over het bedienen
van de CD en raadpleeg de handleiding van de DN-HS5500 voor
aanwijzingen over andere handelingen.
OPMERKING
• Wanneer u het CD-station & Montagepakket vast neemt, houd
het metalen gedeelte dan vast aan de tip en raak de printplaten of
aansluitingen niet aan.
Anders zou u het apparaat kunnen beschadigen.
• CD-stations kunnen gemakkelijk beschadigd raken door schokken.
Zorg ervoor dat u het CD-station niet laat vallen e.d.
• Steek geen vingers of voorwerpen door de opening in de DNHS5500, wanneer het voorpaneel is verwijderd. Anders zou u het
apparaat kunnen beschadigen.
Page 27

NEDERLANDS
Bediening wanneer CD is geselecteerd
q MIRROR MIX-knop
Wanneer het geselecteerde apparaat “CD” is
en de mirror mix is uitgeschakeld, wordt de CD
in het station uitgeworpen wanneer op de Mirror
Mix-knop wordt gedrukt.
Wanneer de CD wordt afgespeeld, wordt het
uitwerpen vergrendeld.
Voor andere gevallen dan de bovenstaande,
raadpleegt u pagina 6, 7 in de handleiding van
het hoofdtoestel.
w EJECT-knop
Wanneer deze toets wordt ingedrukt, wordt de
CD in het station uitgeworpen.
Wanneer de CD wordt afgespeeld, wordt het
uitwerpen vergrendeld.
Raadpleeg pagina 6, 7 in de handleiding van het
hoofdtoestel voor de andere knoppen.
Display wanneer CD is geselecteerd
Wanneer CD is geselecteerd en geen disk is geplaatst, wordt het onderstaande scherm weergegeven.
Apparaatselectie
Raadpleeg pagina 13 in de handleiding van het hoofdtoestel voor de bedieningsinstructies.
Wanneer het bijgevoegde CD-station is aangesloten en de stroom wordt ingeschakeld, verandert “HDD”
in “CD” op het scherm voor apparaatselectie.
Het gebruik van het CD-station wordt mogelijk wanneer “CD” wordt geselecteerd.
OPMERKING
•
Wanneer CD is geselecteerd op een van de decks, kan CD niet worden geselecteerd op het andere deck.
• Het CD-station kan niet worden gebruikt wanneer het wordt aangesloten nadat de stroom werd
ingeschakeld.
CD’s weergeven
Gebruik deze procedure om CD’s weer te geven op de DN-HS5500.
CD-DA-disks kunnen worden weergegeven.
MP3-bestanden opgenomen op een CD-R en andere dergelijke disks kunnen niet worden weergegeven.
b
n De disk plaatsen
• Wanneer de CD wordt geplaatst in de gleuf, wordt de stand-bymodus ingesteld op de eerste track van
de disk. De
• Met de auto cue-functie wordt de stand-bymodus ingesteld op het punt waar het geluid begint.
De instelling kan worden gewijzigd in de voorinstellingen onder “Auto Cue” (zie pagina 34 in de handleiding
van het hoofdtoestel).
n De track selecteren
• Draai aan de PARAMETERS-knop.
• Wanneer de
gebladerd in stappen van 10.
SINGLE PLAY LOCK:
Met deze functie wordt trackselectie onmogelijk gemaakt tijdens de weergave om te voorkomen dat
tracks worden geselecteerd of dat de weergave per ongeluk wordt gestopt.
Om te annuleren, drukt u op de
Zie “Bovenpaneel E2
CUE-knop licht op wanneer de stand-bymodus is ingesteld.
PARAMETERS-knop wordt ingedrukt terwijl hij wordt gedraaid, wordt door de tracks
•
•
CONT./SINGLE, -Relay
CONT./SINGLE, -Relay-knop.
-knop” op pagina 7 in de handleiding van het hoofdtoestel.
Volledige displaymodus Tweevoudige displaymodus
Voor een beschrijving van het scherm, raadpleegt u pagina 8, 9 in de handleiding van het hoofdtoestel.
Page 28

NEDERLANDS
Memo’s maken
Memo’s voor CD’s aanmaken
• Er kunnen in totaal 5000 memo’s worden opgeslagen, een memo
per track.
Wanneer op een schijf bijvoorbeeld 22 tracks staan, kunnen 22
memo’s worden opgeslagen.
OPMERKING
Het geheugensysteem van de trackmemofunctie behandelt
1000 memo’s als één pakket. (1000 memo’s als 5 pakketten) Met
dat geheugensysteem wordt het geheugen gewist in eenheden
van pakketten, dus wanneer één memo wordt gewist, blijft het
geheugennummer en de vrije ruimte hetzelfde. Daarom daalt het
aantal memo’s dat eigenlijk kan worden opgeslagen.
Wanneer 5000 memo’s zijn opgeslagen, verschijnt het bericht
“Memo Full!”. Wanneer dat gebeurt, moet u 1 geheugenpakket (1000
memo’s) wissen, te beginnen met de oudste memo’s.
b Wanneer een disc wordt geladen waarvoor memogegevens zijn
vastgelegd, dan knippert de “MEMO”-indicator. De indicator
licht op wanneer een track wordt geselecteerd waarvoor
memogegevens zijn vastgelegd.
De volgende gegevens worden opgeslagen:
a) CUE-punt
b) A1/B1- en A2/B2-punten
c) Instellingen voor weergavesnelheid, pitch on/off en cue adjust
on/off
d) BPM-gegevens (CUE, A1 en A2)
• De A1, A2, B1 en B2-punten mogen zich op verschillende tracks
bevinden in dezelfde playlist.
• Wanneer het geheugen van de memogegevens van de CD vol is
wanneer u een memo probeert in te stellen ...
Wanneer het geheugen vol is, verschijnen de berichten “Memo
Full” en “Delete 1000?”.
In dat geval moet u de 1000 oudste memo’s wissen uit het
geheugen om ruimte vrij te maken.
Om ruimte vrij te maken, drukt u op de
“Delete 1000?” wordt weergegeven.
Wanneer de
bericht wordt weergegeven om te bevestigen dat u de memo’s
wilt wissen (“Delete OK?”), worden 1000 memo’s gewist.
Raadpleeg pagina 25 in de handleiding van het hoofdtoestel voor de
bedieningsinstructies.
PARAMETERS-knop wordt ingedrukt terwijl het
PARAMETERS-knop terwijl
Toepassingen
Sommige namen zijn veranderd
Nieuw Oud
Preset Data Import/Export
Preset Import File Import
Preset Export File Export
Raadpleeg pagina 31 in de handleiding van het hoofdtoestel voor de
bedieningsinstructies.
“Memo Data” is toegevoegd
n Memo Data
Gebruik deze procedure om memogegevens van een CD op
apparaten op te slaan en ze te importeren, maar ook om de interne
memogegevens van de CD te wissen.
Memogegevensmodus
Terwijl het bovenste menu in de
toepassingenmodus wordt
weergegeven, draait u aan de
PARAMETERS-knop om “MEMO
Data” te selecteren.
Druk op de PARAMETERS-knop
om in te stellen.
De items van “Memo Data” worden
weergegeven.
Memo Import
Terwijl het bovenste menu in de
memomodus wordt weergegeven,
draait u aan de
PARAMETERS
-knop
om “MEMO Import” te selecteren.
b Het apparaat is ingesteld in de modus
Memo Import.
Selecteer het apparaat waarvan de
memogegevens geïmporteerd moeten
worden.
Er wordt een bericht weergegeven om te
bevestigen dat u de interne gegevens wilt
overschrijven.
Selecteer het in te stellen item.
Wanneer “OK” wordt geselecteerd:
wordt het importeren uitgevoerd. Na het voltooien, keert het
apparaat terug naar stap .
Wanneer “Cancel” wordt geselecteerd:
keert het apparaat terug naar stap .
Page 29

NEDERLANDS
Memo Export
Terwijl het bovenste menu in de
memomodus wordt weergegeven,
draait u aan de
om “MEMO Export” te selecteren.
b Het apparaat wordt ingesteld in de modus
Memo Export.
Selecteer het apparaat waarnaar de
memogegevens geëxporteerd moeten
worden.
Wanneer zich geen memogegevens op
het externe USB-geheugen bevinden:
wordt het exporteren uitgevoerd.
Wanneer zich al memogegevens op het externe USBgeheugen bevinden:
wordt er een bericht weergegeven om te bevestigen dat u de
gegevens wilt overschrijven.
Naar stap .
Selecteer het in te stellen item.
PARAMETERS
-knop
Wanneer “OK” wordt geselecteerd:
wordt het exporteren uitgevoerd. Een voortgangsbalk wordt
weergegeven zodat u de voortgang kunt volgen. Nadat het
exporteren is voltooid, keert het apparaat terug naar stap .
Wanneer “Cancel” wordt geselecteerd:
keert het apparaat terug naar stap .
Memo Alles Wissen
Terwijl het bovenste menu in de
memo-modus wordt weergegeven,
draait u aan de
knop om “MEMO All Clear” te
selecteren.
Er wordt een bericht weergegeven om
te bevestigen dat u de gegevens wilt
wissen.
Naar stap .
Selecteer het in te stellen item.
PARAMETERS-
Wanneer “OK” wordt geselecteerd:
wordt het wissen van alle gegevens uitgevoerd. Een
voortgangsbalk wordt weergegeven zodat u de voortgang kunt
volgen. Nadat het wissen is voltooid, keert het apparaat terug
naar stap .
Wanneer “Cancel” wordt geselecteerd:
keert het apparaat terug naar stap .
Page 30

SVENSKA
Vi är mycket glada över att du valt att köpa denna produkt.
BU5501 CD-enhet och monteringssats är speciellt designade för
montering på DN-HS5500 Professional Media & Controller.
Tillbehör
Kontrollera att följande delar finns med.
q Bruksanvisning ........................................................................ 1
w CD-enhet & monteringssats ....................................................1
e Skruvar (M 3 x 6 mm, Svart) .................................................... 2
r Sexkantiga Huvudskruvar (M3 x 6 mm) .................................. 4
t Platta .......................................................................................1
y Frontpanel ...............................................................................1
u Insexnyckel .............................................................................. 1
i Lista på serviceställen .............................................................1
o Lista på serviceställen (endast för Japan) ................................ 1
OBSERVERA
Ladda ner den senaste fasta programvaran från webbsidan som visas
nedan och uppdatera produktens version av den fasta programvaran.
www.denondj.com
De funktioner som beskrivs i dessa instruktioner kommer inte att
fungera innan den fasta programvaran är uppdaterad.
Montering
1. Stäng av strömbrytaren på DN-HS5500 och avlägsna el-sladden
från eluttaget.
2. Avlägsna de fyra skruvar (sexkantiga huvudskruvar) som fäster DN-
HS5500s frontpanel, avlägsna sedan frontpanelen.
3. Avlägsna de två skruvar som håller fast den platta som frontpanelen
var monterad under, avlägsna sedan plattan.
4.
Håll i monteringsdelen på monteringssatsen, för in monteringssatsens
metallskiva i håligheten i skenan i DN-HS5500s öppning och tryck in.
5. Fäst den medföljande plattan på DN-HS5500 tillsammans med
monteringssatsen, med de två medföljande skruvarna (M3 x 6 mm)
så som visas på bilden.
6. Montera den medföljande frontpanelen på DN-HS5500 med de fyra
skruvarna (M3 x 6 mm sexkantiga huvudskruvar) som medföljer
DN-HS5500.
CD-enheten är nu monterad på DN-HS5500 och kan användas.
Hantera apparaten som CD-enheten är installerad på med
försiktighet.
Se denna bruksanvisning för instruktioner om användning av CD:n, se
bruksanvisningen för DN-HS5500 för övriga instruktioner.
OBSERVERA
• När du hanterar CD-enheten och monteringssatsen, håll i kanten på
metalldelen och vidrör inte kretskorten eller kontakterna.
Det kan skada satsen.
• CD-enheter kan lätt skadas av stötar. När du hanterar CD-enheten,
var försiktig så att du inte tappar den eller liknande.
• När frontpanelen har tagits loss från DN-HS5500, placera inte
fingrarna eller andra föremål i enheten genom öppningen. Det kan
skada satsen.
Page 31

SVENSKA
Manövrering när CD har valts
q MIRROR MIX-tangent
När vald enhet är “CD” och mirror mix-läget är
avstängt, matas CD-skivan i CD-enheten ut när
Mirror mix-tangenten trycks ned.
Om CD-skivan spelas är utmatningen låst.
I andra fall än de som nämns ovan, se sidan 6, 7
i huvudenhetens bruksanvisning.
w EJECT-tangent
CD-skivan i CD-enheten matas ut när tangenten
trycks ned.
Om CD-skivan spelas är utmatningen låst.
För andra tangenter, se sidan 6, 7 i huvudenhetens
bruksanvisning.
Display när CD har valts
Om CD har valts och ingen skiva är isatt, visas den display som visas nedan.
Val av komponent
För instruktioner om användning, se sidan 13 i huvudenhetens bruksanvisning.
När den medföljande CD-enheten är anslutet och strömmen sätts på, växlas “HDD” till “CD” på
komponentens skärm för val av källa.
CD-enheten kan användas när “CD” har valts.
OBSERVERA
• När CD har valts på ett av däcken, kan inte CD väljas på det andra däcket.
• CD-enheten kan inte användas om den ansluts efter att strömmen satts på.
Spela CD-skivor
Gör så här för att spela CD-skivor på DN-HS5500.
CD-DA-skivor kan spelas.
b MP3-filer som spelats in på CD-R eller andra skivor kan inte spelas.
n Ladda skivan
• När CD-skivan sätts i skivfacket, ställs standby-läget in vid det första spåret på CD-skivan. CUE-tangenten
tänds när standby-läget ställts in.
• Med funktionen auto cue ställs standby-läget in till den punkt där ljudet startar.
Denna inställning kan ändras med “Auto Cue” i förinställningarna (se sidan 34 i huvudenhetens
bruksanvisning).
n Välja spår
• Vrid på PARAMETERS-kontrollen.
PARAMETERS-kontrollen trycks ned samtidigt som den vrids, växlar spåren i grupper om 10.
• När
SINGLE PLAY LOCK:
Denna funktion avaktiverar spårvalet vid uppspelning för att förhindra att spår väljs eller att uppspelningen
stannar av misstag.
Tryck på tangenten
Se “Översta panelen E2
•
CONT./SINGLE, -Relay för att avbryta.
•
CONT./SINGLE, -Relay-tangent” på sidan 7 i huvudenhetens bruksanvisning.
Läge för hel display Läge för delad display
För en beskrivning av skärmen, se sidan 8, 9 i huvudenhetens bruksanvisning.
Page 32

SVENSKA
Skapa memos
Skapa memos för CD-skivor
• Totalt 5000 memos kan lagras, ett memo per spår.
Om en skiva till exempel innehåller 22 spår, kan 22 memos lagras.
OBSERVERA
Spårmemofunktionens minnessystem hanterar 1000 memos som ett
paket. (1000 memos som 5 paket) Med detta minnessystem raderas
minnet i enheter, där varje enhet är ett paket. Om ett memo raderas så
förblir minnesantalet konstant och minnesutrymmet ökar inte. Detta
innebär att det faktiska antalet memos som kan lagras minskar.
Om 5000 memos lagrats visas ett “Memo Full!” meddelande. När
det sker måste du radera ett paket memos (1000 memos), och börja
med de äldsta.
b “MEMO”-indikatorn blinkar när en skiva som har memodata sätts
i. Indikatorn lyser när ett spår som har memodata har valts.
Följande data lagras:
a) CUE-punkt
b) A1/B1- och A2/B2-punkter
c) Inställningar för uppspelningshastighet, pitch på/av och cue adjust
på/av
d) BPM-data (CUE, A1 och A2)
• A1-, A2-, B1- och B2-punkterna kan vara på olika spår så länge de är
på samma skiva.
• Om CD:ns memodataminne är fullt när du försöker ställa in ett
memo …
Om minnet är fullt visas meddelandet “Memo Full” eller “Delete
1000?”.
I detta fall måste du radera de 1000 äldsta memona från minnet för
att frigöra utrymme.
För att frigöra utrymme, tryck på
“Delete 1000?” visas.
När PARAMETERS-tangenten trycks ned medan meddelandet
visas som ber dig bekräfta att du vill radera memona (“Delete
OK?”), raderas 1000 memos.
För instruktioner om användning, se sidan 25 i huvudenhetens
bruksanvisning.
PARAMETERS-tangenten när
Utilities
En del namn har ändrats
Nytt Tidigare
Preset Data Import/Export
Preset Import File Import
Preset Export File Export
För instruktioner om användning, se sidan 31 i huvudenhetens
bruksanvisning.
“Memo Data” har lagts till
n Memo Data
Gör så här för att lagra CD-memodata på enheter, importera den
från enheter, samt för att radera intern CD-memodata.
Memo data-läge
När toppmenyn visas i utilities-
läget, vrid på
kontrollen och välj “MEMO
Data”.
Tryck på PARAMETERS-tangenten
för att ställa in.
Inställningar för “Memo Data” visas.
PARAMETERS-
Memo Import
När toppmenyn visas i memoläget,
vrid på
PARAMETERS-kontrollen
och välj “MEMO Import”.
b Enheten ställs in på Memo Import-läge.
Välj enhet som memodata ska
importeras från.
Ett meddelande visas för att bekräfta att
du vill skriva över den interna datan.
Välj föremål för inställning.
När “OK” har valts:
Import utförd. När det avslutats återgår enheten till hur den var
i steg .
När “Cancel” har valts:
Enheten återgår till hur den var i steg .
Page 33

SVENSKA
Memo Export
När toppmenyn visas i memoläget,
vrid på
och välj “MEMO Export”.
b Enheten ställs in på Memo Export-läge.
Välj enhet som memodata ska
exporteras till.
Om ingen memodata finns på den
externa USB-minnesenheten:
Export utförd.
Om memodata redan finns på den
externa USB-minnesenheten:
Ett meddelande visas för att bekräfta att du vill skriva över
datan.
Till steg .
Välj föremål för inställning.
PARAMETERS-kontrollen
När “OK” har valts:
Export utförd. En förloppsindikering visas så att du kan följa
förloppet. När exporten avslutats återgår enheten till hur den var
i steg .
När “Cancel” har valts:
Enheten återgår till hur den var i steg .
Rensa all memodata
När toppmenyn visas i memoläget,
vrid på
och välj “MEMO All Clear”.
Ett meddelande visas för att bekräfta att
du vill rensa datan.
Till steg .
Välj föremål för inställning.
PARAMETERS-kontrollen
När “OK” har valts:
All memodata rensas. En förloppsindikering visas så att du kan
följa förloppet. När rensningen avslutats återgår enheten till hur
den var i steg .
När “Cancel” har valts:
Enheten återgår till hur den var i steg .
Page 34

CAUTION
RISK OF ELECTRIC SHOCK
DO NOT OPEN
፩ġġġġġၭ
ġቂ᎙ሃჵ
2
᎙ሃ˖
ၓ߷ݢদˈข႙˄ড˅ȃׁؠႇ૰࢜ቂጚቂܿؠȃ
ġ
ขၘရᏁࢆܿ༦เᄵᅃ୲ˈᎧȃ
݃עᄳ፩ဂດݢܿဇᄳװࡻቂጚٛ൰ܷݢ࿒ঽࡴݢᅼˈ૰
ঐޭเ࿒ዉڈܐܿݢদ၌ნȃ
݃עᄳ፩ࡥྫܿဇᄳװˈቺࡻቂጚࡘົֻغᏮቪ֦ᆻ˄࠵ႚ˅ߴಅ
ሥᆒࢆՙጐྈࡒົֻངಖ༚ȃ
ġภ᎙ሃჵ
2
ࡻ˖
ၓןಁটኳݢদܿ၌ნˈข႙ࡘᇨධ֬௷ቩ፩ডٰܿˈ෩ข႙
Ꭷᇛ࿒ܿ႘࿒ˈ൸ˈࡘᇨධຢȃ
᎙ሃ˖
IJįġ ᄆᄩۃ୲ݢኑღ
ġ ข႙ཿডݢኑღקᄳˈߙໍཿডקᄳˈঐቂ፩ܷݢদডጸ٢ከᏮȃ
ġ ۰ුຢنᏰճڵݢኑღˈขฬไၾ᎘نဂߑ߾ݢኑღȃ
ijįġ ข႙
ġ ၓ߷ፒݢদˈข႙ȃ
ġ ߙໍၳ࿏ˈขቪ࿙ܗ୲ຟనȃ
Ĵįġ ข႙ใ႘
ġ ข႙ۢᄹ႘࿒ডᇛ࿒Ⴜȃ
ġ ጝޕঐዉڈݢদডغᏮடȃ
ข֦܃݃ৃවຢ᎙ಖܿᄲঽᅗளȃ
•
ġ ߷ፒࡴၫ
ġ Ꭷ৩ሥኧᅒڣࠍȃ
•
ġ ௗሃݢኑღ
ġġ۰نᏰ؇ڵنဂሥࡘ᎘ن
ဂඝ؇ڵȃ
•
ġġ႙ׁޡࡴড
ٽܿၤȃ
•
ġġ٣ৱቂׁᅐنဂ
؇୰ݢኑنᏰȃ
ī˄ֻࠞ૾ܿ૮˅
•
ġ ႙ޛ૮ܿࠞ૾ȃ
•
ġ ႙ุኰ႘ݯȃ
•
ġġןಁׁࡒൂຄڥৎˈ
ᇓ႙ቂපቌˈ࿙ೀ༽ডඝྋ๑
ৎಥძȃ
•
ġ ႙ডཱུሃᅃ୲ׁȃ
I
Page 35

፩ġġġġġၭ
ໟࠍࡥᄠࢭళࡘٛ൰ȃ
ŃŖĶĶıIJġńŅ ดވධᎧ৩ၓᎧ ŅŏĮʼnŔĶĶıı ᇖ࿒ ħ ૿፟ධߑ
ົȃ
ി
ขฬไٛ൰ࣽᇵിȃ
ġغᏮངಖ༚ġįįįįįįįįįįįįįįįįįįįįįįįįįįįįįįįįįįįįįįįįįįįįįįįįįįįįįįįįįįįįįįįįįįįįįįįįįįįįįįįįįįįįįįIJ
q
ġńŅ ดވධᎧ৩ġįįįįįįįįįįįįįįįįįįįįįįįįįįįįįįįįįįįįįįįįįįįįįįįįįįįįįįįįįįįįįįįįįįįįįįįįįIJ
w
ġఞཎ˄ŎĴġŹġķ ˈ˅ġįįįįįįįįįįįįįįįįįįįįįįįįįįįįįįįįįįįįįįįįįįįįįįįįįįįįįįįįįįįįij
e
ġఞཎ˄ŎĴġŹġķ ˅ġįįįįįįįįįįįįįįįįįįįįįįįįįįįįįįįįįįįįįįįįįįįįįįįįįįįįįįįįįįįįįįįįĵ
r
ġ༥֊ġįįįįįįįįįįįįįįįįįįįįįįįįįįįįįįįįįįįįįįįįįįįįįįįįįįįįįįįįįįįįįįįįįįįįįįįįįįįįįįįįįįįįįįįįįįįįįįIJ
t
ġಅ֊ġįįįįįįįįįįįįįįįįįįįįįįįįįįįįįįįįįįįįįįįįįįįįįįįįįįįįįįįįįįįįįįįįįįįįįįįįįįįįįįįįįįįįįįįįįįįįįįIJ
y
ġև༇ġįįįįįįįįįįįįįįįįįįįįįįįįįįįįįįįįįįįįįįįįįįįįįįįįįįįįįįįįįįįįįįįįįįįįįįįįįįįįįįįįįįįįįįįįįįIJ
u
ġ࠵ႚዹளװġįįįįįįįįįįįįįįįįįįįįįįįįįįįįįįįįįįįįįįįįįįįįįįįįįįįįįįįįįįįįįįįįįįįįįįįįįįįįįįįįįįįįįįIJ
i
ġ࠵ႚዹளװ˄ქׁ๊˅ġįįįįįįįįįįįįįįįįįįįįįįįįįįįįįįįįįįįįįįįįįįįįįįįįįįįįįįįįįįįįįįįįįIJ
o
᎙
ข۰ᇵ၃ፐኵࢿ໐ৃٛ൰ࢿׁȃ
ŸŸŸįťŦůŰůťūįŤŰŮ
ፔ໐ৃࢿئ૰ቂጝᄎצغᏮ፩ಇ༧࢙ܿȃ
࣋ݵ
Ꭷ؞ᎁ
ġ ࣋ט ŅŏĮʼnŔĶĶıı ܿݢኑ࣋ˈ۰ݢኑنᏰ፩ճڵݢኑღȃ
IJį
ġ ᇧᏖࢿށ ŅŏĮʼnŔĶĶıı ಅ֊ܿ ĵ ࢋఞཎ˄ఞཎ˅ˈะᇧ
ijį
ಅ֊ȃ
ġ ᇧᏖಅ֊ቂࢿށ༥֊ܿ ij ࢋఞཎˈะᇧ༥֊ȃ
Ĵį
ġ ᎘Ꭷ৩ܿᎧؠˈᎧ৩ܿ༥ن ŅŏĮʼnŔĶĶıı ଁࣟ
ĵį
ܻᎫܿաფۃˈထȃ
ġ ဇྈˈቂཱུࡒܿ ij ࢋఞཎ˄ŎĴġ Źġ ķ ˅ཱུࡒܿ༥֊ቪ
Ķį
ŅŏĮʼnŔĶĶıı Ꭷ৩Ꭷിᇜඩȃ
ġ ቂ ŅŏĮʼnŔĶĶıı ࡒ ܿ ĵ ࢋ ఞ ཎ˄ŎĴġ Źġ ķ ఞཎ˅
ķį
ŅŏĮʼnŔĶĶıı ຢᎧࡒܿಅ֊ȃ
ۨ ńŅ ดވධᇲᎧ ŅŏĮʼnŔĶĶıı ຢ૰ᄵغᏮȃ
ቂᎧ ńŅ ดވධܿົֻขࢆိᄆᄩȃ
دኡࡘቂ༇ق፩غᏮ ńŅ ܿངಖˈدኡ ŅŏĮʼnŔĶĶıı ቂ༇ق፩ඝྊܿ
غᏮངಖȃ
᎙
•
ġቂ ńŅ ดވධᎧ৩ˈ༇ၾݾؠܿ༥ؠࠍˈข႙ۂಝღ௸֊
ডޤଁȃ
ġ ࠨዏཿົֻȃ
•
ġጫވসᇸཿ ńŅ ดވධȃغᏮ ńŅ ดވධˈᄆᄩቂᇵಁඝݳథȃ
•
ġᇧڼ ŅŏĮʼnŔĶĶıı ܿಅ֊ˈข႙༇ፑডඝྋ႘࿒ົଁۃȃ
ࠨዏཿົֻȃ
૰ᇵׁຢቂܿݵ
ġሕ ńŅ
q
ġ ׁ؆֡ࣽቑဇྈፗܿݵȃ
ġ ܦˈข᎙ሃׁ؆࿅༓ᄳᎫܿݵ˄ᄩ
ᄳݵȂհעᄳݵ݃˅ȃ࣮༅ဇ؆ጝᄎݵˈ
૰ঐཿׁȃ
᎙
ׁ ńŅ ؆ቂܷ࿒ࣕȃၓฬ֦ၱށከᎡˈሊ༃ၫޡົށ
ၓ ĶɆ˄ĵIJ°Ň˅ȋ ĴĶɆ˄ĺĶ°Ň˅ȃ
Page 36

፩ġġġġġၭ
ᅤ፩ ńŅ ܿغᏮ
ġŎŊœœŐœġŎŊř
q
ġ ܬᅤ፩ܿົֻȐńŅȑ෩ჸছಠ࣋טˈ
ՙჸছˈݵ۰ ńŅ ดވධ፩ܪڵȃ
ġ ؆ ńŅ ˈ྇ށܪڵ࢙ȃ
ġ ڼۨᇵိܿଝˈدኡ᎐ቂ༇قݕ ķˈĸ ᇔȃ
ᅤ፩ ńŅ ܿმ
࣮ᅤ፩ ńŅ ෩ኵݵˈმȃ
ġņŋņńŕ
w
ġ ՙࡘˈܪڵኵ ńŅ ܿݵȃ
ġ ؆ ńŅ ˈ྇ށܪڵ࢙ȃ
ġ ඝྊՙܿغᏮدኡ᎐ቂ༇قݕ ķˈĸ ᇔȃ
ᅤዎົֻ
دኡ᎐ቂ༇قݕ IJĴ ᇔܿغᏮངಖȃ
ܬஏܿ ńŅ ดވධ෩ݢኑතˈົֻܿᅤዎൺຢȐʼnŅŅȑ෧ፚȐńŅȑȃ
ᅤ፩ȐńŅȑ૰ቂ ńŅ ดވධȃ
᎙
•
ġඝ፩ᇜࢋᏰຢᅤዎ ńŅ ˈႇߟௐᇜࢋᏰຢᅤዎ ńŅȃ
•
ġතވݢኑ࣮ஏ ńŅ ดވධዏႇߟቂȃ
؆ ńŅ
ቂࡘ؞ᎁ ŅŏĮʼnŔĶĶıı ຢ؆ ńŅȃ
૰؆ ńŅĮŅł ݵȃ
ġႇߟ؆፟ ńŅĮœ ඝྊཕݵ፩ܿ ŎőĴ ၭȃ
b
ġኵݵ
n
•
ġ ńŅ نݵኵؼˈݵܿݕᇜ༈ฑ಼ົၓቂಠȃົၓቂಠ
•
ġሕ൮ইၤ࢙ˈ۰ሕۃົၓቂಠȃ
ġ ૰࡙קኁົ፩ȐłŶŵŰġńŶŦȑܿົ˄دኡ᎐ቂ༇قݕ Ĵĵ ᇔ˅ȃ
ġᅤዎฑ಼
n
•
ġᎡ ވ
PARAMETERS
•
ġᎡވՙ
ŔŊŏňōņġőōłŚġōŐńŌĻ
؆ࡘ࢙ቂฑ಼ᅤዎˈ߷ፒႜᅤฑ಼ডጚፒ؆ȃ
ቺถᄂˈՙ
دኡ᎐ቂ༇قݕ ĸ ᇔȐݾؠಅ֊E2ġ
PARAMETERS
ᅢഀȃ
ᅢഀˈᇵ IJı ༈ၓᇜᏠ෧ฑ಼ȃ
•
CONT./SINGLEˈ-Relay
ȃ
•
CONT./SINGLEˈ-Relay
ȑȃ
CUE
தඩȃ
ภൺმಠ ༺፱მಠ
دኡ᎐ቂ༇قݕ Ĺˈĺ ᇔܿൺಸಇ༧ȃ
Page 37

፩ġġġġġၭ
ົህ
ၓ ńŅ ۑህ
•
ġ૰ڿ܃܌ Ķııı ህˈ༈ฑ಼ᇜህȃ
ġ ஂˈ࣮ᇜጀݵ֡ࣽ ijij ༈ฑ಼ˈዏ૰ڿ܃ ijij ህȃ
᎙
ฑ಼ህ࢙ܿህႼ૰ IJııı ህᏮၓᇜࢋᏠۃ୲ȃ˄IJııı
ህყܬ Ķ ࢋᏠ˅ۨህႼˈህᇵᏠၓܠၤ־ڼˈሓۨ
࣮ຑڼᇜህˈህ༮Ꮝ֦ௗܦህૼৱঐዓৠȃቈጝ፯ኊሓˈ
ৗ૰ڿ܃ܿህ༮ຬȃ
࣮ᇲڿ܃ Ķııı ህˈმȐŎŦŮŰġŇŶŭŭĢȑᄪႩȃߙໍጝ፯ଝˈ
כᇋ۰ᏥዄܿህຑڼᇜᏠህ˄IJııı ህ˅ȃ
ġኵࣽህ༮દܿݵȐŎņŎŐȑፑ݁ດཇȃᅤዎࣽህ
b
༮દܿฑ಼ፑ݁தඩȃ
ᇲڿ܃ᇵ༮દ˖
Ţ˅ńŖņ ݞ
ţ˅łIJİŃIJ łijİŃij ݞ
Ť˅؆ཨޡˈקཨ İ ࣋ইၤݲ İ ࣋ົ
ť˅ŃőŎ ༮દ˄ńŖņˈłIJ łij˅
•
ġ૰ᇜጀݵܿฑ಼፩ڿ܃ łIJˈłijˈŃIJ Ńij ݞȃ
•
ġܬቺົህ࣮ ńŅ ܿህ༮દᇲȍ
ġ ࣮ህᇲˈڵოȐŎŦŮŰġŇŶŭŭȑȐŅŦŭŦŵŦġIJıııŀȑᄪႩȃ
ġ ۨˈכᅐ۰ህ፩ຑڼᏥܿ IJııı ህᇵૼৱȃ
ġ ቺૼৱˈმȐŅŦŭŦŵŦġIJıııŀȑՙ
ġმᇜᄪႩฬไࠨຑڼህ˄ȐŅŦŭŦŵŦġŐŌŀȑ˅ՙ
PARAMETERS
دኡ᎐ቂ༇قݕ ijĶ ᇔܿغᏮངಖȃ
ˈຑڼ IJııı ህȃ
PARAMETERS
ȃ
ሥቂ࢙
ؠࠍಚڅᇲ࡙ק
ᄧ
őųŦŴŦŵġŅŢŵŢ
őųŦŴŦŵġŊŮűŰųŵ ŇŪŭŦġŊŮűŰųŵ
őųŦŴŦŵġņŹűŰųŵ ŇŪŭŦġņŹűŰųŵ
دኡ᎐ቂ༇قݕ ĴIJ ᇔܿغᏮངಖȃ
ᇲዓৠȐŎŦŮŰġŅŢŵŢȑ
ġŎŦŮŰġŅŢŵŢ
n
ġ ቂࡘ؞ᎁົֻ፩ڿ܃ ńŅ ህ༮દ۰ົܷ༮દˈຑ
ڼ ńŅ ህ༮દȃ
ህ༮દಠ
ህಠܿݾلجܠმˈᎡ
ވ
PARAMETERS
ȐŎņŎŐġŅŢŵŢȑȃ
ՙ
PARAMETERS
მȐŎŦŮŰġŅŢŵŢȑჵȃ
ŊŮűŰųŵİņŹűŰųŵ
ᅢഀᅤዎ
ᄵົȃ
ŎŦŮŰġŊŮűŰųŵ
ህಠܿݾلجܠმˈᎡ
ވ
PARAMETERS
ᅢഀᅤዎ
ȐŎņŎŐġŊŮűŰųŵȑȃ
ġົֻົၓ ŎŦŮŰġŊŮűŰųŵ ಠȃ
b
ᅤዎህ༮દ༕ፚುࢋົֻȃ
მᇜᄪႩฬไࠨࡇ༮દȃ
ᅤዎົჵ಼ȃ
ᅤ፩ȐŐŌȑ˖
ፍᄵ༕ȃဵڈˈົֻইܸݕ؞ܿᎫྙȃ
ᅤ፩ȐńŢůŤŦŭȑ˖
ົֻইܸݕ؞ܿᎫྙȃ
Page 38

፩ġġġġġၭ
ŎŦŮŰġņŹűŰųŵ
ህಠܿݾلجܠმˈᎡ
ވ
PARAMETERS
ȐŎņŎŐġņŹűŰųŵȑȃ
ġົֻົၓ ŎŦŮŰġņŹűŰųŵ ಠȃ
b
ᅤዎህ༮દ༕ڵፚುࢋົֻȃ
ᅢഀᅤዎ
࣮ိ ŖŔŃ ህົֻ፩ౚህ༮દ˖
ፍᄵ༕ڵȃ
࣮ိ ŖŔŃ ህົֻ፩ᇲህ༮દ˖
მᇜᄪႩฬไࠨࡇ༮દȃ
ፚݕ؞ȃ
ᅤዎົჵȃ
ᅤ፩ȐŐŌȑ˖
ፍᄵ༕ڵȃٍ࣎მܿڋமڋȃ༕ڵဵڈˈົইܸ
ݕ؞ܿᎫྙȃ
ᅤ፩ȐńŢůŤŦŭȑ˖
ົֻইܸݕ؞ܿᎫྙȃ
ڼྈህ
ህಠܿݾلجܠმˈᎡ
ވ
PARAMETERS
ȐŎņŎŐġłŭŭġńŭŦŢųȑȃ
მᇜᄪႩฬไࠨࡇ༮દȃ
ፚݕ؞ȃ
ᅤዎົჵȃ
ᅢഀᅤዎ
ᅤ፩ȐŐŌȑ˖
ፍᄵຑڼྈህ༮દȃٍ࣎მܿڋமڋȃڼဵڈ
ˈົইܸݕ؞ܿᎫྙȃ
ᅤ፩ȐńŢůŤŦŭȑ˖
ົইܸݕ؞ܿᎫྙȃ
Page 39

ご使用になる前に
日本語
安全上のご注意
正しく安全にお使いいただくため、ご使
用の前に必ずよくお読みください。
この取扱説明書および製品への表示で
は、製品を安全に正しくお使いいただき、
あなたや他の人々への危害や財産への損
害を未然に防止するために、いろいろな
絵表示をしています。その絵表示と意味
は次のようになっています。
内容をよく理解してから本文をお読みく
ださい。
絵表示の例
図の中や近傍に具体的な禁止内容が
描かれています。
感電注意
記号は注意(危険・警告を含む)を
促す内容があることを告げるものです。
分解禁止
記号は禁止の行為であることを
告げるものです。
この表示を無視して、誤った取り扱いをすると、
警告
人が死亡または重傷を負う危険が差し迫って生じることが想定される内容を示しています。
万一異常が発生したら、
電源プラグをすぐに抜く
●
煙や異臭、異音が出たとき
電源プラグを
コンセント
から抜け
そのまま使用すると、火災・感電の原因となりま
す。すぐに本体と接続している機器の電源を切り、
必ず電源プラグをコンセントから抜いて、安全を
確認してから販売店にご連絡ください。
お客様による修理などは危険ですので絶対におや
めください。
●
落としたり、破損したとき
●
機器内部に水や金属類、燃えやすいも
のなどが入ったとき
ご使用は正しい電源電圧で
表示された電源電圧以外で使用しないで
必ず実施
ください。
火災・感電の原因となります。
電源コードは大切に
電源コードを傷つけたり、破損したり、
必ず実施
加工したりしないでください。また、重
いものをのせたり、加熱したり、引っ張っ
たりすると電源コードが破損し、火災・
感電の原因となります。
電源コードが傷んだら、すぐに販売店に
交換をご依頼ください。
禁止
禁止
水ぬれ
禁止
落としたり、キャビネットを破
損した場合は
まず本体の電源を切り、電源プラグをコ
ンセントから抜いて販売店にご連絡くだ
さい。そのまま使用すると火災・感電の
原因となります。
内部に水などの液体や異物を入
れない
機器内部に水などの液体や金属類、燃え
やすいものなどを差し込んだり、落とし
込んだりしないでください。
火災・感電の原因となります。
特にお子様のいるご家庭ではご注意くだ
さい。
水をかけたり、
濡らしたりしない
雨天・降雪中・海岸・水辺での使用は特
にご注意ください。
火災・感電の原因となります。
分解禁止
接触禁止
水場での
使用禁止
水ぬれ
禁止
ねじを外したり、
分解や改造したりしない
内部には電圧の高い部分がありますので、
火災・感電の原因となります。
内部の点検・調整・修理は販売店にご依
頼ください。
雷が鳴り出したら
機器や電源プラグには触れないでくだ
さい。
感電の原因となります。
風呂・シャワー室では
使用しない
火災・感電の原因となります。
この機器の上に花瓶・植木鉢・
コップ・化粧品・薬品や水など
が入った容器、および小さな金
属物を置かない
こぼれたり、中に入った場合、火災・感
電の原因となります。
電源プラグを
コンセントから抜け
記号は行為を強制したり指示する内容を
告げるものです。
I
Page 40

注意
日本語
この表示を無視して、誤った取り扱いをすると、
人が傷害を負う可能性が想定される内容および物的損害のみの発生が想定される内容を示しています。
電源コードは確実に接続し、
束ねたまま使用しない
必ず実施
また、電源コードは束ねたまま使用しないでくだ
さい。発熱し、火災の原因となることがあります。
電源コードを接続するときは接続口に確
実に差し込んでください。差し込みが不
完全な場合、火災・感電の原因となるこ
とがあります。
根元まで差し込んでもゆるみがあるコン
禁止
セントには接続しないでください。その
場合、販売店や電気工事店にコンセント
の交換を依頼してください。
電源コードを
熱器具に近付けない
コードの被ふくが溶けて、火災・感電の
禁止
原因となることがあります。
電源プラグを抜くときは
電源コードを引っ張らずに必ずプラグを
持って抜
禁止
火災・感電の原因となることがあります。
いてください。コードが傷つき、
この機器の上に小さな金属物を
置かない
万一内部に異物が入った場合は、まず本
禁止
体の電源を切り、電源プラグをコンセン
トから抜いて販売店にご連絡ください。
そのまま使用すると、火災・感電の原因
となります。
濡れた手で電源プラグを
抜き差ししない
ぬれ手禁止
感電の原因となることがあります。
レーザー光源をのぞき込まない
レーザー光が目に当たると視力障害を起
こすことがあります。
禁止
機器の接続は説明書をよく読ん
でから接続する
必ず実施
また、接続には指定のコードを使用してください。
指定以外のコードを使用したり、コードを延長した
りすると発熱し、やけどの原因となることがありま
す。
テレビ・オーディオ機器・ビデオ機器な
どの機器を接続する
各々の機器の取扱説明書に従って接続し
てください。
場合は、電源を切り、
電源を入れる前には
音量を最小にする
必ず実施
突然大きな音が出て、聴力障害などの原
因となることがあります。
不安定な場所に置かない
ぐらついた台の上や傾いたところなど不
安定な場所に置かないでください。落ち
禁止
たり倒れたりして、けがの原因となるこ
とがあります。
次のような場所には置かない
火災・感電の原因となることがあります。
●
調理台や加湿器のそばなど油煙や湯気
禁止
が当たるようなところ
●
湿気やほこりの多いところ
●
直射日光の当たるところや暖房器具の
近くなど高温になるところ
壁や他の機器から
少し離して設置する
必ず実施
放熱をよくするために、他の機器との間
は少し離して置いてください。ラックな
どに入れるときは、機器の天面や背面か
ら少し隙間をあけてください。内部に熱
がこもり、火災の原因となることがあり
ます。
通風孔をふさがない
内部の温度上昇を防ぐため、通風孔が
禁止
●
あお向けや横倒し、逆さまにする
●
押し入れ・専用のラック以外の本箱など風通し
の悪い狭い場所に押し込む
●
テーブルクロスをかけたり、じゅうたん・布団
の上に置いて使用する
開けてあります。次のような使いかた
はしないでください。内部に熱がこも
り、火災の原因となることがあります。
この機器に乗ったり、
ぶら下がったりしない
特に幼いお子様のいるご家庭では、ご注
禁止
意ください。倒れたり、壊れたりして、
けがの原因となることがあります。
重いものをのせない
機器の上に重いものや外枠からはみ出る
ような大きなものを置かないでくださ
い。バランスがくずれて倒れたり、落下
禁止
して、けがの原因となることがあります。
移動させる場合は
まず電源を切り、必ず電源プラグをコン
電源プラグを
コンセント
から抜け
セントから抜き、機器間の接続コードな
ど外部の接続コードを外してからおこ
なってください。コードが傷つき、火災・
感電の原因となることがあります。
この機器の上にテレビなどを載せたまま
移動しないでください。倒れたり、落下
禁止
して、けがの原因となることがあります。
機器の接続は説明書をよく読ん
でから接続する
電源プラグを
コンセント
から抜け
オーディオ機器などの機器を接続する場
合は、電源を切り、各々の機器の取扱説
明書に従って接続してください。また接
続は指定のコードを使用してください。
指定以外のコードを使用したり、コード
を延長したりすると発熱し、やけどの原
因となることがあります。
長期間の外出・旅行のとき、
またはお手入れのときは
安全のため必ず電源プラグをコンセント
電源プラグを
コンセント
から抜け
から抜いてください。火災・感電の原因
となることがあります。
お手入れの際は
安全のため電源プラグをコンセントから
抜いておこなってください。感電の原因
電源プラグを
コンセント
から抜け
となることがあります。
5 年に一度は内部の掃除を
販売店などにご相談ください。内部にほ
こりがたまったまま、長い間掃除をしな
注意
いと火災や故障の原因となることがあり
ます。
特に、湿気の多くなる梅雨期の前におこなうと、
より効果的です。なお、内部の掃除費用について
は販売店などにご相談ください。
II
Page 41

日本語
取り扱い上のご注意
換気についてのご注意
本機をたばこなどの煙が充満している場所に長時間置くと、
光学式ピックアップの表面が汚れ、正しい信号の読み取りが
できなくなることがあります。
ディスクについて
本機では、右のマークが入ったディスクをご
使用ください。但し、ハート型や八角形など
特殊形状のディスクは再生できません。機器
の故障の原因になりますので、ご使用になら
ないでください。
ディスクの持ちかた
ディスクを装着したり取り出すときは、できるだけ表面を触
らないようにしてください。
信号記録面(虹色に光っ
ている面)には、指紋
などを付けないように
してください。
ディスクのお手入れのしかた
●
ディスクに指紋や汚れが付いたときは、汚れを拭き取って
から使用してください。ディスクの信号には影響しません
が、音質が低下したり音が途切れることがあります。
●
拭き取るときは、市販のディスククリーニングセットまた
は柔らかい布などをご使用ください。
内周から外周方向へ軽く拭く。 円周に沿っては拭かない。
ご注意
レコードスプレー・帯電防止剤などは使用できません。ベンジン・
シンナーなどの揮発性の薬品も使用しないでください。
取り扱いについてのご注意
●
指紋、油、ゴミなどを付けないでください。
●
表面に傷を付けないよう、特にケースからの出し入れには
注意してください。
●
曲げたりしないでください。
●
熱を加えないでください。
●
中心の穴を大きくしないでください。
●
レーベル面(印刷面)にボールペンや鉛筆などで文字を書
かないでください。
●
屋外などの寒い場所から急に暖かい場所へ移すと表面に水
滴が付くことがありますが、ヘアードライヤーなどで乾か
さないでください。
保存についてのご注意
●
再生後は必ずディスクを取り出してください。
●
ほこり、傷、変形などを避けるため、必ずケースに入れて
ください。
●
次のような場所には置かないでください。
1. 直射日光が長時間当たるところ
2. 湿気、ほこりなどが多いところ
3. 暖房器具などの熱が当たるところ
ディスクを装着する際のご注意
●
ディスクは 1 枚だけローディングしてください。2 枚以上
重ねてローディングしますと故障の原因になり、ディスク
を傷付けることにもなります。
●
ディスクが引き込まれるときに、指を挟まないように注意
してください。
●
ディスク以外のものをディスクローディングスロットに入
れないでください。
●
ひび割れ、変形または接着剤などで補修したディスクは使
用しないでください。
●
ディスクにセロハンテープやレンタル CD のラベルなどの
糊がはみ出したり、剥がした痕があるものは使用しないで
ください。そのまま使用しますと、ディスクが取り出せな
くなったり、故障の原因になることがあります。
●
レーベル面(印刷面)にボールペンや鉛筆などで文字を書
かないでください。
●
ディスクのラベル面が汚れている場合は、汚れを拭き取っ
てから使用ください。ディスクのローディング / イジェク
ト用のローラーに汚れが付着すると、ディスクのローディ
ングおよびイジェクトが正常におこなえなくなることがあ
ります。
ご注意
機器内部にレーザー光放射装置があります。
また、感電防止のためのねじや蓋を外さないでください。
万一故障の場合には、最寄りのサービスセンター / 営業所、または、
お買い上げ販売店にご依頼ください。
III
Page 42

日本語
本機をお買いいただきありがとうございます。
BU5501CDDRIVE&MOUNTING KIT は弊社の製品
PROFESSIONALMEDIA&CONTROLLERDN-HS5500 に 取 り
付けるための取り付ける専用 Kit です。
アクセサリー
この製品には以下の部品が同梱されていますので確認して下さい。
取扱説明書.................................................................................... 1
q
CD ドライブと取り付けキット.................................................. 1
w
ネジ(M3x6mm、黒色).......................................................... 2
e
ネジ(六角頭M3x6mm)......................................................... 4
r
プレート........................................................................................ 1
t
フロントパネル............................................................................ 1
y
六角レンチ.................................................................................... 1
u
ServiceStationList.................................................................. 1
i
サービス網一覧表........................................................................ 1
o
ご注意
下記 Web サイトからファームウエアーをダウンロードして本体を必
ずバージョンアップして下さい。
www.denondj.com
バージョンアップをしないと本取扱説明書の機能は動作しません。
取り付け方法
DN-HS5500 の電源スイッチを切り、電源コードをコンセントか
1.
ら外してください。
DN-HS5500 のフロントパネルを取り付けているネジ(六角頭)
2.
4 本を外し、フロントパネルを取り外します。
フロントパネルを外した部分にあるプレートを取り付けているネ
3.
ジ 2 本を外し、プレートを取り外します。
取り付けキットの取り付け部を持ち、DN-HS5500 の開口部の中
4.
にあるレールのへこみ部分に取り付けキットの板金を入れて中に
押し込みます。
付属のプレートを図のように付属のネジ(M3x 6mm)2 本で
5.
DN-HS5500 に取り付けキットと一緒に固定します。
付属のフロントパネルを DN-HS5500 に付属のネジ(M3x6mm
6.
六角頭)4 本で取り付ける。
これで CD ドライブは DN-HS5500 に取り付けられて動作します。
CD ドライブが組み込まれたセットの取り扱いは十分注意して下さ
い。
CD に関する操作は、本取扱説明書を参照しそれ以外の操作等に関し
ては DN-HS5500 の取扱説明書を参照して下さい。
ご注意
•
CD ドライブ&マウンティングキットを取り扱うときは先端の板金
部分を持ち、基板や端子部分には触らないようにして下さい。
機器の故障の原因になります。
•
CD ドライブは衝撃等に弱い機器です。取り扱うときは落下等には
十分気をつけて下さい。
•
DN-HS5500 のフロントパネルを外したときは、開口部から機器
の中に手を入れたり、異物を入れたりしないで下さい。手に怪我を
したり、機器の故障の原因になります。
Page 43

日本語
CD 選択時の操作
MIRRORMIX ボタン
q
選択中のデバイスが CD の場合で Mirror Mix
モードがオフの時に押下すると、CD ドライブ
に入っているディスクをイジェクトします。
CD 再生中は、イジェクトをロックします。
上記以外の場合は本体の取扱説明書 6、7 ペー
ジを参照してください。
EJECT ボタン
w
ボタンを押すと、CD ドライブに入っているディ
スクをイジェクトします。
CD 再生中は、イジェクトをロックします。
上記以外のボタンは本体の取扱説明書 6、7ペー
ジを参照してください。
CD 選択時のディスプレイ
CD が選択されてディスクが挿入されていない場合は下記画面になります。
デバイスの選択
操作方法は本体の取扱説明書 13 ページを参照してください。
付属の CD ドライブを接続して電源を起動するとデバイスの選択画面でHDDがCDに変更されます。
CDを選択することで CD ドライブを使用することができます。
ご注意
•
片方の Deck で CD が選択されている場合、逆側の Deck で CD を選択することはできません。
•
電源起動後に CD ドライブを接続しても使用することはできません。
CD で再生する
DN-HS5500 で CD を再生します。
CD-DA のディスクの再生ができます。
CD-R 等に記録された MP3 ファイルは再生できません。
b
ディスクをセットする
n
•
CD をディスクローディングスロットに挿入すると、CD の先頭トラックにスタンバイします。スタ
ンバイすると、
•
オートキュー機能により、音声の立ち上がり位置にスタンバイします。
プリセット AutoCue(本体の取扱説明書 34 ページ)で設定を変えることができます。
曲を選択する
n
•
PARAMETERS
•
PARAMETERS
SINGLEPLAYLOCK:
再生中誤ってトラック選択をおこなったり、再生を停止させることを防止するために再生中はトラッ
ク選択を禁止しています。
解除するには、
本体の取扱説明書 7 ページトップパネルE2
ボタンが点灯します。
CUE
ノブを回します。
ノブを押しながら回すと、10 トラック単位でトラック選択できます。
•
CONT./SINGLE、-Relay
ボタンを押してください。
•
CONT./SINGLE、-Relay
ボタンを参照してください。
Full 画面時 Dual 画面時
画面の説明は本体の取扱説明書 8、9 ページを参照してください。
Page 44

日本語
メモをする
CD 用のメモを作成する
•
1トラック1メモリとし、トータルで最大 5000 メモリが記憶でき
ます。
例えば、22 トラックのディスクであれば、22 個のメモが可能とな
ります。
ご注意
トラックメモ機能のメモリシステムは、1,000 個のメモを1パッケー
ジとして扱っています。(1,000 メモを 5 パッケージ ) このメモシス
テムのメモリ消去は 1 パッケージ単位でおこなうため、1 個のメモ
を消去した場合でもメモ No. は継続されメモリ領域は増えません。
そのため、実際に記憶できるメモ数が少なくなります。
5000 個メモを記憶した場合、Memo Full!のメッセージが表示さ
れます。その場合、メモの古い順に 1 パッケージ(1,000 個のメモ)
のメモリを消去する必要があります。
メモデータが存在するディスクをセットするとMEMO表示
b
が点滅します。また、メモデータが存在するトラックを選択す
ると点灯します。
記憶されるデータは次の通りです。
a)CUE ポイント
b)A1 と B1 ポイントおよび A2 と B2 ポイント
c)再生スピード、ピッチオン / オフ、キーアジャストオン / オ
フの設定
d)BPM データ(CUE、A1、A2)
•
A1、A2、B1 および B2 ポイントは同じ CD に限り、CD 内の違
うトラックに存在することもあります。
•
メモセットを行う際に、CD メモデータが一杯になったら…
メモデータが一杯になったらMemo Full、Delete 1000?
のメッセージが表示されます。
この場合、古いメモから 1,000 個のメモリを消去し、新たなスペー
スを作る必要があります。
スペースを作るには、Delete1000?が表示されているときに、
PARAMETERS
更に消去再確認のメッセージDelete OK?が表示されている
とき、
れます。
操作方法は本体の取扱説明書 25 ページを参照してください。
ボタンを押します。
PARAMETERS
ボタンを押すと 1,000 個のメモリが消去さ
ユーティリティー
一部名称が変更されました
新旧
PresetData
PresetImport FileImport
PresetExport FileExport
操作方法は本体の取扱説明書 31 ページを参照してください。
MemoData が追加されます
MemoData
n
CD メモデータの内容をデバイスに保存したり、読み出したりし
ます。内蔵の CD メモデータの内容を消去します。
MemoData モード
ユーティリティーモードのトッ
プメニュー表示中
ノブを回し、MEMODataを
選択する。
PARAMETERS
定する。
MEMODataの項目が表示されます。
ボタンを押し、決
Import/Export
PARAMETERS
MemoImport
MEMO のトップメニュー表示中
PARAMETERS
ノブを回し、
MEMOImportを選択する。
セットはMemoImport モードになります。
b
インポート元のデバイスを選択
します。
内蔵データ上書き確認メッセージが表示
されます。
設定項目を選択する。
OKを選択した場合:
インポートを実行します。完了すると操作に戻ります。
Cancelを選択した場合:
操作に戻ります。
Page 45

日本語
MemoExport
MEMO のトップメニュー表示中
PARAMETERS
MEMOExportを選択する。
セットはMemo Export モードになりま
b
す。
エクスポート先のデバイスを選
択します。
外部 USB メモリーデバイスにメモデー
タがない場合:
エクスポートを実行します。
外部 USB メモリーデバイスにメモデータがある場合:
データを上書するか確認のためのメッセージが表示されます。
操作へ。
設定項目を選択する。
ノブを回して
OKを選択した場合:
エクスポートを実行します。プログレスバーが表示され、進行
状況を確認できます。完了すると操作に戻ります。
Cancelを選択した場合:
操作に戻ります。
MemoAllClear
MEMO のトップメニュー表示中
PARAMETERS
MEMOAllClearを選択する。
データを消去するか確認のためのメッ
セージが表示されます。
操作へ。
設定項目を選択する。
ノブを回して
OKを選択した場合:
オールクリアを実行します。プログレスバーが表示され、進行
状況を確認できます。完了すると操作に戻ります。
Cancelを選択した場合:
操作に戻ります。
Page 46

保証とサービスについて
詳しくは、付属品『製品のご相談と修理・サービス窓口一覧表』をご参照ください。
日本語
〒 104-0033東京都中央区新川 1-21-2
茅場町タワー
国内営業本部 TEL:
受付時間 9:30 〜 12:00、12:45 〜 17:30
(弊社休日および祝日を除く、月〜金曜日)
故障・修理・サービス部品についてのお問い合わせ先(サービスセンター)については、
次のURLでもご確認できます。
後日のために記入しておいてください。
購入店名: 電話( - - )
ご購入年月日: 年 月 日
【電話番号はお間違えのないようにおかけください。】
03-6731-5588
http://dm-pro.jp
Page 47

Page 48

PROFESSIONAL BUSINESS COMPANY
TOKYO, JAPAN
http://www.dm-pro.jp
Professional Business Company, D&M Holdings Inc.
Printed in Japan 5411 10085 102P
 Loading...