


SPEAKER STAND
ASF-S07
Owner‘s Manual Bedienungsanleitung Manuel de l‘Utilisateur Manuale delle istruzioni Manual del usuario Gebruiksaanwijzing Bruksanvisning
FOR ENGLISH READERS |
vPage 1, 2 |
FÜR DEUTSCHE LESER |
vSeite 1, 3 |
POUR LES LECTEURS FRANCAIS |
vPage 1, 3, 4 |
PER IL LETTORE ITALIANO |
vpagina 1, 4, 5 |
PARA LECTORES DE ESPAÑOL |
vpágina 1, 5 |
VOOR NEDERLANDSTALIGE LEZERS |
vblz. 1, 6 |
FÖR SVENSKA LÄSARE |
vsidan 1, 7 |
|
v 1, 8, 9 |
●
●
●
ENGLISH DEUTSCH FRANCAIS ITALIANO ESPAÑOL NEDERLANDS SVENSKA
nNOTE ON USE / HINWEISE ZUM GEBRAUCH / OBSERVATIONS
RELATIVES A L’UTILISATION / NOTE SULL’USO / NOTAS SOBRE EL USO / ALVORENSTE GEBRUIKEN / OBSERVERA ANGÅENDE ANVÄNDNINGEN
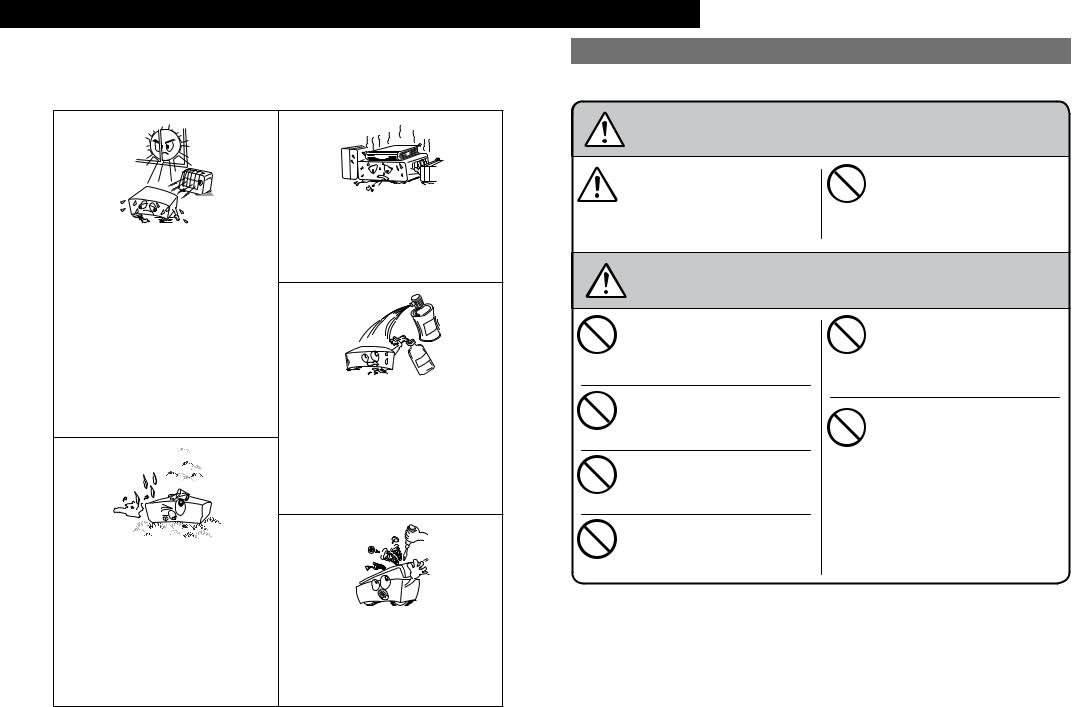
•Avoid high temperatures.
Allow for sufficient heat dispersion when installed in a rack.
•Vermeiden Sie hohe Temperaturen.
Beachten Sie, dass eine ausreichende Belüftung gewährleistet wird, wenn das Gerät auf ein Regal gestellt wird.
•Eviter des températures élevées.
Tenir compte d’une dispersion de chaleur suffisante lors de l’installation sur une étagère.
•Evitate di esporre l’unità a temperature elevate. Assicuratevi che vi sia un’adeguata dispersione del calore quando installate l’unità in un mobile per componenti audio.
•Evite altas temperaturas.
Permite la suficiente dispersión del calor cuando está instalado en la consola.
•Vermijd hoge temperaturen.
Zorg er bij installatie in een audiorack voor, dat de door het toestel geproduceerde warmte goed kan worden afgevoerd.
•Undvik höga temperaturer.
Se till att det finns möjlighet till god värmeavledning vid montering i ett rack.
•Keep the unit free from moisture, water, and dust.
•Halten Sie das Gerät von Feuchtigkeit, Wasser und Staub fern.
•Protéger l’appareil contre l’humidité, l’eau et la poussière.
•Tenete l’unità lontana dall’umidità, dall’acqua e dalla polvere.
•Mantenga el equipo libre de humedad, agua y polvo.
•Laat geen vochtigheid, water of stof in het apparaat binnendringen.
•Utsätt inte apparaten för fukt, vatten och damm.
*(For apparatuses with ventilation holes)
•Do not obstruct the ventilation holes.
•Decken Sie den Lüftungsbereich nicht ab.
•Ne pas obstruer les trous d’aération.
•Non coprite i fori di ventilazione.
•No obstruya los orificios de ventilación.
•De ventilatieopeningen mogen niet worden beblokkeerd.
•Täpp inte till ventilationsöppningarna.
•Do not let insecticides, benzene, and thinner come in contact with the unit.
•Lassen Sie das Gerät nicht mit Insektiziden, Benzin oder Verdünnungsmitteln in Berührung kommen.
•Ne pas mettre en contact des insecticides, du benzène et un diluant avec l’appareil.
•Assicuratevi che l’unità non entri in contatto con insetticidi, benzolo o solventi.
•No permita el contacto de insecticidas, gasolina y diluyentes con el equipo.
•Voorkom dat insecticiden, benzeen of verfverdunner met dit toestel in contact komen.
•Se till att inte insektsmedel på spraybruk, bensen och thinner kommer i kontakt med apparatens hölje.
•Never disassemble or modify the unit in any way.
•Versuchen Sie niemals das Gerät auseinander zu nehmen oder zu verändern.
•Ne jamais démonter ou modifier l’appareil d’une manière ou d’une autre.
•Non smontate né modificate l’unità in alcun modo.
•Nunca desarme o modifique el equipo de ninguna manera.
•Dit toestel mag niet gedemonteerd of aangepast worden.
•Ta inte isär apparaten och försök inte bygga om den.
を負う危険が差し迫って生じることが想定される内容を示しています。
しっかりと締め付ける
|
|
|
|
|
|
|
|||
|
|
|||
|
|
|
|
性が想定される内容および物的損害のみの発生が想定される内容を示 しています。
|
|
|
|
|
|
|
|
|
|
|
|
|
|
||
|
|
|
|
|
|
|
|
|
|
|
|
|
|
|
|
|
|
|
|
|
|
|
|
|
|
|
● |
|
|
|
|
|
|
|
|
|
|
● |
|
|
|
|
● |
|
|
|
|
|
|
|
|
|
|
|
|
|
|
|
|
ENGLISH |
|
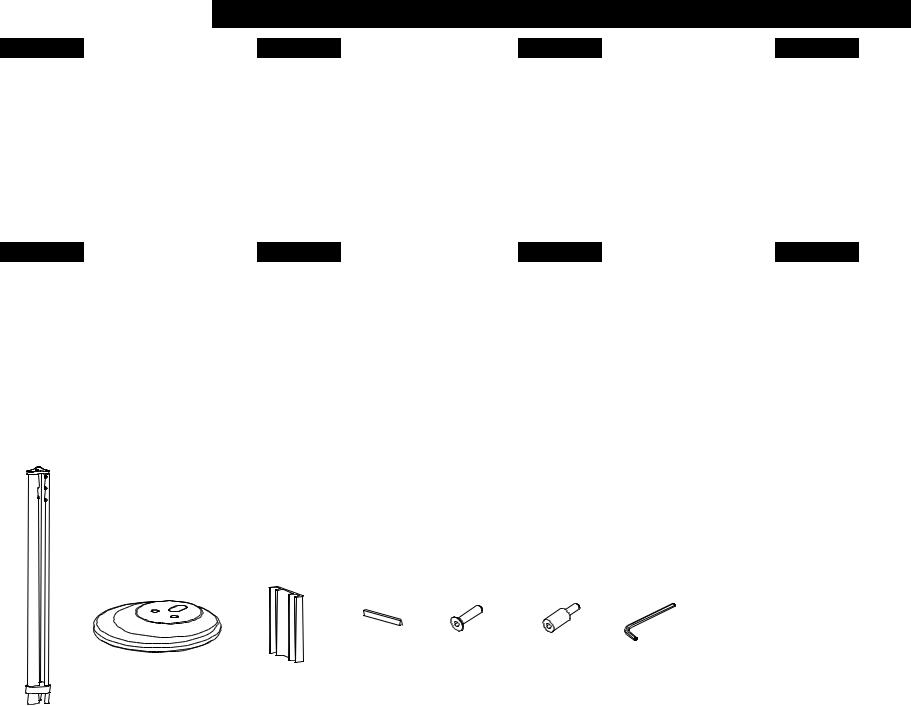
2 Accessories |
|
q Post................................................................... |
2 |
w Base.................................................................. |
2 |
e Bracket.............................................................. |
2 |
r Spacer............................................................... |
6 |
t Screw |
|
(6 mm screw, 20 mm length)............................ |
6 |
y Speaker fixing screw |
|
(5 mm screw, 15 mm length)............................ |
4 |
u Hex wrench....................................................... |
1 |
i Owner’s manual................................................ |
1 |
o Service station list............................................. |
1 |
DEUTSCH |
|
2 Zubehör |
|
q Säule................................................................. |
2 |
w Sockel................................................................ |
2 |
e Halterung........................................................... |
2 |
r Abstandhalter.................................................... |
6 |
t Schraube |
|
(6-mm-Schraube, 20 mm lang).......................... |
6 |
y Lautsprecherbefestigungs-schraube |
|
(5-mm-Schraube, 15 mm lang).......................... |
4 |
u Sechskantschlüssel........................................... |
1 |
i Bedienungsanleitung......................................... |
1 |
o Kundendienstverzeichnis................................... |
1 |
q
SVENSKA NEDERLANDS ESPAÑOL ITALIANO FRANCAIS DEUTSCH ENGLISH
FRANCAIS |
|
2 Accessoires |
|
q Bornier............................................................... |
2 |
w Base.................................................................. |
2 |
e Support............................................................. |
2 |
r Entretoise.......................................................... |
6 |
t Vis |
|
(vis de 6 mm, longueur de 20 mm)................... |
6 |
y Vis de fixation enceinte |
|
(vis de 5 mm, longueur de 15 mm)................... |
4 |
u Clé hexagonale.................................................. |
1 |
i Manuel de l’utilisateur....................................... |
1 |
o Liste des services après-vente......................... |
1 |
ESPAÑOL |
|
2 Accesorios |
|
q Poste................................................................. |
2 |
w Base.................................................................. |
2 |
e Soporte............................................................. |
2 |
r Espaciador......................................................... |
6 |
t Tornillo |
|
(tornillo de 6 mm, 20 mm de longitud).............. |
6 |
y Tornillo de soporte del altavoz |
|
(tornillo de 5 mm, 15 mm de longitud).............. |
4 |
u Llave allen......................................................... |
1 |
i Manual del usuario............................................ |
1 |
o Lista de servicios técnicos................................ |
1 |
ITALIANO |
|
2 Accessori |
|
q Stelo dello stand............................................... |
2 |
w Base.................................................................. |
2 |
e Supporto........................................................... |
2 |
r Distanziatore..................................................... |
6 |
t Vite |
|
(vite da 6 mm, lunghezza di 20 mm)................. |
6 |
y Vte di fissaggio del diffusore |
|
(vite da 5 mm, lunghezza di 15 mm)................. |
4 |
u Chiave esagonale.............................................. |
1 |
i Manuale delle istruzioni..................................... |
1 |
o Elenco dei centri di assistenza tecnica.............. |
1 |
|
NEDERLANDS |
2 Accessoires |
|
q Zuil.................................................................... |
2 |
w Voet................................................................... |
2 |
e Beugel............................................................... |
2 |
r Afstandshouder................................................. |
6 |
t Schroef |
|
(6 mm schroef, lengte 20 mm).......................... |
6 |
y Luidspreker bevestigingsschroef |
|
(5 mm schroef, lengte 15 mm).......................... |
4 |
u Inbussleutel....................................................... |
1 |
i Gebruiksaanwijzing........................................... |
1 |
o Lijst van serviceadressen.................................. |
1 |
|
SVENSKA |
2 Tillbehör |
|
q Kolumn.............................................................. |
2 |
w Fot..................................................................... |
2 |
e Fäste................................................................. |
2 |
r Distans.............................................................. |
6 |
t Monteringsskruv |
|
(6 mm skruv, 20 mm lång)................................. |
6 |
y Monteringsskruv för högtalare |
|
(5 mm skruv, 15 mm lång)................................. |
4 |
u Insexnyckel........................................................ |
1 |
i Bruksanvisning.................................................. |
1 |
o Förteckning över serviceställen......................... |
1 |
|
|
2
q … …………………………………………… 2 w … …………………………………………… 2 e … …………………………………… 2 r … …………………………………… 6 t 6 20 … ……………… 6
y
5 15 … ……………… 4
u … …………………………………… 1 i … …………………………………… 1 o … ………………………… 1
w |
e |
r |
t |
y |
u |

1
2


 SC-S302
54 


7


 6 SC-S102


 3
3
ENGLISH
This product is a speaker stand for the DENON S-302/S-301/S-102 /S- 101 DVD Home Theater. (As of August 2007)
Assembly
•The speaker stand’s post has three speaker mount holes allowing the height of the speaker to be adjusted in three steps. Choose the desired mount hole.
•Use the included hex wrench to tighten the screws.
NOTE
Be careful not to damage the post or speaker with the hex wrench when tightening the screws.
1Insert the post into the base.
2Lower the speaker stand gently and mount it to the post using the (three) screws.
3Pass the speaker cable into the post.
4
b Attach the spacers evenly above and below the screw section to prevent the speaker and bracket from touching each other.
5Line up the screw holes in the bracket and post and mount the bracket on the post.
b Line up the hole in the bracket with the hole in the post to be used to fasten by screw and attach.
6Connect the speaker cables to the speaker.
7Mount the speaker on the speaker stand.
b Fasten securely using the (two) speaker fixing screws.
b After mounting the speaker, pull the speaker cable the necessary amount so that there is no slack inside the post.
NOTE
•When assembling, be very careful not to injury yourself by letting the speaker stand tip over accidentally or dropping the speaker.
•When assembling, work carefully on a soft blanket or the like so as not to scratch the speaker, speaker stand or floor.
•Check that none of the screws fastening the speaker are loose.
•Install the speaker stand on a flat, sturdy floor where it will not shake or tip over.
•When installing, be sure not to place the speaker stand on top of the speaker cable.
•When moving the speaker stand, disconnect the speaker cables from the receiver, etc., and hold the post.
Cleaning
DUse a soft cloth to wipe any dirt off the speaker stand.
•When using chemical-impregnated cloths, read the cloth’s cautions.
DDo not use benzene, thinner or other organic solvents or insecticides, as these could mar or discolor the surface.
Cautions on handling
WARNING
Be sure to check for safety directly after installing, then conduct safety checks periodically to be sure there is no risk
of falling or tipping. DENON will accept no responsibility whatsoever for any damage or accidents due to inadequacies in the place or method of installation.
Specifications
Maximum external dimensions: 300 (W) x 1022 (H) x 300 (D) mm
Mass: Approx. 7.3 kg/stand
bFor purposes of improvement, specifications and design are subject to change without notice.
 Loading...