

Page 1
11
DESCRIPTION
Dear customer,
Congratulations and thank you for choosing our company.
Our products are the result of exhaustive technical tests backed by consolidated
experience in the production of home cleaning appliances.
We have produced this manual to enable you to get the best from your appliance
and appreciate its quality to the full.
If you follow our tips, we are sure the appliance will give you complete
satisfaction and long and faithful service.
This appliance will make your everyday household cleaning easier.
GB
A Brush tool
B Crevice tool
C Carpet/floor brush (depending on
model).
D Telescopic tube
E Hose
Handgrip with remote control (certain
models only)
F "Power Control" button (selects
vacuum power level)
G Infrared transmitter (there are two
emitters, enabling the signal to be
transmitted from all working positions)
H “StopVac” button (pauses during
vacuuming)
I Remote control battery door
J Handgrip extraction tabs
K Infrared signal receiver
L "Power Control" button (selects vacuum
power level)
M LED indicators showing the vacuum
power selected
N "Eco Heart" drum full indicator
O ON/OFF pedal
P Cable wind pedal
Q Air outlet grill with microfilter
R Tool compartment
S Handle
"Eco Heart" system
T Drum cover
U Drum
V Cover release button
W Eco-Heart extraction lever
X Mesh filter
Y Hepa filter
Z Eco-Heart support
Z1 Cleaning brush housing
IMPORTANT INFORMATION FOR CORRECT DISPOSAL OF THE PRODUCT IN
ACCORDANCE WITH EC DIRECTIVE 2002/96/EC.
At the end of its working life, the product must not be disposed of as urban waste.
It must be taken to a special local authority differentiated waste collection centre or to
a dealer providing this service.
Disposing of a household appliance separately avoids possible negative consequences for the environment and health deriving from inappropriate disposal and
enables the constituent materials to be recovered to obtain significant savings in
energy and resources.As a reminder of the need to dispose of household appliances separately, the product is marked with a crossed-out wheeled dustbin.
Page 2
12
IMPORTANT SAFEGUARDS
• Read this manual carefully and keep for futu-
re reference.
• Before using the appliance, check that the
mains supply voltage corresponds to the voltage indicated on the rating plate.
• Connect the appliance to sockets with a
minimum current rating of 10 A only.
• Staccare sempre la spina dalla presa di
corrente quando l’apparecchio non è in
uso e prima di eseguire qualsiasi manutenzione o pulizia dell’apparecchio stesso.
•When not in use or before cleaning or
maintenance, always unplug the appliance from the mains socket.
• Check the filters regularly and if neces-
sary shake or replace them.
• If you wash the filters, make sure they are
completely dry before replacing in the
appliance.
• Never wash the appliance with triethyle-
ne or other solvents.
• Never vacuum up liquids.
• Never leave the appliance turned on
when unattended. Keep away from children and unfit persons.
• Use the appliance for domestic use only
as described in the instructions.
• If the appliance appears defective, do not
use.
• Do not pull the power cable out beyond
the point indicated by the red mark. The
yellow mark before the red mark indicates that the cable is about to run out.
• For repairs or to buy accessories, contact
an authorised technical service centre
only.
• The manufacturer cannot be held responsible for any damage caused by tampering or improper or incorrect use of the
product.
•
If the power cable is damaged, it must be
replaced by the manufacturer, an authorised technical service centre or qualified
personnel in order to avoid all risk.
The manufacturer reserves the right to modify appliances and tools without warning.
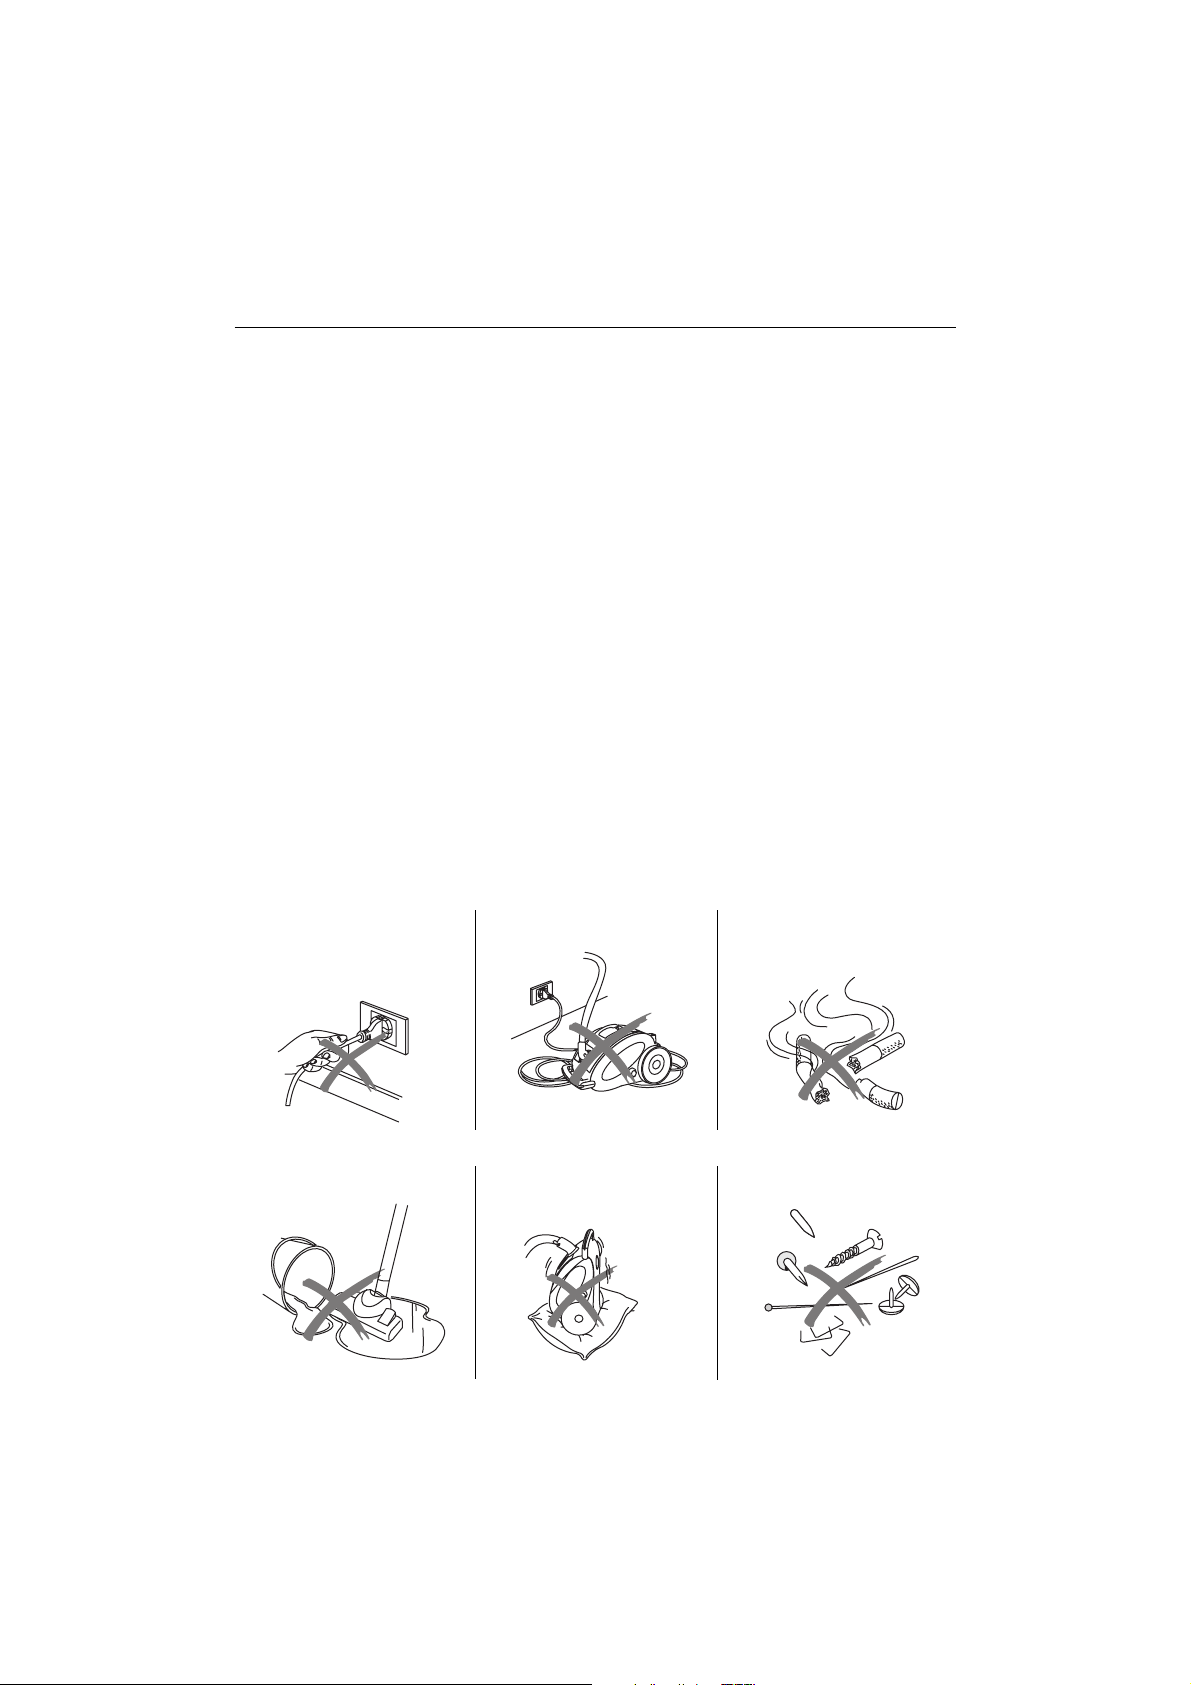
Never unplug the appliance
by pulling the power cable
or the appliance itself.
Do not run the appliance
over the power cable.
Never vacuum up matches,
ash or cigarette ends when
still lit.
Never use the appliance on
wet surfaces.
Avoid obstructing the air
intake or air vent grill.
Never vacuum up needles,
staples or pieces of string.
Page 3

13
ASSEMBLY INSTRUCTIONS
Hose (fig. 1)
Attach the connector to the coupling and
insert until it locks into place (fig. 1).
To remove, press the release button on the
connector and pull.
Telescopic tube (fig. 2)
The telescopic tube enables the hose to be
extended to the required length (fig. 2).
Tool compartment (Fig. 3)
The crevice tool and multipurpose nozzle
are housed in the tool compartment attached to the hose.
USING THE CLEANING TOOLS
• Two position carpet/floor brush
Efficiently removes dust from floors
(marble or tiled), rugs or carpets.
When the pedal is pushed towards the
"hard floors" position ( ), the bristles
protrude to clean hard floors more efficiently. This position is recommended for
in-depth cleaning of floors and for floors
with pronounced joints. When the pedal
is pushed towards the "carpets" symbol
( ), the bristles retract and the brush
is ready to clean fabric surfaces and
delicate floors such as parquet, marble
etc (fig. 5).
• Crevice tool (fig. 6)
to clean radiators, corners, edges, drawers, etc.
• Dusting brush (fig. 7)
The brush tool is ideal for removing
dust from fabric, furniture books, curtains, frames and clothing.
INSTRUCTIONS
Before using the appliance, extract the power cable completely and plug into the mains. To
rewind the cable, unplug and press the cable wind pedal (P) (fig. 8) .
Operation
To turn the vacuum cleaner on, lightly press the pedal switch (O) (fig. 9).
In models with remote control, press the switch to turn the remote control unit on.
Models with remote control:
While cleaning, you can interrupt vacuuming by pressing the "StopVac" button (H) on the
remote control. To resume cleaning, press the "Power Control" button (F or L).
The effectiveness of the remote control is guaranteed by means of two signal transmitters, enabling the signal to be transmitted both from the front and the back. However, bear in mind that
the remote control should always be pointed towards the appliance.
NB: the StopVac" button (H) interrupts vacuuming but does not turn the appliance off. To
turn off, press the pedal switch (O). To turn the appliance on, always press the pedal switch
(O).
Electronic suction power regulation (fig. 10)
The electronic regulator enables suction power to be varied according to the type of surface to
be cleaned.
The maximum power of the appliance can therefore be exploited to vacuum dust from carpets
or hard floors (marble, ceramics, cotto, etc) and a lower suction power to clean curtains or other
light fabrics.
By pressing the "Power Control" button on the appliance (L) and button F in models with remo-
Page 4

te control (fig. 10), you can choose from the three vacuum power levels available. The LED corresponding to the power level selected lights up (fig. 11).
NB: in models with remote control, the power can also be regulated with the batteries flat by
using the "Power Control" button (L) on the appliance.
CLEANING
Replacing the remote control batteries (if present)
If the remote control commands do not work, you must replace the batteries. Open the door (I)
and replace the batteries with the same type.
EPS (Electronic Protection System) “Eco Heart” drum full indicator (Fig. 12)
The indicator lights up when the vacuum duct is blocked or the dust collection drum is full.
When it comes on, empty the drum.
If you continue to use the appliance after the indicator has come on, the vacuum power is reduced automatically. This is a safety device to avoid damage to the motor.
Empty the "Eco Heart" drum (ordinary cleaning)
1) Extract the drum completely using the handle (fig. 13).
2) Press the button to open the cover (fig. 14).
3) Empty the tank (fig. 15).
4) Replace the cover (fig. 16).
NB:
The appliance has a safety device which prevents the drum cover being closed without the "Eco
Heart" filter correctly in place.
Cleaning the "Eco Heart" system (periodic cleaning)
Every three months or so, you should clean the "Eco Heart" dust collection system thoroughly as
follows:
• Follow points 1 to 3 in the section "ordinary cleaning".
• Lift the "Eco-Heart" filter lever (fig. 17) and remove the filter from the drum.
• Pull the cylinder and separate it from the support (fig. 18)
• Clean the mesh and HEPA filters by shaking them and brushing them with a brush (included
in certain models). Do not use wire or hard bristle brushes as they could damage the filter
material. About every six months or so, the filters should be washed under running water.
•Dry all the components of the "Eco Heart" system thoroughly then replace correctly (fig. 19).
• Replace the "Eco Heart" system in the drum, attaching the support to the drum (fig. 20).
•Close the drum and replace in the appliance.
* The HEPA (High Efficiency Particulate Air) filter removes impurities down to a size of 0.3 microns, filtering all types of
particle and even bacteria.
Air outlet microfilter
Your appliance is fitted with a microfilter.
This is housed under the air outlet slits.
To replace, press and lift the grill (fig. 21). Remove the filter (fig. 22).
Replace the filter by resting it in position then close the grill exerting light pressure until the clips
click into place.
You should replace the filter at least every five times you empty the "Eco Heart" drum.
14
Page 5

"PARKING" POSITION
The appliance is provided with a hose tidy system on the bottom to enable it to be put away
safely and tidily. (Fig. 23).
If you have to interrupt cleaning for a brief period, the appliance has a convenient hose "parking" system. Insert the bracket on the brush joint into the housing on the bottom of the appliance. (Fig.24)
IMPORTANT WARNING
Malfunction of the appliance (low power, unusual noise or complete breakdown) could be caused by obstructed nozzles or
hoses or faulty electrical components.
To remove obstructions from the hose, detach the hose from the handle and connector by pressing the tabs (J) (fig. 15) then
extract the hose.
To reassemble the hose, handle and connector, press the tabs and re-insert the hose.
If this does not resolve the problem, take the appliance to an authorised service centre.
15
A) If your appliance comes fitted with a plug, it will incorpo-
rate a 13 Amp fuse. If it does not fit your socket, the plug
should be cut off from the mains lead, and an appropriate
plug fitted, as below.
WARNING: Very carefully dispose of the cut off plug after
removing the fuse: do not insert in a 13 Amp socket elsewhere in the house as this could cause a shock hazard.
With alternative plugs not incorporating a fuse, the circuit
must be protected by a 15 Amp fuse.
If the plug is a moulded-on type, the fuse cover must be refitted when changing the fuse using a 13 Amp Asta approved fuse to BS 1362. In the event of losing the fuse cover,
the plug must NOT be used until a replacement fuse cover
can be obtained from your nearest electrical dealer. The
colour of the correct replacement fuse cover is that as marked on the base of the plug.
B) If your appliance is not fitted with a plug, please follow
the instructions provided below:
WARNING - THIS APPLIANCE MUST BE EARTHED
IMPORTANT
The wires in the mains lead are coloured in accordance with
the following code:
Green and yellow: Earth
Blue: Neutral
Brown: Live
As the colours of the wires in the mains lead may not correspond with the coloured markings identifying the terminals in
your plug, proceed as follows:
The green and yellow wire must be connected to the terminal
in the plug marked with the letter E or the earth symbol
or coloured green or green and yellow.
The blue wire must be connected to the terminal marked with
the letter N or coloured black.
The brown wire must be connected to the terminal marked with
the letter L or coloured red.
N
E
L
ELECTRICAL CONNECTION (UK ONLY)
 Loading...