

Page 1
Ventilatori
Fans
Ventilateurs
Ventilatoren
Ventilatoren
Ventiladores
Ventilação
∞¡∂ªπ™∆∏ƒ∂™
INTRO +I 22-12-2004 17:36 Pagina 1
Page 2
10
11
9
8 7 6 5 4 3 1
12
15
13
14
2
INTRO +I 22-12-2004 17:36 Pagina 3
Page 3

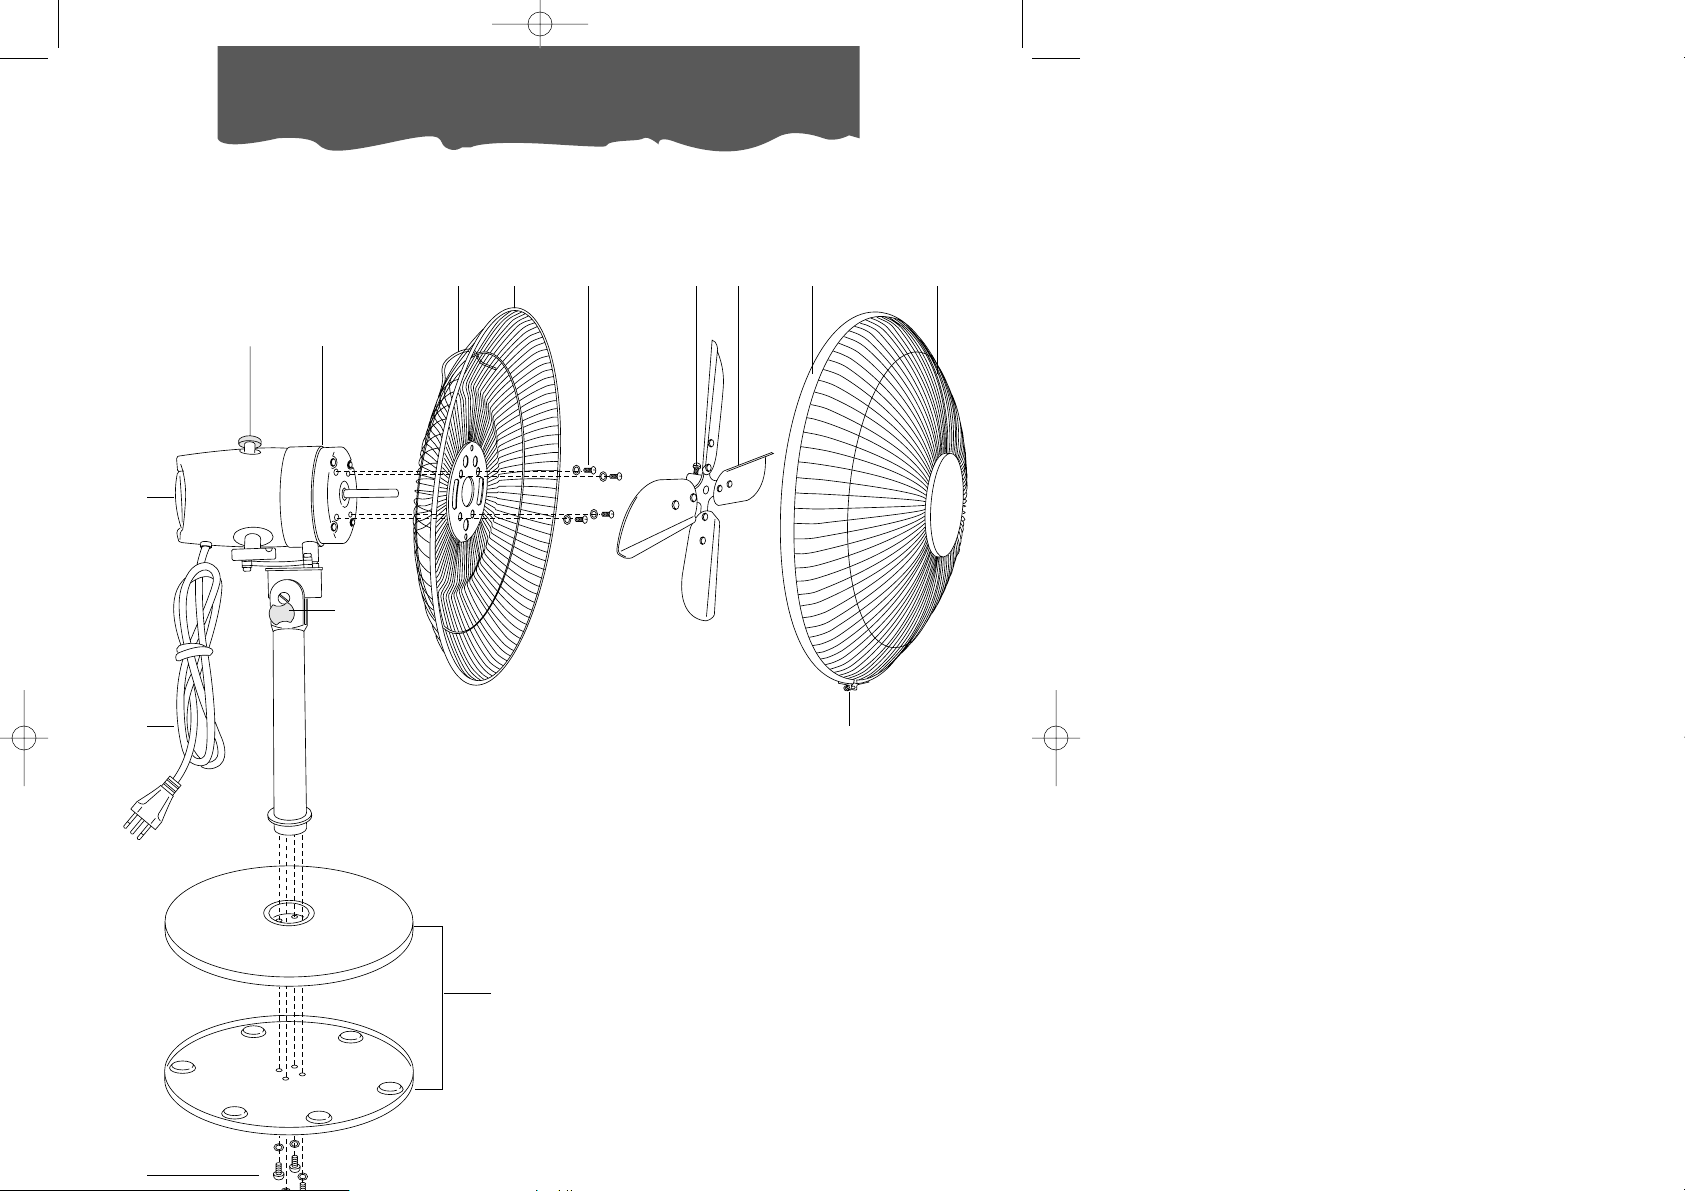
DESCRIPTION
1) Front guard
2) Safety screw plus nut
3) Guard surround
4) Propeller
5) Propeller fixing screw
6) Screws
7) Rear guard
8) Handle
9) Motor unit + shaft
10) Swing control
11) ON/OFF/MIN/MED/MAX knob
12) Power cable
13) Tilt control
14) Base
15) Screws
ASSEMBLING THE FAN
• Assemble the fan as follows:
• Remove the four screws and washers (15)
from the base of the shaft (9), then attach
the motor unit and shaft (9) to the fan
base (14) using the four washers and
screws (15).
• Remove the four central screws (6) and
washers from the motor unit (9). Attach the
rear guard to the motor unit, centring it
and fixing it with the screws removed previously.
Note: When positioning the rear guard (7),
make sure the handle (8) faces upwards.
• Fit the propeller (4) with the screw (5)
facing the motor unit. Lock the propeller in
position using the fixing screw (5), making
sure it corresponds to the flattened area of
the motor shaft.
•Position the front guard (1) near the rear
guard (7) and fasten it using the surround
(3), safety screw and nut (2).
IMPORTANT
Make sure your mains voltage corresponds to
the voltage indicated on the rating plate.
• Connect your fan to an efficiently earthed
socket only.
• Complete assembly before turning the
appliance on.
• Children or infirm persons should not be
allowed to use this product unsupervised
• Children should not be allowed to play
with this appliance
• For indoor use only. Rain and water are
dangerous in the presence of electricity.
• Use on stable horizontal surfaces only to
avoid the fan tipping over.
• Do not use in damp environments or in
particularly humid rooms such as bathrooms etc.
• Do not insert any object into the guard
while the fan is in operation.
•Before removing the guard, always unplug
from the mains.
• Incorrect installation could be hazardous,
with the risk of electric shock.
• Always disconnect the appliance from the
mains before cleaning or moving.
• If necessary, have the power cable replaced by a qualified person only.
Note: To avoid the risk of fire or electric shock,
never use the appliance with additional
speed controls.
Description/Assembly
GB
GB
GB 5-04-2005 9:30 Pagina 6
Page 4

Operation/Maintenance
OPERATION
• Plug the appliance into the mains.
•Turn the ON/OFF knob (11) to the required
position (Min/Med/Max).
•To turn the appliance off, turn the ON/OFF
knob (11) to "0".
For "swing" operation, screw up the swing
control (10) clockwise or unscrew it anticlockwise as required.
To adjust the tilt of the fan, use the tilt control (13) on the top of the shaft. This should
be done with the fan off only.
MAINTENANCE
• Always unplug the fan from the mains
before cleaning or maintenance.
• Never allow water to enter the fan controls.
•We recommend you keep the packaging
your fan came in. You can use it to neatly
store the dismantled fan during the cold
season.
•To clean, use a soft dry cloth.
•Do not use detergents, solvents or abrasives.
This appliance complies with directive 89/336/EEC on radio interference suppression.
The manufacturer declines all responsibility in the event of accidents caused by failure
to follow these instructions or by misuse or negligence on the part of the user.
Electrical connection (U.K. only)
A) If your appliance comes fitted with a plug, it will incorporate a 13 Amp fuse. If it does not fit
your socket, the plug should be cut off from the mains lead, and an appropriate plug fitted, as
below.
WARNING: Very carefully dispose of the cut off plug after removing the fuse: do not insert in a
13 Amp socket elsewhere in the house as this could cause a shock hazard.
With alternative plugs not incorporating a fuse, the circuit must be protected by a 15 Amp fuse.
If the plug is a moulded-on type, the fuse cover must be re-fitted when changing the fuse using
a 13 Amp Asta approved fuse to BS 1362. In the event of losing the fuse cover, the plug must
NOT be used until a replacement fuse cover can be obtained from your nearest electrical
dealer. The colour of the correct replacement fuse cover is that as marked on the base of the
plug.
B) If your appliance is not fitted with a plug, please follow the instructions provided below:
WARNING - THIS APPLIANCE MUST
BE EARTHED
IMPORTANT
The wires in the mains lead are coloured in
accordance with the following code:
As the colours of the wires in the mains lead
may not correspond with the coloured
markings identifying the terminals in your
plug, proceed as follows:
The green and yellow wire must be connected to the terminal in the plug marked with
the letter E or the earth symbol or
GB 5-04-2005 9:30 Pagina 7
 Loading...