

Page 1

COOKERS
Instructions for use
Advice for installation
КУХОННЫЕ ПЛИТЫ
Инструкция по эксплуатации
Рекомендации по установке
Page 2

English Instructions for the use - Installation advices Page 3
The manufacturer cannot be held responsible for possible inaccuracies due to printing or transcription errors in the
present booklet.
The manufacturer reserves the right to make all modications to its products deemed necessary for manufacturer
commercial reasons at any moment and without prior notice, without jeopardising the essential functional and safety
characteristics of the appliances.
РУССКИЙ Инструкция по эксплуатации Рекомендации по установке Cтр. 48
Все описания и иллюстрации, представленные в настоящем буклете, носят чисто информативный характер.
Производитель оставляет за собой право внесения в любой момент без предупреждения всех необходимых
изменений в характеристики отдельных моделей, описанных в настоящем документе для осуществления
соответствующих модификаций или для коммерческих целей.
2
Page 3

Dear Customer,
Thank you for having purchased and given your preference to
our product.
The safety precautions and recommendations reported below
are for your own safety and that of others. They will also provide
a means by which to make full use of the features offered by your
appliance.
Please preserve this booklet carefully. It may be useful in future, either to yourself or to others in the event that doubts should
arise relating to its operation.
This appliance must be used only for the task it has explicitly been designed for, that is for cooking foodstuffs. Any
other form of usage is to be considered as inappropriate and
therefore dangerous.
The manufacturer declines all responsibility in the event
of damage caused by improper, incorrect or illogical use of
the appliance.
Read the instructions carefully before installing and using the appliance.
CAUTION: this apparatus must only be installed in a permanently ventilated room in
compliance with the applicable regulations.
Important:
This appliance is designed and manufactured solely for the cooking of domestic (household) food and is not suitable for any non domestic application and therefore should
not be used in a commercial environment.
This appliance guarantee will be void if the appliance is used within a non domestic
environment i.e. a semi commercial, commercial or communal environment.
3
Page 4

FIRST USE OF THE OVEN
It is advised to follow these instructions:
• Furnish the interior of the oven as described at chapter “Cleaning and maintenance”.
• Switch on the empty oven on max to eliminate grease from the heating elements.
• Let the oven cool down and clean the interior of the oven with a cloth soaked in
water and neutral detergent, then dry carefully.
IMPORTANT PRECAUTIONS AND RECOMMENDATIONS
After having unpacked the appliance, check to ensure that it is not damaged and that the
oven door closes correctly. In case of doubt, do not use it and consult your supplier or a
professionally qualied technician.
Packing elements (i.e. plastic bags, polystyrene foam, nails, packing straps, etc.) should
not be left around within easy reach of children, as these may cause serious injuries.
• Do not attempt to modify the technical characteristics of the appliance as this may
cause danger to users.
• Do not carry out cleaning or maintenance operations on the appliance without having
previously disconnected it from the electric power supply.
• Do not touch the appliance with wet or damp hands (or feet).
• Do not use the appliance whilst in bare feet.
• If you should decide not to use this appliance any longer (or decide to substitute another model), before disposing of it, it is recommended that it be made inoperative in an
appropriate manner in accordance to health and environmental protection regulations,
ensuring in particular that all potentially hazardous parts be made harmless, especially
in relation to children who could play with unused appliances.
• After use, ensure that the knobs are in the off position.
• Household appliances are not intended to be played with by children.
• Keep children away from the cooker during use.
• Children, or persons with a disability which limits their ability to use the appliance,
should have a responsible person to instruct them in its use. The instructor should
be satised that they can use the appliance without danger to themselves or their
surroundings.
• During and after use of the appliance, certain parts will become very hot. Do not touch
hot parts. Care should be taken to avoid touching heating elements inside the oven.
• Some appliances are supplied with a protective lm on steel and aluminium parts.
This lm must be removed before using the appliance.
• WARNING: When correctly installed, your product meets all safety requirements laid
down for this type of product category. However special care should be taken around
the rear or the underneath of the appliance as these areas are not designed or inten-
ded to be touched and may contain sharp or rough edges, that may cause injury.
• Fire risk! Do not store ammable material in the oven or in the storage compartment.
• Make sure that electrical cables connecting other appliances in the proximity of the
cooker cannot come into contact with the hob or become entrapped in the oven door.
4
Page 5

• Do not line the oven walls with aluminium foil. Do not place baking trays or the drip tray
on the base of the oven chamber.
• The manufacturer declines all liability for injury to persons or damage to property caused by incorrect or improper use of the appliance.
• The various components of the appliance are recyclable. Dispose of them in accordance with the regulations in force in your country. If the appliance is to be scrapped,
remove the power cord.
• Always use oven gloves when removing the shelves and food trays from the oven
whilst hot.
• Do not hang towels, dishcloths or other items on the cooker or its handle – as this
could be a re hazard.
• Clean the oven regularly and do not allow fat or oils to build up in the oven base or
trays. Remove spillages as soon as they occur.
• Do not stand on the cooker or on the open oven door.
• Always stand back from the cooker when opening the oven door to allow steam and
hot air to escape before removing the food.
• Safe food handling: Leave food in the oven for as short a time as possible before
and after cooking. This is to avoid contamination by organisms which may cause food
poisoning. Take particular care during warmer weather.
• This appliance is for domestic use only.
• Do not operate your appliance by means of an external timer or separate remotecontrol system.
5
Page 6

COOKING HOB
1
Fig. 1.1
22
4
3
GAS BURNERS
1. Auxiliary burner (A) 1,00 kW
2. Semi-rapid burner (SR) 1,75 kW
3. Rapid burner (R) 3,00 kW
4. Triple-ring burner (TR) 3,50 kW
Notes:
• The electric ignition is incorporated in the knobs.
• The appliance has a safety valve system tted, the ow of gas will be stopped if and
when the ame should accidentally go out.
CAUTION:
Gas appliances produce heat and humidity in the environment in which they are installed.
Ensure that the cooking area is well ventilated by opening the natural ventilation grilles or
by installing an extractor hood connected to an outlet duct.
1
CAUTION:
If the appliance is used for a prolonged time it may be necessary to provide further ventilation by opening a window or by increasing the suction power of the extractor hood (if tted).
6
Page 7

9
CONTROL PANEL
2
Fig. 2.1
P
A
U
T
O
CONTROLS DESCRIPTION
1. Front right burner control knob
2. Rear right burner control knob
3. Central burner control knob
4. Rear left burner control knob
5. Front left burner control knob
6. Multifunction oven thermostat control knob
7. Multifunction oven function selector control knob
8. Electronic clock/programmer
Pilot lamp:
9. Oven temperature indicator light
12345678
Please note:
This appliance incorporates a safety cooling fan which you will hear operating whenever
the oven or grill are in use.
This fan may continue to run for several minutes after the appliance has been switched off.
This fan is to reduce the external temperature of the appliance and cool the internal com-
ponents.
7
Page 8

USE OF THE HOB BURNERS
3
GAS BURNERS
Each burner is controlled by a gas tap (g.
3.1) assuring the opening and the closing
of the gas supply.
Make the lever of the knob match with the
indicator on the control panel to obtain:
– symbol
off
– symbol
– symbol
full on
(nominal rate)
reduced rate
√ To reduce the gas ow to minimum,
rotate the knob anti-clockwise to point
the lever towards the small ame
symbol.
√ The maximum aperture position per-
mits rapid boiling of liquids, whereas
the minimum aperture position allows
slower warming of food or maintaining
boiling conditions of liquids (simme-
ring).
√ Other intermediate operating
adjustments can be achieved by positioning the lever between the maximum and minimum aperture positions,
and never between the maximum
aperture and off positions.
Caution!
The cooking hob becomes very hot
during operation.
Keep children well out of reach.
Fig. 3.1
N.B. When the cooker is not being
used, set the gas knobs to their clo-
sed positions and also close the cock
valve on the gas bottle or the main
gas supply line.
8
Fig. 3.2
Page 9

LIGHTING THE BURNERS
To ignite the burner, the following instructions are to be followed:
1. Press in the corresponding knob and
turn counter-clockwise (g. 3.2) to the
full ame position marked by the
symbol (g. 3.1) and hold the knob in
until the ame has been lit.
In the case of a mains failure light the
burner with a match or lighted taper.
2. Wait for about ten seconds after the
gas burner has been lit before letting
go of the knob (valve activation delay);
3. Adjust the gas valve to the desired po-
sition.
If the burner ame should go out for some
reason, the safety valve will automatically
stop the gas ow.
To re-light the burner, return the knob to
the closed “
1 minute and then repeat the lighting procedure.
If your local gas supply makes it difcult to
light the burner with the knob set to maximum, set the knob to minimum and repeat
the operation.
” position, wait for at least
CHOICE OF THE BURNER
On the control panel, near every knob, there is a diagram that indicates which burner
is controlled by that knob.
The suitable burner must be chosen ac-
cording to the diameter and the capacity
used.
As an indication, the burners and the pots
must be used in the following way:
BURNERS POT DIAMETER
Auxiliary 12 cm (*) 14 cm
Semi-rapid 16 cm 24 cm
Rapid 24 cm 26 cm
Triple-ring 26 cm 28 cm
do not use pans with concave
or convex bases
(*) with grill for small cookware: minimum
diameter 6 cm
Fig. 3.3
It is important that the diameter of the pot
be suitable to the potentiality of the burner
so as not to compromise the high output
of the burners and therefore energy waste.
A small pot on a large burner does not give
you a boiling point in a shorter amount of
time since the capacity of heat absorption
of a liquid mass depends on the volume
and the surface of the pot.
GRATE FOR SMALL PANS
This grate is to be placed on top of the
(smaller) auxiliary burner when using small
diameter pans, in
order to prevent
them from tipping
over.
Fig. 3.4
9
Page 10

MULTIFUNCTION ELECTRIC OVEN
4
Attention: The oven door becomes
very hot during operation.
Keep children away.
Models with glass lid only:
lid must be kept open when the electric
oven/grill is in use.
The cooker
GENERAL FEATURES
As its name indicates, this is an oven that
presents particular features from an opera-
tional point of view.
In fact, it is possible to insert 7 different programs to satisfy every cooking need.
The 7 positions, thermostatically controlled, are obtained by 4 heating elements
which are:
• Bottom element 1750 W
• Top element 1200 W
• Grill element 2400 W
• Circular element 2500 W
NOTE:
Upon rst use, it is advisable to operate the
oven for 60 minutes in the position
for another 15 minutes at the maximum
temperature (thermostat knob on position
250) in the positions
te possible traces of grease on the heating
elements.
Clean the oven and accessories with warm
water and washing-up liquid.
and , to elimina-
and
OPERATING PRINCIPLES
Heating and cooking in the MULTIFUN-
CTION oven are obtained in the following
ways:
a. by normal convection
The heat is produced by the upper and
lower heating elements.
b. by forced convection
A fan sucks in the air contained in the
oven mufe, which sends it through
the circular heating element and then
sends it back through the mufe.
Before the hot air is sucked back
again by the fan to repeat the described cycle, it envelops the food in the
oven, provoking a complete and rapid
cooking.
It is possible to cook several dishes si-
multaneously.
c. by semi-forced convection
The heat produced by the upper and
lower heating elements is distributed
throughout the oven by the fan.
d. by radiation
The heat is irradiated by the infra red
grill element.
e. by radiation and ventilation
The irradiated heat from the infra red
grill element is distributed throughout
the oven by the fan.
f. by ventilation
The food is defrosted by using the fan
only function without heat.
WARNING:
The door is hot, use the handle.
During use the appliance becomes hot.
Care should be taken to avoid touching
heating elements inside the oven.
10
Page 11

Fig. 4.1
Fig. 4.2
THERMOSTAT KNOB (g. 4.2)
To turn on the heating elements of the oven, set function selector knob to the required position and the thermostat knob to the desired temperature.
To set the temperature, turn the thermostat control knob indicator mark to the required
temperature.
The elements will turn on or off automatically which is determined by the thermostat.
The operation of the heating elements is signalled by a light placed obove the knob.
FUNCTION SELECTOR KNOB (gs. 4.1)
Rotate the knob clockwise to set the oven for one of the following functions:
OVEN LIGHT
By turning the knob onto this setting we light the oven cavity.
The oven remains alight while any of the functions is on.
TRADITIONAL CONVECTION COOKING
The upper and lower heating elements are switched on. The heat is diffused by natural
convection and the temperature must be regulated between 50° C and 250° C with the
thermostat knob.
It is necessary to preheat the oven before introducing the foods to be cooked.
Recommended for:
For foods which require the same cooking temperature both internally and externally, i. e.
roasts, spare ribs, meringue, etc.
GRILLING
The infra-red heating element is switched on. The heat is diffused by radiation.
Use with the oven door closed and the thermostat knob to between 50° and 225°C .
Note: It is recommended that you do not grill for longer than 30 minutes at any one
time.
Attention: the oven door becomes very hot during operation. Keep children away.
For correct use see chapter “USE OF THE GRILL”
Recommended for:
Intense grilling action for cooking with a broiler; browning, crisping, “au gratin”, toasting,
etc.
11
Page 12

DEFROSTING FROZEN FOODS
Only the oven fan is on. To be used with the thermostat knob on “ ” because the other
positions have no effect. The defrosting is done by simple ventilation without heat.
Recommended for:
To rapidly defrost frozen foods; 1 kilogram requires about one hour.
The defrosting times vary according to the quantity and type of foods to be defrosted.
HOT AIR COOKING
The circular element and the fan are on. The heat is diffused by forced convection and the
temperature must be regulated between 50° and 250 °C with the ther mostat knob.
It is not necessary to preheat the oven.
Recommended for:
For foods that must be well done on the outside and tender or rare on the inside, i. e. lasagna, lamb, roast beef, whole sh, etc.
VENTILATED GRILL COOKING
The infra-red ray grill and the fan are on. The heat is mainly diffused by radiation and the
fan then distributes it throughout the oven. The temperature must be regulated between
50° and 225 °C for max 30 minutes, with the thermostat knob. It is necessary to preheat
the oven for about 5 minutes.
Use with the oven door closed.
Attention: the oven door becomes very hot during operation.
Keep children away.
For correct use see chapter “GRILLING AND AU GRATIN”.
Recommended for:
For grill cooking when a fast outside browning is necessary to keep the juices in, i. e. veal
steak, steak, hamburger, etc.
THAWING AND WARMING UP
The upper element and the circular element connected in series, are switched on; also the
fan is on. The heat is diffused by forced convection with the most heat being produced by
the upper element.
The temperature must be regulated between 50° and 140 °C with the thermostat knob.
Recommended for:
To keep foods hot after cooking. To slowly heat already cooked foods.
CONVECTION COOKING WITH VENTILATION
The upper and lower heating elements and the fan turn on.
The heat coming from the top and bottom is diffused by forced convection.
The temperature must be regulated between 50° and 250 °C with the thermostat knob.
Recommended for:
For foods of large volume and quantity which require the same internal and external degree
of cooking; for ie: rolled roasts, turkey, legs, cakes, etc.
12
Page 13

COOKING ADVICE
STERILIZATION
Sterilization of foods to be conserved, in
full and hermetically sealed jars, is done in
the following way:
a. Set the switch to position
b. Set the thermostat knob to position
185 °C and preheat the oven.
c. Fill the dripping pan with hot water.
d. Set the jars onto the dripping pan ma-
king sure they do not touch each other
and the door and set the thermostat
knob to position 135 °C.
When sterilization has begun, that is, when
the contents of the jars start to bubble, turn
off the oven and let cool.
;
SIMULTANEOUS COOKING OF DIFFERENT FOODS
The MULTI-FUNCTION oven set on position and gives simultaneous heterogeneous cooking of different foods.
Different foods such as sh, cake and meat
can be cooked together without mixing the
smells and avours.
This is possible since the fats and vapors
are oxidized while passing through the
electrical element and therefore are not deposited onto the foods.
The only precautions to follow are:
• The cooking temperatures of the dif-
ferent foods must be as close to as
possible, with a maximum difference
of 20° - 25 °C.
• The introduction of the different dishes
in the oven must be done at different
times in relation to the cooking times
of each one.
The time and energy saved with this type
of cooking is obvious.
REGENERATION
Set the switch to position and the ther-
mostat knob to position 150° C.
Bread becomes fragrant again if wet with
a few drops of water and put into the oven
for about 10 minutes at the highest tempe-
rature.
ROASTING
To obtain classical roasting, it is necessary
to remember:
• that it is advisable to maintain a tem-
perature between 180 and 200 °C.
• that the cooking time depends on the
quantity and the type of foods.
GRILLING AND “AU GRATIN”
Set the switch to position .
Set the thermostat to position 225°C and
after having preheated the oven, simply
place the food on the shelf.
Close the door and let the oven operate
with the thermostat on, until grilling is complete.
Adding a few dabs of butter before the end
of the cooking time gives the golden “au
gratin” effect.
Note: It is recommended that you do not
grill for longer than 30 minutes at any one
time.
ATTENTION: the oven door becomes
very hot during operation.
Keep children away.
13
Page 14

USE OF THE GRILL
Preheat the oven for about 5 minutes.
Introduce the food to be cooked, positioning
the rack as close to the grill as possible.
The dripping pan should be placed under
the rack to catch the cooking juices and
fats.
Grilling with the oven door closed.
Do not grill for longer than 30 minutes at
any one time.
CAUTION: the oven door becomes very
hot during operation. Keep children well
out of reach.
OVEN COOKING
Before introducing the food, preheat the
oven to the desired temperature.
For a correct preheating operation, it is advisable to remove the tray from the oven
and introduce it together with the food,
when the oven has reached the desired
temperature.
Check the cooking time and turn off the
oven 5 minutes before the theoretical time
to recuperate the stored heat.
COOKING EXAMPLES
Temperatures are approximate as they
vary depending on the quality and amount
of food.
Remember to use ovenproof dishes and
to adjust the oven temperature during cooking if necessary.
DISHES TEMPERATURE
Cakes 180°C
Doughnuts 180°C
Cheese soufé 200°C
Potatoes soufé 200°C
Roast veal 200°C
Spinach crepes 200°C
Potatoes in milk 200°C
Chicken breasts in tomato 200°C
Sole sh let 200°C
Whiting 200°C
Cream puffs 200°C
Plum pie 200°C
Meat balls 200°C
Veal meatloaf 200°C
Grilled chicken - roast chicken 220°C
Baked lasagna 220°C
Roast beef 220°C
Oven cooked pasta 220°C
Lemon cake 220°C
Rice creol 225°C
Baked onions 225°C
Stuffed potatoes 225°C
Grilled veal joint 225°C
Marmalade pie 225°C
Pound cake 225°C
Turkish shishkebab 250°C
Pizza with anchovies 250°C
14
Page 15

ELECTRONIC PROGRAMMER
5
The electronic programmer is a device which groups together the following functions:
• 24 hours clock with illuminated display
• Timer (up to 23 hours and 59 minutes)
• Program for automatic oven cooking
• Program for semi-automatic oven cooking
Description of the buttons:
Timer
Cooking time
End of cooking time
Manual position and cancellation of
the inserted cooking program
To increase the numbers on
the digital display
To decrease the numbers on
the digital display.
Description of the illuminated
symbols:
AUTO - ashing - Programmer in automa-
tic position but not programmed
AUTO - illuminated - Programmer in auto-
matic position with program inser-
ted.
Automatic cooking taking place
Timer in operation
and AUTO - ashing - Program
error.
(The time of day lies between the
calculated cooking start and end
time).
Note:
Select a function by the respective button
and, in 5 seconds, set the required time
with the
ration).
After a power cut the display resets to zero
and cancels the set programs.
/ buttons (“one-hand” ope-
Fig. 5.2Fig. 5.1
15
Page 16

ELECTRONIC CLOCK (g. 5.2)
The programmer is equipped with an electronic clock with illuminated numbers which
indicates hours and minutes.
Upon immediate connection of the oven or
after a power cut, three zeros will ash on
the programmer display.
To set the correct time of day it is necessa-
ry to push the
button until you have set the correct
or
time (g. 5.2).
In another way push simultaneously the
two buttons and at the same time
push the
Note: If the clock is reset it deletes any previously set programs
button and then the
or button.
NORMAL COOKING WITHOUT THE
USE OF THE PROGRAMMER
To manually use the oven, without the aid
of the programmer, it is necessary to cancel the ashing AUTO by pushing the
button (AUTO will be switched off and the
symbol
Attention: If the AUTO is illuminated (which
means a cooking program has already
been inserted), by pushing the button
you cancel the program and return to ma-
nual operation.
If the oven is switched on, you must switch
off manually.
will illuminate - Fig. 5.3).
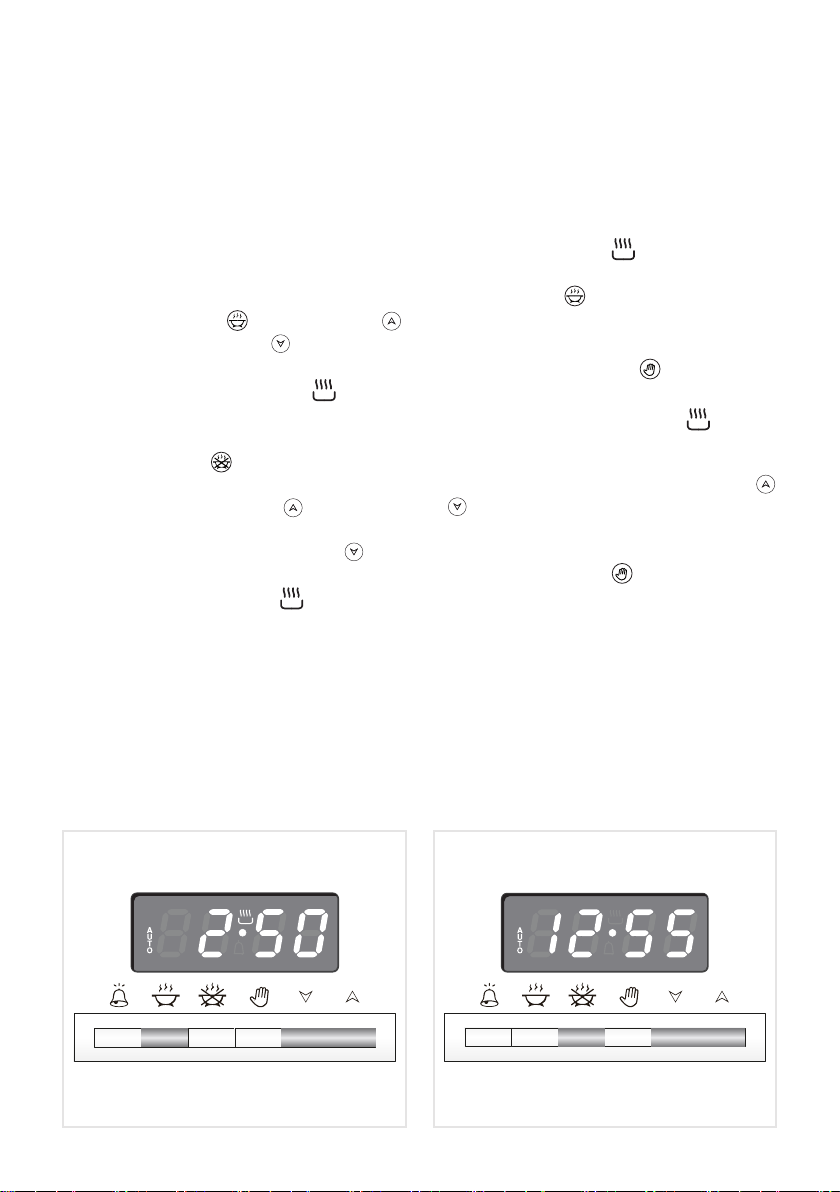
ELECTRONIC TIMER
The timer program consists only of a buzzer which may be set for a maximum period
of 23 hours and 59 minutes.
If the AUTO symbol is ashing push the
button.
To set the time, push the
or until you obtain the desired time in
the display (g. 5.4).
Having nished the setting, the clock hour
will appear on the panel and the symbol
will be illuminated.
The countdown will start immediately and
may be seen at any moment on the panel
by simply pressing the button
At the end of the time, the
disappear and the buzzer will sound and
continue for approximatley 7 minutes or
until a button is pressed (not the
buttons). After a short time the display will
revert back to the time of day.
button and the
symbol will
SETTING THE FREQUENCY OF THE
AUDIBLE SIGNAL
The buzzer has 3 different tones and can
be changed by pressing the
only when the time of day is displayed
button, but
.
/
16
Fig. 5.4Fig. 5.3
Page 17
AUTOMATIC OVEN COOKING
To cook food automatically in the oven, it is
necessary to:
1. Set the length of the cooking period.
2. Set the end of the cooking time.
3. Set the temperature and the oven cooking program.
These operations are done in the following
way:
1. Set the length of the cooking period
by pushing the
button to increase, or
you have passed the desired time (g.
5.5). The AUTO and the
will illuminate.
2. Set the end of the cooking time by
pressing the
time already added to the clock time
will appear), and the
5.6); if you pass the desired time you
may get back by pushing the
ton.
After this setting, the
disappear. If after this setting, the
AUTO ashes on the display and a
buzzer sounds, it means there was
an error in the programming, that is
that the cooking cycle has been superimposed on the clock. In this case,
modify the end of cooking time or the
cooking period itself by following again
the above mentioned instructions.
button and the
to decrease if
symbol
button (the cooking
button (g.
but-
symbol will
3. Set the temperature and the cooking
program by using the switch and thermostat knobs of the oven (see specic
chapters).
Now the oven is programmed and
everything will work automatically, that is
the oven will turn on at the right moment
to end the cooking at the established hour.
During cooking, the
illuminated.
By pushing the
time that remains until the end of cooking.
The cooking program may be cancelled
at any time by pushing
At the end of the cooking time the oven
will turn off automatically, the
will turn off, AUTO will ash and a buzzer
will be sound, which can be turned off by
pushing any of the buttons except the
buttons.
/
Turn the switch and thermostat knobs to
zero and put the programmer onto “ma-
nual” by pressing the
Attention: After a power cut the clock resets to zero and cancels the set programs.
After a power cut, three zeros will ash on
the display.
symbol remains
button you can see the
.
symbol
button.
Fig. 5.6Fig. 5.5
17
Page 18

SEMI-AUTOMATIC COOKING
This is used to automatically switch off the
oven after the desired cooking time has
elapsed.
There are two ways to set your oven:
1. Set the length of the cooking time by
pushing the
ton to advance, or
if you have passed the desired time
(Fig. 5.7).
2. Set the end of the cooking time by
pushing the
ton to advance, or
if you have passed the desired time
(Fig. 5.8).
button and the but-
to go backwards
or
button and the but-
to go backwards
At the end of the cooking time the oven
will turn off automatically, the
will turn off, AUTO will ash and a buzzer
will be sound, which can be turned off by
pushing any of the buttons except the
buttons.
/
Turn the switch and thermostat knobs to
zero and put the programmer onto “ma-
nual” by pressing the
Attention: After a power cut the clock resets to zero and cancels the set programs.
After a power cut, three zeros will ash on
the display.
button.
symbol
AUTO and the
Then set the temperature and the cooking
programme using the oven switch and
thermostat knobs (see specic chapters).
The oven is switched on and it will be
switched off automatically at the end of the
desired time.
During cooking, the
on and by pressing the button
see the time that remains till the end of the
cooking.
The cooking program may be cancelled
at any time by pushing
symbol will be on.
symbol remains
you can
.
Fig. 5.7
18
Fig. 5.8
Page 19

CLEANING AND MAINTENANCE
Do not shut lid when
burner alight.
ATTENTION
Do not lower the glass lid when the
gas burners are still hot or when
the oven is working or still hot.
Do not lay on the glass lid hot pans
and heavy kitchen utensils.
Dry off any liquid whitch may have
spilt on the cover before opening it.
Models with glass lid
6
GLASS LID (ONLY FOR THE MODELS WITH GLASS LID)
For cleaning purposes, the lid can be easily removed upwards once taken to the
upright position.
Should the hinges slip off, replace them in
their housing being careful that:
• The right housing must receive the
hinge marked “D” while the left hou-
sing must receive the hinge marked
“S” (Fig. 6.1).
REGULATING OF THE BALANCE
Lower the lid and check the correct balance. While opened at 45° it should hang up.
The springs of the hinges can be adjusted
if necessary by turning the screws “R”
clockwise (g. 6.1).
SOME MODELS ONLY
S
Fig. 6.1
R
D
19
Page 20

GENERAL ADVICE
• Before you begin cleaning, you
must ensure that the appliance is
disconected from the electrical po-
wer supply.
• When the appliance is not being used,
it is advisable to keep the gas tap closed.
• The periodical lubrication of the gas
taps must be done only by specialized
personnel.
• If a tap becomes stiff, do not force;
contact your local After Sales Service
Centre.
• It is advisable to clean when the appliance is cold and especially when
cleaning the enamelled parts.
• Avoid leaving alkaline or acidic sub-
stances (lemon juice, vinegar, etc.) on
the surfaces.
• Avoid using cleaning products with a
chlorine or acidic base.
• Important: The use of suitable pro-
tective clothing/gloves is recommended when handling or cleaning
of this appliance.
ENAMELLED PARTS
All the enamelled parts must be cleaned
with a sponge and soapy water or other
non-abrasive products.
Dry preferably with a microbre or soft
cloth.
Acidic substances like lemon juice, tomato
sauce, vinegar etc. can damage the ena-
mel if left too long.
STAINLESS STEEL, ALUMINIUM
PARTS, PAINTED AND SILK-SCREEN PRINTED SURFACES
Clean using an appropriate product.
Always dry thoroughly.
IMPORTANT: these parts must be cleaned
very carefully to avoid scratching and abrasion. You are advised to use a soft cloth
and neutral soap.
CAUTION: Do not use abrasive substances or non-neutral detergents as these
will irreparably damage the surface.
WARNING
When correctly installed, your product
meets all safety requirements laid down
for this type of product category. However special care should be taken
around the rear or the underneath of the
appliance as these areas are not desig-
ned or intended to be touched and may
contain sharp or rough edges, that may
cause injury.
Attention! The appliance gets very hot, mainly around the cooking areas. It is very
important that children are not left alone in the kitchen when you are cooking.
Do not use a steam cleaner because the moisture can get into the appliance thus
make it unsafe.
Do not use harsh abrasive cleaners or sharp metal scrapers to clean the oven door
glass or the glass lid (only for the models with glass lid) since they can scratch the
surface, which may result in shattering of the glass.
20
Page 21

GAS TAPS
Periodic lubrication of the gas taps must be
carried out by specialist personnel only.
In the event of operating faults in the gas
taps, call the Service Department.
INSIDE OF OVEN
The oven should always be cleaned after
use when it has cooled down.
The cavity should be cleaned using a mild
detergent solution and warm water. Suitable proprietary chemical cleaners may be
used after rst consulting with the manu-
facturers recommendations and testing a
small sample of the oven cavity. Abrasive
cleaning agents or scouring pads/cloths
should not be used on the cavity surface.
NOTE: The manufacturers of this applian-
ce will accept no responsibility for damage
caused by chemical or abrasive cleaning.
Let the oven cool down and pay special
attention no to touch the hot heating
elements inside the oven cavity.
BURNERS
They can be removed and washed with
soapy water only.
They will remain always perfect if cleaned
with products used for silverware.
After cleaning or wash, check that burnercaps and burner-heads are dry before pla-
cing them in the respective housings.
Check that the electrode “S” (gs. 6.2, 6.4)
next to each burner
sure trouble-free sparking.
Check that the probe “T” (gs. 6.2, 6.4)
next to each burner is always clean to ensure correct operation of the safety valves.
Both the probe and ignition plug must
be very carefully cleaned.
Note: The electrode “S” must be very
carefully cleaned. To avoid damage to
the electric ignition do not use it when
the burners are not in place.
is always clean to en-
CORRECT REPLACEMENT OF
THE AUXILIARY, SEMIRAPID AND
SEMI-RAPID BURNERS
It is very important to check that the burner ame distributor F and the cap C has
been correctly positioned (see gs. 6.2
- 6.3) - failure to do so can cause serious
problems.
CORRECT REPLACEMENT OF THE
TRIPLE RING BURNER
The triple ring burner must be correctly positioned (see g. 6.6); the burner rib must
be enter in their logement as shown by the
arrow (see g. 6.4).
The burner correctly positioned must not
rotate (g. 6.5).
Then position the cap A and the ring B
(gs. 6.5 - 6.6).
21
Page 22

C
F
T
S
Fig. 6.2
Fig. 6.3
T
S
Fig. 6.4
A
B
Fig. 6.5
Fig. 6.6
22
Page 23

OVEN FITTING OUT
• Assemble the wire racks to the oven walls using the 2 screws (Fig. 6.7a).
• Slide in, on the guides, the shelf and the tray (g. 6.7b).
The shelf must be tted so that the safety catch, which stops it sliding out, faces the
inside of the oven.
• To dismantle, operate in reverse order.
Fig. 6.7b
Fig. 6.7a
23
Page 24

REPLACING THE OVEN LAMPS
WARNING: Ensure the appliance is switched off before replacing the lamp to avoid
the possibility of electric shock.
• Let the oven cavity and the heating elements to cool down.
• Switch off the electrical supply.
• Remove the protective cover A (g. 6.8).
• Unscrew and replace the bulb B with a new one suitable for high temperatures (300°C)
having the following specications: 230V or 220-240V, E14 and same power (check
watt power as stamped in the bulb itself) of the replaced bulb.
• Ret the protective cover A.
Note: Oven bulb replacement is not covered by your guarantee.
24
A
B B
A
Fig. 6.8
Page 25

GREASE FILTER
A special screen is provided at the back of the oven to catch grease particles, mainly when
meat is being roasted (g. 6.9).
• When baking pastry etc. this lter should be removed.
• Slide in the grease lter on the back of the oven as in g. 6.9.
Clean the lter after any cooking!
• The grease lter can be removed for cleaning and should be washed regularly in hot
soapy water.
• Always clean the lter after cooking as any solid residues on it might adversely affect
the oven performance.
• Always dry the lter properly before tting it back into the oven.
STORAGE COMPARTMENT
The storage compartment is accessible through the pivoting panel (g. 6.10).
Do not store ammable material in the oven or in the storage compartment.
Fig. 6.9
Fig. 6.10
25
Page 26

REMOVING AND REPLACING THE INNER DOOR GLASS PANE FOR CLEANING
If you wish to clean the inner glass of the door, make sure you follow the precautions and
instructions very carefully.
Replacing the glass pane and the door incorrectly may result in damage to the appliance
and may void your warranty.
IMPORTANT!
• Take care, the oven door is heavy. If you have any doubts, do not attempt to remove
the door.
• Make sure the oven and all its parts have cooled down. Do not attempt to handle the
parts of a hot oven.
• Take extreme care when handling the glass pane. Avoid the edges of the glass bumping against any surface. This may result in the glass shattering.
• CAUTION:
Do not use harsh abrasive cleaners or sharp metal scrapers to clean the oven door
glass since they can scratch the surface, which may result in shattering of the glass.
• If you notice any sign of damage on any of the glass panes (such as chipping, or
cracks), do not use the oven. Call your Authorised Service Centre or Customer Care.
• Make sure you replace the glass pane correctly. Do not use the oven without glass
pane correctly in place.
• If the glass pane feels difcult to remove or replace, do not force it. Call your Authori-
sed Repairer or Customer Care for help.
Note: service visits providing assistance with using or maintaining the oven are not
covered by your warranty.
26
Page 27

Fig. 6.11
Fig. 6.12
REMOVING THE OVEN DOOR
The oven door can easily be removed as
follows:
• Open the door to the full extent (g.
6.11).
• Open the lever “A” completely on the
left and right hinges (g. 6.12).
• Hold the door as shown in g. 6.14.
• Gently close the door (g. 6.13) until
left and right hinge levers “A” are hooked to part “B” of the door (g. 6.12).
• Withdraw the hinge hooks from their
A
location following arrow “C” (g. 6.15).
• Rest the door on a soft surface.
B
Fig. 6.13
Fig. 6.14
C
Fig. 6.15
27
Page 28

REMOVING THE INNER PANE OF GLASS
1
2
1
2
The oven door is tted with no. 2 panes:
• no. 1 outside;
• no. 1 inner.
To clean all panes on both sides it is necessary to remove the inner pane as follows:
REMOVE THE INNER GLASS RETAINER
1. Remove the oven door and place it on a soft surface.
IMPORTANT: The door shall be placed horizontally as per Fig. 6.16.
2. Press down on both tabs to release the glass retainer.
3. Remove the glass retainer.
2
Fig. 6.16
28
Page 29

REMOVE THE INNER GLASS PANE
Lift and remove the inner pane slightly, as shown in the gure 6.17.
2
121
Fig. 6.17
29
Page 30

AFTER CLEANING, REPLACE THE INNER GLASS PANE
When replacing the inner glass pane, make sure that:
• You replace the pane correctly, as shown. The pane must be in the position described
below in order to t into the door and to ensure that the appliance operates safely and
correctly.
• You take extra care not to bump the edges of the glass against any object or surface.
• You do not force the pane into place. If you are experiencing difculties replacing the
pane, remove it and start the process again from the beginning. If this still does not
help, call Customer Care.
• Check that you are holding the pane the correct way. You should be able to read the
wording on it as it faces you.
• Check that the gasket “A” is in place (Fig. 6.18). If not, correctly place the gasket in the
top edge of the inner glass (in the centre).
1. Insert the inner glass pane in the uppermost pair of grooves and push it slightly (arrow
1 in gure 6.18).
2. Gently lower into place (arrow 2 in gure 6.18).
Fig. 6.18
30
A
2
121
Page 31

REPLACE THE GLASS RETAINER
1. Position the glass retainer, as shown in the gure 6.19. It should sit on the bottom edge
of the outer glass. Check that the clamps “M” are not deformed or damaged.
2. Gently push the glass retainer back into place. You should be able to hear the tabs on
both sides click as they lock the glass retainer in.
Important !
Make sure the glass retainer is correctly and rmly in place and that the glass pane is
secure.
2
Click
M
Fig. 6.19
M
1
1
M
2
Click
31
Page 32

REFIT THE DOOR
1. Hold the door rmly (g. 6.20).
2. Insert the hinge tongues into the slots, making sure that the groove drops into place
as shown in the gure 6.21.
3. Open the door to its full extent.
”
4. Fully close the levers “A
5. Close the door and check that it is properly in place.
on the left and right hinges, as shown in the gure 6.22.
Fig. 6.20
Fig. 6.21
32
A
Fig. 6.22
Page 33

Advice for the installer
IMPORTANT
• Cooker installation must only be carried out by QUALIFIED TECHNICIANS and in
compliance with local safety standards. Failure to install the appliance correctly could
invalidate any manufacturer’s warranty.
• The appliance must be installed in compliance with regulations in force in your country
and in observation of the manufacturer’s instructions.
• Always disconnect the appliance from the electrical supply before carrying out any
maintenance operations or repairs.
• Some appliances are supplied with a protective lm on steel and aluminium parts.
This lm must be removed before using the cooker.
33
Page 34

INSTALLATION
7
The installation conditions, concerning protection against overheating of the surfaces adjacent to the cooker, must conform to Figs. 7.1 or 7.2.
The appliance must be kept no less than 200 mm away from any side wall which exceeds
the height of the hob surface (Figs. 7.1 or 7.2).
The veneered syntetical material and the glue used must be resistant to a temperature of
90°C in order to avoid ungluing or deformations.
Curtains must not be tted immediatly behind appliance or within 500 mm of the sides.
If the cooker is located on a pedestal it is necessary to provide safety measures to prevent
falling out.
The appliance must be housed in heat resistant units.
The walls of the units must
not be higher than work top
and must be capable of resi-
sting temperatures of 75 °C
above room temperature.
Do not instal the appliance
near inammable materials
(eg. curtains).
■ Class 1
(Fig. 7.1a)
Gas connection made using
rubber hose which must be
visible and easily inspected
or using rigid or exible metal
pipe.
A space of at least 2 cm must
be left between the cooker and
any adjacent furniture, which
must not exceed the height of
the cooktop.
500 mm
650 mm
20 mm
200 mm
450 mm
20 mm
Fig. 7.1a
34
500 mm
650 mm
450 mm
200 mm
Fig. 7.1b
■ Class 2
■ Subclass 1
(Fig. 7.1b)
Gas connection made using ri-
gid or exible metal pipe.
Page 35

A
B
C
FITTING THE ADJUSTABLE FEET
The adjustable feet must be tted to the
base of the cooker before use (g. 7.2).
Rest the rear of the cooker on a piece of
the polystyrene packaging exposing the
base for the tting of the feet.
Fit the 4 legs by screwing them tight into
the support base as shown in gure 7.3.
LEVELLING THE COOKER
The cooker may be levelled by screwing
the lower ends of the feet IN or OUT (g.
7.4).
Fig. 7.4
BACKGUARD (SUPPLIED WITH
SOME MODELS ONLY)
Before installing the cooker, assemble the
backguard “C” (g. 7.5).
• The backguard “C” can be found pa-
cked at the rear of the cooker.
• Before assembling remove any protective lm/adhesive tape.
• Remove the two spacers “A” and the
screw “B” from the rear of the cooktop.
• Assemble the backguard as shown
in gure 7.5 and x it by screwing the
central screw “B” and the spacers “A”.
SOME MODELS ONLY
Fig. 7.2
Fig. 7.3
Fig. 7.5
35
Page 36

MOVING THE COOKER
WARNING: When raising cooker to upright position always ensure two people carry
out this manoeuvre to prevent damage to the adjustable feet (g. 7.6).
Fig. 7.6
WARNING
Be carefull: do not lift the cooker by the
door handle when raising to the upright
position (g. 7.7).
Fig. 7.7
36
WARNING
When moving cooker to its nal position DO NOT DRAG (g. 7.8).
Lift feet clear of oor (g. 7.6).
Fig. 7.8
Page 37

VENTILATION REQUIREMENTS
The appliance must be installed in compliance with applicable local regulations concerning ventilation and the evacuation of exhaust gases.
Intensive and prolonged use may require extra ventilation, e.g. opening a window,
or more efcient ventilation increasing the mechanical suction power if this is tted.
CHOOSING SUITABLE SURROUNDINGS
The room where the gas appliance is to be installed must have a natural ow of air so that
the gas can burn (in compliance with applicable local regulations).
The ow of air must come directly from one or more openings made in the outside walls
with a free area of at least 100 cm2 (or refer to applicable local regulations).
The openings should be near the oor and preferably on the side opposite the exhaust for
combustion products and must be so made that they cannot be blocked from either the
outside or the outside.
When these openings cannot be made, the necessary air can come from an adjacent room
which is ventilated as required, as long as it is not a bed room or a danger area (in compliance with applicable local regulations).
In this case, the kitchen door must allow the passage of the air.
DISCHARGING PRODUCTS OF COMBUSTION
Extractor hoods connected directly to the outside must be provided, to allow the products
of combustion of the gas appliance to be discharged (Fig. 7.9).
If this is not possible, an electric fan may be used, attached to the external wall or the window; the fan should have a capacity to circulate air at an hourly rate of 3-5 times the total
volume of the kitchen (Fig. 7.10).
The fan can only be installed if the room has suitable vents to allow air to enter, as descri-
bed under the heading “Choosing suitable surroundings”.
Extractor hood
for products of
combustion
Fig. 7.9
Air vent
Electric fan to
extract products
of combustion
H min 650 mm
Air vent
Fig. 7.10
37
Page 38

GAS SECTION
8
GAS INSTALLATION REQUIREMENTS
Important !
• The walls adjacent to the cooker must be of heat-resistant material.
• Before installation, make sure that the local distribution conditions (gas type
and pressure) and the adjustment of this appliance are compatible. The appliance adjustment conditions are given on the plate or the label.
• This appliance must be installed and serviced only by a suitably qualied, registered installer. The installer shall refer to the local standards in force.
• Failure to install the appliance correctly could invalidate any manufacturer’s
warranty.
This appliance is supplied for use on Natural gas or LPG (check the gas regulation label
attached on the appliance).
• Appliances supplied for use on Natural gas: they are adjusted for this gas only and
cannot be used on any other gas (LPG) without modication. The appliances are ma-
nufactured for conversion to LPG.
• Appliances supplied for use on LPG: they are adjusted for this gas only and cannot be
used on any other gas (Natural gas) without modication. The appliances are manu-
factured for conversion to Natural gas.
If the Natural gas/LPG conversion kit is not supplied with the appliance this kit can be purchased by contacting the After-Sales Service.
38
Page 39

CONNECTING THE APPLIANCE TO THE GAS SUPPLY
The gas connection must be carried out by an authorised person according to the relevant
standards.
Ensure that the room in which the cooker is to be installed is adequately ventilated, in compliance with applicable regulations.
• Connect the cooker to the gas mains utilizing rigid or exible pipes.
• The gas supply is connected at the rear of the cooker to the right or left terminal of the
gas inlet pipe (Fig. 8.1a). The connection pipe must not cross the rear of the appliance.
• The unused inlet pipe must be closed off with the cap and sealing washer supplied
(Fig. 8.1b).
Plug
Fig. 8.1a
Fitting the plug on the unused
terminal of the gas inlet pipe
Right or left
inlet pipe
Manifold male
pipe tting
Sealing
washer (#)
Plug (#)
(#) Already tted on the right or
left inlet pipe
1/2” G cylindrical
(ISO 228-1) male
1/2” G cylindrical
(ISO 228-1) female
Fig. 8.1b
39
Page 40

POSSIBLE GAS CONNECTIONS
GAS CONNECTION WITH A RUBBER HOSE
Imporant!
A rubber hose connection shall only be made if permitted by the applicable local
regulations.
The gas connection is made up of:
• the terminal tting of the inlet pipe (right-hand or left-hand);
• sealing washer;
• the appropriate hose holder (for Natural gas or LPG). If not supplied with the appliance
it can be purchased by contacting the After-Sales Service.
Connecting the cooker to Natural gas
1. If not already tted, t the Natural gas hose holder on the inlet pipe, making sure that
you place the sealing washer between them (as shown in Fig. 8.2).
2. Connect the cooker to the gas supply using a suitable rubber hose (internal diameter
15 mm).
The hose must comply with the applicable local regulations and be of the correct con-
struction for the type of gas being used.
3. Make sure that the hose is tightly and securely tted at both ends.
4. Use a standard hose clamp (not supplied) to fasten the hose.
Connecting the cooker to LPG
1. If not already tted, t the LPG hose holder on the inlet pipe, making sure that you
place the sealing washer between them (as shown in Fig. 8.2).
2. Connect the cooker to the gas supply using a suitable rubber hose (internal diameter
6 mm).
The hose must comply with the applicable local regulations and be of the correct con-
struction for the type of gas being used.
3. Make sure that the hose is tightly and securely tted at both ends.
4. Use a standard hose clamp (not supplied) to fasten the hose.
5. Install a gas pressure regulator.
Important!
To comply with applicable local regulations, a gas pressure regulator (conforming
to the local regulations in force) must be installed when connecting the cooker to an
LPG cylinder.
When connecting the cooker to the gas supply with a rubber hose, make sure that
• the hose is as short as possible, without twists or kinks.
• the hose is not longer than 750 mm (or refer to applicable local regulations) and does
not come into contact with sharp edges, corners or moving parts. Use a single rubber
hose only; never connect the appliance with more than one rubber hose.
• the hose is not under tension, twisted, kinked, or too tightly bent, neither while the
appliance is in use nor while it is being connected or disconnected.
• the hose does not come into contact with any part of the cooker with a surface tempe-
rature of 70°C or above (or refer to applicable local regulations).
• the hose is not subject to excessive heat by direct exposure to ue products or by
contact with hot surfaces.
• the hose can easily be inspected along its entire length to check its condition.
40
Page 41

• the hose is replaced at the printed due date or if it shows signs of wear or damage, and
replaced regardless of its condition after a maximum of three years.
• you inform the customer that the gas cylinder valve or the gas supply valve immedia-
tely by the cooker should be closed when the cooker is not in use.
• you inform the customer that the hose should not be subjected to corrosion by acidic
cleaning agents.
After connecting the cooker to the gas supply, make sure that you
• check that the connections are correctly sealed using a soapy solution, but never a
naked ame.
• check whether the injectors are correct for the type of gas being used. If not, follow the
instructions under “GAS MAINTENANCE”.
• replace the sealing washer/s on the slightest sign of deformation or imperfection. The
sealing washer/s is/are the part/s which guarantees a good seal in the gas connection.
• use two spanners when tting the hose holder (Fig. 8.2).
Note: if not already tted on the inlet pipe, the hose holders are supplied
with the product in a separate kit; if not supplied with the appliance
(Important: to be used ONLY IF PERMITTED by the local applicable regulations)
(#) If not already tted on the inlet pipe,
it is supplied with the appliance in a
separate kit
Rubber hose (not supplied)
for LPG connection
(internal diameter 6 mm)
Gas connection with rubber hose holders
they can be purchased by contacting the After-Sales Service.
Inlet pipe
Manifold
male
pipe tting
Sealing
washer (#)
1/2” G cylindrical
(ISO 228-1) female
Hose holder
for LPG
Hose clamp
(not supplied)
1/2” G cylindrical
(ISO 228-1) male
1/2” G cylindrical
(ISO 228-1) female
Hose holder
Natural gas
Hose clamp
(not supplied)
Rubber hose (not supplied)
for Natural gas connection
(internal diameter 15 mm)
for
LPG NG
Fig. 8.2
41
Page 42

GAS CONNECTION WITH RIGID PIPES OR A FLEXIBLE PIPE
The gas connection is made up of:
• the terminal tting of the inlet pipe (right-hand or left-hand);
• sealing washer.
Important!
If tted, remove the hose holder from the terminal tting of the inlet pipe.
When connecting the cooker to the gas supply with rigid pipes or a exible pipe,
make sure that
• you use rigid pipes or a exible pipe complying with applicable local regulations. The
exible pipe shall be of the correct construction for the type of gas being used.
• if compression ttings are used, you tighten them rmly using two spanners (Fig. 8.3).
• the connection with rigid metal pipes does not cause stress or pressure to the gas
piping.
• the exible pipe is not under tension, twisted, kinked or too tightly bent, neither while
the appliance is in use nor while it is being connected or disconnected.
• the exiple pipe does not exceed 2000 mm in length (or refer to applicable local regulations) and does not come into contact with sharp edges, corners or moving parts.
Use a single exible pipe only; never connect the cooker with more than one exible
pipe.
• the exible pipe can easily be inspected along its entire length to check its condition; if
it has an expiry date, it should be replaced before that date.
• if using a exible pipe which is not entirely made of metal, make sure that it does not
come into contact with any part of the cooker with a surface temperature of 70°C or
above (or refer to applicable local regulations).
• the hose is not subject to excessive heat by direct exposure to ue products or by
contact with hot surfaces.
• the rigid or exible pipe is replaced if it shows signs of wear or damage.
• a gas pressure regulator, in compliance with the applicable local regulations, is installed when connecting to an LPG cylinder.
• you inform the customer that the cylinder valve or the supply valve immediately by the
appliance should be closed when the cooker is not in use.
• you inform the customer that the rigid or exible pipe should not be subjected to corrosion by acidic cleaning agents.
After connecting the cooker to the gas supply, make sure that you
• check that the connections are correctly sealed using a soapy solution, but never a
naked ame.
• check whether the injectors are correct for the type of gas being used. If not, follow the
instructions under “GAS MAINTENANCE”.
• replace the sealing washer/s on the slightest sign of deformation or imperfection. The
sealing washer/s is/are the part/s which guarantee/s a good seal in the gas connection.
• use two spanners when connecting the rigid or exible pipe (Fig. 8.3).
42
Page 43

Gas connection with rigid or exible pipe
Note: if already tted on the inlet pipe,
remove the rubber hose holder
Inlet pipe
Manifold
male
pipe tting
Sealing
washer (#)
(#) If not already tted on the inlet pipe,
it is supplied with the appliance in a
separate kit
1/2” G cylindrical
(ISO 228-1) female
1/2” G cylindrical
(ISO 228-1) male
1/2” G cylindrical
(ISO 228-1) female
Flexible pipe
(not supplied)
Rigid pipe
(not supplied)
Fig. 8.3
43
Page 44

GAS MAINTENANCE
TABLE FOR THE CHOICE OF THE INJECTORS - Cat: II 2H3+
LPG
Nominal
BURNERS
Auxiliary (A) 1,00 0,30 50 72 (X)
Semi-rapid (SR) 1,75 0,45 65 97 (Z)
Rapid (R) 3,00 0,75 85 115 (Y)
Triple-ring (TR) 3,50 1,50 95 135 (T)
AIR VENT NECESSARY FOR GAS COMBUSTION = (2 m3/h x kW)
BURNERS Air necessary for combustion [m
Auxiliary (A) 2,00
Semi-rapid (SR) 3,50
Rapid (R) 6,00
Triple-ring (TR) 7,00
Power
[kW]
Reduced
Power
[kW]
G30 28-30 mbar
G31 37 mbar
Ø injector
[1/100 mm]
Natural Gas
G20 20 mbar
Ø injector
[1/100 mm]
3
/h]
LUBRICATION OF THE GAS TAPS
In case of difculty in the gas taps operation, call Service.
IMPORTANT
All intervention regarding installation maintenance of the appliance must be fullled
with original factory parts.
The manufacturer declines any liability resulting from the non-compliance of this
obligation.
44
Page 45

REPLACEMENT OF THE INJECTORS
Select the injectors to be replaced according to the “Table for the choice of the
injectors”.
If the injectors are not supplied they can
be obtained from the “Service Centre”.
REPLACEMENT OF THE INJECTORS OF THE COOKTOP BURNERS
To replace the injectors proceed as follows:
• Remove pan supports and burners
from the cooktop.
• Using a wrench, substitute the nozzle
injectors “J” (gs. 8.4, 8.5) with those
most suitable for the kind of gas for
which it is to be used.
Auxiliary,
semi-rapid
and rapid
burners
Fig. 8.4
Triple-ring
burner
J
The burners are conceived in such a
way so as not to require the regulation
of the primary air.
ADJUSTING OF THE MINIMUM OF
THE TOP BURNERS
In the minimum position the ame must
have a length of about 4 mm and must re-
main lit even with a quick turn from the maximum position to that of minimum.
The ame adjustment is done in the following way:
• Turn on the burner.
• Turn the tap to the MINIMUM position.
• Take off the knob.
• With a thin screwdriver turn the screw
”
until adjustment is correct (g. 8.6).
“F
Normally for LPG (G30/G31), tighten up
the regulation screw.
J
Fig. 8.5
F
Fig. 8.6
45
Page 46

ELECTRICAL SECTION
9
IMPORTANT: The cooker must be installed in accordance with the manu-
facturer’s instructions.
Incorrect installation, for which the
manufacturer accepts no responsbility, may cause injury to persons or ani-
mals etc.
GENERAL
• Connection to the mains must be carri-
ed out by qualied personnel in accordance with current regulations.
• The appliance must be connected to
the mains checking that the voltage
corresponds to the value given in the
rating plate and that the electrical ca-
ble sections can withstand the load
specied on the plate.
• The cooker is supplied without a power
supply plug and therefore if you are
not connecting directly to the mains, a
standardized plug suitable for the load
must be tted.
• The plug must be connected to an ear-
thed socket in compliance with safety
standards.
• If the cooker is to be connected directly
to the mains, it must be placed with an
omnipolar switch with minimum opening between the contacts of 3 mm
between the appliance and the mains.
• The power supply cable must not
touch the hot parts and must be posi-
tioned so that it does not exceed 75°C
at any point.
• Once the appliance has been instal-
led, the switch or socket must always
be accessible.
• If the power supply cable is damaged
it must be substituted by a suitable ca-
ble available in the after sales service.
N.B. For connection to the mains, do
not use adapters, reducers or branching
devices as they can cause overheating
and burning.
If the installation requires alterations to the
domestic electrical system, call an expert.
He should also check that the domestic
electrical system is suitable for the power
absorbed by the appliance.
Before effecting any intervention on
the electrical parts of the appliance,
the connection to the network must be
interrupted.
The connection of the appliance to
earth is mandatory.
The manufacturer declines all respon-
sability for any inconvenience resulting from the inobservance of this condition.
46
Page 47

CONNECTION OF THE POWER SUPPLY CABLE
230 V
PE
• Unhook the terminal board cover by inserting a screwdriver into the two hooks “A” (g.
9.1).
• Open the cable gland by unscrewing screw “F” (g. 9.2), unscrew the terminal screws.
• Insert the feeder cable of the suitable section (as described in the next chapter) into
the cable gland.
• Connect the phase, neutral and earth cables to the terminal block according to the
diagram in gure 9.3.
• Pull the feeder cable and block it with cable gland.
• Close the terminal block cover (check the two hooks “A” are correctly hooked).
IMPORTANT: To connect the power supply cable DO NOT unscrew the screws xing
the cover plate behind the terminal block.
WARNING: If the power supply cable is damaged, it must be replaced only by an
authorised service agent in order to avoid a hazard.
FEEDER CABLE SECTION
Type “H05RR-F”
230 Vac or 220-240 Vac 3 x 1,5 mm
(*) Connection possible with plug and outlet
(**) Connection with wall box connection.
2
(*) (**)
F
Fig. 9.1
Fig. 9.2
230 V ac or 220-240 V ac
A
L
N
Fig. 9.3
47
Page 48

Уважаемый покупатель!
Благодарим Вас за то, что Вы отдали предпочтение
нашей продукции.
Цель приведенных ниже правил пользования и
рекомендаций – обеспечение Вашей безопасности, а также
безопасности окружающих. Кроме того, с их помощью Вы
сможете максимально использовать все возможности
духового шкафа.
Храните данное издание: оно может понадобиться
Вам или окружающим в будущем для решения вопросов,
связанных с функционированием оборудования.
Настоящий духовой шкаф должен эксплуатироваться в
полном соответствии со своим назначением, то есть для
приготовления пищи.
Использование оборудования в других целях считается
неправильным и, следовательно, опасным.
Производитель снимает с себя всю ответственность
за повреждения, возникшие вследствие неправильной,
ошибочной или неразумной эксплуатации духового
шкафа.
Прежде чем приступить к установке или эксплуатации данного устройства,
внимательно изучите инструкции.
Установка данного устройства должна осуществляться с соблюдением действующих
норм в хорошо вентилируемом помещении.
Очень важно:
Настоящая плита была спроектирована исключительно как устройство для
приготовления пищи. Использование оборудования в других целях (отопление
помещений) считается неправильным и, следовательно, опасным.
Гарантия на данное оборудование не будет действительной в случае использования
не в домашних условиях.
48
Page 49

ПРИ ПЕРВОМ ИСПОЛЬЗОВАНИИ ДУХОВОГО ШКАФА
Рекомендуем Вам выполнить следующие опе рации:
• Подготовьте к работе внутреннюю полость духовки, обработав боковые
поверхности согласно указаниям, данным в главе «ОЧИСТКА И ТЕХНИЧЕСКОЕ
ОБСЛУЖИВАНИЕ».
• Вставьте решетки и противни.
• Зажгите пустую духовку, и поставьте на максимум. Это позволит устранить смазку
с нагревательных элементов.
• Промойте внутренние поверхности плиты с помощью влажной тряпочки и
нейтрального детергента и вытрите насухо.
ВАЖНЫЕ ПРАВИЛА ПОЛЬЗОВАНИЯ И РЕКОМЕНДАЦИИ
После извлечения устройства из упаковки убедитесь в его целостности. В
случае возникновения каких-либо сомнений не используйте товар и свяжитесь
с Вашим поставщиком. Храните упаковочные материалы (пластиковые пакеты,
полистирольный пенопласт, гвозди, опорные детали и т.п.), представляющие
потенциальную опасность для детей, в недоступном для них месте.
• Не пытайтесь изменить технические характеристики изделия: это опасно.
• Операции по очистке и техническому обслуживанию устройства разрешается
осуществлять только после отключения устройства от питающей электрической сети.
• дотрагиваться до устройства мокрыми или влажными руками или ногами
запрещено;
• использовать устройство без обуви запрещено;
• В случае если Вы решите отказаться от использования данного устройства (или решите
заменить старую модель на новую) мы рекомендуем Вам, перед тем как избавиться
от оборудования, выполнить ряд мер, предусмотренных действующими нормами по
обеспечению безопасности здоровья и предотвращению загрязнения окружающей
среды и направленных на приведение устройства в нерабочее состояние. Кроме того,
необходимо обезвредить элементы оборудования, которые могут стать источниками
опасности для играющих детей.
• По завершении использования убедитесь, что все регуляторы стоят в положении
ВЫКЛ.
• Данное оборудование не предназначено для детских игр.
• Следите за тем, чтобы рядом с устройством не было детей, особенно в процессе
его эксплуатации.
• При использовании прибора детьми, людьми с ограниченными возможностями
необходимо наличие инструктора, контролирующего использование. Инструктор
должен убедиться, что они могут его использовать, не создавая угроз себе и
окружающим.
• Во время и после использования духовки происходит сильное нагревание
некоторых частей. Не дотрагивайтесь до горячих частей. Не дотрагивайтесь до
горячих элементов внутри духового шкафа.
49
Page 50

• Стальные или алюминиевые элементы некоторых устройств покрыты
специальной защитной пленкой.
Перед использованием плиты необходимо аккуратно удалить защитную
пленку.
• ПРЕДУПРЕЖДЕНИЕ: После правильной установки, ваш прибор отвечает всем
требованиям безопасности для этого типа приборов. Однако, необходимо
дополнительно позаботиться о задней и нижней частях прибора, т.к. эти части не
предназначены, чтобы их трогали и могут иметь острые и грубые края о которые
можно пораниться.
• УГРОЗА ВОСПЛАМЕНЕНИЯ! Хранить легковоспламеняющиеся предметы в
духовке или в ящике запрещено.
• Удостоверьтесь что электрические шнуры, от других приборов, находящихся
поблизости, не были прищемлены дверью духовки.
• Не покрывайте стенки духового шкафа алюминиевой фольгой. Не ставьте
противни или поддоны на основание духового шкафа.
• Производитель не несет ответственности за порчу имущества и травмы, вызванные
неправильным или ненадлежащим использованием прибора.
• Некоторые компоненты устройства подлежат переработке. Избавьтесь от них в
соответствии с правилами, действующими в Вашей стране.
• Используйте специальные прихватки и варежки для извлечения решеток и
противней из горячей духовки.
• Не вешайте полотенца и другие вещи на ручки духовки – это может быть
пожароопасно.
• Чистите духовку регулярно и не позволяйте жиру или маслам скапливаться в
духовке или на подносах. Удаляйте засоры, как только они образуются.
• Не вставайте на открытую дверцу духового шкафа.
• Всегда стойте в стороне, когда открываете шкаф, чтобы дать пару и горячему
воздуху выйти из духовки перед тем, как вытащить противень с едой.
• Безопасное обращение с продуктами: не оставляйте продукты питания
на долгое время в духовке до и после приготовления. Это поможет избежать
размножения организмов, которые могут вызвать пищевое отравление.
Обращайте на это особое внимание в теплое время года.
• Этот прибор был разработан только для домашнего использования.
• Если шнур питания поврежден, он должен быть заменен квалифицированным
специалистом.
50
Page 51

РАБОЧАЯ ПОВЕРХНОСТЬ
1
Рис. 1.1
Описание кухонной плиты
1. Горелка малой мощности (A) 1,00 кВт
2. Горелка средней мощности (SR) 1,75 кВт
3. Горелка большой мощности (R) 3,00 кВт
4. Тройная коронарная горелка (TR) 3,50 кВт
22
ПРИМЕЧАНИЕ:
• Зажигание от электрической искры осуществляется с помощью ручки.
• Все горелки плиты оснащены предохранительными клапанами (газ-контроль),
обеспечивающими перекрытие потока газа, в случае если потухло пламя.
Внимание:
Газовое оборудование является источником влаги и тепла в помещении, где оно
установлено. Убедитесь, что данное помещение хорошо проветривается.
Внимание:
При длительном использовании газового оборудования может потребоваться
дополнительная вентиляция (откройте окно или увеличьте мощность вытяжки)..
51
Page 52

ПЕРЕДНЯЯ ПАНЕЛЬ УПРАВЛЕНИЯ
9
2
Рис. 2.1
P
A
U
T
O
ОПИСАНИЕ ПАНЕЛИ УПРАВЛЕНИЯ
1. Ручка передней правой горелки
2. Ручка задней правой горелки
3. Ручка центральной горелки
4. Ручка задней левой горелки
5. Ручка передней левой горелки
6. Ручка термостата духовки
7. Ручка переключателя режимов духовки
8. Электронный программатор
Индикаторная лампочка
9. Красная лампочка термостата духовки
12345678
Примечание:
Духовой шкаф оборудован охлаждающим вентилятором для достижения оптимальной
эффективности управления и для охлаждения поверхностей духового шкафа. Во
время работы духового шкафа охлаждающий вентилятор включается / выключается
в зависимости от температуры нагрева. Вентилятор может работать даже после
выключения духового шкафа на протяжении некоторого времени, которое зависит от
уровня нагрева и продолжительности приготовления пищи.
52
Page 53

ИСПОЛЬЗОВАНИЕ РАБОЧЕЙ ПОВЕРХНОСТИ
3
ГАЗОВЫЕ ГОРЕЛКИ
Подача газа в горелки регулируется с
помощью клапанного крана, управление
которым осуществляется с помощью
ручки (рис. 3.1).
Команды на приборной панели
изображены с помощью следующих
символов:
– символ
кран закрыт
– символ
– символ
√ Для установки сниженной подачи
поверните ручку дальше до
изображения маленького пламени.
√ Максимальная подача
предусмотрена для быстрого
доведения до кипения жидкостей, в
то время как сниженная подача для
медленного подогрева ния блюд
или для кипения.
√ Все режимы работы должны
выбирать ся при условии, если
ручка настрой ки находится между
максимальным и минимальным
значениями, и ни в коем случае не
между максимальным значением и
точкой закрытия.
макс. раскрытие или
макс. подача
мин. раскрытие или
мин. подача
Рис. 3.1
Рис. 3.2
Внимание: В процессе ксплуатации
варочные зоны на рабочей
оверхности сильно нагреваются. Не
подпускайте детей близко к плите.
ВНИМАНИЕ: при отключении
плиты установите ручки кранов
в положение ЗАКРЫТО, а также
перекройте центральный кран
подачи газа из распределительной
сети или кран на газовом баллоне.
53
Page 54

ЗАЖИГАНИЕ ГОРЕЛОК С
ПРЕДОХРАНИТЕЛЬНЫМИ
КЛАПАНАМИ
Для зажигания горелки
1. Поверните ручку крана против
часовой стрелки и установите в
положение максимальной подачи,
нажмите на нее и удерживайте в таком
положении некоторое время: это
позволит Вам включить зажигание.
При отсутствии электрического тока
поднесите источник огня к горелке.
2. После того как горелка зажжется, не
отпускайте ручку сразу, подождите 10
секунд (время активизации клапана).
3. С помощью крана отрегулируйте
подачу газа по своему желанию.
В случае если по какой-то причине пламя
горелки погаснет, предохранительный
клапан автоматически перекроет подачу
газа.
Для восстановления работы необходимо
установить ручку в положение “ ”,
подождать примерно 1 минуту и повторить
вышеописанные операции по зажиганию
горелки.
В случае если местные условия подачи
газа затрудняют зажигание горелки
с помощью ручки, установленной в
положение максимальной подачи,
рекомендуется повторить все указанные
операции, установив ручку в положение
минимальной подачи.
ВЫБОР ГОРЕЛКИ
Символы, изображенные в верхней
части приборной панели, указывают на
связь между ручкой и горелкой.
В зависимости от диаметра и мощности
выбирается нужная горелка.
Для справки: горелки и кастрюли
используются согласно информации,
представлен¬ной ниже:
Диаметр кастрюль, которые могут
быть использованы на горелках
ГОРЕЛКИ ДИАМЕТР ДИАМЕТР
Малой
мощности
Средней
мощности
Малой
мощности
Тройная
оронарная
Не использовать кастрюли с
вогнутой и выпуклой поверхностью
(*) Приготовление блюд с помощью гриля
в мелкой посуде, минимальный диаметр
посуды - 6 см
12 см (*) 14 см
16 см 24 см
24 см 26 см
26 см 28 см
РЕШЕТКА ДЛЯ ПОСУДЫ МАЛОГО
ДИАМЕТРА (Рис. 3.3)
Устанавливается на решетку
дополнительной горелки (меньшей
по размерам) при использовании
посуды с дном малого диаметра для
предотвращения их опрокидывания.
Рис. 3.3
54
Рис. 3.4
Важно, чтобы диаметр кастрюли
соответс¬твовал производительности
горелки, это позволит не использовать
горелки в режиме высокой подачи и тем
самым избежать бессмысленной траты
топлива.
Выбрав большую горелку для кастрюли
маленького размера, Вы не сможете
быстрее довести до кипения жидкость,
поскольку скорость поглощения тепла
зависит от основания и от поверхности
кастрюли.
Page 55

Как пользоваться духовым шкафом
4
Внимание: Во время работы дверца
духового шкафа сильно нагревается.
Не подпускайте детей близко к
духовому шкафу.
Только для моделей со стеклянной
крышкой:
Важное замечание: В процессе
использования духовки необходимо,
чтобы крышка плиты была открыта.
ОБЩИЕ ХАРАКТЕРИСТИКИ
Как следует из названия Вам предлагается
духовой шкаф, обладающий особенными
эксплутационными характеристиками.
В зависимости от Ваших требований,
Вы можете выбрать один из 7 типов
приготовления пищи.
С помощью регулятора можно выбрать
один из четырех режимов приготовления
пищи в духовом шкафу, в зависимости
от того, какие из трех нагревательных
элементов включены:
• Нижний нагревательный элемент 1750 Вт
• Верхний нагревательный элемент 1200 Вт
• Нагревательный элемент гриля 2400 Вт
• Круговой элемент 2500 Вт
ПРИМЕЧАНИЕ:
Перед началом эксплуатации
рекомендуется поставить духовой
шкаф на максимальную температуру
(установив регулятор на 250), и дать ему
поработать в течение 60 минут в режиме
и Это позволит устранить следы
смазки с нагревательных элементов.
Запустите данную операцию еще на 15
минут для очистки гриля, руководствуясь
при этом указаниями, изложенными в
главах «ПРИГОТОВЛЕНИЕ НА ГРИЛЕ»
и «ГРИЛЬ С КОНВЕКЦИЕЙ».
ПРИНЦИПЫ РАБОТЫ
В МНОГОФУНКЦИОНАЛЬНОМ духовом
шкафу имеются следующие режимы
подогревания и приготовления пищи:
a. Классический нагрев
Тепло вырабатывается верхним
и нижним нагревательным
элементом.
b. Принудительная конвекция
Вентилятор пропускает воздух
внутри духового шкафа через
круговые спирали, обеспечивая
тем самым быстрое и равномерное
приготовление продуктов.
Предусмотрено одновременное
приготовление нескольких блюд.
c. Полупринудительная конвекция
Тепло вырабатывается верхним и
нижним нагревательным элементом
и распределяется внутри духового
шкафа с помощью вентилятора.
d. Гриль
Тепло излучается нагревательным
элементом гриля.
e. Гриль с конвекцией
Одновременная работа
нагревательного элемента гриля и
вентилятора.
f. Режим размораживания
Продукты питания размораживается
с помощью вентилятора, без
активизации режима подогревания.
ПРЕДУПРЕЖДЕНИЕ: Дверь горячая,
используйте ручку. Во время работы
бытовой прибор нагревается. Будьте
осторожны, не дотрагивайтесь до
горячих элементов внутри духовки.
55
Page 56

Рис. 4.2Рис. 4.1
РЕГУЛЯТОР (Рис.4.2)
Для включения поверните ручку переключателя режимов духового шкафа, установив
ее в нужное положение, и задайте необходимую температуру с помощью регулятора.
Для установки температуры поверните регулятор так, чтобы индикатор на ручке
указывал на необходимую температуру.
Автоматическое включение / выключение нагревательных элементов осуществляется
также с помощью регулятора.
Индикатор, расположенный на панели управления, показывает состояние
нагревательных элементов.
РУЧКА ПЕРЕКЛЮЧАТЕЛЯ (Рис. 4.1)
Для выбора следующих режимов работы духового шкафа поверните ручку по часовой
стрелке:
ОСВЕЩЕНИЕ ДУХОВОГО ШКАФА
Вы сможете зажечь лампочку духового шкафа, установив ручку переключателя
режимов в данное положение. При приготовлении лампочка всегда горит.
ТРАДИЦИОННОЕ ПРИГОТОВЛЕНИЕ КОНВЕКЦИЕЙ
Зажигаются нижний и верхний нагревательные элементы.
Тепло распространяется методом естественной конвекции. Предусмотрена
возможность регулирования температуры с помощью регулятора в диапазоне от
50°С до - максимальной.
Перед тем как помещать продукты в духовой шкаф, рекомендуется нагреть его до
нужной температуры.
Рекомендовано для: продуктов, требующих одинаковой степени приготовления
внутри и снаружи, например, для жаркого, свиных ребрышек, безе и т.п.
56
Page 57

ПРИГОТОВЛЕНИЕ НА ГРИЛЕ
Работает нагревательный элемент.
Дверца духового шкафа должна быть закрыта, а регулятор установлен в положение
от 50°С до 225°С.
Для получения более подробной информации по использованию режима смотрите
главу «ИСПОЛЬЗОВАНИЕ ГРИЛЯ».
В процессе приготовления на гриле дверца духового шкафа должна быть
закрытой.
Максимальное время приготовления на гриле– 30 минут.
Внимание: при выборе режима приготовления на гриле дверца духового шкафа
нагревается. Не подпускайте детей к духовому шкафу.
Рекомендовано для: интенсивного зажаривания на гриле; подрумянивания,
получения золотой корочки, обжаривания в сухарях или в тёртом сыре, приготовления
тостов и т.п.
РАЗМОРАЖИВАНИЕ ПРОДУКТОВ
Включается только вентилятор внутри духового шкафа.
Для выбора данного режима регулятор должен быть установлен в положение “
его установка в другие положения не принесет желаемого результата.
Размораживание осуществляется с помощью простой вентиляции, без подогревания.
Рекомендовано для:
быстрого размораживания продуктов; для размораживания одного килограмма
требуется приблизительно 1 час. Время работы зависит от количества и типа
продукта питания, который предстоит разморозить.
”, т.к.
ПРИГОТОВЛЕНИЕ ГОРЯЧИМ ВОЗДУХОМ
Включаются круговой элемент и вентилятор.
Тепло распространяется методом принудительной конвекции. Температура
регулируется с помощью регулятора в диапазоне от 50°С до максимума.
Предварительно нагревать духовой шкаф необязательно.
Рекомендовано для: продуктов питания, которые должны быть хорошо прожарены
снаружи, но сочными и мягкими внутри; например, для лазаньи, мяса ягненка,
ростбифов, рыбы целиком и т.п.
57
Page 58

ГРИЛЬ С КОНВЕКЦИЕЙ
Одновременная работа гриля и вентилятора обеспечивает равномерное
распределение тепла внутри духового шкафа.
Температура регулируется с помощью соответствующего регулятора в диапазоне от
50 до 225°С.
Требуется предварительный разогрев духового шкафа приблизительно в течение 5
минут.
Для получения информации о правильном использовании режима смотрите главу
«ПРИГОТОВЛЕНИЕ НА ГРИЛЕ И ЗАЖАРИВАНИЕ».
В процессе приготовления на гриле дверца духового шкафа должна быть
закрытой.
Максимальное время приготовления на гриле– 30 минут.
Внимание: при выборе режима приготовления на гриле дверца духового шкафа
нагревается. Не подпускайте детей к духовому шкафу.
Рекомендовано для: приготовления на гриле, если требуется быстрое
подрумянивание снаружи, для того чтобы удержать мясной соус внутри, например,
для бифштексов из телятины, отбивных, гамбургеров и т.п.
СОХРАНЕНИЕ ТЕМПЕРАТУРЫ ПОСЛЕ ПРИГОТОВЛЕНИЯ ИЛИ
МЕДЛЕННОЕ РАЗОГРЕВАНИЕ ПРОДУКТОВ ПИТАНИЯ
Одновременно работают последовательно соединенные верхний и круговой
нагревательные элементы, а также вентилятор.
Тепло распределяется методом принудительной конвекции, в основном со стороны
верхнего нагревательного элемента.
Температура регулируется с помощью регулятора в диапазоне от 50 до 140°С.
Рекомендовано для: сохранения тепла приготовленных продуктов питания и
медленного разогревания уже приготовленных продуктов питания.
ПРИГОТОВЛЕНИЕ КОНВЕКЦИЕЙ С ВЕНТИЛЯЦИЕЙ
Одновременная работа верхнего и нижнего нагревательных элементов и вентилятора.
Поток тепла, направленный вверх и вниз, распределяется методом конвекции с
вентиляцией. Температура устанавливается с помощью регулятора в диапазоне от
50°С до максимума.
Рекомендовано для: больших порций продуктов, требующих равномерного
приготовления внутри и снаружи; например, для жареных рулетов, индюка, ножек,
пирогов и т.д.
58
Page 59

РЕКОМЕНДАЦИИ ПО
ПРИГОТОВЛЕНИЮ
СТЕРИЛИЗАЦИЯ
Стерилизация продуктов питания с целью
их последующего консервирования в
герметичных банках осуществляется в
следующем порядке:
a. Установите переключатель в
положение
b. Установите регулятор в положение
185°С и оставьте духовой шкаф для
предварительного разогрева.
c. Налейте горячей воды в противень.
d. Установите банки на противень
так, чтобы они не соприкасались
друг с другом, и, промыв водой
крышки, закройте духовой шкаф
и установите ручку регулятора в
положение 135°С.
Когда начнется процесс стерилизации,
т.е. когда внутри банок начнут появляться
пузырьки, выключите духовой шкаф и
оставьте банки остывать.
.
ОДНОВРЕМЕННОЕ ПРИГОТОВЛЕНИЕ
РАЗЛИЧНЫХ БЛЮД
Выбрав с помощью переключателя
режим и , Вы сможете
одновременно приготовить несколько
различных блюд.
Предусмотрена возможность
одновременного приготовления таких
продуктов, как рыба, мясо и пирог. При
этом смешение ароматов и вкусовых
оттенков полностью исключено.
Небольшие меры предосторожности,
которые рекомендуется соблюдать:
• Необходимо установить значения
температуры для всех блюд,
несущественно отличающиеся
друг от друга: максимальная
температурная разница не должна
превышать 20-25°С.
• Блюда ставятся в духовой шкаф
в разное время, в зависимости
от длительности приготовления
каждого из них. Результат очевиден:
этот способ приготовления позволит
Вам сэкономить время и силы.
ВОССТАНОВЛЕНИЕ
Установите переключатель в положение
а ручку регулятора в положение
150°С.
Хлеб станет душистым, если сбрызнуть
его водой и поставить в духовой шкаф
на 10 минут.
ЖАРКОЕ
Для того чтобы получить классическое
жаркое, хорошо и равномерно
прожаренное, необходимо знать
следующее:
• рекомендуется поддерживать
температуру в диапазоне от 180°С
до 200°С,
• время приготовления зависит
от количества и типа продуктов
питания.
ПРИГОТОВЛЕНИЕ НА ГРИЛЕ И
ЗАЖАРИВАНИЕ
Выбор с помощью переключателя
режимов позволит приготовить продукты
на гриле (гриль + конвекция), поскольку
горячий воздух равномерно обволакивает
приготавливаемый продукт.
Установите регулятор в положение от
50°С до 225°С. После предварительного
прогрева просто положите продукт на
решетку гриля.
Закройте дверцу и оставьте духовой
шкаф до завершения процесса
приготовления на гриле.
Перед завершением приготовления
добавьте несколько тонких ломтиков
сливочного масла, это позволит
подзолотить корочку, образовавшуюся в
процессе зажаривания.
В процессе приготовления на гриле
дверца духового шкафа должна быть
закрытой.
59
Page 60

Максимальное время приготовления на
гриле– 30 минут.
Внимание: при выборе режима
приготовления на гриле дверца
духового шкафа нагревается. Не
подпускайте детей к духовому шкафу.
ПРИМЕРЫ ПРИГОТОВЛЕНИЯ
Ниже приводятся значения температуры
исключительно для информации, поскольку
в действительности температура зависит
от качества и объема продукта.
Рекомендуется пользоваться сковородами,
подходящими для приготовления пищи в
духовке, а также изменять температуру в
духовке в процессе приготовления.
ИСПОЛЬЗОВАНИЕ ГРИЛЯ
Закрыв дверцу, оставьте гриль на 5
минут для предварительного прогрева.
Поставьте в духовой шкаф продукты,
которые предстоит готовить, установив
решетку как можно ближе к грилю.
В процессе приготовления на гриле
дверца духового шкафа должна быть
закрытой.
Максимальное время приготовления на
гриле– 30 минут.
Внимание: при выборе режима
приготовления на гриле дверца
духового шкафа нагревается. Не
подпускайте детей к духовому шкафу.
ПРИГОТОВЛЕНИЕ В ДУХОВКЕ
Прежде чем ставить продукты в духовку,
необходимо предварительно разогреть
ее до нужной Вам температуры.
После того, как внутри духовки будет
достигнута желаемая температура,
ставьте продукты, затем проверьте
время приготовления, и выключите
духовку за 5 минут до окончания
теоретического времени приготовления,
для того чтобы блюдо смогло забрать
накопленное тепл.
БЛЮДА Температура
Лазанья, запеченная в духовке 220°
Паста, запеченная в духовке 220°
Пицца с анчоусами 225°
Рис по-креольски 225°
Картофель в молоке 200°
Фаршированные помидоры 225°
Сырное суфле 200°
Картофельное суфле 200°
Жаркое из телятины 200°
Котлетки из телятины на гриле 225°
Куриная грудка в помидорах 200°
Курица на гриле – жаркое из курицы
Котлеты из говядины 200°
Котлеты из телятины 200°
Шашлык по-турецки 225°
Ростбиф 220°
Филе камбалы 200°
Ароматная европейская мерлуза 200°
Сладкое кольцо (пирожное) 180°
Сливовый пирог 200°
Кексы с конфитюром 225°
Бисквитный торт 225°
Сладкое слоеное пирожное 200°
Торт«Маргаритка» 220°
220°
60
Page 61

Электронный программатор
5
Электронный программатор – это устройство, объединяющее в себе следующие
функции:
• Часы на 24 часа на светящемся дисплее,
• Таймер (до 23 часов и 59 минут),
• Программа автоматического приготовления в духовом шкафу,
• Программа полуавтоматического приготовления в духовом шкафу.
Описание кнопок:
Таймер
Время приготовления
Время окончания приготовления
Ручная настройка и сброс
заданных программ
Увеличение числа на цифровом
дисплее
Уменьшение числа на цифровом
дисплее.
Описание светящихся символов:
AUTO - мигающий символ - программатор
работает в автоматическом режиме, но
программа не установлена
- горящий, немигающий символ -
AUTO
программатор работает в автоматическом
режиме, программа установлена
Запущен режим автоматического
приготовления
Включен таймер
и AUTO - мигающие символы –
Ошибка программирования
(период между временем начала
и окончания приготовления
превосходит 1 день).
Примечание:
Выберите режим с помощью
соответствующих кнопок и через 5 секунд
установите необходимое время, используя
кнопки / (управление одной рукой).
Все значения программатора и программы
обнуляются и удаляются при каждом
отключении от электропитания.
Рис. 5.2Рис. 5.1
61
Page 62

ЭЛЕКТРОННЫЕ ЧАСЫ (Рис. 5.2)
Программатор оснащен электронными
часами со светящимися цифрами, на
которых указываются часы и минуты.
При подключении духового шкафа и
после прерывания питания на дисплее
программатора мигают три нуля.
Для установки времени необходимо
нажать кнопку
точное время с помощью кнопки
(Рис. 5.2).
Другой метод предполагает одновременное
нажатие двух кнопок
параллельное использование
Примечание: Настройка часов ведет к
сбросу заданных программ.
, а затем установить
или
и
или .
ОБЫЧНОЕ ПРИГОТОВЛЕНИЕ
БЕЗ ИСПОЛЬЗОВАНИЯ
ПРОГРАММАТОРА
Для эксплуатации духового шкафа в ручном
режиме, т.е. без помощи программатора,
необходимо отменить режим AUTO
нажатием на кнопку
погаснет, а появится символ
Внимание: Если надпись AUTO не
мигает (это означает, что программа
приготовления была уже установлена),
нажатие кнопки
программу и перейти к ручному режиму
управления.
Если духовой шкаф включен, его
выключение осуществляется вручную.
(надпись AUTO
- Рис.5.3).
позволяет удалить
ЭЛЕКТРОННЫЙ ТАЙМЕР
Программа работы таймера включает
только активизацию звуковой сигнализации
по истечении установленного периода
времени, максимальная протяженность
которого может быть 23 часа 59 минут.
Если мигает надпись AUTO, нажмите
кнопку
Для регулирования времени нажмите
кнопку
или до тех пор, пока на циферблате
не появится нужное время (Рис. 5.4).
По завершении установки на дисплее
вновь появится время и символ
По завершении установки на экране
появится текущее время и высветится
символ
По истечении установленного временного
периода символ
звуковая сигнализация, которая
отключается по истечении 7 минут или
после нажатия на любую клавишу (кроме
кнопок
времени на экране вновь отобразится
время.
.
, а затем нажимайте на кнопку
.
.
погаснет, и включится
/ ). По истечении некоторого
УСТАНОВКА ЧАСТОТЫ ПОДАЧИ
ЗВУКОВОГО СИГНАЛА
Предусмотрена возможность установки
одного из трех тонов сигнала с помощью
кнопки
текущего времени.
при отображении на экране
62
Рис. 5.4Рис. 5.3
Page 63

АВТОМАТИЧЕСКОЕ
ПРИГОТОВЛЕНИЕ
Для приготовления пищи в духовом шкафу в
автоматическом режиме, необходимо выполнить
следующее:
1. Задайте время приготовления.
2. Задайте время окончания приготовления.
3. Задайте температуру и программу
приготовления в духовом шкафу.
Данные операции выполняются в следующем
порядке:
1. Задайте время приготовления, нажав
на кнопку
для увеличения или на кнопку
уменьшения временного периода (Рис.5.5).
Появятся надпись AUTO и символ
2. Для установки времени окончания
приготовления нажмите на кнопку
(появится время приготовления, уже
прибавленное к времени на часах) и кнопки
(Рис. 5.6).
В случае если вы пропустите необходимое
время, вы можете вернуться, нажав на
кнопку
По завершении установки исчезнет символ
. Если после установки на дисплее
мигает надпись AUTO и звучит звуковой
сигнал, это говорит о том, что была
допущена ошибка программирования,
и произошло наложение цикла
приготовления на время на часах. В
этом случае необходимо изменить время
окончания приготовления или время
приготовления, согласно вышеописанным
операциям. Задайте температуру и
режим приготовления в духовому шкафу
, а затем на кнопку
- для
.
.
с помощью соответствующих ручек
переключателя режимов и регулятора
(см. главы, в которых описываются эти
действия).
3. Задайте температуру и режим
приготовления в духовому шкафу
с помощью соответствующих ручек
переключателя режимов и регулятора
(см. главы, в которых описываются эти
действия).
Теперь программирование работы духового
шкафа завершено, и все функции будут
выполняться в автоматическом режиме.
Духовой шкаф включится в нужный момент и
завершит свою работу в установленное время.
В течение всего периода приготовления
постоянно горит символ
Для просмотра времени, оставшегося до конца
приготовления, нажмите на кнопку.
Предусмотрена возможность сброса программы
приготовления нажатием на кнопку
По завершении времени приготовления духовой
шкаф автоматически выключается, символ
гаснет, надпись AUTO начинает мигать,
и раздается звуковой сигнал, который можно
отключить нажатием на любую клавишу, кроме
кнопок
Установите в исходное положение ручку
переключателя режимов и регулятор, и
переведите программатор в режим ручной
настройки, нажав на кнопку
Внимание: перебои с электропитанием ведут к
сбросу времени на часах и аннулированию всех
заданных программ.
После такого отключения все цифры на экране
начинают мигать.
/ .
.
.
.
Рис. 5.6Рис. 5.5
63
Page 64

ПОЛУАВТОМАТИЧЕСКОЕ
ПРИГОТОВЛЕНИЕ
This is used to automatically switch off the
oven after the desired cooking time has
elapsed.
Задайте время приготовления, нажав на
кнопку
увеличения или на кнопку
пропустили нужное время (Рис. 5.7).
Появятся надпись AUTO и символ
Затем установите температуру и задайте
программу приготовления в духовом
шкафу с помощью соответствующей
ручки переключателя режимов и
регулятора (см. главы, в которых
описываются эти действия).
Духовой шкаф начнет работать, а
по наступлении времени окончания
приготовления автоматически
отключится.
В течение всего периода приготовления
постоянно горит символ
просмотра времени, оставшегося
до конца приготовления, нажмите
соответственно на кнопку
Предусмотрена возможность сброса
программы приготовления нажатием
на кнопку
, а затем на кнопку - для
), если вы
.
. Для
.
.
По завершении времени приготовления
духовой шкаф выключается, символ
гаснет, надпись AUTO начинает мигать,
и раздается звуковой сигнал, который
можно отключить нажатием на любую
клавишу, кроме кнопок
Установите в исходное положение ручку
переключателя режимов и регулятор,
и переведите программатор в режим
ручной настройки, нажав на кнопку
Внимание: перебои с электропитанием
ведут к сбросу времени на часах
и аннулированию всех заданных
программ.
После такого отключения все цифры на
экране начинают мигать.
/ .
.
,
Рис. 5.7
64
Рис. 5.8
Page 65

ОЧИСТКА И ТЕХНИЧЕСКОЕ ОБСЛУЖИВАНИЕ
Не закрывайте крышку,
когда горит горелка.
ВНИМАНИЕ
Не опускайте стек лянную
крышку, когда горелки все еще
горячие или когда духовка
работает или все еще горячая.
не ставьте горячие кастрюли и
тяжелую кухонную посуды на
стеклянную крышку .
Протрите на сухо от любой
жидкости, которая, возможно,
пролилась на крышку перед ее
открытием.
Models with glass lid
6
СТЕКЛЯННАЯ КРЫШКА (Только
для моделей со стеклянной
крышкой)
Для проведения очистки Вы можете
просто снять крышку по направлению
вверх, предварительно полностью
открыв ее.
При необходимости извлечения
шарниров вставьте их в прежнее
положение, при этом необходимо
учитывать следующее:
• справа устанавливается шарнир со
знаком «D», а слева – шарнир со
знаком «S» (Рис. 6.1).
Регулирование балансировки
Закройте крышку и убедитесь, что
балансировка отрегулирована
надлежащим образом; при открытии
на 45° крышка остается в таком
полуоткрытом состоянии.
При необходимости отрегулируйте
положение пружин шарниров, повернув
винты (R) по часовой стрелке (Рис. 6.1).
Модели со стеклянной крышкой
Только для некоторых моделей
S
Рис. 6.1
R
D
65
Page 66

СОВЕТЫ ПОТРЕБИТЕЛЮ
• Перед тем как приступать к очистке
оборудования, отключите плиту от
электрической сети и подождите,
пока она остынет.
• В случае если Вы не пользуетесь
плитой, рекомендуется в целях
предосторожности перекрыть кран
подачи газа из распределительной сети
или кран на газовом баллоне.
• Периодическая смазка газовых кранов
должна осуществляться только
квалифицированными специалистами.
• Если кран не поворачивается, не
прилагайте силу, обратитесь в службу
технической поддержки.
• Чистку, особенно эмалированных
поверхностей, рекомендуется
проводить после того, как духовой
шкаф остынет.
• Не оставляйте следы щелочных
или кислотных веществ (например,
лимонного сока, уксуса и т.п.) на
поверхностях.
• Не используйте моющие средства с
хлором или на кислотной основе.
• Важно: рекомендуется использовать
защитную одежду / перчатки при
очистке устройства.
ПРЕДУПРЕЖДЕНИЕ: После правильной
установки, ваш прибор отвечает всем
требованиям безопасности для этого
типа приборов. Однако, необходимо
дополнительно позаботиться о задней
и нижних частях прибора, т.к. эти части
не предназначены, чтобы их трогали
и могут иметь острые и грубые края, о
которые можно пораниться.
ЭМАЛИРОВАННЫЕ ДЕТАЛИ
Все эмалированные детали, включая
плоские решетки, моются с помощью
мыльной воды или другого подобного
раствора, не содержащего абразивных
веществ.
Вытирать детали рекомендуется мягкой
тряпочкой.
Вещества, содержащие кислоту,
например сок лимона, консервированных
томатов, уксус или другие подобные
продукты, при длительном контакте с
эмалью разрушают ее, придавая ей
матовый оттенок.
ДЕТАЛИ ИЗ НЕРЖАВЕЮЩЕЙ
СТАЛИ, АЛЮМИНИЯ И
ОКРАШЕННЫЕ ПОВЕРХНОСТИ
Проводите очистку, используя
соответствующее вещество. Аккуратно
вытирайте.
ОБРАТИТЕ ВНИМАНИЕ: во избежание
появления царапин и истирания
аккуратно мойте эти детали.
Используйте мягкую тряпочку и
нейтральное мыло, применение
средств, содержащих абразивные
вещества, запрещено.
Примечание: длительное использование
оборудования может привести
к изменению цвета горелок под
воздействием высокой температуры.
Прибор сильно нагревается. Очень важно, чтобы дети не оставались
одни на кухне во время приготовления пищи.
Использовать пароструйные приборы запрещено, поскольку влага может
проникнуть внутрь устройства, что представляет опасность для работы
оборудования.
Не используйте грубые абразивные чистящие средства или металлические
скребки для очистки стекла дверцы духовки или стеклянной крышки (только
для моделей со стеклянной крышкой), поскольку они могут поцарапать
поверхность, что может привести к осыпанию стекла.
66
Page 67

СМАЗКА ГАЗОВЫХ КРАНОВ
Периодическая смазка газовых
кранов должна производиться
только квалифицированными
специалистами. В случае сбоев в
работе газовых кранов обратитесь в
Отдел технического обслуживания.
ВНУТРЕННЯЯ ПОВЕРХНОСТЬ
ДУХОВОГО ШКАФА
Очистку духового шкафа необходимо
проводить с помощью специальных
средств после каждого использования.
При очистке поверхности надо
использовать мягкие моющие средства
и теплую воду.
Подходящие моющие средства
могут быть использованы только по
рекомендации производителя и только
после тестирования их на небольшом
участке внутренней поверхности.
Абразивные чистящие вещества или
губки/ткани не должны использоваться
при чистке внутренней поверхности
духовки.
ПРИМЕЧАНИЕ: производитель не
несет ответственность за повреждения,
причиненные чистящими средствами.
Дайте духовке остыть и обращайте
особое внимание, не дотрагивайтесь
до горячих элементов внутри
духовки.
ГОРЕЛОК
Можно снять и помыть только в мыльной
воде.
Следите за тем, чтобы поверхность
всегда была чистой, периодически
протирая ее с помощью средства,
использующихся для чистки
нержавеющей стали.
После каждой операции очистки или
мойки убедитесь, что рассекатели
пламени горелок и сами горелки, сухие и
установлены надлежащим образом.
Следите за тем, чтобы электрод «S»
(Рис. 6.2, 6.4), расположенный рядом с
каждой горелкой, был всегда чистым, это
позволит включать его и регулировать
образование искры.
Следите за тем, чтобы щуп «Т» (Рис.
6.2, 6.4), расположенный рядом с
каждой горелкой, был всегда чистым,
это позволит отрегулировать работу
предохранительных клапанов.
Аккуратно проводите очистку щупа и
крышки.
Примечание: Во избежание
повреждений электрического розжига
не пользуйтесь им, если горелки не
установлены.
ПРАВИЛЬНАЯ УСТАНОВКА
ГОРЕЛОК
Важно проверять, чтобы рассекатели
пламени «F» и крышка «C» горелки
стояли правильно (см. Рис. 6.2 - 6.3),
поскольку их смещение может стать
причиной поломки.
ТРОЙНАЯ КОРОНАРНАЯ ГОРЕЛКА
Данная горелка должна быть правильно
установлена, как показано на Рис. 6.6.
При этом необходимо следить за тем,
чтобы ребра заходили в свои пазы, как
показано стрелочкой (Рис. 6.4).
Горелка при правильной установке не
должна вращаться (Рис. 6.5).
Установите крышку «A» и кольцо «B»
(Рис. 6.5 - 6.6) в соответствующие пазы.
67
Page 68

C
F
T
S
Рис. 6.3Рис. 6.2
T
S
Рис. 6.4
68
A
B
Рис. 6.6Рис. 6.5
Page 69

МОНТАЖ И ДЕМОНТАЖ БОКОВЫХ НАПРАВЛЯЮЩИХ
• Установите проволочные решетки-держатели на стенках духового шкафа с
помощью 2 винтов (Рис. 6.7a).
• Вставьте в направляющую противень и решетку, как показано на Рис. 6.7b . Решетка
устанавливается так, чтобы предохранительный упор, предотвращающий
случайное выпадение, был повернут внутрь духовки.
• Демонтаж осуществляется в обратном порядке.
Рис. 6.7b
Рис. 6.7a
69
Page 70

ЗАМЕНА ЛАМПОЧКИ В ДУХОВОМ ШКАФУ
ПРЕДУПРЕЖДЕНИЕ: Убедитесь, что устройство отключено от источника
питания, прежде чем менять лампу, т.к. можно получить электрический шок.
• Дайте остыть внутренней поверхности духовки и нагревательным элементам.
• Отключите источник питания.
• Снимите защитное покрытие “A” (Рис. 6.8).
• Выкрутите и замените старую лампочку “B” на новую, способную выдерживать
воздействие высоких температур (300 °С) и обладающую следующими
характеристиками: 230 B или 220-240 В, E14 и такой же мощности (посмотрите
какая мощность указана на старой лампочке).
• Установите защитное покрытие “A” на прежнее место.
Примечание: гарантия не распространяется на замену лампочки.
70
A
B B
A
Рис. 6.8
Page 71

ФИЛЬТР-ЖИРОУЛОВИТЕЛЬ
• Установите фильтр-жироуловитель на задней стенке духового шкафа, как
показано на Рис. 6.9.
• После каждого приготовления необходимо проводить очистку фильтра!
Предусмотрена возможность демонтажа фильтра-жироуловителя для
последующей чистки с помощью горячей мыльной воды (Рис. 6.9).
• Необходимо насухо вытереть фильтр, прежде чем устанавливать его в прежнее
положение.
Рис. 6.9
ПОЛОСТЬ ПОД ДУХОВКОЙ
Доступ в полость под духовкой обеспечивается через откидывающуюся панель (Рис.
6.10).
Хранить легковоспламеняющиеся предметы в духовке или в полости под
духовкой запрещено (например, тонкую бумагу, хлопчатобумажную ткань,
шелк, нейлон и другие подобные материалы).
Рис. 6.10
71
Page 72

СНЯТИЕ И ЗАМЕНА ВНУТРЕННЕГО СТЕКЛА ДВЕРЦЫ ДУХОВКИ
Если Вы хотите почистить внутреннее стекло дверцы духовки, внимательно следуйте
инструкциям и соблюдайте меры предосторожности. Неправильное извлечение
стекла дверцы духовки может привести к повреждению прибора и аннулированию
гарантии.
ВАЖНО!
• Будьте осторожны, дверца духовки тяжелая.
• Убедитесь, что все детали духового шкафа остыли.
• Будьте аккуратны при извлечении стекла.
• ВАЖНО!
Не используйте твердые абразивные чистящие материалы или металлические
губки для чистки стекла дверцы, т.к. они могут оставить царапины, что может
привести к разрушению стекла.
• Если Вы заметите какие-либо признаки повреждения на стекле (например, сколы
или трещины), не используйте духовой шкаф. Позвоните в Сервисный центр.
• Убедитесь, что Вы правильно установили стекло. Не используйте духовой шкаф,
если стекло установлено неверно.
• Если Вы не можете заменить стекло самостоятельно, позвоните в Технический
центр.
Примечание: при обращении в не Авторизированный сервисный центр компания
не несет ответственности за качество выполненный работ, гарантийное
обслуживание аннулируется.
72
Page 73

Рис. 6.11
Рис. 6.12
ДЕМОНТАЖ ДВЕРЦЫ ДУХОВОГО
ШКАФА
Демонтаж дверцы духового шкафа
осуществляется в следующем порядке:
• Полностью откройте дверцу
духового шкафа (Рис. 6.11).
• Полностью откройте рычаг “А” на
правом и левом шарнирах (Рис.
6.12).
• Возьмитесь за дверцу, как показано
на Рис. 6.14.
• Немного закройте дверцу (Рис.
A
B
6.13), так чтобы рычаги “А” правого
и левого шарниров зацепились за
часть “B” дверцы (Рис. 6.12).
• Вытащите крючки шарнирного
соединения из пазов, как показано
стрелочкой “C” (рис. 6.15).
• Положите дверцу на мягкую
поверхность.
Рис. 6.13
C
Рис. 6.14 Рис. 6.15
73
Page 74

Снятие внутреннего стекла дверцы духового шкафа
1
2
1
2
Дверца духовки состоит из 2-х стекол:
• 1 внешнее;
• 1 внутреннее.
Для очистки всех стекол с обеих сторон необходимо снять внутреннее стекла
следующим образом:
Снятие крепежа внутреннего стекла дверцы духового шкафа
1. Снимите дверцу духового шкафа и поместите ее на мягкую поверхность.
ВАЖНО: дверца должна быть расположена горизонтально, как показано на рис.
6.16
2. Нажмите на петли крепежа, чтобы освободить стекло.
2
Рис. 6.16
74
Page 75

3. Приподнимите и вытащите стекло, как показано на рис. 6.17.
2
121
Рис. 6.17
75
Page 76

После чистки установите стекло на дверцу духового шкафа
После установки стекла убедитесь, что:
• Вы установили стекло правильно, как показано на рисунке.
• Устройство работает правильно и безопасно.
• Будьте аккуратны при установке стекла, не роняйте его.
• Если Вы не можете заменить стекло самостоятельно, позвоните в Технический
центр.
• Убедитесь, что правильно держите стекло.
• Убедитесь, что прокладка А в правильном положении (рис.6.18). Если она не на
месте, поместите ее по центру верхнего края внутреннего стекла.
1. Вставьте стекло в верхние пазы и слегка подтолкните (стрелка 1 на рис. 6.18).
2. Осторожно опустите стекло (стрелка 2 на рис. 6.18).
76
A
2
121
Рис. 6.18
Page 77

УСТАНОВКА КРЕПЕЖА ВНУТРЕННЕГО СТЕКЛА ДВЕРЦЫ ДУХОВОГО
ШКАФА
1. Установите крепеж, как показано на рис. 6.19. Убедитесь, что зажимы «М» не
деформированы и не повреждены.
2. Осторожно надавите на крепеж. Вы услышите щелчок.
ВАЖНО: убедитесь, что стекло и крепеж установлены правильно.
2
щелчок
Click
M
1
M
Рис. 6.19
1
M
2
щелчок.
Click
77
Page 78

УСТАНОВКА ДВЕРИ
1. Возьмитесь за дверцу, как показано на Рис. 4.20.
2. Вставьте петли в пазы, как показано на рис. 6.21.
3. Полностью откройте дверцу духового шкафа и замкните рычаг “A” на левом и
правом шарнирах (Рис. 6.22)
4. Закройте дверь и убедитесь, что она установлена правильно.
Рис. 6.20
78
A
Рис. 6.22Рис. 6.21
Page 79

Рекомендации
для монтажников
ВАЖНО
• Для проведения надлежащей установки, регулировки и изменения плиты
для работы на другом виде газа необходимо обратиться за помощью
КВАЛИФИЦИРОВАННОГО МОНТАЖНИКА. Несоблюдение данного требования
ведет к аннулированию гарантии.
• Оборудование должно быть установлено надлежащим образом в соответствии с
действующими нормами и инструкциями производителя.
• Прежде чем приступать к ремонту или техническому обслуживанию плиты,
обязательно отключайте ее от сети.
• Стальные или алюминиевые элементы некоторых устройств покрыты
специальной защитной пленкой.
Перед использованием плиты необходимо аккуратно удалить защитную
пленку.
79
Page 80

УСТАНОВКА
7
Условия установки, с учетом необходимости предотвращения перегрева
поверхностей, примыкающих к плите, показаны на Рис 7.1a - 7.1b.
Устройство можно устанавливать не ближе 200 мм от любой боковой стенки, высота
которой превышает высоту стола плиты (рис. 7.1a, 7.1b).
Облицовочный материал и клей должны быть устойчивыми к температуре 90°С .
Устройство должно быть установлено минимум за 500 мм от штор. Если устройство
установлено на пьедестале, во избежание падения необходимо принять меры
безопасности.
Кухонная мебель должна быть термостойкая.
Стенки мебели должны
выдерживать температуру
окружающего воздуха до
75°С и выше.
Не устанавливайте
650 mm
200 mm
450 mm
плиту вблизи
легковоспламеняющихся
материалов (например,
штор).
80
500 mm
500 mm
■ Класс 1
(Pис. 7.1a)
Соединение с источником
газа осуществляется с
20 mm
Рис. 7.1a
20 mm
650 mm
200 mm
450 mm
Рис. 7.1b
помощью специальной
резиновой трубки, которая
должна быть установлена
так, чтобы ее можно
было видеть, или с помощью
жесткой или гибкой
металлической трубки.
Расстояние между плитой
и рядом стоящей мебелью
не должно быть меньше 2
см. Мебель не должна быть
выше плиты.
■ Класс 2
■ Подкласс 1
(Pис. 7.1b)
Соединение с источником
газа осуществляется с
помощью жесткой или гибкой
металлической трубки.
Page 81

A
B
C
УСТАНОВКА РЕГУЛИРУЕМЫХ НОЖЕК
Перед началом эксплуатации плиты
необходимо установить на основание
регулируемые ножки.
Для получения доступа к основанию и
облегчения процесса установки ножек
осторожно положите плиту на заднюю
стенку, подложив кусок упаковочного
полистирола.
Установите 4 ножки, ввинтив их в отверстия
на основании, как показано на Рис. 7.2 и 7.3.
РЕГУЛИРОВАНИЕ УРОВНЯ ПЛИТЫ
При необходимости можно регулировать
уровень плиты, ввинчивая или
вывинчивая концы ножек (Рис. 7.4).
Рис. 7.2
Рис. 7.4 Рис. 7.3
УСТАНОВКА ЗАЩИТНОЙ ПАНЕЛИ
(Только для некоторых моделей)
Перед установкой плиты закрепите
защитную панель «С» (рис. 7.5).
• Защитная панель «С» может быть
упакована и размещена в задней
части плиты.
• Перед установкой панели удалите
защитную пленку/скотч.
• удалите две распорных детали “A”
и винт “B” вверху тыльной стороны
плиты.
• возьмите защитную планку, как
показано на рис. 7.5 и установите
её, закрепив центральным винтом
“B” и распорными деталями “A”.
Только для некоторых моделей
Рис. 7.5
81
Page 82

ПЕРЕДВИЖЕНИЕ ПЛИТЫ
ВНИМАНИЕ: Для того чтобы не повредить ножки, переносить плиту необходимо
вдвоем (Рис. 7.6).
Рис. 7.6
ВНИМАНИЕ
Не передвигайте плиту, держась за
ручку духовки (Рис. 7.7).
82
ВНИМАНИЕ
После установки в нужное положение
передвигать плиту волоком запрещено
(Рис. 7.8): приподнимайте ножки над
поверхностью пола (Рис. 7.6).
Рис. 7.8Рис. 7.7
Page 83

ТРЕБОВАНИЯ К ВЕНТИЛЯЦИИ
Устройство должно быть установлено в соответствии с правилами, действующими
в Вашей стране, в отношении вентиляции и выхода выхлопных газов.
Интенсивное и длительное использование может потребовать более эффективной
вентиляции (например, откройте окно или увеличьте мощность вытяжки).
ПОМЕЩЕНИЕ ДЛЯ УСТАНОВКИ
Помещение, в котором планируется установить газовое оборудование, должно иметь
доступ к воздуху для обеспечения процесса горения газа в соответствии с правилами,
действующими в Вашей стране.
Приток воздуха должен осуществляться через одно или несколько отверстий
на наружных стенках: общая площадь свободной зоны должна составлять
приблизительно 100 см2 (в соответствии с правилами, действующими в Вашей
стране).
Отверстия должны находиться рядом с полом, предпочтительно со стороны,
противоположной вытяжке продуктов горения. При этом конструкция этих отверстий
должна исключать их засорение, как с внешней, так и с внутренней стороны.
Если устроить необходимые вентиляционные отверстия невозможно, то, в
соответствии с правилами, действующими в Вашей стране, следует обеспечить тягу
из соседней комнаты, в которой действует требуемая система вентиляции (если это
не спальня и не область повышенной опасности).
В таком случае нужно открыть дверь в кухню, чтобы обеспечить тягу в помещении.
ОТВОД ПРОДУКТОВ ГОРЕНИЯ
Продукты горения, образующиеся в процессе эксплуатации газового устройства,
отводятся с помощью специальных колпаков, устанавливаемых снаружи (Рис. 7.9).
В случае если это невозможно, допускается использование электрического
вентилятора, установленного на внешней стенке или на окне. В данном случае
мощность вентилятора должна обеспечивать ежечасный обмен воздуха объемом, в
3-4 раза превышающим объем помещения, в котором установлена плита (Рис. 7.10).
Установка вентилятора допустима только в случае наличия отверстия, через которое
осуществляется доступ воздуха, согласно указаниям, данным в главе «Помещение
для установки».
Колпак для
Extractor hood
вытяжки
for products of
продуктов
combustion
горения
Отверстие для
доступа
Air vent
воздуха
mm
H min 650
Мин. высота 650 мм
Электрический
Electric fan to
extract products
вентилятор для
of combustion
вытяжки
продуктов
горения
Рис. 7.10Рис. 7.9
Отверстие для
Air vent
доступа
воздуха
83
Page 84

ГАЗОВЫЕ ЭЛЕМЕНТЫ ОБОРУДОВАНИЯ
8
ТРЕБОВАНИЯ К УСТАНОВКЕ
ВАЖНО !
• Стенки, примыкающие к плите, должны быть изготовлены из термостойкого
материала.
• Перед началом эксплуатации необходимо убедиться в том, что местные
условия газораспределения (вид газа и его давление) отвечают
требованиям.
Условия эксплуатации настоящего духового шкафа указаны на таблич ке и
на ярлыке.
• Данное устройство должно быть установлено и обслуживаться только
квалифицированным специалистом.
• Неправильная установка может привести к аннулированию гарантии
производителя.
Данное оборудование предназначено для использования природного или сниженного
газа (проверьте прикрепленную к устройству этикету).
• Использование природного газа: данное устройство предназначено только для
использования природного газа и не может использовать никакой другой газ.
• Использование сжиженного газа: данное устройство предназначено только для
использования природного газа и не может использовать никакой другой газ.
Комплект для перехода с одного газа на другой Вы можете приобрести в
Авторизированном Сервисном Центре.
84
Page 85

ПОДКЛЮЧЕНИЕ УСТРОЙСТВА К СИСТЕМЕ ПОДАЧИ ГАЗА
Подключение газа с соблюдением всех местных действующих норм должен
осуществлять только квалифицированный специалист.
Убедитесь, что вентиляция в помещении, в котором планируется установка данной
плиты, отвечает всем действующим нормам.
• Подсоедините плиту к газу с помощью медной трубы или стального шланга.
• Соединение плиты с источником газа осуществляется с задней стороны (Рис.
8.1a) с помощью правого или левого вывода на плите; трубка не должна идти
через всю плиту.
• Неиспользуемая труба должна быть закрыта прокладкой и крышкой (рис. 8.1b).
Заглушка
Рис. 8.1a
Установка прокладки на
неиспользуемую трубу
Правая/
Левая труба
монтаж
трубопровода
1/2” дюйма цилиндрическое
Прокладка
(#)
Заглушка (#)
(#) уже установлена на правой/
левой трубе
1/2” дюйма цилиндрическоеl
(ISO 228-1)
(ISO 228-1)
Fig. 8.1b
85
Page 86

СПОСОБЫ ПОДКЛЮЧЕНИЯ ГАЗА
Подключение с помощью резинового шланга.
ВАЖНО: подключение с помощью резинового шланга может быть
осуществлено только в том случае, если это допускается правилами,
действующими в Вашей стране.
Подключение газа с помощью резинового шланга осуществляется путем:
• Установки трубы (левой или правой)
• Установки прокладки
• Закрепления шланга.
Подключение к плите природного газа
1. Прикрепите резиновый шланг к трубе, предварительно установив между ними
прокладку (как показано на рис. 8.2).
2. Подключите плиту к системе подачи газа с помощью резинового шланга (диаметр
шланга 15 мм).
Шланг должен соответствовать нормам, действующим в Вашей стране, и
подходить к данному типу газа.
3. Убедитесь, что шланг надежно закреплен с обеих сторон.
4. Используйте стандартный зажим для закрепления шланга.
Подключение к плите сжиженного газа
1. Прикрепите резиновый шланг к трубе, предварительно установив между ними
прокладку (как показано на рис. 8.2).
2. Подключите плиту к системе подачи газа с помощью резинового шланга (диаметр
шланга 6 мм).
Шланг должен соответствовать нормам, действующим в Вашей стране, и
подходить к данному типу газа.
3. Убедитесь, что шланг надежно закреплен с обеих сторон.
4. Используйте стандартный зажим для закрепления шланга.
5. Установите регулятор давления газа.
ВАЖНО: в соответствии с действующими правилами регулятор
давления газа должен быть установлен при подключении плиты к
баллону сжиженного газа.
Перед подключением плиты к системе подачи газа убедитесь, что:
• Шланг достаточно короткий, без сгибов и трещин.
• Длина шланга составляет не более 750 мм.
• Шланг не контактирует с острыми краями и углами.
• Шланг не перекручен, не передавлен и не находится в напряжении.
• Шланг не контактирует с поверхностью, которая нагревается более чем на 70°С.
• В случае износа или повреждения, а также каждые три года шланг должен быть
заменен на новый.
• В случае если шланг не используется, необходимо его закрыть.
• Шланг не должен подвергаться коррозии.
86
Page 87

После подключения плиты к системе подачи газа убедитесь, что:
• Все соединения плотно закрыты.
• В случае износа или деформации прокладки ее необходимо заменить.
• Используйте два гаечных ключа при закреплении шланга (рис. 8.2).
Примечание: крепежи поставляются вместе с устройством. Если комплект крепежей в
Подключение с помощью резинового шланга.
комплект не входит, обратитесь в Авторизированный Сервисный Центр.
ВАЖНО: следует использовать, только если это разрешено правилами и нормами,
действующими в Вашей стране.
Труба
(#)Примечание: крепежи
поставляются вместе с
устройством. Если комплект
крепежей в комплект не входит,
обратитесь в Авторизированный
Сервисный Центр.
1/2” дюйма цилиндрическое
Крепеж для
сжиженного
шланговой зажим
(в комплекте не
поставляется)
– резиновый шланг для
сжиженного газа (диаметр
6 мм) (в комплекте не
поставляется)
сжиженный газ
монтаж
трубопровода
Прокладка
(#)
(ISO 228-1)
газа
1/2” дюйма
цилиндрическое
(ISO 228-1)
1/2” дюйма цилиндрическое
(ISO 228-1)
крепеж для
природного
газа
шланговой зажим
(в комплекте не
поставляется)
резиновый шланг для
природного газа (диаметр
15 мм) (в комплекте не
природный газ
поставляется)
Рис. 8.2
87
Page 88

Подключение с помощью жесткой или гибкой трубы
Подключение газа с помощью жесткой или гибкой трубы осуществляется путем:
• Установки трубы (левой или правой)
• Установки прокладки
При подключении плиты к системе подачи газа убедитесь, что:
When connecting the cooker to the gas supply with rigid pipes or a exible pipe,
make sure that
• Вы используете трубы, соответствующие нормам и правилам, действующим в
Вашей стране.
• Труба должна подходить к конкретному типу газа (природному или сжиженному).
• Используете два гаечных ключа для крепежа труб (рис. 8.3).
• Гибкая труба не перекручена, не передавлена и не согнута.
• Гибкая труба в длину не превышает 2000 мм.
• Гибкая труба не контактирует с острыми краями и углами.
• В случае износа или повреждения, а также по истечению срока годности труба
должна быть заменена.
• Гибкая труба не контактирует с поверхностью, которая нагревается более чем
на 70°С.
• В соответствии с действующими правилами при подключении плиты к баллону
сжиженного газа установлен регулятор давления.
• В случае если труба не используется, необходимо ее закрыть.
• Труба не должна подвергаться коррозии.
После подключения плиты к системе подачи газа убедитесь, что:
• Все соединения плотно закрыты.
• В случае износа или деформации прокладки ее необходимо заменить.
• Используйте два гаечных ключа при закреплении шланга (рис. 8.3).
88
Page 89

Подключение с помощью жесткой или гибкой трубы.
Примечание: если труба уже установлена, снимите крепеж
(#)Примечание: крепежи
поставляются вместе с
устройством. Если комплект
крепежей в комплект не входит,
обратитесь в Авторизированный
Сервисный Центр.
1/2” дюйма цилиндрическое
для резинового шланга.
Труба
монтаж
трубопровода
Прокладка
(#)
(ISO 228-1)
1/2” дюйма цилиндрическое
(ISO 228-1)
1/2” дюйма цилиндрическое
(ISO 228-1)
Гибкая труба (в
комплекте не
поставляется)
Жесткая труба
(в комплекте не
поставляется)
Рис. 8.3
89
Page 90

ТЕХНИЧЕСКОЕ ОБСЛУЖИВАНИЕ
ТАБЛИЦА С ДАННЫМИ О ФОРСУНКАХ - КАТ.: II 2H3+
сжиженный газ
Метан
ГОРЕЛКА
Дополнительная горелка (A)
Полубыстрая горелка (SR)
Быстрая горелка (R)
Тройная коронарная горелка
(TR)
НОМНАЛЬН
ПОДАЧА
1,00 0,30 50 72 (X)
1,75 0,45 65 97 (Z)
3,00 0,75 85 115 (Y)
3,50 1,50 95 135 (T)
АЯ
[кВт
]
СНИЖЕНН
АЯ
ПОДАЧА
[кВт]
Приток воздуха, необходимый для обеспечения горения газа (2м3/час х кВт)
ГОРЕЛКА Необходимый приток воздуха [м
Дополнительная горелка (A) 2,00
Полубыстрая горелка (SR) 3,50
Быстрая горелка (R) 6,00
Тройная коронарная горелка (TR) 7,00
G30 28-30 мбар
G31 37 мбар
Внутренний диаметр
форсунки
[мм]
G20 20 мбар
Внутренний диаметр
форсунки
[мм]
3
]
СМАЗКА КРАНОВ ПОДАЧИ ГАЗА
Если кран не поворачивается, не прилагайте силу, обратитесь в службу технической
поддержки.
ВНИМАНИЕ
Для проведения установки, технического обслуживания и изменения плиты для
работы на другом виде газа используйте только запасные части, предлагаемые
производителем.
Несоблюдение данного требования ведет к аннулированию гарантии.
90
Page 91

ЗАМЕНА ФОРСУНОК ГОРЕЛОК
Выбор форсунок должен
осуществляться в соответствии с
данными, приведенными в таблице.
Диаметр форсунок, выраженный в сотых
мм, указывается на корпусе каждой
форсунки.
Если в комплект поставки не
включены указанные детали, их
можно легко преобрести в центрах
технической поддержки.
ЗАМЕНА ФОРСУНОК ГОРЕЛОК НА
РАБОЧЕЙ ПОВЕРХНОСТИ
Замена форсунок осуществляется в
следующем порядке:
• Снимите решетку, крышечки и
рассекатели пламени горелок.
• С помощью жесткого ключа
замените старые форсунки
на новые «J» (Рис. 8.4 - 8.5),
специально спроектированные для
использования нужного Вам газа
(См. Таблицу на стр. 78).
Горелки были разработаны с
учетом устранения необходимости
проведения регулирования
первичного воздуха.
РЕГУЛИРОВАНИЕ МИНИМУМА
ГОРЕЛОК НА РАБОЧЕЙ
ПОВЕРХНОСТИ
При переходе с одного вида газа на
другой необходимо скорректировать
минимальную подачу, с учетом того, что
в данном положении высота пламени
должна быть приблизительно 4 мм, при
этом пламя должно сохраняться даже
при резком переходе с максимальной на
минимальную подачу.
Регулирование проводится при
включенной горелке в следующем
порядке:
• Включите горелку
• Установите ручку в положение
минимальной подачи.
• Снимите ручку управления.
• С помощью отвертки поверните
винт «F» так, чтобы добиться
нужного Вам результата. (Рис. 8.6).
ВНИМАНИЕ: При использовании
газа G30/G31 (бутана/пропана) винт
затягивается до конца.
Стандартная
конфорка,
экспрессконфорка.
Рис. 8.4
Тройная
коронарная
горелка
Рис. 8.5
F
Рис. 8.6
J
J
91
Page 92

ЭЛЕКТРИЧЕСКИЕ ЭЛЕМЕНТЫ ОБОРУДОВАНИЯ
9
ОБРАТИТЕ ВНИМАНИЕ:
Установка оборудования должна
осуществляться в соответствии с
указаниями производителя.
Неправильная установка может
стать причиной получения травм
людьми, животными и повреждения
оборудования, в данном случае
производитель не несет никакой
ответственности.
ОБЩИЕ СВЕДЕНИЯ:
• Подсоединение к электрической
сети должно проводиться
только квалифицированными
специалистами в соответствии с
действующими нормами.
• При подключении установки к
электрической сети необходимо,
прежде всего, убедиться в том, что
напряжение в сети соответствует
значению, указанному на
табличке с характеристиками
оборудования, а сечение кабелей
электрооборудования способно
выдержать нагрузку, указанную на
табличке.
• Плита поставляется без сетевого
штепселя; поэтому если Вы не
соединяете плиту с сетью напрямую,
необходимо установить штепсель,
соответствующий данной нагрузке.
• Штепсель должен вставляться в
розетку, соединенную с заземленным
электрооборудованием,
отвечающим правилам техники
безопасности.
• Соединение оборудования с сетью
может осуществляться напрямую
через специальный однополярный
прерыватель с минимальным
вскрытием контактного окна 3 мм.
• Питающий кабель не должен
касаться нагретых элементов
и должен быть проложен так,
чтобы избежать нагревания до
температуры 75°С.
92
• При установке необходимо
учитывать требование обеспечения
беспрепятственного доступа к
прерывателю или розетке.
ВНИМАНИЕ: при подключении к
сети не используйте переходники,
редукторы или дифференциаторы,
которые могут привести к перегреву
или стать причиной получения
ожогов.
При необходимости изменения местного
электрооборудования, обратитесь
за помощью квалифицированного
специалиста.
Последний должен убедиться, что
сечение кабелей оборудования
соответствует мощности, потребляемой
данной установкой.
Прежде чем приступать к техническому
обслуживанию электронных элементов
оборудования необходимо отключить
установку от сети.
Установка должна быть обязательно
заземлена. Производитель
не несет ответственности за
любые повреждения, вызванные
несоблюдением данного положения.
Page 93

ПОДСОЕДИНЕНИЕ НОВОГО ПИТАЮЩЕГО КАБЕЛЯ
230 V
PE
• Снимите с крючков крышку щитка с зажимами, подведя отвертку под два крючка
“А” (Рис. 9.1).
• Откройтесь сальниковое уплотнение кабеля, отвинтив винт “F” (Рис. 9.2),
открутите винт, скрепляющий зажим и извлеките кабель.
• Вставьте в держатель “F” питающий кабель с сечением согласно указаниям,
данным в главе «Сечение питающего кабеля».
• Подсоедините фазовый, нейтральный провода и провод заземления к клеммной
панели как показано на рис.9.3.
• Выньте кабель питания и заблокируйте его кабельным сальником.
• Закройте крышку блока питания (проверьте правильность крепления держателей
кабеля А).
ВАЖНО: для подключения кабеля питания не откручивайте винты крепления
крышки за клеммной панелью.
ОСТОРОЖНО: В случае если кабель поврежден, он должен быть установлен
только авторизированными сервисными центрами во избежание опасности.
СЕЧЕНИЕ ПИТАЮЩЕГО КАБЕЛЯ
типа H05RR-F
230B~ or 220-240B~ 3 x 1,5 mm2 (*) (**)
(*) соединение возможно при
помощи вилки и розетки
(**) соединение возможно при
помощи распределительного шкафа
F
Рис. 9.2
230 B~ или 220-240 B~
A
Рис. 9.1
L
N
Рис. 9.3
93
Page 94

94
Page 95

95
Page 96

Cod. 1104105 - ß1
 Loading...