

Delonghi MWA 221IX Instructions Manual

30
CHAP. 1 – GENERAL 1.1 Description of the oven......................................................pag. 31
1.2 Description of the control panel..........................................pag. 32
1.3 Building-in........................................................................pag. 33
1.4 Important safety warnings..................................................pag. 36
1.5 Technical data...................................................................pag. 37
1.6 Installation and electrical connection...................................pag. 37
1.7 Ovenware to use...............................................................pag. 38
1.8 How to get the best results from your oven ............................pag. 39
1.9 Rules and general suggestions for using the oven ................pag. 40
CHAP. 2 – USING THE CONTROLS AND SETTING THE MODES
2.1 Setting the clock................................................................pag. 41
2.2 Simultaneous cooking on 2 levels .......................................pag. 42
2.3 How to programme automatic defrosting ............................pag. 44
2.4 How to programme the oven so as to keep food hot,
to reheat and to cook ........................................................pag. 46
2.5 Using the microwave-only function to keep food hot ............pag. 47
2.6 Using the microwave-only function to re-heating .................pag. 47
2.7 Using the microwave-only function to cooking.....................pag. 49
2.81Programming several operations one after another..............pag. 52
2.9 Using the “Automatic function” keys ...................................pag. 53
2.10Programme: from 1 to 6 minutes at maximum power ..........pag. 54
2.11Child safety device ............................................................pag. 54
CHAP. 3 – CLEANING AND MAINTENANCE
3.1 Cleaning...........................................................................pag. 55
3.2 Maintenance.....................................................................pag. 56
INDEX

31
CHAPTER 1 – GENERAL
A Control panel
B Inside of door
C Microwave outlet cover
D Tu rntable spindle
E Tu rntable
F Turntable support
G Wire rack
1.1 DESCRIPTION OF THE OVEN
A
D
G
CB
E
F
32
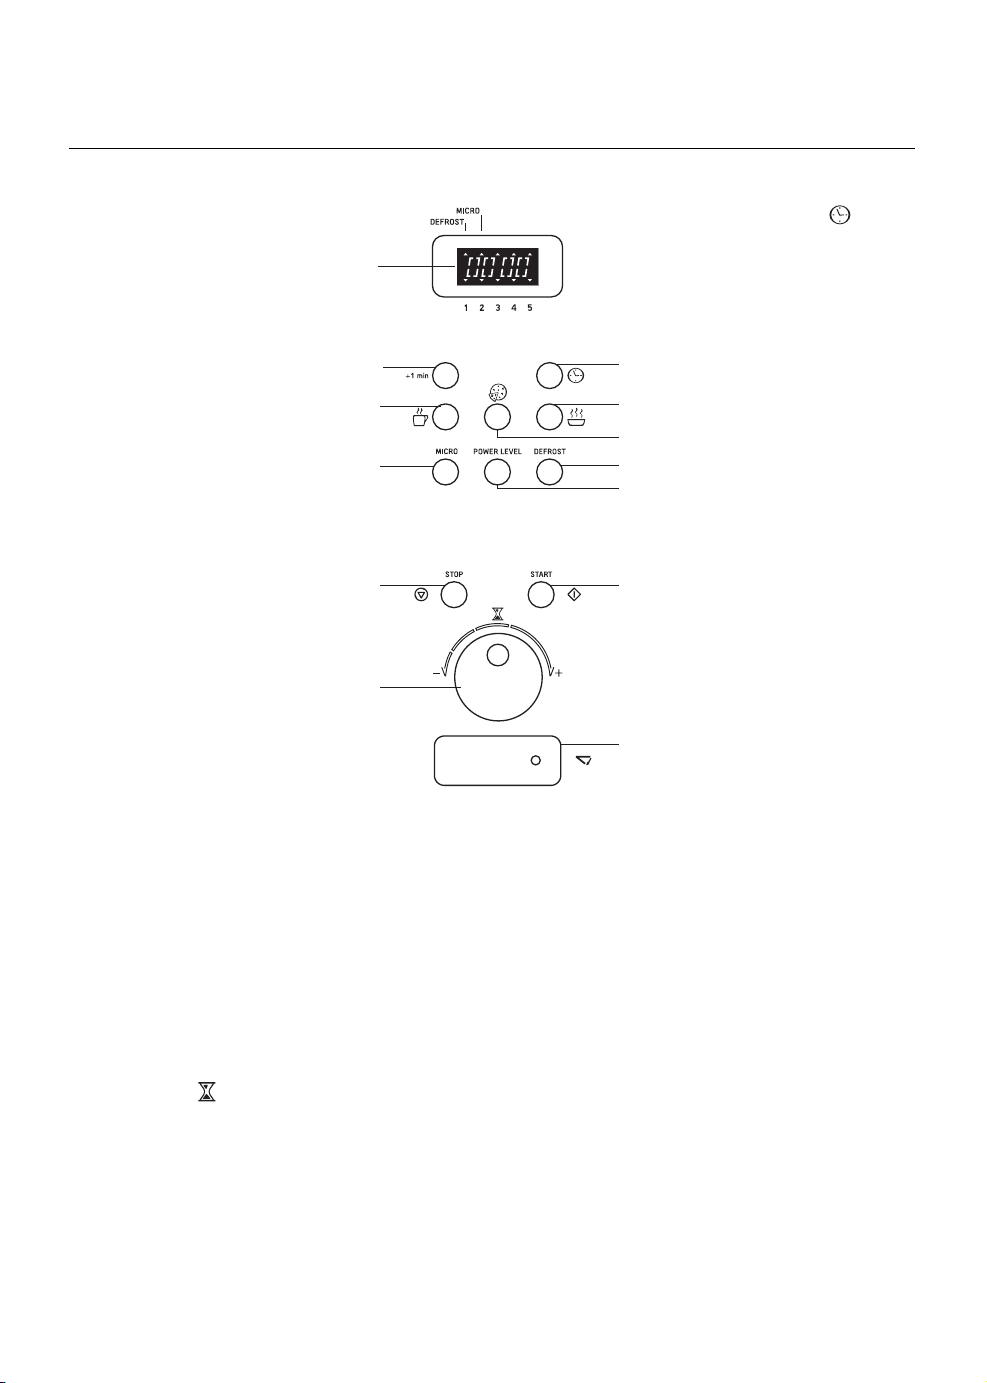
1.2 DESCRIPTION OF THE CONTROL PANEL
1. Display
The control panel shows a
24-hour clock, the pre-set
cooking times, the functions chosen (upper indicators) and the microwave
level selected (lower indicators).
2. +1 Min button
Press this button to set
exactly one minute of
microwaving at max
power level. Each additional touch of this button will
increase the set time by 30
seconds, up to a maximum
of 6 minutes.
3 - 8 - 9:
Automatic functions buttons:
Push one of these buttons
to warm beverages, readyto-serve dishes,
frozen
pizza and pre-cooked frozen food
.
4. MICRO button:
microwave cooking
Push this button to cook or
heat foodstuffs.
5. STOP BUTTON:
Cancelling a function
Push this button to stop the
cooking or to cancel the
pre-set cooking times.
6. Timer knob :
Cooking times
Use this knob to set the
cooking time or the time of
day.
7. Clock button :
Clock adjustment
Push this button to set the
correct time of day and to
get a view of the clock
while the oven is working.
10.DEFROST button:
automatic thawing
Push this button to thaw
foodstuffs.
11.POWER LEVEL button:
Microwave power level
Push this button to select
the microwave power
level required.
The available power levels of
the microwaves are the
following:
1 - 150 W
2 - 300 W
3 - 450 W
4 - 700 W
5 - 900 W
12.START button:
Press this button to turn
the oven on, but only
after you selected the
function and the cooking
times.
13.Open door button
1
2
3
4
5
6
7
8
9
10
11
12
13
33
5
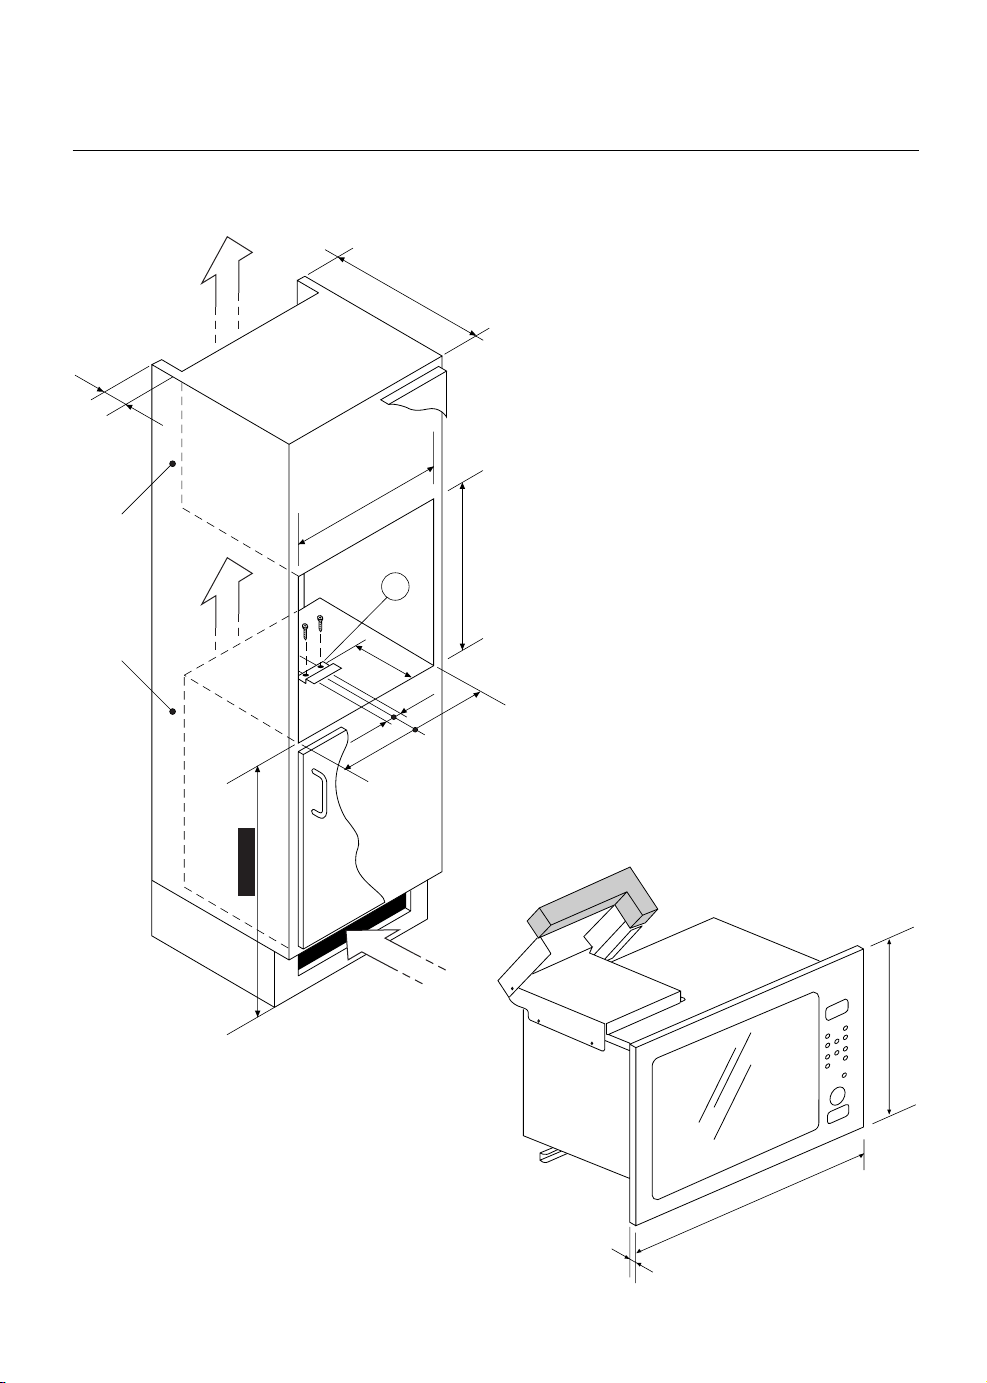
1.3 BUILDING-IN
Inside the oven there is a plastic bag with fixing material. Take this bag out of the oven.
BEFORE USING THE OVEN,
REMOVE THE PLASTIC PROTECTION ANGLES ON THE GLASS DOOR (IF EQUIPPED)
1. Fasten metal strip (A) using the two 13 mm. screws (all of which can be found in the accessory bag).
The appliance needs sufficient ventilation. Make an opening in the plinth at least 280 cm
2
large for this purpose.
ventilation passageway
550 min.
0 min.
+8
0
560
320 min.
360
+2
0
A
30
30
=
=
850 min
20
368
595
34
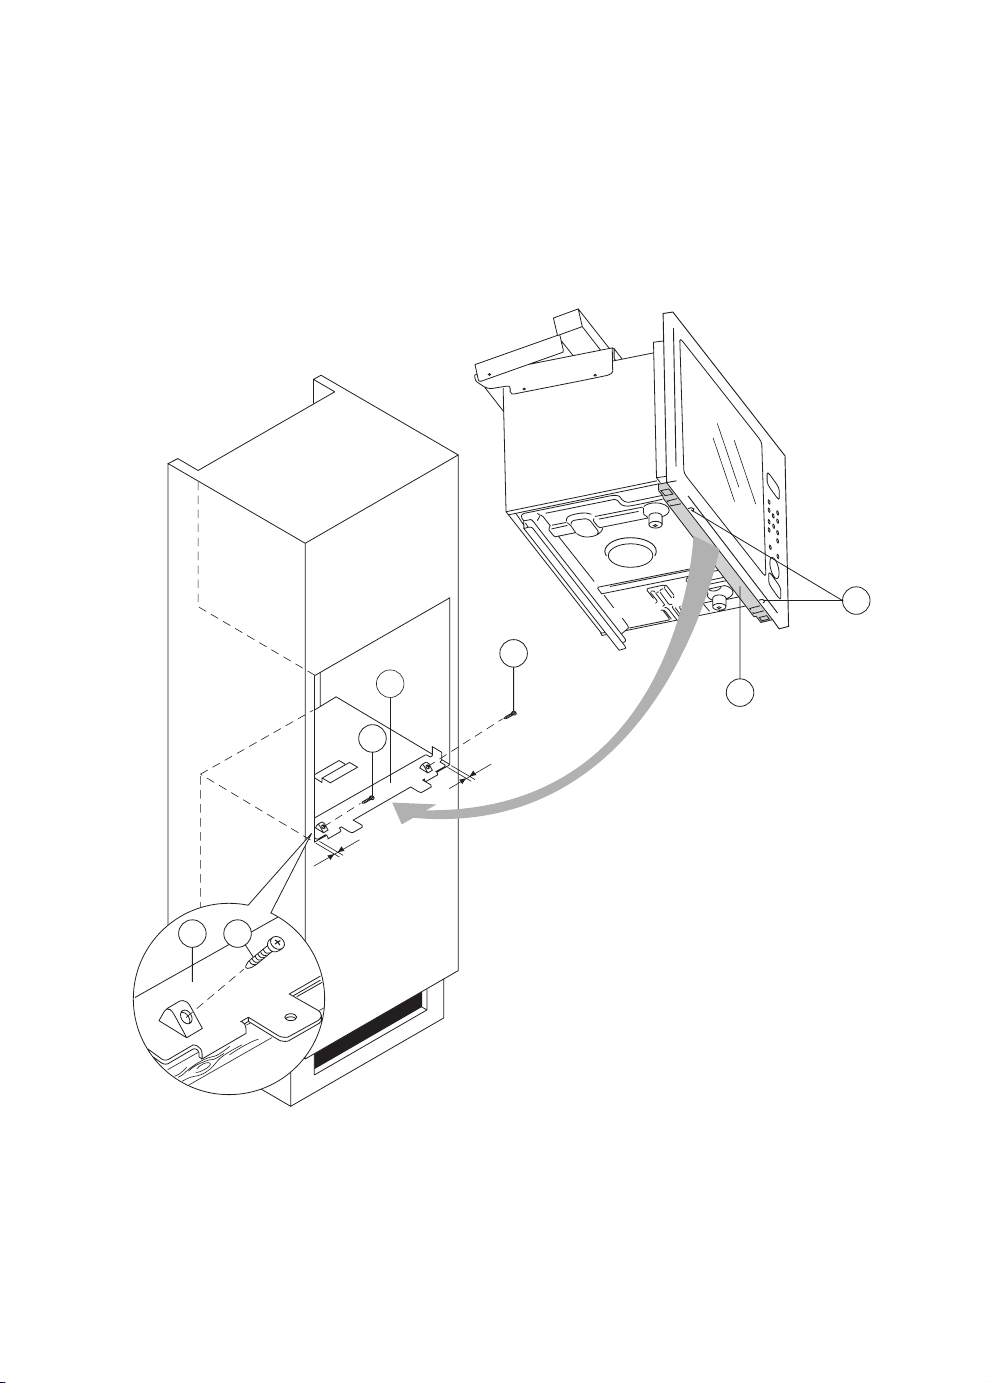
Fix the fastening bar such that the two lips stick out over the edge of the bottom of the recess and rest against it
at the front.
2.
Remove the 2 screws (X)from the fastening bar under the microwave oven.
3. Fit the fastening bar (B) at the correct position in the recess. Make sure that there is the same amount of free
space at each side of the fastening bar. Fasten the fastening bar using the two 16 mm. screws (H) which can
be found in the accessory bag.
X
H
B
B
H
=
=
B
H
35
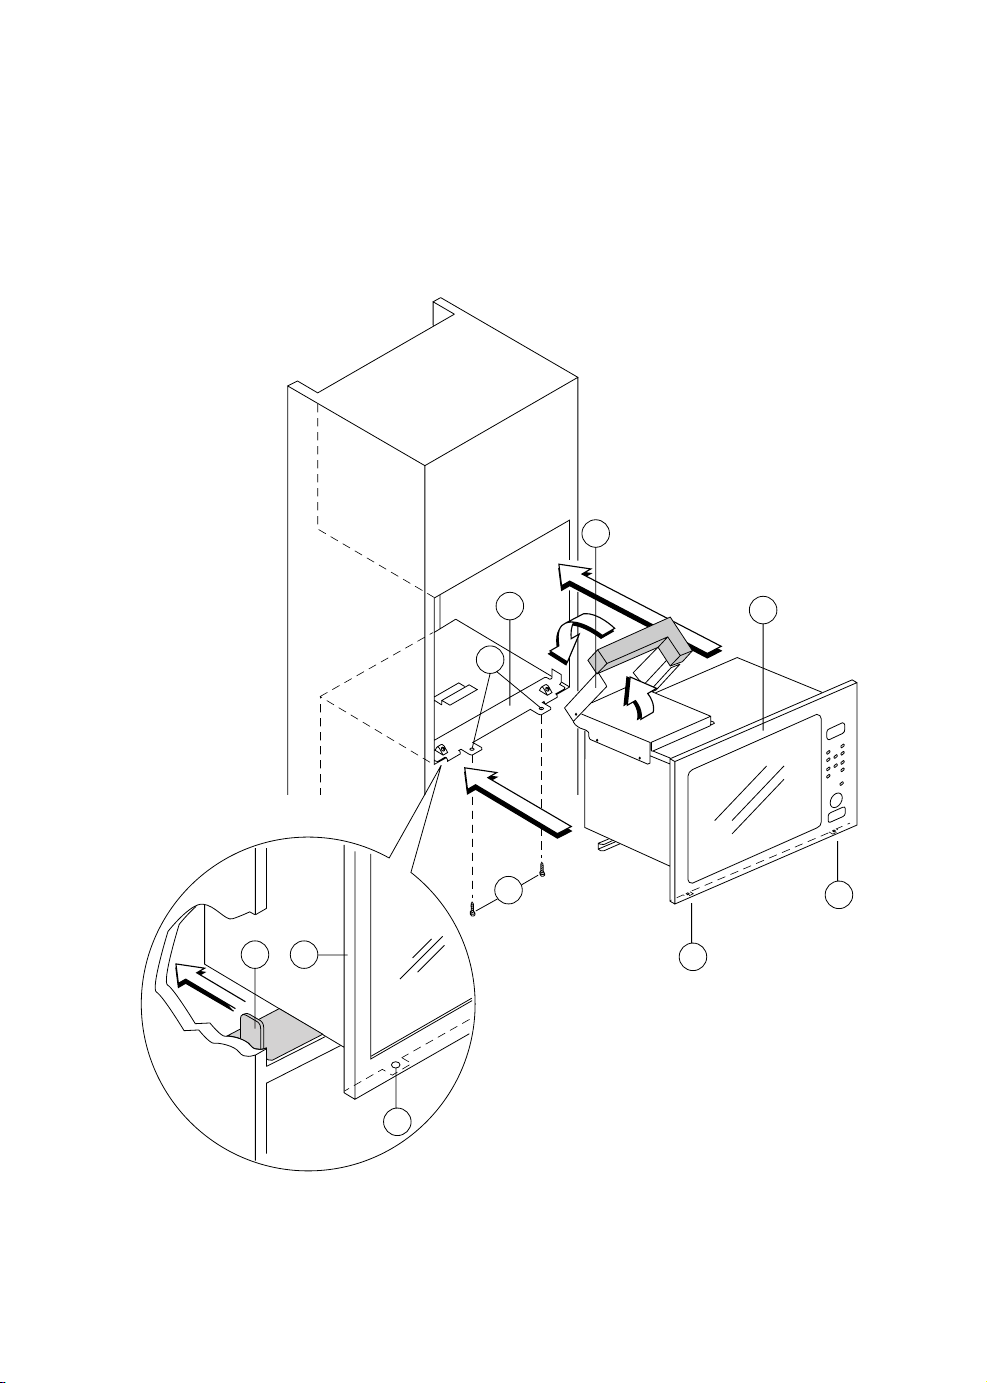
4. Open the lid of the smoke discharge (C) fully.
5. Slide the appliance into the recess. Slide the front of the appliance over the fastening bar (B). Keep sliding it
until the front of the oven (G) is resting against the cupboard and the holes (D) under the oven are aligned
with the holes (E) in the fastening bar (B).
6. Fasten the appliance to the fastening bar (B) using the previously removed screws (X).
ELECTRICAL CONNECTION - IMPORTANT:
If the appliance is provided with supply cord AND plug, the appliance shall be positioned so that the plug is always
accessible. If the appliance is provided with a supply cord WITHOUT the plug, the appliance must be connected to a
fixed main wiring incorporating a disconnection switch with contact separation of at least 3 mm in all poles and provided with permanent connection to earth.
C
B
G
E
F
B
G
D
D
D
36
1.4 IMPORTANT SAFETY WARNINGS
Read these instructions carefully and keep for future reference.
N.B. This oven has been designed to defrost, heat and cook food in the home. It must never be used for other
purposes, modified or tampered with in any way.
1) WARNING: If the door or door seals are damaged, the oven must not be operated until it has been repaired
by a competent person (trained by the manufacturer or by its Customer Service).
2) WARNING: It is hazardous for anyone other than a competent person to carry out any service or repair
operation which involves the removal of a cover which gives protection against exposure to microwave energy.
3) WARNING: Liquids and other foods must not be heated in sealed containers since they are liable to explode.
Eggs in their shell and whole hard-boiled eggs should not be heated in microwave ovens since they may
explode even after microwave heating has ended.
4) WARNING: Accessible parts may become hot during use. Young children should be kept away. The appliance is not intended for use by young children or infirm persons without supervision. Children should not be
allowed to play with the appliance or tamper with its controls. Do not allow children near the oven when it
is in operation, as this may result in severe burns.
5) Do not attempt to operate the oven with the door open by tampering with the safety devices.
6) Do not operate the oven if objects for any kind get stuck between the front panel of the oven and the door.
Always keep the inside of the door (B) clean, using a damp cloth and non-abrasive
detergents. Do not allow dirt or remains of food to accumulate between the front
panel of the oven on the door.
7) If the power cable becomes damaged, this must be substituted only by specialised
personnel authorised or by the manufacturer.
8) If smoke is observed, switch off or unplug the appliance and KEEP THE DOOR
CLOSED in order to stifle any flames.
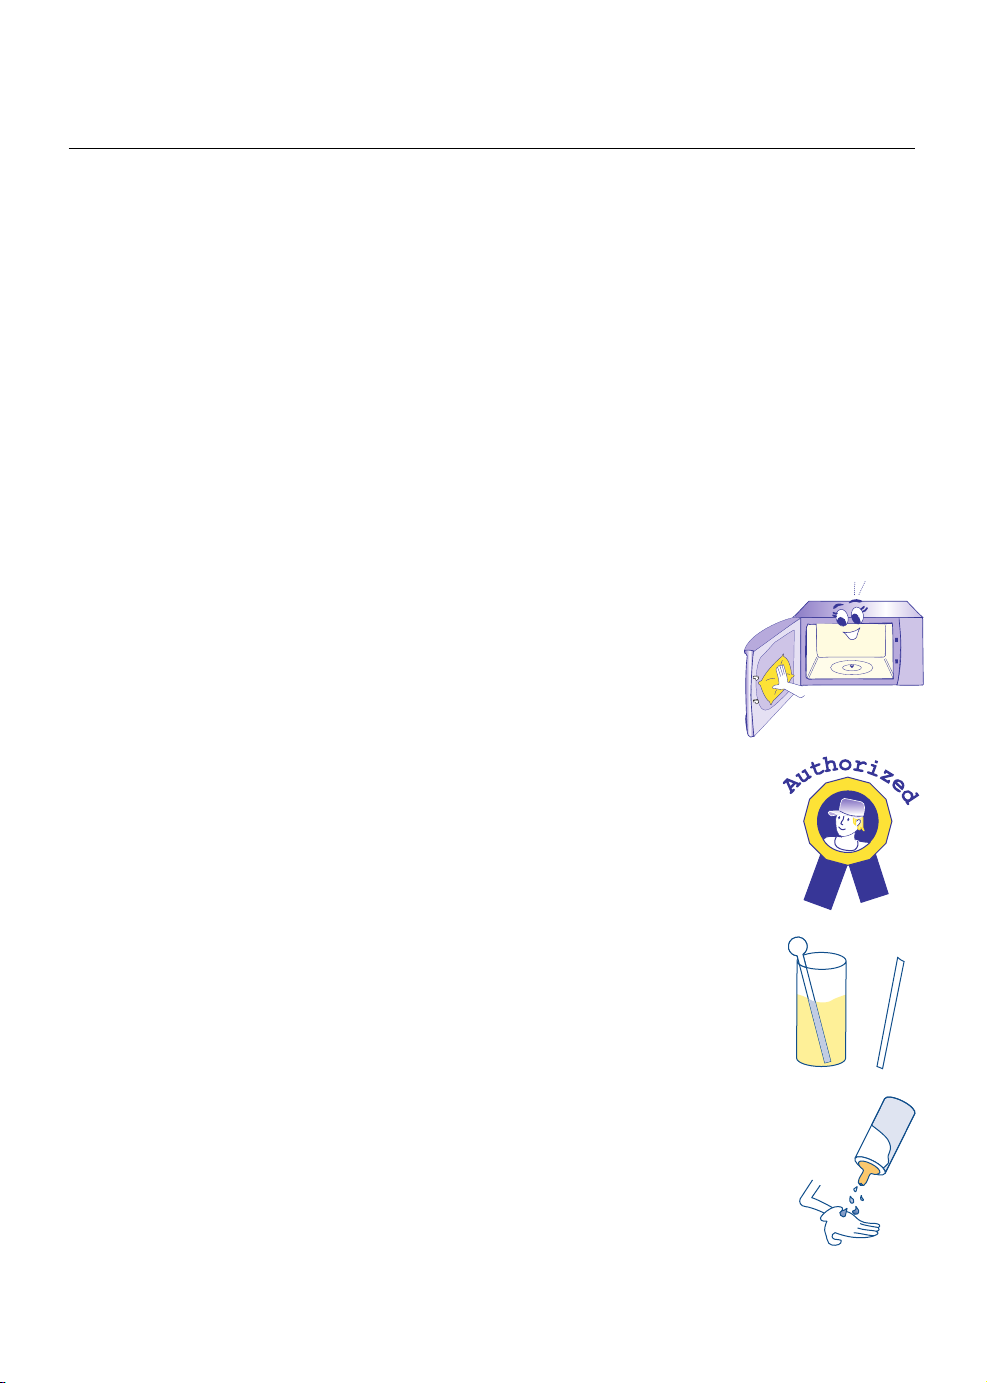
9) Only use utensils that are suitable for use in microwave ovens. In order to avoid overheating and the consequent risk of fire, it is advisable to supervise the oven when
cooking food in disposable containers made of plastic, cardboard or other inflammable materials, and when heating small quantities of food.
10)Never place the turntable in water after it has ben heated for a long time. The high
thermal shock resulting would break the turntable.
11)You must not either preheat or operate the microwave oven in any way without food
in the oven. Sparking can occur if you were to ignore this warning.
12)Before using this oven, make sure that the utensil and containers chosen are suitable
for microwave oven use (see the section on "Glassware and Similar Items").
13)When heating liquids (water, coffee, milk, etc.) it is possible that the contents may
suddenly start to boil and spill violently as a result of delayed boiling, causing scalding. To avoid this happening, you should place a heat-resistant plastic spoon or a
glass rod in the container before starting to heat liquids. Anyway, care should be
taken when handling the container.
14)Do not heat spirit with a high alcohol content, nor large quantities of oil, as these
could catch fire !
15)The contents of feeding bottles and baby food jars should be stirred or shaken and
the temperature should be checked before consumption in order to avoid burns. It is
also advisable to stir or shake the food in order to ensure that it has an even temperature.
When using commercially available bottle sterilisers, before turning the oven on, ALWAYS make sure the

37
1.5 TECHNICAL DATA
Outer measurements (see building-in)
Inner measurements (LxDxH) 322x202x330
Oven’s net volume 24 Lt
Approximate weight 20 Kg
Turntable diameter 27,5 cm
Oven light 25 w
OUTPUT POWER - MICROWAVE: 900 W (IEC705)
For additional data, consult the data plate placed on the front side of the appliance.
This appliance conforms to EC directives 89/336 and 92/31 on Electromagnetic Compatibility and EC
directive no. 1935/2004 of 27/10/2004 on materials intended for contact with food.
1.6 INSTALLATION AND ELECTRICAL CONNECTION
The oven must be built-in at a minimum hight of 850 mm.
1) Remove all the accessories and wash them.
2) Clean the inside with a soft, damp cloth.
3) Check that there is no damage as a result of transportation, and in particular that the door opens and closes properly.
4) Place the support (I) in the centre of the circular groove and fix the turntable (H) to it. The spindle (D) should
be inserted in the corresponding groove in the centre of the turntable.
5) After the installation has been performed, the power supply cable and the power socket must be easy to
access.
6) Only a qualified electrician may install or relocate a socket outlet.
7) Only connect the appliance to a power socket with a power capacity of at least 16A. Also make sure that the
main switch installed in your home has a minimum power capacity of 16A in order to avoid it suddenly tripping while the oven is on.
8) Before use, check that the power supply voltage is the same as the one shown on the rating label and that
the power outlet is properly earthed: the manufacturer disclaims any liability in the event of non-compliance
with this safety regulation.
9) The majority of modern electronic appliances (TV, radio, stereo systems etc) are shielded from radio frequency (RF) signals. Certain electronic appliances may not, however, be shielded from radio frequency signals deriving from a microwave oven. You should therefore keep a distance of at least 1 - 2 metres between
these appliances and the operating oven.
container is filled with the quantity of water indicated by the manufacturer.
16)Do not use harsh abrasive cleaners or sharp metal scrapers to clean the oven door glass since they can
scratch the surface, which may result in shattering of the glass.
17)All microwaves are tested and approved in accordance with current electromagnetic safety and compatibility
regulations and standards. As a precautionary measure, pacemaker manufacturers recommend wearers to
keep a minimum distance of 20-30 cm between an operating microwave oven and the pacemaker in order
to avoid possible interference with the pacemaker. If you suspect that such an interference is occurring, turn
the oven off immediately and contact the pacemaker manufacturer.
38
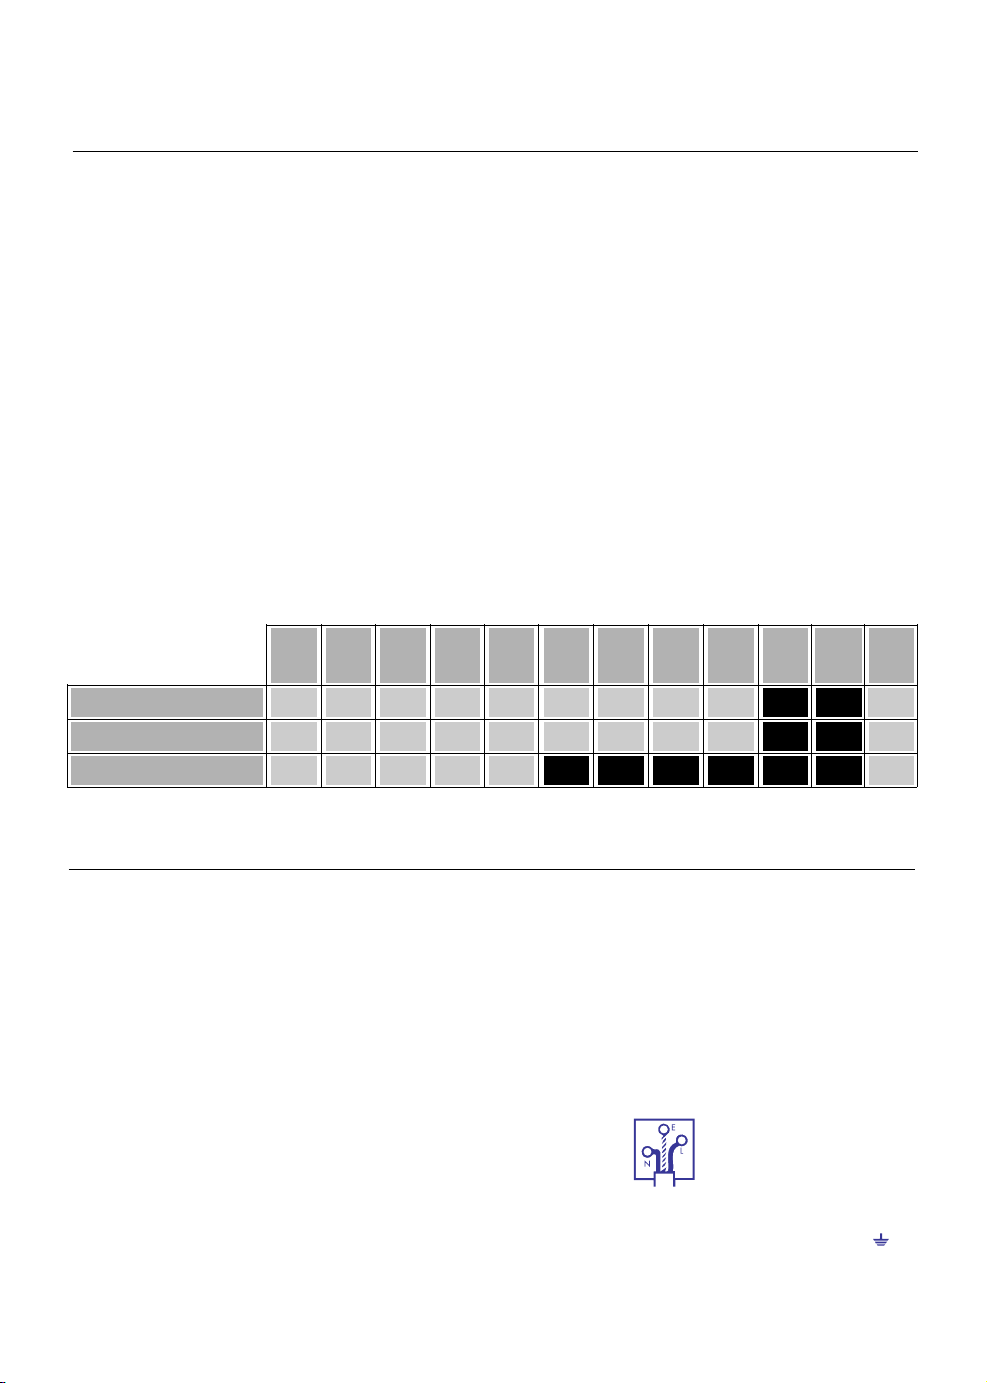
1.7 OVENWARE TO BE USED
You can make use of all types of containers made of glass (preferably Pyrex), ceramics, porcelain and glazed
pottery as long as they do not have decorations or metal parts (gilded borders, handles, feet). Heat resistant
plastic containers can also be used, but only for “Microwave Only” cooking. If you are still doubtful about using
a particular container, you can perform a simple test. Place the empty container in the oven for 30 seconds at
maximum power (“Microwave Only” function). If the container is still cold or only slightly warm, it is suitable for
microwave cooking. If it is very hot or gives out sparks, it is not suitable.
For short heating periods, you may use paper napkins, cardboard trays and plastic “throwaway” plates as a
base. As far as shape and size are concerned, it is absolutely essential that containers be such as to allow the
turntable to rotate. In order to use large-size rectangular containers (which may not be able to rotate inside the
cooking cavity), you can remove the spindle (D) from its housing to prevent the turntable (E) moving. Bear in mind
that to be assured of good results when carrying this out you must stir the food and turn the container around
several times during the cooking process. Containers made of metal, wood, recycled kitchen paper, cane and
plate glass are not suitable for use in microwave ovens. The metal rack supplied with your microwave have
been fully tested for safe use. You should remember, too, that since microwaves heat the food and not the
glassware, earthenware or similar containers for that food, it is possible to cook such foods in the serving dish
and thereby avoid the problem of having to clean pans later.
However, remember that heat may be transferred from the food itself to the plate, making it necessary to use an
oven glove.
In any case, observe the guidelines shown in the following table:
Plastic for
microwaves
YES
YES
YES
Paper
cups*
YES
YES
NO
Paper
plates*
YES
YES
NO
Parch-
ment
paper*
YES
YES
NO
Cardboard
YES
YES
NO
Metal
contain-
ers
NO
NO
NO
Glass-
ware with
metal
parts
NO
NO
NO
Special
roasting
paper
YES
YES
YES
Defrosting
Heating
Cooking
Clay
plates
YES
YES
YES
Porce-
lain
YES
YES
YES
Cera-
mics
YES
YES
YES
Glass
YES
YES
YES
* If the cooking time required is too long, there is a possibility of fire.
ELECTRICAL CONNECTION (U.K. ONLY)
A) If your appliance comes fitted with a plug, it will incorporate a 13 Amp fuse. If it does not fit your socket, the plug should
be cut off from the mains lead, and an appropriate plug fitted, as below.
WARNING: Very carefully dispose of the cut off plug after removing the fuse: do not insert in a 13 Amp socket elsewhere
in the house as this could cause a shock hazard.
With alternative plugs not incorporating a fuse, the circuit must be protected by a 15 Amp fuse.
If the plug is a moulded-on type, the fuse cover must be re-fitted when changing the fuse using a 13 Amp Asta approved
fuse to BS 1362. In the event of losing the fuse cover, the plug must NOT be used until a replacement fuse cover can be
obtained from your nearest electrical dealer. The colour of the correct replacement fuse cover is that as marked on the base
of the plug.
B) If your appliance is not fitted with a plug, please follow the instructions provided below:
WARNING - THIS APPLIANCE MUST BE EARTHED
IMPORTANT
The wires in the mains lead are coloured in accordance with the following code:
Green and yellow: Earth
Blue: Neutral
Brown: Live
As the colours of the wires in the mains lead may not correspond with the coloured markings identifying the terminals in your
plug, proceed as follows:
The green and yellow wire must be connected to the terminal in the plug marked with the letter E or the earth symbol or
coloured green or green and yellow. The blue wire must be connected to the terminal marked with the letter N or coloured
black. The brown wire must be connected to the terminal marked with the letter L or coloured red.
 Loading...