

Page 1

42
TABLE OF CONTENTS
CHAPTER 1. GENERAL
1.1 Important safety warnings . . . . . . . . . . . . . . . . . . . . . . . . . . . . . . . . . . . . . . . . . . .pag. 43
1.2 Technical data . . . . . . . . . . . . . . . . . . . . . . . . . . . . . . . . . . . . . . . . . . . . . . . . . . .pag. 44
1.3 Installation and electrical connections . . . . . . . . . . . . . . . . . . . . . . . . . . . . . . . . . . .pag. 44
1.4 Standard accessories . . . . . . . . . . . . . . . . . . . . . . . . . . . . . . . . . . . . . . . . . . . . . . .pag. 45
1.5 Ovenware . . . . . . . . . . . . . . . . . . . . . . . . . . . . . . . . . . . . . . . . . . . . . . . . . . . . . .pag. 46
1.6 Rules and hints for using the oven . . . . . . . . . . . . . . . . . . . . . . . . . . . . . . . . . . . . .pag. 47
CHAPTER 2. SWITCHING ON AND GETTING TO KNOW YOUR OVEN
2.1 Selecting the language . . . . . . . . . . . . . . . . . . . . . . . . . . . . . . . . . . . . . . . . . . . . .pag 48
2.2 Setting the clock . . . . . . . . . . . . . . . . . . . . . . . . . . . . . . . . . . . . . . . . . . . . . . . . . .pag. 48
2.3 Function modes . . . . . . . . . . . . . . . . . . . . . . . . . . . . . . . . . . . . . . . . . . . . . . . . . .pag. 49
2.4 Display . . . . . . . . . . . . . . . . . . . . . . . . . . . . . . . . . . . . . . . . . . . . . . . . . . . . . . . .pag. 50
CHAPTER 3. AUTOMATIC MODE
3.1 Using automatic mode . . . . . . . . . . . . . . . . . . . . . . . . . . . . . . . . . . . . . . . . . . . . .pag. 51
3.2 Food categories . . . . . . . . . . . . . . . . . . . . . . . . . . . . . . . . . . . . . . . . . . . . . . . . . .pag. 53
READY MEALS. . . . . . . . . . . . . . . . . . . . . . . . . . . . . . . . . . . . . . . . . . . . . . . . . . . . . . . . .pag.53
PIZZA/SAVOURIES . . . . . . . . . . . . . . . . . . . . . . . . . . . . . . . . . . . . . . . . . . . . . . . .pag. 54
QUICHE . . . . . . . . . . . . . . . . . . . . . . . . . . . . . . . . . . . . . . . . . . . . . . . . . . . . . . .pag. 54
RICE/RISOTTO . . . . . . . . . . . . . . . . . . . . . . . . . . . . . . . . . . . . . . . . . . . . . . . . . .pag. 54
PASTA GRATIN . . . . . . . . . . . . . . . . . . . . . . . . . . . . . . . . . . . . . . . . . . . . . . . . . . .pag. 54
SOUP / PORRIDGE . . . . . . . . . . . . . . . . . . . . . . . . . . . . . . . . . . . . . . . . . . . . . .pag. 54
MEAT . . . . . . . . . . . . . . . . . . . . . . . . . . . . . . . . . . . . . . . . . . . . . . . . . . . . . . . . .pag. 55
ROAST BEEF . . . . . . . . . . . . . . . . . . . . . . . . . . . . . . . . . . . . . . . . . . . . . . . . . . . .pag. 55
CASSEROLE . . . . . . . . . . . . . . . . . . . . . . . . . . . . . . . . . . . . . . . . . . . . . . . . . . . . .pag. 55
POULTRY . . . . . . . . . . . . . . . . . . . . . . . . . . . . . . . . . . . . . . . . . . . . . . . . . . . . . . .pag. 55
FISH . . . . . . . . . . . . . . . . . . . . . . . . . . . . . . . . . . . . . . . . . . . . . . . . . . . . . . . . . .pag. 56
POTATOES . . . . . . . . . . . . . . . . . . . . . . . . . . . . . . . . . . . . . . . . . . . . . . . . . . . . . .pag. 56
VEGETABLES . . . . . . . . . . . . . . . . . . . . . . . . . . . . . . . . . . . . . . . . . . . . . . . . . . . .pag. 56
CAKES . . . . . . . . . . . . . . . . . . . . . . . . . . . . . . . . . . . . . . . . . . . . . . . . . . . . . . . .pag. 57
REHEAT LIQUIDS . . . . . . . . . . . . . . . . . . . . . . . . . . . . . . . . . . . . . . . . . . . . . . . . .pag. 57
CHAPTER 4. MANUAL MODE
4.1 Summary table . . . . . . . . . . . . . . . . . . . . . . . . . . . . . . . . . . . . . . . . . . . . . . . . . . .pag. 58
4.2 MICRO mode (microwave mode) . . . . . . . . . . . . . . . . . . . . . . . . . . . . . . . . . . . . . .pag. 59
4.3 MICRO FAN mode (microwave fan mode) . . . . . . . . . . . . . . . . . . . . . . . . . . . . . . . .pag. 60
4.4 FAN mode . . . . . . . . . . . . . . . . . . . . . . . . . . . . . . . . . . . . . . . . . . . . . . . . . . . . . .pag. 62
4.5 MICRO GRILL mode (microwave grill mode) . . . . . . . . . . . . . . . . . . . . . . . . . . . . . . .pag. 63
4.6 GRILL mode . . . . . . . . . . . . . . . . . . . . . . . . . . . . . . . . . . . . . . . . . . . . . . . . . . . . .pag. 64
4.7 Quick reheat mode . . . . . . . . . . . . . . . . . . . . . . . . . . . . . . . . . . . . . . . . . . . . . . . .pag. 65
4.8 Memory key . . . . . . . . . . . . . . . . . . . . . . . . . . . . . . . . . . . . . . . . . . . . . . . . . . . .pag. 66
4.9 Turntable stop key . . . . . . . . . . . . . . . . . . . . . . . . . . . . . . . . . . . . . . . . . . . . . . . . .pag. 66
4.10 Timer function . . . . . . . . . . . . . . . . . . . . . . . . . . . . . . . . . . . . . . . . . . . . . . . . . . . .pag. 66
4.11 Child safety lock . . . . . . . . . . . . . . . . . . . . . . . . . . . . . . . . . . . . . . . . . . . . . . . . .pag. 66
4.12 Defrosting: rules, hints and defrosting table . . . . . . . . . . . . . . . . . . . . . . . . . . . . . . .pag. 66
4.13 Reheating: rules, hints and reheating table . . . . . . . . . . . . . . . . . . . . . . . . . . . . . . .pag. 68
4.14 Cooking hors d’oeuvres and first courses: rules, tips and table . . . . . . . . . . . . . . . . .pag. 69
4.15 Cooking meat: rules, hints and cooking table . . . . . . . . . . . . . . . . . . . . . . . . . . . . . .pag. 70
4.16 Cooking fish: rules, tips and cooking table . . . . . . . . . . . . . . . . . . . . . . . . . . . . . . .pag. 70
4.17 Cooking side dishes and vegetables: rules, hints and cooking table . . . . . . . . . . . . . .pag. 70
4.18 Cooking cakes and tarts: rules, hints and cooking table . . . . . . . . . . . . . . . . . . . . . .pag. 71
CHAPTER 5. RECIPES
. . . . . . . . . . . . . . . . . . . . . . . . . . . . . . . . . . . . . . . . . . . . . . . . . . . . . . . . . . . . . . . . .pag. 72
CHAPTER 6. CLEANING AND MAINTENANCE . . . . . . . . . . . . . . . . . . . . . . . . . . . . . . . . . .
6.1 Cleaning . . . . . . . . . . . . . . . . . . . . . . . . . . . . . . . . . . . . . . . . . . . . . . . . . . . . . . .pag. 77
6.2 Maintenance . . . . . . . . . . . . . . . . . . . . . . . . . . . . . . . . . . . . . . . . . . . . . . . . . . . .pag. 78
GB 10-09-2002 12:24 Pagina 42
Page 2

43
CHAPTER 1: GENERAL
1.1 IMPORTANT SAFETY WARNINGS
Read these instructions carefully and keep them safe for future reference.
1) WARNING: If the door or door seals are damaged, the oven must not be operated until it has been
repaired by a competent person (trained by the manufacturer or by its
Customer Service).
2) WARNING: It is hazardous for anyone other than a competent person to
carry out any service or repair operation which involves the removal of
a cover which gives protection against exposure to microwave energy.
3) WARNING: Liquids and other foods must not be heated in sealed containers since they are liable to explode. Eggs in their shell and whole
hard-boiled eggs should not be heated in microwave ovens since they
may explode even after microwave heating has ended.
4) WARNING: Only allow children to use the oven without supervision
when adequate instructions have been given so that the child is able to
use the oven in a safe way and understands the hazards of improper
use. The appliance is not intended for use by young children or infirm
persons. Young children should be supervised to ensure that they do not
play with the appliance.
5) Do not tamper with the safety devices in an attempt to operate the oven with the door
open.
6) Do not operate the oven if objects of any kind get stuck between the front panel and
the door. Always keep the inside of the door (E) clean, using a damp cloth and nonabrasive detergents. Do not allow dirt or the remains of food to build up between the
front panel and the door (fig. 1).
7) Do not place heavy objects on the opened door or pull downwards sharply on the
handle. The oven could tip over. Never place hot containers or pans (e.g. just taken off the stove) on
the opened door (fig. 2).
8) If the supply cord is damaged, it must be replaced by the manufacturer or its service agent or a similarly qualified person in order to avoid a hazard.
9) If smoke comes out of the oven, switch it off and unplug it immediately. KEEP THE DOOR CLOSED to
stifle any flames.
10)Only use utensils that are suitable for use in microwave ovens. To avoid overheating and risk of fire,
always monitor the oven when cooking food in disposable containers made of plastic, cardboard or
other inflammable materials, and when heating small quantities of food.
11)Never place the turntable in cold water when it is hot. Rapid cooling can cause it to crack.
12)Never preheat or operate the oven when empty in MICROWAVE, MICROWAVE FAN, or MICROWAVE GRILL modes, because this can could cause sparking.
13)Make sure that ovenware and containers are suitable for use in microwave ovens before using them in
the oven (see "Ovenware").
14)The temperature of the door or the outer surface may be high when the appliance is operating. Do not
place anything on top of the oven while in use. Do not touch the heating elements inside the oven.
15)Liquids like water, coffee, milk, etc. can boil with delayed action after heating in a microwave oven.
They can boil and spill suddenly, causing scalding. To avoid this, place a heat-resistant plastic spoon
or glass rod in the container before starting to heat liquids (fig. 4). Always take care when handling
containers full of hot liquids.
fig. 1
fig. 2
fig. 3
GB 10-09-2002 12:24 Pagina 43
Page 3

44
CHAPTER 1: GENERAL
16) Do not heat spirits with a high alcohol content, or large quantities of oil.
Both types of liquid are flammable!
17) To avoid burns, stir and shake the contents of feeding bottles and baby
food jars, and always check their temperature before feeding (fig. 5).
Stirring or shaking also ensures that the temperature of the food is
uniform throughout.
When using commercial bottle sterilisers, ALWAYS make sure that the
container is filled with the quantity of water specified by the manufacturer before starting heating.
NOTE: When you switch on the oven for the first time, it may produce
a “new” smell and even small amounts of smoke for the first ten minutes or so. This is normal and due to protective coatings applied the heating elements.
1.2 TECHNICAL DATA
• ENERGY CONSUMPTION (CENELEC HD 376 standards)
To reach 200 °C 0,35 kWh
To maintain 200°C for one hour 1,15 kWh
Total consumption 1,5 kWh
• MICROWAVE OUTPUT POWER: 1000W (IEC705)
Consult the data plate on the rear of the oven for further details.
This appliance conforms to E.E.C. directives 89/336 and 92/31 on Electromagnetic Compatibility, and
to E.E.C. directive 89/109 on materials which come into contact with food.
MICROWAVE OUTPUT POWER
The microwave output power is specified on the data plate on the rear of the oven (see “MICRO OUTPUT”).
When using cooking tables, always refer to the output power for your oven. This is specially important when
you use microwave cookery books.
On some models, the microwave output power is also stated inside this symbol
on the control panel.
1.3 INSTALLATION AND ELECTRICAL CONNECTIONS
1) Remove the oven from its box. Remove the protective packaging containing the turntable (H), its support ring (I), and all the oven accessories. Check that the turntable spindle (D) engages correctly in its
recess in the centre of the turntable.
2) Clean the inside of the oven with a soft, damp cloth.
3) Check that the oven has not been damaged during transport. Check in
particular that the door opens and closes properly.
4) Place the oven on a flat, stable surface at least 85 cm out of the reach of
children, since the door can become very hot during cooking.
5) When positioning the oven on the worktop, take care to maintain a
gap of approx. 5 cm between the oven and the walls to its rear and
sides, and a gap of at least 20 cm above the oven (fig. 6).
20 cm
5 cm
fig. 6
fig. 4
fig. 5
GB 10-09-2002 12:24 Pagina 44
Page 4
45
CHAPTER 1: GENERAL
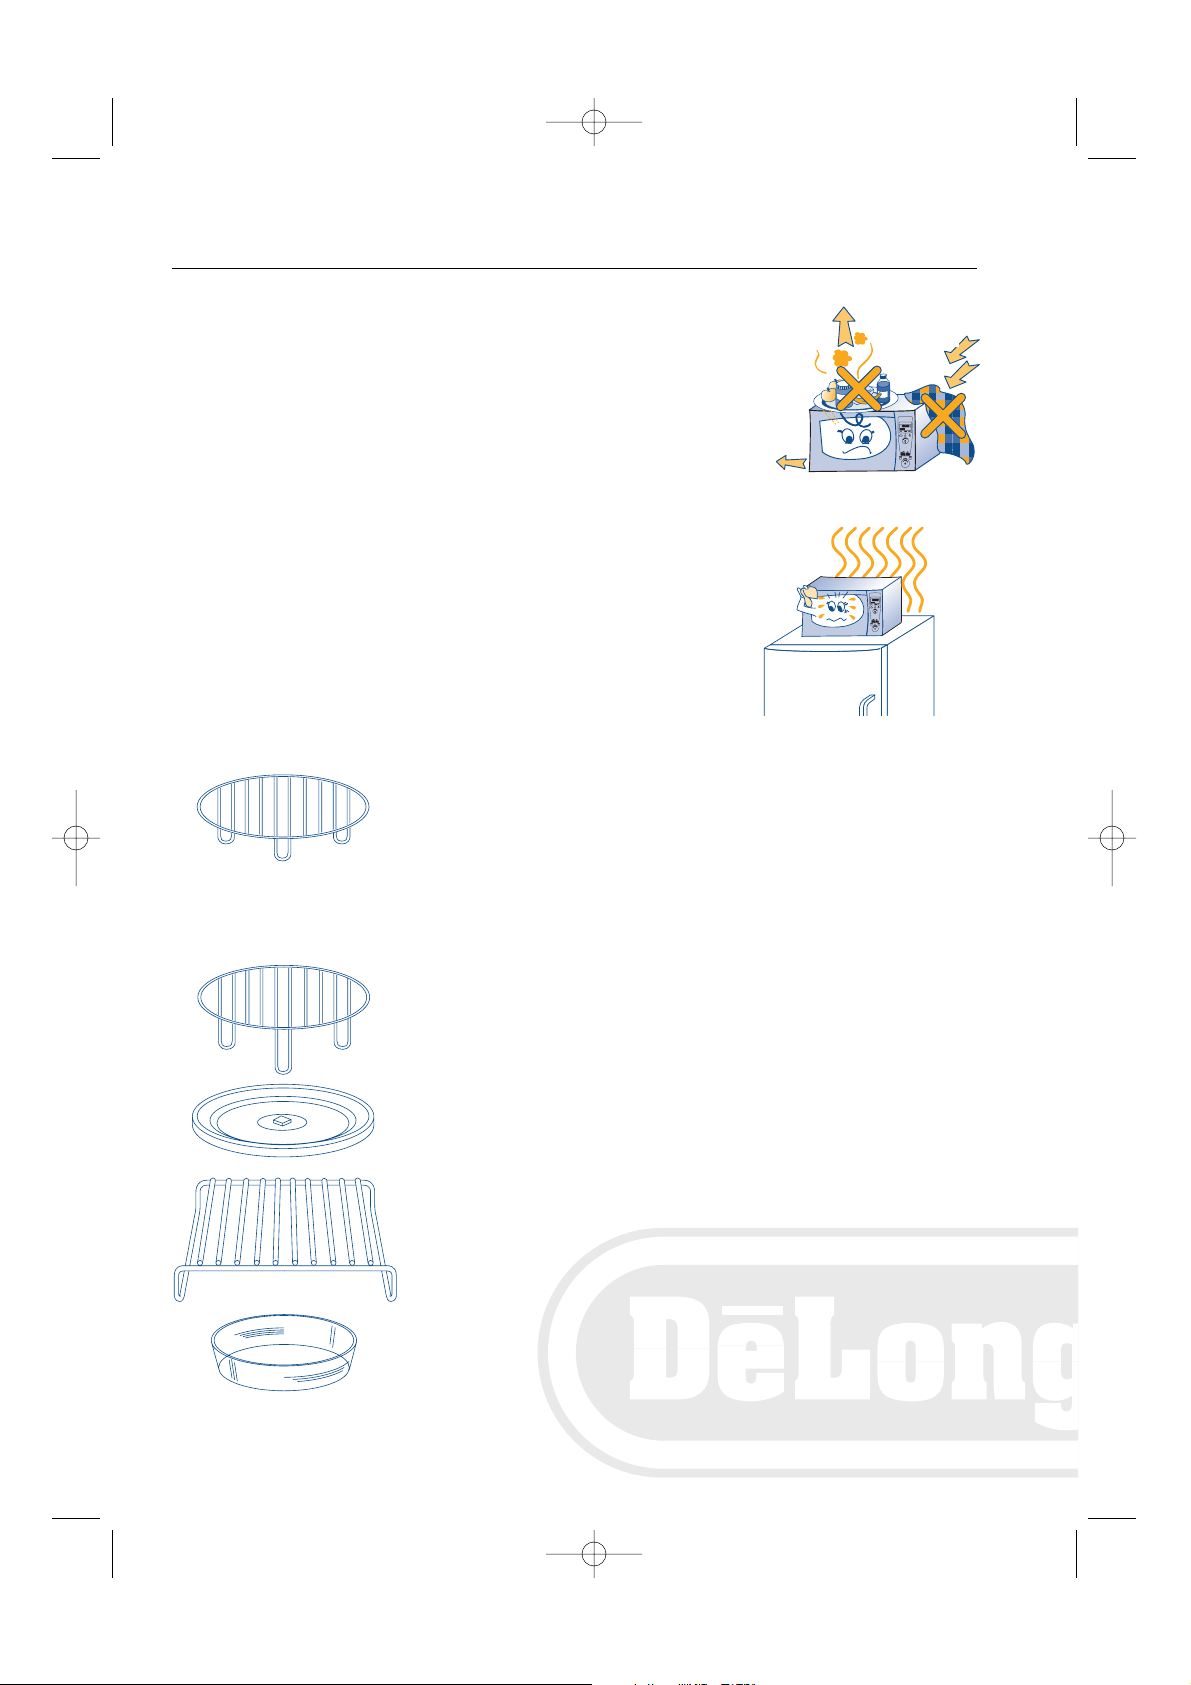
6) Do not block the air intake vents. Do not place any objects on top of the
oven and check that the air and steam outlet vents (at the top, bottom
and/or rear of the oven) are ALWAYS UNOBSTRUCTED (fig. 7)
7) Place the turntable support ring (I) in the centre of the circular recess in
the oven floor and place the turntable (H) on top of it. Engage the spindle (D) with the recess in the centre of the turntable.
N.B. Do not position the oven on or near sources of heat (for example
on top of a refrigerator) (fig. 8).
8) Only connect the oven to a power socket rated at least 16A. Also make
sure that your home’s main switch is rated at least 16A to avoid sudden
power failures when the oven is switched on.
9) Position the oven in such a way that the power plug and socket are easily
accessible.
10)Before you switch on the oven, check that the mains voltage corresponds
to that specified on the oven’s data plate and that the power socket is pro-
perly earthed. The manufacturer declines all responsibility if this safety
precaution is not observed.
1.4 STANDARD ACCESSORIES
LOW WIRE RACK
Fan mode:
use for all types of traditional cooking, especially cakes.
Micro fan mode and micro grill mode
use for rapid cooking of meat, potatoes, some leavened cakes and desserts
and gratin dishes (e.g. lasagne).
Automatic mode:
use with nearly all food categories (carefully read the instructions in the
cooking tables).
HIGH WIRE RACK
Grill mode:
use for all types of grilled food.
TURNTABLE
Used for all operating and cooking modes.
RECTANGULAR WIRE RACK
Fan mode
use for all types of traditional cooking requiring large rectangular casserole dishes. The food must be stirred or turned manually during cooking. Place
the rack directly on the bottom of the oven. There is no need to remove the
turntable (H). Do not use this wire rack for microwave cooking.
OVENPROOF DISH
For use in certain cooking modes as specified in the recipes and cooking
tables.
fig. 7
fig. 8
AIR
OUTLET
AIR
OUTLET
AIR
INLET
GB 10-09-2002 12:24 Pagina 45
USCITA
ARIA
USCITA
ARIA
ENTRATA
ARIA
Page 5
46
CHAPTER 1: GENERAL
1.5 OVENWARE
• AUTOMATIC MODE
In AUTOMATIC mode, always use the ovenware specified in the tables in section 3.2 - FOOD
CATEGORIES.
•MANUAL MODE
In MICRO, MICRO FAN and MICRO GRILL modes, any glass (preferably Pyrex), ceramic, china or
terracotta ovenware may be used provided it has no metal decorations or parts (e.g. gold paint
decorations, metal handles, feet etc.).
Heat resistant plastic containers may also be used, but only in MICRO mode.
If you are in doubt about the suitability of a particular dish, perform this simple test. Place the empty
dish in the oven and operate in MICRO mode for 30 seconds at maximum power level.
If after 30 seconds the dish is still cold or only slightly warm, it is suitable for microwave cooking. If it
is very hot or if it causes sparks while the oven is operating, it is not suitable.
Paper napkins, cardboard trays and disposable plastic plates can also be used underneath dishes for
short cooking times.
The size and shape of containers must allow them to rotate easily inside the oven.
Metal, wood, cane and crystal glass containers are not suitable for microwave cooking.
É opportuno ricordare che, poiché le microonde riscaldano il cibo e non il vasellame, é possibile cuocere
il cibo direttamente sul piatto di portata ed evitare così l’uso e la conseguente pulizia di pentole. Tenere
comunque presente che è possibile che sia il cibo, molto caldo, a trasmettere calore al piatto, rendendo
necessario l’uso di presine.
Since microwaves heat food - and not the dish - you can also heat food on the plate you intend to serve it
on. This can save you a lot of unnecessary washing up.
Remember that heat may transfer from the food to the plate, and that you may have to use an oven glove
to remove it.
All standard ovenware may be used in FAN and GRILL modes.
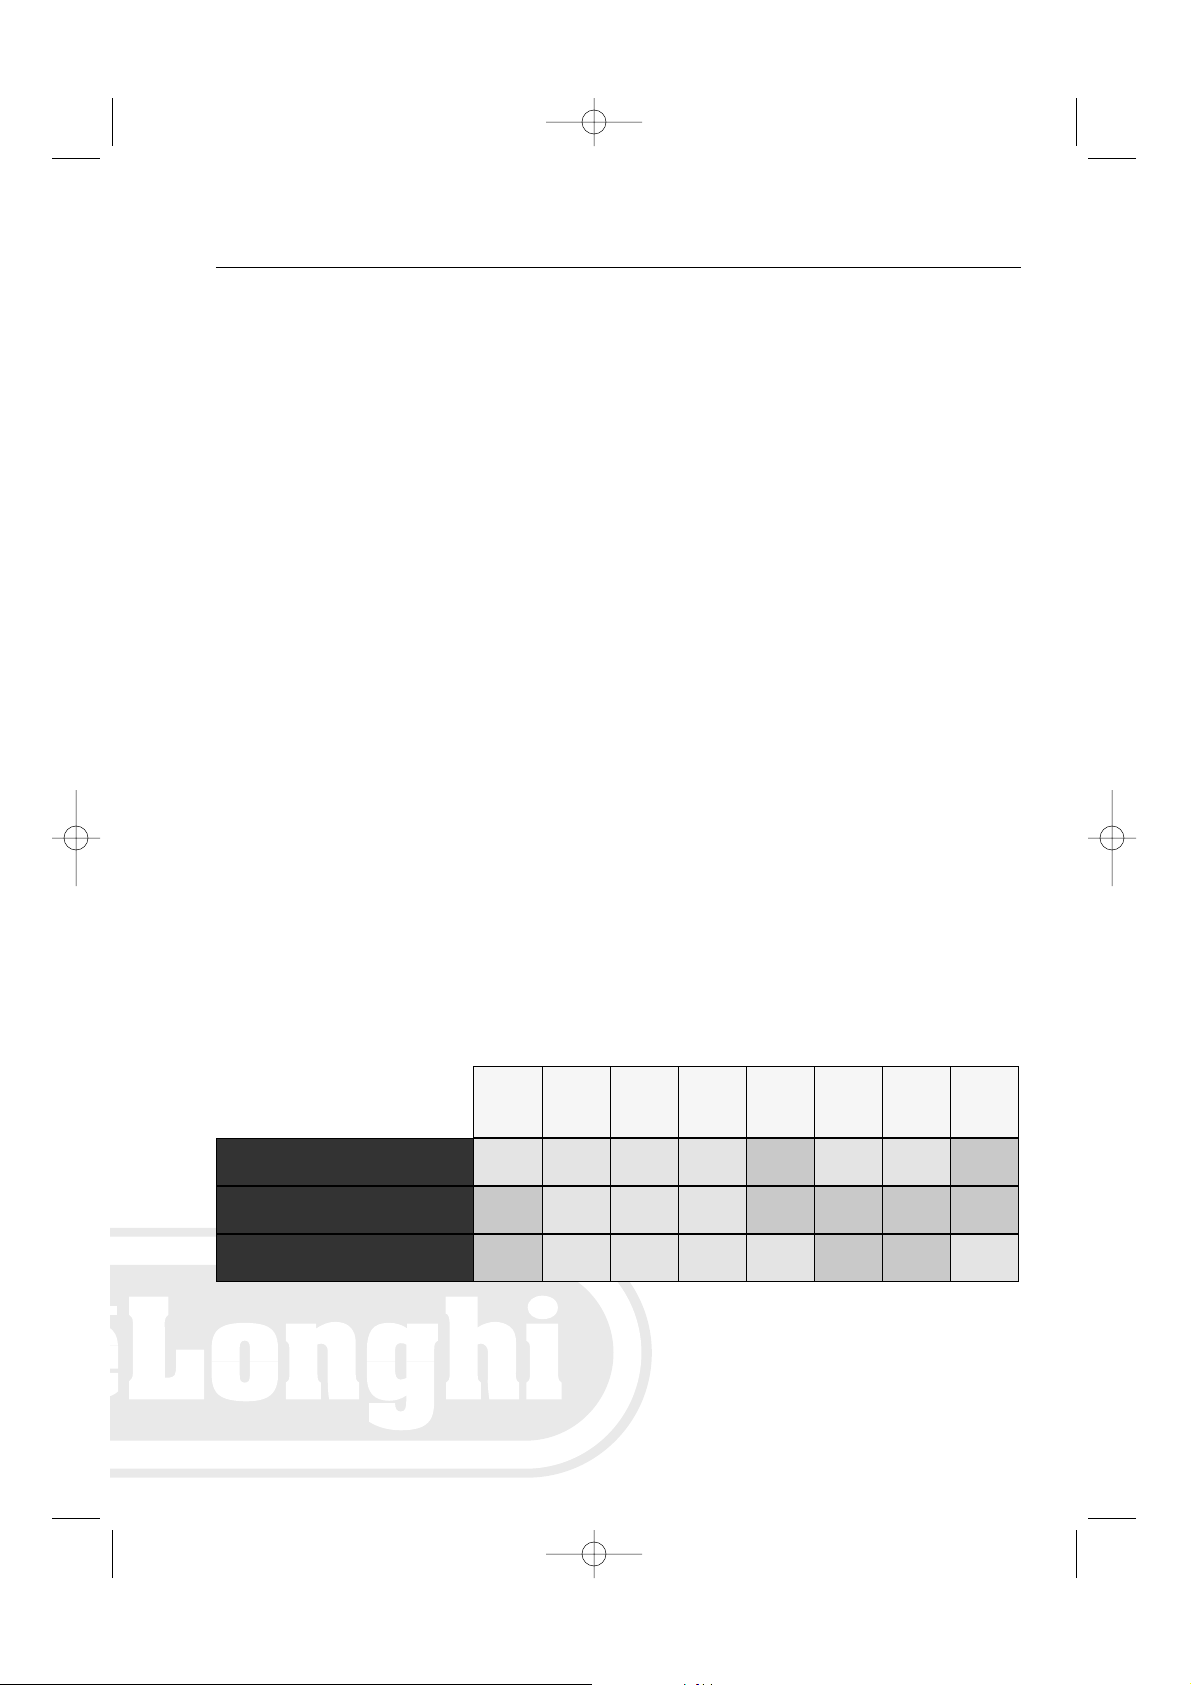
The following table provides useful guidelines for choosing ovenware:
Metal
containers
Paper or
cardboard
Plastic
Aluminium
foil
Terracotta
Pyroce-
ram
PyrexGlass
NOYESYESNOYESYESYESYES
NONONONOYESYESYESNO
YESNONOYESYESYESYESNO
“MICRO” mode
“MICRO FAN”
modes
“MICRO GRILL” modes
“FAN OVEN” modes
“GRILL”modes
GB 10-09-2002 12:24 Pagina 46
Page 6

47
CHAPTER 1: GENERAL
1.6 RULES AND HINTS FOR USING THE OVEN
Microwaves are a form of electromagnetic radiation. They occur in nature in the form of light waves (e.g.
sunlight). In the oven, these waves penetrate food from all directions to heat water, fat and sugar molecules.
This generates heat very quickly only in the food itself. The container warms up only as a result of heat
spreading from the food.
In microwave cooking, food does not stick to its dish. You can therefore use very little fat and in some cases
no fat at all.
Microwave cooking is therefore a healthy form of cooking. In contrast to traditional methods, microwave
cooking also dehydrates foods less, destroys less of their nutritional value, and retains more original flavour.
Basic rules for correct microwave cooking
1) Cooking time depends directly on the size and consistency of the
food. A casserole will cook faster than a roast because it consists of
smaller pieces, and because all the pieces are of the same consistency.
When you refer to the cooking tables later in this manual, remember
that you must increase or reduce cooking time to match the volume of
the food you are cooking.
Always respect standing time. Standing time is the time for which you
must leave food “rest” after cooking. Standing time ensures that food
is served at an even temperature throughout.
The temperature of meat, for example, can rise between 5°C and 8°C
(approx. 9°F to 15°F) during standing time. Food can be left to stand
inside or out of the oven.
2) Always mix or stir food several times during cooking. This not only
ensures even temperature distribution but also reduces cooking time.
3) Also turn food over during cooking. This is specially important for
meat, whether in large pieces (roasts, whole chickens, etc.) or small
pieces (chicken breasts, casseroles, etc.).
4) Pierce foods with skins, shells or peel (e.g. apples, potatoes, tomatoes, frankfurters, fish, etc.) with a fork
at several points to allow steam to escape from inside. This prevents these foods from exploding inside
the oven (see fig. 9).
5) If you are cooking a number of portions of the same type of food (e.g. potatoes), arrange the portions
in a ring around the outside of an ovenproof dish to ensure that they cook uniformly (see fig. 10).
6) The lower the temperature at which food is placed in the oven, the longer the cooking time required.
Food placed in the oven at room temperature will cook sooner than food coming directly from the refrigerator.
7) Always place dishes and containers in the middle of the turntable.
8) It is perfectly normal for condensation to form inside the oven and
near the air outlet vents. To reduce condensation, cover food with
clear film, wax paper, a Pyrex lid or simply an overturned plate.
Foods with a high water content (e.g. greens and vegetables) cook better when covered. Covering food also helps keep the inside of the oven
clean. Use clear film made expressly for microwave ovens.
9) Do not cook eggs in their shells (fig. 11). Pressure will build up inside
and can cause the egg to explode, even after cooking has finished.
Do not reheat eggs in their shells even if they have already been cooked. Only reheat scrambled eggs.
10)Always open air-tight or sealed containers before placing them in the oven. Otherwise pressure will
build up inside and can cause them to swell and explode even after cooking has finished.
fig. 9
fig. 10
fig. 11
GB 10-09-2002 12:24 Pagina 47
Page 7
48
CHAPTER 2: SWITCHING ON AND GETTING TO KNOW YOUR OVEN
2.1 SELECTING THE LANGUAGE
1) Connect the oven to the mains power socket. The control emits a short beep and displays
the following languages in sequence: ENGLISH, ITALIANO, DEUTSCH, FRANCAIS, ESPA-
NOL.
2) Select the language you want the display to operate in. You cannot use any other oven function until you have done this.
3) Wait until the language you want is displayed then press and hold down the SELECT ‘AUTO-
MATIC’ knob (5) for at least 5 seconds. The control emits 3 beeps, then after 5 seconds
another beep, and displays “LANGUAGE STORED”. A few seconds
later the display changes to “--:--” and the dashes flash.
At this point you can use any oven function or proceed to set the
clock (as instructed below).
4) The language setting remains permanently in the memory even
in the event of a temporary power failure.
5) If you want to change language, press STOP/CLEAR (6), then
press and hold the AUTOMATIC knob (5) for 5 seconds. The con-
trol emits a beep and the five language options scroll on the
display. Repeat the steps from 3) on to select a new language.
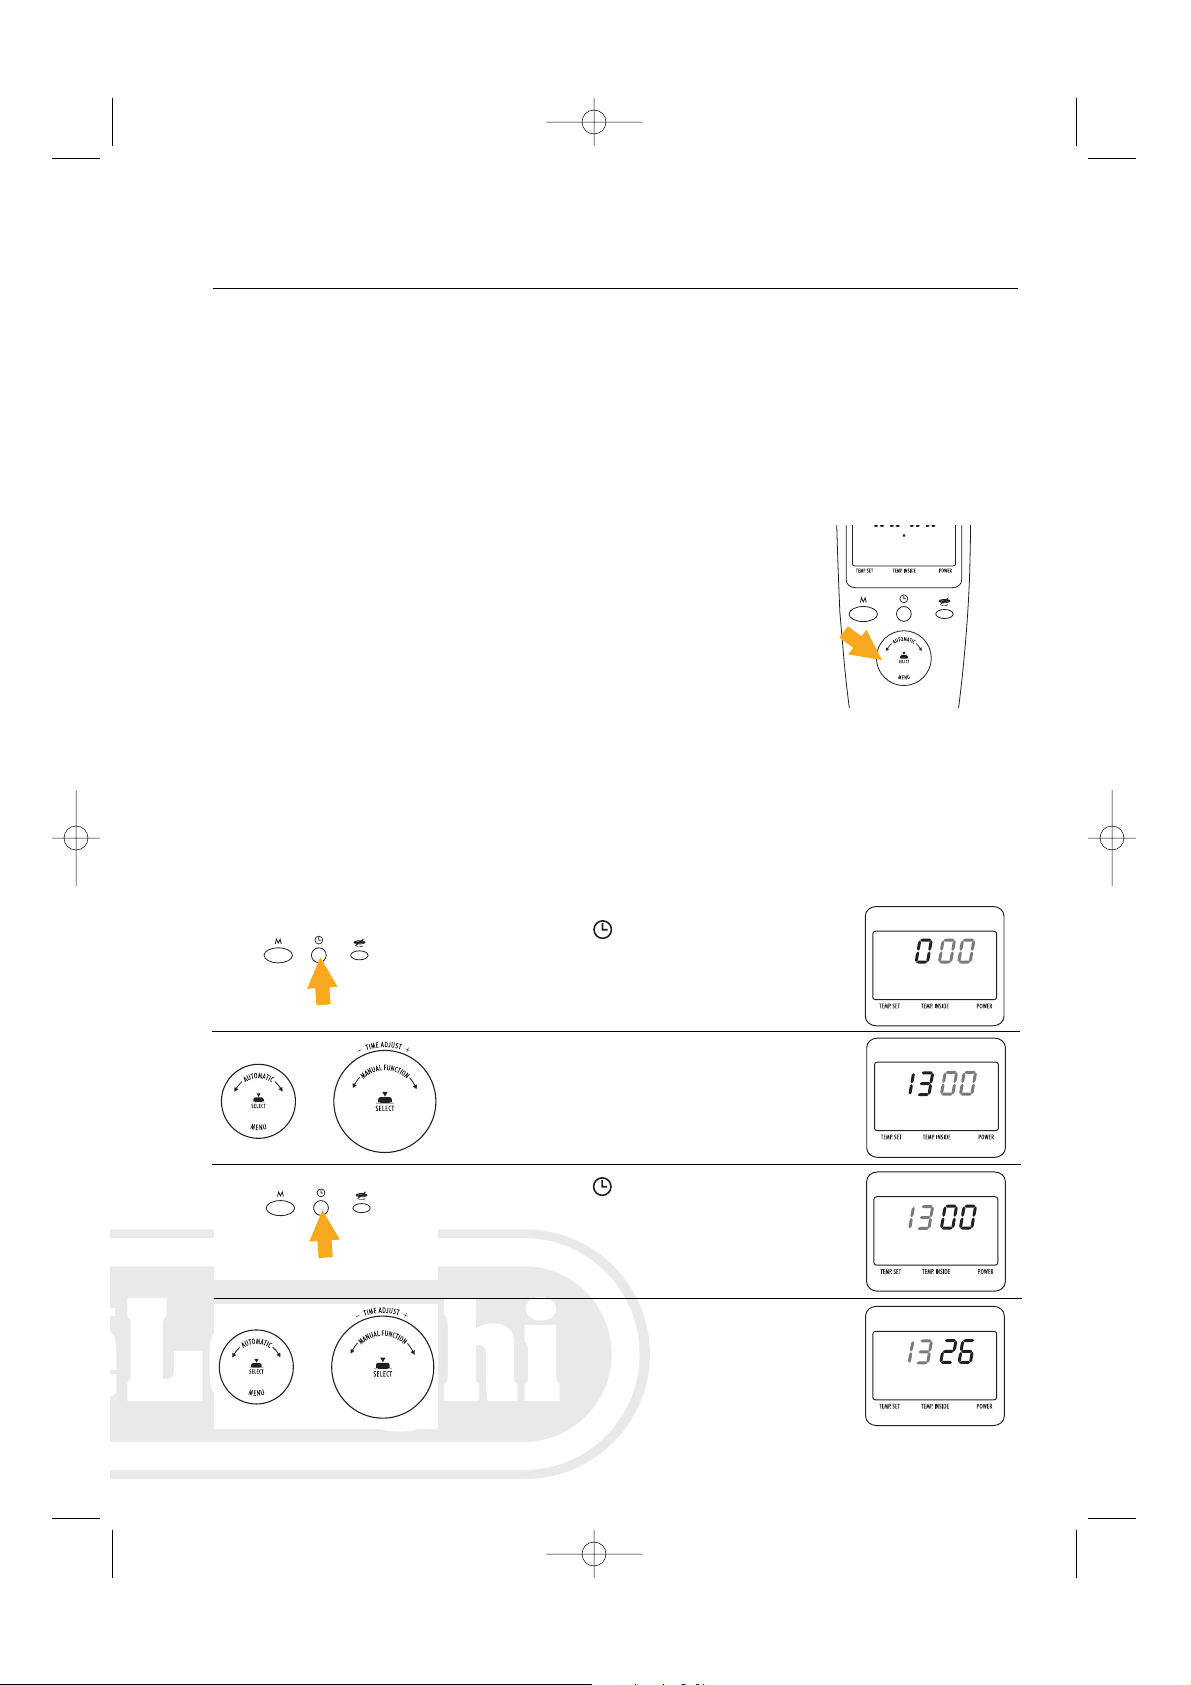
2.2 SETTING THE CLOCK
After the desired language has been selected, setting the clock as follow:
o
1. Press CLOCK (3). The hours flash.
2. Turn either SELECT knob (5) or knob (10)
to set the hours. The hours continue to
flash.).
3. Press CLOCK (3) again. The minutes
flash.
4. Turn either SELECT knob (5) or knob (10)
to set the minutes. The minutes continue to
flash.
o
GB 10-09-2002 12:24 Pagina 48
LANGUAGE STORED
5 SECONDS
Page 8
49
CHAPTER 2: SWITCHING ON AND GETTING TO KNOW YOUR OVEN
2.3 FUNCTION MODES
This oven has two fully independent functioning modes:
AUTOMATIC (see Chapter 3, page 51)
In Automatic mode, when you select a recipe, the oven’s computer automatically sets cooking temperature,
time, and cooking mode. Recipes are listed in section 3.2 - FOOD CATEGORIES.
MANUAL (see Chapter 4, page 58)
The SELECT ‘MANUAL FUNCTION’ knob at the bottom of the control panel allows you to manually select
cooking modes (MICRO, MICRO FAN, FAN, GRILL, MICRO GRILL) as well as cooking time, temperature,
and microwave power level.
NOTE: If you make a mistake when selecting recipes or setting oven functions, simply press
STOP/CLEAR (6) and start again.
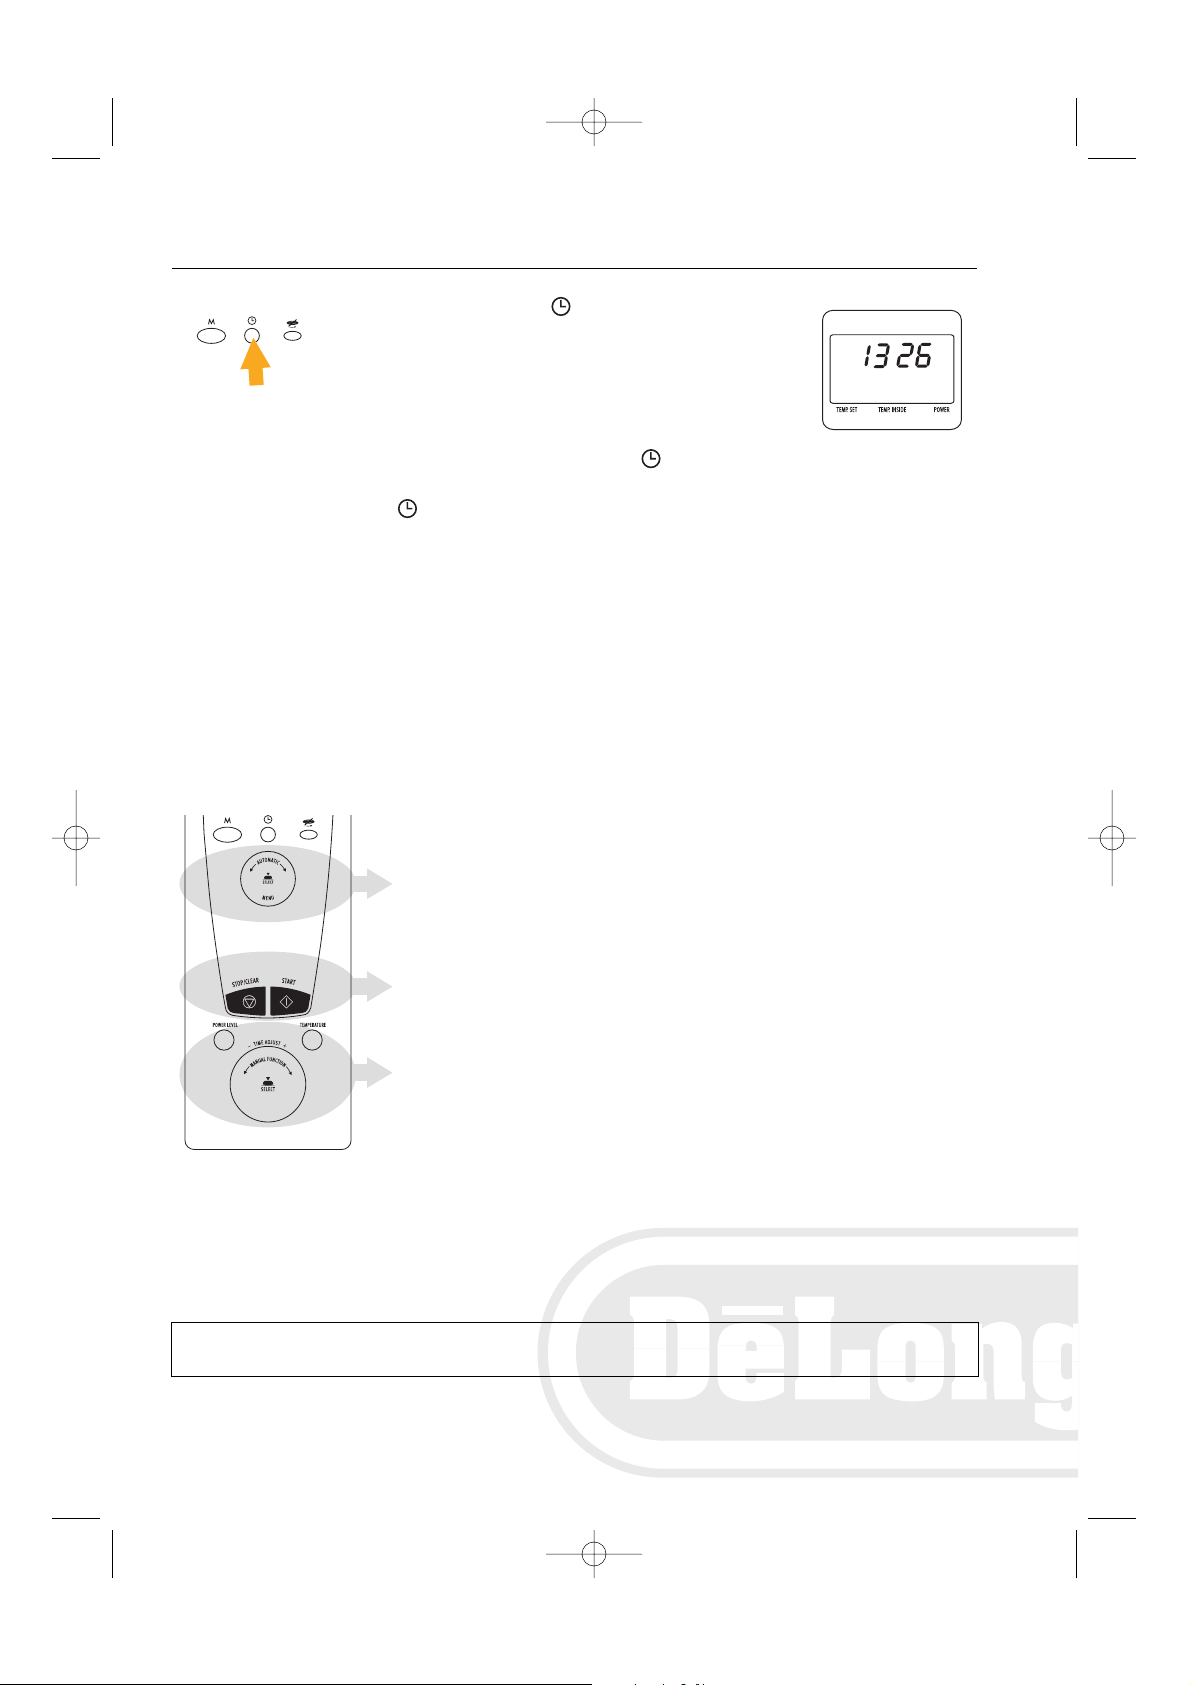
AUTOMATIC MODE
START AND STOP KEYS FOR AUTOMATIC AND MANUAL MODES
MANUAL MODE
• If you want to change the time setting, press CLOCK (3) and repeat the setting procedure as
instructed above.
•You can press CLOCK (3) at any moment, even when the oven is operating, to display the time.
5. Press CLOCK (3) again. The set time
is displayed.
GB 10-09-2002 12:24 Pagina 49
Page 9
50
CHAPTER 2: SWITCHING ON AND GETTING TO KNOW YOUR OVEN
2.4 DISPLAY
The display shows all the relevant information on the selected cooking functions.
• AUTOMATIC MODE (see Chapter 3, page 51)
MICRO FAN
200°C 20°C 750W
selected cooking
mode
temperature setting
for MICRO FAN and
FAN modes
actual oven temperature
for MICRO FAN and FAN
modes (value increases as
oven gets hot)
power level for:
MICRO, MICRO FAN,
MICRO GRILL modes
cooking time
Once you become familiar with the functioning of the oven, you can eliminate instructions from the display.
To do so, proceed as follows.
•Press and hold CLOCK (3) for 5 seconds.
• The control emits a short beep. The display now only reads out food categories, sub-menus and manual
settings.
• Repeat the first step to restore the display of instructions.
• MANUAL MODE (see Chapter 4, page 58)
MEAT
Turn the knob to select
name of selected
recipe/food category
instructions and submenus displayed by
the oven itself
GB 10-09-2002 12:24 Pagina 50
Page 10
51
CHAPTER 3: AUTOMATIC MODE
3.1 USING AUTOMATIC MODE
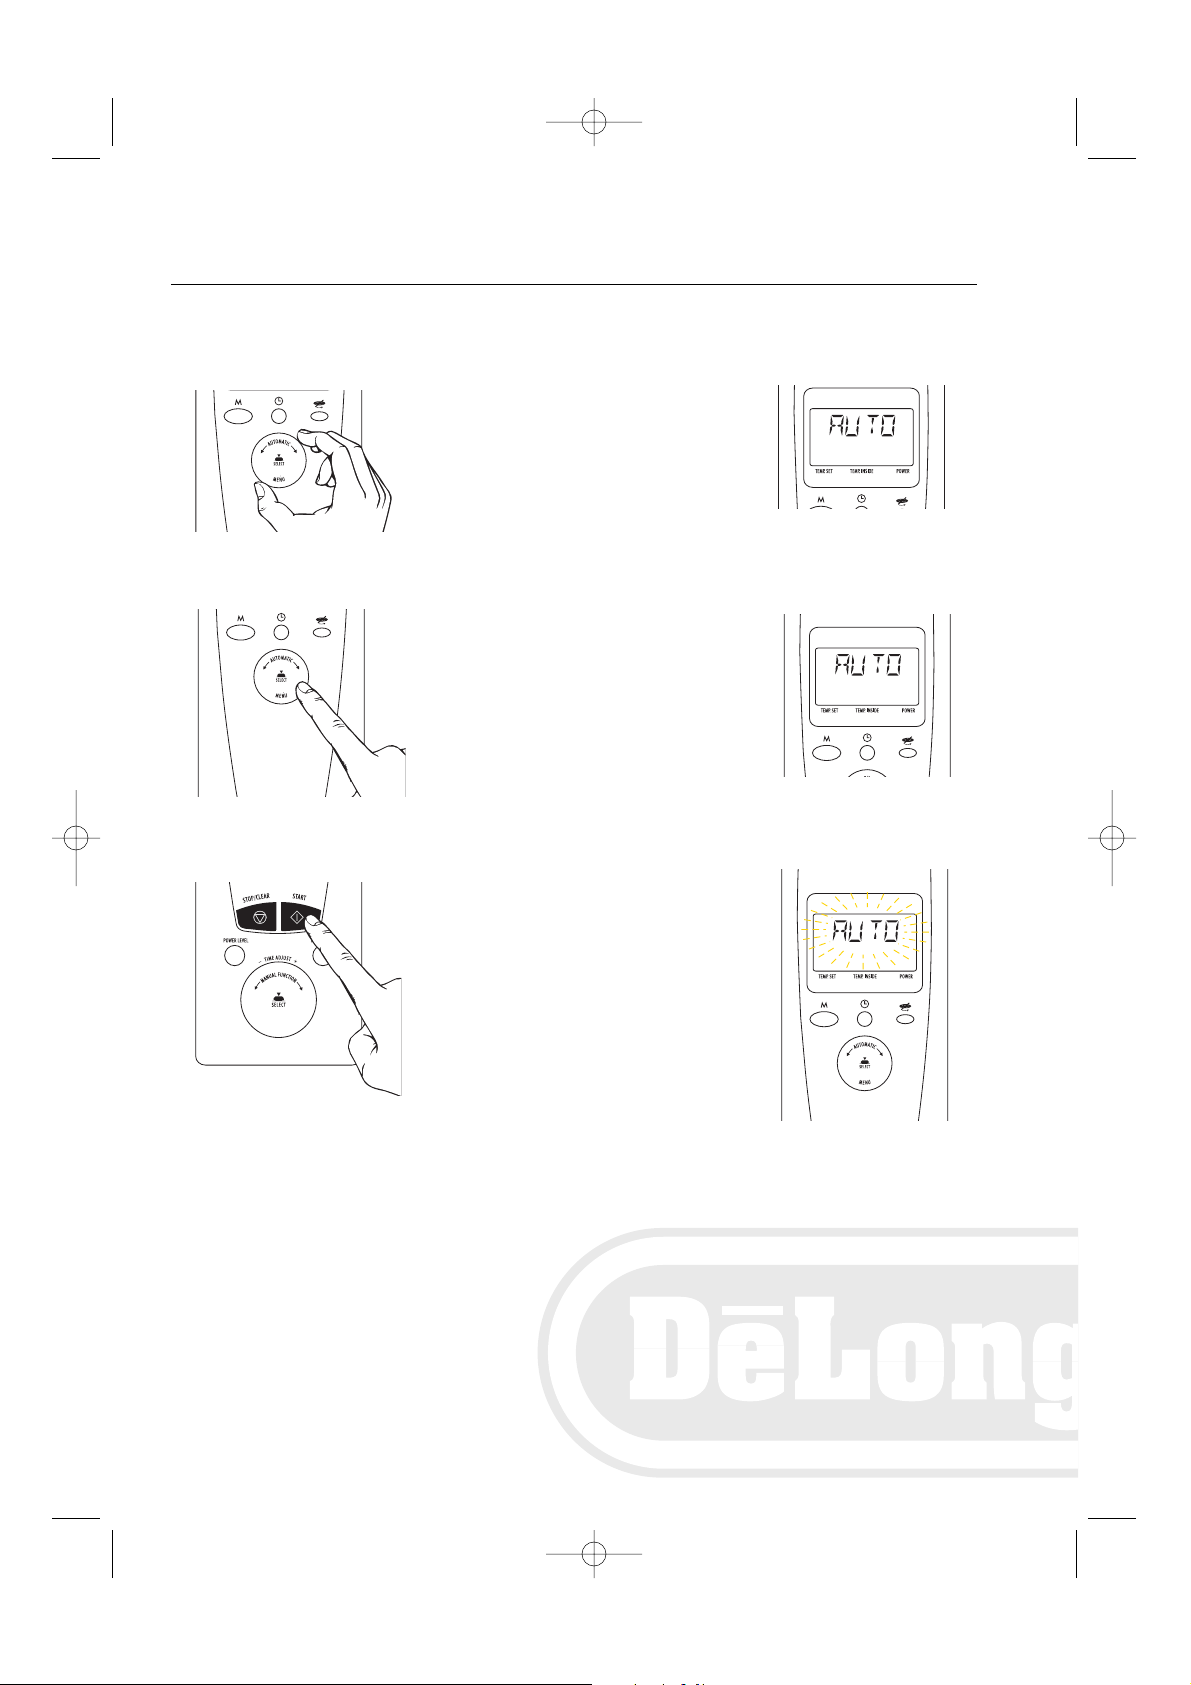
1. Turn the SELECT ‘AUTOMATIC’ knob (5)
until the first line of the display shows the
food category you want. (See below for
the complete list.)
2. Press the SELECT ‘AUTOMATIC’ knob (5)
to confirm your choice. Now turn the
knob again to select the sub-menu you
want. (See below for the complete list.)
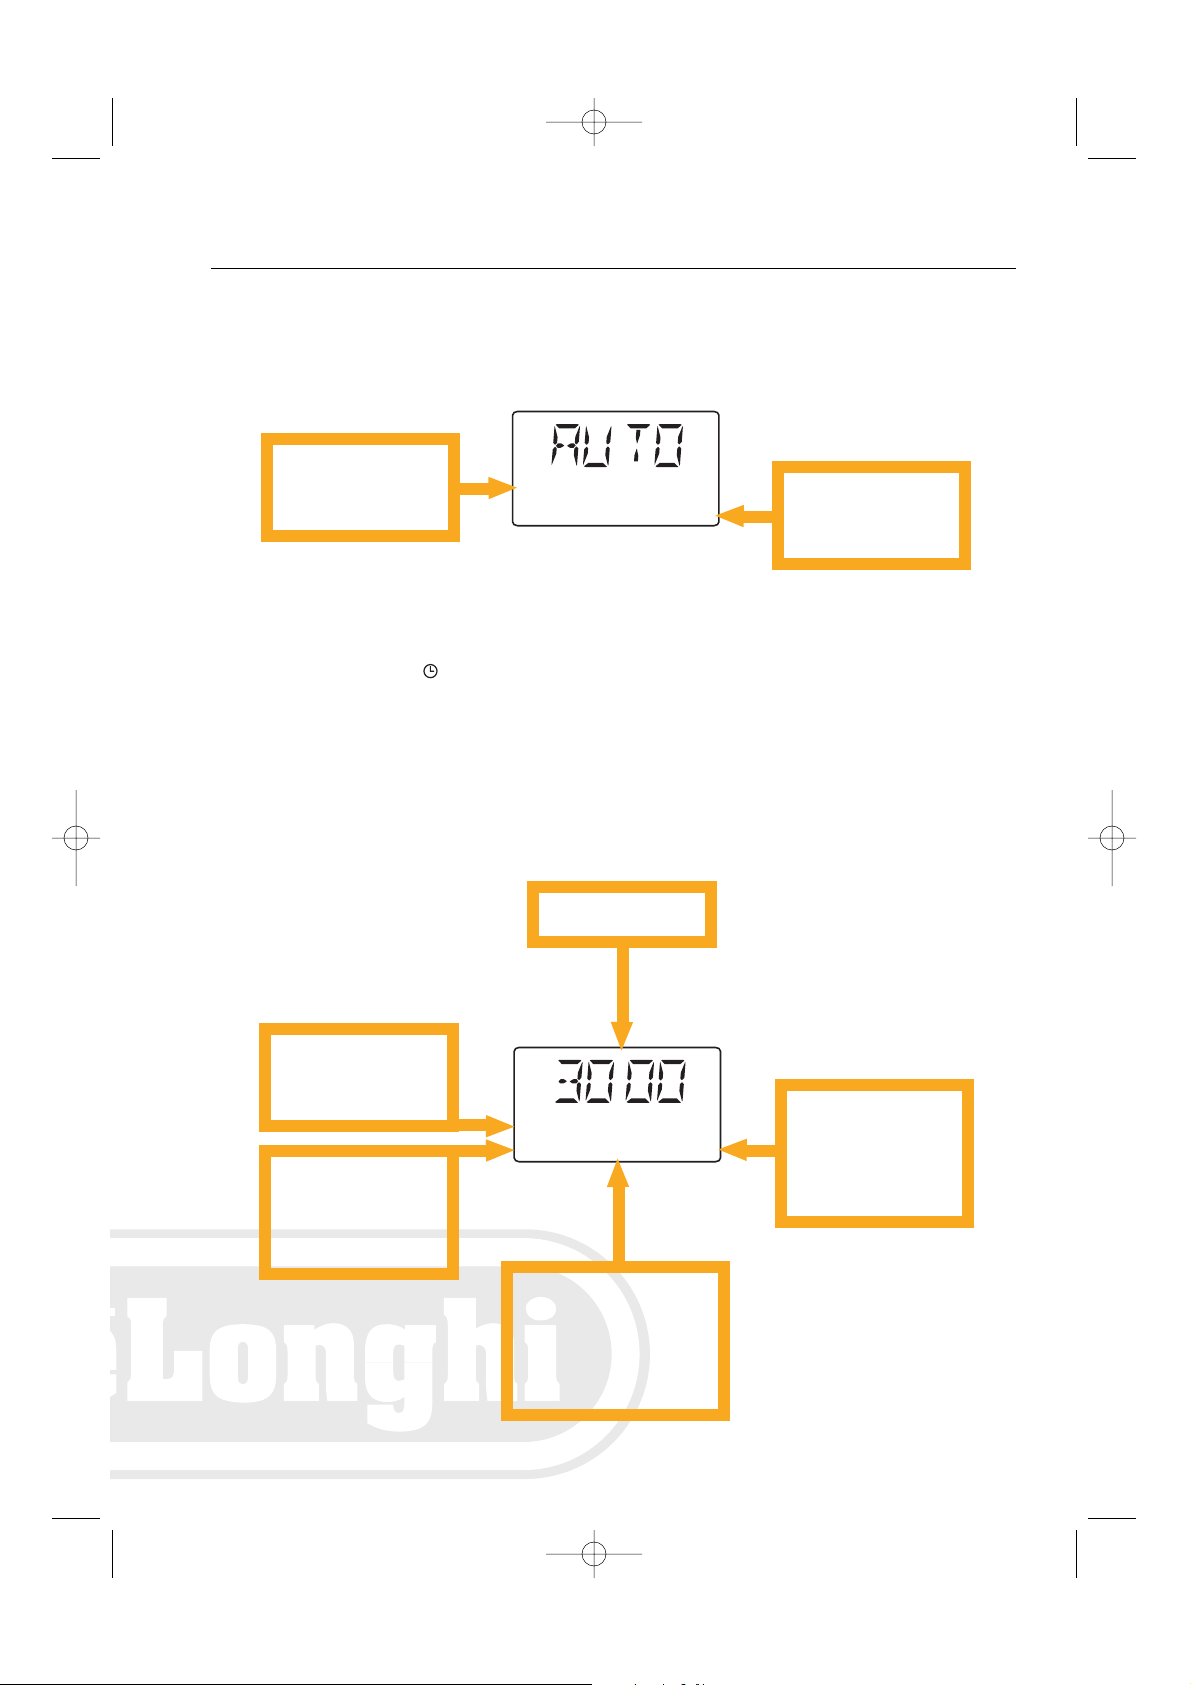
3. When the right sub-menu is displayed,
press START (7). The display will flash
“AUTO” and the selected recipe.
GB 10-09-2002 12:24 Pagina 51
POULTRY
MEAT
MEAT
ROAST
Page 11

52
CHAPTER 3: AUTOMATIC MODE
4. You can change the level of cooking even after you press START. To do so, simply turn the SELECT
‘AUTOMATIC’ knob (5).
•Turn the knob clockwise to cook the food more.
•Turn the knob anti-clockwise to cook the food less.
• The selected receipt is display again after a few seconds.
You can adjust the level of cooking at any time while “
AA UU TT OO
” appears on the display.
5. At the end of the cooking time the control beeps and displays the word “end”.
In certain cooking modes the display also reads out: “Your meal is ready. If you wish to continue for a few
minutes , press
SS TT AA RR TT
, otherwise press
SS TT OOPP //CC LL EE AARR
”.
Open the door and check the food. :
IF YOU THINK THE FOOD IS WELL COOKED:
•- Remove it, close the door and press STOP/CLEAR (6).
The message "ENJOY YOUR MEAL" appears. If the oven is very hot, the message “THE OVEN IS COOLING”
also appears (see the note below).
IF YOU THINK THE FOOD NEEDS ANOTHER FEW MINUTES COOKING:
• Close the door again and press START (7). The oven continues cooking for a few minutes more.
• At the end of this extra period the control beeps and displays the word “END” together with the mes-
sage “OVEN IS COOLING” (see the note below).
cooking level
indicator
ANTI-CLOCKWISE CLOCKWISE
less cooked
much less
cooked
more cooked
much more
cooked
NOTE: Never open the door or press STOP/CLEAR (6) while
AA UU TT OO
is displayed, or the computer’s
cooking calculations will be lost. Wait until the display shows remaining cooking time before opening
the door (e.g. to check or turn the food). For some food categories, the control beeps or displays a message suggesting the most suitable moment to stir or turn food.
NOTE: This oven features an automatic cooling cycle. This cycle starts if the oven is still hot after you
remove your food and press STOP/CLEAR (6), e.g. after long cooking times. During the cooling cycle
the display reads out the message "OVEN IS COOLING".
The fans, oven light and the turntable all operate during the cooling cycle and switch off automatically
at the end of it. The heating elements and microwave system remain off. You do not need to wait for the
cooling cycle to finish to start cooking again.
GB 10-09-2002 12:24 Pagina 52
cook
Page 12

53
CHAPTER 3: AUTOMATIC MODE
3.2 FOOD CATEGORIES
15 categories of food can be displayed. When you turn the SELECT ‘AUTOMATIC’ knob (5), the categories
scroll on the display in the following order.
• READY MEAL • ROAST BEEF
• PIZZA/SAVOURIES • CASSEROLE
• QUICHE • POULTRY
• RICE/RISOTTO • FISH
• PASTA GRATIN • POTATOES
• SOUP / PORRIDGE • VEGETABLES
• MEAT • CAKES
• REHEAT LIQUIDS
GETTING THE BEST RESULTS FROM AUTOMATIC MODE
1) Follow the cooking tables for food weights (minimum and maximum), and the use of the low wire
rack (F) and ovenproof dish (M) supplied. If the food weight is outside the values in the table, use
manual mode (see Chapter 5) to get the best results.
2) Always refer to the photos in the quick reference guide, showing the correct use of ovenware and
oven accessories.
3) If you need another ovenproof dish, to continue getting optimum cooking results, buy one as near as
possible in shape and size to that supplied with the oven.
NOTES/HINTS
SUB-MENU
1 CHILLED SERVING (100-200 g)
2 CHILLED SERVINGS (200-300 g)
3 CHILLED SERVINGS (300-400 g)
FROZEN (min. 200g - max. 500g)
SEE PHOTO 2 IN THE QUICK REFERENCE GUIDE.
For frozen pre-cooked foods. If the food is packaged in a metal tray,
remove it and place on a serving dish on the low wire rack. Make sure
that plastic trays and clear film are oven resistant (at high
temperatures). Refer to the instructions on the food packaging.
SEE PHOTO 1 IN THE QUICK REFERENCE GUIDE.
For portions of any type of pre-cooked food to be reheated from
refrigerator temperature (5-8°C). If the food is packaged in a
microwave compatible container, place it directly in the oven on the
low wire rack. Alternatively place on a dish (either the plate you wish
to serve on, the ovenproof dish supplied). Cover with clear film.
READY MEAL
4 CHILLED SERVINGS (400-500 g)
GB 10-09-2002 12:24 Pagina 53
Page 13

54
CHAPTER 3: AUTOMATIC MODE
SEE PHOTO 3 IN THE QUICK REFERENCE GUIDE. Place the pizza or
savouries in a well oiled metal dish and place on the low wire rack
(F).
SEE PHOTO 4 IN THE QUICK REFERENCE GUIDE. Remove the pizza
from its packaging and place directly on the low wire rack (F) with
no tray
NOTES/HINTS
SUB-MENU
FRESH
FROZEN
NOTES/HINTS
SUB-MENU
FRESH
FROZEN
SEE PHOTO 5 IN THE QUICK REFERENCE GUIDE. A special cooking
function for quiches, like quiche Lorraine, spinach quiche, etc. Cook
on the low wire rack in a metal tray and not in the ovenproof dish
(M) supplied. Frozen quiches can be removed from their packaging
and placed directly in a metal tray.
NOTES/HINTS
SUB-MENU
COOK
SEE PHOTO 6 IN THE QUICK REFERENCE GUIDE. Do not exceed
300g of rice and 750ml of stock or water. Mix together in the
ovenproof dish (M) supplied and cover with a Pyrex lid or clear film.
It is normal for film to rise and liquid to drip out onto the turntable.
NOTES/HINTS
SUB-MENU
FRESH
FROZEN
SEE PHOTO 7 IN THE QUICK REFERENCE GUIDE.
Pre-cook all baked
pastas (lasagne, cannelloni, macaroni, etc.). Place in the ovenproof dish
(M), and cover with béchamel sauce, Bolognese sauce and grated
parmesan cheese. Place on the low wire rack (F). Do not cover, since this
would prevent the crust from forming.
SEE PHOTO 8 IN THE QUICK REFERENCE GUIDE. For convenience
packs of lasagne, cannelloni, etc. sold in oven resistant trays. Place
the packaging or the plate (if you prefer to remove the food from the
packaging) on the low wire rack (F). Do not cover, since this would
prevent the crust from forming.
NOTES/HINTS
SUB-MENU
1 SERVING 250ml
2 SERVINGS 500ml
3 SERVINGS 750ml
4 SERVINGS 1l
SEE PHOTO 9 IN THE QUICK REFERENCE GUIDE.
For soups to be heated from room temperature (18°/20°C). Note
that the “AUTO” message does not appear at the start of this cooking
function.
PIZZA/SAVOURIES
QUICHE
RICE/RISOTTO
PASTA GRATIN
SOUP / PORRIDGE
GB 10-09-2002 12:24 Pagina 54
Page 14

55
CHAPTER 3: AUTOMATIC MODE
NOTES/HINTS
SUB-MENU
DEFROST PIECES
(min. 200g - max 700g)
DEFROST BIG PIECES
(min. 600g - max 1700g)
SEE PHOTO 10 IN THE QUICK REFERENCE GUIDE. Place steak,
chops, mince, etc. directly on the turntable (H).
SEE PHOTO 10 IN THE QUICK REFERENCE GUIDE. Place joints, legs,
etc. directly on the turntable (H).
ROAST
(min. 600g - max 1700g)
SEE PHOTO 11 IN THE QUICK REFERENCE GUIDE. For roast lamb,
pork, beef, etc. Add
1
/2 glass of water and any spices you want. Keep
oil and wine to a minimum to avoid splashes. Place the ovenproof dish
(M) on the low wire rack.
NOTES/HINTS
SUB-MENU
SEE PHOTO 11 IN THE QUICK REFERENCE GUIDE. For roast beef,
well done outside and raw inside. Add
1
/2glass of water and any
spices you want. Place the ovenproof dish (M) on the low wire rack.
ROAST
(min. 800g - max 2000g)
NOTES/HINTS
SUB-MENU
SEE PHOTO 12 IN THE QUICK REFERENCE GUIDE. Place the meat
and sauce together in the ovenproof dish. Place on the low wire rack.
BRAISE
(min. 400g - max 1500g)
NOTES/HINTS
SUB-MENU
SEE PHOTO 10 IN THE QUICK REFERENCE GUIDE. For defrosting
whole birds. Place directly on the turntable.
DEFROST WHOLE
(min. 700g - max 2000g)
SEE PHOTO 10 IN THE QUICK REFERENCE GUIDE. For defrosting
poultry pieces. Place directly on the turntable.
DEFROST PIECES
(min. 400g - max 1000g)
ROAST WHOLE
(min. 700g - max 2000g)
SEE PHOTO 11 IN THE QUICK REFERENCE GUIDE.
For roasting
whole duck, guinea fowl, chicken, turkey, etc. Add
1
/2 glass of water and
any spices you want. Keep oil and wine to a minimum to avoid splashes.
Place the ovenproof dish on the low wire rack.
ROAST PIECES
(min. 400g - max 1000g)
SEE PHOTO 11 IN THE QUICK REFERENCE GUIDE. For roasting
duck, guinea fowl, chicken, turkey, pieces etc. Add
1
/2 glass of water
and any spices you want. Keep oil and wine to a minimum to avoid
splashes. Place the ovenproof dish on the low wire rack.
MEAT
ROAST BEEF
CASSEROLE
POULTRY
GB 10-09-2002 12:24 Pagina 55
Page 15

56
CHAPTER 3: AUTOMATIC MODE
NOTES/HINTS
SUB-MENU
SEE PHOTO 13 IN THE QUICK REFERENCE GUIDE. Cook the fish whole
(small-medium size fish) or in slices (large fish). Do not cover. Place on the
low wire rack.
BAKE
(min. 400g - max 1000g)
SEE PHOTO 14 IN THE QUICK REFERENCE GUIDE. Cook the fish
covered with clear film or a Pyrex lid. Add a half glass of water. Place
on the low wire rack.
FRESH POACH
(min. 400g - max 1000g)
FRESH GRATIN
(min. 400g - max 1000g)
SEE PHOTO 15 IN THE QUICK REFERENCE GUIDE.
For gratin fish in
béchamel, breadcrumbs or milk. Do not cover, since this would prevent
the crust from forming. Place on the low wire rack
FROZEN DEFROST
(min. 400g - max 1000g)
SEE PHOTO 10 IN THE QUICK REFERENCE GUIDE.
Place the fish
directly on the turntable. If the fish is to be poached, it is best to cook it
from frozen (see next recipe).
FROZEN POACH
(min. 400g - max 1000g)
SEE PHOTO 14 IN THE QUICK REFERENCE GUIDE. Cook the fish
covered with clear film or a Pyrex lid. Add a half glass of water.
Place on the low wire rack.
FROZEN GRATIN
(min. 400g - max 1000g)
SEE PHOTO 15 IN THE QUICK REFERENCE GUIDE.
(For frozen
convenience packs.) Place the packaging or the plate (if you prefer to
remove the food from the packaging) on the low wire rack. Do not cover,
since this would prevent the crust from forming. Place on the low wire
rack.
SEE PHOTO 16 IN THE QUICK REFERENCE GUIDE. Can be used for
fresh or frozen potatoes. Cut into pieces and add oil, white wine,
rosemary, garlic, etc. to taste. Place in the ovenproof dish (M) on the
low wire rack (F). Stir 2-3 times, but only after the “AUTO” message
has switched off and remaining cooking time is displayed.
ROAST
(min. 500g - max 1500g)
NOTES/HINTS
SUB-MENU
BOIL
(quantita’ min. 300g - max 900g)
VEDERE FOTO 14 DELLA GUIDA PIEGHEVOLE. Cut into pieces or peel but leave
whole. Add 1/2glass of water. Place in the ovenproof dish (M). Cover with clear
film and cook on the low wire rack (F).
1 JACKET POT. (200g)
VEDERE FOTO 17 DELLA GUIDA PIEGHEVOLE.
Use whole potatoes of
the same size. Wash the skin thoroughly, pierce in several points with a
fork, and cook directly on the turntable. When cooked, cut the potato
lengthways and flavour with butter, yoghurt or ketchup.
2 JACKET POT. (400g)
3 JACKET POT. (600g)
SEE PHOTO 14 IN THE QUICK REFERENCE GUIDE. Place the
ovenproof dish (M) on the low wire rack (F). Cover with clear film.
Add
1
/2glass of water.
FRESH BOIL
(min. 300g - max 900g)
NOTES/HINTS
SUB-MENU
SEE PHOTO 18 IN THE QUICK REFERENCE GUIDE.
Always pre-cook
fresh vegetables (except tomatoes) to be gratined (covered with
béchamel and parmesan cheese). Do not cover, since this would prevent
the crust from forming.
FRESH GRATIN
(min. 500g - max 1200g)
SEE PHOTO 14 IN THE QUICK REFERENCE GUIDE.
Place the
ovenproof dish (M) on the low wire rack (F). Cover with clear film. Do
not add water.
FROZEN BOIL
(min. 300g - max 900g)
SEE PHOTO 8 IN THE QUICK REFERENCE GUIDE.
For frozen
convenience packs. Place the packaging or the plate (if you prefer to
remove the food from the packaging) on the low wire rack (F).
FROZEN GRATIN
(min. 200g - max 600g)
FISH
POTATOES
VEGETABLES
GB 10-09-2002 12:24 Pagina 56
Page 16

57
CHAPTER 3: AUTOMATIC MODE
LONG BAKING
NOTES/HINTS
SUB-MENU
SEE PHOTOS 19-20-21 IN THE QUICK REFERENCE GUIDE. For all
cakes needing long cooking times at low temperatures (160°C), like
plum cake, apple pie and cheese cake.
SEE PHOTOS 19-20-21 IN THE QUICK REFERENCE GUIDE. For all
cakes needing short cooking times (35-40 minutes) at higher
temperatures (180°C), like puff pastries, sponges, jam tarts, etc.
SHORT BAKING
NOTES FOR BOTH CAKE SUB-MENUS:
• Portions are intended for 6-8 persons.
• Always cook cakes in metal cake dishes. Do not use Pyrex or glass cake dishes.
• Always grease and flour the inside of the cake dish first.
•Cook all cakes on the low wire rack (F).
• Do not pre-heat the oven for cakes and desserts.
125ml ROOM TEMP
NOTES/HINTS
SUB-MENU
250ml ROOM TEMP
500ml ROOM TEMP
750ml ROOM TEMP
1l ROOM TEMP
125ml CHILLED
250ml CHILLED
500ml CHILLED
1l CHILLED
750ml CHILLED
SEE PHOTO 22 IN THE QUICK REFERENCE GUIDE. For drinks
(coffee, tea, broth, milk, etc.) to be heated from 15°C to around
80°C. Note that the “AUTO” message does not appear at the start of
this cooking function. Place the container directly on the turntable (H).
Do not use the low wire rack (F).
SEE PHOTO 22 IN THE QUICK REFERENCE GUIDE. For drinks
(coffee, tea, broth, milk, etc.) to be heated from 5-8°C to around
80°C. Note that the “AUTO” message does not appear at the start of
this cooking function. Place the container directly on the turntable (H).
Do not use the low wire rack (F).
CAKES
REHEAT LIQUIDS
GB 10-09-2002 12:24 Pagina 57
Page 17

58
CHAPTER 4: MANUAL MODE
4.1 SUMMARY TABLE
In Manual mode you can achieve the same cooking results as in Automatic mode, but in less time, since the
oven does not have to perform calculations for weight, time, and cooking mode.
WHAT DO I WANT TO DO?
WHICH MODE
SEE INSTRUCTIONS
SEE NOTES AND
DO I USE? ON PAGE HINTS ON PAGE
Defrost foods (meat, fish, vegetables, etc.) MICRO 59 67
Soften chocolate/icing MICRO 59 68
Melt butter MICRO 59 68
Reheat pre-cooked foods MICRO 59 68/69
Cook rice/soups MICRO 59 69
Bake pizzas, quiches, etc. FAN 62 69
Bake lasagne, cannelloni, etc. (pasta gratin) MICRO GRILL 63 69
Roast pork loin, chicken, meatballs, etc.
MICRO FAN
60 70
Cook chicken breasts or goulash MICRO 59 70
Grill chops, sausages, hamburgers, etc. GRILL 64 70
Poach fish MICRO 59 70
Bake fish
MICRO FAN
60 70
Boil vegetables MICRO 59 71
Gratin vegetables (cauliflower, tomatoes, etc.)
MICRO GRILL 63 71
Grill vegetables (aubergines, courgettes, etc.) GRILL 64 71
Bake cakes and desserts in general
FAN
62 71
GB 10-09-2002 12:24 Pagina 58
Page 18

CHAPTER 4: MANUAL MODE
4.2 MICRO MODE
1.Turn the SELECT ‘MANUAL FUNCTION’
knob (10) until “MICRO” appears on the
display.
2.Press the SELECT ‘MANUAL FUNCTION’
knob (10) to confirm your choice and then
turn it to set the cooking time. Refer to the
cooking tables further on in this manual to
select the right time.
3.Press POWER LEVEL (9) repeatedly until the
microwave power level you want is
displayed. Refer to the cooking tables
further on in this manual to select the right
power level.
4.Press START (7) to start cooking. The
remaining cooking time is displayed.
5. At the end of the cooking time the control
beeps and displays the word “END”. Open
the door and remove the food. The message "ENJOY YOUR MEAL" appears.
59
GB 10-09-2002 12:24 Pagina 59
MICRO
MICRO
MICRO
1000
500
MICRO
ENJOY YOUR MEAL
500
Page 19

60
CHAPTER 4: MANUAL MODE
•In MICRO mode, use the lowest power level for defrosting all types of food. “DEFROST” appears on the
display.
•You can change the microwave power level even during cooking simply by pressing POWER LEVEL (9).
• If you do not start cooking within 2 minutes of setting cooking parameters, the oven cancels them.
4.3 MICRO FAN MODE
NOTE: You can open the door to check on cooking at any time in Manual mode.
If you open the door during cooking, the microwave unit switches off. To restart cooking, close the door
and press START (7).
If you need to stop cooking without opening the door for any reason, simply press STOP/CLEAR (6).
To finish cooking, proceed as follows.
- If the oven door is open, simply press STOP/CLEAR (6) once.
- If the oven door is closed and cooking is in progress, press STOP/CLEAR (6) twice.
The clock is displayed again to show that cooking has stopped.
1.Turn the SELECT ‘MANUAL FUNCTION’
knob (10) until “MICRO FAN” appears on the
display.
2.Press the SELECT ‘MANUAL FUNCTION’
knob (10) to confirm your choice and then
turn it to set the cooking time. Refer to the
cooking tables further on in this manual to
select the right time.
3.Press POWER LEVEL (9) repeatedly until the
microwave power level you want is
displayed. Refer to the cooking tables
further on in this manual to select the right
power level. In this mode, the maximum
microwave power level you can set is
750W.
4.Press TEMPERATURE (8) repeatedly until
the cooking temperature you want appears
at the bottom left of the display.
GB 10-09-2002 12:24 Pagina 60
MICRO FAN
MICRO FAN
200°c 20°C 750W
MICRO FAN
200°c 20°C
MICRO FAN
160°c 20°C 250W
250W
Page 20

61
CHAPTER 4: MANUAL MODE
NOTE: The actual oven temperature appears at the bottom centre of the display. This figure increases as the oven gets
hot. When the actual temperature reaches the set temperature, the control emits three short beeps and from then on
only displays the set temperature.
You can change the temperature setting even during cooking simply by pressing TEMPERATURE (8).
You can change the microwave power level even during cooking simply by pressing POWER LEVEL (9).
You can open the door to check on cooking at any time in Manual mode.
If you open the door during cooking, the microwave unit switches off. To restart cooking, close the door and press START
(7).
If you need to stop cooking without opening the door for any reason, simply press STOP/CLEAR (6).
To finish cooking, proceed as follows.
- If the oven door is open, press STOP/CLEAR (6) once.
- If the oven door is closed and cooking is in progress, press STOP/CLEAR (6) twice. The clock is displayed again to show
that cooking has stopped.
You can also keep food warm when it has finished cooking. To do so, do NOT open the door but press START (7) instead.
The message "
KK EE EE PP IINNGG WW AA RRMM
" is displayed. You can stop keeping warm at any time by opening the door or pressing
STOP/CLEAR (6).
This oven features an automatic cooling cycle. This cycle starts if the oven is still hot after you remove your food and
press STOP/CLEAR (6), e.g. after long cooking times. During the cooling cycle the display shows the message "
OO VVEENN II SS
CC OO OO LL II NN GG
". The fans, oven light and the turntable all operate during the cooling cycle and switch off automatically at the
end of it.
If you do not start cooking within 2 minutes of setting cooking parameters, the oven cancels them.
5.Press START (7) to start cooking. The
remaining cooking time is displayed.
6. At the end of the cooking time the control
beeps and displays the word “END”. Open
the door and remove the food. The message "ENJOY YOUR MEAL" appears.
GB 10-09-2002 12:24 Pagina 61
MICRO FAN
160°c 20°C 250W
ENJOY YOUR MEAL
Page 21

62
CHAPTER 4: MANUAL MODE
4.4 FAN MODE
1.Turn the SELECT ‘MANUAL FUNCTION’
knob (10) until “FAN ” appears on the
display.
2.Press the SELECT ‘MANUAL FUNCTION’
knob (10) to confirm your choice and then
turn it to set the cooking time. Refer to the
cooking tables further on in this manual to
select the right time.
3.Press TEMPERATURE (8) repeatedly until
the cooking temperature you want appears
at the bottom left of the display.
4.Press START (7) to start cooking. “Pre heat”
flashes on the display to show that the oven
is pre-heating
In FAN mode, the oven always pre-heats. When the oven reaches the set temperature, it emits 5 short beeps
and the set cooking time (see step 2 above) is displayed. The bottom line of the display tells you to “Put the
food in the oven and press Start”. Place your food in the oven on the low wire rack and press START. The
remaining cooking time is displayed.
GB 10-09-2002 12:24 Pagina 62
FAN
FAN
200°c 20°C
FAN
180°c 20°C
FAN
180°c 20°C
Page 22

63
CHAPTER 4: MANUAL MODE
4.5 MICRO GRILL MODE
NOTE: The actual oven temperature appears at the bottom centre of the display. This figure increases as the oven gets
hot. When the actual temperature reaches the set temperature, the control emits three short beeps and from then on
only displays the set temperature.
You can change the temperature setting even during cooking simply by pressing TEMPERATURE (8).
You can open the door to check on cooking at any time in Manual mode.
If you open the door during cooking, the oven switches off. To restart cooking, close the door and press START (7).
If you need to stop cooking without opening the door for any reason, simply press STOP/CLEAR (6).
To finish cooking, proceed as follows.
- If the oven door is open, press STOP/CLEAR (6) once.
- If the oven door is closed and cooking is in progress, press STOP/CLEAR (6) twice. The clock is displayed again to show
that cooking has stopped.
You can also keep food warm when it has finished cooking. To do so, do NOT open the door but press START (7) instead.
The message "
KK EE EE PP IINNGG ww aa rrmm
" is displayed. You can stop keeping warm at any time by opening the door or pressing
STOP/CLEAR (6).
This oven features an automatic cooling cycle. This cycle starts if the oven is still hot after you remove your food and
press STOP/CLEAR (6), e.g. after long cooking times. During the cooling cycle the display shows the message "
OO VVEENN II SS
CC OO OO LL II NN GG
". The fans, oven light and the turntable all operate during the cooling cycle and switch off automatically at the
end of it.
If you do not start cooking within 2 minutes of setting cooking parameters, the oven cancels them.
1.Turn the SELECT ‘MANUAL FUNCTION’
knob (10) until “MICRO GRILL” appears on the
display.
2.Press the SELECT ‘MANUAL FUNCTION
knob (10) to confirm your choice and then
turn it to set the cooking time. Refer to the
cooking tables further on in this manual to
select the right time.
3.Press POWER LEVEL (9) repeatedly until the
microwave power level you want is
displayed. Refer to the cooking tables
further on in this manual to select the right
power level.
GB 10-09-2002 12:24 Pagina 63
MICRO GRILL
MICRO GRILL
1000
MICRO GRILL
750
Page 23

64
CHAPTER 4: MANUAL MODE
4.Press START (7) to start cooking. The
remaining cooking time is displayed.
5. At the end of the cooking time the control
beeps and displays the word “END”. Open
the door and remove the food. The message "ENJOY YOUR MEAL" appears.
You can change the microwave power level even during cooking simply by pressing POWER LEVEL (9).
You can open the door to check on cooking at any time in Manual mode.
If you open the door during cooking, the microwave unit switches off. To restart cooking, close the door and press
START (7).
If you need to stop cooking without opening the door for any reason, simply press STOP/CLEAR (6).
To finish cooking, proceed as follows.
- If the oven door is open, press STOP/CLEAR (6) once.
- If the oven door is closed and cooking is in progress, press STOP/CLEAR (6) twice. The clock is displayed again
to show that cooking has stopped.
This oven features an automatic cooling cycle. This cycle starts if the oven is still hot after you remove your food
and press STOP/CLEAR (6), e.g. after long cooking times. During the cooling cycle the display shows the message
"
OO VV EE NN IISS CC OO OO LL IINN GG
". The fans, oven light and the turntable all operate during the cooling cycle and switch off automatically at the end of it.
If you do not start cooking within 2 minutes of setting cooking parameters, the oven cancels them.
4.6 GRILL COOKING MODE
grill
1.Turn the SELECT ‘MANUAL FUNCTION’
knob (10) until “GRILL” appears on the
display.
GB 10-09-2002 12:24 Pagina 64
MICRO GRILL
750
ENJOY YOUR MEAL
Page 24

65
CHAPTER 4: MANUAL MODE
PRE-HEAT THE GRILL FOR 3 MINUTES BEFORE PLACING THE FOOD IN THE OVEN.
You can open the door to check on cooking at any time in Manual mode.
If you open the door during cooking, the microwave unit switches off. To restart cooking, close the door and press START
(7).
If you need to stop cooking without opening the door for any reason, simply press STOP/CLEAR (6).
To finish cooking, proceed as follows.
- If the oven door is open, press STOP/CLEAR (6) once.
- If the oven door is closed and cooking is in progress, press STOP/CLEAR (6) twice. The clock is displayed again to show
that cooking has stopped.
This oven features an automatic cooling cycle. This cycle starts if the oven is still hot after you remove your food and
press STOP/CLEAR (6), e.g. after long cooking times. During the cooling cycle the display shows the message "
OO VVEENN II SS
CC OO OO LL II NN GG
". The fans, oven light and the turntable all operate during the cooling cycle and switch off automatically at the
end of it.
If you do not start cooking within 2 minutes of setting cooking parameters, the oven cancels them.
2.Press the SELECT ‘MANUAL FUNCTION’
knob (10) to confirm your choice and
then turn it to set the cooking time. Refer
to the cooking tables further on in this
manual to select the right time.
3.Press START (7) to start cooking. The remai-
ning cooking time is displayed.
Note: Half way through the set cooking
time the control displays the message
“Remember to turn or stir the food”.
4. At the end of the cooking time the control
beeps and displays the word “END”. Open
the door and remove the food. The message "ENJOY YOUR MEAL" appears.
4.7 QUICK REHEAT MODE
This function is very useful for heating small quantities of food or drink, or for adding a few minutes at the
end of cooking time.
•Press START. The oven will operate for 30 seconds at maximum power. You can press START repeatedly
to set any time between 30 seconds and 3 minutes, in 30 second steps.
• This function only works within 1 minute of food being placed in the oven and the door being closed.
GB 10-09-2002 12:24 Pagina 65
grill
grill
ENJOY YOUR MEAL
Page 25

66
CHAPTER 4: MANUAL MODE
4.8 MEMORY KEY
You can use this key to memorise the cooking program (in manual mode) that you use most frequently.
• At the end of the cooking program you want to memorise, press and hold M (2) for 5 seconds. The program that has just finished is stored in memory and the display shows the message “MEMORY STORED”.
•To recall this cooking program at any time, press M for 3 seconds. If there is no cooking program in
memory, the display shows “MEMORY EMPTY”.
•To replace one cooking program with another, simply repeat the steps given above.
4.9 TURNTABLE STOP KEY
If you need to use large dishes or ones with handles that are too big to turn in the oven, you can stop the
turntable from rotating. To do so, press the TURNTABLE STOP key (4) after you have selected a cooking
function. The rotation stop LED at the top right of the display lights.
When you press START, the LED flashes 5 times and then stays lit for the set cooking time. To get the best
results, remember to stir or turn your food a number of times during cooking.
The TURNTABLE STOP function remains active until you press the TURNTABLE STOP key again. If you use
TURNTABLE STOP for microwave cooking, you can only set a power level up to 750 W. (Microwave power
level is automatically limited when you press the TURNTABLE STOP key.)
4.10 TIMER FUNCTION
This function allows you to use the oven’s clock as a timer for up to 99 minutes when you are NOT using
the oven.
•Turn the SELECT ‘MANUAL FUNCTION’ knob (10) until the display shows “Timer”.
•Press the SELECT ‘MANUAL FUNCTION knob (10) to confirm your choice and turn it to set the time you
want. Press START.
• The control beeps at 5 minutes and 1 minute from the end of the set time.
• At the end of the set time, the control beeps and displays the message “End”.
4.11 CHILD SAFETY LOCK
This oven features two safety functions.
The first prevents cooking times from being tampered with while food is cooking. This stops times from being
extended dangerously and food burned.
• To activate this function press and hold STOP/CLEAR (6) for 5 seconds.
• The control emits a short beep. Cooking times cannot now be changed during cooking.
• To cancel this function, press and hold STOP/CLEAR until the control beeps again.
The second safety function disables the START key.
• To activate this function press and hold START for 5 seconds.
• The control emits a short beep and the lock symbol appears on the display.
• To cancel this function, press and hold START until the control beeps again.
4.12 DEFROSTING: RULES, HINTS AND DEFROSTING TABLE
• Frozen foods in plastic bags, film, or oven ready containers can be placed directly in the oven. Check
first that there are no metal objects like staples or ties.
• Certain foods, like vegetables and fish, do not need to be fully defrosted before cooking.
• Foods in meat and other sauces defrost quicker and more evenly if they are stirred, turned, and/or
separated occasionally.
• Meat, fish and fruit all lose liquids during defrosting. Always place these foods in a bowl to defrost
them.
• When freezing meat, arrange pieces separately in the plastic bag. This will save valuable time when it
comes to defrosting.
• Always respect standing times between defrosting and cooking. Standing time is the time for which you
must leave food “rest” before cooking. Standing time ensures that food has an even temperature throughout when cooking starts.
GB 10-09-2002 12:24 Pagina 66
Page 26

67
CHAPTER 4: MANUAL MODE
MEAT
•Roasts (pork, beef, veal,
etc.)
•Steaks, cutlets, slices
•Casserole, goulash
•Mince
•Hamburgers
•Sausages
POULTRY
• Duck, turkey
• Whole chicken
• Chicken pieces
• Chicken breasts
VEGETABLES
• Diced aubergines
• Chopped peppers
• Shelled peas
• Artichoke hearts
• Asparagus pieces
• Chopped beans
• Whole broccoli
• Brussels sprouts
• Sliced carrots
• Broccoli pieces
• Mixed vegetables
• Chopped spinach
FISH
• Filets
• Slices
• Whole
• Shrimps/prawns
DAIRY PRODUCTS
• Butter
• Cheese
• Cream
BREAD
• 2 medium rolls
• 4 medium rolls
• Sliced bread
• Wholemeal sliced bread
FRUIT
•Strawberries, plumbs,
cherries, blackcurrants,
apricots
•Raspberries
• Blackberries
DEFROSTING TABLE
FOOD TYPE
QUANTITY FUNCTION
POWER
LEVEL
DEFROSTING
TIME (minutes)
NOTES/HINTS
STANDING
TIME
WHAT WIRE
RACK TO USE
1 kg
200g
500g
500g
250g
200g
300g
1,5kg
1,5kg
850g
300g
500g
500g
500g
300g
500g
500g
500g
500g
500g
450g
300g
300g
300g
400g
500g
400g
250g
250g
200ml
150g
300g
250g
250g
500g
300g
250g
MICRO
MICRO
MICRO
MICRO
MICRO
MICRO
MICRO
MICRO
MICRO
MICRO
MICRO
MICRO
MICRO
MICRO
MICRO
MICRO
MICRO
MICRO
MICRO
MICRO
MICRO
MICRO
MICRO
MICRO
MICRO
MICRO
MICRO
MICRO
MICRO
MICRO
MICRO
MICRO
MICRO
MICRO
MICRO
MICRO
MICRO
DEFROST
DEFROST
DEFROST
DEFROST
DEFROST
DEFROST
DEFROST
DEFROST
DEFROST
DEFROST
DEFROST
DEFROST
DEFROST
DEFROST
DEFROST
DEFROST
DEFROST
DEFROST
DEFROST
DEFROST
DEFROST
DEFROST
DEFROST
DEFROST
DEFROST
DEFROST
DEFROST
DEFROST
DEFROST
DEFROST
DEFROST
DEFROST
DEFROST
DEFROST
DEFROST
DEFROST
DEFROST
25 - 28
6 - 8
14 - 16
11 - 13
5 - 7
7 - 9
9 - 11
35 - 40
35 - 40
24 - 26
13 - 15
16 - 19
15 - 18
12 - 15
9 - 11
14 - 16
15 - 18
15 - 17
15 - 17
14 - 16
13 - 15
8 - 10
9 - 11
9 - 11
10 - 12
13 - 15
10 - 12
5 - 7
6 - 8
8 - 10
1 - 2
4 - 6
4 - 6
4 - 6
12 - 14
8 -10
6 - 8
Turn the meat over half way
through defrosting time.
See the note “*”
Turn the poultry over half way
through defrosting time.
At the end of standing time,
wash under hot water to
remove any residual ice.
Mix the vegetables
occasionally to facilitate
defrosting.
Tu rn the fish over half
way through defrosting
time.
Remove any aluminium foil
and pieces of metal.
Do not fully defrost cheese.
Respect standing times. Remove
cream from containers and place
in a bowl instead.
Place bread directly on
the turntable.
Mix 2 - 3 times.
Mix 2 - 3 times.
Mix 2 - 3 times.
20
5
10
15
10
10
10
20
20
10
10
5
5
5
5
5
5
5
5
5
5
5
5
7
7
7
7
10
15
5
3
3
3
3
10
10
6
None
None
None
None
None
None
None
None
None
None
None
None
None
None
None
None
None
None
None
None
None
None
None
None
None
None
None
None
None
None
None
None
None
None
None
None
None
*
These times are correct according to IEC standard 705, section 18.3 for the minced meat defrosting test. Turn the meat over half way
through defrosting time. Place the meat directly on the turntable. Refer to the table on page 2 for information on other defrosting tests
according to IEC standard 705.
GB 10-09-2002 12:24 Pagina 67
Page 27

68
CHAPTER 4: MANUAL MODE
4.13 REHEATING: RULES, HINTS AND REHEATING TABLE
You will soon see how versatile and effective your microwave oven is for reheating foods. Reheating in a
microwave oven saves both time and energy.
• Reheat all foods (specially from frozen) to at least 70°C. (Foods should be very hot to touch!) Even though
you may not be able to eat the food immediately because it is too hot, you can be sure that it has been
fully sterilised.
•Always follow these rules for reheating cooked or frozen foods:
- Remove the food from metal containers.
- Cover the food with clear film (use microwave resistant film) or greaseproof paper. This keeps the flavour
in and keeps the oven clean. You can even use an overturned plate to cover food.
- Whenever possible, mix or stir the food frequently. This distributes temperature evenly and speeds up
cooking.
- Follow the cooking instructions on the packaging. Remember that under certain circumstances, cooking
times may have to be increased.
• Defrost frozen food before you reheat it. The colder the food when you start reheating, the longer the
time needed to reheat it.
SOFTENING
• Chocolate/icing
• Butter
• Yoghurt
• Baby’s bottle
• Convenience packs of
lasagne or filled pasta
• Convenience packs of
meat with rice and/or
vegetables
• Convenience packs of
fish and/or vegetables
• Plate of meat and/or
vegetables
• Plate of pasta,
cannelloni or lasagne
• Plate of fish and/or rice
REHEATING TABLE
FOOD TYPE
QUANTITY FUNCTION
POWER
LEVEL
REHEATING
TIME (minutes)
NOTES/HINTS
100 gr
50-70 gr
125 gr
240 gr
400 gr
400 gr
300 gr
400 gr
400 gr
300 gr
MICRO
MICRO
MICRO
MICRO
MICRO
MICRO
MICRO
MICRO
MICRO
MICRO
Place in a bowl. Mix the icing once.
Remove any metal foil.
Reheat the bottle without its teat. and shake after reheating to
ensure uniform temperature. Test the temperature of the
contents before giving it to the baby!
If the milk is at room temperature, you can reduce reheating time
accordingly. If you are using powdered milk, mix the powder thoroughly
first. Powder can catch fire in a microwave oven! Only use sterilised milk.
For convenience pack of all types of pre-cooked foods
to be reheated to 70°C. Remove the food from any
metal container and place it directly on the serving
dish. Always cover for best results.
For all types of pre-cooked food to be reheated to
70°C. Place the food directly on the serving dish.
Cover with film or an overturned plate.
FOODS FROM REFRIGERATOR TEMPERATURE (5/8°C) TO 20/30°C
FOODS FROM REFRIGERATOR TEMPERATURE (5/8°C) TO 70°C
500
1000
1000
“
1000
“
“
“
“
“
4 - 5
0’.10”-0’.15”
0’.15”-0’.20”
0’.30”-0’.35”
3 - 5
3 - 5
2 - 4
4 - 6
4 - 6
3 - 5
GB 10-09-2002 12:24 Pagina 68
Page 28

69
CHAPTER 4: MANUAL MODE
400g
400g
300g
300g
400g
400g
300g
180 cc
150 cc
100 cc
300 cc
180 cc
150 cc
100 cc
300 cc
MICRO
MICRO
MICRO
MICRO
MICRO
MICRO
MICRO
MICRO
MICRO
MICRO
MICRO
MICRO
MICRO
MICRO
MICRO
For convenience packs of all types of frozen pre-cooked foods
to be reheated to 70°C. Reheat/cook in the package. If the
package is metal, remove the food and place it directly on the
serving dish, and increase cooking time by a few minutes.
Remove uncooked food from its packaging and place it in a
microwave resistant dish.
For convenience packs of all types of frozen pre-cooked foods
to be reheated to 70°C. Reheat/cook directly on the serving
dish. Cover with an upturned plate or Pyrex dish. Make sure
that the food is thoroughly hot in the centre. Mix if possible.
Stir all drinks at the end of reheating to ensure uniform
temperature throughout. Cover broth with an upturned saucer.
Stir all drinks at the end of reheating to ensure uniform
temperature throughout. Cover broth with an upturned saucer.
REHEATING TABLE
FOOD TYPE
QUANTITY FUNCTION
POWER
LEVEL
REHEATING
TIME (minutes)
NOTES/HINTS
FOOD TYPE
QUANTITY
FUNCTION
POWER
LEVEL
DEFROSTING
TIME
(minutes)
NOTES/HINTS
FROZEN FOODS (-18/-20°C) TO REHEAT/COOK
DRINKS FROM REFRIGERATOR TEMPERATURE (5/8°C) TO 70°C
DRINKS FROM ROOM TEMPERATURE (20/30°C) TO 70°C
• Convenience packs of
lasagne or filled pasta
• Convenience packs of meat
with rice and/or vegetables
•
Convenience packs of precooked fish and/or vegetables
•
Convenience packs of uncooked
fish and/or vegetables
• Portions of meat and/or
vegetables
• Portions of pasta,
cannelloni or lasagne
•
Portions of fish and/or rice
• 1 cup of water
• cup of milk
• 1 cup of coffee
• 1 bowl of broth
•1 cup of water
• cup of milk
• 1 cup of coffee
• 1 bowl of broth
4.14 COOKING ANTIPASTI AND FIRST COURSES: RULES, HINTS AND COOKING TABLE
Soups and minestrones in general can be made with less water because very little water is lost through
evaporation in microwave ovens. Add salt at the end of cooking or during standing time because salt has
a dehydrating effect.
The time required to cook rice (and pasta) in a microwave oven is about the same as to cook it on the hob.
The advantage is that it is not necessary to stir it continuously (2 - 3 times are enough).
MICRO +
MICROGRILL
MICROGRILL
MICROGRILL
MICRO
FAN
FAN
FAN
•Lasagne
•Gnocchi (dumplings)
•Macaroni
•Risotto
•Pizza
•Fresh quiche Lorraine
•Frozen quiche Lorraine
TEMPERATURE
WHAT WIRE
RACK TO USE
1100g
600g
1500g
300g
di riso
600g
800g
550g
Times are for uncooked pasta. If the
pasta is pre-cooked, 8 minutes in MICRO
GRILL mode is enough.
Do not pile dumplings too high.
Boil the pasta separately first.
Place all the ingredients in a microwave
resistant dish and cover with film. For
300g of rice, you need 750g of broth
and maximum microwave power level for
12 - 15 minutes.
Lay the pizza in the bottom of a cake
dish or on greaseproof paper on the low
wire rack. Preheat the oven.
Use a cake dish with a handle. Preheat
the oven.
Place in a metal cake dish. Preheat the
oven.
Low
Low
Low
None
Low
Low
Low
-
-
-
-
-
200°C
160°C
190°C
1000
“
“
“
“
“
“
1000
“
“
“
1000
“
“
“
5 - 7
4 - 6
2 - 4
6 - 8
5 - 7
6 - 8
3 - 5
1’30” - 2’
1’.15” - 1’.45”
1’.15” - 1’.45”
3 - 4
1’.15” - 1’.45”
1 - 1’.30”
0’.45” - 1’.15”
2 - 3
1000
1000
1000
1000
1000
-
-
-
8
8
12
8
12-15
30
40
45
+
GB 10-09-2002 12:24 Pagina 69
Page 29

70
CHAPTER 4: MANUAL MODE
4.15 COOKING MEAT: RULES AND HINTS AND COOKING TABLE
- Cooking time depends directly on the size and homogeneity of the food. Skewered meat pieces cook
quicker than a joint because the pieces are smaller and the consistency more uniform.
-To keep roasts, chicken and skewered meats tender, add
1
/2cup of water when you start cooking.
•Roasts (pork, beef)
•Meatballs
•Meatballs
•Whole chicken
•Chicken pieces
•Skewered meats
•Goulash
•Chicken breasts
•Beef steak or pork chop
•Sausages
•Hamburgers
1Kg
800g
900g
1,2 kg
850g
600g
1,5 kg
500g
3 pieces
3 pieces
3 pieces
MICRO FAN
MICRO FAN
MICRO
MICRO FAN
MICRO FAN
MICRO FAN
MICRO
MICRO
GRILL
GRILL
GRILL
190 °C
180 °C
-
190 °C
190 °C
180 °C
-
-
-
-
-
Leave some fat around the edges to stop the
roast from drying. Do not add to much
condiment.
Mix 500g of minced beef, eggs, ham,
breadcrumbs, etc. Add a dash of oil and white
wine to taste.
See note (
*
)
See note (
**
)
Mix once during cooking.
Turn over half way through the cooking time.
Do not cover. Stir 2-3 times.
Turn over half way through the cooking time.
Preriscaldare ilgrill per 3 minuti. Girare a
metà cottura, dato che la resistenza grill
irraggia solo dalla parte alta del forno.
Preheat the grill for 3 minutes. Turn over half
way through the cooking time, because the
grill only heats the top of the food.
Preheat the grill for 3 minutes. Turn over half
way through the cooking time, because the
grill only heats the top of the food.
Low
Low
None
Low
Low
Low
None
None
High
High
High
*
These times are correct according to IEC standard 705, section 17.3, test C for minced meat. Cover the dish with film. Refer to the table on page 2 for
information on other tests according to IEC standard 705.
**
These times are correct according to IEC standard 705, section 17.3, test F for minced meat. Cover the dish with film. Refer to the table on page 2 for
information on other tests according to IEC standard 705.
FOOD TYPE
QUANTITY
FUNCTION
POWER
LEVEL
COOKING
TIME
(minutes)
NOTES/HINTS
TEMPE-
RATURE
WHAT WIRE
RACK TO USE
4.16 COOKING FISH: RULES, HINTS AND COOKING TABLE
Fish cooks quickly and with excellent results in a microwave oven. Fish can be flavoured with butter or oil
or left as it is. Cover with film. Cut skin before cooking. Arrange fillets evenly. Avoid cooking fish covered
in egg and breadcrumbs.
4.17 COOKING SIDE DISHES AND VEGETABLES: RULES, HINTS AND COOKING TABLE
Vegetables conserve more of their natural colour and nutritional goodness when cooked in a microwave
oven compared to traditional cooking methods. Wash and clean the vegetables thoroughly before cooking.
Cut large vegetables into uniform pieces. For every 500g of vegetables, add about 5 spoonfuls of water.
(Fibrous vegetables need more water.) Always cover vegetables with film.
Stir at least once half way through the cooking time. Add salt only at the end of cooking.
•Filets
•Small slices
•Whole
•Whole
•Large slices
•Shrimps/prawns
•Baked fish
300g
300g
500g
250g
400g
500g
600g
MICRO
MICRO
MICRO
MICRO
MICRO
MICRO
MICRO FAN
-
-
-
-
-
-
190°C
Cover with film.
Cover with film.
Cover with film.
Cover with film.
Cover with film.
Cover with film.
Cover with film.
None
None
None
None
None
None
Low
500
500
750
750
750
500
1000
750
-
-
-
35-40
22-25
20
40
25
17-20
30-35
10-15
16-18
10-12
10-12
5-7
7-9
8-10
5-7
7-9
7-9
30
750
750
750
750
750
750
150
FOOD TYPE
QUANTITY
FUNCTION
POWER
LEVEL
COOKING
TIME
(minutes)
NOTES/HINTS
TEMPE-
RATURE
WHAT WIRE
RACK TO USE
GB 10-09-2002 12:24 Pagina 70
Page 30

71
CHAPTER 4: MANUAL MODE
• Asparagus
•Artichokes
•Green beans
•Broccoli
•Brussels sprouts
• White/green cabbage
• Red cabbage
• Carrots
• Cauliflower
• Cauliflower in béchamel
sauce
• Celer y
• Aubergines
• Grilled aubergines
• Aubergines alla
parmigiana
• Leaks
• Champignon mushrooms
• Onions
• Spinach
• Peas
• Fennel
• Gratin tomatoes
• Peppers
• Grilled peppers
• Stuffed peppers
• Potatoes
• Roast potatoes (fresh)
• Roast potatoes (frozen)
• Gratin potatoes
• Courgettes
500g
300g
500g
500g
500g
500g
500g
500g
500g
1000g
500g
4 slices
1300g
500g
500g
250g
300g
500g
500g
800g
500g
4 quarters
1400g
500g
500g
900g
1100g. total
500g
MICRO
MICRO
MICRO
MICRO
MICRO
MICRO
MICRO
MICRO
MICRO
MICRO
+ MICRO GRILL
MICRO
MICRO
GRILL
MICRO
GRILL
MICRO
MICRO
MICRO
MICRO
MICRO
MICRO
MICRO GRILL
MICRO
GRILL
MICRO
+
MICRO GRILL
MICRO
MICRO FAN
MICRO FAN
MICRO FAN
MICRO
-
-
-
-
-
-
-
-
-
-
-
-
-
-
-
-
-
-
-
-
-
-
-
-
-
-
190°C
200°C
190°C
-
Cut into 2 cm pieces and cover.
Cut off the stem and cover.
Cut into pieces and cover.
Cut into pieces and cover.
Leave whole and cover.
Leave whole and cover.
Leave whole and cover.
Cut into uniform size pieces and cover.
Cut into pieces and cover.
Times with raw cauliflower. If pre-cooked, 10
minutes in MICRO GRILL mode is sufficient.
Cut into pieces and cover.
Cut into pieces and cover.
Turn over half way through cooking.
The aubergines can be fried or grilled
first.
Leave whole and cover.
Leave whole and cover. Do not add water.
Cook whole but of similar size. Do not
add water.
Wash and drain first. Cover.
Cover.
Cut into quarters and cover.
Choose of similar size if possible.
Cut into pieces and cover.
Turn over half way through cooking
Choose short, wide peppers.
Cut into pieces and cover.
Mix 2-3 times.
Mix 2-3 times.
See note (
*
)
Leave whole and cover.
None
None
None
None
None
None
None
None
None
Low
None
None
High
Low
None
None
None
None
None
None
Low
None
High
Low
None
Low
Low
Low
None
*
These times are correct for combination cooking tests according to IEC standard 705, third edition, issued in IEC publication
53H/69/CD. Refer to the table on page 2 for information on other tests according to IEC standard 705.
N.B.: The cooking times given here are purely indicative. Increase or reduce them to suit the weight and
starting temperature of foods, and, in the case of vegetables, their consistency and fibre content too.
4.18 COOKING CAKES AND TARTS: RULES, HINTS AND COOKING TABLE
PREHEAT THE OVEN prior to cooking any type of cake or tart. See section 4.4.
•Hazelnut cake
•Quark cake
•Jam tart
•Plum cake
•Sponge cake
•Walnut cake
•Egg custard
•Sponge cake
•Sponge cake
1100g
1500g
700g
950g
700g.
650g.
750g
475g
710g
MICRO FAN
MICRO FAN
FAN
FAN
FAN
FAN
MICRO
MICRO
MICRO FAN
170 °C
170 °C
160 °C
160 °C
160 °C
160 °C
--
--
170°C
Use the ovenproof dish supplied.
Use the ovenproof dish supplied.
Use a metal cake dish.
Use a rectangular cake dish.
Use a metal cake dish.
Use a metal cake dish.
*
*
**
Low
Low
Low
Low
Low
Low
None
Low
Low
*
These times are correct for cooking tests A and B according to IEC standard 705, section 17.3. Refer to the table on page 2 for
information on other tests according to IEC standard 705.
**
These times are correct for combination cooking test E according to IEC standard 705, third edition, issued in IEC publication
59H/69/CD. Remember to preheat the oven in FAN mode with the low wire rack in place. Refer to the table on page 2 for information
on other tests according to IEC standard 705.
1000
1000
1000
1000
1000
1000
1000
1000
1000
1000
1000
1000
1000
-
1000
1000
1000
1000
1000
1000
1000
500
1000
1000
1000
1000
500
500
750
1000
8-9
10-11
10-11
6-7
6-7
6-7
6-7
8-9
10-11
7
10
6-7
5-6
9-11
7-9
5-6
5-6
4-5
5-6
9-10
11-12
9-11
8-9
9-11
8
9
7-8
25-30
35-40
20
6-7
25-30
35-40
40
90
40
40
16
6
30
150
500
-
-
-
1000
1000
150
FOOD TYPE
QUANTITY
FUNCTION
POWER
LEVEL
COOKING
TIME
(minutes)
NOTES/HINTS
TEMPE-
RATURE
WHAT WIRE
RACK TO USE
FOOD TYPE
QUANTITY
FUNCTION
POWER
LEVEL
COOKING
TIME
(minutes)
NOTES/HINTS
TEMPERATURE
WHAT WIRE
RACK TO USE
GB 10-09-2002 12:24 Pagina 71
Page 31

72
CHAPTER 5: RECIPES
PIZZA
Ingredients: 500g of pizza dough, 1 mozzarella cheese, 1 tin of peeled tomatoes, oregano, 50g of cooked
ham, salt.
Method: Preheat the oven to 200°C in FAN mode with the low wire rack in place. Roll the dough out thin,
and rest it on a flat, round surface (e.g. the bottom of a cake dish). Cover with tomato and add the diced
mozzarella cheese and thinly chopped ham. Add a pinch of oregano and salt to taste. Place in the oven
and cook for 30 minutes.
In Automatic mode, select “PIZZA/SAVOURIES - FRESH”. Use the low wire rack, but do not preheat the
oven.
QUICHE LORRAINE
Ingredients for the pastry: 200g of flour , 100g of butter, 1 pinch of salt , one cup of water approx.
Ingredients for the filling: 180g of smoked bacon,
1
/4litre of milk, 3 eggs, 150g of fresh cream; salt, pep-
per, nutmeg to taste.
Method: Mix the flour, salt and butter. Add the water and kneed the dough into a ball. Leave stand in a
cool place for 30 minutes. Dice the smoked bacon, and place in an ovenproof dish. Brown lightly in MICRO
mode at maximum power level for 1 minute 30 seconds. Drain off the grease and set aside. Preheat the
oven to 160°C in FAN mode, with the low wire stand in place.
Roll out the pastry and place in a greased and floured oven dish with a handle. Beat the eggs, add the
milk, cream, salt, pepper and a dash of nutmeg. Arrange the bacon evenly over the pastry and pour on
the mix. Place in the oven and cook for 40 minutes.
In Automatic mode, select “QUICHE - FRESH”. Use the low wire rack, but do not preheat the oven.
GB 10-09-2002 12:24 Pagina 72
Page 32

73
CHAPTER 5: RECIPES
LASAGNE
Ingredients: 9 strips of egg pasta, 1/2litre of béchamel sauce, 500g of Bolognese sauce, 50g of grated par-
mesan cheese.
Method: Spread some of the béchamel in the bottom of an ovenproof dish. Add a first layer of pasta, cover
with a thin layer of béchamel sauce and Bolognese sauce and a sprinkling of parmesan cheese. Continue
in this way to make three layers of pasta and sauce. Pour the remaining béchamel sauce and Bolognese
sauce over the top, and sprinkle with parmesan cheese.
Place the dish in the oven on the low wire rack and cook for 8 minutes in MICRO mode at 1000 W power
level, then cook in MICRO GRILL mode at maximum power level for another 8 minutes or until browned.
If the pasta is pre-cooked, cook only in MICRO GRILL mode at maximum power level for 8 minutes.
In Automatic mode, select “PASTA GRATIN - FRESH”. Always pre-cook the pasta. Place the dish on the low
wire rack.
CRESPELLE ALLA FIORENTINA
Ingredients for the filling: 200g of frozen spinach, 250g of ricotta cheese, 1 egg, salt and parmesan chee-
se.
Ingredients for the crespelle: 2 eggs, 100g of flour, 25g of margarine, 250g of milk, salt.
Ingredients for the sauce:
1
/2litre béchamel sauce, tomato sauce, parmesan cheese.
Method: Cook the spinach for 11 minutes in an ovenproof dish, covered with film, in MICRO mode at 1000
W. Strain, chop finely and mix with the rest of the filling ingredients. To prepare the crespelle, mix all the
ingredients and cook in a greased, non-stick in FAN mode at 210°C.
Fill the crespelle and place them in the ovenproof dish with the béchamel sauce. Splash the tomato sauce
over the top (a few spoonfuls is sufficient) and sprinkle with parmesan cheese. Cook on the low wire rack
in MICRO GRILL mode at 500 W power level for 8 - 10 minutes, or until well browned.
In Automatic mode, select “PASTA GRATIN - FRESH”. Place the dish on the low wire rack.
GB 10-09-2002 12:24 Pagina 73
Page 33

74
CHAPTER 5: RECIPES
ROAST CHICKEN
Ingredients: 1 x 1200g chicken, 1/2glass of water, salt and pepper.
Method: Clean the chicken well, and pierce its skin with a fork to allow the fat to run out. Lay the bird in
an ovenproof dish. Add the water. Season the chicken with salt and pepper. Place the dish in the oven on
the low wire rack. Cook for 40 minutes in MICRO FAN mode at 750 W power level and 190°C. Turn the
chicken over after 25 - 30 minutes.
In Automatic mode, select “POULTRY - ROAST WHOLE”. Place the ovenproof dish on the low wire rack.
PORK ROAST
Ingredients: 1 kg pork, 1/2glass of water, salt and pepper.
Method: Place the pork in an ovenproof dish and add the water. Season with salt and pepper. Place in the
oven on the low wire rack. Cook for 35 - 40 minutes in MICRO FAN mode at 500 W power level and
190°C. Turn the meat over after 25 - 30 minutes.
In Automatic mode, select “MEAT - ROAST”. Place the ovenproof dish on the low wire rack.
GOULASH
Ingredients: 500g of beef, 500g of onions, 200g of peeled tomatoes, 30g of flour, 400 ml of water.
Method: Cut the onions into slices and the meat into cubes. Place in a high sided ovenproof dish. Cover
and cook for 15 minutes in MICRO mode at maximum power level. Add the remaining ingredients and
cook uncovered for a further 20 minutes, again in MICRO mode and at maximum power level. Stir 2 - 3
times.
In Automatic mode, select “CASSEROLE - STEW”. Place the ovenproof dish on the low wire rack.
GB 10-09-2002 12:24 Pagina 74
Page 34

75
CHAPTER 5: RECIPES
TROUT WITH OLIVES
Ingredients: 1 x 500g trout, 50g black de-stoned olives, a small bunch of parsley, salt and pepper.
Method: Clean and wash the trout well. Lay it in an ovenproof dish. Stuff it with the parsley and olives. Sea-
son it with salt and pepper. Cover with film. Place in the oven directly on the turntable. Cook for 8-10 minutes in MICRO mode at 750 W power level.
In Automatic mode, select “FRESH FISH - POACH”. Place the ovenproof dish on the low wire rack.
SALMON GRATIN
Ingredients: 400g of salmon slices (2 slices), 1 glass of milk, 50g of butter, salt.
Method: Place the slices of salmon in an ovenproof dish. Cover with curls of butter and salt. Pour the milk
around the fish. Place in the oven on the low wire rack. Cook for 10 - 12 minutes in MICRO GRILL mode
at 500 W power level.
In Automatic mode, select “FRESH FISH - GRATIN”. Place the ovenproof dish on the low wire rack.
CAULIFLOWER GRATIN
Ingredients: 400g of cauliflower, 500g of béchamel sauce, 50g of sliced cooked ham, 50g of grated chee-
se.
Method: Cut the cauliflower into pieces and arrange in an ovenproof dish. Add a glass of water. Cover
with film. Place in the oven on the low wire rack. Select “VEGETABLES - BOILED FRESH” to cook. Pour some
of the béchamel sauce into an ovenproof dish.
Arrange the cut and cooked cauliflower in the dish. Cover with the cooked ham and then with the rest of
the béchamel sauce. Top with the grated cheese.
Place in the oven on the low wire rack. Cook in MICRO GRILL mode at maximum power level for 10 minutes or until well browned.
In Automatic mode, select “FRESH VEGETABLES - BOIL”. Place the ovenproof dish on the low wire rack.
GB 10-09-2002 12:24 Pagina 75
Page 35

76
CHAPTER 5: RECIPES
JACKET POTATOES
Ingredients: 400g of potatoes (2 medium potatoes)
Method: Wash the potatoes, and pierce the peel with a fork. Place directly on the turntable.
Cook for 10 - 15 minutes in MICRO mode at maximum power level. Vary according to the type of potato.
Cut in half and serve with a knob of butter and filling to taste.
In Automatic mode, select “POTATOES - 2 JACKET POT”. Cook directly on the turntable.
PLUM CAKE
Ingredients: 250g of butter, 250g of sugar, 3 whole eggs + 2 egg yokes, 250g of flour, 80g raisins, 30 ml
of rum, a pinch of salt.
Method: Preheat the oven to 160°C in FAN mode with the low wire rack in place. Mix the sugar into the
butter (which must be removed from the fridge at least 1 hour beforehand), until the mix is white in colour.
Add the eggs one at a time, then gradually add the flour and a pinch of salt.
Slowly add the rum and raisins (soaked in warm water). Pour the mix into a rectangular cake dish lined
with aluminium foil. Place in the oven on the low wire rack. Cook for 90 minutes. Remove from the cake
dish only when cold.
N. B. Squeeze the excess water out of the raisins and cover them in flour before mixing them in. This prevents them from sinking to the bottom of the mix during cooking.
In automatic mode, select “CAKES - LONG BAKING”. Place the cake dish on the low wire rack. Do not
preheat the oven.
JAM TART
Ingredients: 250g of flour, 110g of sugar, 125g of butter, 1 whole egg + 1 egg yoke, 1 pinch of salt, 200g
of jam.
Method: Preheat the oven to 160°C in FAN mode with the low wire rack in place. Mix all the ingredients
together (except the jam) in a kitchen mixer. Separate off about 1/3 of the pastry to decorate the tart with
afterwards.
Roll the pastry and use it to line a previously greased and floured cake dish with a handle.
Spread the jam on top. Decorate the top in a criss-cross manner with strips of pastry from the remaining
third. Place in the oven on the low wire rack. Cook for 40 minutes.
In automatic mode, select “CAKES - SHORT BAKING”. Place the cake dish on the low wire rack. Do not
preheat the oven.
GB 10-09-2002 12:24 Pagina 76
Page 36

77
CHAPTER 6 – CLEANING AND MAINTENANCE
6.1 CLEANING
Before performing any cleaning or maintenance, always disconnect the plug from the power socket and
wait for the oven to cool down.
Your oven’s cavity is coated with a special non-stick enamel for quick and easy
cleaning. Always keep the microwave unit cover (C) clean and free from grease and splashes of fat.
Do not use scouring powders, wire sponges or sharp metal utensils to clean
the outside of the oven. Also take care to prevent water and detergents from
entering the vents on the top of the oven.
Do not to use alcohol, scouring powders, or ammonia-based detergents
to clean the inside or outside of the door.
Always keep the inside of the door clean to ensure that it closes properly.
Make sure that dirt and food residues do not build up between the door
and the oven’s front panel.
Clean the air vents at the rear of the oven regularly to prevent dust and
dirt from blocking them over time.
Remove the turntable (H) and its support ring (I) periodically to clean
them. Also clean the bottom of the oven under the turntable.
Wash the turntable and its support ring in soapy water using a neutral detergent.
Both the turntable and its support ring can be washed in a dishwasher.
Never plunge the hot turntable into cold water. The sudden change in temperature could cause it to crack.
The turntable motor is sealed. Nevertheless, take care to prevent water from entering the spindle (D) when cleaning the bottom of the oven.
The top heating element can be lowered by turning its ceramic catch to make cleaning inside the oven easier.
IMPORTANT: Return the heating element to its raised position and secure it with the catch after cleaning.
Never use the oven with the heating element in lowered position.
GB 10-09-2002 12:24 Pagina 77
Page 37

78
CHAPTER 6 – CLEANING AND MAINTENANCE
6.2 MAINTENANCE
If any malfunction or defect occurs, contact an authorised Service Centre to have the oven repaired. It is
always worth carrying out the following simple checks before requesting technical assistance.
NOTE: You can continue to use the oven normally if the internal oven light fails. Contact an
authorised Service Centre to have the bulb replaced.
CAUSE/SOLUTION
• The door is not closed properly.
• The plug is not correctly inserted.
• There is no power at the mains socket
(check the fuse box).
• When foods containing water are cooked, it is quite
normal for the steam generated to condense into
water inside the oven and on the work surface
beneath.
• In Automatic mode, and in MICRO, MICRO FAN, and
MICRO GRILL modes, do not start the oven without
food inside.
• Do not use metal containers for the above cooking
modes or bags or packets with metal parts.
•In AUTOMATIC mode, check that the chosen food
category matches the type of food in the oven.
Respect the food quantities and cooking accessories
and times specified in the recipe.
•In MANUAL mode, make sure that you have selected
the right function. Increase the cooking time if
necessary.
• The food was not completely defrosted before
cooking.
•In AUTOMATIC mode, check that the chosen food
category matches the type of food in the oven.
Respect the food quantities and cooking accessories
and times specified in the recipe.
•In MANUAL mode, make sure that you have selected
the right function. Reduce the cooking time if
necessary.
• Stir or mix the food during cooking. Remember that
food cooks better if cut into uniform size pieces.
•Turntable rotation has not been switched on.
PROBLEM
The oven does not work.
Condensation on the work surface, inside
the oven or around the door.
Sparks inside the oven.
The food does not heat or cook properly.
The food burns.
The food does not cook evenly.
• Contact an authorised Service Centre.
A “
FF AA II LL
” message appears on the display.
GB 10-09-2002 12:24 Pagina 78
 Loading...