

Page 1

De’Longhi Appliances via Seitz, 47 31100 Treviso Italia www.delonghi.com
5711310351/05.15_00
Page 2
HSX2320 Series
CONVECTOR
Instructions for use
Page 3
ELECTRICAL CONNECTION (UK ONLY)
A) If your appliance comes tted with a plug, it will incorporate a 13 Amp fuse. If it does not t your socket, the plug should
be cut o from the mains lead, and an appropriate plug tted, as below.
WARNING: Very carefully dispose of the cut o plug after removing the fuse: do not insert in a 13 Amp socket elsewhere
in the house as this could cause a shock hazard.
With alternative plugs not incorporating a fuse, the circuit must be re-tted when changing the fuse using a 13 Amp
Asta approved fuse to BS 1362. In the event of losing the fuse cover, the plug must NOT be used until a replacement
fuse cover can be obtained from your nearest electrical dealer. The colour of the correct replacement fuse cover is that as
marked on the base of the plug.
B) If your appliance is not tted with a plug, please follow the instructions provided below:
Important
The wires in the mains lead are coloured in accordance with the following code:
Blue: Neutral
Brown: Live
As the colours of the wires in the mains lead of this appliance may not correspond with the coloured markings identifying the
terminals in your plug, proceed as follows:
The wire which is coloured blue must be connected to the terminal which is marked with the letter N or coloured black.
The wire which is coloured brown must be connected to the terminal which is marked with the letter L or coloured red.
Important - This appliance is Class II. If you have a 3-pin plug, do not connect any wire to the “earth” terminal.
2
Page 4

A
B
C
1
2
“ ”
800mm
200mm
500mm
200mm
200mm
75mm
3
3
Page 5

IMPORTANT INFORMATION
Safety Warnings
Danger!
Failure to observe the warnings may result in life-threatening
injury by electric shock.
- The appliance must not be placed
immediately below a power socket.
- Do not use the heater close to bath,
wash-basin, shower and swimming
pool.
- If the power cable has been damaged, it
must be replaced by the manufacturer
or the service centre or by an expert
sta member so as to avoid all risks.
Important!
Failure to observe the warning could result in injury or
damage to the appliance.
- The appliance can be used by children
at least 8 years old and by persons
with reduced physical, mental and
sensory capacities or with inadequate
experience and knowledge, as long
as they are carefully supervised or
instructed on how to safely use the
appliance and the hazards involved.
Make sure that children do not play
with the appliance. Cleaning and
maintenance performed by the user
must not be performed by children
without supervision.
- Children less than 3 years old should be
kept away from the appliance unless
continuously supervised.
- Children between 3 and 8 years old
may only switch the appliance on and
o, provided that it has been placed
or installed in its normal operating
position, they are carefully supervised
and instructed concerning use of
the appliance in a safe way and they
understand the hazards involved.
Children between 3 and 8 years old
should not insert the plug, adjust
and clean the appliance or perform
maintenance on it. ATTENTION: Some
parts of the appliance can become
very hot and cause burns. Pay
particular attention when children and
vulnerable persons are present.
- ATTENTION: to avoid any danger
caused by an accidental reset of the
safety system, this appliance must not
be powered through an external timer.
- Do not use the appliance in small
rooms when they are occupied by
persons that are not capable of leaving
the room on their own, unless constant
supervision is provided.
Danger of burns!
Failure to observe these warnings may cause burns.
- ATTENTION: to avoid overheating, do
not cover the appliance for any
reason during operation, this
would cause dangerous
overheating.
- Extension leads should not be used as it could overheat
during operation of the appliance.
Note:
This symbol indicates recommendations and important
information for the user.
- Never use the appliance to dry laundry.
- Do not place the power cable on the appliance when it is
hot.
- For greater eciency position the device away from
draughts.
- Only use the heater in an upright position.
- The appliance must be positioned at a minimum
distance of 80 cm from curtains or other movable
objects sensitive to heat.
- The rst time you use the appliance it may emit smells.
It is advisable to let it run for at least 15 minutes with
the thermostat at the maximum setting and then
ventilate the room. A little smoke may be emitted due
4
Page 6

to the protective substances applied to the heating
element before transport.
- Do not position the appliance on deep-pile carpets or rugs,
to avoid obstruction to the air intake grille located under it.
- Do not obstruct the hot air outlet grille or the air intake
grille on the bottom of the appliance.
- Position the appliance so that the plug and the power
socket can be easily reached after installation.
- Do not use this appliance in a room whose surface area
is less than 4 m2.
- The appliance is tted with a safety cuto device
which will switch the appliance o in case of accidental
overheating. To reset the cuto, disconnect the plug
from the power supply for a few minutes, remove the
cause of overheating then reconnect the appliance.
If this abnormal situation happens several times,
contact customer service.
sockets are in good condition and the plug is inserted
correctly to avoid any accidental overheating.
We suggest that you check the plug AND THE SOCKET
regularly if the heater is in prolonged use, if you are in any
doubt please consult an electrician.
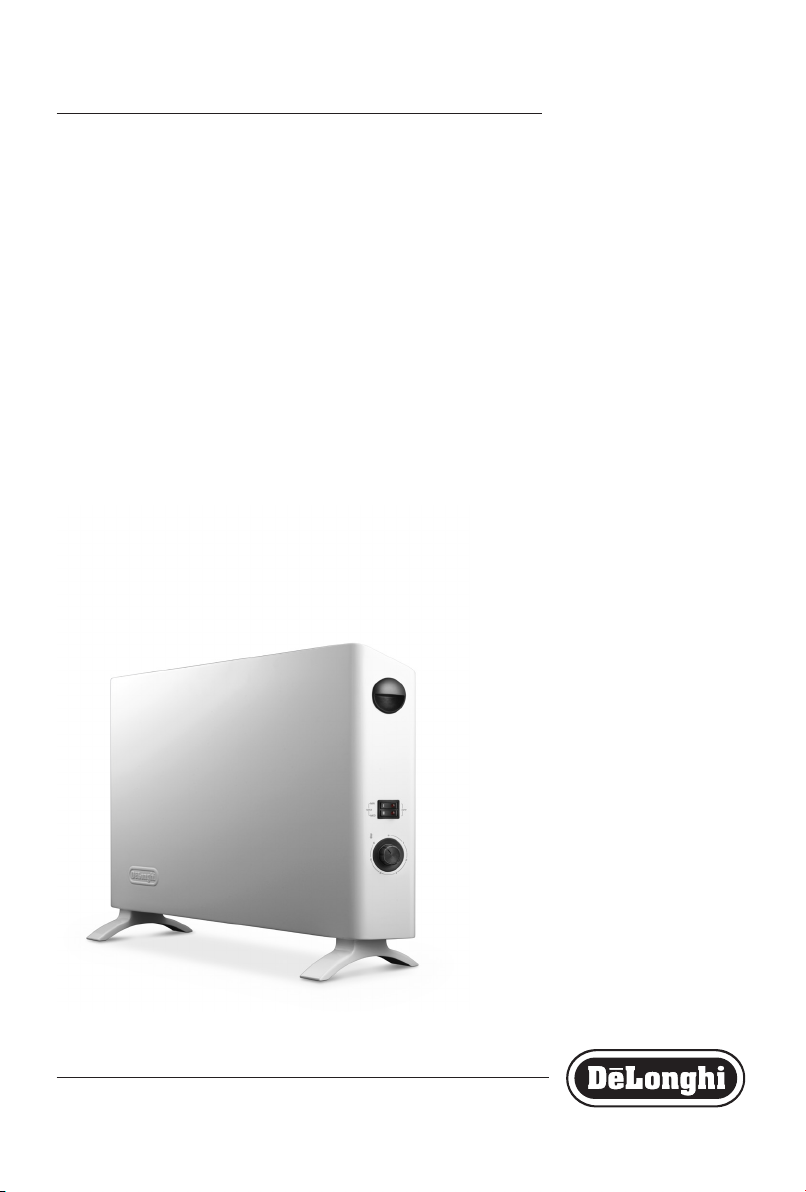
DESCRIPTION
A Switches
B Thermostat
USE
General instructions
Remove the appliance from the packaging.
Check that neither the appliance nor the power cable has
been damaged during transport. Do not operate the heater if
damaged. Remove all publicity material from the appliance.
The appliance is only suitable for use on the oor.
This appliance conforms to the following EC directives:
- Low Voltage Directive 2006/95/EC and subsequent
amendments
- Directive 2004/108/EC on electromagnetic compatibility
(EMC) and subsequent amendments
Use in compliance with intended use
Use this heater only as described in this manual. All other
use is considered improper. This appliance is not suitable for
commercial use. The manufacturer is not liable for damage
deriving from improper use of the appliance. This is a
household appliance only. It is not intended to be used in:
• staff kitchen areas in shops, offices and other working
environments;
• farm houses;
• by clients in hotels, motels and other residential type
environments;
• bed and breakfast type environments.
Use in this manner will invalidate the manufacturers
warranty.
Disposing of the appliance
The appliance must not be disposed of with
household waste but must be taken to an authorised
waste separation and recycling centre.
Fundamental recommendations regarding safety
Dear Customer – The plug on this appliance will get ‘warm’
during use, this is perfectly normal.
This product is A HIGH POWER HEATING APPLIANCE designed
to our usual high standards but please make sure your wall
Electrical connection
- Before connecting the appliance to the power socket,
check that the voltage indicated on the appliance rating
plate is the same as your electrical system and that it can
support the power consumption (Watt) indicated.
- If more than one appliance is used at the same time, it is
important to ensure that the electrical system is able to
support the power required.
Assembly of the feet
Tools required:
Screwdriver PH2x100 (crosshead)
2 supplied screws 3.5x13 PH (C)
Place the appliance on a stable surface.
For mounting the feet, proceed as follows:
- Insert the two hooks in the slots and rotate the foot until
it is engaged as shown in gure 1.
- Insert the two pins in their respective holes.
- Fix the foot with the screw (C) supplied (gure 2).
- Observe the minimum distances for the appliance from
the walls as shown in Figure 3. The measurements are
indicated both for models equipped with fan " " and
for models without.
Important! never use the appliance without the feet
attached.
USE
Operation and use
To switch on the appliance turn the thermostat knob (B)
clockwise up to maximum position 6, then press the switches:
5
Page 7

• To select minimum power press the button MIN (the red
LED will light up on the button).
• To select medium power press the button MED (the red
LED will light up on the button).
• To select maximum power MAX press both buttons MIN
and MED.
• To turn o the appliance completely press the two
switches to OFF (the red LEDs will go out), rotate the
thermostat (B) to , then remove the plug from the
power socket.
Models with fan
The appliance is equipped with a fan that provides even more
rapid and uniform heating.
The fan comes on when MED or MAX power is selected.
Adjusting the thermostat
When the room has reached the required temperature, turn
the thermostat knob (B) slowly anticlockwise until you hear
a click and no further. The LEDs of the switches will go out.
The temperature will be automatically maintained by the
thermostat. In spring or autumn or on mild days, you can save
energy by using minimum power.
Freezing protection
With the knob of the thermostat (B) in position and one
of the power levels selected, the appliance will maintain the
room at a temperature of about 5°C preventing freezing with
minimum energy consumption.
MAINTENANCE
Before carrying out any maintenance, disconnect
the appliance from the mains and wait for it to cool
down completely. This appliance requires no particular
maintenance. It is sucient to remove dust with a soft, dry
cloth. Never use abrasive powders or solvents. If necessary
remove areas of concentrated dirt with a vacuum cleaner.
TECHNICAL CHARACTERISTICS
Power supply See appliance rating plate
Power consumption "
TROUBLESHOOTING
PROBLEM CAUSE SOLUTION
The appliance doesn’t
work
The plug is not inserted properly into the power socket or the socket switch is o.
Insert the plug into the power socket and
switch on if necessary.
Check for any obstruction.
The switches are OFF.
The thermostat is set too low.
Remove the obstruction, disconnect the
power plug of the heater and let the appliance cool down. If the problem persists, contact customer experience.
Press the switches to positions MIN, MED ,
MAX .
Turn the thermostat knob clockwise to higher
settings until the heater restarts.
6
 Loading...