

Page 1

Instructions
mode d’emploi
Istruzioni per l’uso
ELECTRIC CONVECTOR HEATER
CONVECTEUR ÉLECTRIQUE
TERMOCONVETTORE ELETTRICO
Page 2
2
fig. 1
fig. 2
Page 3
3
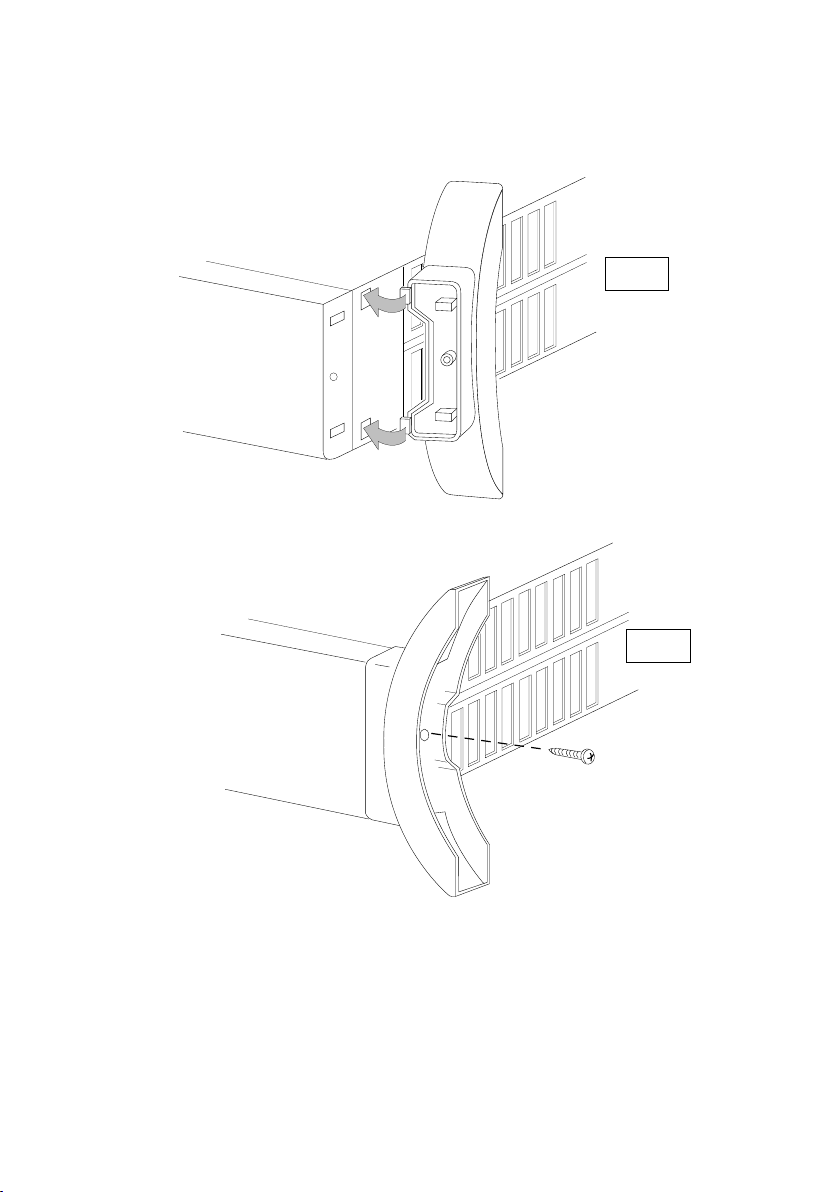
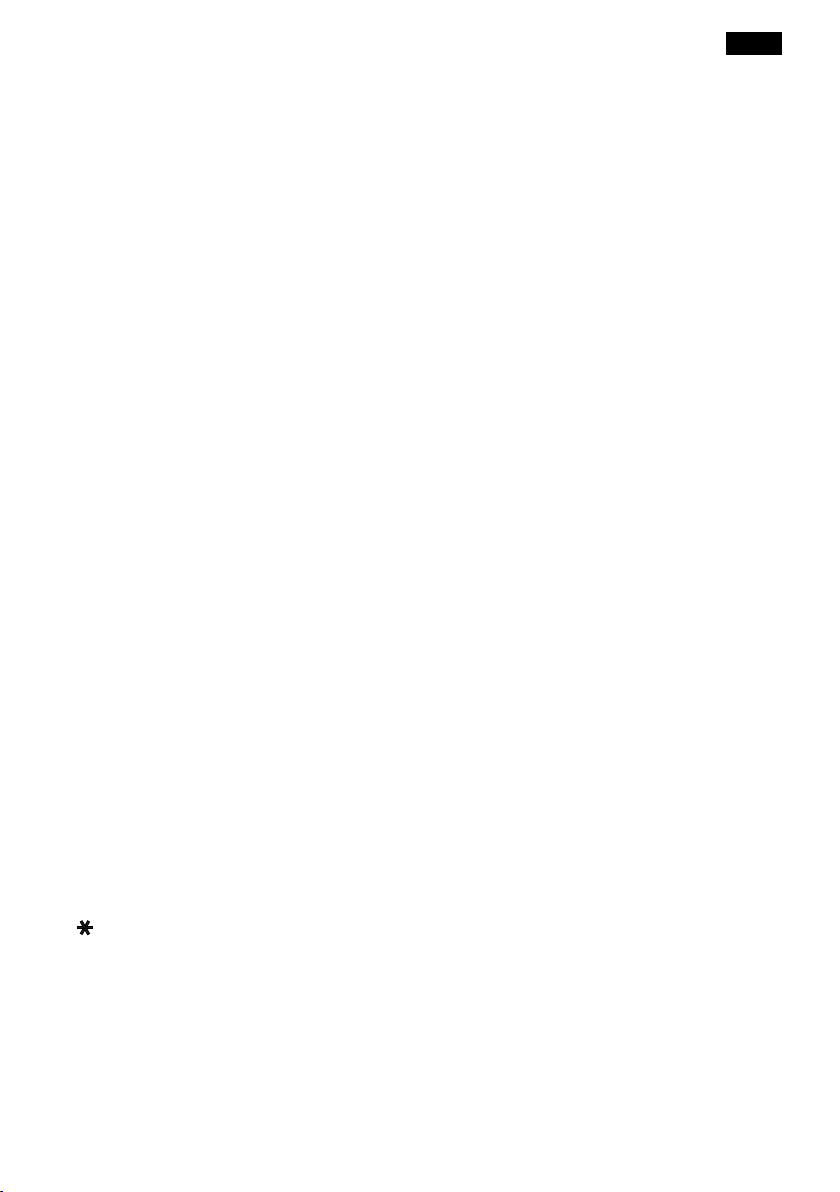
ASSEMBLING THE FEET
- Fit the feet to the appliance as follows:
- Insert the anchor pins into the slots and turn the foot until it clicks into position (fig. 1).
- Fasten the feet in position using the screws (fig. 2).
WALL-MOUNTING
If you want to fix the appliance to the wall, please contact your nearest Service Centre asking
for the wall-mounting kit.
electrical connection
- Before inserting the plug in an electrical outlet, check carefully to be certain that the voltage
in your home’s electrical system matches the voltage indicated on the appliance and that the
socket and main feed are of a size sufficient to power this appliance.
- This appliance complies with EEC Directive 89/336 regarding electromagnetic compatibility.
OPERATION AND USE
Turning the appliance on
Models with only one switch
- This appliance is turned on when you can see the red area on the switch (or, in those models
so equipped, when the warning light on the switch comes on).
Models with only a thermostat
This appliance can be turned on by rotating its knob clockwise until it stops at the last possible
setting.
To turn this appliance off, rotate the knob to its lowest position and remove its plug from the
electrical outlet.
Models with a thermostat and two switches
Turn the thermostat knob clockwise until it reaches its last possible setting, then press one switch
(minimum power) or both switches (maximum power) so the red area becomes visible (or the
warning light comes on in those models so provided).
Adjusting the thermostat
When the room has reached the desired temperature, turn the thermostat knob slowly in an
anti-clockwise direction until you get to the setting — and not beyond it — where you hear a
click (or, for models with warning lights, until those lights turn off). The thermostat will then
adjust that set temperature automatically and keep it constant.
If your appliance is the type with 2 switches, you could utilize only one of them during mild
seasons and on days not particularly cold. You will thus use but little electrical power and
obtain even greater savings in energy consumption.
Anti-freeze function (only for models with a thermostat)
Turn the switch (or switches) to make the red area show, then turn the thermostat knob to the
" " setting. When so regulated, this appliance will keep a room at a temperature of 5° C.
while consuming but a minimum of energy.
Model with a fan
This version makes it possible to heat a room even more quickly, thanks to a built-in fan that
speeds up the spread of heat and keeps the temperature uniform.
To turn this unit on, proceed as follows:
• Turn the thermostat knob clockwise to the last possible setting.
• To operate the appliance at minimum with the fan, push the I button (the red area will become visible or, in models having a switch with a warning light, the light will come on).
GB
Page 4

4
• To operate the appliance at minimum without the fan, press the II button (the red area will
become visible or, in models having a switch with a warning light, the light will come on).
• Push both switches in order to get the highest power
In this model, the thermostat can be adjusted just as it is for models without a fan.
MAINTENANCE
Always pull the plug out of its electrical outlet before beginning any cleaning.
This electric convector requires no special maintenance. All you have to do is dust it off with a
soft, dry cloth — but do so only when the appliance is cold. Never use abrasive powders or
solvents.
HELPFUL ADVICE
• Do not make use of this heating convector in the immediate proximity of bathtubs, showers,
washbasins, pools, etc. In addition, this appliance must never be placed directly under a permanent electrical outlet.
• Do not place the power cable atop this appliance when it is hot.
• Always use this heating convector only in an upright position.
• Do not block the hot-air outlet grilles or the intake grille located on the bottom of the appliance.
• If the supply cord is damaged, it must be replaced by the manufacturer, its service agent in
order to avoid a hazard.
• Never use this appliance in a room whose base area is less than 4 m
2
. We likewise recommend that you not place this equipment in a draft, because blasts of air may adversely affect
the equipment's operational efficiency.
WARNING: In order to avoid overheating, never under any circumstances cover the
appliances during operation.
CAUTION: In order to avoid a hazard due to inadvertent resetting of the thermal cutout, this
appliance must not be supplied through an external switching device, such as a timer, or connected to a circuit that is regularly switched on and off by the utility.
ELECTRICAL CONNECTION (U.K. ONLY)
A) If your appliance comes fitted with a plug, it will incorporate a 13 Amp fuse. If it does not fit your
socket, the plug should be cut off from the mains lead, and on appropriate plug fitted, as below. WARNING: Very carefully dispose of the cut off plug after removing the fuse: do not insert in a 13 Amp
socket elsewhere in the house as this could cause a shock hazard. With alternative plugs not incorporating a fuse, the circuit must be protected by a 15 Amp fuse. If the plug is a moulded-on type, the fuse
cover must be re-fitted when changing the fuse using a 13 Amp Asta approved fuse to BS 1362. In the
event of losing the fuse cover, the plug must NOT be used until a replacement fuse cover can be obtained from your nearest electrical dealer. The colour of the correct replacement fuse cover is that as
marked on the base of the plug.
B) If your appliance is not fitted with a plug, please follow the instructins provided below:
IMPORTANT
The wires in the mains lead are coloured in accordance with the following code:
Blue Neutral
Brown Live
As the colours of the wires in the mains lead may not correspond with the coloured markings identifying the
terminals in your plug, proceed as follows:
The blue wire must be connected to the terminal marked with the letter N or coloured black.
The brown wire must be connected to the terminal marked with the letter L or coloured red.
If you have a 3-pins plug, do not connect any wire to the “earth” terminal.
Page 5

5
MONTAGE DES PIEDS
Effectuer les opérations suivantes permettant le montage des pieds.
- Introduire les crochets dans les trous et tourner le pied jusqu'à ce qu'il s'accroche. (fig. 1)
- Lorsque les pieds sont accrochés à l'appareil, il faut ensuite les fixer en utilisant les vis four-
nies avec l'appareil. (fig. 2)
MONTAGE MURAL
Si vous souhaitez fixer l’appareil au mur, adressez-vous au centre de service après-vente le
plus proche de chez vous pour obtenir le kit pour l’installation murale.
BRANCHEMENT ELECTRIQUE
- Avant de brancher la fiche dans la prise de courant, vérifiez attentivement que le voltage de
secteur corresponde bien à la valeur en V indiquée sur l’appareil et que la prise de courant
et la ligne d’alimentation soient dimensionnées pour la charge de l’appareil.
- CET APPAREIL EST CONFORME A LA DIRECTIVE 89/336/CEE CONCERNANT LA COM-
PATIBILITE ELECTROMAGNETIQUE.
FONCTIONNEMENT ET UTILISATION
Mise en marche
Modèles muni d’un seul interrupteur
- L’appareil est allumé quand la zone rouge est visible sur l’interrupteur (ou lorsque le voyant
s’allume sur les modèles munis d’un interrupteur avec voyant lumineux).
Modèles munis seulement de thermostat
- Pour mettre l’appareil en marche, tournez la manette dans le sens des aiguilles d’une montre
jusqu’à la butée de la position maximale. Pour éteindre l’appareil, tournez le bouton sur la
position minimum et débranchez la fiche de la prise de courant.
- Modèles munis de thermostat et de deux interrupteurs
- Tournez la manette du thermostat dans le sens des aiguilles d’une montre complètement
jusqu’à la position maximale, appuyez ensuite sur un (puissance minimale) ou sur les deux
interrupteurs (puissance maximale) de façon à voir la zone rouge (ou l’allumage du voyant
sur les modèles munis d’interrupteur avec voyant lumineux).
Réglage du thermostat
Quand la pièce aura atteint la température souhaitée, tournez lentement la manette du thermostat dans le sens contraire à celui des aiguilles d’une montre afin d’atteindre la position
signalée par un “click” (pour les modèles munis de voyants, jusqu’à l’extinction de ceux-ci) et
pas au-delà. La température ainsi fixée sera automatiquement réglée et maintenue constante
par le thermostat. Si votre appareil est muni de 2 interrupteurs, pendant les demi-saisons ou les
journées où il ne fait pas particulièrement froid, vous pouvez appuyer sur un seul interrupteur
afin de sélectionner la puissance minimum, réalisant ainsi une économie d’énergie supplémentaire.
Fonction antigel (seulement pour les modèles munis de thermostat)
Actionnez les interrupteurs de façon à voir la zone rouge, tournez ensuite la manette du thermostat sur la position " ". De cette manière, l’appareil maintient la température de la pièce à
5°C environ avec une consommation minimale d’énergie.
Modèle avec ventilateur
Cette variante permet de chauffer encore plus rapidement grâce au ventilateur incorporé qui
accélère la diffusion de la chaleur dans la pièce et garantit une température uniforme.
Pour la mise en marche, procédez de la manière suivante:
F
Page 6

6
• Tournez la manette du thermostat dans le sens des aiguilles d’une montre jusqu’à la position
maximale.
• Pour le fonctionnement au ralenti avec ventilateur, appuyez sur le bouton I(la zone rouge
sera visible ou, sur les modèles munis d’un interrupteur avec voyant lumineux, le voyant s’allumera).
• Pour le fonctionnement au ralenti sans ventilateur, appuyez sur le bouton II (la zone rouge
sera visible ou, sur les modèles munis d’un interrupteur avec voyant lumineux, le voyant s’allumera).
• La puissance maximale est obtenue en appuyant sur les deux interrupteurs.
Le réglage du thermostat, sur ce modèle, s’effectue de la même manière que sur les modèles
sans ventilation.
ENTRETIEN
Avant d’effectuer toute opération de nettoyage, débranchez toujours la fiche de la prise de
courant.
Le convecteur électrique ne nécessite pas d’entretien particulier. Il suffit d’enlever la poussière à
l’aide d’un chiffon doux et sec; nettoyez-le uniquement quand il est froid. N’utilisez jamais de
poudres abrasives ou de solvants.
AVERTISSEMENTS
• N’utilisez jamais le thermoconvecteur tout près de baignoires, douches, éviers, piscines, etc.
En outre, l’appareil ne doit jamais être placé directement en dessous d’une prise de courant
fixe.
• Ne déposez pas le cordon d’alimentation sur l’appareil chaud.
• N’utilisez le thermoconvecteur que dans la position verticale.
• N’obstruez pas les grilles de sortie de l’air chaud, ni celle d’entrée située sur le fond de l’ap-
pareil.
•
Si le câble d’alimentation est endommagé, il doit être changé par le fabricant, son service aprèsvente ou par une personne de qualification similaire, afin d’éviter tout danger.
• N’utilisez pas l’appareil dans des pièces ayant une aire de base inférieure à 4m2. Il est en
outre déconseillé de le placer dans des courants d'air qui pourraient perturber le fonctionnement de l'appareil.
IMPORTANT: afin d'éviter tout risque de surchauffe, ne jamais couvrir l'appareil pendant son fonctionnement, car cela provoquerait une dangereuse augmentation de
température.
ATTENTION: afin d’éviter les risques liés à une remise à zéro accidentelle de l’interrupteur à relais
thermique, cet appareil ne doit pas être alimenté par un dispositif de marche/ arrêt externe (minuterie) ni branché sur un circuit régulièrement allumé et éteint par le fournisseur d’énergie.
Page 7

7
MONTAGGIO DEI PIEDINI
Per il montaggio dei piedini, procedere nel seguente modo:
- Inserire i ganci nei fori e ruotare il piedino fino ad agganciarlo. (fig.1)
- Dopo aver agganciato i piedini all'apparecchio, fossarli con le viti in dotazione. (fig. 2)
MONTAGGIO A PARETE
Se volete fissare l'apparecchio alla parete, rivolgetevi al Centro Assistenza a voi più vicino
richiedendo il Kit di installazione a parete.
ALLACCIAMENTO ELETTRICO
- Prima di inserire la spina nella presa di corrente verificare attentamente che il voltaggio della
Vostra rete domestica corrisponda al valore in V indicato sull’apparecchio e che la presa di
corrente e la linea di alimentazione siano dimensionate al carico dell'apparecchio.
- QUESTO APPARECCHIO É CONFORME ALLA DIRETTIVA 89/336/CEE ED AL D.M.
476/92 SULLA COMPATIBILITÁ ELETTROMAGNETICA.
FUNZIONAMENTO ED USO
Accensione
Modelli con un solo interruttore
- L'apparecchio è acceso quando sull'interruttore è visibile la zona rossa (o si accende la spia
nei modelli dotati di interruttore con spia luminosa).
Modelli con solo termostato
- L'apparecchio si accende ruotando la manopola in senso orario fino all'arresto in posizione
massima. Per spegnere l'apparecchio, ruotare la manopola in posizione minima e staccare
la spina dalla presa di corrente.
Modelli con termostato e due interruttori
- Ruotare la manopola del termostato in senso orario fino alla posizione di massimo, quindi
premere uno (potenza minima) o ambedue gli interruttori (potenza massima) in modo che
sia visibile la zona rossa (o si accende la spia nei modelli dotati di interruttore con spia
luminosa).
Regolazione termostato
Quando l’ambiente avrà raggiunto la temperatura desiderata, ruotare lentamente la manopola
del termostato in senso antiorario fino alla posizione segnalata da un "click" (per i modeli con
spie, fino allo spegnimento delle stesse) e non oltre. La temperatura così fissata verrà automaticamente regolata e mantenuta costante dal termostato.
Se il Vostro apparecchio è del tipo a due interruttori, nelle stagioni intermedie o nelle giornate
non particolarmente rigide potrete premere un solo interruttore e selezionare, così, la potenza
minima ottenendo una ulteriore economia di consumo.
Funzione antigelo (solo per i modelli con termostato)
Agire sugli interruttori in modo da far apparire la zona rossa, quindi portare la manopola termostato in posizione " ". Così impostato l'apparecchio mantiene l'ambiente ad una temperatura di circa 5°C con un minimo dispendio di energia.
Modello con ventilatore
Questa versione permette di ottenere un riscaldamento ancora più rapido grazie al ventilatore
incorporato che accellera la diffusione del calore nell'ambiente e rende la temperatura uniforme.
I
Page 8

8
Per l'accensione, procedere come segue:
• Ruotare la manopola termostato in senso orario in posizione massima.
• Per il funzionamento al minimo con ventola, premere il tasto I (sarà visibile la zona rossa o,
nei modelli dotati di interruttore con spia luminosa, si accenderà la spia).
• Per il funzionamento al minimo senza ventola, premere il tasto II (sarà visibile la zona rossa
o, nei modelli dotati di interruttore con spia luminosa, si accenderà la spia).
• La massima potenza si ottiene premendo ambedue gli interruttori.
La regolazione del termostato, in questo modello, si effettua come per i modelli senza ventilazione.
MANUTENZIONE
Prima di qualsiasi pulizia togliere sempre la spina dalla presa di corrente.
Il convettore elettrico non richiede una particolare manutenzione. E’ sufficiente spolverarlo con
un panno soffice ed asciutto; pulirlo solo quando è freddo. Non usare mai polveri abrasive o
solventi.
AVVERTENZE
• Non usare il termoconvettore nelle immediate vicinanze di vasche da bagno, docce, lavandi-
ni, piscine, ecc. Inoltre, l’apparecchio non deve essere posto direttamente sotto una presa di
corrente fissa.
• Non appoggiare il cavo di alimentazione sull’apparecchio caldo.
• Usare il termoconvettore sempre e solamente in posizione verticale.
• Non ostruire le griglie d’uscita dell’aria calda, né quella di entrata, che si trova sul fondo
dell’apparecchio.
•
Se il cavo di alimentazione è danneggiato, esso deve essere sostituito dal costruttore o dal suo
servizio assistenza tecnica, in modo da prevenire ogni rischio.
• Non utilizzare questo apparecchio in stanze, la cui area di base è inferiore a 4 m2.
Ed inoltre si sconsiglia di posizionarlo in correnti d'aria che possono perturbare il funzionamento dell'apparecchio.
IMPORTANTE: Al fine di evitare surriscaldamenti, non coprire in nessun caso l'apparecchio durante il funzionamento, poiché ciò provocherebbe un pericoloso aumento di
temperatura.
AVVERTENZA: per evitare i rischi connessi al resettaggio accidentale del dispositivo di sicurezza, questo apparecchio non deve essere alimentato tramite un dispositivo di accensione/spegnimento esterno, come un timer, né collegato ad un circuito che venga acceso e spento regolarmente dal fornitore di energia.
 Loading...