

Page 1

instructions
ELECTRIC HEATING CONVECTOR
Page 2
HS
2
3
1
8
m
m
2
7
5mm(min.
)
600 mm (min.)412 mm (min.)
A
B
Fig.1
Fig.2
Fig.3
Fig.3
Fig.4
Page 3

Thank you for choosing this De’Longhi convector. To
get the very best out of your new convector it is
advisable to read these instructions before using it.
This will ensure that you gain optimum results and
use the appliance safely.
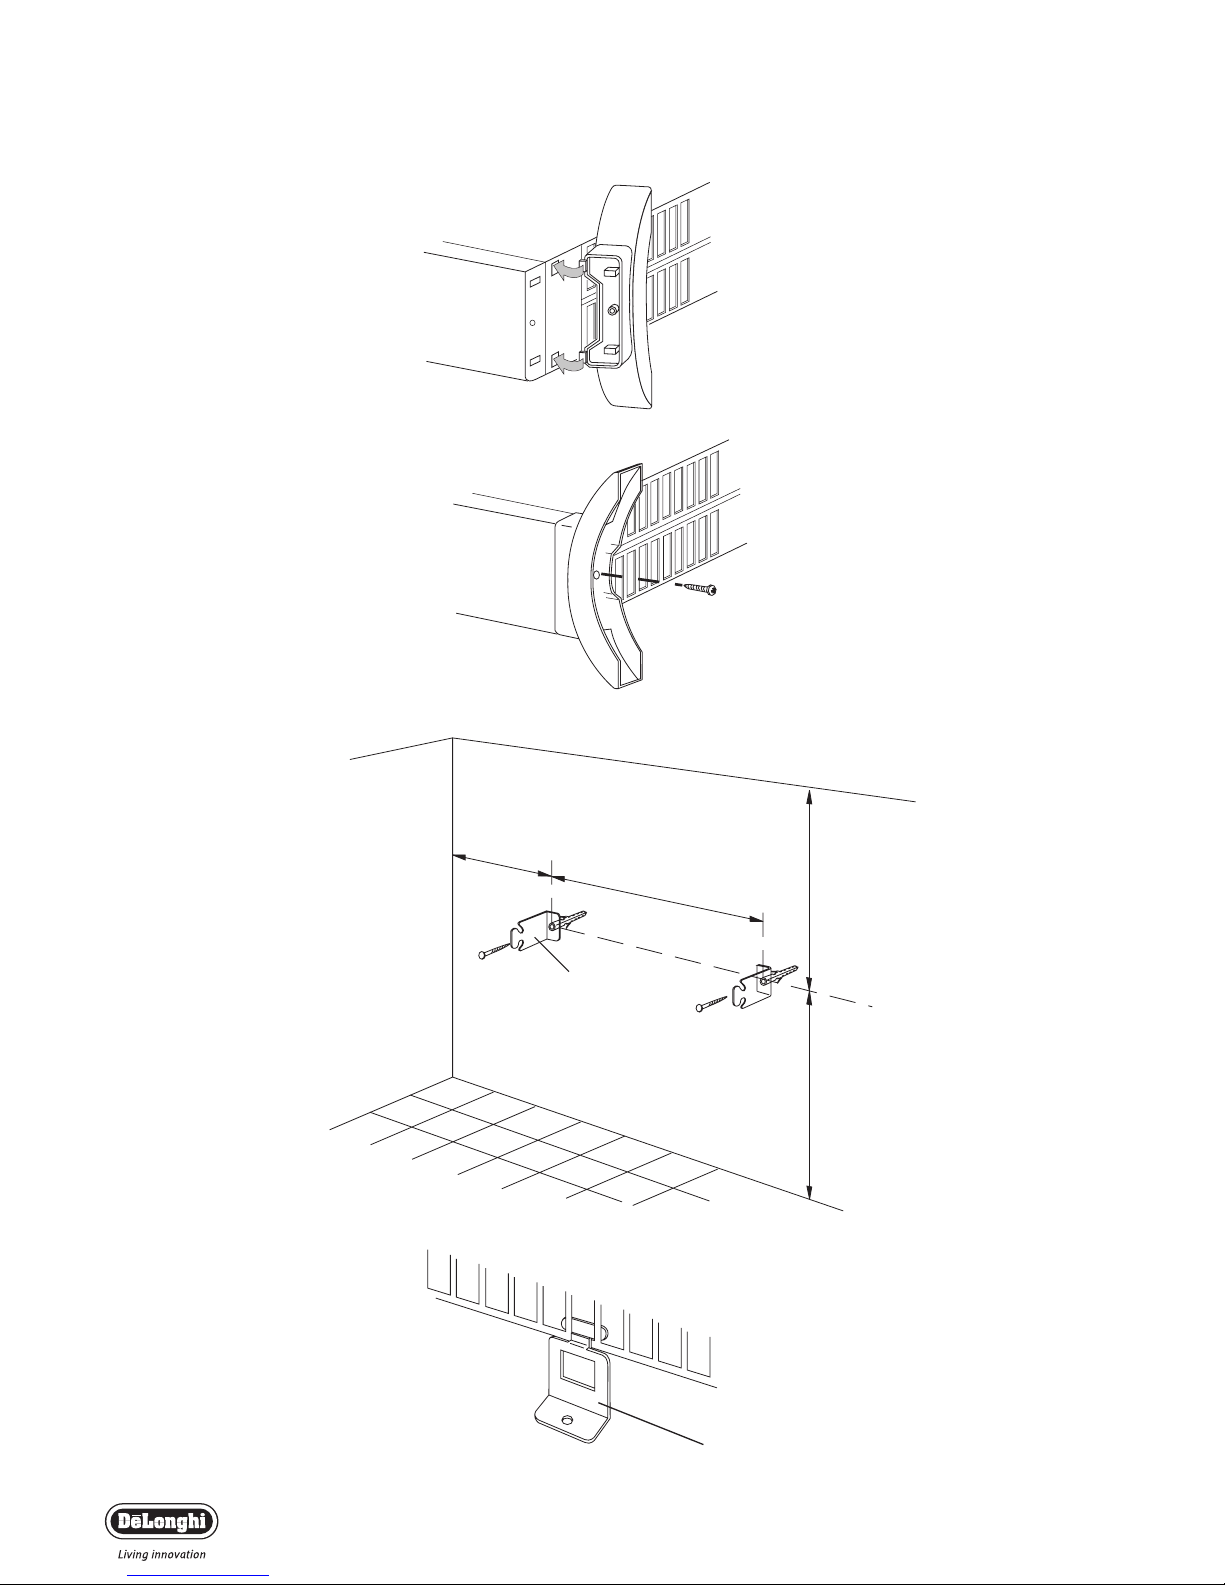
Assembling the feet
Fit the feet to the appliance as follows:
- Insert the anchor pins into the slots and turn the foot until it
clicks into position (fig. 1)
- Fasten the feet in position using the screw (fig. 2)
Wall mounting
Before drilling into any wall ensure no electrical cables are present
in the area.
In order to wall mount your convector please proceed as follows:
1. Fix two brackets “A” following carefully the dimensions as indicated in figure 3. Use a 6 mm masonry drill.
2. Hang the convector on the two brackets fixed to the wall and
insert metal brackets “B” into the bottom rear section of the
base of the convector as indicated in figure 4, one at each end.
Mark the positions for fixing these brackets to the wall.
This bracket when fixed retains the base of the convector in a
fixed position, preventing removal.
3. Remove the convector heater from the hanging brackets and
drill the wall for the dowels and insert them.
4. Fit the convector to the 2 brackets “A”. Insert Brackets “B” to
the convector base and fix brackets “B” to the pre-drilled.
Your convector is now wall mounted.
The appliances should not be installed directly under a wall
power socket.
Do not use your heater close to bath and wash basin.
Electrical connection
- Before plugging the appliance into the mains, check that your sup-
ply voltage is the same as that shown on the rating plate of the
appliance.
- If using more than one appliance at a time, it is important to
ensure that the ring main is adequate to cope with the power
requirements.
- This appliance complies with EEC directive 89/336 regarding elec-
tromagnetic compatibility.
HS
3
Page 4

Operation and use
Turning the appliance on
Insert the plug into the mains socket and switch on.
Models with only one switch
Press the bottom of the switch down so the red area at the top of
the switch is showing.
Models with thermostat only
Turn the appliance on by rotating the thermostat dial clockwise
until it can be turned no further.
To turn the appliance off, rotate the thermostat dial fully anticlockwise and remove the plug from the socket.
Models with two switches and thermostat
Turn the thermostat dial clockwise until it can be turned no further, then press the bottom of the left switch (minimum power) or
both switches (maximum power) so the red area at the top of the
switch(es) is showing. We suggest that on days when temperatures
are not particularly cold, select minimum output to optimise savings on energy consumption.
Adjusting the thermostat (where applicable)
When the room has reached the desired temperature, turn the
thermostat dial slowly in an anti-clockwise direction until you hear
a click and the appliance turns off. The thermostat will now keep
the temperature in the room constant, turning the heater on and
off as appropriate.
Frost protection function (only on models with a
thermostat)
Turn the thermostat dial fully anti-clockwise to the position. If your
convector has one switch,press this on. If your convector has two switches press one or both switches on. When set in this way, the appliance will
switch on automatically only if the room temperature falls below 5°C, to
prevent freezing at minimum energy consumption.
Cleaning and maintenance
The convector should not require any maintenance. However
before carrying out any cleaning or maintenance, unplug the heater
from the mains and wait for it to cool (this should take around 5
minutes. It is sufficient to remove external dust with a soft, dry
cloth. Never use abrasive powders or solvents. If necessary, remove
concentrated areas of dirt with a vacuum cleaner.
Warnings
- Do not use the heater in a bathroom or in the vicinity of bathtubs, wash basins, showers or swimming pools.
- Never use the heater to dry laundry.
- Never place the power cable on top of the heater while it is hot.
- Only use the heater in an upright position.
HS
4
Page 5

- Do not block the outlet grilles at the top of the heater or the
intake grille at the bottom of the heater.
- The heater must be positioned at least 50cm from furniture or
other objects.
- If the power cable is damaged, it must be replaced by the manufacturer or an authorised technical service centre.
- Do not use this appliance in rooms which have a floor area smaller than 4m
2
.
- We recommend that you do not place the heater in a draught as this
may adversely affect the appliance’s operational efficiency.
- The heater must never be placed immediately under a fixed mains
socket.
- IMPORTANT: Never for any reason cover the appliance during operation as this could lead to dangerous overheating.
- A safety device intervenes and turns the appliance off in the event of
overheating or because the appliance is positioned in a strong draught
of air. To reactivate the heater, remove the plug from the mains, allow
the appliance to cool (for about 5 mins),remove the cause of the overheating/draught and then plug the appliance back into the mains and
turn it back on.
- The use of an extension lead is not recommended, as overheating of
the extension lead may occur during the operation of the heater.
- In order to avoid any danger caused by an accidental resetting of
the safety system, this appliance must not be powered through an
external timer.
- As with any electrical appliance, whilst the instructions aim to
cover as many eventualities as possible, caution and common
sense should be applied when operating your appliance, particularly in the vicinity of young children.
WARNING: In order to avoid overheating, never under
any circumstances cover the appliances during operation,as
this would lead to dangerous overheating.
IMPORTANT INFORMATION FOR CORRECT DISPOSAL OF THE
PRODUCT IN ACCORDANCE WITH EC DIRECTIVE 2002/96/EC.
At the end of its working life, the product must not be disposed of
as urban waste.
It must be taken to a special local authority differentiated waste collection centre or to a dealer providing this service.
Disposing of a household appliance separately avoids possible negative consequences for the environment and health deriving from
inappropriate disposal and enables the constituent materials to be
recovered to obtain significant savings in energy and resources.As a
reminder of the need to dispose of household appliances separately,
the product is marked with a crossed-out wheeled dustbin.
HS
5
Page 6

Electrical connection (U.K. only)
A) If your appliance comes fitted with a plug, it will incorporate a
13 Amp fuse. If it does not fit your socket, the plug should be
cut off from the mains lead and an appropriate plug fitted, as
below.
WARNING:Very carefully dispose of the cut off plug after
removing the fuse: do not insert in a 13 Amp socket elsewhere
in the house as this could cause a shock hazard.
With alternative plugs not incorporating a fuse, the circuit must
be protected by a 15 Amp fuse. If the plug is a moulded-on
type, the fuse cover must be re-fitted when changing the fuse
using a 13 Amp Asta approved fuse to BS 1362. In the event of
losing the fuse cover, the plug must NOT be used until a
replacement fuse cover can be obtained from your nearest electrical dealer.The colour of the correct replacement fuse cover
is that as marked on the base of the plug.
B) If your appliance is not fitted with a plug, please follow the
instructions provided below.
IMPORTANT
The wires in the mains lead are coloured in accordance with the
following code:
Blue: Neutral
Brown: Live
As the colours of the wires in the mains lead may not correspond with the coloured markings identifying the terminals in
your plug, proceed as follows:
The blue wire must be connected to the terminal marked with
the letter N or coloured black.
The brown wire must be connected to the terminal marked
with the letter L or coloured red.
If you have a 3-pins plug, do not connect any wire to the "earth"
terminal.
HS
6
 Loading...