

Page 1

DRAGON HM3
We were thinking of you
when we thought of it
Australia
P.O.Box 597
Riverwood NSW 2210
Customer Service Ph: 1800 126659
Fax: 1800 706932
e-mail:
delonghi@delonghi.com.au
Proudly distributed by
De’Longhi
25 CARBINE ROAD
MT WELLINGTON
PO BOX 58056
GREENMOUNT
Auckland, New Zealand
Customer Service Ph: (09) 915 7273
Fax: (09) 915 7280
e-mail:delonghi@delonghi.co.nz
IMPORTANT
DO NOT OPERATE WITHOUT READING
INSTRUCTIONS FIRST
Spare copies of this leaflet can be obtained
from your dealer
Page 2
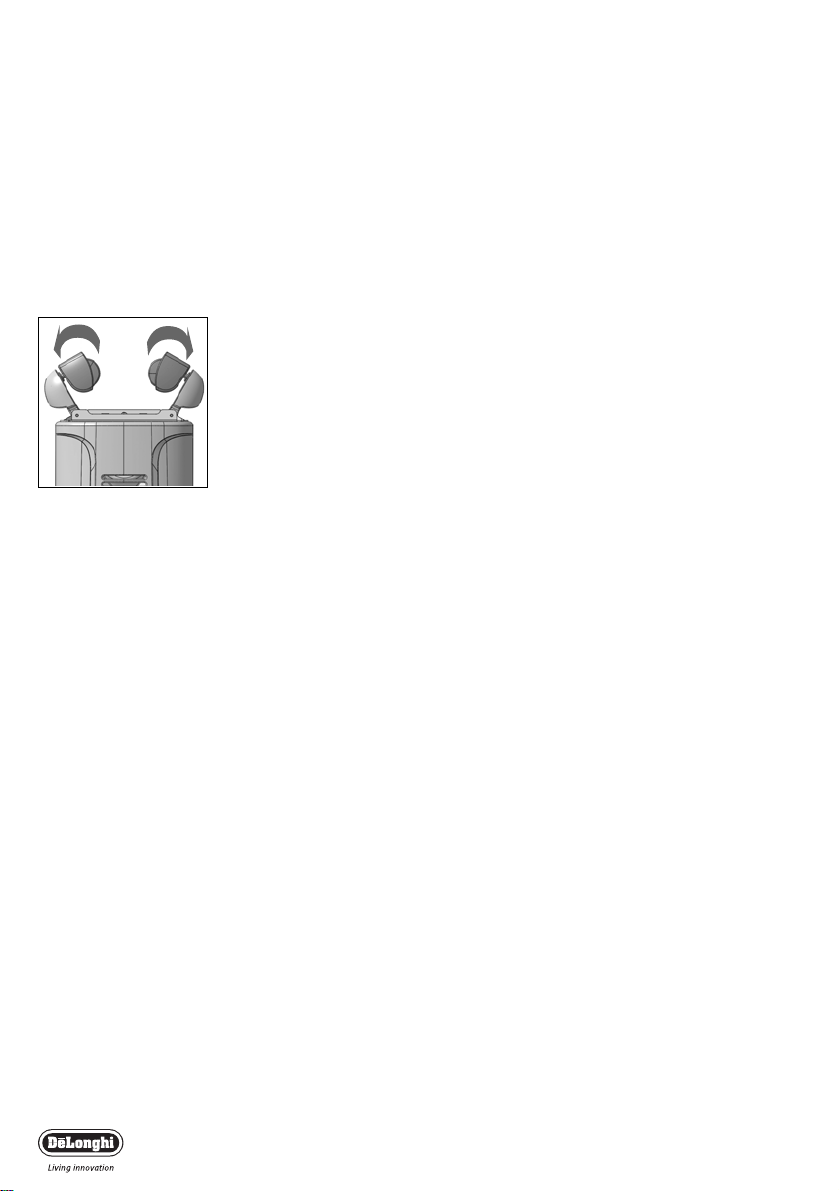
Fig.1
Dragon HM3
2
Thank you for choosing this De’Longhi radiator. To get the
very best out of your new radiator it is advisable to read
these instructions before using it.This will ensure that you
gain optimum results and use the appliance safely.
General instructions
Ta ke the radiator out of its packing box and remove any polystyrene pieces or any other packaging material that might be
lodged inside it.
Make sure that the radiator has not been damaged during transit
and that the mains cable is in working order. Do not operate the
radiator if damaged.
“Easy wheel”system
Turn the radiator upside-down on a rug or a soft surface in order to
prevent damaging the paint finish. Fully unfold the castors by turning
them outwards (Fig. 1).Turn the radiator back to its upright position.
Electrical connection
- Before plugging the radiator into the mains, check that your
supply voltage is the same as that shown on the rating plate of
the radiator.
- If using more than one appliance at a time, it is important to
ensure that the ring main is adequate to cope with the power
requirements.
- It is important to ensure that the socket is adequately earthed.
- This radiator complies with EEC Directive 89/336 relating to
electromagnetic compatibility.
How to use it
Switching on
Plug the radiator in; position the thermostat slider to maximum
and turn the radiator on as follows using the power selector:
•Turn the power selector to position 1 to select minimum output (the light on the left will come on).
•Turn the power selector to position 2 to select medium output
(the light on the right will come on).
•Turn the power selector to position 3 to select maximum output (both lights will come on).
Adjusting the thermostat
Leave the thermostat at its highest setting until the room has
reached the required temperature.Then slowly turn the thermostat slider back until you hear a click.The temperature
selected in this way will then be regulated automatically and
kept constant by the thermostat.
Page 3

3
Frost protection function
With the thermostat slider in the minimum position and a power
selected, the unit maintains the room at a temperature of about
5˚C, preventing freezing with minimum energy consumption.
Models with 24-hour timer
Using the timer
If you wish to use the timer, position the switch in the middle position (Fig. 4).
Setting the correct time
Check the time on your watch. If for example it is 4.00 pm.
(16.00), turn the dial in a clockwise direction until the number 16
is lined up with the triangular pointer (fig.2).
N.B.: Never turn the dial in an anti-clockwise direction!
The timer is in effect an electric clock and works only if the plug is
connected to the power supply. Whenever the plug is disconnected or there is a power failure, the clock must be re-set.
To program the timer
1) Set the operating times by pushing in with your thumbnail to
the outer rim, the notches on the dial corresponding to the
period required (fig.3) (each notch represents 15 mins.)
2) Make sure that the timer indicates the correct time (see
instructions on setting the correct time).
3) Turn the radiatior on and set it to the heat setting and temperature
level on the thermostat as required.
Once programmed in this way, the appliance will repeat the preestablished program every day, if the selector is in the position.
Timer override
If you wish to override the timer settings, push the timer switch to
position 1 (fig.4) manual (timer override).To return to timed operation push the switch back to the middle position (fig.4).
NOTE: if the timer switch is at the 0 position (fig.4), the heater is
off and will not operate).
I Manual (timer override)
0
Timer operation
Heater off
Fig.2
2
1
20
19
16
pointer
2
1
20
19
16
operating time
fig.3
fig.4
Dragon HM3
Page 4

4
Cleaning and maintenance
Your oil filled raditor is absolutely free from maintenance, fully reliable and will give many years of trouble free service.Wipe radiator
with soft damp cloth; do not use detergents or abrasives.
If necessary, use a vacuum cleaner to remove any built-up dirt.
Important notes
- Do not use your radiator close to bath, wash-basin, shower and
swimming pool.
- Do not use your radiator to dry laundry.
-Never place the power cable on top of the radiator while it is hot.
- Only use the radiator in an upright position.
- The heater must be positioned at least 50 cm from furniture or
other objects.
- If the power cable has been damaged, it must be replaced by the
manufacturer or the technical service centre or by a qualified person
so as to avoid all risks.
- In order to eliminate the radiator’s “new” smell, set it to maximum
power for at least 8 hours when used for the first time. During this
operation, the room in which the radiator is located must be ventilated.
- The power cord should be fully removed from the cord storage unit
when in use.
- The appliance is not intended for use by young children or infirm
person without supervision.
-Young children should be supervised to ensure that they do not play
with the appliance.
- The appliance is fitted with a tilt-switch which turns the appliance off
if it should fall over.
To r estart the appliance, simply place it upright again.
- It is perfectly normal for the radiator to make “creacking” sounds
when used for the first time. (or in the case of unfrequent use).
-The radiator must not be located immediately below a fixed socketoutlet.
- The body of this radiator is filled with a precise quantity of special
oil, so that repairs requiring the opening of the oil body must only be
made by the service agent. Any oil leakage must be reported to the
service agent.
- Do not use this appliance in rooms having a floor area of less than
4m
2
as this can lead to overheating.
- If the appliance is scrapped, provisions on the disposal of oil must be
respected.
- The use of an extension lead is not recommended, as overheating of
the extension lead may occur during the operation of the radiator.
Dragon HM3
Page 5

- As with any electrical appliance, whilst the instructions aim to cover
as many eventualities as possible, caution and common sense should
be applied when operating your appliance, particularly in the vicinity
of young children.
The appliance is fitted with a safety device which will switch off
it in case of accidental overheating.To reset, disconnect the plug
from the power for 30 minutes, remove the cause of overheating then plug the appliance in again.
ATTENTION: in order to avoid any danger caused by an accidental resetting of the safety system, this appliance must not be
powered through an external timer.
IMPORTANT: Do not cover the radiator during operation as this could lead to dangerous overheating,
Dragon HM3
5
Page 6

5710009100/10.04
 Loading...