

Page 1
FX180 eco
FX180 eco
• Istruzioni per l’uso . . . . . . . . . . . .
pag. 4
• Use and maintenance manual . . . .pag. 20
• Mode d’emploi et d’entretien . . . . .pag. 34
• Betriebsanleitung . . . . . . . . . . . . .pag. 48
• Gebruiksaanwijzing . . . . . . . . . . . . . .pag. 62
• Instrucciones de uso . . . . . . . . . .pag. 76
• Manual de instruções . . . . . . . . . .
pag. 90
• √‰ËÁ›Â˜ ¯Ú‹Û˘ Î·È Û˘ÓÙ‹ÚËÛ˘ . . .ÛÂÏ. 104
FX180eco 16-05-2002 14:52 Pagina 1
Page 2

Gentile Cliente,
La ringraziamo per aver scelto un prodotto De’Longhi, il leader mondiale
nella costruzione dei climatizzatori portatili. Anni di esperienza in tutto il
mondo ci consentono di migliorare costantemente la qualità e le prestazioni di Pinguino e SuperPinguino. Siamo certi che rimarrà subito soddisfatto del suo acquisto e che godrà a lungo del fresco benessere che Pinguino e SuperPinguino creano. La preghiamo di dedicare un po’ del suo
tempo alla lettura di questo libretto di istruzioni, e di conservarlo con cura.
In questo modo, potrà utilizzare Pinguino nelle condizioni di massima efficacia e serenità.
Dear Customer,
Thank you for having purchased an appliance made by De’ Longhi, the
international leader in portable air conditioning units. Thanks to our years
of experience all around the world we are constantly improving the quality and perfor mance of Pinguino. We are confident that you will be satisfied with your purchase and enjoy the cool comfort created by the Pinguino for many years to come. You should spend some time reading this
instruction manual and keep it handy to refer to in order to use your Pinguino in conditions of maximum efficiency and peace of mind.
Verehrter Kunde
Wir danken Ihnen, daß Sie sich für ein Produkt von De'Longhi entschieden haben,
dem weltweiten Marktführer bei der Herstellung von tragbaren Klimageräten.
Jahre der Erfahrung in der gesamten Welt ermöglichen uns, die Qualität von Pinguino und SuperPinguino konstant zu verbessern. Wir sind sicher , daß Sie mit Ihrem
Kauf zufrieden sein werden und das frische Wohlbefinden, das Pinguino und
SuperPinguino verbreiten, über eine lange Zeit genießen werden. Wir bitten Sie,
sich etwas Zeit zu nehmen, um diese Gebrauchsanweisung durchzulesen und Sie
danach sorgfältig aufzubewahren. Auf diese Weise haben Sie die Gewißheit, mit
Pinguino die größte Leistungsfähigkeit und Sicherheit zu erzielen.
Chère Cliente, Cher Client,
Nous vous remercions d’avoir choisi un produit De’Longhi, le plus important
fabricant mondial de climatiseurs portables. Des années d’expérience
dans le monde entier nous permettent d’améliorer constamment la qualité
et les performances de Pinguino. Nous sommes certains que vous serez
immédiatement satisfait de votre achat et que vous profiterez pendant
longtemps de la fraîcheur et du bien-être que Pinguino cré. Nous vous
prions de bien vouloir consacrer un peu de temps à la lecture de ce mode
d’emploi et de le conserver soigneusement. Ses conseils vous permettront
d’obtenir les meilleurs résultats de votre Pinguino en toute sécurité.
FX180eco 16-05-2002 14:52 Pagina 2
Page 3

Geachte Client,
Wij danken u voor het kiezen van een produkt De'Longhi, nummer één op
wereldniveau op het gebied van de constructie van draagbare airconditioners. Jaren ervaring over de hele wereld maken het ons mogelijk de kwaliteit en de prestaties van Pinguino en SuperPinguino constant te verbeteren.
Wij zijn er zeker van dat u tevreden zult zijn met uw aankoop en dat u voor
lange tijd zult genieten van het frisse welzijn dat Pinguino en Superpinguino
in staat zijn te creëren. Wij verzoeken u enige tijd te besteden aan het lezen
van dit instructieboekje, en dit goed te bewaren. Op deze manier zult u Pinguino kunnen gebruiken met de meeste efficiëntie en zonder problemen.
Estimado Cliente
Le agradecemos por haber elegido un producto De’ Longhi, líder mundial en la fabricación de los acondicionadores portátiles. Años de experiencia en todo el mundo nos permiten mejorar constantemente la calidad y las prestaciones de Pingüino. Estamos seguros que quedará inmediatamente satisfecho de su compra y que gozará por largo tiempo el
fresco bienestar que da Pingüino. Le pedimos que dedique un poco de
su tiempo a la lectura de este manual de instrucciones y de guardarlo
con cuidado. De este modo, podrá usar Pingüino en condiciones de
máxima eficacia y serenidad.
AÁ·ËÙ¤ ÂÏ¿ÙË,
™·˜ ¢¯·ЪИЫЩФ‡МВ Ô˘ ÂÈϤͷÙ ¤Ó· ÚÔ˚fiÓ De' Longhi, Ù˘ ÌÂÁ·Ï‡ÙÂÚ˘
ÂÙ·ÈÚ›·˜ ηٷÛ΢‹˜ КФЪЛЩТУ ОПИМ·ЩИЫЩИОТУ. ∏ ÔÏ˘ÂÙ‹˜ Ì·˜ ÂÌÂÈÚ›· Û fiÏÔ
ÙÔÓ ÎfiÛÌÔ, Ì·˜ ÂÈÙÚ¤ÂÈ ÙË Û˘Ó¯‹ ‚ÂÏÙ›ˆÛË Ù˘ ÔÈfiÙËÙ·˜ Î·È ÙˆÓ
ÂȉfiÛÂˆÓ ÙÔ˘ Pinguino Î·È ÙÔ˘ SuperPinguino.
∂›Ì·ÛÙ ‚¤‚·ÈÔÈ fiÙÈ ı· Ì›ÓÂÙ ·fiÏ˘Ù· ÈηÓÔÔÈË̤ÓÔÈ ·fi ÙËÓ ·ÁÔÚ¿ Û·˜ ηÈ
fiÙÈ ı· ·ÔÏ·‡ÛÂÙ ÁÈ· ÔÏÏ¿ ¯ÚfiУИ· ЩЛ ‰ЪФЫВЪ‹ В˘ÂÍ›· Ô˘ ÚÔÛʤÚÔ˘Ó Ù·
ОПИМ·ЩИЫЩИО¿ Pinguino О·И SuperPinguino. ™·˜ ·Ъ·О·ПФ‡МВ У· ·КИВЪТЫВЩВ
П›БФ ·fi ÙÔ ¯ÚfiÓÔ Û·˜ ÛÙËÓ ·Ó¿ÁÓˆÛË ÙÔ˘ ·ÚfiÓÙÔ˜ ÂÁ¯ÂÈÚȉ›Ô˘ Ф‰ЛБИТУ О·И
У· ЩФ К˘Ï¿ÍÂÙ ЪФЫВОЩИО¿. ªВ ЩФУ ЩЪfiÔ ·˘Ùfi, ÌФЪВ›ЩВ У· ¯ЪЛЫИМФÔÈ‹ÛÂÙÂ
ÙÔ Pinguino ÛÂ Û˘Óı‹ОВ˜ М¤БИЫЩЛ˜ ·fi‰ÔÛ˘ Î·È ·ÛÊ¿ÏÂÈ·˜.
Prezado Cliente
agradecemos por ter escolhido um produto Dé Longhi, o líder mundial na
fabricação dos condicionadores portáteis. Anos de experiência em todo
o mundo permitem-nos melhorar constantemente a qualidade e os
desempenhos dos aparelhos Pinguino. Temos certeza de que ficará logo
satisfeito com a sua compra e que usufruirá por muito tempo do fresco
bem-estar que Pinguino e Super Pinguino oferecem. Por favor, dedique
um pouco do seu tempo à leitura deste manual de instruções e conserve-o com cuidado. Desta forma, poderá utilizar o aparelho Pinguino com
a máxima eficácia e serenidade.
FX180eco 16-05-2002 14:52 Pagina 3
Page 4
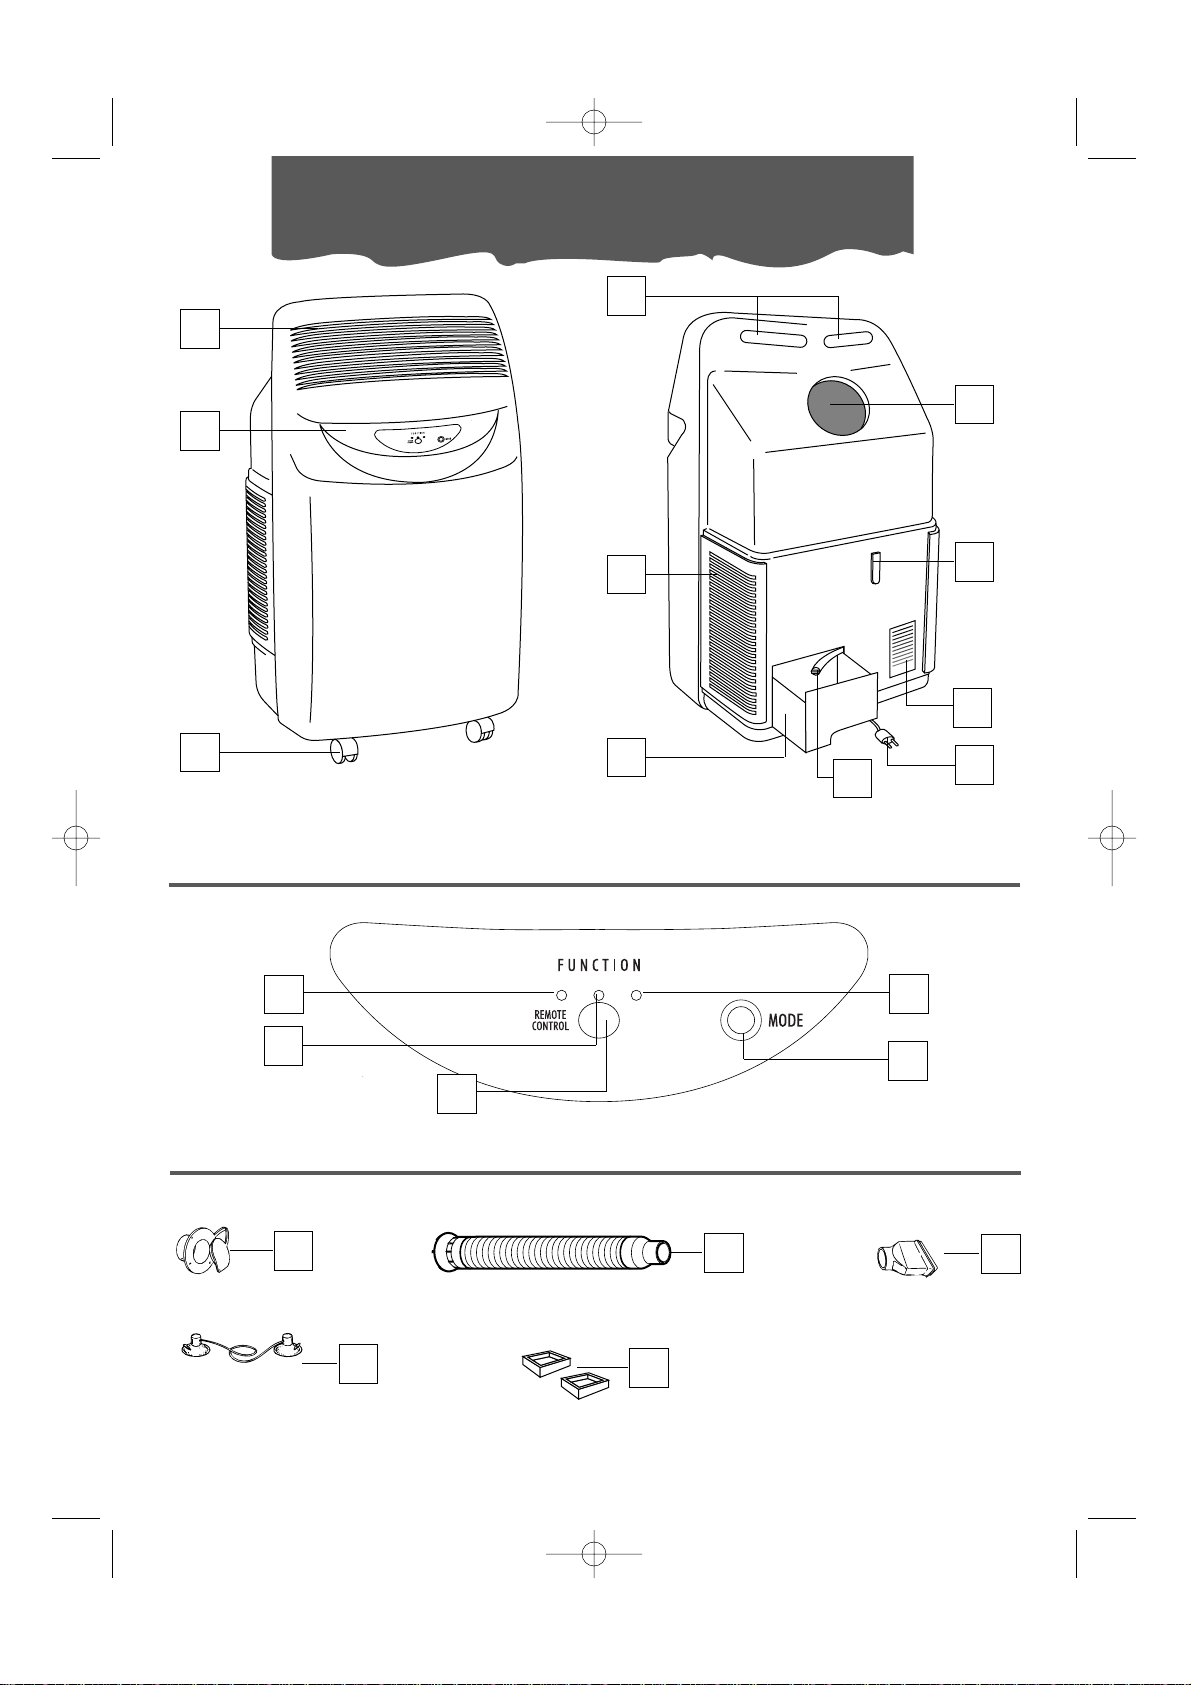
Descrizione • Description • Description • Beschreibung •
Beschrijving • Descriptción • Descrição • ¶ВЪИБЪ·К‹
1
2
3
4
5
6
7
8
9
10
16
18
19
17
20
*
* targa caratteristiche
* serial plate
* plaquette des données
* Typenschild
* Typeplaatje
* etiqueta de calsificación
* etiqueta de especificações
* ИУ·О›‰· ¯·Ъ·ОЩЛЪИЫЩИОТУ
11
13
14
12
15
PANNELLO COMANDI • CONTROL PANEL • PANNEAU DE COMMANDE • BEDIENUNGSBLENDE
• BEDIENINGSPANEEL • TABLERO DE MANDOS • PAINEL DE COMANDOS •
Ã∂πƒπ™∆∏ƒπ∞
ACCESSORI • ACCESSORY-SET • ACCESSOIRES • ZUBEHÖR • ACCESSOIRES • ACCESORIOS
• ACESSÓRIOS •
∞•∂™√À∞ƒ
FX180eco 16-05-2002 14:52 Pagina 4
Page 5
A
B
I
L
O
U
D
E
K
M
N
Q
G
T
C
F
H
P
R
S
FX180eco 16-05-2002 14:52 Pagina 5
°C
HR
Page 6
6
Avvertenze
•Questo apparecchio è stato costruito per condizionare gli ambienti domestici e non deve
essere adoperato per altri scopi.
•É pericoloso modificare o alterare in qualsiasi
modo le caratteristiche dell’apparecchio.
• L’apparecchio deve essere installato secondo le
regole impiantistiche nazionali.
• Per eventuali riparazioni, rivolgetevi sempre ed
esclusivamente ai Centri di Assistenza Tecnica
autorizzati dalla Casa Costruttrice. Le riparazioni
effettuate da personale incompetente possono
essere pericolose.
•Questo apparecchio deve essere usato esclusivamente da adulti; non permettete che i bambini giochino con esso.
•Questo apparecchio deve essere collegato ad
un’efficace impianto di “terra”. Fate controllare
l’impianto elettrico da un elettricista qualificato.
• Evitate l’utilizzo di prolunghe per il cavo di alimentazione elettrica.
• Prima di ogni operazione di pulizia o di manutenzione, staccate sempre la spina dalla presa
di corrente.
• Non tirate il cavo di alimentazione elettrica per
spostare il prodotto.
• In caso di danneggiamento del cavo di alimentazione esso deve essere sostituito solo da
personale specializzato autorizzato dalla casa
costruttrice.
• Non installate l’apparecchio in ambienti dove
l’aria può contenere gas, olio, zolfo o in prossimità di fonti di calore.
• Non appoggiate oggetti pesanti o caldi sopra
l’apparecchio.
• Pulite i filtri almeno ogni settimana.
• Evitate di utilizzare apparecchi di riscaldamento
in prossimità del climatizzatore.
• In caso di trasporto, l’apparecchio deve restare in
posizione verticale o adagiato su un fianco.
Prima di un trasporto vuotate la bacinella dell’acqua di condensa e la vaschetta. Dopo un
trasporto, attendete almeno 1 ora prima di
avviare l’apparecchio.
•I materiali utilizzati per l’imballaggio sono riciclabili.
Si consiglia quindi di riporli negli appositi contenitori per la raccolta differenziata.
FX180eco 16-05-2002 14:52 Pagina 6
Page 7
7
Nella stagione estiva, le condizioni di benessere sono raggiunte con una temperatura com-
presa tra i 24 e i 27°C e con una umidità relativa attorno al 50%.
Il climatizzatore è una macchina che sottrae umidità e calore dall’ambiente in cui è collocata.
Rispetto ai modelli da installazione, i climatizzatori portatili hanno il vantaggio di poter essere spostati da una stanza all’altra di una casa, e di essere trasferibili da un edificio all’altro.
L’aria calda della vostra stanza viene fatta
passare attraverso una batteria raffreddata da un gas refrigerante. In tal
modo cede calore e umidità in
eccesso prima di venire re-immessa nell’ambiente.
Nei modelli monoblocco (Pinguino) una piccola parte di
questa aria viene utilizzata
per raffreddare il gas refrigente e quindi, divenuta
calda e umida, viene rilasciata all’esterno.
Nei modelli con valigetta
(SuperPinguino) il circuito
si raffredda sfruttando l’aria esterna.
Ogni Pinguino e SuperPinguino può essere usato
anche in funzione di sola
ventilazione.
Per approfondimenti e chiarimenti, potete rivolgervi al:
oppure contattare il nostro sito internet:
www.delonghi.it
Cosa sono Pinguino e SuperPinguino
ITALIANO
FX180eco 16-05-2002 14:53 Pagina 7
Page 8
8
Di seguito troverete tutte le indicazioni necessarie per predisporre al meglio il funzionamento del
vostro climatizzatore.
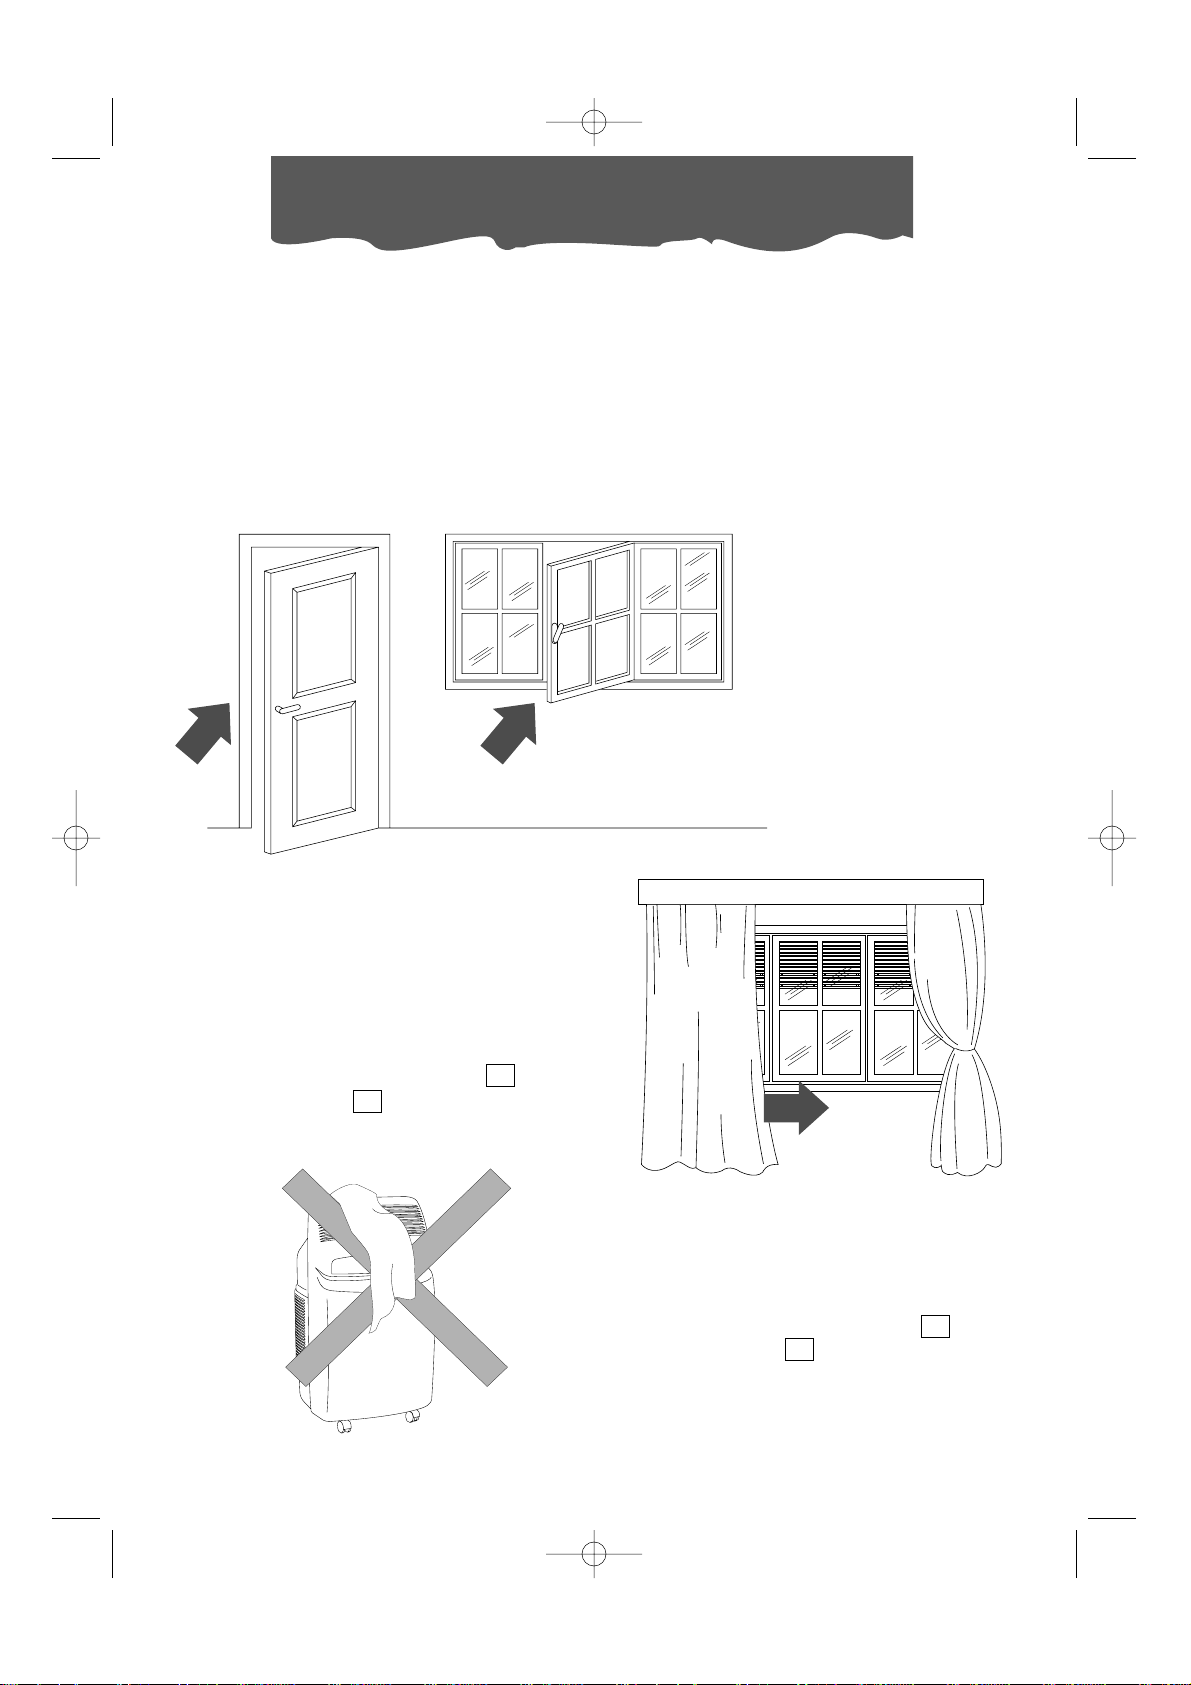
CLIMATIZZAZIONE SENZA INSTALLAZIONE
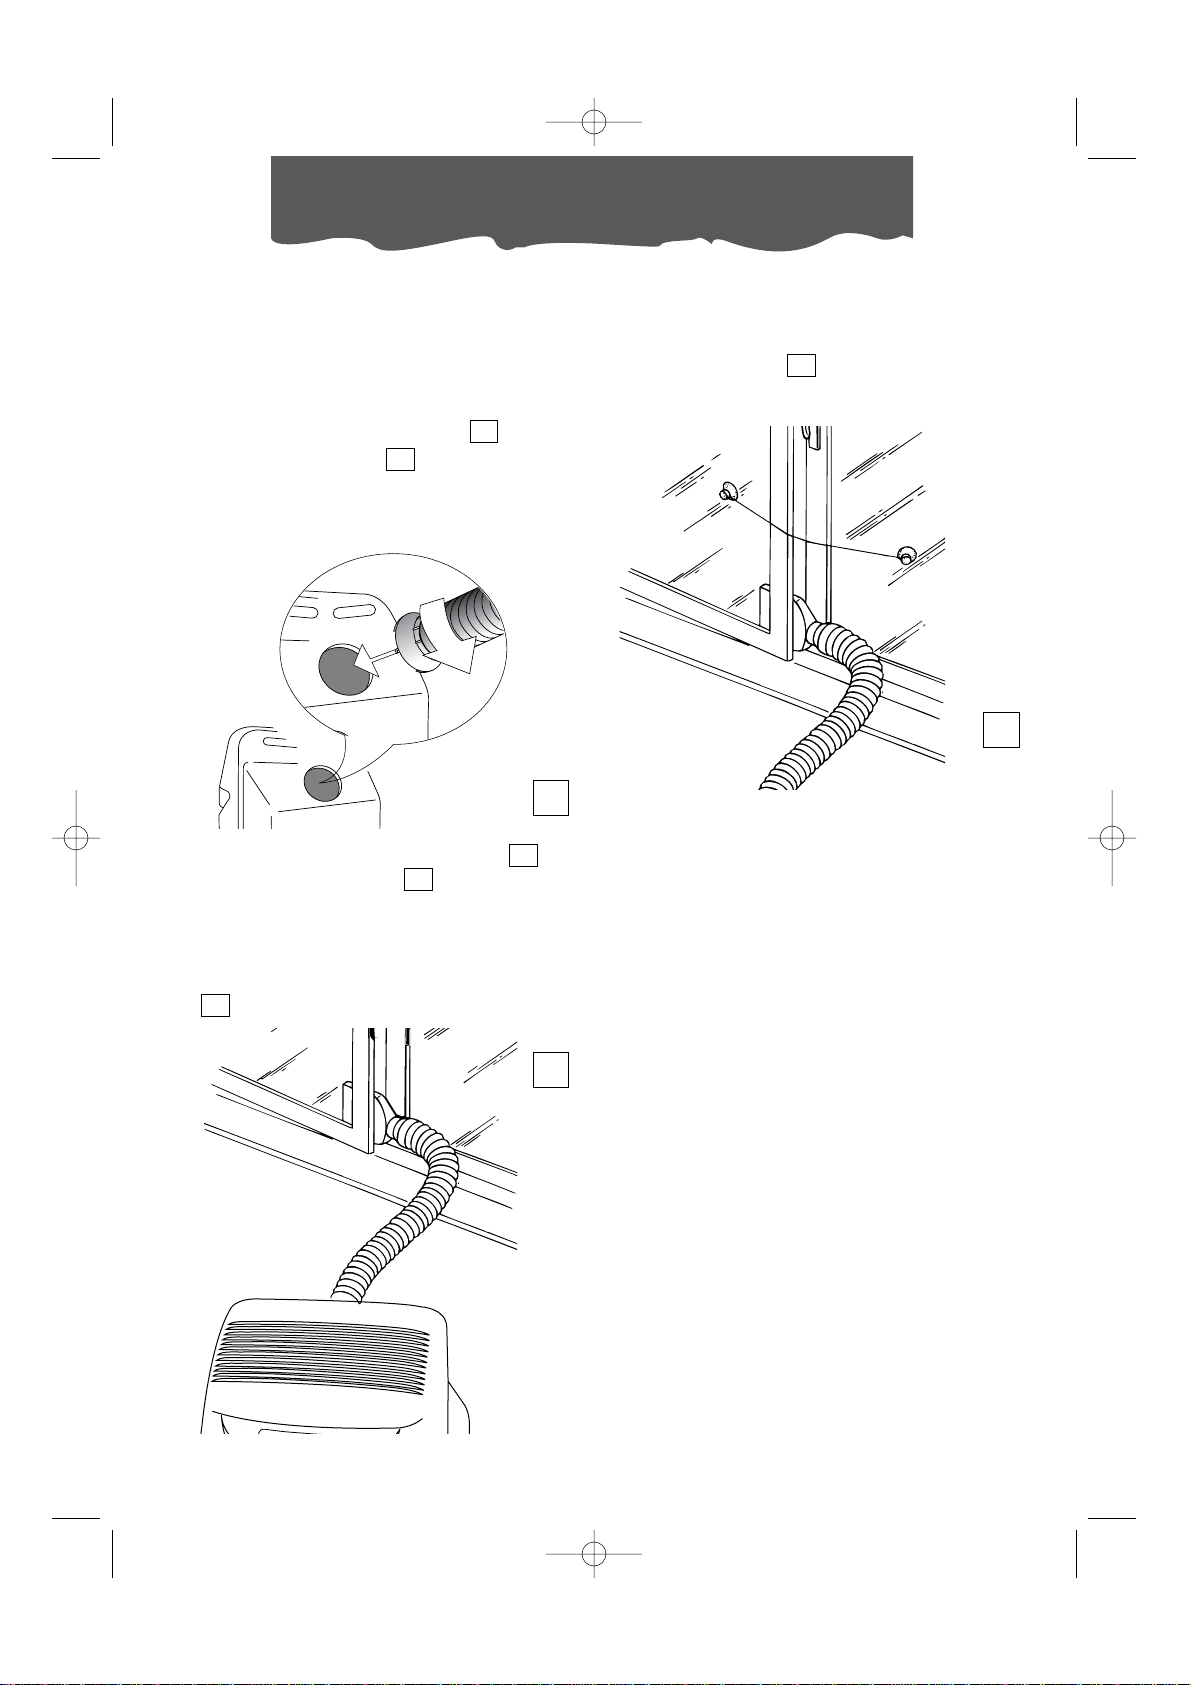
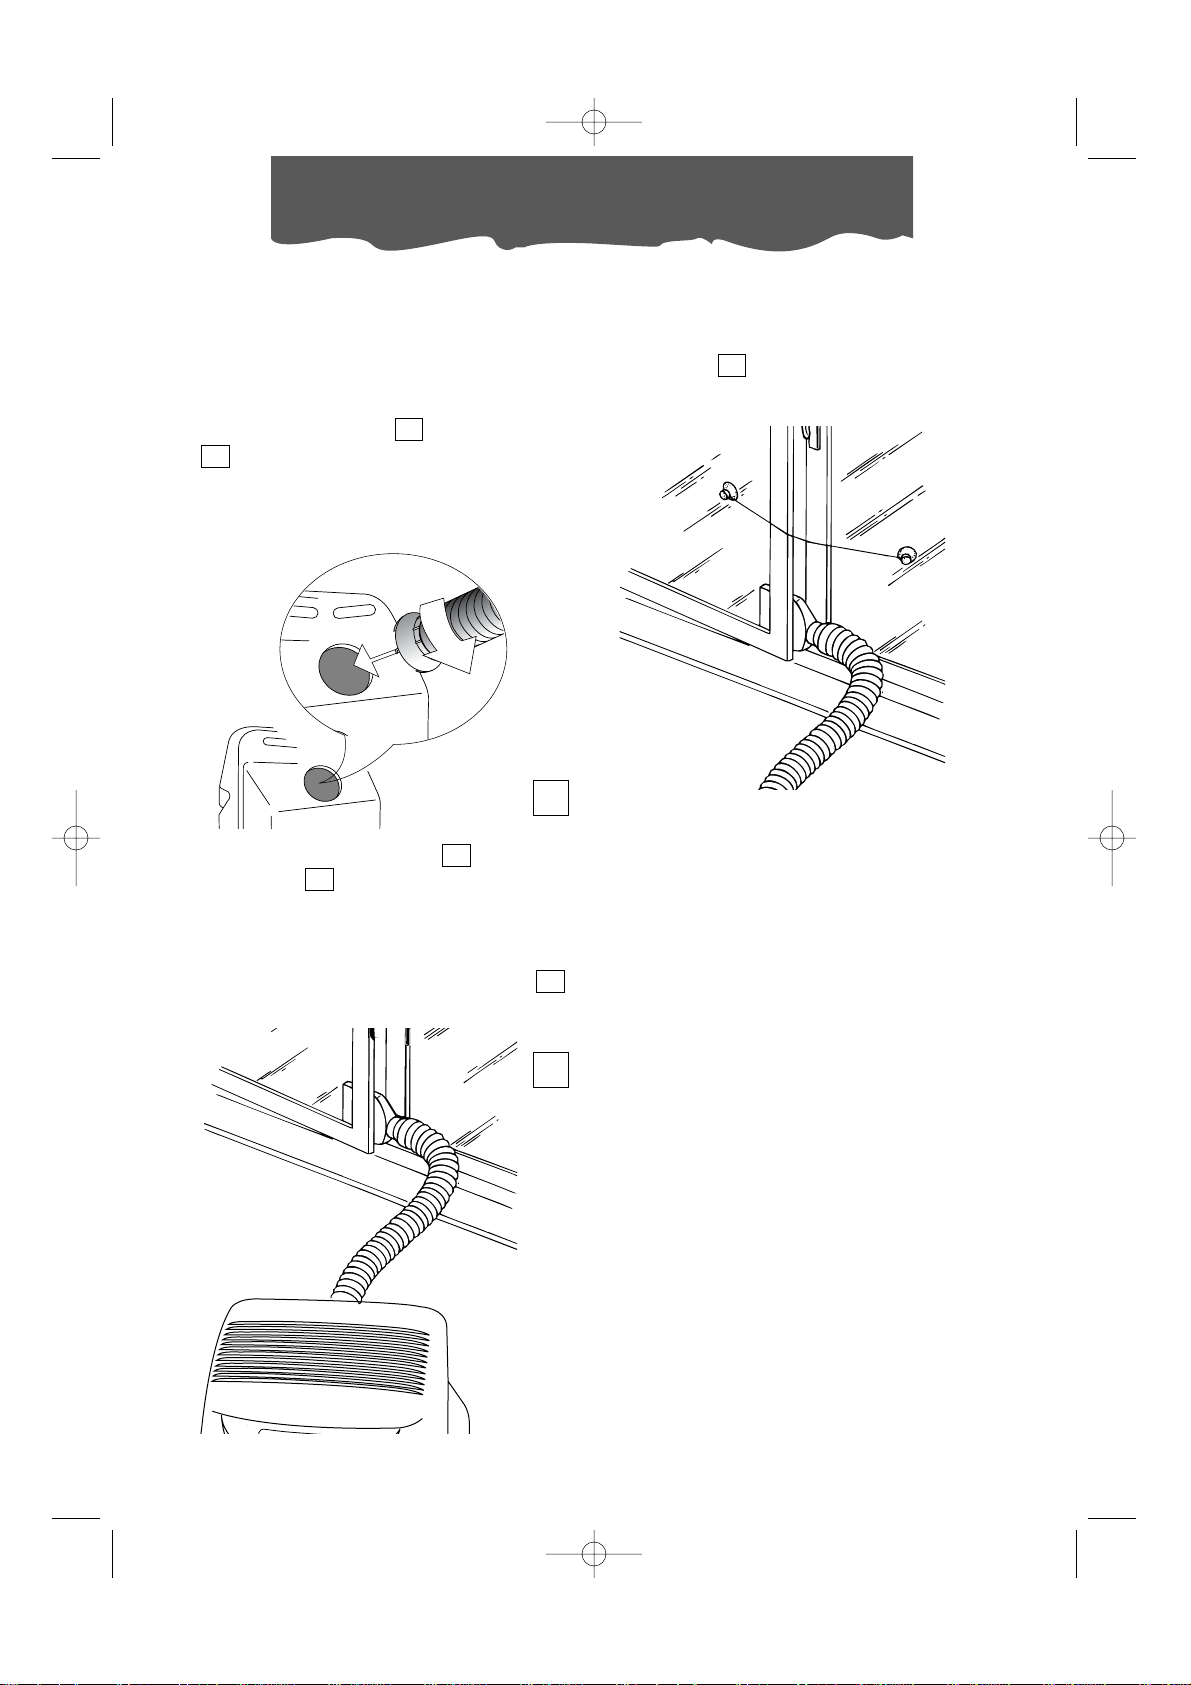
Poche, semplici operazioni, e Pinguino vi
riporta alle condizioni di benessere:
• Fissate il tubo di fuoriuscita aria nell'apposito alloggiamento posto nella parte
posteriore dell'apparecchio. Inseritelo come
indicato in figura A.
5
17
• Se avete una finestra a doppia anta, utilizzate le ventose in dotazione per mantenere accostati i vetri (fig. C).
19
• Applicate all'estremità del tubo la
bocchetta per finestra .
•Avvicinate il climatizzatore ad una finestra
o portafinestra.
• Aprite leggermente la finestra o portafinestra e mettete in posizione la bocchetta
come rappresentato in figura B.
18
18
17
A
Pr edisposizione all’uso
B
C
FX180eco 16-05-2002 14:53 Pagina 8
1
2
Page 9
9
ITALIANO
Pr edisposizione all’uso
CLIMATIZZAZIONE CON INSTALLAZIONE
Se lo desiderate, Pinguino può anche essere
installato in maniera semi- permanente.
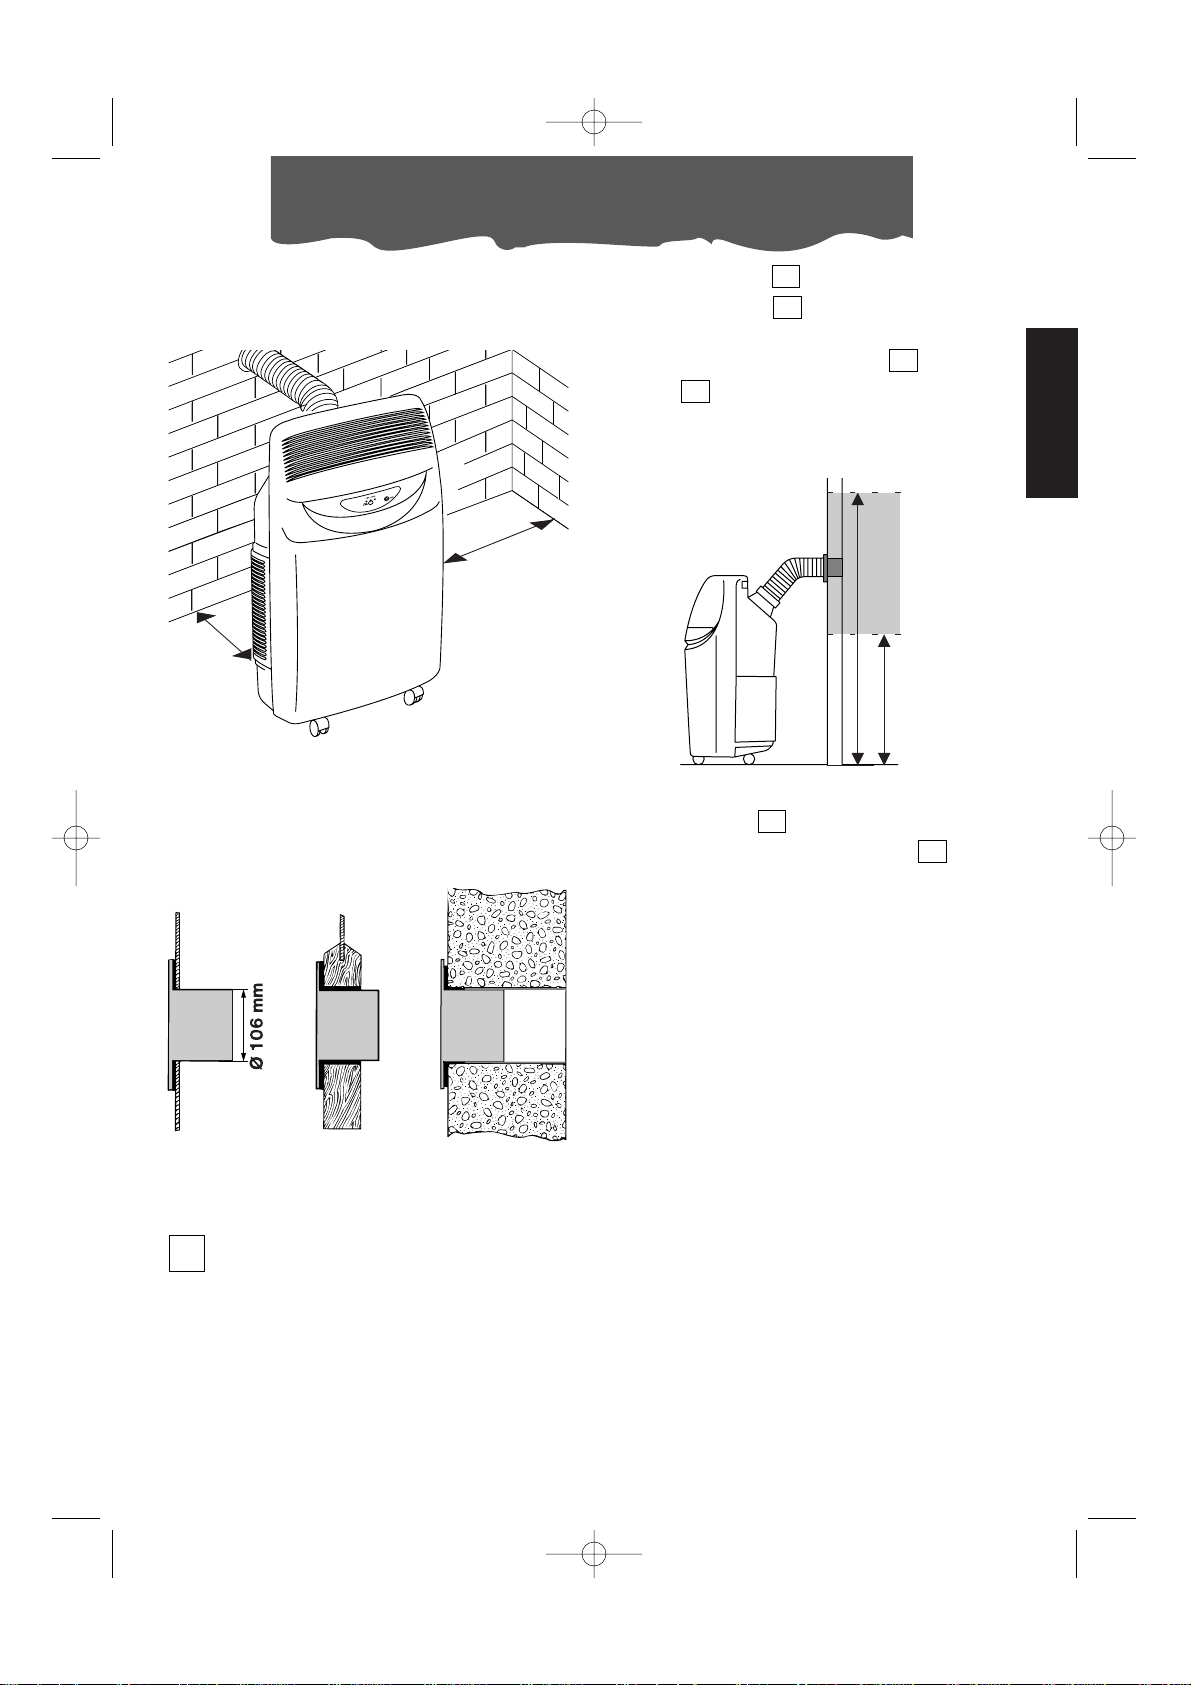
• Applicare al foro l'accessorio flangia
in dotazione
• Fissare il tubo all'apposito alloggiamento posto nella parte posteriore dell'apparecchio (fig. A pag. 6).
• Applicare l'estremità del tubo alla
flangia come indicato in fig. E.
16
17
17
16
In questo caso sarà necessario:
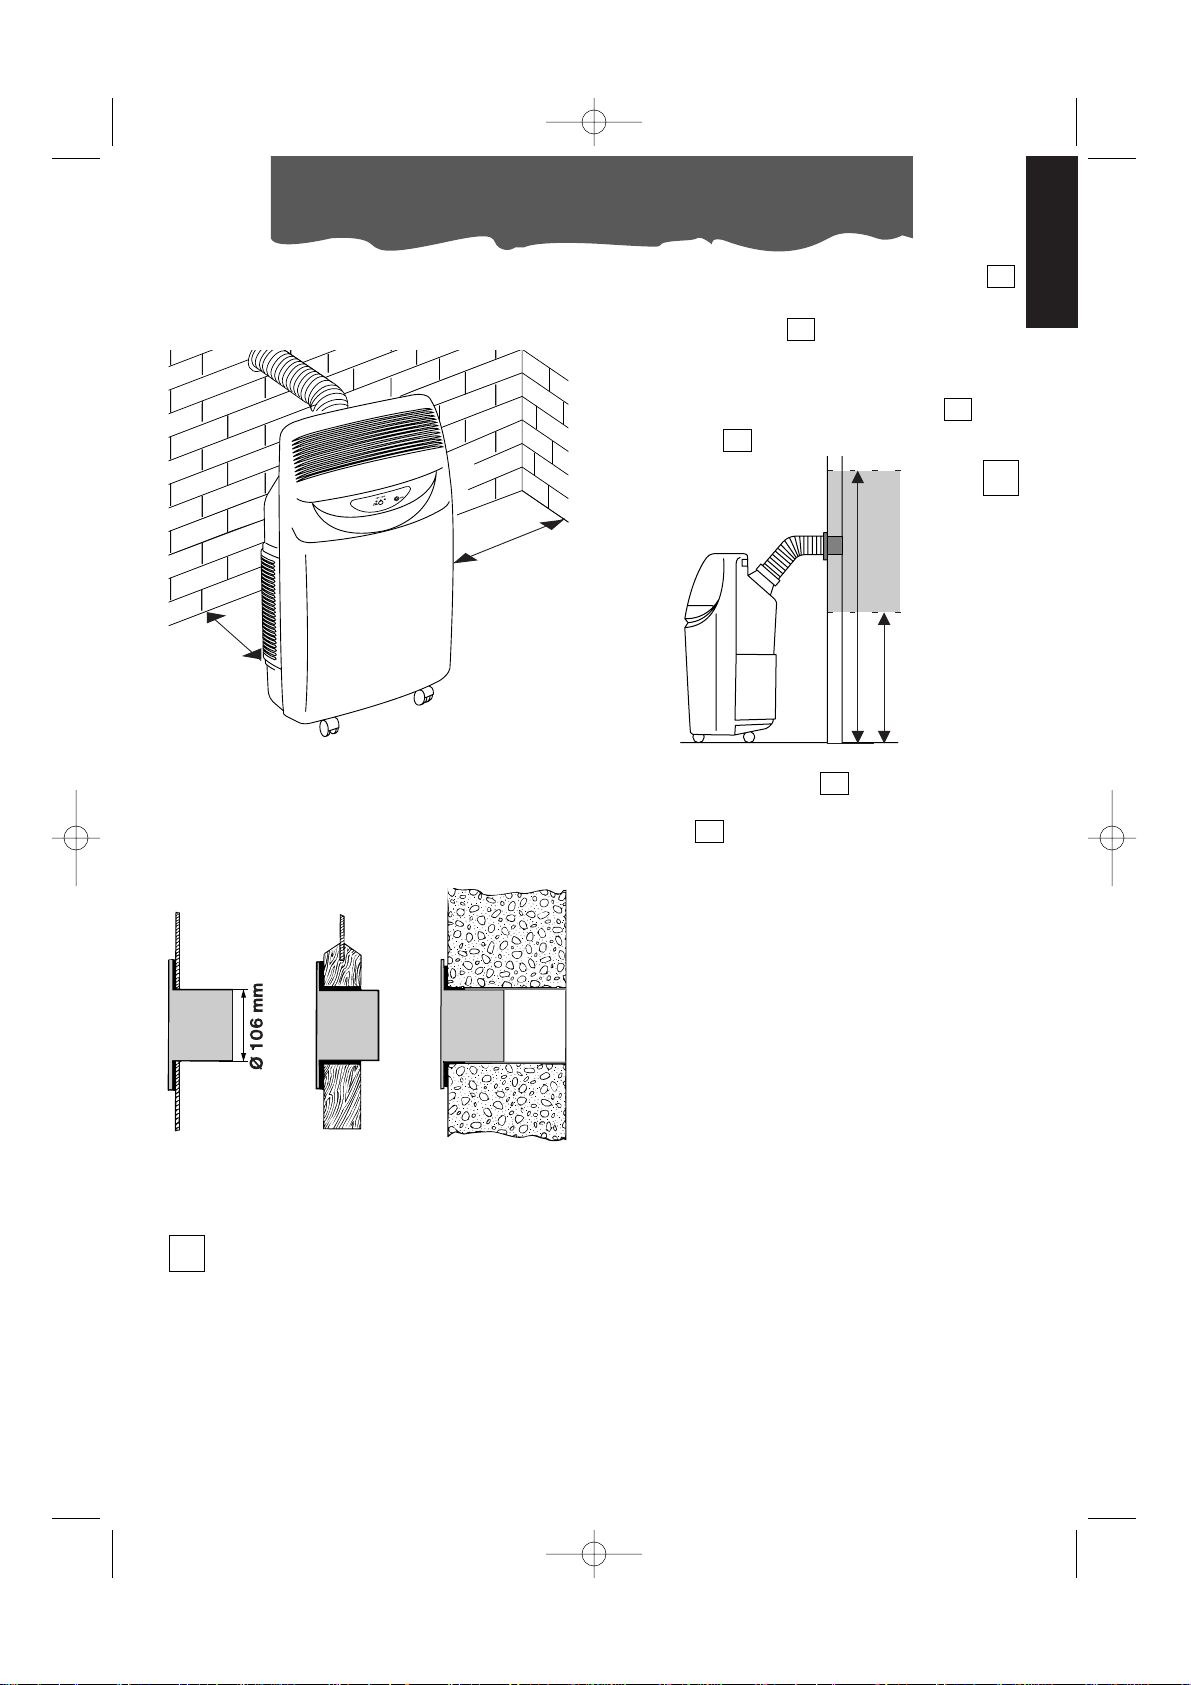
• Praticare un foro in una parete comunticante con l’esterno oppure attraverso il
vetro di una finestra. Rispettate l’intervallo
di altezza e le dimensioni del foro indicati
in figura D.
Ogniqualvolta il tubo non è innestato, il
foro può essere chiuso tramite il tappo della
flangia .
NOTA.
Quando farete un'installazione di tipo semipermanente, vi consigliamo di lasciare leggermente aperta una porta (anche solo di 1
cm) per garantire il giusto ricambio dell'aria.
16
17
nel vetro della
finestra
nel muro: vi consigliamo di isolare la
sezione del muro
con un idoneo
materiale isolante.
nello zoccolo
in legno della
portafinestra
D
E
DEUMIDIFICAZIONE
Posizionate l’apparecchio nella stanza senza
inserire il tubo; in questo modo l’aria deumidificata sarà rilasciata direttamente nell’ambiente.
FX180eco 16-05-2002 14:53 Pagina 9
30 cm
30 cm
MAX115 cm
MIN 50 cm
Page 10
10
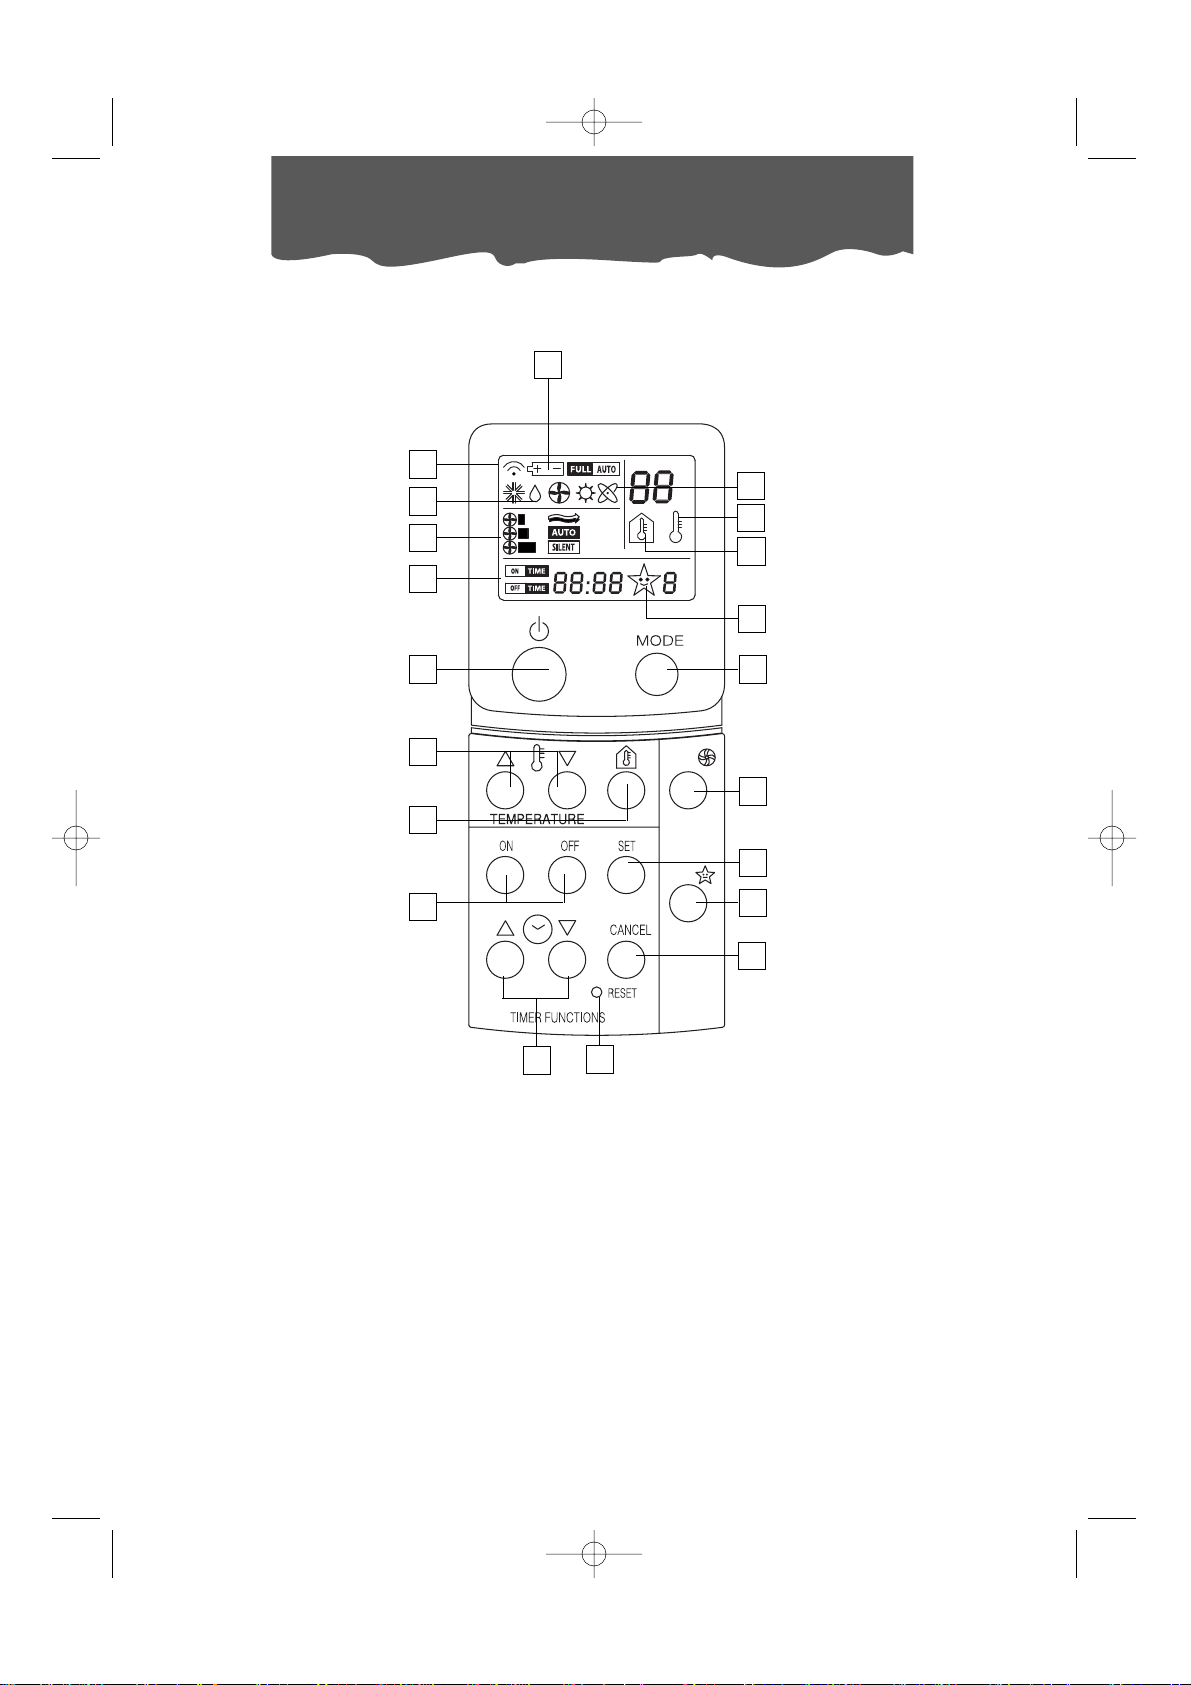
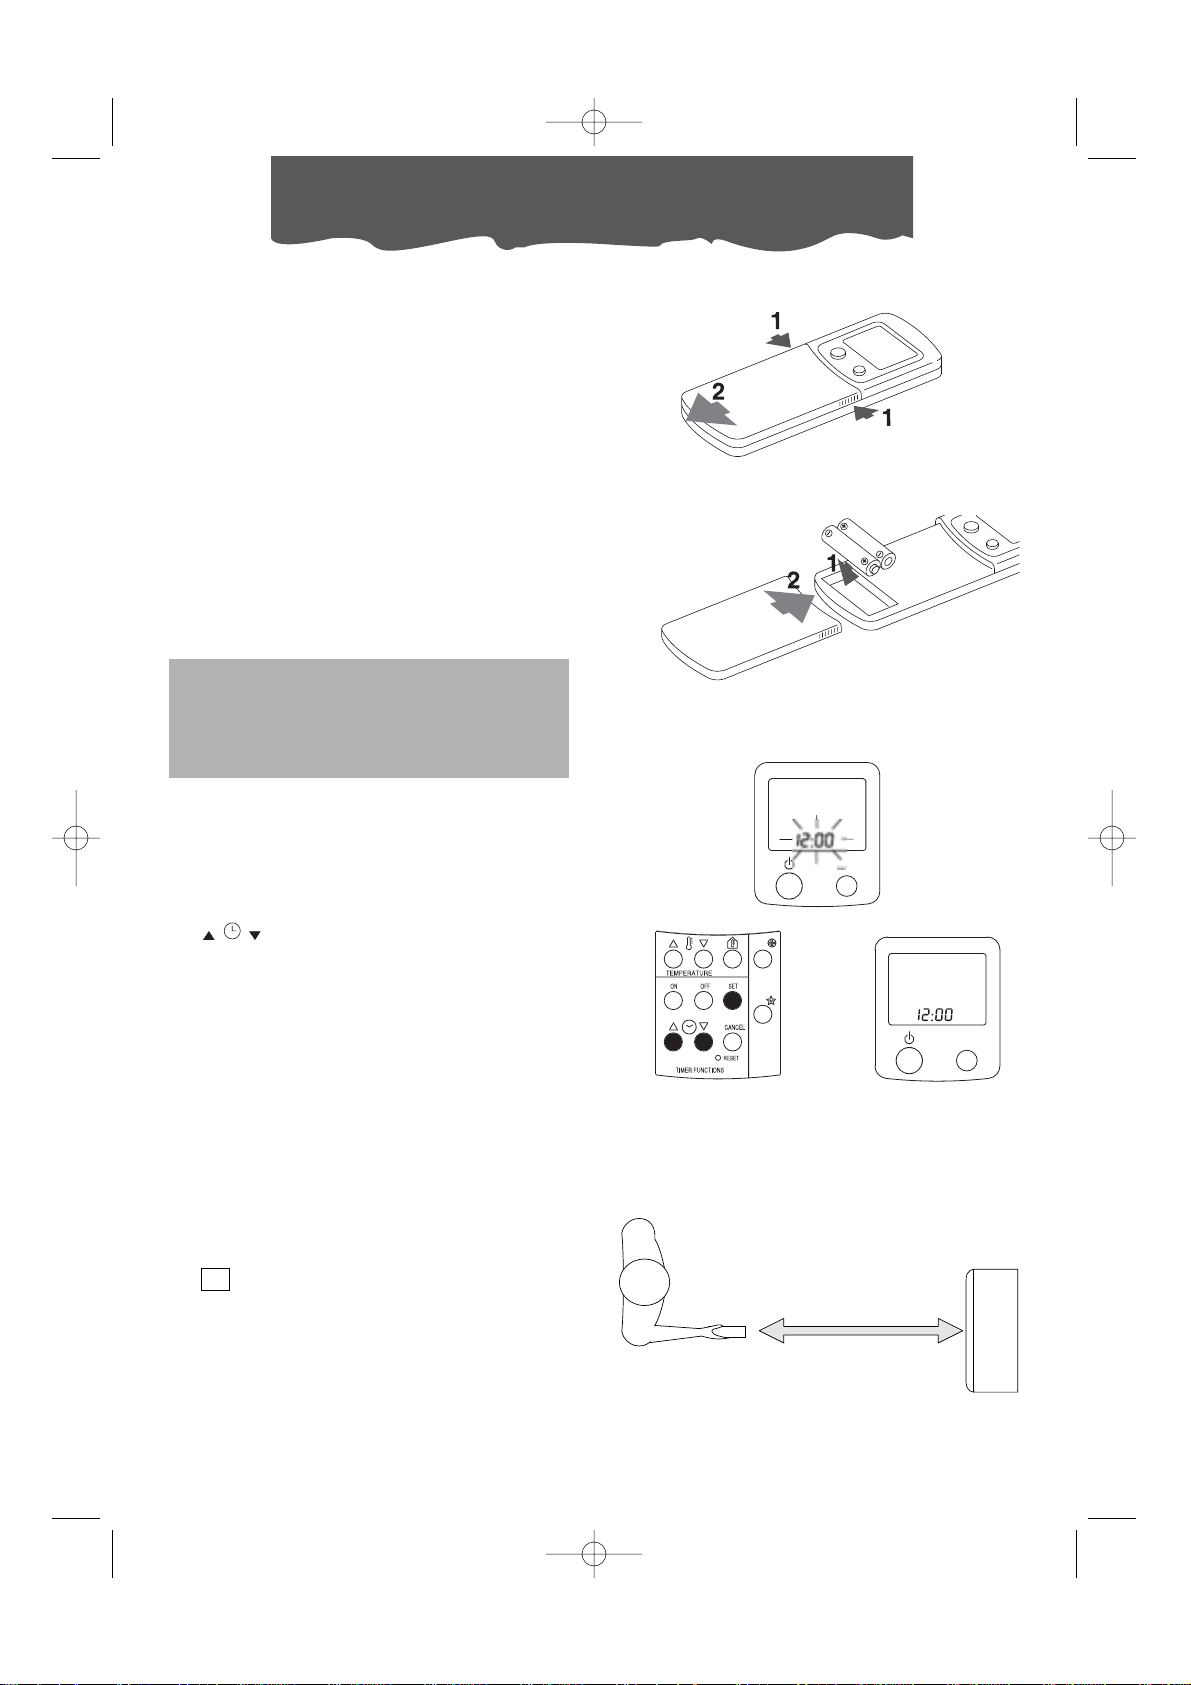
Descrizione del telecomando/
Collegamento elettrico
COLLEGAMENTO ELETTRICO
Prima di collegare la spina alla presa di corrente, bisogna verificare che:
• la tensione di rete sia conforme al valore indicato nella targa caratteristiche posta sul retro
della macchina;
• la presa e la linea di alimentazione elettrica siano dimensionate per sopportare il carico richiesto;
• la presa sia del tipo adatto alla spina, altrimenti far sostituire la presa stessa;
• la presa sia collegata con un efficace impianto di terra. La casa costruttrice declina ogni
responsabilità nel caso questa norma antinfortunistica non fosse rispettata.
10
IL DISPLAY
Con l’accensione del climatizzatore tutti i simboli vengono visualizzati.
Con lo spegnimento, rimane acceso solamente l’orologio.
A. Beep
Visualizza il segnale acustico e l’avvio del
climatizzatore, si attiva inoltre tutte le volte
che si compie un’operazione.
B. Simboli delle diverse funzioni
Condizionamento, deumidificazione, ventilazione, riscaldamento (non presente in
questo modello), Full Auto.
C. Temperatura ambiente
Visualizza la temperatura ambiente.
D. Velocità del ventilatore
Visualizza le diverse velocità: minima,
media, massima, automatica e silent.
E. Timer accensione/spegnimento
Visualizza i tempi programmati di accensione e spegnimento
F. Timer sleep/auto
visualizza la funzione e le ore desiderate di
funzionamento, in funzione SLEEP.
G. Indicazione di batterie da sostituire
H. Purificazione dell’aria
Il simbolo rimane sempre acceso perché
con il climatizzatore acceso, l’aria viene
sempre filtrata dalle impurità.
I. Temperatura impostata
Visualizza la temperatura desiderata.
J. L’orologio
Visualizza l’ora.
2
I PULSANTI
K. Accensione/spegnimento
L. MODE: selezione funzione
Premendo più volte questo tasto vengono
selezionate le diverse modalità di funzionamento: condizionamento, deumidificazione, ventilazione, riscaldamento (non
presente in questo modello) e Full Auto.
M. Termostato ambiente
I due tasti selezionano la temperatura
desiderata nell’ambiente.
N. Visualizzazione temperatura ambiente
Il tasto visualizza la temperatura presente
nell’ambiente. Dopo circa 4 secondi
segnalerà la temperatura impostata precedentemente.
O. Selezione velocità ventilatore
Il tasto seleziona la velocità del ventilatore: minima, media, massima, auto e silent.
P. Set: confer ma orologio o timer
Conferma la programmazione dell’orologio o del timeer ON/OFF.
Q. ON/OFF: programmazione timer
I tasti programmano lo spegnimento e
l’accensione del climatizzatore.
R. CANCEL: cancellazione timer
Il tasto annulla le impostazione del Timer
ON/OFF
S. RESET del telecomando da premere con
l’aiuto di un oggetto appuntito.
T. Programmazione orologio o timer
I tasti programmano ore e minuti dell’orologio e del timer
U. Sleep
Il tasto imposta la funzione notte.
Il cavo di alimentazione deve essere sostituito solo da personale tecnico specializzato.
Selezionando la funzione di climatizzazione in concomitanza con un calo di tensione di corrente
elettrica, potrebbe intervenire un dispositivo di sicurezza. Questo blocca il funzionamento del circuito frigorifero, cosicché l'apparecchio funziona come fosse in ventilazione/purificazione. Per
ripristinare la funzione di climatizzazione, spegnete l'apparecchio e tenete la spina staccata per
almeno trenta secondi. Quindi ricollegate.
FX180eco 16-05-2002 14:53 Pagina 10
Page 11
11
ITALIANO
Spie luminose/
Funzionamento manuale
SPIE LUMINOSE
Si accendono a seconda della funzione selezionata o segnalano eventuali anomalie.
ANOMALIA
SPIA ROSSA
11
SPIA GIALLA
12
SPIA VERDE
13
FILTRI SPORCHI (1)
- lampeggia -
ALLARME
lampeggia lampeggia lampeggia
FUNZIONE
SPIA ROSSA
11
SPIA GIALLA
12
SPIA VERDE
13
SPENTO
---
CONDIZIONAMENTO
--accesa
DEUMIDIFICAZIONE
accesa - accesa
VENTILAZIONE
- accesa -
FULL AUTO
TIMER
Appena selezionata questa funzione, tutte le spie rimarranno accese per alcuni secondi finché il controllo non avrà deciso come funzionare (se in condizionamento, deumidificazione, ventilazione).
Le spie luminose rimangono tutte accese, a macchina spenta, se almeno una delle funzioni TIMER
è impostata.
(1) La spia lampeggiante indica che è necessario procedere alla pulizia dei filtri antibatterici.
Per spegnere la spia, dopo aver provveduto alla pulizia dei filtri, premete il pulsante di funzionamento manuale fino a quando udirete un beep seguito da un doppio beep.
Questa procedura può essere eseguita anche quando l’apparecchio sta funzionando.
14
FUNZIONAMENTO MANUALE
É un modo di funzionamento da utilizzare solo quando non è possibile l’utilizzo del telecomando
(rottura, smarrimento o pile scariche).
Premere il tasto di funzionamento manuale e avviare l’apparecchio. Ripremere per ottenere
la sequenza delle diverse modalità di funzionamento (climatizzazione, deumidificazione, ventilazione, full auto, spento), il climatizzatore funzionerà con impostazioni automatiche.
14
FX180eco 16-05-2002 14:53 Pagina 11
Page 12
12
Descrizione del telecomando
IL TELECOMANDO
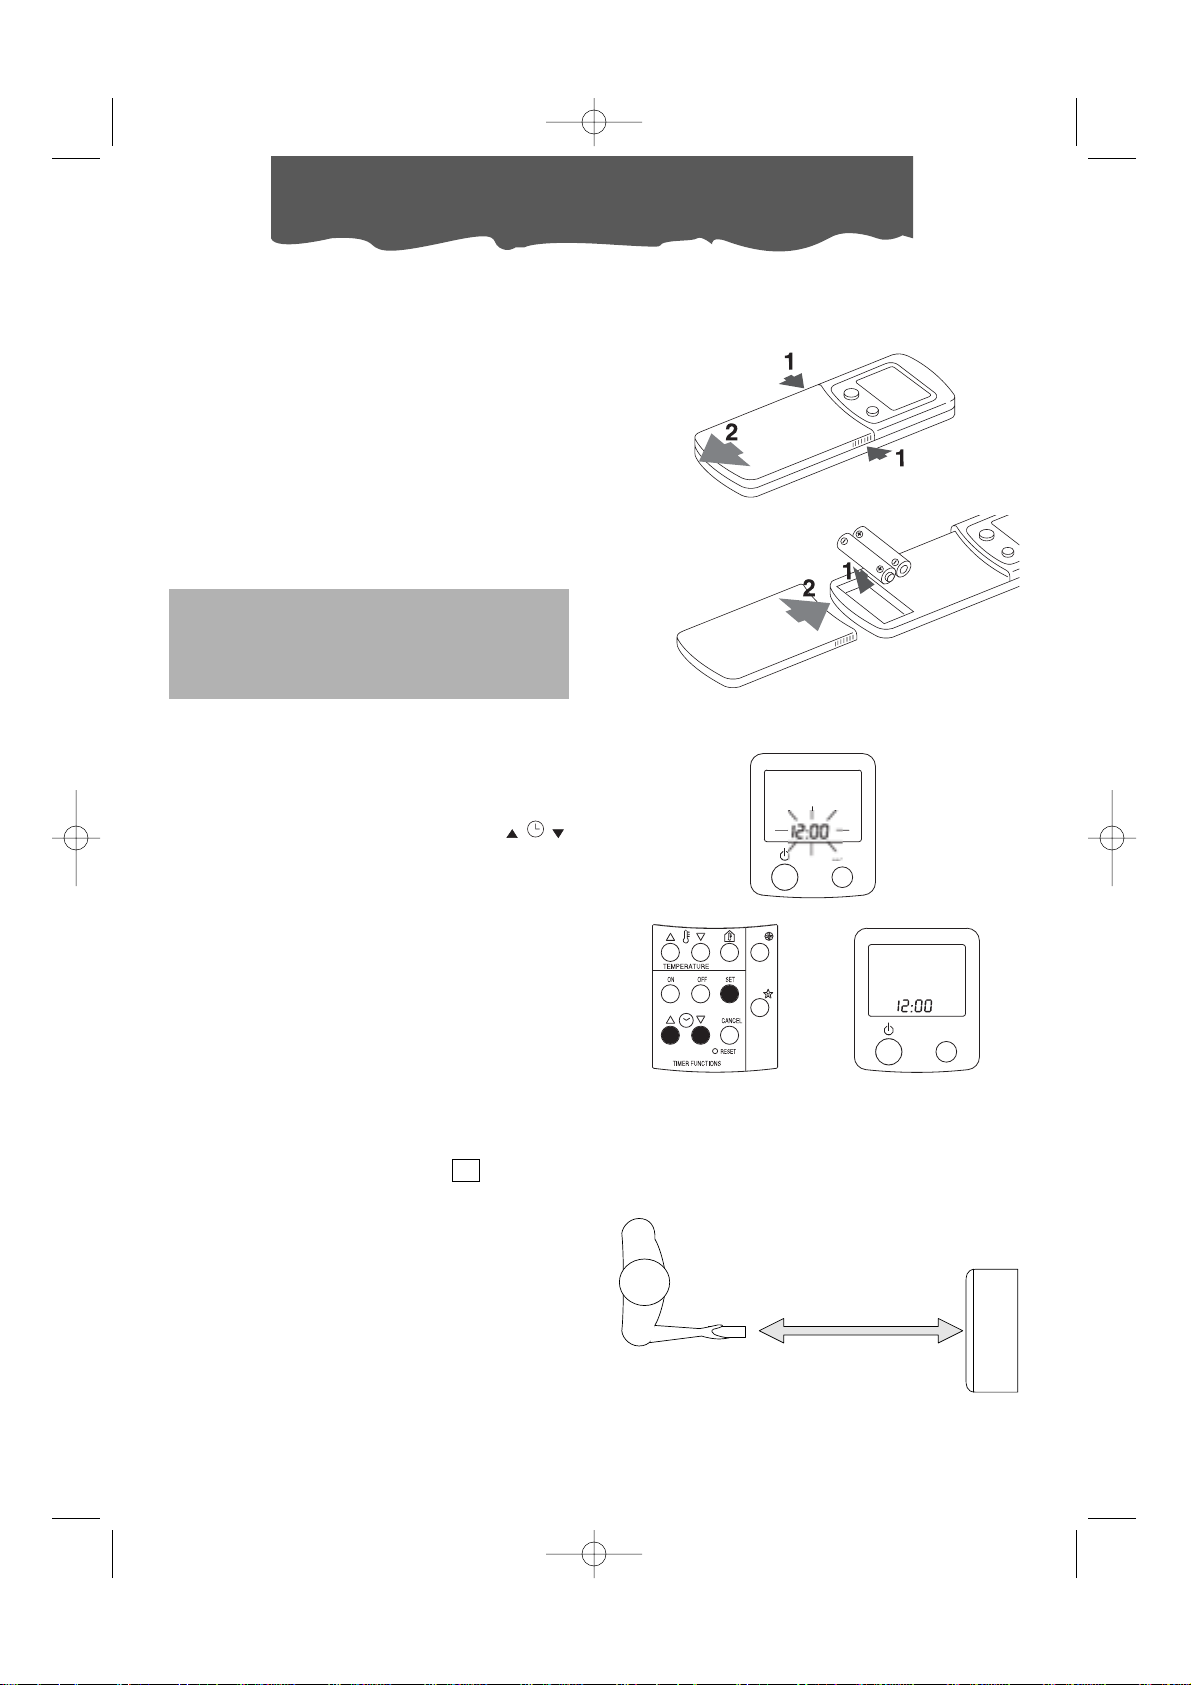
Inserimento batterie
• Rimuovere il coperchio di protezione (vedi
figura).
•Inserire due batterie in dotazione nuove
del tipo non ricaricabili, facendo attenzione a posizionarle nella direzione corretta
(+) e (-).
• Reinserire il coperchio, facendolo scorrere
fino alla posizione iniziale.
• Sul display appariranno per qualche istante tutti i simboli del telecomando.
A questo punto l’orologio sul display inizierà a
lampeggiare segnalando le ore 12:00. Impostare quindi l’ora esatta.
Nota: Vi consigliamo l’utilizzo di batterie di
tipo alcalino.
Sia in caso di sostituzione che di eliminazione del telecomando, le batterie devono
essere rimosse ed eliminate secondo le
leggi vigenti in quanto dannose per l’ambiente.
IMPOSTAZIONE DELL’OROLOGIO
• Se entro 2 minuti dal reset o dalla sostituzione delle batterie non viene impostata
l’ora, il telecomando si posiziona automaticamente alle ore 12:00.
• Per programmare l’ora, premere i tasti
per aumentare o diminuire. L’aumento o la diminuzione è di 1 minuto.
Tenendo i tasti premuti, l’orologio scorrerà
più velocemente.
• L’orologio continuerà a lampeggiare. Premere il tasto SET per confermare l’ora
impostata: l’orologio smetterà di lampeggiare.
• Se fosse necessario regolare l’ora, bisogna
premere il tasto RESET e quindi reimpostare
l’ora corrente. (Non esistono altre modalità).
USO CORRETTO
• Direzionare il telecomando verso il ricevitore di segnale del climatizzatore d’aria
.
• Distanza massima: circa 7 metri (senza
alcun ostacolo tra telecomando e ricevitore).
• Il telecomando va maneggiato con estre-
ma cura e rispetto: senza farlo cadere,
senza esporlo alla luce solare diretta, né
vicino a fonti di calore.
15
MODE
MODE
FX180eco 16-05-2002 14:53 Pagina 12
Page 13
13
ITALIANO
Selezionare le funzioni
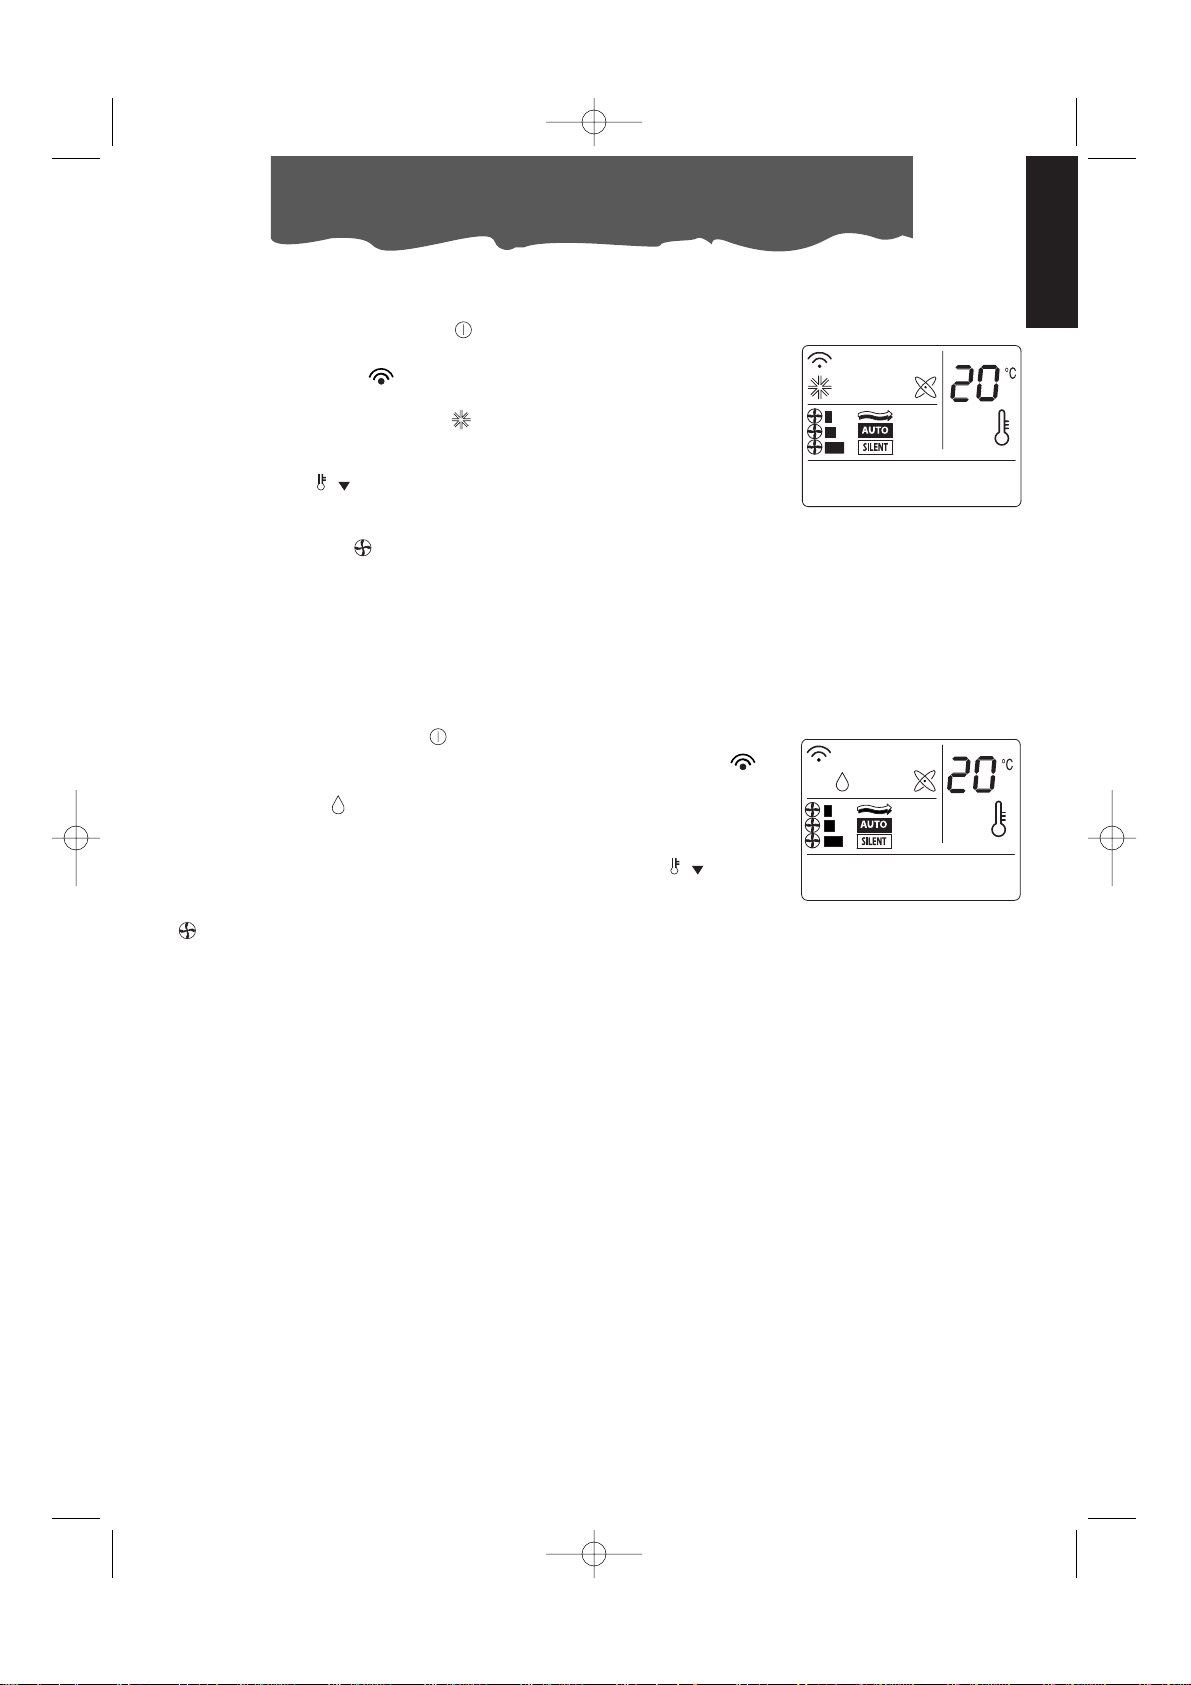
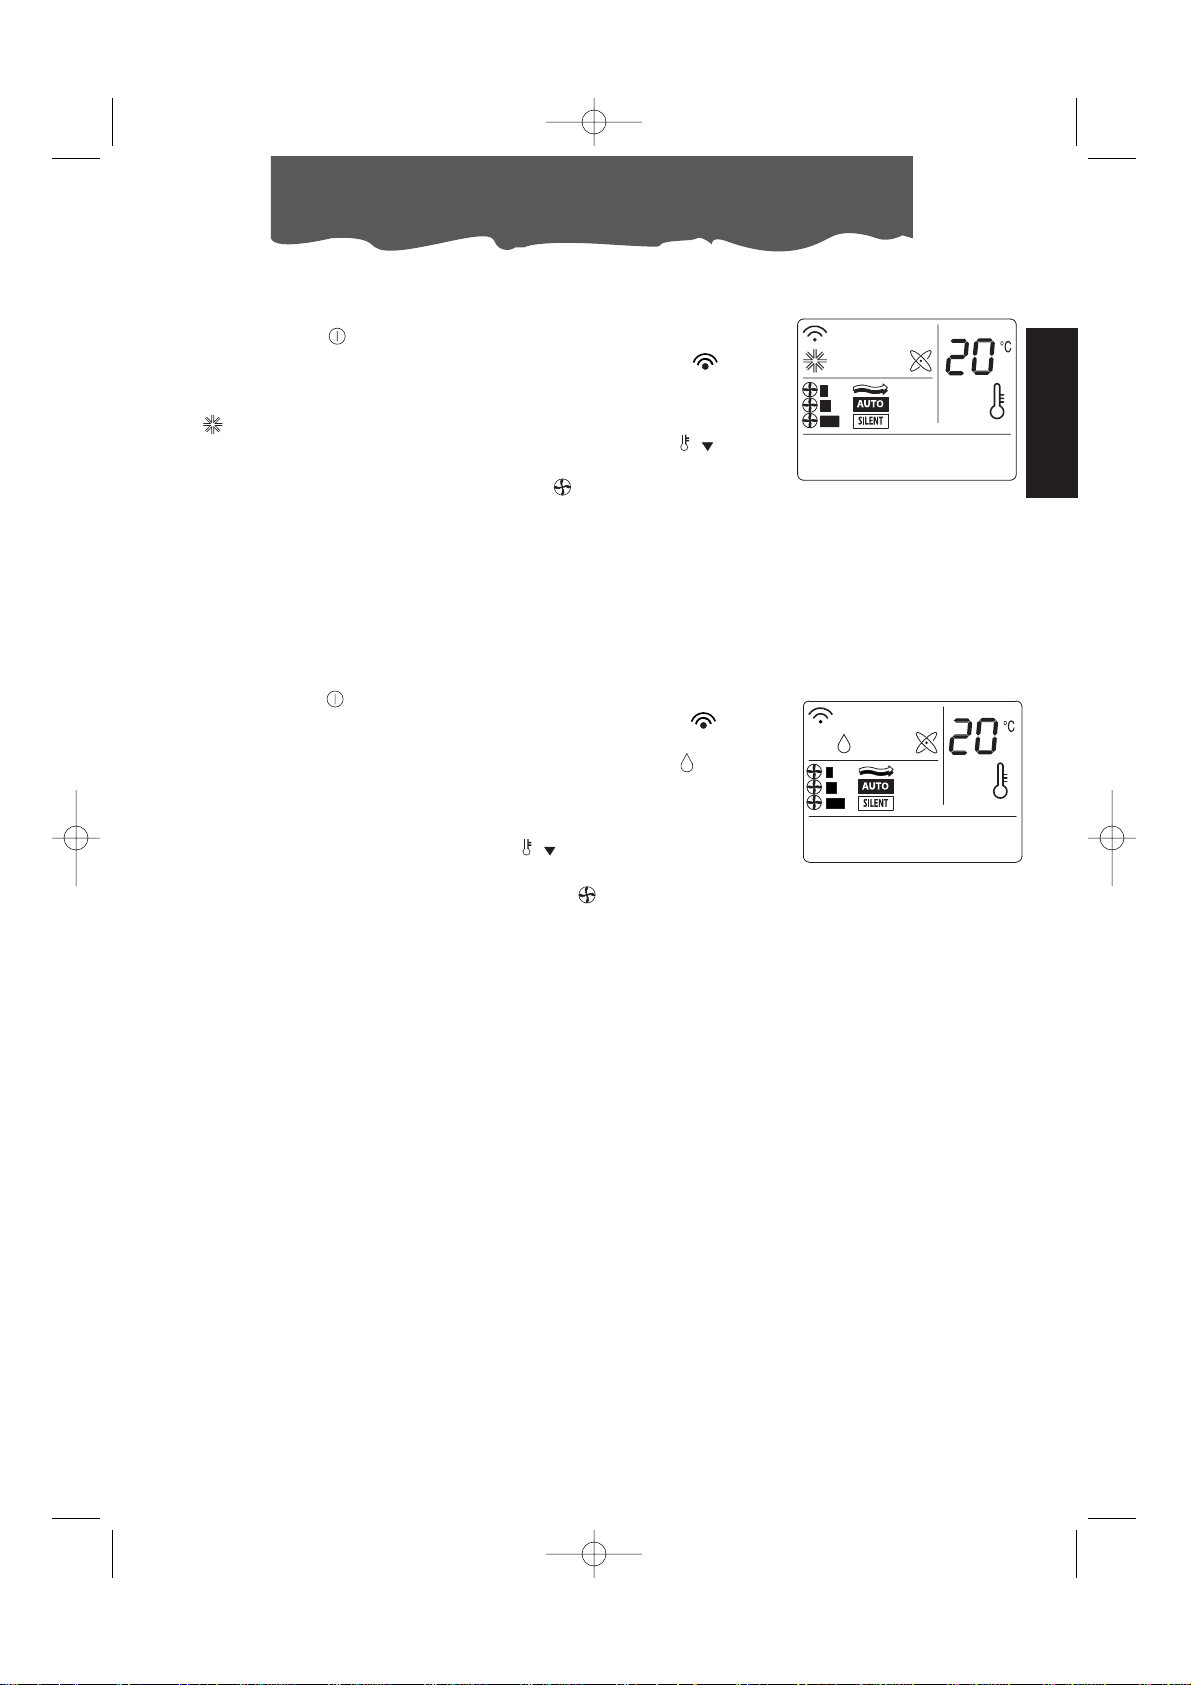
FUNZIONE CONDIZIONAMENTO
•Innanzitutto premere il tasto per l’accensione.
• Un beep segnalerà l’avvio del climatizzatore e sul display lampeggerà il simbolo .
• Poi selezionare più volte il tasto MODE, finché apparirà sul display
il simbolo condizionamento .
•A questo punto va impostata la temperatura: per diminuirla premere il tasto .
•Per selezionare la velocità del ventilatore, basta premere ripetutamente il tasto fino al raggiungimento della ventilazione
desiderata (minima, media, massima, automatica, silent).
N.B.:
In funzione di condizionamento, l’apparecchio sottrae automaticamente l’umidità in eccesso dall’ambiente.
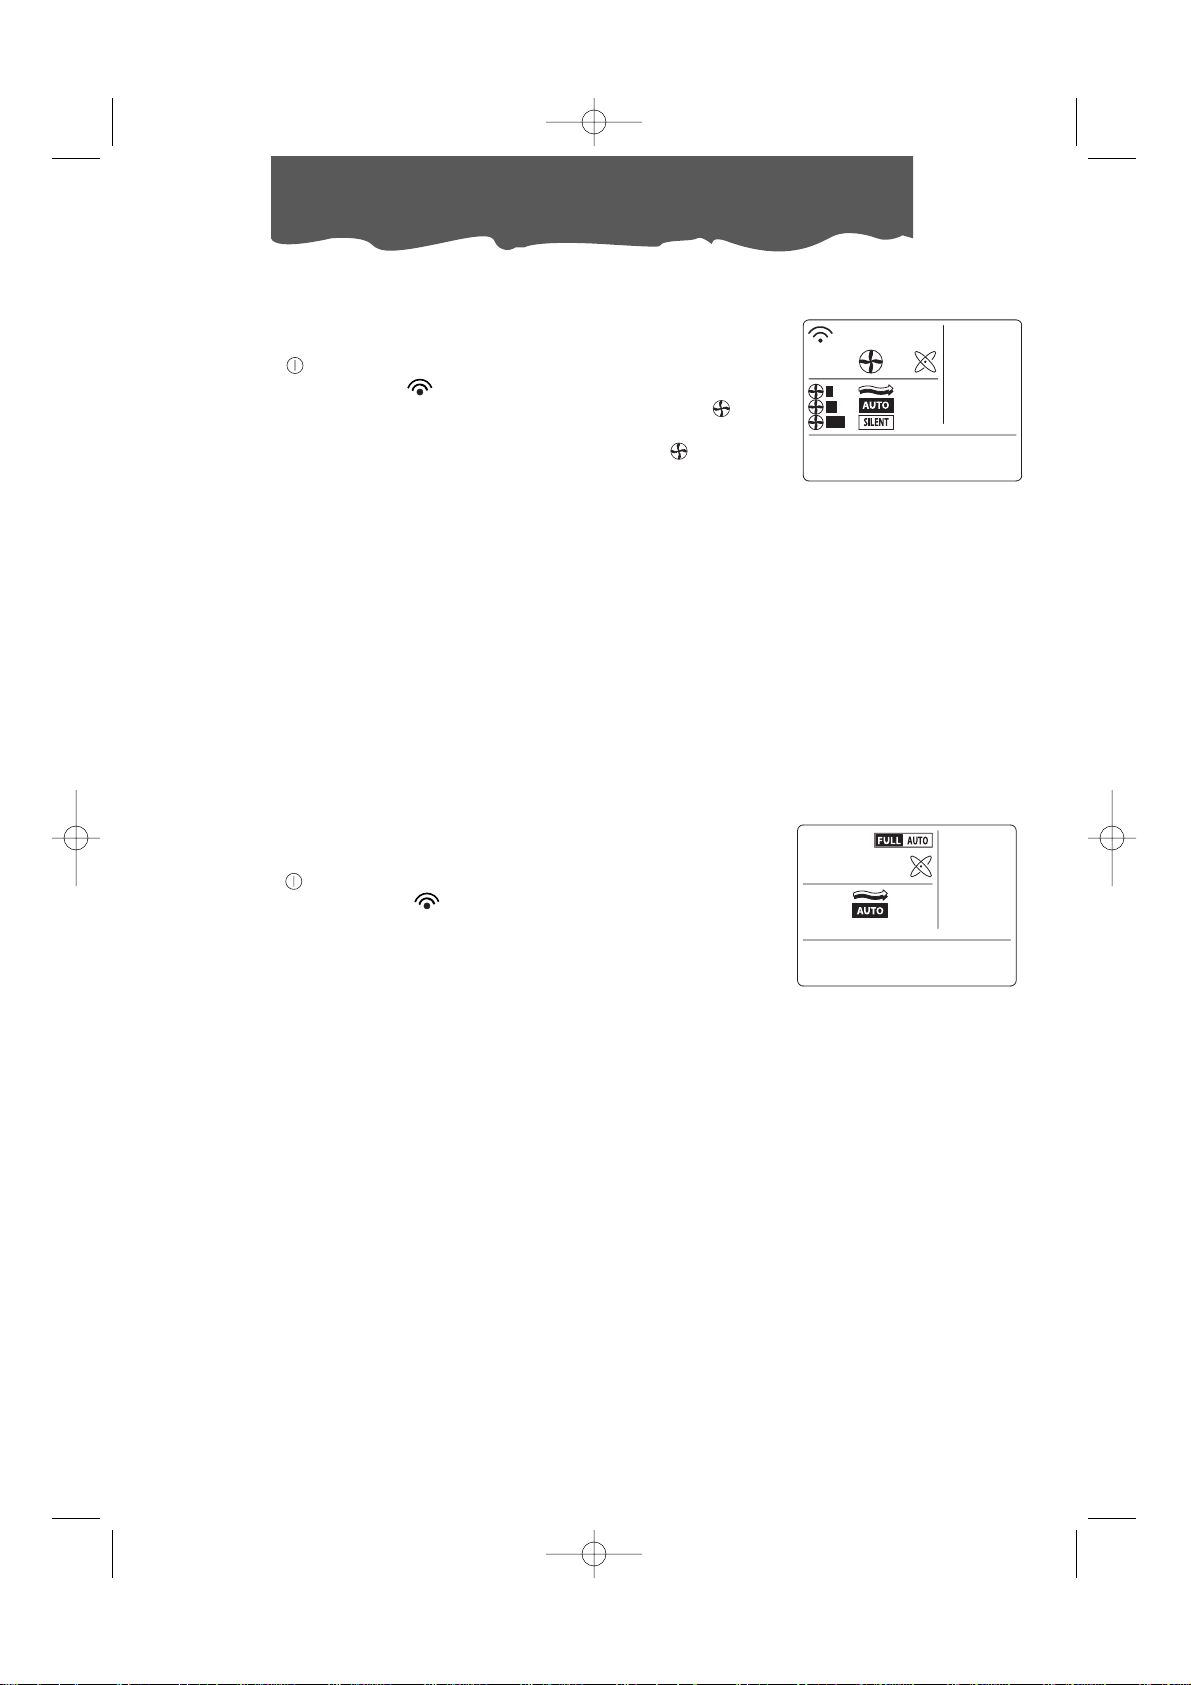
FUNZIONE DEUMIDIFICAZIONE
É bene attivare tale funzione in caso di alti livelli di umidità.
Innanzitutto, premere il tasto per l’accensione. Un beep segnalerà l’avvio del climatizzatore e sul display lampeggerà il simbolo .
Poi selezionare il tasto MODE finché apparirà sul display il simbolo
deumidificazione .
Va sottolineato che è importante impostare la temperatura in modo
che sia più bassa di quella ambiente, premendo il tasto .
Per selezionare la velocità del ventilatore basta premere il tasto
fino al raggiungimento della ventilazione desiderata.
Si fa presente che a seconda delle condizioni ambientali e delle e
della temperatura selezionata l’apparecchio può scegliere in
modo automatico la velocità del ventilatore.
FX180eco 16-05-2002 14:53 Pagina 13
Page 14

14
Selezionare le funzioni
FUNZIONE VENTILAZIONE/ PURIFICAZIONE
In caso di giornate afose, manon particolarmente calde, può essere sufficiente attivare la funzione ventilazione/purificazione.
•Premere il tasto . Un beep segnalerà l’avvio del climatizzatore
e sul display lampeggerà il simbolo .
• Poi selezionare il tasto MODE, finché apparirà sul display il simbo-
lo ventilazione .
• Una volta attivata, selezionare ripetutamente il tasto , fino al
raggiungimento della velocità desiderata (minima, media, massima, automatica, silent).
Va precisato che nelle funzioni con ventilazione automatica, sarà
l’apparecchio stesso a scegliere la velocità più idonea.
FUNZIONE FULL AUTO
Selezionando la funzione FULL AUTO sarà il climatizzatore stesso a
decidere come funzionare per garantirvi le condizioni di benessere.
•Premere il tasto per l’accensione. Un beep segnalerà l’avvio
del climatizzatore e sul display lampeggerà il simbolo .
• Poi selezionate il tasto MODE, finché apparirà sul display il sim-
bolo FULL AUTO.
L’apparecchio stabilirà automaticamente la funzione (condizionamento, deumidificazione, ventilazione) e la velocità ottimali.
FX180eco 16-05-2002 14:53 Pagina 14
Page 15
FUNZIONE AUTOMATICA SLEEP
La funzione automatica SLEEP è ideale per le ore notturne in quanto consente, all’interno della modalità di climatizzazione corrente
(condizionamento, deumidificazione, ventilazione o FULL AUTO), di
ridurre progressivamente il funzionamento del climatizzatore fino al
suo completo spegnimento. Per selezionare la funzione SLEEP procedere come segue:
Premere il tasto per l’accensione del climatizzatore.
Un beep segnalerà l’avvio del climatizzatore e sul display lampeggerà il simbolo .
Poi premere più volte il tasto MODE, finché apparirà sul display il simbolo della funzione desiderata.
Selezionare quindi la temperatura desiderata premendo i tasti
.
Ora premere il tasto per impostare la funzione notte: si accenderà il simbolo . Premendo più volte il tasto fino al numero di
ore desiderate (da 1 a 7) deciderete l’ora di spegnimento del climatizzatore. Con questa funzione, il ventilatore funziona a bassa
velocità (silent).
La funzione notte consente di mantenere l’ambiente alla temperatura ottimale evitando un eccessivo innalzamento o abbassamento della temperatura con funzionamento silenzioso. Il flusso d’aria diminuisce, mentre la temperatura dell’ambiente varia gradualmente seguendo le esigenze di benessere: aumenta di 1°C dopo
60 minuti e di 2°C dopo 2 ore.
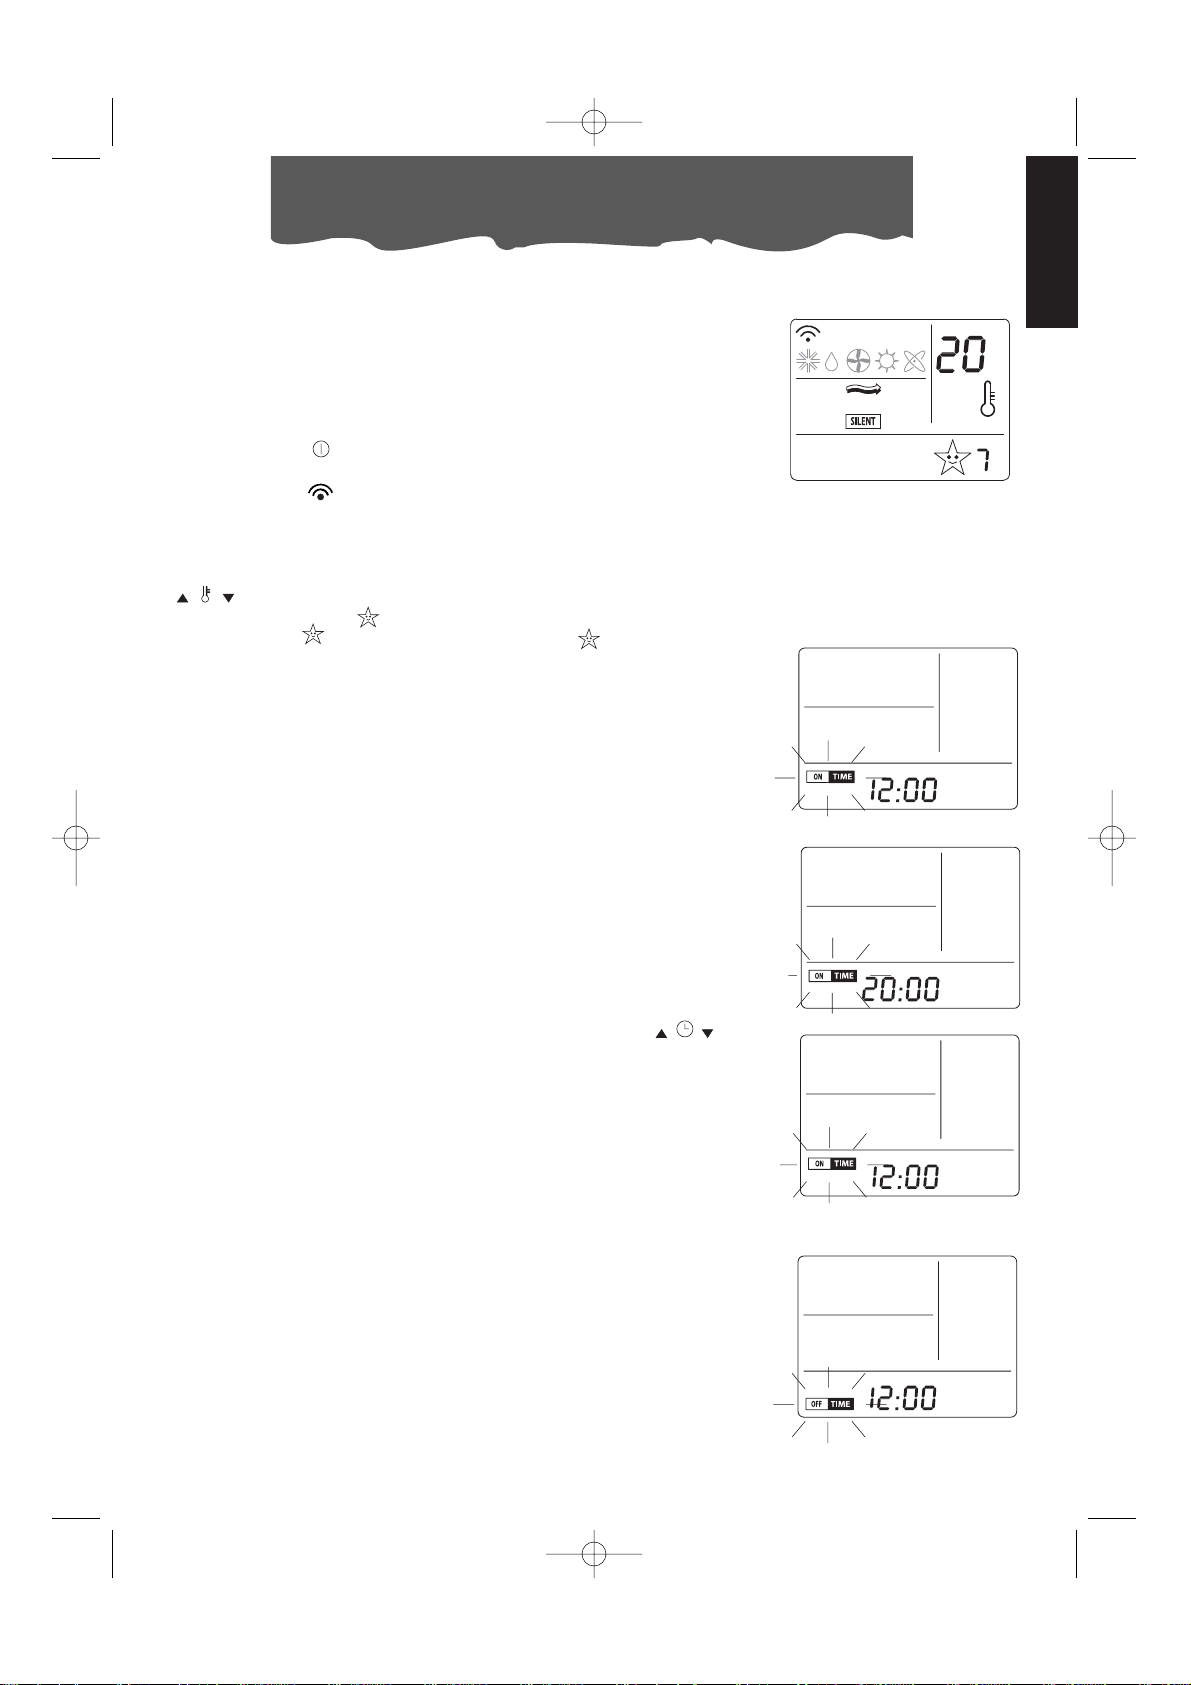
PROGRAMMAZIONE DEL TIMER
Programmazione dell’accensione
A climatizzatore acceso, premere il tasto ON: inizierà a lampeggiare il simbolo ON TIME e l’orologio segnerà le ore 12:00.
Va ricordato che il timer avvia il climatizzatore reimpostando tutte le
funzioni e le modalità attive prima dell’ultimo spegnimento.
•Per impostare l’orario di accensione, utilizzate i tasti .
• L’incremento o il decremento sarà di 10 minuti, ad ogni singola
pressione dei tasti, mentre tenendoli premuti, gli spostamenti
saranno più veloci.
• La scritta ON TIME continuerà a lampeggiare. Ripremendo il
tasto SET, verrà confermata l’impostazione del timer per l’accensione.
• Per cancellare la programmazione, premere il tasto ON: il sim-
bolo ON TIME lampeggerà visualizzando l’ora di accensione.
•A questo punto, selezionare il tasto CANCEL: l’orologio segnerà
l’ora corrente.
Programmazione spegnimento
Il procedimento di programmazione spegnimento e cancellazione,
è simile al precedente: la differenza consiste unicamente nel premere il tasto OFF anziché il tasto ON.
15
ITALIANO
Selezionare le funzioni
FX180eco 16-05-2002 14:53 Pagina 15
°C
HR
Page 16
16
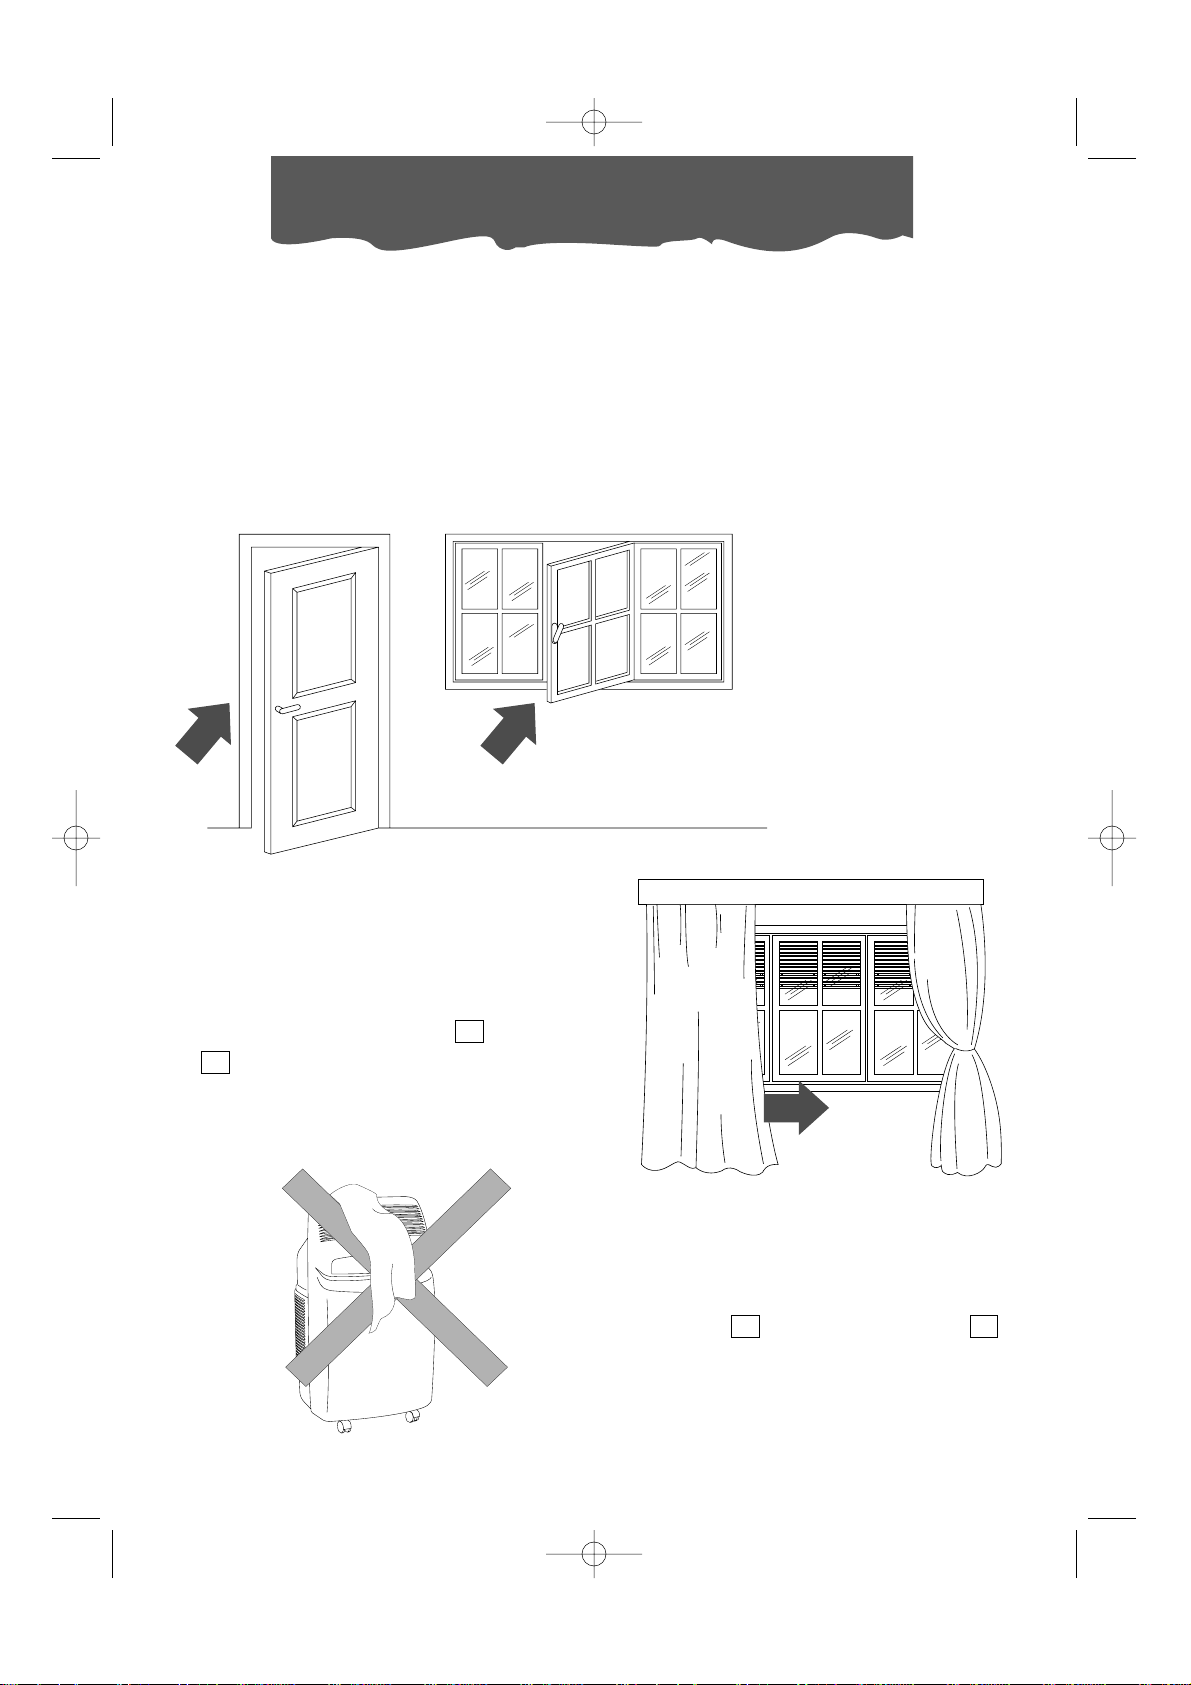
Ci sono alcune avvertenze da seguire per
ottenere il massimo rendimento dal climatizzatore:
• chiudete i serramenti dell’ambiente da cli-
matizzare. Unica eccezione nel caso di
installazione attraverso un foro nella parete.
In tal caso è consigliabile lasciare uno spiraglio (1 cm) attraverso una porta o finestra,
così da garantire il giusto cambio d’aria.
•Proteggete la stanza dalle esposizioni
dirette del sole, tirando le tende e/o
abbassando parzialmente le persiane in
modo da avere un funzionamento estremamente economico;
• Non appoggiare oggetti sul climatizzato-
re;
• Non ostacolare l’aspirazione e la
mandata d’aria ;
• Assicurarsi che nell’ambiente non vi siano
sorgenti di calore.
1
7
Consigli
chiudere porte e finestre
abbassare le persiane o tirare le tende
non coprire
• Controllare che il climatizzatore sia posizionato su un pavimento “in piano”. Inserire
eventualmente i 2 fermaruote sotto le
ruote anteriori .
3
20
•Non utilizzare l’apparecchio in ambienti
ad alto tasso di umidità (es. lavanderia).
•Non utilizzare l’apparecchio in ambiente
esterno.
•Tenere l’apparecchio ad una adeguata
distanza da superfici combustibili.
FX180eco 16-05-2002 14:53 Pagina 16
Page 17
17
ITALIANO
Prima di ogni operazione di pulizia o di manutenzione, spegnete l’apparecchio e staccate sempre la spina dalla presa di corrente.
PULIZIA DEL MOBILE ESTERNO
Vi suggeriamo di pulire l’apparecchio con un
panno che sia soltanto inumidito ed asciugare con un panno asciutto. Per motivi di sicurezza non lavate il climatizzatore con acqua.
Precauzioni
Mai usare benzina, alcool o solventi per la
pulizia. Mai spruzzare liquido inseticida o simili.
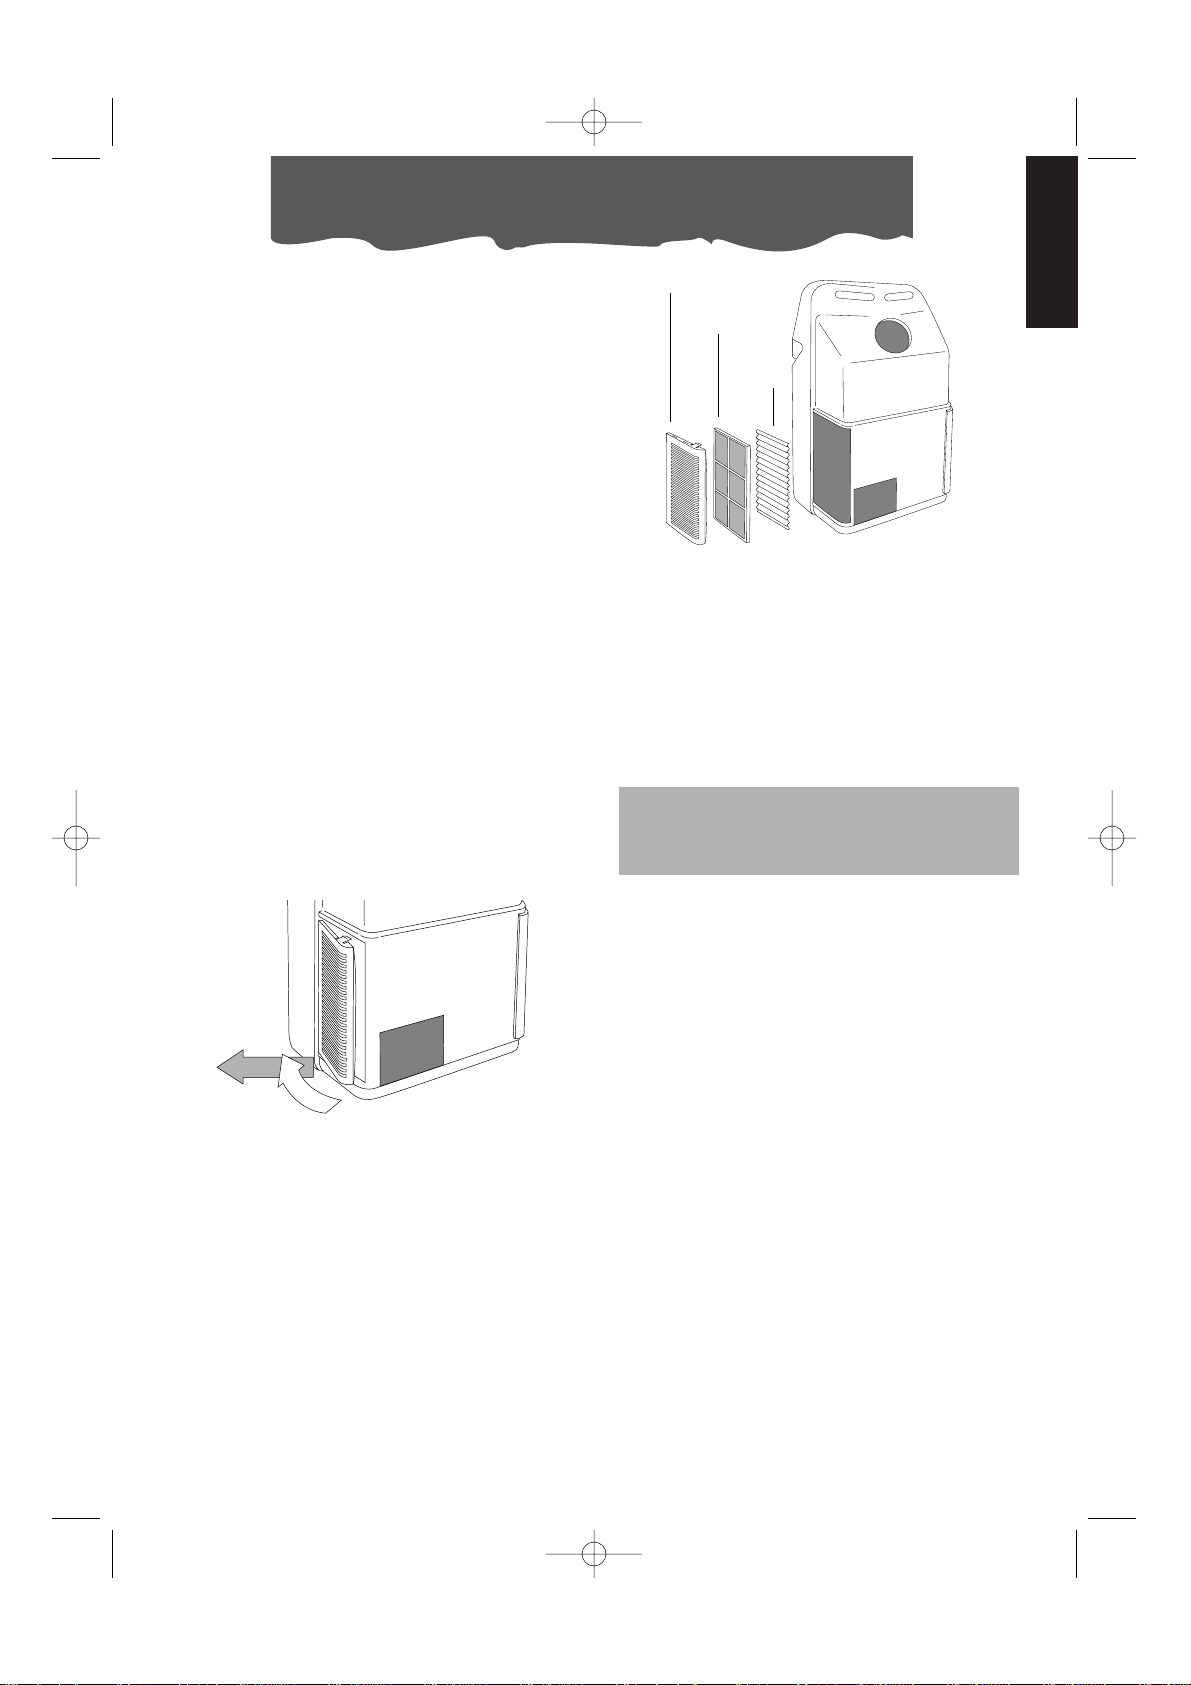
PULIZIA DEI FILTRI ARIA.
Per mantenere inalterata l'efficienza del
vostro climatizzatore. Vi consigliamo di:
1. Pulire il filtro antibatterico ogni settimana
2. Sostituire il filtro FILTRETETMal termine di ogni
stagione, o comunque quando sarà esausto
(seguite le indicazioni poste sull’apparecchio
presso la sede del filtro).
I filtri per la purificazione dell'aria si trovano in
corrispondenza delle due griglie di aspirazione. Le griglie sono a loro volta la sede degli
stessi filtri.
Per la pulizia dei filtri sarà quindi necessario:
1. Rimuovere le griglie di aspirazione, ruotandole verso l'esterno (fig. F).
Per togliere la polvere depositata sul filtro
antibatterico usare un aspirapolvere. Se è
molto sporco immergerlo in acqua tiepida
risciacquando più volte. La temperatura dell’acqua va mantenuta sotto i 40° C.
Dopo averlo lavato, lasciare asciugare il filtro.
Per reinserirlo, ricollocate i filtri nel portafiltro,
quindi riagganciare quest’ultimo alla macchina.
Non cercate di pulire il filtro FILTRETETM, poiché
questo potrebbe diminuirne la capacità di filtraggio.
VERIFICHE DI INIZIO STAGIONE
Verificate che il cavo di alimentazione e la
presa siano perfettamente integri e assicuratevi che l’impianto di messa a terra sia efficiente. Osservate scrupolosamente le norme
di installazione.
OPERAZIONI DI FINE STAGIONE
Fate uscire l’acqua della bacinella di raccolta togliendo il tappo del tubo di drenaggio.
Estraete la vaschetta raccoglicondensa posizionata sulla parte posteriore del climatizzatore e vuotatela. Reinseritela quindi correttamente. Pulite i filtri antibatterici e fateli asciugare bene prima di reinserirli.
fig. F
Pulizia
1
2
2. Rimuovere il 1° filtro FILTRETETM(di colore
bianco)
3. Rimuovere il portafiltro sede del filtro antibatterico sganciandolo dalla griglia esterna.
griglia di aspirazione
filtro
filtro
filtrete
tm
FX180eco 16-05-2002 14:53 Pagina 17
Page 18

18
Se qualcosa non funziona…
PROBLEMI CAUSE RIMEDI
Il climatizzatore non
funziona
• manca la corrente
• la spina non è inserita
• il ventilatore è bloccato
•è intervenuto il galleggiante di sicurezza
• ripristinare
• inserire la spina
• chiamare il Centro Assistenza
• vuotare la vaschetta
Il climatizzatore funziona solo per poco
tempo
• il tubo di scarico forma una strozzatura
• il tubo di scarico è ostruito
• il tubo di scarico presenta delle pieghe
• posizionare correttamente il
tubo di scarico
• vedere se vi sono degli ostacoli
che impediscono lo scarico
dell’aria all’esterno
• eliminare le pieghe
Il climatizzatore funziona ma non rinfresca la stanza
• finestra aperta
• nella stanza sta funzionando qualche fonte
di calore (bruciatore, lampada etc.) oppure
vi sono molte persone
• il tubo di scarico dell’aria è uscito dalla sua
sede
• filtri aria intasati
• il climatizzatore ha una potenzialità non adeguata alle condizioni o alle dimensioni dell’ambiente
• chiudere la finestra
• eliminare la fonte di calore
• inserire il tubo nella sede
• pulire i filtri o sostituirli
• pulire i filtri o sostituirli
Odore particolare
nella stanza
• filtri dell’ aria intasati
Perdita di condensa
dall’unità interna
del climatizzatore
• vaschetta raccolta condensa piena
• installazione errata dell’apparecchio
8
• vuotare la vaschetta e drenare
l’acqua attraverso il tubo di
drenaggio condensa
posto sulla parte posteriore dell’apparecchio
•Vedere pag. 8 per installare
l’apparecchio correttamente
9
Il climatizzatore non
funziona per circa 3
minuti dal riavvio
• interviene il dispositivo di sicurezza della macchina
• attendere che siano trascorsi 3
min.
Le tre spie lampeggiano
• bacinella raccolta condensa piena • vuotare la vaschetta.
• rimuovere la spina e reinserirla
• se le 3 spie continuano a lampeggiare, rivolgersi ad un Centro Assistenza
L’indicazione del
telecomando è
debole o inesistente
• batterie scariche
•probabile inserimento invertito delle batterie
• cambiare le batterie
• verificare i poli delle batterie
(+) e (-)
FX180eco 16-05-2002 14:53 Pagina 18
Page 19

19
ITALIANO
Garanzia/caratteristiche tecniche
ASSISTENZA TECNICA
Conservate l’elenco dei Centri Assistenza Tecnica
ed individuate il Centro più vicino a voi.
CONDIZIONI LIMITE
DI FUNZIONAMENTO
Temperatura nella stanza 21 ÷ 32°C
Temperatura esterna 21 ÷ 43°C
CARATTERISTICHE TECNICHE
Tensione di
alimentazione vedere targa caratteristiche
Potenza max. assorbita
in condizionamento “
Potenza max. assorbita
in deumidificazione “
Potenza frigorifera* “
Dimensioni unità interna:
• larghezza 452 mm
•altezza 800 mm
•profondità 455 mm
• peso 33,5 kg
*Condizioni standard:
Temperatura interna 27°C
47% umidità relativa
Temperatura esterna 35°C
41% umidità relativa
FX180eco 16-05-2002 14:53 Pagina 19
Page 20
20
During the summer, optimum comfort is achieved with a temperature of between 24 and 27˚C
and about 50% relative humidity.
An air conditioner removes moisture and heat from the room where it is located. One advantage
of portable air conditioning units over fitted models is that they can be moved from one room to
another in the home or even transferred
between different buildings.
The hot air in your room is passed
through a coil cooled by refrigerant gas, losing excess heat
and moisture before being
discharged again into the
room.
In single unit models (Pinguino), a small part of this
air is used to cool the refrigerant gas before, hot
and moist, being discharged outside.
In suitcase models (SuperPinguino), the circuit is cooled using the air outside.
Each Pinguino and SuperPinguino can also be used as a
fan only.
For more details, contact or visit our
Internet site
www.delonghi.it
What is Pinguino Pinguino and SuperPinguino
FX180eco 16-05-2002 14:53 Pagina 20
Page 21
21
ENGLISH
Important Safe-guards
• This appliance has been manufactured to
cool and de-humidify domestic environments and should not be used for other
purposes.
• It is dangerous to alter or modify the unit's
characteristics in any way.
• The appliance must be installed in conformity with the relevant national legislation.
• Should repairs be necessary, contact the
nearest authorised Repair Service Centre.
Unauthorised servicing can be dangerous.
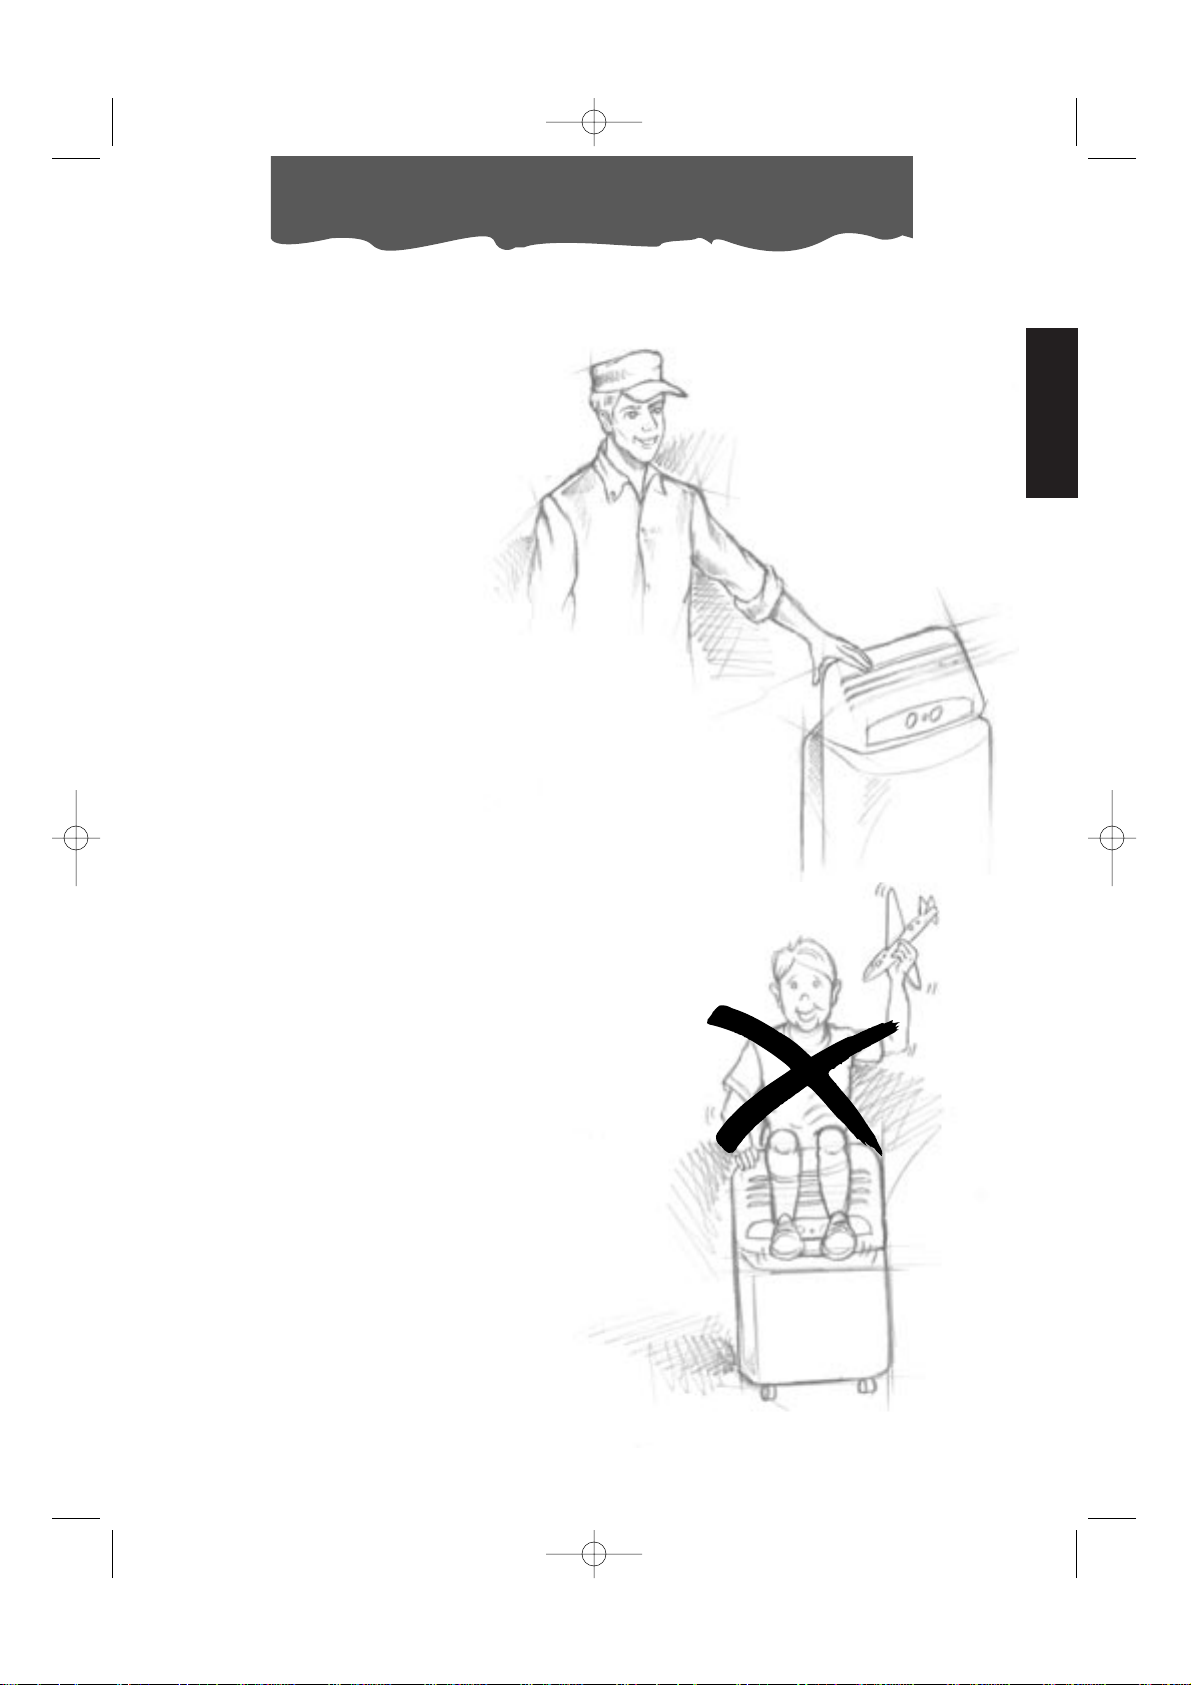
• This appliance is to be used by adults only;
keep children away from it.
• Always ground the appliance. Have the
electrical system checked by a qualified
electrician.
•Avoid using extension leads with the unit.
• Before cleaning or maintenance operations, always unplug the unit from the
socket.
•Do not pull on or place strain on the power
cable when moving the appliance.
• In the case that the power cable becomes damaged, this must be substituted
only by specialised personnel authorised
by the manufacturer.
• The appliance should not be installed
where the atmosphere may contain combustible gases, oil or sulphur, or near heat
sources.
• Do not rest hot or heavy objects onto the
appliance.
• Clean the filters at least once a week.
•Avoid using heaters near the unit.
• If it is not possible to transport the appliance in an upright position, then either lay it
on its side.
• Before transporting the unit drain the condensation collecting-tray and basin. After
transportation, wait at least 1 hour before
switching on the unit.
• The packaging materials can be recycled.
You are therefore recommended to place
them in the special containers for differentiated waste collection.
FX180eco 16-05-2002 14:53 Pagina 21
Page 22
22
The following instructions will help you set up your air conditioning unit as efficiently as possible.
AIR CONDITIONING WITHOUT INSTALLATION
With just a few simple operations, Pinguino will
restore comfortable conditions in your room:
• Fix the air outlet tube to the coupling
on the back of the unit as shown in figu-
re A.
5
17
•With a double casement window, use the
suckers provided to hold the two halves of the window together (fig. C).
19
• Fix the window attachment to the end
of the tube .
• Place the unit near a window or a French
window.
• Open the window or French window slightly and place the window attachment
as shown in figure B.
18
18
17
A
Setting up
B
FX180eco 16-05-2002 14:53 Pagina 22
1
2
Page 23
23
ENGLISH
Setting up
AIR CONDITIONING WITH INSTALLATION
Pinguino can also be semi-permanently
installed
• Fit the flange supplied to the hole.
• Fix the tube to the coupling on the
back of the unit (figure A).
• Attach the end of the tube to the flange as shown in the figure E.
16
17
17
16
To install, proceed as follows:
• Make a hole in a wall communicating with
the outside or through the pane of a window. Respect the height and dimensions
given in figure D
When the tube is not attached, close the
hole with the bung on the flange .
NOTE:
When the unit is installed semi-permanently,
we recommend leaving a door slightly open
(1 cm is enough) to ensure an adequate
exchange of air.
16
17
in a window
pane
in the wall: for
optimum results,
insulate the section of the wall
with suitable
insu-lating
material.
in the
wood sill of
a window
D
DEHUMIDIFICATION
Position the appliance in the room without
inserting the tube; in this way the dehumidified air will exhaust directly into the room.
FX180eco 16-05-2002 14:53 Pagina 23
0 cm
30 cm
MAX115 cm
MIN 50 cm
Page 24

24
Description of the remote control/
Electrical connection
THE DISPLAY
Once the air-conditioner is turned on, all the
symbols will be shown.
When the appliance is turned off, only the
clock will remain visible.
A. Beep
Display of beef and start of the air-conditioner; it also activates every time an operation is carried out.
B. Symbols
Air-conditioning, dehumidifying, ventilation, heating (only on some models), Full
Auto.
C. Room temperature
Shows the room temperature.
D. Fan speed
Shows the various speeds: minimum,
medium, maximum, automatic and silent.
E. On/Off Timer
Shows the times programmed for turning
the appliance on and off.
F. Sleep/Silent Timer
Shows the function and the desired operating time, with the sleep function
G. Battery-replacement indicator
H. Air purification
The symbol remains on permanently
because when appliance is on, air is continuously filtered of impurities.
I. Set temperature
Shows the temperature set.
J. Clock
Shows the time.
2
BUTTONS
K. On / Off
L. MODE: Function selecting
This button selects the various functions:
air-conditioning, dehumidifying, Ventilation/Purification, Heating (only on some
models) and Full Auto
M. Room thermostat
These two buttons select the desired room
temperature.
N. Room temperature display
Gives you the current room temperature.
After about four (4) seconds, the display
will show the temperature set previously.
O. Fan speed
Determines fan speed: minimum, medium,
maximum, automatic and silent.
P. SET: Clock and timer verification
Confirms the setting of the clock and the
ON/OFF timer.
Q. ON/OFF: programmazione timer
I tasti programmano lo spegnimento e
l’accensione del climatizzatore.
R. CANCEL: Timer
Cancels the setting on the ON/OFF timer.
S. RESET
T. ON / OFF: Timer programming
These buttons program the turning on and
off of the air-conditioner.
U. Sleep
This button controls the night-time opera-
tions.
ELECTRICAL CONNECTION
Before plugging in check that:
• the mains supply corresponds to the value shown in the specifications table;
• the socket and the mains lead correspond to the power requirements of the appliance;
• the socket is suited to the plug , otherwise have the socket replaced;
• the socket is properly grounded. The manufactures cannot be held responsible for any dama-
ges due to failure in following normal safety procedures.
If when selecting the air-conditioning function while concurrently there would be a decrease in
the voltage of the electrical current, a security device could intervene. This blocks the functioning
of the refrigerator circuit, in a way that the appliance operates as if it were in the ventilation/purification mode. In order to restore the air-conditioning function, you must turn off the appliance
and remove the plug from the outlet for at least thirty seconds. Then plug it back in.
10
Replacement of the power cable must be carried out by qualified personnel.
FX180eco 16-05-2002 14:53 Pagina 24
Page 25
25
ENGLISH
Warning lights/
Forced operations
THE LEDS
Led displays come on depending on the selected function or as warning of possible anomalies.
ANOMALY
RED LIGHT
11
YELLOW LIGHT
12
GREEN LIGHT
13
DIRTY FILTERS (1)
- blinking -
ALARM
blinking blinking blinking
FUNZIONE
RED LIGHT
11
YELLOW LIGHT
12
GREEN LIGHT
13
OFF
---
AIR-CONDITIONING
--on
DEHUMIDIFYING
on - on
PURIFYING
- on -
FULL AUTO
TIMER
As soon as this function is selected, all LED displays will remain on for some seconds until the control
unit selects which mode to function in (whether air-conditioning, dehumidifier, fan or heater).
All 3 LEDs remain on when machine is off, if at least one TIMER function is selected.
(1) A flashing LED indicator means that the anti-bacterial filters need cleaning. To switch off the
LED indicator, after having cleaned the filters, press the manual function button until a
beep followed by a double-beep is heard. This procedure can be carried out also while the
unit is operating.
14
FORCED OPERATIONS
This is a way of operating to be selected if there are problems with the remote control (broken or
lost, or the batteries run-down).
Push the button to start the unit and then press it again to get the sequence of the different
operational procedures (air-conditioning, dehumidifying, ventilation, full auto, turn off) with an
automatic setting.
14
FX180eco 16-05-2002 14:53 Pagina 25
Page 26
26
Description of the remote control
REMOTE CONTROL
Inserting the batteries
• Slide the cover as shown in figure.
• Insert two new non-rechargeable batteries, being careful to place them in the
correct positions (+) and (-).
• Put the cover back on, letting it slide into its
original position.
• The Display will show all of the remote control's symbols for several seconds.
At this point the clock on the display will start
to blink showing 12:00 o'clock; at this point
set the correct time.
Note: WE SUGGEST USING ALKALINE BATTE-
RIES.
If the remote control is to be replaced or
thrown away, the batteries must be removed and disposed of in accordance with
the current laws as it represents an environmental hazard.
SETTING THE CLOCK
• If the time is not set within two minutes of
the reset or of battery replacement, the
remote control will automatically read
12:00.
•To programme the hour, push the
keys to move ahead or back. The segments are of one minute.
If you hold the buttons down, the minute
designations will run more quickly.
• The clock will continue to blink. Push the
SET button to confirm the time set: the
clock will then stop blinking.
• If you have to adjust the time, you must
push the RESET button and then enter the
correct time. (There is no other way to do
this).
PROPER USE
• Point the remote control toward the airconditioner’s signal receiver .
• Maximum distance: about seven (7)
metres (without any obstacle between
remote control and receiver).
• The remote control must be handled with
great care: do not drop it, expose it to
direct sunlight, or leave it close to heat
sources.
10
MODE
MODE
FX180eco 16-05-2002 14:53 Pagina 26
Page 27
27
ENGLISH
Selecting functions
AIR-CONDITIONING FUNCTION
This operation is ideal on especially hot days.
•First press the button to tur n the appliance on. A beep will
indicate that the air-conditioner has turned on, and the symbol will begin to blink.
• Now press the MODE button until the air-conditioning symbol
appears on the display.
• At this point, set the temperature: to lower it, press the button.
•To select the fan speed, simply press the button repeatedly
until you obtain the speed desired (minimum, medium, maximum, automatic and silent).
Note:
In air conditioning mode, the appliance automatically removes
excess humidity from the atmosphere.
DEHUMIDIFYING FUNCTION
It is a good idea to activate this operation when there is high humidity.
•First press the button to tur n the appliance on. A beep will
indicate that the air-conditioner has turned on and the symbol will begin to blink.
• Now press the MODE button until the dehumidifying symbol
appears on the display.
• Rememeber that the set temperature must be lower than the
room temperature by pressing the button.
•To select the fan speed, simply press the button until you
get the desired speed.
Remember that the fan speed can be choosed automatically
by the appliance, depending on the room and the selected
temperature.
FX180eco 16-05-2002 14:53 Pagina 27
Page 28
28
Selecting functions
VENTILATION FUNCTION/PURIFICATION
On humid but not particularly hot days, it may be sufficient to operate the appliance in ventilation/purification mode.
•Press the button. A beep will indicate that the air-conditioner
has turned on, and the symbol will begin to blink.
• Now press the MODE button until the ventilation symbol
appears on the display.
• Once the ventilation has been activated, press the button
repeatedly until you get the desired fan speed (min, med, max,
auto,silent).
It should be pointed out that when the automatic ventilation functions are activated, the appliance itself will choose the proper
speed.
FULL AUTO FUNCTION
FULL AUTO automatically activates the air-conditioner, including
the temperature, fan speed thus assuring the best possible conditions for the room.
•Press the button. A beep will indicate that the air-conditioner
has turned on, and the symbol will begin to blink. .
• Now use the MODE button until the FULL AUTO symbol appears
on the display.
The appliance will automatically establish the optimum mode (air
conditioning, dehumidification, ventilation) and speed.
FX180eco 16-05-2002 14:53 Pagina 28
Page 29
29
ENGLISH
Selecting functions
AUTOMATIC SLEEP FUNCTION
Ideal for those wanting a peaceful night’s sleep in a perfectly air
conditioned room.
•Press the button to start the appliance.
•A beep will indicate that the air-conditioner has turned on, and
the symbol will begin to blink.
• Now use the MODE button until you get the symbol for the function you want.
• Next select the desired temperature by pushing the buttons.
• Now press the to set up the night-time function: the symbol will appear. By pushing the button repeatedly until you
get the number of hours you want (from 1 to 7), you will set the
time for the appliance to switch off.
In this function, the fan functions automatically.
N.B:The night-time function makes it possible to keep a room at a per fect temperatu-
re, thus preventing an excessive rise or a drop in temperature while the silent operation is in effect. The air-flow will decrease, while the room temperature will vary
gradually to provide the ideal condition: the temperature will increase by 2° C.
after 60 minutes and by 2° C. after two hour.
PROGRAMMING THE TIMER
Programming the ON function
With the air-conditioner already running, press the ON button: the
ON TIME symbol will start blinking and the clock will read 12:00.
Remember that the timer turns the air-conditioner on, thereby resetting all the functions and procedures operating before the appliance was last turned off.
• If the programming is the one you want, simply press the
button.
• The increase or decrease will be in ten-minute (10-minute) segments for each press of the button, whereas if you hold the button down the time will change more quickly.
• The ON TIME marking will continue to blink. By pressing down on
the SET button again, you will get confirmation of the time set for
the appliance to turn on.
•To cancel the programming, push the ON button: the ON TIME
marking will blink while showing the turn-on time.
• At this point, use the CANCEL button: the clock will show the correct time at that moment.
Programming the turn-off function
The procedure for programming the turn-off and cancellation operations is similar to the one just described: the only difference is that
you must push the OFF instead of the ON button.
FX180eco 16-05-2002 14:53 Pagina 29
°C
HR
Page 30
30
Recommendations
Follow these recommendations to achieve
maximum efficiency from your air conditioning unit:
• Close the doors and windows in the room
where the unit is functioning. The only
exception is in the case of installation through a hole in the wall. In this case, you are
recommended to allow a small amount of
air to enter through a door or window to
guarantee an adequate exchange of air.
•Protect the room from direct exposure to
the sun’s rays by drawing the curtains
and/or partially lowering the blinds so as
to maximise energy savings.
• Do not rest objects on the air conditioning
unit.
• Do not obstruct the air intake or outlet
.
• Make sure there are no heat sources in the
room.
1
7
• Do not install the heater in humid environments.
• Do not use the appliance outdoors.
• Keep the appliance a safe distance from
combustible surfaces
close doors and windows
lower the blinds or draw the curtains
do not cover
• Make sure the unit is located on a level
floor. If necessary, place the two blocking
devices under the front wheels .
320
FX180eco 16-05-2002 14:53 Pagina 30
Page 31

31
ENGLISH
Before cleaning or maintenance, always turn the
unit off and unplug from the mains.
CLEANING THE EXTERNAL UNIT
We recommend cleaning the unit with a slightly damp cloth then drying with a dry cloth.
For safety reasons, do not wash the air conditioner with water.
Precautions
Never clean with benzene, alcohol or solvents. Never spray liquid insecticide or similar.
CLEANING THE AIR FILTERS.
To maintain the air conditioning unit at peak
efficiency, you are recommended to:
1. Clean the anti-bacteria filter weekly.
2. Replace the FILTRETE™ filter at the end of
each season or when spent (follow the
instructions on the unit near the filter).
The air purification filters are located behind the
two intake grilles. The grilles in fact house the filters themselves.
To clean the filters:
1.Remove the intake grilles by rotating them
outwards (Fig. F).
To remove dust deposited on the anti-bacteria filter, use a vacuum cleaner. If very dirty,
rinse repeatedly in warm water at a temperature of not more than 40°C.
After washing, dry the filter. To replace, put
the filters back into the filter holder, then hook
the latter to the unit.
Do not clean the FILTRETE™ filter as this
would reduce its filtering capacity.
END OF SEASON OPERATIONS
Take out the condensation basin located in
the rear of the unit and empty it.
Empty the residual water by removing the
bung in the drainage tube.
After replacing the bung, put the condensation basin back.
Clean the filters and dry well before replacing.
.
BEGIN OF SEASON CHECKS
Check that the power cable and socket are
undamaged and that the earth installation is
efficient.
fig. F
Cleaning
1
2
2.Remove the first FILTRETE™ filter (white).
3.Remove the filter holder holding the filter by
unhooking it from the external grille.
intake grille
filter
filtrete™
filter
FX180eco 16-05-2002 14:53 Pagina 31
Page 32

32
Troubleshooting
PROBLEMS CAUSES SOLUTIONS
The air conditioner
doesn’t work
• the power is off
•
the plug is not inserted into the electrical outlet
• the fan is blocked
• the security float was triggered
• plug in the appliance
• call the Service Centre
• empty the basin
The air conditioner
works for a short
time only
• the exhaust tube is twisted
• the exhaust tube is blocked
• the drain tube is bent
• position exhaust tube correctly
• check if there are obstacles
blocking the exhaust of air out
of the appliance
• unbend the tube
The air conditioner
works but doesn’t
cool the room
•a window is open
•in the room there is some source of heat
(lamp, burner, etc.) or there are many people in the room
• the exhaust tube has come out of place
• the air filter is dirty
• the air conditioner has a capacity not adequate for the conditions or the ldimensions of
the room
• close the open window
•remove the heat source
•reinsert the tube into its place
• clean the filter or replace
• clean the filter or replace it
Strange odour in the
room
• air filters dirty
Leaking condensation from the unit
around of the conditioner
• condensation collection basin is full
• incorrect installation of the appliance
8
• empty the basin and drain the
water with the drainage tube
found on the back side of
the appliance
• see page 22 to properly install
the appliance
9
The air conditioner
doesn’t work for
about 3 minutes
from turning on the
appliance
• the appliance’s security system has intervened
• wait for 3 minutes
The 3 LED indicators
are flashing
• Condensation collecting-basin is full • empty out the basin.
•remove the plug and reinsert,
If LEDs remain on, call the
Qualified Service
Remote control
signals are weak or
inexistent
• Batteries run down
• Batteries may be inserted incorrectly
• Change the batteries
• Check the batteries’ (+) and (-)
poles
FX180eco 16-05-2002 14:53 Pagina 32
Page 33

33
ENGLISH
Technical specification
RECOMMENDED OPERATING CONDITIONS
Room temperature 21 ÷ 32°C
Outside temperature 21 ÷ 43°C
TECHNICAL SPECIFICATION
Power supply see rating plate
Max. absorbed power
in air conditioning “
Max. absorbed power
when dehumidifying “
Refrigerating capacity* “
Dimensions of internal unit:
• width 452 mm
• height 800 mm
• depth 455 mm
• weight 33,5 kg
* Standard conditions:
Room temperature 27°C
47% relative humidity
Outside temperature 35°C
41% relative humidity
ELECTRICAL CONNECTION (U.K. ONLY)
A) If your appliance comes fitted with a plug, it will incorporate a 13 Amp fuse. If it does not fit your socket, the plug should
be cut off from the mains lead, and on appropriate plug fitted, as below. warning: Ver y carefully dispose of the cut off
plug after removing the fuse: do not insert in a 13 Amp socket elsewhere in the house as this could cause a shock hazard.
With alternative plugs not incorporating a fuse, the circuit must be protected by a 15 Amp fuse. If the plug is a mouldedon type, the fuse cover must be re-fitted when changing the fuse using a 13 Amp Asta approved fuse to BS 1362. In the
event of losing the fuse cover, the plug must NOT be used until a replacement fuse cover can be obtained from your nearest electrical dealer. The colour of the correct replacement fuse cover is that as marked on the base of the plug.
B) If your appliance is not fitted with a plug, please follow the instructins provided below:
WARNING - THIS APPLIANCE MUST BE EARTHED
IMPORTANT
The wires in the mains lead are coloured in accordance with
the following code:
Green and yellow Earth
Blue Neutral
Brown Live
As the colours of the wires in the mains lead may not correspond with the coloured markings identifying the terminals
in your plug, proceed as follows:
The green and yellow wire must be connected to the terminal in the plug marked with the letter E or the earth symbol
or coloured green or green and yellow.
The blue wire must be connected to the terminal marked with
the letter N or coloured black.
The brown wire must be connected to the terminal marked
with the letter L or coloured red.
N
E
L
FX180eco 16-05-2002 14:53 Pagina 33
Page 34

34
Le climatiseur portable Pinguino
Pendant les mois d’été, les conditions de bien-être sont atteintes avec une température com-
prise entre 24°C et 27°C et avec une humidité relative d’environ 50%.
Le climatiseur est un appareil qui enlève l’humidité et la chaleur de la pièce dans laquelle il est
placé. Par rapport aux modèles à installation fixe, les climatiseurs portables présentent l’avantage de pouvoir être non seulement déplacés d’une pièce à l’autre d’une maison mais aussi transportés d’un édifice à un autre.
L’air chaud de votre pièce passe, sous l’effet du gaz réfrigérant, à travers une
batterie de refroidissement où il
cède la chaleur et l’humidité en
excès avant d’être réintroduit
dans la pièce.
Dans les modèles monobloc
(Pinguino), une petite partie
de cet air est utilisée pour
refroidir le gaz réfrigérant;
ensuite, devenue chaude
et humide, elle est évacuée vers l’extérieur.
Dans les modèles avec
unité extérieure (SuperPinguino) le circuit se refroidit
en exploitant l’air extérieur.
Tous les climatiseurs Pinguino
et SuperPinguino peuvent
être également utilisés en
mode seulement ventilation.
Pour tous renseignements complémentaires, vous pouvez contacter
notre site Internet:
www.delonghi.it
FX180eco 16-05-2002 14:53 Pagina 34
Page 35

35
FRANÇAIS
Avertissements
• Cet appareil a été conçu pour la climatisation
des locaux domestiques et il ne doit pas être
destiné à d'autres usages.
• Il est dangereux de modifier ou altérer de n'importe quelle façon les caractéristiques de l'appareil.
• L'appareil doit être installé selon les normes en
vigueur dans le pays d'installation.
• Pour les éventuelles réparations, adressez-vous
toujours et exclusivement aux Centres de Service
Après-V ente agréés par la Firme de construction.
Les réparations effectuées par un personnel non
qualifié peuvent être dangereuses.
• Cet appareil doit être exclusivement utilisé par
des adultes: ne pas laisser des enfants jouer
avec le climatiseur.
• Cet appareil doit être relié à une efficace installation de mise à la terre. Faites contrôler l'installation électrique par un électricien qualifié.
• Evitez d'utiliser des rallonges pour le cordon d'alimentation électrique.
• Si le cordon d’alimentation est abîmé, il devra
être remplacé exclusivement par un personnel
spécialisé agréé par le Fabricant.
•Avant toute opération de nettoyage ou d'entretien, débranchez toujours la fiche de la prise
de courant.
• Ne tirez pas sur le cordon d'alimentation électrique pour déplacer l'appareil.
• N'installez pas l'appareil dans des locaux où l'air
peut contenir du gaz, de l'huile, du soufre ou
tout près de sources de chaleur.
• Ne déposez pas d'objets lourds ou chauds sur
l'appareil.
• Nettoyez les filtres anti-bactéries au moins une
fois par semaine.
• Evitez d'utiliser des appareils de chauffage tout
près du climatiseur.
• En cas de transport, l'appareil doit resté en position verticale ou être déposé sur un côté.
Avant le transport, veillez à vider la cuvette
recueillant l’eau de condensation ainsi que la
bassine. Après un transport, attendez au moins
1 heure avant de mettre l'appareil en marche.
• Les matériaux utilisés pour l'emballage sont
recyclables. Il est conseillé, par conséquent, de
les déposer dans les conteneurs spéciaux pour
le recyclage de ce type de déchets.
FX180eco 16-05-2002 14:53 Pagina 35
Page 36

36
Vous trouverez ci-après toutes les indications nécessaires pour préparer de manière optimale le
fonctionnement de votre nouveau climatiseur.
CLIMATISATION SANS INSTALLATION
Il suffit de quelques simples opérations et Pinguino vous garantira les conditions de bienêtre souhaitées:
• Fixez le tuyau d’évacuation de l'air
dans le logement prévu à cet effet sur la
partie arrière de l’appareil, en l’insérant
comme illustré à la figure A.
5
17
• Si vous avez une fenêtre à double battant,
utilisez les ventouses fournies avec l’appareil pour maintenir les vitres légèrement
entrouvertes (fig. C).
19
• Appliquez à l’extrémité du tuyau l’embout pour fenêtre .
• Approchez le climatiseur près d’une fenêtre ou d’une porte-fenêtre
• Entrebâillez légèrement la fenêtre ou la
porte-fenêtre et positionnez l’embout
comme illustré à la figure B.
18
18
17
A
Opérations préliminaires avant l’utilisation
B
C
FX180eco 16-05-2002 14:53 Pagina 36
2
1
Page 37

37
FRANÇAIS
Opérations préliminaires avant l’utilisation
CLIMATISATION AVEC INSTALLATION
Si vous le souhaitez, Pinguino peut être aussi
installé de manière semi-permanente.
• Appliquez dans le trou l’accessoire bride
fourni avec l’appareil.
• Fixez le tuyau dans le logement prévu
à cet effet sur la partie arrière de l’appareil (fig. A ).
4. Appliquez l’extrémité du tuyau à la
bride comme illustré à la fig. E.
16
17
17
16
Dans ce cas, vous devrez accomplir les opérations suivantes:
• Percez un trou dans un mur communicant
avec l’extérieur ou bien à travers la vitre
d’une fenêtre. Respectez la mesure de la
hauteur et les dimensions du trou indiquées dans la figure D.
Chaque fois que le tuyau n’est pas raccordé, il est conseillé de boucher le trou au
moyen du bouchon de la bride .
REMARQUE:
Dans le cas d’une installation semi-permanente, nous vous conseillons de laisser une
porte légèrement entrouverte (il suffit même
d’1 cm) afin de garantir un renouvellement
suffisant de l’air dans la pièce.
16
17
dans la vitre
de la fenêtre
dans le mur,
nous vous conseillons d’isoler
la section du
mur avec un
matériau isolant
approprié.
dans le
socle en
bois de la
porte-fenêtre
D
E
DESHUMIDIFCATION
Positionnez l'appareil dans la pièce sans insérer le tuyau; de cette manière l'air déshumidifié sera diffusé directement dans la pièce.
CHAUFFAGE
Positionnez l'appareil dans la pièce en insérant le bouchon à la place du tuyau
1721
FX180eco 16-05-2002 14:53 Pagina 37
0 cm
30 cm
MAX115 cm
MIN 50 cm
Page 38

38
Description de la telecommande/
Branchement electrique
BRANCHEMENT ELECTRIQUE
Avant de brancher la fiche à la prise de courant, vérifiez que:
• la tension du secteur corresponde bien à la tension indiquée dans les caractéristiques techniques;
• la prise et la ligne d'alimentation électrique soient dimensionnées pour la charge de l'appareil;
• la prise soit appropriée à la fiche de l'appareil; en cas d'incompatibilité, faites remplacer la
prise;
• la prise soit reliée à une installation de mise à la terre efficace. La firme constructrice décline
toute responsabilité en cas de non respect de cette norme pour la prévention des accidents.
Si on sélectionne la fonction de Climatisation au moment où se produit une chute de tension du
courant électrique, il est possible qu’un dispositif de sécurité intervienne. Celui-ci interrompt le
fonctionnement du circuit frigorifique et l’appareil fonctionne, par conséquent, comme s’il se
trouvait en mode Ventilation/Purification. Pour rétablir la fonction de Climatisation, on doit éteindre l'appareil et débrancher la fiche de la prise de courant pendant au moins trente secondes.
On rebranche ensuite la fiche.
10
L’AFFICHEUR
Lors de la mise en marche du climatiseur, tous
les symboles sont allumés.
Au moment de son arrêt, seule l’horloge reste
allumée.
A. Bip
Visualise le signal sonore et la mise en marche du climatiseur; il est en outre activé
chaque fois que l’on accomplit une opération.
B. Symboles des différentes fonctions
Climatisation, déshumidification, ventilation, chauffage (seulement sur certains
modèles), Full Auto.
C. Température ambiante.
Visualise la température ambiante.
D. Vitesse du ventilateur.
Visualise les différentes vitesses: petite,
moyenne, grande, automatique et silence.
E. Minuterie marche/arrêt
Visualise les horairs de marche et arrêt
programmés.
F. Minuterie sleep/auto
Visualise les heures de fonctionnement
souhaitées pour un fonctionnement avec
le ventilateur sur la position Silence.
G. Indicateur de piles à changer
H. Purification de l’air.
Le symbole reste toujours allumé étant
donné que lorsque le climatiseur est
allumé l’air est toujours filtré des impuretés.
I. Température réglée.
Visualise la température réglée.
J. L’horloge
Visualise l’heure.
2
LES TOUCHES
K. Mise en marche/arrêt
L. MODE: sélection fonction
En appuyant sur cette touche, on sélectionne les différents modes de fonctionnement: climatisation, ventilation/purification, chauffage (seulement sur certains
modèles), et Full Auto.
M. Thermostat d’ambiance
Ces deux touches sélectionnent la température souhaitée dans la pièce
N. Visualisation température ambiante
Cette touche visualise la température présente dans la pièce. Après 4 secondes
environ, elle affichera la température
réglée précédemment.
O. Sélection vitesse du ventilateur
Cette touche sélectionne la vitesse du
ventilateur: petite, moyenne, grande et
automatique.
P. SET: confirme horloge ou minuterie
Cette touche confirme la programmation
de l’horloge ou de la minuterie ON/OFF.
Q. ON/OFF: programmation minuterie
Ces touches programment l’arrêt et la
mise en marche du climatiseur.
R. CANCEL: annulation minuterie
Cette touche annule les réglages de la
minuterie ON/OFF.
S. RESET
T. Programmation horloge ou minuterie
Ces touches programment les heures et
minutes de l’horloge et de la minuterie.
U. Sleep
Cette touche sélectionne la fonction de
nuit.
En cas de remplacement du câble d’alimentation, mettez-vouz en contact avec du personnel
spécialisé.
FX180eco 16-05-2002 14:53 Pagina 38
Page 39

39
FRANÇAIS
Les vo yants lumineux/
Fonctionnement forcé
LES VOYANTS LUMINEUX
Les voyants lumineux s’allument pour indiquer la fonction sélectionnée ou pour signaler les
éventuelles anomalies.
PANNE
VOYANT ROUGE
11
VOYANT JAUNE
12
VOYANT VERT
13
FILTRES SALES (1)
- clignotant -
ALARME
clignotant clignotant clignotant
FONCTION
VOYANT ROUGE
11
VOYANT JAUNE
12
VOYANT VERT
13
ETEINT
---
CLIMATISATION
--allumé
DESHUMIDIFICATION
allumé - allumé
VENTILATION
- allumé -
FULL AUTO
TIMER
Dès que ce mode de fonctionnement est sélectionné, tous les voyants restent allumés pendant quelques secondes jusqu’au moment
où le dispositif de contrôle aura choisi le système de fonctionnement (climatisation, déshumidification, ventilation ou chauffage).
Les 3 voyants restent tous allumés si une des fonctions MINUTERIE est sélectionnée même si l’appareil est éteint.
(1) Le clignotement du voyant signale qu’il est nécessaire d’effectuer le nettoyage des filtres
anti-bactéries. Pour éteindre le voyant, après avoir effectué le nettoyage des filtres,
appuyez sur le bouton de fonctionnement manuel jusqu’au moment où vous enten-
drez un bip suivi par un double bip. Cette procédure peut être effectuée même lorsque
l’appareil est en marche.
14
FONCTIONNEMENT FORCE
Ce mode de fonctionnement est sélectionné en cas de problèmes avec la télécommande (cassée, égarée ou piles déchargées).
Appuyez sur le bouton pour mettre en marche l’appareil et appuyez à nouveau pour obtenir la séquence des différents modes de fonctionnement (climatisation, déshumidification, ventilation, full auto, éteint), avec réglage automatique.
14
FX180eco 16-05-2002 14:53 Pagina 39
Page 40

40
Description de la telecommande
LA TELECOMMANDE
Mise en place des piles
• Poussez vers l’avant le couvercle (voir fig.).
• Introduisez les deux nouvelles piles de type
non rechargeable, en veillant à les placer
dans la bonne direction (+) et (-).
•Tous les symboles de la télécommande
apparaîtront pendant quelques instants
sur l’afficheur.
L’horloge sur l’afficheur commencera alors à
clignoter signalant 12:00 heures. Réglez à présent l’heure exacte.
REMARQUE: NOUS VOUS CONSEILLONS D’UTILISER DE PREFERENCE DES PILES ALCALINES.
Aussi bien en cas d’élimination de la telecommande que de remplacement de la
batterie, celle-ci doit être enlevée et éliminée conformément aux lois en vigueur
étant donné qu’elle est nuisible pour l’environnement.
MISE A L’HEURE DE L’HORLOGE
• Si 2 minutes après le Reset (restauration)
ou le remplacement des piles l’heure n’a
pas été programmée, la télécommande
affiche automatiquement 12:00 heures.
• Pour programmer l’heure, appuyez sur les
touches pour augmenter ou diminuer. L’augmentation ou la diminution est
d’1 minute.
En maintenant les touches pressées, l’horloge défilera plus rapidement.
• L’horloge continuera à clignoter. Appuyez
sur le bouton SET pour confirmer l’heure
introduite: l’horloge ne clignotera plus.
• Pour modifier l’heure, appuyez sur le bouton RESET et introduisez l’heure actuelle.
(C’est le seul procédé).
UTILISATION CORRECTE
• Dirigez la télécommande vers le récepteur
de signal du climatiseur d’air .
• Distance maximale: environ 7 mètres (sans
aucun obstacle entre la télécommande
et le récepteur).
• La télécommande doit être manipulée
avec beaucoup de précaution: ne pas la
laisser tomber, ne pas l’exposer aux rayons
directs du soleil ni la placer à côté de sources de chaleur.
MODE
MODE
15
FX180eco 16-05-2002 14:53 Pagina 40
Page 41

41
FRANÇAIS
Sélection des fonctions
FONCTION CLIMATISATION
C’est la fonction idéale au cours des journées particulièrement
chaudes.
• Appuyez tout d’abord sur la touche de mise en marche.
• Un bip signalera la mise en marche du climatiseur et le symbole
clignotera sur l’afficheur.
•Sélectionnez ensuite la touche MODE jusqu’à ce que le symbole
de climatisation apparaisse sur l’afficheur.
•Introduisez à présent la température: pour la diminuer, appuyez
sur la touche .
• Pour sélectionner la vitesse du ventilateur , il suffit d’appuyer à plusieurs reprises sur la touche jusqu’à ce que la ventilation
souhaitée (petite, moyenne, grande, automatique) soit atteinte.
Rémarque:
En mode Climatisation, l'appareil enlève automatiquement l’humidité en excès dans la pièce.
FONCTION DESHUMIDIFICATION
Cette fonction doit être activée lorsque le degré d’humidité est
élevé.
• Appuyez tout d’abord sur la touche de mise en marche.
•Sélectionnez ensuite la touche MODE jusqu’à ce que le symbole
de déshumidification apparaisse sur l’afficheur.
• Il convient de préciser qu’il est important d’introduire une
température inférieure à la température ambiante. Appuyez sur
la touche .
Pour sélectionner la vitesse du ventilateur, il suffit d’appuyer sur la
touche jusqu’à ce que la ventilation souhaitée soit atteinte.
Il est à noter que, en fonction des conditions ambientes et de la
température selectionée, l’appareil peut choisir de façon automatique la vitesse du ventilateur
FX180eco 16-05-2002 14:53 Pagina 41
Page 42

42
Sélection des fonctions
FONCTION VENTILATION
Pendant les journées de temps lourd mais pas particulièrement
chaud, il suffit de sélectionner le mode Ventilation/Purification.
• Appuyez tout d’abord sur la touche de mise en marche.
• Un bip signalera la mise en marche du climatiseur et le symbole
clignotera sur l’afficheur.
• Sélectionnez ensuite la touche MODE jusqu’au moment où le
symbole ventilation apparaîtra sur l’afficheur.
• Une fois la ventilation activée, sélectionnez à plusieurs reprises la
touche afin d’obtenir la vitesse souhaitée (petite, moyenne,
grande, automatique, ventilation, silent).
Il est à noter que pour les fonctions avec ventilation automatique,
c’est l’appareil qui choisit la vitesse la plus appropriée.
FONCTION FULL AUTO
La fonction Full Auto commande automatiquement toutes les fonctions du climatiseur, y compris la température, la vitesse de ventilation , garantissant ainsi des conditions de bien-être optimales dans
la pièce.
• Appuyez tout d’abord sur la touche de mise en marche.
• Un bip signalera la mise en marche du climatiseur et le symbole
clignotera sur l’afficheur.
• Sélectionnez ensuite la touche MODE jusqu’à ce que le symbole FULL AUTO apparaisse sur l’afficheur.
L'appareil sélectionnera automatiquement le mode de fonctionnement (climatisation, déshumidification, ventilation) et la vitesse optimaux.
FX180eco 16-05-2002 14:53 Pagina 42
Page 43

FONCTION AUTOMATIQUE SLEEP
La fonction SLEEP peut être activée à tout moment.
• Appuyez tout d’abord sur la touche de mise en marche.
• Un bip signalera la mise en marche du climatiseur et le symbole
clignotera sur l’afficheur.
• Sélectionnez ensuite la touche MODE jusqu’à ce que le symbole de la fonction souhaitée apparaisse sur l’afficheur.
• Sélectionnez ensuite la température souhaitée en appuyant sur
les touches .
• Appuyez à présent sur la touche pour choisir la fonction nuit:
le symbole s’allumera. En appuyant à plusieurs reprises sur la
touche afin d’obtenir le nombre d’heures souhaitées (de 1 à
7), vous déciderez de l’heure d’arrêt du climatiseur.
Avec cette fonction, le ventilateur fonctionne en mode automatique.
N.B: La fonction nuit per met de maintenir la température optimale dans la pièce, évi-
tant une augmentation ou une diminution excessive de la température avec un
fonctionnement silencieux. Le flux d’air diminue, tandis que la température de la
pièce varie progressivement selon les exigences de bien-être: elle augmente de
1°C après 60 minutes et de 2°C après 2 heures.
PROGRAMMATION DE LA MINUTERIE
Programmation de la mise en marche
Avec le climatiseur allumé, appuyez sur la touche ON: le symbole
ON TIME commencera à clignoter et l’horloge indiquera 12:00 heures.
Il est à noter que la minuterie met le climatiseur en marche en rétablissant toutes les fonctions et les modes activés avant son dernier
arrêt.
•Si la programmation est celle souhaitée, il suffit d’appuyer sur la
touche SET.
• Pour augmenter l’horloge ou pour la diminuer, sélectionnez la
touche .
• L’augmentation ou la diminution sera de 10 minutes pour chaque pression des touches, tandis qu’en maintenant les touches
pressées, le défilement sera plus rapide.
• L’inscription ON TIME continuera à clignoter. En appuyant à nouveau sur la touche SET, vous confir merez le réglage de la minuterie pour la mise en marche.
• Pour annuler la programmation, appuyez sur la touche ON: le
symbole ON TIME clignotera en indiquant l’heure de mise en
marche.
•A ce point, sélectionnez la touche CANCEL: l’horloge indiquera
l’heure actuelle.
PROGRAMMATION ARRET
Le procédé de programmation pour l’arrêt et l’annulation est semblable au procédé précédent: la seule différence consiste à
appuyer sur la touche OFF au lieu de la touche ON.
43
FRANÇAIS
Sélection des fonctions
FX180eco 16-05-2002 14:53 Pagina 43
°C
HR
Page 44

44
Voici quelques conseils pratiques pour obtenir
un rendement optimal de votre climatiseur:
• fermez toutes les portes et les fenêtres de
la pièce à climatiser, sauf dans le cas
d’une installation à travers un trou percé
dans un mur. Dans ce cas, il est conseillé
de laisser un entrebâillement d’une porte
ou d’une fenêtre afin de garantir un bon
renouvellement de l'air dans la pièce.
• Pour garantir un fonctionnement extrêmement économique de votre climatiseur,
n’exposez pas la pièce aux rayons directs
du soleil, en fermant les rideaux et/ou en
baissant partiellement les stores.
• Ne déposez pas d’objets sur votre climatiseur.
• N’obstruez pas l’aspiration et le refoulement de l’air .
• Assurez-vous qu’il n’y ait pas de sources
de chaleur dans la pièce.
Conseils pratiques
Fermez les portes et les fenêtres
Baissez les stores ou fermez les rideaux.
Ne couvrez jamais l'appareil.
• Contrôlez que le climatiseur soit positionné
sur un sol “parfaitement plat”. Insérez
éventuellement les 2 cale-roulettes
sous les roulettes avant .
20
• Ne pas installer l’appareil dans des
endroits humides.
•Ne pas utiliser l’appareil à l’extérieur.
•Veillez à positionner l'appareil à une
distance appropriée par rapport aux surfaces combustibles.
7
1
3
FX180eco 16-05-2002 14:53 Pagina 44
Page 45

45
FRANÇAIS
grille d’aspiration
filtre
filtre
filtrete™
Avant d’ef fectuer toute opération de nettoyage
ou d’entretien, éteignez l'appareil et débranchez
toujours la fiche de la prise de courant.
NETTOYAGE DU MEUBLE EXTÉRIEUR
Nous vous conseillons de nettoyer l'appareil
avec un chiffon tout simplement humide et
de l’essuyer avec un chiffon sec. Pour des raisons de sécurité, ne nettoyez jamais le climatiseur avec de l’eau.
Précautions
N’utilisez jamais d’essence, d’alcool ou de
solvant pour le nettoyage. Ne vaporisez
jamais de liquide insecticide ou similaire..
NETTOYAGE DES FILTRES À AIR
Pour maintenir intacte toute l’efficacité de
votre climatiseur, nous vous conseillons de:
1. Nettoyer le filtre anti-bactéries chaque
semaine.
2. Remplacer le filtre FILTRETE™ à la fin de
chaque saison ou en tout cas quand il sera
épuisé (suivre les indications présentes sur
l'appareil près du logement du filtre).
Les filtres pour la purification de l’air se trouvent
en dessous des deux grilles d’aspiration. Les filtres
sont en fait logés dans les grilles mêmes.
Pour nettoyer les filtres il faudra donc:
1.Enlever les grilles d’aspiration, en les tournant vers l’extérieur.
3.Enlever le porte-filtre siège du filtre en le
décrochant de la grille extérieure.
Pour enlever la poussière qui s’est déposée
sur le filtre anti-bactéries, utilisez un aspirateur.
Si le filtre est très sale, plongez-le dans de
l’eau tiède et rincez-le plusieurs fois. La
température de l’eau doit être inférieure à
40°C.
Après l’avoir lavé, laissez-le sécher avant de
le remettre en place.
N’essayez pas de laver le filtre filtrete™ étant
que cela pourrait diminuer sa capacité de filtrage.
CONTRÔLES AU DÉBUT DE LA SAISON
Vérifiez que le cordon d’alimentation et la
prise soient parfaitement intacts et assurezvous que l’installation de la mise à la terre soit
efficace. Respectez scrupuleusement les normes d'installation.
OPERATIONS A LA FIN DE LA SAISON
Videz l’eau contenue dans la bassine de
stockage en enlevant le bouchon du tuyau
de drainage. Enlevez la cuvette recueillant
l’eau de condensation située sur la partie
arrière du climatiseur, videz-la et remettez-la
ensuite en place correctement. Nettoyez les
filtres et laissez-les sécher complètement
avant de les remettre en place.
fig. F
Entretien
1
2
2.Enlever le premier filtre FILTRETE™ (de couleur
blanche).
FX180eco 16-05-2002 14:53 Pagina 45
Page 46

46
Si l’appareil ne fonctionne pas normalement…
PROBLEMES CAUSES SOLUTIONS
Le climatiseur ne
fonctionne pas
• absence de courant
• la fiche n’est pas branchée
• le ventilateur est bloqué
• le flotteur de sécurité est intervenu
• attendre
• brancher la fiche
•
faire appel au service après-vente
• vider la cuvette
Le climatiseur ne
fonctionne que
pendant peu de
temps
• le tuyau d’évacuation a un étranglement
• le tuyau d’évacuation est obstrué
• le tuyau d’évacuation forme des plis
• déployer correctement le
tuyau d’évacuation
• vérifier s’il existe des obstacles
empêchant l’évacuation de
l’air à l’extérieur
• enlever les plis
Le climatiseur fonctionne mais ne
refroidit pas la
pièce
• fenêtre ouverte
•une source de chaleur (brûleur, lampe, etc.)
fonctionne dans la pièce ou bien il y a
beaucoup de monde dans la pièce
• le tuyau d’évacuation de l’air est sorti de son
logement
• filtres à air encrassés
• la puissance du climatiseur n’est pas appropriée aux conditions et aux dimensions de la
pièce
• fermer la fenêtre
• éliminer la source de chaleur
•remettre le tuyau en place
• nettoyer les filtres ou les remplacer
• nettoyer les filtres d’air ou les
remplacer
Odeur bizarre dans
la pièce
• filtres à air encrassés
Fuite d’eau de condensation du climatiseur
• cuvette stockage eau condensation
pleine
• mauvaise installation de l’appareil
• vider la cuvette et évacuer
l’eau à travers le tuyau de
drainage de l’eau de condensation situé sur la partie
arrière de l’unité.
•Vedere pag. 36 per installare
l’apparecchio correttamente
Le climatiseur ne fonctionne pas pendant 3
minutes environ après
la remise en marche
• le dispositif de sécurité de l’appareil intervient
• attendre que 3 min. se soient
écoulées
Les 3 voyants
clignotent
• cuvette stockage eau condensation pleine • vider la cuvette et évacuer l’eau.
• Enlever la prise et la remettre.
Si les voyants restent encore
allumés, faites appel au centre
de service Après-Vente.
L’affichage de la
télécommande est
faible ou absent
• piles déchargées
• les piles sont probablement mal positionnées
•remplacer les piles
• vérifier les pôles (+) et (-) des
piles
8
9
FX180eco 16-05-2002 14:53 Pagina 46
Page 47

47
FRANÇAIS
Caracteristiques téchniques
CARACTERISTIQUES TECHNIQUES
Tension
d'alimentation voir plaquette signalétique
Puissance max. absorbée
en climatisation “
Puissance max. absorbée
en deshumidification “
Puissance réfrigérante* “
Vitesses de ventilation 2
Volume air traité max. 310 m
3
/h
Dimensions :
• largeur 452 mm
•hauteur 800 mm
•profondeur 415 mm
• poids 33,5 kg
* Conditions standards:
Température interne: 27°C
47% Humidité relative
Température externe: 35°C
41% Humidité relative
CONDITIONS DE FONCTIONNEMENT
CONSEILLÉES
Température dans la pièce: . . . .21÷32°C
Température extérieure: . . . . . . .21÷43°C
FX180eco 16-05-2002 14:53 Pagina 47
Page 48

48
Im Sommer wird das Wohlbefinden bei einer Temperatur zwischen 24 und 27°C und einer relati-
ven Feuchte von etwa 50% erreicht.
Das Klimagerät ist eine Maschine, die dem Raum, in dem sie aufgestellt ist, Feuchtigkeit und
Wärme entzieht. Im Gegensatz zu den festinstallierten Modellen haben die tragbaren Klimageräte den Vorteil, daß sie von einem Raum in einen anderen umgestellt und von einem in ein anderes Gebäude befördert werden können.
Die warme Luft Ihres Raumes durchläuft
eine Batterie, die durch ein Kühlgas
gekühlt wird. Auf diese Weise gibt
sie übermäßige Wärme und Feuchtigkeit ab, bevor sie wieder in
den Raum zurückgeleitet wird.
Bei den einteiligen Modellen
(Pinguino) wird ein geringer
Teil dieser Luft verwendet,
um das Kühlgas zu kühlen,
die dann warm und feucht
geworden, nach außen
abgegeben wird.
Bei den Modellen mit zwei
Einheiten (SuperPinguino)
kühlt sich der Kreis mit Hilfe
der Außenluft.
Alle Pinguino und SuperPinguino können auch allein in
der Betriebsart Belüftung eingesetzt werden.
Für weitere Informationen und
Erläuterungen können Sie an unsere
Internet-Adresse wenden:
www.delonghi.it
Was sind Pinguino und SuperPinguino?
FX180eco 16-05-2002 14:53 Pagina 48
Page 49

49
DEUTSCH
• Dieses Gerät wurde ausschließlich als Haushaltsgerät zum Kühlen von Wohnräumen
entwickelt und darf nicht zweckentfremdet
werden.
• Eingriffe oder Änderungen, die die Betriebseigenschaften des Gerätes verändern,
stellen eine Gefahrenquelle dar.
• Das Gerät muß gemäß den inländischen
Vorschriften für den Anlagenbau installiert
werden.
• Eventuelle Reparaturen am Gerät dürfen
ausschließlich durch vom Händler autorisierte Kundendienststellen ausgeführt werden.
Reparaturen, die von Nichtfachleuten vorgenommen werden, können gefährlich
sein.
• Dieses Gerät dar f ausschließlich von Erwachsenen bedient werden. Verhindern Sie,
daß Kinder damit spielen.
• Das Gerät darf nur an eine einwandfrei
geerdete Steckdose angeschlossen werden. Lassen Sie im Zweifelsfall Ihre Hausstromversorgungsanlage von einem Elektriker überprüfen.
• Vermeiden Sie möglichst die Verwendung
von Verlängerungskabeln.
• Vor Beginn jeder Reinigungs- oder Wartungsarbeit stets den Netzstecker aus der Steckdose ziehen.
• Ziehen Sie zum Verstellen des Gerätes nicht
dirket am Netzkabel.
• Bei Beschädigung des Versorgungskabels
darf dieses ausschließlich von Personal
ausgewechselt werden, das hierzu vom
Hersteller autorisiert ist.
• Das Gerät nicht in der Nähe von Wärmequellen aufstellen oder in Räumen, wo die
Luft Gas, Schwefel oder Öl enthalten könnte.
• Stellen Sie keine schweren oder heißen
Gegenstände auf das Gerät.
• Reinigen Sie die Filter mindestens einmal
pro Woche.
• Verwenden Sie keine Heizungen in der
Nähe des Klimagerätes.
• Transportieren Sie das Gerät nur in vertikaler
Stellung bzw. auf eine Seite gelegt.
Entleeren Sie vor dem Transport den Kondenswasserbehälter und die Auffangschale. V or der erneuten Inbetriebsetzung nach
dem Transport, warten Sie mindestens 1
Stunde ab.
• Das Verpackungsmaterial kann recycelt
werden. Entsorgen Sie es daher in den entsprechenden Behältern für getrennte
Abfallsammlung.
Sicherheitshinweise
FX180eco 16-05-2002 14:53 Pagina 49
Page 50

50
Nachstehend finden Sie alle erforderlichen Hinweise, um den Betrieb Ihres Klimagerätes aufs Beste
vorzubereiten.
• Sollten Sie ein Fenster mit zwei Flügeln
haben, verwenden Sie die mitgelieferten
Saugköpfe , damit die Fenster angelehnt bleiben (Abb. C).
19
• Bringen Sie am Schlauchende die
Düse für Fenster an.
• Bringen Sie das Klimagerät in die Nähe
eines Fensters oder einer Balkontür.
•Öffnen Sie das Fenster bzw. die Balkontür
einen Spalt und positionieren Sie die Düse
wie auf Abbildung B dargestellt.
18
18
17
A
Vorbereitung für den Betrieb
B
C
KÜHLEN OHNE FESTINSTALLATION
Wenige, einfache Arbeitsgänge und Pinguino
bringt Ihnen Ihr Wohlbefinden zurück:
• Befestigen Sie den Luftablaßschlauch
in der entsprechenden Aufnahme ,
die sich auf der Geräterückseite befindet.
Führen Sie ihn so ein, wie auf Abbildung A
gezeigt.
5
17
FX180eco 16-05-2002 14:53 Pagina 50
1
2
Page 51

51
DEUTSCH
Vorbereitung für den Betrieb
KLIMATISIERUNG MIT FESTINSTALLATION
Wenn Sie es wünschen, kann Pinguino auch
zeitweilig festinstalliert werden.
•Bringen Sie den mitgelieferten Flansch
an der Öffnung an.
• Befestigen Sie den Schlauch in der
entsprechenden Aufnahme, die sich auf
der Geräterückseite befindet (Abb. A).
• Bringen Sie das Schlauchende am
Flansch an wie auf Abbildung E
gezeigt.
16
17
17
16
In diesem Fall gehen Sie wie folgt vor:
• Bohren Sie eine Öffnung in eine
Außenwand oder in die Scheibe eines
Fensters. Beachten Sie die auf Abbildung
D angegebenen Höhen und Abmessungen der Öffnung.
Wenn der Schlauch nicht angeschlossen
ist, kann die Öffnung mit dem Flanschstöpsel
verschlossen werden.
Hinweis:
Wenn Sie eine zeitweilige Festinstallation vornehmen, empfehlen wir Ihnen, eine Tür einen
Spalt offen zu lassen (1 cm genügt völlig),
damit der richtige Lauftaustausch gewährleistet ist.
16
17
In der Fensterscheibe
In der Wand: Wir
empfehlen Ihnen,
den Bereich der
Wand mit einem
geeigneten Isoliermaterial zu isolieren.
im Holzrahmen der
Balkontür
D
ENTFEUCHTEN
Stellen Sie das Gerät im Raum auf, ohne den
Schlauch anzuschließen. Auf diese Weise wird
die entfeuchtete Luft direkt in den Raum
abgegeben.
E
FX180eco 16-05-2002 14:53 Pagina 51
0 cm
30 cm
MAX115 cm
MIN 50 cm
Page 52

52
Beschreibung der Fernbedienung/
Elektrischer Anschluß
ELEKTRISCHER ANSCHLUß
Bevor Sie den Netzstecker an der Steckdose anschließen, folgendes überprüfen:
• ob die Netzspannung mit der auf dem Typenschild angegebenen übereinstimmt;
• ob die Strombelastung der Steckdose und des Stromnetzes der des Gerätes entspricht;
• ob der Gerätestecker für die Steckdose geeignet ist, sollte dies nicht der Fall sein, lassen Sie ihn
auswechseln;
• ob die Steckdose einwandfrei geerdet ist. Der Hersteller übernimmt keinerlei Haftung, wenn
diese Unfallverhütungsvorschrift nicht beachtet werden sollte.
Wird während eines Stromabfalls die Klimatisierungs-Funktion angewählt, könnte eine Sicherheitsvorrichtung ansprechen. Diese stoppt den Betrieb des Kühlkreises, so daß das Gerät arbeitet, als
wäre es im Belüftungs-/Luftreinigungsbetrieb. Um die Klimatisierungs-Funktion wieder in Betrieb
nehmen zu können, schalten Sie das Gerät aus und ziehen für etwa dreißig Sekunden den Netzstecker. Danach schließen Sie das Gerät erneut an.
DIE ANZEIGE
Bei Einschalten des Klimagerätes, werden alle
Symbole gezeigt.
Beim Ausschalten bleibt nur die Uhr eingeschaltet.
A. Beep
Zeigt das akustische Signal sowie das Einschalten des Klimagerätes an, wird außerdem jedesmal dann aktiviert, wenn ein
Arbeitsgang ausgeführt wird.
B. Symbole der verschiedenen Funktionen
Kühlung, Entfeuchten, Heizen (nicht bei
allen Modellen), Full Auto.
C. Raumtemperatur
Zeigt die Raumtemperatur an.
D. Gebläsegeschwindigkeit
Zeigt die verschiedenen Geschwindigkeiten an: minimal, mittel, maximal, automatisch und silent.
E. Timer Ein-/Ausschalten
Zeigt die programmierten Ein- bzw. Ausschaltzeiten an.
F. Timer sleep/auto
Zeigt die gewünschten Betriebszeiten nur
mit dem Sleep-Funktion.
G. Batterien zu wechseln
H. Luftreinigung
Das Symbol bleibt stets eingeschaltet, da
die Luft bei eingeschaltetem Klimagerät
immer von Unreinheiten befreit wird.
I. Eingegebene Temperatur
Zeigt die eingegebene Temperatur an
J. Uhr
Zeigt die Uhrzeit an.
DIE TASTEN
K. Ein-/Ausschalten
L. Mode: Wahl der Betriebsart
Durch Drücken dieser Taste werden die
verschiedenen Betriebsmöglichkeiten
gewählt: Kühlung, Entfeuchten, Belüften/Reinigen, Heizen (nicht bei allen
Modellen) und Full Auto.
M. Raumthermostat
Mit den beiden Tasten wird die gewünschte Raumtemperatur gewählt.
N. Anzeige der Raumtemperatur
Die Taste zeigt die vorhandene Raumtemperatur an. Nach etwa 4 Sekunden zeigt sie
die vorab eingegebene Temperatur an.
O. Wahl Belüftungsgeschwindigkeit
Die Taste wählt die Gebläsegeschwindigkeit: minimal, mittel, maximal, Auto und
silent.
P. SET: Bestätigung Uhrzeit oder Timer
Mit dieser Taste wird die Programmierung
der Uhr oder des Timers ON/OFF bestätigt.
Q. ON/OFF: Programmieren des Timers
Mit diesen Tasten werden die Ein- und Ausschaltzeiten des Klimagerätes eingegeben.
R. Cancel: Löschen des Timers
Mit dieser Taste werden die Eingaben des
Timers ON/OFF gelöscht.
S. RESET
T. Programmierung Uhr oder Timer
Mit diesen Tasten werden Stunden und
Minuten der Uhr und des Timers program-
miert.
U. Sleep
Mit dieser Taste wird der Nachtbetrieb ein-
gegeben.
Das Auswechseln des Netzanschlußkabels darf nur durch Fachpersonal vorgenommen werden.
2
10
FX180eco 16-05-2002 14:53 Pagina 52
Page 53

53
DEUTSCH
Kontrollampen / Zwangsbetrieb
KONTROLLAMPEN
Die Kontrollampen zeigen den Betrieb des Gerätes an.
STÖRUNG
ROTES LED
11
GELBES LED
12
GRÜNES LED
13
SCHMUTZIGE FILTER (1)
- blinkt -
ALARM
blinkt blinkt blinkt
FUNKTION
ROTES LED
11
GELBES LED
12
GRÜNES LED
13
AUS
---
KÜHLUNG
--an
ENTFEUCHTEN
an - an
BELÜFTUNG
- an -
FULL AUTO
TIMER
Wird diese Funktion angewählt, bleiben alle LED-Anzeigen einige Sekunden eingeschaltet, bis die Kontrolle entschieden hat, in welcher Betriebsart das Gerät funktionieren soll (Kühlen, Entfeuchten, Belüften oder Heizen).
Die 3 LED-Anzeigen bleiben bei ausgeschaltetem Gerät alle eingeschaltet, wenn zumindest eine der TIMERFunktionen eingegeben wurde.
(1) Die blinkende LED-Anzeige weist darauf hin, daß die antibakteriellen Filter gereinigt werden
müssen. Um die Kontrollampe nach der Reinigung der Filter auszuschalten, drücken Sie den
Schalter für den manuellen Betrieb , bis Sie ein Beep und danach ein doppeltes Beep vernehmen. Dieser Arbeitsgang kann auch bei laufendem Gerät ausgeführt werden.
ZWANGSBETRIEB
Eine Betriebsart, die bei Problemen mit der Fernbedienung gewählt wird (Beschädigung, Verlust
oder leere Batterien).
Drücken Sie die Taste , um die Raumeinheit zu starten und dann erneut drücken, um die Abfolge der verschiedenen Betriebsarten mit automatischer Einstellung zu erzielen (Kühlung, Entfeuchten, Belüftung, Full Auto (vollautomatisch) , aus).
14
14
FX180eco 16-05-2002 14:53 Pagina 53
Page 54

54
Beschreibung der Fernbedienung
DIE FERNBEDIENUNG
Einlegen der Batterien
• Schieben Sie den Deckel nach vorne
(siehe Abb.)
• Legen Sie zwei neue Einwegbatterien ein
und achten Sie dabei auf die korrekte Einlegerichtung (+) und (-).
• Auf dem Display erscheinen einige Sekunden lang alle Symbole der Fernbedienung.
Danach beginnt die Uhr auf dem Display zu
blinken und zeigt 12:00 Uhr an. Stellen Sie
jetzt die genaue Uhrzeit ein.
HINWEIS: WIR EMPFEHLEN IHNEN DEN
GEBRAUCH VON ALKALIBATTERIEN.
Sollten Sie die Fernbedienung austauschen
oder endgültig ausrangieren, nehmen Sie
zuvor die Batterie heraus und entsorgen
diese gemäß den geltenden Gesetzesvorschriften, da sie umweltschädigend ist.
ZEITEINSTELLUNG
•Wird zwei Minuten nach der Rückstellung
oder nach dem Auswechseln der Batterien
keine Zeit eingestellt, positioniert sich die
Fernbedienung automatisch auf 12:00 Uhr.
•
Zum Eingeben der Uhrzeit die Tasten
drücken, um die Zeit zu erhöhen oder zu
vermindern. Die Erhöhung oder die Verminderung beträgt jeweils 1 Minute.
Werden die Tasten gedrückt gehalten,
läuft die Uhr schneller.
• Die Uhr blinkt weiter. Drücken Sie die Taste
SET, um die eingegebene Zeit zu bestätigen: die Uhr blinkt nicht mehr.
• Soll die Uhrzeit berichtigt werden, muß die
Taste RESET (Rückstellung) gedrückt und die
richtige Uhrzeit erneut eingegeben werden.
(Es gibt keine anderen Möglichkeiten).
DER RICHTIGE GEBRAUCH
• Richten Sie die Fernbedienung auf den
Signalempfänger des Klimagerätes .
• Maximale Entfernung: etwa 7 Meter (ohne
jegliches Hindernis zwischen Fernbedienung und Empfänger).
• Behandeln Sie die Fernbedienung äußerst
sorgfältig: nicht fallenlassen, nicht dem
Sonnenlicht aussetzen und nicht in die
Nähe von Wärmequellen bringen.
15
MODE
MODE
FX180eco 16-05-2002 14:53 Pagina 54
Page 55

55
DEUTSCH
Funktionswahl
FUNZIONE CONDIZIONAMENTO
• Drücken Sie zunächst die Taste , um das Gerät einzuschalten.
• Ein “Beep” zeigt den Start des Klimagerätes an und auf der
Anzeige blinkt das Symbol .
•DieTaste MODE betätigen, bis auf der Anzeige das Stymbol Kühlung erscheint.
• Nun wird die Temperatur eingegeben: zur Verminderung die
Taste drücken.
• Um die Gebläsegeschwindigkeit zu wählen, drücken Sie einfach
wiederholt die Taste , bis die gewünschte Ventilationsgeschwindigkeit erreicht wurde (minimal, mittel, maximal, automatisch, silent).
Hinweis:
Im Kühlbetrieb entzieht das Gerät dem Raum automatisch die überschüssige Feuchtigkeit.
ENFEUCHTUNGSBETRIEB
Diese Betriebsart sollte bei hoher Luftfeuchtigkeit eingesetzt werden.
• Drücken Sie zunächst die Taste , um das Gerät einzuschalten.
• Ein “Beep” zeigt den Start des Klimagerätes an und auf der
Anzeige blinkt das Symbol .
•DieTaste MODE betätigen, bis auf der Anzeige das Symbol Entfeuchten erscheint.
• Wir weisen darauf hin, daß die Temperatur so eingegeben werden
muß, daß sie niedriger als die Raumtemperatur ist. Dies durch
Drücken der Taste .
• Um die Gebläsegeschwindigkeit zu wählen, drücken Sie einfach
die Taste , bis die gewünschte Ventilationsgeschwindigkeit
erreicht wurde.
Wir möchten Sie daran erinnern, daß nach den umgebungsbedingungen
und der eingegeben temperatur kann das Gerät die geschwindigkeit des
Ventilators automatisch wählen.
Hinweis:
Wurde nur die Entfeuchtungsfunktion aktiviert, ist es völlig normal,
daß das Gerät in regelmäßigen Abständen ein- und ausschaltet.
FX180eco 16-05-2002 14:53 Pagina 55
Page 56

56
Funktionswahl
BELÜFTUNGSBETRIEB
An schwülen aber nicht besonders heißen Tagen kann es bereits
ausreichend sein, die Funktion Belüftung/Luftreinigung zu aktivieren.
• Drücken Sie zunächst die Taste , um das Gerät einzuschalten.
• Ein “Beep” zeigt den Start des Klimagerätes an und auf der
Anzeige blinkt das Symbol .
•DieTaste MODE betätigen, bis auf der Anzeige das Symbol Belüftung erscheint.
• Nachdem diese aktiviert wurde, wiederholt die Taste drücken,
bis die gewünschte Geschwindigkeit erreicht wurde (Min. Mit.
Max, Auto, Silent).
Wir weisen darauf hin, daß das Gerät bei den Funktionen mit automatischer Belüftung die geeigneteste Geschwindigkeit wählt.
FULL-AUTO-BETRIEB
Full-Auto aktiviert automatisch alle Betriebsarten des Klimagerätes
einschließlich Temperatur, Belüftungsgeschwindigkeit, wodurch das
maximale Wohlbefinden im Raum gewährliestet wird.
• Drücken Sie zunächst die Taste , um das Gerät einzuschalten.
• Ein “Beep” zeigt den Start des Klimagerätes an und auf der
Anzeige blinkt das Symbol .
•DieTaste MODE betätigen, bis auf der Anzeige das Symbol FULL
AUTO erscheint.
Das Gerät legt automatisch die Betriebsart (Klimatisierung, Entfeuchtung, Belüftung) sowie die optimale Geschwindigkeit fest.
FX180eco 16-05-2002 14:53 Pagina 56
Page 57

57
DEUTSCH
Funktionswahl
AUTOMATISCHE SLEEP-FUNKTION
Für alle, die in einem perfekt klimatisierten Raum ruhig schlafen
möchten.
• Drücken Sie zunächst die Taste , um das Gerät einzuschalten.
• Ein “Beep” zeigt den Start des Klimagerätes an und auf der
Anzeige blinkt das Symbol .
• DieTaste MODE betätigen, bis auf der Anzeige das Symbol der
gewünschten Betriebsart erscheint.
• Nun durch Drücken der Tasten die gewünschte Temperatur wählen.
• Jetzt drücken Sie die Taste , um den Nachtbetrieb einzugeben: das Symbol schaltet ein. Durch wiederholtes Drücken
der Taste bis zur gewünschten Stundenanzahl (von 1 bis 7)
wählen Sie die Abschaltzeit des Klimagerätes.
In dieser Betriebsart arbeitet der Ventilator automatisch.
Hinweis: Während dem Nachtbetrieb wird der Raum a optimaler Temperatur gehalten,
wobei bei geräuscharmem Betrieb ein übermäßiger Temperaturanstieg oder abfall verhindert wird. Der Luftstrom nimmt ab, während die Raumtemperatur
je nach den Bedürfnissen des Wohlbefindens schrittweise variiert: in der Kühlungsphase erhöht sie sich nach 60 Minuten um 1°C und nach 2 Stunden um
2°C.
PROGRAMMIERUNG DES TIMERS
Programmierung der Einschaltzeit
Bei eingeschaltetem Klimagerät die Taste ON drücken: das Symbol
ON TIME beginnt zu blinken und die Uhr zeigt 12:00 Uhr an.
Wir weisen darauf hin, daß der Timer das Klimagerät startet und alle
Funktionen und Bedingungen, die vor dem letzten Ausschalten
aktiv waren, wieder einstellt.
• Handelt es sich um die gewünschte Programmierung, drücken
Sie einfach die Taste SET.
•Um die Uhrzeit heraufzusetzen, die Taste verwenden, zum
Herabsetzen die Taste
• Das Herauf- bzw. Herabsetzen erfolgt bei jedem Drücken der
Tasten in 10-Minuten Abständen, werden die Tasten gedrückt
gehalten, laufen die Veränderungen schneller ab.
• Die Schrift ON TIME blinkt weiter. Durch erneutes Drücken der
Taste SET wird die Eingabe der Einschaltzeit des Timers bestätigt.
• Um die Programmierung zu löschen, die Taste ON drücken: Das
Symbol ON TIME blinkt und zeigt die Einschaltzeit an.
• Nun die Taste CANCEL betätigen: die Uhr zeigt die laufende Uhrzeit an.
Programmierung der Ausschaltzeit
Der Programmierungsvorgang der Ausschaltzeit und der Löschung
unterscheidet sich von dem vorhergehenden nur dadurch, daß
anstelle der Taste ON die Taste OFF gedrückt werden muß.
FX180eco 16-05-2002 14:53 Pagina 57
°C
HR
Page 58

58
Um die optimale Leistung Ihres Klimagerätes
zu erzielen, hier einige Hinweise:
• Schließen Sie die Fenster und Türen des zu
kühlenden Raumes. Nur im Falle, daß die
Installation durch eine Wandöffnung
erfolgt ist, eine Türe oder ein Fenster leicht
geöffnet halten, um den richtigen Luftaustausch zu gewährleisten.
•Damit Ihr Gerät energiesparend arbeitet,
den Raum vor direkter Sonnenbestrahlung
schützen, indem Sie die Vorhänge
zuziehen und/oder die Rolläden teilweise
herablassen.
• Legen Sie keine Gegenstände auf das Klimagerät.
• Lassen Sie den Lufteingang und den
Luftausgang am Gerät frei .
• Vergewissern Sie sich, daß sich keine Wärmequellen im Raum befinden.
7
1
Hinweise
Türen und Fenster schließen
Fensterläden schließen oder Gardinen
bzw. Vorhänge zuziehen
Nicht abdecken
• Kontrollieren Sie, daß das Klimagerät eben
steht. Befestigen Sie hierzu gegebenenfalls die beiden Rollenfeststeller unter
den vorderen Rollen .
3
20
• Das Gerät nicht in feuchten Räumen aufstellen.
• Das Gerät nicht Witterungseinflüssen
(Regen, Sonne, Frost usw.) aussetzen.
• Das Gerät in einem angemessenen
Abstand zu entflammbaren Flächen aufstellen.
FX180eco 16-05-2002 14:53 Pagina 58
Page 59

59
DEUTSCH
Luftreinigungsfilter
Filter
Filter
Filtrete
tm
Bevor Sie mit Reinigungs- bzw. Wartungsarbeiten beginnen, schalten Sie das Gerät aus:
ziehen Sie dann stets den Netzstecker aus der
Steckdose.
REINIGUNG DES GERÄTEGEHÄUSES
Wir empfehlen Ihnen, das Gerät mit einem
angefeuchteten Tuch zu reinigen und danach mit einem trockenen Tuch abzuwischen.
Das Klimagerät aus Sicherheitsgründen nicht
mit Wasser reinigen.
Vorsicht
Verwenden Sie zur Reinigung nie Benzin,
Alkohol oder Lösemittel. Sprühen Sie keine
Insektizide oder ähnliches auf das Gerät.
REINIGUNG DER LUFTFILTER
Um die Leistungsfähigkeit Ihres Klimagerätes
nicht zu beeinträchtigen empfehlen wir:
1. den antibakteriellen Filter einmal wöchen
tlich zu reinigen
2. Den Filter FILTRETETMbei Saisonende und
vor dem Wegstellen des Klimagerätes
auszuwechseln.
Die Luftreinigungsfilter befinden sich hinter
den beiden Luftansauggittern, die ihrerseits als Filteraufnahme dienen.
Zur Reinigung der Filter verfahren Sie wie
folgt:
1. Entfernen Sie die Luftansauggitter, indem
Sie diese nach außen drehen (siehe Abb.
F)
Um den abgelagerten Staub vom antibakteriellen Filter zu entfernen, verwenden Sie
einen Staubsauger. Ist er stark verschmutzt,
waschen Sie ihn in warmem Wasser und spülen ihn danach mehrmals. Die Wassertemperatur sollte unter 40° liegen.
Den gereinigten Filter vollkommen trocknen
lassen, bevor Sie ihn erneut einsetzen.
Waschen Sie den Filter Filtretetm nicht, da dies
dessen Filterleistung herabsetzen könnte.
KONTROLLEN VOR DER WIEDERINBETRIEBNAHME
Prüfen Sie, ob das Netzkabel und der Netzstecker in einwandfreiem Zustand sind. Beachten Sie, daß die Aufstellungsvorschriften
eingehalten werden.
AUFBEWAHREN DES GERÄTES
Lassen Sie das Wasser aus der Sammelschale
ab, indem Sie den Stüpsel des Abflußschlauchs entfernen. Ziehen Sie die Kondenswasserschale heraus, die sich auf der Geräterückseite befindet und entleeren Sie diese. Setzen
Sie sie danch wieder ordnungsgemäß ein.
Reinigen Sie die Filter und lassen Sie diese vollkommen trocknen, bevor Sie sie erneut einsetzen.
fig. F
Reinigung
1
2
2. Entfernen Sie den 1. Filter FILTRETETM(weiß)
3. Entfernen Sie die Filteraufnahme des Filters, indem Sie ihn aus dem Außengitter
aushaken (siehe Abb. 2).
FX180eco 16-05-2002 14:53 Pagina 59
Page 60

60
Im Falle eventueller Betriebsstörungen
STÖRUNG URSACHEN ABHILFEN
Das Klimagerät
funktioniert nicht
• Die Stromzufuhr ist unterbrochen
• Der Stecker ist nicht angeschlossen
• Das Gebläse ist blockiert
• Der Sicherheitsschwimmer hat eingesetzt
• Den Stecker einstecken
• Kundendienst anfordern
• Die Schale entleeren
Das Klimagerät
funktioniert nur über
einen kurzen
Zeitraum
• Der Ablaßschlauch ist eingeklemmt
• Der Ablaßschlauch ist verstopft
• Der Ablaßschlauch ist geknickt
• Den Ablaßschlauch richtig
positionieren
•Verstopfungen beseitigen, die
den Luftablaß nach außen
verhindern könnten
• Knicke beseitigen
Das Klimagerät
funktioniert, kühlt
den Raum aber
nicht
• Fenster offen
• Im Raum befindet sich eine Wärmequelle
(Heizkörper, Lampe usw.) oder es halten sich
zu viele Personen auf
• Der Luftablaßschlauch ist aus seiner Aufnahme geglitten
• Luftfilter verstopft
• Raumabmessungen bzw. -bedingungen entsprechen nicht der Geräteleistung
• Fenster schließen
• Wärmequelle beseitigen
• Schlauch in seine Aufnahme
einsetzen
• Filter reinigen/auswechseln
• Filter reinigen/auswechseln
Unangenehmer
Geruch im Raum
• Luftfilter verstopft
Kondenswasserverlu
st des Klimagerätes
• Auffangschale Kondenswasser voll
• Falsche Geräteinstallation
• Auffangschale entleeren oder
das Wasser über den Kondenswasserschlauch ablassen, der sich auf der Geräterückseite befindet
• Siehe Seite 50 für die korrekte
Installation des Gerätes.
Das Klimagerät arbeitet
nach dem Einschalten
etwa 3 Minuten nicht
• Die Sicherheitsvorrichtung des Gerätes hat
angesprochen
•3 Minuten abwarten
Die 3 LED-Anzeigen
blinken
• Auffangschale Kondenswasser voll • Auffangschale entleeren oder
das Wasser über den Kondenswasserschlauch ablassen,
der sich auf der Geräterückseite
befindet. Bleiben die Kontrolllampen eingeschalten, den
Kundendiest hinzuziehen.
Die Anzeigen der Fernbedienung sind schwach
oder unbeständig
• Batterien leer
• Batterien wurden wahrscheinlich falsch eingesetzt
• Batterien auswechseln
• Die Pole der Batterien (+) und
(-) überprüfen
8
9
9
FX180eco 16-05-2002 14:53 Pagina 60
Page 61

61
DEUTSCH
Technische Eigenschaften
TECHNISCHE EIGENSCHAFTEN
Anschlußspannung siehe Typenschild
Max. Leistungsaufnahme
bei Kühlung “
Max. Leistungsaufnahme
beim Entfeuchten “
Kühlleistung* “
Abmessungen:
•Breite 452 mm
• Höhe 800 mm
•Tiefe 455 mm
• Gewicht 33,5 kg
* Standard-Betriebsbedingungen
Raumtemperatur 27°C
47% relative Luftfeuchte
Außentemperatur 35°C
41% relative Luftfeuchte
OPTIMALE BETRIEBSBEDINGUNGEN
(KÜHLUNG)
Raumtemperatur 21 ÷ 32°C
Außentemperatur 21 ÷ 43°C
FX180eco 16-05-2002 14:53 Pagina 61
Page 62

62
Tijdens het zomerseizoen wordt het welzijn in een ruimte bereikt bij een temperatuur tussen de 24 en de 27°C
en met een relatieve vochtigheidsgraad rond de 50%.
De airconditioner is een apparaat dat vochtigheid en warmte elimineert uit de ruimte waarin hij zich bevindt.
In vergelijking met modellen die geïnstalleerd worden, hebben de draagbare airconditioners het voordeel
dat ze verplaatst kunnen worden van de ene kamer naar de andere in huis, en dat ze van het ene gebouw
naar het andere vervoerd kunnen worden.
De warme lucht in uw kamer wordt door
een batterij geleid die afgekoeld wordt
door middel van een koelgas. Op
deze manier wordt het té veel aan
warmte en vochtigheid afgegeven
voordat de lucht weer in de ruimte geblazen wordt.
Bij de modellen die uit één element bestaan (Pinguino),
wordt een klein gedeelte van
deze gekoelde lucht gebruikt
voor het afkoelen van het
koelgas en dan, nadat de
lucht warm en vochtig is
geworden, naar buiten afgevoerd.
Bij de modellen met twee elementen (SuperPinguino) wordt
het circuit afgekoeld met
behulp van de buitenlucht.
Elke Pinguino en SuperPinguino
kan ook gebruikt worden met uitsluitend de ventilatie functie aan.
Voor meer infor matie en uitleg kunt u zich
wenden tot
internet site : www.delonghi.it
Wat zijn Pinguino en SuperPinguino
FX180eco 16-05-2002 14:53 Pagina 62
Page 63

63
NEDERLAND
AWAARSCHUWINGEN
• Dit apparaat is ontworpen als airconditioner
voor huiselijke ruimtes en dient niet voor andere
doeleinden gebruikt te worden.
• Het is gevaarlijk de eigenschappen van het
apparaat te wijzigen of te veranderen op welke
manier dan ook.
• Het apparaat dient geïnstalleerd te worden volgens de nationaal voorgeschreven regels
omtrent de installatie.
•Voor eventuele reparaties, dient men zich altijd
en uitsluitend te wenden tot de Technische Assistentie Centra die geautorizeerd zijn door de
Fabrikant. Reparaties uitgevoerd door niet vakbekwaam personeel kunnen gevaarlijk zijn.
• Dit apparaat dient uitsluitend bedient te worden door volwassenen; men dient absoluut niet
toe te laten dat kinderen ermee spelen.
• Dit apparaat dient aangesloten te worden op
een goed functionerende aardleiding: Laat uw
elektriciteitsnet controleren door een vakman.
• Het gebruik van verlengsnoeren dient vermeden te worden.
• Altijd eerst de stekker uit het stopcontact
trekken, alvorens over te gaan tot schoonmaken of onderhoud.
• Niet aan het electriciteitssnoer trekken om het
apparaat te verplaatsen.
• Als het snoer beschadigd is, mag dat uitsluitend
worden vervangen door gespecialiseerd personeel dat geautoriseerd is door de fabrikant.
• Het apparaat niet installeren in ruimtes waarbinnen de lucht gas, olie of zwavel kan bevatten
en niet in nabijheid van warmtebronnen.
• Geen zware of warme voorwerpen op het
apparaat zetten.
• Minstens elke week de filters schoonmaken.
• Het gebruik van verwarmingsapparaten in
nabijheid van de airconditioner vermijden.
• In geval van transport, dien het apparaat in ver
ticale positie te blijven of rustend op een zijkant.
Alvorens het apparaat te transporteren eerst
het condenswaterbakje en de opvangbak
legen. Na een transport minstens één uur
wachten alvorens het apparaat aan te zetten.
• De materialen die gebruikt worden voor de verpakking kunnen gerecycleerd worden. Wij
raden daarom aan deze materialen in de hiervoor bestemde afvalbakken voor gescheiden
verzameling te werpen.
FX180eco 16-05-2002 14:53 Pagina 63
Page 64

64
Onderstaand zult u alle nodige aanwijzingen vinden om uw airconditioner op de beste manier
voor te bereiden op de functionering.
KLIMATISERING ZONDER INSTALLATIE
Enkele eenvoudige handelingen en Pinguino
brengt het welzijn weer terug in de ruimte
waar u zich bevindt:
• Bevestig de slang voor luchtafvoer op
de hiervoor bestemde opening dat
zich aan de achterkant van het apparaat
bevindt. De slang bevestigen zoals aangegeven in figuur A.
5
17
• Indien het een venster betreft met twee
ramen de bijgeleverde zuignapjes
gebruiken om te voorkomen dat de
ramen te ver open gaan (fig. C)
19
A
Voorbereiding voor het gebruik
B
C
•Aan het uiteinde van de slang het
element voor afvoer via een venster
bevestigen.
• De airconditioner in de buurt van een
raam of een balkondeur zetten.
• Het venster of de balkondeur een klein
stukje openen en het afvoerelement
positioneren zoals aangegeven in figuur B.
18
18
17
FX180eco 16-05-2002 14:53 Pagina 64
1
2
Page 65

65
NEDERLAND
Voorbereiding voor het gebruik
KLIMATISERING MET INSTALLATIE
Indien gewenst kan Pinguino ook op een
semi-permanente manier geïnstalleerd worden.
In dit geval zal het noodzakelijk zijn:
• Een gat aan te brengen in een buitenmuur of in een raam van een venster. Hierbij dienen de hoogte en de afmetingen
van het gat aangehouden worden zoals
aangegeven in figuur D
Wanneer de slang niet bevestigd is, kan
het gat afgesloten worden door middel van
het deksel van de flens .
N.B.:
Wanneer gekozen wordt voor een semi-permanente installatie, raden wij aan een deur
enigszins open te laten staan (ook al is het
maar 1 cm) om de juiste luchtcirculatie te
garanderen.
16
17
In het raam
van het venster
Bij muren raden wij
aan het gat in de
muur te voorzien
van geschikt isolatiemateriaal.
In de houten
structuur van
de balkondeur
D
E
ONVOCHTIGING
Zet het apparaat in de kamer zonder de
slang aan te sluiten; op deze manier zal de
ontvochtigde lucht direct in de ruimte geblazen worden.
• Op het gat de bijgeleverde flens
aanbrengen.
• De slang aan de hiervoor aangebrachte opening bevestigen dat zich aan de achterkant van het apparaat bevindt (fig. A.)
• Het uiteinde van de slang aan de
flens bevestigen zoals aangegeven
in figuur E.
16
17
17
16
FX180eco 16-05-2002 14:53 Pagina 65
0 cm
30 cm
MAX115 cm
MIN 50 cm
Page 66

66
Beschrijving van de afstandbediening/
De elektrische annsluiting
DE ELEKTRISCHE AANSLUITING
Alvorens de stekker in het stopcontact te steken dient men te controleren dat:
• De netspanning overeenkomt met de waarde aangegeven in de technische gegevens;
• Het stopcontact en het elektriciteitsnet van dien aard zijn dat ze de vereiste belasting kunnen
verdragen;
• lHet stopcontact van het geschikte type is voor de stekker , indien dit niet het geval is het stopcontact vervangen.
• Het stopcontact geaard is. De fabrikant stelt zich niet aansprakelijk indien deze veiligheid-
snorm niet in acht genomen wordt.
Indien men de functie airconditioning kiest op het moment dat er een vermindering optreedt in
de electriciteitstoevoer, kan het gebeuren dat het beveiligingsmechanisme in werking treedt. Dit
blokkeert het functioneren van het koelcircuit, waardoor het apparaat functioneert alsof het
geprogrammeerd is voor ventilatie/luchtzuivering. Om de functie airconditioning weer op te starten, het apparaat afzetten en de stekker uit het stopcontact halen en houden gedurende minstens 30 seconden. Hierna weer aansluiten.
HET PANEEL
Bij het aanzetten van de airconditioner worden alle symbolen zichtbaar. Bij het uitzetten,
blijft alleen de klok zichtbaar.
A. Beep
Hiermee wordt de pieptoon zichtbaar
gemaakt bij het aanzetten van de airconditioner, bovendien gaat dit symbool branden bij elke handeling die verricht wordt.
B. Symbolen van de verschillende functies
Airconditioning, ontvochtiging, ventilatie,
verwarming (niet voor alle modellen), vol
automatisch.
C. Omgevingstemperatuur
Geeft de temperatuur in de ruimte aan.
D. Ventilatorsnelheid
Geeft de verschillende snelheden aan:
minimum, gemiddeld, maximum, automatisch en geruisloos
E. Timer aan en uit
Geeft de geprogrommeerde tijden aan
voor het aan-en uitgaan van de airconditioner.
F. Timer sleep/geruisloos
Geeft de gewenste uren aan tijdens
welke en sleep functie.
G. Aanduiding dat de batterijen aan vervan-
ging toezijn.
H. Zuivering van de lucht
Het symbool blijft zichtbaar omdat, wanneer de airconditioner aanstaat, de lucht
altijd gefiltreerd wordt.
I. Geprogrammeerde temperatuur
Geeft de geprogrammeerde temperatuur
aan.
J. De klok
Geeft de tijd aan.
DE TIPTOETSEN
K. Aan/Uit
L. MODE: keuze van de functies
Door op deze toets te drukken worden de
verschillende functiemogelijkheden gekozen: airconditioning, ontvochtiging,ventilatie/Zuivering, Verwar ming (niet voor alle
modellen) en Full Auto.
M. Ruimte thermostaat.
Deze twee toetsen kiezen de gewenste
temperatuur in de ruimte,
N. Aanduiding omgevingstemperatuur
Deze toets geeft de huidige temperatuur
in de ruimte aan. Na ongeveer 4 seconden zal de voorheen geprogrammeerde
temperatuur weer verschijnen.
O. Keuze ventilatorsnelheid
Deze toets kiest de ventilatorsnelheid:
minimum, gemiddeld, maximum en automatisch/silent.
P. SET: bevestiging klok of timer
Deze toets bevestigd de programmering
van de klok of van de Timer AAN/UIT.
Q. AAN/UIT Programmering Timer
Deze toetsen programmeren het aan- en
uitgaan van de airconditioner.
R. CANCEL: Annuleren van de timer.
Deze toets annuleert de programmering
van de Timer AAN/UIT
S. RESET
T. Programmering klok of timer
Deze toetsen programmeren de uren en
de minuten van de klok en van de timer.
U. Sleep
Deze toets stelt de nachtfunctie in.
De vervanging van de voedingskabel mag alleen door geautoriseerd personeel worden uitgevoerd.
2
10
FX180eco 16-05-2002 14:53 Pagina 66
Page 67

67
NEDERLAND
Controlelampjes/Handmatige bediening
CONTROLELAMPJES
De controlelampjes geven het functioneren van het apparaat aan.
WAARSCHUVINGS
RODE LED
11
GELE LED
12
GROENE LED
13
VUILE FILTERS (1)
-
knippert
-
ALARM
knippert knippert knippert
FUNCTIE
RODE LED
11
GELE LED
12
GROENE LED
13
UIT
---
AIRCONDITIONING
--aan
ONVOCHTIGING
aan - aan
VENTILATOR
- aan -
FULL AUTO
TIMER
Onmiddelijk nadat deze functie gekozen is, zullen alle LCD’s gedurende enkele seconden blijven branden totdat het
controlesysteem besloten heeft hoe te functioneren (of airconditioning, ontvochtiging, ventilatie of verwarming).
De 3 LCD’s blijven branden, ook als het apparaat af staat, indien tenminste één
van de TIMER functies geprogrammeerd is.
(1) De knipperende LCD geeft aan dat het nodig is de anti bacterie filters schoon te maken.
Om de LCD uit te laten gaan, nadat de filters schoongemaakt zijn, op de toets voor handmatige functionering drukken totdat een pieptoon afgegeven wordt gevolgd door
een dubbele pieptoon. Deze handelingen kunnen ook uitgevoerd worden als het apparaat in werking is.
HANDMATIGE BEDIENING
Deze manier van functioneren wordt gekozen indien er problemen zijn met de afstandsbediening
(kapot, kwijt of batterijen leeg).
Op de schakelaar drukken om de binnen unit aan te zetten en nogmaals drukken om de
diverse functie mogelijkheden te verkrijgen (airconditioning, ontvochtiging, ventilatie, vol automatisch of uit), met automatische regulering.
14
14
FX180eco 16-05-2002 14:53 Pagina 67
Page 68

68
Beschrijving van de afstandsbediening
DE AFSTANDSBEDIENING
Het plaatsen van de batterijen.
• Schuif het deksel naar voren. (zie fig.)
•Twee nieuwe niet-oplaadbare batterijen
inbrengen, let er hierbij op ze in de juiste
richting te leggen (+) en (-).
• Het deksel weer sluiten door het tot aan
de beginpositie te schuiven.
• Op het paneel zullen gedurende zeer
korte tijd alle symbolen van de afstandsbediening zichtbaar worden.
Hierna zal de klok op het paneel gaan knipperen en 12:00 uur aangeven. De juiste tijd
dient ingesteld te worden.
N.B.: WIJ RADEN HET GEBRUIK VAN ALKALI-
NEBATTERIJEN AAN.
Zowel in geval van vervanging als indien het
afstandsbediening niet meer gebruikt wordt,
dient de batterij verwijderd te worden en weggegooid volgens de wettelijke voorschriften
omdat deze schadelijk is voor het milieu.
HET INSTELLEN VAN DE KLOK
• Indien binnen 2 minuten, na op de reset
knop gedrukt of de batterijen vervangen
te hebben, niet de tijd geprogrammeerd
wordt, zal de afstandsbediening zich automatisch op 12.00 uur instellen.
• drukken, om een latere of een vroegere tijd in te stellen. De toename of de
afname gaat met 1 minuut tegelijk.
Door de knoppen ingedruk te houden, zal
de klok sneller lopen.
• De klok zal blijven knipperen. Druk op de
knop SET om de ingestelde tijd vast te leggen: de klok stopt met knipperen.
•Indien het nodig mocht blijken de tijd te
veranderen, dient men op de knop RESET te
drukken en hierna de juiste tijd te programmeren. (Dit is de enige mogelijke manier).
CORRECT GEBRUIK
• De afstandsbediening op de ontvanger
van de airconditioner richten .
• De maximale afstand is ongeveer 7 meter
(zonder obstakels tussen de afstandsbediening en de ontvanger).
• De afstandsbediening moet zeer voorzich-
tig behandeld worden: zonder deze te laten
vallen, zonder deze aan direct zonlicht of
aan warmtebronnen bloot te stellen.
MODE
MODE
15
FX180eco 16-05-2002 14:53 Pagina 68
Page 69

69
NEDERLAND
De keuze van de functies
AIRCONDITIONING FUNCTIE
Deze functie is ideaal op bijzonder warme dagen.
• In de eerste plaats op de toets drukken om het apparaat aan te
zetten.
• Een pieptoon geeft het aanslaan van de airconditioner aan en op
het paneel knippert het symbool
.
• Hierna de toets MODE kiezen, totdat op het paneel het symbool
voor airconditioning verschijnt.
• Op dit punt aangekomen dient de temperatuur ingesteld te wor-
den: om deze te verlagen op de toets drukken.
• Om de snelheid van de ventilator te kiezen, is het voldoende
herhaaldelijk op de toets te drukken totdat de gewenste ventilatiesnelheid bereikt wordt (minimum, medium, maximum, automatisch, silent).
N.B.:
Tijdens het functioneren als airconditioning, wordt het teveel aan vochtigheid in de ruimte automatisch door het apparaat opgenomen.
ONTVOCHTIGGINGS FUNCTIE
Deze functie kan gekozen worden in geval van een hoge vochtigheidsgraad.
• In de eerste plaats op de toets drukken om het apparaat aan
te zetten.
• Een pieptoon geeft het aanslaan van de airconditioner aan en op
het paneel knippert het symbool
• Hierna de toets MODE kiezen, totdat op het paneel het symbool
voor ontvochtiging verschijnt.
•
Het is belangrijk een lagere temperatuur in te stellen dan de
kamertemperatuur, door op de toets
• Om de snelheid van de ventilator te kiezen, is het voldoende
herhaaldelijk op de toets te drukken totdat de gewenste
ventilatiesnelheid bereikt wordt.
• U dient te onthouden dat indien de functie ontvochtiging aan-
staat, het koelen automatisch functioneert met de ventilator op
lage snelheid en dat de compressor periodiek aan- en afslaat.
N.B.:
Wanneer het apparaat ingesteld wordt op de functie ontvochtigen,
is het normaal dat het apparaat regelmatig aan- en afslaat.
FX180eco 16-05-2002 14:53 Pagina 69
Page 70

VENTILATIE/ZUIVEZRING FUNCTIE
Op dagen dat het weer drukkend is maar niet bijzonder warm, kan het
voldoende zijn alleen de functie ventilatie/luchtzuivering in te stellen.
• In de eerste plaats op de toets drukken om het apparaat aan te
zetten.
• Een pieptoon geeft het aanslaan van de airconditioner aan en op
het paneel knippert het symbool
.
•Hierna de toets MODE kiezen, totdat op het display het symbool
ventilatie verschijnt.
• Als deze functie eenmaal aanstaat, kan men door herhaaldelijk
op de toets te drukken de gewenste snelheid kiezen (minimum, medium, maximum, automatisch).
Indien men functies kiest met automatische ventilatie, zal het apparaat zelf de meest geschikte snelheid kiezen.
FUNCTIE VOL AUTOMATISCH
Bij de functie VOL AUTOMATISCH zullen automatisch alle functies
van de airconditioner aanslaan, inbegrepen temperatuur, ventilatiesnelheid en verplaatsing van de luchtstroom, waarbij het maximale comfort in de ruimte wordt gegarandeerd.
•
In de eerste plaats op de toets drukken om het apparaat aan te
zetten.
• Een pieptoon geeft het aanslaan van de airconditioner aan en op
het paneel knippert het symbool
.
•Hierna de toets MODE kiezen, totdat op het display het symbool
FULL AUTO zichtbaar wordt.
Het apparaat zal automatisch de optimale functie (airconditioning,
onvochtigen, ventilatie) en de snelheid instellen.
70
De keuze van de functies
FX180eco 16-05-2002 14:53 Pagina 70
Page 71

AUTOMATISCHE SLEEP FUNCTIE
Ideaal voor diegenen die rustig wensen te slapen in een perfect
geklimatiseerde omgeving.
• In de eerste plaats op de toets drukken om het apparaat aan
te zetten.
• Een pieptoon geeft het aanslaan van de airconditioner aan en
op het paneel knippert het symbool .
•Hierna de toets MODE kiezen, totdat op het display het symbool
van de gewenste functie verschijnt.
•Hierna de gewenste temperatuur kiezen door op de toetsen
te drukken.
• Nu op de toets drukken om de nachtfunctie in te stellen: het
symbool zal gaan branden. Door meermalen op de toets te
drukken tot aan het gewenste aantal uren (van 1 tot 7) zult u het
tijdstip kiezen waarop de airconditioner afslaat.Bij deze functie,
draait de ventilator op lage snelheid (geruisloos).
N.B:Met de nachtfunctie wordt de temperatuur in de ruimte op een
optimaal niveau gehouden, waarbij overdreven stijgen of dalen van
de temperatuur vermeden wordt met een geruisloze functionering.
De luchtstroom verminderd, terwijl de temperatuur in de ruimte
gelijkmatig gewijzigd wordt volgens de eisen van het comfort; de
temperatuur neemt toe met 1°C na 60 minuten en met 2°C na 2 uur ,
tijdens de airconditioning fase.
PROGRAMMERING VAN DE TIMER
Programmering van het aanslaan
Terwijl de airconditioner aanstaat, op de toets ON drukken: het symbool ON TIME zal beginnen te knipperen en de klok geeft 12:00 uur
aan.
Men dient te bedenken dat de timer de airconditioner aan laat slaan
met alle functies en keuzes die ingesteld waren bij de laatste functionering.
•Indien de programmering de gewenste is, is het voldoende op
de toets SET te drukken.
•Om de klok vooruit te laten lopen op de toets drukken.
• De toename of de afname zal met 10 minuten tegelijk gaan bij
elke afzonderlijke druk op de toetsen, terwijl door de toetsen
ingedrukt te houden de klok sneller doorloopt.
• Het woord ON TIME zal blijven knipperen. Door weer op de toets
SET te drukken, zal de programmering van de timer voor het tijdstip van aanslaan van de airconditioner bevestigd worden.
• Om de programmering te annuleren, op de toets ON drukken: het
symbool ON TIME zal beginnen te knipperen en het tijdstip van
aanslaan zal zichtbaar worden.
• Druk nu op de toets CANCEL : de klok zal de huidige tijd aangeven.
PROGRAMMERING VAN HET AFSLAAN
De procedure voor het programmeren van het afslaan en het
annuleren, is gelijk aan de voorafgaande: het verschil bestaat uitsluitend in het drukken op de toets OFF in plaats van op de toets ON.
71
NEDERLAND
De keuze van de functies
FX180eco 16-05-2002 14:53 Pagina 71
°C
HR
Page 72

72
Er zijn enkele aanwijzingen die opgevolgd
dienen te worden om het optimaal functioneren van de airconditioner te verkrijgen:
• Ramen en deuren sluiten van de ruimte
die geklimatiseerd moet worden. Enige
uitzondering indien men gekozen heeft
voor een installatie met een gat in de
muur. In dat geval raden wij aan een deur
of een raam op een kier te laten staan om
een juiste luchtwisseling te garanderen.
• De kamer beschermen tegen direct zonlicht, door de gordijnen dicht te doen
en/of de zonwering (gedeeltelijk) te laten
zakken, teneinde een zeer economische
functionering te verkrijgen.
• Geen voorwerpen op de airconditioner
plaatsen;
• De luchtaanzuiging en de luchtafvoer
niet blokkeren;
• Zich ervan verzekeren dat binnen de ruimte geen warmtebronnen aanwezig zijn.
Raadgevingen
Vensters sluiten, deuren sluiten
Gordijnen sluiten, rolluiken neerlaten
Niet bedekken
• Controleren dat de airconditioner
geplaatst wordt op een “waterpas” vloer:
Eventueel de wielblokkeringen
gebruiken onder de wieltjes aan de
voorkant.
20
• Installeer het apparaat niet in vochtige
vertrekken.
• Laat het apparaat niet in de zon, regen of
kou staan.
• Het apparaat op voldoende afstand houden van brandbare oppervlakten
7
1
3
FX180eco 16-05-2002 14:53 Pagina 72
Page 73

73
NEDERLAND
Schoonmaken
Alvorens over te gaan tot het schoonmaken
of het uivoeren van onderhoud, altijd eerst
het apparaat afzetten en door de stekker uit
het stopcontact te halen.
HET SCHOONMAKEN VAN DE BUITENKANT
Wij raden aan het apparaat schoon te
maken met een vochtige doek en daarna
met een droge doek om het apparaat af te
drogen. Om veiligheidsredenen wordt afgeraden de airconditioner met water te wassen
Voorzorgsmaatregelen
Nooit benzine, alcohol of oplosmiddelen
gebruiken voor het schoonmaken. Nooit
insectenspray of dergelijke gebruiken.
HET SCHOONMAKEN VAN DE LUCHTFILTERS
Om het goed functioneren van uw airconditioner te waarborgen, raden wij u aan om:
1.Het anti-bacterie filter elke week schoon te
maken
2.Het FILTRETETMfilter aan het einde van elke
seizoen te vervangen, alvorens de airconditioner op te bergen.
IDe luchtzuiveringsfilters bevinden zich achter
de 2 aanzuigroosters. De roosters zelf functioneren als filterhouders.
Voor het schoonmaken van de filters is het
derhalve noodzakelijk:
1.De aanzuigroosters te verwijderen door
deze naar buiten te draaien.
Luchtaanzuigrooster
Filter
Filtrete
tm
Filter
fig. F
1
2
2.Het eerste filter FILTRETETM(wit van kleur)
verwijderen
3. De filterhouder waarin zich het filter bevindt
verwijderen door deze los te haken van het
buiten rooster.
Om het stof te verwijderen dat zich vastgezet
heeft op het anti-bacterie filter, een stofzuiger
gebruiken.
Indien dit filter erg vuil is, kan het filter ook in
lauw water gedompeld en meermalen
gespoeld worden. De temperatuur van het
water dient de 40°C niet te overschrijden.
Na het wassen, het filter laten drogen alvorens deze weer terug te schuiven op zijn
plaats.
Niet proberen het FILTRETETM,filter schoon
te maken, omdat hierdoor het filtreervermogen zou kunnen verminderen
CONTROLES AAN HET BEGIN VAN HET SEIZOEN
Nagaan of het electriciteitssnoer en het stopcontact in goede staat verkeren en zich
ervan verzekeren dat de aardleiding goed
functioneert. Nauwgezet de installatienormen opvolgen.
HANDELINGEN AAN HET EINDE VAN HET SEIZOEN
Het water uit de opvangbasin laten lopen
door de dop van de afvoerbuis te halen. Het
condens opvangbakje verwijderen dat zich
aan de achterkant van de airconditioner
bevindt en dit legen. Hierna het bakje weer
op zijn plaats zetten.
fig. G
FX180eco 16-05-2002 14:53 Pagina 73
Page 74

74
Indienietsniet functioneer t…
PROBLEMEN
OORZAKEN
OPLOSSINGEN
De airconditioner
functioneert niet
• de electriciteitstoevoer ontbreekt
• de stekker steekt niet in het stopcontact
• de ventilator is geblokkeerd
• de beveiligingsdobber is in werking getreden
•
de stekker in het stopcontact steken
• het assistentie centrum bellen
• het bakje legen
De airconditioner
functioneert slechts
voor korte tijd
• de afvoerslang is afgeklemd
• de afvoerslang is verstopt
• er zit een kniek in de afvoerslang
• de afvoerslang op de juiste
manier aansluiten
• nagaan of er obstakels zijn die
de luchtafvoer naar buiten
onmogelijk maken
• de kniek verwijderen
De airconditioner
functioneert maar
de kamer wordt niet
koeler
• er staan ramen open
• in de kamer bevindt zich een warmtebron
(brander, lamp, enz.) of er zijn veel mensen in
de kamer
• de luchtafvoerbuis zit niet meer op zijn plaats
• de luchtfilters zijn verstopt
• het vermogen van de airconditioner is niet
voldoende voor de omstandigheden in of de
afmetingen van de ruimte
• de vensters sluiten
• de warmtebron verwijderen
• de afvoerbuis op de juiste
manier aansluiten
•
de filters schoonmaken of vervangen
• de filters schoonmaken of vervangen
Vreemde geur in de
kamer
• de luchtfilters zijn verstopt
De interne eenheid
van de aircondtioner verliest condensvocht
• opvangbakje condensvocht is vol
• het apparaat is verkeerd geïnstalleerd
• het opvangbakje legen en het
water afvoeren via de condensafvoerslang die zich
aan de achterkant van het
apparaat bevindt
• zie bladzijde 64 voor de correcte installatie van het apparaat
De airconditioner functioneert niet gedurende ongeveer 3 min. na het aanzetten
• het beveiligingsmechanisme van het apparaat is in werking getreden
•3 minuten wachten
De 3 LCD’s knipperen
• het opvangbakje condensvocht is vol • het opvangbakje legen
Als het lampje blijft branden,
contact opnemen met een
Assistentie Centrum.
De aanduidingen op
de afstandsbediening zijn zwak of
afwezig
• batterijen leeg
• batterijen mogelijk omgekeerd ingezet
• batterijen vervangen
• controleer de polen van de
batterijen (+) en (-)
8
9
FX180eco 16-05-2002 14:53 Pagina 74
Page 75

75
NEDERLAND
Technische kenmerken
TECHNISCHE KENMERKEN
Netspanning zie typeplaatje
Max. opgenomen vermogen
bij airconditioning “
Max. opgenomen vermogen
bij onvochtiging “
Koelingsvermogen* “
Max. luchtverwerking 310 m
3
/h
Afmetingen binnen unit:
•breedte 452 mm
• hoogte 800 mm
• diepte 455 mm
• gewicht 33,5 kg
* Standaard omstandigheden:
Binnen temperatuur 27°C
47% relatieve vochtigheid
Buiten temperatuur 35°C
41% relatieve vochtigheid
TECHNISCHE GEGEVENS OPTIMALE
GEBRUIKSOMSTANDIGHEDEN
Temperatuur van kamer 21 ÷ 32°C
Buiten temperatuur 21 ÷ 43°C
FX180eco 16-05-2002 14:53 Pagina 75
Page 76

76
En la estación veraniega, las condiciones de bienestar se alcanzan con una temperatura com-
prendida entre 24 y 27°C, con una humedad relativa de alrededor 50%.
El acondicionador es una máquina que saca la humedad y calor del ambiente en el cual está
colocado. Con respecto a los modelos para instalar, los acondicionadores portátiles tienen la
ventaja de poder desplazarse de una habitación a otra, de la casa, y de transferirse de una oficina a otra.
El aire caliente de su habitación se hace
pasar a través de una batería enfriada por un gas refrigerante. De este
modo cede calor y humedad
excesiva antes que vuelva al
ambiente.
En Pingüino, una pequeña
parte de este aire se utiliza
para enfriar el gas refrigerante, por lo tanto, una vez
caliente y húmeda, se
manda al exterior.
Pingüino se puede usar
sólo como ventilador.
Para averiguaciones y
aclaraciones, dirigirse a:
dirección internet
www.delonghi.it
Qué es Pingüino y SuperPinguino
FX180eco 16-05-2002 14:53 Pagina 76
Page 77

ESPAÑOL
77
Advertencias
• Este aparato ha sido fabricado para acondicionar los ambientes domésticos y no debe ser
utilizado para otros fines.
• Es peligroso modificar o alterar de cualquier
forma las características del aparato.
• Se tiene que instalar el aparato de acuerdo a
las reglas de instalación internacionales.
• Para eventuales reparaciones diríjanse siempre
a los centros de Asistencia Técnica autorizados
por el fabricante. Las reparaciones efectuadas
por personal no especializado pueden resultar
peligrosas.
• Este aparato debe ser utilizado exclusivamente
por los adultos, no permitan que los niños jueguen con él.
• Este aparato debe estar conectado con una
eficaz puesta a tierra. Hagan controlar la instalación a un electricista especializado.
• Eviten utilizar las prolongas para el cable de alimentación eléctrica.
• Antes de cualquier operación de limpieza o conservación, desenchufen siempre el aparato.
• No tirar del cable de alimentación eléctrica
para desplazar el producto.
• En el caso que el cable de alimentación se dañe,
lo tiene que cambiar sólo personal autorizado por
el fabricante.
• No instalen el aparato en ambientes donde el
aire puede contener gas, aceite, azufre, o
cerca de fuentes de calor.
• No pongan objetos pesados o calientes encima del aparato.
• Limpien los filtros por lo menos cada semana.
• Eviten utilizar aparatos de calefacción cerca
del acondicionador.
• En caso de transporte el aparato debe estar en posición vertical o colocado sobre uno de los lados.
Antes del transporte vacíen los recipientes de
recogida del agua y de la condensación.
Tras el transporte esperar por lo menos una hora
antes de poner en marcha el aparato.
• Los materiales usados para el embalaje son
reciclables. Se aconseja, por lo tanto, de volverlos a poner en sus correspondientes contenedores para la recogida diferenciada.
FX180eco 16-05-2002 14:53 Pagina 77
Page 78

78
A continuación encontrará todas las indicaciones necesarias para predisponer lo mejor posible
el funcionamiento de su acondicionador.
ACONDICIONAMIENTO SIN INSTALACION
Pocas, simples operaciones y Pingüino lo
lleva a las condiciones de bienestar:
• Fijar el tubo de salida de aire en su correspondiente orificio , colocado en la
parte posterior del aparato. Colocarlo como
indicado en la figura A
5
17
• Si tiene una ventana con dos hojas, usar las
ventosas que se entregan con el aparato para mantener entrecerrados los
vidrios (fig. C).
19
• Aplicar a la extremidad del tubo to la
embocadura para ventana .
• Acercar el acondicionador a una ventana o puerta ventana.
• Entreabrir la ventana o puerta ventana y
poner en posición la embocadura
como representado en la figura B.
18
18
17
A
Predisposición para el uso
B
FX180eco 16-05-2002 14:53 Pagina 78
1
2
Page 79

ESPAÑOL
79
Predisposición para el uso
ACONDICIONAMIENTO CON INSTALACION
Si lo desea, puede instalar Pingüino de manera semi permanente.
• Aplicar al agujero el accesorio brida
que se entrega con el aparato.
• Fijar el tubo en su correspondiente
lugar colocado en la parte posterior del
aparato (fig. A).
• Aplicar la extremidad del tubo en la
brida como indicado en la fig. E.
16
17
17
16
En este caso será necesario:
• Realizar un agujero en la pared que se
comunica con el exterior, o a través de un
vidrio de una ventana. Respetar el intervalo de altura y las dimensiones del agujero, indicadas en la figura D.
Cada vez que el tubo no esté colocado,
se tiene que cerrar el agujero con la tapa de
la brida .
NOTA:
Cuando se realice la instalación semi-permanente, se aconseja dejar ligeramente abierta
una puerta (aunque sea de 1 cm) para
garantizar el justo cambio de aire.
16
17
en el vidrio
de la ventana
en la pared:
aconsejamos
aislar la sección
de la pared con
un adecuado
material aislador.
en el zócalo de
madera de
la puerta
ventana
D
DEHUMIDIFICACION
Colocar el aparato en la habitación sin
conectar el tubo; de este modo el aire dehumidificado será librada directamente en el
ambiente.
E
FX180eco 16-05-2002 14:53 Pagina 79
0 cm
30 cm
MAX115 cm
MIN 50 cm
Page 80

80
Descripción del telemando/
La conexión con la red eléctrica
LA CONEXIÓN CON LA RED ELÉCTRICA
Antes de enchufar el aparato, hay que verificar lo siguiente:
• La tensión de la red es compatible con el valor indicado en las características técnicas;
• La toma de corriente y la línea de alimentación eléctrica están dimensionadas para soportar
la carga requerida.
• La toma de corriente es compatible con la clavija , si no es así sustituir la toma;
• La toma de corriente está conectada con una eficaz puesta a tierra. La fabrica no se hace
cargo de ninguna responsabilidad en el caso de que esta norma contra los infortunios no
haya sido respetada.
Seleccionando la función de climatización, si baja la tensión eléctrica, podría intervenir un dispositivo de seguridad. El mismo bloquea el funcionamiento del circuito frigorífico, de este modo, el aparato funciona como en ventilación/purificación. Para restablecer la función de climatización, apagar el aparato y tenerlo desenchufado por lo menos treinta segundos. Luego volver a conectar.
10
EL DISPLAY
Al encender el acondicionador todos los símbolos se visualizan.
Al apagarlo se queda encendido el reloj
solamente.
A. Beep
Visualiza el señal acústico y la puesta en
marcha del acondicionador, se activa
además cada vez que se cumple una
operación.
B. Símbolos de las varias funciones
Acondicionamiento, deshumidificación,
ventilación, calefacción (no en todos los
modelos), Full Auto.
C. Temperatura ambiente
Visualiza la temperatura ambiente
D. Velocidad del ventilador
Visualiza las diferentes velocidades: mínima, mediana, máxima, automática y silent.
E. Temporizador encendido/apagado
Visualiza los tiempos programados para el
encendido y el apagado.
F. Temporizador sleep/silent
Visualiza las horas de funcionamiento
deseadas en función sleep.
G. Indica que es necesario sustituir las
baterías.
H. Purificación del aire.
El símbolo se queda siempre encendido
pues cuando el acondicionador está
encendido, filtra siempre las impurezas del
aire.
I. Temperatura programada
Visualiza la temperatura programada.
J. El reloj
Visualiza el horario
LOS MANDOS
K. Encendido/Apagado
L. MODE: selección de la función.
Apretando este mando se seleccionan las
varias funciones: acondicionamiento,
deshumidificación, Ventilación,/Purificación, Calefacción (no en todos los modelos), y Full auto (Completamente Automático)
M. Termostato ambiente
Los dos mandos seleccionan la temperatura deseada en el ambiente.
N. Visualización de la temperatura ambiente
El mando visualiza la temperatura presente en el ambiente. Después de 4 segundos aproximadamente indica la temperatura programada anteriormente.
O. Selección de la velocidad del ventilador
El mando selecciona la velocidad del
ventilador: mínima, mediana, máxima,
auto y silent.
P. SET: Confirmación del reloj y del tempori-
zador.
Confirma la programación del reloj y del
temporizador ON/OFF.
Q. ON/OFF: programación del temporizador
Los mandos programan el apagado y el
encendido del acondicionador.
R. Cancel: anulación del temporizador
El mando anula el planteamiento del tem-
porizador ON/OFF.
S. RESET
T. Programación del reloj o del temporizador
Los mandos programan las horas y los
minutos del reloj y del temporizador.
U. Sleep
El mando plantea la función noche.
El reemplazo del cable de alimentación deberá ser realizado por parte de personal autorizado.
2
FX180eco 16-05-2002 14:53 Pagina 80
Page 81

ESPAÑOL
81
Señales luminosas/
Funcionamiento forzado
LOS LEDS
Se encienden según la función seleccionada y señalan eventuales anomalías.
ANOMALIA
LED ROJO
11
LED AMARILLO
12
LED VERDE
13
FILTROS SUCIOS (1)
- luz intermitente -
ALARMAS
luz intermitente luz intermitente luz intermitente
FUNCIÓN
LED ROJO
11
LED AMARILLO
12
LED VERDE
13
APAGADO
---
ACONDICIONADOR
--encendido
DESHUMIDIFICACIÓN
encendido - encendido
VENTILACIÓN
- encendido -
FULL AUTO
TIMER
Recién seleccionada esta función, todos los led se quedan encendidos durante algunos segundos hasta que el control ha
decidido cómo funcionar (si como acondicionamiento, como deshumidificación, ventilación o calefacción).
Los tres led se quedan encendidos aunque la máquina esté apagada si una de las funciones
TIMER (TEMPORIZADOR) está programada.
(1) El led que centellea indica que es necesario efectuar la limpieza de los filtros antibactéri-
cos. Para apagar el indicador, tras haber limpiado los filtros, pulsen el botón de funcionamiento manual hasta que oyen un bip seguido de un doble bip. Esta operación se
puede realizar aunque el aparato esté funcionando.
FUNCIONAMIENTO FORZADO
Es un modo de funcionar que se elige en caso de problemas con el telemando (se ha roto, perdido o las pilas están descargadas).
Apretar el botón para hacer funcionar la unidad interna y volver a apretarlo para obtener
la secuencia de los diferentes modos de funcionamiento (acondicionamiento, deshumidificación, ventilación, full auto, apagado) con programación automática.
14
14
FX180eco 16-05-2002 14:53 Pagina 81
Page 82

82
Descripción del telemando
EL TELEMANDO
Introducción de las baterías
• Empujar hacia delante (ver la fig.)
• Introducir dos baterías nuevas del tipo no
recargable, prestando atención para colocarlas en la dirección correcta (+) y (-).
•Volver a poner la tapa, haciéndola resbalar hasta que llega a la posición inicial.
• En el visor aparecen durante unos segundos todos los símbolos del telemando.
Ahora el reloj del visor empieza a centellear
señalando las 12:00. Ponga la hora exacta.
ACONSEJAMOS UTILIZAR BATERÍAS DE TIPO
ALCALINO
Tanto en el caso de cambio como en la
eliminación del telemando, se deben
sacar y eliminar las pilas de acuerdo a las
leyes vigentes, ya que son da~õsas para el
ambiente.
PLANTEAMIENTO DEL RELOJ
• Si después de 2 minutos del reset o de la
sustitución de las baterías no se plantea la
hora, el telemando se pone automáticamente a las 12:00 h.
• Para programar la hora, apretar los mandos para aumentar o disminuir. El
aumento o la disminución es de 1 minuto.
Tener los mandos apretados, el reloj correrá más rápidamente.
• El reloj sigue centelleando. Apretar el
mando SET para confirmar la hora planteada: el reloj deja de centellear.
• Si fuese necesario regular la hora, entonces hay que apretar el mando RESET y volver a plantear la hora corriente. (No existe
otro modo).
USO CORRECTO
• Dirigir el telemando hacia el receptor de
señal del acondicionador de aire.
• La distancia máxima es de 7 metros (sin
que haya obstáculos entre el telemando y
el receptor).
• El telemando hay que usarlo con mucho
cuidado y respeto: sin hacerlo caer, sin
exponerlo a la luz directa del sol, ni dejarlo cerca de fuentes de calor.
MODE
MODE
15
FX180eco 16-05-2002 14:53 Pagina 82
Page 83

ESPAÑOL
83
Seleccion de las funciones
FUNCIÓN ACONDICIONAMIENTO
Esta función es ideal en caso de días particularmente calurosos.
•Primero apretar el mando para el encendido.
• Un beep indica la puesta en marcha del acondicionador y en
el display centellea el símbolo .
• Luego seleccionar el mando MODE, hasta que aparece en el
display el símbolo acondicionamiento .
• Sucesivamente se programa la temperatura: para disminuirla
apretar el mando .
• Para seleccionar la velocidad del ventilador, es suficiente apretar
repetidamente el mando hasta alcanzar la ventilación deseada (mínima, mediana, máxima, automática y silent).
Nota:
En función de acondicionador, el aparato extrae automáticamente
la humedad excesiva en el ambiente.
FUNCIÓN DESHUMIDIFICACIÓN
Es mejor activar esta función en caso de altos niveles de humedad.
•Primero apretar el mando para el encendido.
• Un beep indica la puesta en marcha del acondicionador y en
el display centellea el símbolo .
• Luego seleccionar el mando MODE, hasta que aparece en el
display el simbolo deschumidificación .
Nota:
Hay que subrayar que es importante programar la temperatura de
manera que sea más baja que la del ambiente, apretar el mando.
.
Para seleccionar la velocidad del ventilador es suficiente apretar el
mando hasta alcanzar la ventilación deseada.
Es necesario recordar que a según de las condiciones ambientales
y de la temperatura seleccionada, el aparato puede eligir en
manera automatica la velocidad de ventilación.
Nota:
Cuando se activa solamente la función dehumidificadora, es normal que el aparato se encienda y apague periódicamente.
FX180eco 16-05-2002 14:53 Pagina 83
Page 84

84
Seleccion de las funciones
FUNCIÓN VENTILACIÓN/PURIFICACIÓN
En caso de días sofocantes, pero no tan cálidos, puede ser suficiente activar la función ventilación/purificación.
•Primero apretar el mando para el encendido.
• Un beep indica la puesta en marcha del acondicionador y en
el display centellea el símbolo .
• Luego seleccionar el mando MODE hasta que en el display aparece el símbolo ventilación .
• Una vez activada, seleccionar repetidamente el mando
hasta alcanzar la velocidad deseada (mín., med, máx, auto.)
Es necesario precisar que en las funciones con ventilación automática, el aparato mismo elige la velocidad más adecuada.
FUNCIÓN FULL AUTO
Full Auto activa automáticamente todas las funciones del acondicionador, incluidas la temperatura, la velocidad de la ventilación,
garantizando el máximo bienestar ambiental..
•Primero apretar el mando para el encendido.
• Un beep indica la puesta en marcha del acondicionador y en
el display centellea el símbolo .
• Luego seleccionar el mando MODE, hasta que aparece en el
display el símbolo FULL AUTO.
El aparato establecerá automáticamente la función (acondicionamiento, dehumidificación, ventilación) y la velocidad optimales.
FX180eco 16-05-2002 14:53 Pagina 84
Page 85

ESPAÑOL
FUNCIÓN AUTOMÁTICA SLEEP
Es ideal para quien desea dormir tranquilo, en un ambiente perfectamente climatizado.
•Primero apretar el mando para el encendido.
• Un beep indica la puesta en marcha del acondicionador y en
el display centellea el símbolo .
• Luego seleccionar el mando MODE, hasta que aparece en el
display el símbolo de la función deseada.
• Después, seleccionar la temperatura deseada apretando los
mandos .
• Ahora apretar el mando para programar la función noche:
se enciende el símbolo . Apretando más veces el mando
hasta alcanzar el número de horas deseadas (desde 1 hasta 7),
se decide la hora de apagado del acondicionador.
Con esta función el ventilador funciona automáticamente.
Nota: La función noche consiente mantener el ambiente a la temperatura más apro-
piada evitando una excesiva elevación o bajada de la temperatura, con un
funcionamiento silencioso. El flujo de aire disminuye, mientras la temperatura del
ambiente cambia gradualmente siguiendo las exigencias del bienestar: aumen-
ta 1ºC después de 60 minutos y 2ºC después de 2 horas.
PROGRAMACIÓN DEL TEMPORIZADOR
Programación del encendido
Cuando el acondicionador está encendido apretar el mando ON:
empieza a centellear el símbolo ON TIME y el reloj indica las 12:00 h.
Es necesario recordar que el temporizador pone en marcha el
acondicionador volviendo a plantear todas las funciones y modalidades activas antes del apagado.
•Si la programación es la deseada, es suficiente apretar el
mando SET.
• Para aumentar ou para disminuir la hora del reloj seleccionar el
mando ,
• El aumento o la disminución consiste en 10 minutos por cada
presión de los mandos , mientras que teniéndolos apretados los
cambios son más veloces.
• El escrito ON TIME sigue centelleando.
•Volviendo a apretar el mando SET, se confirma la programación
del temporizador para el encendido.
•Tras ello, seleccionar el mando CANCEL: el reloj indica la hora
corriente.
Programación del apagado
El procedimiento de programación del apagado y la anulación es
parecido al anterior: la diferencia consiste solamente en apretar el
mando OFF en vez del mando ON.
85
Seleccion de las funciones
FX180eco 16-05-2002 14:53 Pagina 85
°C
HR
Page 86

86
Es necesario seguir las siguientes advertencias para obtener el máximo rendimiento del
Acondicionador:
• Cerrar puertas y ventanas del local que se
desea acondicionar, a excepción de instalación por medio de un agujero en la
pared, en tal caso es aconsejable dejar
una rendija en una puerta o ventana en
modo de garantizar un adecuado cambio
del aire en el ambiente.
•Proteger la habitación de los rayos solares, cerrando las cortinas y/o bajando
parcialmente las persianas, para obtener
un funcionamiento más económico.
• No apoyar objetos sobre el Acondicionador.
• No obstaculizar la aspiración y expulsión de aire .
•Verificar que en el ambiente no haya
fuentes de calor.
Consejos
Cerrar puertas y ventanas
Bajar las persianas o cerrar las cortinas.
No cubrir
• Controlar que el Acondicionador esté
colocado en un piso “plano”. Colocar
eventualmente los dos bloques
debajo de las ruedas anteriores .
20
• No instalar el aparato en sitios húmedos.
• No dejar el aparato expuesto a agentes
atmosféricos.
•Tener el aparato a una adecuada distancia de superficies combustibles.
7
1
3
FX180eco 16-05-2002 14:53 Pagina 86
Page 87

ESPAÑOL
87
Limpieza
Antes de cada operación de limpieza o de mantenimiento apagar el aparato y desenchufando
el mismo.
LIMPIEZA DEL MUEBLE EXTERIOR
Le aconsejamos limpiar el aparato con un
paño apenas humedecido y secar con un
paño seco. Por motivos de seguridad no se
debe lavar el Acondicionador con agua.
Precauciones
No usar nunca bencinas, alcoholes o solventes para la limpieza. No rociar con líquidos
insecticidas o similares.
LIMPIEZA DE LOS FILTROS DE AIRE
Para mantener inalterada la eficacia de su
acondicionador, le aconsejamos lo siguiente:
1 Limpiar el filtro antibactérico cada semana
2 Sustituir el filtro FILTRETETMal final de cada
temporada antes de guardar el acondicionador.
Los filtros para la purificación del aire se
encuentran en correspondencia de las 2
rejillas de aspiración. Las rejillas son al mismo
tiempo la sede de los mismos filtros.
Para limpiar los filtros, por lo tanto, es necesario:
1 - Quitar las rejillas de aspiración, girándolas
hacia fuera (ver fig.F)
fig. F
1
2
2 - Quitar el 1º filtro FILTRETETM(de color blanco)
3 - Quitar el portafiltro sede del filtro desenganchándolo de la rejilla externa (ver fig.G)
Rejilla de aspiración
filtro
filtro
filtrete
tm
fig. G
Para quitar el polvo que se ha depositado en
el filtro antibactérico usar una aspiradora. Si
está muy sucio sumergirlo en agua templada
y enjuagarlo varias veces. La temperatura
del agua no debe superar los 40º C.
Tras haberlo lavado, secar bien el filtro antes
de introducirlo nuevamente.
No traten de limpiar el filtro FILTRETETMpues
podría disminuir su capacidad de filtrar.
VERIFICACONES DE INIZIO DE ESTACION
Verificar que el cable de alimentación y el
enchufe estén perfectamente íntegros y asegurarse que la conexión a tierra sea eficiente.
Atenerse escrupulosamente a las normas de
instalación.
VERIFICACONES AL FINAL DE ESTACION
Hagan salir el agua del recipiente que la
recoge quitando el tapón del tubo de drenaje. Saquen el recipiente de recoger la condensación que está colocado en la parte
posterior del acondicionador de aire y
vacíenlo.
Vuelvan a colocarlo correctamente.
Limpien los filtros, séquenlos bien antes de
volver a introducirlos.
FX180eco 16-05-2002 14:53 Pagina 87
Page 88

88
Si algo no funciona…
PROBLEMAS CAUSAS REMEDIOS
El acondicionador
no funciona
• Falta la corriente
• El aparato no está enchufado
• El ventilador está bloqueado
• Ha intervenido el flotador de seguridad
• Enchufar
• Llamar al Centro de Asistencia
•Vaciar el recipiente
El acondicionador
funciona sólo por
poco tiempo
• El tubo de descarga presenta un aplastamiento
• El tubo de descarga está obstruido
• El tubo de descarga presenta pliegues
• Colocar correctamente el tubo
de descarga
• Controlar si hay obstáculos que
impiden la descarga del aire
externo
• Eliminar los pliegues
El acondicionador
funciona per no
refresca la habitación
•Ventana abierta
• En la habitación está funcionando alguna
fuente de calor (quemador, lámpara, etc) o
también hay demasiadas personas
• El tubo de descarga del aire se ha salido de su
sede
• Filtros de aire atrancados
• El acondicionador tiene una potencia inadecuada
• Cerrar la ventana
• Eliminar las fuentes de calor
• Introducir el tubo en su sede
• Limpiar los filtros.
• limpiar los filtros ou sustituirlos
Olor particular en la
habitación
• filtros del aire obstruidos
Pérdida de condensación desde el
acondicionador
• el recipiente que recoge la condensación
está lleno
• el aparato ha sido mal instalado
• vaciar el recipiente y drenar el
agua a través del tubo de drenaje de la condensación
colocado en la parte posterior
del aparato.
•Ver pág. 78 para instalar el
aparato correctamente.
El acondicionador no
funciona por aprox. 3
minutos desde el
encendido
• interviene el dispositivo de seguridad de la
máquina
• esperar que hayan transcurrido
3 minutos.
Los tres leds
centellean
• el recipiente que recoge la condensación está
lleno
•Vaciar el recipiente y drenar el
agua a través del tubo de drenaje de la condensación
colocado en la parte posterior
del aparato.
• Desenchufar la clavija y
después enchufarla otra vez.
Si los leds se quedan encendidos de todas formas, diríjanse
al Centro de Asistencia.
La indicación del
telemando es débil o
inexistente
• baterías descargadas
• baterías colocadas al revés
• cambiar las baterías
• verificar la posición de los
polos de las baterías (+) y (-).
8
9
9
FX180eco 16-05-2002 14:53 Pagina 88
Page 89

ESPAÑOL
89
Caracteristicas tecnicas
CARACTERISTICAS TECNICAS
Tensión
de alimentación ver chapa características
Potencia máx. absorción
en acondicionamiento “
Potencia máx. absorción
en deshumidificación “
Potencia frigorífica* “
Dimensiones unidad interna.
• Ancho 452 mm
• Altura 800 mm
•Profundidad 455 mm
• Peso 33,5 kg
* En condiciones estándar:
Temperatura de la habitación 27°C
47% de humedad relativa
Temperatura externa 35°C
41% de humedad relativa
CONDICIONES ACONSEJADAS PARA EL
FUNCIONAMIENTO
Temperatura en la habitación 21 ÷ 32°C
Temperatura externa 21 ÷ 43°C
FX180eco 16-05-2002 14:53 Pagina 89
Page 90

90
Durante o verão, as condições de bem-estar são alcançadas com uma temperatura com-
preendida entre 24 e 27 ºC e com uma humidade relativa por volta de 50%.
O condicionador de ar é um aparelho que subtrae humidade e calor do ambiente onde foi colocado. Em relação aos modelos que devem ser instalados, os condicionadores portáteis têm a
vantagem de poderem ser deslocados de uma divisão para a outra de uma casa, e de poderem ser transferidos de um edifício ao outro.
O ar quente da sua divisão passa através
de uma bateria resfriada por um gás
refrigerante. Desta maneira, cede
calor e humidade em excesso
antes de ser enviado novamente ao ambiente.
Nos Pinguinos, uma pequena
parte deste ar é utilizado
para resfriar o gás refrigerante e, quando torna-se
quente e húmida, é enviada para o exterior.
Cada aparelho Pinguino
pode ser utilizado somente com a função de ventilação.
Para maiores informações,
consulte o nostro site internet:
www.delonghi.it
Que é Pinguino e Super Pinguino
FX180eco 16-05-2002 14:53 Pagina 90
Page 91

PORTUGÛES
91
Informações importantes
• Este aparelho foi fabricado para condicionar
os ambientes domésticos e não deve ser usado
para outros fins.
•É perigoso modificar ou alterar as características do aparelho.
•O aparelho deve ser instalado segundo as normas de instalações nacionais.
• Para eventuais reparações, contactar sempre
e somente os Centros de Assistência Técnica
autorizados pelo Fabricante. As reparações
efectuadas por pessoa não experiente podem
ser perigosas.
• Este aparelho deve ser usado exclusivamente
por adultos; não permitir que as crianças brinquem com o mesmo.
• Este aparelho deve ser ligado a um sistema eficaz de ligação à terra. Mandar controlar o sistema eléctrico por um electricista qualificado.
• Evitar a utilização de extensões para o cabo de
alimentação eléctrica.
• Antes de cada limpeza ou manutenção, retirar
sempre a ficha da tomada de corrente.
• Não puxar o cabo de alimentação eléctrica
para movimentar o aparelho.
• Em caso de avaria do cabo de alimentação, este
deve ser substituído somente por pessoal especializado e autorizado pelo fabricante.
• Não instalar o aparelho em ambientes onde o
ar possa conter gases, óleos, enxofre ou próximo a fontes de calor.
• Não apoiar objectos pesados ou quentes sobre
o aparelho.
• Limpar os filtros pelo menos uma vez por semana.
• Evite utilizar aparelhos de aquecimento nas
proximidades do aparelho de ar condicionado.
• Em caso de transporte, o aparelho deve ficar
na posição vertical ou apoiado cuidadosamente sobre um lado.
Antes de transportar o aparelho, esvaziar o
reservatório e a cuba de colecta de condensado. Após o transporte do aparelho, esperar
pelo menos 1 hora antes de o ligar.
• Os materiais utilizados para a embalagem são
recicláveis. Recomenda-se, portanto, colocálos nos respectivos recipientes para a recolha
diferenciada.
FX180eco 16-05-2002 14:54 Pagina 91
Page 92

92
A seguir, encontram-se todas as instruções necessárias para preparar, da melhor forma possível,
o funcionamento do seu ar condicionado.
CLIMATIZAÇÃO SEM INSTALAÇÃO
Com poucas e simples operações, o Pinguino
oferece condições de bem-estar:
• fixar o tubo de saída de ar na respectiva sede da parte posterior do aparelho.
Inseri-lo segundo a ilustração da figura A
5
17
• Se houver uma janela francesa, utilizar as
ventosas que foram entregues para
manter próximos os vidros (fig. C).
19
• colocar na extremidade do tubo , o
bocal para a janela .
• colocar o condicionador de ar próximo a
uma janela ou porta-janela;
• abrir levemente a janela ou porta-janela
e posicionar o bocal conforme ilustrado na figura B.
18
18
17
A
Pr eparações para o uso
B
C
FX180eco 16-05-2002 14:54 Pagina 92
1
2
Page 93

PORTUGÛES
93
Pr eparações para o uso
CLIMATIZAÇÃO COM INSTALAÇÃO
Se desejar, o Pinguino também pode ser
instalado de maneira semi-permanente.
2. Colocar no orifício o acessório flange
15 que foi entregue com o aparelho.
3. Fixar o tubo na respectiva sede na parte
posterior do aparelho (fig. A).
4. Colocar a extremidade do tubo no
flange , conforme ilustra a fig. F.
16
17
17
16
Neste caso, vai ser necessário:
• fazer um furo na parede que comunica
com a parte externa ou através do vidro
de uma janela. Respeitar o intervalo de
altura e as dimensões do furo indicados
na figura D.
Quando o tubo não estiver conectado, o
orifício pode ser fechado com a tampa do
flange .
OBSERVAÇÃO
Quando for feita uma instalação tipo semipermanente, recomendamos deixar levemente aberta uma porta (mesmo se só 1
cm), para garantir a correcta troca de ar.
16
17
No vidro da
janela
Na parede
recomendamos
isolar a secção
da parede com
um material isolante apropriado.
No rodapé
de madeira da janela
D
E
DESUMIDIFICAÇÃO
Posicionar o aparelho na divisão sem inserir o
tubo; desta maneira, o ar desumidificado vai
ser eliminado directamente no ambiente.
FX180eco 16-05-2002 14:54 Pagina 93
0 cm
30 cm
MAX115 cm
MIN 50 cm
Page 94

94
Descrição do telecomando/
Conexão a rede eléctrica
CONEXÃO À REDE ELÉCTRICA
Antes de colocar a ficha na tomada de corrente, é necessário verificar que:
•la tensão de rede esteja em conformidade com o valor indicado nas características técnicas;
• la tomada e a linha de alimentação eléctrica sejam dimensionadas para suportar a carga
necessária;
• la tomada seja apropriado ao tipo da ficha, se não o for, mandar substituir a tomada;
• la tomada esteja conectada a uma ligação à terra eficiente. O fabricante declina toda e
qualquer responsabilidade caso esta norma de prevenção contra acidentes não seja respeitada.
Seleccionando a função de climatização ao mesmo tempo em que se dá uma queda de tensão de correnteeléctrica, poderia haver a intervenção de um dispositivo de segurança. Este
dispositivo bloqueia o funcionamento do circuito frigorifero, e o aparelho funciona como ese estivesse em ventilação/purificação. Para restabelecer a função de climatização, desligar o aparelho e manter a ficha desligada por pelo menos trinta segundos. Então ligar novamente.
O VISOR
Ao ligar o climatizador, todos os símbolos se
acendem.
Ao desligá-lo, permanece aceso somente o
relógio.
A. Beep
Indica o sinal acústico e o início de funcionamento do climatizador, activa-se
também todas as vezes que uma operação é completada.
B. Símbolos das várias funções
Ar condicionado, desumidificação, ventilaçã oaquecimento (ñao en todos os
modelos), e Full Auto.
C. Temperatura ambiente
Indica a temperatura ambiente.
D. Velocidade do ventilador.
Indica as várias velocidades: mínima,
média, máxima, automática e silent.
E. Timer para ligar/desligar
Indica os tempos programados de ligar e
desligar.
F. Timer sleep/silent
Indica as horas desejadas de funcionamento, na função Sleep.
G. Indicador de substituição das pilhas
H. Purificação do ar
O símbolo fica sempre aceso porque,
com o ar condicionado aceso, o ar é
sempre filtrado para retirar as suas impuridades.
I. Temperatura programada
Indica a temperatura programada.
J. O relógio
Indica a hora.
AS TECLAS
K. Ligar/Desligar
L. MODE: selecção da função
Premindo esta tecla, são seleccionadas
as várias modalidades de funcionamento:
ar condicionado, desumidificação,ventilação/purificação, aquecimento (ñao en
todos os modelos), e full auto
M. Termóstato ambiente
As duas teclas seleccionam a temperatura desejada no ambiente.
N. Indicação da temperatura ambiente
A tecla indica a temperatura presente no
ambiente. Depois de aproximadamente 4
segundos, mostrará a temperatura programada anteriormente.
O. Selecção da velocidade do ventilador
A tecla selecciona a velocidade do ventilador: mínima, média, máxima, auto.
P. SET: memoriza relógio ou timer
Memoriza o ajuste do relógio ou do Timer
ON/OFF.
Q. ON/OFF: programação do timer
As teclas fazem a programação para
ligar e desligar o climatizador.
R. CANCEL: anulação do timer
A tecla anula as programações do timer
ON/OFF.
S. RESET
T. Ajuste do relógio ou timer
As teclas ajustam horas e minutos do reló-
gio e do timer.
U. Sleep
A tecla programa a função noite.
A substituição do cabo de alimentação deve ser feita por pessoal autorizado.
2
10
FX180eco 16-05-2002 14:54 Pagina 94
Page 95

PORTUGÛES
95
Os indicadores luminosos/
Funcionamento forçado
OS INDICADORES LUMINOSOS
Acendem-se segundo a função seleccionada ou indicam eventuais anomalias.
ANOMALIA
INDICADOR VERMELHO
11
INDICADOR AMARELO
12
INDICADOR LUMINOSO
13
FILTROS ENTUPIDOS (1)
- lampejante -
ALLARME
lampejante lampejante lampejante
FUNÇÃO
INDICADOR VERMELHO
11
INDICADOR AMARELO
12
INDICADOR LUMINOSO
13
DESLIGADO
---
CLIMATIZAÇÃO - - aceso
DESUMIDIFICAÇÃO
aceso - aceso
VENTILAÇÃO
- aceso -
FULL AUTO
TIMER
Assim que for seleccionada esta função, todos os indicadores luminosos ficarão acesos por alguns segundos
até o controlo decidir como funcionar (se condicionamento, desumidificação, ventilação ou aquecimento).
Os 3 indicadores luminosos ficam acesos, quando o aparelho estiver desligado, se pelo menos uma das
funções TIMER estiver programada.
(1) O indicador luminoso lampejante indica que é necessário fazer a limpeza dos filtros anti-
bacterianos. Para desligar o indicador luminoso, após ter feito a limpeza dos filtros, premer
o botão de funcionamento manual até quando ouvir um beep seguido por um duplo
beep. Este procedimento pode ser feito mesmo quando o aparelho estiver a funcionar.
FUNCIONAMENTO FORÇADO
É um modo de funcionamento que é escolhido em caso de problemas com o telecomando
(quebra, desaparecimento ou pilhas descarregadas).
Premer a tecla para ligar a unidade interna e premer novamente para obter a sequência
das diversas modalidades de funcionamento (ar condicionado, desumidificação, ventilação, full
auto, desligado), com programação automática.
14
14
FX180eco 16-05-2002 14:54 Pagina 95
Page 96

96
Descrição do telecomando
O TELECOMANDO
Como colocar as pilhas
•Empurrar a tampa para frente (ver figura).
• Colocar duas pilhas, novas e não recarregáveis, prestando atenção para
colocá-las na direcção correcta (+)e(-).
• Colocar novamente a tampa, fazendo
com que deslize até a posição inicial.
• No visor aparecerão por alguns instantes
todos os símbolos do telecomando.
Neste momento, o relógio do visor
começará a lampejar indicando 12:00
horas. Em seguida, programar a hora exacta.
NOTA: ACONSELHAMOS O USO DE PILHAS
ALCALINAS.
Tanto em caso de substituição como de
eliminação do telecomando, a bateria
deve ser retirada e tratada segundo as leis
vigentes, pois é danosa para o ambiente.
AJUSTE DO RELÓGIO
• Se, dentro de 2 minutos após ter feito o
reset ou substituído as pilhas, a hora não
for ajustada, o telecomando posiciona-se
automaticamente em 12:00 horas.
• Para programar a hora, premer as teclas
para aumentar ou diminuir. O
aumento ou diminuição é feito em passos
de 1 minuto.
Mantendo as teclas premidas, o relógio
mudará as horas mais rapidamente.
•O relógio continuará a lampejar. Premer a
tecla SET para confirmar a hora programada: o relógio pára de lampejar.
• Se for necessário acertar a hora, é preciso
premer a tecla RESET e, em seguida, ajustar a hora corrente. (Não existe outra
maneira).
USO CORRECTO
• Colocar o telecomando em direcção do
receptor de sinais do climatizador de ar
.
•A distância máxima é de aproximadamente 7 metros (sem obstáculos entre o
telecomando e o receptor).
•O telecomando deve ser manuseado
com muito cuidado: não deixar cair, não
expor à luz solar directa e nem deixá-lo
próximo a fontes de calor.
MODE
MODE
15
FX180eco 16-05-2002 14:54 Pagina 96
Page 97

PORTUGÛES
97
Selecção das funções
FUNZIONE CONDIZIONAMENTO
Esta função é ideal em caso de dias particularmente quentes.
• Primeiramente, premer a tecla para ligar o aparelho.
• Um beep indicará que o climatizador foi ligado e no visor lampejará
o símbolo .
•Em seguida, seleccionar a tecla MODE até aparecer no visor o símbolo ar condicionado.
•A esta altura, deve ser programada a temperatura: para diminuí-la premer a tecla .
• Para seleccionar a velocidade do ventilador basta premer
repetidamente a tecla até alcançar a ventilação desejada
(mínima, média, máxima, automática, silent).
NOTA:
Na função condicionamento, o aparelho remove automaticamente do ambiente a humidade em excesso.
FUNÇÃO DESUMIDIFICAÇÃO
É aconselhável activar tal função em caso de altos níveis de humidade.
• Primeiramente, premer a tecla para ligar o aparelho.
• Um beep indicará que o climatizador foi ligado e no visor lampejará
o símbolo .
• Em seguida, seleccionar a tecla MODE até aparecer no visor o
símbolo desumidificação .
Nota:
Sublinhamos que é importante programar a temperatura de modo
que seja mais baixa que a temperatura do ambiente, premindo a
tecla .
Para seleccionar a velocidade do ventilador basta premer repetidamente a tecla até alcançar a ventilação desejada (mínima,
média, máxima, automática).
Dependendo das condições da ambiente e da temperatura selecionada pode escolher de manera automatica a velociolade da
ventilação.
NOTA:
Quando a função de apenas desumidificação está activada, é normal que o aparelho ligue e desligue periodicamente.
FX180eco 16-05-2002 14:54 Pagina 97
Page 98

98
Selecção das funções
FUNÇÃO VENTILAÇÃO
Quando o dia for abafado mas não particularmente quente, pode
ser suficiente activar a função ventilação/purificação.
• Primeiramente, premer a tecla para ligar o aparelho.
• Um beep indicará que o climatizador foi ligado e no visor lampejará
o símbolo .
• Em seguida, seleccionar a tecla MODE até aparecer no visor o
símbolo ventilação .
• Uma vez activada, premer repetidamente a tecla até
alcançar a velocidade desejada.
Lembramos que nas funções com ventilação automática, será o
próprio aparelho que escolherá a velocidade mais apropriada.
FUNÇÃO FULL AUTO
Full Auto activa automaticamente todas as funções do climatizador, incluindo temperatura, velocidade de ventilação, garantindo
o máximo bem-estar ambiental.
• Primeiramente, premer a tecla para ligar o aparelho.
• Um beep indicará que o climatizador foi ligado e no visor lampejará
o símbolo .
• Em seguida, seleccionar a tecla MODE até aparecer no visor o
símbolo FULL AUTO.
O aparelho irá estabelecer automaticamente a função (condicionamento, desumidificação, ventilação) e a velocidade óptimas de
funcionamento.
FX180eco 16-05-2002 14:54 Pagina 98
Page 99

PORTUGÛES
FUNÇÃO AUTOMÁTICA SLEEP
É ideal para quem deseja dormir tranquilo, num ambiente perfeitamente climatizado.
• Primeiramente, premer a tecla para ligar o aparelho.
• Um beep indicará que o climatizador foi ligado e no visor lampejará
o símbolo .
•Em seguida, seleccionar a tecla MODE até aparecer no visor o símbolo da função desejada.
• Seleccionar a temperatura desejada premendo as teclas .
•A seguir, premer a tecla para programar a função noite: se
acenderá o símbolo . Premindo várias vezes a tecla até o
número de horas desejadas (de 1 a 7), decidir a que hora deve
se desligar o climatizador.
Com esta função, o ventilador funciona automaticamente.
NOTA A função noite permite manter o ambiente na temperatura ideal evitando um
aumento ou abaixamento excessivo da temperatura, com funcionamento
silencioso.
O fluxo de ar diminui e a temperatura do ambiente varia gradualmente seguindo as exigências de bem-estar: aumenta de 1ºC após 60 minutos e de 2ºC após
2 horas, na fase de condicionamento.
AJUSTE DO TIMER
Ajuste para ligar
Com o climatizador ligado, premer a tecla ON: começará a lampejar o símbolo ON TIME e o relógio mostrará 12:00 horas.
Lembrar-se que o timer acciona o climatizador reprogramando
todas as funções e as modalidades activas no último funcionamento.
• Se a programação é a desejada, basta premer a tecla SET.
• Para fazer avançar/retroceder o relógio, seleccionar a
.
•O aumento e a diminuição será de 10 minutos a cada vez que
as teclas são premidas, e mantendo-as premidas os aumentos
ou diminuições serão mais rápidos.
•A escrita ON TIME continuará a lampejar. remindo novamente a
tecla SET, memoriza-se a programação do timer para ligar o aparelho.
• Para anular a programação, premer a tecla ON; o símbolo ON
TIME lampejará indicando a hora para ligar.
• Em seguida, seleccionar a tecla CANCEL e o relógio mostrará a
hora corrente.
AJUSTE PARA DESLIGAR
O procedimento de programação para desligar e para anular é
semelhante ao anterior: a diferença encontra-se somente em premer a tecla OFF no lugar da tecla ON.
99
Selecção das funções
FX180eco 16-05-2002 14:54 Pagina 99
°C
HR
Page 100

100
Há algumas advertências a serem seguidas
para obter o máximo rendimento do condicionador:
•fechar as portas e as janelas da divisão que
se deseja climatizar. A única excepção é
em caso de instalação através de um furo
na parede. Neste caso, recomenda-se
deixar uma pequena passagem de ar
através de uma porta ou janela, para
garantir a correcta troca de ar;
•proteger a divisão contra as exposições
directas do sol, fechando as cortinas e/ou
abaixando parcialmente as persianas de
modo a ter um funcionamento extremamente económico;
•não apoiar objectos sobre o condicionador de ar;
•não obstruir a aspiração ou saída do
ar ;
• certificar-se de que no ambiente não
haja fontes de calor;
Alguns conselhos
fechar portas e janelas
abaixar as persianas ou fechar as cortinas
não cobrir
• controlar que o condicionador de ar
esteja posicionado num pavimento nivelado; colocar, se necessário, os 2 travões
sob as rodas anteriores .
20
• Não instale o aparelho em locais húmidos.
• Não deixe o aparelho indevidamente
exposto aos agentes atmosféricos.
• Manter o aparelho a uma distância apropriada das superfícies combustíveis
7
1
3
FX180eco 16-05-2002 14:54 Pagina 100
 Loading...