

Page 1

FRIGGITRICE ELETTRICA
ELECTRIC DEEP FRYER
FRITEUSE ELECTRIQUE
ELEKTRISCHE FRITEUSE
ELEKTRISCHE FRITEUSE
FREIDORA ELECTRICA
FRITADEIRA ELECTRICA
H§EKTPIKH ºPITEZA
ELEKTRISK FRITYRGRYTE
ELEKTRISK FRITUREGRYDE
ELEKTRISK FRITÖS
SÄHKÖRASVAKEITIN
ùùããÖÖääííêêààóóÖÖëëääÄÄüü îîêêààííûûêêççààññÄÄ
ELEKTROMOS OLAJSÜTŐ
ELEKTRICK¯ FRITOVACÍ HRNE
FRYTKOWNICA ELEKTRYCZNA
Istruzioni per l’uso
Instructions for use
Mode d’emploi
Bedienungsanleitung
Gebruiksaanwijzingen
Instrucciones para el uso
Instruções
O‰ËÁ›Â˜ ¯Ú‹Û˘
Brugsanvisninger
Bruksanvisning
Bruksanvisningar
Käyttöohje
ààÌÌÒÒÚÚÛÛÍ͈ˆËËËË ÔÔÓÓ ˝˝ÍÍÒÒÔÔÎÎÛÛ‡‡ÚÚ‡‡ˆˆËËËË
Használati utasítás
Návod k pouÏití
Instrukcja obs∏ugi
10
Page 2
ELECTRICAL CONNECTION (U.K. ONLY)
A) If your appliance comes fitted with a plug, it will incorporate a 13 Amp fuse. If it does not fit your socket, the plug
should be cut off from the mains lead, and on appropriate plug fitted, as below. warning: Very carefully dispose of
the cut off plug after removing the fuse: do not insert in a 13 Amp socket elsewhere in the house as this could cause
a shock hazard. With alternative plugs not incorporating a fuse, the circuit must be protected by a 15 Amp fuse. If the
plug is a moulded-on type, the fuse cover must be re-fitted when changing the fuse using a 13 Amp Asta approved
fuse to BS 1362. In the event of losing the fuse cover, the plug must NOT be used until a replacement fuse cover can
be obtained from your nearest electrical dealer. The colour of the correct replacement fuse cover is that as marked on
the base of the plug.
B) If your appliance is not fitted with a plug, please follow the instructins provided below:
WARNING - THIS APPLIANCE MUST BE EARTHED
IMPORTANT
The wires in the mains lead are coloured in accordance
with the following code:
Green and yellow Earth
Blue Neutral
Brown Live
As the colours of the wires in the mains lead may not correspond with the coloured markings identifying the terminals in your plug, proceed as follows:
The green and yellow wire must be connected to the terminal in the plug marked with the letter E or the earth symbol or coloured green or green and yellow.
The blue wire must be connected to the terminal marked
with the letter N or coloured black.
The brown wire must be connected to the terminal marked
with the letter L or coloured red.
N
E
L
A
2
U
V
B
S
T
C
R
Q
KJ
D
P
E
O
N
M
H
F
I
G
L
Page 3
3
2
1
3
6
NO!
OK!
8
5
4
7
NO!
MAX
level
Page 4
4
LEGGERE CON ATTENZIONE QUESTO LIBRETTO
ISTRUZIONI PRIMA DI INSTALLARE E USARE L’APPARECCHIO. SOLO COSI’ POTRETE OTTENERE I
MIGLIORI RISULTATI E LA MASSIMA SICUREZZA
D’USO.
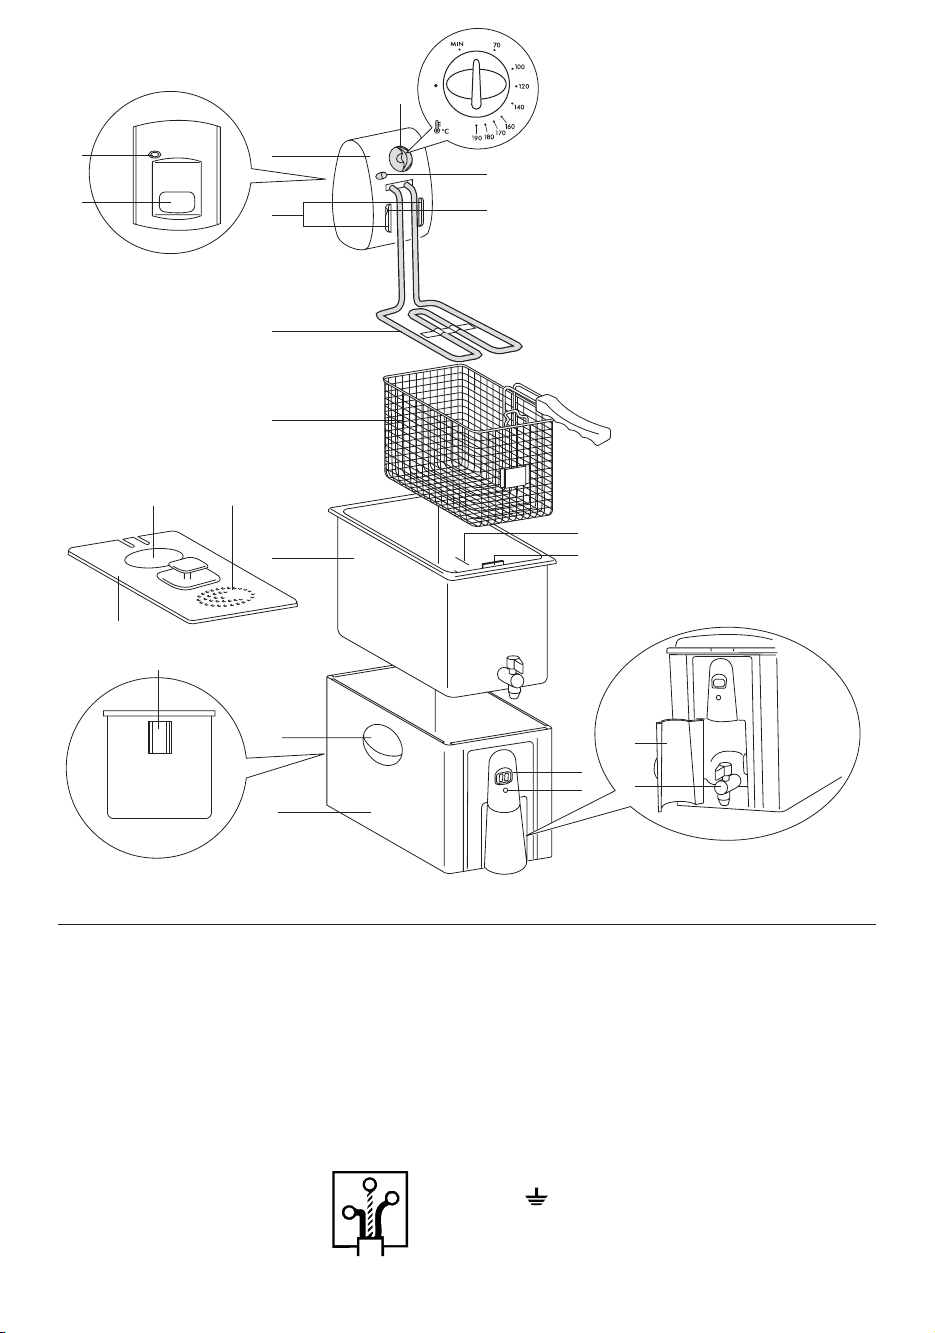
DESCRIZIONE DELL’APPARECCHIO:
A. Manopola termostato per la regolazione della
temperatura
B. Spia luminosa temperatura olio (rosso, verde)
C. Microinterruttore di sicurezza
D. Indicazione dei livelli MIN – MAX
E. Supporto cestello
F. Contaminuti (se previsto)
G. Pulsante contaminuti (se previsto)
H. Sportellino rubinetto scarico olio (se previsto)
I. Rubinetto scarico olio (se previsto)
J. Oblò (se previsto)
K. Filtro (se previsto)
L. Mantello
M. Maniglie
N. Sedi per il fissaggio del gruppo comandi
O. Coperchio con maniglia
P. Vasca amovibile
Q. Cestello con manico ribaltabile
R. Resistenza elettrica
S. Vano porta-cavo
T. Guide per il fissaggio del gruppo comandi all’ap-
parecchio
U. Reset del dispositivo termico di sicurezza
V. Gruppo comandi
AVVERTENZE IMPORTANTI:
• Questo apparecchio è stato progettato per friggere
cibi e per uso esclusivamente domestico, non deve
essere utilizzato per altri scopi e non deve essere
modificato o manomesso in alcun modo.
• Non avviare l’apparecchio se danneggiato (es. a
causa di una caduta) o se presenta problemi di funzionamento. Rivolgersi ad un centro assistenza
autorizzato dal costruttore.
• Prima dell’utilizzo verificare che la tensione della
rete corrisponda a quella della targa dati dell’apparecchio.
• Collegare l’apparecchio solo a prese di corrente
aventi portata minima di 10A e dotate di una efficiente messa a terra.
• Il cavo di alimentazione di questo apparecchio non
deve essere sostituito dall’utente in quanto la sua
sostituzione richiede l’impiego di utensili speciali. In
caso di danneggiamento, rivolgersi esclusivamente
ad un centro assistenza autorizzato dal costruttore.
• Se il cavo di alimentazione è danneggiato, esso
devo essere sostituito dal costruttore o dal suo servizio assistenza tecnica o comunque da una persona con qualifica similare, in modo da prevenire ogni rischio.
• Non staccare la spina tirando il cavo di alimentazione: agire sempre sulla spina stessa.
• Il cavo alimentazione non deve rimanere vicino o
toccare le parti calde dell’apparecchio, sorgenti di
calore o spigoli taglienti.
• Non posizionare l’apparecchio vicino a sorgenti di
calore o a possibile presenza d’acqua.
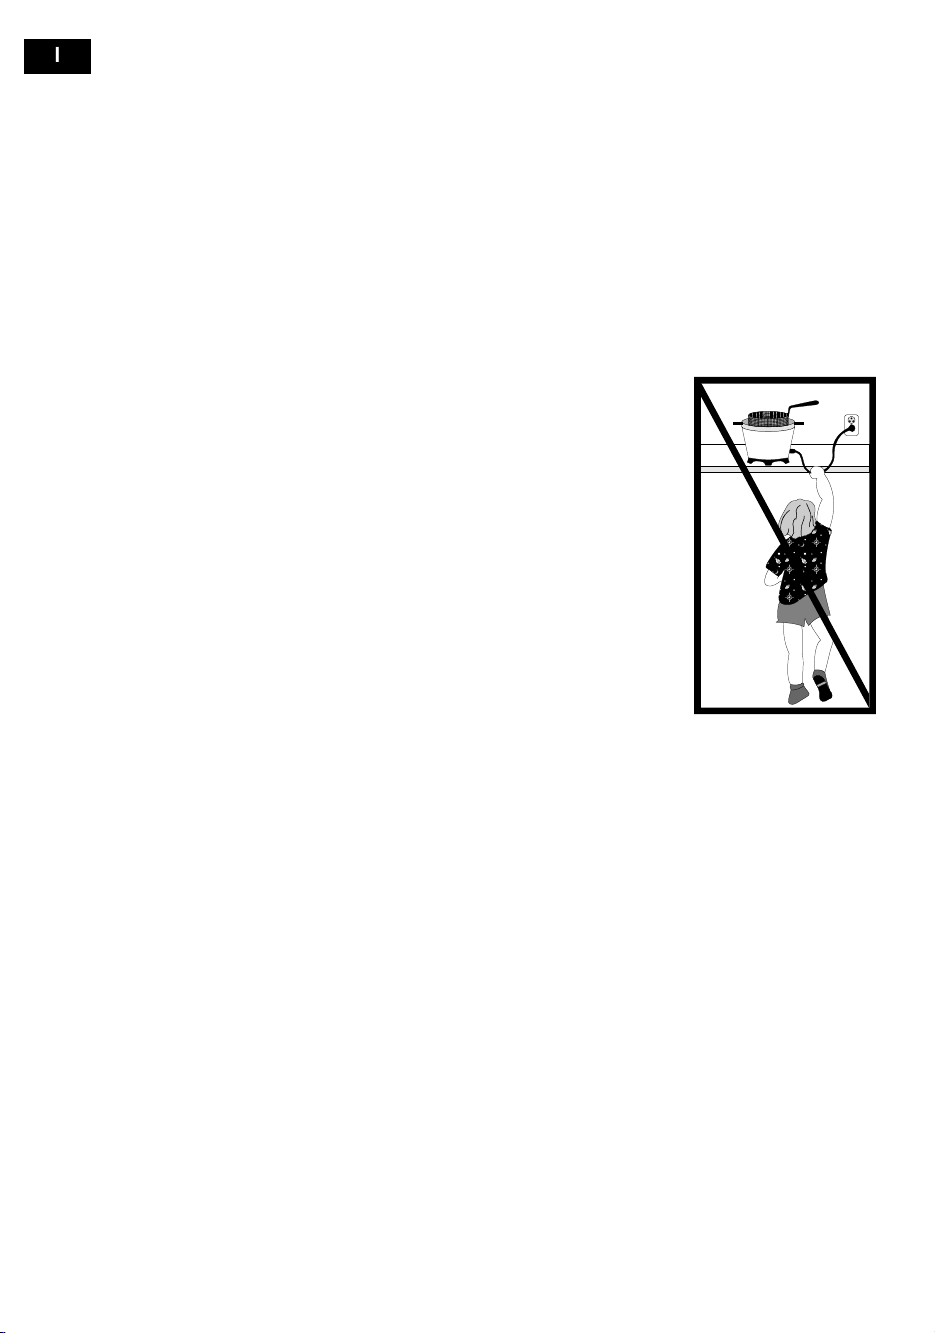
• Gravi ustioni possono essere provocate da una friggitrice che cade dall’alto. Non lasciare che il cavo
penda dal bordo della superficie su cui è appoggiata la friggitrice, dove potrebbe essere agevolmente a portata di mano di un bambino o essere
d’impiccio all’utente. Non usare prolunghe.
• Durante il funzionamento l’apparecchio è caldo,
usare solamente maniglie e manopole.
NON
LASCIARE L’APPARECCHIO ALLA PORTATA DI
MANO DEI BAMBINI.
• Non trasportare la friggitrice quando l’olio è
caldo, perché si rischiano
gravi scottature.
L’apparecchio deve essere
spostato solamente quando è freddo, utilizzando
le apposite maniglie.
• La friggitrice deve essere
messa in funzione solo
dopo averla correttamente riempita con olio o
grasso già liquefatto,
infatti, se riscaldata a
vuoto interviene un dispositivo termico di sicurezza che ne interrompe il funzionamento.
• Rispettare sempre i livelli MIN e MAX indicati all’interno del recipiente mobile.
• Il microinterruttore di sicurezza garantisce che l’elemento riscaldante possa funzionare solo se il gruppo comandi è correttamente posizionato.
• Tenere sempre l’apparecchio scollegato durante le
operazioni di pulizia e quando non in uso.
• Non immergere mai il gruppo comandi, il cavo e la
spina elettrica nell’acqua o in altri liquidi.
• Senza opportuna sorveglianza l’uso di questo
apparecchio non deve essere consentito a bambini
e persone incapaci.
• L’olio ed il grasso sono infiammabili; se prendono
fuoco, scollegare subito l’apparecchio dalla presa di
corrente e smorzare il fuoco con il coperchio o con
una coperta. Non utilizzare mai acqua per spegnere
le fiamme.
• Per togliere la vasca amovibile attendere sempre
che l’olio o il grasso siano completamente freddi.
• Conservare queste istruzioni.
• Non aprire lo sportellino del rubinetto di scarico olio
(se previsto) quando l'olio è ancora caldo.
• Prima di riempire la vasca di olio accertarsi che il
rubinetto sia ben chiuso.
I
Page 5

5
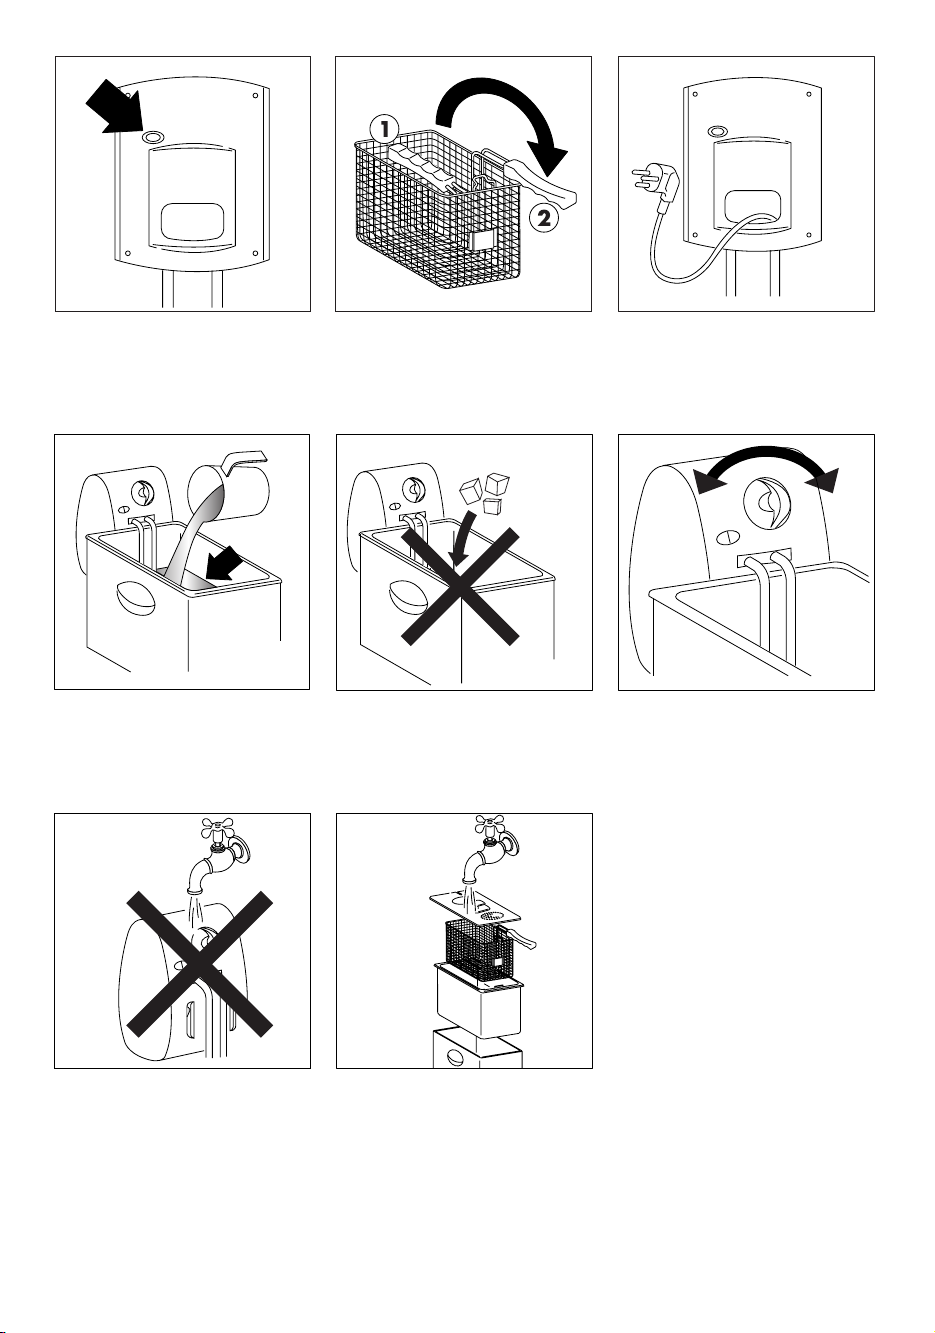
DISPOSITIVO TERMICO DI SICUREZZA
L’apparecchio è dotato di un dispositivo termico di
sicurezza che interrompe il riscaldamento in caso di
errato utilizzo o di funzionamento anomalo. Dopo che
l’apparecchio si è raffreddato, con l’aiuto di uno stuzzicadenti o qualcosa di simile, premere delicatamente
il pulsante di riarmo del dispositivo di sicurezza “U”
in prossimità della scritta RESET (vedi fig. 1). Se l’apparecchio non dovesse funzionare è necessario consultare un centro di assistenza autorizzato dal costruttore.
ISTRUZIONI PER L’USO
Prima di utilizzare la friggitrice per la prima volta,
pulire bene, con acqua calda e detergente per stoviglie, il cestello, la vasca ed il coperchio. Il gruppo
comandi con cavo alimentazione e resistenza possono essere puliti con un panno umido. Assicurarsi che
non sia penetrata acqua nel gruppo comandi e che
non ci siano residui nel fondo della vasca amovibile
Asciugare accuratamente tutte le parti.
Verificare che il gruppo comandi sia ben fissato al
corpo friggitrice. Il microinterruttore di sicurezza “C”
non permette il funzionamento dell’apparecchio se il
gruppo comandi “V” non è correttamente posizionato
nel mantello “L”.
La friggitrice è ora pronta per l’utilizzo.
RIEMPIMENTO DELL’OLIO O GRASSO
•Togliere il coperchio “O” sollevandolo per la maniglia. Ruotare l’impugnatura del cesto ribaltabile fino
al suo bloccaggio (pos. 2 di fig. 2). Estrarre il cestello “Q” tirandolo verso l’alto.
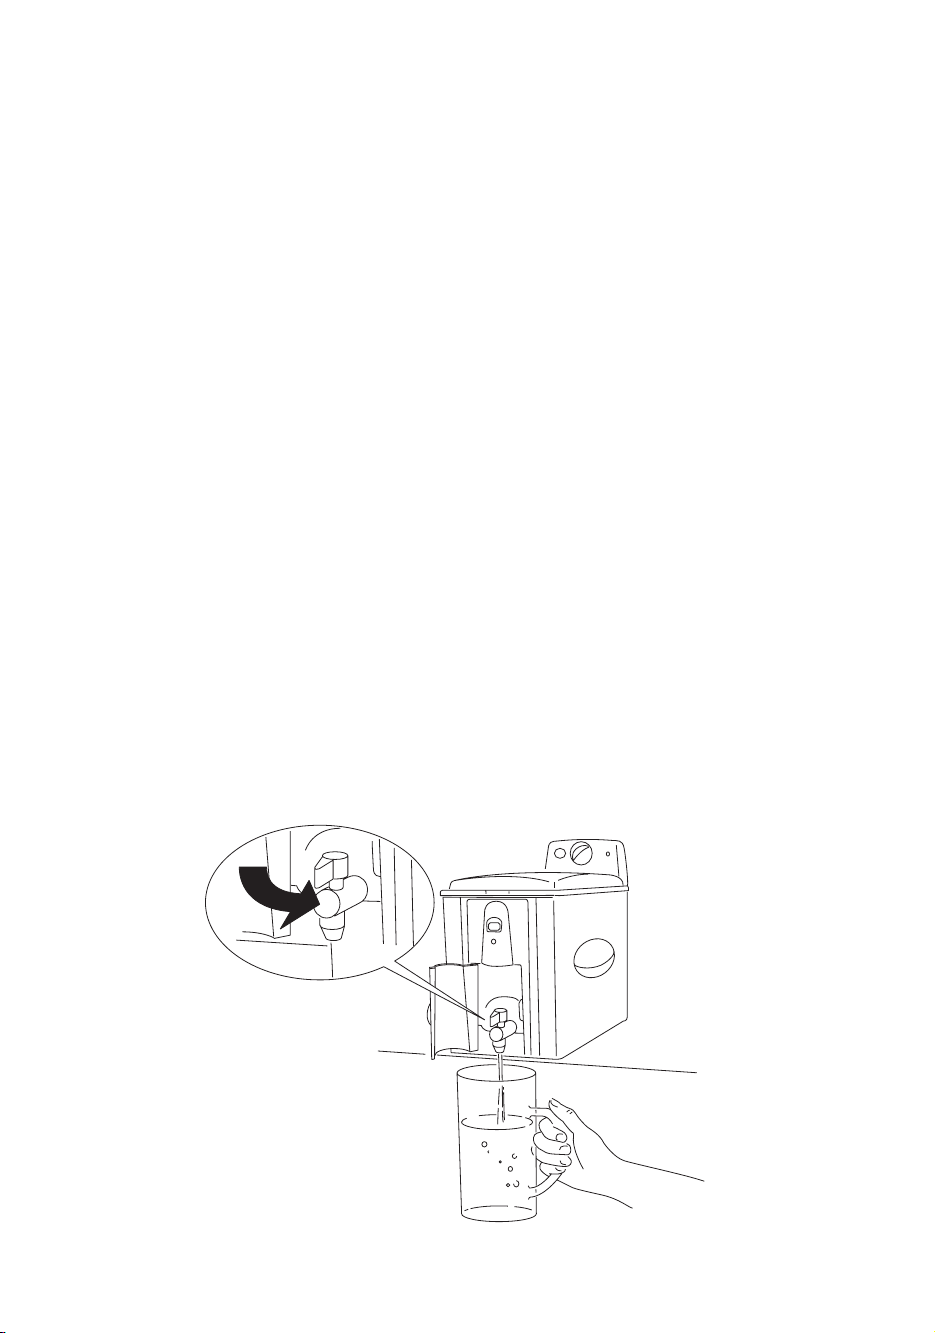
• Estrarre dal vano portacavo “S” la lunghezza di
cavo necessaria per collegare l’apparecchio alla
rete (vedi fig. 3).
• Se utilizzate olio, versatelo nella vasca “P” fino a
raggiungere il livello massimo indicato (vedi fig. 4).
Non superare mai questo limite, si rischia la fuoriuscita di olio dal recipiente.
Il livello dell’olio deve sempre trovarsi tra i riferimenti massimo e minimo “D” (max. 3 o 4 lt. a
seconda della versione). I migliori risultati si ottengono utilizzando un buon olio di semi di arachide.
• Se invece utilizzate dei pani di grasso tagliateli a
pezzetti e fateli fondere in un altro recipiente e poi
versate il grasso liquefatto in quello della friggitrice.
Non fondere mai il grasso nel cestello o sulla resistenza della friggitrice (vedi fig. 5).
• Richiudere il coperchio “O”.
PRERISCALDAMENTO
• Mettere il cibo da friggere nel cestello “Q”, senza
mai sovraccaricarlo (max 1 kg. per la versione 3 lt.
e 1,3 kg. per la versione 4 lt.). Assicurarsi che il
manico del cestello sia posizionato correttamente
(pos. 2 di fig. 2).
• Posizionate la manopola “A” del termostato (vedi fig.
6) sulla temperatura desiderata (vedi tabella cottura).
La spia luminosa “B” passa dal colore verde al rosso.
•Al raggiungimento della temperatura impostata, la
spia luminosa “B” si accende sul verde.
INIZIO FRITTURA
• Appena la spia luminosa “B” si accende sul verde,
immergere il cestello “Q” nell’olio, abbassandolo
molto lentamente per evitare schizzi o fuoriuscita
d’olio caldo.
•E’ del tutto normale che fuoriesca una notevole
quantità di vapore.
IMPOSTAZIONE DEL CONTAMINUTI(se previsto)
Premere il pulsante “G”, sul display compare “OO”.
Tener premuto il pulsante “G” fino a che si raggiunge il tempo desiderato. É possibile selezionare
da 01 a 99 min.
A selezione avvenuta rilasciare il pulsante “G”. Sul
display comincia il conto alla rovescia:
• da 99 a 01 min. il display conteggia di min. in min.;
• da 01min. il conteggio avviene di sec. in sec.
Un segnale acustico segnalerá la scadenza del
tempo impostato per spegnere il segnale acustico
basta premere il tasto contaminuti “G”.
In caso di programmazione errata del timer é possibile azzerarlo tenendo premuto il pulsante “G” per
qualche secondo.
Il contaminuti segnala la fine del tempo selezionato, ma non spegne l’apparecchio.
Per la sostituzione della batteria é necessario accedere alla parte interna del mantello “L” agendo
come segue:
•
Rimuovere tutti i componenti della friggitrice;
• Svitare le due viti che sostengono lo sportellino del
timer;
• Sfilare il timer prestando attenzione a non perdere
il pulsante;
• Aiutandosi con una moneta, rimuovere il coperchiodella batteria, svitandolo in senso antiorario;
• Sostituire la batteria con un’altra dello stesso tipo;
Per reinserire il timer eseguire le stesse operazioni in
senso contrario.
Sia in caso di sostituzione che di eliminazione dell’apparecchio, la batteria deve essere rimossa ed
eliminata secondo le leggi vigenti, in quanto dannose per l’ambiente.
Page 6

6
FRITTURA DI ALIMENTI NON SURGELATI
Consultare la seguente tabella tenendo presente che i tempi e le temperature di cottura sono approssimativi e
devono essere regolati in funzione delle quantità e del gusto personale.
Alimento Quantità max. (gr.) Temperatura (°C) Tempo (minuti)
Patatine fresche Mezza porzione 500
(versione 3 lt.)
170 6 – 8
700
(versione 4 lt.)
170 8 – 10
Porzione intera 1000
(versione 3 lt.)
170 13 – 15
1300
(versione 4 lt.) 170
14 – 16
Pesce Calamari 600 140 9 - 11
Canestrelli 600 140 10 - 12
Sardine 600 140 10 - 12
Gamberetti 600 140 8 - 10
Sogliole 500 140 6 - 8
Carne Cotolette di maiale (3-4) 500 160 8 - 9
Cotolette di pollo (3-4) 500 160 8 - 10
Polpette (15) 700 160 8 - 10
Verdure Carciofi 400 150 15 - 17
Cavolfiore 600 150 10 - 11
Funghi 500 150 8 - 10
Melanzane 200 150 9 - 11
Zucchine 500 150 13 - 15
FINE FRITTURA
• Allo scadere del tempo di cottura alzare il cestello
“Q” e controllare se il cibo ha raggiunto il grado di
doratura desiderato.
• Se ritenete che la cottura sia ultimata, spegnere l’apparecchio portando la manopola “A” del termostato nella posizione “•”. La lampada spia è verde.
•Togliere la spina dalla presa di corrente.
• Fate sgocciolare l’olio in eccesso agganciando il
cestello “Q” nel supporto “E” della vasca.
• N.B. Se la cottura è richiesta in 2 fasi o si vogliono
eseguire più cotture, al termine della prima fase
agganciare il cestello ”Q” nel supporto cestello “E”
ed attendere che la spia si accenda sul verde ad
indicare il nuovo raggiungimento della temperatura
impostata. Quindi reimmergere lentamente il cestello “Q” nell’olio per una seconda volta.
CONSIGLI PER LA COTTURA
DURATA DELL’OLIO O GRASSO
L’olio o il grasso non deve mai scendere sotto il livello
minimo. Di tanto in tanto, è necessario rinnovarlo completamente. La durata dell’olio o grasso dipende da cosa
si frigge. L’impanatura, per esempio, sporca l’olio più
della frittura semplice. Come in una qualsiasi friggitrice,
l’olio, se riscaldato più volte si deteriora! Pertanto, anche
se utilizzato correttamente, consigliamo di sostituirlo
completamente con una certa frequenza.
PER FRIGGERE NEL MODO GIUSTO
E’ importante seguire per ogni ricetta la temperatura
consigliata. A temperatura troppo bassa, la frittura
assorbe olio. A temperatura troppo alta si forma subito la crosta e l’interno rimane crudo. Gli alimenti da
friggere devono essere immersi solo quando l’olio ha
raggiunto la giusta temperatura, cioè quando la spia
luminosa “B” si spegne. Non sovraccaricare il cestello,
ciò provocherebbe un abbassamento repentino della
temperatura dell’olio e quindi una frittura troppo grassa e non uniforme. Controllare che gli alimenti siano
sottili e di uguale spessore, in quanto gli alimenti troppo spessi cuociono male all’interno, malgrado il bell’aspetto, mentre quelli di spessore uniforme raggiungono contemporaneamente la cottura ideale.
Asciugare perfettamente gli alimenti prima di immergerli nell’olio o grasso per evitare spruzzi di olio; inoltre gli alimenti umidi risultano molli dopo la cottura
(specialmente le patate). E’ consigliato impanare o
infarinare gli alimenti ricchi di acqua (pesci, carne,
verdure), avendo cura di eliminare il pane o la farina
in eccesso prima di immergerli nell’olio.
Page 7
7
FRITTURA DI ALIMENTI SURGELATI
I surgelati hanno temperature molto basse. Di conseguenza provocano un notevole abbassamento della temperatura del liquido di cottura. Per ottenere un buon risultato, vi consigliamo di non superare le quantità massime
di alimenti per ogni frittura. Gli alimenti surgelati sono sovente ricoperti da numerosi cristalli di ghiaccio che bisogna cercare di eliminare prima della cottura. Immergere poi il cestello nell’olio di frittura molto lentamente per
evitare ribollimenti dell’olio.
I tempi di cottura sono approssimativi e devono essere variati in funzione della temperatura iniziale degli alimenti
da friggere ed in funzione della temperatura consigliata dal produttore dei surgelati.
Alimento Quantità max. (gr.) Temperatura (°C) Tempo (minuti)
Patatine precotte surgelate 1000
(versione 3 lt.)
190 15 - 17
1300
(versione 4 lt.)
190 17 - 19
Crocchette di patate 700 180 9 - 11
Pesce Bastoncini di merluzzo 500 180 7 - 8
Filetti di platessa 500 180 6 - 7
Carne Cotolette di pollo (3) 300 180 5 – 6
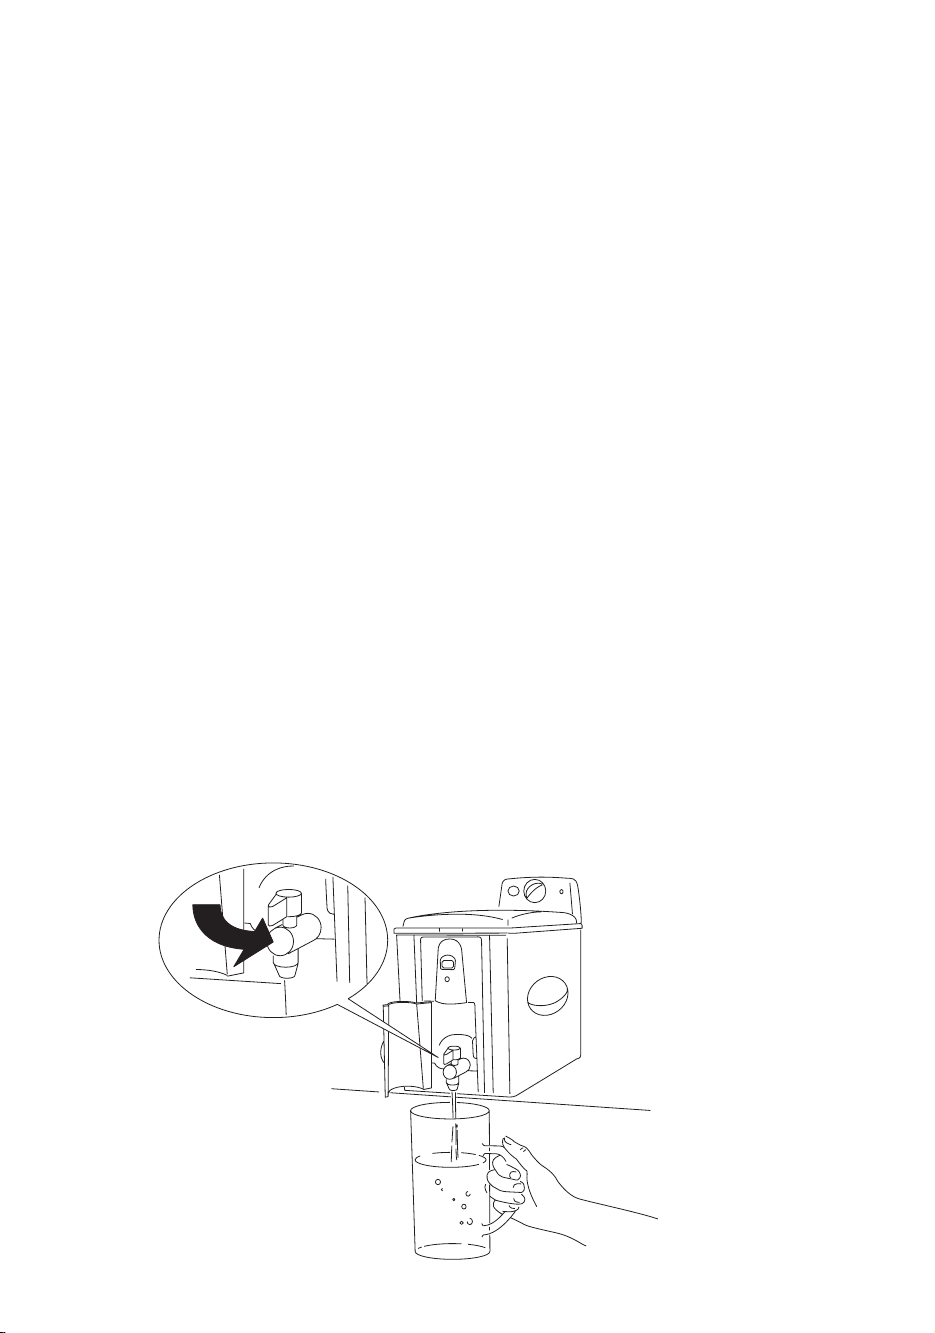
MODELLI DOTATI DI RUBINETTO SCARICO OLIO (se previsto)
ATTENZIONE: non scaricare l’olio quando è caldo, perché si rischiano scottature.
Procedere nel seguente modo:
1. Togliere il cestello.
2. Aprire lo sportellino “H”.
3. Aprire il rubinetto “I” ruotandolo in senso antiorario.
4. Fare defluire il liquido in un recipiente (vedi figura sotto) accertandosi che non trabocchi.
5. Rimuovere eventuali depositi dalla vasca con l’aiuto di una spugna o con della carta assorbente.
6. Chiudere il rubinetto ruotandolo in senso orario.
7. Richiudere lo sportellino “H”.
E’ buona norma conservare separatamente l’olio usato per friggere pesce da quello usato per friggere
altri cibi.
Se si usa strutto o lardo, non lasciarlo raffreddare troppo, per evitare che si solidifichi.
Page 8

8
RIMEDIO
Sostituire l’olio o il grasso.
Usare olio di arachide o olio vegetale di buona qualità
Sostituire l’olio o il grasso
Asciugare bene gli alimenti.
Immergerli lentamente.
Diminuire la quantità di olio nella
vasca.
Selezionare una temperatura più
alta.
Ridurre la quantità di cibo.
Rivolgersi al Centro Assistenza (il
dispositivo va sostituito)
CAUSA
L’olio si è deteriorato.
Il liquido di cottura non è adatto.
L’olio si è deteriorato e si forma troppa
schiuma
Avete immerso nell’olio caldo degli alimenti non sufficientemente asciutti.
Il cestello è stato immerso troppo rapidamente.
Il livello dell’olio supera il limite massimo.
La temperatura dell’olio è troppo
bassa.
Il cestello è sovraccarico.
La friggitrice è stata usata senza olio nella
vasca, provocando il guasto del dispositivo termico di sicurezza.
ANOMALIE DI FUNZIONAMENTO
ANOMALIA
Cattivo odore
L’olio trabocca
Gli alimenti non raggiungono la
doratura in fase di cottura
L’olio non si
scalda
PULIZIA
Prima di qualsiasi pulizia accertarsi che la spina sia
disinserita.
Non immergere mai la friggitrice nell’acqua e non
metterla sotto il getto del rubinetto (vedi fig. 7).
Infiltrandosi nel corpo comandi, l’acqua potrebbe
provocare folgorazioni.
Controllare che l’olio sia sufficientemente freddo,
successivamente, togliere il gruppo comandi e svuotare l’olio. Rimuovere il deposito dalla vasca con
l’aiuto di una spugna o con carta assorbente.
Escludendo il gruppo comandi, cavo alimentazione
e resistenza, tutte le altre parti possono essere lavate con acqua calda e detergente per stoviglie (vedi
fig. 8).
Non utilizzate mai spugne abrasive in modo da non
rovinare la friggitrice.
A fine operazione asciugare tutto con molta cura,
questo per evitare che durante il funzionamento fuoriescano spruzzi d’olio caldo.
Page 9

9
READ THIS INSTRUCTION BOOKLET CAREFULLY
BEFORE INSTALLING AND USING THE APPLIANCE.
THIS IS THE ONLY WAY TO ENSURE THE BEST
RESULTS AND MAXIMUM SAFETY FOR THE USER.
DESCRIPTION OF THE APPLIANCE:
A. Thermostat knob for setting the temperature
B. Oil temperature light (red, green)
C. Safety micro-switch
D. MIN– MAX level indicators
E. Basket support
F. Timer (if present)
G. Timer button
H. Oil drain tap cover (if fitted)
I. Oil drain tap (if fitted)
J. Viewing window (if present)
K. Filter (if present)
L. Casing
M. Handles
N. Slots for fitting the control unit
O. Cover with handle
P. Removable bowl
Q. Basket with folding handle
R. Electrical heating element
S. Cable compartment
T. Guides for attaching the control unit
U. Thermal safety device reset
V. Control unit
IMPORTANT WARNINGS:
• This appliance has been designed to fry foods exclu-
sively for household use; it must not be used for other
purposes and must not be modified or tampered with
in any way.
• Do not turn the appliance on if it is damaged (e.g.
after having been dropped) or if operating problems
arise. Contact a service centre authorised by the
manufacturer.
• Before using the appliance check that the mains vol-
tage corresponds to the value specified on the
appliance rating plate.
• Only connect the appliance to power points with a
minimum rating of 10A that are properly earthed.
• If the supply cord is damaged, it must be replaced
by the manufacturer, its service agent or similarly
qualified persons in order to avoid a hazard.
• Do not remove the plug by tugging the power cable:
always use the plug itself.
• The power cable must not be placed near or against
the hot parts of the appliance, sources of heat or
sharp edges.
• Do not position the appliance near sources of heat or
where water may be present.
• Serious burns may be caused by the deep fryer fal-
ling. Do not leave the cable hanging from the edge of
the surface the deep fryer rests on, where it may be
within the reach of a child or represent an obstacle to
the user. Do not use extension cords.
• During operation the appliance is hot; as a consequence, only use the handles and knobs.
DO NOT LEAVE THE APPLIANCE WITHIN THE
REACH OF CHILDREN.
• Do not move the deep fryer when the oil is hot, as this
risks causing serious
burns. The appliance must
only be moved when cold,
using the handles.
• The deep fryer must be
operated only after having
correctly filled it with oil or
liquefied fat; if heated
when empty, a thermal
safety device is activated
to stop operation.
•Always respect the MIN
and MAX levels indicated
inside the removable container.
• The safety micro-switch
ensures that the heating element operates only if the
control unit is correctly positioned.
• Always keep the appliance disconnected during cleaning operations and when not in use.
•Never immerse the control unit, the cable and the
electrical plug in water or other liquids.
• The appliance is not intended for use by young
children or infirm persons without supervision.
•Young children should be supervised to ensure
that they do not play with the appliance.
• The oil and fat are inflammable; if these substances
catch fire, immediately disconnect the appliance from
the power point and dampen the fire using the lid or
a blanket. Never use water to extinguish the flames.
•When removing the bowl, always wait for the oil or
fat to cool completely.
• Keep these instructions.
• Do not open the tap of oil drain system (if fitted) when
the oil is hot.
THERMAL SAFETY DEVICE
The appliance is fitted with a thermal safety device that
stops the appliance from heating in the event of incorrect use or irregular operation. Once the appliance has
cooled, using a toothpick or similar, delicately press the
safety device reset button “U” marked RESET (see Fig.
1). If the appliance does not start operating again, con-
tact a service centre authorised by the manufacturer.
GB
Page 10

10
OPERATING INSTRUCTIONS
Before using the deep fryer for the first time, carefully
clean, using warm water and dishwashing detergent,
the basket, the bowl and the cover. The control unit,
power cable and heating element may be cleaned using
a damp cloth. Check that water does not enter into the
control unit and that there is no residual water in the bottom of the removable bowl. Carefully dry all the parts.
Check that the control unit is properly fastened to the
deep fryer body. The safety micro-switch “C” will not
allow the appliance to be operated if the control unit “V”
is not correctly positioned in the casing “L”.
The deep fryer is now ready for use.
FILLING WITH OIL OR FAT
• Remove the cover “O”, lifting it by the handle. Turn
the folding handle of the basket until it locks into place
(pos. 2, Fig. 2). Remove the basket “Q” by lifting it
upwards.
• Remove the length of cable required to connect the
appliance to the mains, from the cable compartment
“S” (see Fig. 3).
• If oil is used, pour it into the bowl “P” until reaching
the maximum level indicated (see Fig. 4). Never
exceed this limit, as oil may overflow from the container. The level of oil must always be between the maximum and minimum limits, “D” (3 or 4 litres max.
depending on version). For best results, use good
quality peanut oil.
• If lumps of fat are used, cut the lumps into pieces and
melt them in another container, then pour the liquefied fat into the deep fryer bowl. Never melt the fat in
the basket or on the deep fryer heating element (see
Fig. 5).
• Close the cover “O”.
PREHEATING
• Place the food to be fried in the basket “Q”, without
overfilling (1 kg max. for the 3 litre version and 1.3
kg for the 4 litre version). Check that the handle of the
basket is correctly positioned (pos. 2 in Fig. 2).
•Move the thermostat knob “A” (see Fig. 6) to the
required temperature (see cooking table). The indicator light "B" changes from green to red.
• When the set temperature is reached, the indicator
light "B" becomes green.
STARTING FRYING
• As soon as the indicator light "B" is green, lower the
basket "Q" into the oil very slowly to avoid the hot oil
splashing or overflowing.
•A significant amount of steam will be released: this is
completely normal.
SETTING THE TIMER (if featured)
Press the button “G”; the display will show “OO”. Keep
the button “G” pressed until the required time is shown
on the display. The set time can range from 01 to 99
minutes.
Once the required time has been set, release the button
“G”. The display will start counting down:
•from 99 to 01 minutes, the display will count down
minute by minute;
•from 01 minutes on, the countdown will be in
seconds.
An audible signal will indicate the end of the set time; to
switch off the audible signal, simply press the timer button “G”.
To change the setting of the timer, reset it by holding the
button “G” for a number of seconds.
The timer signals the end of the set time, but does not
stop the appliance.
To replace the battery, access the inside of the casing
“L”, proceeding as follows:
• Remove all the deep fryer components;
• Unscrew the two screws that support the timer;
• Remove the timer being careful not to let go of the button;
•Turn the battery cover in an anticlockwise direction
until it is released.
• Replace the battery with another of the same type;
To re-insert the timer, perform the same operations in
reverse.
When either replacing or disposing of the appliance,
the battery must be removed and disposed according
to the laws in force, in that it may damage the environment.
END OF FRYING TIME
• When the set cooking time has elapsed, lift the basket
“Q” and check that the food has been cooked to the
required colour.
• If the food is completely cooked, turn the appliance
off by moving the thermostat knob “A” to the “•”
position. The indicator light is green.
• Unplug from the mains socket.
• Allow the excess oil to drain by hooking the basket
“Q” onto the support “E” on the bowl.
• N.B. If cooking requires two phases or more than one
cooking cycle is to be performed, at the end of the first
phase, hook the basket "Q" to the basket support "E"
and wait until the light becomes green, indicating that
the oil is again at the set temperature. Then slowly
place the basket “Q” in the oil a second time.
Page 11

11
FRYING NON-FROZEN FOOD
When referring to the following table, please keep in mind that the cooking times and temperatures are approximate, and must be adjusted according to the quantity of food and personal tastes.
Food Max quantity. (g.) Temperature (°C) Time (minutes)
Fresh potato chips Half portion 500 (3 litre version) 170 6 - 8
700 (4 litre version) 170 8 - 10
Full portion 1000 (3 litre version) 170 13 – 15
1300 (4 litre version) 170 14 – 16
Fish Calamari 600 140 9 - 11
Canestrelli 600 140 10-12
Sardines 600 140 10-12
Prawns 600 140 8 - 10
Tongue-fish 500 140 6 - 8
Meat Pork cutlets 500 160 8 - 9
Chicken cutlets 500 160 8 - 10
Meatballs 700 160 8 - 10
Vegetables Artichokes 400 150 15-17
Cauliflower 600 150 10-11
Mushrooms 500 150 8 - 10
Aubergines 200 150 9 - 11
Courgettes 500 150 13-15
COOKING HINTS
HOW LONG THE OIL OR FAT LASTS
The level of oil or fat must never fall below the minimum.
Every now and then it must be completely changed. The
life of the oil or fat depends on what foods are being
fried. Food coated in breadcrumbs, for example, dirties
the oil more than simple frying. As for any deep fryer,
the oil deteriorates after being heated a number of times!
Therefore, even if used correctly, it should be completely
changed on a regular basis.
CORRECT FRYING
The recommended temperature should be followed for
all recipes. If the temperature is too low, the oil will be
absorbed. If the temperature is too high, a crust will form
immediately and the inside of the food will not be
cooked.
The food being fried must only be immersed in the oil
when the oil has reached the correct temperature, that is
when the light “B” has turned off.
Never overfill the basket, as this may cause a sudden
drop in the temperature of the oil and thus greasier and
less uniform frying.
Check that the food is sliced into thin, even pieces. If the
slices are too thick, the food will not be well cooked inside, despite its appearance, while even slices will be perfectly cooked at the same time.
Carefully dry the food before immersing it in the oil or
fat, to avoid oil being sprayed; furthermore, wet food
will be less crisp after cooking (especially potatoes).
Foods with a high water content (fish, meat, vegetables)
should be crumbed before frying, making sure the
excess flour or breadcrumbs are removed before immersing the food in the oil.
Page 12
12
FRYING FROZEN FOODS
Frozen foods are stored at very low temperatures. Consequently, they significantly lower the temperature of the liquid
used for cooking.
For best results, never exceed the maximum recommended quantity of food when frying.
Frozen foods are often covered with a layer of ice; this ice should be removed before cooking. Immerse the basket
in the oil very slowly to prevent the oil from boiling over.
The cooking times are approximate and must be adjusted according to the initial temperature of the food being fried
and the temperatures indicated on the packaging of the food.
Food Max quantity. (g.) Temperature (°C) Time (minutes)
Pre-cooked frozen potato chips 1000 (3 litre version) 190 15 - 17
1300 (4 litre version) 190 17 - 19
Potato croquettes 700 180 9 - 11
Fish Fish-fingers 500 180 7 - 8
Fish fillets 500 180 6 - 7
Meat Chicken cutlets 300 180 5 - 6
MODELS FITTED WITH OIL DRAIN TAP (if fitted)
CAUTION! To avoid getting burnt do not drain oil when oil is hot.
Proceed as follows:
1. Remove the basket.
2. Open the cover “H”.
3. Open the tap “I” by turning it anticlockwise.
4. Run the liquid into a container (see the figure below), making sure it doesn’t overflow.
5. Remove any deposits form the bowl using a sponge or tissue paper.
6. Close the tap by turning it clockwise.
7. Close the cover “H”.
It is a good idea to keep the oil used to fry fish separate from that used to fry other food.
If lard or fat is used, make sure it does not cool down too much, otherwise it will solidify.
Page 13

13
CLEANING
Before cleaning, make sure that the power plug is
disconnected.
Never immerse the deep fryer in water and never place
it under running tap water (see Fig. 7). The infiltration of
water into the control unit may cause electrocution.
Check that the oil has cooled down, and then remove
the control unit and drain the oil. Remove the deposits
from the bowl using a sponge or absorbent paper.
Except for the control unit, power cable and heating element, all the other parts can be cleaned with warm
water and dishwashing detergent (see Fig. 8).
Never use abrasive sponges, to avoid damaging the
deep fryer.
When this procedure has been completed, carefully
dry all parts, to prevent hot oil from spraying out
during operation.
OPERATING FAULTS
FAULT
Bad smell
The oil
overflows
Food does not brown during cooking
The oil does not heat up
CAUSE
The oil has deteriorated.
The cooking liquid is unsuitable.
The oil has deteriorated and causes too
much foam.
You have immersed food which is not
sufficiently dry in the hot oil.
The basket has been immersed too
quickly. The oil level in the deep fryer is
over the maximum limit.
Oil temperature is too low.
The basket is over loaded
The deep fryer has previously been used
without oil in the fryer bowl, causing the
thermal safety device to break.
REMEDY
Replace the oil or fat.
Use high quality peanut or vegetable oil.
Replace the oil or fat.
Dry the food well.
Immerse it slowly.
Reduce the amount of oil in the
fryer bowl.
Select a higher temperature.
Reduce a food quantity.
Contact the Service Centre (the
device must be replaced).
Page 14

14
AVANT TOUTE INSTALLATION ET UTILISATION DE
L'APPAREIL, LIRE AVEC ATTENTION CE LIVRET D'INSTRUCTIONS, CONDITION INDISPENSABLE À
GARANTIR DES RÉSULTATS OPTIMAUX EN TOUTE
SÉCURITÉ.
DESCRIPTION DE L'APPAREIL:
A. Poignée thermostat pour le réglage de la tempéra-
ture
B. Témoin lumineux de température de l'huile (rouge,
vert)
C. Micro-interrupteur de sécurité
D. Indication de niveau MIN – MAX
E. Support panier
F. Compte-minutes (si prévu)
G. Bouton-poussoir compte-minutes (si prévu)
H. Volet robinet vidange huile
I. Robinet vidange huile (si prévu)
J. Hublot (si prévu)
K. Filtre (si prévu)
L. Carcasse
M. Poignées
N. Emplacement pour fixation du groupe des commandes
O. Couvercle avec poignée
P. Cuve amovible
Q. Panier avec manche amovible
R. Résistance électrique
S. Compartiment porte-câble
T. Guides pour fixation du boîtier de commandes à
l’appareil
U. Rétablissement dispositif thermique de sécurité
V. Groupe des commandes
AVERTISSEMENTS IMPORTANTS:
• Cet appareil a été conçu pour frire des aliments et
pour un usage exclusivement domestique; ne pas le
destiner à d'autres usages, le modifier ou chercher à
le réparer de quelque façon que ce soit.
• Ne pas tenter de mettre l'appareil en fonction si ce
dernier est endommagé (par ex. à la suite d'une
chute) ou s'il présente des problèmes de fonctionnement. S'adresser à un centre d'assistance agréé autorisé par le constructeur.
•Avant toute utilisation, contrôler que la tension du
réseau d'alimentation correspond à celle de la plaque d'identification de l'appareil.
• Brancher uniquement l'appareil à des prises de cou-
rant d'une portée minimale de 10A et équipées d'une
mise à la terre efficace.
• Si le câble d’alimentation est endommagé, il doit
être changé par le fabricant, son service aprèsvente ou par une personne de qualification similaire, afin d’éviter tout danger.
• Ne jamais débrancher la prise en tirant le câble d'a-
limentation. Agir directement sur la prise.
• Ne pas laisser le câble d'alimentation à contact avec
les parties chauffées de l'appareil, avec une source
de chaleur ou un angle coupant.
• Ne pas placer l'appareil à proximité de sources de
chaleur ou de l'eau.
• La chute d'une friteuse peut provoquer de graves brûlures. Ne pas laisser pendre le câble du bord de la
surface où est posée la friteuse, ne pas laisser l'appareil à portée des enfants ou dans une position où il
pourrait représenter une gêne pour l'usager.
• L'appareil chauffe durant le fonctionnement; ne le
manipuler qu'au moyen de sa poignée ou de poignées de tissu.
NE PAS LAISSER L'APPAREIL À PORTÉE DES
ENFANTS
• Ne pas transporter la friteuse lorsque l'huile est chaude, sous risque de brûlures
graves. Ne déplacer l'appareil que lorsque ce dernier est froid et au moyen
des poignées prévues.
• Ne mettre la friteuse en
fonction qu'après l'avoir
remplie d'huile ou de
graisse déjà fondue; si
l'appareil est chauffé à
vide, un dispositif thermique de sécurité intervient
et en interrompt le fonctionnement.
•Toujours respecter les
niveaux MIN et MAX indiqués à l'intérieur du récipient mobile.
• Le micro-interrupteur de sûreté garantit le fonctionnement de l'élément chauffant uniquement si le corps
des commandes est correctement positionné.
•Toujours débrancher l'appareil durant les opérations
de nettoyage et lorsqu'il n'est pas utilisé.
•Ne jamais immerger le corps des commandes, le
câble et la prise électrique dans l'eau ou autres liquides.
• L'usage de cet appareil par des enfants ou des personnes handicapées n'est autorisé que sous la surveillance d'un adulte.
• L'huile et la graisse sont des matières inflammables; si
ces dernières s'enflamment, débrancher immédiatement l'appareil et étouffer le feu au moyen du couvercle ou d'une couverture. Ne jamais utiliser d'eau
pour éteindre les flammes.
• Pour retirer la cuve amovible, toujours attendre que
l'huile ou la graisse aient refroidi.
• Conserver ces instructions.
•N’ouvrez pas le volet du robinet de vidange d’huile
(si prévu) quand l’huile est encore chaude.
F
Page 15

15
DISPOSITIF THERMIQUE DE SÉCURITÉ
L'appareil est équipé d'un dispositif thermique de sécuritè en interrompant le chauffage en cas d'utilisation ou
de fonctionnement incorrects. Après le refroidissement
de l'appareil, et avec l'aide d'un cure-dent ou similaire,
presser délicatement le bouton-poussoir de réarmement
du dispositif de sécurité “U” à proximité de l'inscription
RÉTABLISSEMENT (voir fig. 1). Si l'appareil ne fonctionne pas, s'adresser exclusivement à un centre d'assistance agréé autorisé par le constructeur.
INSTRUCTIONS D'UTILISATION
Avant la première utilisation, nettoyer soigneusement,
avec de l'eau chaude et du liquide vaisselle, le panier,
le bac et le couvercle. Le groupe commandes, le câble
d'alimentation et la résistance peuvent être nettoyés au
moyen d'un chiffon humide. S'assurer que l'eau ne
pénètre pas dans le groupe commande et de l'absence
de résidus au fond de la cuve mobile. Sécher soigneusement toutes les parties.
Contrôler que le groupe commandes est solidement fixé
au corps de la friteuse. Le micro-interrupteur de sûreté “C”
empêche tout fonctionnement de l'appareil si le groupe
commandes “V” n'est pas correctement positionné dans la
carcasse “L”. La friteuse est prête à l'utilisation.
REMPLISSAGE D'HUILE OU DE GRAISSE
• Retirer le couvercle "O" en le soulevant par sa poignée. Tourner la poignée du panier basculable
jusqu'à le bloquer (pos. 2 fig. 2). Retirer le panier
“Q” en le tirant vers le haut.
• Extraire du compartiment porte-câble “S” la longueur
de câble nécessaire à brancher l'appareil au réseau
d'alimentation (voir fig. 3).
• En cas d'utilisation d'huile, verser cette dernière dans le
bac “P” jusqu'au niveau maximal indiqué (voir fig. 4). Ne
jamais dépasser cette limite pour éviter tout débordement
d'huile du récipient. Le niveau d'huile doit toujours se
trouver entre les repères max et min “D” (max. 3 ou 4 l
selon la version). Pour obtenir de meilleurs résultats, utiliser une huile d'arachide de bonne qualité.
• En cas d'utilisation d'un pain de graisse, couper ce
dernier en petits morceaux et les faire fondre dans un
autre récipient avant de verser la graisse dans la friteuse. Ne jamais faire fondre la graisse dans le
panier ni sur la résistance de la friteuse (voir fig. 4).
• Refermer le couvercle “O”.
PRÉCHAUFFAGE
• Placer les aliments à frire dans le panier “Q”, sans
jamais surcharger ce dernier (max. 1 kg pour la version 3 l et 1,3 kg pour la version 5 l). Contrôler que
le manche du panier est correctement positionné
(pos. 2 fig. 2).
• Positionner le levier “A” du thermostat (voir fig. 6) sur
la température désirée (voir tableau de cuisson). Le
voyant “B” passe du vert au rouge.
• Dès que la température programmée est atteinte, le
voyant “B” s’allume en vert.
DÉBUT FRITURE
• Dès que le voyant “B” s’allume en vert, immerger le
panier “Q” dans l’huile en l’abaissant très lentement
pour éviter les éclaboussures et le débordement d’huile chaude.
• La production d'une grande quantité de vapeur est
normale.
RÉGLAGE DU COMPTE-MINUTES (si prévu)
Enfoncer le bouton-poussoir “G”, sur l'afficheur apparaît “
OO”. Maintenir enfoncé le bouton “G” jusqu'à la fin
du temps désiré. Il est possible de sélectionner entre 1 et
99 min.
La sélection effectuée, relâcher le bouton “G”. L'écran
affiche le compte à rebours:
• de 99 à 1 min. l'écran compte de min en min.
•à partir d'1min. le compte se fait de sec. en sec.
Un signal acoustique signale l'échéance du temps préfixé; pour éteindre le signal acoustique, il suffit d'enfoncer le bouton compte-minutes “G”.
En cas de programmation incorrecte du compteur,
enfoncer pendant quelques secondes le bouton “G”
pour le remettre à zéro.
Le compte-minutes signale la fin du temps L, mais n'éteint pas l'appareil.
Pour remplacer la pile, accéder à l'intérieur de la carcasse “L” de la façon suivante:
• Retirer tous les composants de la friteuse;
• Desserrer les deux vis soutenant le compteur;
• Enlever le compte-minutes en faisant attention à ne
pas perdre le bouton;
•Tourner le couvercle des piles dans le sens con-
traire des aiguilles d'une montre jusqu'à le débloquer.
• Remplacer la pile par une neuve de même type; pour
remonter le compte-minutes effectuer les mêmes opérations en sens inverse.
En cas de remplacement ou d'élimination de l'appareil, retirer et éliminer la batterie conformément aux
normes en vigueur, cette dernière contenant des substances représentant un danger pour l'environnement.
FIN FRITURE
•A la fin du temps de cuisson, remonter le panier “Q”
et contrôler si les aliments sont dorés à point.
• Si la cuisson est satisfaisante, éteindre l'appareil en
déplaçant le levier “A” du thermostat en position “•”.
La lampe témoin est verte.
• Débrancher l’appareil.
• Égoutter l'excès d'huile en accrochant le panier “Q”
sur le support “E” du bac.
• N.B. Dans le cas d’une cuisson en 2 temps ou de plu-
sieurs cuissons, à la fin de la première phase accrocher le panier ”Q” sur le support panier “E” et attendre que le témoin s'allume en vert pour indiquer que
la température programmée est atteinte à nouveau.
Immerger ensuite à nouveau le panier “Q” une
seconde fois dans l'huile.
Page 16

16
FRITURE D'ALIMENTS NON SURGELÉS
Consulter le tableau suivant, sans oublier que les temps et températures de cuisson sont approximatifs et doivent être
adaptés en fonction de la quantité et des goûts de chacun.
Aliment Quantité max. (gr.) Température (°C) Temps (minutes)
Pommes frites
fraîches Demi-portion 500 (version 3 l) 170 6 – 8
700 (version 4 l) 170 8 – 10
Portion entière 1000 (version 3 l) 170 13 – 15
1300 (version 4 l) 170 14 – 16
Poisson Calamars 600 140 9 - 11
Mollusques 600 140 10 - 12
Sardines 600 140 10 - 12
Crevettes 600 140 8 - 10
Soles 500 140 6 - 8
Viande Côtes de porc 500 160 8 - 9
Croquettes de poulet 500 160 8 - 10
Boulettes 700 160 8 - 10
Légumes Artichauts 400 150 15 - 17
Choux-fleurs 600 150 10 - 11
Champignons 500 150 8 - 10
Aubergines 200 150 9 - 11
Courgettes 500 150 13 - 15
CONSEILS POUR LA CUISSON
DURÉE DE L'HUILE OU DE LA GRAISSE
L'huile ou la graisse ne doit jamais descendre en dessous du niveau minimal. De temps en temps, il est nécessaire de les changer complètement. La durée de l'huile
ou de la graisse dépend du type de friture effectuée. Les
aliments panés, par ex., salissent davantage l'huile que
les aliments simplement frits. Comme dans n'importe
quelle friteuse, l'huile chauffée plusieurs fois se détériore! Par conséquent, même si utilisée correctement, il est
conseillé de remplacer complètement le corps gras avec
une certaine régularité.
POUR FRIRE CORRECTEMENT
Pour chaque recette, il est important de se conformer à
la température conseillée. A température trop basse, la
friture absorbe l'huile et, à une température trop élevée,
la croûte se forme immédiatement autour de l'aliment et
l'intérieur reste cru.
Les aliments à frire ne doivent être immergés que lorsque l'huile a atteint la température voulue, c'est-à-dire
quand le témoin lumineux a “B” s'éteint.
Ne pas surcharger le panier, pour éviter d'entraîner une
baisse soudaine de la température de l'huile et donc
une friture trop grasse et non uniforme.
Contrôler que les aliments sont en tranche mince et de
même épaisseur, les aliments trop épais cuisant mal à
l'intérieur malgré un aspect appétissant, tandis que ceux
d'une épaisseur uniforme atteigne simultanément un
degré de cuisson idéal.
Parfaitement sécher les aliments avant de les plonger
dans l'huile ou la graisse, afin d'éviter les projections
d'huiles; en outre, les aliments humides restent mous
après la cuisson, en particulier les pommes de terre.
Il est conseillé de paner ou de passer dans la farine les
aliments riches en eau (poissons, viandes, légumes), en
ayant soin d'éliminer le surplus de pain ou de farine
avant de les plonger dans l'huile.
Page 17

17
FRITURE D'ALIMENTS SURGELÉS
Les surgelés ayant une température très basse, ils entraînent une baisse notable de la température du liquide de cuisson.
Pour obtenir de bons résultats, ne pas dépasser la quantité maximale d'aliments recommandée pour chaque friture.
Les aliments surgelés sont souvent recouverts de nombreux cristaux de glace qu'il vaut mieux éliminer avant la cuisson. Plonger ensuite le panier dans l'huile de friture très lentement pour éviter que l'huile ne bouillonne.
Les temps de cuisson sont approximatifs et doivent être adaptés en fonction de la température initiale des aliments à
frire et de la température conseillée par la marque de surgelés.
Aliment Quantité max. (gr.) Température (°C) Temps (minutes)
Pommes frites précuites surgelées 1000 (version 3 l) 190 15 - 17
1300 (version 4 l) 190 17 - 19
Croquettes de pommes de terre 700 180 9 - 11
Poisson Bâtonnets de poisson 500 180 7 - 8
Filets de sole 500 180 6 - 7
Viande Croquettes de poulet 300 180 5 - 6
MODÈLES DOTÉS DE ROBINET DE VIDANGE D’HUILE (si prévu)
ATTENTION : ne pas vider l'huile encore chaude, risque de brûlures.
Procéder de la façon suivante
1. Retirer le panier.
2. Ouvrir le volet “H”.
3. Ouvrir le robinet “I” en tournant en sens inverse des aiguilles d’une montre.
4. Faire couler le liquide dans un récipient (voir figure ci-dessous) en veillant à ce qu’il ne déborde pas.
5. Passer une éponge ou du papier essuie-tout dans la cuve pour éliminer les éventuels dépôts.
6. Fermer le robinet en tournant dans le sens des aiguilles d’une montre.
7. Refermer le volet “H”.
Il est de bonne règle de conserver séparément l’huile utilisée pour frire le poisson et celle utilisée pour et
les autres aliments.
Attention, le saindoux et le lard se solidifient ! Éviter de les laisser refroidir trop longtemps.
Page 18

18
ANOMALIES DE FONCTIONNEMENT
ANOMALIE
Odeur désagréable
L'huile déborde
Les aliments ne sont pas dorés à
point
L'huile ne chauffe pas
CAUSE
L'huile s'est détériorée.
Liquide de cuisson inadéquat.
L'huile s'est détériorée et entraîne la
formation d'un excès de mousse.
Introduction dans l'huile chaude d'aliments humides.
Le panier a été immergé trop rapidement. Le niveau de l'huile dépasse la
limite maximum.
La température de l'huile est trop basse.
Le panier est surchargé.
La friteuse a été mise en fonction sans huile
dans la cuve, et a provoqué la rupture du
dispositif thermique de sécurité.
SOLUTIONS
Remplacer l'huile ou la graisse.
Utiliser de l’huile d’arachide ou de
l’huile végétale de bonne qualité.
Remplacer l'huile ou la graisse.
Bien sécher les aliments.
Immerger lentement les aliments.
Réduire la quantité d'huile dans la
cuve.
Sélectionner une température plus
élevée.
Réduire la quantité d'aliments.
S'adresser au Centre d'assistance (le
dispositif doit être remplacé)
NETTOYAGE
Débrancher l'appareil avant tout nettoyage.
Ne jamais immerger la friteuse dans l'eau ni sous le
robinet (voir fig. 7). Toute infiltration d'eau dans le corps
des commandes comporte des risques d'électrocution.
Contrôler que l'huile est suffisamment refroidie, puis retirer le groupe commandes et vider l'huile.
Retirer le dépôt de la cuve au moyen d'une éponge ou
d'un papier absorbant.
A l'exception du groupe des commandes, du câble d'alimentation et des résistances, toutes les autres parties
peuvent être lavées avec de l'eau chaude et du liquide
vaisselle (voir fig. 8).
Ne jamais utiliser d'éponges abrasives risquant d'abîmer la friteuse.
Une fois l'opération terminée, sécher soigneusement
le tout pour éviter toute projection d'huile chaude
durant le fonctionnement.
Page 19

19
LESEN SIE DIESE GEBRAUCHSANWEISUNG VOR
DER INSTALLATION UND DER ERSTEN INBETRIEBSETZUNG DES GERÄTES AUFMERKSAM DURCH. NUR
SO KÖNNEN SIE BESTE ERGEBNISSE UND
HÖCHSTE BETRIEBSSICHERHEIT ERZIELEN.
GERÄTEBESCHREIBUNG:
A. Thermostatdrehknopf zur Temperatureinstellung
B. Kontrollleuchte Öltemperatur (rot, grün)
C. Mikroschutzschalter
D. Standanzeige MIN.– MAX.
E. Korbhalterung
F. Minutenzähler (falls vorgesehen)
G. Drucktaste Minutenzähler (falls vorgesehen)
H. Klappe Ölablasshahn (falls vorgesehen)
I. Ölablasshahn (falls vorgesehen)
J. Sichtfenster (falls vorgesehen)
K. Filter (falls vorgesehen)
L. Mantel
M. Griffe
N. Sitze zur Befestigung der Schalteinheit
O. Deckel mit Griff
P. Herausnehmbare Wanne
Q. Frittierkorb mit Klappgriff
R. Elektrischer Widerstand
S. Kabelstaufach
T. Führungen zur Befestigung der Schalteinheit am
Gerät
U. Reset-Taste der Thermoschutzvorrichtung
V. Schalteinheit
WICHTIGE HINWEISE:
• Dieses Gerät wurde ausschließlich für den
Hausgebrauch und für das Frittieren von Speisen konzipiert und darf weder zweckentfremdet benutzt noch
verändert oder umgerüstet werden.
• Setzen Sie das Gerät auf keinen Fall in Betrieb, wenn
es Schäden (z.B. in Folge eines Sturzes) oder sonstige
Betriebsstörungen aufweist. Wenden Sie sich bitte an
eine vom Hersteller autorisierte Kundendienststelle.
• Prüfen Sie vor der Inbetriebnahme des Gerätes, ob die
Netzspannung mit der auf dem Typen/Leistungsschild angegebenen Spannung übereinstimmt.
• Schließen Sie das Gerät nur an eine fachgerecht geer-
dete Steckdose mit einer Mindestleistung von 10 A.
• Bei Beschädigung des Netzanschlusskabels ist
dieses vom Hersteller, von einer seiner
Kundendienststellen oder auf jeden Fall von einem
Fachmann zu ersetzen, um Gefährdungen zu
vermeiden.
• Ziehen Sie zum Herausnehmen des Steckers niemals
am Speisekabel: immer nur am Stecker selbst ziehen.
• Das Netzkabel darf nicht mit den heißen Teilen des
Gerätes in Berührung kommen und nicht in der Nähe von
Wärmequellen oder spitzen Kanten aufbewahrt werden.
• Stellen Sie das Gerät nicht in der Nähe von
Wärmequellen oder Wasser auf.
• Durch das eventuelle Herunterfallen der Fritteuse können schwere Verbrennungen verursacht werden.
Achten Sie also darauf, dass das Kabel nicht vom
Bord der Auflagefläche, wo die Fritteuse steht,
herabhängt, weil es so Kindern zugänglich wäre oder
sich der Benutzer selbst darin verfangen könnte.
Benutzen Sie keine Verlängerungskabel.
• Während des Betriebs wird das Gerät heiß, sodass
nur die Griffe und Drehschalter benutzt werden sollen.
DAS GERÄT AUSSER REICHWEITE VON KINDERN AUFSTELLEN.
•Transportieren Sie die
Fritteuse nicht, wenn das
Öl noch heiß ist, da sonst
Verbrennungsgefahr
besteht. Das Gerät darf
erst dann verstellt werden,
wenn es abgekühlt ist.
Dazu tragen Sie es an den
dafür vorgesehenen
Griffen
• Die Fritteuse darf erst nach
Einfüllen des Öls bzw. des
bereits verflüssigten Fettes
in Betrieb genommen werden. Wird das Gerät nämlich leer in Betrieb gesetzt,
wird dieser durch einen
Thermoschutzschalter unterbrochen.
• Achten Sie stets auf die an der Innenseite des beweglichen Behälters angebrachte MIN. und MAX.
Standanzeige.
• Der Mikroschutzschalter sorgt dafür, dass das
Heizelement nur dann in Betrieb gesetzt wird, wenn
die Schalteinheit korrekt positioniert ist.
• Bei Nichtgebrauch des Gerätes oder für dessen
Reinigung ziehen Sie bitte immer den Netzstecker.
•Tauchen Sie niemals die Schalteinheit, das Kabel
sowie den Netzstecker ins Wasser oder in andere
Flüssigkeiten.
• Dieses Gerät darf nicht von Kindern oder unbefähigten Personen unbeaufsichtigt benutzt werden.
• Öl und Fett sind entflammbar; sollte es vorkommen,
dass sie Feuer fangen, sofort den Netzstecker des
Gerätes ziehen und das Feuer mit dem Deckel oder
einer Decke löschen. Verwenden Sie auf keinen Fall
Wasser, um die Flammen zu löschen.
• Bevor Sie die abnehmbare Wanne herausnehmen,
warten Sie bitte immer ab, dass Öl und Fett vollkommen abgekühlt sind.
•Bewahren Sie diese Betriebsanleitung gut auf.
• Nicht die Klappe des Ölablasshahns öffnen (wenn
vorgesehen), wenn das Öl noch heiß ist.
D
Page 20

20
THERMOSCHUTZVORRICHTUNG
Das Gerät ist mit einer Thermoschutzvorrichtung ausgestattet, die dazu dient, den Heizvorgang zu unterbrechen, wenn das Gerät unsachgemäß oder falsch
benutzt wird oder es nicht einwandfrei funktioniert.
Nachdem das Gerät abgekühlt ist, drücken Sie unter
Zuhilfenahme eines Zahnstochers oder etwas Ähnlichem leicht die Reset-Taste der Sicherheitsvorrichtung
nahe der Aufschrift RESET (siehe Abb.1). Sollte das
Gerät nicht funktionieren, wenden Sie sich bitte an eine
vom Hersteller autorisierte Kundendienststelle.
GEBRAUCHSANWEISUNG
Vor der ersten Inbetriebnahme der Fritteuse, reinigen
Sie den Korb, die Wanne und den Deckel mit warmem
Wasser und Spülmittel. Die Schalteinheit samt
Netzkabel und Widerständen können mit einem feuchten Tuch gereinigt werden. Vergewissern Sie sich, dass
kein Wasser in die Schalteinheit eingedrungen ist und
dass keine Speisereste am Boden der herausnehmbaren
Wanne liegen. Trocknen Sie alle Teile gründlich ab.
Überprüfen Sie, dass die Schalteinheit gut an der
Frittiereinheit befestigt ist. Der Mikroschutzschalter „C“
unterbindet den Betrieb des Gerätes wenn die Schalteinheit
„V“ nicht einwandfrei am Mantel „L“ positioniert ist.
Nun ist die Fritteuse gebrauchsbereit.
FÜLLEN MIT ÖL BZW. FETT
• Entnehmen Sie den Deckel „O” , indem Sie ihn am
Griff hochheben. Den Klappgriff des Frittierkorbs
solange drehen bis er fest einrastet (Pos.2, Abb.2)
Ziehen Sie den Frittierkorb „Q“ nach oben heraus.
• Ziehen Sie aus dem Kabelstaufach „S“ die erforderliche Kabellänge zum Anschluss des Gerätes an das
Stromnetz heraus (siehe Abb. 3).
• Bei der Verwendung von Öl, geben Sie dieses bitte in
die Wanne „P“ bis zum angegebenen Höchststand
(siehe Abb. 4). Überschreiten Sie niemals diese
Höchstgrenze, da es sonst vorkommen kann, dass
das Öl aus dem Behälter tritt. Der Ölstand muss
immer innerhalb der Höchst- und Mindestanzeige
„D“ liegen (max. 3 oder 4 l, je nach Version). Die
besten Ergebnisse erzielen Sie, wenn Sie ein
hochwertiges Erdnusssamenöl benutzen.
•Wenn Sie stattdessen Fett in Tafeln verwenden, schneiden Sie diese in Stücke und schmelzen sie in einem
anderen Gefäß. Dann geben Sie das verflüssigte Fett
in den Behälter der Fritteuse. Schmelzen Sie niemals
das Fett im Frittierkorb oder auf den Widerständen
der Fritteuse (siehe Abb.5)
• Schließen Sie wieder den Deckel „O”.
VORHEIZEN
• Das Frittiergut in den Korb „Q“ geben, ohne ihn jedoch zu überfüllen (max. 1 kg für die 3 l Version und
1,3 kg für die 4 l Version). Stellen Sie sicher, das der
Korbgriff richtig positioniert ist (Pos.2, Abb.2).
•Drehen Sie den Drehschalter „A” des Thermostats
(siehe Abb. 6) auf die gewünschte Temperatur (siehe
Tabelle Frittieren).
Die Kontrollleuchte “B” schaltet sich von Grün auf Rot um.
• Sobald die eingestellte Temperatur erreicht ist, schaltet sich die Kontrollleuchte „B“ auf Grün.
FRITTIEREN
• Sofort nachdem die Kontrollleuchte “B” sich auf Grün
geschaltet hat, den Frittierkorb „Q“ ins Öl eintauchen.
Dazu den Frittierkorb sehr langsam absenken, um
Ölspritzer und das Heraustreten von heißem Öl zu
vermeiden.
• Es ist vollkommen normal, wenn eine große Menge
an Dampf austritt.
EINSTELLUNG DES MINUTENZÄHLERS (wenn
vorgesehen)
Drücken Sie die Taste „G“, auf dem Display erscheint
„
00“. Halten Sie die Taste „G“ solange gedrückt, bis Sie
die gewünschte Zeit erreichen. Man kann von 01 bis 99
Minuten auswählen.
Bei erfolgter Auswahl lassen Sie die Taste „G“ wieder
los. Auf dem Display beginnt die Rückwärtsrechnung:
• von 99 bis 01 Min. zählt das Display in Min.;
• ab 01Min. erfolgt die Zählung in Sekunden.
Ein Tonsignal zeigt an, dass die eingestellte Zeit abgelaufen ist. Zum Abstellen des Tonsignals drücken Sie einfach die Taste Minutenzähler „G“.
Bei nicht korrekt ausgeführter Programmierung des
Timers kann dieser rückgesetzt werden. Dazu die Taste
„G“ einige Sekunden lang gedrückt halten.
Der Minutenzähler zeigt zwar an, dass die einprogrammierte Zeit abgelaufen ist, schaltet jedoch nicht
das Gerät aus.
Das Auswechseln der Batterien erfolgt intern im
Mantel “L”, so dass dieser geöffnet werden muss.
Dazu wie folgt vorgehen:
• Sämtliche Komponenten der Fritteuse entfernen;
•Die beiden zur Befestigung des Timers erforderli-
chen Schrauben abschrauben;
• Die Zeitschaltuhr herausnehmen. Dabei darauf
achten, den Knopf nicht zu verlieren;
• Die Abdeckung der Batterie gegen den
Uhrzeigersinn drehen, bis sie sich löst.
• Die Batterie durch eine neue desselben Typs erset-
zen; um die Zeitschaltuhr wieder einzubauen, dieselben Vorgänge in umgekehrter Reihenfolge durchführen.
Sowohl bei Auswechseln als auch bei Entfernen
des Gerätes muss die Batterie auf Grund ihrer
Umweltschädlichkeit entfernt und entsprechend
den geltenden Gesetzen entsorgt werden.
ENDE DES FRITTIERVORGANGES
• Nach Ablauf der Frittierzeit, den Frittierkorb „Q“
hochheben und überprüfen, ob das Frittiergut den
gewünschten Bräunungsgrad erreicht hat.
•Wenn Sie der Ansicht sind, dass der Frittiervorgang
beendet ist, schalten Sie das Gerät aus. Dazu drehen
Sie den Drehknopf „A“ des Thermostats auf die
Position „•“. Die Kontrollleuchte ist Grün.
• Ziehen Sie den Stecker aus der Steckdose.
Page 21

21
FRITTIEREN VON FRISCHKOST
Bei der nachstehenden Tabelle ist zu berücksichtigen, dass es sich bei den angegebenen Frittierzeiten- und temperaturen um Richtwerte handelt, die je nach Menge und individuellem Geschmack variiert werden können.
Lebensmittel Menge max. (g.) Temperatur (°C) Dauer (Minuten)
Frische
Pommes frites Halbe Portion 500 (3 l Version) 170 6 – 8
700 (4 l Version) 170 8 – 10
Ganze Portion 1000 (3 l Version) 170 13 – 15
1300 (4 l Version) 170 14 – 16
Fisch Tintenfische 600 140 9 - 11
Kammmuscheln 600 140 10 - 12
Sardinen 600 140 10 - 12
Garnelen 600 140 8 - 10
Seezunge 500 140 6 - 8
Fleisch Schweineschnitzel 500 160 8 - 9
Hähnchenschnitzel 500 160 8 - 10
Frikadellen 700 160 8 - 10
Gemüse Artischocken 400 150 15 - 17
Blumenkohl 600 150 10 - 11
Pilze 500 150 8- 10
Auberginen 200 150 9 - 11
Zucchini 500 150 13 - 15
• Haken Sie den Frittierkorb „Q“ in die Halterung „E“
der Wanne ein, sodass das überschüssige Öl abtropfen kann.
• Hinweis: Wenn für den Frittiervorgang 2 Phasen vorgesehen sind oder Sie auf mehrere Male frittieren
möchten, haken Sie den Frittierkorb “Q” nach Ablauf
der ersten Phase in die Korbhalterung “E” ein und warten ab, bis die Kontrollleuchte auf Grün umschaltet,
womit angezeigt wird, dass die eingestellte Temperatur
erreicht worden ist. Erst dann tauchen Sie den
Frittierkorb „Q“ ein zweites Mal langsam in das Öl.
TIPPS FÜR DAS FRITTIEREN
VERWENDUNGSDAUER DES FRITTIERFETTS –
ODER ÖLS
Das Öl bzw. Fett darf niemals unter den Mindeststand
sinken. Von Zeit und Zeit ist es notwendig, das Frittieröloder fett vollständig zu erneuern. Seine
Ver wenungsdauer hängt von dem Frittiergut ab. Zum
Beispiel wird beim Panieren das Öl mehr als bei einem
einfachen Frittiervorgang verschmutzt. Wie bei einer
jeden Fritteuse, verliert das Öl an Qualität, wenn es
mehrmals aufgewärmt wird. Wir empfehlen daher, auch
bei einem vorschriftsmäßigen Gebrauch, das Öl
regelmäßig vollständig zu erneuern.
RICHTIGES FRITTIEREN
Es ist wichtig, für jedes Rezept die empfohlene Temperatur
einzuhalten. Bei einer zu niedrigen Temperatur, nimmt das
Frittiergut zuviel Öl auf. Ist die Temperatur hingegen zu hoch,
bildet sich um das Frittiergut eine Kruste und innen bleibt es
roh.
Das Frittiergut darf erst in das Öl eingetaucht werden,
wenn dieses die richtige Temperatur erreicht hat, d.h.
wenn die Kontrollleuchte „B“ erlischt.
Nicht zuviel Frittiergut in den Korb geben, weil sonst die
Temperatur des Frittieröls plötzlich zu stark absinken
würde und das Frittiergut demzufolge zu fettig und
ungleichmäßig gegart würde.
Achten Sie darauf, dass das Frittiergut in feine und gleichmäßig dicke Stücke geschnitten ist. Zu dick geschnittenes Frittiergut sieht zwar schön knusprig aus, gart aber
innen schlecht, während gleichmäßig geschnittenes
Frittiergut auch zur gleichen Zeit gart.
Bevor Sie das Frittiergut in das Öl bzw. Fett eintauchen,
trocknen Sie es gut ab. Damit können Ölspritzer vermieden werden. Zudem wird noch feuchtes Frittiergut nicht
knusprig und bleibt trotz Frittieren weich (insbesondere
Kartoffeln). Es wird empfohlen, stark wasserhaltige
Lebensmittel (Fisch, Fleisch, Gemüse) zu panieren oder in
Mehl zu wenden. Achten Sie jedoch darauf, das überschüssige Paniermehl oder Mehl abzuklopfen bevor Sie
das Frittiergut ins Öl eintauchen.
Page 22

22
FRITTIEREN VON TIEFKÜHLKOST
Tiefkühlkost hat bekanntlich sehr niedrige Temperaturen. Demzufolge sinkt beim Frittieren die Temperatur der
Frittierflüssigkeit erheblich ab.
Wenn Sie die in der Tabelle von uns empfohlenen Höchstmengen einhalten, können dennoch gute Ergebnisse erzielt
werden.
Vor dem Frittieren sollten Sie die Eiskristalle entfernen, die sich häufig auf der Tiefkühlkost bilden. Danach wird der
Frittierkorb sehr langsam in das Frittieröl eingetaucht, um ein Aufwallen des Öls zu verhindern.
Bei den angegebenen Frittierzeiten handelt es sich um Richtwerte, die je nach Anfangstemperatur des Frittierguts und
der vom Hersteller der Tiefkühlkost empfohlenen Temperatur zu variieren sind.
Lebensmittel Menge max. (g.) Temperatur (°C) Dauer (Minuten)
Tiefgekühlte vorgekochte
Pommes frites 1000 (3 l Version) 190 15 - 17
1300 (4 l Version) 190 17 - 19
Kartoffelkroketten 700 180 9 - 11
Fisch Kabeljau-Fischstäbchen 500 180 7 - 8
Flunderfilet 500 180 6 - 7
Fleisch Hähnchenschnitzel 300 180 5 - 6
MODELLE MIT ÖLABLASSHAHN (wenn vorgesehen)
VORSICHT: Um Verbrennung zu vermeiden, das Öl nicht ablassen, wenn es noch heiß ist.
Wie folgt vorgehen:
1. Den Frittierkorb entnehmen.
2. Die Klappe „H” öffnen.
3. Den Hahn „I” öffnen, indem Sie ihn nach links aufdrehen.
4. Die Flüssigkeit in ein Gefäß abfließen lassen (siehe Abbildung unten) und dabei darauf achten, dass es
nicht überläuft.
5. Mit einem Schwamm oder Löschpapier eventuelle Ablagerungen aus der Wanne entfernen.
6. Durch Drehen nach rechts den Hahn zudrehen.
7. Die Klappe „H” wieder schließen.
Es wird empfohlen, das zum Frittieren von Fisch verwendete Öl separat von dem für das Frittieren anderer Speisen gebrauchten Öl aufzubewahren.
Wenn Sie Schweinefett oder – schmalz verwenden, dieses/n nicht zu sehr abkühlen lassen, da es/er
sonst hart wird.
Page 23

23
REINIGUNG
Stellen Sie vor jedem Reinigungsvorgang sicher, dass das
Gerät vom Stromnetz getrennt und der Stecker gezogen
ist. Tauchen Sie die Fritteuse niemals ins Wasser und
stellen Sie sie nicht unter den Wasserhahn (siehe
Abb.7). Durch das womöglich in die Schalteinheit durchsickernde Wasser könnte ein elektrischer Schlag
verursacht werden. Überprüfen Sie, dass das Öl ausreichend abgekühlt ist. Danach entfernen sie die
Schalteinheit und entleeren das Öl. Entfernen Sie mit
einem Schwamm oder mit Küchenpapier die
Lebensmittelreste aus der Wanne.
Mit Ausnahme der Schalteinheit, des Speisekabels und
den Widerständen, können allen anderen Teile mit warmem Wasser und Spülmittel gereinigt werden (siehe
Abb.8). Verwenden Sie zur Reinigung niemals
Scheuerschwämme, da sonst die Fritteuse beschädigt
wird. Bei Abschluss des Vorgangs alles sorgfältig
trocknen, damit während des Betriebs keine heißen
Ölspritzer herausspritzen.
BETRIEBSSTÖRUNGEN
STÖRUNG
Unangenehmer Geruch
Öl läuft über
Das Frittiergut erhält beim
Frittieren nicht die typische goldbraune Färbung
Das Öl wird nicht erhitzt
URSACHE
Das Öl ist verbraucht.
Die Frittierflüssigkeit ist ungeeignet.
Das Öl ist verbraucht und deshalb
bildet sich zu viel Schaum.
Das eingetauchte Frittiergut war nicht
trocken genug.
Der Korb wurde zu schnell eingesenkt.
Der Ölstand übersteigt die
Höchstmarke.
Zu niedrige Öltemperatur.
Der Korb wurde überfüllt.
Die Fritteuse wurde ohne Öl im
Frittierbecken benutzt, und folglich der
Wärmeschutzschalter ausgelöst.
ABHILFE
Frittieröl bzw. -fett wechseln.
Erdnussöl oder qualitativ hochwertiges pflanzliches Öl verwenden
Frittieröl bzw. -fett wechseln
Die Lebensmittel gut abtrocknen.
Langsam eintauchen.
Ölmenge im Frittierbecken
reduzieren.
Eine höhere Temperatur einstellen.
Menge des Frittierguts reduzieren.
Wenden Sie sich an den
Kundendienst (die Vorrichtung
muss ersetzt werden)
Page 24

24
LEES AANDACHTIG DEZE GEBRUIKSAANWIJZINGEN ALVORENS HET APPARAAT TE INSTALLEREN
EN TE GEBRUIKEN. ALLEEN OP DEZE MANIER
GARANDEERT U DE BESTE RESULTATEN EN DE
MAXIMALE GEBRUIKSVEILIGHEID.
BESCHRIJVING VAN HET APPARAAT
A. Thermostaatknop voor de regeling van de tem-
peratuur
B. Controlelampje temperatuur olie (rood, groen)
C. Microbeveiligingsschakelaar
D. Aanduiding MIN / MAX-niveau
E. Houder frituurmand
F. Klok (indien aanwezig)
G. Drukknop klok (indien aanwezig)
H. Deurtje aftapkraan olie (indien aanwezig)
I. Aftapkraan olie (indien aanwezig)
J. Kijkvenstertje (indien aanwezig)
K. Filter (indien aanwezig)
L. Mantel
M. Handvaten
N. Zittingen voor de bevestiging van de bediening-
sgroep
O. Deksel met handvat
P. Uitneembare frituurpan
Q. Frituurmand met plooibare handgreep
R. Elektrische weerstand
S. Snoervak
T. Geleiders voor de bevestiging van de bedie-
ningsgroep aan het apparaat
U. Reset van het thermisch beveiligingsmechanisme
V. Bedieningsgroep
BELANGRIJKE WAARSCHUWINGEN
• Dit apparaat is bestemd voor het frituren van
etenswaren en voor uitsluitend huishoudelijke
doeleinden. Het apparaat dient niet voor andere
doeleinden te worden gebruikt, of te worden
gewijzigd.
• Het apparaat niet inschakelen als het beschadigd
is (vb. na een val) of als er werkingsproblemen
worden vastgesteld. Wendt u tot een Service-centrum erkend door de fabrikant.
• Alvorens het apparaat te gebruiken controleren of
de netspanning overeenkomt met de spanning
aangegeven op het gegevensplaatje van het
apparaat.
• Het apparaat alleen aansluiten op een stopcon-
tact met een minimum vermogen van 10A en
voorzien van een goed functionerende aardleiding.
•Wanneer het stroomsnoer beschadigd is, wordt
het vervangen door de fabrikant of zijn technische dienst, of in ieder geval door een persoon
met gelijkaardige bekwaamheid, teneinde elk risi-
co te vermijden.
•Trek nooit aan het stroomsnoer om het uit het
stopcontact te halen.
• Het stroomsnoer komt nooit nabij of in aanraking
met de warme delen van het apparaat, warmtebronnen of snijdende randen.
• Plaats het apparaat nooit vlakbij een warmtebron
of in aanwezigheid van water.
• Een friteuse die valt kan ernstige brandwonden
veroorzaken. Laat het stroomsnoer nooit van het
draagvlak hangen waarop de friteuse staat, om te
vermijden dat kinderen het vastgrijpen of dat
volwassenen worden belemmerd. Gebruik geen
verlengsnoeren.
•Tijdens de werking is het apparaat warm, raak
alleen de handvaten en knoppen aan.
HET APPARAAT BUITEN HET BEREIK VAN KINDEREN HOUDEN.
• De friteuse niet verplaatsen wanneer de olie heet
is, om ernstige
brandwonden te vermijden. Het apparaat wordt
alleen verplaatst als het
afgekoeld is, met behulp
van de daarvoor
bestemde handvaten.
•De friteuse dient pas in
werking gesteld te worden nadat ze gevuld is
met olie of reeds vloeibaar vet. Indien de friteuse leeg wordt
opgewarmd, treedt een
thermisch beveiligingsmechanisme in werking
waardoor de werking onderbroken wordt.
• Respecteer steeds de MIN / MAX-niveaus aangeduid aan de binnenkant van de frituurpan.
• De microbeveiligingsschakelaar garandeert dat
het verwarmingselement alleen kan functioneren
als het bedieningshuis correct geplaatst is.
• Sluit het apparaat steeds af van de netvoeding
vóór elke onderhoudsbeurt en wanneer u het
apparaat niet gebruikt.
• Dompel het bedieningshuis, het snoer en de stekker
nooit onder in water of andere vloeistoffen.
• Laat het apparaat nooit onbewaakt achter in aanwezigheid van kinderen of onbekwame personen.
• Olie en vet zijn brandbaar; als ze vuur vatten,
trekt u onmiddellijk de stekker uit het stopcontact
en blust u het vuur met het deksel of een deken.
Gebruik nooit water om de vlammen te doven.
• Vóór u de frituurpan verwijdert wacht u steeds tot
de olie of het vet volledig afgekoeld zijn.
•Bewaar deze instructies.
• Deurtje aftapkraan olie (indien aanwezig) niet openen
wanneer de olie nog warm is.
NL
Page 25

25
THERMISCH BEVEILIGINGSMECHANISME
Het apparaat is voorzien van een thermisch beveiligingsmechanisme dat de verwarming onderbreekt bij een
verkeerd gebruik of een abnormale werking. Nadat het
apparaat afgekoeld is, drukt u met behulp van een tandenstoker of iets gelijkaardigs op het knopje om het
beveiligingsmechanisme terug te stellen "U", naast het
opschrift RESET (zie fig. 1). Indien het apparaat niet functioneert, wendt u zich tot een Service-centrum erkend
door de fabrikant.
GEBRUIKSAANWIJZINGEN
Alvorens de friteuse voor de eerste keer te gebruiken,
maakt u de frituurmand, de frituurpan en het deksel
grondig schoon met warm water en vloeibaar afwasmiddel. De bedieningsgroep en het stroomsnoer worden schoongemaakt met een vochtige doek. Waak erover dat er geen water in de bedieningsgroep sijpelt en
dat er geen restjes achterblijven in de uitneembare frituurpan. Droog alle onderdelen goed af.
Controleer of de bedieningsgroep goed bevestigd is aan
het friteusehuis. De micro-beveiligingsschakelaar "C"
verhindert de werking van het apparaat als de bedieningsgroep "V" niet correct geplaatst is in de mantel "L".
De friteuse is nu klaar voor het gebruik.
HET VULLEN MET OLIE OF VET
• Hef het deksel "O" met behulp van het handvat. Draai
de plooibare handgreep van de frituurmand tot hij
blokkeert (stand 2 in fig. 2). Verwijder de frituurmand
"Q" langs boven.
• Haal uit het snoervak "S" voldoende snoerlengte om het
apparaat aan te sluiten op het stroomnet (zie fig. 3).
• Als u olie gebruikt, giet u deze in de frituurpan "P" tot
aan het aangeduid maximumniveau (zie fig. 4). Ga
nooit over deze limiet, om te voorkomen dat olie uit de
mand spat. Het olieniveau moet zich steeds tussen de
MAX / MIN-aanduidingen "D" bevinden (max. 3 or
4 liter naargelang de versie). U bekomt de beste resultaten met een goede arachideolie.
• Als u de voorkeur geeft aan een blok vet, snijdt u dit
in stukjes die u laat smelten in een andere kom, waarna u het vloeibaar geworden vet in de frituurpan giet.
Laat het vet nooit smelten in de frituurmand of op de
weerstand van de friteuse (zie fig. 5).
• Hersluit het deksel "O".
VOORVERWARMING
• Doe de te frituren etenswaren in de frituurmand "Q",
maar maak hem niet te vol (max. 1 kg voor de versie
3 liter en 1,3 kg voor de versie 4 liter). Zorg ervoor dat
de handgreep van de mand correct geplaatst is (stand
2 in fig. 2).
• Zet de thermostaatnop "A" (zie fig. 6) op de gewenste temperatuur (zie tabel baktijden). Het groen controlelampje “B” wordt rood.
•Wanneer de ingestelde temperatuur bereikt werd,
wordt het controlelampje “B” groen.
BEGIN FRITUREN
•Van zodra het controlelampje “B” groen wordt, de frituurmand “Q” onderdompelen in de olie, door hem
heel langzaam te laten zakken om spatten en
overkoken van de olie te voorkomen.
• Het is volkomen normaal als een behoorlijke hoeveelheid stoom ontstaat.
INSTELLING VAN DE KLOK (indien voorzien)
Druk op de knop "G", op de display verschijnt "OO".
Houd de knop "G" ingedrukt tot de gewenste tijd bereikt
wordt. U kunt van 01 tot 99 min. instellen.
Na de selectie lost u de knop "G". Op de display begint
de ingestelde tijd terug te tikken:
• van 99 tot 01 min. wordt de tijd op de display minuut
per minuut weergegeven;
• vanaf 01 min, wordt de tijd in seconden weergegeven.
Een geluidssignaal duidt het einde van de ingestelde tijd
aan, om dit signaal uit te schakelen drukt u nogmaals op
de knop "G".
Als u de timer verkeerd hebt geprogrammeerd, kunt u
hem terugstellen door de knop "G" gedurende enkele
seconden ingedrukt te houden.
De klok signaleert het einde van de ingestelde tijd, maar
schakelt het apparaat niet uit.
Om de batterij te vervangen, dient u de interne onderdelen van de mantel “L” te bereiken, door als volgt te
werk te gaan:
•Verwijder alle componenten uit de friteuse;
• Schroef de twee schroeven van de timer los;
•Verwijder de klok, maar let erop de drukknop niet te
verliezen.
• Draai het deksel van de batterij in tegenwijzerzin tot
hij opengaat.
•Vervang de batterij door een nieuwe van hetzelfde
type; om de klok terug te plaatsen voert u dezelfde
handelingen in omgekeerde volgorde uit.
Ingeval van vervanging of vernietiging van het apparaat, dient de batterij verwijderd en vernietigd te worden volgens de wetgeving van kracht, en uit respect
voor de natuur.
NA HET FRITUREN
•Als de baktijd om is, heft u de frituurmand "Q" en controleert u of de etenswaren naar wens gebakken zijn.
• Als u van mening bent dat de bereiding voltooid is, zet
u het apparaat uit door de thermostaatknop "A" in de
stand "•". Het controlelampje is groen.
•Trek de stekker uit het stopcontact.
• Laat de overtollige olie uitlekken door de frituurmand
"Q" vast te haken in de houder "E" van de frituurpan.
• N.B. Bij het frituren in 2 fasen of indien u meerdere
bakfasen wenst, haakt u de frituurmand "Q" na de
eerste fase vast aan de houder “E” en wacht u tot het
controlelampje groen wordt om aan te geven dat de
olie opnieuw de gewenste temperatuur heeft bereikt.
Daarna dompelt u het mandje "Q" nogmaals onder
in de olie.
TIPS VOOR HET FRITUREN
DE DUUR VAN DE OLIE OF HET VET
De olie of het vet mogen nooit onder het minimumniveau
zakken. Af en toe moet u de olie of het vet volledig vervangen. De duur hangt af van de etenswaren die gefrituurd worden. Gepaneerd voedsel, bijvoorbeeld, vervuilt
de olie meer dan andere. Zoals bij alle friteuses, bederft
olie dat meerdere keren wordt verhit! Daarom dient u de
olie of het vet dus regelmatig te vervangen, zelfs bij een
correct gebruik.
Page 26

26
FRITUREN VAN VERSE ETENSWAREN
De volgende tabel raadplegen, rekening houdend met het feit dat de aangegeven baktijden en -temperaturen bij benadering zijn en moeten worden aangepast volgens de hoeveelheid en persoonlijke smaak.
Voedsel Max. hoeveelheid (gr.) Temperatuur (°C) Tijd (minuten)
Verse frites Halve portie 500 (versie 3 liter) 170 6 - 8
700 (versie 4 liter) 170 8 - 10
Hele portie 1000 (versie 3 liter) 170 13 - 15
1300 (versie 4 liter) 170 14 - 16
Vis Calamares 600 140 9 - 11
Canestrelli 600 140 10 - 12
Sardines 600 140 10 - 12
Garnalen 600 140 8 - 10
Tong 500 140 6 - 8
Vlees Rundkoteletten 500 160 8 - 9
Kippenbouten 500 160 8 - 10
Gehaktballen 700 160 8 - 10
Groenten Artisjokken 400 150 15 - 17
Bloemkool 600 150 10 - 11
Champignons 500 150 8 - 10
Aubergines 200 150 9 - 11
Courgettes 500 150 13 - 15
GOED FRITUREN
Het is belangrijk voor elk recept de aanbevolen temperatuur te volgen. Bij een te lage temperatuur, neemt het voedsel olie op. Bij een te hoge temperatuur wordt direct een
korst gevormd en blijft het voedsel vanbinnen rauw.
De te frituren etenswaren worden in de olie ondergedompeld, als deze de juiste temperatuur bereikt heeft, dus
nadat het controlelampje "B" gedoofd is.
Doe het mandje niet te vol, anders daalt de temperatuur
van de olie te snel en zijn de etenswaren te vet en onregelmatig gefrituurd.
Controleer of de etenswaren in dunne en evengrote
stukken gesneden zijn. Dikke stukken zijn moeilijk gaar te
krijgen vanbinnen, ook al zien ze er van buiten goed uit,
terwijl stukken met een gelijke dikte gelijktijdig gaar zijn.
Maak de etenswaren perfect droog voor u ze onderdompelt
in olie of vet, om oliespatten te vermijden; bovendien zijn vochtige etenswaren na het bakken week (vooral frites).
Het is aangeraden etenswaren met een hoog vochtgehalte (vis, vlees, groenten) te paneren of met meel te bestuiven. Verwijder zorgvuldig overtollig meel of paneermeel
alvorens de etenswaren in de olie te laten zakken.
FRITUREN VAN DIEPGEVROREN ETENSWAREN
Diepgevroren etenswaren hebben een heel lage temperatuur. Dit houdt in dat ze de temperatuur van het frituurvocht
behoorlijk omlaag halen.
Om een goed resultaat te bereiken, raden we aan de maximale hoeveelheden bij het frituren niet te overschrijden.
Diepgevroren etenswaren zijn vaak bedekt met ijskristallen, die zo goed mogelijk verwijderd moeten worden voordat
u gaat frituren. Laat daarna het mandje heel langzaam in de olie zakken zodat die niet overkookt.
De baktijden zijn bij benadering en moeten worden aangepast aan de begintemperatuur van de te frituren etenswaren en de temperatuur aangeduid op de verpakking van de diepgevroren etenswaren.
Voeding Max. hoeveelheid (gr.) Temperatuur (°C) Tijd (minuten)
Voorgebakken diepvriesfrites 1000 (versie 3 liter) 190 15 - 17
1300 (versie 4 liter) 190 17 - 19
Aardappelkroketten 700 180 9 - 11
Vis Kabeljauwsticks 500 180 7 - 8
Pladijsfilets 500 180 6 - 7
Vlees Kippenbouten 300 180 5 - 6
MODELLE MIT ÖLABLASSHAHN (wenn vorgesehen)
ATTENTIE: Voer de olie niet af zolang hij heet is, om brandwonden te voorkomen.
Wie folgt vorgehen:
1. Den Frittierkorb entnehmen.
2. Die Klappe „H” öffnen.
3. Den Hahn „I” öffnen, indem Sie ihn nach links aufdrehen.
Page 27

27
PROBLEMEN BIJ DE WERKING
PROBLEEM
Geurtjes
De olie kookt over
De etenswaren krijgen geen
bruingebakken kleurtje tijdens de
bakfase
De olie verhit niet
OORZAAK
De olie is bedorven.
De bakvloeistof is niet geschikt.
De olie is bedorven en vormt bijgevolg
te veel schuim.
U hebt niet voldoende afgedroogde
etenswaren ondergedompeld in de olie.
U hebt de firtuurmand te snel in de olie
laten zakken.
Het niveau van de olie overschrijdt het
MAX-niveau.
De temperatuur van de olie is te laag.
De frituurmand is te vol.
De friteuse is in gebruik genomen zonder
olie in de oliepan, zodat de thermische
beveiliging defect is.
OPLOSSING
Ver vang de olie of het vet.
Gebruik zonnebloemolie of plantaardige olie van goede kwaliteit.
Ver vang de olie of het vet.
Droog de etenswaren goed af.
Dompel de etenswaren langzaam
onder.
Doe minder olie in de oliepan.
Selecteer een hogere temperatuur.
Doe minder etenswaren in de frituurmand.
Wendt u zich tot een Service-centrum (om de beveiliging te laten
vervangen)
ONDERHOUD
Vóór elke onderhoudsbeurt controleert u of de stekker uit
het stopcontact is.
Dompel de friteuse nooit onder in water, en spoel hem
nooit af onder stromend kraantjeswater (zie fig. 7). Het
water kan binnendringen in het bedieningshuis en elektrische schokken veroorzaken.
Controleer of de olie voldoende afgekoeld is, waarna u
de bedieningsgroep verwijderd en de olie weggiet.
Ver wijder etensrestjes uit de frituurpan met behulp van
een sponsje of keukenpapier.
Uitgezonderd de bedieningsgroep, stroomsnoer en
weerstand, mogen alle onderdelen afgewassen worden
met warm water en vloeibare afwaszeep (zie fig. 8).
Vermijd het gebruik van schurende sponsen, om de friteuse niet te beschadigen.Na deze handeling droogt u
alles zorgvuldig af, om te voorkomen dat tijdens de
werking van het apparaat hete olie opspat.
4. Die Flüssigkeit in ein Gefäß abfließen lassen (siehe Abbildung unten) und dabei darauf achten, dass es
nicht überläuft.
5. Mit einem Schwamm oder Löschpapier eventuelle Ablagerungen aus der Wanne entfernen.
6. Durch Drehen nach rechts den Hahn zudrehen.
7. Die Klappe „H” wieder schließen.
Es wird empfohlen, das zum Frittieren von Fisch verwendete Öl separat von dem für das Frittieren anderer Speisen
gebrauchten Öl aufzubewahren.
Wenn Sie Schweinefett oder – schmalz verwenden, dieses/n nicht zu sehr abkühlen lassen, da es/er sonst hart wird.
Page 28

28
LEER ATENTAMENTE ESTE MANUAL DE INSTRUCCIONES ANTES DE INSTALAR Y USAR EL APARATO
SOLAMENTE DE ESTE FORMA SE PODRÁN OBTENER LOS MEJORES RESULTADOS Y LA MÁXIMA
SEGURIDAD DE USO
DESCRIPCIÓN DEL APARATO
A. Botón termostato para la programación de la tem-
peratura.
B. Indicador luminoso temperatura aceite (rojo, verde)
C. Microinterruptor de seguridad
D. Indicación de los niveles MIN – MAX
E. Soporte cesta
F. Minutero
G. Pulsador minutero
H. Portezuela del grifo para vaciar el aceite (si previsto).
I. Grifo para vaciar el aceite (si previsto).
J. Mirilla (si prevista)
K. Filtro (si previsto)
L. Cuerpo exterior
M. Asas
N. Sedes para la fijación del grupo mandos
O. Tapadera con asa
P. Cubeta amovible
Q. Cesta con empuñadura abatible
R. Resistencia eléctrica
S. Alojamiento porta cable
T. Guías para la fijación del grupo de mandos del
aparato
U. Restablecimiento del dispositivo térmico de seguri-
dad
V. Grupo mandos
ADVERTENCIAS IMPORTANTES
• Este aparato ha sido proyectado para freír alimentos
y para un uso exclusivamente doméstico, no debe ser
utilizado para otras finalidades y no se debe modificar o abrir bajo ningún concepto.
• Si el aparato está estropeado (por ej. a causa de una
caída) o si presenta problemas de funcionamiento no
poner en marcha el aparato. Contactar un centro de
asistencia autorizado por el fabricante.
• Antes de utilizar el aparato, comprobar que la ten-
sión de la red corresponde a la tensión de la placa
datos del aparato.
• Enchufar el aparato solamente a tomas de corriente
con una capacidad mínima de 10ª y equipadas con
una puesta a tierra eficaz.
• Si el cable de alimentación está estropeado, el
fabricante o su servicio de asistencia técnica, o en
cualquier caso, una persona con una cualificación similar deberá sustituirlo para eliminar cualquier riesgo.
• Extraer el enchufe para desenchufar el aparato. No
tirar del cable de alimentación.
• El cable de alimentación no debe estar cerca o en
contacto con las partes calientes del aparato, fuentes
de calor o cantos agudos.
• No colocar el aparato en las proximidades de fuentes de calor o en superficies con eventual presencia
de agua.
• La caída de este aparato desde una posición elevada puede provocar graves quemaduras. No dejar
nunca que el cable cuelgue por el borde de la superficie sobre la que se apoya la freidora, donde sería
fácilmente accesible para un niño o de estorbo para
el usuario. No utilizar alargadores.
• Durante su funcionamiento, el aparato está caliente,
usar solamente las asas y guantes de cocina.
NO DEJAR EL APARATO AL ALCANCE DE LOS
NIÑOS.
• No cambiar de lugar la
freidora cuando el aceite
contenido está aún caliente, porque podría provocar graves quemaduras.
Cambiar de lugar el aparato solamente cuando
esté frío y utilizar las asas
específicas.
• Encender solamente la
freidora después de
haberla llenado correctamente con aceite o grasa
derretida, ya que, si se
calienta vacía, un dispositivo térmico de seguridad
interviene e interrumpe el
funcionamiento.
• Respetar siempre los niveles MIN. y MAX indicados
en el interior del recipiente amovible.
• El microinterruptor de seguridad garantiza que el
elemento calentador pueda funcionar solamente con
el cuerpo de mandos colocado correctamente.
• No dejar nunca el aparato enchufado durante las
operaciones de limpieza y cuando no se utiliza.
• No introducir nunca el cuerpo mandos, el cable y el
enchufe en el agua o en otros líquidos.
• Sin vigilancia oportuna, no dejar nunca usar este
aparato a niños o personas no capacitadas.
• El aceite y la grasa son inflamables, si prenden
fuego, desenchufar inmediatamente el aparato de la
toma de corriente y apagar el fuego con la tapadera
o con una manta. No utilizar nunca agua para apagar las llamas.
• Para quitar la cubeta amovible esperar que el aceite
o la grasa se hayan enfriado completamente.
• Conservar estas instrucciones.
• Si el aceite está todavía caliente, no abrir la portezuela del grifo para vaciar el aceite (si previsto).
E
Page 29

29
DISPOSITIVO TÉRMICO DE SEGURIDAD
El aparato está dotado de un dispositivo térmico de
seguridad que interrumpe el calentamiento en caso de
utilización incorrecta o de funcionamiento anómalo.
Después de que el aparato se haya enfriado, con la
ayuda de palillos para dientes o de otros objetos similares, pulsar delicadamente el pulsador de restablecimiento del dispositivo de seguridad “U”, situado junto a la
palabra RESET (véase fig. 1). Si el aparato no funcionase, es necesario consultar un centro de asistencia autorizado por el fabricante.
INSTRUCCIONES PARA EL USO
Antes de utilizar la freidora por primera vez, limpiar correctamente, con agua caliente y detergente para vajillas,
la cesta, la cubeta y la tapadera. El grupo de mandos con
cable de alimentación y resistencia pueden limpiarse con
un paño húmedo. Asegurarse que no haya penetrado
agua en el grupo de mandos y que no haya residuos en
el fondo de la cubeta amovible. Secar meticulosamente
todas las partes.
Comprobar que el grupo mandos esté bien fijado al cuerpo freidora. El microinterruptor de seguridad “C” no permite el funcionamiento del aparato si el grupo de mandos
“V” no está correctamente colocado en el cuerpo exterior
“L”. La freidora estará lista para la utilización.
LLENADO DEL ACEITE O GRASA
• Quitar la tapadera “O” y levantarla cogiéndola por el
asa. Girar la empuñadura de la cesta abatible hasta
su bloqueo (pos. 2 de fig. 2). Sacar la cesta “Q” tirando hacia arriba de ella.
• Sacar del alojamiento porta cable “S” la longitud de
cable necesaria para enchufar el aparato a la red
(véase fig. 3).
• Si se utiliza el aceite, verter el aceite en la cubeta “P”
hasta alcanzar el nivel máximo indicado (véase fig.
4). No superar nunca este límite, el aceite podría salirse del recipiente. El nivel de aceite debe estar siempre
entre las indicaciones máximo y mínimo “D” (máx. 3
o 4 l, dependiendo de la versión). Los mejores resultados se obtienen utilizando un aceite bueno de semillas de cacahuete.
• Pero si utilizan barras de grasa, cortarlas en trozos y
deshacerlos en otro recipiente y verter a continuación
la grasa derretida en la cubeta de la freidora. No fundir nunca la grasa en la cesta o sobre la resistencia de
la freidora (véase fig. 5).
• Cerrar de nuevo la tapadera “O”.
PRECALENTAMIENTO
• Poner los alimentos para freír en la cesta “Q”, sin
sobrecargarla nunca (máx. 1 kg para la versión de 3
l, y 1,3 kg para la versión de 4 l,). Asegurarse que la
empuñadura de la cesta esté colocada correctamente
(pos. 2 de fig. 2).
• Colocar el botón “A” del termostato (véase fig. 6) sobre
la temperatura deseada (véase la tabla cocción). El
indicador luminoso “B” pasa del color verde al rojo.
• Al alcanzar la temperatura programada, el indicador
luminoso “B” se enciende y se pone de color verde.
INICIO FRITURA
• En cuanto el indicador luminoso “B” se encienda y se
ponga de color verde, introducir la cesta “Q” en el
aceite, bajándola muy lentamente para evitar salpicaduras o la salida de aceite caliente.
• Es perfectamente normal que salga una cantidad de
vapor.
PROGRAMACIÓN DEL MINUTERO (si está previsto)
Pulsar el pulsador “G”, sobre la pantalla aparece “OO”.
Mantener pulsador el pulsador “G” hasta que se alcance el tiempo deseado. Es posible seleccionar de 01 a 99
min.
Cuando se ha hecho la selección soltar el pulsador “G”.
en la pantalla aparece la cuenta atrás.
• De 99 a 01 min., la pantalla cuenta de min. en min.;
• De 01 min. la cuenta se hace de segundo en segundo.
Una señal acústica indicará el vencimiento del tiempo
programado; para apagar la señal acústica es suficiente pulsar el pulsador minutero “G”. Si se programa
incorrectamente el temporizador, mantener pulsado el
pulsador “G” durante unos segundos para ponerlo a
cero. El minutero indica el final del tiempo seleccionado,
pero no tiene la función de apagar el aparato.
Para sustituir la batería hay que acceder a la parte
interna del cuerpo exterior “L” y actuar de la siguiente
forma:
• Quitar todos los componentes de la freidora;
• Desenroscar los dos tornillos que sostienen el temporizador;
• Extraer el temporizador teniendo cuidado de no perder el pulsador;
• Gire la tapa de la pila en el sentido contrario de las
agujas del reloj hasta desbloquearla.
• Sustituir la batería con otra batería del mismo tipo;
invertir el orden de las operaciones para volver a
colocar el temporizador.
En caso de sustitución y de eliminación, extraer la
batería para eliminarla según lo establecido por la
leyes vigentes, ya que es perjudicial para el ambiente.
FINAL FRITURA
• Cuando se haya cumplido el tiempo de cocción,
levantar la cesta “Q” y controlar que los alimentos
contenidos hayan alcanzado el grado de cocción
deseado.
• Cuando se considera finalizada la cocción, situar el
botón A del termostato en la posición “•”. El indicador luminoso se pone de color verde.
• Desenchufar el aparato de la corriente.
• Enganchar la cesta “Q” en el soporte “E” de la cubeta para escurrir el aceite sobrante.
• N.B. Si la cocción se realiza en 2 fases, o si se quieren efectuar varias cocciones, al final de la primera
fase, enganchar la cesta “Q” en el soporte cesta “E “
y esperar hasta que el indicador luminoso se encienda y se ponga de color verde para indicar que se ha
alcanzado de nuevo la temperatura programada.
A continuación, introducir de nuevo lentamente la
cesta “Q” en el aceite por segunda vez.
Page 30

30
FRITURA DE ALIMENTOS NO CONGELADOS
Consultar la siguiente tabla teniendo en consideración que los tiempos y las temperaturas de cocción son aproximados y deben ser regulados en función de las cantidades y del gusto personal.
Alimento Cantidad máxima (gr.) Temperatura (°C) Tiempo (minutos)
Patatas frescas Media ración 500 (versión 3 l,) 170 6 - 8
700 (versión 4 l,) 170 8 - 10
Ración entera 1000 (versión 3 l,) 170 13 – 15
1300 (versión 4 l,) 170 14 - 16
Pescado Calamares 600 140 9 - 11
Vieiras 600 140 10 - 12
Sardinas 600 140 10 - 12
Quisquillas 600 140 8 - 10
Lenguados 500 140 6 - 8
Carne Chuletas de cerdo 500 160 8 - 9
Filetes de pollo 500 160 8 - 10
Albóndigas 700 160 8 - 10
Verduras Alcachofas 400 150 15 - 17
Coliflor 600 150 10 - 11
Setas 500 150 8 - 10
Berenjenas 200 150 9 - 11
Calabacines 500 150 13 - 15
CONSEJOS PARA LA COCCIÓN
DURACIÓN DEL ACEITE O GRASA
El aceite o la grasa no debe estar nunca por debajo del
nivel mínimo. Esporádicamente, hay que renovarlo
completamente. La duración del aceite o grasa dependen de lo que se fríe. El rebozado por ejemplo ensucia
más el aceite que una simple operación de fritura. ¡Al
igual que con las demás freidoras, recalentar el aceite
varias veces lo deteriora! Por tanto aconsejamos, aunque se utilice correctamente, sustituir todo el aceite con
una cierta frecuencia.
PROCEDIMIENTO PARA FREIR CORRECTAMENTE
Es importante seguir para cada receta la temperatura
aconsejada. Con una temperatura demasiado baja, la
fritura absorbe aceite. Con una temperatura demasiado alta, se crea inmediatamente la costra y la parte
interna sigue estando cruda.
Poner en el aceite los alimentos que se desean freír,
solamente cuando el aceite alcance la temperatura correcta, es decir cuando el indicador luminoso “B” se
apaga.
No sobrecargar la cesta, ello provoca el descenso
repentino de la temperatura del aceite y por tanto una
fritura demasiado grasa y no uniforme.
Controlar que los alimentos no sean gruesos y que el
grosor sea el mismo para todos, ya que los alimentos
demasiados gruesos se cuecen mal en el interior, aunque presenten luego un aspecto bonito, sin embargo los
que tienen un grosor uniforme alcanzan al mismo tiempo una cocción ideal.
Secar perfectamente los alimentos antes de introducirlos
en el aceite o grasa para evitar salpicaduras de aceite;
además los alimentos mojados resultan blandos
después de la cocción (especialmente las patatas).
Aconsejamos rebozar o enharinar los alimentos con un
alto contenido de agua (pescado, carne, verduras)
teniendo cuidado de eliminar el pan o la harina
sobrantes antes de ponerlos en el aceite.
Page 31

31
FRITURA DE ALIMENTOS CONGELADOS
Los productos congelados tienen una temperatura muy baja. Por consiguiente, provocan un notable descenso de la
temperatura del líquido de cocción. Para obtener un buen resultado, es aconsejable no superar las cantidades
máximas de alimentos para cada fritura.
Los alimentos congelados con frecuencia están recubiertos por conchas de hielo que hay que intentar eliminar antes
de la cocción. Introducir a continuación la cesta en el aceite de fritura muy lentamente para evitar hervores del aceite.
Los tiempos de cocción son aproximados y deben modificarse en función de la temperatura inicial de los alimentos
que se freirán y en función de la temperatura aconsejada por el fabricante de los congelados.
Alimento Cantidad máxima (gr.) Temperatura (°C) Tiempo (minutos)
Patatas fritas
precocinadas congeladas 1000 (versión 3 l,) 190 15 - 17
1300 (versión 4 l,) 190 17 - 19
Croquetas de patatas 700 180 9 - 11
Pescado Palitos de merluza 500 180 7 - 8
Filetes de platija 500 180 6 - 7
Carne Filetes de pollo 300 180 5 - 6
MODELOS CON GRIFO PARA VACIAR EL ACEITE (si previsto)
ATENCIÓN: no vacíe el aceite si está aún caliente, puede quemarse.
Efectuar las siguientes operaciones:
1. Extraer la cesta.
2. Abrir la portezuela “H”.
3. Abrir el grifo “I” dándole vueltas en el sentido contrario de las agujas del reloj.
4. Verter el líquido en un recipiente (véase la figura inferior), asegurarse de que no se derrame.
5. Eliminar los eventuales depósitos presentes en la cubeta con una esponja o papel absorbente.
6. Dar vueltas al grifo en el sentido de las agujas del reloj para cerrarlo.
7. Cerrar de nuevo la portezuela “H”.
Es conveniente conservar por separado el aceite usado para freír el pescado y el aceite usado para freír
otros alimentos.
Si se usa manteca o lardo, no dejar que se enfríe excesivamente para evitar que se solidifique.
Page 32

32
ANOMALÍAS DE FUNCIONAMIENTO
ANOMALÍA
Mal olor.
El aceite se salta.
Los alimentos no se doran durante
la fase de cocción.
El aceite no se calienta.
CAUSA
Aceite deteriorado.
Líquido de cocción inadecuado.
El aceite se ha deteriorado y por este
motivo se forma demasiada espuma
Los alimentos introducidos en el aceite
caliente no estaban suficientemente secos.
La cesta ha sido sumergida demasiado
rápidamente. El nivel del aceite supera
el límite máximo.
Temperatura del aceite demasiado baja.
Cesta demasiado cargada.
Utilización de la freidora sin aceite en la
cuba, lo cual ha provocado la rotura del
dispositivo térmico de seguridad.
SOLUCIÓN
Sustituir el aceite o la grasa.
Usar aceite de cacahuete o aceite
vegetal de buena calidad.
Sustituir el aceite o la grasa.
Seque correctamente los alimentos.
Introduzca lentamente los alimentos.
Disminuya la cantidad de aceite en la
cuba.
Seleccione una temperatura más alta.
Disminuya la cantidad de alimentos.
Contacte el centro de asistencia (el
dispositivo debe ser sustituido).
LIMPIEZA
Asegurarse que el aparato esté desenchufado antes de
efectuar cualquier operación de limpieza.
No introducir nunca la freidora en el agua y no ponerla bajo el chorro del grifo (véase fig. 7). Si el agua se
infiltra en el cuerpo de mandos, se podrían provocar
riesgos de electrocución.
Controlar que el aceite esté suficientemente frío, a continuación, quitar el grupo de mandos y vaciar el aceite.
Quitar el depósito de la cubeta con la ayuda de una
esponja o con papel absorbente.
Si se excluye el grupo de mandos, cable alimentación y
resistencia, se pueden lavar todas las demás partes con
agua caliente y detergente para vajilla (véase fig. 8).
No utilizar nunca esponjas abrasivas para no estropear
la freidora.
Al final de la operación, secar todo meticulosamente para evitar que durante el funcionamiento del
aparato se produzcan salpicaduras de aceite
caliente.
Page 33

33
LER COM ATENÇÃO ESTE MANUAL DE
INSTRUÇÕES ANTES DE INSTALAR E USAR O APARELHO. SÓ ASSIM SE PODERÃO OBTER OS MELHORES RESULTADOS E A MÁXIMA SEGURANÇA DE
USO.
DESCRIÇÃO DO APARELHO
A. Botão termóstato para a regulação da temperatura
B. Lâmpada-piloto da temperatura do óleo (vermelho,
verde)
C. Micro-interruptor de segurança
D. Marcas dos níveis MÍN – MÁX
E. Suporte do cesto
F. Contador de minutos
G. Botão do contador de minutos
H. Portinhola da torneira de descarga do óleo (se
incluída)
I. To rneira de descarga do óleo (se incluída)
J. Óculo (quando equipado)
K. Filtro (quando equipado)
L. Carcaça
M. Asas
N. Encaixes para a fixação do grupo de comandos
O. Tampa com asa
P. Cuba amovível
Q. Cesto com punho dobrável
R. Resistência eléctrica
S. Alojamento para o cabo de alimentação
T. Guia para a fixação do grupo de comandos do
aparelho
U. Reset do dispositivo térmico de segurança
V. Grupo de comandos
CONSELHOS IMPORTANTES:
• Este aparelho foi concebido para fritar alimentos e
para uso exclusivamente doméstico, não deve ser utilizado para outros fins e não deve ser modificado ou
mexido de modo nenhum.
• Não ligar o aparelho se estiver danificado (por ex.
por causa de uma queda) ou se apresentar problemas de funcionamento.
Contactar um centro de assistência autorizado pelo
fabricante.
• Antes de usar o aparelho, verificar se a tensão da
rede corresponde à da placa de identificação do
aparelho.
• Ligar o aparelho somente a tomadas de corrente com
uma capacidade mínima de 10A e com uma ligação
à terra eficiente.
• Se o cabo de alimentação estiver danificado,
deverá ser substituído pelo fabricante ou pelo seu
serviço de assistência técnica ou, em todo o caso,
por uma pessoa com uma qualificação semelhante, de modo a evitar qualquer risco.
• Não desligar a ficha puxando pelo cabo de alimentação: pegar sempre na ficha.
•O cabo de alimentação não deve estar próximo ou
tocar nas partes quentes do aparelho, fontes de calor
ou arestas cortantes.
• Não colocar o aparelho junto a fontes de calor ou
onde seja possível a presença de água.
•A queda da fritadeira pode provocar queimaduras
graves. Não deixar que o cabo fique pendurado
fora do bordo da superfície onde está apoiada a fritadeira, pois pode ficar ao alcance das mãos de uma
criança ou ser um obstáculo para o utilizador. Não
usar extensões.
• Durante o funcionamento o aparelho está quente,
tocar somente nas asas e nos botões.
NÃO DEIXAR O APARELHO AO ALCANCE DAS
CRIANÇAS.
• Não transportar a fritadeira quando o óleo está
quente, porque existe o
perigo de sofrer queimaduras graves. O aparelho
só deve ser deslocado
quando está frio, utilizando as respectivas asas.
•A fritadeira só deve ser
ligada depois de correctamente enchida com óleo
ou gordura já liquefeita,
de facto, se for aquecida
com a cuba vazia
intervém um dispositivo
térmico de segurança que
interrompe o seu funcionamento.
• Respeitar sempre os níveis MÍN e MÁX indicados
pelas marcas na cuba amovível.
•O micro-interruptor de segurança garante que o elemento aquecedor só possa funcionar se o corpo de
comandos estiver colocado correctamente.
•Ter sempre o aparelho desligado durante a limpeza
e quando não está a ser usado.
• Nunca mergulhar o corpo de comandos, o cabo e a
ficha eléctrica em água ou outros líquidos.
• Sem uma vigilância adequada, não deve ser consentida a utilização deste aparelho a crianças ou
pessoas incapazes.
•O óleo e a gordura são inflamáveis; se pegarem
fogo, desligar imediatamente o aparelho da tomada
de corrente e apagar o fogo com a tampa ou com
um cobertor. Nunca utilizar água para apagar as
chamas.
• Para retirar a cuba amovível aguardar sempre que o
óleo ou a gordura estejam completamente frios.
• Conservar estas instruções.
•Não abrir a portinhola da torneira de descarga do
óleo (se incluída) quando o óleo ainda está quente.
P
Page 34

34
DISPOSITIVO TÉRMICO DE SEGURANÇA
O aparelho tem um dispositivo térmico de segurança
que interrompe o aquecimento em caso de utilização
errada ou de funcionamento anormal. Depois que o
aparelho tenha arrefecido, com o auxílio de um palito
ou de qualquer coisa semelhante pontiaguda, carregar
com cuidado no botão de rearme do dispositivo de
segurança “U” que se encontra junto à palavra RESET
(ver a fig. 1). Se o aparelho não funcionar é necessário
consultar um centro de assistência autorizado pelo
fabricante.
INSTRUÇÕES DE USO
Antes de utilizar a fritadeira pela primeira vez, limpar
bem, com água quente e detergente para louça, o
cesto, a cuba e a tampa. O grupo de comandos com
cabo de alimentação e resistência só podem ser limpos
com um pano húmido. Assegurar-se que não tenha
entrado água no grupo de comandos e que não
tenham ficado resíduos no fundo da cuba amovível.
Enxugar bem toas as partes.
Verificar se o grupo de comandos está bem fixado à
carcaça da fritadeira. O micro-interruptor de segurança “C” não permite o funcionamento do aparelho se
o grupo de comandos “V” não estiver bem colocado na
carcaça “L”.
A fritadeira está agora pronta para a utilização.
ENCHIMENTO DO ÓLEO OU DA GORDURA
• Retirar a tampa “O” levantando-a pela asa. Girar o
punho do cesto até ficar bloqueado (pos. 2 da fig. 2).
Extrair o cesto “Q” puxando-o para cima.
• Extrair do seu alojamento “S” o comprimento de
cabo necessário para ligar o aparelho à corrente de
rede (ver a fig. 3).
• Se estiver a utilizar óleo, deite-o na cuba “P” até atingir o nível máximo indicado (ver a fig. 4). Nunca
ultrapassar este limite, arrisca-se a saída de óleo da
cuba. O nível do óleo deve encontrar-se sempre entre
as marcas de máximo e mínimo “D” (máx. 3 ou 4 l
consoante a versão). Os melhores resultados são
obtidos utilizando um bom óleo de amendoim.
• Se estiver a utilizar blocos de gordura, corte-os em
pedaços, funda-os noutro recipiente e depois deite a
gordura liquefacta na cuba da fritadeira. Nunca fundir a gordura no cesto ou na resistência da fritadeira (ver a fig. 5).
• Fechar a tampa “O”.
PRÉ-AQUECIMENTO
• Colocar os alimentos a fritar no cesto “Q”, sem nunca
o sobrecarregar (máx. 1 kg. para a versão de 3 l. e
1,3 kg. para a versão de 4 l). Assegurar-se que o
punho do cesto esteja bem colocado (pos. 2 da fig. 2).
• Pôr o botão “A” do termóstato (ver a fig. 6) na temperatura desejada (ver a tabela de tempos de cozedura). O indicador luminoso “B” passa da cor verde
a vermelho.
• Ao atingir a temperatura seleccionada, o indicador
luminoso “B” acende-se com a cor verde.
INÍCIO DA FRITURA
• Logo que o indicador luminoso “B” se acenda em
verde, mergulhe o cesto “Q” no óleo, baixando-o
muito lentamente para evitar salpicos ou derrame do
óleo quente.
•É absolutamente normal que saia uma grande quantidade de vapor.
PROGRAMAÇÃO DO CONTADOR DE MINUTOS (se previsto)
Carregar no botão “G”, no visor aparece “OO”. Manter
o botão carregado “G” até aparecer o tempo desejado. É possível seleccionar de 01 a 99 min.
Depois de efectuada a selecção largar o botão “G”. No
visor inicia a contagem decrescente:
• de 99 a 01 min. o visor conta de min. em min.;
•a partir de 01 min. a contagem dá-se de seg. em seg.
Um sinal sonoro indicará que terminou o tempo programado, para desligar o sinal sonoro basta carregar
no botão do contador de minutos “G”.
Em caso de programação errada do temporizador, é
possível pô-lo a zeros carregando por alguns segundos
no botão “G”.
O contador de minutos assinala o final do tempo seleccionado, mas não desliga o aparelho.
Para a substituição da pilha é necessário abrir a parte
interna da carcaça (H) procedendo do seguinte modo:
• Retirar todos os componentes da fritadeira;
• Desapertar os dois parafusos que fixam o temporizador;
• Desenfiar o temporizador tomando atenção para não
perder o botão;
• Girar a cobertura da pilha para a esquerda até se
soltar.
• Substituir a pilha por outra do mesmo tipo; para introduzir o temporizador, executar as mesmas operações
no sentido inverso.
Quer no caso de substituição como de eliminação do
aparelho, a pilha deve ser extraída e eliminada de
acordo com as leis em vigor, pois é nociva para o bem
ambiente.
FIM DA FRITURA
• Ao terminar o tempo de cozedura, alçar o cesto “Q”
e verificar se os alimentos têm o grau de dourado
desejado.
• Se considerar que a cozedura está terminada, desligar
o aparelho levando o botão “A” do termóstato para a
posição “•”. O indicador luminoso está verde.
• Retirar a ficha da tomada de corrente.
• Deixar escorrer o óleo em excesso encaixando o
cesto “Q” no suporte “E” da cuba.
• N.B. Caso se pretenda a cozedura em 2 fases ou se
pretenda prosseguir a cozedura, no final da primeira fase encaixar o cesto “Q” no suporte de cesto “E”
e aguardar que o indicador luminoso se acenda em
verde a indicar que foi novamente atingida a temperatura seleccionada. Então mergulhar lentamente o
cesto “Q” no óleo pela segunda vez.
Page 35

35
FRITURA DE ALIMENTOS NÃO CONGELADOS
Consultar a seguinte tabela tendo presente que os tempos e as temperaturas de cozedura são aproximados e devem
ser regulados em função das quantidades e da preferência pessoal.
Alimento Quantidade máx. (g) Temperatura (°C) Tempo (minutos)
Batatas frescas Meia porção 500 (versão de 3 l) 170 6 – 8
700 (versão de 4 l) 170 8 – 10
Porção inteira 1000 (versão de 3 l) 170 13 – 15
1300 (versão de 4 l) 170 14 – 16
Peixe Lulas 600 140 9 - 11
Lulas às rodelas 600 140 10 - 12
Sardinhas 600 140 10 - 12
Gambas 600 140 8 - 10
Solhas 500 140 6 - 8
Carne Panados de porco 500 160 8 - 9
Panados de frango 500 160 8 - 10
Croquetes 700 160 8 - 10
Legumes Alcachofras 400 150 15 - 17
Couve-flor 600 150 10 - 11
Cogumelos 500 150 8 - 10
Beringelas 200 150 9 - 11
Courgettes 500 150 13 - 15
CONSELHOS PARA A COZEDURA
DURAÇÃO DO ÓLEO OU DA GORDURA
O óleo ou a gordura não devem nunca descer abaixo
do nível mínimo. De vez em quando é necessário
renová-lo completamente. A duração do óleo ou da
gordura depende do alimento que se frita. Os panados, por exemplo, sujam mais o óleo que a frito simples. Como em qualquer fritadeira, o óleo, quando é
aquecido várias vezes deteriora-se! Portanto, mesmo se
utilizado correctamente, aconselhamos a sua substituição completa com uma certa frequência.
PARA FRITAR CORRECTAMENTE
É importante seguir a temperatura aconselhada para
cada receita. Com uma temperatura muito baixa, os fritos absorvem óleo. Com uma temperatura muito alta
forma-se imediatamente a crosta e o interior fica cru.
Os alimentos a fritar só devem mergulhados quando o
óleo atingiu a temperatura, isto é quando a lâmpadapiloto “B” se apagar.
Não sobrecarregar o cesto, isso provocará um abaixamento repentino da temperatura do óleo e portanto
uma fritura muito gordurosa e não uniforme.
Verificar se os alimentos são finos e de espessura uniforme, pois os alimentos muito grossos cozem mal por
dentro, apesar do seum bom aspecto, enquanto que os
de espessura uniforme atingem ao mesmo tempo a
cozedura ideal.
Enxugar muito bem os alimentos antes de mergulhá-los
no óleo ou na gordura para evitar que o óleo salpique;
por outro lado, os alimentos húmidos ficam muito moles
após a cozedura (especialmente as batatas).
É aconselhável panar ou enfarinhar os alimentos ricos
de água (peixe, carne, verduras), tendo o cuidado de
eliminar o pão ou a farinha em excesso antes de mergulhá-los no óleo.
Page 36

36
FRITURA DE ALIMENTOS CONGELADOS
Os alimentos congelados têm temperaturas muito baixas. Por consequência provocam um abaixamento considerável da temperatura do líquido de cozedura.
Para se obter um bom resultado, aconselhamos de não ultrapassar as quantidades máximas de alimentos para cada
fritura.
Os alimentos congelados muitas vezes estão cobertos com numerosos cristais de gelo que é necessário tentar eliminar antes de fritar. Mergulhar depois o cesto no óleo de fritar muito lentamente para evitar a fervura do óleo.
Os tempos de cozedura são aproximados e devem ser alterados em função da temperatura inicial dos alimentos a
fritar e em função da temperatura aconselhada pelo produtor dos congelados.
Alimento Quantidade máx. (g) Temperatura (°C) Tempo (minutos)
Batatas pré-cozinhadas congeladas 1000 (versão de 3 l) 190 15 - 17
1300 (versão de 4 l) 190 17 - 19
Croquetes de batata 700 180 9 - 11
Peixe Filetes de pescada 500 180 7 - 8
Filetes de linguado 500 180 6 - 7
Carne Panados de frango 300 180 5 - 6
MODELOS DOTADOS DE TORNEIRA DE DESCARGA DO ÓLEO (se incluída)
ATENÇÃO: Para evitar queimaduras, não descarregue o óleo enquanto ele estiver quente.
Proceda da seguinte forma:
1. Retire o cesto.
2. Abra a portinhola “H”.
3. Abra a torneira “I”, rodando-a no sentido contrário ao dos ponteiros do relógio.
4. Deite o líquido num recipiente (ver a figura abaixo) certificando-se de que não transborda.
5. Elimine eventuais depósitos da cuba com o auxílio de uma esponja ou papel absorvente.
6. Feche a torneira, rodando-a no sentido dos ponteiros do relógio.
7. Feche novamente a portinhola “H”.
É aconselhável conservar separadamente o óleo usado para fritar peixe do óleo usado para fritar outros
alimentos.
Se utilizar banha ou lardo, não os deixe arrefecer demasiado, para evitar que se solidifiquem.
Page 37

37
ANOMALIAS DE FUNCIONAMENTO
ANOMALIA
Mau cheiro
O óleo transborda
Os alimentos não ficam dourados
durante a fritura
O óleo não aquece
CAUSA
O óleo deteriorou-se.
O líquido de fritura não é o adequado.
O óleo deteriorou-se e por isso formase muita espuma
Mergulharam-se alimentos pouco enxutos no óleo quente.
O cesto foi mergulhado muito rapidamente. O nível do óleo ultrapassa o
nível máximo.
A temperatura do óleo está muito baixa
O cesto está muito carregado.
A fritadeira foi usada sem óleo na cuba,
provocando a ruptura do dispositivo térmico de segurança.
SOLUÇÃO
Substituir o óleo ou a gordura.
Utilizar óleo de amendoim ou óleo
vegetal de boa qualidade
Substituir o óleo ou a gordura
Enxugar bem os alimentos.
Mergulhá-los lentamente.
Diminuir a quantidade de óleo na
cuba.
Seleccionar uma temperatura mais alta.
Reduzir a quantidade dos alimentos.
Contactar o Centro de Assistência (o
dispositivo tem que ser substituído)
LIMPEZA
Antes de efectuar a limpeza assegurar-se que a ficha
esteja desligada.
Nunca mergulhar a fritadeira em água e não pô-la por
baixo da torneira da água (ver a fig. 7). Infiltrando-se
no corpo de comandos, a água pode provocar descargas eléctricas.
Verificar se o óleo está suficientemente frio, depois retirar o grupo de comandos e esvaziar o óleo. Extrair os
restos de comida depositados na cuba com uma
esponja ou com papel absorvente.
Excluindo o grupo de comandos, o cabo de alimentação e a resistência, todas as outras partes podem ser
lavadas com água quente e detergente para louça (ver
a fig. 8).
Nunca utilizar esponjas abrasivas para não danificar a
fritadeira.
Enxugar tudo muito bem no final da operação para
evitar que salpique óleo quente durante o funcionamento.
Page 38

38
¢π∞µ∞™∆∂ ¶ƒ√™∂∫∆π∫∞ ∆π™ √¢∏°π∂™ Ã∏™∏™
¶ƒπ¡ ∂°∫∞∆∞™∆∏™∂∆∂ ∫∞π Ã∏™πª√¶√π∏™∂∆∂
∆∏ ™À™∫∂À∏. ª√¡√¡ ∂∆™π £∞ ¶∂∆ÀÃ∂∆∂ ∆∞
∫∞§À∆∂ƒ∞ ∞¶√∆∂§∂™ª∞∆∞ ∫∞π ∆∏ ª∂°π™∆∏
∞™º∞§∂π∞ ∫∞∆∞ ∆∏ Ã∏™∏.
¶∂ƒπ°ƒ∞º∏ ∆∏™ ™À™∫∂À∏™:
A ¢И·ОfiЩЛ˜ ıЪМФЫЩ¿ЩЛ БИ· ЩЛ Ъ‡ıМИЫЛ ЩЛ˜
ıЪМФОЪ·Ы›·˜
B ∂У‰ИОЩИО‹ П˘¯У›· ıЪМФОЪ·Ы›·˜ П·‰ИФ‡ (ОfiООИУФ,
Ú¿ÛÈÓÔ)
C ªÈÎÚԉȷÎfiÙ˘ ·ÛÊ·Ï›·˜
D ŒÓ‰ÈÍË ÛÙ¿ıÌ˘ MIN - MAX
E ™Ù‹ÚÈÁÌ· ηϷıÈÔ‡
F. ГЪФУfiМВЩЪФ
G. ¢И·ОfiЩЛ˜ ¯ЪФУФМ¤ЩЪФ˘
H. ¶ÔÚÙ¿ÎÈ ÚÔ˘ÌÈÓ¤ÙÔ˘ ÂÎΤӈÛ˘ Ï·‰ÈÔ‡ (·Ó
˘¿Ú¯ÂÈ)
I. ƒÔ˘ÌÈÓ¤ÙÔ ÂÎΤӈÛ˘ Ï·‰ÈÔ‡ (·Ó ˘¿Ú¯ÂÈ)
J. ¶·Ú¿ı˘ÚÔ (·Ó ˘¿Ú¯ÂÈ)
K. º›ÏÙÚÔ (·Ó ˘¿Ú¯ÂÈ)
L. ¶Ú›‚ÏËÌ·
M. ГИЪФП·‚¤˜
N. £¤ЫИ˜ ЫЩЪ¤ˆЫЛ˜ МФУ¿‰·˜ ¯ИЪИЫЩЛЪ›ˆУ
O. ∫·¿ÎÈ Ì ¯ÈÚÔÏ·‚‹
P. ∞Ê·ÈÚÔ‡ÌÓÔ ‰Ô¯›Ô
Q. ∫·Ï¿ıÈ Ì ·Ó·‰ÈÏÔ‡ÌÓË ¯ÈÚÔÏ·‚‹
R. ∏ПОЩЪИО‹ ·УЩ›ЫЩ·ЫЛ
S. £¤ÛË Î·Ïˆ‰›Ô˘
T. √‰ЛБФ› БИ· ЩЛ ЫЩВЪ¤ˆЫЛ ЩˆУ ¯ВИЪИЫЩЛЪ›ˆУ ЫЩЛ
Û˘Û΢‹˜
U. ∂·У·КФЪ¿ ЩФ˘ ıЪМИОФ‡ Ы˘ЫЩ‹М·ЩФ˜
·ÛÊ·Ï›·˜
V. ªФУ¿‰· ¯ИЪИЫЩЛЪ›ˆУ
™∏ª∞¡∆π∫∂™ ¶ƒ√∂π¢√¶√π∏™∂π™
• ∏ Ы˘ЫО˘‹ ·˘Щ‹ ЪФФЪ›˙Щ·И БИ· ЩЛБ¿УИЫМ· К·БЛЩТУ
О·И ·ФОПИЫЩИО¿ БИ· ФИОИ·О‹ ¯Ъ‹ЫЛ. ¢У Ъ¤И У·
¯ЪЛЫИМФФИ›Щ·И БИ· ¿ППФ˘˜ ЫОФФ‡˜ Ф‡Щ У·
ЩЪФФФИ›Щ·И О·И У· ИЫО˘¿˙Щ·И М ФФИФУ‰‹ФЩ ЩЪfiФ.
• ªЛ ¯ЪЛЫИМФФИ›Щ ЩЛ Ы˘ЫО˘‹ ·У ·ЪФ˘ЫИ¿˙И ‚П¿‚˜
(.¯. ÏfiÁˆ ÙÒÛ˘) ‹ ÚÔ‚Ï‹Ì·Ù· ÏÈÙÔ˘ÚÁ›·˜.
∞˘ı˘Óı›Ù ÛÙÔ ÍÔ˘ÛÈÔ‰ÔÙË̤ÓÔ ™¤Ú‚Ș ÙÔ˘
ηٷÛ΢·ÛÙ‹.
• ¶ÚÈÓ ÙË ¯Ú‹ÛË, ‚‚·Èˆı›Ù fiÙÈ Ë Ù¿ÛË ÙÔ˘ ‰ÈÎÙ‡Ô˘
·УЩИЫЩФИ¯› Ы ·˘Щ‹У Ф˘ ·У·БЪ¿КЩ·И ЫЩЛУ ЩИО¤Щ·
¯·Ъ·ОЩЛЪИЫЩИОТУ ЩЛ˜ Ы˘ЫО˘‹˜.
• ∏ Û˘Û΢‹ Ú¤È Ó· Û˘Ó‰¤Ù·È ÌfiÓÔ Û Ú›˙˜ Ì
П¿¯ИЫЩЛ ·ЪФ¯‹ 10A О·И ·ФЩПЫМ·ЩИО‹ Б›ˆЫЛ.
• ∞У ЩФ ЛПВОЩЪИОfi О·ПТ‰ИФ ¤¯ВИ ¿ıВИ ˙ЛМИ¿,
Ъ¤ВИ У· ·УЩИО·Щ·ЫЩ·ıВ› ·fi ЩФУ
О·Щ·ЫОВ˘·ЫЩ‹ ‹ ·fi ЩФ ™¤Ъ‚И˜ ‹ ¿УЩˆ˜ ·fi
¤У·У ЛПВОЩЪФПfiБФ, ТЫЩВ У· ЪФПЛКıВ› ¿ЫЛ˜
К‡ЫВˆ˜ О›У‰˘УФ˜.
• ªЛУ ·ФЫ˘У‰¤Щ ЩФ КИ˜ ЩЪ·‚ТУЩ·˜ ЩФ ЛПОЩЪИОfi
О·ПТ‰ИФ: ЩЪ·‚¿Щ МfiУФУ ЩФ КИ˜.
• ∆Ф ЛПОЩЪИОfi О·ПТ‰ИФ ‰У Ъ¤И ФЩ¤ У· ‚Ъ›ЫОЩ·И
ОФУЩ¿ ‹ У· ·ОФ˘М¿ ıЪМ¿ М¤ЪЛ ЩЛ˜ Ы˘ЫО˘‹˜,
ЛБ¤˜ ıЪМfiЩЛЩ·˜ ‹ ·И¯МЛЪ¤˜ БˆУ›˜.
• ªËÓ ÙÔÔıÙ›Ù ÙË Û˘Û΢‹ ÎÔÓÙ¿ Û ËÁ¤˜
ıÚÌfiÙËÙ·˜ ‹ Û ÛËÌ›· Ô˘ ÌÔÚ› Ó· ›Ó·È ‚ÚÁ̤ӷ.
• ∏ КЪИЩ¤˙·, ¿У ¤ЫИ ·fi „ЛП¿, МФЪ› У· ЪФО·П¤ЫИ
ЫФ‚·Ъ¿ БО·‡М·Щ·. ªЛУ ·К‹УЩ ЩФ О·ПТ‰ИФ У·
ОЪ¤МЩ·И ·fi ЩЛУ ¿ОЪЛ ЩЛ˜ ИК¿УИ·˜ ЫЩ‹ЪИНЛ˜ ЩЛ˜
КЪИЩ¤˙·˜, fiФ˘ ı· МФЪФ‡Ы У· ЩФ КЩ¿ЫИ ‡ОФП· ¤У·
·И‰› ‹ У· МЪ‰˘Щ› ЫЩФ ¯Ъ‹ЫЩЛ. ªЛ ¯ЪЛЫИМФФИ›Щ
ЪФОЩ¿ЫИ˜.
• ∫·Щ¿ ЩЛ ‰И¿ЪОИ· ЩЛ˜ ПИЩФ˘ЪБ›·˜, Л Ы˘ЫО˘‹ ›У·И
˙ЫЩ‹. ГЪЛЫИМФФИ›Щ МfiУФУ ЩИ˜ ¯ИЪФП·‚¤˜ О·И ЩФ˘˜
‰И·ОfiЩ˜.
ª∏¡ ∞º∏¡∂∆∂ ∆∏ ™À™∫∂À∏ ™∂ ™∏ª∂π∞
¶ƒ√™π∆∞ ™∆∞ ¶∞π¢π∞.
• ªЛ МЩ·К¤ЪЩ ЩЛ КЪИЩ¤˙·
fiЩ·У ЩФ П¿‰И ›У·И ˙ЫЩfi,
БИ· У· ·ФК‡БЩ ЩФУ
О›У‰˘УФ ЫФ‚·ЪТУ
БО·˘М¿ЩˆУ. ∏ Ы˘ЫО˘‹
Ъ¤И У· МЩ·ОИУ›Щ·И
МfiУФУ fiЩ·У ›У·И ОЪ‡·,
¯ЪЛЫИМФФИТУЩ·˜ ЩИ˜
И‰ИО¤˜ ¯ИЪФП·‚¤˜.
• ∏ ÊÚÈÙ¤˙· Ú¤È Ó· Ù›ıÙ·È
Û ÏÈÙÔ˘ÚÁ›· ÌfiÓÔÓ ·ÊÔ‡
ÁÌ›ÛÈ ÛˆÛÙ¿ Ì Ï¿‰È ‹ Ì
˘ÁÚÔÔÈË̤ÓÔ Ï›Ô˜.
¶Ú¿ÁÌ·ÙÈ, ·Ó ıÚÌ·Óı›
¿‰È·, Ì‚·›ÓÈ ÙÔ ıÚÌÈÎfi
Û‡ÛÙËÌ· ·ÛÊ·Ï›·˜ Ô˘
‰È·ÎfiÙÈ ÙË ÏÈÙÔ˘ÚÁ›· Ù˘.
• ∆ЛЪ›Щ ¿УЩФЩ ЩЛ ª¤БИЫЩЛ О·И ∂П¿¯ИЫЩЛ ЫЩ¿ıМЛ Ф˘
˘Ф‰ИОУ‡ФУЩ·И ЫЩФ ЫˆЩЪИОfi ЩФ˘ ОИУЛЩФ‡ ‰Ф¯›Ф˘.
• √ МИОЪФ‰И·ОfiЩЛ˜ ·ЫК·П›·˜, ИЩЪ¤И ЩЛ
ПИЩФ˘ЪБ›· ЩФ˘ ıЪМ·УЩИОФ‡ ЫЩФИ¯›Ф˘ МfiУФУ fiЩ·У Л
МФУ¿‰· ¯ИЪИЫЩЛЪ›ˆУ ЩФФıЩЛı› ЫˆЫЩ¿.
• Œ¯Щ ¿УЩФЩ ЩЛ Ы˘ЫО˘‹ ·ФЫ˘У‰‰М¤УЛ fiЩ·У ЩЛУ
О·ı·Ъ›˙Щ ‹ ‰У ЩЛУ ¯ЪЛЫИМФФИ›Щ.
• ªЛ ‚˘ı›˙Щ ФЩ¤ ЩЛ МФУ¿‰· ¯ИЪИЫЩЛЪ›ˆУ, ЩФ ЛПОЩЪИОfi
О·ПТ‰ИФ О·И ЩФ КИ˜ Ы УЪfi ‹ Ы ¿ПП· ˘БЪ¿.
• ГˆЪ›˜ О·Щ¿ППЛПЛ ИЩ‹ЪЛЫЛ, ‰У Ъ¤И У·
ИЩЪ¤Щ·И Л ¯Ъ‹ЫЛ ЩЛ˜ Ы˘ЫО˘‹˜ Ы ·И‰И¿ ‹
·Ó‹ÌÔÚ· ¿ÙÔÌ·.
• ∆Ф П¿‰И О·И ЩФ П›Ф˜ ›У·И ‡КПОЩ·. ∞У ¿ЪФ˘У
КˆЩИ¿, ·ФЫ˘У‰¤ЫЩ ·М¤Ыˆ˜ ЩЛ Ы˘ЫО˘‹ ·fi ЩЛУ
Ъ›˙· ЩФ˘ Ъ‡М·ЩФ˜ О·И Ы‚‹ЫЩ ЩЛ КˆЩИ¿ М ЩФ
О·¿ОИ ‹ М М›· ОФ˘‚¤ЪЩ·. ªЛ ¯ЪЛЫИМФФИ›Щ ФЩ¤
УЪfi БИ· У· Ы‚‹ЫЩ ЩЛ КˆЩИ¿.
• °È· Ó· ‚Á¿ÏÙ ÙÔ ·Ê·ÈÚÔ‡ÌÓÔ ‰Ô¯›Ô, ÚÈ̤ÓÙ Ó·
ÎÚ˘ÒÛÈ Î·Ï¿ ÙÔ Ï¿‰È ‹ ÙÔ Ï›Ô˜.
• º˘Ï¿ÍÙ ÙȘ ·ÚÔ‡Û˜ Ô‰ËÁ›˜.
GR
Page 39

39
£∂ƒªπ∫√ ™À™∆∏ª∞ ∞™º∞§∂π∞™
∏ Ы˘ЫО˘‹ ‰И·ı¤ЩИ ıЪМИОfi Ы‡ЫЩЛМ· ·ЫК·П›·˜ Ф˘
‰И·ОfiЩИ ЩЛ ı¤ЪМ·УЫЛ Ы Ъ›ЩˆЫЛ П·Уı·ЫМ¤УЛ˜
¯Ъ‹ЫЛ˜ ‹ ·УТМ·ПЛ˜ ПИЩФ˘ЪБ›·˜. ∞КФ‡ ОЪ˘ТЫИ Л
Ы˘ЫО˘‹, М ЩЛ ‚Ф‹ıИ· МИ·˜ Ф‰ФУЩФБП˘К›‰·˜ ‹
·ЪfiМФИФ˘ ФЪБ¿УФ˘, И¤ЫЩ ЪФЫОЩИО¿ ЩФ ОФ˘М›
·У·КФЪ¿˜ ЩФ˘ Ы˘ЫЩ‹М·ЩФ˜ ·ЫК·П›·˜ "U", ОФУЩ¿
ЫЩЛУ ¤У‰ИНЛ RESET (‚П¤ ИО. 1). ∂¿У Л Ы˘ЫО˘‹ ‰У
ПИЩФ˘ЪБ›, ·˘ı˘Уı›Щ ЫЩФ НФ˘ЫИФ‰ФЩЛМ¤УФ ™¤Ъ‚И˜
ЩФ˘ О·Щ·ЫО˘·ЫЩ‹.
√¢∏°π∂™ Ã∏™∏™
¶ЪИУ ¯ЪЛЫИМФФИ‹ЫЩ ЩЛ КЪИЩ¤˙· БИ· ЪТЩЛ КФЪ¿,
О·ı·Ъ›ЫЩ О·П¿ М ˙ЫЩfi УЪfi О·И ·ФЪЪ˘·УЩИОfi БИ·
И¿Щ·, ЩФ О·П¿ıИ, ЩФ ‰Ф¯›Ф О·И ЩФ О·¿ОИ. ∏ МФУ¿‰·
¯ИЪИЫЩЛЪ›ˆУ М ЩФ ЛПОЩЪИОfi О·ПТ‰ИФ О·И ЩЛУ
·УЩ›ЫЩ·ЫЛ, МФЪФ‡У У· О·ı·ЪИЫЩФ‡У М ¤У· ˘БЪfi
·У›. µ‚·Иˆı›Щ fiЩИ ‰У ЩЪ¤¯И УЪfi ЫЩФ ЫˆЩЪИОfi ЩЛ˜
МФУ¿‰·˜ ¯ИЪИЫЩЛЪ›ˆУ О·И fiЩИ ‰У ˘¿Ъ¯Ф˘У
˘ФП›ММ·Щ· ЫЩФУ ¿ЩФ ЩФ˘ ·К·ИЪФ‡МУФ˘ О¿‰Ф˘.
™ОФ˘›ЫЩ ЪФЫОЩИО¿ fiП˜ ЩИ˜ ИК¿УИ˜.
µ‚·Иˆı›Щ fiЩИ Л МФУ¿‰· ¯ИЪИЫЩЛЪ›ˆУ ЫЩЪТıЛО ЫˆЫЩ¿
ЫЩФ ЫТМ· ЩЛ˜ КЪИЩ¤˙·˜. √ МИОЪФ‰И·ОfiЩЛ˜
·ÛÊ·Ï›·˜ "C" ‰Ó ÈÙÚ¤È ÙË ÏÈÙÔ˘ÚÁ›· Ù˘ Û˘Û΢‹˜
·У Л МФУ¿‰· ¯ИЪИЫЩЛЪ›ˆУ "V" ‰У ЩФФıЩЛı› ЫˆЫЩ¿
ЫЩФ Ъ›‚ПЛМ· "L".
∏ КЪИЩ¤˙· ›У·И ЩТЪ· ¤ЩФИМЛ БИ· ¯Ъ‹ЫЛ.
°∂ªπ™ª∞ ª∂ §∞¢π ◊ §π¶√™
• µБ¿ПЩ ЩФ О·¿ОИ "O" ·У·ЫЛОТУФУЩ·˜ ЩЛ
¯ÈÚÔÏ·‚‹. °˘Ú›ÛÙ ÙËÓ ·Ó·‰ÈÏÔ‡ÌÓË ¯ÈÚÔÏ·‚‹
ÙÔ˘ ηϷıÈÔ‡ ¤ˆ˜ fiÙÔ˘ ·ÛÊ·Ï›ÛÈ (ı¤ÛË 2 ÈÎ. 2).
µÁ¿ÏÙ ÙÔ Î·Ï¿ıÈ "Q" ÙÚ·‚ÒÓÙ·˜ ÙÔ ÚÔ˜ Ù· ¿Óˆ.
• µÁ¿ÏÙ ·fi ÙË ı‹ÎË ÙÔ˘ ηψ‰›Ô˘ "S" ÙÔ ·Ó·Áη›Ô
ÙÌ‹Ì· ÙÔ˘ ηψ‰›Ô˘ ÁÈ· Ó· Û˘Ó‰¤ÛÙ ÙË ÊÚÈÙ¤˙·
ÛÙËÓ Ú›˙· (‚Ϥ ÈÎ. 3).
• ∂¿У ¯ЪЛЫИМФФИ›Щ П¿‰И, БМ›ЫЩ ЩФ ‰Ф¯›Ф "P" ¤ˆ˜ ЩЛ
М¤БИЫЩЛ ЫЩ¿ıМЛ (‚П¤ ИО. 4). ªЛУ ˘Ъ‚·›УЩ ФЩ¤
·˘Щfi ЩФ fiЪИФ, БИ· У· ·ФК‡БЩ ЩФУ О›У‰˘УФ Нfi‰Ф˘
П·‰ИФ‡ ·fi ЩФ ‰Ф¯›Ф. ∏ ЫЩ¿ıМЛ ЩФ˘ П·‰ИФ‡ Ъ¤И
У· ‚Ъ›ЫОЩ·И ¿УЩ· МЩ·Н‡ ЩЛ˜ М¤БИЫЩЛ˜ О·И ЩЛ˜
П¿¯ИЫЩЛ˜ ¤У‰ИНЛ˜ "D" (М¤Б. 3 ‹ 4 П›ЩЪ· ·У·ПfiБˆ˜
МВ ЩФ МФУЩ¤ПФ). ∆· О·П‡ЩЪ· ·ФЩП¤ЫМ·Щ·
ИЩ˘Б¯¿УФУЩ·И ¯ЪЛЫИМФФИТУЩ·˜ К˘ЫЩИО¤П·ИФ
О·П‹˜ ФИfiЩЛЩ·˜.
• ∞У ·УЩ›ıЩ· ¯ЪЛЫИМФФИ›Щ ЫЩЪfi П›Ф˜, Оfi„Щ ЩФ Ы
МИОЪ¿ ОФММ¿ЩИ·, ·К‹ЫЩ ЩФ У· ПИТЫИ Ы ¿ППФ ЫО‡Ф˜
О·И ЫЩЛ Ы˘У¤¯И· ·‰И¿ЫЩ ЩФ ˘БЪФФИЛМ¤УФ П›Ф˜ ЫЩФ
‰Ф¯›Ф ЩЛ˜ КЪИЩ¤˙·˜. ªЛ ПИТУЩ ФЩ¤ ЩФ П›Ф˜ ЫЩФ
‰Ф¯›Ф ‹ ЫЩЛУ ·УЩ›ЫЩ·ЫЛ ЩЛ˜ КЪИЩ¤˙·˜ (‚П¤ ИО. 5).
• ∫Ï›ÛÙ ¿ÏÈ ÙÔ Î·¿ÎÈ "O".
¶ƒ√£∂ƒª∞¡™∏
• ∆ÔÔıÙ‹ÛÙ Ù· ÙÚfiÊÈÌ· ÁÈ· ÙËÁ¿ÓÈÛÌ· ÛÙÔ Î·Ï¿ıÈ
"Q", ¯ˆЪ›˜ У· ЩФ ˘ЪКФЪЩТУЩ·И (М¤Б. 1 kg. БИ· ЩФ
МФУЩ¤ПФ 3 П›ЩЪˆУ О·И 1,3 kg. БИ· ЩФ МФУЩ¤ПФ 4
П›ЩЪˆУ). µ‚·Иˆı›Щ fiЩИ Л ¯ИЪФП·‚‹ ЩФ˘ О·П·ıИФ‡
¤¯И ЩФФıЩЛı› ЫˆЫЩ¿ (ı¤ЫЛ 2 ИО. 2).
• ∆ФФıЩ‹ЫЩ ЩФ ‰И·ОfiЩЛ "A" ЩФ˘ ıЪМФЫЩ¿ЩЛ (ИО. 6)
ЫЩЛУ Иı˘МЛЩ‹ ıЪМФОЪ·Ы›· (‚П¤ ›У·О·
ЩЛБ·У›ЫМ·ЩФ˜). ∏ ВУ‰ВИОЩИО‹ П˘¯У›· "B" ·fi
Ъ¿ЫИУЛ Б›УВЩ·И ОfiООИУЛ.
• ŸЩ·У ВИЩВ˘¯ıВ› Л ВИПВБМ¤УЛ ıВЪМФОЪ·Ы›·, Л
ВУ‰ВИОЩИО‹ П˘¯У›· "µ" ·У¿‚ВИ МВ Ъ¿ЫИУФ ¯ЪТМ·.
∆∏°∞¡π™ª∞
• ªfiПИ˜ ·У¿„ВИ Л ВУ‰ВИОЩИО‹ П˘¯У›· "Q" МВ Ъ¿ЫИУФ
¯ЪТМ·, О·ЩВ‚¿ЫЩВ ФП‡ ·ЪБ¿ ЩФ О·П¿ıИ БИ· У·
‚˘ıИЫЩВ› ЫЩФ П¿‰И ТЫЩВ У· ·ФК‡БВЩВ
ИЩЫИП›ЫМ·Щ· ‹ ¤НФ‰Ф О·˘ЩФ‡ П·‰ИФ‡.
• ∏ ¤ÍÔ‰Ô˜ ÌÁ¿Ï˘ ÔÛfiÙËÙ·˜ ·ÙÌÔ‡ ›Ó·È ·fiÏ˘Ù·
К˘ЫИФПФБИО‹.
ƒ‡ıМИЫЛ ¯ЪФУФМ¤ЩЪФ˘ (·У ˘¿Ъ¯ВИ)
¶È¤ÛÙ ÙÔ Ï‹ÎÙÚÔ "G", ÛÙËÓ ÔıfiÓË ÂÌÊ·Ó›˙ÂÙ·È Ë
¤Ó‰ÂÈÍË "
OO". ∫Ъ·Щ‹ЫЩВ ·ЩЛМ¤УФ ЩФ П‹ОЩЪФ "G"
¤ˆ˜ fiЩФ˘ ВМК·УИЫЩВ› Ф ВИı˘МЛЩfi˜ ¯ЪfiУФ˜. ∏
Ъ‡ıМИЫЛ МФЪВ› У· О˘М·›УВЩ·И ·fi 01 ¤ˆ˜ 99 ПВЩ¿.
ªВЩ¿ ЩЛ Ъ‡ıМИЫЛ, ·К‹ЫЩВ ЩФ П‹ОЩЪФ "G". ™ЩЛУ
ФıfiУЛ ·Ъ¯›˙ВИ Л ·УЩ›ЫЩЪФКЛ М¤ЩЪЛЫЛ:
• ·fi 99 ¤ˆ˜ 01 ПВЩfi, Л М¤ЩЪЛЫЛ Б›УВЩ·И ·fi
ÏÂÙfi ÛÂ ÏÂÙfi
• ·fi ЩФ 01 ПВЩfi, Л М¤ЩЪЛЫЛ Б›УВЩ·И ЫВ
‰В˘ЩЪfiПВЩ·.
ŒУ· Л¯ЛЩИОfi Ы‹М· ВИЫЛМ·›УВИ ЩЛ П‹НЛ ЩФ˘
ВИПБМ¤УФ˘ ¯ЪfiУФ˘. °И· У· ‰И·Оfi„ВЩВ ЩФ Л¯ЛЩИОfi
Ы‹М·, ·ЪОВ› У· И¤ЫВЩВ ЩФ П‹ОЩЪФ "G" ЩФ˘
¯ЪФУФМ¤ЩЪФ˘.
™В ВЪ›ЩˆЫЛ П·Уı·ЫМ¤УЛ˜ Ъ‡ıМИЫЛ˜ ЩФ˘
¯ЪФУФМ¤ЩЪФ˘, МФЪВ›ЩВ У· ЩФ МЛ‰ВУ›ЫВЩВ
ОЪ·ЩТУЩ·˜ ·ЩЛМ¤УФ ЩФ П‹ОЩЪФ "G" БИ· П›Б·
‰В˘ЩВЪfiПВЩ·.
∆Ф ¯ЪФУfiМВЩЪФ ВИЫЛМ·›УВИ ЩЛ П‹НЛ ЩФ˘ ВИПБМ¤УФ˘
¯ЪfiУФ˘, ·ПП¿ ‰ВУ Ы‚‹УВИ ЩЛ Ы˘ЫОВ˘‹.
°È· ÙËÓ ·ÓÙÈηٿÛÙ·ÛË Ù˘ Ì·Ù·Ú›·˜ ›ӷÈ
··Ъ·›ЩЛЩФ У· ¤¯ВЩВ ЪfiЫ‚·ЫЛ ЫЩФ ВЫˆЩВЪИОfi ЩФ˘
ВЪИ‚П‹М·ЩФ˜ “L” МВ ЩФУ ВН‹˜ ЩЪfiФ:
с ∞К·ИЪ¤ЫЩВ fiП· Щ· ВН·ЪЩ‹М·Щ· ЩЛ˜ КЪИЩ¤˙·˜.
с •В‚И‰ТЫЩВ ЩИ˜ ‰‡Ф ‚›‰В˜ Ф˘ ЫЩВЪВТУФ˘У ЩФ
¯ЪФУfiМВЩЪФ.
с ‚Б¿ПЩВ ЩФ ¯ЪФУФ‰И·ОfiЩЛ ЪФЫВОЩИО¿ БИ· У· МЛ
¯¿ÛÂÙ ÙÔ ÎÔ˘Ì›
ñ°˘Ú›ÛÙ ÙÔ Î¿Ï˘ÌÌ· Ù˘ Ì·Ù·Ú›·˜
·ЪИЫЩВЪfiЫЩЪФК· БИ· У· ВПВ˘ıВЪˆıВ›.
ñ ·ÓÙÈηٷÛÙ‹ÛÙ ÙËÓ Ì·Ù·Ú›· Ì ¿ÏÏË ÙÔ˘ ȉ›Ô˘
Ù‡Ô˘. °È· ÙËÓ ÙÔÔı¤ÙËÛË ÙÔ˘ ¯ÚÔÓԉȷÎfiÙË
ВОЩВП¤ЫЩВ ЩИ˜ ›‰ИВ˜ ВУ¤ЪБВИВ˜ МВ ·УЩ›ЫЩЪФКЛ
ÛÂÈÚ¿.
∆fiÛÔ Û ÂÚ›ÙˆÛË ·ÓÙÈηٿÛÙ·Û˘, fiÛÔ Î·È
·fiЫ˘ЪЫЛ˜ ЩЛ˜ Ы˘ЫОВ˘‹˜, Л М·Щ·Ъ›· Ъ¤ВИ У·
‰И·Щ›ıВЩ·И Ы‡МКˆУ· МВ ЩФ˘˜ ИЫ¯‡ФУЩВ˜
О·УФУИЫМФ‡˜, БИ·Щ› В›У·И ВИ‚П·‚‹˜ БИ· ЩФ
ВЪИ‚¿ППФУ.
∆∂§√™ ∆∏°∞¡π™ª∞∆√™
• ªÙ¿ ÙËÓ ¿ÚÔ‰Ô ÙÔ˘ ¯ÚfiÓÔ˘ ÙËÁ·Ó›ÛÌ·ÙÔ˜,
·У·ЫЛОТЫЩ ЩФ О·П¿ıИ "Q" О·И П¤БНЩ ·У ЩФ К·БЛЩfi
ÙËÁ·Ó›ÛÙËÎ ÛˆÛÙ¿.
• ∂¿Ó ıˆÚ›Ù fiÙÈ ÙÔ ÙËÁ¿ÓÈÛÌ· ÙÏ›ˆÛ, Û‚‹ÛÙ ÙË Û˘Û΢‹
Б˘ЪУТУЩ·˜ ЩФ ‰И·ОfiЩЛ "A" ЩФ˘ ıЪМФЫЩ¿ЩЛ ЫЩЛ
ı¤ÛË "
•". ∏ ВУ‰ВИОЩИО‹ П˘¯У›· В›У·И Ъ¿ЫИУЛ.
Page 40

40
∆∏°∞¡π™ª∞ ª∏ ∫∞∆∂æÀ°ª∂¡ø¡ ∆ƒ√ºπªø¡
™˘М‚Ф˘П˘ı›Щ ЩФУ ·Ъ·О¿Щˆ ›У·О·, ¤¯ФУЩ·˜ ˘fi„Л ˆ˜ ФИ ¯ЪfiУФИ О·И ФИ ıЪМФОЪ·Ы›˜ ЩЛБ·У›ЫМ·ЩФ˜ ›У·И
О·Щ¿ ЪФЫ¤ББИЫЛ О·И Ъ¤И У· Ъ˘ıМ›˙ФУЩ·И ·У¿ПФБ· М ЩЛУ ФЫfiЩЛЩ· О·И ЩИ˜ ЪФЫˆИО¤˜ ЪФЩИМ‹ЫИ˜.
º·ÁËÙ¿ ª¤БИЫЩЛ ФЫfiЩЛЩ· (gr.) £ЪМФОЪ·Ы›· (ЖC) ÃÚfiÓÔ˜ (ÏÙ¿)
ºÚ¤ÛÎȘ ·Ù¿Ù˜˜ ªÈÛ‹ ÌÚ›‰· 500 (ÌÔÓÙ¤ÏÔ 3 Ï›ÙÚˆÓ) 170 6 - 8
700 (ÌÔÓÙ¤ÏÔ 4 Ï›ÙÚˆÓ) 170 8 - 10
√ПfiОПЛЪЛ МЪ›‰· 1000 (ÌÔÓÙ¤ÏÔ 3 Ï›ÙÚˆÓ) 170 13 - 15
1300 (ÌÔÓÙ¤ÏÔ 4 Ï›ÙÚˆÓ) 170 14 - 16
æ¿ÚÈ· ∫·Ï·Ì·Ú¿ÎÈ· 600 140 9 - 11
ª‡‰È· 600 140 10 - 12
™·Ú‰¤Ï˜ 600 140 10 - 12
°·Ú›‰˜ 600 140 8 - 10
°ÏÒÛÛ˜ 500 140 6 - 8
∫Ú¤·˜ ∫ФЩФП¤Щ˜ ¯ФИЪИУФ‡ 500 160 8 - 9
∫ÔÙÔϤ٘ ÎÔÙfiÔ˘ÏÔ˘ 500 160 8 - 10
∫ÊÙ¤‰˜ 700 160 8 - 10
§·¯·ÓÈο ∞ÁÎÈÓ¿Ú˜ 400 140 15 - 17
∫Ô˘ÓÔ˘›‰È 600 140 10 - 11
ª·ÓÈÙ¿ÚÈ· 500 140 8 - 10
ªÏÈÙ˙¿Ó˜ 200 140 9 - 11
∫ÔÏÔ΢ı¿ÎÈ· 500 140 13 - 15
• ∞ÔÛ˘Ó‰¤ÛÙ ÙÔ ÊȘ ·fi ÙËÓ Ú›˙· ÙÔ˘ Ú‡̷ÙÔ˜.
• ∞К‹ЫЩ У· ЫЩ¿НИ ЩФ П¿‰И, ЫЩЪТУФУЩ·˜ ЩФ О·П¿ıИ
"Q" ÛÙÔ ÛÙ‹ÚÈÁÌ· "E" ÙÔ˘ ‰Ô¯›Ô˘.
• ™∏ª. ∞Ó ÙÔ ÙËÁ¿ÓÈÛÌ· Ú¤ÂÈ Ó· Á›ÓÂÈ Û 2
К¿ЫВИ˜ ‹ ı¤ПВЩВ У· ЩЛБ·У›ЫВЩВ ВЪИЫЫfiЩВЪВ˜
КФЪ¤˜, ЫЩФ Щ¤ПФ˜ ЩЛ˜ ЪТЩЛ˜ К¿ЫЛ˜ ЫЩЛЪ›НЩВ ЩФ
О·П¿ıИ "Q" ЫЩФ ЫЩ‹ЪИБМ· О·П·ıИФ‡ "E" О·И
ВЪИМ¤УВЩВ У· ·У¿„ВИ ЩФ Ъ¿ЫИУФ ЩЛ˜ ВУ‰ВИОЩИО‹˜
П˘¯У›·˜ Ф˘ ˘Ф‰ЛПТУВИ ЩЛУ В›ЩВ˘НЛ ЩЛ˜
ВИПВБМ¤УЛ˜ ıВЪМФОЪ·Ы›·˜. ™ЩЛ Ы˘У¤¯И· ‚˘ı›ЫЩ
О·И ¿ПИ ·ЪБ¿ ЩФ О·П¿ıИ "Q" ЫЩФ П¿‰И БИ· ‰‡ЩЪЛ
КФЪ¿.
™Àªµ√À§∂™ °π∞ ∆√ ∆∏°∞¡π™ª∞
¢π∞ƒ∫∂π∞ §∞¢π√À ◊ §π¶√À™
∆Ô Ï¿‰È ‹ ÙÔ Ï›Ô˜ ‰Ó Ú¤È ÔÙ¤ Ó· ¤ÊÙÔ˘Ó Î¿Ùˆ
·fi ÙËÓ Ï¿¯ÈÛÙË ÛÙ¿ıÌË. ¶ÚÈÔ‰Èο, ›Ó·È ·Ó·Áη›Ô
У· ·У·УТУЩ fiПФ ЩФ П¿‰И. ∏ ‰И¿ЪОИ· ЩФ˘ П·‰ИФ‡ ‹
ЩФ˘ П›Ф˘˜ Н·ЪЩ¿Щ·И ·fi ЩФ ›‰Ф˜ ЩˆУ К·БЛЩТУ Ф˘
ЩЛБ·У›˙Щ. °И· ·Ъ¿‰ИБМ·, Щ· К·БЛЩ¿ ·У¤ ПЪТУФ˘У
ЪИЫЫfiЩЪФ ЩФ П¿‰И ·' fiЩИ ЩФ ·Пfi ЩЛБ¿УИЫМ·.
Ÿˆ˜ Ы fiП˜ ЩИ˜ КЪИЩ¤˙˜, ЩФ П¿‰И ·У ıЪМ·Уı› ФПП¤˜
КФЪ¤˜ ·ППФИТУЩ·И! ™˘УТ˜, ·ОfiМЛ ОИ ·У
¯ЪЛЫИМФФИ›Щ·И ЫˆЫЩ¿, Ы˘УИЫЩ¿Щ·И Л П‹ЪЛ˜
·ÓÙÈηٿÛÙ·Û‹ ÙÔ˘ Ì Î¿ÔÈ· Û˘¯ÓfiÙËÙ·.
¶ø™ ¡∞ ∆∏°∞¡π™∂∆∂ ™ø™∆∞
°И· О¿ı К·БЛЩfi, ›У·И ЫЛМ·УЩИОfi У· ЩЛЪ›Щ·И Л
Ы˘УИЫЩТМУЛ ıЪМФОЪ·Ы›·. ™ ФП‡ ¯·МЛП‹
ıЪМФОЪ·Ы›·, ЩФ К·БЛЩfi ЪФ˘К¿И П¿‰И, УТ ЫЩИ˜
˘„ЛП¤˜ ıЪМФОЪ·Ы›˜ Ы¯ЛМ·Щ›˙И ·М¤Ыˆ˜ ЩЛУ
ОЪФ‡ЫЩ· О·И ЩФ ЫˆЩЪИОfi ·Ъ·М¤УИ ·ЩЛБ¿УИЫЩФ.
∆· К·БЛЩ¿ БИ· ЩЛБ¿УИЫМ· Ъ¤И У· ‚˘ı›˙ФУЩ·И ЫЩФ
П¿‰И МfiУФУ fiЩ·У КЩ¿ЫИ ЫЩЛ ЫˆЫЩ‹ ıЪМФОЪ·Ы›·,
fiЩ·У ‰ЛП·‰‹ Ы‚‹ЫИ Л У‰ИОЩИО‹ П˘¯У›· "B".
ªЛУ ˘ЪКФЪЩТУЩ ЩФ О·П¿ıИ. ∞˘Щfi ı· ЪФО·ПФ‡Ы
·fiЩФМЛ ЩТЫЛ ЩЛ˜ ıЪМФОЪ·Ы›·˜ ЩФ˘ П·‰ИФ‡ О·И
Ы˘УТ˜ ˘Ъ‚ФПИО¿ П·‰Ъfi О·И ·УФМФИfiМФЪКФ
ЩЛБ¿УИЫМ·.
∂П¤БНЩ ·У Щ· ЩЪfiКИМ· ›У·И ПЩ¿ О·И М ЩФ ›‰ИФ ¿¯Ф˜,
БИ·Щ› Щ· ЩЪfiКИМ· М МБ¿ПФ ¿¯Ф˜ ЩЛБ·У›˙ФУЩ·И
¿Ы¯ЛМ· ЫЩФ ЫˆЩЪИОfi, ·Ъ¿ ЩЛУ ˆЪ·›· fi„Л, УТ О›У·
М ФМФИfiМФЪКФ ¿¯Ф˜ КЩ¿УФ˘У Щ·˘Щfi¯ЪФУ· ЫЩФ
И‰·УИОfi ЩЛБ¿УИЫМ·.
™ЩБУТЫЩ О·П¿ Щ· ЩЪfiКИМ· ЪИУ Щ· ‚˘ı›ЫЩ Ы П¿‰И ‹
П›Ф˜, БИ· У· ·ФК‡БЩ ИЩЫИП›ЫМ·Щ· П·‰ИФ‡. ∆·
˘БЪ¿ ЩЪfiКИМ·, МЩ¿ ЩФ ЩЛБ¿УИЫМ·, ·Ъ·М¤УФ˘У
М·П·О¿ (И‰ИО¿ ФИ ·Щ¿Щ˜).
™˘УИЫЩ¿Щ·И ЩФ ·У¿ЪИЫМ· ‹ ЩФ ·П‡ЪˆМ· ЩˆУ
ЩЪФК›МˆУ Ф˘ ›У·И ПФ‡ЫИ· Ы УЪfi („¿ЪИ·, ОЪ¤·˜,
П·¯·УИО¿), ·К·ИЪТУЩ·˜ ЩФ ПФУ¿˙ФУ „ˆМ› ‹ ·П‡ЪИ
ЪИУ Щ· ‚˘ı›ЫЩ ЫЩФ П¿‰И.
Page 41

41
∆∏°∞¡π™ª∞ ∫∞∆∂æÀ°ª∂¡ø¡ ∆ƒ√ºπªø¡
∆· О·Щ„˘БМ¤У· ¤¯Ф˘У ФП‡ ¯·МЛП‹ ıЪМФОЪ·Ы›·. ∫·Щ¿ Ы˘У¤И· ЪФО·ПФ‡У ЫЛМ·УЩИО‹ ЩТЫЛ ЩЛ˜
ıЪМФОЪ·Ы›·˜ ЩФ˘ П·‰ИФ‡.
°И· У· ¤¯Щ О·П¿ ·ФЩП¤ЫМ·Щ·, ›У·И ЫОfiИМФ У· МЛУ ˘Ъ‚·›УЩ ЩИ˜ М¤БИЫЩ˜ ФЫfiЩЛЩ˜ ЩЪФК›МˆУ БИ· О¿ı
ЩЛБ¿УИЫМ·.
∆· О·Щ„˘БМ¤У· О·П‡ЩФУЩ·И Ы˘¯У¿ ·fi ФП˘¿ЪИıМФ˘˜ ОЪ˘ЫЩ¿ППФ˘˜ ¿БФ˘ Ф˘ Ъ¤И У· ·К·ИЪФ‡УЩ·И ЪИУ
·fi ÙÔ ÙËÁ¿ÓÈÛÌ·. µ˘ı›ÛÙ ÛÙË Û˘Ó¤¯È· ÙÔ Î·Ï¿ıÈ ÛÙÔ Ï¿‰È Ôχ ·ÚÁ¿ ÁÈ· Ó· ·ÔʇÁÙ ÙÔÓ ·Ó·‚Ú·ÛÌfi ÙÔ˘
П·‰ИФ‡.
√И ¯ЪfiУФИ ЩЛБ·У›ЫМ·ЩФ˜ ›У·И О·Щ¿ ЪФЫ¤ББИЫЛ О·И Ъ¤И У· Ъ˘ıМ›˙ФУЩ·И ·У¿ПФБ· М ЩЛУ ·Ъ¯ИО‹ ıЪМФОЪ·Ы›·
ЩˆУ ЩЪФК›МˆУ О·И ЩЛ Ы˘УИЫЩТМУЛ ıЪМФОЪ·Ы›· ·fi ЩФУ ·Ъ·БˆБfi ЩˆУ О·Щ„˘БМ¤УˆУ.
º·ÁËÙ¿ ª¤БИЫЩЛ ФЫfiЩЛЩ· (gr.) £ЪМФОЪ·Ы›· (ЖC) ÃÚfiÓÔ˜ (ÏÙ¿)
¶ЪФЩЛБ·УИЫМ¤У˜ О·Щ„˘БМ¤У˜ ·Щ¿Щ˜ 1000 (МФУЩ¤ПФ 3 П›ЩЪˆУ) 190 15 - 17
1300 (ÌÔÓÙ¤ÏÔ 4 Ï›ÙÚˆÓ) 190 17 - 19
∫ÚÔΤ٘ ·Ù¿Ù·˜ 700 180 9 - 11
æ¿ÚÈ ∫ÚÔΤ٘ „·ÚÈÔ‡ 500 180 7 - 8
ºÈϤÙÔ Ì·Î·ÏÈ¿ÚÔ˘ 500 180 6 - 7
∫Ú¤·˜ ∫ÔÙÔϤ٘ ÎÔÙfiÔ˘ÏÔ˘ 300 180 5 - 6
ª√¡∆∂§∞ ª∂ ƒ√Àª¶π¡∂∆√ ∂∫∫∂¡ø™∏™ §∞¢π√À (·Ó ˘¿Ú¯ÂÈ)
¶ƒ√™√Ã∏: ÌËÓ ·‰ÂÈ¿˙ÂÙ ÙÔ Ï¿‰È fiÙ·Ó Â›Ó·È ˙ÂÛÙfi, ÁÈ· Ó· ·ÔʇÁÂÙ ÂÁη‡Ì·Ù·.
∂ÓÂÚÁ‹ÛÙ ˆ˜ ÂÍ‹˜:
1. µÁ¿ÏÙ ÙÔ Î·Ï¿ıÈ.
2. ∞ÓÔ›ÍÙ ÙÔ ÔÚÙ¿ÎÈ "∏".
3. ∞УФ›НЩВ ЩФ ЪФ˘МИУ¤ЩФ "π" Б˘Ъ›˙ФУЩ·˜ ·ЪИЫЩВЪfiЫЩЪФК·.
4. ∞Ê‹ÛÙ ӷ ÙÚ¤ÍÂÈ ÙÔ Ï¿‰È ÛÙÔ ‰Ô¯Â›Ô (‚Ϥ οو ÂÈÎ.) ÚÔÛ¤¯ÔÓÙ·˜ Ó· ÌËÓ Í¯ÂÈÏ›ÛÂÈ.
5. ∞К·ИЪ¤ЫЩВ Щ˘¯fiУ ˘ФПВ›ММ·Щ· ·fi ЩФУ О¿‰Ф ¯ЪЛЫИМФФИТУЩ·˜ ЫКФ˘ББ¿ЪИ ‹ ·ФЪЪФКЛЩИОfi ¯·ЪЩ›.
6. ∫ПВ›ЫЩВ ЩФ ЪФ˘МИУ¤ЩФ Б˘Ъ›˙ФУЩ¿˜ ЩФ ‰ВНИfiЫЩЪФК·.
7. ∫Ï›ÛÙ ͷӿ ÙÔ ÔÚÙ¿ÎÈ "∏".
∂›У·И ЫОfiИМФ У· ‰И·ЩЛЪВ›ЩВ ¯ˆЪИЫЩ¿ ЩФ П¿‰И Ф˘ ¯ЪЛЫИМФФИВ›ЩВ БИ· ЩЛБ¿УИЫМ· „·ЪИТУ ·fi ЩФ
П¿‰И Ф˘ ¯ЪЛЫИМФФИВ›ЩВ БИ· ¿ПП· К·БЛЩ¿.
™В ВЪ›ЩˆЫЛ ¯Ъ‹ЫЛ˜ П›Ф˘˜, МЛУ ЩФ ·К‹УВЩВ У· ОЪ˘ТЫВИ БИ· У· МЛ ЫЩВЪВФФИЛıВ›.
Page 42

42
∞¡øª∞§π∂™ §∂π∆√Àƒ°π∞™
∞¡øª∞§π∞
∞Û¯ËÌ‹ ÔÛÌ‹
∆Ô Ï¿‰È ͯÂÈÏ›˙ÂÈ
∆· Ê·ÁËÙ¿ ‰ÂÓ ÚÔ‰›˙Ô˘Ó
ÛÙÔ ÙËÁ¿ÓÈÛÌ·
∆Ô Ï¿‰È ‰ÂÓ ˙ÂÛÙ·›ÓÂÙ·È
∞π∆π∞
∆Ô Ï¿‰È ¤¯ÂÈ ·ÏÏÔȈı›.
∆Ô ˘ÁÚfi ÙËÁ·Ó›ÛÌ·ÙÔ˜ ›ӷÈ
·О·Щ¿ППЛПФ.
∆Ф П¿‰И ¤¯ВИ ·ППФИˆıВ› О·И БИ' ·˘Щfi
Ы¯ЛМ·Щ›˙ВЩ·И ФП‡˜ ·КЪfi˜
µ˘ı›Ы·ЩВ ЫЩФ ˙ВЫЩfi П¿‰И ЩЪfiКИМ· Ф˘
‰ВУ ЫЩ¤БУˆЫ·У О·П¿.
µ˘ı›Ы·ЩВ ФП‡ БЪ‹БФЪ· ЩФ О·П¿ıИ. ∏
ЫЩ¿ıМЛ ЩФ˘ П·‰ИФ‡ ˘ВЪ‚·›УВИ ЩФ
М¤БИЫЩФ fiЪИФ.
¶ФП‡ ¯·МЛП‹ ıВЪМФОЪ·Ы›· П·‰ИФ‡.
АВЪКfiЪЩˆЫЛ О·П·ıИФ‡.
∏ КЪИЩ¤˙· ¯ЪЛЫИМФФИ‹ıЛОВ ¯ˆЪ›˜ П¿‰И
ЫЩФУ О¿‰Ф О·И ЪФО¿ПВЫВ ЩЛУ В¤М‚·ЫЛ
ЩФ˘ Ы˘ЫЩ‹М·ЩФ˜ ıВЪМИО‹˜ ·ЫК¿ПВИ·˜.
§À™∏
∞УЩИО·Щ·ЫЩ‹ЫЩВ ЩФ П¿‰И ‹ ЩФ П›Ф˜.
ГЪЛЫИМФФИВ›ЩВ К˘ЫЩИО¤П·ИФ ‹
К˘ЩИОfi П¿‰И О·П‹˜ ФИfiЩЛЩ·˜
∞ÓÙÈηٷÛÙ‹ÛÙ ÙÔ Ï¿‰È ‹ ÙÔ Ï›Ô˜.
™ЩВБУТЫЩВ О·П¿ Щ· ЩЪfiКИМ·.
µ˘ı›ЫЩВ Щ· ·ЪБ¿.
ªВИТЫЩВ ЩЛУ ФЫfiЩЛЩ· П·‰ИФ‡ ЫЩФУ
О¿‰Ф.
∂ИП¤НЩВ ˘„ЛПfiЩВЪЛ ıВЪМФОЪ·Ы›·.
ªВИТЫЩВ ЩЛУ ФЫfiЩЛЩ· ЩˆУ
ЩЪФК›МˆУ.
∞¢ı˘Óı›Ù ÛÙÔ ™¤Ú‚Ș (ÙÔ
Û‡ÛÙËÌ· Ú¤ÂÈ Ó· ·ÓÙÈηٷÛÙ·ı›).
∫∞£∞ƒπ™ª√™
¶ЪИУ ·fi ФФИ·‰‹ФЩ ¤М‚·ЫЛ О·ı·ЪИЫМФ‡,
‚‚·Иˆı›Щ fiЩИ ·ФЫ˘У‰¤Ы·Щ ЩФ КИ˜.
ªЛ ‚˘ı›˙Щ ФЩ¤ ЩЛ КЪИЩ¤˙· Ы УЪfi ‹ О¿Щˆ ·fi
ЩЪ¯Ф‡МУФ УЪfi ЩЛ˜ ‚Ъ‡ЫЛ˜ (ИО. 7). ∏ ›ЫФ‰Ф˜ УЪФ‡
ЫЩЛ МФУ¿‰· ¯ИЪИЫЩЛЪ›ˆУ МФЪ› У· ЪФО·П¤ЫИ
ЛПОЩЪФПЛН›·.
µ‚·Иˆı›Щ fiЩИ ЩФ П¿‰И ¤¯И ОЪ˘ТЫИ О·П¿ О·И ЫЩЛ
Ы˘У¤¯И· ‚Б¿ПЩ ЩЛ МФУ¿‰· ¯ИЪИЫЩЛЪ›ˆУ О·И ·‰И¿ЫЩ
ЩФ П¿‰И. ∞К·ИЪ¤ЫЩ ЩФ О·Щ·О¿ıИ ·fi ЩФ ‰Ф¯›Ф М
ЫКФ˘ББ¿ЪИ ‹ ·ФЪЪФКЛЩИОfi ¯·ЪЩ›.
ª Н·›ЪЫЛ ЩЛ МФУ¿‰· ¯ИЪИЫЩЛЪ›ˆУ, ЩФ ЛПОЩЪИОfi
О·ПТ‰ИФ О·И ЩЛУ ·УЩ›ЫЩ·ЫЛ, fiП· Щ· ¿ПП· М¤ЪЛ
МФЪФ‡У У· П˘ıФ‡У М ˙ЫЩfi УЪfi О·И
·ФЪЪ˘·УЩИОfi И¿ЩˆУ (ИО. 8).
ªЛ ¯ЪЛЫИМФФИ›Щ ФЩ¤ ЫОПЛЪ¿ ЫКФ˘ББ·Ъ¿ОИ·
БИ·Щ› О·Щ·ЫЩЪ¤КФ˘У ЩЛУ ИК¿УИ· ЩЛ˜ КЪИЩ¤˙·˜.
™ЩФ Щ¤ПФ˜ ЫЩБУТНЩ fiП· ФП‡ О·П¿, ¤ЩЫИ ТЫЩ У·
·ÔʇÁÙ ÙÔ ÈÙÛ›ÏÈÛÌ· ˙ÛÙÔ‡ Ï·‰ÈÔ‡ ηٿ ÙË
‰È¿ÚÎÈ· Ù˘ ÏÈÙÔ˘ÚÁ›·˜.
 Loading...