

DeLonghi F14427CZ Instructions Manual
instructions
Electric deep fryer
F14427CZ
Please retain these instructions for future reference
Electric deep fryer
2
00:00
1
2361312 59
4781615141011
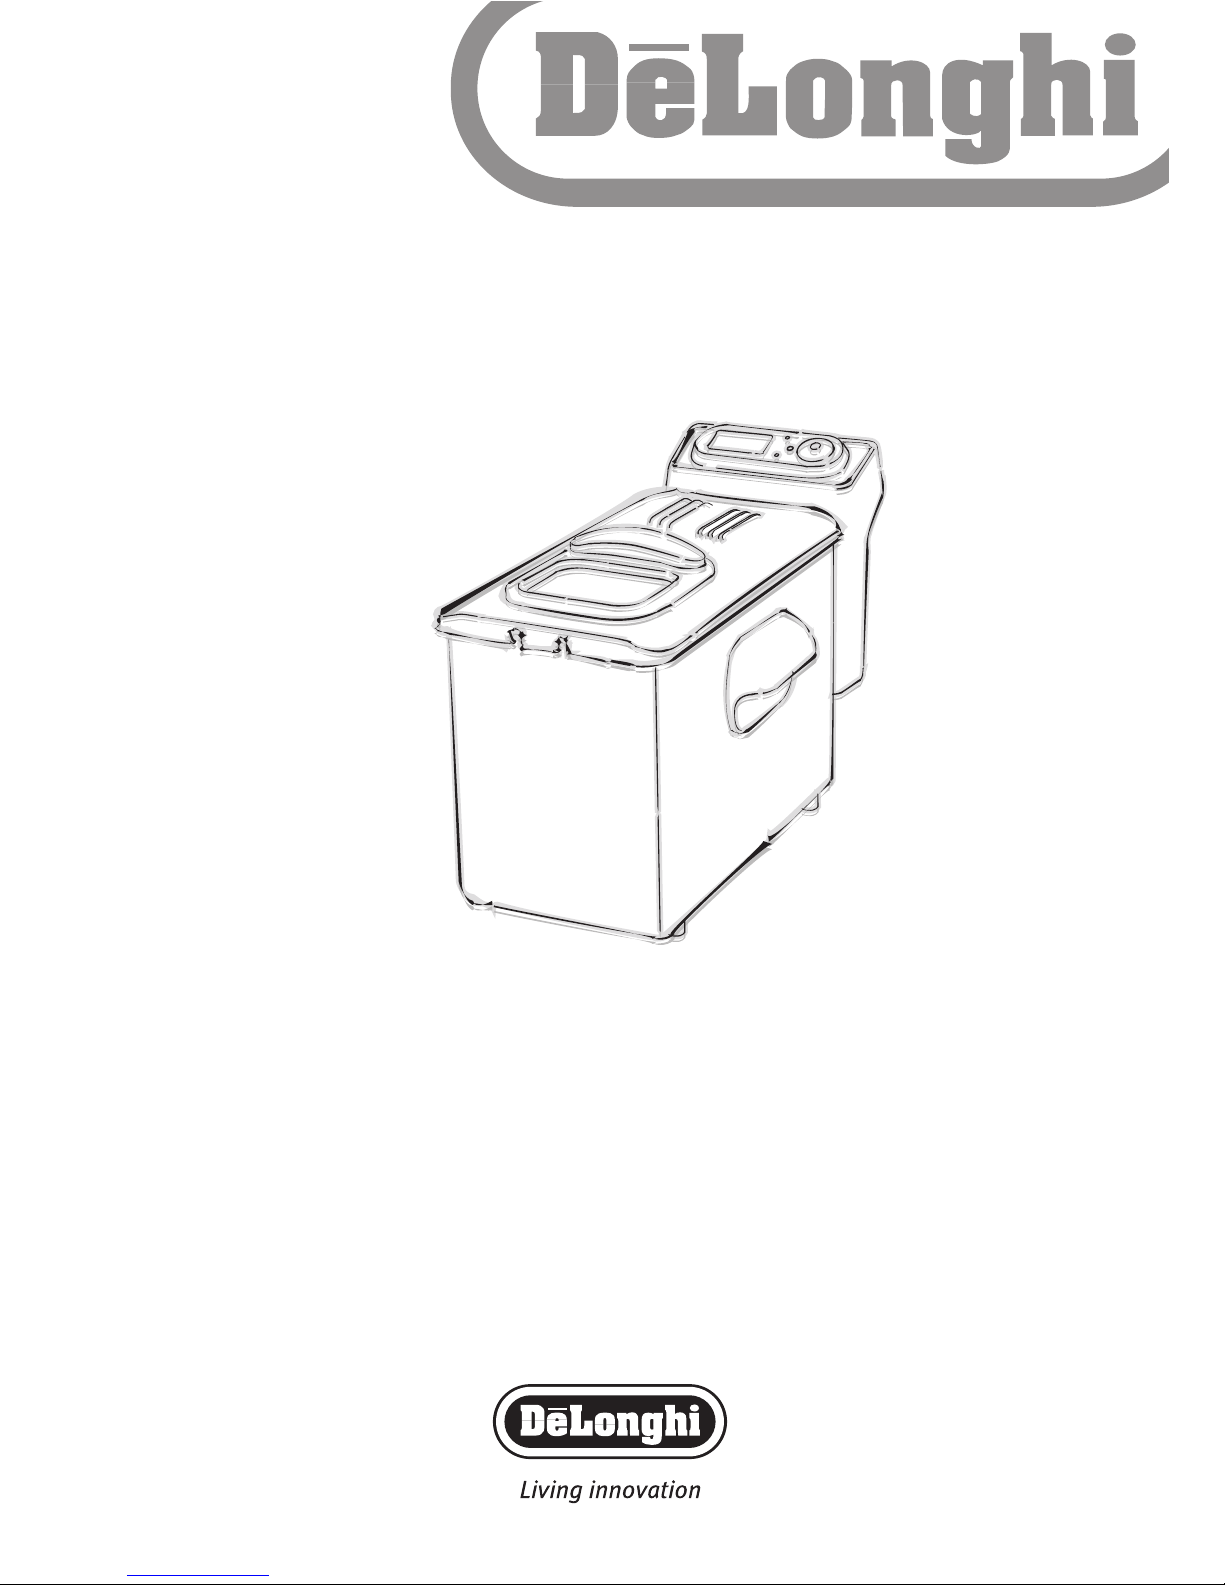
Control Panel
Thermal cut-out device
reset buttons
Cord storage
compartment
Control unit guides
Heating element
Basket with folding handle
Removable bowl
Min/Max oil
level indicator
Basket support
Filter
Handle
Outer casing
Viewing
window
Guide for attaching
the control unit
Cover with handle

Electric deep fryer
3
Thank you for choosing this electric deep fryer.To get the best results from your
deep fryer it is advisable to read these instructions before using the appliance.
This is the only way to ensure optimum results and maximum safety.
Installation
• Before use, check that the appliance has not been damaged during transport.
• Remove the appliance from the packaging, including any p.o.s.
• Before use, check that the power supply voltage corresponds to the value
shown on the appliance rating plate.The appliance must always be connected
to a well earthed socket rated at 10A minimum.The manufacturer is not liable
for damage caused by inadequate earthing of the appliance.
• Before using the deep fryer for the first time, carefully clean the basket, the bowl,
the outer casing and the lid, using warm water and washing up liquid. The control
unit, power cable and heating element may be cleaned using a damp cloth. Check
that water does not enter into the control unit and that there is no residual water
in the bottom of the removable bowl. Carefully dry all the parts.
• Check that the control unit is properly fastened to the deep fryer body.The safety
micro-switch will not allow the appliance to be operated if the control unit is not
correctly positioned in the casing.
• Place the fryer on a flat work surface at a safe distance from taps and sinks.
• The deep fryer is now ready for use.
Thermal safety device
The appliance is fitted with a thermal safety device that stops the appliance from heating in the event of incorrect use or irregular operation. Once the appliance has cooled,
using a toothpick or something similar, delicately press the safety device reset buttons
marked RESET. If the appliance does not start operating again, contact a service centre
authorised by the manufacturer.
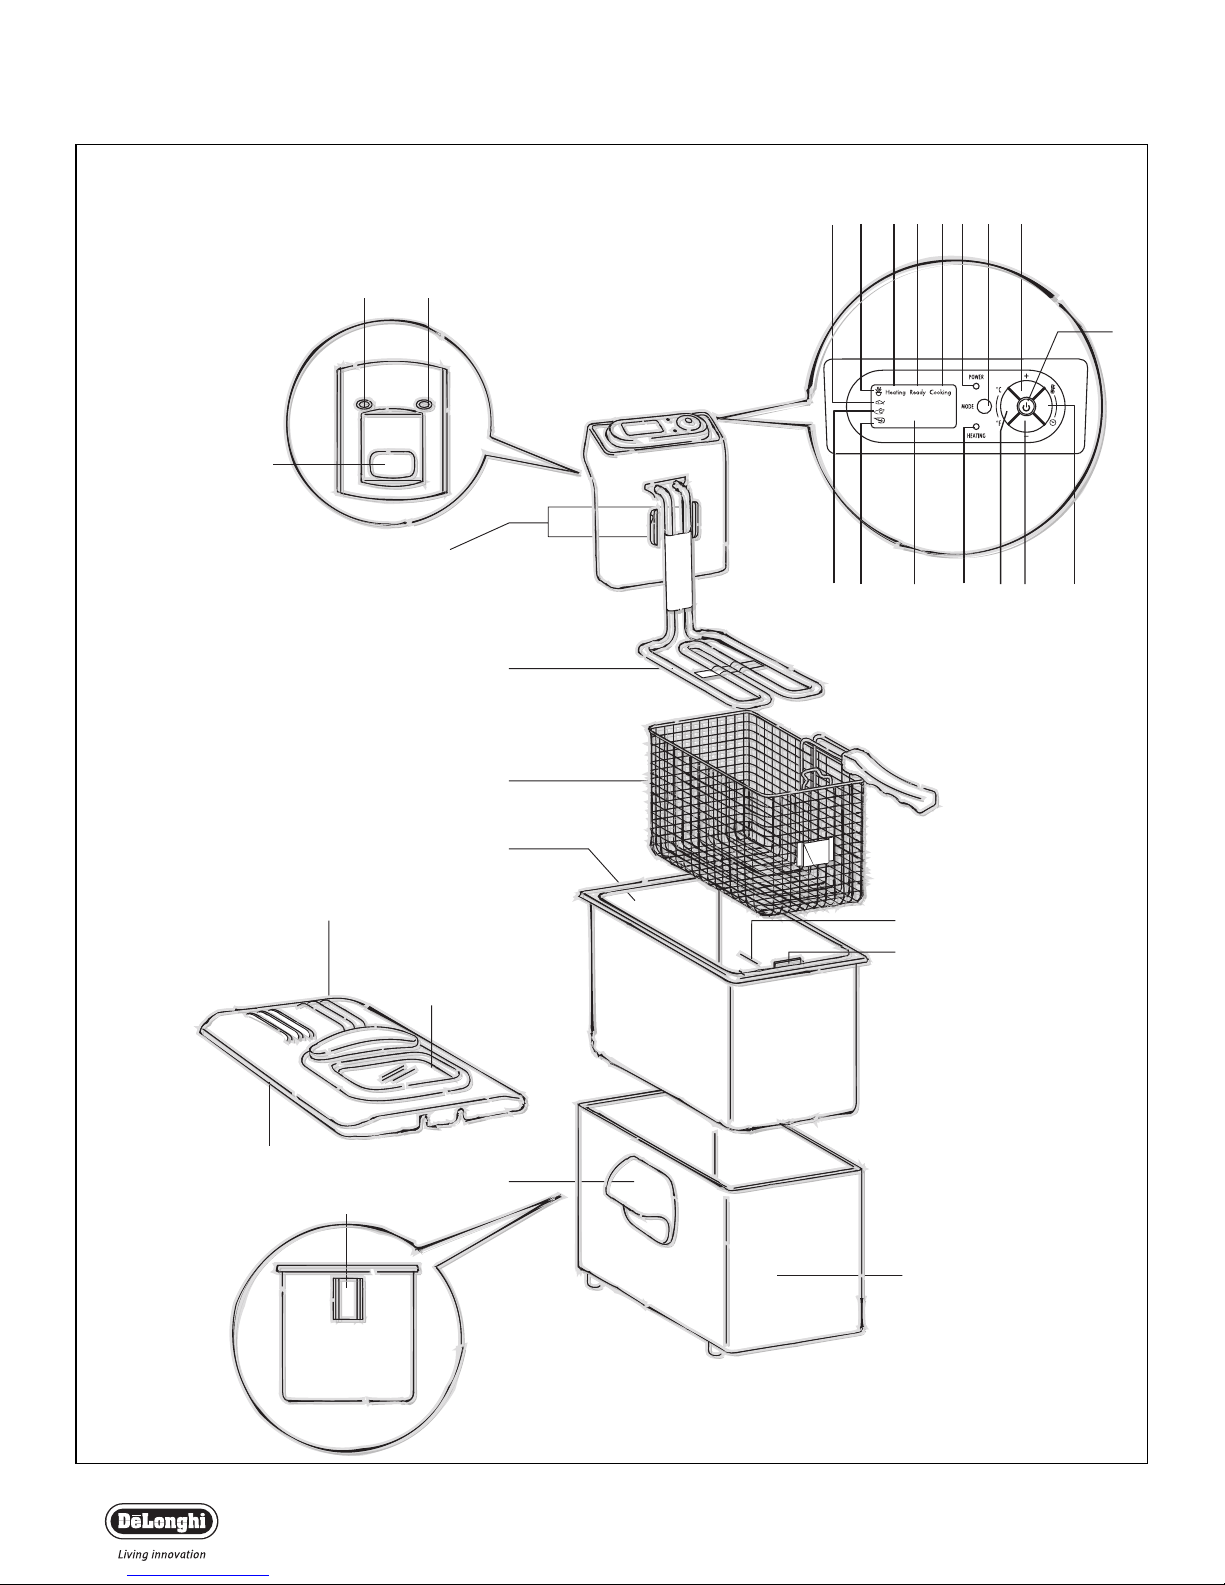
Operating the Control Panel
1. On/Off Button. Used to start preheat function and countdown timer.
2. Temp/Time Button. Used to change temperature and timer settings.
Temperature and time must be flashing in order to change.
3. Celsius/Fahrenheit Button. Used to change display to either setting.
4. + (plus) Button. Used to increase temperature or time while flashing.
5. - (minus) Button. Used to decrease temperature or time while flashing.
6. Heating Light. Will illuminate during the preheating cycle.Will cycle on and
off during Ready and Cooking to maintain the set temperature.
7. Mode Button. Press to change between 4 preset programs.
8. Power Light. Will illuminate whenever the unit is plugged in.
9. Temperature/Time display.
10. Chip Program Indicator.
11. Fish Program Indicator.
12. Chicken Program Indicator.
13. Shrimp Program Indicator.
14. Heating Indicator. Will flash while unit is preheating.
15. Ready Indicator. Will flash when preset temperature has been reached.
Fryer will maintain temperature displayed when ready indicator is flashing.
16. Cooking indicator. Will flash when preset temperature has been reached
and countdown timer is being used.
Filling with oil or fat
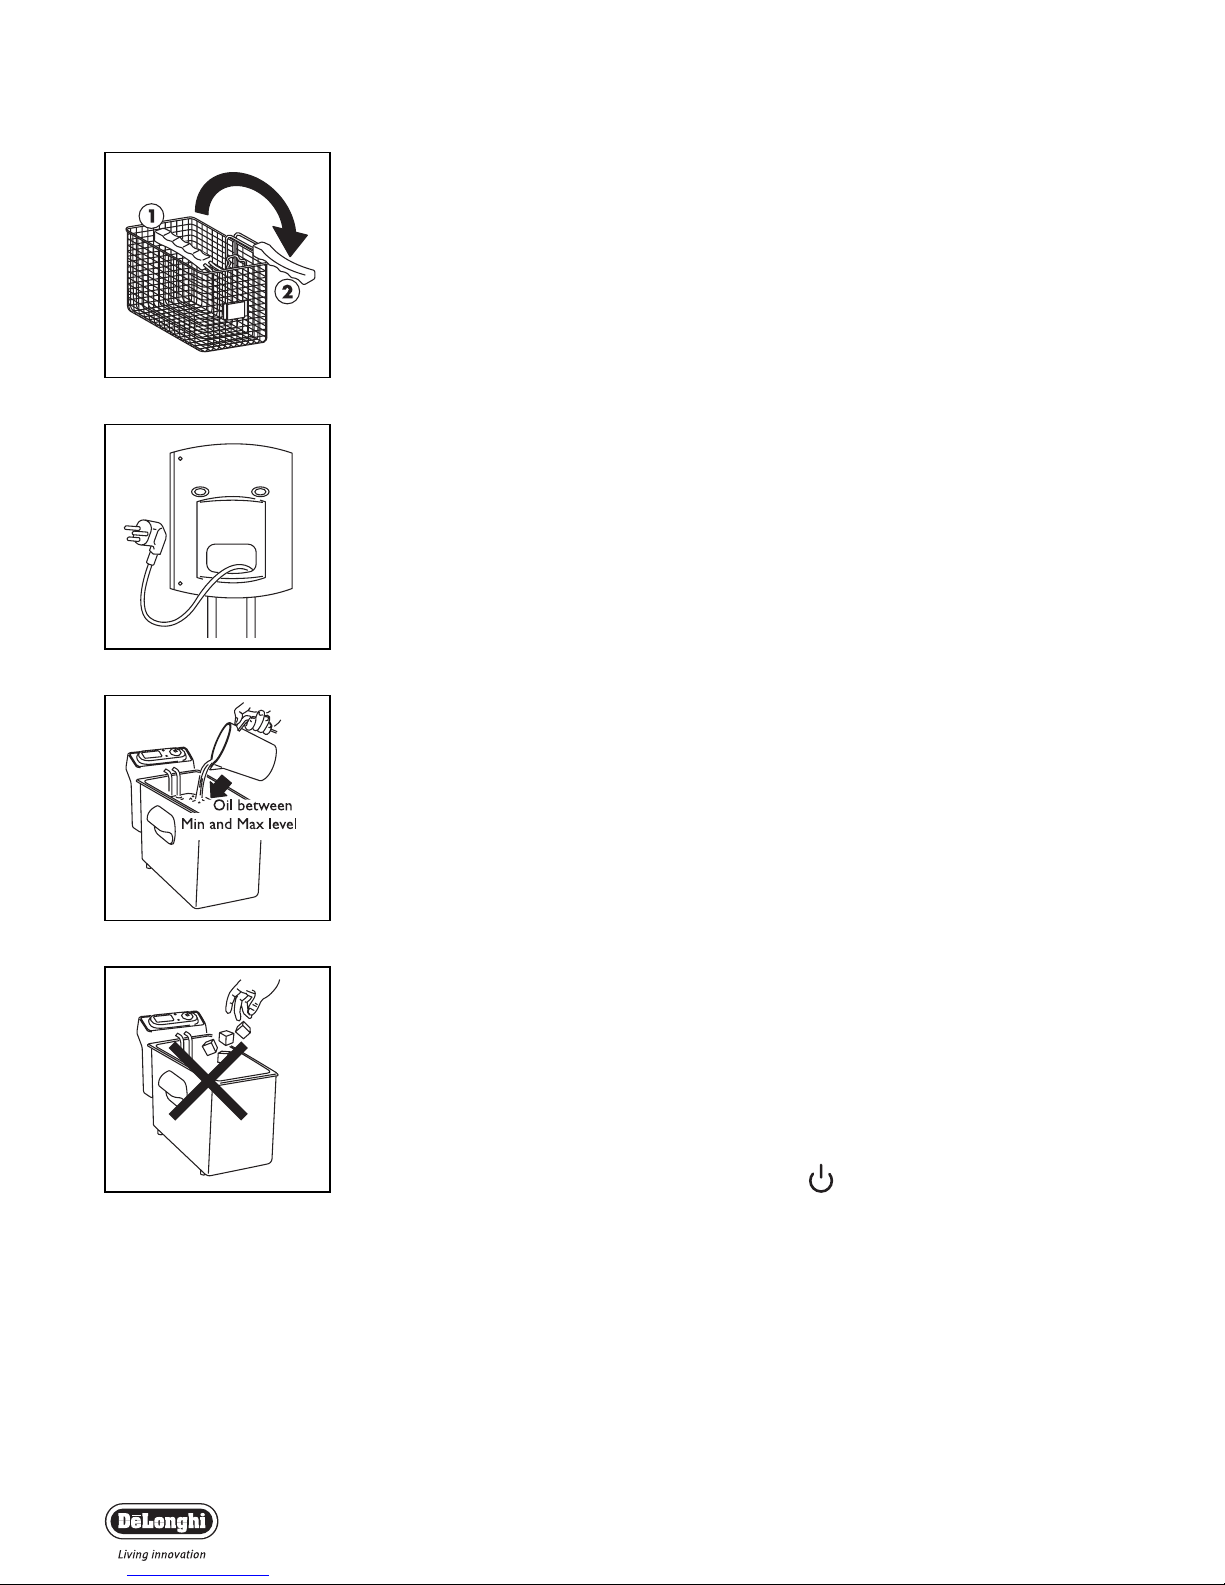
• Remove the cover lifting it by the handle. Turn the folding handle of the basket until it locks into place (pos. 2, fig. 1 ).
Remove the basket by lifting it upwards.
• Remove the length of cable required to connect the appliance
to the mains, from the cable compartment (fig. 2).
• If oil is used, pour it into the bowl. (fig. 3).
Warning:The level must always be between the maximum and minimum levels indicated.Never exceed max
limit, as oil may overflow from the container.
Never use the deep fryer when the oil is below the
“min” level as it could cause the thermal safety device
to come into operation; to replace it you need to contact one of our service centres.
Best results are obtained by using a good quality oil. Avoid
mixing different types of oil. If you use lumps of solid fat, cut
them into small pieces and melt them in another container,
then pour the liquefied fat into the deep fryer bowl. Never
melt the fat in the basket or on the deep fryer heating element
(fig. 4).
• Close the cover.
Manual setting
• Plug the appliance; the deep fryer emits a “beep” and the temperature 160° (or the last selected temperature) is displayed.
• Use the Celsius/Fahrenheit Button to select the desired
scale (°C or °F).
• Use the Temp/Time Button to select temperature and time
of frying.
• Use the + (plus)/-(minus) Buttons to set the temperature
from 100 to 190°C.The temperature will increase or decrease
by 5°C, pressing the + (plus)/-(minus) Buttons.
• Use the + (plus)/-(minus) Buttons to set the time of cooking from 0 to 60 minutes.The time will increase or decrease by
1 minute, pressing the + (plus)/-(minus) Buttons.
Preheating
•Once set time and temperature, push the On/Off Button.
If the time has not been set, the deep fryer will not start the
heating process.The deep fryer starts heating: the “heating”
light switches on and the display shows “HEATING”.You can
modify time and temperature by pressing the Temp/Time
Button and then the + (plus)/-(minus) Buttons.
As soon as the temperature is reached, the “heating” light
switches off and the display shows “READY”; the fryer emits 5
“beeps”.
Note: the heating element works for 30 minutes and then switches
off.
fig. 1
fig. 2
fig. 3
Electric deep fryer
4
fig. 4
 Loading...