

Page 1
instructions
Coffee Maker
EC270
Please retain these instructions for future reference
Page 2
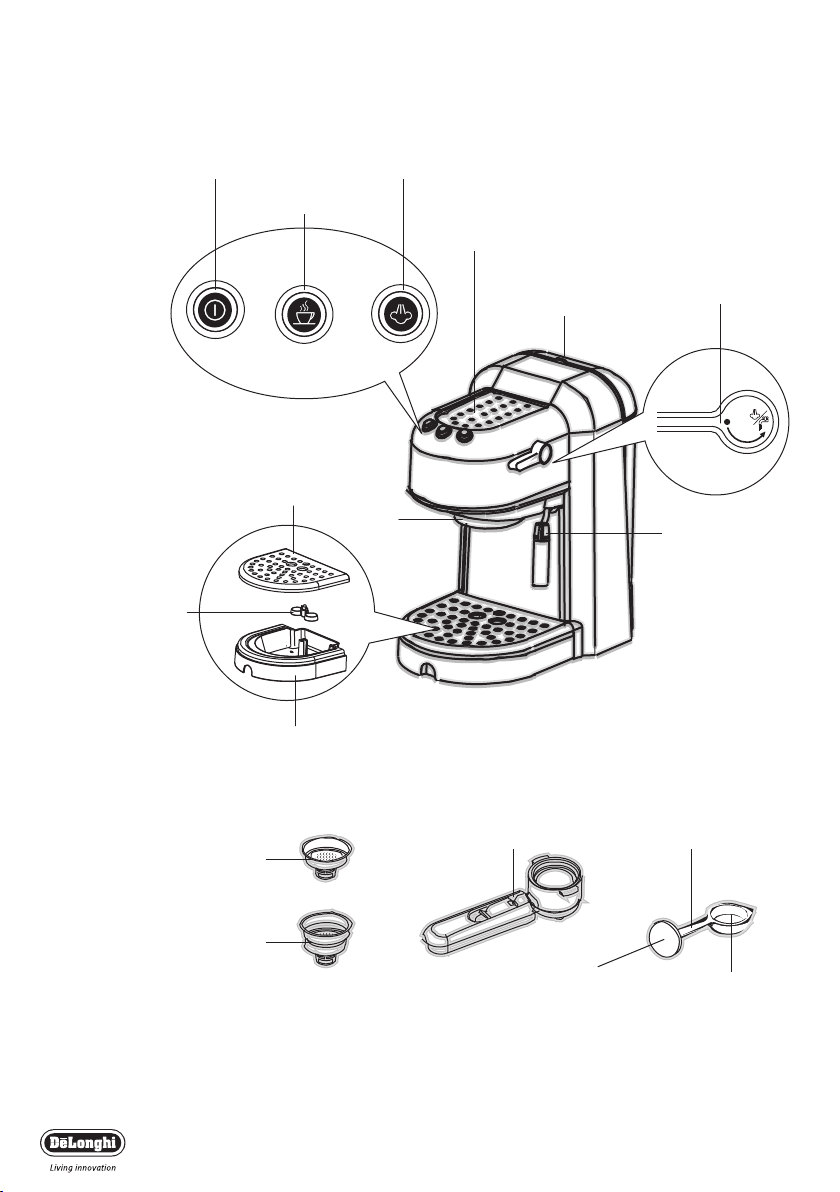
Coffee Maker 2
r
ON/OFF
button
Coffee
button
Steam
button
Cup warmer
Steam knob
Water tank
Water level indicator
1-cup or 1-pod coffee filter
with crema inhancer
2-cups coffee filter
with crema inhancer
Cup grid
Drip tray
Boiler
outlet
Cappuccino make
and steam nozzle
Coffee filter holder Measure and tamper
Ta mper
Measure
Page 3

Thank you for choosing this De’Longhi coffee machine. To
get the best results from your new coffee machine please read
these instructions carefully before use. This should ensure
optimum results and maximum safety.
Safety Warnings
• This machine has been built to make coffee and to heat and froth
milk for cappuccinos; please be careful to avoid burns from the
sprays of hot water or steam and avoid any improper use.
• When the appliance is in use, do not touch any of the machine’s
hot surfaces.
• After unpacking, make sure that the machine is complete and
undamaged. In case of doubt, do not use the appliance and seek
the advice of Customer Services.
• Packaging materials (plastic bags, foam polystyrene, etc.) should
not be left within the reach of children as this could be a
potential source of danger.
• This appliance is to be utilised for domestic use only. Any other
use is to be considered improper and therefore, dangerous.
• The manufacturer takes no responsibility for damage derived
from improper use.
• Never touch the appliance with wet or damp hands.
• The appliance is not intended for use by persons (including children) with reduced physical, sensory or mental capabilities, or
lack of experience and knowledge, unless they have been given
supervision or instruction concerning use of the appliance by a
person responsible for their safety. Children should be supervised to ensure that they do not play with the appliance.
• In case of breakdown or malfunctioning, turn the appliance off
immediately and do not touch. For repairs, please contact the
Customer Services authorised by the manufacturer and request
the use of original replacement parts only. Disregard for this
point may compromise the safe use of the appliance.
• The power cable must never be replaced by the user. If the
power cable is damaged, it must be replaced by the manufacturer or an authorised service centre in order to eliminate all risk.
• When the appliance is not in use, turn off and disconnect the
plug from the socket.
• As with any electrical appliance, whilst the instructions aim to
cover as many eventualities as possible, caution and common
sense should be applied when operating your appliance, particularly in the vicinity of young children.
• Materials and accessories coming into contact with food conform to EC regulation 1935/2004.
Coffee Maker
3
Page 4

Setting up the appliance
Before using the machine for the first time, wash all the accessories in warm soapy water and rinse. For the best tasting coffee
the internal circuits must be flushed through at least five times. To
do this follow the instructions in the paragraphs “Filling the water
tank” and “preheating the coffee machine” using just water
and without coffee.
Installation
• Place the coffee maker on flat work surface at a safe distance
from taps and sinks.
• Check that the voltage corresponds to that indicated on the
appliance rating plate. The appliance must always be connected
to a well-earthed socket rated at 10A minimum. The manufacturer is not liable for damage caused by inadequate earthing of
the appliance.
• If the cable is damaged or requires replacing, contact Customer
Services (refer to guarantee leaflet).
• Never install the machine in an environment that can reach a
temperature less than or equal to 0°C (if the water in it
freezes, the coffee maker may be damaged).
Electrical connection
Important - Uk only
· The wires in the cord are coloured as follows:
Green and Yellow = Earth
Blue = Neutral
Brown = Live.
· The appliance must be protected by a 13A approved (BS1362)
fuse.
· Warning: this appliance must be earthed.
Note:
· For non-rewireable plugs the fuse cover MUST be refitted when
replacing the fuse. If the fuse cover is lost then the plug must not
be used until a replacement can be obtained. The correct fuse
cover is identified by colour and a replacement may be obtained
from your De’Longhi Authorised Repairer.
· If a non-rewireable plug is cut off it must be destroyed immedia-
tely. An electric shock hazard may arise if an unwanted non-rewireable plug is inadvertently inserted into a 13A socket outlet.
· This appliance complies with European Economic Community
Directive 89/336/EEC.
Coffee Maker
4
Page 5
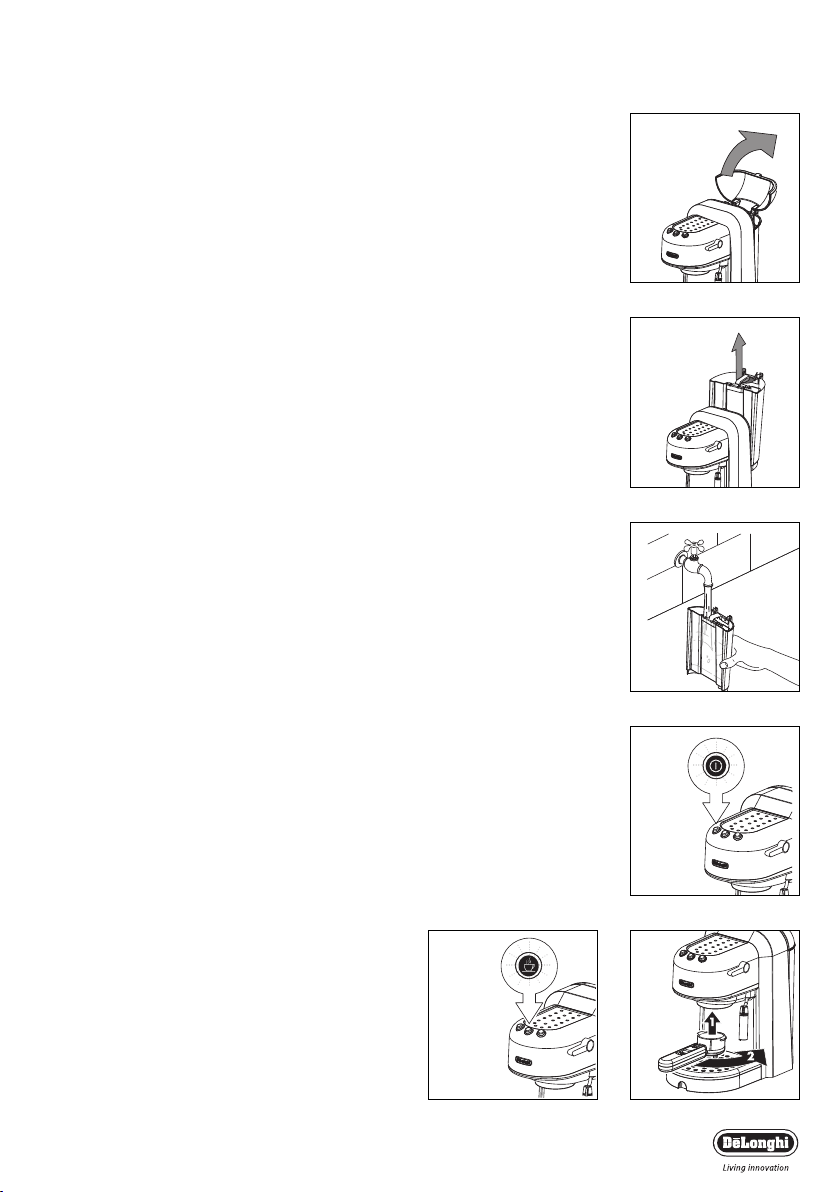
fig. 1
fig. 2
fig. 3
fig. 4
fig. 5
Coffee Maker
fig. 6
5
How to prepare espresso coffee
Filling the water tank
To remove the water tank lift the lid (fig.1) and simply pull
upwards (fig 2) and fill the tank at the sink (fig 3). Do not exceed
the MAX level on the water tank. The tank may also be filled without removing it, simply by pouring water into it directly from a jug.
Replace the tank by connecting the valve at the bottom of the tank
with the hole in the base on the machine.
WARNING: it is completely normal for there to be water in the
compartment under the tank; as a result, this compartment should
be dried using a clean sponge.
Note: Do not operate the appliance without water in the tank
and always remember to fill the tank when the level drops to a
couple of centimetres from the bottom.
Preheating the coffee machine
To ensure your espresso coffee is dispensed at the right temperature it is essential that the coffee unit is preheated.
1. Press the ON/OFF button (the button lights up) (fig. 4).
2. Attach the empty filter holder (without coffee) to the machine
by positioning it under the boiler outlet with the handle
towards the left (fig. 5). Push upwards and at the same time
turn the handle as far right as possible. It does not matter if the
handle is not centrally aligned with the machine, as long as the
filter holder is firmly attached to the appliance.
3. Position a cup under the filter holder. Use the same cup that
the coffee will be served in, so that it may be preheated.
Wait until the “coffee ready" light on the Coffee Button comes
on (fig. 6), then immediately press the Coffee Button. Allow the
water to run until the “coffee ready" indicator light goes out,
then stop the water by pressing the Coffee Button again.
4. Empty the cup, wait until the “coffee ready" pilot light comes on
again and repeat the whole operation one more time.
(It is normal for a small and harmless puff of steam to be given off
when removing the filter holder).
.
Page 6

fig. 7
fig. 8
fig. 9
fig. 10
fig. 12
Coffee Maker
6
How to prepare espresso coffee
1. After carrying out the preheating of the machine as described
in the preceding section, in order to make just one cup of
espresso coffee, insert the 1-cup filter (the smaller of the two
provided) into the filter holder (Fig. 7) and fill it with one level
measuring spoon of ground coffee (fig. 8) – about 7 grams. If
you wish to prepare two cups of espresso coffee, use the 2-cup
filter (the larger of the two provided) and fill it with two lessthan-level measuring spoons of ground coffee (about 6+6
grams).
IMPORTANT: for correct operation, before adding the
ground coffee to the filter holder, make sure the filter is
free from ground coffee from the previous infusion.
2. Distribute the ground coffee evenly and press it quite firmly
with the coffee tamper (Fig. 9).
NOTE:Pressing the coffee is very important in order to prepare
a good coffee. However if you press too hard, coffee will come
out slowly and crema will be of a dark colour. If you press too
light, coffee will come out too fast and crema will be a very light
colour.
3. Remove any excess coffee from the rim of the filter holder.
Attach the filter holder to the machine by positioning the handle
to the left of the boiler outlet, then pushing upwards and turning
the handle to the right (as in preheating the machine fig. 5).
4. Place the cup or cups (cups can be preheated by rinsing under
hot water or heating on the cup warmer plate for 15-20
minutes - fig. 10) on the removable drip tray (fig 11). Ensure
that the cup or cups line up with the dispensing holes on the
filter holder. Press the on/off button (fig. 4).
5. Wait until the “coffee ready” light on the Coffee Button comes
on (fig 6) then press the Coffee Button. Once the required
quantity of coffee has been obtained (we recommend about 30–
40ml for an espresso), interrupt delivery by pressing the same
button again.
6. To detach the filter holder, turn the handle from right to left.
To avoid any splashing, do not detach the filter holder
while the machine is dispensing coffee.
7. To remove the used coffee lock the filter with the built-in lever
(fig. 13) and let the coffee fall out by knocking the over turned
filter holder (fig. 14).
8. To turn the coffee machine off, press the ON/OFF button (fig.
4).
Page 7

fig. 13
fig. 14
fig. 15
fig. 16
Coffee Maker
7
How to prepare coffee using pods
1. Preheat the machine as described in the ‘Preheating the Coffee
Machine’ section, attaching the coffee filter holder with 1 cup or
pod filter to the unit. This procedure ensures that the coffee is
delivered at a hotter temperature and that the seal of the holder is more effective.
Note: Use pods which conform to the ESE standard: this will be
indicated on the packaging by the symbol as in fig. 15.
The ESE standard is a system accepted by the leading coffee pod
manufacturers, and allows espresso coffee to be prepared simply
and without any mess.
2. Place the small filter (1 cup or pods) in the filter holder, making
sure the projection is correctly inserted in the slot as shown in
fig. 7.
3. Insert a pod, centring it as far as possible on the filter (fig. 16).
Always follow the instructions on the pod pack to position the
pod on the filter correctly.
4. Attach the filter holder onto the machine, moving from left to
right (fig 5).
5. Proceed as in points 4, 5 and 6 of the previous section (how to
prepare espresso coffee using the filter holder for ground coffee).
Important: should the coffee holder for pods be used after one
for ground coffee, it’s necessary to clear the ground coffee remaining in the boiler outlet. This cleaning operation is necessary in
order to avoid water leakages.
Page 8

fig. 17
fig. 18
fig. 19
Coffee Maker
8
How to make cappuccino
1. Prepare espresso coffee, using cups that are large enough for
cappuccinos.
2. Press the steam button (fig. 17).
3. Open the steam tap for a few seconds to eliminate all water from
the circuit. Close the tap.
3. Wait for the steam indicator light on the steam button to come
on (fig. 17). The steam indicator light indicates that the boiler has
reached the ideal temperature for steam production.
4. In the meantime, fill a container with about 100 ml of milk for each
cappuccino to be prepared. Ideally use a small stainless steel jug.
The milk must be at refrigerator temperature (not hot!). In choosing the size of the container, bear in mind that the milk increases
in volume by 2 or 3 times. NB: YOU ARE RECOMMENDED TO USE
SEMI-SKIMMED MILK AT REFRIGERATOR TEMPERATURE.
5. Place the container with the milk under the cappuccino maker.
6. Dip the cappuccino maker into the milk (fig. 18), taking care not
to immerse the raised line on the cappuccino maker.
Turn the steam knob anticlockwise (fig. 19). Steam is given off by
the cappuccino maker, giving the milk a creamy frothy appearance. To obtain a creamier froth, dip the cappuccino maker into
the milk and rotate the container with slow movements from the
bottom upwards.
6. When the required temperature is reached, interrupt steam
delivery by rotating the steam knob clockwise. Then press the
steam button (fig. 17).
8. Pour the frothed milk into the cups containing the espresso
coffee. Your cappuccino is now ready. If desired, add sugar and
sprinkle a little powdered chocolate or cinnamon on top of the
froth.
N.B.: to make coffee again after frothing milk, you must wait until
the appliance has cooled down. If it is too hot ( and lights
on together), the coffee will be burnt. To cool, place a container
under the boiler outlet, press the coffee button and run off the
water until the "steam ready" light goes off. Stop the flow of
water by pressing the button again.
You are recommended to deliver steam for a maximum of 60
seconds and never to froth milk more than three times consecutively.
Page 9

fig. 20
fig. 21
Coffee Maker
9
IMPORTANT: to ensure hygiene, you are recommended to
follow this procedure each time you make cappuccino to avoid
milk stagnating in the milk circuit. Leave to cool slightly before
cleaning.
1. Discharge a little steam for a few seconds by rotating the steam
knob (fig. 19). This empties any milk left inside the steam tube.
2. With one hand, hold the cappuccino tube firmly and with the
other unscrew the cappuccino maker itself by rotating clockwise
and extracting downwards (fig. 20).
3. Remove the nozzle from the steam tube by pulling it downwards.
Note: Metal of steam pipe may be hot!!!
4. Wash the cappuccino maker and steam nozzle thoroughly with
warm water.
5. Make sure the two holes indicated by the arrows in fig. 21 are not
blocked. If necessary, clean with a pin.
6. Replace the steam nozzle by inserting it onto the steam tube and
rotating firmly towards the top of the tube.
7. Replace the cappuccino maker by inserting it and rotating anticlockwise.
Producing hot water
1. Turn the appliance on by pressing the ON/OFF button (the light
on the button comes on) (fig. 4). Wait until the “coffee ready“ indicator light on the coffee button comes on (fig. 6).
2. Place a container under the cappuccino maker.
3. Press the coffee button (fig. 6) and at the same time open the
steam knob. Hot water is delivered from the cappuccino maker.
4. To interrupt the flow of hot water, close the steam knob by rotating
clockwise and press the coffee button again.
Cleaning and maintenance
Before performing any cleaning or maintenance operations, turn the
machine off, unplug it from the power socket and allow it to cool
down.
Cleaning the filter holder
About every 200 coffees, or when the coffee comes out of the filter holder and filters in drips or not at all, clean the filter holder of
ground coffee as follows:
• Remove the filter with crema enhancer
• Clean the inside of the filter holder. Never wash in a dishwasher.
• Remove the crema enhancer cup (fig. 22) by unscrewing in the
direction indicated by the arrow on the cap.
• Remove the crema enhancer from the container by pushing it
from the cap end (fig. 23).
• Remove the gasket (fig. 24).
fig. 22
fig. 23
fig. 24
Page 10

fig. 25
fig. 26
fig. 27
fig. 28
fig. 29 fig. 30 fig. 31
Coffee Maker
10
• Rinse all components and clean the metal filter thoroughly in hot
water using a brush (fig. 25). Make sure the holes in the metal filter are not blocked. If necessary, clean with a pin (see fig. 26).
• Replace the filter and gasket on the plastic disk as shown in fig. 27.
Make sure to insert the pin on the plastic disk into the hole in the
gasket indicated by the arrow in fig. 28.
• Replace the assembly in the steel filter container (fig. 29), making sure
the pin is inserted in the hole in the support (see arrow in fig. 29).
• Finally, screw on the cap.
Failure to clean as described above invalidates the guarantee.
Cleaning the boiler outlet
About every 200 coffees, the espresso boiler outlet must be cleaned
as follows:
• Make sure the appliance is not hot and that it is unplugged from
the mains;
• Using a screwdriver, unscrew the screw fixing the espresso boiler
outlet (fig. 30);
• Clean the boiler with a damp cloth (fig. 31);
• Clean the outlet thoroughly in hot water using a brush. Make sure
the holes are not blocked. If necessary, clean with a pin (fig.26).
• Rinse under running water, rubbing all the time.
• Replace the espresso boiler outlet, making sure the gasket is correctly positioned.
Failure to clean as described above invalidates the guarantee.
Other cleaning operations
1. Do not use solvents or detergents when cleaning the coffee
maker. Use a soft, damp cloth.
2. Clean the filter holder cup, filters, drip tray and water tank
regularly.
The drip tray has a red indicator which becomes visible when
the tray needs emptying.
To empty, remove the cup grille (fig. 32), empty the water and
clean the tray with a cloth. Replace the drip tray, making sure
the indicator is correctly positioned.
Clean the tank, using a brush to reach the bottom.
ATTENTION: during cleaning, never immerse the unit in
water – it is an electrical appliance.
Page 11

Descaling
It is advisable to clean the calcium from the machine every 200
cups of coffee. It is recommended that specific (store-bought)
products for descaling of espresso coffee machines be used. If such
products are not available, it is possible to proceed as follows:
1. Fill the tank with water using 1 litre of water;
2. Dissolve 2 spoonfuls (about 30 grams) of citric acid in the
water (available from chemists);
3. Press the ON/OFF button (the light on the button comes on - fig.
4) and wait for the “coffee ready” indicator light to come on.
4. Make sure the filter holder is not attached and position a contai-
ner under the outlet.
5. Press the coffee switch and allow about 1/4 of the solution
in the tank to flow out, rotating the steam knob every now and
then to deliver a little solution. Then stop the flow by pressing the
switch again and leave the solution to act for about five minutes.
6.Repeat point 5 a further three times until the tank is completely
empty.
7. To eliminate residues of the solution and scale, rinse the tank well,
fill with clean water and replace in its housing. Press the coffee
button and operate the appliance until the tank is completely
empty.
8. Press the button again and repeat the last operation.
Repairs for malfunctioning caused by problems of calcium
build-up are not covered by the guarantee if the descaling
process described above is not carried out regularly.
fig. 32
Coffee Maker
11
Page 12

Coffee Maker
12
PROBLEM POSSIBLE CAUSES SOLUTION
Problem solving
Espresso coffee no longer
comes out.
• Lack of water in the tank.
• The holes in the filter
holder are blocked.
• The outlet of the espresso boiler is blocked.
• The tank is badly inserted
and the valve at the bottom is not open.
• Fill the water tank.
• Clean the holes in the
spouts.
• Clean as indicated in
the “Cleaning the
espresso boiler outlet”
section.
• Press the tank lightly so
as to open the valve at
the bottom.
Espresso coffee drips from
the edges of the filter
holder, instead of from its
holes.
• The filter holder is badly
inserted.
• The gasket of the espresso boiler has lost elasticity.
• The holes in the filter
holder are blocked.
• Attach the filter holder
correctly by rotating
firmly as far as it will go.
• Have the espresso boiler gasket replaced at an
Service Centre
• Clean the holes in the
filter holder.
The espresso coffee is
cold.
• The ‘OK’ pilot light was not
on when the coffee delivery switch was pressed.
• The preheating was not
carried out.
• The cups were not preheated.
• Wait until the OK pilot
light comes on.
• Carry out the preheating as indicated in the
“Preheating the coffee
unit” section.
• Preheat the cups by
rinsing them in hot
water.
The pump is too noisy.
• The water tank is empty.
• The tank is inserted
wrongly and the valve at
the bottom is not open.
• Fill the water tank
• Press the tank lightly to
open the valve at the
bottom.
The coffee crema is lightcoloured (the coffee comes
out quickly from the
spout).
• The ground coffee has
not been pressed enough.
• The quantity of ground
coffee is scarce.
• The coffee is not ground
finely enough.
• Tamper the ground coffee down more.
• Increase the quantity of
coffee.
• Only use coffee specifically ground for espresso coffee machines.
Page 13

Coffee Maker
13
PROBLEM POSSIBLE CAUSES SOLUTION
The coffee crema is dark
(the coffee comes out
slowly from the spout).
• The ground coffee is too
tightly pressed.
• The quantity of ground
coffee is too much.
• The espresso boiler outlet is blocked.
• The coffee is too finely
ground.
• Press the coffee less.
• Decrease the quantity
of ground coffee.
• Clean the outlet as
described in “Cleaning
the espresso boiler outlet” section.
• Only use coffee specifically ground for espresso coffee machines.
The coffee has an acidic
taste.
• The unit was not sufficiently rinsed after the
descaling process procedure.
• Rinse the unit as
described in the “descaling” section.
The milk does not froth
when making a cappuccino.
• The milk is not cold
enough.
• The cappuccino maker is
dirty.
• The milk has too high a
fat content.
• Always use milk at
refrigerator temperature.
• Carefully clean the pinholes in the milk frother
• Use skimmed or semiskimmed milk.
Important information for correct disposal of the product in
accordance with EC Directive 2002/96/EC.
At the end of its working life, the product must not be disposed of as urban
waste.
It must be taken to a special local authority differentiated waste collection
centre or to a dealer providing this service.
Disposing of a household appliance separately avoids possible negative
consequences for the environment and health deriving from inappropriate disposal and enables the constituent materials to be recovered to
obtain significant savings in energy and resources. As a reminder of the
need to dispose of household appliances separately, the product is
marked with a crossed-out wheeled dustbin.
Page 14

5713211381/09.08
De’Longhi Appliances
Via Seitz, 47
31100 TREVISO
ITALY
 Loading...