

Page 1

DE300/DE300P/DE400/DE400P/DH400P/DE500/DE500P/DE650
DE300/DE300P/DE400/DE400P/DH400P/DE500/DE500P/DE650
• Use and maintenance manual . . . . . .pag. 3
• Mode d’emploi et d’entretien . . . . . . .
pag. 14
• Instrucciones de uso . . . . . . . . . . . . .
pag. 25
• Istruzioni per l’uso . . . . . . . . . . . . . .pag. 37
Register this product on-line and receive a free trial issue of “Cook's Illustrated”. Visit www.prodregister.com/delon-
ghi.Visit www.delonghi.com for a list of service centers near you. (U.S. and Canada).
Veuillez enregistrer ce produit on-line et Vous recevrez une copie gratuite du magazine “Cook's
Illustrated”.Visitez www.prodregister.com/delonghi.
Visitez www.delonghi.com pour trouver le centre d'assistance le plus proche de chez vous (U.S. et Canada).
Registre su producto en nuestra web y reciba una muestra de prueba de “Cook's Illustrated”.
visite www.prodregister.com/delonghi. Visite www.delonghi.com para consultar la lista de nuestros centros
de asistencia más cercanos (ee. uu. y Canada).
Registrate questo prodotto on-line e riceverete una copia gratuita della rivista “Cook's Illustrated”.
Visitate www.prodregister.com/delonghi. Visitate il sito www.delonghi.com per trovare il centro assistenza
autorizzato a Voi più vicino (U.S. e Canada).
CARACTERISTICAS ELECTRICAS
115V-60Hz
Page 2

ENGLISH
3
Thank you for choosing this appliance. This Owner's Manual will provide you with valuable
information necessary for the proper care and maintenance of your new appliance. If properly maintained, your appliance will give you many years of trouble-free operation. Please
take a few moments and read the instructions thoroughly and familiarize yourself with all of
the operational aspects of this appliance.
This unit can be conveniently moved from room to room within your home and set-up in just minutes.
IMPORTANT SAFEGUARDS
Read all instructions before using this dehumidifier. To reduce the risk of fire, electric shock, or injury to persons when using your dehumidifier follow basic safety precautions, including the following:
1) After transporting the appliance, wait 1 hour before using it.
2) Do not store or use gasoline, oil, sulphur or other flammable vapors and liquids in the vicinity of
this or any other appliance. Do not install the appliance near source of heat. Read product labels
carefully. Common sense and caution must be used when installing, operating and maintaining any
appliance.
3) This appliance must be used by adults only. Do not allow children to play with the appliance. Do not
leave children unattended in an area where the appliance is operating. Do not allow them to
sit or stand on the appliance.
4) This appliance is designed to dehumidify domestic living areas, and must not be used for other
purposes. It must be operated in an encolsed area to be most effective. Close all doors,
windows, and other outside openings to the room.
5) The appliance must not be modified in any way, as any modifications may be extremely dangerous.
6) Do not operate any appliance with a damaged cord or plug or after the appliance malfunctions, or
has been damaged in any manner. Return appliance to the nearest authorized service facility for
examination, repair or adjustment.
7) The use of accessory attachments is not reccommended by the appliance manufacturer. It may
cause injuries.
8) Do not use outdoors.
9) For your safety and protection, this dehumidifier is equipped with a three prong grounding plug on the
power cord. Do not, under any circumstances, cut or remove the round grounding prong from the plug.
10) Your dehumidifier must plug directly into a properly grounded and polarized three-prong outlet.
If the wall outlet will not accept a three prong plug, or if you are not sure the outlet is adequately
grounded or protected by a time delay fuse or circuit breaker, have a qualified electrician install the
proper outlet. Do not use an extention cord or an adapter plug.
11) Never unplug the dehumidifier by pulling on the power cord. Always grip the plug fir mly and pull
straight out from the outlet. Do not pinch, bend, or knot the power cord.
12) Always remove the plug from the socket before perfor ming cleaning or maintenance operations
and when not in use.
13) Do not place heavy or hot objects on the top of the appliance.
14) Clean the air filter at least once a week.
15) The appliance must always remain upright or laid on one side during transportation. Remember to
drain the tank before transporting the appliance.
16) WARNING: Handling the cord on this product will expose you to lead, a chemical known to the State
of California to cause [cancer, and] birth defects or other reproductive harm. Wash hands after hand
ling.
SAVE THESE INSTRUCTIONS
THIS PRODUCT IS FOR HOUSEHOLD ONLY
Introduction and Warning
Page 3
4
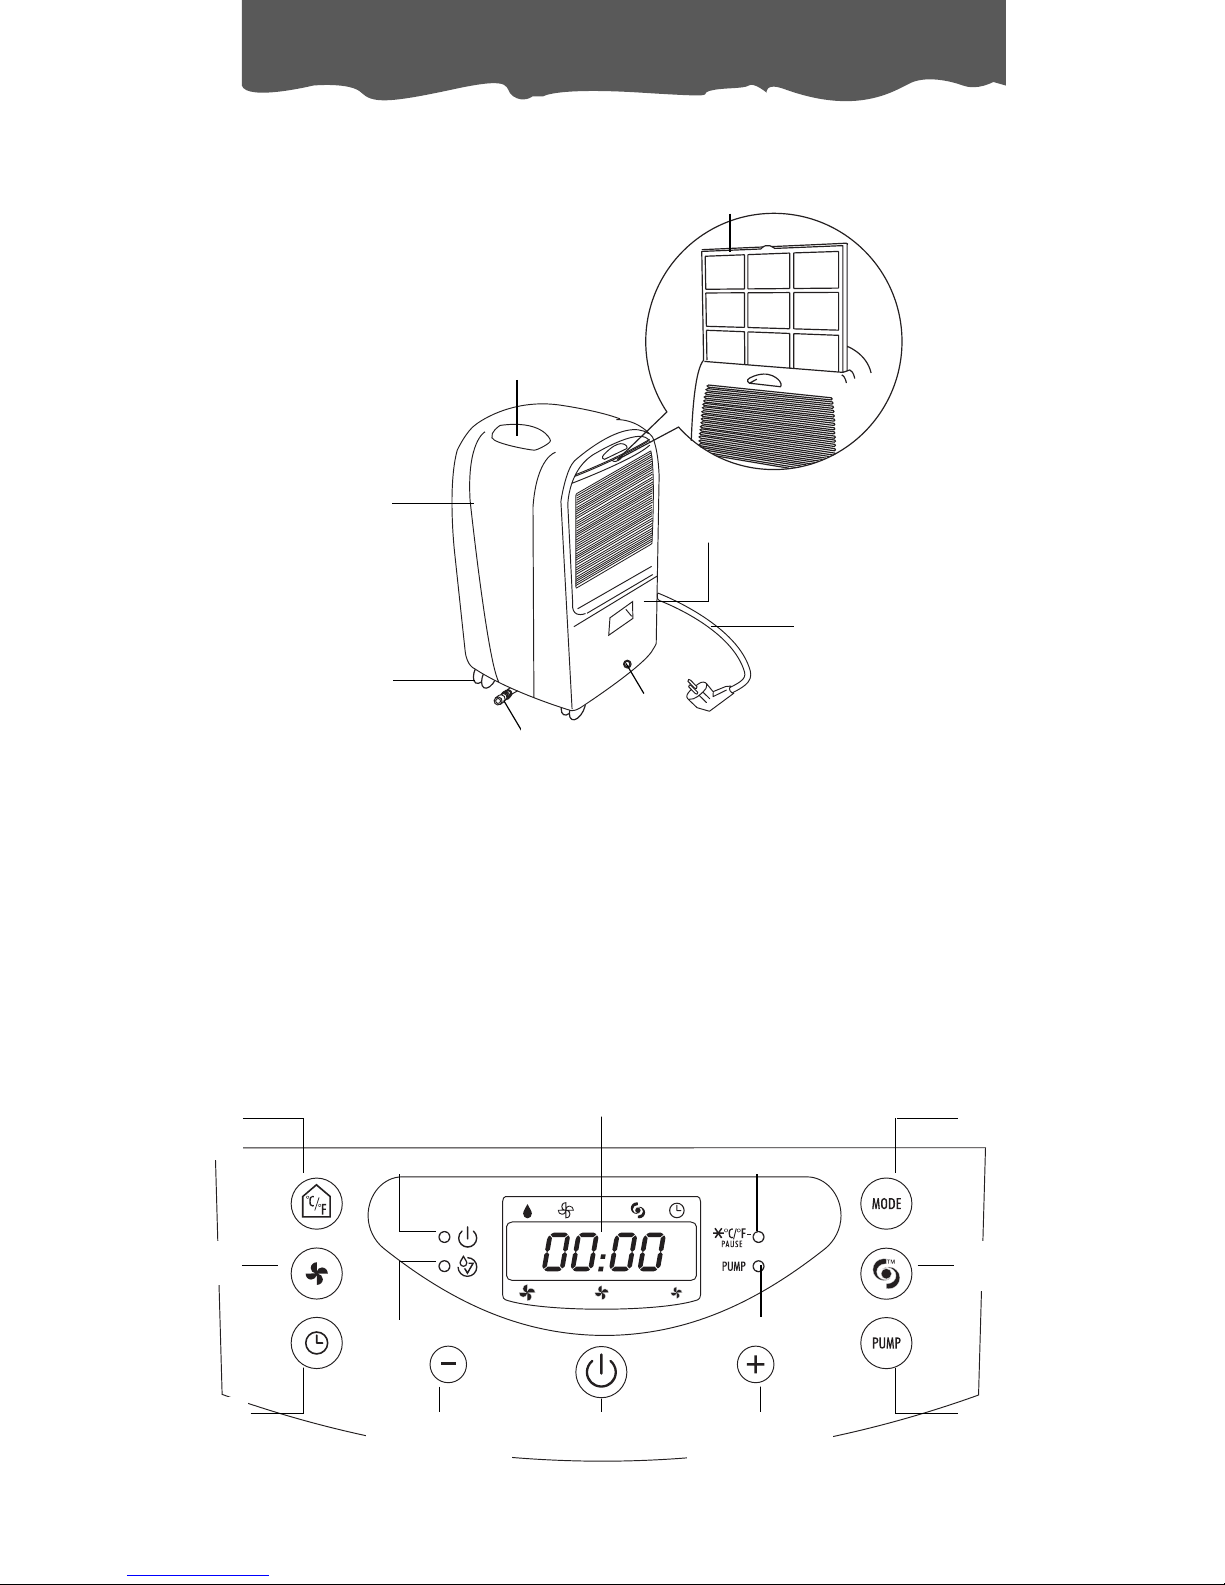
1. Control panel
2. Cabinet
3 Wheels
4. Air Filter
5. Water Tank
6. Power Cord
7. Continuous Draining Outlet
8. Pump connection (only on some
models)
Description of the appliance
Description
5
4
2
1
Room
temperature
button
°F/°C
Fan speed
button
TIMER
button
MODE
button
TURBO POWER
button
PUMP button *
Decrease
humidity level/
time button
Increase
humidity level/
time button
STAND-BY
button
Display
ON light Defrost light
Tank warning light
Description of the control panel
3
6
7
Pump light *
* (only on some models)
8
Page 4

5
ENGLISH
STAND-BY button
Press this button to start /stop the appliance. To turn the appliance completely off, remove the plug from the outlet.
Room temperature button
Press this button to display the Temperature on the LCD display. If you press the button once
the display will show the °F . If you press the button twice, the display will show the tempe-
rature in °C. After few seconds, the display will automatically show the humidity level.
FAN speed button
Press this button to select the Fan Speed (High, Medium, Low).
Decrease or increase Humidity Level/ Time buttons
These buttons are used to adjust the desired humidity level, with 5% increments; they are
also used to set the timer.
From 0 -10 the hours increase by 30 min. and from 10-24 the hours increase by 1 hour increments.
TIMER button
With the appliance switched ON, if you press the TIMER button the display will show the
hours after which you want the appliance to switch OFF (1-2-3... hours ).
With the appliance in the STAND-BY position, if you press the TIMER button the display will
show the hours after which you want the appliance to switch ON (1-2-3... hours ).
MODE button
Press this button to select the Fan only or Dehumidifier modes.
TURBO POWER button
Use this button to activate the “turbo power” function. In this mode, the appliance will
operate at maximum fan speed and in continuous mode. If pressed again, the unit will
revert back to previous settings.
PUMP button (only on pump models)
Use this button to activate the heavy-duty pump system for active drainage.
Control panel
Page 5

6
ON light
When the STAND-BY button is pressed to start the unit, the ON light will come on automatically. The light will go off again when the unit is switched off.
NOTE: After a power outage, the unit will not switch itself on again automatically. When the
power supply has been reestablished, please press the STAND-BY button to start the unit
again.
TANK Warning light
If the water tank is full, improperly positioned or missing, the tank warning light will start
blinking.
An alarm will sound until the tank is either emptied or correctly positioned into place.
DEFROSTING light
With an ambient temperature of less than 15°C, (59°F) the appliance perfor ms defrosting
cycles.
While the appliance is defrosting, the defrosting light comes on and remains on until defrosting is completed.
During the defrosting cycle only the following 4 keys are active:
pump button, stand-by button, temperature button, timer button.
PUMP light (only on some models)
Once the pump button is pressed the pump light will switch on.
If the pump light flashes it means that the pump is not functioning properly.
Display lights
Page 6
7
ENGLISH
Installation Instructions
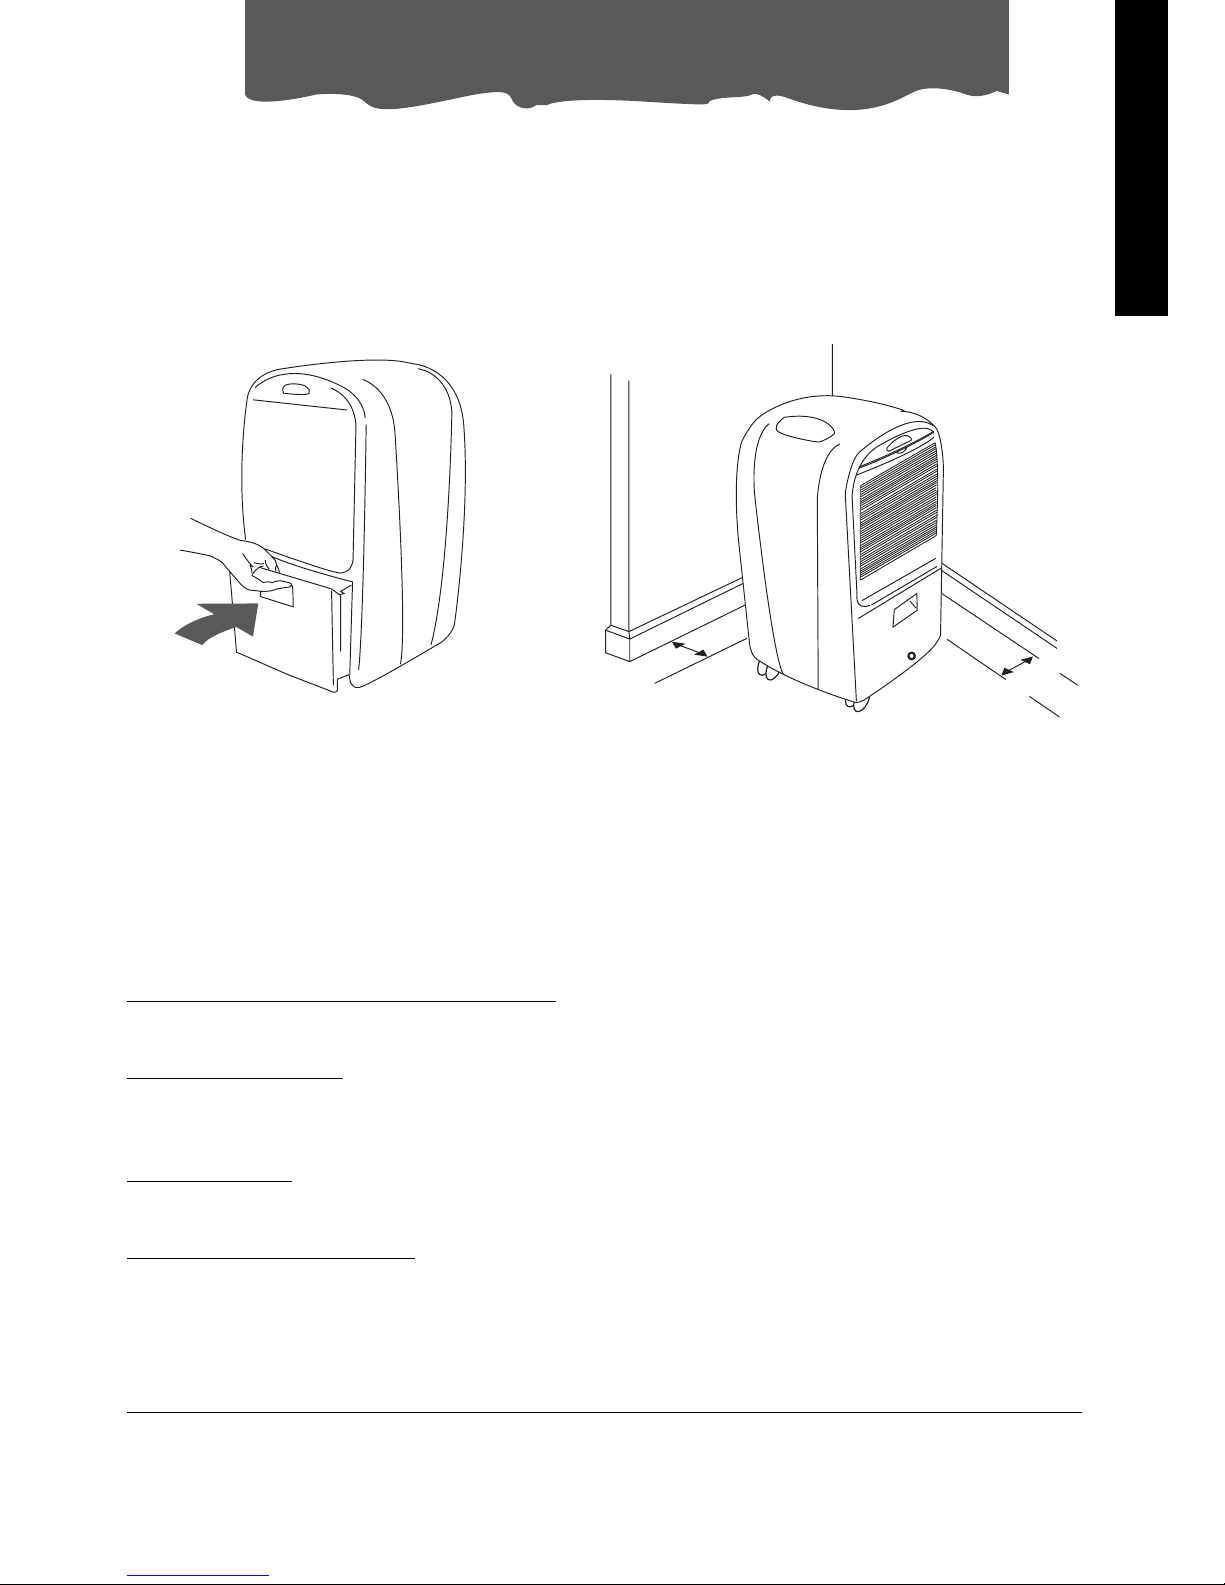
1. Allow at least 12 inches (30cm) of space on all sides of the unit for good air circulation.
2. Install your dehumidifier on a floor, table, or shelf. When installing the unit on a table or shelf,
make sure the table or shelf is strong enough to support the weight of the unit with a full
bucket.
Note: The dehumidifier needs to be secured when installed on a table or a shelf.
Do not sit or stand on the dehumidifier.
3. The tank must be properly positioned.
4. Castor wheels let you move the dehumidifier easily.
Choosing the proper location for the unit
1. Use the unit in a basement to help prevent moisture damage.
2. Use the unit in cooking, laundry, bathing, and dishwashing areas that have excessive moisture.
3. Use the unit to prevent moisture damage anywhere books or valuables are stored.
4. Place the unit where you want to have comfortable conditions.
List of components
For models equipped with pump system:
• 16 ft. (5 m) clear hose with Quick-Connect connection
• 3 ft. (1 m) clear hose
For all other models:
• 3 ft. (1 m) clear hose
Required tools and assembly time
Collection tank:
No assembly or plumbing necessary.
Continuous draining outlet:
To use the Continuous Draining feature the following tools will be necessary:
• 5 mm (0.2 in.) drill bit (to drill open the draining outlet)
• Drill tool
The estimated assembly time is 1-2 minutes.
Pump system and Quick-Connect 16ft. hose (only on models equipped with pump system):
No tools necessary. The estimated assembly time is 1-2 minutes.
12 in.
(30 cm)
12 in.
(30 cm)
Page 7
A) Empty the tank manually.
When the tank is full, remove (fig.1) and
empty it into a sink.
When finished, replace it properly.
NOTE: The tank must be positioned properly.
If you hear the intermittent sound of the
beep, it means the tank is not in the proper
position.
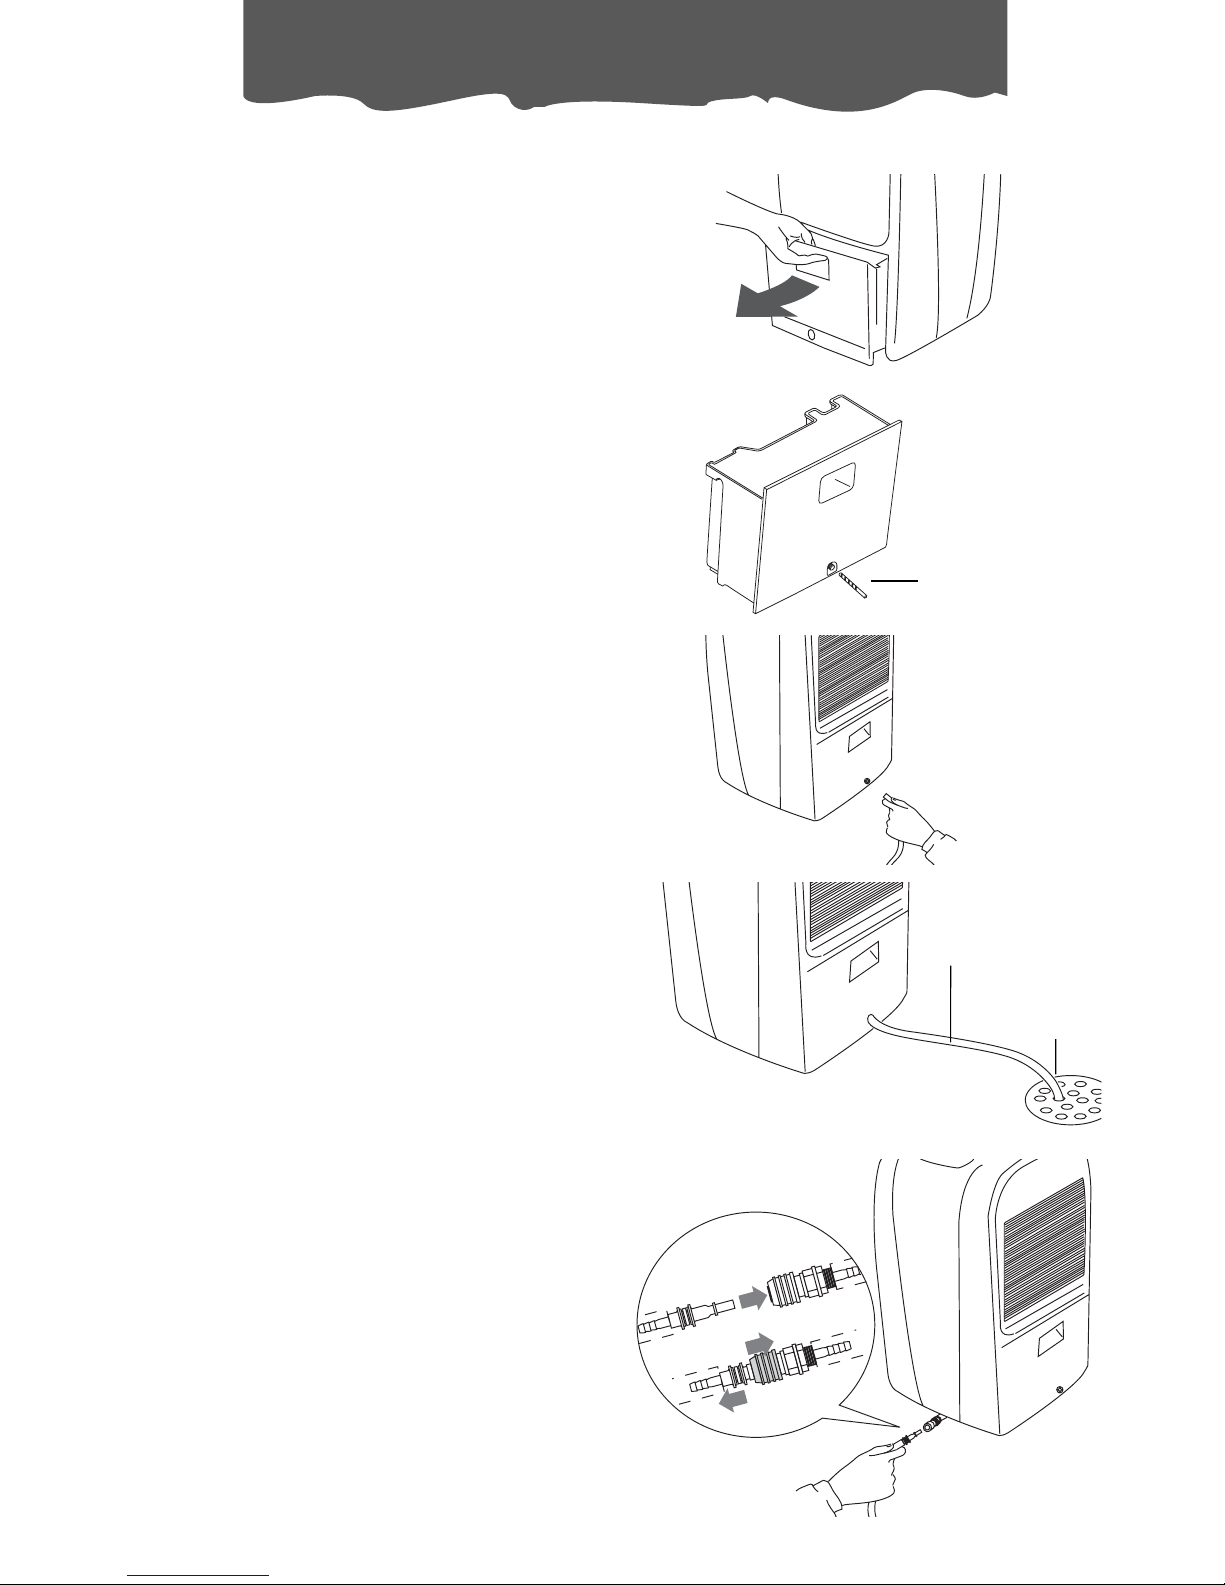
B) Continuous draining.
Condensed water can be drained via a hose
connected to the outlet located in the lower
part of the tank proceeding in the following
way:
1. remove the water tank.
2. Using a 5 mm drill bit, (0.2 inches) drill a hole
in the base of the tank along the torus as
shown in figure 2.
3. Connect a hose to the hose connector (fig.
3). Be sure the hose does not kink or bend.
Make sure that the hose is not higher than the
hose connection (see figure 4).
NOTE: When you remove the rubber cap
keep it in a safe place in case you want
drain into the tank.
C) Continuous draining using the pump
(only on pump models)
The exclusive heavy-duty pump system allows
water removal of up to 13.12 feet (4m) in height.
If you want the water to flow directly to a drain,
connect the condensation discharge tube supplied to the connection pipe located on the
lower part of the unit (Fig. 5).
Select the dehumidifying function and press the
PUMP button.
Note: With the condensation discharge hose
missing and the pump switched ON, the pump
light will start blinking. To eliminate this problem:
•Check the hose is correctly positioned;
•Disconnect and reconnect the appliance.
i
8
Disposing of the collected
water
fig. 1
fig. 2
Drill
fig. 3
fig. 4
Hose
Drain
1 PUSH
2
fig. 5
Page 8

9
ENGLISH
Stand-by position
Once the power outlet is plugged in, the display will show on the left side the degree of humidity you want to reach (the default data is 60) and on the right side the display will show (for
a minute) two dots, followed by the room humidity level.
How to Select the Desired Humidity Level
1) Push the stand-by button.
2) Press the button to set the desired humidty level. (30% means a dry environment,
80% a humid environment).
3) Push the MODE button to choose the dehumidifying function; the function is selected when
the small dot on the display is under the symbol).
4) When the appliance reaches the humidity set point the appliance will automatically stop
working. As soon as the humidity increases above the set point, the appliance will automatically resume dehumidification operation.
Note: The appliance is equipped with a safety device. The appliance only works after 3 minutes from the last time it was turned off.
How to use the FAN function
1) Push the stand-by button.
2) Push the MODE button to choose the FAN function; the function is selected when the small
dot on the display is under the symbol).
3) Press the button to modify the ventilation speed (min/med/max).
Turbo power
1) Press the button.
2) The turbo power function is an automatic dehumidification function that is used when you
wish to operate the appliance at maximum power . When in this mode, the display will show
on the left side (two dots) and on the right side the room humidity present.
To stop the turbo power function, simply press the button again.
How to program the delayed start function: From the OFF Position
1) With the unit OFF, press the button and use the button to set the number of
hours after which the appliance should start functioning.
2) On the left side the display will show the number of hours after which the appliance should
start the operation (1-24h) and a small dot under the symbol indicates that the timer
function has been selected.
3) When the selected time is reached, the appliance will start working.
Selecting the operations
Page 9

10
Selecting the operations
H
ow to Program the delayed stop function: From the ON Position
1) Press the button and use the button to set the number of hours after which the
appliance should stop functioning.
2) The left side the display will show the number of hours after which the appliance should stop
the operation (1-24h) and a small dot under the symbol indicates that the timer function has been selected.
3) When the selected time is reached, the appliance will stop working.
Page 10

WARNING
Electrical Shock Hazard
Always disconnect power supply cord from outlet before performing any maintenance.
Failure to follow the below precautions could result in the electrical shock or personal
injuries.
M
aintenance
Your dehumidifier is designed to serve you year-round.
Listed below are the care and maintenance instructions
Cleaning the Front Panel and Cabinet
• Using a soft cloth, clean the front panel and cabinet with warm water and a mild soap or
detergent. NOTE: Never sprinkle water into the appliance in order to prevent risk of short-
circuit and fire.
• Never use gasoline, thinner or any other similar chemicals for cleaning.
• Do not use bleach or abrasives.
C
leaning the Air Filter
If the filter is dirty, air circulation is compromised and the efficiency of the dehumidifying
decreases. It is therefore good practice to clean the filter at regular intervals. The frequency
depends on the duration and conditions of operation.
•To remove the air filter, pull it out (Fig. 6).
• Use a vacuum cleaner to remove dust accumulations from
the filter. If the filter is very dirty, wash in warm water and
rinse several times.
• After washing the filter, allow it to dry completely before
replacing it.
11
ENGLISH
Care and Maintenance
fig. 6
Page 11

12
Troubleshooting tips
Often times, a problem is minor and a service call may not be necessary. Use this troubleshooting guide to identify possible problems you may be experiencing.
Problem Possible cause Remedy
•Plug into the power outlet
•Empty the tank
•Position the tank correctly
•Turn the unit on
Unit does not operate
•Check power cord connection.
•Check if water tank is full
•Check water tank is properly installed.
•Check if the unit is not turned on.
•The desired humidity may
be lower than the room
humidity.
Dehumidifying capacity (moisture removal) low
•Clean the filter
•Increase the room temperature
•Improve the airflow
•Air filter is dirty and /or
blocked.
•Ambient room temperature
too low.
•Poor airflow
circulation/obstruction
•The desired humidity is lower
then the room humidity
Relative Humidity setting not
reached after long period of
operation
•There are windows or
doors opened
•Area/room is too large for
the capacity of the dehumidifier
•Check that the doors and
the windows are closed.
The appliance does not work
in the 3 minutes since the last
swith off
•The safety device has
been activated
•Wait 3 minutes to pass
The display shows
“
E1”/“E2”/“E3”
•Contact the Service
Center
The pump lamp blink •The condensation dischar-
ge hose is not positioned
corretly or is bent.
•Check the hose is correctly
positioned
•Disconnect and reconnect
the appliance
Page 12

13
ENGLISH
This warranty applies to all home appliances with De’Longhi or Kenwood brand names.
FOR CONTIGUOUS UNITED STATES ONLY
Limited Warranty
We warrant each De’Longhi appliance to be free from defects in material and workmanship.
From the purchase date, our obligation under this warranty is to provide one (1) year free parts
and labor on the entire appliance, with an additional four (4) years free on any part of the sealed system consisting of the compressor, evaporator, condenser and factory connected refrigerant tubing. Labor and all other parts during the additional four (4) year warranty are to be
paid by the owner. All appliances in need of repair are to be shipped to an authorized
De’Longhi service center at the owner’s expense, and De’Longhi will then incur the return shipping costs. After the first five (5) years of ownership, all expenses (all parts, labor and shipping)
are to be paid by the owner of the unit. This warranty shall apply only if the appliance is used
in accordance with the factory directions that accompany it, and on an Alternating Current
(AC) circuit. This warranty is in lieu of all other warranties and representations, expressed or
implied, and all other obligations or liabilities on our part. We do not authorize any other person or company to assume for us any liability in connection with the sale or use of our appliance. This warranty shall not apply to any appliance that has been repaired or altered outside
our factory nor shall it apply to any appliance that has been subjected to misuse, negligence
or accidents.
If repairs become necessary, see contact information below:
U.S. Residents:
Please contact our toll free hotline at 1-800-322-3848 or log onto our website at
www.delonghi.com.
For all accessories, spare parts or replacement parts, please contact our parts division at 1-
800-865-6330.
Residents of Canada:
Please contact our toll free hotline at 1-888-335-6644 or log onto our website at www.delon-
ghi.com.
Other countries:
Please visit: www.delonghi.com.
Limited Warranty
Page 13

14
Félicitations ! Vous avez choisi un produit capable de satisfaire aux exigences de toute la
famille, à la maison ou au bureau. Ce manuel contient toutes les informations nécessaires au
bon entretien de votre nouvel appareil. Un entretien correct le fera durer longtemps sans
qu’il vous pose le moindre problème. Prenez juste quelques instants pour lire cette notice et
vous familiariser avec le fonctionnement de l'appareil.
Ce déshumidificateur est facile à déplacer d’une pièce à l’autre et il s’installe en quelques
minutes.
PRECAUTIONS IMPORTANTES
Lire attentivement ce mode d’emploi avant d’installer et d’utiliser l’appareil. Cela vous permettra
d’obtenir les meilleurs résultats et le maximum de sécurité.:
1) Après un transport, attendez au moins 1 heure avant de mettre l'appareil en marche. Avant de
le transporter, vider l’eau de condensation présente à l’intérieur du réservoir.
2) Ne pas installer l’appareil dans des pièces où l’air peut contenir des gaz, de l’huile, du soufre. De
même, ne pas l’installer à proximité de sources de chaleur.
3) Cet appareil doit être exclusivement utilisé par des adultes. Ne pas permettre que les enfants jouent
avec l’appareil.
4) Cet appareil a été construit pour déshumidifier les pièces à usage d’habitation. Aussi, il ne doit pas être
utilisé à d’autres fins. Veuillez utlilser l’appareil dans des endroits fermés. Veuillez également fermer toutes portes et les fenêtres et toute ouverture dans la pièce.
5) Il est dangereux de modifier ou d’altérer de quelque façon que ce soit les caractéristiques de l’appareil.
6) Ne pas mettre l’appareil en marche si le câble d'alimentation ou la fiche sont endommagés car
cela pourrait provoquer des décharges électriques.
Si le câble d’alimentation est détérioré, il devra, pour éviter tout risque, être remplacé par le
constructeur, par son service après-vente, ou par une personne ayant une qualification similaire.
7) Evitez d'utiliser des rallonges pour le cordon d'alimentation électrique.
8) Veuillez ne utiliser pas l’appareil à l’exterieur.
9) Pour des raisons de sécurité, votre produit est muni d’une fiche avec trois broches. N’enlever ou
couper jamais la broche ronde de mise à terre de la fiche.
10)L’appareil doit être raccordé à une installation de terre efficace. Faire contrôler l’installation électrique
par un électricien qualifié. V otre produit est muni d’une fiche à trois broches (à savoir une fiche ayant
une broche plus large que les autres). Cette fiche ne peut être enfoncée dans la prise que dans
une seule position. Il s’agit d’une mesure de sécurité. Si vous ne pouvez pas insérer complètement
la fiche dans la prise essayez de la tourner. Si malgré tout vous ne pouvez pas encore la brancher,
demandez à un électricien de remplacer la prise obsolète. Eviter d’utiliser des rallonges pour le câble
d’alimentation électrique.
11)Ne pas tirer le câble d’alimentation électrique pour déplacer l’appareil. Ne pas plier le câble.
12) Avant d’entreprendre toute opération de nettoyage ou d’entretien, enlever toujours la fiche de la
prise de courant.
13)Ne pas poser des objets lourds ou chauds sur l’appareil.
14)Nettoyer le filtre à air chaque semaine.
15)En cas de transport, l’appareil doit rester dans la position verticale ou bien il doit être couché sur un
côté. Avant de le transporter, vider l’eau de condensation présente à l’intérieur du réservoir.
16)ATTENTION: Toucher le câble d’alimentation de ce produit peut vous exposer au plomb, un élement chimique que l’État de Californie indique entre ceux qui peuvent causer cancer, malformations prénatales et autres problèmes au appareil génital. Veuillez laver vos mains après chaque utilisation.
CONSERVEZ LES PRESENTES INSTRUCTIONS
PRODUIT À USAGE DOMESTIQUE UNIQUEMENT
Précautions importantes
Page 14

15
FRANÇAIS
1. Tableau de commande
2. Carrosserie
3 Roulettes
4. Filtre à air
5. Réservoir récupération eau de con-
densation
6. Câble d’alimentation
7. Raccord d’évacuation en continu
8. Connexion de la pompe (seulement
sur certains modèles)
Déscription de l’appareil
Composants
5
4
2
1
Bouton
température
ambiante °F/°C
Bouton
ventilation
Bouton
PROGRAMMATEUR
Bouton
MODE
Bouton
TURBO POWER
Bouton pompe *
Bouton pour
réduire le niveau
d’humidité/heures
Bouton pour
augmenter le
niveau
d’humidité/heures
Bouton
STAND-BY
Afficheur
Voyant ON
Voyant de
dégivrage
Voyant
Tank Control System
Description des commandes
3
6
7
Voyant pompe *
* (seulement sur certains modèles)
8
Page 15

16
Bouton STAND-BY
Appuyez sur ce bouton pour allumer/ éteindre l’appareil. Pour éteindre complètement
l’appareil, débrancher l’aappareil.
Bouton température ambiente
Appuyez sur ce bouton pour afficher la lecture de Température sur l’afficheur . En appuyant
une fois sur le bouton , la température en °F sera affichée à l’écran; en appuyant sur le bou-
ton deux fois, l’afficheur visualise la température en °C. Après quelques secondes l’afficheur
montre le niveau d’humidité.
Bouton ventilateur
Appuyez sur ce bouton pour sélectionner les réglages de vitesse du ventilateur (maximum,
moyenne, minimum).
Bouton hausse/réduction niveau d’humidité
Appuyez ces boutons -/+ pour augmenter de 5% le niveau d’humidité. Avec ces boutons
on peut également régler le programmateur.
De 0 à10 les heures augmentent de 30 minutes et de 10 à 24 de 1 heure.
Bouton programmateur
Avec l’appareil allumé, en appuyant sur le bouton programmateur, l’afficheur visualise les
heures après lesquelles on veut que l’appareil s’éteint (1-2-3... heures).
Avec l’appareil en stand-by, en appuyant sur le bouton programmateur, l’afficheur visualise les heures après lesquelles on veut que l’appareil s’allume (1-2-3... heures).
B
outon MODE
Appuyez sur ce bouton pour sélectionner les modes seulement ventilation ou déshumidification.
Bouton TURBO POWER
Appuyez sur ce bouton per sélectionner la fonction “turbo power”. Dans cette fonction
l’appareil fonctionne à la vitesse de ventilation maximale et de façon continue. En
appuyant une deuxième fois, l’appareil retourne dans la fonction selectionée précédemment.
Bouton POMPE (seulement sur certains modèles)
Appuyez sur ce bouton pour actionner la pompe et l’évacuation en continu.
Tableau de commande
Page 16

17
FRANÇAIS
Voyant “ON”
Lorsque le bouton STAND-BY est appuyé, le voyant “ON” s’allume. Le voyant s’éteint
quand l’appareil s’arrête.
NOTA: Après une coupure de courant, l’appareil ne repart pas automatiquement. Appuyez
sur le bouton STAND-BY pour mettre l’appareil en marche.
Voyant réservoir
Si le réservoir de récupération d’eau est plein ou mal positionné, le voyant rouge clignote,
et ensuite émet un signal acoustique. Ce signal continuera jusqu’à ce que le réservoir sera
vidé ou positionné correctement.
Voyant de dégivrage
Avec une température ambiante inférieure à15°C (59°F) l’appareil effectue un cycle de
dégivrage.
Pendant le dégivrage, le voyant correpondant s’allume et reste allumé jusqu’à dégivrage
terminé.
Pendant le cycle de dégivrage seulement les 4 fonctions suivantes sont actives:
bouton pompe, bouton stand-by, bouton température ambiante, bouton programmateur .
Voyant pompe (seulement sur certains modèles)
Si le voyant pompe est appuyé, le voyant correpondant s’allume.
Si le voyant pompe clignote, ça signifie que la pompe ne fonctionne pas correctement.
Vo yants
Page 17

18
Installation
1. Laissez au moins 30 cm (12 pouces) de chaque côté de l’appareil pour permettre une
bonne circulation de l’air.
2. Installez le déshumidificateur sur le sol, sur une table ou sur une étagère. Assurez-vous que
la table ou l’étagère peut supporter le poids de l’appareil quand son réservoir est plein.
Évitez de vous asseoir ou de monter sur le déshumidificateur.
3. Le réservoir doit être correctement positionné sur les supports du bac d’évacuation, pour
permettre le bon fonctionnement de l’arrêt automatique.
4. Les roulettes permettent de déplacer le déshumidificateur facilement.
Choix de l’emplacement le plus approprié
1. Utilisez l’appareil dans une cave pour prévenir les dégâts provoqués par l’humidité.
2. Utilisez l’appareil dans la cuisine, la buanderie, la salle de bains, etc. ou dans des pièces
trop humides.
3. Utilisez l’appareil pour prévenir les dégâts provoqués par l’humidité dans des endroits où
sont conservés des livres ou des objets de valeur.
4. Installez l’appareil là où vous désirez un bon niveau de confort.
Liste des composants
Modèles avec pompe:
• 1 tuyau de connexion rapide 16 pieds (5 m)
• 1 tuyau 3 pieds (1 m)
Pour tous les modèles:
• 1 tuyau 3 pieds (1 m)
Outillage nécessaire et temps de montage
Évacuation dans le
réservoir:
On n’a pas besoin de montage ni de l’intervention d’un plombier.
Évacuation en continu
:
Pour évacuer en continu, on a besoin de l’outillage suivant:
• une mèche de perceuse de 5 mm (0.2 pouces)
•une perceuse
Le temps de montage prévu est d’ environ 1-2 minutes.
(Évacuation en continu avec connexion rapide de 16 pieds
(5 m): (seulement sur certains
modèles):
On n’a pas besoin de montage. Le temps de montage prévu est d’environ 1-2 minutes.
12 in.
(30 cm)
12 in.
(30 cm)
Page 18

19
FRANÇAIS
A) Videz le réservoir manuellement.
Quand le réservoir est plein, retirez-le et videzle dans le lavabo ou dans la baignoire (fig.1).
Après cette opération, remettez-le correctement à sa place.
NOTA: insérez convenablement le réservoir.
Sur le modèle électronique, la sonnerie indi-
que que le réservoir est mal positionné.
B) Évacuation en continu.
Il est possible d’évacuer l’eau de condensation
par le tuyau en dotation relié à la sortie au dos
du réservoir :
1. retirez le réservoir
2. avec une mèche de perceuse de 5 mm (0.2
pouce) percez un trou, avec la perceuse, au
dos du réservoir (voir figure 2).
3. Fixez le tuyau sur le raccord. Veillez à ce que
le tuyau ne soit ni étranglé ni plié (voir figure
3).
Pour une évacuation correcte, le tuyau ne
doit pas dépasser des dénivellations d’hauteur supérieures au raccord (voir figure 4).
NOTA : Si vous ne désirez pas utiliser le tuyau,
vous pouvez boucher le trou avec un bouchon en caoutchouc fourni avec l’appareil.
C) Évacuation en continu avec pompe
(seulement sur certains modèles)
Un exclusif système d’évacuation de l’eau de
condensation vous permet d’utliser un tuyau
d’évacuation capable de évacuer l’eau
jusqu’à 13.12 pieds (4m) en haut. Si vous voulez
que l’eau s’écoule directement en continu vers
l’extérieur, connectez le tuyau d’évacuation de
l’eau, fourni avec l’appareil, avec le raccord se
trouvant sous la partie inférieure de l’appareil
(Fig.5).
Sélectionner la fonction déshumidfication et
appuyer sur le bouton pompe.
Nota: S’il n’y a pas le tuyau et le bouton
pompe est appuyé, le voyant pompe clignote.
Pour éliminer le problème:
•Vérifier que le tuyau d’évacuation eau de
condensation ne soit pas plié ou mal
positionné;
•Débrancher et puis brancher l’appareil.
Évacuation de l’eau de
condensation récupérée
fig. 1
fig. 2
Mèche de
perceuse
fig. 3
fig. 4
Tuyau
Évacuation
1 PUSH
2
fig. 5
Page 19

20
Stand-by
Après avoir branché l’appareil, l’afficheur visualise à gauche le niveau d’humidité qu’ on désire atteindre (la valeur affichée automatiquement est 60) et à droite l’afficheur visualise pour
une minute deux traits d’union suivi par le niveau d’humidité.
Comment sélectionner le niveau d’humidité désiré
1) Appuyez sur le bouton stand-by.
2) Appuyez sur le bouton “ ” ou “ “ pour choisir l’humidité désirée (30% équivaut à un
milieu sec, 80% à un milieu humide).
3) Appuyez sur le bouton MODE pour choisir la fonction déshumidification; la sélection est
effectuée quand le point de l’afficheur se trouve sous le symbole .
4) Lorsque l’appareil aura atteint la valeur d’humidité programmée il s’arrêtera.
Nota: l’appareil est doté d’un dispositif de sécurité qui permet l’activation de la fonction
déshumidification seulement après 3 minutes du dernier arrêt.
Comment ventiler
1) Appuyez sur le bouton stand-by.
2) Appuyez sur le bouton MODE et choisissez la fonction ventilation; la sélection à lieu seulement quand le point de l’afficheur se trouve sous le symbole .
3) Appuyez sur le bouton “ ” pour sélectionner le niveau de puissance de déshumidification + chauffage désiré (maximum, moyen, minimum).
Turbo power
1) Appuyez sur le bouton .
2) La fonction turbo power est une fonction automatique de déshumidification, utile lorsque
vous désirez faire fonctionner l’appareil à la puissance maximale. Avec cette fonction
activée l’afficheur visualise à gauche deux traits d’union et à droite l’humidité dans la
pièce.
Pour désactiver la fonction turbo power, il suffit d’appuyer de nouveau sur le bouton .
Comment programmer la mise en marche retardée avec appareil éteint
1) Avec appareil éteint, appuyer sur le bouton et appuyer sur les boutons pour
sélectionner les heures aprè lesquelles vous désirez que l’appareil fonctionne.
2) Sur le côté gauche l’afficheur visualise le numéro des heures après lesquelles l’appareil
commence à fonctionner (1-24 heures ) et sous le symbole un point est visualisée pour
indiquer que la fonction programmateur a été sélectionée.
3) Une fois le temps affiché s’écoule, l’appareil commence à fonctionner.
Sélection des fonctions
Page 20

21
FRANÇAIS
Sélection des fonctions
C
omment programmer l’arrêt retardé avec appareil allumé
2) Avec appareil allumé, appuyer sur le bouton et appuyer sur les boutons pour
sélectionner les heures aprè lesquelles vous désirez que l’appareil s’arrête.
2) Sur le côté gauche l’afficheur visualise le numéro des heures après lesquelles l’appareil
s’arrête (1-24 heures ) et sous le symbole un point est visualisée pour indiquer que la
fonction programmateur a été sélectionée.
3) Une fois le temps affiché s’écoule, l’appareil s’arrête.
Page 21

22
ATTENTION
Risque de décharges électriques
Avant toute opération d’entretien, débranchez l’appareil.
Le non-respect des précautions susmentionnées pourrait provoquer des décharges électriques ou
des blessures corporelles.
Entretien
Votre déshumidificateur a été conçu pour travailler toute l’année.
Veuillez trouver ci-après les instructions pour un correct nettoyage et entretien de l’appareil.
Panneau frontal et carrosserie
• Nettoyez le panneau frontal et la carrosserie avec un chiffon doux imbibé d’eau tiède et
de savon ou de détergent délicat.
• Rincez et séchez complètement. Passez un chiffon doux et sec.
NOTA: Ne vaporisez jamais d’eau dans l’appareil pour ne pas créer de risque de court-cir-
cuit et d’incendie.
• Pour le nettoyage, n’utilisez jamais d’essence, ni de solvants, ni d’autres produits semblables.
• N’utilisez pas d’eau de Javel ni de produits abrasifs.
Filtre à air
Si le filtre est sale, la circulation de l'air devient difficile, le déshumidificateur devient moins efficace et sa fonction de purification baisse. C’est pourquoi il est de bonne règle de nettoyer le
filtre périodiquement.
La fréquence de l'opération doit être rapportée au milieu et à la durée du fonctionnement. En
cas d'utilisation constante/ systématique
• Il est de bonne règle de nettoyer le filtre toutes les semaines.
• Pour enlever le filtre, saisissez-le et tirez (Fig.6).
• Pour éliminer la poussière qui s’est déposée sur le filtre, utili-
sez un aspirateur. Si le filtre est très sale, lavez-le à l’eau
tiède et rincez-le plusieurs fois.
• Après avoir lavé le filtre, laissez-le sécher complètement
avant de le remonter.
Nettoyage et entretien
fig. 6
Page 22

23
FRANÇAIS
Pr oblèmes et solutions
Souvent, les problèmes sont faciles à résoudre, sans appeler le service technique. Ce guide
vous aidera à identifier les éventuelles pannes.
PROBLÈME
CAUSE POSSIBLE SOLUTIONS
•Enfoncer la fiche dans la
prise de courant
•Vider le réservoir
•Mettre le réservoir d’eau
dans la position correcte
•Allumer l’appareil
L’appareil ne marche pas
•Vérifier le branchement du
câble d’alimentation
•Vérifier si le réservoir est plein
•Vérifier si le réservoir est
installé correctement
•Vérifier si l’appareil n’est
pas éteint
•La température ou l’humidité dans la pièce sont trop
basses
Faible capacité de déshumidification
•Nettoyer le filtre à air
•Augmenter la température de la pièce
•Améliorer la circulation de
l’air dans la pièce
•Le filtre à air est sale ou
bouché
•La température de la pièce
est trop basse
•Faible circulation d’air/
obstruction
•La commande pourrait être
réglée sur une valeur trop
basse
Au bout d’une longue période de fonctionnement, le
niveau d’humidité relative
programmé n’est pas atteint
•Vérifier si toutes les portes et
les fenêtres sont fermées
•La salle/ l’espace est trop
grand pour la capacité du
déshumidificateur.
•Vérifier si les fenêtres ou
les portes sont fermés
L’appareil ne fonctionne pas
pendant 3 minutes environ
après la remise en marche
•Le dispositif de sécurité de
l’appareil s’est éclenché
•Attendre 3 minutes
L’afficheur indique
“
E1”/“E2”/“E3”
•Appeler le Service aprèsvente
Le voyant pompe clignote
(seulement sur certains
modèles)
•Le tuyau d’évacuation
eau de condensation
n’est pas inséré ou il est
plié
•Vérifier que le tuyau d’éva cuation eau de condensation ne soit pas plié ou mal
positionné
•Débrancher et puis brancher l’appareil
Page 23

24
Cette garantie s’applique à tous les appareils ménagers de marques De’Longhi ou Kenwood.
RÉSERVÉ UNIQUEMENT AUX ÉTATS-UNIS CONTIGUS ET LE CANADA
Garantie limitée
Nous garantissons que chaque appareil de DeLonghi est exempt de défauts de matériau et
de fabrication. À compter de la date d’achat, notre obligation selon cette garantie est d’offrir une (1) année de pièces de rechange et de main-d’œuvre gratuites sur l’appareil entier,
avec quatre (4) années supplémentaires de pièces de rechange gratuites pour le système
scellé consistant en le compresseur, l’évaporateur, le condenseur et les tubes frigorifiques connectés à l’usine. La main-d’œuvre et toutes les autres pièces pendant les quatre (4) années
supplémentaires de garantie doivent être payées par le propriétaire. (Pour le Canada uniquement: veuillez contracter le revendeur chez qui l’appareil a été acheté ou le centre de
services agréé de DeLonghi le plus proche de chez vous pour tous travaux d’entretien et de
réparation sur les climatiseurs.) Tout appareil devant être réparés doit être expédié à un centre de réparation autorisé de DeLonghi aux frais du propriétaire et DeLonghi encourra alors les
frais du transport de retour. Après les cinq (5) premières années de possession, tous les frais
(pour les pièces de rechange, la main-d’œuvre et le transport) devront être payés par le propriétaire de l’appareil. Cette garantie ne s’appliquera que si l’appareil est utilisé conformément aux instructions de l’usine qui l’accompagnent et sur un circuit électrique à courant
alternatif (c.a.). Cette garantie remplace toute autre garantie et représentation, explicite ou
implicite, et toute autre obligation ou responsabilité de notre part. Nous n’autorisons aucune
autre personne ou société à assumer, en notre nom, des obligations associées à la vente ou
l’utilisation de notre appareil. Cette garantie ne s’appliquera ni aux appareils qui ont été
réparés ou modifiés en dehors de notre usine ni aux appareils qui ont fait l’objet d’une mauvaise utilisation, d’une négligence ou d’accidents.
Si des réparations s’avèrent nécessaires, consultez les coordonnées ci-dessous :
Résidents des É.-U. :
Veuillez appeler, sans frais, notre ligne téléphonique au 1-800-322-3848 ou visitez notre site
Web à www.delonghi.com.
Pour tous les accessoires, des pièces détachées ou des pièces de rechange, veuillez contacter notre service des pièces détachées au 1-800-865-6330.
Autres pays : Veuillez visitez www.delonghi.com.
Garantie limitée
 Loading...