

Page 1
IMPORTANT WARNINGS
Safety warnings
Danger!
Failure to observe the warning may result in life threatening
injury by electric shock.
- Before plugging the appliance into the mains, make
sure that:
● The voltage indicated on the appliance rating plate
corresponds to your mains voltage;
● The mains socket is earthed and has a minimum
rating of 16A. Failure to follow these important safety
instructions absolves the manufacturer of all liability.
- Make sure the power cable does not
come into contact with parts of the
appliance which become hot during
use. If the power cable is damaged, it
must be replaced by the manufacturer
or the manufacturer's customer
services in order to avoid all risk.
- Before putting the appliance away, removing the
cooking plates or performing cleaning and maintenance,
turn the appliance o by placing the switch in the “0”
position and unplugging from the mains.
- Never use the appliance outdoors.
- Never immerse the appliance in water.
- The appliance must not be operated
by a timer or a separate remote control
system.
- Use extension cables complying with current safety
regulations and standards only.
- Never unplug from the mains socket by pulling on the
cable.
- Never use the appliance when half open.
- Before plugging the appliance into the mains, make
sure the switch is in the “0” position.
other working environments; farm
houses; by clients in hotels, motels and
other residential type environments;
bed and breakfast type environments.
- This appliance can be used by children
aged from 8 years and above and
persons with reduced physical, sensory
or mental capabilities or lack of
experience and knowledge if they have
been given supervision or instruction
concerning use of the appliance in a
safe way and understand the hazards
involved. Children shall not play with
the appliance.
- Cleaning and user maintenance shall not be made
by children unless they are aged from 8 years and
supervised.
Keep the appliance and its cable out of the reach of
children aged 8 and younger.
- Do not leave the appliance within reach of children or
unattended while in operation.
- Never use the appliance without the cooking plates.
- Wait until the appliance is completely cold before
putting away.
- Do not move the appliance during use.
Danger of burns!!
Failure to observe the warning could result in burns or scalds.
- When the appliance is in operation,
the outside may become very hot.
Always use the handgrip (2) or oven
gloves if necessary.
- Remove or change the cooking plates when the
appliance has cooled down.
Important!
Failure to observe the warning could result in injury or
damage to the appliance.
- This appliance is designed to cook food. It must never be
used for other purposes, modied or tampered with in
any way.
- This is a household appliance only.
It is not intended to be used in: sta
kitchen areas in shops, oces and
Please note:
This symbol indicates recommendations and important
information for the user.
- To avoid the risk of re, do not cook food wrapped in
plastic lm or tinfoil or in plastic bags.
This appliance conforms to EC Regulation 1935/2004
on materials and articles intended to come into contact
with food.
8
Page 2
Disposing of the appliance
The appliance must not be disposed of with
household waste, but taken to an authorised waste
separation and recycling centre.
DESCRIPTION
1. Base and cover: solid stainless steel structure with
self-adjusting cover.
2. Handgrip: strong cast metal handgrip to adjust the
cover according to the thickness of the food.
3. Removable plates: non-stick, dishwasher safe, easy
to clean.
a. Grill plates: perfect for grilling steak, hamburger,
chicken and vegetables.
b. Griddle plates: to prepare perfect pancakes, eggs,
bacon and shellsh (some models only).
4. Mode selector: contact grill, barbecue grill.
5. Contact grill thermostat dial: adjusts temperature
from 80 to 230°C.
6. Griddle thermostat dial: adjusts temperature from
positions 1 to 5.
7. ON light.
8. Contact grill ready light.
9. Ready light.
10. Grease drip cups: collect the grease, dishwasher safe.
11. Cleaning tool: helps clean the plates after use.
12. Plate release buttons: press to release and remove
the plate.
13. Hinge release lever: enables the cover to be fully
opened to cook in the at position.
INSTRUCTION FOR USE
When using the appliance for the rst time
Remove all packaging and labels from the plate. Before
throwing the packing material away, make sure you have
removed all parts of the new appliance. We recommend you
keep the box and packing to re-use in the future.
Please note: the grease drip cups are outside the
polystyrene insert.
Before use, clean the base, cover and dials with a damp cloth
to remove dust accumulated during transport.
Clean the cooking plates, grease drip cups and cleaning tool
thoroughly. The plates, grease drip cups and spatula are
dishwasher safe.
appliance is supplied with a black cleaning tool to clean the
plates when the appliance has completely cooled down after
use (after at least 30 minutes).
If you use the tool for a long time on plates which are still hot,
the plastic may melt.
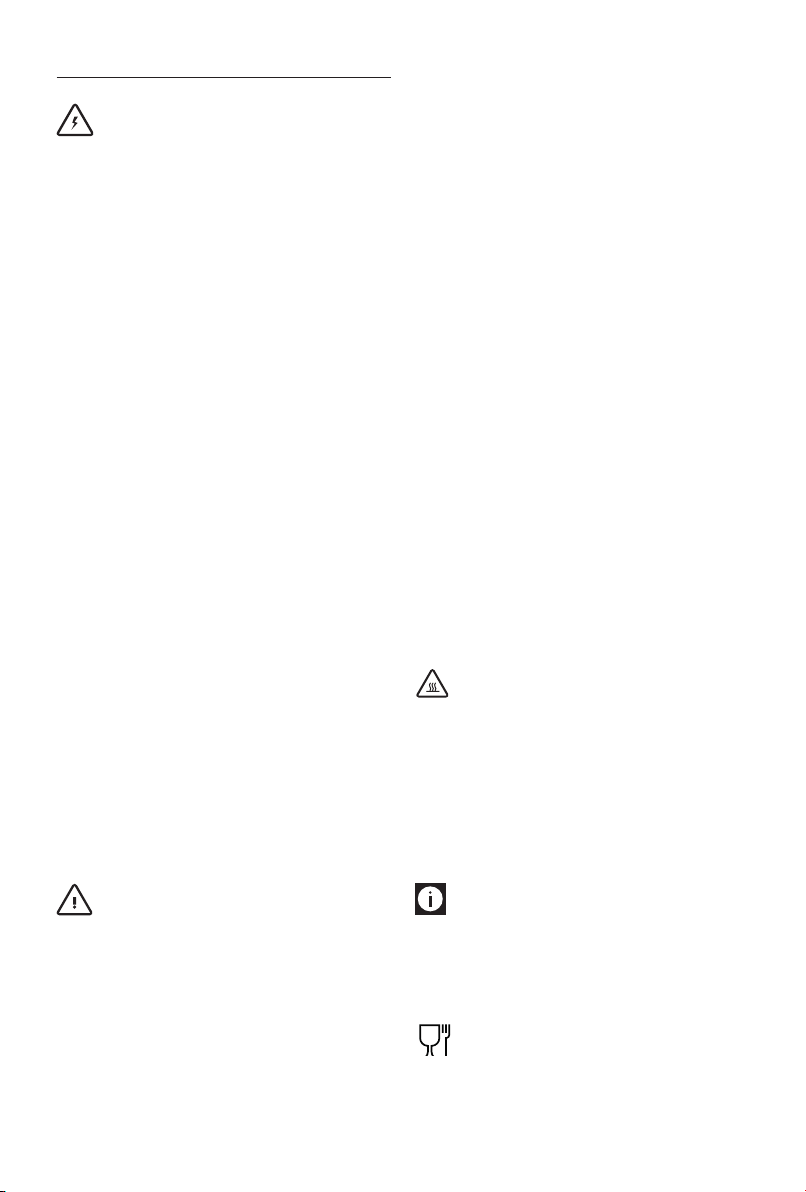
Contact grill (use the grill plate)
The contact grill is ideal for cooking hamburgers, deboned
meat and thin meat slices, vegetables and sandwiches.
The “contact” function is perfect to prepare food rapidly and
healthily. When you use the contact grill, the food cooks
quickly as it is in contact with the plates on both side at once
(see gure).
The grease from the food is drained and collected by the
grooves on the plate and the hole at the corner.
When the appliance is used in the “contact” position, we
recommend using the grill plates.
Rest the cover evenly on the food until the required cooking
level is reached.
The appliance has a special handgrip and hinge allowing the
cover to be adjusted according to the thickness of the food.
Thinly sliced potatoes and very thick steaks can be prepared
with equally perfect results. If you want to cook a number of
dierent types of food simultaneously using the contact grill,
the various foods should have the same thickness to allow the
cover to be closed evenly.
Barbecue mode with grill plate (use the grill plate)
The appliance can be used as a grill/barbecue to prepare
hamburgers, steak, chicken (chicken on the bone is not
recommended as it does not cook evenly) and sh.
The grill/barbecue mode is the most versatile.
The plates are in the open position, doubling the cooking
surface (see gure).
Please note: The rst time you use the appliance, it
may give o a slight odour and a little smoke. This is normal
and common to all appliances with non-stick surfaces. The
You can prepare a number of dierent foods on the separate
9
Page 3

plates without mixing the avours, or cook more of the same
food. The grill/barbecue position can be used to grill cuts of
meat with dierent thicknesses, each with the preferred level
of cooking. In the grill/barbecue position, the cover is fully
open, creating a double at cooking surface.
In this position, you need to turn the food during cooking. To
use the appliance in the grill/barbecue position, use the grill
plates.
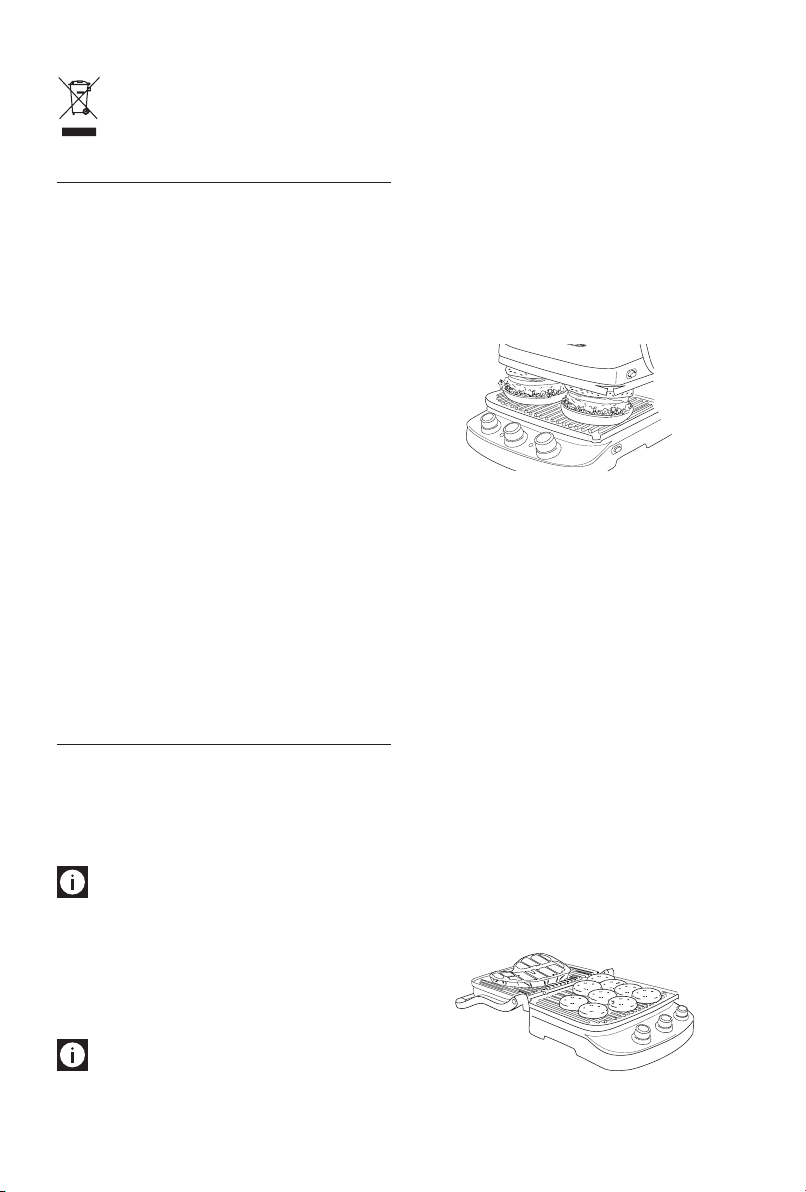
Barbecue mode with griddle plate (some models only)
The appliance can also be used as a griddle plate to prepare
pancakes, eggs, cheese, fritters and bacon and sausages for
breakfast (see gure).
The large cooking surface enables a number of dierent foods
to be prepared simultaneously, or to cook more of the same
food.
When the appliance is used as a griddle plate, the cover must
be fully opened to create a double at cooking surface.
In this position, you need to turn the food during cooking.
When using this function, use the griddle plates.
USE
When the appliance has been prepared correctly and you
are ready to cook, turn the selector to the left to choose the
barbecue function with griddle or grill plate, or to the right to
choose the contact grill function.
After selecting one of the two positions, the red light comes
on to indicate that the appliance is on.
To use the appliance as a contact grill, turn the grill
thermostat dial to the required temperature.
You can set a temperature of between 80°C and 230°C.
To use the appliance as a barbecue with griddle plate, turn
the griddle plate thermostat dial to the required temperature.
You can set it from position 1 to position 5.
The appliance takes up to eight minutes to heat up depending
on the set temperature.
When the thermostat reaches the required temperature, the
green light comes on to indicate the appliance is ready to use.
It is normal for the light to go on and o during use as the
thermostat regulates the temperature.
The thermostat dials adjust the temperature of the cooking
surface. The temperature can be varied at any time during
cooking, depending on the type of food being prepared.
Take great care when cooking.
To open the appliance, hold the black part of the handgrip
which remains cold.
The die-cast aluminium parts become very hot, avoid
touching them during and immediately after cooking.
If you need to adjust the position of the cover during cooking,
always use an oven glove to avoid burns.
The bottom plate housing is made from plastic and even
though it may become very hot, there is no risk of burns.
Before performing any operation on the appliance, leave to
cool down for at least 30 minutes.
COOKING POSITIONS
Rest the appliance on a clean at surface where you want
to cook. The appliance can be used in the three following
positions:
- Closed position - The top plate/cover rests on the
bottom plate/base. This is the starting position and also
one of the cooking positions when the appliance is used
as a contact grill. The cover automatically adjusts to the
thickness of the food on the plate.
- Open position - The top plate/cover is open and
at 100° with respect to the base. The cover must be
opened to this position before using the appliance as a
contact grill.
The cover remains in the open position until the
handgrip is lowered.
- Flat position (fully open) - The top plate/cover is
level with the bottom plate/base. The bottom and
top plates are both at the same level, forming a large
cooking surface. In this position, the appliance can be
used in barbecue mode with either the grill plate or the
griddle plate. To place the appliance in this position, rst
identify the hinge release lever on the right. Hold the
handgrip with the left hand and with the right, slide the
release lever towards you. Push the handgrip backwards
until the cover rests upside down on the work surface.
If the appliance is in the open position and you want to
place it in the closed position, pull the handgrip gently
towards you until the cover rests upside down in the
closed position.
Inserting the cooking plates
Place the appliance in the at position (see above) with the
controls in front of you. Insert one plate at a time.
Each plate must be inserted in it's top or bottom housing
only, and they are marked “top” or “bottom”.
Lift the bottom plate with the housing for the heating
10
Page 4

element facing downwards. Looking at the grill, the grease
drain hole must be in the front right corner. Identify the metal
supports at the centre of the housing. Tilt the back of the
plate and line up the shape on the back of the plate with the
metal supports. Slide the plate on the supports and push the
front of the plate downwards until it clicks into place.
Turn the appliance and insert the top plate, following the
same procedure.
To remove the plates
Place the appliance in the at position (see above).
Identify the plate release buttons on one side.
Push the button decisively to eject the plate from the base.
Hold the plate with both hands, slide it along the metal
supports and remove it from the base.
Press the other release button to remove the second plate,
following the same operations.
Remove or change the cooking plates when the
appliance has cooled down.
Positioning the grease drip cups
When the appliance is used as a contact grill, only one of
the grease drip cups is needed. During cooking, place the
cup directly under the grease drain hole. The grease coming
from the food is drained towards the hole in the plate and
gathered in the cup.
After cooking, dispose of the grease collected appropriately.
The grease drip cups are dishwasher safe.
When the appliance is used as a grill/barbecue or griddle
plate, both cups must be used.
Place a cup under the grease drain hole at the end of each of
the plates. Once the appliance has been prepared, plug the
appliance into a mains socket.
You can now start cooking.
down for at least 30 minutes.
Cleaning
Please note: Before cleaning the appliance, make
sure it has cooled down completely.
At the end of cooking, turn the selector to the “0” position and
unplug from the mains.
Leave the appliance to cool down for at least 30 minutes.
Use the special tool supplied to remove any food residues
from the plates. The tool can be washed by hand or in the
dishwasher. Empty the grease drip cups. The grease drip cups
can be washed by hand or in the dishwasher.
Press the plate release buttons to remove the plates from the
appliance. Before touching them, make sure they have cooled
down completely (wait at least 30 minutes).
The cooking plates are dishwasher safe. Frequent washing
could reduce the properties of the ceramic coating.
Do not use metal objects to clean the plates.
CLEANING AND MAINTENANCE
User maintenance
- Never use metal implements which could scratch the
non-stick plates. Use wood or heat-resistant plastic
implements.
- Never leave plastic implements in contact with the hot
plates, including the cleaning tool supplied.
- Between cooking one food and the next, remove food
residues through the grease drain hole and collect them
in the grease drip cup, then clean with kitchen paper
and move on to the next cooking operation.
- Before cleaning, always leave the appliance to cool
11
 Loading...