

IMPORTANT
SAFEGUARDS
When using electrical appliances, basic safety precautions
should always be followed, including the following. READ
ALL INSTRUCTIONS.
Danger!
Failure to observe the warning may result in life threatening
injury by electric shock.
- To protect against re, electric shock, and
injury to persons, DO NOT IMMERSE THE
APPLIANCE , CORD OR PLUG IN WATER OR
OTHER LIQUIDS.
- The use of accessory attachments not
recommended by the appliance manufacturer
might cause injuries.
- WARNING: TO REDUCE THE RISK OF FIRE
OR ELECTRIC SHOCK, ONLY AUTHORIZED
PERSONNEL SHOULD DO REPAIRS.
Important!
Failure to observe the warning could result in injury or
damage to the appliance.
- The appliance is not intended for use by
persons (including children) with reduced
physical, sensory or mental capabilities, or
lack of experience and knowledge, unless they
have been given supervision or instruction
concerning use of the appliance by a person
responsible for their safety. Children should
be supervised to ensure that they do not play
with the appliance.
- Close supervision is necessary when any
appliance is used by or near children.
- Unplug from outlet when not in use and before
cleaning. Allow to cool before putting on or taking
o parts, and before cleaning the appliance.
- The appliance do not exceed one hour ON in a
two hours period.
Danger of burns!!
Failure to observe the warning could result in burns or scalds.
- Do not touch hot surfaces; use handles or
dials.
- Do not let the power cord hang over the edge
of the table or counter, or touch hot surfaces.
- Do not place on or near hot gas burners,
electric hobs, or hot ovens.
- Extreme caution must be exercised when
moving an appliance containing hot oil or
other hot liquids.
- Do not use on surfaces that may be damaged
by the heat. If the grill is used on countertop
made in solid surface material (e.g. Silestone®,
Corian®, etc.), follow carefully the indications
of countertop manifacturer and/or supplier.
- Do not place the appliance above or near a gas
or electric cooker.
- If the plug heats up, contact a qualied
electrician.
- Do not use abrasive/aggressive/acid
detergent, metal sponges or steel wool to
clean the appliance.
- Cooking appliances should be positioned in a
stable cooking surface.
- When in use, the appliance must be kept far
from amable liquids or materials.
Please note:
This symbol indicates recommendations and important
information for the user.
- Do not use this appliance for purposes other
than those it has been designed for.
- Do not operate any appliance with a
damaged cord or plug, or after the appliance
has malfunctioned or has been damaged
in any manner. Return the appliance to an
authorized Service center for examination,
repair or adjustment.
- Do not use outdoors.
- Unplug the unit when nished using.
- Do not use appliance for other than intended
use.
- To disconnect, turn the control to OFF, then
unplug from the wall outlet.
SAVE THESE
INSTRUCTIONS
This product is for household use only
4
ELECTRICAL CONNECTION
Only use a three-pin, 120 Volt, 60 Hz power outlet
GROUNDING INSTRUCTIONS
CAUTION: MAKE SURE THAT THE PLUG IS CORRECTLY
GROUNDED.
This appliance must be grounded: in the event of short
circuits, the ground connection reduces the risk of electric
shock, allowing the electrical current to be dispersed.
This appliance is tted with a power cable with ground wire.
The plug must be connected to a power outlet that has been
correctly installed and grounded.
WARNING: IMPROPER USE OF THE GROUND WIRE MAY LEAD
TO THE RISK OF ELECTRIC SHOCK.
If you are not sure that the power outlet is properly grounded,
contact a qualied electrician.
a) A short power-supply cord is provided to reduce the risk
resulting from becoming entangled in or tripping over a
longer cord.
b) Extension cord are available and may be used if care is
exercised in their use.
C) If an extension cord is used:
1) The marked electrical rating of extension cord should
be at least as or greater than the electrical rating of the
appliance;
2) The extension must be grounding 3-wire cord, as
appliance's power supply cord.
3) The extension cord should be arranged so that it does
not drape over the counter or table top where it could
be pulled by children or tripped over unintentionally.
4) The extension shall be in good operating condition.
DESCRIPTION
1. Base and cover: solid stainless steel structure with
self-adjusting cover.
2. Handgrip: strong cast metal handgrip to adjust the
upper plate/cover according to the thickness of the food.
3. Plate release buttons: press to release and remove
the plate.
4. Grill plates lock/release device
5. Hinge release lever: enables the appliance to be fully
opened to cook in at position.
6. Height adjustment dial: to lock the upper plate/
cover at desired height, suitable for preparing food that
need not be pressed.
7. ON light.
8. Start/stop button.
9. Time button t: to adjust the cooking time
(decreasing).
10. Time button s: to adjust the cooking time
(increasing).
11. Lower plate "SEAR" button.
12. Lower plate thermostat dial: to adjust the
temperature from 140°F to 450°F, or switch o the lower
plate.
13. Upper plate "SEAR" button.
14. Upper plate thermostat dial: to adjust the
temperature from 140°F to 450°F, or switch o the
upper plate.
15. Removable plates: non-stick, dishwasher safe, easy
to clean. THE NUMBER AND THE TYPE OF PLATES CAN
RANGE ACCORDING TO MODEL.
15a. Grill plates: perfect for grilling steak, hamburger,
chicken and vegetables.
15b. Griddle plates: to prepare perfect pancakes, eggs,
bacon and shellsh.
15c. Upper wae plate (CGH1030D only)
15d. Lower wae plate (CGH1030D only): to prepare
perfect waes.
16. Grease tray: integrated with appliance and removable
for easy clean up.
17. Cleaning tool: helps clean the plates after use.
USING FOR THE FIRST TIME
Remove all packaging and labels from the plate.
Before throwing the packing material away, make sure you
have removed all parts of the new appliance. We recommend
you keep the box and packing to re-use in the future.
Please note: Before use, clean the base, cover and
dials with a damp cloth to remove dust accumulated during
transport. Clean the cooking plates, grease tray and cleaning
tool thoroughly. The plates, grease tray and spatula are
dishwasher safe.
Please note: The rst time you use the appliance, it
may give o a slight odor and a little smoke. This is normal
and common to all appliances with non-stick surfaces.
The appliance is supplied with a cleaning tool to clean the
plates when the appliance has completely cooled down after
5
use (after at least 30 minutes).
CLICK
The cleaning tool can be used during cooking for a few
seconds to remove residual food and oil. If you use the tool for
a long time on plates which are still hot, the plastic may melt.
Please note: the removable grill plates (grill and
griddle) are fully interchangeable on the appliance.
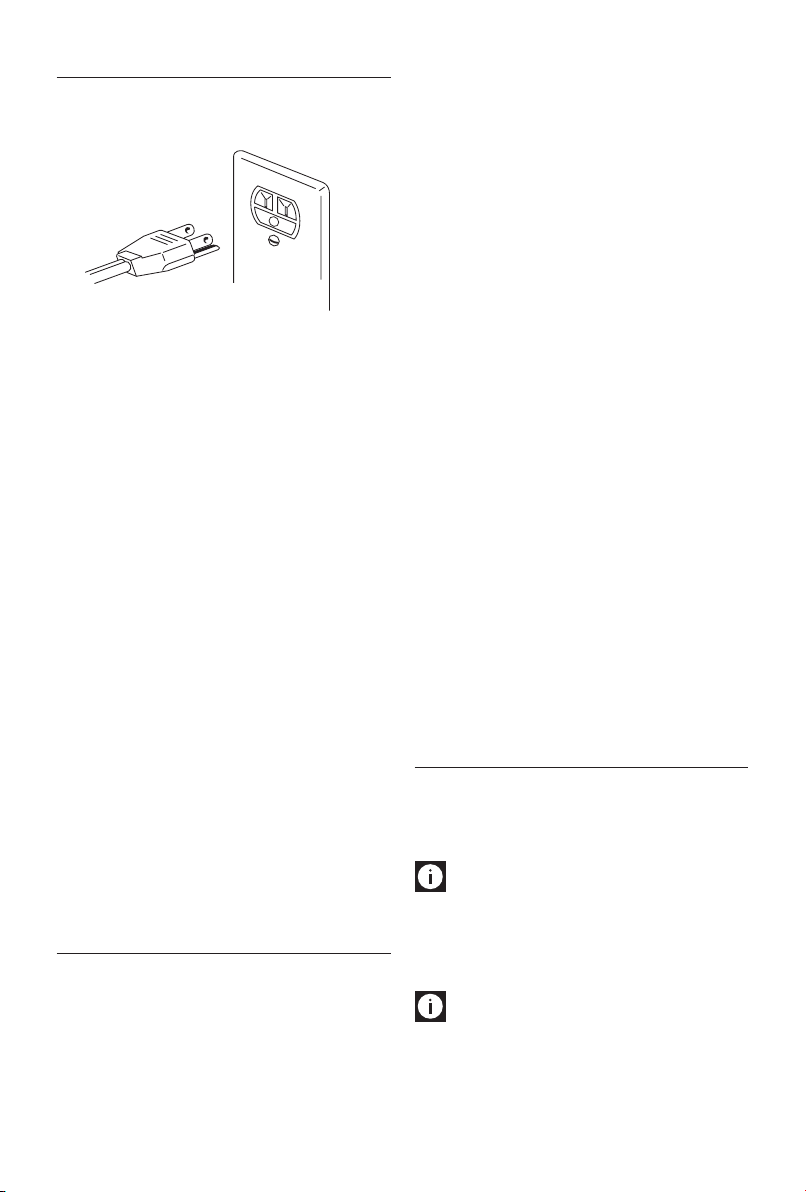
Inserting the cooking plates
- Place the appliance in the at position (see gure 1).
Insert one plate at a time.
- Each plate can be inserted in either the top or bottom
housing (see gure 2).
Please note: During cooking, check the grease tray
frequently and pull out to avoid excess liquid grease.
After cooking, dispose of the grease collected appropriately.
The grease tray is dishwasher safe.
Important! Pay attention during cooking.
To open the appliance, hold the handgrip which remains
cold. The die-cast aluminum parts become very hot, avoid
touching them during and immediately after cooking.
Before performing any operation on the appliance, leave to
cool down for at least 30 minutes.
Cook only with the grease tray in place. Do not empty the
grease tray until the appliance is completely cool. Take care
when pulling out the grease tray in order to avoid spilling the
liquid.
COOKING POSITIONS
Contact grill mode (closed position)
- The upper plate rests on the lower plate. This is the
starting position and also one of the cooking positions
when the appliance is used as a contact grill. The cover
automatically adjusts to the thickness of the food on the
plate. The food will thus be cooked evenly on both sides.
The contact grill is ideal for cooking hamburgers,
deboned meat and thin meat slices, vegetables and
sandwiches. The “contact” function is perfect to prepare
food rapidly and healthily. When you use the contact
grill, the food cooks quickly as it is in contact with the
plates on both sides at once (see gure 3).
To remove the plates
Place the appliance in the at position.
Identify the plate release buttons (3) on the right side. Press
the button decisively to eject the plate from the base. Hold
the plate with both hands, slide it along the metal supports
and remove it from the base. Press the other release button
to remove the second plate, following the same operations.
Danger of burns!! Remove or change the cooking
plates when the appliance has cooled down.
Positioning the grease tray
During cooking, the grease tray must be inserted in its
housing on the back of the appliance. The grease coming
from the food is drained towards the hole in the plate and
gathered in the tray.
The grease from the food is drained and collected by
the grooves on the plate and the hole at the back and
is collected in the grease tray. The appliance has a
special handgrip and hinge allowing the upper plate
to be adjusted according to the thickness of the food.
If you want to cook a number of dierent types of food
simultaneously using the contact grill, the various foods
should have the same thickness to allow the cover to be
cooked evenly.
6
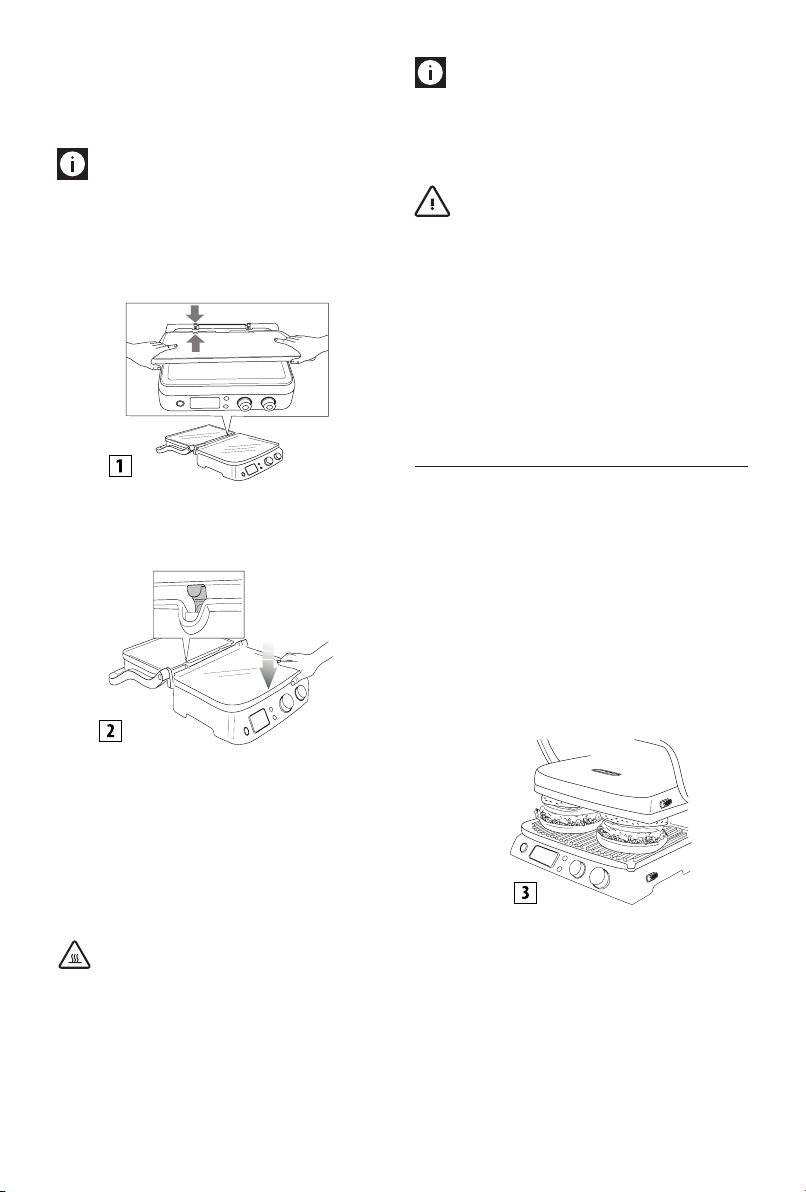
BBQ mode (Flat position)
- The upper plate is level with the lower plate. The lower
and upper plates are both at the same level, forming a
large cooking surface. In this position, the appliance can
be used in barbecue mode with either the grill plate or
the griddle plate. To place the appliance in this position,
rst identify the hinge release lever on the right. Hold
the handgrip with the left hand and with the right, slide
the release lever upwards (see gure 4).
Push the handgrip backwards until the cover rests
upside down in the at position (see gure 5).
each with the preferred level of cooking. In this position,
you need to turn the food during cooking.
- The appliance can also be used as a griddle/barbecue
plate to prepare pancakes, eggs, cheese, fritters and
bacon and sausages for breakfast (see gure 7).
The large cooking surface enables a number of dierent
foods to be prepared simultaneously, or to cook more of
the same food.
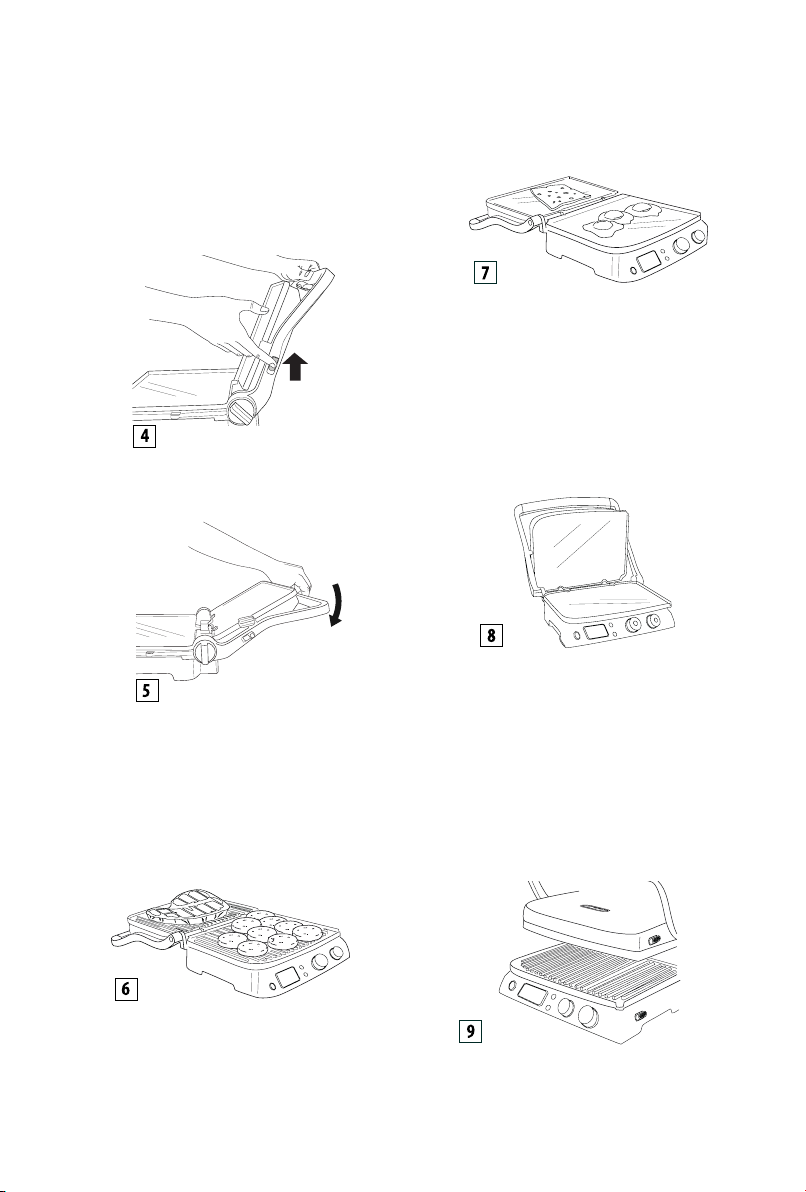
Open position (barbeque)
- For small quantity of food, the appliance can be used in
barbecue mode using only the lower plate. In this case,
open the appliance at 90° as shown in gure 8.
Lifting the handgrip slightly before pulling the release
lever lightens pressure on the hinge and facilitates the
operation. The appliance can be used as a grill/barbecue
to prepare hamburgers, steak, chicken and sh. The
grill/barbecue mode is the most versatile. The grill
plates are in the open position, doubling the cooking
surface (see gure 6).
You can prepare a number of dierent foods on the
separate plates without mixing the avors, or cook
more of the same food. The grill/barbecue position can
be used to grill cuts of meat with dierent thicknesses,
- The upper plate is open at 90° respect to the base. To
place the cover in this position, just lift the cover by the
handgrip. Adjust the upper plate thermostat dial to the
OFF position, and lower plate thermostat dial to the
desired temperature.
Broil Grill Mode
This position (see gure 9) is suitable for grilling without
contact thick foodstus that need to be roasted slowly and
uniformly.
It is ideal for preparing vegetables with high water content,
so the water can evaporate.
7
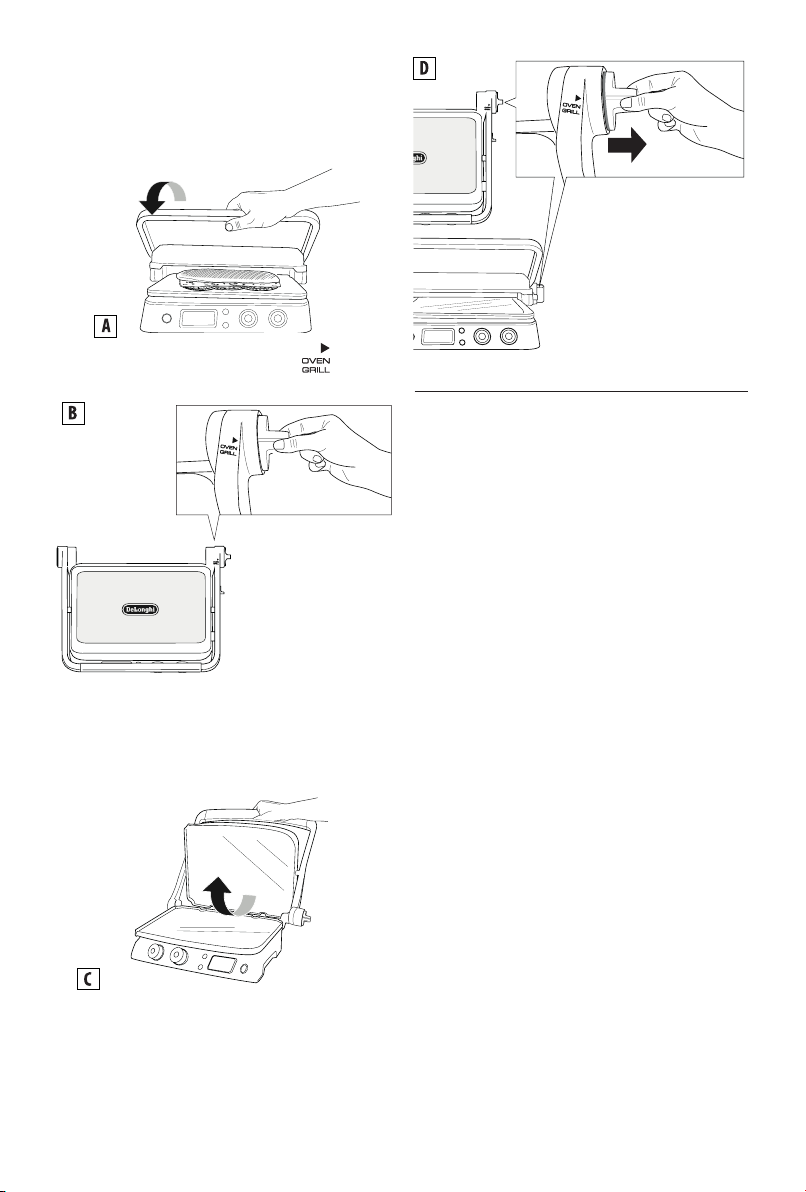
You can also use this hot plate position to prepare soft
sandwiches and foods which do not require pressing.
- Place the food in lower plate.
- Bring the upper plate near the food, holding the handle
(g. A).
- Turn the height adjustment knob (6) to (g. B).
CLICK
- The upper plate is locked in position. There are 4
positions of height regulation.
- Further lift of upper plate will automatically unlock the
regulation system (g. C).
CLICK
- Once the height is set, further adjustments are possible
by pulling out the dial and set a new position (g. D).
USE
°F / °C CONVERSION VISUALIZATION
The set temperature of both grill plates can be showed in
°F or °C. The appliance has defualt setting in °F. To change
the visualization in °C, from stand-by mode (display not
illuminated), press together time buttons (9 and 10) and
keep pressed for 5 seconds. The appliance now show °C
visualization. To come back to °F visualization, just repeat the
operation.
Operation
When the appliance has been prepared correctly and you
are ready to cook, you can set a temperature from 140°F to
450°F (60 °C to 230°C) for each grill plate (upper and lower)
independently (using the thermostat dials 12 and 14).
Press the start/stop button and the ON light will come on.
The appliance takes some minutes to heat up depending
on the set temperature. When the thermostat reaches the
required temperature, the appliance emits a beep, and is
ready to use. "READY" appears on the display.
The temperature can be changed at any time during cooking,
depending on the type of food being prepared.
Timer function
When "READY" appears on the display, select the cooking
position (see the section "Cooking Position"), then place
the food on the plates. The cooking time can be selected by
pressing the timer buttons (9 and 10); in this case, at the end
of the cooking time, the appliance switches o automatically
and "END" is displayed. To switch the appliance on again,
press the start/stop button (8). When the food is cooked, if
you have not selected a cooking time, switch the appliance
o by pressing the start/stop button or turn the thermostat
dials (12 and 14) to the o position.
8
 Loading...