

Page 1
Owner’s instructions
COFFEE MACHINE
BCO110
Page 2
2
20
21
22
19
17
16
15
14
13
12
11
10
23
25
24
26
18
1
2
9
3
4
78
6
5
Page 3

3
3
1
4
6
7
8
9
10
13
14
11
15
12
2
5
ACCUFLAVOR
Page 4

4
17
18
19
20
21
22
23
24
26 27
29
31
30
28
B
A
C
25
16
12:00
12:00
Page 5

5
SHORT CORD INSTRUCTIONS
- A short power cord is provided to reduce risks resulting from becoming entangled in or tripping
over a longer cord.
- Longer, detachable power supply cords or extension cords are available and may be used if care
is exercised in their use.
- If an extension cord is used, the marked electrical rating should be at least as great as the electrical rating of the appliance. If the appliance is provided with 3- wire, grounding type cord, the
extension should be a GROUNDING TYPE 3 - WIRE CORD. The longer cord should be arranged
so that it will not drape over the counter-top or table top where it can be pulled on by children or
tripped over.
- Your product is equipped with a polarized alternating current line plug (a plug having one blade
wider than the other). This plug will fit into the power outlet only one way. This is a safety feature.
If you are unable to insert the plug fully into the outlet, try reversing the plug. If the plug should
still fail to fit, contact your electrician to replace your obsolete outlet. Do not defeat the safety purpose of the polarized plug.
IMPORTANT SAFEGUARDS
When using electrical appliances, basic safety precautions should always be followed, including the
following:
• Read all instructions.
• Do not touch hot surfaces. Use handles and knobs.
• To protect against fire, electrical shock and personal injury, do not immerse cord, plug or appliance in water or other liquid.
• Close supervision is necessary when any appliance is used by or near children.
• Unplug from the outlet when not in use and before cleaning. Allow to cool before fitting or taking off parts, and before cleaning the appliance.
• Do not operate with a damaged cord or plug, or after the appliance malfunctions, or has been
damaged in any manner. Return the appliance to the nearest authorized service facility for examination, repair or adjustment.
• The use of accessory attachments or spare parts not recommended by the appliance manufacturer may result in fire, electrical shock or personal injury.
• Do not use outdoors.
• Do not let the cord hang over the edge of the table or counter, or touch hot surfaces.
• Do not place on or near a hot gas or electrical burner, or in a heated oven.
• Always attach plug to appliance first, then plug cord into the wall outlet. To disconnect, turn any
control to “off”, then remove plug from wall outlet.
• Do not use the appliance for other than the intended use.
• DO NOT unscrew or remove boiler cap while the machine is in operation. Wait until brewing
cycle is completed and all water and steam has been used up.
• Appliances with Glass Containers:
A. The container is designed for use with this appliance. It must never be used on a range top.
B. Do not set a hot container on a wet or cold surface.
C. Do not use a cracked container or a container having a loose or weakened handle.
D. Do not clean container with cleansers, steel wool pads, or other abrasive material.
SAVE THESE INSTRUCTIONS
Page 6

Please read this instructions manual carefully
before installing and using the appliance. Only
by following these directions will you be able to
obtain the best results from the appliance and in
complete safety.
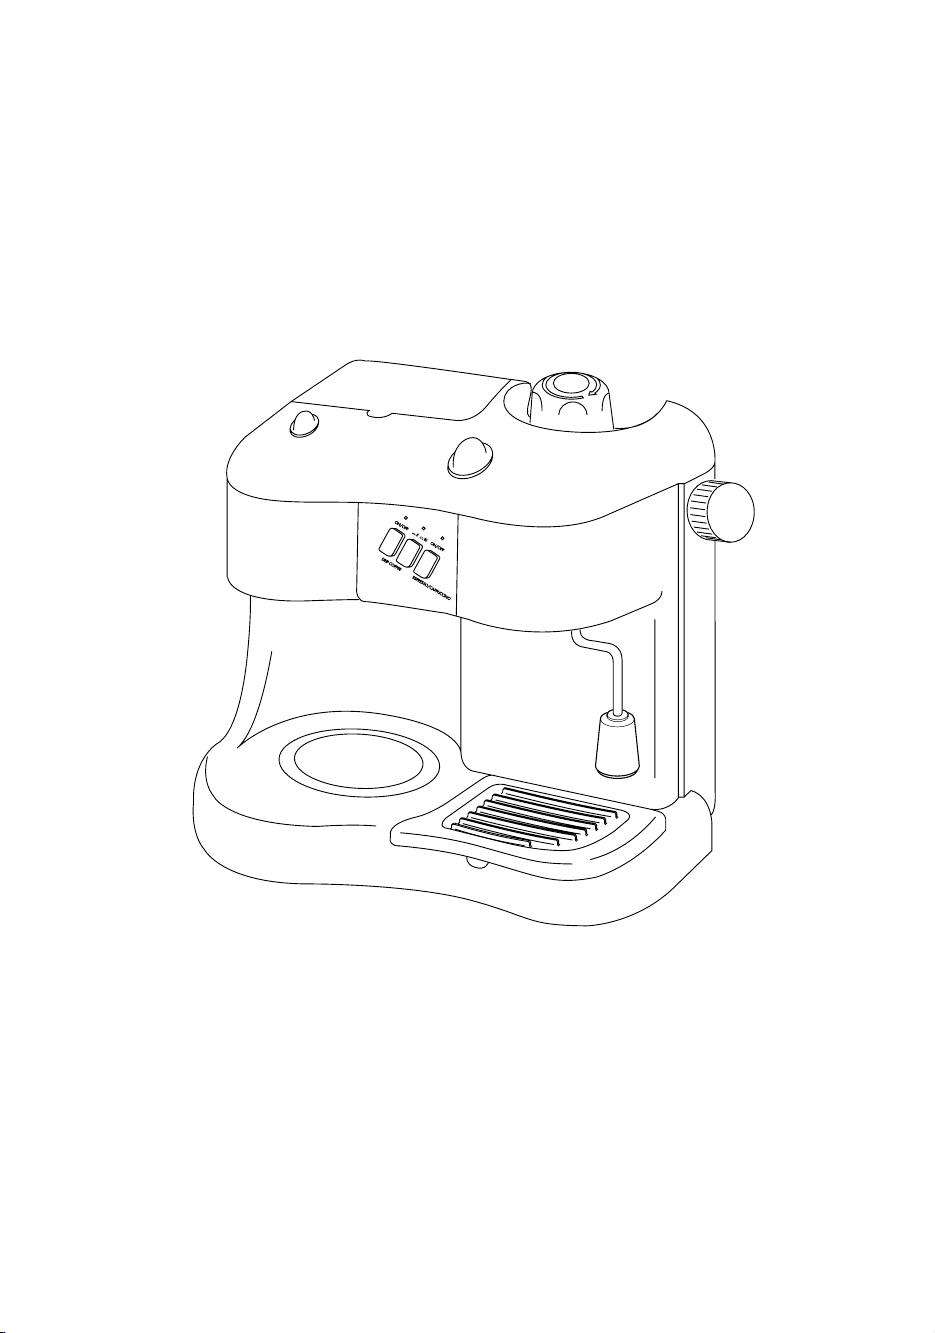
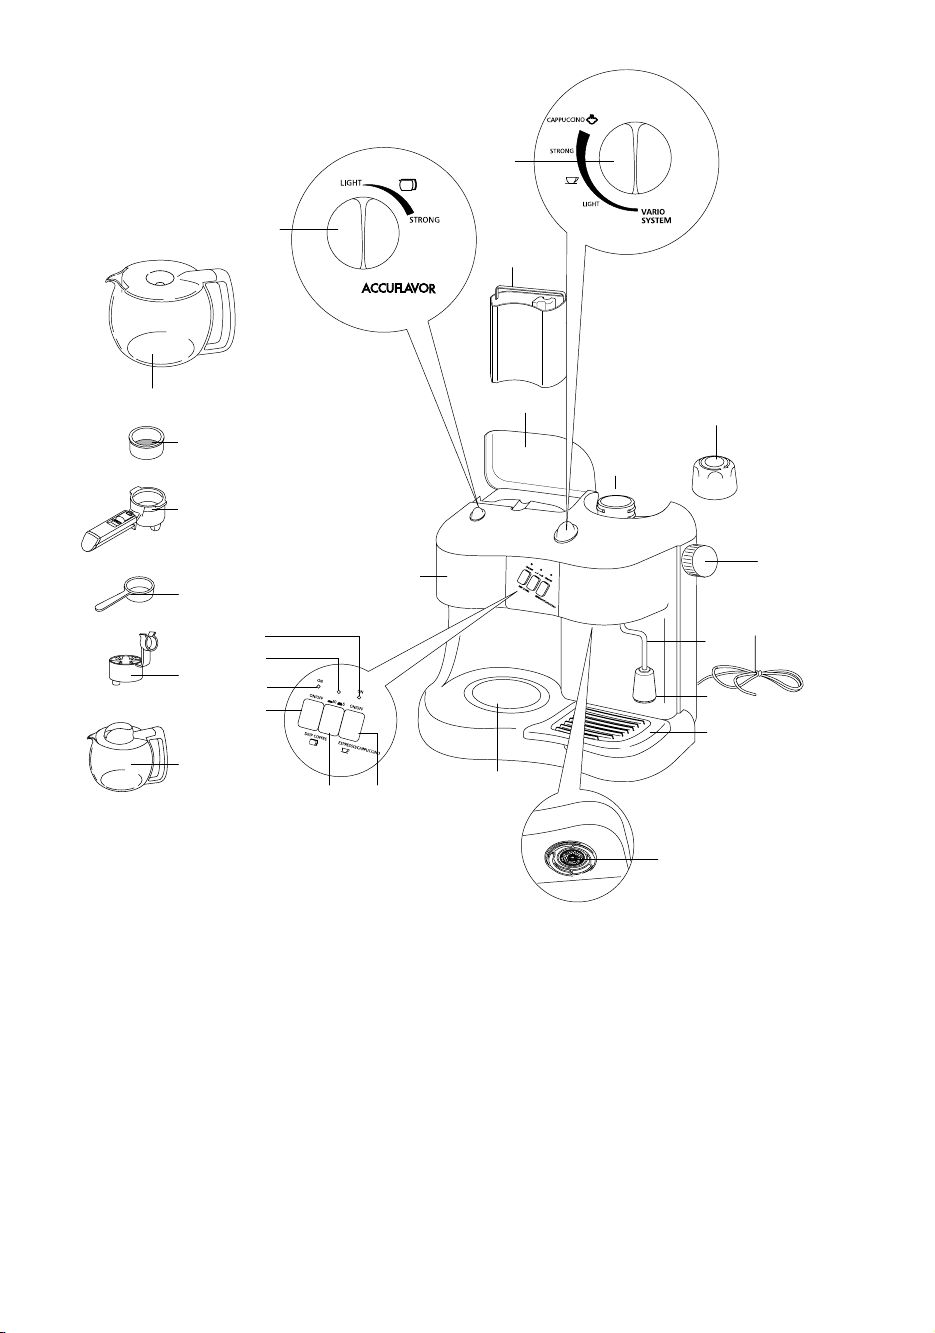
DESCRIPTION OF THE APPLIANCE
The following terms are used throughout the
instructions manual.
1. Power supply cable
2. Drip collection pan
3. Anti spray nozzle
4. Hot water drip spout
5. Hot plate
6 Display
7 Coffee ON DRIP pilot light
8 Coffee DRIP/AUTO button
9 PROG button
10 ‘Min’ button
11 ‘Hour’ button
12.ON/OFF switch espresso coffee/cappuccino
13.ON warning light espresso coffee/cappuccino
14.Steam ready warning light
15. cups warning light for drip coffee
16. cups switch for coffee drip
17. Small coffee pot for espresso coffee/cappuccino
18.Two cup attachment for espresso coffee
19.Measuring spoon
20.Filter holder for drip coffee
21.Filter holder for espresso coffee
22.Permanent filter (if supplied)
23.Filter for espresso coffee
24.Drip coffee pot
25.Drip coffee aroma selector switch
26.Lid for the water tank
27.Removable water tank
28.Anti-chlorine water filter holder (if supplied)
29.Anti-chlorine water filter (if supplied)
30.“Vario system” selector switch
31.Lid for milk tank
32.Milk frother
33.Milk tank
34.Hot water heater plug
35.Hot water heater for steam
36.Steam release knob
INSTALLATION
• Place the appliance on a flat work surface
away from water sources such as taps or sinks.
• Check that the voltage of the electrical power
line corresponds to the voltage indicated on the
appliance label.
• Never install the machine in an environment
which can reach a temperature of less than or
equal to 0°C (if the water inside the machine
freezes, the machine might be damaged):
ANTI-CHLORINE FILTER (IF SUPPLIED)
The anti-chlorine filter eliminates the taste of chlorine in the water. For installation, proceed as follows:
• Remove the anti-chlorine filter from the plastic
bag and rinse it thoroughly under running tap
water.
• Raise the coffee lid, remove the container from
its housing by pulling it up (Fig. 1).
• Open the container by pressing on the opposite areas, marked with the writing “PUSH”
and place the filter into its housing carefully as
illustrated in fig. 2.
• Close the container and reinsert it into the
housing by pressing down gently.
• After 80 cycles, or in any case after six months
of use, the anti-chlorine filter must be replaced.
HOW TO SET THE CLOCK
When the coffee maker is connected for the first
time to the electrical mains, the figures 12:00
appear on the display, blinking.
In order to set the time, proceed as follows:
1.Set the hour by repeatedly pressing the HOUR
button. Remember to choose AM or PM, as
appropriate.
2.Set the minutes by repeatedly pressing the MIN
button.
The above operations may be speeded up by
keeping the buttons pressed.
NOTE: The time entered will not be stored in
memory in the event of a temporary blackout of
electrical energy.
6
ENGLISH
10 5
10
Page 7

7
HOW TO SET THE TIMER
Make sure that the clock has been set correctly.
To set the timer for delayed activation (to turn on
the coffee maker at the time that you want the coffee to be made), proceed as follows:
1.To set the hour, press the PROG button and
simultaneously repeatedly press the HOUR button.
2.To set the minutes, press the PROG button and
simultaneously repeatedly press the MIN button.
Note: the coffee maker will automatically begin
making coffee at the set hour, but will not turn on
the hot water generator for espresso coffee.
HOW TO PREPARE THE COFFEE FILTER
• Raise the lid and remove the water tank (fig.
3).
• Fill the tank with cold, clean water, up to the
level indicated on the tank corresponding to
the number of cups of coffee that are desired
(fig. 4).
• Reinsert the tank into the machine by pressing
it slightly. If desired, the tank can be left in its
place and to fill it, the drip coffee pot can be
used which also has the level indicators on it
(fig. 5).
• Open the filter holder by turning it towards the
left (fig. 6).
• Place the permanent filter into the filter holder
(fig. 7).
• Put the ground coffee into the filter by using the
measuring spoon included with the machine
and level off the grounds uniformly (fig. 8). As
a general rule, use one level measuring spoonful of coffee (about 7 grams) for each cup of
coffee (for example, use 10 measures to make
10 cups of coffee). In any case, the quantity of
ground coffee to use can vary according to the
strength desired and personal taste. Use high
quality ground coffee, with a medium grind
and the kind packaged especially for drip coffee makers.
• Close the filter holder and place the pot, with
its lid inserted, onto the hot plate.
• Select the aroma desired as indicated in the
paragraph “How to select the aroma”.
• If you wish to turn the coffee maker on immediately, press the DRIP/AUTO button twice
(fig. 9) and the ON DRIP pilot light will
come on. Alternatively, if you wish the appliance to turn on after a certain delay, press the
DRIP/AUTO button just once; the word PROG
will appear in the top left-hand corner of the
display and the coffee maker will automatically turn on at the time set (as described in the
“HOW TO SET THE TIMER” section).
• If more than five cups of coffee are desired,
press the switch ( ) (fig. 10)
and the 5/10 cup warning light will light up.
If, on the other hand, five or fewer cups of coffee are desired, the switch should not be
pressed. In this way, the hot water will flow
more slowly through the ground coffee and a
more flavorful beverage will be obtained.
• The brewed coffee will begin to drip out after
a few seconds.
It is completely normal that
during the percolation of the coffee, some
steam may escape from the machine.
• If the DRIP/AUTO button (fig. 9) is left
pressed after percolation, and the container is
standing on the heating plate, the coffee will
be kept at the ideal temperature.
HOW TO SELECT THE AROMA OF THE FILTER
COFFEE
With the ACCUFLAVOR , it is possible to select the
aroma of the filter coffee depending on personal
taste. By turning the aroma regulation knob of the
coffee filter (fig. 11), the coffee machine can be
programmed for a strong aftertaste (STRONG
position) or a lighter flavor (LIGHT position).
The ACCUFLAVOR feature changes the aftertaste
of the coffee, more or less strong, while the true
taste of the coffee remains unchanged.
HOW TO PREPARE ESPRESSO COFFEE
1. Unscrew the plug of the hot water heater tank
by turning it in a counter-clockwise direction.
2. Fill the small container for espresso coffee with
the quantity of water indicated in the table at
the end of the text and in accordance with the
number of cups of espresso that you wish to
make (fig. 12).
3. Pour the water into the hot water heater tank
(fig. 13).
10 5
Page 8

8
4. Replace the plug in the hot water heater tank
by turning firmly in a clockwise direction.
5. Insert the filter for espresso coffee into the filter
holder (fig. 14).
6. Fill the filter with the ground coffee, respecting
the dosages indicated in the chart at the end of
this text and distribute it uniformly in the filter
(fig. 15). It is important to use the highest quality coffee and having a medium grind in order
to avoid the obstruction of the filter during the
brewing. Remove any excess coffee from
around the edges of the filter (fig. 16).
7. To attach the filter holder to the appliance,
position it under the hot water drip spout with
the handle towards the left, see fig. 17. Push
upwards, and at the same time, turn the handle towards the right.
Always turn right to the
end.
8. Place the coffee pot for espresso coffee under
the filter holder so that the spout where the coffee exits the filter is inside of the opening found
on the lid of the coffee pot (fig. 18).
9. Position the “Vario System” selector according
the type of espresso coffee desired: “LIGHT”
for a lighter coffee and “STRONG” for a
stronger tasting brew (fig. 19).
10.Make sure that the steam release knob is
closed.
11.Push the ON/OFF switch for espresso/cappuccino (fig. 20) . The ON/OFF warning light
for espresso/cappuccino will turn on.
12.After approximately two minutes, the espresso
coffee will begin to flow out (fig. 21).
ATTENTION: to avoid spraying, never detach
the filter holder while the machine in brewing
coffee.
13.When the coffee no longer flows out from the
filter holder, push the ON/OFF switch for
espresso/cappuccino to turn off the hot water
heater (fig. 20). Pour the coffee into the cups.
14.To eliminate the used coffee in the filter, detach
the filter holder, keeping the filter locked in
place with the special lever incorporated in the
handle and remove the coffee by turning the
filter holder upside down and striking gently
(fig. 22).
ATTENTION: Before removing the filter holder, it is
important to eliminate all of the residual steam
from the inside of the hot water heater to avoid
puffs of steam. Allow it to blow out completely by
rotating the steam release knob (fig. 23).
NOTE: For safety reasons, when the hot water
heater is hot, it is not possible to remove its plug as
it will spin without opening. If for any reason it is
necessary to remove it, it is important to always
release the steam in the hot water tank by acting
on the steam release knob as described in the previous point.
ATTENTION: The first time that coffee is prepared, it is necessary to wash all of the accessories and the internal circuits of the machine as
follows:
• For the coffee machine filter: make at least two
pots of coffee without using the ground coffee
in the filter (following the instructions in the
paragraph How to prepare the coffee filter);
• For the espresso coffee filter: make at least
four cups of espresso coffee without using
ground coffee in the filter (following the instructions in the paragraph How to prepare the
espresso coffee filter);
HOW TO USE THE TWO CUP ATTACHMENT
The attachment must be used every time that it is
desired that the coffee drips directly into the cups.
To mount the attachment, it is sufficient to attach it
to the lower part of the filter holder (fig. 24).
HOW TO PREPARE CAPPUCCINO
• Prepare the espresso coffee as described in the
paragraph “How to prepare espresso coffee”
from points 1 through 12; using however, the
quantity of water necessary to obtain 2 cappuccinos as indicated in the chart at the end of
this text. Note that the quantity of water
required for making cappuccinos is greater
that the amount necessary for making espresso
coffee: the extra water is used for the production of steam for frothing the milk.
• In the meantime, pour the milk,
not boiled and
not hot
, into the milk tank (fig. 25). With the
tank filled to the MAX line, there will be
enough milk to make 2 or 3 cappuccinos.
Never fill beyond the MAX line otherwise once
the cappuccino has been made, the milk may
Page 9

continue to drip out of the tube.
• Brew the coffee into the small espresso coffee
pot. When the darker colored coffee (which
lies under the lighter coffee colored froth)
reaches the level 2 on the “COFFEE LEVEL” side
of the small espresso pot (fig. 26), place the
Vario System selector to the “cappuccino”
mode (fig. 19). Careful attention must be paid
to this operation: in fact, if the coffee should
surpass the level 2, there will be no water left in
the tank to make the steam for frothing the milk.
• Pour the coffee into 2 sufficiently large cups.
• Place the cup containing the coffee under the
tube of the milk tank, making sure that the milk
tank has been attached firmly, then turn the
steam release knob in a counter-clockwise
direction. The frothed milk will begin to exit
from the tube of the milk tank (fig. 23). Before
beginning this operation, always wait for the
“OK” light (fig. 27) to turn on which indicates
that the ideal temperature has been reached
for frothing the milk. To keep the milk from
spraying it is necessary to slide on the antispray nozzle (fig. 28) onto the tube of the milk
tank. This is also useful when the cups used for
the cappuccino are quite small.
• Fill the cup with the desired quantity of frothed
milk.
To ensure that the milk froths correctly,
always wait for the “OK” warning light to
turn on before frothing milk between one
cappuccino and the other.
• ATTENTION: Once the frothing of milk for the
last cappuccino has finished, before closing
the steam handle always wait until all the
steam has come out from the milk tank tube;
in this way you avoid the milk going sour in
the internal tubes of the frother.
• Press the ON/OFF switch for espresso/cappuccino to turn off the appliance.
• In order to make 4 cappuccinos, it is necessary
to repeat the previous operations, paying
attention to the quantity of ground coffee and
water, indicated in the chart at the end of the
text. Furthermore, before positioning the Vario
System selector to the Cappuccino position,
brew enough coffee into the coffee pot to reach
the level 4 on the “COFFEE LEVEL” side as indicated in figure 29.
• To make the perfect cappuccino, we recommend the use of the following proportions:
1/3 coffee, 1/3 plain hot milk, and 1/3
frothed milk.
CLEANING AND MAINTENANCE
• Before beginning any cleaning or maintenance
operation, turn the machine off, remove the
plug from the electrical power source and let
the machine cool down.
CLEANING THE MILK FROTHER
The cleaning operations for the milk frother must
be done after each use. Proceed as follows:
• Remove the milk tank by pressing the ‘C’ lever
(fig. 30) and simultaneously pulling upwards;
wash it with warm water.
• Remove the red milk frothing instrument by
pressing down on lever (A) and at the same
time, pulling upwards (fig. 30). Remove the
rubber mixer, rinse it and clean it thoroughly
with hot water, with special attention paid to
the holes illustrated in figure 31 (clean them
with the use of a needle).
Make sure that the hole marked with the arrow
B (fig. 31) has not been clogged (clean it with
the use of a needle).
• Once clean, all of the pieces must be reassembled in the correct order. In particular, make
sure that the rubber mixer has been inserted
properly all the way down and that the milk
tank and the red milk frother have been inserted all the way until a click is heard.
If this cleaning need is not done after every use,
the milk frothing operation may not come out
well or it may happen that either the milk is not
drawn up properly or that the milk drips from the
milk tank tube.
OTHER CLEANING PROCEDURES
• To clean the machine, do not use solvents or
abrasive detergents. A soft damp cloth should
be used to clean the surfaces.
• Regularly clean the filter holder, the drip collection pan, the hot water drip spout, and the
coffee pots. Do not wash the filter holder in the
dish washer.
9
Page 10

• Never immerse the machine in water: it is an
electrical appliance.
• Check from time to time that the holes in the filter for espresso coffee are not obstructed. If
necessary, carefully clean the filter with hot
water, scrubbing with an abrasive pad.
SCALE REMOVAL
The scale contained in the water, over time, will
cause plugging up of some elements in the appliance and will thereby compromise its correct functioning. The result will be that more time is
required to make coffee. The formation of scale
depends on the hardness of the water and on how
much the coffee maker has been used. To achieve
the best performance, descaling must be carried
out every so often. The coffee maker has a built-in
system that counts the number of cups of coffee
that have been made. The ON DRIP pilot light will
begin to blink when it is time to carry out descaling. To do so, proceed as follows:
• remove the anti-chlorine filter (if present) and the
permanent filter from the coffee maker (so as not
to bathe them with vinegar)
• Dissolve 2 dessert spoons (about 30 grams) of
citric acid (available in pharmacies) in the
water;
• Place the container on the heating plate;
• Press the DRIP/AUTO button twice, allow
the equivalent of two cups to percolate and then
turn off the appliance;
• Allow the solution to sit for an hour;
• Turn the appliance back on and allow the rest of
the solution to percolate;
• Rinse by allowing the coffee maker to operate
with only water at least three times (1 full container each time).
• Press the PROG and DRIP/AUTO buttons
simultaneously to reset the counter to zero.
IMPORTANT: if the machine is left unconnected to
the electrical mains for over two months, before
using it again it is necessary to carry out the
process of scale removal as described in the preceding section.
10
Page 11

11
Problem
Probable Causes
Resolution
Espresso coffee longer drips
out
The coffee has been ground too
finely
The hole in the spout of the filter
holder is plugged
The filter is obstructed
Use coffee with a medium grind or the
kind made for mocha coffee
Clean the hole in the filter holder
Clean the filter with hot water, scrubbing with an abrasive pad
The milk froth does not form
properly when making cappuccinos
The milk is not cold enough
The cappuccino nozzle is dirty.
Always use milk cold from the refrigerator
Accurately clean the frother as
described in the paragraph “Cleaning
the milk frother”
The coffee has a vinegary
aftertaste
The machine has not been rinsed
enough
Rinse the appliance as described in
the chapter “Scale removal”
PROBLEMS DURING OPERATION
Page 12

12
To make
The amount of water in the small
coffee pot to pour into the hot
water heater tank
(WATER LEVEL side)
The quantity of ground coffee to put
into the filter
Two coffees
Two cappuccinos
Four coffees
Four cappuccinos
- 4
- 2
- 4
- 2
- 4
- 2
- 4
- 2
Page 13

13
Limited Warranty
What Does This Warraty Cover? We warrant each Espresso Coffee Machine to be free from defects in mater-
ial and workmanship. Our obligation under this warranty is limited to replacement or repair, free of charge at our
factory or authorized service centers, of any defective part or parts there of other than parts damaged in transit,
which shall be returned to us, transportation prepaid. This warranty shall apply only if the Espresso Coffee Machine
is used in accordance with the factory directions which accompany it.
How Long Does The Coverage Last? This warranty runs for one year from the date of delivery and applies
only to the original purchaser.
What Does This Warranty Not Cover? This warranty does not cover defects or damage of the Espresso Coffee Machine which result from repairs or alterations to the machine outside our factory or authorized service centers,
nor shall it apply to any Espresso Coffee Machine which has been subject to abuse, misuse, negligence or accidents.
Also, consequential and incidental damages resulting from the use of this product or arising out of any breach of
contract or breach of this warranty are not recoverable under this warranty. Some states do not allow the exclusion
or limitation of incidental or consequential damages, so the above limitation may not apply to you.
How Do You Get Service? If repairs become necessary or spare parts are needed, plase write to:
De’Longhi America Inc.
Park 80 West Plaza One, 4th floor
Saddle Brook NJ 07663
or call Service Tel. No 1-800-322-3848
or visit our internet site:
www.delonghiusa.com
The above warranty is in lieu of all other express warranties and representations; All implied warranties are limited
to the applicable warranty period set forth above. This limitation does apply if you enter into an extended warranty
with De’Longhi. Some states do not allow limitations on how long an implied warranty lasts, so the above exclusions
connection with the sale or use of its Espresso Coffee Machine.
How Does State Law Apply? This warranty gives you specific legal rights, and you may also have other rights
which vary from state to state.
 Loading...