

Page 1

DellTM XPS 18
User’s Manual
Page 2

Notes, Cautions, and Warnings
NOTE: A NOTE indicates important information that helps you make better use
of your computer.
CAUTION: A CAUTION indicates potential damage to hardware or loss of data
if instructions are not followed.
WARNING: A WARNING indicates a potential for property damage, personal
injury, or death.
-------------------------------
Information in this document is subject to change without notice.
© 2013 Dell Inc. All rights reserved.
Reproduction of these materials in any manner whatsoever without the
written permission of Dell Inc. is strictly forbidden.
Trademarks used in this text: DellTM the DELL logo, and XPS are trademarks
of Dell Inc.; Microsoft®, and Windows® are either trademarks or registered
trademarks of Microsoft Corporation in the United States and/or other
countries.
Other trademarks and trade names may be used in this document to refer to
either the entities claiming the marks and names or their products.
Dell Inc. disclaims any proprietary interest in trademarks and trade names
other than its own.
2013 - 03 A00
Page 3

Page 4

Contents
44 ││
1 Features. . . . . . . . . . . . . . . . . . . . . . . . . . . . . 6
2 Accessories. . . . . . . . . . . . . . . . . . . . . . . . . . 10
3 Setting Up Your Computer . . . . . . . . . . . . . . . . 12
Connect the Power Cable to the Power Adapter . . . . . . 12
Charge Your Computer . . . . . . . . . . . . . . . . . 13
Insert an SD Card (optional) . . . . . . . . . . . . . . . 15
Turning On Your Computer . . . . . . . . . . . . . . . 16
Enable/Disable Wi-Fi . . . . . . . . . . . . . . . . . . 18
Connecting to a Network . . . . . . . . . . . . . . . . 18
Switch Networks . . . . . . . . . . . . . . . . . . . . 18
4 Using Your Computer . . . . . . . . . . . . . . . . . . . 19
Screen Orientation . . . . . . . . . . . . . . . . . . . 19
Windows 8 Start Screen. . . . . . . . . . . . . . . . .20
Gestures . . . . . . . . . . . . . . . . . . . . . . . 21
Using Headphones/Microphones . . . . . . . . . . . . 26
Removing the SD Card . . . . . . . . . . . . . . . . . 27
Turning O the Screen . . . . . . . . . . . . . . . . . 28
Turning O Your Computer . . . . . . . . . . . . . . .28
Managing Computer Settings . . . . . . . . . . . . . . 29
5 Synchronizing Your Computer . . . . . . . . . . . . . . 31
Page 5

││ 55
6 Powered Stand (optional) . . . . . . . . . . . . . . . . . 32
Features . . . . . . . . . . . . . . . . . . . . . . . 32
Using the Powered Stand . . . . . . . . . . . . . . . . 34
Dock Your Computer on the Powered Stand. . . . . . . . 36
Undocking Your Computer . . . . . . . . . . . . . . . 37
7 Cleaning Your Computer . . . . . . . . . . . . . . . . . 38
8 Troubleshooting. . . . . . . . . . . . . . . . . . . . . . . 39
9 Locating Your Service Tag and Express Service Code 43
10 Specifications . . . . . . . . . . . . . . . . . . . . . . . . 44
Page 6
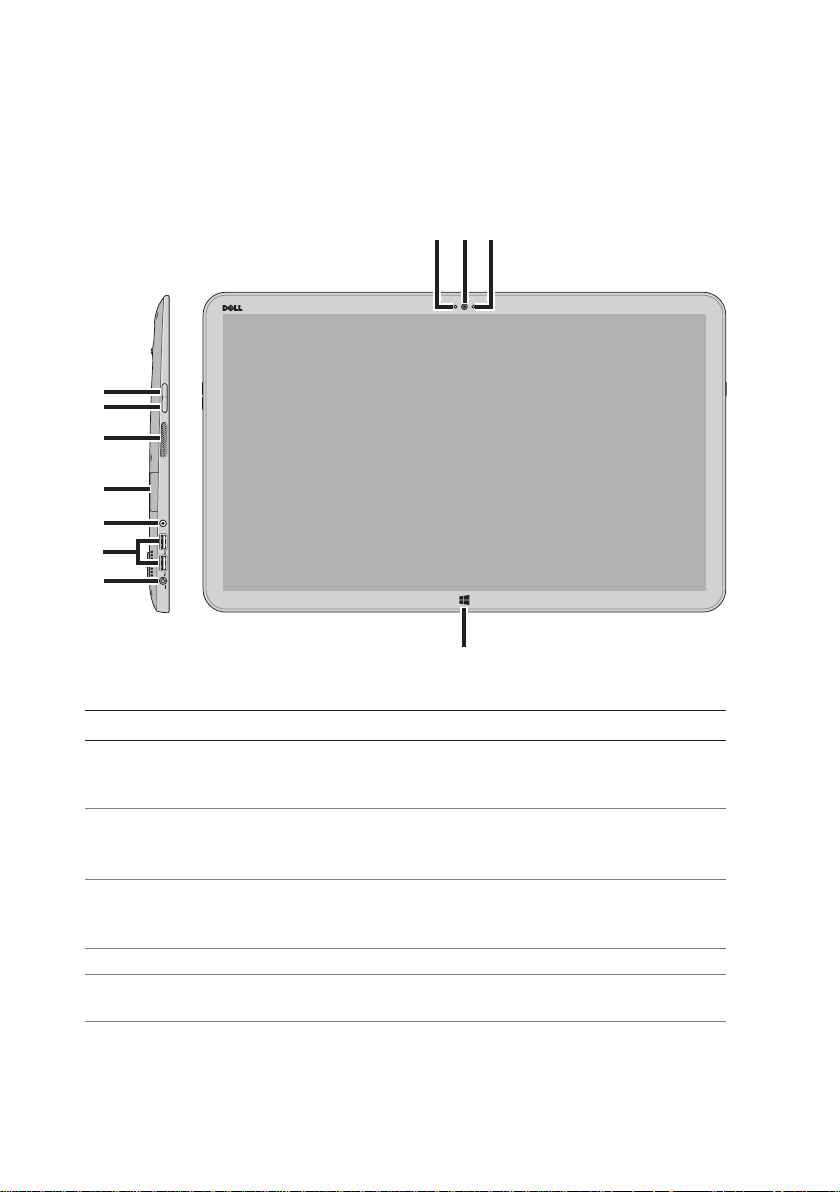
Features
6 │ Features
This section provides information about the features available on your
computer.
8
109
7
6
5
4
3
2
1
11
Feature Functionality
1 Power-adapter port Connect the supplied power adapter to
provide power to the computer and charge
the battery.
2 USB 3.0 ports (2) Connect USB devices for transferring or
synchronizing data, music, photos, videos,
contacts, and so on.
3 Audio port (3.5 mm) Connect headphones, microphones, and
other audio equipment to listen to stereo
sound, record audio, or make calls.
4 SD-card slot Full-sized SD-card slot.
5 Left speaker Provides audio output for video and music
playback.
Page 7

Feature Functionality
Features │ 7
6 Volume-down button • Press to decrease the volume by one
7 Volume-up button • Press to increase the volume by one
8 Camera-status light Turns on when camera is active.
9 Front-facing camera • Capture a front-view picture or record
10 Ambient-light sensor Automatically adjusts the brightness of the
11 Windows button • Press to access/show the Windows Start
level.
• Press and hold to continuously decrease
the volume.
level.
• Press and hold to continuously increase
the volume.
videos.
• Make video calls with web applications,
such as Skype.
display’s backlight based on surrounding
light levels.
screen.
• Press for quick access to the most
recently used application or most
recently viewed screen.
Page 8
1
8 │ Features
2
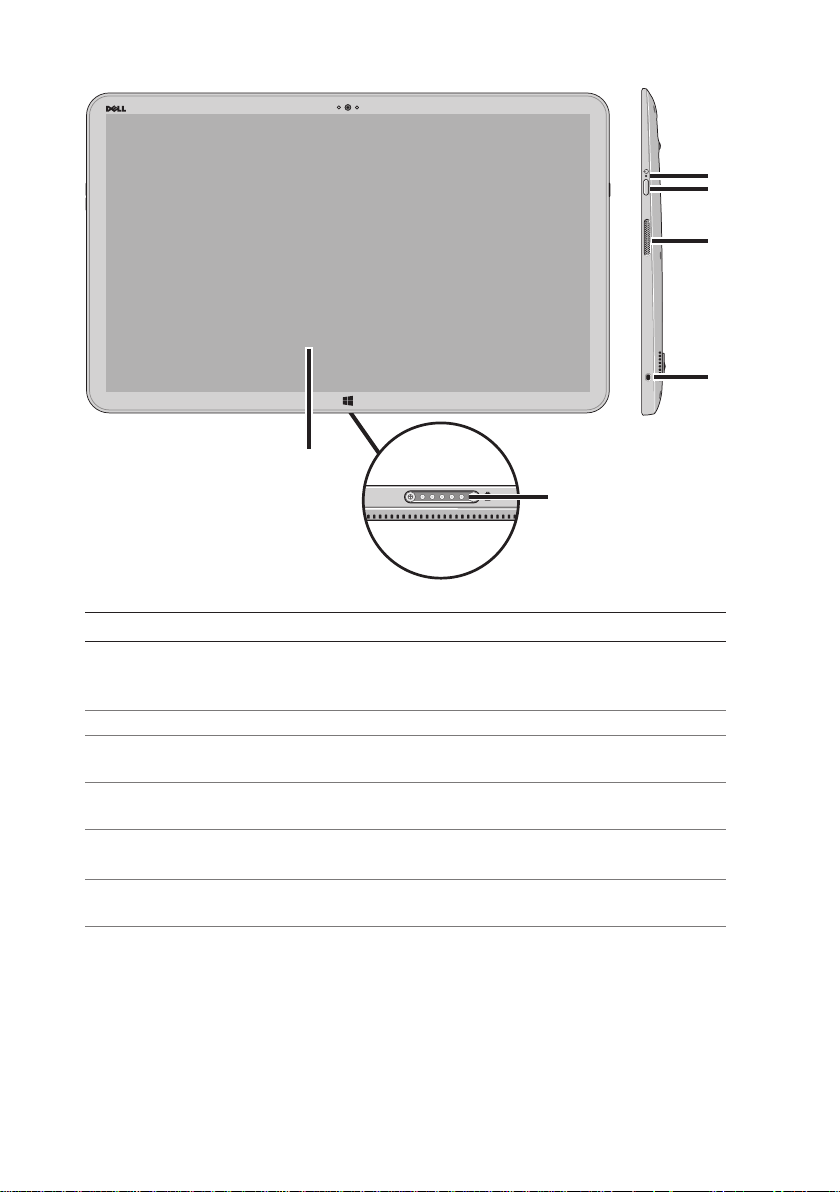
Feature Functionality
1 Touchscreen display Touch the display to use on-screen controls
including buttons, menu items, and the
on-screen keyboard.
2 Docking port Connect to a Dell Powered Stand (optional).
3 Noble lock port Allows you to secure your computer using a
Noble lock.
4 Right speaker Provides audio output for video and music
playback.
5 Power and sleep/wake Press and release to turn your computer on or
button o.
6 Power/Battery-status Indicates the power/battery charge status.
indicator (see battery status table)
6
5
4
3
Page 9
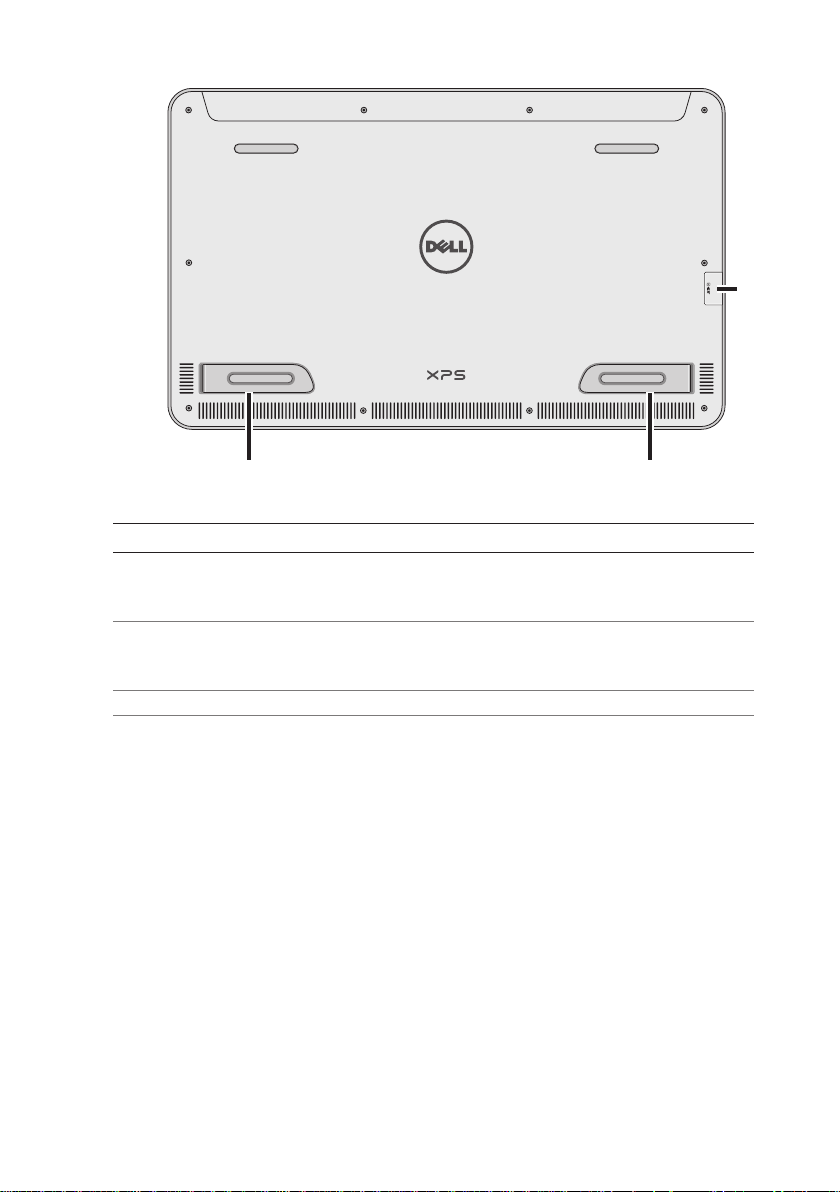
3
Features │ 9
1
Feature Functionality
1 Right foot Fold outwards to allow your computer to
CAUTION: Not for use in stand upright, fold inwards to allow your
portrait mode computer to lay flat.
2 Left foot Fold outwards to allow your computer to
CAUTION: Not for use in stand upright, fold inwards to allow your
portrait mode computer to lay flat.
3 SD-card slot Full-sized SD-card slot.
2
Page 10
Accessories
10 │ Accessories
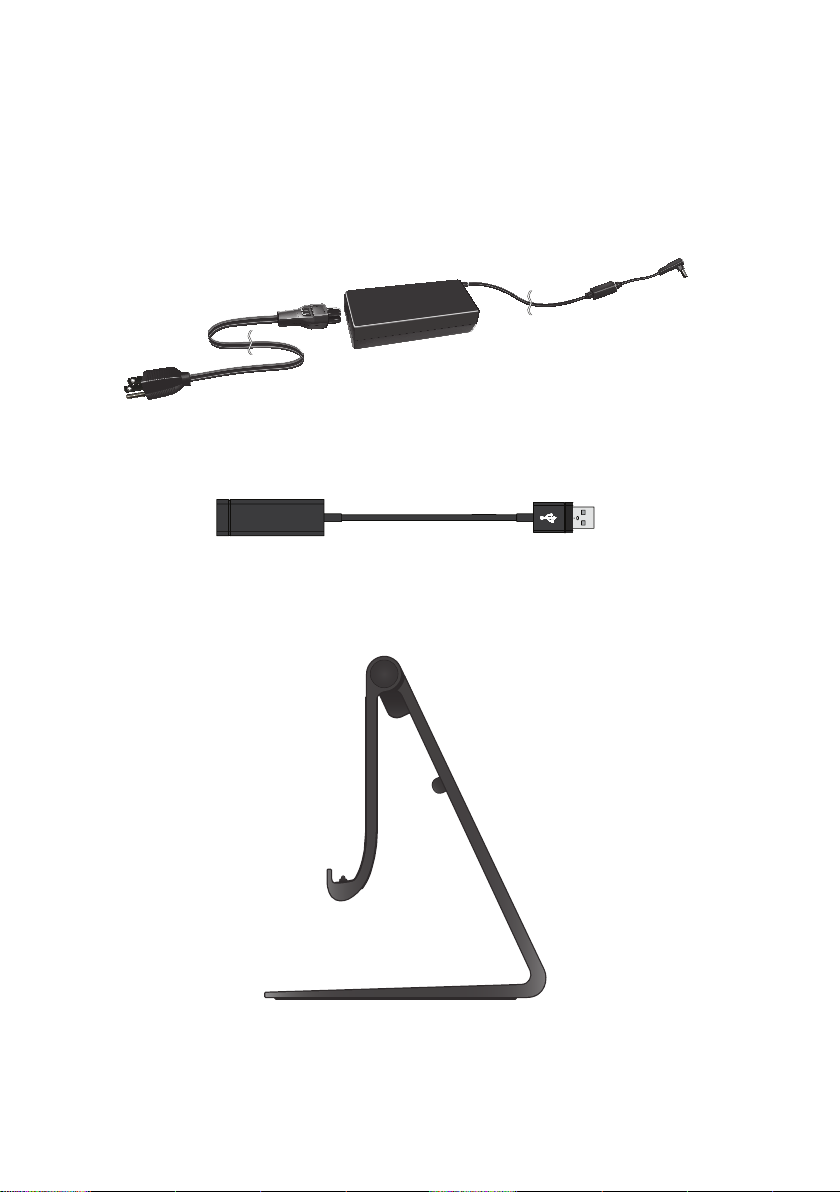
Your computer package includes the following accessories:
• Power adapter and cable — Provides power to your computer
and charges the battery.
• USB to ethernet adapter (optional) — Allows you to connect a
RJ45 (network) cable to your computer using a USB port.
• Powered stand (optional) — Allows your computer to be placed
upright with adjustable viewing angles and battery charging
capabilities.
Page 11

• Wireless keyboard and mouse (optional) - Inputs text and
Accessories │ 11
controls the cursor.
NOTE: The keyboard and mouse are already paired to your computer if
you ordered the keyboard and mouse along with your computer. If you
purchased the keyboard and mouse separately, or if you need to pair
them again, see
Pairing the Wireless Keyboard and Mouse.
Page 12
Setting Up Your Computer
12 │ Setting Up Your Computer
This section provides information about setting up your computer for
first use.
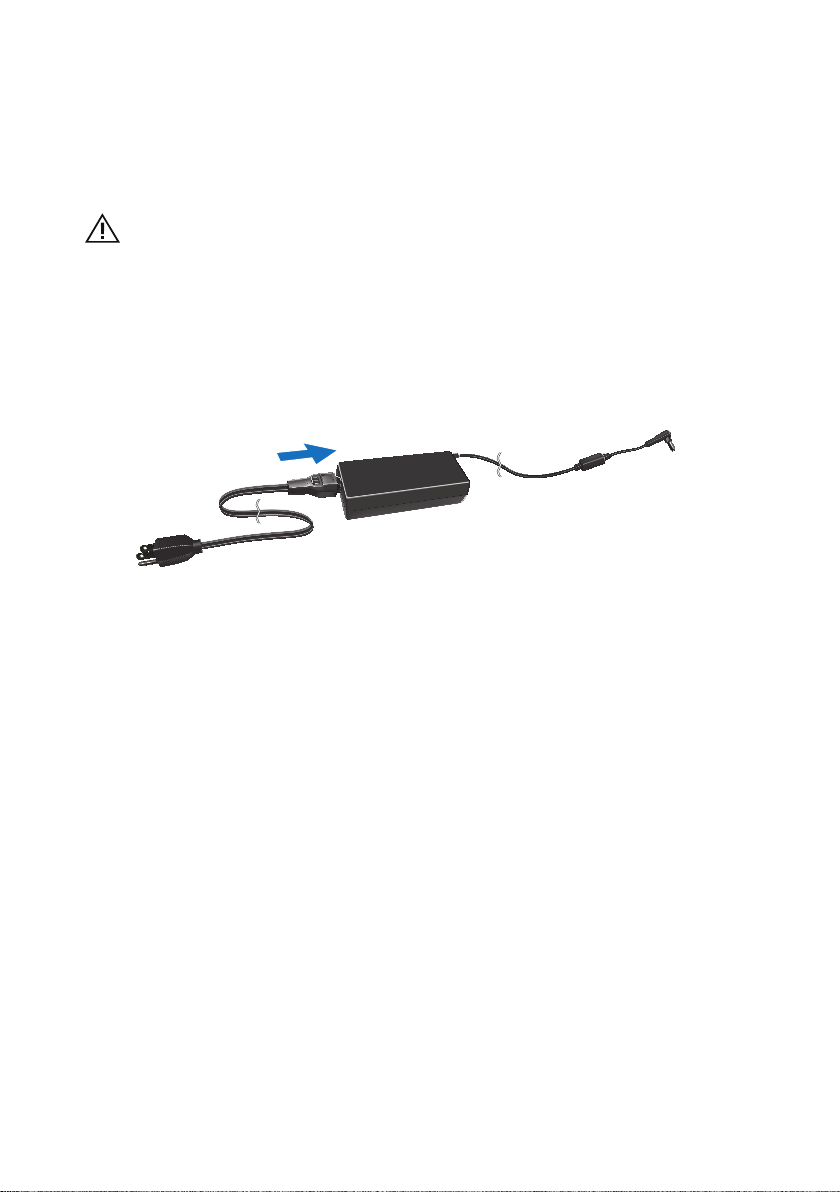
WARNING: Before you begin any of the procedures in this section,
read the safety information that shipped with your computer.
For additional best practices information, see
www.dell.com/regulatory_compliance.
Connect the Power Cable to the Power Adapter
Page 13
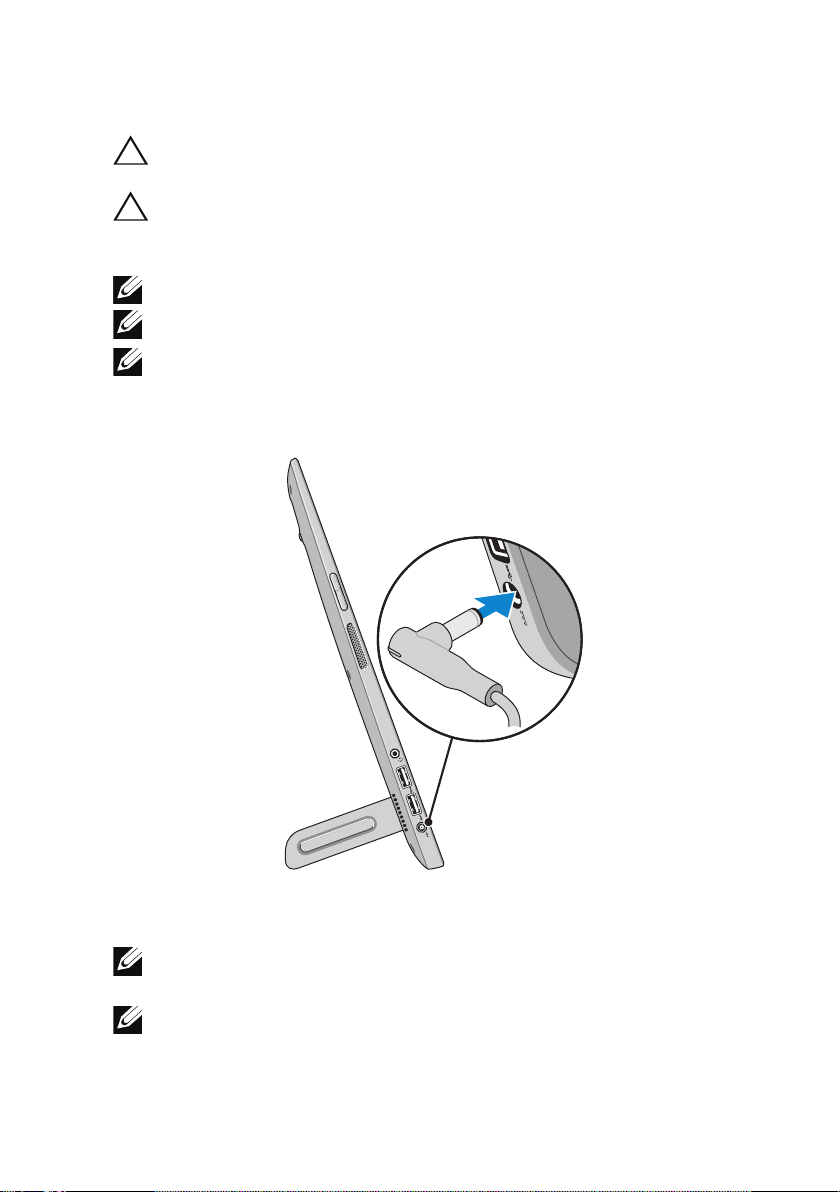
Charge Your Computer
Setting Up Your Computer │ 1 3
CAUTION: Charge the battery in an environmental temperature between
0 °C and 40 °C (32 °F and 104 °F).
CAUTION: Use only the supplied power adapter and power cable to
charge your computer. Using unauthorized power adapters or power
cables may severely damage to your computer.
NOTE: Your computer cannot be charged through a USB cable.
NOTE: The battery is not fully charged when you first receive it.
NOTE: You receive your computer in shipping mode to prevent it from
accidentally turning on during shipping. To turn on your computer for the
first time, connect the power adapter and then press the power button.
1 Connect the power adapter to your computer.
2 Connect the power adapter into an electrical outlet and charge
your computer until the battery is fully charged.
NOTE: A completely discharged battery takes 4-5 hours to charge fully
while the computer is turned o.
NOTE: The battery charge light on the right side of your computer turns
o once the battery is fully charged.
Page 14
You can check the charge/power status of your computer by checking
14 │ Setting Up Your Computer
the light on the side of your computer or the icon on the screen when
your computer is turned on:
Battery-charge indicator located on the right side of your computer:
Power state
S0/S1 (ON) Solid white Solid white Solid amber
S3 (Sleep)
S4/S5
(Hibernate or OFF)
Low battery
Battery with no
power adapter
Slow blinking
white
OFF OFF Solid amber
Fast blinking
amber
Power adapter
and battery fully
charged
Slow blinking
white
Fast blinking
amber
Power adapter
and battery is
charging
Slow blinking
amber
Fast blinking
amber
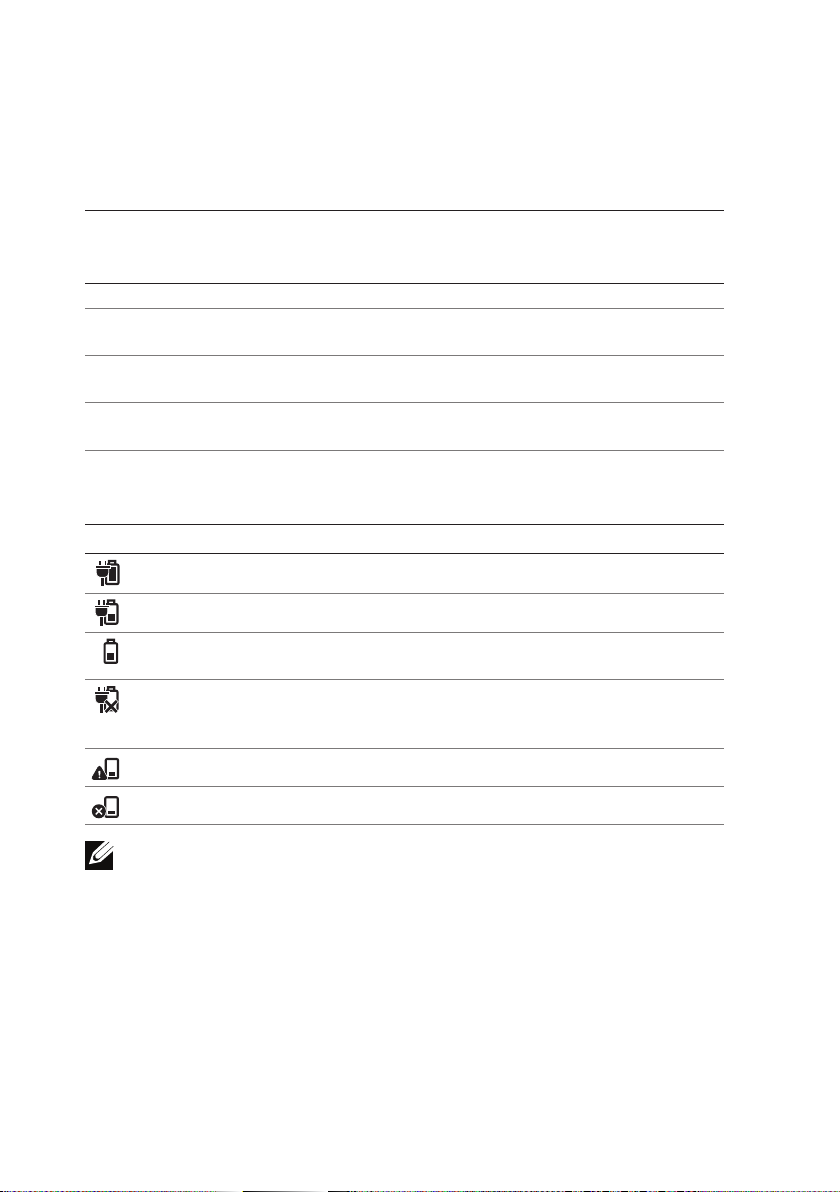
Battery icon displayed on the screen:
Battery icon Description
Battery is fully charged
Battery is charging
Computer is running on battery power
and the battery is discharging.
Computer is plugged in, and either no
battery is detected, or the battery isn’t
working correctly.
Battery is low
Battery is critically low
NOTE: You can check exact battery charge level by booting to the
operating system.
Page 15

Insert an SD Card (optional)
Setting Up Your Computer │ 1 5
1 Make sure the orientation of the SD card is correct so that the pins
on the card are facing the rear when inserted.
2 Push the slot cover down.
3 Push the SD card into the spring-loaded slot until it is locked firmly
into place.
NOTE: The SD-card slot is compatible with Standard-Capacity (SDSC),
High-Capacity (SDHC), the eXtended-Capacity (SDXC) storage cards,
Memory Stick, Memory Stick Pro, MMC, and xD, with a maximum storage
capacity of 2 TB.
Page 16

Turning On Your Computer
16 │ Setting Up Your Computer
CAUTION: Use your computer in an ambient temperature between 0 °C
and 35 °C (32 °F and 95 °F).
1 Press and release the Power and Sleep/Wake button .
NOTE: After the button is pressed, there is a slight delay before your
computer turns on or o.
2 Complete all steps for the initial setup of Windows including
Personalize, Settings, Sign in.
3 Enable security on the Security & Dell Updates page.
4 Configure wireless settings (optional).
Page 17

5 Complete initial setup of Windows.
Setting Up Your Computer │ 1 7
Your computer is ready for use when the Windows Start screen is
displayed.
NOTE: A lock screen may be displayed when your computer wakes up
from a sleep state.
NOTE: If the login screen is not enabled, the Start screen appears after
you swipe-up on the lock screen.
Page 18

Enable/Disable Wi-Fi
18 │ Setting Up Your Computer
1 Swipe from the right edge of the display to access Charms.
2 Touch Settings → Change PC settings→ Wireless.
3 Move the slider to the right to enable Wi-Fi. Move the Wi-Fi
slider to the left to disable Wi-Fi.
Connecting to a Network
1 Swipe from the right edge of the display to access Charms.
2 Touch Settings → Available → Select an available
network→ Connect.
Switch Networks
NOTE: If you need to connect to another network later, access
Charms →
and select the network you want to connect to.
Page 19

Using Your Computer
Using Your Computer │ 1 9
Screen Orientation
For optimal viewing experience, the screen orientation changes
automatically to portrait or landscape format depending on your
computer’s orientation. Automatic screen rotation is enabled by
default.
NOTE: Some applications may not support automatic screen rotation.
Enabling/Disabling automatic screen rotation
1 Swipe from the right edge of the display to access Charms.
2 Touch Settings → Screen .
3 Touch or to toggle automatic screen rotation.
Page 20

Windows 8 Start Screen
20 │ Using Your Computer
The Windows 8 Start screen displays a list of default and custom Live
Tiles, which act as shortcuts to various installed applications.
Live Tiles on your Start screen update in real time with information
on news, sports, weather, stocks, social networks, and so on. The
tile-based user interface gives you direct access to your most recently
used applications, emails, photos, music, videos, contacts, social
media updates, and frequently viewed websites. You can pin desired or
favorite applications as Live Tiles to customize the Start screen.
NOTE: You can add or remove Live Tiles by using Pin or Unpin
options.
Accessing the Start screen
• Press the Windows button .
• Swipe from the right edge of the display to access Charms, and
then touch the Start icon .
NOTE: The Start icon in the Charms sidebar and the Start button
on your computer have the same functionality.
Getting more information on Windows 8
Touch the Getting Started With Windows tile on the Start screen to get
more information about the features of Windows 8.
Page 21

Gestures
Using Your Computer │ 2 1
Your computer has a 10-point multi-touch display.
Finger gestures
Touch
Tap gently on the screen with your
fingertip.
Touch and hold
Touch and hold your finger on the • Display detailed information about
screen. an item
Allows you to:
• Select items on the screen
including options, entries, images,
icons, and so on.
• Start applications.
• Touch buttons on the screen.
• Input text using the on-screen
keyboard.
• Open the context menu of an item
to perform further actions.
Page 22

Finger gestures Allows you to:
22 │ Using Your Computer
Drag
1 Touch and hold your finger on an
item on the screen.
2 Keeping your finger in contact with
the screen, move your fingertip to
the desired location.
3 Take your finger o the screen
to drop the item at the desired
location.
Swipe or slide
Move your finger in a vertical or • Scroll through the Start screen,
horizontal direction on the screen. web pages, lists, entries, photos,
Move items such as images and icons
on the screen.
NOTE: Touching and holding for
a long time brings up the context
menu. If the context menu appears,
cancel the action and try again or
touch and hold for a shorter duration
to be able to drag.
contacts, and so on.
• Close an app. (Swipe the app to
the bottom of the display.)
Swipe left
Swiping-in from the right edge of the
display reveals the Charms sidebar.
Charms provide access to the system
commands, such as Search, Share,
Start, Devices, and Settings options.
If your computer is running an
application or performing actions,
pressing the Start icon
you back to the Start screen. If you
are at the Start screen, pressing the
Start icon
recently used application or most
recently viewed screen.
takes you to the most
takes
Page 23

Finger gestures Allows you to:
Using Your Computer │ 2 3
Swipe right
• Swiping-in quickly from the left
edge of the display switches the
currently running applications.
• Swiping slowly from the left edge
to the right edge of the display
reveals thumbnails of open
applications.
• Swiping-in and out on the left edge
of the display brings up a list of the
most recently used applications.
Swipe up/down
• Swiping-in from the bottom or
top edge of the display reveals
the All apps icon
apps to show an alphabetical list
of all applications installed on your
computer.
• Swiping-in from the top edge
of the application and dragging
the application window to the
bottom of the screen closes the
application.
Zoom out
Touch the display with two fingers Reduce the zoom level of an image
and then move the fingers closer. or web page.
. Touch All
Page 24

Finger gestures Allows you to:
24 │ Using Your Computer
Zoom in
Touch the display with two fingers Increase the zoom level of an image
and then move the fingers apart. or web page.
Rotate
Touch the display with two or more Rotate an object by 90 degrees.
fingers and then move the fingers in a
clockwise or counter-clockwise arc.
For more information on using Windows 8 Start screen, see
http://support.dell.com/windows8 and
http://windows.microsoft.com/en-US/windows-8/get-started as
well as touching the Dell Getting Started with Windows application (on
the Metro screen).
Page 25

Using the Keyboard and Mouse
Using Your Computer │ 2 5
If you purchased a wireless keyboard and mouse with your computer,
they will be already paired. To use the keyboard and mouse, make sure
both devices have batteries installed and are powered on.
Pairing the wireless keyboard and mouse
If the keyboard and mouse do not work automatically you may need to
add them manually:
1 Swipe from the right edge of the display to access Charms.
2 Touch Settings → Change PC Settings→ Devices→ Add a
device, to manually add a keyboard and mouse.
NOTE: If the keyboard or mouse pairing has been lost for some reason,
use these steps to pair them again.
NOTE: The wireless keyboard and mouse may ship with a USB dongle.
You do not need to install the dongle to use the wireless keyboard and
mouse on this computer.
Page 26

Using Headphones/Microphones
26 │ Using Your Computer
Your computer has a headphone/microphone combo port that
supports a headphone, a microphone, or a combo device to listen to
music, record audio, or make voice calls.
WARNING: Listening to loud music for extended periods of time can
lead to hearing loss.
NOTE: It is recommended to keep the volume level low before
connecting the headphones to your computer.
1 Connect headphones to the audio port.
2 Insert the headphones in your ears and adjust the volume level to
a comfortable level.
NOTE: The integrated speakers on your computer are muted
automatically when you connect an audio device to the audio port.
CAUTION: To prevent damage to the headphones when disconnecting
them from your computer, pull the connector and not the cable.
Page 27

Removing the SD Card
Using Your Computer │ 2 7
CAUTION: To avoid data loss, ensure all read/write operations to the
SD card are complete before removing it from the computer.
1 Touch the bottom left corner to enter Desktop mode.
2 Touch/click Safely Remove Hardware in the notification area
at the bottom-right corner of the screen.
NOTE: If you don’t see Safely Remove Hardware , touch Show
Hidden Icons to display all icons in the notification area.
3 Touch Eject SD Memory Card. A message appears confirming that
the SD card can be safely removed.
NOTE: If a warning message appears stating the SD card cannot be
removed, ensure all data transfers to and from the SD card are
complete and try again.
4 Push the SD card inwards to release it from the spring loaded SD-
card slot.
5 Pull the SD card out of the SD-card slot.
Page 28

Turning O the Screen
28 │ Using Your Computer
• Using the power button:
Press and release the Power and Sleep/Wake button to turn
o the screen.
• Using Charms:
1 Swipe from the right edge of the display to access Charms.
2 Touch Settings → Power → Sleep to turn o the screen.
NOTE: If your computer is in a sleep state (computer is on, but screen is
o), press the Power and Sleep/Wake button
once to turn on the screen.
or Windows button
Turning O Your Computer
1 Swipe from the right edge of the display to access Charms.
2 Touch Settings → Power → Shut down to turn o the
computer.
Page 29

Managing Computer Settings
Using Your Computer │ 2 9
Refreshing your computer
Refreshing your computer restores Windows to the original factory
settings without deleting any of your personal files, installed
applications, or personalization settings.
CAUTION: Refreshing your computer removes all third-party applications.
1 Swipe from the right edge of the display to access Charms.
2 Touch Settings → Change PC settings→ General→ Refresh
your PC without aecting your files.
3 Touch Get started.
4 Read the instructions on the screen then touch Next.
Resetting your computer
Resetting your computer returns the system software to original
factory settings.
CAUTION: Resetting your computer erases all data from your computer,
including your account configuration, music, pictures, files, and so on.
Ensure that you back up all the required data before you proceed.
1 Swipe from the right edge of the display to access Charms.
2 Touch Settings → Change PC settings→ General→ Remove
everything and reinstall Windows.
3 Touch Get started.
4 Read the instructions on the screen then touch Next.
Page 30

Using advanced startup
30 │ Using Your Computer
Use advanced startup if you have problems starting up your computer
or if you want to change the computer’s startup settings, such as
allowing your computer to start up from a USB device or an optical
media.
1 Swipe from the right edge of the display to access Charms.
2 Touch Settings → Change PC settings→ General→ Advanced
startup→ Restart now.
3 Touch the Troubleshoot option to configure various startup
settings.
Hotkeys
You can access various menus on your computer using the following
hotkeys:
Menu Key combination
Boot menu Press and release both the volume up and
power buttons.
BIOS / System setup menu Press and release both the volume down
and power buttons.
ePSA menu Press and hold down the volume up and
power buttons for 3 seconds then release
both buttons.
LCD BIST menu Press and hold down the volume down and
power buttons for 3 seconds then release
both buttons.
Menu descriptions:
• Boot menu — Allows the user a method to stop the normal start-
up of the computer and bring up a special menu to run ePSA or
boot from an alternate source other than the normal boot from
the system hard drive.
• BIOS / System setup menu — A tool that halts the normal boot
process and allows the user to enter a BIOS setup mode to review
more advanced system information and perform some advanced
system settings.
Page 31

• ePSA menu — Dell’s Enhanced Pre-Boot System Assessment.
Synchronizing Your Computer │ 3 1
ePSA provides valuable configuration and diagnostic information
and helps assure correct system operation.
• LCD BIST menu — A diagnostic tool which utilizes Built In Self-
Test capability to help users trouble shoot a no video scenario by
running video test outside the normal path.
NOTE: For more information on the tools available to keep your
computer running properly, see
dell.com/support.
Synchronizing Your Computer
Using a Microsoft account
You can sync user settings of your computer using a Microsoft
account. When you sign in with your Microsoft account on your
computer, you can automatically synchronize your settings, including
internet browser history, application settings, and personal files and so
on, with other Windows 8 computers.
1 Swipe from the right edge of the display to access Charms, then
click Settings → Change PC Settings→ Users→ Switch to a
Microsoft account to switch a local account to your Microsoft
account.
2 Sync your settings option is added to PC Settings.
3 Click Settings → Change PC Settings→ Sync your settings to
configure synchronization options.
Page 32

Powered Stand (optional)
32 │ Powered Stand (optional)
Features
1
2
Feature Functionality
1 Docking status light Turns on when your computer is
successfully docked (if the power
adapter is attached to the powered
stand).
2 Docking connector Connects the computer to the
docking port to provide power to
your computer and charge the
battery
Page 33

Powered Stand (optional) │ 3 3
1
2
3
Feature Functionality
1 Powered stand hinge Allows you to adjust the angle of your
computer between 10 degrees and
70 degrees.
2 Power-adapter port Connect the power adapter to
provide power to the computer, and
charge the battery.
3 Adapter cable clip Holds the adapter cable in place.
Page 34

Using the Powered Stand
34 │ Powered Stand (optional)
Connect the Power Adapter to the Powered Stand
CAUTION: Use only the supplied power adapter and power cable. Using
unauthorized power adapters or power cables may cause severe damage
to your computer and powered stand.
1 Connect the power adapter to the power-adapter port on your
powered stand.
2 Connect the power adapter to an electrical outlet.
Page 35

You can check the powered stand’s status from:
Powered Stand (optional) │ 3 5
• The light located at the front of the powered stand:
LED behavior Description
Solid white color on Computer is docked in the powered
stand
O Computer is not docked in the
powered stand, or the power adapter
is not connected to the stand.
For more information on checking the battery status, see battery
charge indicator status table.
NOTE: If the LED is o and the computer is placed on the powered stand
with power, it may not be properly docked. Realign the computer on the
powered stand until the LED lights up.
Page 36

Dock Your Computer on the Powered Stand
36 │ Powered Stand (optional)
1 Align the docking port on your computer to the docking
connector on the powered stand.
2 Place your computer onto the powered stand.
NOTE: The docking status light turns on when your computer is correctly
seated on the powered stand and the powered stand is properly
connected to a power source.
Page 37

Undocking Your Computer
Powered Stand (optional) │ 3 7
Lift the computer from the powered stand.
Page 38

Cleaning Your Computer
38 │ Cleaning Your Computer
CAUTION: Disconnect all cables from your computer before cleaning it.
Clean your computer with a soft cloth dampened with water. Do not use
liquid or aerosol cleaners, that may contain flammable substances.
1 Turn o your computer. For more information on turning o your
computer, see Turning O Your Computer.
2 Moisten a soft, lint-free cloth with either water or a display cleaner,
and wipe the surface of the computer until it is clean. Do not allow
water from the cloth to seep into the computer ports.
NOTE: Do not spray cleaning solution directly onto the display. Only use
products specifically designed for cleaning displays, and follow the
instructions that are included with the product.
Page 39

Troubleshooting
Troubleshooting │ 39
Battery Problems
Problems Possible causes Possible solution
Battery does not charge • Your computer is not
properly plugged into
a power source.
• You are using an
incorrect power
adapter/cable.
• The power outlet is
not be working.
• The power adapter/
cable is too loosely
connected.
The computer
temperature is lower
than 0 °C or higher than
35 °C.
The battery or power Contact technical
adapter is damaged. support or the
1 Use the supplied
power adapter and
power cable.
2 Unplug the power
adapter from the wall
and verify that the
outlet is functioning.
3 Check all cable
connections and plug
back into the wall,
then back into the
computer.
4 Check all connectors
to ensure proper
connectivity.
5 Verify that the power
adapter’s white LED is
on. If it is not, unplug
and re-plug the power
adapter and/or try
another outlet that is
known to work. If the
LED still does not turn
on, try replacing the
power adapter
Charge the battery in an
ambient temperature
between 0 °C and 35 °C.
manufacturer to replace
the damaged parts.
Page 40

System problem
40 │ Troubleshooting
Problems Possible causes Possible solution
Computer does not turn
on
The battery is
completely discharged.
Your computer could be
in an unresponsive or
locked state.
Your computer may be Computers shipped
in shipping mode. from the factory will be
Connect your computer
to a power source using
the power adapter.
Press and hold the
power button for 11
seconds to perform a
hard shut down, then
press the power button
to turn the computer
back on.
set in shipping mode.
To get out of this mode,
the user needs to plug in
the power adapter and
press the power button
to turn on the computer.
After the initial power
up, the computer
behaves as normal. This
is to avoid the computer
from being accidentally
turned on during
shipping and draining
the battery.
Page 41

Computer is not
Troubleshooting │ 41
responding or behaving
unexpectedly
Software or feature is The application or Software updates may
not working as expected feature could be in a
Your computer could
be in a hung or locked
state.
hung state.
1 Reboot the computer.
See Turning O
Your Computer and
Turning On Your
Computer.
2 Refresh your
computer. See
Refreshing your
computer.
3 Reset your computer.
See Resetting your
computer.
4 Contact Dell’s support
service. Go to dell.
com/support or
dell.com/ContactDell.
have been downloaded
in the background.
Restart your computer.
Swipe from the right
edge of the display to
access Charms and
touch Settings →
Power → Restart to
restart the computer.
Touchscreen problem
Problems Possible causes Possible solution
Touchscreen responds
slowly or improperly
Your computer display
may be dirty, or you may
need to adjust display
settings
• Turn o your
computer screen
to avoid accidental
touches, then gently
wipe the display with
a clean dry cloth.
• Adjust display settings
in Windows Desktop,
Control Panel→
Appearance and
Personalization→
Display.
Page 42

Network problem
42 │ Troubleshooting
Problems Possible causes Possible solution
No wireless connection Your computer is not
able to properly access
a wireless signal.
Slow Internet The signal strength is 1 Move your computer
connections not strong enough. to a dierent location
1 Check if the wireless
radio is on. See
Enabling/Disabling
Wi-Fi.
2 Move closer to the
wireless access point.
3 Reset the wireless
router if using a
private network.
4 Open the browser
to view the landing
page if using a public
network, and follow
the instructions given
by the public network.
5 Try another wireless
connection.
for better signal
reception.
2 Contact your Internet
Service Provider.
Page 43

Locating Your Service Tag and
Locating Your Service Tag and Express Service Code │ 4 3
Express Service Code
You need your computer’s Service Tag/Express Service Code when
you contact Dell regarding your computer. The Express Service Code
helps the automated telephone support system redirect your call to the
appropriate support department.
The Service Tag and Express Service Code for your computer are
located on a label at the back of your computer.
CAUTION: Lay your computer face down before you look for Service Tag
and Express Service Code.
Page 44

Specifications
44 │ Specifications
Physical dimensions
Height 283.70 mm (11.17 inches)
Width 463.60 mm (18.25 inches)
Depth 17.70 mm (0.70 inch)
Weight 2.20 kg (4.85 lb)
Hardware
Processor 3rd Generation Intel Core i3/i5/i7 ULT
Chipset Intel Panther Point HM77
Graphics Intel HD 4000 for Core I processors
Internal Memory (RAM) 4 GB or 8 GB
Internal Storage 2.5 inch HDD (SATA3) or
Speaker Power 2 watts
Camera HD 720 p (1280 x 720)
Pentium Dual Core
Intel HD for Pentium Dual Core
processors
DDR3L 1600 MHz
SSD (mSATA)
Page 45

Touchscreen display
Specifications │ 45
Type 18.4” Full HD with multi-point
capacitive touch
Maximum resolution 1920 × 1080
Aspect ratio 16:9
Brightness 350 nits
Viewing angle 89 degrees
Contrast ratio 1000:1
Color depth 262.144 bits
Ports and connectors
Audio 1 3.5mm audio jack/port
SD card 1 SD card slot
Dock 1 docking port
USB 2 USB 3.0 ports
1 internal USB 2.0 port for wireless
keyboard and mouse receiver
Power Adapter
Input voltage 90 -240 VAC
Input current (maximum) 1.6 A
Input frequency 50-60 Hz
Output power 65 W
Output current 3.34 A (maximum)
Rated output voltage 19.5 VDC
Temperature range:
Operating 0 °C to 40 °C (32 °F to 104 °F)
Storage -40 °C to 70 °C (-40 °F to 158 °F)
Page 46

Environmental requirements
Temperature range:
Operating 0 °C to 35 °C (32 °F to 95 °F)
Non-Operating -40 °C to 65 °C (-40 °F to 149 °F)
Relative humidity (maximum):
Operating 10% to 90% (noncondensing)
Non-Operating 5% to 95% (noncondensing)
Maximum Vibration (measured using a random vibration spectrum
that simulates user environment):
Operating 0.66 GRMS
Non-Operating 1.30 GRMS
Maximum Shock
Operating 140 G
Non-Operating 163 G
Altitude (maximum, unpressurized):
Operating -15.2 m to 3048 m (-50 ft to
10,000 ft)
Non-Operating -15.2 m to 10,668 m (-50 ft to
35,000 ft)
46 │ Specifications
 Loading...