

Page 1

XC Series Data Protection Management Console
Administrator’s Guide
Dell EMC Reference Architecture
Page 2

Revisions
Date
Description
November 2017
Initial release
March 2018
Added set up instructions for Linux VM (section 8.7.2)
Revisions
T
he information in this publication is provided “as is.” Dell Inc. makes no representations or warranties of any kind with respect to the information in this
publication, and specifically disclaims implied warranties of merchantability or fitness for a particular purpose.
e, copying and distribution of any software described in this publication requires an applicable software license.
Us
© 2018 Dell Inc. or its subsidiaries. All Rights Reserved. Dell, EMC, Dell EMC and other trademarks are trademarks of Dell Inc. or its subsidiaries. Other
trademarks may be trademarks of their respective owners.
l believes the information in this document is accurate as of its publication date. The information is subject to change without notice.
Del
Dell EMC Reference Architecture
Page 3

Revisions
Table of contents
1 Solution Overview ........................................................................................................................................................ 6
2 Avamar and Data Domain reference architecture ........................................................................................................ 7
2.1 Solution architecture in ESXi .............................................................................................................................. 7
2.2 Solution architecture in Hyper-V ......................................................................................................................... 8
2.3 Solution component architecture DPMC ............................................................................................................ 8
3 Data Protection Management Console (DPMC) deployment and registration with Prism Centra l .............................. 9
3.1 Prerequisites ....................................................................................................................................................... 9
3.2 Software requirements ....................................................................................................................................... 9
3.3 Deploying DPMC VMware Virtual Machine ........................................................................................................ 9
3.3.1 Infrast ructural requirements .......................................................................................................................... 9
3.3.2 Syst em requirements .................................................................................................................................. 10
3.3.3 Network requirements ................................................................................................................................. 10
3.3.4 Software package ....................................................................................................................................... 10
3.3.5 Deploying DPMC using vSphere Web Client or desktop client .................................................................. 10
3.3.6 Deployment of DPMC Hyper-V Virtual Machine ......................................................................................... 18
4 Linking DPMC with Prism Central .............................................................................................................................. 27
4.1 Powering on and launching DPMC web interface ............................................................................................ 27
4.2 Connecting with Prism Central ......................................................................................................................... 27
5 Association of Avamar with DPMC Virtual Machine ................................................................................................... 30
6 DPMC web interface menu overview ......................................................................................................................... 32
6.1 Home page ....................................................................................................................................................... 32
6.2 Home page widgets .......................................................................................................................................... 32
6.3 Home page menu items ................................................................................................................................... 33
6.3.1 Menu from Home drop-down ...................................................................................................................... 33
6.3.2 Settings (gear tool) menu ........................................................................................................................... 40
6.3.3 Admin m enu ................................................................................................................................................ 56
7 Initial Configuration ..................................................................................................................................................... 59
7.1 vSphere Proxies for ESXi ................................................................................................................................. 59
7.1.1 DPMC b ehavior if no proxy is created after adding a new cluster .............................................................. 63
7.2 Avamar client configuration in Hyper-V ............................................................................................................ 64
7.2.1 Setting iSCSI Data Services IP address ..................................................................................................... 64
7.2.2 Step 1: Conf igure Avamar Clients .............................................................................................................. 66
7.2.3 Running Windows Cluster Configuration wizard ........................................................................................ 72
7.2.4 Step 2: Complete Avamar Configuration .................................................................................................... 78
8 Runtime backup management ................................................................................................................................... 81
3 XC Series Data Protection Management Console Administrator’s Guide
Page 4

Revisions
8.1 Manage Nutanix Clusters ................................................................................................................................. 81
8.1.1 Configure Notify and Auto-protect .............................................................................................................. 82
8.1.2 Updat i ng VM Backup Policies ..................................................................................................................... 83
8.2 Avamar Registration (runtime management) ................................................................................................... 85
8.3 Updating the Backup Schedule ........................................................................................................................ 85
8.4 Managing Retention Policies ............................................................................................................................ 86
8.5 Launch Avamar Administrator .......................................................................................................................... 89
8.6 On-Demand VM Backup ................................................................................................................................... 89
8.7 Hyper-V Cluster – Protection of VM ................................................................................................................. 91
8.7.1 Manually m oving VMs to a failover cluster ................................................................................................. 91
8.7.2 Addit i onal set up instructions for Linux VM ................................................................................................. 91
9 Log location ................................................................................................................................................................ 93
9.1 Log Files ........................................................................................................................................................... 93
10 Best Practices in DPMC deployment, Association and runtime ................................................................................. 94
11 Adding New XC Series Clusters to DPMC ................................................................................................................. 95
11.1 ESXi Cluster Add .............................................................................................................................................. 95
11.2 Hyper-V Cluster Add ......................................................................................................................................... 96
12 Health monitoring ....................................................................................................................................................... 97
12.1 Heartbeat status ............................................................................................................................................... 97
12.1.1 Avamar heartbeat .................................................................................................................................... 97
12.1.2 Data domain heartbeat ............................................................................................................................ 97
12.1.3 Prism Central Heartbeat .......................................................................................................................... 98
12.1.4 Nutanix Cluster Heartbeat ....................................................................................................................... 98
12.1.5 DPMC Idle status .................................................................................................................................... 99
12.2 Alert entity ......................................................................................................................................................... 99
12.2.1 Alert acknowledgment ............................................................................................................................. 99
12.3 Storage Utilization............................................................................................................................................. 99
12.3.1 Avamar metadata storage utilization ..................................................................................................... 100
12.3.2 Data Domain metadata storage utilization ............................................................................................ 100
13 Restoring a VM ......................................................................................................................................................... 102
13.1 Example of VM Restore .................................................................................................................................. 102
A Technical support and resources ............................................................................................................................. 107
4 XC Series Data Protection Management Console Administrator’s Guide
Page 5

Solution Overview
Dell EMC Configuration and Deployment Guide
Page 6

1 Solution Overview
The XC Series Data Protection Management Console (DPMC) is a cross domain application that aims to
integrate Dell EMC XC appliances with Dell EMC data protection IP. A main driver of the program is the
proliferation of Microsoft Hyper-V workloads and integration with Microsoft virtualization and public cloud
offerings.
Data Protection integration is accomplished through the following approaches:
• Integrating Avamar Virtual Edition (AVE) and Data Domain with the XC Series hyper-converged platform
• Providing a backup target built on PowerEdge servers with Data Domain Virtual Edition (DDVE)
• Using dedicated Data Domain appliances as required backup targets
NOTE: Data Domain (DD) appliances are available in several optio ns wit h sales tiers for mid-market small,
mid-market large, remote office, branch office (ROBO) and enterprise.
Because of the turnkey functionality and value-add automation that simplifies customer operation, DPMC
adds security and provides platform flexibility while sti ll using a familiar management framework.
Customers benefit from streamlined deployments and automation in the run-time environment with automated
VM protection, tiering based on policy (including cloud) and aut omated solution updates.
The following Hypervisors are supported:
• ESXi 5.5 and above
• Microsoft Windows Server 2012R2
The key features of this solution include:
• VM system backups using Avamar as the backup solution with Data Domain Boost Integration
• Source-side deduplication via Data Domain Boost (DDBoost) – a reduction in network bandwidth
utilization and decreased backup times
• Data Domain storage target for all backu p data
• Prism-like user interface with integration into Prism C ent ral
• Multiple and mixed clustered environments (Hyper-V and ESXi)
6 XC Series Data Protection Management Console Administrator’s Guide | A02
Page 7
Avamar and Data Domain reference architecture
2 Avamar and Data Domain reference architecture
DPMC offers data protection of VMs by integrating a few component s, i ncluding:
• Avamar as a backup agent
• Data Domain Boost Integration for source-side deduplication of backup data
• Data Domain storage target
• DPMC, management console
The solution also offers backups within multiple clusters and mixed clustered environments (Hyper-V and
ESXi).
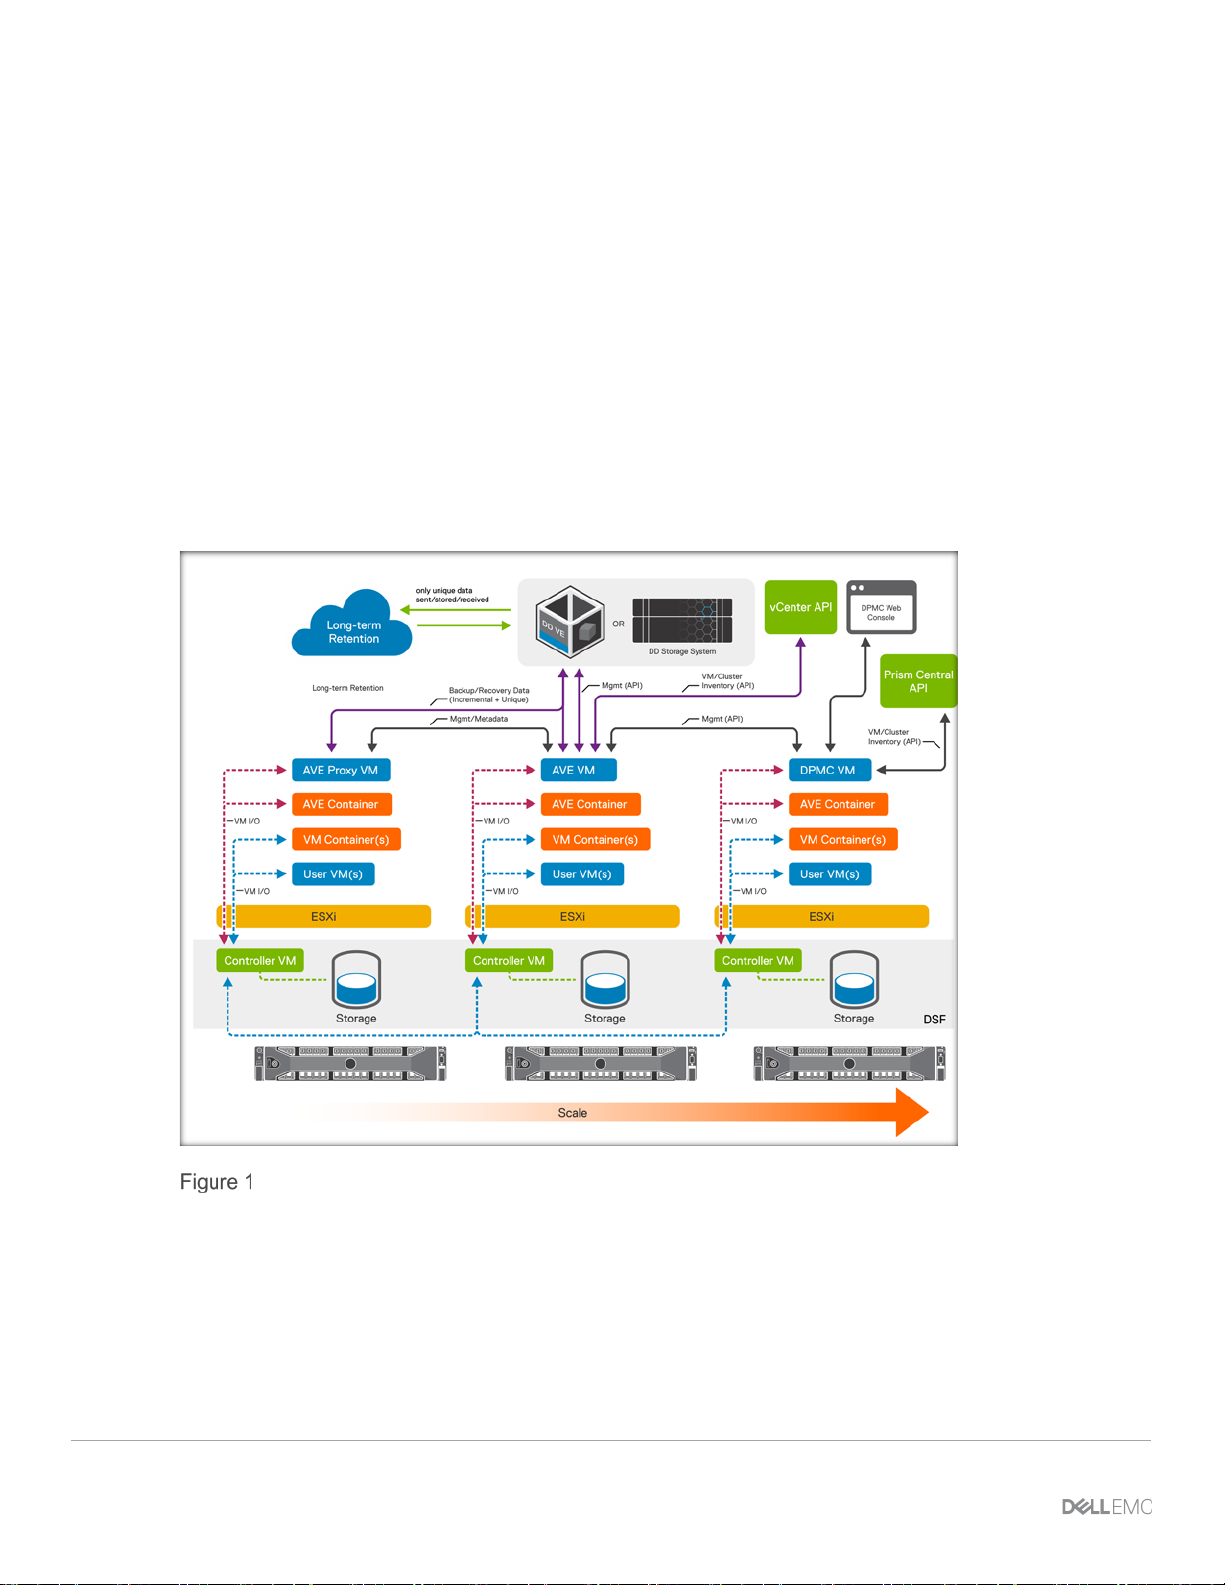
2.1 Solution architecture in ESXi
The diagram below illustrates the solution architecture for ESXi.
Dell EMC XC Series Appliances
7 XC Series Data Protection Management Console Administrator’s Guide
Page 8
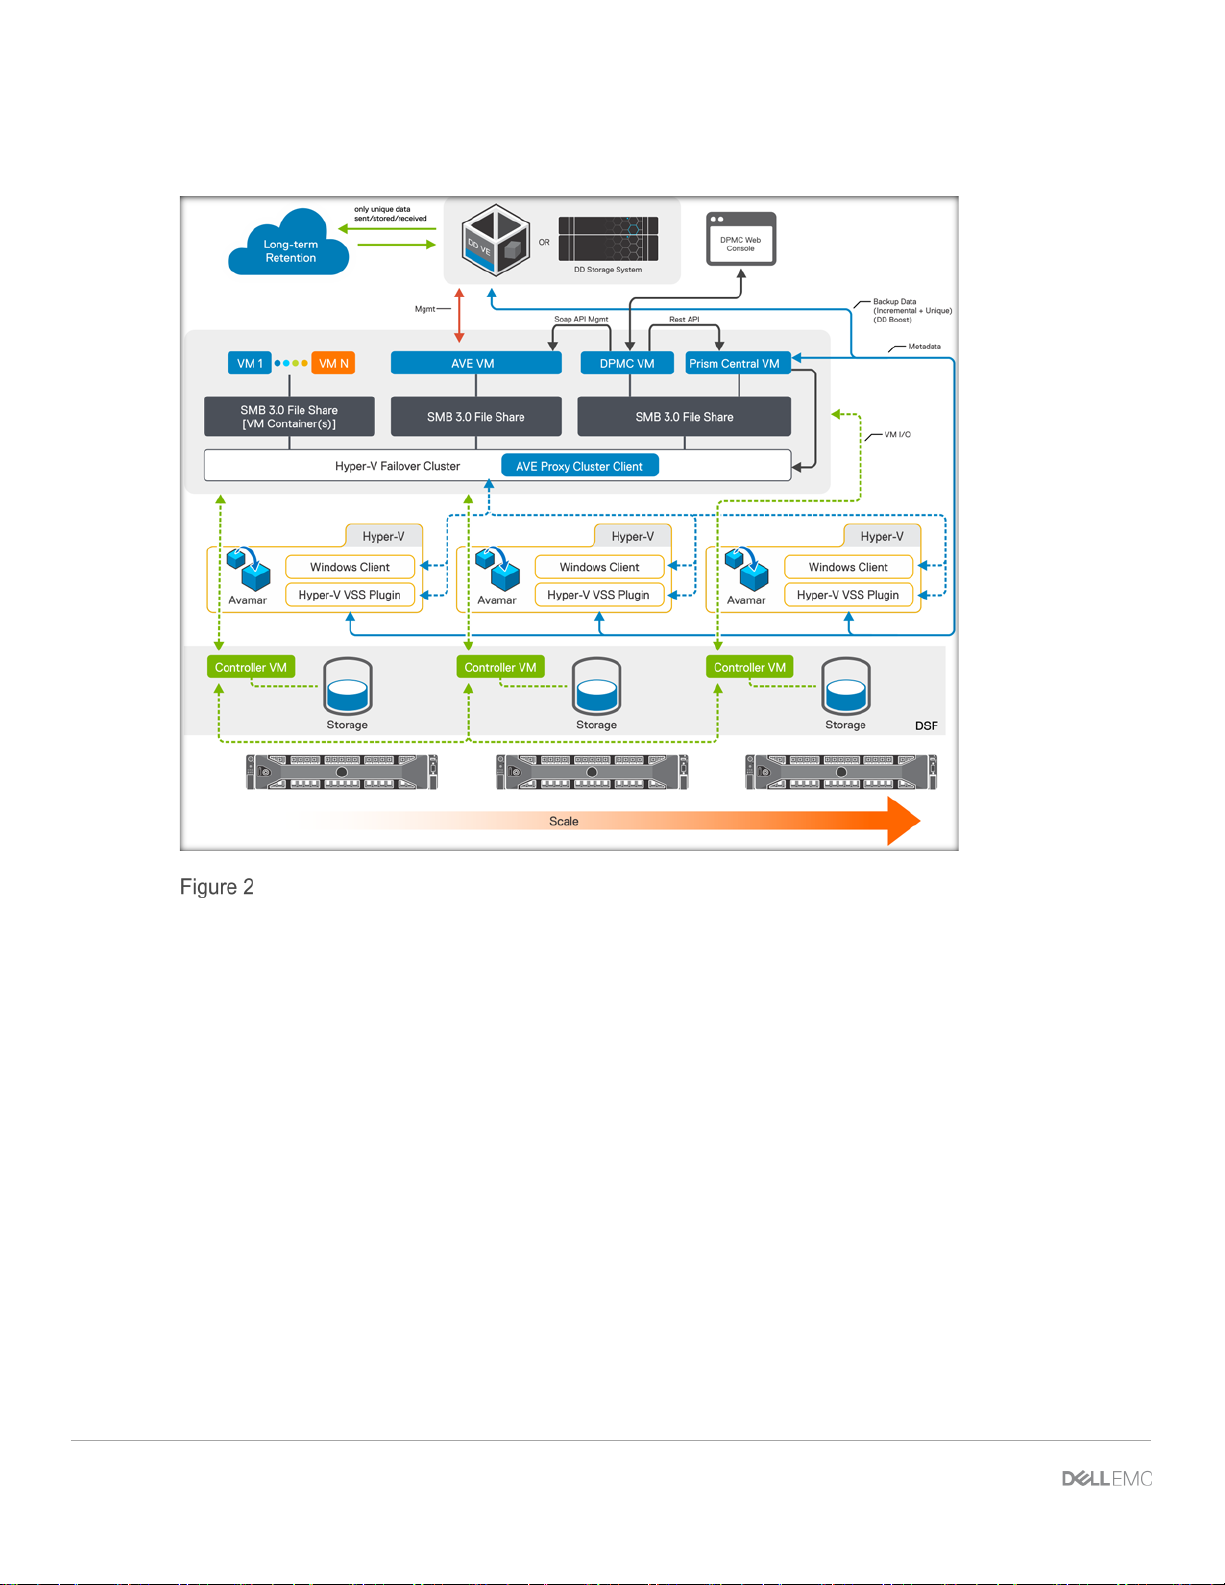
2.2 Solution architecture in Hyper-V
The diagram below illustrates the solution architecture for Hyper-V.
Dell EMC XC Series Appliances (Hyper-V)
2.3 Solution component architecture DPMC
The DPMC solution has multiple components that are managed by DPMC. As displayed in the diagram
above, the following components are required for the solution:
• DPMC (developed by Dell EMC)
• Avamar Virtual Edition (manually installed and configured prior to DPMC setup)
• Prism Central (manually installed and configured prior to DPMC setup)
• Data Domain (manually installed and configured prior DPMC set up)
• XC Cluster (manually installed and configured prior DPMC setup)
8 XC Series Data Protection Management Console Administrator’s Guide | A02
Page 9

Data Protection Management Console (DPMC) deployment and registration with Prism Central
3 Data Protection Management Console (DPMC) deployment
and registration with Prism Central
This section outlines the prerequisites, requirements and step-by-step instructions to deploy DPMC in a
Nutanix cluster with an integrated Avamar VE.
3.1 Prerequisites
For a successful deployment of DPMC, make sure the following prerequisites are met:
• A static IP address with DNS reverse resolution
• Sufficient resources to house the DPMC VM (see the System requirements
• No active DPMC VM running in the cluster (current release only supports one DPMC instance per
implementation)
• Valid OVA file of DPMC VM for ESXi (or DPMC VM zip archive for Hyper-V)
• vSphere Web Client with VMware Client Integration Plug-in installed for ESXi
• Hyper-V requires hosts with administrator access
section below)
3.2 Software requirements
You must have the following software:
• vSphere Component for ESXi
• Microsoft Hypervisor:2012 R2 for Hyper-V deployment
• DDOS Version: DD OS 5.7.x, DD OS 6.0.x, DD OS 6.1.x
• Cluster NOS 5.1 or above
• Avamar Virtual Edition (AVE) 7.5.0.183 with Hotfix 289693
3.3 Deploying DPMC VMware Virtual Machine
The following sections describe steps performed on the vCenter server in the vSphere Web Client.
3.3.1 Infrastructural requirements
Before deploying the DPMC virtual machine, you must complete the following tasks:
Associate Nutanix cluster with Prism Central
Deploy and Configure an AVE virtual machine
Associate AVE VM with Data Domain instance
3.3.1.1 Associate Nutanix cluster(s) with Prism Central
You must set up a Nutanix Storage cluster on either a V Mware or a Hyper-V environment. You must also
install and configure Prism Central (PC) and register all clusters with PC. Because DPMC communicates with
PC directly, only clusters that are associated with PC are managed by DPMC. Refer to the
Guide on the Nutanix portal for more details on instal l ing and registering to Prism Central.
Prism Central
3.3.1.2 Deploy and Configure an AVE virtual machine
You must configure an AVE virtual machine with at least 0.5 TB for use with DPMC.
9 XC Series Data Protection Management Console Administrator’s Guide
Page 10

ESXi system requirements
CPU
4 virtual CPUs
Memory
16 GB
Hard Disk
50 GB
Network
1 network adapter
Hyper-V system requirements
CPU
4 virtual CPUs
Memory
16 GB
Hard Disk
50 GB (Dynamic)
Network
1 network adapter
3.3.1.3 Associate AVE with a Data Domain instance
You must associate AVE with a Data Domain instance.
NOTE: All backups initiated by DPMC are stored on the def aul t Data Domain instance and not on the AVE.
3.3.2 System requirements
To run the DPMC VM, the host system must meet the following minimum requirements:
3.3.3 Network requirements
After deploying the DPMC OVA, configure the VM’s network, including IP address, hostname, DNS and
subnet.
3.3.4 Software package
The DPMC installation files for ESXi are packa ged as an OVA. It can be deployed on a vCent er cluster
through the vSphere (web) client.
For Hyper-V, DPMC installation files are packaged as a compressed zip file with a VM configuration file and
virtual disks. Installation can be accomplished by importing the VM through Hyper-V manager.
3.3.5 Deploying DPMC using vSphere Web Client or desktop client
The following sections describe steps performed on the vCenter server in the vSphere web client. You can
also complete these steps through the vSpher e desktop client.
1. To deploy the DPMC virtual machine, locate the downloaded OVA/OVF file.
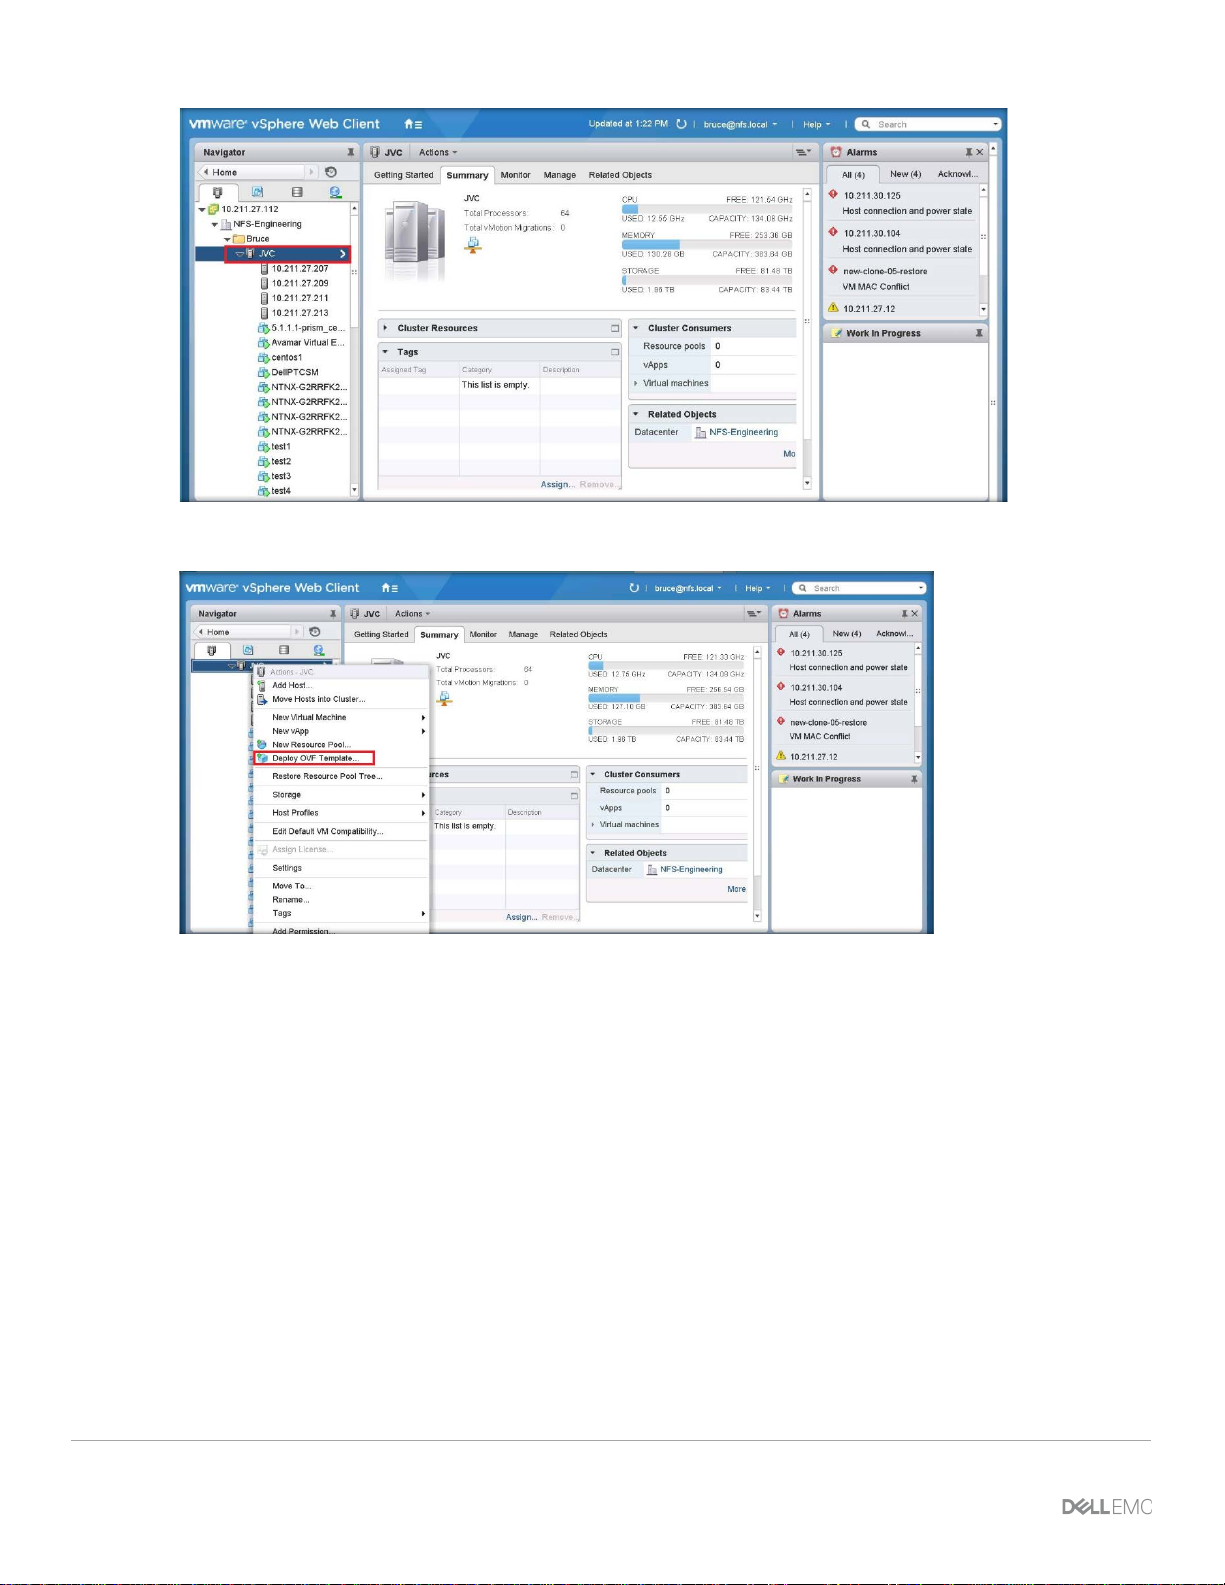
2. In the vSphere Web Client, navigate to the cluster that will host the DPMC virtual machine.
10 XC Series Data Protection Management Console Administrator’s Guide | A02
Page 11
Data Protection Management Console (DPMC) deployment and registration with Prism Central
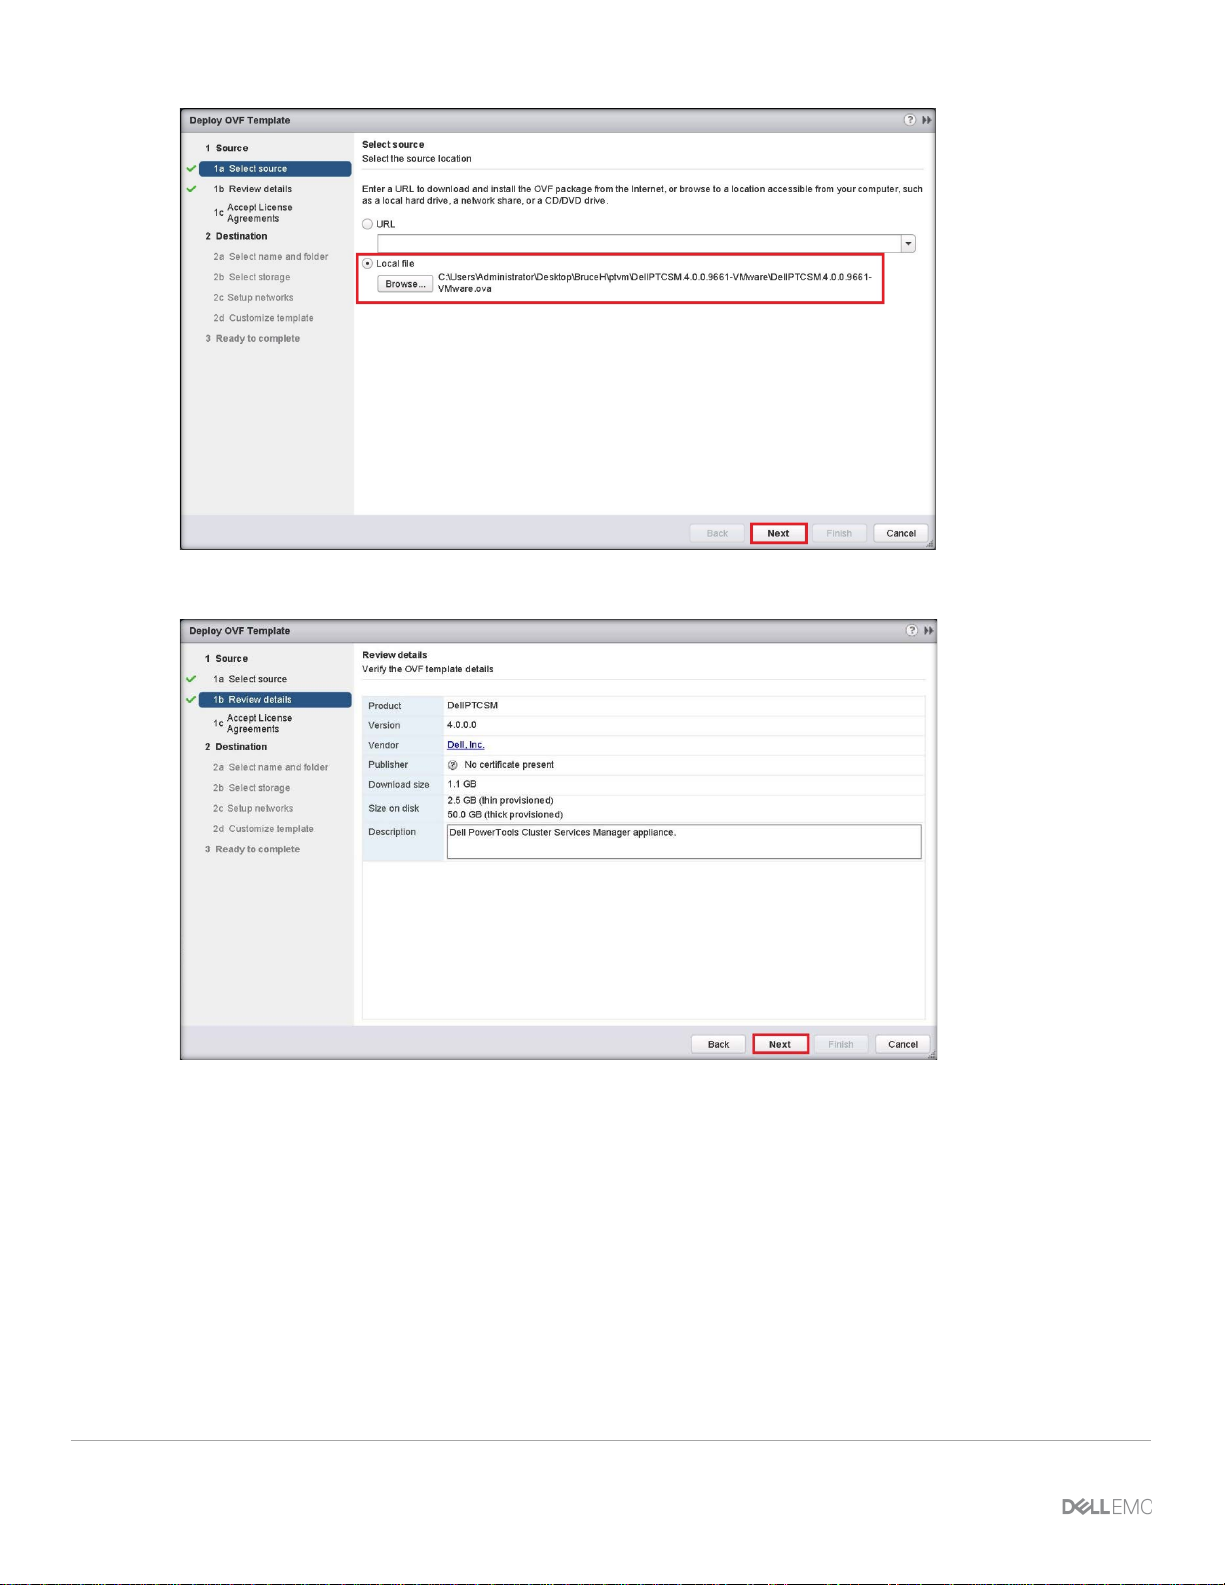
3. Right-click on the desired cluster and select De pl oy OVF Template.
4. Select Local file and then click Browse.
11 XC Series Data Protection Management Console Administrator’s Guide
Page 12
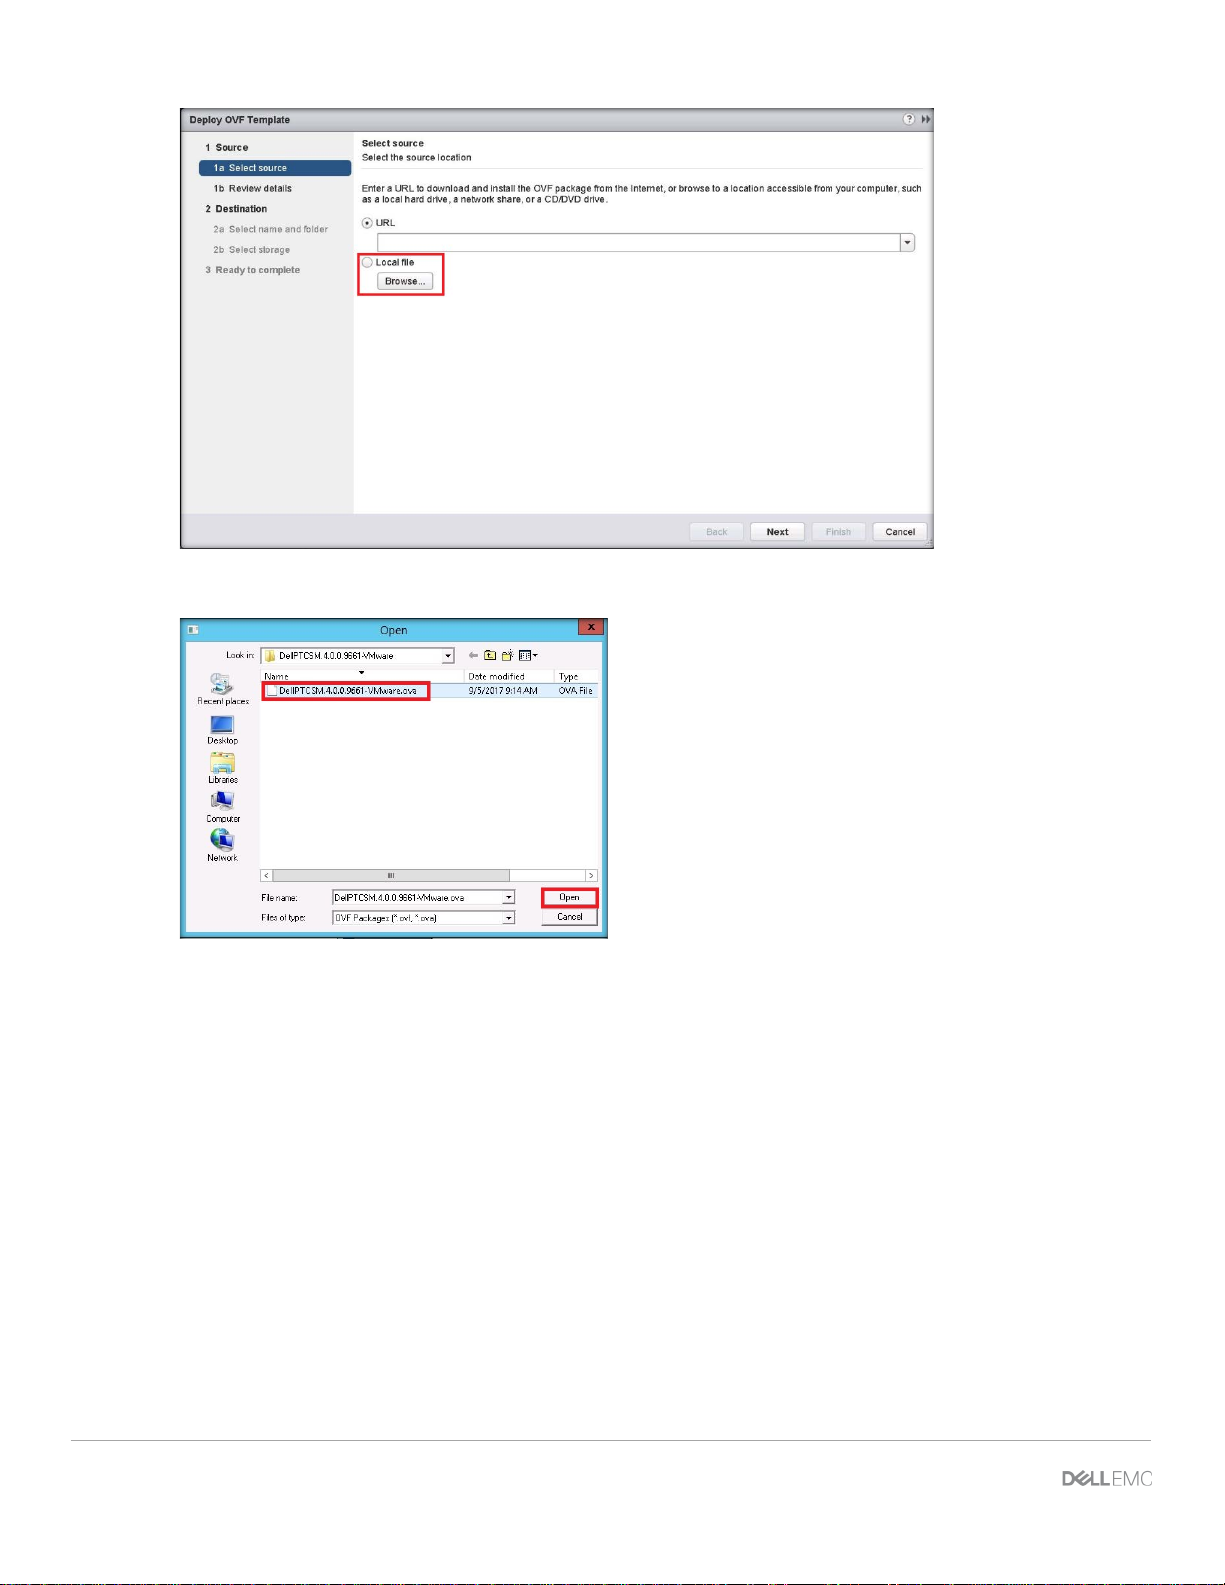
5. Browse to the location of the virtual machine f i le and click Open.
6. Click Next.
12 XC Series Data Protection Management Console Administrator’s Guide | A02
Page 13
Data Protection Management Console (DPMC) deployment and registration with Prism Central
7. Review details and then click Next.
8. To accept the software license agreement, cli ck Accept and then click Next.
13 XC Series Data Protection Management Console Administrator’s Guide
Page 14
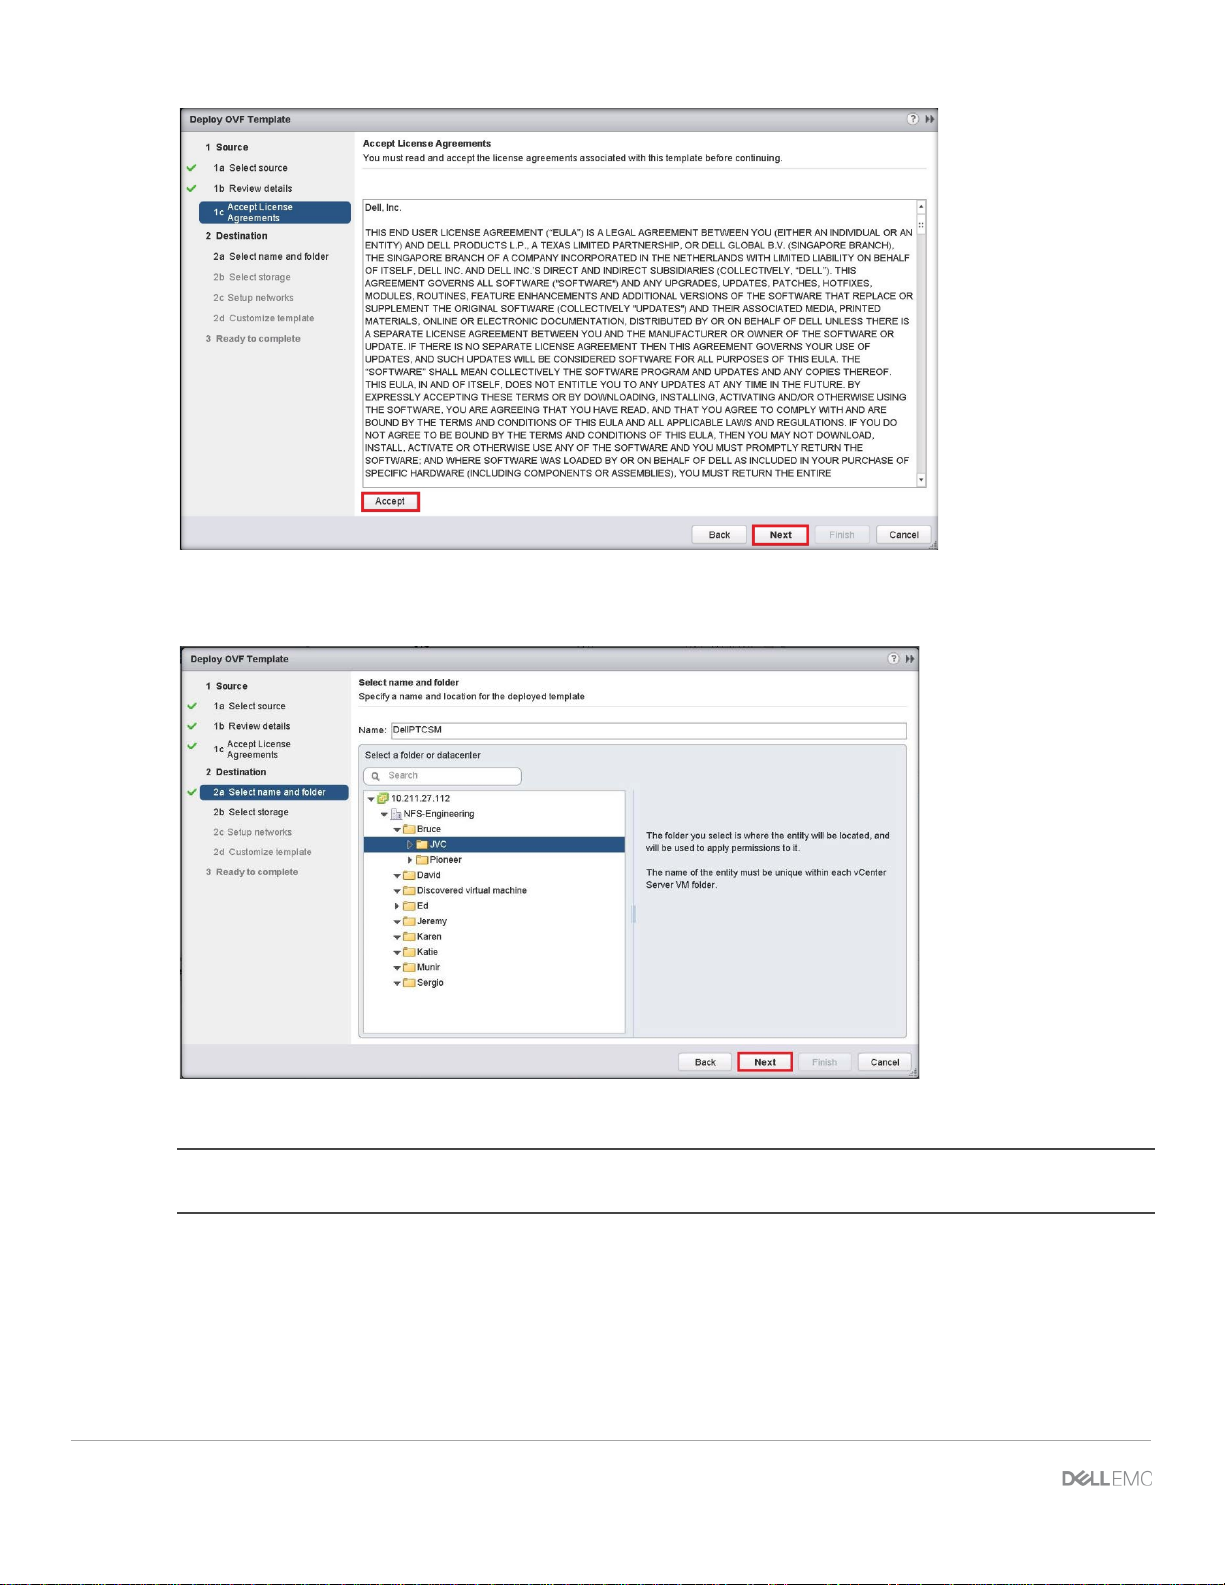
9. Browse to the folder that will be used to assign management permissions to the DPMC VM and then click
Next.
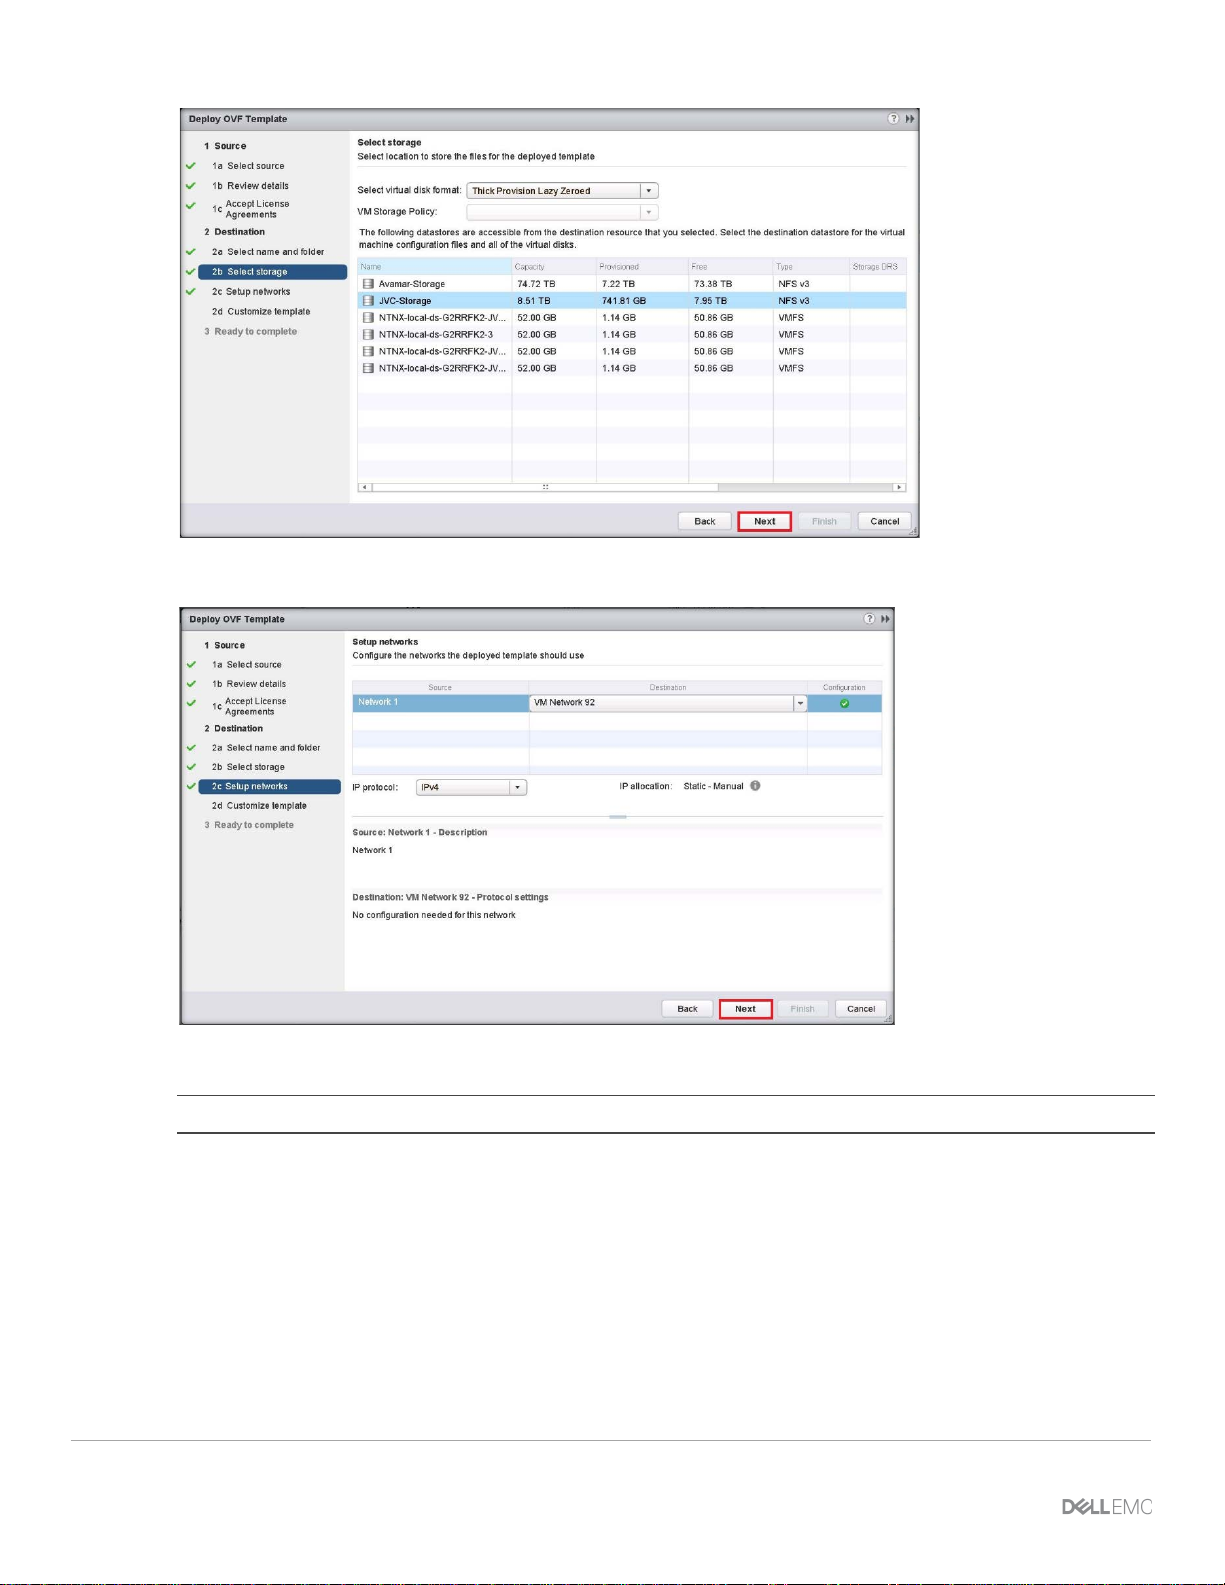
10. Select the storage location for the DPMC VM.
WARNING: Do not select storage shared with Avamar VMs or proxies. Do not select any of t he SATADOMs
(on XCx30 appliances).
11. Click Next.
14 XC Series Data Protection Management Console Administrator’s Guide | A02
Page 15
Data Protection Management Console (DPMC) deployment and registration with Prism Central
12. Select the network that the DPMC VM will use and then click Next.
13. Enter the network information and then click Next.
NOTE: Dell EMC recommends a static IP address for DP M C V M .
15 XC Series Data Protection Management Console Administrator’s Guide
Page 16
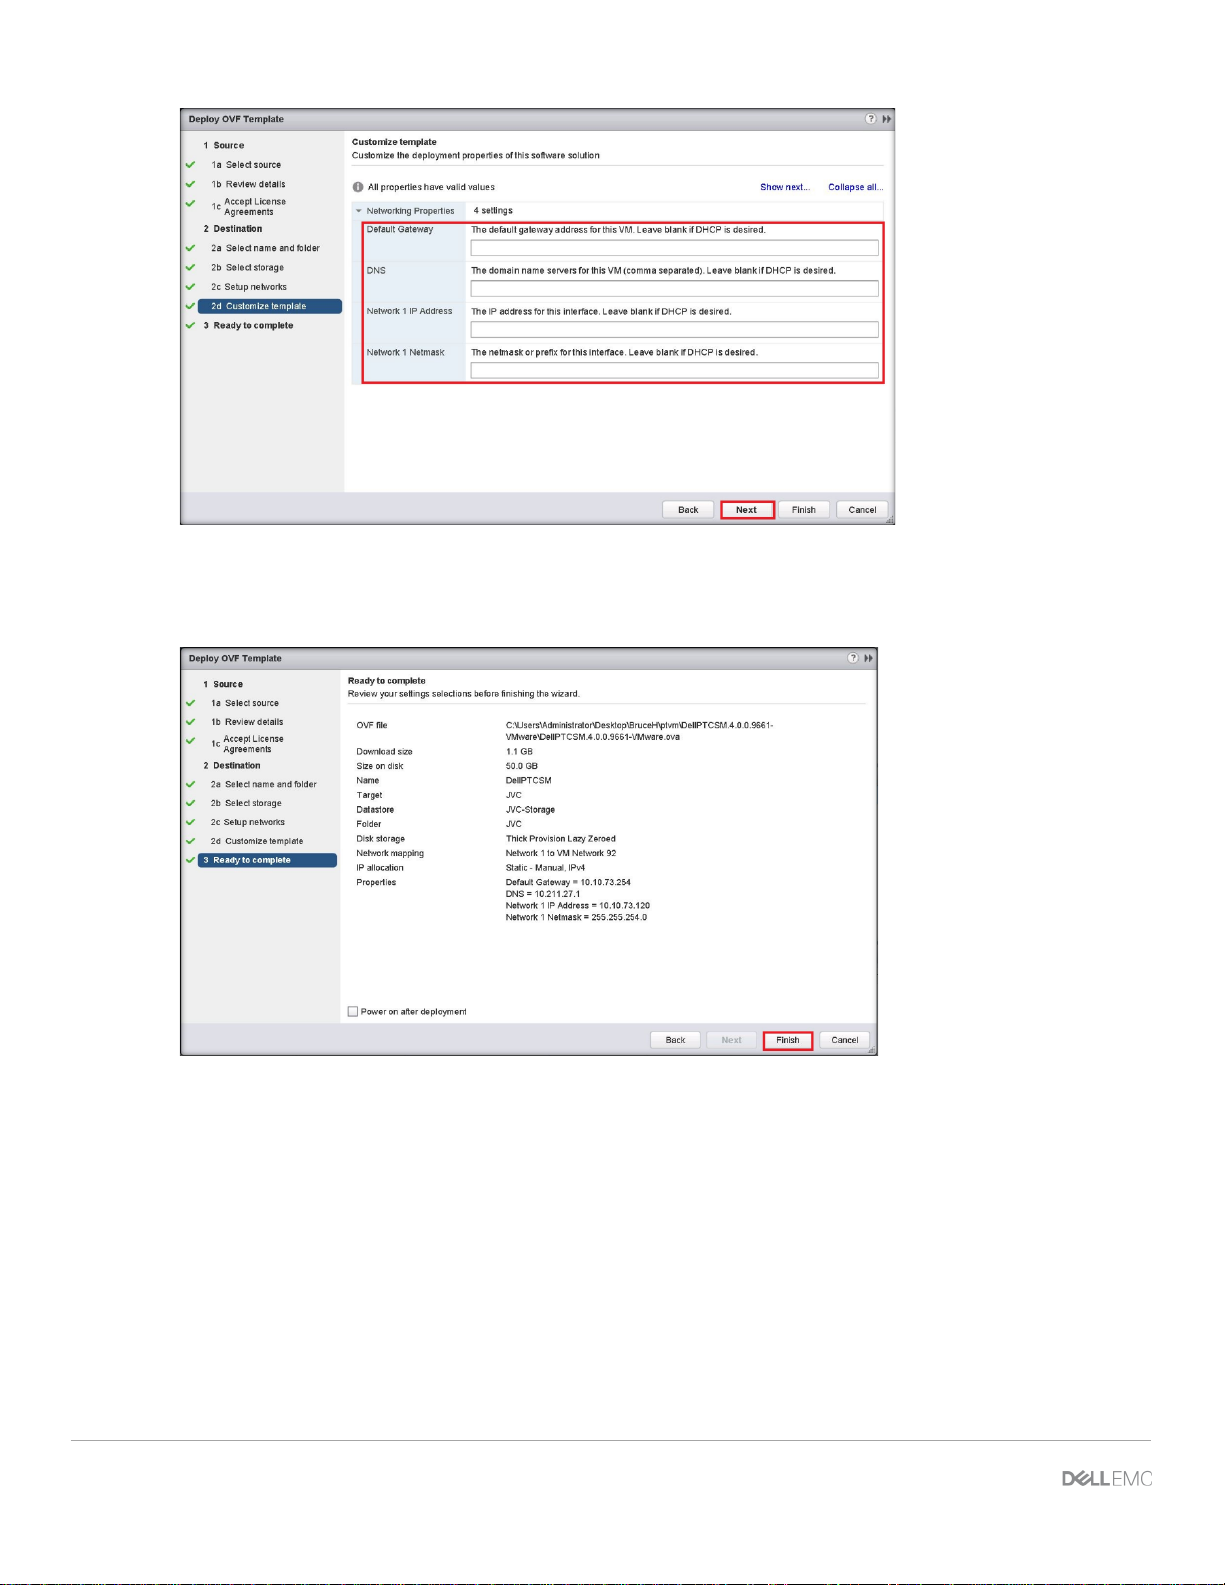
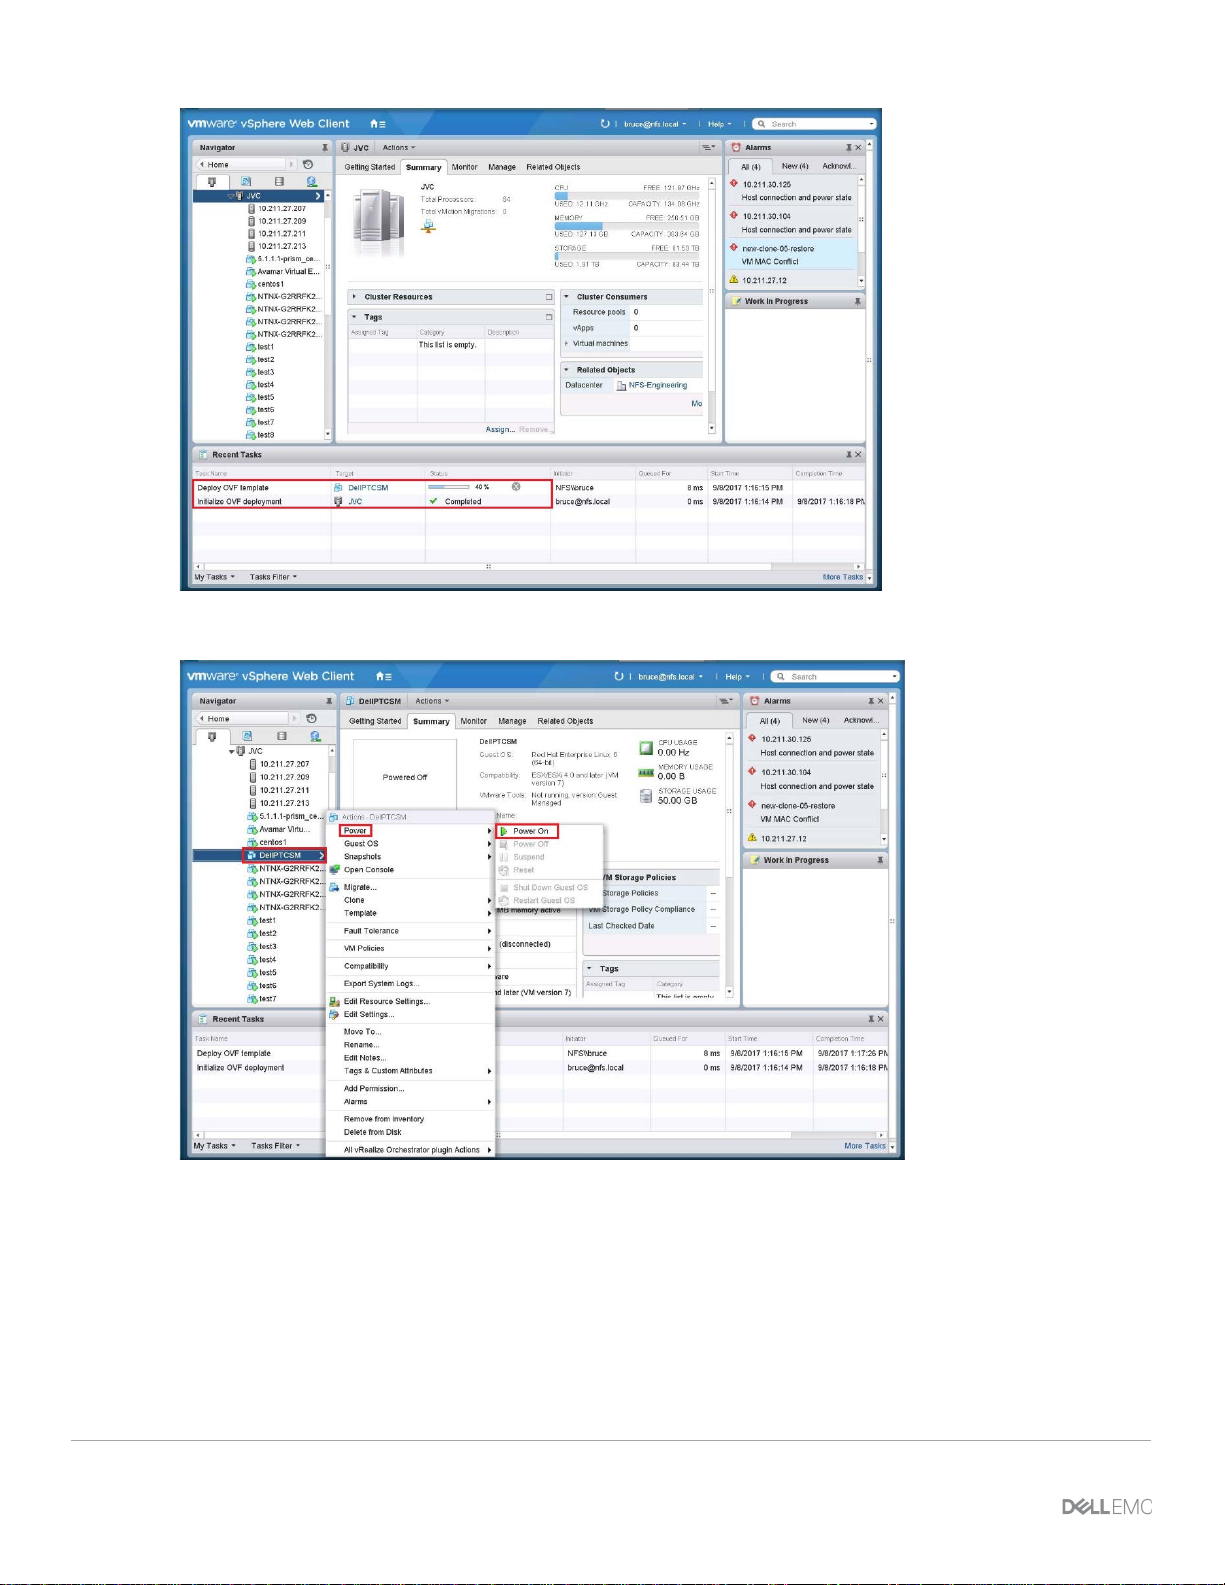
14. Check the Power on after deployment checkbox (optional).
Review the information. If you need to make change s, click Back. If the information is correct, click
Finish.
The vSphere Web Client deploys the DPMC VM and di splays progress in the bottom frame.
16 XC Series Data Protection Management Console Administrator’s Guide | A02
Page 17
Data Protection Management Console (DPMC) deployment and registration with Prism Central
15. In the left pane of vSphere Web Client, right-click on the DPMC VM and select Power On from the menu.
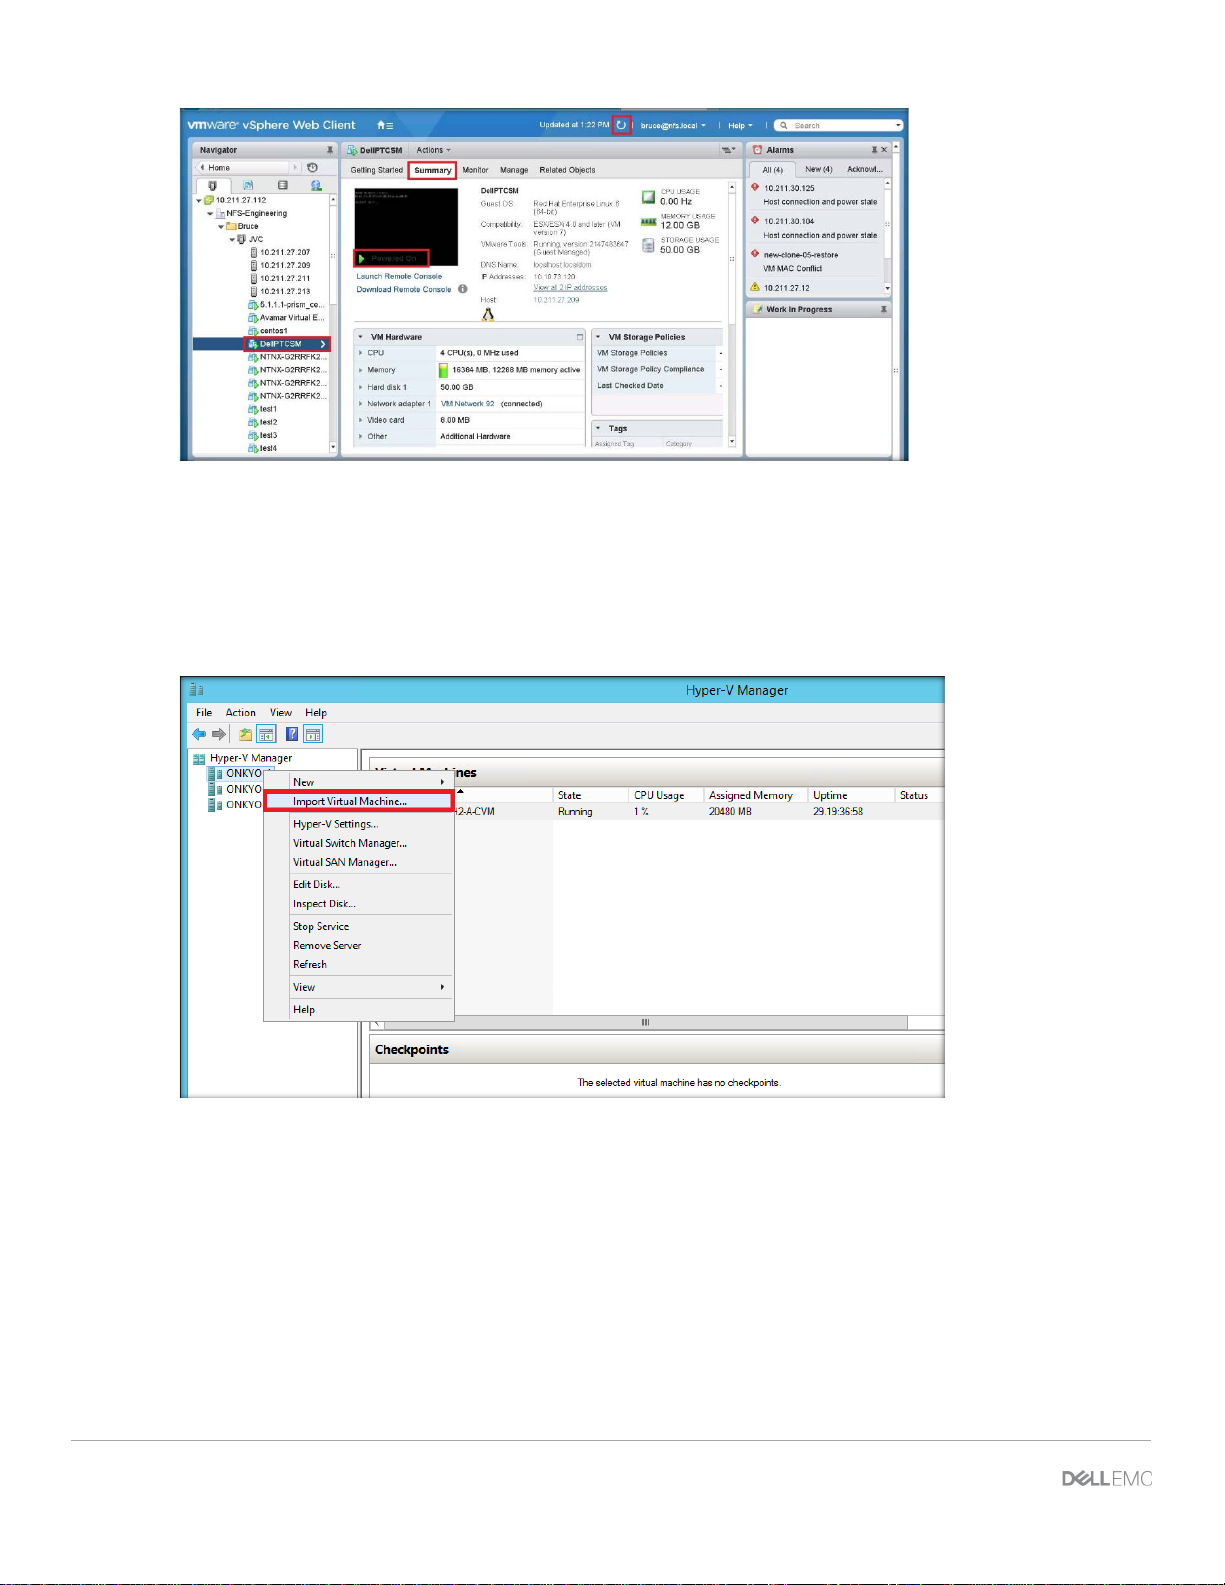
16. After a few seconds, the DPMC displays as Powered On in the Summary tab. You may need to click the
Refresh button to see the power status sooner.
17 XC Series Data Protection Management Console Administrator’s Guide
Page 18
3.3.6 Deployment of DPMC Hyper-V Virtual Machine
The process to deploy a Hyper-V DPMC Virtual Machine can be performed in Hyper-V Manager, or Virt ual
Machine Manager. The following sections demonstrate the deployment of a DPMC VM in Hyper-V Manager.
1. In Hyper-V Manager, on the left pane, select t he host where the DPMC VM will be hosted. Right-click and
select Import Virtual Machine.
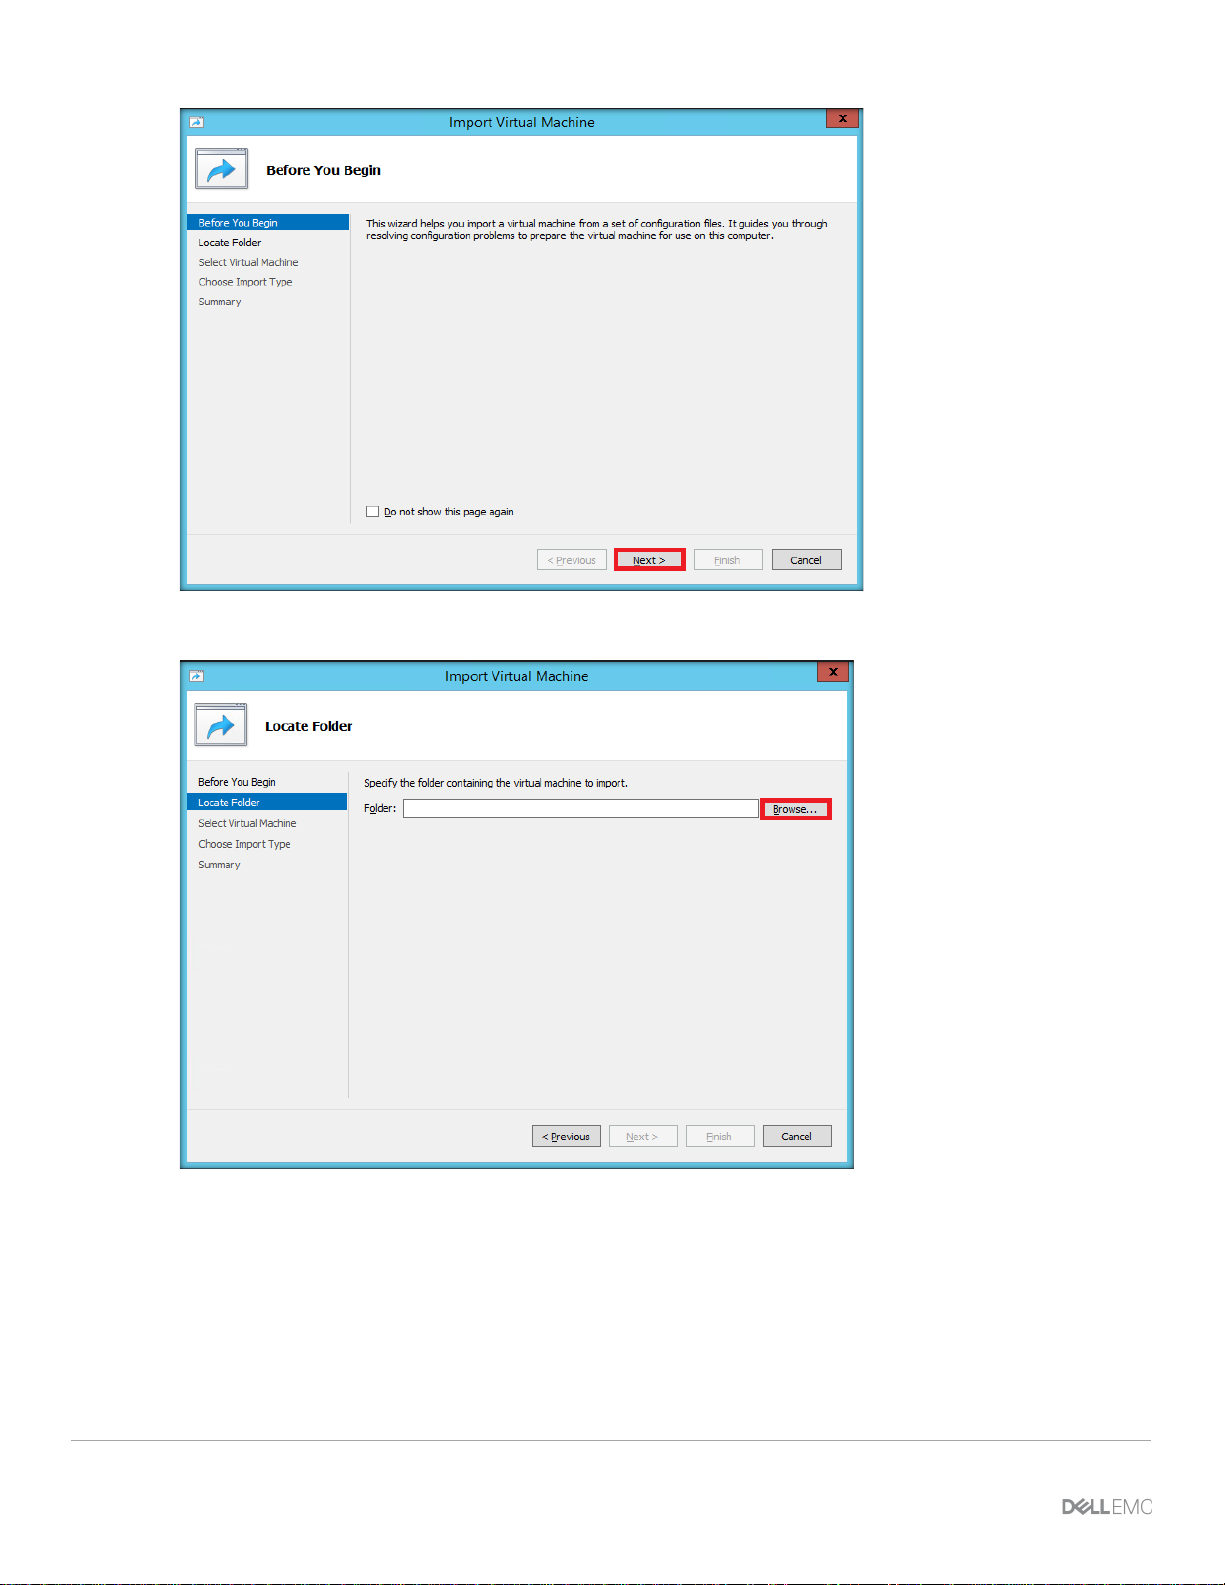
2. Click Next.
18 XC Series Data Protection Management Console Administrator’s Guide | A02
Page 19
Data Protection Management Console (DPMC) deployment and registration with Prism Central
3. Click Browse to locate the DPMC VM package.
4. After the selected Folder is displayed, click Next.
19 XC Series Data Protection Management Console Administrator’s Guide
Page 20
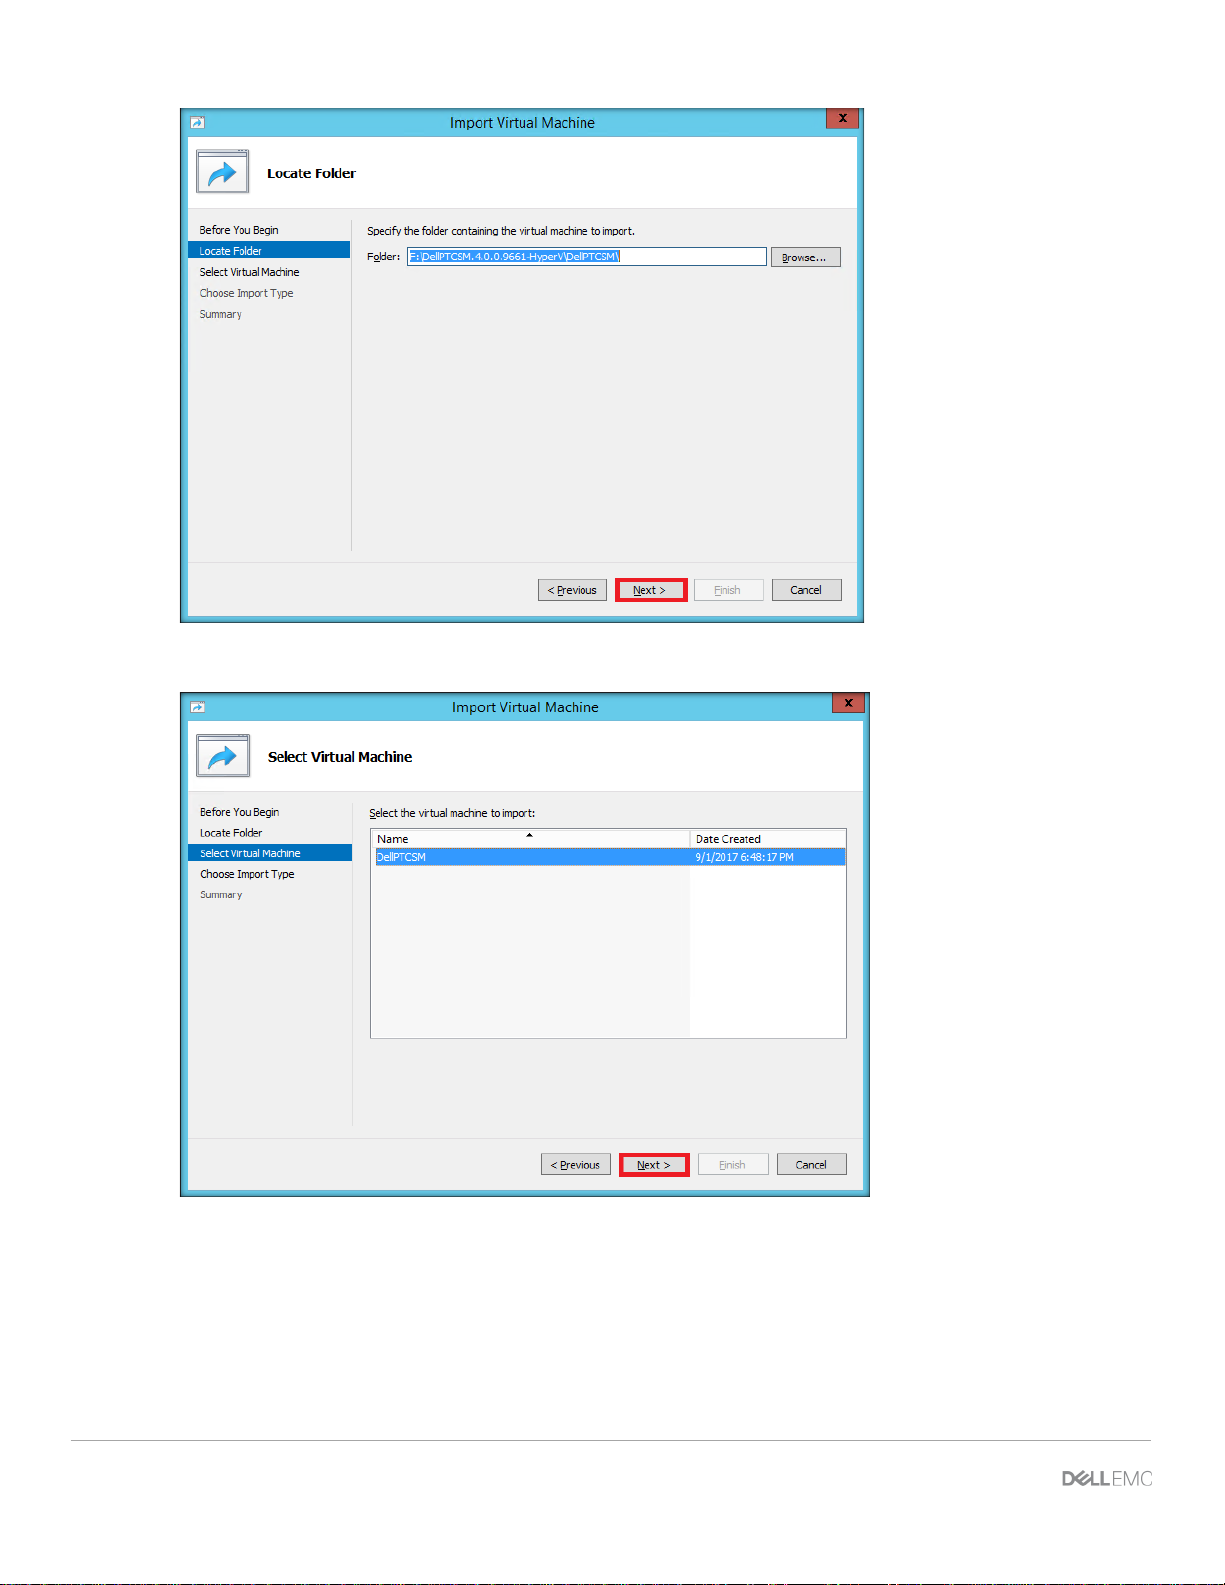
5. Select the virtual machine and then click Next.
6. Select the import type and then click Next.
20 XC Series Data Protection Management Console Administrator’s Guide | A02
Page 21

Data Protection Management Console (DPMC) deployment and registration with Prism Central
7. Choose the destination for DPMC VM file on the appropriate Nutanix storage container and then click
Next.
WARNING: Do not select storage shared with Avamar VMs or proxies. Do not select any of t he SATADOMs
(on XCx30 appliances). You may need to create a new Nuta ni x storage container if there is not one
available.
8. Choose the storage folder for the DPMC VM virtual hard disk and then click Next.
21 XC Series Data Protection Management Console Administrator’s Guide
Page 22
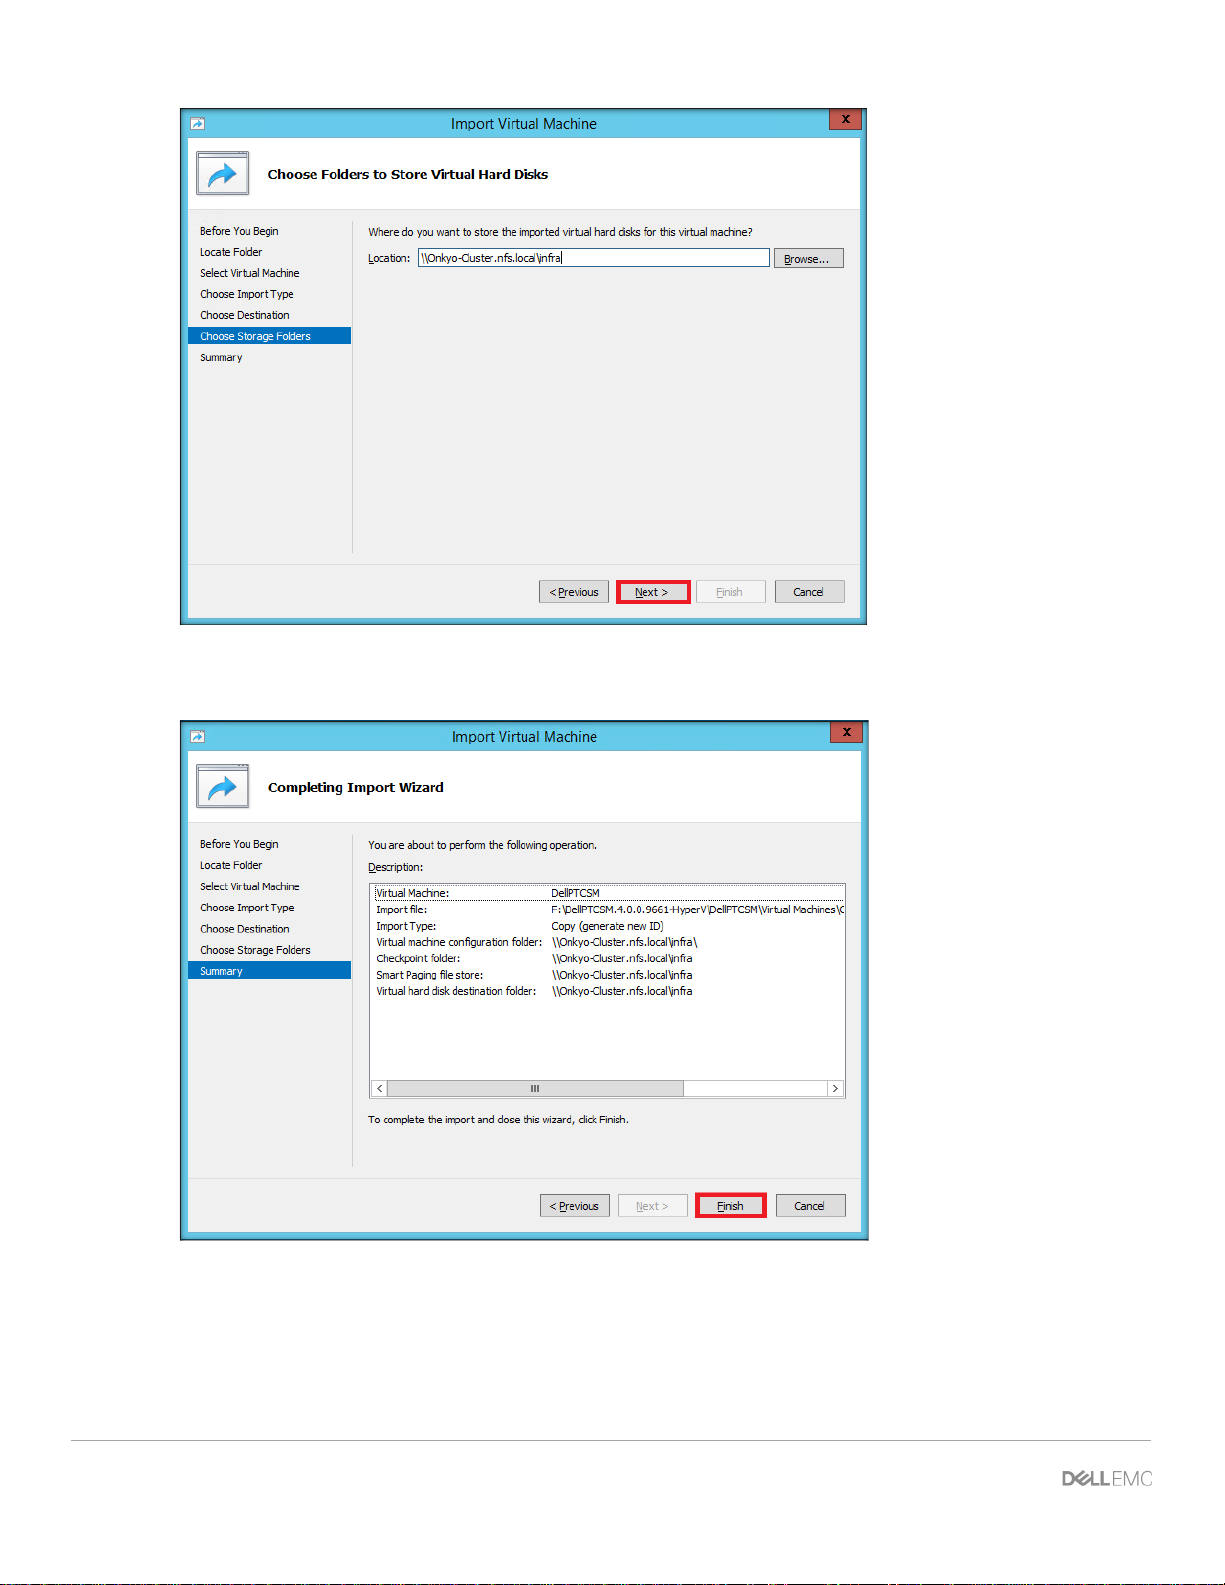
9. Review the summary. Click Previous to make any necessary changes.
10. To complete the DPMC VM import, click Finish.
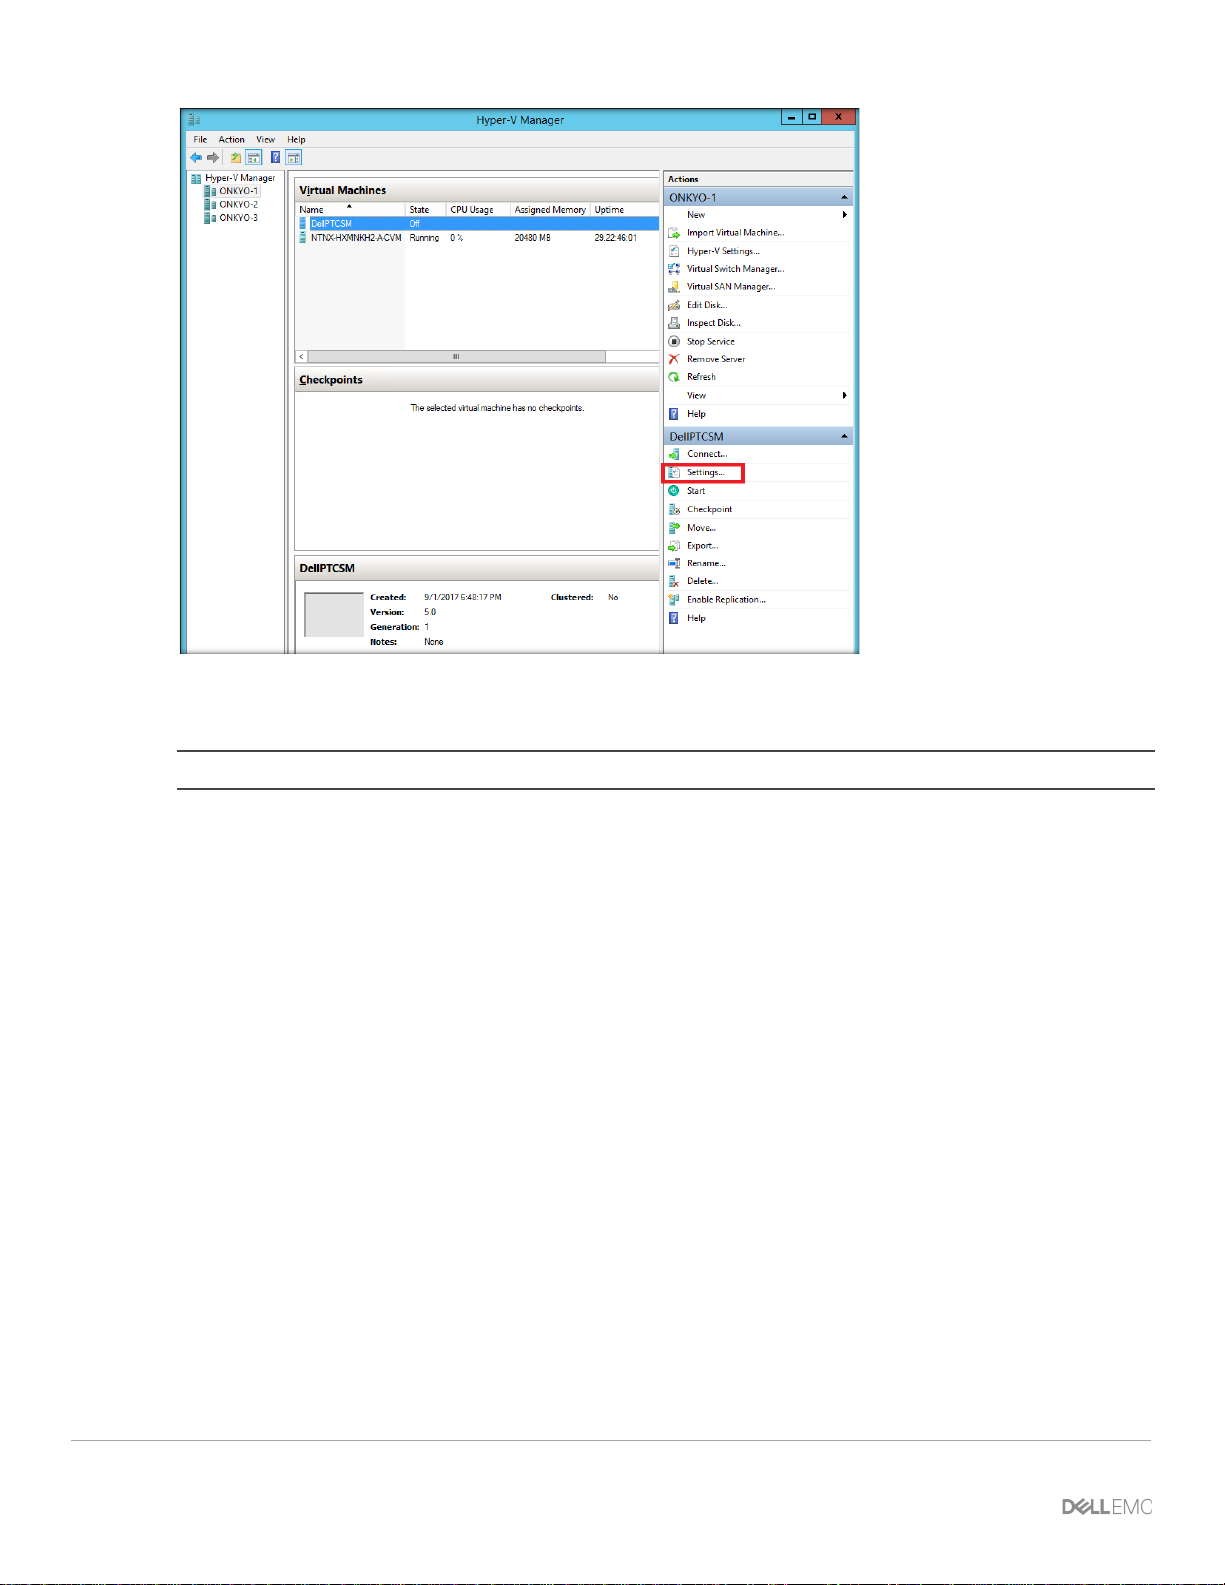
11. From the Hyper-V Manager, select the DPMC VM and go to Settings.
22 XC Series Data Protection Management Console Administrator’s Guide | A02
Page 23
Data Protection Management Console (DPMC) deployment and registration with Prism Central
12. From the Virtual switch drop-down menu, select ExternalSwitch to connect the network adapter to an
external switch.
NOTE: You can enable a VLAN ID at this time if needed.
13. Click OK.
23 XC Series Data Protection Management Console Administrator’s Guide
Page 24
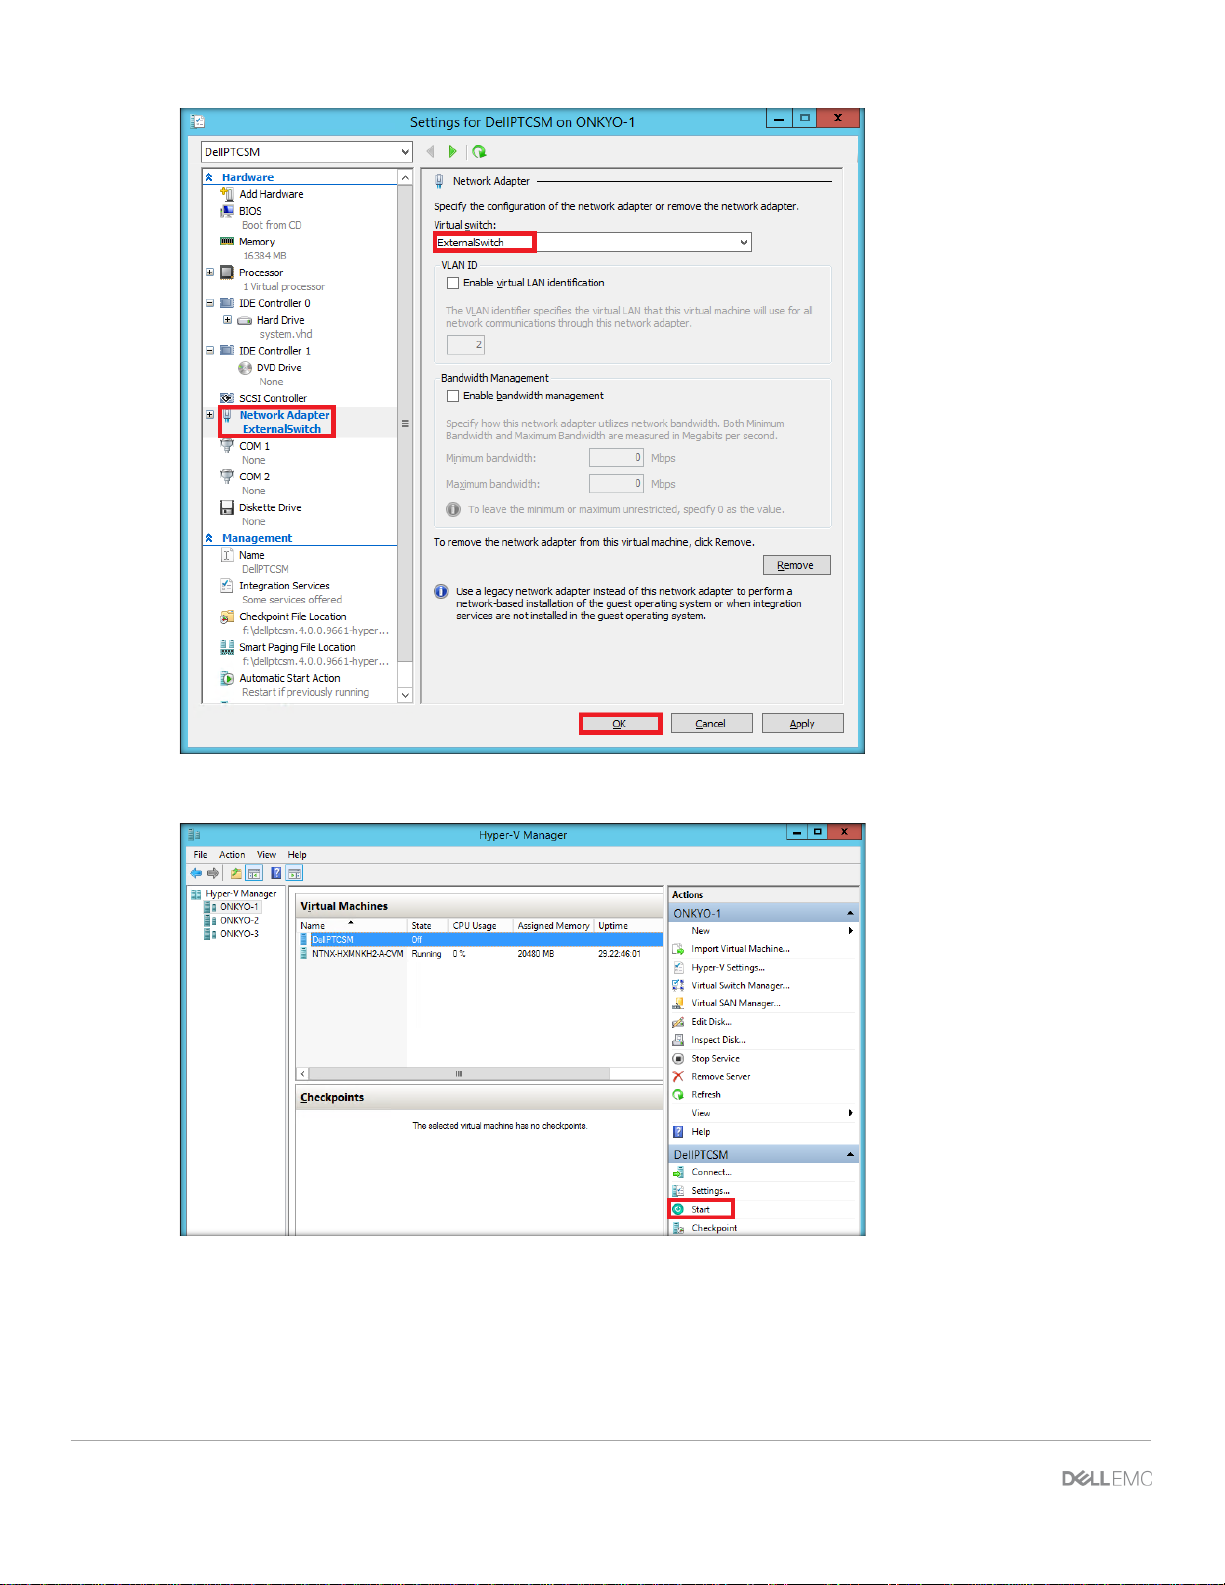
14. To turn on the DPMC VM, in the right pane, click Start.
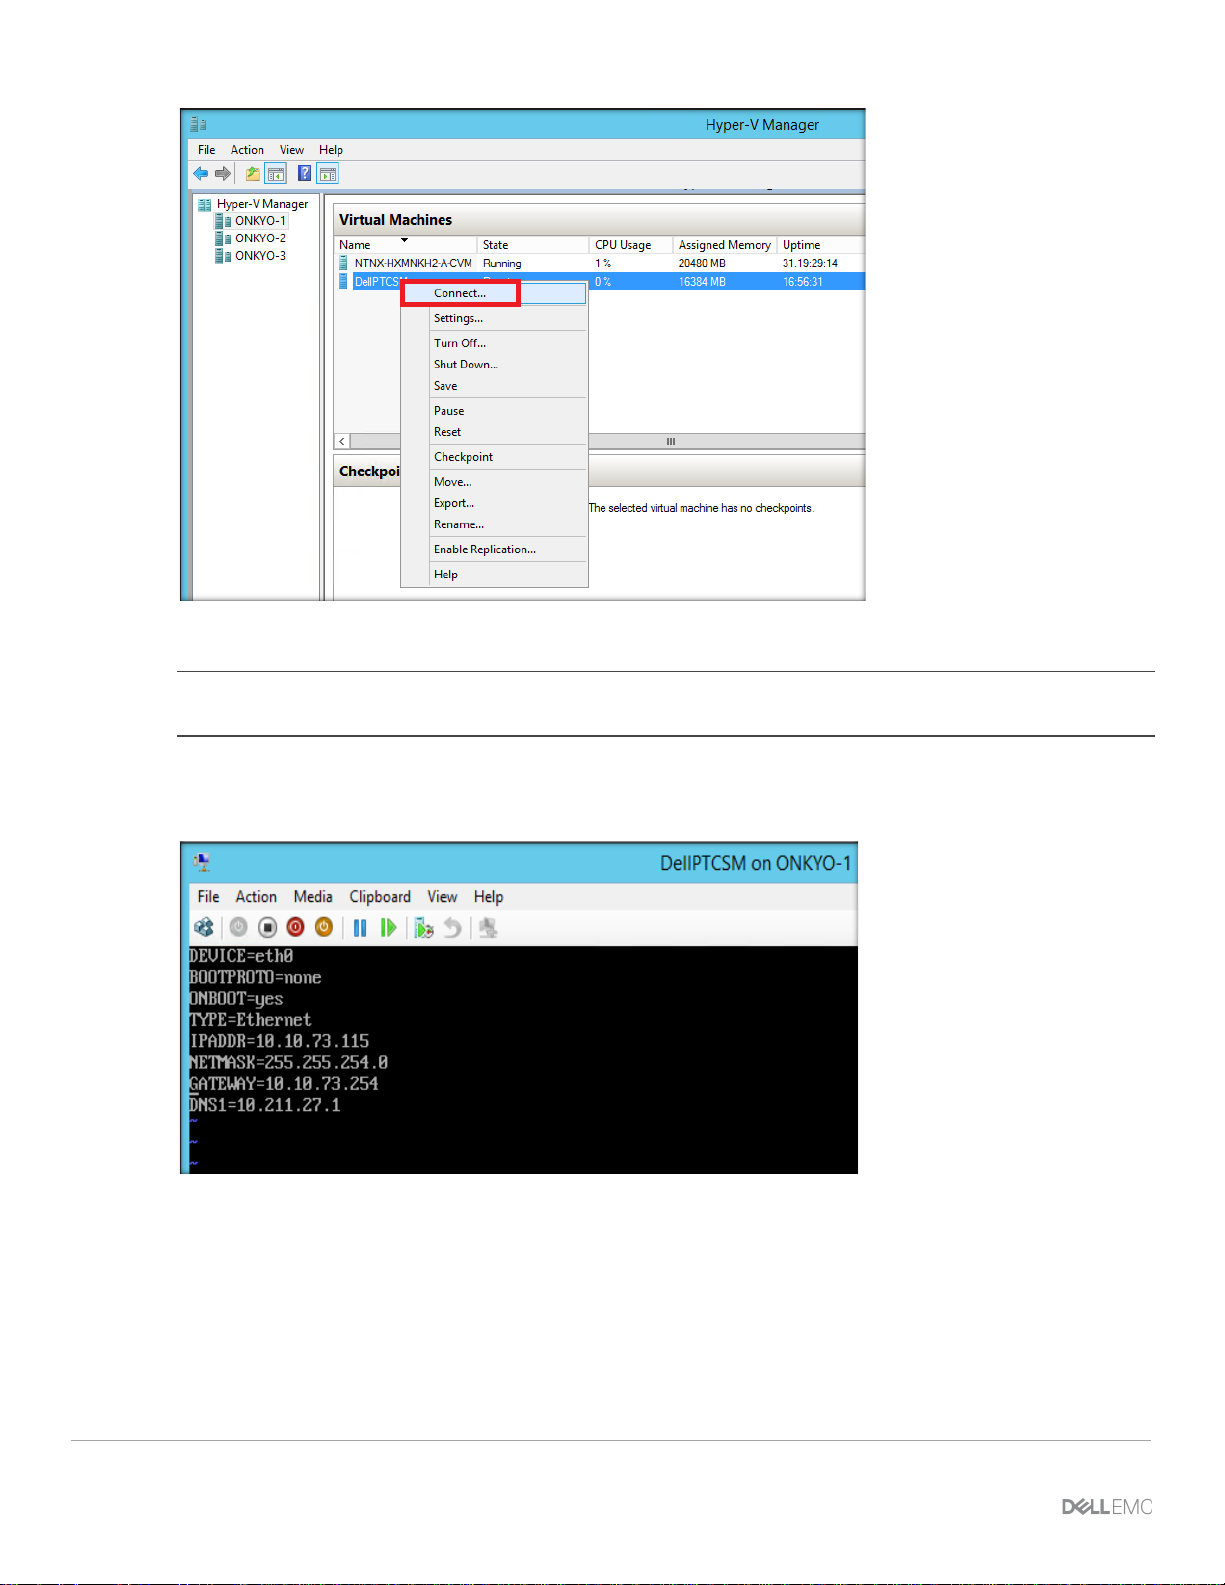
15. To launch the console, right-click on the newly imported DPMC VM and select Connect.
24 XC Series Data Protection Management Console Administrator’s Guide | A02
Page 25
Data Protection Management Console (DPMC) deployment and registration with Prism Central
16. In the DPMC VM console, open the configuration file for the first network interface, et h0.
NOTE: For assistance with Hyper-V deployment requiring login to the DPMC filesystem, contact Dell EMC
support.
sudo vi /etc/sysconfig/network-scripts/ifcfg-eth0
17. Edit the network configuration to set static IP address and other network information.
18. Open the server’s /etc/sysconfig/network file, modify the HOSTNAME and DOMAINNAME to match
your FQDN and then save the file.
25 XC Series Data Protection Management Console Administrator’s Guide
Page 26
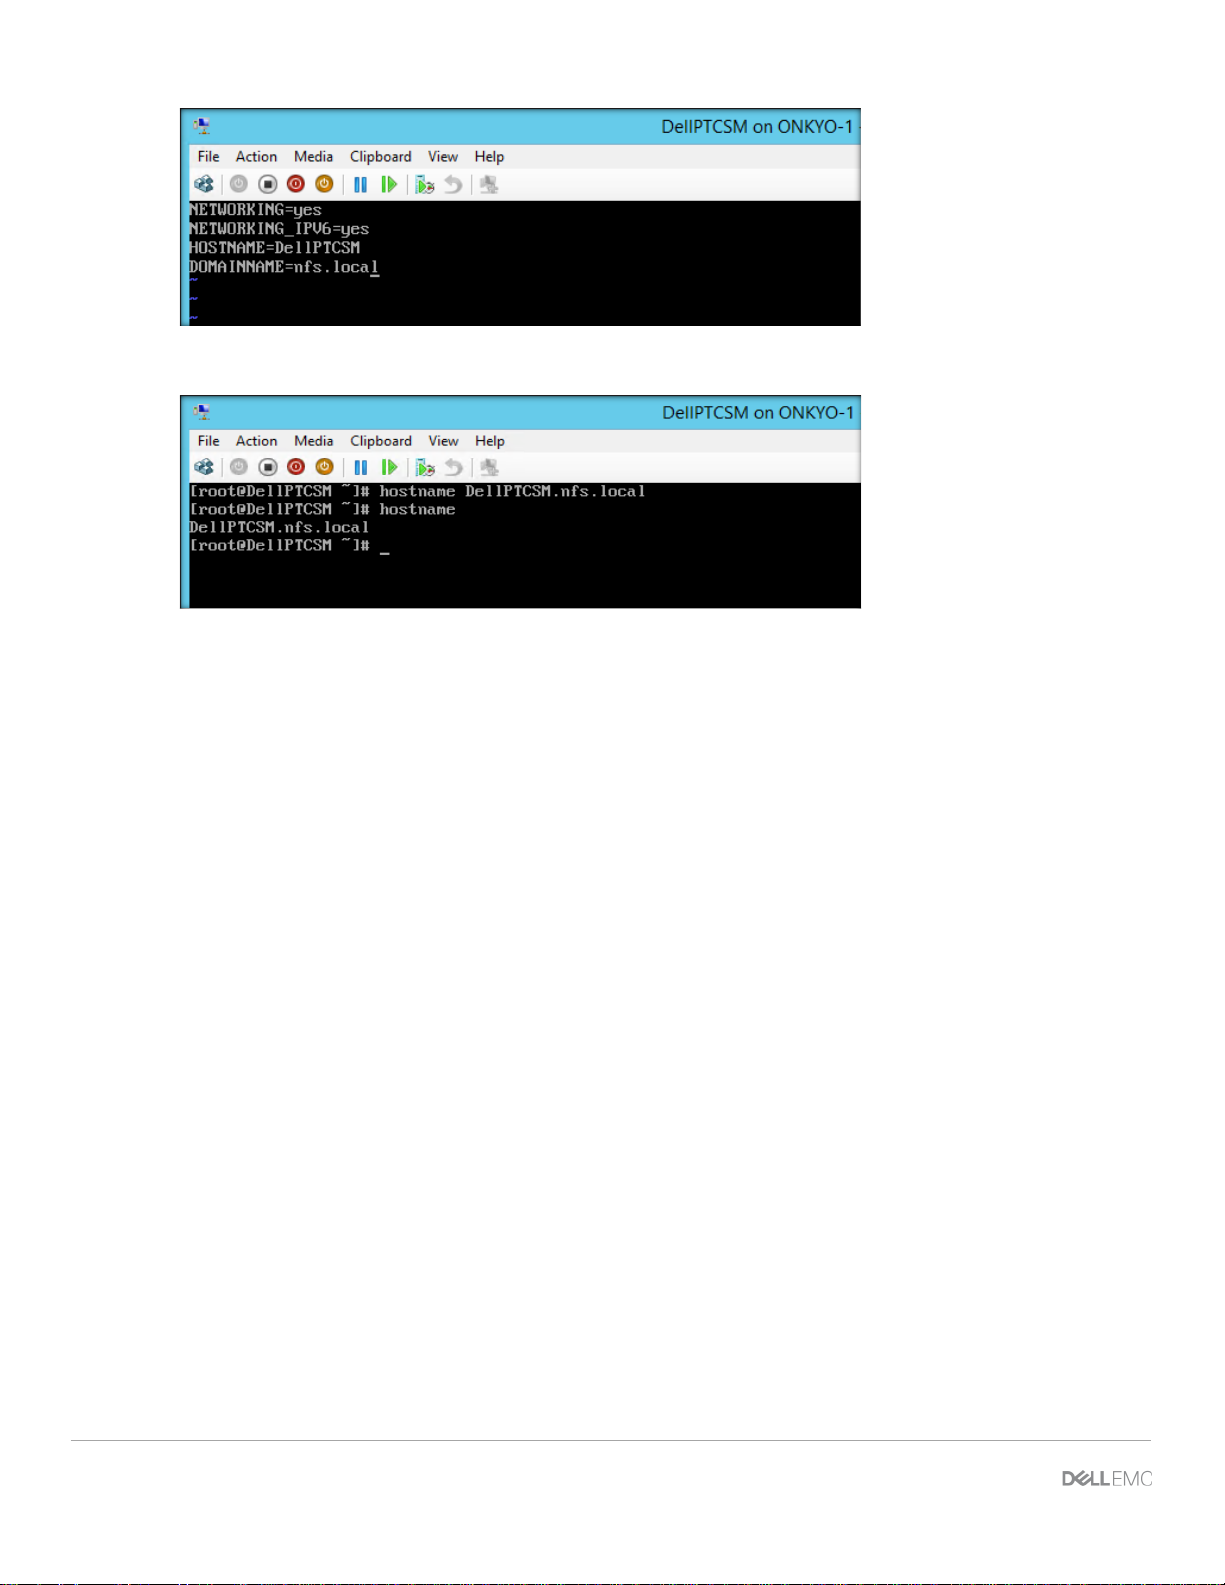
19. Run the hostname command using your FQDN to update the host name.
20. To implement the changes, restart the network service:
service network restart
26 XC Series Data Protection Management Console Administrator’s Guide | A02
Page 27

Linking DPMC with Prism Central
4 Linking DPMC with Prism Central
DPMC works seamlessly with Prism Central and supports all ESXi and Hyper-V clusters registered with Prism
Central (AHV is not supported). You can connect Prism Central after DPMC is powered on.
4.1 Powering on and launching DPMC web interface
To power on and launch the DPMC web interface:
1. Launch the vSphere Client or vSphere Web Client, and then log into the vCenter Server. In Hy per -V,
launch the Hyper-V manager.
2. Locate the DPMC VM.
3. Right-click Power>Turn on VM.
4. Open the console window to monitor the power-on process until the power on is completed and no error
message is displayed.
5. After DPMC is successfully powered on, launch the DPMC web interface using the Network address
provided during the DPMC VM installation.
NOTE: Google Chrome is the only web browser that supports DPMC.
4.2 Connecting with Prism Central
To connect Prism Central with DPMC, you need the P rism Central IP address and credentials. You must
access DPMC with a Prism Central local user account wit h Admin privileges other than the default admin
account.
NOTE: After you have registered DPMC with Prism Central, the registration lasts for t he li fetime of the DPMC
instance and cannot be changed.
During login, DPMC can also determine the account type (default admin or non-admin) and display s an error
if you try to access Prism Central as admin.
1. Use a web browser to connect to the DPMC web interf ace by entering the IP address assigned to DPMC
during deployment.
2. Enter the Prism Central IP address, username and password of Prism Central on the initial page. Click
the arrow.
27 XC Series Data Protection Management Console Administrator’s Guide
Page 28

NOTE: This step associates DPMC with Prism Cent ral for the life of the DPMC instance, which cannot be
changed.
3. After DPMC is successfully connected to Prism Cent ral, the DPMC home page is displayed.
28 XC Series Data Protection Management Console Administrator’s Guide | A02
Page 29

Linking DPMC with Prism Central
NOTE: The home page displays No data available because no associat i on to Avamar has been completed for
the Avamar Server.
29 XC Series Data Protection Management Console Administrator’s Guide
Page 30
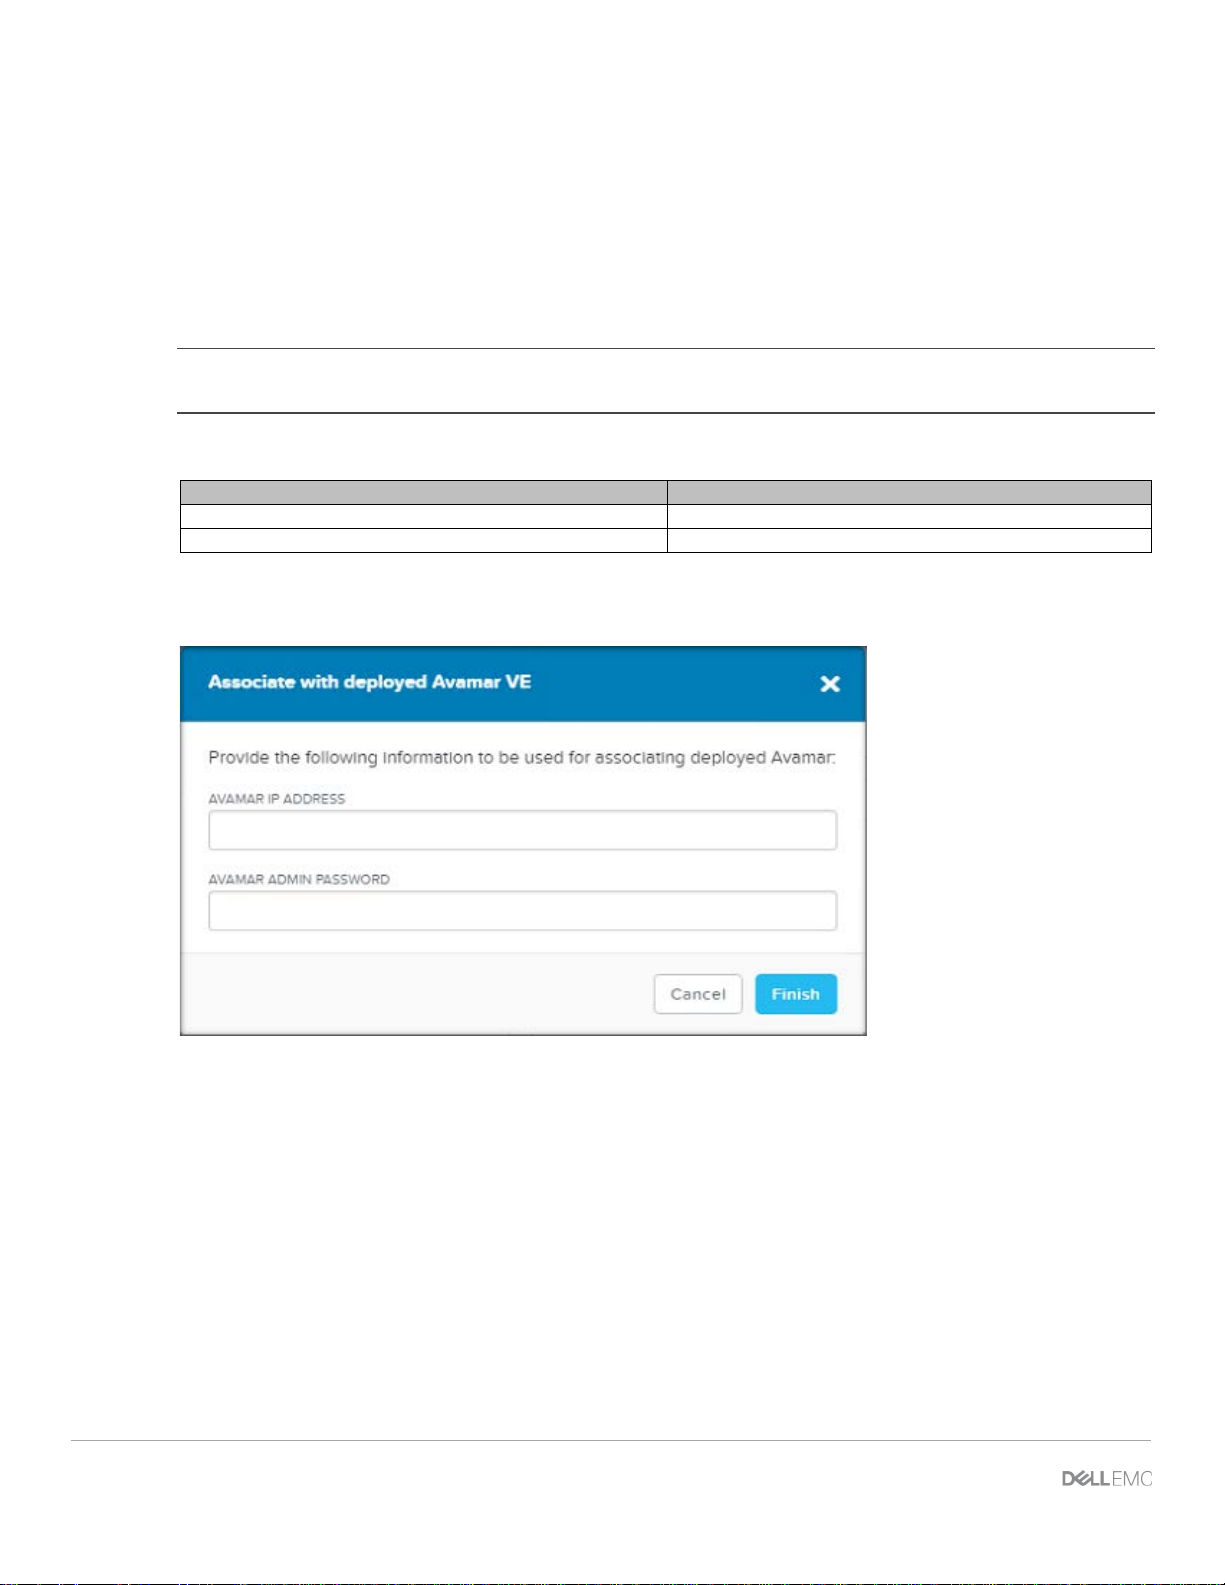
Field
Description
AVAMAR IP ADDRESS
The IP address of the AVE VM.
AVAMAR ADMIN PASSWORD
The password for the admin user in AVE.
5 Association of Avamar with DPMC Virtual Machine
To associate an Avamar Virtual Edition (AVE ) i nstance with DPMC, you need a web browser to connect to the
DPMC web interface.
The blank frames, displayed above, are intended t o be populated with the AVE and Data Domain information.
To allow DPMC to populate these frames, deploy AVE and associate it with DPMC.
1. From the Settings (gear tool) drop-down menu, select Associate with Deployed Avamar VE.
NOTE: Consult the Avamar documentation for the deployment of the AVE VM and associating AVE with Data
Domain.
2. From the pop-up screen, enter the following inf ormation:
3. Click Finish.
After DPMC successfully connects to AVE, the system populat es the frames on the DPMC Home page with
AVE and Data Domain information. All Avamar server information is updated by DPMC and is gathered every
15 minutes.
30 XC Series Data Protection Management Console Administrator’s Guide | A02
Page 31

Association of Avamar with DPMC Virtual Machine
Widget
Information Provided
Avamar Server Summary
Avamar Health
License Expiration
Data Domain Server Summary
Data Domain Host Name
Monitoring Status
Avamar Metadata Storage
Utilization
Bytes Protected by AVE
Data Domain File System Summary
Utilization
Available capacity of the Data Domain storage
The following table specifies the information provided on the DPMC Home page wit h AVE and Data Domain
information:
DPMC home page with AVE and Data Domain inform at i on
Avamar Host Name
Avamar Version
Last Validated Checkpoint
Data Domain Health
Data Domain OS Version
Data Domain System Name
Total capacity of the AVE meta data storage
Available capacity of the AVE meta data storage
Total capacity of the Data Domain file system stor age
DPMC Home page with AVE and Data Domain informat i on
31 XC Series Data Protection Management Console Administrator’s Guide
Page 32

6 DPMC web interface menu overview
The following sections describe the user interface.
6.1 Home page
The home page is the main dashboard providing an ov eral l summary of important information in the form of
widgets and menu items.
The home page is the default page that is displayed after logging into t he sy st em . The home page is always
accessible from other pages by clicking on the Dell EMC logo on the management toolbar.
6.2 Home page widgets
The home page has widgets that serve as the main inf ormation window for the customer. The following
widgets are displayed on the home page:
• Avamar Server Summary
• Avamar Metadata Storage
• Data Domain Server Summary
• Data Domain File System Summary
• Activity Summary (Last 24 hours)
• XC Series Cluster and VM Summary
• Critical Alerts
• Warning Alerts
• Info Alerts
• Events
Home page displaying the widgets
32 XC Series Data Protection Management Console Administrator’s Guide | A02
Page 33

DPMC web interface menu overview
Menu item
Description
Home
Links to Home page and additional options
Alerts
Links to additional menu of system alerts
Help
Links to Help menu items
Settings
(gear tool)
Links to Setting options
Admin
Links to administrative submenu items
Menu Item
Description
Home
Links to Home page.
VM
View and interact with VMs registered to Prism Central and managed by
DPMC.
Cluster
View and interact with XC clusters registered to Prism Central and
managed by DPMC.
Alerts
View and interact with alerts displayed by the application.
6.3 Home page menu items
The home page also has a drop-down menu of items available. T he home page menu items are always
available from the top of all pages.
Home page menu items
Home page menu items
6.3.1 Menu from Home drop-down
The Home drop-down menu displays the following opt i ons:
Home drop-down menu
6.3.1.1 Home submenu
The Home submenu item links you to the home page.
33 XC Series Data Protection Management Console Administrator’s Guide
Page 34

Sortable item
Description
VM Name
Displays the VMs that are in XC cluster and managed by Prism Central.
Cluster Name
Displays the name of the cluster for the correspondin g VMs.
Host
Displays the name of the Host that holds the corre sponding VM.
IP Address
Displays IP address of the VM.
Backup protection status
Displays Protected or Unprotected status. A VM is determined to be
successful backup less than 72 hours old.
Avamar Group
Displays all Avamar backup groups that a VM is a member of.
Retention Policy
Displays retention policy of the VMs.
Last backup (Date)
Displays the last date of backup associated with t he VM.
Last backup status
Displays the latest backup status.
Last successful backup
Displays the last successful backup.
6.3.1.2 VM submenu
The VM submenu item links you to the page where you can view and interact with the VMs that are managed
by the application. It contains a sortable table of V M s and ot her menu items.
The following table is a list of items for the VMs. The VM t abl e i s so rtable and filtered by one or all of the
following:
VM submenu items
Protected if it is a member of an active Avamar backup group or contains a
VM page
34 XC Series Data Protection Management Console Administrator’s Guide | A02
Page 35

DPMC web interface menu overview
Item
Description
XC Series Cluster Name
The name of the cluster that are managed by Prism Central.
Acropolis (AOS) version
Nutanix operating system for corresponding cluster.
Hypervisors
Cluster hypervisor.
Number of Hosts
Number of nodes for the corresponding cluster.
Number of VMs
The total number of VMs on the cluster.
VMs Protected
Number of VMs that are protected from the cluster.
Monitoring status
Configuration to be done when a new VM is added to the cluster.
Default retention
Default retention policy chosen for the cluster.
By using the Select Filter drop-down, you can select a filter to sort the VMs by Cl uster Name and Backup
protection.
Select Filter
6.3.1.3 Cluster submenu
The cluster submenu is a drop-down item in the management toolbar where you can view and interact with
the XC clusters that are registered to Prism Central and managed by DPMC.
The Cluster page contains a sortable table of clusters, which may be filtered by one or all of the following:
Cluster submenu items
35 XC Series Data Protection Management Console Administrator’s Guide
Page 36

Item
Description
NONE
No automated action is taken by DPMC. Manual configuration and
protection may still be configured.
NOTIFY ONLY
DPMC provides alerts for new VMs detected in the DPMC Alerts page but
protection may still be configured.
NOTIFY AND AUTO-
DPMC automatically protects new VMs on the cluster with the default
taken.
RETENTION POLICY
The default retention policy for a cluster selected from all available
protection is enabled on the cluster.
XC Series Cluster page
NOTE: You can search the cluster table for any text from the Search the Table field.
The Cluster page provides the option of configuring the action to perform when a new VM is detected on the
cluster. You can choose from the following options:
PROTECT
does not perform any action on the VMs. Manual conf i gurat i on and
retention policy selected for the cluster and provides an alert for the action
retention policies in Avamar. This policy is used to p rotect VMs when auto-
Manage Nutanix Clusters
36 XC Series Data Protection Management Console Administrator’s Guide | A02
Page 37

DPMC web interface menu overview
Item
Description
Severity (Info,
Warning, Critical)
Severity level.
Issue
Short description of the reason for the alert.
Time Stamp
Date/time the alert was generated.
Acknowledged
User and date/time it has been marked acknowledged or unacknowledged.
Resolved
User and date/time it has been marked resolved or unresolved.
Entities
Entity generating the alert.
6.3.1.4 Alerts submenu
The Alerts submenu item is where you can vie w and interact with alerts displayed by the application.
The Alerts page contains a sortable tabl e, which may be filtered by one or all of the following:
Alerts submenu items
Alerts page
The Select Filter option lets you sort alerts by severity and resoluti on. It also displays alerts based on
timeline. You can select alerts within a specific time frame for a particular severity and the resolution status.
37 XC Series Data Protection Management Console Administrator’s Guide
Page 38

Alert
Description
Acknowledge
Updates the acknowledge status of the alert with the date/time and user who
performed the action
Resolve
Updates the resolve status of the alert with the date/time and User who performed the
action.
Select filter on Alerts page
When alert(s) are selected in the alerts table, you have the option to Acknowledge or Resolve the selected
alerts.
You also have an option to perform the same action on all al erts or clear the selection.
Acknowledge and Resolve on the Alerts page
38 XC Series Data Protection Management Console Administrator’s Guide | A02
Page 39

DPMC web interface menu overview
Item
Description
Message
Description of the event
Modified by
Entity that generated the event
Acknowledged
Acknowledgment status
Time Stamped
Time the event occurred
The second tab on this page is for events. The Event page contains a sortable table that you can filter by one
or all of the following:
Event page items
Event page
You can manage the events from this page (review, acknowledge and other activities).
39 XC Series Data Protection Management Console Administrator’s Guide
Page 40

Menu item
Description
Associate with Deployed Avamar
VE
This option only appears when DPMC has not been associated with an
Avamar VE.
Manage XC Series Clusters
Monitors status and default Avamar Retention pol icy for each Nutanix
cluster.
Avamar Registration
Update Avamar IP address or credentials.
Backup schedule
The VM backup schedule.
Retention Policies
Configure and manage VM retention policies.
On-demand Backup
Allows you to back up any individual from the VM table on the VM page
Deploy Avamar vSphere Proxies
Allows you to deploy the Avamar vSphere proxies (ESXi only).
Launch Avamar Administrator
Allows you to launch the Avamar administrator.
Support Bundle
Generate a log bundle that contains log files from both DPMC and Avamar.
UI Settings
Configure web session timeout.
Upgrade Software
Allows you to upgrade the DPMC.
6.3.2 Settings (gear tool) menu
The Settings (gear tool) menu contains the following submenu options:
Settings (gear tool) menu items
Settings (gear tool) menu
6.3.2.1 Associate with Deployed Avamar VE
This menu item allows the user to associate an existi ng AVE with DPMC. This menu item is explained in the
Association of Avamar with DPMC Virtual Machine section.
40 XC Series Data Protection Management Console Administrator’s Guide | A02
Page 41

DPMC web interface menu overview
After the association and validation is complete, t he menu item to associate an existing AVE with DPMC wil l
no longer display in the Settings (gear tool) drop-down menu.
6.3.2.2 Manage XC Series Clusters
This menu item selects the monitoring status and default Avamar Retention policy for each Nutanix cluster.
You can select no monitoring, notification of new unprot ect ed VMs only or notification and auto-protection of
new VMs.
On this setup page, you can manage the cluster.
You can select the monitoring status of the cluster as well as
the default retention policy. After selected, DPMC manages the cluster and all the VMs associated with that
cluster based on the selection.
DPMC is notified when Nutanix clusters are joined to the Prism Central instance; therefore, if any new cluster
is added, DPMC will display the new cluster. DPMC a l so c hecks the heartbeat of each cluster that P rism
Central is connected. If the cluster is in an unreachable state, you are not able to initiate any actions on that
cluster.
Manage XC Series Cluster
41 XC Series Data Protection Management Console Administrator’s Guide
Page 42

6.3.2.3 Avamar registration
This submenu item allows you to configure the Avamar i nst ance being managed, update the IP address or
change the credentials if needed.
NOTE: Updating the Avamar Registration does not update any settings on the Avamar server itself. This is to
update DPMC with the correct information in the case where you have reconfigured one or more of the
settings on Avamar.
Avamar Registration
After the Avamar registration is selected, a pop-up window is displayed. To edit the Av am ar s etting, click the
Edit icon, update the appropriate fields and then click Save.
Edit icon
42 XC Series Data Protection Management Console Administrator’s Guide | A02
Page 43

DPMC web interface menu overview
HOSTNAME
6.3.2.4 Backup schedule
This menu item configures the frequency of A vamar scheduled backups for DPMC managed VMs. You can
change the default as needed.
Backup Schedule
DPMC automatically defines a single backup schedule. The name of the Avamar backup schedule group is
XC-Series-DPMC-Schedule. The default configuration for the backup schedule is to run dai l y backups at
10:00PM in the Avamar server’s time zone. DPMC expects less network traffic at 10PM. However, you can
select a different schedule if necessary.
43 XC Series Data Protection Management Console Administrator’s Guide
Page 44

Update Backup Schedule
6.3.2.5 Retention Policies
This menu item provides you the ability to create new ret ention policies. DPMC creates the following default
Avamar retention policies:
• XC-Series-Gold (90 days)
• XC-Series-Silver (60 days)
• XC-Series-Bronze (30 days)
Retention Policies
After you select the Retention Policy button, a page is displayed that allow s you to create a new retention
policy.
44 XC Series Data Protection Management Console Administrator’s Guide | A02
Page 45

DPMC web interface menu overview
Add new retention
To create a new retention policy, click + New Retention.
After the new retention policy window opens you can provide a name for the new policy and configure the
retention of the backups using one of the basic options or the advanced settings.
For a basic retention policy select one of the following:
• Retention period
• End date
• No end date
45 XC Series Data Protection Management Console Administrator’s Guide
Page 46

Create basic Retention Policy
For an advanced retention policy, you may define the retention period in days, weeks, months or years for
one or more of the following:
• Dailies
• Weeklies
• Monthlies
• Yearlies
46 XC Series Data Protection Management Console Administrator’s Guide | A02
Page 47

DPMC web interface menu overview
6.3.2.6 On-demand Backup
On-Demand backup lets you initiate a one-time backup of one or more VMs managed by DPMC including
VMs across multiple clusters.
47 XC Series Data Protection Management Console Administrator’s Guide
Page 48

On-Demand Backup from Setting (gear tool)
You can select multiple VMs or a particular VM to backup. After the on-demand bac kup is requested, DPMC
immediately initiates the backup action on the V M requested.
On-Demand Backup
After you select the VM(s) that you want backed up, select Backup.
Click OK to confirm or cancel to go back and review.
On-demand backup confirmation window
A popup window is displayed momentarily informing you that the backup job was initiated successfully.
48 XC Series Data Protection Management Console Administrator’s Guide | A02
Page 49

DPMC web interface menu overview
6.3.2.7 Deploy Avamar vSphere Proxies (ESXi only)
This menu item is always displayed but only applies to ESXi clusters.
This menu item deploys Avamar vSphere proxi es according to the Avamar Server recommendation. Proxy
VMs facilitate backup activities for Avamar on ESXi clusters and are require d for backing up VMs. A proxy
deployment recommendation may be performe d at any time, but DPMC prompts the user to run the proxy
deployment recommendation when a new ESX i clust er is discovered. DPMC deploys these proxy VMs with
minimal effort. This action must be completed during the initial configuration.
Deploy Avamar vSphere Proxies
Proxy VM creation is described in detail in the v Sphere Proxies for ESXi section of this document. This step
may take 10 minutes or more based on number of clust ers to be configured.
NOTE: Proxy VMs are created using vCenter and must remain with the host (i.e. cannot be migrated). An
Avamar or DPMC VM deletion will not delete the proxy VMs.
6.3.2.8 Launch Avamar Administrator
You can manage Avamar by using the Avamar Admini st rat or applet.
DPMC provides a download option. You can select the Launch Avamar Administrator item and DPMC will
install the administrator application on the management console.
You can also download the Avamar Administrator applet, directly from the Avamar web se rv er located at
https://xx.xx.xx.xx/dtlt/home.html, where xx.xx.xx.xx is the AVE web address.
49 XC Series Data Protection Management Console Administrator’s Guide
Page 50

Launch Avamar Administrator
If you want to launch the administrator from DPMC, DPMC launches a java application, which downloads the
application.
Avamar Administrator Java Application download
The DPMC runs the administrator application, which will start the Av amar M anagement Console Client. After
the application launches successfully, a window opens requesting the Avamar IP address and credentials.
50 XC Series Data Protection Management Console Administrator’s Guide | A02
Page 51

DPMC web interface menu overview
Login – Avamar Administrator
After you enter the proper credentials, the Avamar Administrator Console is displayed.
Avamar Administrator Console
6.3.2.9 Support Bundle
This menu item provides you a way to collect logs easily from DPMC. The Support Bundle is a unified
compressed support bundle or diagnostic file that is downloaded to the download f ol der. It includes
configuration information, licensing and log fi les f or DPMC and the Avamar server.
To download the file:
1. From the Settings (gear tool), click Support Bundle.
51 XC Series Data Protection Management Console Administrator’s Guide
Page 52

2. A popup is displayed requesting confirmation. Click OK.
3. After the file is generated, DPMC displays the log file downloaded in the left corner. The file is al so
available in the Downloads folder of the managem ent node.
4. DPMC and Avamar logs are downloaded to the browser in a singl e zip archive.
52 XC Series Data Protection Management Console Administrator’s Guide | A02
Page 53

DPMC web interface menu overview
NOTE: Keep the DPMC Web Console open until the bundle has d ownloaded completely. Otherwise, the
system cancels the operation.
6.3.2.10 UI Settings
UI settings set the security policy of the DPMC web s ession.
UI Settings
The UI Settings allow you to change the session timeo ut as needed.
53 XC Series Data Protection Management Console Administrator’s Guide
Page 54

Session Timeout
6.3.2.11 Upgrade Software
This item provides you the current build version and an easy way to upgrade the DPMC software if needed.
Upgrade Software
If you select the upgrade menu item, DPMC displays the current version and provides an upgrade choice.
54 XC Series Data Protection Management Console Administrator’s Guide | A02
Page 55

DPMC web interface menu overview
Version and upgrade choice
55 XC Series Data Protection Management Console Administrator’s Guide
Page 56

Upgrade
If DPMC is running the latest version, it displays a message that there is not an available version for upg rade.
You can download the upgraded version of DPMC from the internet, if necessary.
6.3.3 Admin menu
The home page has a drop-down Admin menu item that contains the following:
• About Dell EMC
• Sign Out
Admin drop-down menu
6.3.3.1 About Dell EMC
This menu item provides information about DPMC.
56 XC Series Data Protection Management Console Administrator’s Guide | A02
Page 57

DPMC web interface menu overview
About Dell EMC
About Dell EMC
6.3.3.2 Sign out
This menu item lets you sign out of the system.
Sign Out
After signing out you are returned to the DPMC login page.
57 XC Series Data Protection Management Console Administrator’s Guide
Page 58

DPMC login page
58 XC Series Data Protection Management Console Administrator’s Guide | A02
Page 59

Initial Configuration
7 Initial Configuration
After an Avamar instance is associated with DPMC, you need to deploy the proxy VM (for ESXi) or configure
Avamar clients for Hyper-V.
7.1 vSphere Proxies for ESXi
Avamar reduces the backup workload movement a cross clusters; therefore, the Avamar agent needs to be
installed on the cluster that you want to back up. Thi s is accomplished by deploying an Avamar Proxy. The
proxy VM works with VMware infrastructure and is required for ESXi cluster backups/restores.
DPMC can install and configure the Avamar vSphere Proxy VM. This option becomes available after an ESXi
cluster is discovered by DPMC or during initial setup.
Installing a proxy VM needs to be completed wh en DPMC associates an Avamar instance. Additionally, the
proxy VM deployment needs to be completed when a new cluster is added. After the cluster is added, DPMC
prompts to deploy the proxy VM.
After you select the Deploy Avamar vSphere Proxies menu item , DPMC performs a series of tasks to install
and configure the Avamar Proxy VM. If a failure occ urs, identify which step failed by checking the followi ng
progression.
1. To configure, click Deploy Avamar vSphere Proxy.
2. Configure the data change rate and the backup window.
59 XC Series Data Protection Management Console Administrator’s Guide
Page 60

3. After you provide the change rate and bac kup window time, DPMC queries the cluster str ucture.
This operation may take a few minutes because DPMC nee ds to retrieve all the cluster information from
Avamar. After the proxy deployment recommendation is generated, DPMC creates the proxy based on
the input provided.
4. Configure the Proxy VM by clicking the edit button.
60 XC Series Data Protection Management Console Administrator’s Guide | A02
Page 61

Initial Configuration
NOTE: If the recommendation determines that no addi tional proxy VM(s) are required, indicating t hey have
already been previously deployed through DPMC o r A vamar Administrator, you will see the message bel ow.
5. Click Finish to exit the proxy deployment wizard.
6. Validate the Proxy VM configuration.
61 XC Series Data Protection Management Console Administrator’s Guide
Page 62

7. DPMC attempts to validate forward and reverse DNS nam e resolution. If successful, the system prompts
you to deploy the proxy VM.
8. Submit the Proxy VM for creation after validation.
9. Status of Proxy VM creation is displayed.
62 XC Series Data Protection Management Console Administrator’s Guide | A02
Page 63

Initial Configuration
10. Check the vCenter for the proxy VM deployment status.
7.1.1 DPMC behavior if no proxy is created after adding a new cluster
A pop-up window is displayed every 30 seconds when DPM C detects that a new ESXi cluster has been
registered to Prism Central, prompting you to complete a proxy deployment recommendation. After you have
completed the steps for creating and deploying the proxy VM(s), the prompt disappears.
63 XC Series Data Protection Management Console Administrator’s Guide
Page 64

Deploy Avamar vSphere Proxies
7.2 Avamar client configuration in Hyper-V
DPMC can install and configure the EMC Avamar Client and the EMC Avamar Backup Hyper-V VSS Plugin to
an iSCSI target using Acropolis Block Services on each Windows host that exists on a cluster. This option
becomes available once a Hyper-V cluster is di sc overed by DPMC or during initial setup.
NOTE: If multiple Hyper-V clusters are discovered by DPMC at the same t i m e, you need to perform all steps
in this section for each cluster.
7.2.1 Setting iSCSI Data Services IP address
You need to set the iSCSI Data Services IP address in the Prism web interface to provide target discovery to
clients and simplify external iSCSI configuration on clients with Acropolis Block Services.
1. Access the Prism web page using the Nutanix cluster IP address and log in.
64 XC Series Data Protection Management Console Administrator’s Guide | A02
Page 65

Initial Configuration
2. In the upper right corner of the page click on t he Settings (gear tool) and select Cluster Details .
3. Enter the iSCSI Data Services IP address in t he field and select Save.
65 XC Series Data Protection Management Console Administrator’s Guide
Page 66

7.2.2 Step 1: Configure Avamar Clients
DPMC performs a series of tasks to install the necessary appli cati ons correctly on all Windows hosts.
NOTE: Before you follow the steps to configure the Avam ar clients, you must complete the steps for
iSCSI Data Services IP address.
1. Log in the DPMC by entering the Prism Central login information.
Setting
2. To start step 1 of Hyper-V Cluster Setup, click on Settings (gear tool) in the upper right corner of the
page and then select Configure Avamar Client.
66 XC Series Data Protection Management Console Administrator’s Guide | A02
Page 67

Initial Configuration
3. Enter the local administrator credentials to ini t i ate the client configuration on each host.
NOTE: This step may take some time, depending on the number of nodes in the cluster. Do not navigate
away from the page during this time.
A series of automated steps are executed and completed by DPMC automatically. In the event of a failure,
identify the step on which the error occurred and then manually fix it by checking the following progression.
AVEContainer is created
67 XC Series Data Protection Management Console Administrator’s Guide
Page 68

4. A new Storage Container is created on the cluster with the name AVEContainer. To find it, go to the
cluster’s Prism Web Console.
5. Navigate to the Storage page, then click Table, and then Storage Container.
Volume group is created
6. A Volume Groups with a 10GB disk is created for each Windows host. To find it, go to the cluster’ s P rism
Web Client.
7. Navigate to Storage page, then click on Table, and t hen Volume Group.
8. An iSCSI connection on each host is made to one of t he V ol um e Groups as depicted in image below.
68 XC Series Data Protection Management Console Administrator’s Guide | A02
Page 69

Initial Configuration
9. Connect Volume Group to the iSCSI Target by going to the Remote Desktop, then to the Windows Host
and then open the iSCSI Initiator.
10. The new disk is then initialized and formatted with an NTFS partition as depicted in i m age below.
69 XC Series Data Protection Management Console Administrator’s Guide
Page 70

A new disk is initialized and formatted
11. The name of the disk is AVE-CLIENT-LOGS and is assigned a drive letter. To find it, open Disk
Management and locate the last disk.
70 XC Series Data Protection Management Console Administrator’s Guide | A02
Page 71

Initial Configuration
Avamar Client and the Avamar Hyper-V VSS Plugin are installed.
12. On each host, the Avamar Client and the Avamar Hyper-V VSS Plugin are installed on the AVE-CLIENTLOGS disk.
avhypervvss.cmd configuration file is created:
71 XC Series Data Protection Management Console Administrator’s Guide
Page 72

The avhypervvss.cmd configuration file is created in \Program Files\avs\var
13. Once the configuration has completed, the first step is displayed as completed in the Settings (gear tool)
prompt. Proceed to Running Windows Cluster Configuration wizard
before attempting step 2.
7.2.3 Running Windows Cluster Configuration wizard
Once the Configure Avamar Clients process is successfully completed, the next proces s is to run Windows
Cluster Configuration wizard.
1. Remote desktop into one of the Windows host s. Double click on the Avamar Windows Cluster
Configuration Wizard icon on the desktop to launch the wizard.
72 XC Series Data Protection Management Console Administrator’s Guide | A02
Page 73

Initial Configuration
2. The first page displays all the Windows hosts that are part of the Wi ndows Failover Cluster. Confirm that
the information is correct and then click Next.
3. On the Plug-ins page, select Hyper-V VSS and then click Next.
73 XC Series Data Protection Management Console Administrator’s Guide
Page 74

4. Confirm that the correct Cluster Nodes are displayed and that they all have the Avamar Windows Clie nt
and the Hyper-V VSS Plug-In installed. Click Next.
5. On the Operations page, select Configure a new (federated) cluster client over SMB/CSV for all nodes.
For Storage Type, select SMB. Click Next.
74 XC Series Data Protection Management Console Administrator’s Guide | A02
Page 75

Initial Configuration
6. On the Prerequisites page, select IPv4 as your IP version and then click Next.
7. Before proceeding with the Cluster Client Settings section, make sure that you have an available IP
address for the new Avamar cluster client VM. If no errors appear, click Next.
NOTE: The cluster client name must be under 15 characters long. Dell EMC recommends that the name
does not contain any special characters. Hyphens are used in the name in this example but should be
avoided. Also, ensure that this name does not already exist on your DNS server. Avamar creates a new DNS
entry with the name and IP address that you provide.
75 XC Series Data Protection Management Console Administrator’s Guide
Page 76

8. Under the Server Settings section, provide your Avamar server informat i on. Use a server Name and
provide an FQDN. Keep the Avamar client domain for the cluster client at the default value (/client s). If no
errors appear, click Next.
9. On the Client Settings page, you are prompted for paths to two directories:
var directory
SYSDIR directory
Provide the path to the AVEContainer.
The location of the container should be:
\\<CLUSTERNAME>\AVEContainer
The recommended path to use is:
76 XC Series Data Protection Management Console Administrator’s Guide | A02
Page 77

Initial Configuration
NOTE: Notate the location of the Cluster client’s v ar directory because it will be used later for the final
Complete Avamar Configuration step in the DPMC Web Console.
\\<CLUSTERNAME>\AVEContainer\var
\\<CLUSTERNAME>\AVEContainer\etc
10. The final Summary page lists information that the Wizard uses to set up the Federated cluster. Confirm
that the information is correct and then click Configure.
11. After the Federated Cluster is successfully created, the follow page is displayed.
77 XC Series Data Protection Management Console Administrator’s Guide
Page 78

NOTE: If the wizard was unsuccessful, make su re the clust er client name does not contain any special
characters.
7.2.4 Step 2: Complete Avamar Configuration
This is the final step in the configuration process which sets up the Avamar federated cluster.
1. Log into the DPMC by entering the Prism Central l ogin information.
2. Click on Settings (gear tool) in the upper right corner of the page and select Complete Avamar
Configuration.
3. Provide the credentials for a user with administrative rights (for example, local Administrator ) .
4. In the PATH field enter the cluster client’s var directory specified during the Avamar Cluster Config urat i on
wizard.
78 XC Series Data Protection Management Console Administrator’s Guide | A02
Page 79

Initial Configuration
5. Confirm that the information is correct and then click Finish.
6. Execution above concludes Step 2. In the event of a failure at any poi nt during the process. You can
finish or fix the configuration manually by completing the following st eps:
a. Remote Desktop onto any of the Windows Host.
b. Navigate to the Cluster client’s var directory pat h.
c. In that directory, locate the avhypervvss.cmd file.
d. Right-click on the file and click Edit.
e. Make sure the file has data and format simila r to the image below.
79 XC Series Data Protection Management Console Administrator’s Guide
Page 80

7. Save and exit the file.
NOTE: If the configuration is completed manually, the DPMC Web Console will continue to prompt you to
complete the Avamar configuration. Contact Dell.c om /support for assistance.
80 XC Series Data Protection Management Console Administrator’s Guide | A02
Page 81

Runtime backup management
8 Runtime backup management
DPMC provides many options for runtime backup management. You can use the drop-down menu from the
Settings (gear tool) to access and manage the backup activit y during runtime.
A list of helpful options available during runtime include:
• Manage Nutanix Cluster
• Avamar Registration
• Backup Schedule
• Retention Policies
• On-Demand Backup
• Deploy Avamar vSphere Proxies (ESXi only)
• Launch Avamar Administrator
Runtime backup management
8.1 Manage Nutanix Clusters
If you want to manage the backup protection at a cluster level, during runtime, you can do it from this menu.
You can select the monitoring status, auto protect the clusters (all VMs within the cluster) and add the default
retention policy. This feature is useful when a new cl ust er is added and needs to be managed.
Select the DPMC monitoring level for each XC Series from the f ol l owing:
• None – DPMC performs no action. You can sti l l perf orm manual operations on VMs.
• Notify Only – DPMC sends a Warning alert every time a new VM is detected on the cluster.
• Notify and Auto-protect – DPMC automatically prot ects a new VM with the chosen retention policy
when it is detected and notifies the user of this action.
This option is described in detail in the XC Series Cl uster submenu
81 XC Series Data Protection Management Console Administrator’s Guide
section.
Page 82

8.1.1 Configure Notify and Auto-protect
The following procedure outlines the steps to configure automatic protection of VMs on a cluster through
DPMC.
1. From DPMC, navigate to Home>Cluster.
2. In the upper-right corner of the page, click + Man age Clu sters.
3. Select NOTIFY AND AUTO-PROTECT and the RETENTION POLICY for the cluster that you want to
enable VM backups for and then click Save.
82 XC Series Data Protection Management Console Administrator’s Guide | A02
Page 83

Runtime backup management
You will now receive the following alerts when new VMs are created and DPMC protects them automatically
Checking the VM table shows the new VM has been aut om at i cally added to the XC-Series-DPMC-Group with
the default retention policy of the cluster, XC-Series-Gold in this case.
NOTE: It may take up to 5 minutes before group and retention policy i nformation populates the VM table.
8.1.2 Updating VM Backup Policies
The following procedure outlines the steps to update the backup policies for a VM to add scheduled backups
through DPMC.
1. In the VM table, select the VM you would like to update and click Update Policy, which appears
underneath the table.
83 XC Series Data Protection Management Console Administrator’s Guide
Page 84

2. To enable scheduled backups for a VM check (or un-check if you want to discontinue scheduled backups)
the box for Avamar Scheduled Backup and optionall y select a Retention Policy if you would like a policy
different from the cluster’s default value.
NOTE: For Hyper-V clusters, you cannot select a retention policy for an individua l V M . This must be
configured at the cluster level.
84 XC Series Data Protection Management Console Administrator’s Guide | A02
Page 85

Runtime backup management
8.2 Avamar Registration (runtime management)
This menu item is used to update credentials used by DPMC to connect to Avamar.
This option is described in detail in the Avamar Registration
section.
8.3 Updating the Backup Schedule
To change the automated backup schedule, from the Settings (gear tool) menu, click Backup Schedule.
85 XC Series Data Protection Management Console Administrator’s Guide
Page 86

The Update Backup Schedule window is displayed and lets you adjust the day of the week and the time of
day that scheduled backups occur.
8.4 Managing Retention Policies
1. To create or edit retention policies, choose Retention Policies from the Settings (ge ar tool) menu.
86 XC Series Data Protection Management Console Administrator’s Guide | A02
Page 87

Runtime backup management
2. The Retention Policy control is display ed. To create a new retention policy, click + New Retention.
3. The Create Retention Policy controls page is displayed. Type a Name for your new policy and set the
Retention Period or set an End date or choose No end date to set the time for which your VM backups
will be stored. Click Save after making desired entries.
87 XC Series Data Protection Management Console Administrator’s Guide
Page 88

4. If more retention options are desired, click the Advanced Settings button.
5. The Advanced Settings option is displayed. This provides options for setting retention periods for d ai l y,
weekly, monthly and yearly backups. Click Save after making changes.
NOTE: To return to the basic settings, click Advanced Settings again.
88 XC Series Data Protection Management Console Administrator’s Guide | A02
Page 89

Runtime backup management
8.5 Launch Avamar Administrator
This option is described in detail in the Launch Av am ar Administrator section.
8.6 On-Demand VM Backup
The following procedure outlines the steps to perfor m an on-demand backup through DPMC.
1. Navigate to Home>VM.
2. Click on the + On-Demand Backup button in the upper rig ht corner of VM page.
3. Select the VM that you want to backup and then clic k t he Backup button.
89 XC Series Data Protection Management Console Administrator’s Guide
Page 90

4. Click OK to start the backup.
5. Backups are tracked in the Activity window of the Avamar Administrator panel. An example of
successful backups is shown below.
90 XC Series Data Protection Management Console Administrator’s Guide | A02
Page 91

Runtime backup management
8.7 Hyper-V Cluster – Protection of VM
For Windows Server 2012 solution, Microsoft uses a failover cluster concept where the VM and the failover
VM can exist in different nodes for business continuity . Failover clusters provide high availability and
scalability to server workload. The DPMC solution offers protection only for VMs in the failover cluster.
8.7.1 Manually moving VMs to a failover cluster
If you select a cluster to auto protect, DPMC will auto protect any new VMs added directly to the failover
cluster. However, if you manually move VMs in and out of the Hyper-V failover cluster, DPMC will not
recognize it as a new VM.
In this situation, Dell EMC advises that you manually select the VMs that you want to protect.
8.7.2 Additional set up instructions for Linux VM
Hyper-V requires that you install a client and the Hyper-V VSS plugin in each Hyper-V host. For image-level
backups of a virtual machine with a Microsoft Windows guest OS, you also need the Hyper-V Integration
Components and the integration components version for the backup. Hyper-V Server and the guest virtual
machine must match. If the versions do not match, then the virtual machine might not start when you restore it
to a different Hyper-V Server.
Make sure that the Linux VM backup/checkpoint i s unchecked. Linux VM backup checkpoint is not
compatible with the Avamar checkpoint; therefo re, a VM backup will always fail unless you uncheck the
checkpoint.
To uncheck the checkpoint:
1. Open the Server Manager.
2. Go to Tools>Hyper-V Manager.
91 XC Series Data Protection Management Console Administrator’s Guide
Page 92

3. Click on the Linux Virtual Machines, right click the VM and select Settings.
4. In Settings, select the Management and t hen the Integration Service.
5. Uncheck the checkpoint.
92 XC Series Data Protection Management Console Administrator’s Guide | A02
Page 93

Log location
Log file
Location
DPMC Deployment Log
/root/dell/pt/logs/deploymentlog.out
DPMC Runtime Log
/root/dell/pt/logs/log.out
DPMC Rollover Archives
/root/dell/pt/logs/log-1.out.zip
/root/dell/pt/logs/log-5.out.zip
DPMC Appliance Service Log
/var/log/dell/csm/appliance_service.log
NDP Server logs
/root/dell/pt/logs/ptcsm_ndp_log
Avamar log bundle (tar)
Directory from which getlogs command was run
9 Log location
Logs may be easily obtained using the Support Bundle feature in the Settings (gear tool) menu but may also
be collected manually in some situations.
9.1 Log Files
The following is a list of log file locations.
/root/dell/pt/logs/log-2.out.zip
/root/dell/pt/logs/log-3.out.zip
/root/dell/pt/logs/log-4.out.zip
93 XC Series Data Protection Management Console Administrator’s Guide
Page 94

10 Best Practices in DPMC deployment, Association and
runtime
Use the following best practices for DPMC.
• Use a Static IP
• Forward and reverse DNS lookup defined
• Do not install VMs on SATADOM
• Have a separate dedicated Datastore for A vamar
• Have one Avamar instance (DPMC is basically deploying)
• Verify ESX and vCenter certificates
• Use properly registered certificates from a trusted provider that match DNS names for ESX and
vCenter.
94 XC Series Data Protection Management Console Administrator’s Guide | A02
Page 95

Adding New XC Series Clusters to DPMC
11 Adding New XC Series Clusters to DPMC
DPMC can monitor all ESXi and Hyper-V clusters registered to the Prism Central. Registering a new cluster
with Prism Central does not require deploying an additional DPMC or Avamar server, but some workflows will
be triggered on DPMC to properly configure the new cluster.
11.1 ESXi Cluster Add
When a new ESXi cluster is added to Prism Central, DPMC will prompt you to run a proxy VM
recommendation (vSphere Proxies for ESXi
required, you are prompted to enter the necessa ry information and continue deploying the prox y VM(s);
otherwise, the system indicates that no additional proxy VM(s) are needed (in the event they were previously
deployed through DPMC or Avamar Administrato r).
) to make sure there is proper coverage. If proxy VM(s) are
Deploy Avamar vSphere Proxies
After you have completed a proxy deployment recommendation (whether or not new proxy VM(s) need to be
deployed), the prompt will be removed from the Settings (ge ar tool) menu.
95 XC Series Data Protection Management Console Administrator’s Guide
Page 96

11.2 Hyper-V Cluster Add
When a new Hyper-V cluster is added to Prism Central, DPMC prompts you to configure Avamar clients as
outlined in the Avamar client configuration on Hyp er-V
section.
Configure Avamar Clients
If Avamar clients already exist for the Hyper-V hosts, the first step is marked complete automatically and you
are taken to the second step. For further assistance with client configuration, contact Dell EMC su pport.
96 XC Series Data Protection Management Console Administrator’s Guide | A02
Page 97

Health monitoring
12 Health monitoring
The following sections describe health monitoring in DPMC.
12.1 Heartbeat status
DPMC constantly monitors Prism Central, Av am ar and Dat a Domain heartbeats; it displays an alert if the
heartbeat is missing for any one of these components.
12.1.1 Avamar heartbeat
DPMC constantly monitors the Avamar Heartbeat. I f the heartbeat check fails, DPMC attempts to reconnect
every 5 minutes to ensure the connection can be established. If no connection was established after the initial
5 minutes, DPMC will begin generating alerts. You are notified with a crit ical alert that the Avamar server
connection is lost. The system also displays the timestamp when the alert was generated.
DPMC attempts to re-establish connectivity every minute. During this time, tasks from the VM or cluster
pages (on-demand backup, manage clusters and ot hers) cannot be initiated.
DPMC turns the health indicator grey on the home dashboard for the following:
• Avamar server
• Backup summary
• Data Domain server
• Avamar utilization
• Data Domain utilization
DPMC displays the Attention icon nex t to the Cluster Name entry in the cluster table or VM table for every
cluster until the Avamar heartbeat is restored. Hovering over the i con displays the following message: Avamar
server is not reachable.
After 30 minutes, if the heartbeat check has failed for all retries, DPMC sends an additional notification every
30 minutes that the Avamar server is disconnected.
12.1.2 Data domain heartbeat
DPMC constantly monitors the Data Domain connection status through the Avamar server. It utilizes the
information that it gathers from AVE monitoring Dat a Domain. If the monitoring status shows that Data
Domain is disconnected, DPMC retries before an alert is generated. The severity of the alert is Critical.
DPMC attempts to re-establish connectivity everyminute. It presents the following conditions:
• Keeps all last known Data Domain data for VMs and clusters in the cluster table, VM table and home
dashboard.
• Turns the Data Domain server health indicator grey on the home dashboard.
• Turns the Data Domain utilization indicator grey on the home da shboard.
• Does not allow tasks to be initiated from the VM or cluster pages (on-demand backup, manage
clusters and others).
• Displays the Attention icon next to the Cluster Name entry in the cluster table or VM table for every
cluster or VM until the Data Domain heartbeat is restored. Hoveri ng over the icon displays the
following message: Data Domain server is not reachable.
97 XC Series Data Protection Management Console Administrator’s Guide
Page 98

After 30 minutes, if the heartbeat check has failed for all retries, DPMC sends an additional notificati on every
30 minutes that the Data Domain is disconnected.
12.1.3 Prism Central Heartbeat
DPMC constantly monitors the Prism Central Heartbeat and notifies you if the application can no longer
communicate with the Prism Central instance.
If the heartbeat check fails, DPMC tries reconnecting, every minute f or 5 m i nutes, to ensure the connection
can be established. If no connection was established aft er t he i ni tial 5 minutes, DPMC begins generating
alerts and will not allow changes to any cluster. You are noti fied with a critical alert that Prism Central is
disconnected. It also displays the timestam p when the alert is generated.
DPMC attempts to re-establish connectivity every minute. DPMC presents the following conditions:
• Keeps all the last known data for VMs and clusters in the tables.
• Does not allow tasks to be initiated from the VM or cluster pages (on-demand backup, manage
clusters and others).
• Displays the Attention icon next to the Cluster Name entry in the c l ust er t able for every cluster until
Prism Central heartbeat is restored. Hovering over t he icon displays the following message: Prism
Central is not reachable.
• DPMC displays the Attention icon next to the Cluster Name entry in the VM table for every V M until
Prism Central heartbeat is restored. Hovering over the icon displays the following message: Prism
Central is not reachable.
After 30 minutes, if the heartbeat check has failed for all retries, DPMC sends an additional notification every
30 minutes that Prism Central is still disconnected.
12.1.4 Nutanix Cluster Heartbeat
DPMC responds when Nutanix clusters are join ed to the Prism Central instance. If a cluster is joined and is in
an unreachable state, DPMC suspends the user init i ated actions for that cluster only.
If no connection was established after the initial 5 minutes, DPMC notifies you that the cluster is
disconnected. DPMC attempts to re-establish connectivity every minute. DPMC presents the following
conditions:
• Keeps all last known data for VMs and clusters in the tables.
• Does not allow you to initiate any tasks from the cluster page on the impacted cluster.
• Does not allow you to initiate any tasks from the VM page for the V M s on the impacted cluster.
• Displays the Attention icon next to the Cluster Name entry in the clust er t able for the impacted cluster
until availability is restored. Hovering over the icon displays the following message: This clust er is not
reachable.
• Displays the Attention icon next to the Cluster Name entry in the VM table for every VM on the
impacted cluster until availability is restored. Hovering over the icon displays the following message:
This cluster is not reachable.
After 30 minutes, if the heartbeat check has failed for all retries, DPMC sends an additional notification every
30 minutes that the cluster is still disconnected.
98 XC Series Data Protection Management Console Administrator’s Guide | A02
Page 99

Health monitoring
12.1.5 DPMC Idle status
DPMC monitors the backup activity and updates the h ome page accordingly. However, if the DPMC does not
perform any backup activity for 72 hours, it may show the Avamar Server Summary as a gray color (Healt h
summary).
DPMC constantly monitors Avamar heartbeat and backup count. One of the conditions is if there are no
successful backups within 72 hou rs, DPMC assigns an UNKNOWN status to Avamar Server Summary. If
there are no activities returned, the backup activ ity health is also marked as UNKNOWN. In this situat i on, the
Avamar server summary shows gray.
12.2 Alert entity
DPMC Alerts management page provides access to the alerts given by the application. The ale rt s page is the
area where you can view and interact with alerts given by the application. An alert is made up of the following:
Severity (Critical, Warning, Info)
• Critical: The critical error will show the critical icon. Examples:
> Notify user when a backup has failed
> Notify user when a heartbeat fail s
> Data Domain storage util i zation reaches 90%
• Warning: The warning error will show the icon. Examples:
> Remove a proxy server
> New VM detection
• Info: The information will show with the icon. Examples:
> When protection of a VM is discontinued
> When backup completes successfully
Issue: A brief description of the reason for the alert
Timestamp: The date/time when the alert was generated
Acknowledged status: User and date/time it was marked acknowledged or unacknowledged
Resolved status: User and date/time it was marked resolved o r unresolved
12.2.1 Alert acknowledgment
Alert management is an essential part of DPMC. You can observe the alerts, resolve the alerts or simply
acknowledge the alerts. DPMC defines alerts in 3 major categories:
• Critical
• Warning
• Information
When you resolve an Alert in DPMC, issue the acknowledgement of the corresponding Avamar Event.
12.3 Stor age Utilizatio n
The following sections describe storage utilization.
99 XC Series Data Protection Management Console Administrator’s Guide
Page 100

Color
Utilization status percentage
Red
90% or more
Yellow
Less than 90% and greater
than or equal to 80%
Green
Less than 80%
Gray
Unknown percentage
12.3.1 Avamar metadata storage utilization
DPMC provides a graphical representation from the Utilization metric gathered from Avamar. It provides a
green/yellow/red status and notifications when n ecessary.
Utilization status is defined as follows:
The Utilization health status circle is displayed next t o the Utilization metric in the Avamar Metadata Storage
box on the home page.
Avamar Storage
12.3.2 Data Domain metadata storage utilization
DPMC provides a graphical presentation from the Util i zat ion metric gathered from Data Domain. It provides
green/yellow/red status and notifications when n ecessary.
Utilization status is defined as follows:
100 XC Series Data Protection Management Console Administrator’s Guide | A02
 Loading...