

Page 1

Dell™ W4200HD and W4200ED
42" Plasma TV
Owner's Manual
FILE LOCATION: C:\Documents and Settings\solinak\Ƈ¦±\OM update\fronte.fm
DELL CONFIDENTIAL – PRELIMINARY 10/8/04 – FOR PROOF ONLY
www.dell.com | support.dell.com
Page 2

Notes, Notices, and Cautions
Throughout this document, blocks of text may be accompanied by an icon and printed in bold or italic type. These blocks are notes,
notices, and cautions, and they are used as follows:
NOTE: A NOTE indicates important information that helps you make better use of your TV.
NOTICE: A NOTICE indicates either potential damage to hardware and tells you how to avoid the problem.
CAUTION: A CAUTION indicates a potential for property damage, personal injury, or death.
_____________________
Information in this document is subject to change without notice.
© 2004 Dell Inc. All rights reserved.
Reproduction of this document in any manner whatsoever without the written permission of Dell Inc. is strictly forbidden.
Trademarks used in this text: Dell, the DELL logo; TruSurround XT, SRS, and symbol are trademarks of SRS Labs, Inc.
Other trademarks and trade names may be used in this document to refer to either the entities claiming the marks and names or their products.
Dell Inc. disclaims any proprietary interest in trademarks and trade names other than its own.
October 2004 Rev. A00
Page 3

Contents
1 About Your TV
Front View . . . . . . . . . . . . . . . . . . . . . . . . . . . . . . . . . 5
FILE LOCATION: C:\Documents and Settings\solinak\Ƈ¦±\OM update\DZ101_eyUM.fm
Right View
Bottom View
Package Contents
Caring for Your TV
. . . . . . . . . . . . . . . . . . . . . . . . . . . . . . . . . 6
. . . . . . . . . . . . . . . . . . . . . . . . . . . . . . . . 7
. . . . . . . . . . . . . . . . . . . . . . . . . . . . . . 9
. . . . . . . . . . . . . . . . . . . . . . . . . . . . . 10
2 Setting Up Your TV
Proper Location for Your TV . . . . . . . . . . . . . . . . . . . . . . . . 11
Connecting Your TV
. . . . . . . . . . . . . . . . . . . . . . . . . . . . 12
3 Your Remote Control
Installing Batteries . . . . . . . . . . . . . . . . . . . . . . . . . . . . 19
Using Your Remote Control
Using Your Remote Control
Using Your TV With a Universal or Learning Remote Control
. . . . . . . . . . . . . . . . . . . . . . . . 20
. . . . . . . . . . . . . . . . . . . . . . . . 22
. . . . . . . . . 24
4 Using the On-Screen Display
www.dell.com | support.dell.com
Using Your Remote Control With the OSD . . . . . . . . . . . . . . . . . . 25
Selecting Your OSD Language
Input Select
Picture Menu
Audio
PIP/POP/PBP
. . . . . . . . . . . . . . . . . . . . . . . . . . . . . . . . 26
. . . . . . . . . . . . . . . . . . . . . . . . . . . . . . . 28
. . . . . . . . . . . . . . . . . . . . . . . . . . . . . . . . . . . 28
. . . . . . . . . . . . . . . . . . . . . . . . . . . . . . . 29
DELL CONFIDENTIAL – PRELIMINARY 10/8/04 – FOR PROOF ONLY
. . . . . . . . . . . . . . . . . . . . . . . 26
Contents 3
Page 4

FILE LOCATION: C:\Documents and Settings\solinak\Ƈ¦±\OM update\DZ101_eyUM.fm
Size . . . . . . . . . . . . . . . . . . . . . . . . . . . . . . . . . . . . 30
Parental Control
. . . . . . . . . . . . . . . . . . . . . . . . . . . . . . . . . . . 31
Setup
5 Troubleshooting Problems With Your TV
Troubleshooting Tips . . . . . . . . . . . . . . . . . . . . . . . . . . . . 33
General Problems
OSD Messages
www.dell.com | support.dell.com
www.dell.com | support.dell.com
Remote Control Problems
Using the Self-Test Feature when Connected to a Computer
Problems When Using the TV Display as a Monitor
6 Specifications for Your TV
Index
. . . . . . . . . . . . . . . . . . . . . . . . . . . . . . . . . . . . 45
. . . . . . . . . . . . . . . . . . . . . . . . . . . . . . 30
. . . . . . . . . . . . . . . . . . . . . . . . . . . . . 34
. . . . . . . . . . . . . . . . . . . . . . . . . . . . . . . 38
. . . . . . . . . . . . . . . . . . . . . . . . . . 38
. . . . . . . . . 39
. . . . . . . . . . . . . 39
4 Contents
DELL CONFIDENTIAL – PRELIMINARY 10/8/04 – FOR PROOF ONLY
Page 5
About Your TV
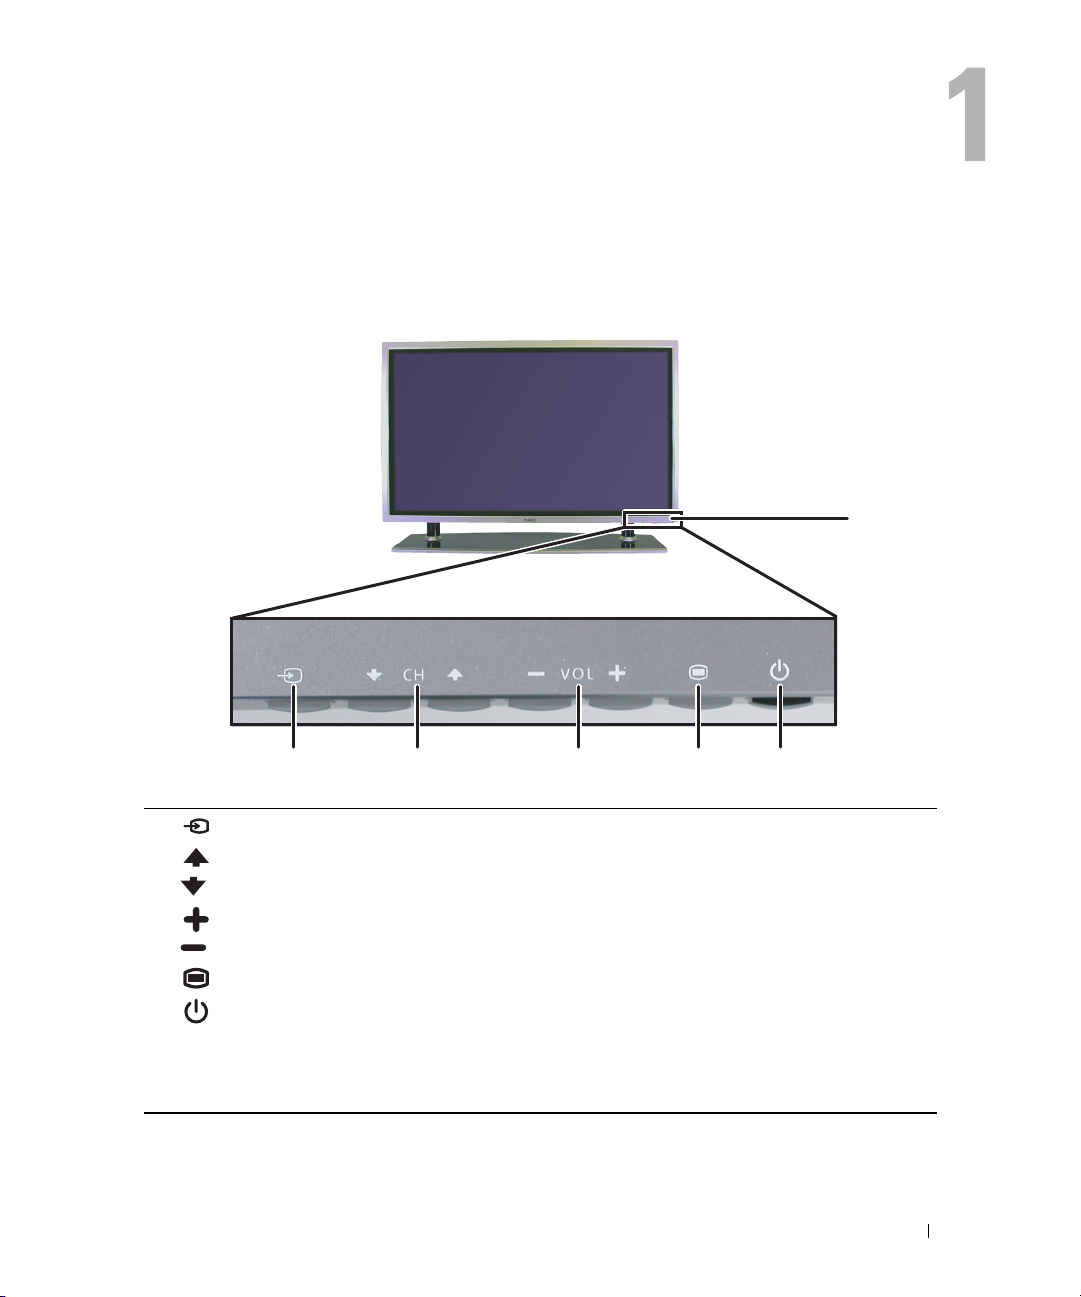
Front View
12 345
6
1 Input Source button Push to display the Input Select menu
2 Channel up/down
button
3 Volume up/down
button
4 OSD Menu button Push to display the OSD menu
5 Power button and light
(LED)
6 IR receiver Senses the signal from the remote control
FILE LOCATION: C:\Documents and Settings\solinak\Ƈ¦±\OM update\ch1e.fm
DELL CONFIDENTIAL – PRELIMINARY 10/8/04 – FOR PROOF ONLY
Push to select the previous/next channel or navigate through the onscreen display (OSD) menu
Push to increase/decrease the volume or to select an OSD option
Push to turn the TV on and off
The power light is blue when the TV is on and amber when it is in
power saving mode
About Your TV 5
Page 6
FILE LOCATION: C:\Documents and Settings\solinak\Ƈ¦±\OM update\ch1e.fm
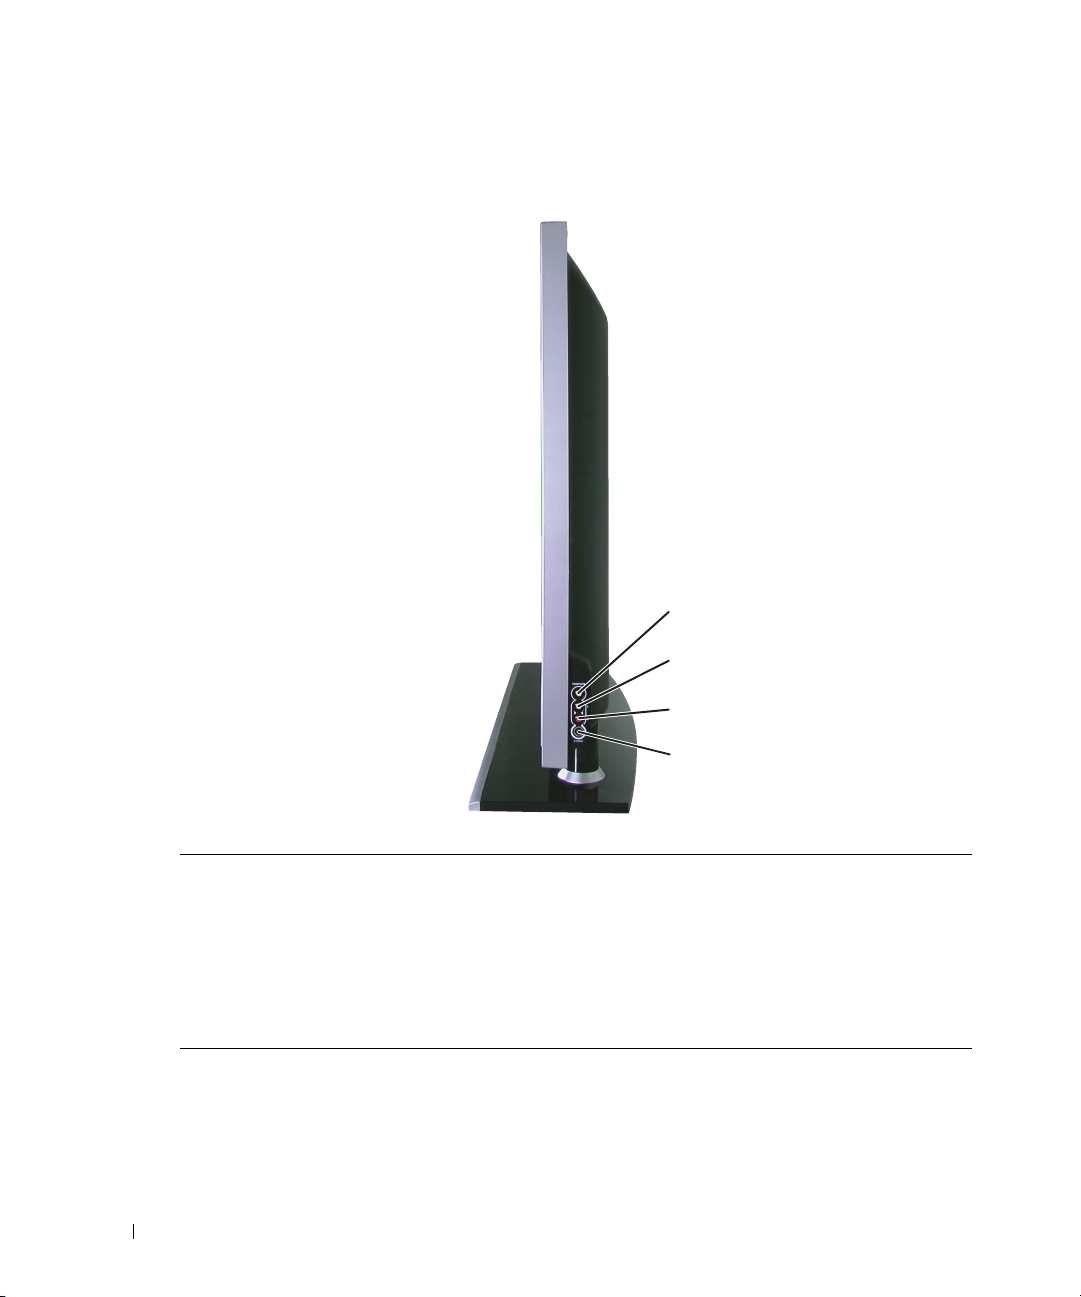
Right View
www.dell.com | support.dell.com
1
1 Composite video connector (AV7) Connect devices such as a VCR or DVD player
2 Audio connector (L) Use this connector if you have connected a device to the
3 Audio connector (R) Use this connector if you have connected a device to the
4 S-Video input (AV8) Connect devices such as a video game system, a digital camera, or
6 About Your TV
2
3
4
composite connector (AV7) or the S-Video connector (AV8)
composite connector (AV7) or the S-Video connector (AV8)
a DVD player
DELL CONFIDENTIAL – PRELIMINARY 10/8/04 – FOR PROOF ONLY
Page 7
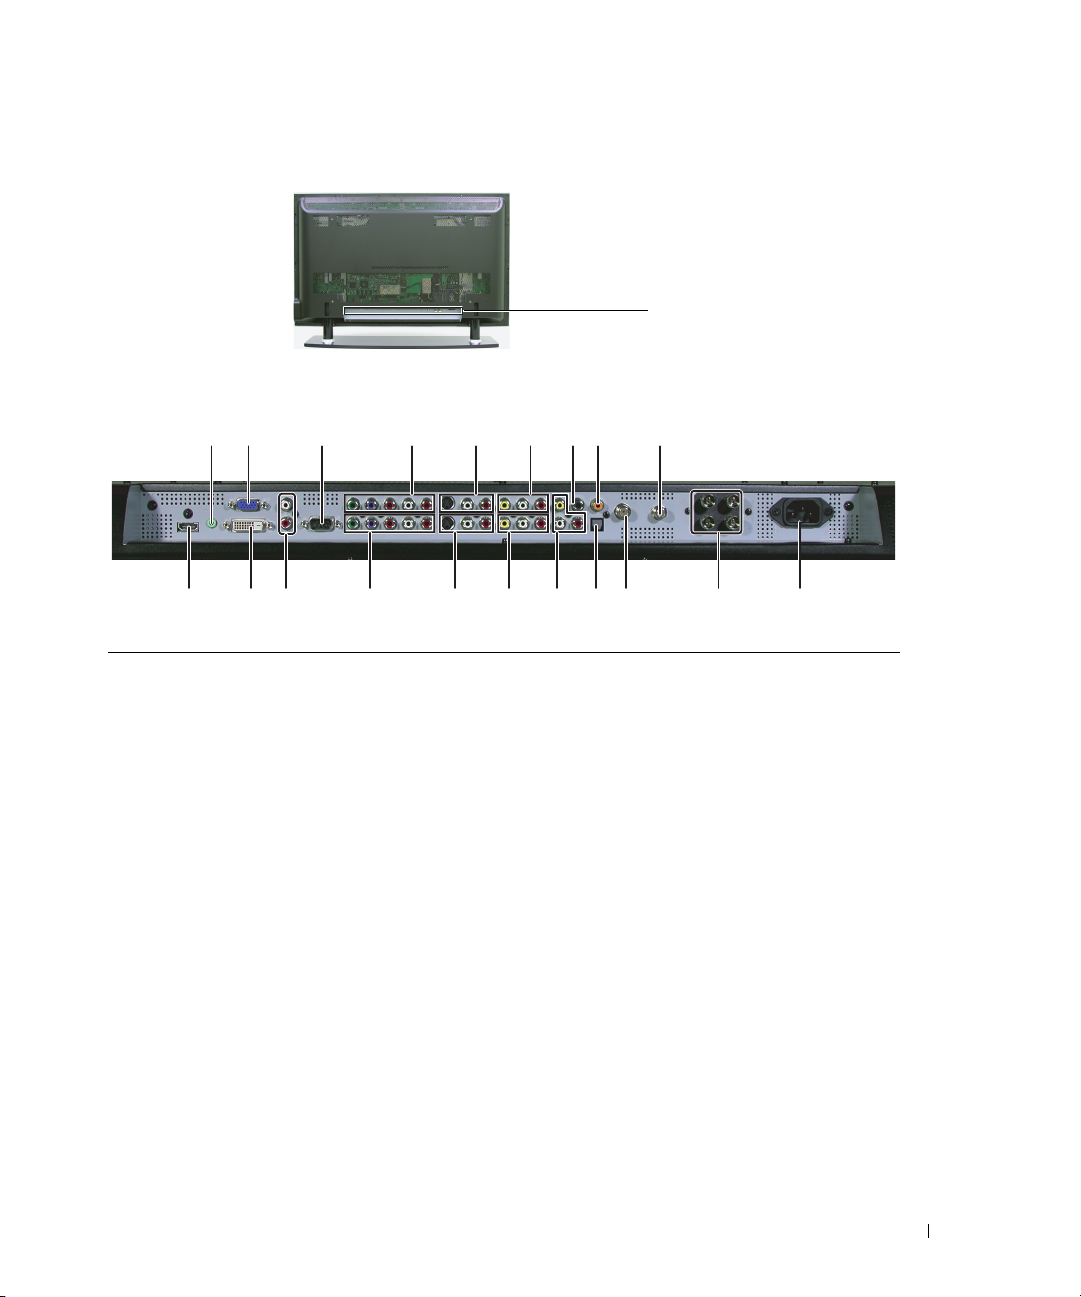
Bottom View
FILE LOCATION: C:\Documents and Settings\solinak\Ƈ¦±\OM update\ch1e.fm
Connectors are here
234
1
1 HDMI connector Connect devices such as a DVD player or set-top box
2 Audio connector for VGA Connect the audio cable from your computer to the TV
3 DVI connector Connect devices such as a DVD player, set-top box, or your computer
4 VGA connector Connect to the VGA cable from your computer to the TV
5 DVI audio connectors (R/L) Connect to the DVI audio connectors if you have connected a device
6 RS232 For factory use only
7 Component audio and
video connectors (AV2)
8 Component audio and
video connectors (AV1)
9 S-Video connectors (AV4) Connect devices such as a video game system or a DVD player
10 S-Video connectors (AV3) Connect devices such as a video game system or a DVD player
11 Composite video and audio
connectors (AV6)
12 Composite video and audio
connectors (AV5)
5
6
89101112131415161718
7
such as a DVD player or set-top box to the DVI connector
Connect devices such as a DVD player, set-top box, or cable TV box
Connect devices such as a DVD player, set-top box, or cable TV box
Connect devices such as a VCR or DVD player
Connect a device such as a VCR or DVD player
19 20
www.dell.com | support.dell.com
DELL CONFIDENTIAL – PRELIMINARY 10/8/04 – FOR PROOF ONLY
About Your TV 7
Page 8

FILE LOCATION: C:\Documents and Settings\solinak\Ƈ¦±\OM update\ch1e.fm
13 Composite video and
audio-out connectors
14 Subwoofer audio out Connect an optional powered subwoofer to the TV
15 Optical digital out (SPDIF)
(for W4200HD only)
16 Coaxial digital audio out
(for W4200HD only)
17 ATSC connector
(for W4200HD only)
18 NTSC connector Connect an antenna or a cable TV box
www.dell.com | support.dell.com
19 Speaker out connectors Connect speakers
20 Power connector Connect your power cord
Connect a device such as a VCR if you have connected an antenna or
cable TV through the ANT/Cable connector
Connect an audio decoder or audio/video receiver
Connect an audio decoder or audio/video receiver when using a Digital
TV (ATSC connector)
Connect an antenna for the digital tuner when using Digital TV
(ATSC connector)
8 About Your TV
DELL CONFIDENTIAL – PRELIMINARY 10/8/04 – FOR PROOF ONLY
Page 9
FILE LOCATION: C:\Documents and Settings\solinak\Ƈ¦±\OM update\ch1e.fm
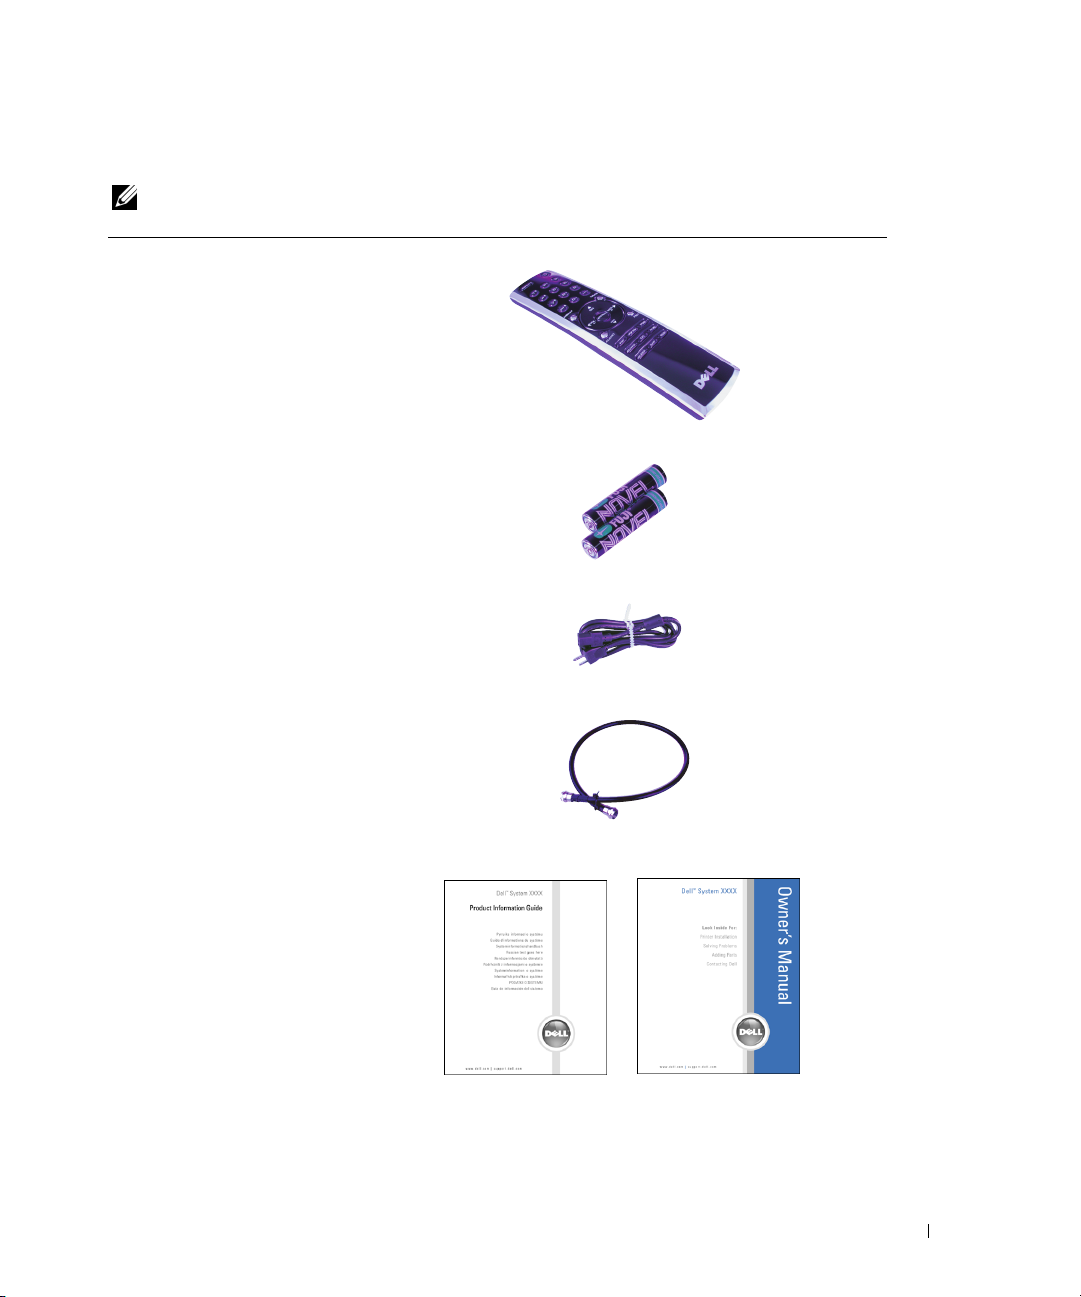
Package Contents
NOTE: If you need additional cables, contact Dell.
Remote control
AAA batteries (2)
Power cord
Antenna (coaxial) cable
Documentation
www.dell.com | support.dell.com
DELL CONFIDENTIAL – PRELIMINARY 10/8/04 – FOR PROOF ONLY
About Your TV 9
Page 10
FILE LOCATION: C:\Documents and Settings\solinak\Ƈ¦±\OM update\ch1e.fm
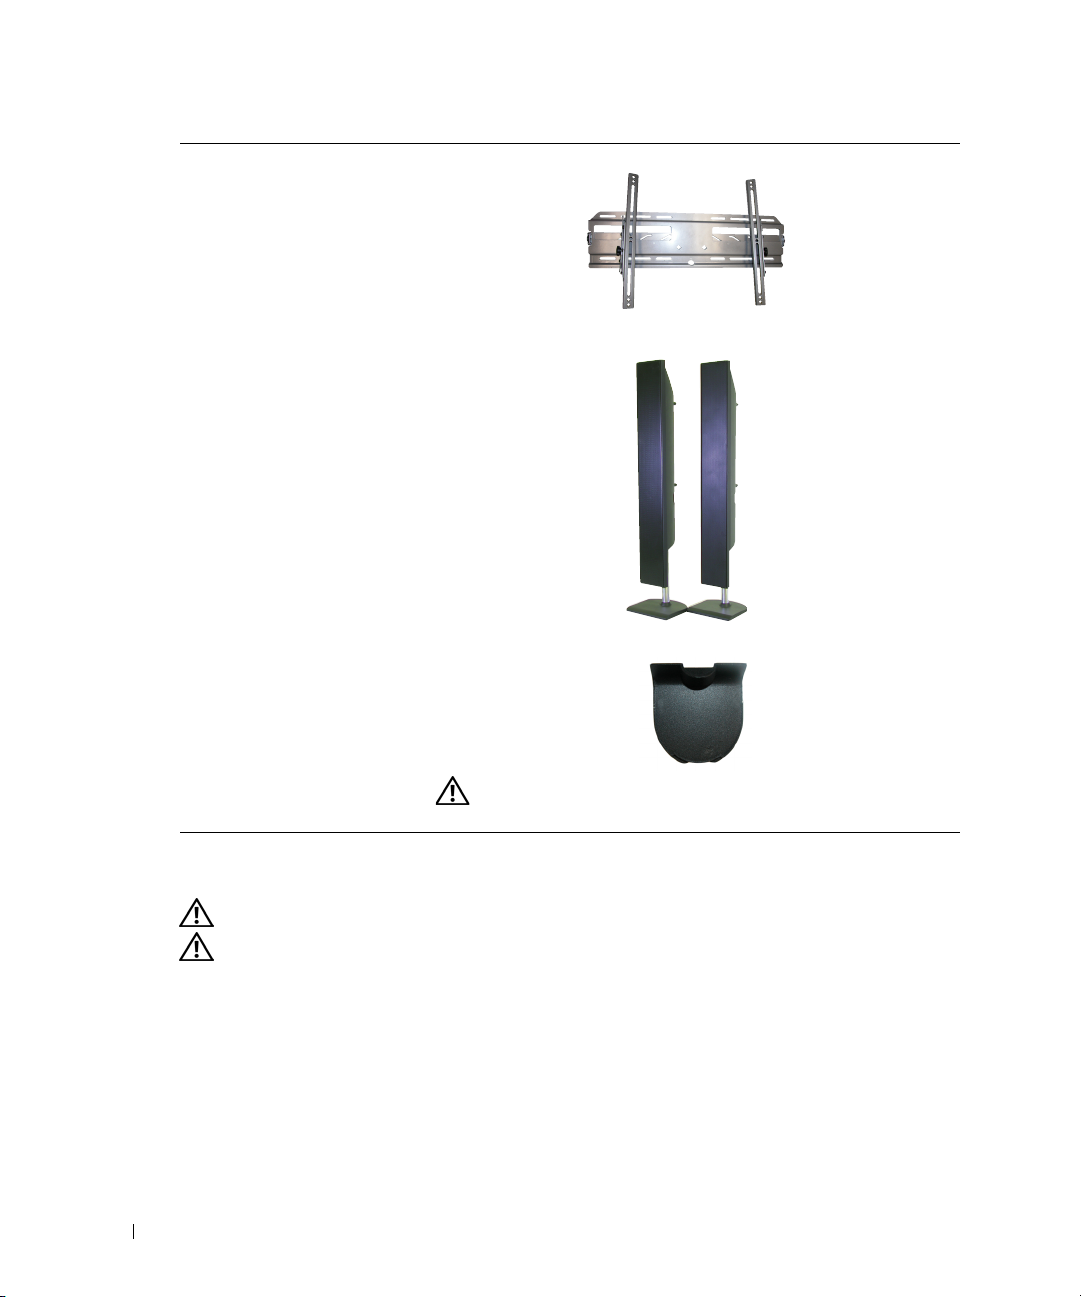
Wall mount (optional)
Speakers (optional)
www.dell.com | support.dell.com
Stand hole cover (2)
Caring for Your TV
CAUTION: Only a licensed technician should service the TV. Do not disassemble the TV.
CAUTION: Before cleaning the TV, unplug it from the electrical outlet.
• To clean the surface of the panel, lightly dampen a soft, clean, lint-free cloth with water.
• To clean the TV cabinet, use a cloth lightly dampened with a mild detergent.
• Do not use chemicals such as benzene, thinner, ammonia, or any type of abrasive cleaner.
• Do not use compressed air to clean the TV.
10 About Your TV
CAUTION: Install the covers in the base of the TV when the TV
stand is removed to hang the TV on the wall.
DELL CONFIDENTIAL – PRELIMINARY 10/8/04 – FOR PROOF ONLY
Page 11

Setting Up Your TV
CAUTION: Before you begin any of the setup procedures described in this section, follow the basic
safety instructions located in the Product Information Guide.
Proper Location for Your TV
Consider the following environmental factors when you are deciding where to put your TV:
• Ensure you allow adequate ventilation.
• Do not store or use the TV in locations that are exposed to high heat, direct sunlight, or
extreme cold.
• Avoid moving the TV between locations with extreme temperature differences. For more
information, see "Specifications for Your TV" on page 41.
• Do not subject the TV to severe vibration or high impact conditions. Do not place the TV
inside a car trunk.
• Do not store or use the TV in locations where the TV would be exposed to high humidity or
dusty environment.
• Do not place the TV in a location where water or other liquids could spill on or into the TV.
FILE LOCATION: C:\Documents and Settings\solinak\Ƈ¦±\OM update\ch2e.fm
DELL CONFIDENTIAL – PRELIMINARY 10/8/04 – FOR PROOF ONLY
Setting Up Your TV 11
Page 12
FILE LOCATION: C:\Documents and Settings\solinak\Ƈ¦±\OM update\ch2e.fm
Connecting Your TV
The tables below provide a description of the connectors on your TV to help you decide which
connectors to use for your various video devices.
Connecting Your Cable TV Box or Antenna
Quality Cable and connector When to Use
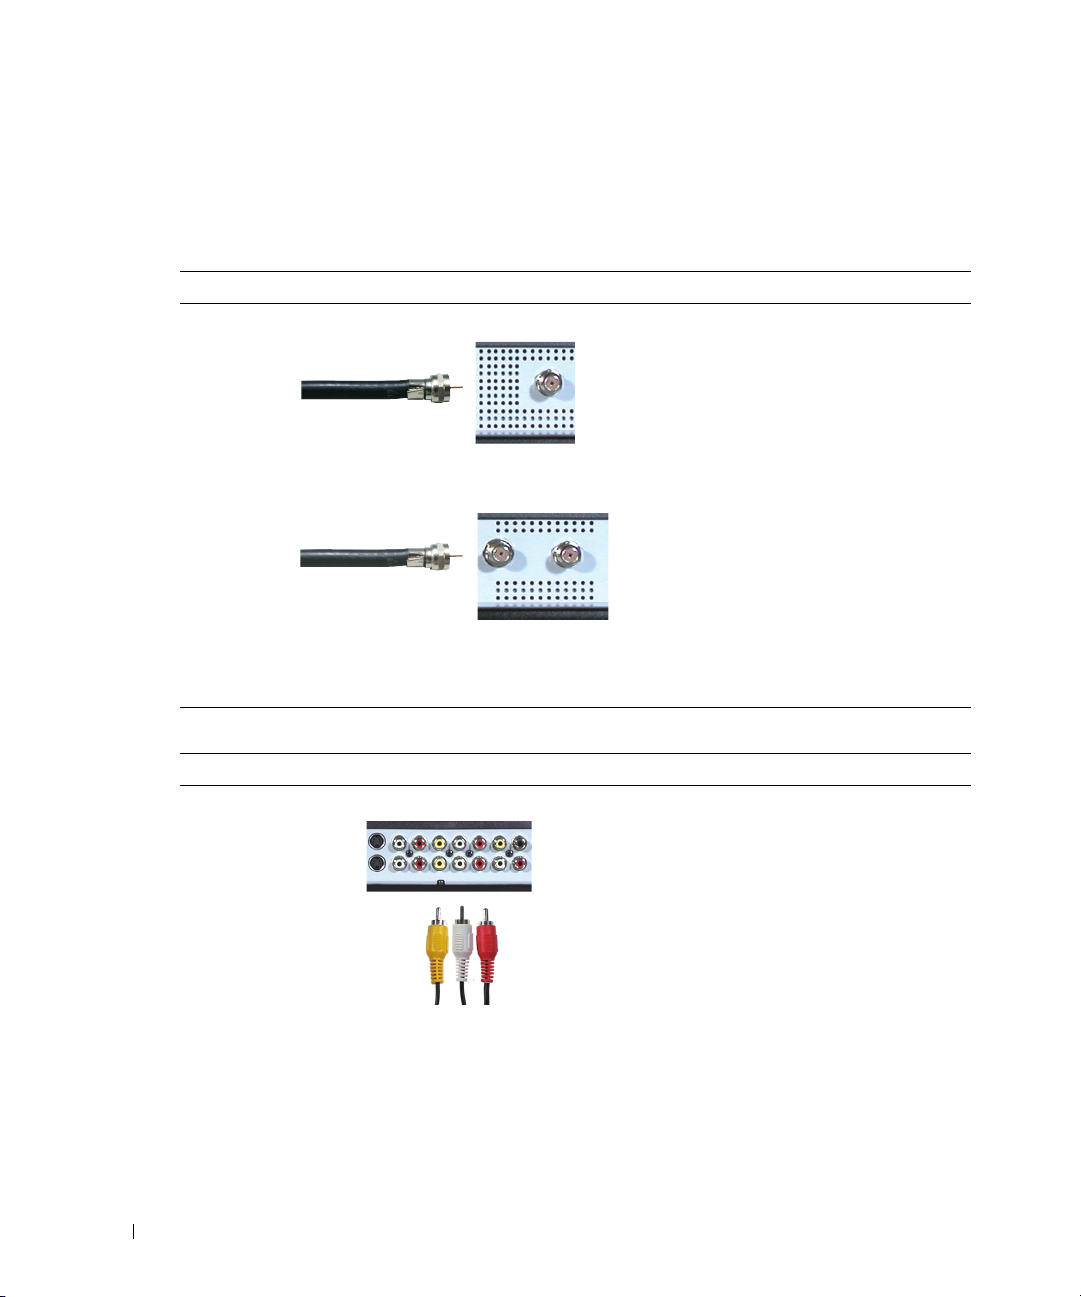
Good Coaxial cable
www.dell.com | support.dell.com
Coaxial (RF) cable carries the video and
audio signal from the antenna or cable
connector to your TV. The coaxial connector
is labelled NTSC. To locate the NTSC
connector see "Bottom View" on page 7.
Best Coaxial cable (for W4200HD only)
Connecting Your Video Devices
Quality Cable and connector When to Use
Good Composite
The ATSC cable carries the digital video and
audio signal from the antenna connector to
your TV. To locate the ATSC connector see
"Bottom View" on page 7.
The composite connector carries the video
signal through a single pin. If you are using a
composite video connector, you also need to
connect composite audio cables. To locate
the composite connectors, see "Right View"
on page 6 and "Bottom View" on page 7.
DELL CONFIDENTIAL – PRELIMINARY 10/8/04 – FOR PROOF ONLY
12 Setting Up Your TV
Page 13
FILE LOCATION: C:\Documents and Settings\solinak\Ƈ¦±\OM update\ch2e.fm
Quality Cable and connector When to Use
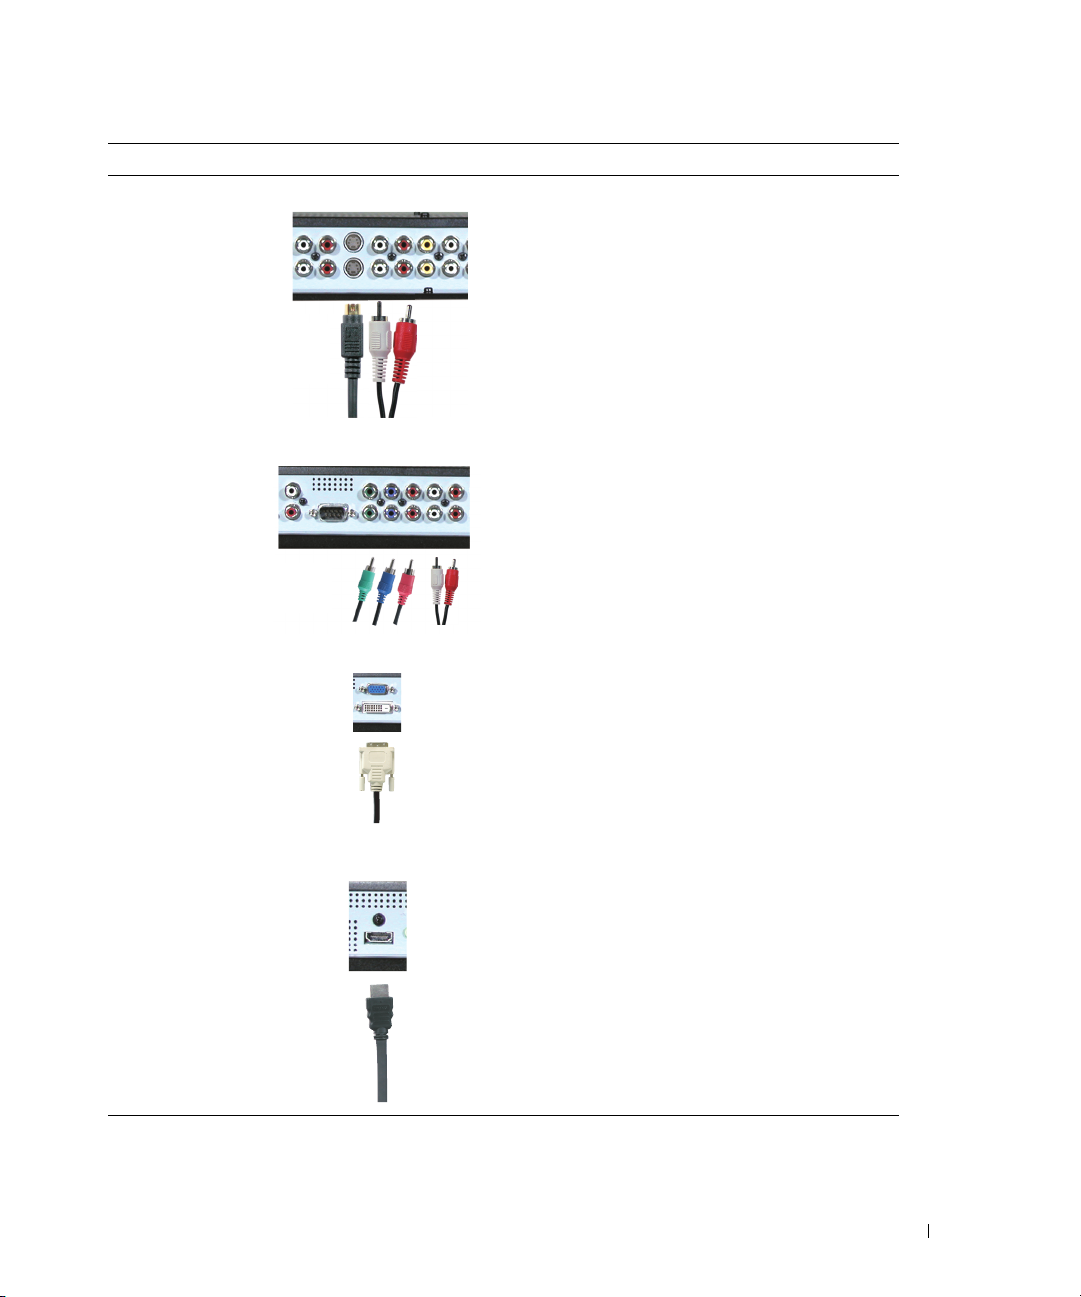
Better S-Video
The S-Video connector splits the video signal
into two signals, black-and-white and color. If
you are using the S-Video connector, you also
need to connect the audio cables. To locate
the S-Video connectors, see "Right View" on
page 6 and "Bottom View" on page 7.
Best Component (YPbPr)
Excellent DVI
Excellent HDMI
The component connectors splits the video
signal into three signals, two color and one
black-and-white. If you are using the
component connectors, you also need to
connect the audio cables. To locate the
component connectors, see "Bottom View" on
page 7.
DVI receives the image data in digital format
so that the TV does not need to perform an
analog-to-digital conversion, as with the
input types described above. Because the TV
uses digital data to display the image, DVI
provides the highest quality input, although
actual results depend on the video source
(DVD player, DVR, etc.). To locate the
connector see "Bottom View" on page 7.
HDMI (High Definition Multimedia
Interface) assures that the best video signal is
always sent from source (HDTV signal, DVD
player) to the TV. This is achieved by allowing
uncompressed video and multi-channel audio
data to be sent to the display device through
a single cable. To locate the connector see
"Bottom View" on page 7.
www.dell.com | support.dell.com
DELL CONFIDENTIAL – PRELIMINARY 10/8/04 – FOR PROOF ONLY
Setting Up Your TV 13
Page 14
FILE LOCATION: C:\Documents and Settings\solinak\Ƈ¦±\OM update\ch2e.fm
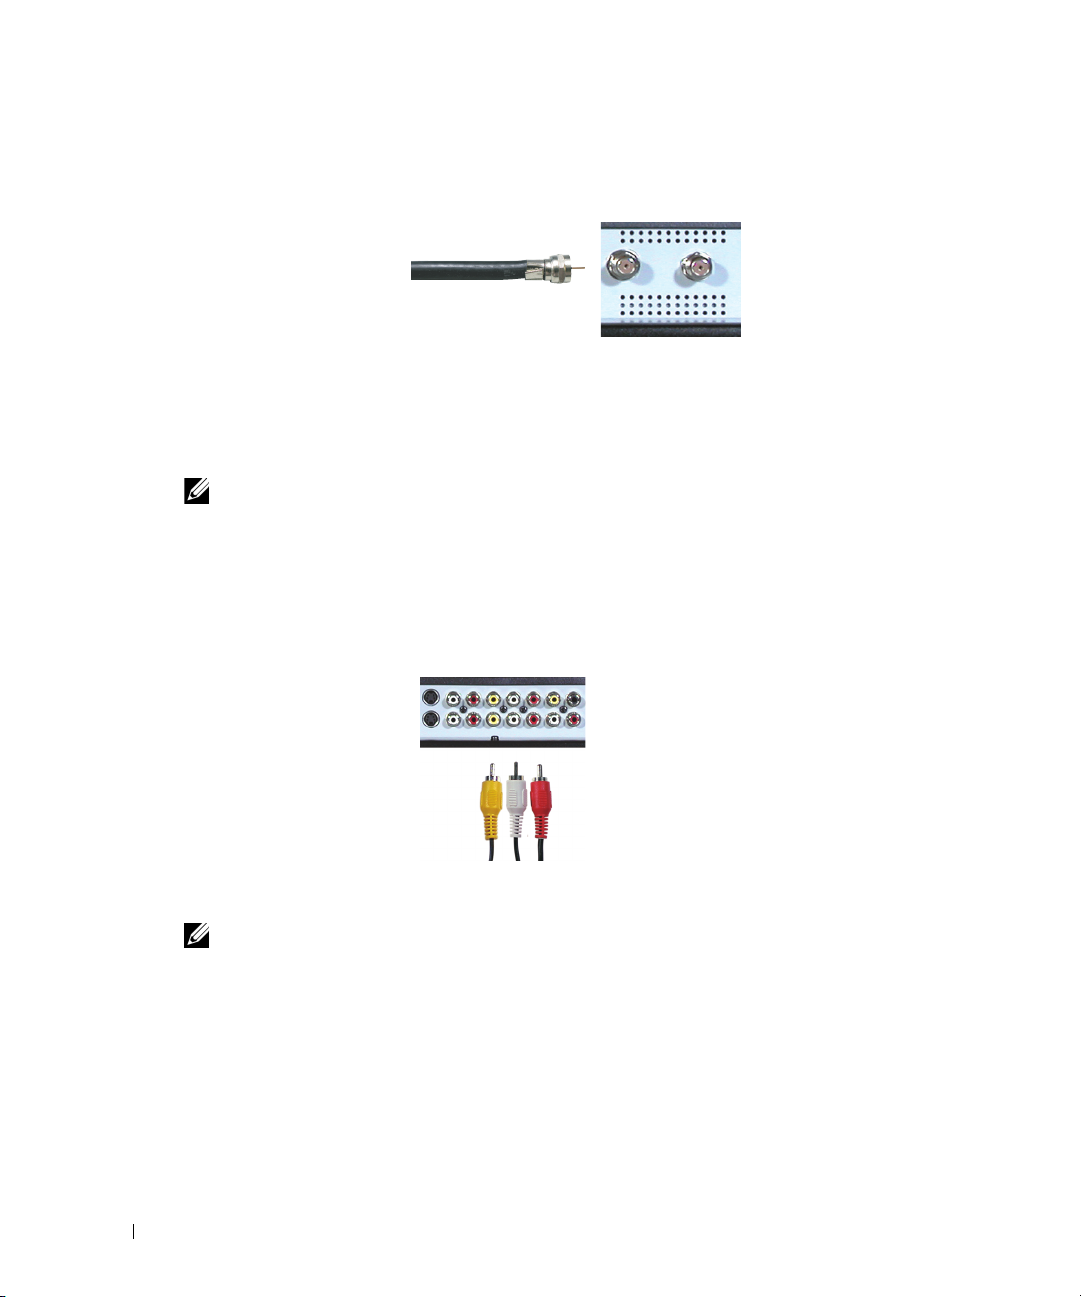
Using the ATSC or NTSC Connector (Coaxial)
1
www.dell.com | support.dell.com
Turn off the TV and unplug the power cord.
2
Connect the coaxial cable to the ATSC or the NTSC connectors on the TV.
NOTE: ATSC connector is available only on W4200HD.
Plug in the power cord for the TV and turn on the TV.
3
4
Enter the OSD and select TV for NTSC or Digital TV for ATSC. See "Input Select" on
page 26 for more information.
Using the Composite Connector
1
Turn off the TV and unplug the power cord.
NOTE: If you are connecting a device that you want to be able to remove, such as a video game system
or a camcorder, use the composite connector on the right side of the TV (see "Right View" on page 6).
Connect your device to the TV using the audio and video cable.
2
3
Plug in the power cords for the TV and devices and turn them on.
4
Enter the OSD and select AV5 or AV6. See "Input Select" on page 26 for more information.
DELL CONFIDENTIAL – PRELIMINARY 10/8/04 – FOR PROOF ONLY
14 Setting Up Your TV
Page 15
FILE LOCATION: C:\Documents and Settings\solinak\Ƈ¦±\OM update\ch2e.fm
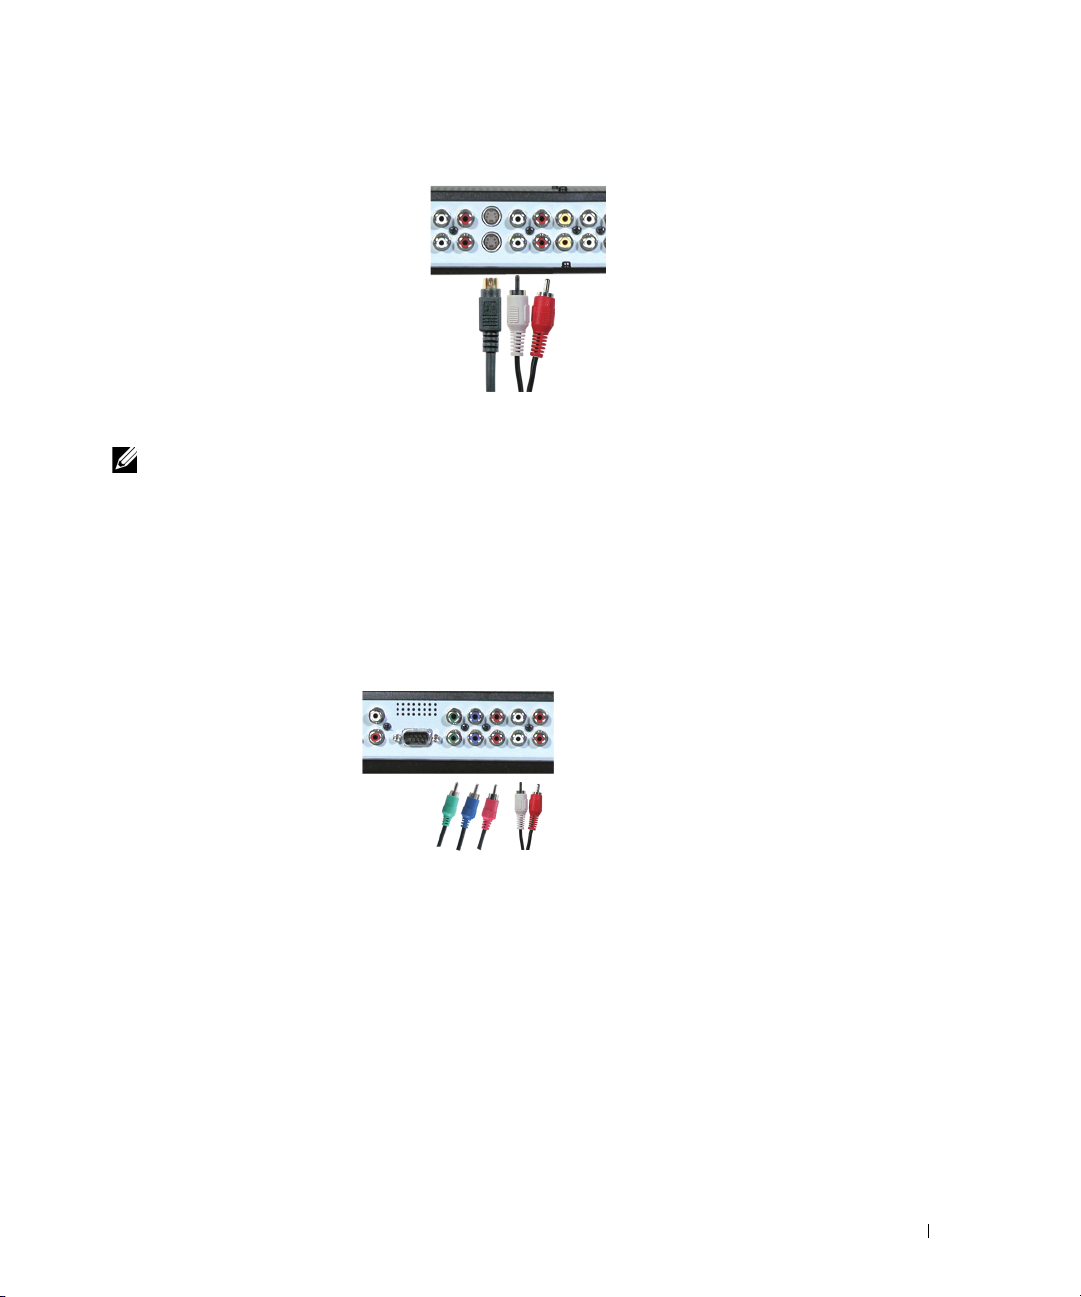
Using the S-Video Connector
1
Turn off the TV and unplug the power cord.
NOTE: If you are connecting a device that you want to be able to remove, such as a video game system,
or a camera, use the S-Video connector on the right side of the TV (see "Right View" on page 6).
2
Connect your device using the S-Video and audio cables.
3
Plug in the power cords for the TV and devices and turn them on.
4
Enter the OSD and select AV3, AV4, or AV8 (side S-Video connector). See "Input Select" on
page 26 for more information.
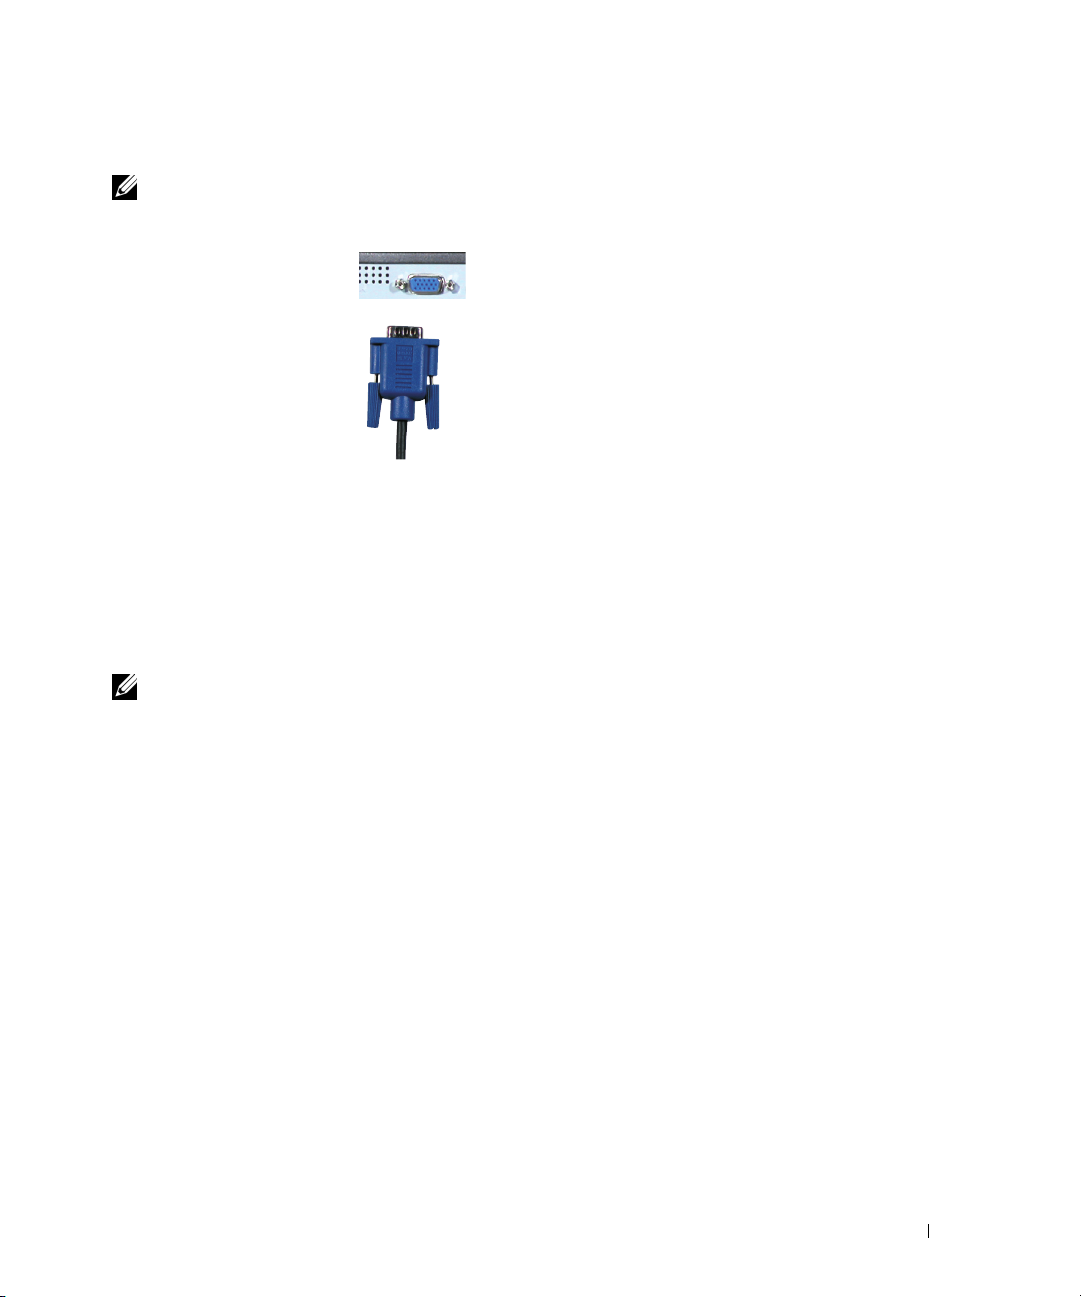
Using the Component Connector
www.dell.com | support.dell.com
1
Turn off the TV and unplug the power cord.
2
Connect your device using the component video and audio cables.
3
Plug in the power cords for the TV and devices and turn them on.
4
Enter the OSD and select AV1 or AV2. See "Input Select" on page 26 for more information.
DELL CONFIDENTIAL – PRELIMINARY 10/8/04 – FOR PROOF ONLY
Setting Up Your TV 15
Page 16

FILE LOCATION: C:\Documents and Settings\solinak\Ƈ¦±\OM update\ch2e.fm
Using the HDMI Connector
www.dell.com | support.dell.com
1
Turn off the TV and unplug the power cord.
2
Connect your device using the HDMI connector.
3
Plug in the power cords for the TV and devices and turn them on.
4
Enter the OSD and select HDMI. See "Input Select" on page 26 for more information.
Using the DVI Connector
NOTE: Only one connector can be used for a computer, either VGA or DVI.
1
Turn off the TV and unplug the power cord.
2
Connect the white DVI cables and the audio cables.
NOTE: Some cable TV boxes may have DVI connectors, but do not support using a DVI connection. For
more information, contact your cable TV company.
Plug in the power cords for the TV and devices and turn them on.
3
4
Enter the OSD and select DVI. See "Input Select" on page 26 for more information.
DELL CONFIDENTIAL – PRELIMINARY 10/8/04 – FOR PROOF ONLY
16 Setting Up Your TV
Page 17
FILE LOCATION: C:\Documents and Settings\solinak\Ƈ¦±\OM update\ch2e.fm
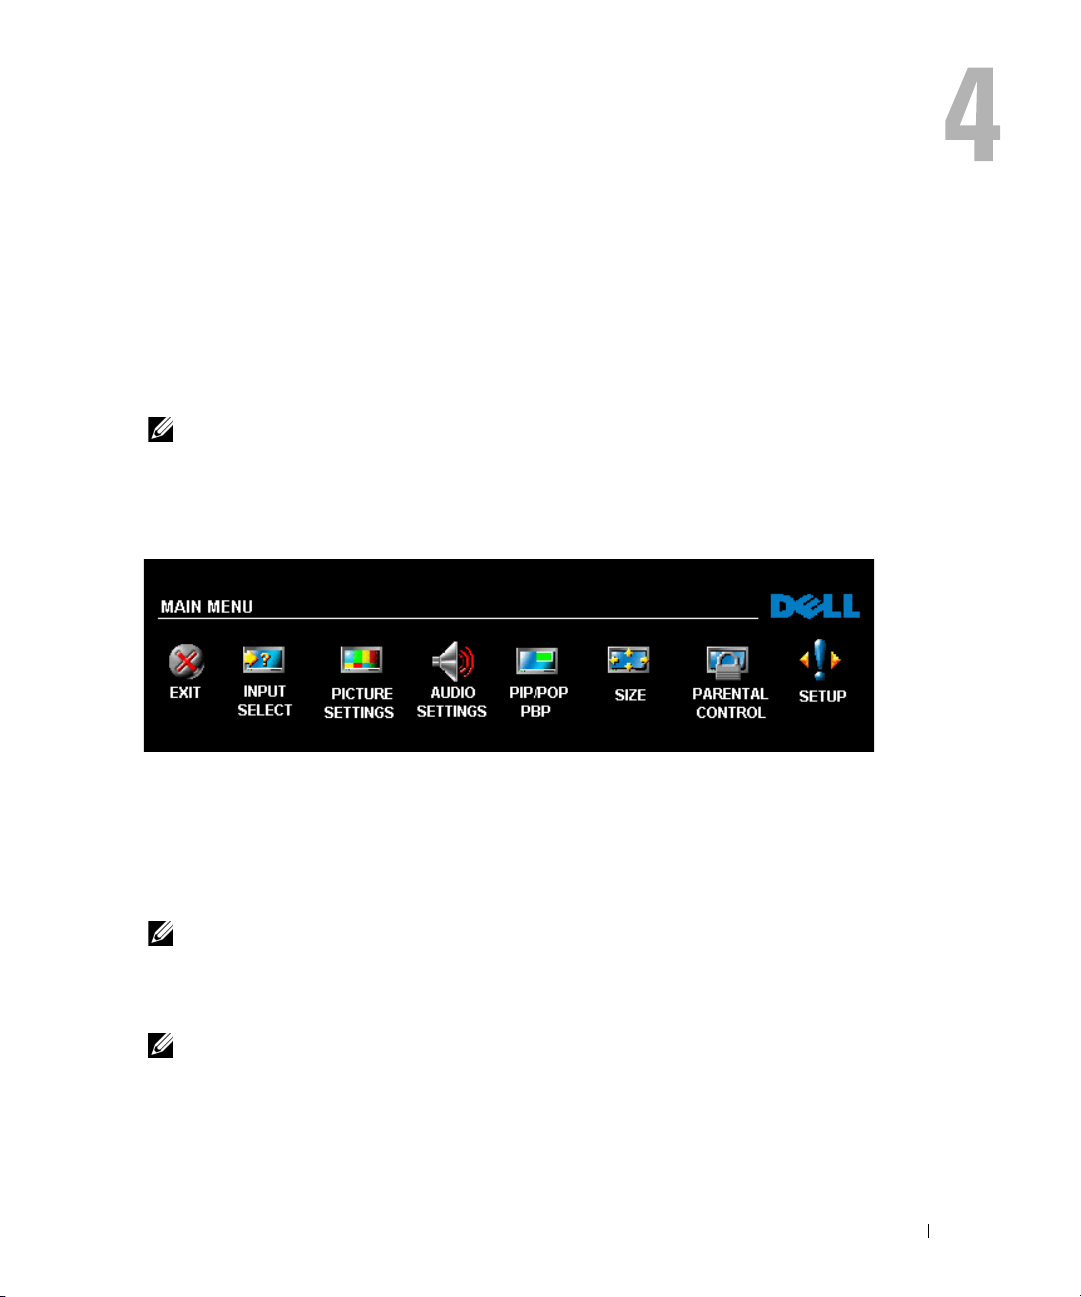
Using the VGA Connector
NOTE: Only one connector can be used for a computer, either VGA or DVI.
1
Turn off the TV and unplug the power cord.
2
Connect the VGA and audio cables to your TV and to your computer.
3
Plug in the power cords for the TV and devices and turn them on.
4
Enter the OSD and select VGA. See "Input Select" on page 26 for more information.
Image Retention and Burn-In
www.dell.com | support.dell.com
NOTE: Image retention and burn-in are not covered by your Dell warranty.
Displaying an image for an extended period of time can cause an image to remain or burn-in on the
screen. Burn-in is a characteristic of all plasma displays.
To help avoid image burn-in, it is best to avoid leaving stationary images on your TV for extended
periods of time. Examples of stationary images that may lead to burn-in include:
• TV menus
• Black bars such as those used in 4:3 or wide screen mode
• TV channel logos
• Stock market or news tickers
• Time display
• Shopping channel pricing display
• Static computer images
• Static video game images
• Closed captioning backgrounds
DELL CONFIDENTIAL – PRELIMINARY 10/8/04 – FOR PROOF ONLY
Setting Up Your TV 17
Page 18

FILE LOCATION: C:\Documents and Settings\solinak\Ƈ¦±\OM update\ch2e.fm
www.dell.com | support.dell.com
DELL CONFIDENTIAL – PRELIMINARY 10/8/04 – FOR PROOF ONLY
18 Setting Up Your TV
Page 19

Your Remote Control
Installing Batteries
Before you can use your remote control, install two AAA batteries in the remote control as follows.
1
Open the battery cover.
2
Install the batteries. Make sure that you match the + and - on the batteries with the + and symbols in the battery compartment.
3
Close the battery cover.
FILE LOCATION: C:\Documents and Settings\solinak\Ƈ¦±\OM update\ch3e.fm
DELL CONFIDENTIAL – PRELIMINARY 10/8/04 – FOR PROOF ONLY
Your Remote Control 19
Page 20

FILE LOCATION: C:\Documents and Settings\solinak\Ƈ¦±\OM update\ch3e.fm
Using Your Remote Control
W4200ED
www.dell.com | support.dell.com
1
2
3
4
5
6
7
8
9
10
12
13
14
15
16
17
18
19
20
21
22
DELL CONFIDENTIAL – PRELIMINARY 10/8/04 – FOR PROOF ONLY
20 Your Remote Control
11
23
Page 21

FILE LOCATION: C:\Documents and Settings\solinak\Ƈ¦±\OM update\ch3e.fm
1 INPUT Enters the Input Select menu
2 DISP Displays information about your TV (for example, in TV mode, it displays
the channel you are watching)
3 MENU Enters and exits the OSD main menu
4 Vol - Decreases the volume
In the OSD menu, use the volume button to navigate through the menus
5 Vol + Increases the volume
In the OSD menu, use the volume button to navigate through the menus
6 AUDIO Cycles through the preset Audio options
7 POP PBP Enters and exits POP or PBP mode
8 PIP Enters and exits PIP mode
9 SWAP Swaps images when using PIP, POP, or PBP
10 SAP Turns on Second Audio Program (SAP)
11 SLEEP Turns on the sleep timer
12 Power Turns the TV on and off
13 Number buttons Press to select a channel
14 LAST Returns you to the previously viewed channel
15 MUTE Press to turn the sound on and off
16 CH Push to view the next channel
In the on-screen display (OSD) menu, use the channel button to navigate
through the menus
17 ENTER Press to confirm your selection
18 CH Push to view the previous channel
In the OSD menu, use the channel button to navigate through the menus
19 PICT Cycles through the preset options for the Picture menu
20 POS Press to change the position of the PIP, POP, or PBP window
21 PIP SEL Toggles between windows when you use Picture-in-Picture (PIP), Picture-
Outside-Picture (POP), or Picture-By-Picture (PBP)
22 CC Cycles through the Closed Caption menu
23 SIZE Cycles through the size (aspect ratio) options from the Picture menu
www.dell.com | support.dell.com
DELL CONFIDENTIAL – PRELIMINARY 10/8/04 – FOR PROOF ONLY
Your Remote Control 21
Page 22

FILE LOCATION: C:\Documents and Settings\solinak\Ƈ¦±\OM update\ch3e.fm
Using Your Remote Control
W4200HD
www.dell.com | support.dell.com
1
2
3
4
5
6
7
8
9
10
13
14
15
16
17
18
19
20
21
22
23
DELL CONFIDENTIAL – PRELIMINARY 10/8/04 – FOR PROOF ONLY
22 Your Remote Control
11
12
24
25
Page 23

FILE LOCATION: C:\Documents and Settings\solinak\Ƈ¦±\OM update\ch3e.fm
1 INPUT Enters the Input Select menu
2 DISP Displays information about your TV (for example, in TV mode, it displays
the channel you are watching)
3 MENU Enters and exits the OSD main menu
4 Vol - Decreases the volume
In the OSD menu, use the volume button to navigate through the menus
5 Vol + Increases the volume
In the OSD menu, use the volume button to navigate through the menus
6 GUIDE
(W4200HD only)
Displays an electronic program guide when using Digital TV (ATSC
connector)
NOTE: Content may vary depending on the broadcaster.
7 POP PBP Enters and exits POP or PBP mode
8 PIP Enters and exits PIP mode
9 SWAP Swaps images when using PIP, POP, or PBP
10 SAP Turns on Second Audio Program (SAP)
11 SLEEP Turns on the sleep timer
12 AUDIO Cycles through the preset Audio options
13 Power Turns the TV on and off
14 Number buttons Press to select a channel
15 LAST Returns you to the previously viewed channel
16 MUTE Press to turn the sound on and off
17 CH Push to view the next channel
In the on-screen display (OSD) menu, use the channel button to navigate
through the menus
18 ENTER Press to confirm your selection
19 CH Push to view the previous channel
In the OSD menu, use the channel button to navigate through the menus
20 INFO
(W4200HD only)
21 POS Press to change the position of the PIP, POP, or PBP window
22 PIP SEL Toggles between windows when you use Picture-in-Picture (PIP), Picture-
23 CC Cycles through the Closed Caption menu
24 SIZE Cycles through the size (aspect ratio) options from the Picture menu
25 PICT Cycles through the preset options for the Picture menu
Displays HDTV channel information
Outside-Picture (POP), or Picture-By-Picture (PBP)
www.dell.com | support.dell.com
DELL CONFIDENTIAL – PRELIMINARY 10/8/04 – FOR PROOF ONLY
Your Remote Control 23
Page 24

FILE LOCATION: C:\Documents and Settings\solinak\Ƈ¦±\OM update\ch3e.fm
Using Your TV With a Universal or Learning Remote Control
Preprogrammed universal remote controls can be programmed to control the following functions
on your Dell TV:
•Power
• Channel Up (+)
• Channel Down (-)
• Volume Up (+)
• Volume Down (-)
• Mute
www.dell.com | support.dell.com
• Input Select
NOTE: Future preprogrammed universal remote controls may be able to control more functions.
You can program universal remote controls to work with your Dell TV in the following ways:
• If the remote control manual lists codes by manufacturer, use the Phillips codes.
• If the remote control has a search function, this function may be used to find the correct
code.
• If the remote control has a learning function, you can program specific buttons on it from the
Dell remote control, in addition to those buttons listed above.
NOTE: See the remote control documentation for specific instructions for your universal or learning
remote control.
DELL CONFIDENTIAL – PRELIMINARY 10/8/04 – FOR PROOF ONLY
24 Your Remote Control
Page 25
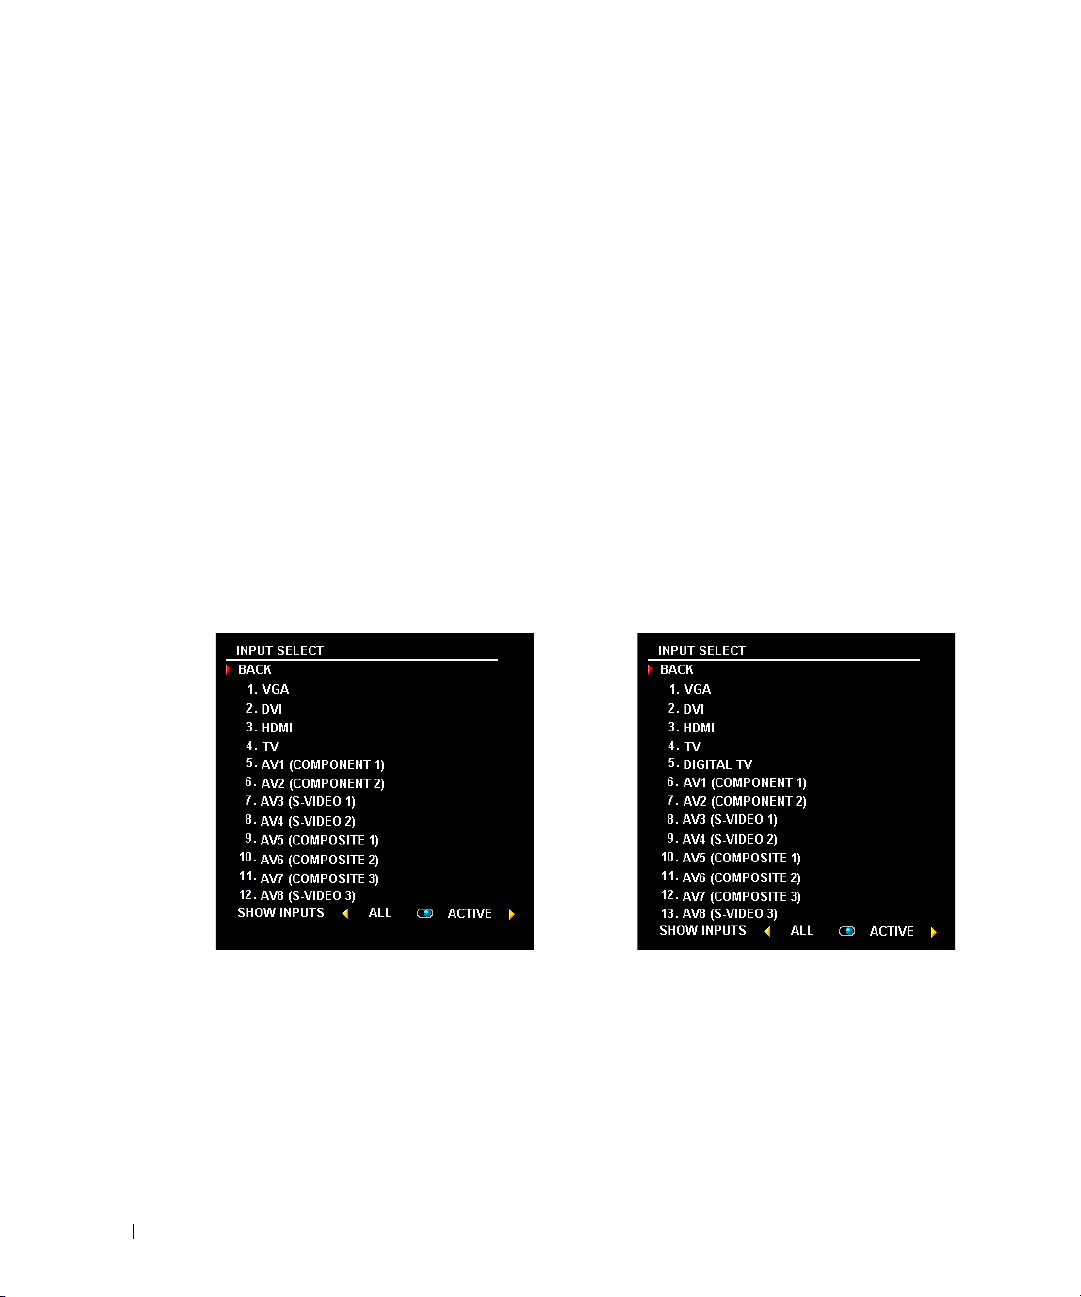
Using the On-Screen Display
Your TV display has an on-screen display (OSD) that allows you to select the proper input source,
make adjustments to the image and audio settings, select to view Picture-In-Picture, PictureOutside-Picture, and Picture-By-Picture, and set parental controls.
Using Your Remote Control With the OSD
NOTE: You can access and make selections to the OSD using the volume and channel buttons on the
side panel of the TV or you can use the remote control. Except where noted, this section describes how
to use the OSD with the remote control.
1
To enter the OSD, press the
Eight icons appear along the bottom of the screen.
2
Use the left and right buttons (volume buttons) to move between the icons.
The icon appears highlighted as you move through the menu.
Menu
button.
3
To select an option, push the
4
A new menu appears for that selected option. Use the up and down buttons (channel
buttons) to move through the various settings.
NOTE: A red arrow appears next to the setting as you navigate through the options. A check mark
appears next to the option that you have selected.
Use the left and right buttons (volume buttons) and the
5
settings.
NOTE: You can select Exit or press the Menu button at any time to return to the main menu.
After you have made your selections, push the
6
7
To exit the OSD, select the
FILE LOCATION: C:\Documents and Settings\solinak\Ƈ¦±\OM update\ch4e.fm
Menu
EXIT
icon and press
button when the icon is highlighted.
Enter
button to adjust or select
Menu
button to return to the main menu.
Enter
.
Using the On-Screen Display 25
Page 26
FILE LOCATION: C:\Documents and Settings\solinak\Ƈ¦±\OM update\ch4e.fm
Selecting Your OSD Language
1
Press
Menu
2
Select
Setup
3
In the
Setup
to appear in.
Input Select
The
Input Select
display and video equipment connected. Press
menu. You can also press
www.dell.com | support.dell.com
Select
to enter the OSD.
.
menu, select
Language
and scroll to select the language that you want the OSD
menu allows you to select the proper source based on how you have your TV
Input
Menu
and select
on the remote to go directly to the
Input Select
from the main menu.
Input
If you are using the
can preset the viewable channels. Go to the
then select
Channel Search
and the ATSC connector, you need to preset the viewable channels for both the
TV
input sources.
VGA — Select when you have your computer connected to the VGA connector. See "Bottom View" on
page 7 for the location of the VGA connector.
DVI — Select when you have connected your computer or a device such as a DVD player to the DVI
connector. See "Bottom View" on page 7 for the location of the DVI connector.
HDMI — Select when you have connected a device, such as a DVD player using the HDMI connector. See
"Bottom View" on page 7 for the location of the HDMI connector.
TV — Select when you have your antenna or cable TV box connected to the NTSC connector. See "Bottom
View" on page 7 for the location of the NTSC connector.
TV
(NTSC connector) or the
Digital TV
Main Menu
(ATSC connector) input source, you
, select
Setup
, select
Channel Setup
. If you have a W4200HD TV and you are using the NTSC connector
Digital TV
W4200ED W4200HD
, and
and the
DELL CONFIDENTIAL – PRELIMINARY 10/8/04 – FOR PROOF ONLY
26 Using the On-Screen Display
Page 27

FILE LOCATION: C:\Documents and Settings\solinak\Ƈ¦±\OM update\ch4e.fm
DIGITAL TV — Select when you have your antenna connected to the ATSC connector. See "Bottom View"
on page 7 for the location of the ATSC connector. (for W4200HD only)
AV1 (COMPONENT 1) — Select when you have a video device, such as a DVD player, set-top box, or cable
TV box, connected to the component audio and video connectors on the bottom of the TV. See "Bottom
View" on page 7 for the location of the component audio and video connectors.
AV2 (COMPONENT 2) — Select when you have a video device, such as a DVD player, set-top box, or cable
TV box, connected to the component audio and video connectors on the bottom of the TV. See "Bottom
View" on page 7 for the location of the component audio and video connectors.
AV3 (S-VIDEO 1) — Select when you have a video device, such as a VCR, connected to the S-Video
connector on the bottom of the TV display. See "Bottom View" on page 7 for the location of the S-Video
connector.
AV4 (S-VIDEO 2) — Select when you have a video device, such as a VCR, connected to the S-Video
connector on the bottom of the TV display. See "Bottom View" on page 7 for the location of the S-Video
connector.
AV5 (COMPOSITE 1) — Select when you have a video device, such as a video game system, connected to the
composite connector on the bottom of the TV display. See "Bottom View" on page 7 for the location of the
composite video and audio connectors.
AV6 (COMPOSITE 2) — Select when you have a video device, such as a video game system, connected to the
composite connector on the bottom of the TV display. See "Bottom View" on page 7 for the location of the
composite video and audio connectors.
AV7 (COMPOSITE 3) — Select when you have a video device, such as a video game system, connected to the
composite connector on the side of the TV display. See "Right View" on page 6 for the location of the
composite connector.
AV8 (S-VIDEO 3) — Select when you have a video device, such as a VCR, connected to the S-Video
connector on the side of the TV display. See "Right View" on page 6 for the location of the S-Video
connector.
SHOW INPUTS — Show Inputs allows you to select Active or All. Active searches for which connectors are
being used. The available input sources appear in white and input sources that are not available appear in
grey. All shows all the input sources and allows you to select all the input sources even if you do not have a
device connected.
www.dell.com | support.dell.com
NOTE: In OSD Settings, located in the Setup menu, you can set the Input Select to display the device that
you have attached. For example, AV2 would say DVD when you view the Input Select menu.
DELL CONFIDENTIAL – PRELIMINARY 10/8/04 – FOR PROOF ONLY
Using the On-Screen Display 27
Page 28
FILE LOCATION: C:\Documents and Settings\solinak\Ƈ¦±\OM update\ch4e.fm
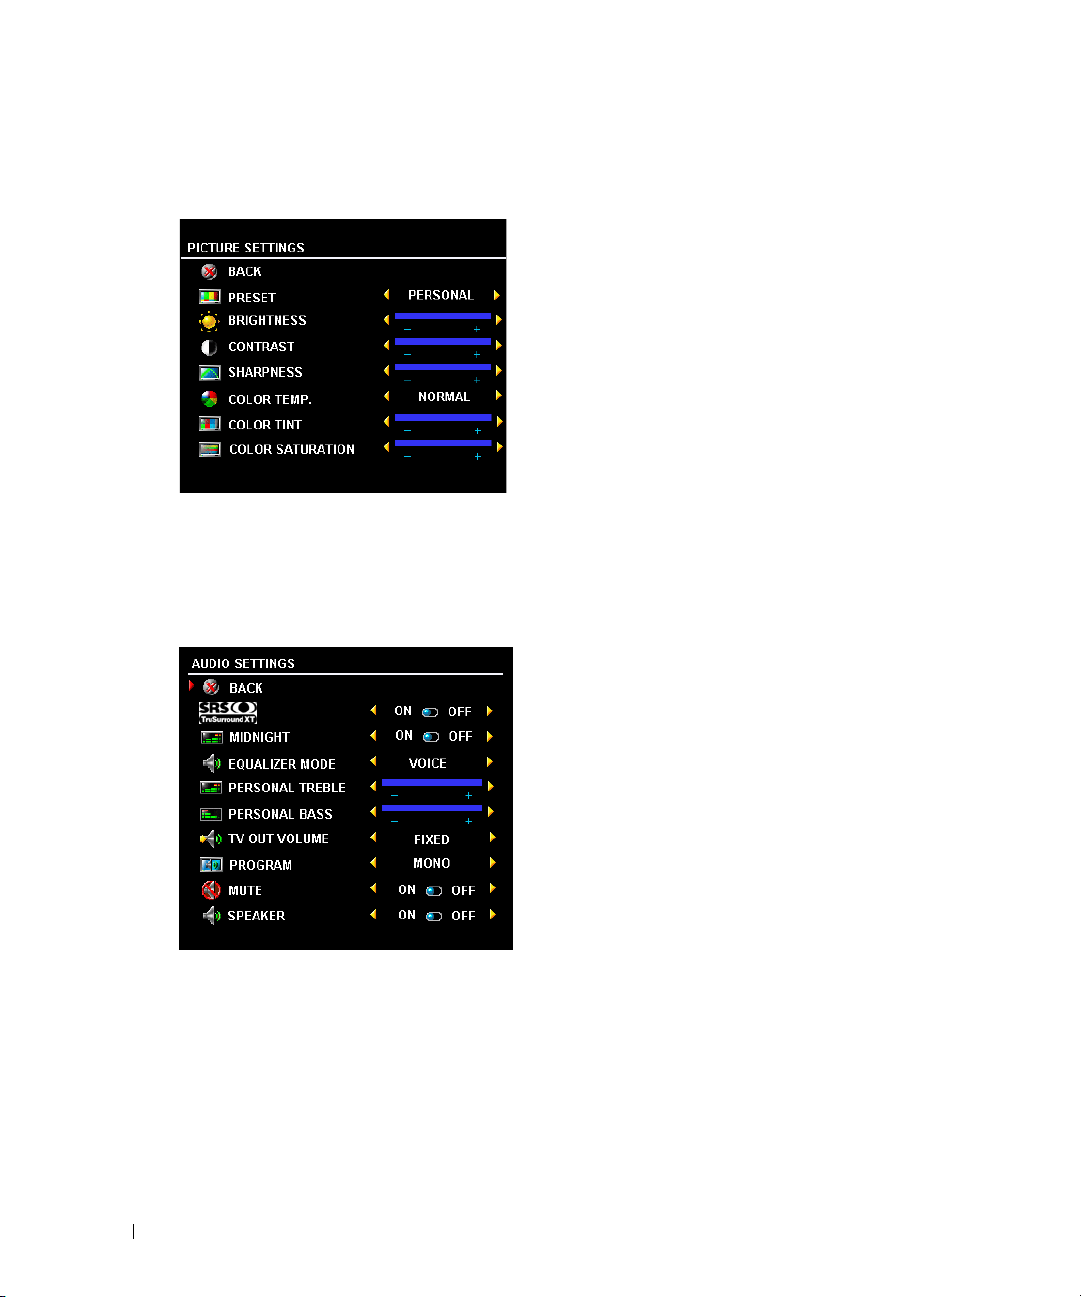
Picture Menu
The Picture Menu allows you to adjust the appearance of the image including color and brightness.
www.dell.com | support.dell.com
Audio
The Audio Menu allows you to set the audio to best fit the type of show you are watching.
If you select one of the following preset
automatically updated:
•
Music
•
Theater
•
Voi ce
If you select
Program
Use
28 Using the On-Screen Display
Personal
to select
DELL CONFIDENTIAL – PRELIMINARY 10/8/04 – FOR PROOF ONLY
If you select one of the following preset image settings
the individual settings are automatically updated.
•Movies
•Sports
If you select
settings, such as
The color temperature presets are:
•Natural: 6500K
•Normal: the native panel temperature
•Blue: 9300K
•Red: 5700K
Midnight Mode
variations between voice and action scenes.
SRS TruSurround XT
sound over two speakers from any source, which creates
a wider sound with deep rich bass.
Speaker On/Off
from the speaker.
TV Out Volume
the volume using the remote or volume control on an
attached audio receiver. Select
adjust the volume using the TV remote or front panel
buttons. Using
the volume on an attached audio receiver
Equalizer Mode
, you can adjust the individual audio levels, such as
Stereo, Mono
, or
SAP
(Second Audio Program).
Personal
, you can adjust the individual
Brightness
— Evens out the large volume
— Allows you turn on or off the sound
— Select
Variable
settings, the individual audio levels are
• Weak Signal
• Multimedia
and
— Delivers virtual surround
Fixed
adjusts the TV volume out not
Color
.
if you want to adjust
Va r i ab l e
Bass
if you want to
and
Tr eb le
.
Page 29
FILE LOCATION: C:\Documents and Settings\solinak\Ƈ¦±\OM update\ch4e.fm
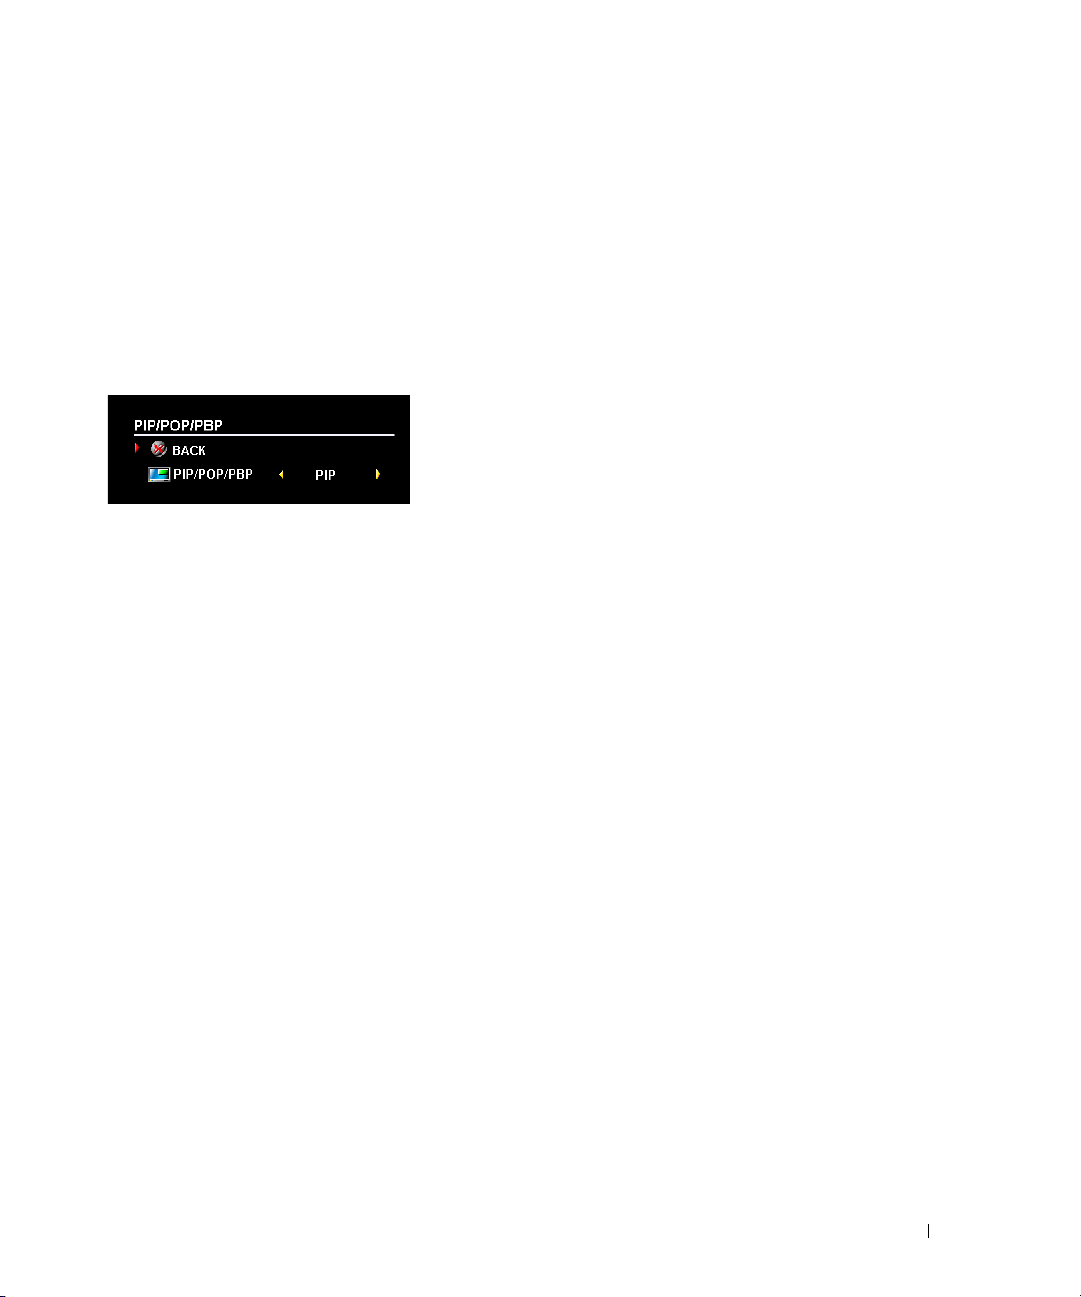
PIP/POP/PBP
You can view two active sources simultaneously using Picture-In-Picture (PIP), Picture-OutsidePicture (POP), or Picture-By-Picture (PBP).
For POP, you can select from three different POP options:
•
POP
— One large POP window to the left and a smaller, centered window on the right.
•
POP3
— One large POP window to the left and three smaller, vertically-aligned windows on
the right.
•
POP12
— One large, centered POP window surrounded by twelve smaller windows.
The remote control offers the following PIP/POP/PBP
options:
•Use the
remote control to turn on and off PIP, POP, and PBP.
•If you are in PIP, POP, or PBP mode, use the
button on the remote control to switch between the two
windows.
• Use the
appears.
In the OSD, you can adjust the
position of the PIP/POP/PBP windows. When you are selecting the horizontal orientation, - moves
the window left and + moves the window to the right. When you are adjusting the vertical
orientation, 0 is at the top of the screen and 100 is at the bottom of the screen.
POP Scan Mode
channels that appear in the windows.
preselected channels. The rotation mode runs through all the available channels before it starts
again at the lowest channel.
POS
button on the remote to change which corner of the screen the PIP window
Transparency
allows you to select
Sequential
Sequential
PIP
button or the
, the
Size
, and H (horizontal) and V (vertical)
or
Float. Float
rotates through each window and plays all of the
POP PBP
mode plays the source for selected
button on the
SWAP
www.dell.com | support.dell.com
PIP/POP/PBP Compatibility
When using PIP/POP/PBP you can select any of the input sources that appear in the PIP/POP/PBP
windows. The only input sources that cannot work together are HDMI with HDMI, DVI with DVI,
and HDMI with DVI.
DELL CONFIDENTIAL – PRELIMINARY 10/8/04 – FOR PROOF ONLY
Using the On-Screen Display 29
Page 30
FILE LOCATION: C:\Documents and Settings\solinak\Ƈ¦±\OM update\ch4e.fm
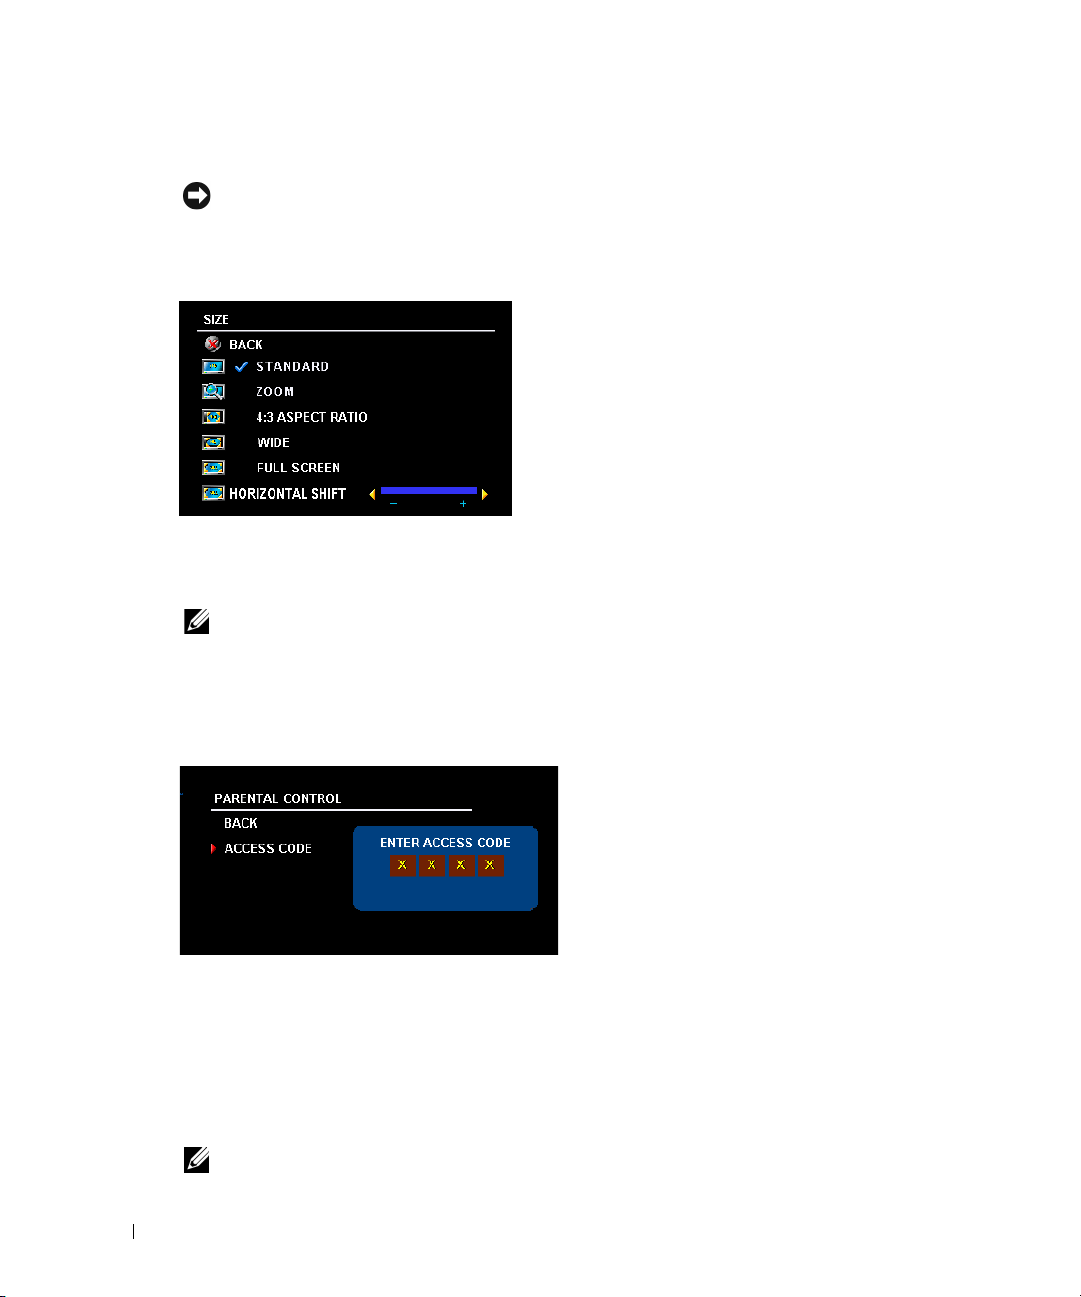
Size
NOTICE: Using black bars, such as those seen in Wide or 4:3, for an extended period of time may cause
burn-in on your TV.
Size allows you to adjust the appearance of the image. Use
the horizontal and vertical placement of the image.
www.dell.com | support.dell.com
Full Screen
Horizontal Shift
— Best selection for viewing digital HDTV or 16:9 DVD movies.
NOTE: Most DVDs have information about the supported aspect ratio on the case.
H. Position
Use the following settings to adjust the aspect ratio:
Standard
16:9 or 22:9 DVD movies.
Zoom
DVD movie.
4:3
movie.
Wide
and 22:9 DVD movies.
— Adjust the horizontal placement of the image.
— Best selection for viewing digital HDTV,
— Best selection for viewing TV, VCR or 4:3
— Best selection for viewing TV, VCR or 4:3 DVD
— Best selection for viewing digital HDTV, 16:9
and
V. Position
to adjust
Parental Control
Parental Control allows you to block certain channels or programs so children cannot view
programs that are not age appropriate.
You can set the following options to block content:
•
Channel Lock
Movie Rating
•
•
TV Ratings
•
Block Options
NOTE: You can use Clear All to unblock the channels and programs that you have set.
DELL CONFIDENTIAL – PRELIMINARY 10/8/04 – FOR PROOF ONLY
30 Using the On-Screen Display
— Blocks selected channels
— Blocks movies based on their rating (G, PG, PG-13, R, NC-17, and X)
— Blocks TV shows based on their rating
— Turns on or off all your parental control settings
To enter the Parental Control menu, you need an
access code. The first time you enter, use access
code 3355. See "Setting an Access Code" on
page 31 for information on creating a new access
code.
Page 31

FILE LOCATION: C:\Documents and Settings\solinak\Ƈ¦±\OM update\ch4e.fm
Setting an Access Code
After you enter the
code. If for any reason you lose or forget your access code, you can use the default code.
1
In the
2
Using the number pad on the remote control, enter a new access code.
3
Select
Parental Control
Parental Control
Exit
.
menu for the first time, you can set your own four-digit access
menu, select
Change Code
.
Setup
Setup allows you to adjust the appearance of the OSD, preset
viewable cable channels, change the language of the OSD (see
"Selecting Your OSD Language" on page 26) and to restore factory
settings.
In the
OSD Settings
decrease the amount of time the OSD appears. The maximum
amount of time is 60 seconds. You can select
lock the buttons on the bottom panel. When this option is enabled,
only the power button functions. Hold the volume increase and the
channel increase buttons together for 10 seconds to unlock the
buttons.
menu, use
OSD Hold Time
TV Button Lock
to increase or
www.dell.com | support.dell.com
to
Channel Setup
channels. If you are using the TV (NTSC connector) or the Digital TV (ATSC connector) input
source, you can preset the viewable channels. Go to the
Setup
, and then select
If you have a W4200HD TV and you are using the NTSC connector and the ATSC connector, you
need to preset the viewable channels for both the Digital TV and the TV input source.
DVI Settings
are not displaying correctly, you can change the setting to YUV.
Sleep Timer
Closed Caption
Select
If an image appears to be stuck on the TV, select
retention. Using the plasma conditioning feature may take several hours. Severe cases of image
retention are known as burn-in, the plasma conditioning feature does not remove burn-in.
Use plasma conditioning only when you experience a problem with image retention. Overuse may
degrade the TV brightness.
allows you adjust the settings for individual channels and preset the viewable
Main Menu
Channel Search
allows you to change the color space. The default color space is RGB, but if the colors
allows you to set an increment of time after which the TV automatically turns off.
to turn on and off closed captioning and set several other CC options.
.
Plasma Conditioning
, select
Setup
, select
Channel
to help eliminate any image
DELL CONFIDENTIAL – PRELIMINARY 10/8/04 – FOR PROOF ONLY
Using the On-Screen Display 31
Page 32

FILE LOCATION: C:\Documents and Settings\solinak\Ƈ¦±\OM update\ch4e.fm
www.dell.com | support.dell.com
DELL CONFIDENTIAL – PRELIMINARY 10/8/04 – FOR PROOF ONLY
32 Using the On-Screen Display
Page 33

Troubleshooting Problems With Your TV
CAUTION: If at any time you see smoke or sparks coming from your TV, contact Dell. Do not try to
perform any troubleshooting steps.
Troubleshooting Tips
NOTE: Some problems may be related to your device. See the documentation for any devices connected
to your TV display.
Most problems with your TV may be caused by not having the correct input selection. Each
connector on the TV (side and bottom) is associated with an input selection, which are labelled
AV1 through AV8 in the Input Select menu.
• AV1 — Component connector on the bottom of the TV
• AV2 — Component connector on the bottom of the TV
• AV3 — S-Video connector on the bottom of the TV
• AV4 — S-Video connector on the bottom of the TV
• AV5 — Composite connector on the bottom of the TV
• AV6 — Composite connector on the bottom of the TV
• AV7 — Composite connector on the right of the TV
• AV8 — S-Video connector on the right of the TV
You can also select the following inputs:
• TV — NTSC connector on the bottom of the TV
• DIGITAL TV — ATSC connector on the bottom of the TV
• VGA — VGA connector on the bottom of the TV
• DVI — DVI connector on the bottom of the TV
FILE LOCATION: C:\Documents and Settings\solinak\Ƈ¦±\OM update\ch5e.fm
Troubleshooting Problems With Your TV 33
Page 34

FILE LOCATION: C:\Documents and Settings\solinak\Ƈ¦±\OM update\ch5e.fm
General Problems
Problem Possible Solution
Poor picture quality while watching
TV and using a device such as a DVD
player or a VCR
www.dell.com | support.dell.com
Poor picture quality when using a
device connected to the ANT/Cable
(coaxial) connector
1
Check the aspect ratio settings in the OSD. Press the Menu
button on the remote control and select Size. For more
information on using the OSD, see "Using the On-Screen Display"
on page 25.
2
Reconnect the device using the same type of connector. For
example, if you are using the composite connector on the bottom,
try connecting the device to the composite connector on the side
of the TV display. See "About Your TV" on page 5 for the location
of the connectors. After you connect the device, change the input
source in the OSD. See "Input Select" on page 26 for more
information.
3
Connect the device using a different connector. For example, if
you are experiencing the problem using a composite connector, try
using the component connector.
NOTE: To connect to a different connector, you need the appropriate
cables for that connector. See your device documentation for a list of
supported connections.
After you connect the device, change the input source in the OSD.
"Input Select" on page 26
See
4
Reset the original factory defaults. Press Menu on the remote
for more information.
control, select Setup, and then select Factory Reset.
5
Adjust the color temperature. Press Menu on the remote control,
select Picture, and then select Color Temperature.
NOTE: Some set top boxes offer aspect ratio. See your device
documentation for more information.
1
Ensure TV display is selected as the input source in the Input
Source menu. See "Input Select" on page 26 for more information.
2
Press Menu on the remote control, select Setup, and then select
Channel Setup. This resets the channels on your TV.
3
Check the aspect ratio settings in the OSD. Press the Menu
button on the remote control and select Size. For more
information on using the OSD, see "Using the On-Screen Display"
on page 25.
4
Reset the original factory defaults. Press Menu on the remote
control, select Setup, and then select Factory Reset.
5
Adjust the color temperature. Press Menu on the remote control,
select Picture, and then select Color Temperature.
6
The problem may be with your device, contact your service
provider.
DELL CONFIDENTIAL – PRELIMINARY 10/8/04 – FOR PROOF ONLY
34 Troubleshooting Problems With Your TV
Page 35

FILE LOCATION: C:\Documents and Settings\solinak\Ƈ¦±\OM update\ch5e.fm
Problem Possible Solution
Nothing appears on my TV display 1
Ensure the TV display is turned on.
2
Verify that all the cables are properly connected to the TV display,
including the power cable.
3
Check to see if there is a blue or amber light on the lower, righthand corner of the TV display. A blue light indicates the TV
display is on. An amber light, means the TV display is in power
save mode.
4
Ensure the proper source is selected in the Input Source menu.
See "Input Select" on page 26 for more information.
5
Reconnect any devices that are currently connected to the TV
display. If you are using multiple devices, connect and test one
device at a time.
6
Connect another device that you know is working properly.
7
Reset the original factory defaults. Press Menu on the remote
control, select Setup, and then select Factory Reset.
www.dell.com | support.dell.com
DELL CONFIDENTIAL – PRELIMINARY 10/8/04 – FOR PROOF ONLY
Troubleshooting Problems With Your TV 35
Page 36

FILE LOCATION: C:\Documents and Settings\solinak\Ƈ¦±\OM update\ch5e.fm
Problem Possible Solution
No sound 1
www.dell.com | support.dell.com
Double image or no image with DVD Turn off the progressive scan on the DVD player. Your Dell™ TV
Picture is too dim or too bright Update the color settings in the OSD. Press Menu on the remote
Ensure mute is not turned on. Pressing the Mute button on the
remote control turns the mute function on and off.
2
If only certain TV channels do not have sound, then you need to
correct the Input Select menu in the OSD (see "Input Select" on
page 26).
3
Verify that the audio cables are firmly connected to both the audio
input connectors on your TV display and audio output connectors
on your devices. Ensure that the cable colors match the
connectors colors.
4
Also, ensure that the audio cables are connected to the same row
as the video cables. See "About Your TV" on page 5 for the
location of the connectors.
5
Reconnect the device using the same type of connector. For
example, if you are using the composite connector on the bottom,
try connecting the device to the composite connector on the side
of the TV display. See "About Your TV" on page 5 for the location
of the connectors.
After you connect the device, change the input source in the
OSD. See "Input Select" on page 26 for more information.
6
Connect the device using a different connector. For example, if
you are experiencing the problem using a composite connector, try
using the component connector.
NOTE: To connect to a different connector, you need the appropriate
cables for that connector. See your device documentation for a list of
supported connections.
After you connect the device, change the input source in the OSD.
"Input Select" on page 26
See
7
Test the device on a different TV.
8
If you are using PIP/POP/PBP, ensure the proper Audio Source is
selected. Press Menu on your remote control, and select
PIP/POP/PBP.
display offers built-in deinterlacer that is equal to or better quality
than the deinterlacer on your DVD player. For more information
about progressive scan on your DVD player, see the documentation
for your DVD player
Pixel defects within industry specifications are inherent to an PDP
TV and do not constitute a defective problem. For more
information about pixels and PDP technology, go to
support.dell.com.
control and select Picture.
for more information.
DELL CONFIDENTIAL – PRELIMINARY 10/8/04 – FOR PROOF ONLY
36 Troubleshooting Problems With Your TV
Page 37

FILE LOCATION: C:\Documents and Settings\solinak\Ƈ¦±\OM update\ch5e.fm
Problem Possible Solution
The screen is not centered correctly 1
Update the size settings in the OSD. Press Menu on the remote
control and select Size.
2
Reset the original factory defaults. Press Menu on the remote
control, select Setup, and then select Factory Reset.
Screen has one or more lines 1
Check the aspect ratio settings in the OSD. Press the Menu
button on the remote control and select Size. For more
information on using the OSD, see "Using the On-Screen Display"
on page 25.
2
Ensure the proper source is selected in the Input Source menu.
See "Input Select" on page 26 for more information.
3
Try connecting a different device. Ensure that you properly
connect the cables and update the input source in the OSD.
4
Update the size settings in the OSD. Press Menu on the remote
control and select Size.
5
Reset the original factory defaults. Press Menu on the remote
control, select Setup, and then select Factory Reset.
The front panel buttons do not work Check the OSD to see if the buttons have been locked. Press Menu
on your remote control, select Setup.
If you are unable to use the remote control, press the volume up
and the channel up buttons on the bottom of the TV display for 10
seconds to unlock the buttons.
The picture is too small 1
Adjust the size settings. Press Menu on the remote control, and
select Size.
2
This may be a problem with your device. See the documentation
for the device.
An image appears to be stuck on the
TV.
In OSD Setup select Plasma Conditioning. Using this option may
take several hours before the image is eliminated.
NOTE: Burn-in is not covered by your Dell warranty.
www.dell.com | support.dell.com
DELL CONFIDENTIAL – PRELIMINARY 10/8/04 – FOR PROOF ONLY
Troubleshooting Problems With Your TV 37
Page 38

FILE LOCATION: C:\Documents and Settings\solinak\Ƈ¦±\OM update\ch5e.fm
OSD Messages
While using your TV display, the following messages may appear.
Message Possible Solution
Auto Adjust No action required, the TV display is performing an auto
Out of Range Check the optimal resolution settings.
No Video Input
www.dell.com | support.dell.com
TV Button Lock To unlock, press Menu on your remote control, select Setup.
Self Test Appears for computer source when there is nothing plugged in.
Remote Control Problems
adjustment.
You may need to download a new video driver. For more
information, go to support.dell.com.
1
Check all cables are properly connected.
2
Ensure the proper source is selected. See "Input Select" on page 26
for more information.
Select VGA or DVI from Input Select menu and nothing is plugged
in. Plug a computer in to the VGA or DVI connector.
Problem Possible Solution
The TV display does not respond
when using the remote control
DELL CONFIDENTIAL – PRELIMINARY 10/8/04 – FOR PROOF ONLY
38 Troubleshooting Problems With Your TV
1
Point the remote control directly at the lower right corner of the
TV display. Be sure that nothing is blocking the front of the TV
display. For the location of the IR, see "Front View" on page 5.
2
Verify that the batteries are properly installed.
3
If the batteries are old, install new batteries.
NOTE: Bright lights or other infrared devices may interfere with your
remote control and IR on the TV display.
Page 39

FILE LOCATION: C:\Documents and Settings\solinak\Ƈ¦±\OM update\ch5e.fm
Using the Self-Test Feature when Connected to a Computer
When your computer is connected to the TV display through DVI or VGA connector you can use
the self-test feature to check whether your TV display is functioning properly. If your TV display
and computer are properly connected but the TV display screen remains dark, run the TV display
self-test by performing the following steps:
1
Turn off both your computer and the TV display.
2
Unplug the video cable from the back of the computer.
3
Turn on the TV display. If the TV display cannot sense a video signal and is working correctly,
the floating "
Self-Test Feature Check"
dialog box appears on the screen (against a black
background). While in self-test mode, the power light remains blue and the self-test pattern
scrolls through the screen continually. This box also appears during normal system operation
if the video cable becomes disconnected or damaged.
4
Turn off your TV display and reconnect the video cable; then turn on both your computer and
the TV display. If your TV display screen remains blank, the problem may be with your
computer or graphic card.
See your computer documentation for more information.
Problems When Using the TV Display as a Monitor
www.dell.com | support.dell.com
Problem Possible Solution
The picture is off-centered or too small
1
Use Auto Adjust to check the Image Settings. Press Menu to
enter the OSD, select Image Settings, and then select Auto
Adjust.
2
Check the optimal resolution settings. You may need to
download a new video driver. For more information, go to
support.dell.com.
NOTE: Some older video cards may not support the resolution
settings for the TV display.
No audio
1
Ensure the green audio cable is connected to audio connector on
the TV display and on the computer. For the location of the
connector on the TV display, see "Using the VGA Connector" on
page 17. See your computer documentation for the location of
connectors on your computer.
Do not connect the audio cable to the headphone jack.
2
Ensure the volume on the computer is not muted.
3
Verify that sound on your computer is working by checking the
speakers. See your computer documentation for information on
troubleshooting your computer.
4
Disconnect the TV display from the computer and test to see if
the TV display volume works.
DELL CONFIDENTIAL – PRELIMINARY 10/8/04 – FOR PROOF ONLY
Troubleshooting Problems With Your TV 39
Page 40

FILE LOCATION: C:\Documents and Settings\solinak\Ƈ¦±\OM update\ch5e.fm
Problem Possible Solution
PIP/POP/PBP not working 1
No video NOTE: If you see a self-test, it means there is a problem with your
www.dell.com | support.dell.com
Ensure the settings in the OSD are properly set. Press Menu to
enter the OSD, and select PIP/POP/PBP.
2
Swap the video and audio source.
video card or you are using the wrong input source.
1
Ensure the TV display is turned on.
2
Verify that all the cables are properly connected to the TV
display, including the power cable.
3
Check to see if there is a blue or amber light on the lower, righthand corner of the TV display. A blue light indicates the TV
display is on. An amber light, means the TV display is in power
save mode.
4
Ensure proper source is selected. See "Input Select" on page 26
for more information.
5
Reconnect the computer.
6
Connect another device that you know is working properly.
7
Reset the original factory defaults. Press Menu on the remote
control, select Setup, and then select Factory Reset.
DELL CONFIDENTIAL – PRELIMINARY 10/8/04 – FOR PROOF ONLY
40 Troubleshooting Problems With Your TV
Page 41

Specifications for Your TV
General
Model number W4200 PDP TV
Display type HD PDP panel (W4200HD)
ED PDP panel (W4200ED)
Screen size 42-inches
Viewable area 932 x 532 mm (36.7 x 20.9 inches)
Image aspect ratio 16:9 (wide screen)
Video display capabilities 480i
480p
576i
576p
720p
1080i
Additional features:
SAP capable Yes
CC capable Yes
Parental control capable Yes
Physical Dimensions
Display (with stand) 1031.8 x 712.5 x 245.7 mm
Display (no stand) 1031.8 x 631.5 x 83.8 mm
With Speakers
Weight (with stand) 46 kg/101.41 lbs (est.)
Native Resolution 1024 x 768 XGA (W4200HD)
852 x 480 WVGA (W4200ED)
HDTV Capable Yes
Specifications for Your TV 41
Page 42

Picture-In-Picture
Picture-In-Picture (PIP) Yes
Picture-Outside-Picture (POP) Yes
Picture-By-Picture (PBP) Yes
Number of Tuners 2
Brightness (typical)
ED version
HD version
Contrast Ratio
www.dell.com | support.dell.com
ED version
HD version
Viewing Angle
Horizontal +/-80 degree
Vertical +/-80 degree
Inputs
Video
Composite (CVBS)
S-Video
Component
TV In (coaxial)
Audio (RCA L+R)
DVI
HDMI
Computer
VGA (for use as computer monitor)
Audio (PC)
Other
RS232
450 nits (typ.)
420 nits (typ.)
2700: 1 (typ.)
2300: 1 (typ.)
three in total (side and bottom)
three in total (side and bottom)
two (bottom)
two (bottom) (HD version x 2, ED version x 1)
eight pairs in total (side and bottom)
one (bottom)
one (bottom)
one (bottom)
one (bottom)
one (bottom)
Outputs
Video
42 Specifications for Your TV
Page 43

Outputs
Composite (CVBS)
Audio (RCA L+R)
Subwoofer
SPDIF (RCA + Optical)
Audio
Effects SRS TruSurround XT
Speakers (separate) 20 watts/channel
one (bottom)
one pair (bottom)
one
one (HD model only)
Midnight Mode
40 watts total
Specifications for Your TV 43
Page 44

www.dell.com | support.dell.com
44 Specifications for Your TV
Page 45

Index
A
about
package contents, 9
TV, 5
access code
default, 30
parental control, 30
setting, 31
ATSC, 31
cable, usage, 12
connecting, 14
connector, location, 8
audio
button, 21-23
connector for VGA, location, 7
connectors, location, 6
DVI connectors, location, 7
equalizer mode, 28
midnight mode, 28
OSD menu, 28
program, 28
speaker on/off, 28
SRS TruSurround, 28
TV out volume, 28
AV1/AV2. See component.
AV3/AV4. See S-Video.
AV5/AV6. See composite.
B
block
parental control, 30
button
audio, 21-23
CC, 21-23
channel up/down, 5
DISP, 21-23
enter, 21-23
guide (W4200HD), 23
INFO (W4200HD), 23
input, 21-23
input source, 5
last, 21-23
menu, 21-23
mute, 21-23
OSD menu, 5
PICT, 21-23
PIP, 21-23
PIP SEL, 21-23
POP/PBP, 21-23
POS, 21-23
power, 5
SAP, 21-23
size, 21-23
sleep, 21-23
swap, 21-23
volume up/down, 5
C
CC
button, 21-23
channel
setup, 26, 31
channel lock
parental control, 30
coaxial
ATSC connector, 14
cable, usage, 12
digital audio out connector,
location, 8
NTSC connector, 14
color temperature, 28
component
AV1/AV2 connectors,
location, 7
cable, usage, 13
connecting, 15
composite
AV5/AV6 connectors,
location, 7
cable, usage, 12
connecting, 14
video/audio out connectors,
location, 8
composite video
connector, location, 6
computer
connecting, 17
connector
ATSC, 8
audio left/right, 6
coaxial digital audio out, 8
component (AV1/AV2), 7
composite (AV5/AV6), 7
composite video, location, 6
composite video/audio out, 8
DVI, 7
Index 45
Page 46

DVI audio connectors, 7
HDMI, 7
NTSC, 8
optical digital out, location, 8
power, 8
speaker out, 8
subwoofer, 8
S-Video, 6-7
VGA, 7
VGA audio, 7
D
DISP
button, 21-23
DVI
audio connectors, location, 7
cable, usage, 13
connecting, 16
connector, location, 7
G
guide
button (W4200HD), 23
H
HDMI
cable, usage, 13
connecting, 16
connector, location, 7
I
INFO
button (W4200ED), 23
input
button, 21-23
IR receiver
location, 5
button, 21-23
N
NTSC, 31
connecting, 14
connector, location, 8
O
optical digital out
connector, location, 8
OSD
audio menu, 28
hold time, 31
messages, 38
parental control menu, 30
picture menu, 28
PIP/POP/PBP, 29
setup menu, 31
size menu, 30
E
enter
button, 21-23
equalizer mode, 28
music, 28
theater, 28
voice, 28
F
float
POP scan mode, 29
46 Index
L
last
button, 21-23
M
menu
button, 21-23
midnight mode, 28
mono, 28
movie rating
parental control, 30
mute
P
parental control, 30
about, 30
block options, 30
channel lock, 30
movie rating, 30
PICT
button, 21-23
picture by picture. See
PIP/POP/PBP
picture in picture. See
PIP/POP/PBP
picture menu
Page 47

color temperature, 28
movies, 28
multimedia, 28
sports, 28
weak signal, 28
picture on picture. See
PIP/POP/PBP
PIP
button, 21-23
PIP SEL
button, 21-23
PIP/POP/PBP
compatibility, 29
setting up, 29
plasma conditioning, 31, 37
POP/PBP
button, 21-23
POS
button, 21-23
power
connector, location, 8
power LED
location, 5
R
remote control
audio button, 21-23
CC button, 21-23
DISP button, 21-23
enter button, 21-23
guide button (W4200HD), 23
INFO button (W4200HD), 23
input button, 21-23
installing batteries, 19
last button, 21-23
menu button, 21-23
mute button, 21-23
PICT button, 21-23
PIP button, 21-23
PIP SEL button, 21-23
POP/PBP button, 21-23
POS button, 21-23
SAP button, 21-23
size button, 21-23
sleep button, 21-23
swap button, 21-23
troubleshooting, 38
universal, using, 24
W4200ED, using, 20
W4200HD, using, 22
S
SAP, 28
button, 21-23
second audio program. See
SAP
self-test
using, 39
Sequential, 29
sequential
POP scan mode, 29
setup
channel setup, 31
channels, 31
DVI settings, 31
menu, 31
OSD hold time, 31
size
4 to 3, 30
button, 21-23
full screen, 30
menu, 30
PIP/POP/PBP window, 29
standard, 30
wide, 30
zoom, 30
sleep
button, 21-23
SPDIF. See optical digital out
speaker out
connectors, location, 8
specifications, 41
audio, 43
general, 41
inputs, 42
outputs, 42
physical dimensions, 41
picture-in-picture (PIP), 42
viewing angle, 42
SRS TruSurround XT, 28
stereo, 28
subwoofer
connector, location, 8
S-Video
AV3/AV4 connectors,
location, 7
cable, usage, 13
connecting, 15
connector, location, 6
swap
button, 21-23
Index 47
Page 48

T
W
tips
troubleshooting, 33
transparency
of PIP/POP/PBP window, 29
troubleshooting, 33
general problems, 34
OSD messages, 38
remote control, 38
self-test, 39
tips, 33
VGA monitor, 39
TV
about, 5
bottom view, 7
caring for, 10
front view, 5
proper location, 11
right view, 6
setting up, 11
troubleshooting, 33
TV ratings, 30
parental control, 30
W4200HD
ATSC, 8
coaxial digital audio out, 8
optical digital out, 8
weak signal, 28
V
VGA
connecting, 17
connector, location, 7
volume
fixed, 28
variable, 28
48 Index
Page 49

Dell™ W4200HD et W4200ED
Téléviseur à écran plasma
106 cm (42 pouces)
Manuel d’utilisation
EMPLACEMENT DE FICHIER : C:\Documents and Settings\solinak\Ƈ¦±\OM update\frontf.fm
CONFIDENTIALITÉ DELL – PRÉLIMINAIRE 10/8/04 – POUR PREUVE UNIQUEMENT
www.dell.com | support.dell.com
Page 50

Remarques, avis et précautions
Dans ce document, certains blocs de texte sont accompagnés d’une icône et imprimés en caractères gras ou italiques. Ces paragraphes
correspondent à des remarques, des avis et des précautions qui sont utilisés comme suit :
REMARQUE : Une REMARQUE indique des informations importantes qui vous aident à mieux utiliser votre téléviseur.
AVIS : Un AVIS vous avertit d’un risque de dommage matériel ou de perte de données et vous indique comment éviter
le problème.
PRÉCAUTION : Une PRÉCAUTION indique un risque potentiel d’endommagement du matériel, de blessure corporelle
ou de mort.
_____________________
Les informations contenues dans ce document sont sujettes à modification sans préavis.
© 2004 Dell Inc. Tous droits réservés.
Toute reproduction de ce document sous quelque forme que ce soit sans l’autorisation écrite de Dell Inc. est strictement interdite.
Marques utilisées dans ce texte : Dell, le logo DELL ; TruSurround XT, SRS et le symbole sont des marques de SRS Labs, Inc.
D’autres marques et noms commerciaux peuvent être utilisés dans ce document pour faire référence aux entités se réclamant de ces marques
et de ces noms ou à leurs produits. Dell Inc. dénie tout intérêt propriétaire dans les marques et les noms commerciaux autres que les siens.
Octobre 2004 Rév. A00
Page 51

FILE LOCATION: C:\Documents and Settings\solinak\Ƈ¦±\OM update\DZ101_fyUM.fm
Sommaire
1 À propos de votre téléviseur
Vue avant . . . . . . . . . . . . . . . . . . . . . . . . . . . . . . . . . 53
Vue du côté droit
Vue du dessous
Contenu de la boîte
Précautions à prendre avec votre téléviseur
. . . . . . . . . . . . . . . . . . . . . . . . . . . . . 54
. . . . . . . . . . . . . . . . . . . . . . . . . . . . . . 55
. . . . . . . . . . . . . . . . . . . . . . . . . . . . 57
. . . . . . . . . . . . . . . . 58
2 Installation de votre téléviseur
Emplacement approprié pour votre téléviseur . . . . . . . . . . . . . . . 59
Branchement de votre téléviseur
. . . . . . . . . . . . . . . . . . . . . . 60
3 Votre télécommande
Installation des piles . . . . . . . . . . . . . . . . . . . . . . . . . . . 67
Utilisation de votre télécommande
Utilisation de votre télécommande
. . . . . . . . . . . . . . . . . . . . . 68
. . . . . . . . . . . . . . . . . . . . . 70
Utilisation de votre téléviseur avec une télécommande universelle intelligente
4 Utilisation de l’affichage à l’écran (OSD)
www.dell.com | support.dell.com
72
Utilisation de votre télécommande avec l’OSD . . . . . . . . . . . . . . . 73
Sélection de la langue de l’OSD
Sélection entrée
Menu Image
Audio
. . . . . . . . . . . . . . . . . . . . . . . . . . . . . . . . . . . 76
PIP/POP/PBP
Size (Taille)
Contrôle parental
. . . . . . . . . . . . . . . . . . . . . . . . . . . . . 74
. . . . . . . . . . . . . . . . . . . . . . . . . . . . . . . 76
. . . . . . . . . . . . . . . . . . . . . . . . . . . . . . . 77
. . . . . . . . . . . . . . . . . . . . . . . . . . . . . . . . 78
. . . . . . . . . . . . . . . . . . . . . . . . . . . . . 79
DELL CONFIDENTIAL – PRELIMINARY 10/8/04 – FOR PROOF ONLY
. . . . . . . . . . . . . . . . . . . . . . 74
Sommaire 51
Page 52

FILE LOCATION: C:\Documents and Settings\solinak\Ƈ¦±\OM update\DZ101_fyUM.fm
Configuration . . . . . . . . . . . . . . . . . . . . . . . . . . . . . . . 80
5 Résolution des problèmes de votre téléviseur
Conseils de dépannage . . . . . . . . . . . . . . . . . . . . . . . . . . . 81
Problèmes généraux
Messages OSD
Problèmes de télécommande
Utilisation de la fonction Test auto en cas de raccordement avec un ordinateur
www.dell.com | support.dell.com
www.dell.com | support.dell.com
Problèmes lors de l’utilisation de l’écran de téléviseur comme moniteur
6 Caractéristiques de votre téléviseur
Index
. . . . . . . . . . . . . . . . . . . . . . . . . . . . . . . . . . . . 95
. . . . . . . . . . . . . . . . . . . . . . . . . . . . 82
. . . . . . . . . . . . . . . . . . . . . . . . . . . . . . . 86
. . . . . . . . . . . . . . . . . . . . . . . . 86
87
. . . 88
52 Sommaire
DELL CONFIDENTIAL – PRELIMINARY 10/8/04 – FOR PROOF ONLY
Page 53

À propos de votre téléviseur
Vue avant
12 345
6
1 Bouton Source d’entrée Appuyez sur ce bouton pour afficher le menu Sélection entrée.
2 Bouton chaîne +/- Appuyez sur ce bouton pour sélectionner la chaîne précédente/
suivante ou pour naviguer dans le menu d’affichage à l’écran (OSD).
3 Bouton volume +/- Appuyez sur ce bouton pour augmenter/diminuer le volume ou pour
sélectionner une option de l’OSD.
4 Bouton du menu OSD Appuyez sur ce bouton pour afficher le menu OSD.
5 Bouton et voyant (LED)
d’alimentation
6 Récepteur IR (infrarouge) Reçoit le signal émis par la télécommande.
EMPLACEMENT DE FICHIER : C:\Documents and Settings\solinak\Ƈ¦±\OM update\ch1f.fm
CONFIDENTIALITÉ DELL – PRÉLIMINAIRE 10/8/04 – POUR PREUVE UNIQUEMENT
Appuyez sur ce bouton pour allumer et éteindre le téléviseur.
Le voyant d’alimentation est bleu lorsque le téléviseur est allumé,
et orange lorsqu’il est en veille.
À propos de votre téléviseur 53
Page 54

EMPLACEMENT DE FICHIER : C:\Documents and Settings\solinak\Ƈ¦±\OM update\ch1f.fm
Vue du côté droit
www.dell.com | support.dell.com
1
1 Connecteur vidéo composite (AV7) Branchez des périphériques, tels qu’un magnétoscope ou un
2 Connecteur audio (G) Utilisez ce connecteur si vous avez branché un périphérique sur
3 Connecteur audio (D) Utilisez ce connecteur si vous avez branché un périphérique sur
4 Entrée S-Vidéo (AV8) Branchez des périphériques, tels qu’un système de jeux vidéos,
CONFIDENTIALITÉ DELL – PRÉLIMINAIRE 10/8/04 – POUR PREUVE UNIQUEMENT
54 À propos de votre téléviseur
2
3
4
lecteur de DVD.
le connecteur composite (AV7) ou le connecteur S-Vidéo (AV8).
le connecteur composite (AV7) ou le connecteur S-Vidéo (AV8).
un appareil photo numérique ou un lecteur de DVD.
Page 55

EMPLACEMENT DE FICHIER : C:\Documents and Settings\solinak\Ƈ¦±\OM update\ch1f.fm
Vue du dessous
Les connecteurs se
trouvent à cet endroit.
234
1
1 Connecteur HDMI Branchez des périphériques, tels qu’un lecteur de DVD ou un boîtier
2 Connecteur audio pour VGA Branchez le câble audio de votre ordinateur à votre téléviseur.
3 Connecteur DVI Branchez des périphériques tels qu’un lecteur de DVD, un boîtier
4 Connecteur VGA Branchez sur le câble VGA de votre ordinateur à votre téléviseur.
5 Connecteurs audio
DVI (D/G)
6 RS232 Réservé à l’installation en usine
7 Connecteurs audio et vidéo
composants (AV2)
8 Connecteurs audio et vidéo
composants (AV1)
9 Connecteur S-Vidéo (AV4) Branchez des périphériques tels qu’un système de jeux vidéos ou un
10 Connecteurs S-Vidéo (AV3) Branchez des périphériques tels qu’un système de jeux vidéos ou un
5
6
89101112131415161718
7
décodeur.
décodeur ou votre ordinateur.
Raccordez les connecteurs audio DVI si vous avez branché un
périphérique tel qu’un lecteur de DVD ou un boîtier décodeur
sur le connecteur DVI.
Branchez des périphériques tels qu’un lecteur de DVD, un boîtier
décodeur ou un récepteur réseau câblé.
Branchez des périphériques tels qu’un lecteur de DVD, un boîtier
décodeur ou un récepteur réseau câblé.
lecteur de DVD.
lecteur de DVD.
19 20
www.dell.com | support.dell.com
CONFIDENTIALITÉ DELL – PRÉLIMINAIRE 10/8/04 – POUR PREUVE UNIQUEMENT
À propos de votre téléviseur 55
Page 56

EMPLACEMENT DE FICHIER : C:\Documents and Settings\solinak\Ƈ¦±\OM update\ch1f.fm
11 Connecteurs vidéo et audio
composites (AV6)
12 Connecteurs vidéo et audio
composites (AV5)
13 Connecteurs de sortie audio
et vidéo composites
14 Sortie audio pour caisson
d’extrêmes graves
15 Sortie optique numérique
(SPDIF) (pour W4200HD
uniquement)
www.dell.com | support.dell.com
16 Sortie audio numérique
coaxiale (pour W4200HD
uniquement)
17 Connecteur ATSC
(pour W4200HD
uniquement)
18 Connecteur NTSC Branchez une antenne ou un récepteur réseau câblé.
19 Connecteurs de sortie
haut-parleurs
20 Connecteur d’alimentation Branchez votre cordon d’alimentation.
Branchez des périphériques, tels qu’un magnétoscope ou un lecteur
de DVD.
Branchez un périphérique tel qu’un magnétoscope ou un lecteur
de DVD.
Branchez un périphérique tel qu’un magnétoscope si vous avez
raccordez une antenne ou le câble TV au connecteur ANT/Cable.
Branchez un caisson d’extrêmes graves alimenté, en option,
au téléviseur.
Branchez un décodeur audio ou un récepteur audio/vidéo.
Branchez un décodeur audio ou un récepteur audio/vidéo si vous
utilisez un téléviseur numérique (connecteur ATSC).
Branchez une antenne pour le syntoniseur numérique si vous utilisez
un téléviseur numérique (connecteur ATSC).
Branchez les haut-parleurs.
CONFIDENTIALITÉ DELL – PRÉLIMINAIRE 10/8/04 – POUR PREUVE UNIQUEMENT
56 À propos de votre téléviseur
Page 57

EMPLACEMENT DE FICHIER : C:\Documents and Settings\solinak\Ƈ¦±\OM update\ch1f.fm
Contenu de la boîte
REMARQUE : Si vous avez besoin de câbles supplémentaires, contactez Dell.
Télécommande
Piles AAA (2)
Cordon d’alimentation
Câble d’antenne (coaxial)
Documentation
www.dell.com | support.dell.com
CONFIDENTIALITÉ DELL – PRÉLIMINAIRE 10/8/04 – POUR PREUVE UNIQUEMENT
À propos de votre téléviseur 57
Page 58

EMPLACEMENT DE FICHIER : C:\Documents and Settings\solinak\Ƈ¦±\OM update\ch1f.fm
Support mural (en option)
Haut-parleurs
www.dell.com | support.dell.com
Cache du piédestal (2)
Précautions à prendre avec votre téléviseur
PRÉCAUTION : Seul un technicien agréé doit réviser le téléviseur. Ne démontez pas le téléviseur.
PRÉCAUTION : Avant de nettoyer le téléviseur, débranchez-le.
• Pour nettoyer l’écran, humectez légèrement un chiffon doux, propre et sans peluche avec
de l’eau.
• Pour nettoyer le coffre du téléviseur, utilisez un chiffon légèrement imprégné de
détergent doux.
• N’utilisez pas de produits chimiques, tels que du benzène, du diluant, de l’ammoniaque
ou tout autre type de produit abrasif.
• N’utilisez pas d’air comprimé pour nettoyer le téléviseur.
CONFIDENTIALITÉ DELL – PRÉLIMINAIRE 10/8/04 – POUR PREUVE UNIQUEMENT
58 À propos de votre téléviseur
PRÉCAUTION : Installez les caches sur la base du téléviseur
lorsque vous lui enlevez le piédestal afin de le suspendre au mur.
Page 59

Installation de votre téléviseur
PRÉCAUTION : Avant de commencer l’une des procédures de configuration décrites dans cette
section, suivez les consignes de sécurité de base fournies dans le Guide d’informations du produit.
Emplacement approprié pour votre téléviseur
Lorsque vous déciderez de l’emplacement de votre téléviseur, tenez compte des facteurs
environnementaux suivants :
• Veillez à permettre une ventilation correcte.
• Ne stockez ni n’utilisez votre téléviseur dans des endroits exposés à une chaleur élevée,
à la lumière directe du soleil ou à un froid extrême.
• Évitez de déplacer le téléviseur d’un emplacement à un autre, avec des différences de
températures importantes. Pour plus d’informations, consultez la section « Caractéristiques
de votre téléviseur » page 91.
• Ne soumettez pas le téléviseur à d’importantes vibrations ou à des chocs violents. Ne placez
pas le téléviseur dans le coffre d’une voiture.
• Ne stockez ni n’utilisez le téléviseur dans des endroits où il pourrait être exposé à un fort taux
d’humidité ou à un environnement poussiéreux.
• Ne placez pas le téléviseur dans un endroit où de l’eau ou d’autres liquides pourraient
l’éclabousser ou pénétrer à l’intérieur.
EMPLACEMENT DE FICHIER : C:\Documents and Settings\solinak\Ƈ¦±\OM update\ch2f.fm
Installation de votre téléviseur 59
Page 60

EMPLACEMENT DE FICHIER : C:\Documents and Settings\solinak\Ƈ¦±\OM update\ch2f.fm
Branchement de votre téléviseur
Les tableaux ci-dessous fournissent une description des connecteurs de votre téléviseur qui vous
aidera à identifier le connecteur à utiliser pour divers périphériques vidéo.
Branchement du récepteur réseau câblé ou de l’antenne
Qualité Câble et connecteur Quand les utiliser
Satisfaisante Câble coaxial
www.dell.com | support.dell.com
Le câble coaxial (RF) transporte le signal
vidéo et audio du connecteur de l’antenne
ou du câble au téléviseur. Le connecteur
coaxial porte la mention NTSC. Pour situer
le connecteur NTSC, consultez la section
« Vue du dessous » page 55.
Très bonne Câble coaxial (pour W4200HD uniquement)
Connexion de vos périphériques vidéo
Qualité Câble et connecteur Quand les utiliser
Satisfaisante Composite
Le câble ATSC transporte les signaux
vidéo et audio numériques du connecteur
d’antenne au téléviseur. Pour situer le
connecteur ATSC, consultez la section
« Vue du dessous » page 55.
Le connecteur composite transporte le signal
vidéo via une seule broche. Si vous utilisez
un connecteur vidéo composite, vous avez
également besoin de brancher des câbles
audio composites. Pour situer les connecteurs
composites, consultez les sections « Vue du
côté droit » page 54 et « Vue du dessous »
page 55.
CONFIDENTIALITÉ DELL – PRÉLIMINAIRE 10/8/04 – POUR PREUVE UNIQUEMENT
60 Installation de votre téléviseur
Page 61

EMPLACEMENT DE FICHIER : C:\Documents and Settings\solinak\Ƈ¦±\OM update\ch2f.fm
Qualité Câble et connecteur Quand les utiliser
Bonne S-Vidéo
Le connecteur S-Vidéo divise le signal vidéo
en deux signaux, un noir et blanc et un
couleur. Si vous utilisez le connecteur
S-Vidéo, vous avez également besoin de
brancher les câbles audio. Pour situer les
connecteurs S-Vidéo, consultez les sections
« Vue du côté droit » page 54 et «Vue du
dessous » page 55.
Très bonne Composant (YPbPr)
Excellente DVI
Excellente HDMI
Les connecteurs composants divisent
le signal vidéo en trois signaux, deux
couleur et un noir et blanc. Si vous
utilisez les connecteurs composants,
vous avez également besoin de brancher
les câbles audio. Pour situer les connecteurs
composants, consultez la section « Vue du
dessous » page 55.
Le connecteur DVI reçoit les données
d’image au format numérique pour que le
téléviseur n’ait pas à opérer la conversion
analogique vers numérique, comme c’est le
cas pour les types d’entrée décrits ci-dessus.
Étant donné que le téléviseur utilise des
données numériques pour afficher l’image, le
connecteur DVI offre l’entrée de plus grande
qualité, bien que concrètement les résultats
dépendent de la source vidéo (lecteur de
DVD, magnétoscope numérique, etc.). Pour
situer ce connecteur, consultez la section
« Vue du dessous » page 55.
L’interface HDMI (High Definition
Multimedia Interface) garantit l’envoi
du meilleur signal vidéo de la source
(signal HDTV, lecteur de DVD) vers le
téléviseur. Cela est rendu possible par
l’envoi au périphérique d’affichage, via un
même câble, des données vidéo et audio
multichaînes non compressées. Pour situer
ce connecteur, consultez la section « Vue du
dessous » page 55.
www.dell.com | support.dell.com
CONFIDENTIALITÉ DELL – PRÉLIMINAIRE 10/8/04 – POUR PREUVE UNIQUEMENT
Installation de votre téléviseur 61
Page 62

EMPLACEMENT DE FICHIER : C:\Documents and Settings\solinak\Ƈ¦±\OM update\ch2f.fm
Utilisation du connecteur ATSC ou NTSC (coaxial)
1
Éteignez le téléviseur et débranchez le cordon d’alimentation.
2
Branchez le câble coaxial sur le connecteur ATSC ou NTSC du téléviseur.
REMARQUE : Le connecteur ATSC est disponible uniquement sur le modèle W4200HD.
Branchez le cordon d’alimentation du téléviseur et allumez le téléviseur.
www.dell.com | support.dell.com
3
4
Accédez au menu OSD et sélectionnez TV pour NTSC ou TV numérique pour ATSC.
Pour plus d’informations, consultez la section « Sélection entrée » page 74.
Utilisation du connecteur composite
1
Éteignez le téléviseur et débranchez le cordon d’alimentation.
REMARQUE : Si vous branchez un périphérique que vous voulez pouvoir enlever à tout moment, tel
qu’un système de jeux vidéo ou un caméscope, utilisez le connecteur composite situé sur le côté droit du
téléviseur (consultez la section « Vue du côté droit » page 54).
Raccordez le périphérique au téléviseur à l’aide du câble audio et vidéo.
2
3
Branchez les cordons d’alimentation du téléviseur et des périphériques et allumez
les appareils.
4
Accédez au menu OSD et sélectionnez AV5 ou AV6. Pour plus d’informations, consultez
la section « Sélection entrée » page 74.
CONFIDENTIALITÉ DELL – PRÉLIMINAIRE 10/8/04 – POUR PREUVE UNIQUEMENT
62 Installation de votre téléviseur
Page 63

EMPLACEMENT DE FICHIER : C:\Documents and Settings\solinak\Ƈ¦±\OM update\ch2f.fm
Utilisation du connecteur S-Vidéo
1
Éteignez le téléviseur et débranchez le cordon d’alimentation.
REMARQUE : Si vous branchez un périphérique que vous voulez pouvoir enlever à tout moment, tel
qu’un système de jeux vidéo ou un appareil photo, utilisez le connecteur S-Vidéo situé sur le côté droit du
téléviseur (consultez la section « Vue du côté droit » page 54).
Branchez votre périphérique à l’aide des câbles S-Vidéo et audio.
2
3
Branchez les cordons d’alimentation du téléviseur et des périphériques et allumez
les appareils.
4
Accédez au menu OSD et sélectionnez AV3, AV4 ou AV8 (connecteur S-Vidéo latéral).
Pour plus d’informations, consultez la section « Sélection entrée » page 74.
www.dell.com | support.dell.com
Utilisation du connecteur composant
1
Éteignez le téléviseur et débranchez le cordon d’alimentation.
2
Branchez votre périphérique à l’aide des câbles audio et vidéo composants.
3
Branchez les cordons d’alimentation du téléviseur et des périphériques et allumez
les appareils.
4
Accédez au menu OSD et sélectionnez AV1 ou AV2. Pour plus d’informations, consultez
la section « Sélection entrée » page 74.
CONFIDENTIALITÉ DELL – PRÉLIMINAIRE 10/8/04 – POUR PREUVE UNIQUEMENT
Installation de votre téléviseur 63
Page 64

EMPLACEMENT DE FICHIER : C:\Documents and Settings\solinak\Ƈ¦±\OM update\ch2f.fm
Utilisation du connecteur HDMI
1
www.dell.com | support.dell.com
Éteignez le téléviseur et débranchez le cordon d’alimentation.
2
Branchez votre périphérique à l’aide du connecteur HDMI.
3
Branchez les cordons d’alimentation du téléviseur et des périphériques et allumez
les appareils.
4
Accédez au menu OSD et sélectionnez HDMI. Pour plus d’informations, consultez la
section « Sélection entrée » page 74.
Utilisation du connecteur DVI
REMARQUE : Un seul connecteur peut être utilisé pour un ordinateur, soit le connecteur VGA soit le
connecteur DVI.
1
Éteignez le téléviseur et débranchez le cordon d’alimentation.
2
Branchez les câbles DVI blancs et les câbles audio.
REMARQUE : Certains récepteurs réseau câblés peuvent posséder des connecteurs DVI mais ne
prennent pas en charge les connexions DVI. Pour plus d’informations, contactez l’entreprise qui vous a
installé le câble.
Branchez les cordons d’alimentation du téléviseur et des périphériques et allumez
3
les appareils.
4
Accédez au menu OSD et sélectionnez DVI. Pour plus d’informations, consultez la section
« Sélection entrée » page 74.
CONFIDENTIALITÉ DELL – PRÉLIMINAIRE 10/8/04 – POUR PREUVE UNIQUEMENT
64 Installation de votre téléviseur
Page 65

EMPLACEMENT DE FICHIER : C:\Documents and Settings\solinak\Ƈ¦±\OM update\ch2f.fm
Utilisation du connecteur VGA
REMARQUE : Un seul connecteur peut être utilisé pour un ordinateur, soit le connecteur VGA soit le
connecteur DVI.
1
Éteignez le téléviseur et débranchez le cordon d’alimentation.
2
Branchez les câbles VGA et audio sur votre téléviseur et sur votre ordinateur.
3
Branchez les cordons d’alimentation du téléviseur et des périphériques et allumez
les appareils.
4
Accédez au menu OSD et sélectionnez VGA. Pour plus d’informations, consultez la section
« Sélection entrée » page 74.
www.dell.com | support.dell.com
Rémanence et brûlure image
REMARQUE : La rémanence et la brûlure image ne sont pas couvertes par votre garantie Dell.
L’affichage d’une image sur une durée prolongée peut aboutir à ce qu’une image reste à l’écran
(brûlure). La brûlure image est une caractéristique de tous les écrans plasma.
Pour éviter la brûlure image, il convient d’éviter de laisser trop longtemps des images fixes affichées
sur le téléviseur. La liste ci-dessous présente quelques exemples d’images susceptibles d’entraîner
une brûlure.
• Menus du téléviseur
• Barres noires telles celles utilisées en mode 4:3 ou panoramique
• Logos des chaînes de télévision
• Bandeaux des téléscripteurs de cotations boursières ou d’actualités
• Affichage de l’heure
• Affichage des tarifs d’une émission de téléachat
• Images fixes d’ordinateur
• Images fixes de jeu vidéo
5
Arrière-plans de sous-titrages
CONFIDENTIALITÉ DELL – PRÉLIMINAIRE 10/8/04 – POUR PREUVE UNIQUEMENT
Installation de votre téléviseur 65
Page 66

EMPLACEMENT DE FICHIER : C:\Documents and Settings\solinak\Ƈ¦±\OM update\ch2f.fm
www.dell.com | support.dell.com
CONFIDENTIALITÉ DELL – PRÉLIMINAIRE 10/8/04 – POUR PREUVE UNIQUEMENT
66 Installation de votre téléviseur
Page 67

Votre télécommande
Installation des piles
Avant de pouvoir utiliser votre télécommande, installez-y les deux piles AAA comme suit.
1
Ouvrez le capot du compartiment à piles.
2
Installez les piles. Assurez-vous que vous avez bien fait correspondre le + et le - des piles avec
les symboles + et - du compartiment à piles.
3
Remettez le capot du compartiment à piles en place.
EMPLACEMENT DE FICHIER : C:\Documents and Settings\solinak\Ƈ¦±\OM update\ch3f.fm
CONFIDENTIALITÉ DELL – PRÉLIMINAIRE 10/8/04 – POUR PREUVE UNIQUEMENT
Votre télécommande 67
Page 68

EMPLACEMENT DE FICHIER : C:\Documents and Settings\solinak\Ƈ¦±\OM update\ch3f.fm
Utilisation de votre télécommande
W4200ED
www.dell.com | support.dell.com
1
2
3
4
5
6
7
8
9
10
12
13
14
15
16
17
18
19
20
21
22
CONFIDENTIALITÉ DELL – PRÉLIMINAIRE 10/8/04 – POUR PREUVE UNIQUEMENT
68 Votre télécommande
11
23
Page 69

EMPLACEMENT DE FICHIER : C:\Documents and Settings\solinak\Ƈ¦±\OM update\ch3f.fm
1 ENTRÉE Permet d’accéder au menu Sélection entrée.
2 DISP (affichage) Affiche les informations concernant votre téléviseur (par exemple,
en modes TV, affiche la chaîne que vous êtes en train de regarder).
3 MENU Ouvre et quitte le menu principal de l’OSD.
4 Vol - Diminue le volume.
Dans l’OSD, ce bouton de volume permet de parcourir les menus.
5 Vol + Augmente le volume.
Dans l’OSD, ce bouton de volume permet de parcourir les menus.
6 SON Navigue à travers les options de réglage Son.
7 POP PBP Ouvre et quitte le mode POP ou PBP.
8 PIP Ouvre et quitte le mode PIP.
9 SWAP
Permute les images lors de l’utilisation des PIP, POP ou PBP.
(Permutation)
10 SAP (seconde
Active le programme SAP (Second Audio Program)
piste sonore)
11 SLEEP (Veille) Allume l’horloge de mise en veille.
12 Alimentation Allume et éteint le téléviseur.
13 Boutons numérotés Appuyez sur un de ces boutons pour sélectionner une chaîne.
14 LAST (Dernier) Vous renvoie à la chaîne sélectionnée précédemment.
15 SILENCIEUX Appuyez sur ce bouton pour couper ou rétablir le son.
16 CH Appuyez sur ce bouton pour voir la chaîne suivante.
Dans le menu d’affichage à l’écran (OSD), utilisez ce bouton de chaînes
pour parcourir les menus.
17 ENTRÉE Appuyez sur ce bouton pour confirmer votre sélection.
18 CH Appuyez sur ce bouton pour voir la chaîne précédente.
Dans l’OSD, ce bouton de chaînes permet de parcourir les menus.
19 PICT (image) Navigue à travers les options de réglage dans le menu Image.
20 POS Appuyez sur ce bouton pour changer la position de la fenêtre PIP,
POP ou PBP.
21 PIP SEL Navigue entre les fenêtres lorsque vous utilisez l’incrustation d’image (PIP),
les fonctions Picture-Outside-Picture (POP) ou Picture-By-Picture (PBP).
22 CC (sous-titrage) Navigue à travers le menu Sous-titrage
23 TAILLE Navigue à travers les options de taille (format de l’image) dans le
menu Image.
www.dell.com | support.dell.com
CONFIDENTIALITÉ DELL – PRÉLIMINAIRE 10/8/04 – POUR PREUVE UNIQUEMENT
Votre télécommande 69
Page 70

EMPLACEMENT DE FICHIER : C:\Documents and Settings\solinak\Ƈ¦±\OM update\ch3f.fm
Utilisation de votre télécommande
W4200HD
www.dell.com | support.dell.com
1
2
3
4
5
6
7
8
9
10
13
14
15
16
17
18
19
20
21
22
23
CONFIDENTIALITÉ DELL – PRÉLIMINAIRE 10/8/04 – POUR PREUVE UNIQUEMENT
70 Votre télécommande
11
12
24
25
Page 71

EMPLACEMENT DE FICHIER : C:\Documents and Settings\solinak\Ƈ¦±\OM update\ch3f.fm
1 ENTRÉE Permet d’accéder au menu Sélection entrée.
2 DISP (affichage) Affiche les informations concernant votre téléviseur (par exemple,
en modes TV, affiche la chaîne que vous êtes en train de regarder).
3 MENU Ouvre et quitte le menu principal de l’OSD.
4 Vol - Diminue le volume.
Dans l’OSD, ce bouton de volume permet de parcourir les menus.
5 Vol + Augmente le volume.
Dans l’OSD, ce bouton de volume permet de parcourir les menus.
6 GUIDE
(W4200HD
uniquement)
Affiche un guide des programmes électroniques lorsque vous utilisez
la télévision numérique (connecteur ATSC).
REMARQUE : Le contenu peut varier en fonction du diffuseur.
7 POP PBP Ouvre et quitte le mode POP ou PBP.
8 PIP Ouvre et quitte le mode PIP.
9 SWAP
Permute les images lors de l’utilisation des PIP, POP ou PBP.
(Permutation)
10 SAP (seconde piste
Active le programme SAP (Second Audio Program)
sonore)
11 SLEEP (Veille) Allume l’horloge de mise en veille.
12 SON Navigue à travers les options de réglage Son.
13 Alimentation Allume et éteint le téléviseur.
14 Boutons
Appuyez sur un de ces boutons pour sélectionner une chaîne.
numérotés
15 LAST (Dernier) Vous renvoie à la chaîne sélectionnée précédemment.
16 SILENCIEUX Appuyez sur ce bouton pour couper ou rétablir le son.
17 CH Appuyez sur ce bouton pour voir la chaîne suivante.
Dans le menu d’affichage à l’écran (OSD), utilisez ce bouton de chaînes
pour parcourir les menus.
18 ENTRÉE Appuyez sur ce bouton pour confirmer votre sélection.
19 CH Appuyez sur ce bouton pour voir la chaîne précédente.
Dans l’OSD, ce bouton de chaînes permet de parcourir les menus.
20 INFO
Affiche les informations des chaînes HDTV (TV haute définition).
(W4200HD
uniquement)
21 POS Appuyez sur ce bouton pour changer la position de la fenêtre PIP, POP ou PBP.
22 PIP SEL Navigue entre les fenêtres lorsque vous utilisez l’incrustation d’image (PIP),
les fonctions Picture-Outside-Picture (POP) ou Picture-By-Picture (PBP).
23 CC (sous-titrage) Navigue à travers le menu Sous-titrage
24 TAILLE Navigue à travers les options de taille (format de l’image) dans le menu Image.
25 PICT (image) Navigue à travers les options de réglage dans le menu Image.
CONFIDENTIALITÉ DELL – PRÉLIMINAIRE 10/8/04 – POUR PREUVE UNIQUEMENT
Votre télécommande 71
www.dell.com | support.dell.com
Page 72

EMPLACEMENT DE FICHIER : C:\Documents and Settings\solinak\Ƈ¦±\OM update\ch3f.fm
Utilisation de votre téléviseur avec une télécommande
universelle intelligente
Les télécommandes universelles préprogrammées peuvent être programmées pour contrôler
les fonctions suivantes de votre téléviseur Dell :
• Alimentation
• Chaîne suivante (+)
• Chaîne précédente (-)
• Monter le volume (+)
www.dell.com | support.dell.com
• Baisser le volume (-)
• Mute (silencieux)
• Sélection entrée
REMARQUE : Les futures télécommandes universelles préprogrammées seront capables de contrôler
davantage de fonctions.
Vous pouvez programmer les télécommandes universelles pour votre téléviseur Dell des
façons suivantes :
• Si le manuel de la télécommande répertorie les codes par fabricant, utilisez les codes Phillips.
• Si la télécommande possède une fonction de recherche, vous pouvez l’utiliser pour trouver
le code correct.
• Si la télécommande possède une fonction d’apprentissage, vous pouvez programmer
des boutons spécifiques à partir de la télécommande Dell, en plus des boutons répertoriés
ci-dessus.
REMARQUE : Consultez la documentation de votre télécommande pour obtenir des instructions
détaillées sur votre télécommande universelle ou intelligente.
CONFIDENTIALITÉ DELL – PRÉLIMINAIRE 10/8/04 – POUR PREUVE UNIQUEMENT
72 Votre télécommande
Page 73

Utilisation de l’affichage à l’écran (OSD)
Votre écran de téléviseur possède un affichage à l’écran (OSD) qui vous permet de sélectionner
la source d’entrée appropriée, de régler les paramètres image et son, de sélectionner le mode PIP,
POP ou PBP, et de régler les contrôles parentaux.
Utilisation de votre télécommande avec l’OSD
REMARQUE : Vous pouvez accéder à l’OSD et y faire des sélections en utilisant les boutons de volume
et de chaînes situés sur le panneau latéral du téléviseur ou sur votre télécommande. Sauf mention
particulière, cette section décrit essentiellement comment utiliser l’OSD avec la télécommande.
1
Pour entrer dans l’OSD, appuyez sur le bouton
Huit icônes apparaissent alignées en bas de l’écran.
2
Utilisez les boutons droit et gauche (boutons de volume) pour passer d’une icône à l’autre.
L’icône apparaît en surbrillance lorsque vous naviguez dans le menu.
Menu
.
3
Pour sélectionner une option, appuyez sur le bouton
4
Un nouveau menu apparaît pour l’option sélectionnée. Utilisez les boutons haut et bas
(boutons de chaînes) pour naviguer à travers les différents paramètres.
REMARQUE : Une flèche rouge apparaît en regard du paramètre lorsque vous naviguez à travers les
options. Une coche apparaît près de l’option sélectionnée.
Utilisez les boutons droit et gauche (boutons de volume) et le bouton
5
régler ou sélectionner les paramètres.
REMARQUE : Vous pouvez sélectionner Quitter ou appuyez sur le bouton Menu à tout moment pour
retourner au menu principal.
6
Après avoir fait vos sélections, appuyez sur le bouton
7
Pour sortir de l’OSD, sélectionnez l’icône
EMPLACEMENT DE FICHIER : C:\Documents and Settings\solinak\Ƈ¦±\OM update\ch4f.fm
Quitter
Menu
lorsque l’icône est en surbrillance.
Enter (Entrée)
Menu
pour retourner au menu principal.
, puis appuyez sur
Utilisation de l’affichage à l’écran (OSD) 73
Enter (Entrée)
.
pour
Page 74

EMPLACEMENT DE FICHIER : C:\Documents and Settings\solinak\Ƈ¦±\OM update\ch4f.fm
Sélection de la langue de l’OSD
1
Appuyez sur
2
Sélectionnez
3
Dans le menu
Menu
pour entrer dans l’OSD.
Configur
Configur
.
, sélectionnez
Langue
, et faites défiler le contenu afin de sélectionner
la langue voulue pour l’OSD.
Sélection entrée
Le menu
Sélection entrée
vous avez branché votre écran de téléviseur et votre équipement vidéo. Appuyez sur
www.dell.com | support.dell.com
sur la télécommande pour entrer directement dans le menu
également appuyer sur
Si vous utilisez la source
pouvez prérégler les chaînes visibles. Accédez au
Configuration chaînes
utilisez les connecteurs NTSC et ATSC, vous devez prérégler les chaînes visibles pour les sources
d’entrée
TV numérique
vous permet de sélectionner la source appropriée, selon la façon dont
Input
Menu
et sélectionner
TV
(connecteur NTSC) ou
, puis
Recherche chaînes
Sélection entrée
Sélection entrée
TV numérique
Menu principal
dans le menu principal.
(connecteur ATSC), vous
et sélectionnez
. Si vous possédez le téléviseur W4200HD et
. Vous pouvez
Configur
et TV.
W4200ED W4200HD
(Entrée)
,
VGA — Sélectionnez VGA lorsque votre ordinateur est raccordé au connecteur VGA. Consultez la section
« Vue du dessous » page 55 pour visualiser l’emplacement du connecteur VGA.
DVI — Sélectionnez DVI lorsque vous avez raccordé votre ordinateur ou un périphérique tel qu’un lecteur
de DVD au connecteur DVI. Consultez la section «Vue du dessous » page 55 pour visualiser
l’emplacement du connecteur DVI.
HDMI — Sélectionnez HDMI lorsque vous avez raccordé un périphérique tel qu’un lecteur de DVD
en utilisant le connecteur HDMI. Consultez la section « Vue du dessous » page 55 pour visualiser
l’emplacement du connecteur HDMI.
CONFIDENTIALITÉ DELL – PRÉLIMINAIRE 10/8/04 – POUR PREUVE UNIQUEMENT
74 Utilisation de l’affichage à l’écran (OSD)
Page 75

EMPLACEMENT DE FICHIER : C:\Documents and Settings\solinak\Ƈ¦±\OM update\ch4f.fm
TV — Sélectionnez TV lorsque votre antenne ou votre récepteur réseau câblé est branché sur le
connecteur NTSC. Consultez la section « Vue du dessous » page 55 pour visualiser l’emplacement
du connecteur NTSC.
NUMéRIQUE — Sélectionnez TV numérique lorsque votre antenne est branchée sur le connecteur ATSC.
TV
Consultez la section « Vue du dessous » page 55 pour visualiser l’emplacement du connecteur ATSC. (pour
W4200HD uniquement)
AV1 (COMPOSANT 1) — Sélectionnez AV1 lorsqu’un périphérique vidéo tel qu’un lecteur de DVD,
un boîtier décodeur ou un récepteur réseau câblé est branché sur les connecteurs audio et vidéo
composants situés en dessous du téléviseur. Consultez la section « Vue du dessous » page 55 pour
visualiser l’emplacement des connecteurs audio et vidéo composants.
AV2 (COMPOSANT 2) — Sélectionnez AV2 lorsqu’un périphérique vidéo tel qu’un lecteur de DVD,
un boîtier décodeur ou un récepteur réseau câblé est branché sur les connecteurs audio et vidéo
composants situés en dessous du téléviseur. Consultez la section « Vue du dessous » page 55 pour
visualiser l’emplacement des connecteurs audio et vidéo composants.
AV3 (S-V
IDéO 1) — Sélectionnez AV3 lorsqu’un périphérique vidéo, tel qu’un magnétoscope, est branché sur
le connecteur S-Vidéo situé sous l’écran du téléviseur. Consultez la section « Vue du dessous » page 55 pour
visualiser l’emplacement du connecteur S-Vidéo.
AV4 (S-V
IDéO 2) — Sélectionnez AV4 lorsqu’un périphérique vidéo, tel qu’un magnétoscope, est branché sur
le connecteur S-Vidéo situé sous l’écran du téléviseur. Consultez la section « Vue du dessous » page 55 pour
visualiser l’emplacement du connecteur S-Vidéo.
AV5 (COMPOSITE 1) — Sélectionnez AV5 lorsqu’un périphérique vidéo, tel qu’un système de jeux vidéos,
est branché sur le connecteur composite situé sous l’écran du téléviseur. Consultez la section « Vue du
dessous » page 55 pour visualiser l’emplacement des connecteurs audio et vidéo composites.
AV6 (COMPOSANT 2) — Sélectionnez AV6 lorsqu’un périphérique vidéo, tel qu’un système de jeux vidéos,
est branché sur le connecteur composite situé sous l’écran du téléviseur. Consultez la section « Vue du
dessous » page 55 pour visualiser l’emplacement des connecteurs audio et vidéo composites.
AV7 (COMPOSITE 3) — Sélectionnez AV7 lorsqu’un périphérique vidéo, tel qu’un système de jeux vidéos,
est branché sur le connecteur composite situé sur le panneau latéral de l’écran de téléviseur. Consultez
la section « Vue du côté droit » page 54 pour visualiser l’emplacement du connecteur composite.
AV8 (S-V
IDéO 3) — Sélectionnez AV8 lorsqu’un périphérique vidéo, tel qu’un magnétoscope, est branché sur
le connecteur S-Vidéo situé sur le panneau latéral du téléviseur. Consultez la section « Vue du côté droit »
page 54 pour visualiser l’emplacement du connecteur S-Vidéo.
AFFICHER ENTRÉES — Afficher entrées vous permet de sélectionner Actives ou Toutes. L’option Actives
recherche les connecteurs en cours d’utilisation. Les sources d’entrée disponibles apparaissent en blanc
et les sources d’entrée non disponibles apparaissent en gris. L’option Toutes affiche toutes les sources
d’entrée et vous permet de sélectionner toutes les sources d’entrée même si vous n’avez pas branché de
périphérique.
www.dell.com | support.dell.com
REMARQUE : Dans Paramètres affich OSD, qui se trouve dans le menu Configur, vous pouvez
sélectionner Sélection entrée afin d’afficher le périphérique que vous avez branché. Par exemple,
AV2 indiquera DVD lorsque vous visualiserez le menu Sélection entrée.
CONFIDENTIALITÉ DELL – PRÉLIMINAIRE 10/8/04 – POUR PREUVE UNIQUEMENT
Utilisation de l’affichage à l’écran (OSD) 75
Page 76

EMPLACEMENT DE FICHIER : C:\Documents and Settings\solinak\Ƈ¦±\OM update\ch4f.fm
Menu Image
Le menu Image vous permet de régler l’aspect de l’image, notamment la couleur et la luminosité.
www.dell.com | support.dell.com
Les températures de couleur prédéfinies sont les suivantes :
• Naturelle : 6 500 K
• Normale : température d’origine du panneau
• Bleu : 9 300 K
• Rouge : 5700K
Si vous sélectionnez l’un des paramètres de préréglage
d’image suivants, les paramètres individuels seront
automatiquement mis à jour.
• Cinéma
•Sport
Si vous sélectionnez
les paramètres individuels, tels que la
et la
Couleur
.
Personnel
• Signal bas
• Multimédia
, vous pouvez régler
Luminosité
Audio
Le menu Son vous permet d’adapter au mieux le son selon le programme que vous regardez.
de la télécommande ou des boutons du panneau avant du téléviseur.
le volume de la sortie TV, et non le volume d’un récepteur audio branché.
CONFIDENTIALITÉ DELL – PRÉLIMINAIRE 10/8/04 – POUR PREUVE UNIQUEMENT
76 Utilisation de l’affichage à l’écran (OSD)
Mode minuit
volume existant entre les voix et les scènes d’action.
SRS TruSurround XT
sur deux haut-parleurs à partir de n’importe quelle
source, ce qui crée un son plus enveloppant doté de
graves puissants.
ON/OFF haut-parleurs
ou de désactiver le son des haut-parleurs.
VOL. SORTIE TV
vous souhaitez régler le volume en utilisant la
télécommande ou le bouton de contrôle du
volume d’un récepteur audio branché. Sélectionnez
Va r i a bl e
— Égalise les grandes variations de
— Offre un son surround virtuel
— Permet d’activer
— Sélectionnez
si vous souhaitez régler le volume à l’aide
Va r i ab l e
Fixe
si
permet de régler
Page 77

EMPLACEMENT DE FICHIER : C:\Documents and Settings\solinak\Ƈ¦±\OM update\ch4f.fm
Si vous sélectionnez l’un des paramètres de préréglage
individuels seront automatiquement mis à jour :
•
Musique
•
Film
•
Voi x
Si vous sélectionnez
et les
Aigus
.
Utilisez
Programme
Personnel
pour sélectionner
, vous pouvez régler les niveaux audio individuels, tels que les
Stéréo, Mono
Mode égaliseur
, ou
SAP
(seconde piste sonore).
suivants, les niveaux audio
Basses
PIP/POP/PBP
Vous pouvez visualiser deux sources actives simultanément en utilisant l’incrustation d’image
(PIP), la fonction POP (Picture-Outside-Picture) ou la fonction PIP (Picture-By-Picture).
Pour le mode POP, vous pouvez sélectionner parmi les trois options POP suivantes :
•
POP
— Une grande fenêtre POP à gauche et une fenêtre centrée, plus petite, à droite.
•
POP3
— Une grande fenêtre POP à gauche et trois fenêtres verticalement alignées et plus
petites, à droite.
•
POP12
— Une grande fenêtre POP centrée entourée de douze fenêtres plus petites.
La télécommande propose les options
PIP/POP/PBP suivantes :
• Utilisez le bouton PIP ou le bouton
POP/PBP de la télécommande pour
ouvrir et quitter les modes PIP, POP et
PBP.
• Si vous êtes en mode PIP, POP ou
PBP, utilisez le bouton SWAP de la
télécommande pour permuter entre
les deux fenêtres.
• Utilisez le bouton
télécommande pour modifier la position
de la fenêtre PIP à l’écran.
Dans l’OSD, vous pouvez régler la Transparence, la Tai ll e, et les Positions H (horizontal)
et V (vertical) des fenêtres PIP/POP/PBP. Lorsque vous sélectionnez l’orientation horizontale,
le bouton - déplace la fenêtre vers la gauche et le bouton + déplace la fenêtre vers la droite.
Lorsque vous réglez l’orientation verticale, 0 se trouve en haut de l’écran et 100 est en bas
de l’écran.
POS
de la
www.dell.com | support.dell.com
CONFIDENTIALITÉ DELL – PRÉLIMINAIRE 10/8/04 – POUR PREUVE UNIQUEMENT
Utilisation de l’affichage à l’écran (OSD) 77
Page 78

EMPLACEMENT DE FICHIER : C:\Documents and Settings\solinak\Ƈ¦±\OM update\ch4f.fm
Le
Mode balayage POP
vous permet de sélectionner
Séquentiel
ou
Flottant
. Le mode
Flottant
exécute la source pour les chaînes sélectionnées qui apparaissent dans les fenêtres. Le mode
Séquentiel
active chaque fenêtre tour à tour et exécute toutes les chaînes présélectionnées.
Ce mode de rotation parcourt toutes les chaînes disponibles avant de redémarrer à la chaîne
la plus basse.
Compatibilité PIP/POP/PBP
En utilisant PIP/POP/PBP, vous pouvez sélectionner la source d’entrée de votre choix parmi
celles qui apparaissent dans les fenêtres PIP/POP/PBP. Les seules sources d’entrée qui ne peuvent
pas fonctionner ensemble sont HDMI avec HDMI, DVI avec DVI et HDMI avec DVI.
www.dell.com | support.dell.com
Size (Taille)
AVIS : Utiliser des barres noires, comme celles que l’on peut voir en affichage large ou 4:3, de façon prolongée peut
entraîner une brûlure image sur votre téléviseur.
Taille vous permet de régler l’aspect de l’image. Utilisez
position horizontale et verticale de l’image.
Décalage horizontal
REMARQUE : La plupart des DVD contiennent des informations sur le format d’image pris en charge
selon le cas.
Position H.
Utilisez les paramètres suivants pour régler
le format de l’image :
Standard
— Format idéal pour visualiser
des films DVD au format HDTV numérique,
16:9 ou 22:9.
Zoom
— Format idéal pour visualiser des
films DVD 4:3, TV ou magnétoscope.
4:3
— Format idéal pour visualiser des films
DVD 4:3, TV ou magnétoscope.
Large
— Format idéal pour visualiser des
films DVD au format HDTV numérique,
16:9 et 22:9.
Plein Écran
des films DVD 16:9 ou HDTV numérique.
— Régler la position horizontale de l'image.
et
Position V.
pour régler la
— Format idéal pour visualiser
CONFIDENTIALITÉ DELL – PRÉLIMINAIRE 10/8/04 – POUR PREUVE UNIQUEMENT
78 Utilisation de l’affichage à l’écran (OSD)
Page 79

EMPLACEMENT DE FICHIER : C:\Documents and Settings\solinak\Ƈ¦±\OM update\ch4f.fm
Contrôle parental
La fonction Contrôle parental vous permet de bloquer certaines chaînes ou émissions afin que
les enfants ne puissent voir des programmes qui ne sont pas recommandés pour leur âge.
Pour entrer dans le menu Contrôle
parental, vous avez besoin d’un code d’accès.
La première fois que vous y entrez, utilisez
le code d’accès 3355. Consultez la section
« Création d’un code d’accès » page 79 pour
plus d’informations sur la création d’un
nouveau code d’accès.
Vous pouvez régler les fonctions suivantes afin de bloquer le contenu :
• Verrouil chaînes — Bloque les chaînes sélectionnées.
• Classification film — Bloque les films selon leur classification (G, PG, PG-13, R, NC-17 et X).
• Classification TV — Bloque les programmes TV selon leur classification.
• Options de blocage — Active ou désactive tous vos paramètres de contrôle parental.
REMARQUE : Vous pouvez utiliser Effacer tout pour débloquer les chaînes et les émissions que vous
aviez bloquées.
www.dell.com | support.dell.com
Création d’un code d’accès
Après avoir ouvert le menu
code d’accès numérique à quatre chiffres. Si pour quelque raison que ce soit vous perdez ou oubliez
votre code d’accès, vous pouvez utiliser le code d’accès par défaut.
1
Dans le menu
le code)
2
À l’aide du clavier numérique de la télécommande, entrez un nouveau code d’accès.
3
Sélectionnez
Parental Control (contrôle parental)
.
Quitter
Contrôle parental
.
une première fois, vous pouvez créer votre propre
, sélectionnez
Change Code (modifier
CONFIDENTIALITÉ DELL – PRÉLIMINAIRE 10/8/04 – POUR PREUVE UNIQUEMENT
Utilisation de l’affichage à l’écran (OSD) 79
Page 80

EMPLACEMENT DE FICHIER : C:\Documents and Settings\solinak\Ƈ¦±\OM update\ch4f.fm
Configuration
www.dell.com | support.dell.com
Configuration chaînes
chaînes visibles. Si vous utilisez la source d’entrée TV (connecteur NTSC) ou TV numérique
(connecteur ATSC), vous pouvez prérégler les chaînes visibles. Accédez au
et sélectionnez
Si vous possédez le téléviseur W4200HD et utilisez les connecteurs NTSC et ATSC, vous devez
prérégler les chaînes visibles pour la TV numérique et l’entrée TV.
Paramètres DVI
est RGB (RVB), mais si les couleurs ne s’affichent pas correctement, vous pouvez modifier
le paramètre en YUV.
Veille auto
automatiquement.
Sélectionnez
options de sous-titrage.
Si une image semble collée à l’écran, sélectionnez
plasma)
plasma peut prendre plusieurs heures. Les cas sévères de rémanence sont appelés brûlure image.
La fonctionnalité de conditionnement plasma ne permet pas d’éliminer les brûlures image.
N’utilisez le conditionnement plasma que lorsque vous rencontrez un problème de rémanence.
Une utilisation excessive peut dégrader la luminosité du téléviseur.
vous permet de définir un intervalle de temps après lequel le téléviseur s’éteindra
pour éliminer la rémanence. L’utilisation de la fonctionnalité de conditionnement
Le menu Configur vous permet de régler l’aspect de l’OSD, de
prérégler les chaînes de télévision par câble visibles, de modifier
la langue de l’OSD (consultez la section « Sélection de la langue
de l’OSD » page 74) et de rétablir les paramètres d’origine du
constructeur.
Dans le menu
augmenter ou diminuer la durée d’affichage de l’OSD. La durée
maximale est de 60 secondes. Vous pouvez sélectionner
pour verrouiller les boutons du panneau inférieur.. Lorsque
TV
cette option est activée, seul le bouton d’alimentation fonctionne.
Maintenez les boutons d’augmentation du volume et de chaîne
suivante enfoncés pendant 10 secondes pour déverrouiller
les boutons.
vous permet de paramétrer des chaînes individuelles et de prérégler les
Configur, Configuration chaînes
vous permet de modifier l’espace de couleur. L’espace de couleur par défaut
Sous-titrage
pour activer ou désactiver les sous-titres et définir plusieurs autres
Paramètres affich OSD
, puis
Recherche chaînes
Plasma Conditioning (conditionnement
, utilisez
Menu principal
.
Durée affich
pour
Ver b o uton
CONFIDENTIALITÉ DELL – PRÉLIMINAIRE 10/8/04 – POUR PREUVE UNIQUEMENT
80 Utilisation de l’affichage à l’écran (OSD)
Page 81

Résolution des problèmes de votre
téléviseur
PRÉCAUTION : Si vous voyez de la fumée ou des étincelles provenant de votre téléviseur, contactez
Dell. N’essayez en aucun cas de dépanner votre écran de téléviseur vous-même.
Conseils de dépannage
REMARQUE : Certains problèmes peuvent être liés à votre appareil. Consultez la documentation de tout
périphérique branché sur votre écran de téléviseur.
La plupart des problèmes de votre téléviseur peuvent être dus à un mauvais choix de la source
d’entrée. Chacun des connecteurs situés sur le côté et en dessous du téléviseur est associé à une
sélection d’entrée, marquée de AV1 à AV8 dans le menu Sélection entrée.
• AV1 — Connecteur composant en dessous du téléviseur
• AV2 — Connecteur composant en dessous du téléviseur
• AV3 — Connecteur S-Vidéo en dessous du téléviseur
• AV4 — Connecteur S-Vidéo en dessous du téléviseur
• AV5 — Connecteur composite en dessous du téléviseur
• AV6 — Connecteur composite en dessous du téléviseur
• AV7 — Connecteur composite sur le côté droit du téléviseur
• AV8 — Connecteur S-Vidéo sur le côté droit du téléviseur
Vous pouvez également sélectionner les entrées suivantes :
• TV — Connecteur NTSC en dessous du téléviseur
• TV numérique — Connecteur ATSC en dessous du téléviseur
• VGA — Connecteur VGA en dessous du téléviseur
• DVI — Connecteur DVI en dessous du téléviseur
EMPLACEMENT DE FICHIER : C:\Documents and Settings\solinak\Ƈ¦±\OM update\ch5f.fm
Résolution des problèmes de votre téléviseur 81
Page 82

EMPLACEMENT DE FICHIER : C:\Documents and Settings\solinak\Ƈ¦±\OM update\ch5f.fm
Problèmes généraux
Problème Solution possible
Mauvaise qualité d’image lorsque
vous regardez la télévision et que
vous utilisez un périphérique tel
qu’un lecteur de DVD ou un
magnétoscope
www.dell.com | support.dell.com
1
Vérifiez les paramètres du format de l’image dans l’OSD. Appuyez
sur le bouton Menu de la télécommande et sélectionnez Taille.
Pour plus d’informations sur l’utilisation de l’OSD, consultez
la section « Utilisation de l’affichage à l’écran (OSD) » page 73.
2
Rebranchez le périphérique en utilisant le même type de
connecteur. Par exemple, si vous utilisez le connecteur composite
situé en dessous de l’écran de téléviseur, essayez de brancher le
périphérique sur le connecteur composite situé sur le panneau
latéral de l’écran de téléviseur. Consultez la section « À propos de
votre téléviseur » page 53 pour visualiser l’emplacement des
connecteurs. Après avoir branché le périphérique, modifiez
la source d’entrée dans l’OSD. Pour plus d’informations,
consultez la section « Sélection entrée » page 74.
3
Branchez le périphérique en utilisant un connecteur différent.
Par exemple, si vous rencontrez un problème avec un connecteur
composite, essayez d’utiliser un connecteur composant.
REMARQUE : Pour brancher un périphérique sur un connecteur
différent, vous avez besoin des câbles compatibles avec ce
connecteur. Consultez la documentation de votre périphérique
pour voir la liste des branchements possibles.
Après avoir branché le périphérique, modifiez la source d’entrée
dans l’OSD. Pour plus d’informations, consultez la section
« Sélection entrée » page 74
4
Réinitialisez la configuration originale du constructeur. Appuyez
sur le bouton Menu de la télécommande, sélectionnez Configur,
puis sélectionnez Rest param init.
5
Réglez l’échelle des gris. Appuyez sur le bouton Menu de
la télécommande, sélectionnez Image, puis sélectionnez
Te mp c o ul e ur.
.
REMARQUE : Certains boîtiers décodeurs offrent une option
de format de l’image. Pour plus d’informations, consultez la
documentation qui accompagne votre périphérique.
CONFIDENTIALITÉ DELL – PRÉLIMINAIRE 10/8/04 – POUR PREUVE UNIQUEMENT
82 Résolution des problèmes de votre téléviseur
Page 83

EMPLACEMENT DE FICHIER : C:\Documents and Settings\solinak\Ƈ¦±\OM update\ch5f.fm
Problème Solution possible
Mauvaise qualité d’image lors
de l’utilisation d’un périphérique
branché au connecteur ANT/
Cable (coaxial)
1
Assurez-vous que le connecteur TV est sélectionné comme source
d’entrée dans le menu Sélection entrée. Pour plus d’informations,
consultez la section « Sélection entrée » page 74.
2
Appuyez sur le bouton Menu de la télécommande, sélectionnez
Configur, puis sélectionnez Configuration chaînes. Cette action
réinitialise les chaînes sur votre téléviseur.
3
Vérifiez les paramètres du format de l’image dans l’OSD. Appuyez
sur le bouton Menu de la télécommande et sélectionnez Taille.
Pour plus d’informations sur l’utilisation de l’OSD, consultez la
section « Utilisation de l’affichage à l’écran (OSD) » page 73.
4
Réinitialisez la configuration originale du constructeur. Appuyez
sur le bouton Menu de la télécommande, sélectionnez Configur,
puis sélectionnez Rest param init.
5
Réglez l’échelle des gris. Appuyez sur le bouton Menu de
la télécommande, sélectionnez Image, puis sélectionnez
Temp couleur.
6
Le problème peut provenir de votre périphérique, contactez votre
fournisseur de services.
Rien n’apparaît sur mon écran
de téléviseur
1
Assurez-vous que l’écran de téléviseur est allumé.
2
Vérifiez que tous les câbles sont branchés correctement à l’écran
de téléviseur, y compris le câble d’alimentation.
3
Vérifiez qu’il y a une lumière bleue ou orange sur le coin en bas,
à droite de l’écran de téléviseur. Une lumière bleue indique que
l’écran de téléviseur est allumé. Une lumière orange indique que
l’écran de téléviseur est en mode veille.
4
Assurez-vous que la source appropriée est sélectionnée dans
le menu Source d’entrée. Pour plus d’informations, consultez
la section « Sélection entrée » page 74.
5
Rebranchez tout périphérique qui est actuellement branché
sur l’écran de téléviseur. Si vous utilisez plusieurs périphériques,
branchez et testez un périphérique à la fois.
6
Branchez un autre périphérique dont vous savez qu’il fonctionne
correctement.
7
Réinitialisez la configuration originale du constructeur. Appuyez
sur le bouton Menu de la télécommande, sélectionnez Configur,
puis sélectionnez Rest param init.
www.dell.com | support.dell.com
CONFIDENTIALITÉ DELL – PRÉLIMINAIRE 10/8/04 – POUR PREUVE UNIQUEMENT
Résolution des problèmes de votre téléviseur 83
Page 84

EMPLACEMENT DE FICHIER : C:\Documents and Settings\solinak\Ƈ¦±\OM update\ch5f.fm
Problème Solution possible
Pas de son 1
www.dell.com | support.dell.com
Image double ou pas d’image
avec le DVD
CONFIDENTIALITÉ DELL – PRÉLIMINAIRE 10/8/04 – POUR PREUVE UNIQUEMENT
84 Résolution des problèmes de votre téléviseur
Assurez-vous que la fonction Silencieux n’est pas activée. Appuyez
sur le bouton Mute (Silencieux) de la télécommande pour activer
et désactiver cette fonction.
2
Si seules quelques chaînes n’ont pas le son, vous devez corriger
le menu Sélection entrée dans l’OSD (consultez la section
« Sélection entrée » page 74).
3
Vérifiez que les câbles audio sont solidement branchés sur les
connecteurs d’entrée audio de votre écran de téléviseur et sur les
connecteurs de sortie audio de vos périphériques. Assurez-vous
que les couleurs des câbles correspondent aux couleurs des
connecteurs.
4
Assurez-vous également que les câbles audio sont branchés sur la
même rangée que les câbles vidéo. Consultez la section « À propos
de votre téléviseur » page 53 pour visualiser l’emplacement des
connecteurs.
5
Rebranchez le périphérique en utilisant le même type de
connecteur. Par exemple, si vous utilisez le connecteur composite
situé en dessous de l’écran de téléviseur, essayez de brancher le
périphérique sur le connecteur composite situé sur le panneau
latéral de l’écran de téléviseur. Consultez la section « À propos de
votre téléviseur » page 53 pour visualiser l’emplacement des
connecteurs.
Après avoir branché le périphérique, modifiez la source d’entrée
dans l’OSD. Pour plus d’informations, consultez la section
« Sélection entrée » page 74.
6
Branchez le périphérique en utilisant un connecteur différent.
Par exemple, si vous rencontrez un problème avec un connecteur
composite, essayez d’utiliser un connecteur composant.
REMARQUE : Pour brancher un périphérique sur un connecteur
différent, vous avez besoin des câbles compatibles avec ce
connecteur. Consultez la documentation de votre périphérique
pour voir la liste des branchements possibles.
Après avoir branché le périphérique, modifiez la source d’entrée
dans l’OSD. Pour plus d’informations, consultez la section
entrée » page 74
7
Testez le périphérique sur un téléviseur différent.
8
Si vous utilisez les fonctions PIP/POP/PBP, assurez-vous d’avoir
.
sélectionné la Source audio appropriée. Appuyez sur le bouton
Menu de votre télécommande et sélectionnez PIP/POP/PBP.
Éteignez le balayage progressif sur le lecteur de DVD. Votre
écran de téléviseur Dell™ offre un deinterlacer intégré de qualité
équivalente, voire meilleure, que celui de votre lecteur de DVD.
Pour plus d’informations sur le balayage progressif de votre lecteur
de DVD, consultez la documentation de votre lecteur de DVD.
« Sélection
Page 85

EMPLACEMENT DE FICHIER : C:\Documents and Settings\solinak\Ƈ¦±\OM update\ch5f.fm
Problème Solution possible
Les défauts de pixellisation dans les spécifications industrielles
sont inhérentes aux téléviseurs PDP et ne constituent pas un
défaut de conception. Pour plus d’informations sur les pixels
et la technologie PDP, allez sur support.dell.com.
L’image est trop faible ou
trop brillante
L’écran n’est pas centré correctement
Mettez les paramètres de couleur à jour dans l’OSD. Appuyez
sur le bouton Menu de la télécommande et sélectionnez Image.
1
Mettez les paramètres de taille à jour dans l’OSD. Appuyez sur
le bouton Menu de la télécommande et sélectionnez Taille.
2
Réinitialisez la configuration originale du constructeur. Appuyez
sur le bouton Menu de la télécommande, sélectionnez Configur,
puis sélectionnez Rest param init.
Il y a une ou plusieurs lignes
sur l’écran
1
Vérifiez les paramètres du format de l’image dans l’OSD. Appuyez
sur le bouton Menu de la télécommande et sélectionnez Taille.
Pour plus d’informations sur l’utilisation de l’OSD, consultez la
section « Utilisation de l’affichage à l’écran (OSD) » page 73.
2
Assurez-vous que la source appropriée est sélectionnée dans le
menu Source d’entrée. Pour plus d’informations, consultez la
section « Sélection entrée » page 74.
3
Essayez de brancher un périphérique différent. Assurez-vous que
vous avez correctement branché les câbles et mis à jour la source
d’entrée dans l’OSD.
4
Mettez les paramètres de taille à jour dans l’OSD. Appuyez sur
le bouton Menu de la télécommande et sélectionnez Taille.
5
Réinitialisez la configuration originale du constructeur. Appuyez
sur le bouton Menu de la télécommande, sélectionnez Configur,
puis sélectionnez Rest param init.
Les boutons du panneau avant
ne fonctionnent pas
Vérifiez dans l’OSD si les boutons ont été verrouillés. Appuyez sur
le bouton Menu de votre télécommande et sélectionnez Configur.
Si vous ne pouvez pas utiliser la télécommande, appuyez pendant
10 secondes sur les boutons de volume et de chaîne situés au bas de
l'écran du téléviseur pour déverrouiller les boutons.
1
L’image est trop petite
Réglez les paramètres de taille. Appuyez sur le bouton Menu de la
télécommande et sélectionnez Taille.
2
Il peut s’agir d’un problème provenant de votre périphérique.
Consultez la documentation de votre périphérique.
Une image semble collée à l’écran. Dans Configur sélectionnez Conditionnement plasma.
L’utilisation de cette option peut demander plusieurs heures avant
que l’image ne soit éliminée.
REMARQUE : La brûlure image n’est pas couverte par votre garantie
Dell.
www.dell.com | support.dell.com
CONFIDENTIALITÉ DELL – PRÉLIMINAIRE 10/8/04 – POUR PREUVE UNIQUEMENT
Résolution des problèmes de votre téléviseur 85
Page 86

EMPLACEMENT DE FICHIER : C:\Documents and Settings\solinak\Ƈ¦±\OM update\ch5f.fm
Messages OSD
Lors de l’utilisation de votre écran de téléviseur, les messages suivants peuvent apparaître.
Message Solution possible
Réglage auto Aucune action requise, l’écran de téléviseur opère un réglage
Hors plage Vérifiez les paramètres de résolution optimum.
Pas d’entrée vidéo
www.dell.com | support.dell.com
Ver bouton TV (verrouillage des
boutons du téléviseur)
Self Test (test auto) Apparaît pour la source d’ordinateur lorsque rien n’est connecté.
Problèmes de télécommande
automatique.
Vous pouvez avoir besoin de télécharger un nouveau pilote vidéo.
Pour plus d’informations, allez sur support.dell.com.
1
Vérifiez que tous les câbles sont branchés correctement.
2
Assurez-vous que la source appropriée est sélectionnée dans
le menu Source d’entrée. Pour plus d’informations, consultez
la section « Sélection entrée » page 74.
Pour déverrouiller les boutons, appuyez sur le bouton Menu
de votre télécommande et sélectionnez Configur.
Sélectionnez VGA ou DVI à partir du menu Sélection entrée et
branchez un ordinateur sur le connecteur VGA ou DVI.
Problème Solution possible
L’écran de téléviseur ne répond
pas lorsque vous utilisez la
télécommande
CONFIDENTIALITÉ DELL – PRÉLIMINAIRE 10/8/04 – POUR PREUVE UNIQUEMENT
86 Résolution des problèmes de votre téléviseur
1
Dirigez la télécommande vers le coin en bas, à droite de l’écran
de téléviseur. Assurez-vous que rien ne gêne l’avant de l’écran
de téléviseur. Pour visualiser l’emplacement de l’infrarouge,
consultez la section « Vue avant » page 53.
2
Vérifiez que les piles sont correctement installées.
3
Si les piles sont vieilles, installez des piles neuves.
REMARQUE : Des lumières brillantes ou d’autres périphériques
à infrarouge peuvent interférer avec votre télécommande et
l’infrarouge de votre écran de téléviseur.
Page 87

EMPLACEMENT DE FICHIER : C:\Documents and Settings\solinak\Ƈ¦±\OM update\ch5f.fm
Utilisation de la fonction Test auto en cas de raccordement
avec un ordinateur
Lorsque votre ordinateur est branché sur votre écran de téléviseur via le connecteur DVI
ou VGA, vous pouvez utiliser la fonction Self test (Test auto) pour vérifier si votre écran de
téléviseur fonctionne correctement. Si votre écran de téléviseur et votre ordinateur sont branchés
correctement mais que l’écran du téléviseur reste vide, lancez le test auto du téléviseur en
exécutant les étapes suivantes :
1
Éteignez votre écran de téléviseur et votre ordinateur.
2
Débranchez le câble vidéo à l’arrière de l’ordinateur.
3
Allumez l’écran de téléviseur. Si l’écran de téléviseur ne peut pas détecter de signal vidéo et
fonctionne correctement, la boîte de dialogue flottante « Self-Test Feature Check » apparaît à
l’écran (sur fond noir). En mode Self test (Test auto), le voyant d’alimentation reste bleu et le
motif de test auto défile à l’écran en continu. Cette boîte apparaît également pendant
l’exécution normale du système si le câble vidéo est débranché ou endommagé.
4
Éteignez votre écran de téléviseur et rebranchez le câble vidéo; puis allumez votre ordinateur
et l’écran de téléviseur. Si l’écran du téléviseur reste vide, le problème peut provenir de votre
ordinateur ou de la carte graphique.
Pour plus d’informations, consultez la documentation qui accompagne votre ordinateur.
www.dell.com | support.dell.com
CONFIDENTIALITÉ DELL – PRÉLIMINAIRE 10/8/04 – POUR PREUVE UNIQUEMENT
Résolution des problèmes de votre téléviseur 87
Page 88

EMPLACEMENT DE FICHIER : C:\Documents and Settings\solinak\Ƈ¦±\OM update\ch5f.fm
Problèmes lors de l’utilisation de l’écran de téléviseur
comme moniteur
Problème Solution possible
L’image est désaxée ou trop petite
www.dell.com | support.dell.com
Pas de son
La fonction PIP/POP/PBP ne
fonctionne pas
1
Utilisez Réglage auto pour vérifier les paramètres d’image.
Appuyez sur Menu pour entrer dans l’OSD, sélectionnez
Paramètres d’image, puis sélectionnez Réglage auto.
2
Vérifiez les paramètres de résolution optimum. Vous pouvez
avoir besoin de télécharger un nouveau pilote vidéo. Pour plus
d’informations, allez sur support.dell.com.
REMARQUE : Il est possible que certaines cartes vidéo anciennes
ne supportent pas les paramètres de résolution due l’écran de
téléviseur.
1
Assurez-vous que le câble audio vert est branché sur le
connecteur audio de l’écran de téléviseur et sur celui de
l’ordinateur. Consultez la section « Utilisation du connecteur
VGA » page 65 pour visualiser l’emplacement du connecteur
sur l’écran du téléviseur. Consultez la documentation de votre
ordinateur pour visualiser l’emplacement des connecteurs sur
votre ordinateur.
Ne branchez pas le câble audio sur la prise jack du casque.
2
Assurez-vous que l’ordinateur n’est pas en mode silencieux.
3
Vérifiez que le son sur votre ordinateur fonctionne en
contrôlant les haut-parleurs. Consultez la documentation
de votre ordinateur pour plus d’informations sur le dépannage
de votre ordinateur.
4
Débranchez l’écran de téléviseur de l’ordinateur et vérifiez que le
volume de l’écran de téléviseur fonctionne.
1
Assurez-vous que les paramètres dans l’OSD sont réglés
correctement. Appuyez sur le bouton Menu pour entrer
dans l’OSD et sélectionnez PIP/POP/PBP.
2
Permutez les sources audio et vidéo.
CONFIDENTIALITÉ DELL – PRÉLIMINAIRE 10/8/04 – POUR PREUVE UNIQUEMENT
88 Résolution des problèmes de votre téléviseur
Page 89

EMPLACEMENT DE FICHIER : C:\Documents and Settings\solinak\Ƈ¦±\OM update\ch5f.fm
Problème Solution possible
Pas de vidéo REMARQUE : Si vous voyez un auto test, cela signifie qu’il y a
un problème avec votre carte vidéo ou bien que vous utilisez la
mauvaise source d’entrée.
1
Assurez-vous que l’écran de téléviseur est allumé.
2
Vérifiez que tous les câbles sont branchés correctement à l’écran
de téléviseur, y compris le câble d’alimentation.
3
Vérifiez qu’il y a une lumière bleue ou orange sur le coin en bas,
à droite de l’écran de téléviseur. Une lumière bleue indique que
l’écran de téléviseur est allumé. Une lumière orange indique que
l’écran de téléviseur est en mode veille.
4
Assurez-vous que VGA est sélectionné dans le menu Source
d’entrée. Pour plus d’informations, consultez la section
« Sélection entrée » page 74.
5
Rebranchez l’ordinateur.
6
Branchez un autre périphérique dont vous savez qu’il fonctionne
correctement.
7
Réinitialisez la configuration originale du constructeur. Appuyez
sur le bouton Menu de la télécommande, sélectionnez Configur,
puis sélectionnez Rest param init.
www.dell.com | support.dell.com
CONFIDENTIALITÉ DELL – PRÉLIMINAIRE 10/8/04 – POUR PREUVE UNIQUEMENT
Résolution des problèmes de votre téléviseur 89
Page 90

EMPLACEMENT DE FICHIER : C:\Documents and Settings\solinak\Ƈ¦±\OM update\ch5f.fm
www.dell.com | support.dell.com
CONFIDENTIALITÉ DELL – PRÉLIMINAIRE 10/8/04 – POUR PREUVE UNIQUEMENT
90 Résolution des problèmes de votre téléviseur
Page 91

Caractéristiques de votre téléviseur
Généralités
Numéro de modèle Téléviseur à écran plasma W4200
Type d’écran Écran plasma à haute définition (W4200HD)
Écran plasma à définition améliorée (W4200ED)
Taille de l’écran 106 cm (42 pouces)
Surface de vision 932 x 532 mm (36,7 x 20,9 pouces)
Format de l’image 16:9 (écran large)
Capacités de l’affichage vidéo 480 i
480 p
576 i
576 p
720 p
1080 i
Caractéristiques supplémentaires :
Fonction SAP (seconde piste sonore) Oui
Fonction CC (sous-titrages) Oui
Fonction contrôle parental Oui
Dimensions physiques
Affichage (avec support) 1031,8 x 712,5 x 245,7 mm
Affichage (sans support) 1031,8 x 631,5 x 83,8 mm
Avec haut-parleurs
Poids (avec support) 46 kg (environ)
Résolution native XGA 1 024 x 768 (W4200HD)
WVGA 852 x 480 (W4200ED)
Fonction HDTV Oui
EMPLACEMENT DE FICHIER : C:\Documents and Settings\solinak\Ƈ¦±\OM update\ch6f.fm
CONFIDENTIALITÉ DELL – PRÉLIMINAIRE 10/8/04 – POUR PREUVE UNIQUEMENT
Caractéristiques de votre téléviseur 91
Page 92

EMPLACEMENT DE FICHIER : C:\Documents and Settings\solinak\Ƈ¦±\OM update\ch6f.fm
Incrustation d’image
Incrustation d’image (PIP) Oui
Picture-Outside-Picture (POP) Oui
Picture-By-Picture (PBP) Oui
Nombre de tuners 2
Luminosité (normale)
version ED 450 nits (normal)
version HD 420 nits (normal)
Rapport de contraste
version ED 2700: 1 (normal)
www.dell.com | support.dell.com
version HD 2300: 1 (normal)
Angle de vision
Horizontal +/-80 degrés
Vertical +/-80 degrés
Entrées
Vidéo
Composite (CVBS)
S-Vidéo
Composant
Entrée TV (coaxial)
Audio (RCA L+R)
DVI
HDMI
trois au total (côté et dessous)
trois au total (côté et dessous)
deux (dessous)
deux (dessous) (version HD x 2, version ED x 1)
huit paires au total (côté et dessous)
une (dessous)
une (dessous)
Ordinateur
VGA (pour utilisation en tant que
une (dessous)
moniteur informatique)
Audio (PC)
une (dessous)
Autres
RS232
une (dessous)
Sorties
Vidéo
Composite (CVBS)
CONFIDENTIALITÉ DELL – PRÉLIMINAIRE 10/8/04 – POUR PREUVE UNIQUEMENT
une (dessous)
92 Caractéristiques de votre téléviseur
Page 93

EMPLACEMENT DE FICHIER : C:\Documents and Settings\solinak\Ƈ¦±\OM update\ch6f.fm
Sorties
Audio (RCA L+R)
Caisson d’extrêmes graves
SPDIF (RCA + optique)
une paire (dessous)
un
un (modèle HD uniquement)
Audio
Effets Son SRS TruSurround XT
Mode minuit
Haut-parleurs (séparés) 20 watts/canal
40 watts au total
www.dell.com | support.dell.com
CONFIDENTIALITÉ DELL – PRÉLIMINAIRE 10/8/04 – POUR PREUVE UNIQUEMENT
Caractéristiques de votre téléviseur 93
Page 94

EMPLACEMENT DE FICHIER : C:\Documents and Settings\solinak\Ƈ¦±\OM update\ch6f.fm
www.dell.com | support.dell.com
CONFIDENTIALITÉ DELL – PRÉLIMINAIRE 10/8/04 – POUR PREUVE UNIQUEMENT
94 Caractéristiques de votre téléviseur
Page 95

Index
A
alimentation électrique
connecteur, emplacement, 56
ATSC, 80
câble, utilisation, 60
connecteur, emplacement, 56
connexion, 62
audio
bouton, 69-71
connecteur pour VGA,
emplacement, 55
connecteurs DVI,
emplacement, 55
connecteurs, emplacement, 54
haut-parleurs, ON/OFF, 76
menu OSD, 76
mode égaliseur, 76
mode minuit, 76
programme, 77
SRS TruSurround, 76
volume sortie TV, 76
AV1/AV2. Voir composant.
AV3/AV4. Voir S-Vidéo.
AV5/AV6. Voir composites.
B
blocage
contrôle parental, 79
bouton
alimentation électrique, 53
audio, 69-71
CC (sous-titrage), 69-71
chaîne +/-, 53
DISP (affichage), 69-71
entrée, 69, 71
guide (W4200HD), 71
INFO (W4200HD), 71
last (dernier), 69-71
menu, 69-71
menu OSD, 53
mute (silencieux), 69-71
PICT (image), 69-71
PIP, 69-71
PIP SEL, 69-71
POP/PBP, 69-71
POS, 69-71
SAP (seconde piste
sonore), 69-71
sleep (veille), 69-71
source d’entrée, 53
swap (permutation), 69-71
taille, 69-71
volume +/-, 53
C
caisson d’extrêmes graves
connecteur, emplacement, 56
caractéristiques, 91
angle de vision, 92
audio, 93
dimensions, 91
entrées, 92
généralités, 91
incrustation d’image (PIP), 92
sorties, 92
CC (sous-titrage)
bouton, 69-71
chaîne
configuration, 74, 80
classification des films
contrôle parental, 79
classification des programmes
TV, 79
contrôle parental, 79
coaxial
câble, utilisation, 60
Connecteur ATSC, 62
Connecteur NTSC, 62
coaxiale
connecteur de sortie audio
numérique,
emplacement, 56
code d’accès
affectation, 79
contrôle parental, 79
valeur par défaut, 79
composant
câble, utilisation, 61
connecteurs AV1/AV2,
emplacement, 55
connexion, 63
composite
câble, utilisation, 60
connexion, 62
composites
Index 95
Page 96

connecteurs AV5/AV6,
emplacement, 56
connecteurs de sortie
vidéo/audio,
emplacement, 56
conditionnement plasma, 80,
85
configuration
chaînes, 80
configuration des chaînes, 80
durée affichage, 80
menu, 80
paramètres DVI, 80
connecteur
alimentation électrique, 56
ATSC, 56
audio gauche/droite, 54
audio VGA, 55
caisson d’extrêmes graves, 56
composant (AV1/AV2), 55
composites (AV5/AV6), 56
connecteurs audio DVI, 55
DVI, 55
HDMI, 55
NTSC, 56
sortie audio numérique
coaxiale, 56
sortie haut-parleurs, 56
sortie optique numérique,
emplacement, 56
sortie vidéo/audio
composites, 56
S-vidéo, 54-55
VGA, 55
vidéo composite,
emplacement, 54
conseils
dépannage, 81
contrôle parental, 79
classification des films, 79
options de blocage, 79
présentation, 79
verrouillage des chaînes, 79
D
dépannage, 81
conseils, 81
messages OSD, 86
moniteur VGA, 88
problèmes généraux, 82
télécommande, 86
test auto, 87
DISP (affichage)
bouton, 69-71
DVI
câble, utilisation, 61
connecteur, emplacement, 55
connecteurs audio,
emplacement, 55
connexion, 64
E
entrée
bouton, 69, 71
F
flottant
mode de balayage POP, 78
G
guide
bouton (W4200HD), 71
H
HDMI
câble, utilisation, 61
connecteur, emplacement, 55
connexion, 64
I
INFO
bouton (W4200ED), 71
L
last (dernier)
bouton, 69-71
LED d’alimentation
emplacement, 53
M
menu
bouton, 69-71
menu Image
films, 76
multimédia, 76
signal faible, 76
sports, 76
temp couleur, 76
mode égaliseur, 77
film, 77
96 Index
Page 97

musique, 77
voix, 77
mode minuit, 76
mono, 77
mute (silencieux)
bouton, 69-71
N
NTSC, 80
connecteur, emplacement, 56
connexion, 62
O
ordinateur
connexion, 65
OSD
durée d’affichage, 80
menu audio, 76
menu Contrôle parental, 79
menu de configuration, 80
menu Image, 76
menu Taille, 78
messages, 86
PIP/POP/PBP, 77
P
PICT (image)
bouton, 69-71
picture by picture. Voir
PIP/POP/PBP
picture in picture
(incrustation d’image).
Voir PIP/POP/PBP
picture on picture. Voir
PIP/POP/PBP
PIP
bouton, 69-71
PIP SEL
bouton, 69-71
PIP/POP/PBP
compatibilité, 78
configuration, 77
POP/PBP
bouton, 69-71
POS
bouton, 69-71
présentation
contenu de la boîte, 57
TV, 53
R
Récepteur IR (infrarouge)
emplacement, 53
S
SAP (seconde piste
sonore), 77
bouton, 69-71
seconde piste sonore. Voir
SAP (seconde piste
sonore)
séquentiel
mode de balayage POP, 78
signal faible, 76
sleep (veille)
bouton, 69-71
Son SRS TruSurround XT, 76
sortie haut-parleurs
connecteurs, emplacement, 56
sortie optique numérique
connecteur, emplacement, 56
SPDIF. Voir sortie optique
numérique
stéréo, 77
S-vidéo
câble, utilisation, 61
connecteur, emplacement, 54
connecteurs AV3/AV4,
emplacement, 55
connexion, 63
swap (permutation)
bouton, 69-71
T
taille
4:3, 78
bouton, 69-71
fenêtre PIP/POP/PBP, 77
large, 78
menu, 78
plein écran, 78
standard, 78
zoom, 78
télécommande
bouton audio, 69-71
bouton CC (sous-titrage), 69-
71
Index 97
Page 98

bouton d’entrée, 69, 71
bouton de mise en
sourdine, 69-71
bouton DISP (affichage), 69-
71
bouton entrée, 69, 71
bouton guide (W4200HD), 71
bouton INFO
(W4200HD), 71
bouton last (dernier), 69-71
bouton Menu, 69-71
bouton PICT (image), 69-71
bouton PIP, 69-71
bouton PIP SEL, 69-71
bouton POP/PBP, 69-71
bouton POS, 69-71
bouton SAP (seconde piste
sonore), 69-71
bouton sleep (veille), 69-71
bouton Swap
(Permutation), 69-71
bouton taille, 69-71
dépannage, 86
installation des piles, 67
universelle, utilisation, 72
W4200ED, utilisation, 68
W4200HD, utilisation, 70
vue avant, 53
vue du côté droit, 54
vue du dessous, 55
V
verrouillage des chaînes
contrôle parental, 79
VGA
connecteur, emplacement, 55
connexion, 65
vidéo composite
connecteur, emplacement, 54
volume
fixe, 76
variable, 76
W
W4200HD
ATSC, 56
sortie audio numérique
coaxiale, 56
sortie optique numérique, 56
temp couleur, 76
test auto
utilisation, 87
transparence
de la fenêtre PIP/POP/PBP, 77
TV
configuration, 59
dépannage, 81
emplacement approprié, 59
précautions, 58
présentation, 53
98 Index
Page 99

Dell™ W4200HD y W4200ED
Televisor de plasma de 42"
Manual del propietario
UBICACIÓN DEL ARCHIVO: C:\Documents and Settings\solinak\Ƈ¦±\OM update\fronts.fm
CONFIDENCIAL DE DELL – VERSIÓN PRELIMINAR 10/8/04 – SÓLO PARA REVISIÓN
www.dell.com | support.dell.com
Page 100

Notas, avisos y advertencias
En este documento, los bloques de texto pueden ir acompañados de un icono e impresos en negrita o cursiva. Estos bloques son notas,
avisos y precauciones, y se utilizan del siguiente modo:
NOTA: Una NOTA indica información importante que ayuda a una mejor utilización del televisor.
AVISO: un AVISO indica un posible daño al equipo o una pérdida de información y explica cómo evitar el problema.
PRECAUCIÓN: Una ADVERTENCIA indica posibles daños materiales, daños personales o incluso muerte.
_____________________
La información contenida en este documento puede cambiar sin previo aviso.
© 2004 Dell Inc. Reservados todos los derechos.
La reproducción de este documento por cualquier procedimiento sin el permiso por escrito de Dell Inc. está totalmente prohibida.
Marcas comerciales utilizadas en este texto: Dell, el logotipo de DELL; TruSurround XT, SRS y el símbolo son marcas
comerciales registradas de SRS Labs, Inc.
En este documento pueden aparecer otras marcas y nombres comerciales para hacer referencia a las entidades propietarias de las marcas,
nombres o productos. Dell Inc. renuncia a todo interés propietario sobre otras marcas y nombres comerciales aparte de los suyos.
Octubre 2004 Rev. A00
 Loading...