

Dell W2607C LCD HD TV Owner's Manual

www.dell.com | support.dell.com
Dell™ W2607C LCD TV Display
Owner’s Manual
Model W2607C

Notes, Notices, and Cautions
NOTE: A NOTE indicates important information that helps you make better use of your LCD TV display.
NOTICE: A NOTICE indicates either potential damage to hardware or loss of data and tells you how to avoid the
problem.
CAUTION: A CAUTION indicates a potential for property damage, personal injury, or death.
____________________
Information in this document is subject to change without notice.
© 2006 Dell Inc. All rights reserved.
Reproduction in any manner whatsoever without the written permission of Dell Inc. is strictly forbidden.
Trademarks used in this text: Dell, Dimension, OptiPlex, Dell Precision, Latitude, Inspiron, DellNet, PowerApp, PowerEdge. PowerConnect,
PowerVault, EMC
®
and the DELL logo are trademarks of Dell, Inc.; TruSurround XT, SRS, and symbol are trademarks of
SRS Labs, Inc.
TruSurround XT technology is incorporated under license from SRS Labs, Inc.
Other trademarks and trade names may be used in this document to refer to either the entities claiming the marks and names or their products.
Dell Inc. disclaims any proprietary interest in trademarks and trade names other than its own.
February 2006 Rev. A00

Contents 3
Contents
1 About Your LCD TV Display . . . . . . . . . . . . . . . . . . . . . . . . . . . . . .5
Front View. . . . . . . . . . . . . . . . . . . . . . . . . . . . . . . . . 5
Right Side View
. . . . . . . . . . . . . . . . . . . . . . . . . . . . . . 6
Left Side View
. . . . . . . . . . . . . . . . . . . . . . . . . . . . . . . 7
Bottom View
. . . . . . . . . . . . . . . . . . . . . . . . . . . . . . . . 8
Package Contents
. . . . . . . . . . . . . . . . . . . . . . . . . . . . . 9
2 Setting Up Your LCD TV Display . . . . . . . . . . . . . . . . . . . . . . . . .11
Proper Location for Your LCD TV Display . . . . . . . . . . . . . . . . . . 11
Connecting Your LCD TV Display
. . . . . . . . . . . . . . . . . . . . . . 11
Connecting Your Computer to the LCD TV Display
. . . . . . . . . . . . . . 13
3 Your Remote Control . . . . . . . . . . . . . . . . . . . . . . . . . . . . . . . . . . .19
Installing Batteries . . . . . . . . . . . . . . . . . . . . . . . . . . . . 19
Using Your Remote Control
. . . . . . . . . . . . . . . . . . . . . . . . . 20
Using Your LCD TV Display With a Universal or Learning Remote Control
. . . 22
4 Using the TV Menu . . . . . . . . . . . . . . . . . . . . . . . . . . . . . . . . . . . .23
Using Your Remote Control With the TV Menu. . . . . . . . . . . . . . . . 23
Selecting Your TV Menu Language
. . . . . . . . . . . . . . . . . . . . . 24
Input Select Menu
. . . . . . . . . . . . . . . . . . . . . . . . . . . . . 24
Picture Settings Menu
. . . . . . . . . . . . . . . . . . . . . . . . . . . 25
Audio Settings Menu
. . . . . . . . . . . . . . . . . . . . . . . . . . . . 26
Size Menu
. . . . . . . . . . . . . . . . . . . . . . . . . . . . . . . . . 26

4 Contents
Parental Control . . . . . . . . . . . . . . . . . . . . . . . . . . . . . . 27
Setup Menu
. . . . . . . . . . . . . . . . . . . . . . . . . . . . . . . . 28
Sleep Timer
. . . . . . . . . . . . . . . . . . . . . . . . . . . . . . . . 29
Closed Caption
. . . . . . . . . . . . . . . . . . . . . . . . . . . . . . 29
5 Troubleshooting Your LCD TV Display . . . . . . . . . . . . . . . . . . . . 30
Troubleshooting Tips. . . . . . . . . . . . . . . . . . . . . . . . . . . . 30
General Problems
. . . . . . . . . . . . . . . . . . . . . . . . . . . . . 31
TV Menu Messages
. . . . . . . . . . . . . . . . . . . . . . . . . . . . 35
Remote Control Problems
. . . . . . . . . . . . . . . . . . . . . . . . . 36
Using the Self-Test Feature When Your LCD TV Display is Connected
to Your Computer . . . . . . . . . . . . . . . . . . . . . . . . . . . . . 36
Problems When Using the LCD TV Display as a Monitor
. . . . . . . . . . . 37
6 Specifications for Your LCD TV Display. . . . . . . . . . . . . . . . . . .38
7 Contacting Dell . . . . . . . . . . . . . . . . . . . . . . . . . . . . . . . . . . . . . . .42
Index . . . . . . . . . . . . . . . . . . . . . . . . . . . . . . . . . . . . 59
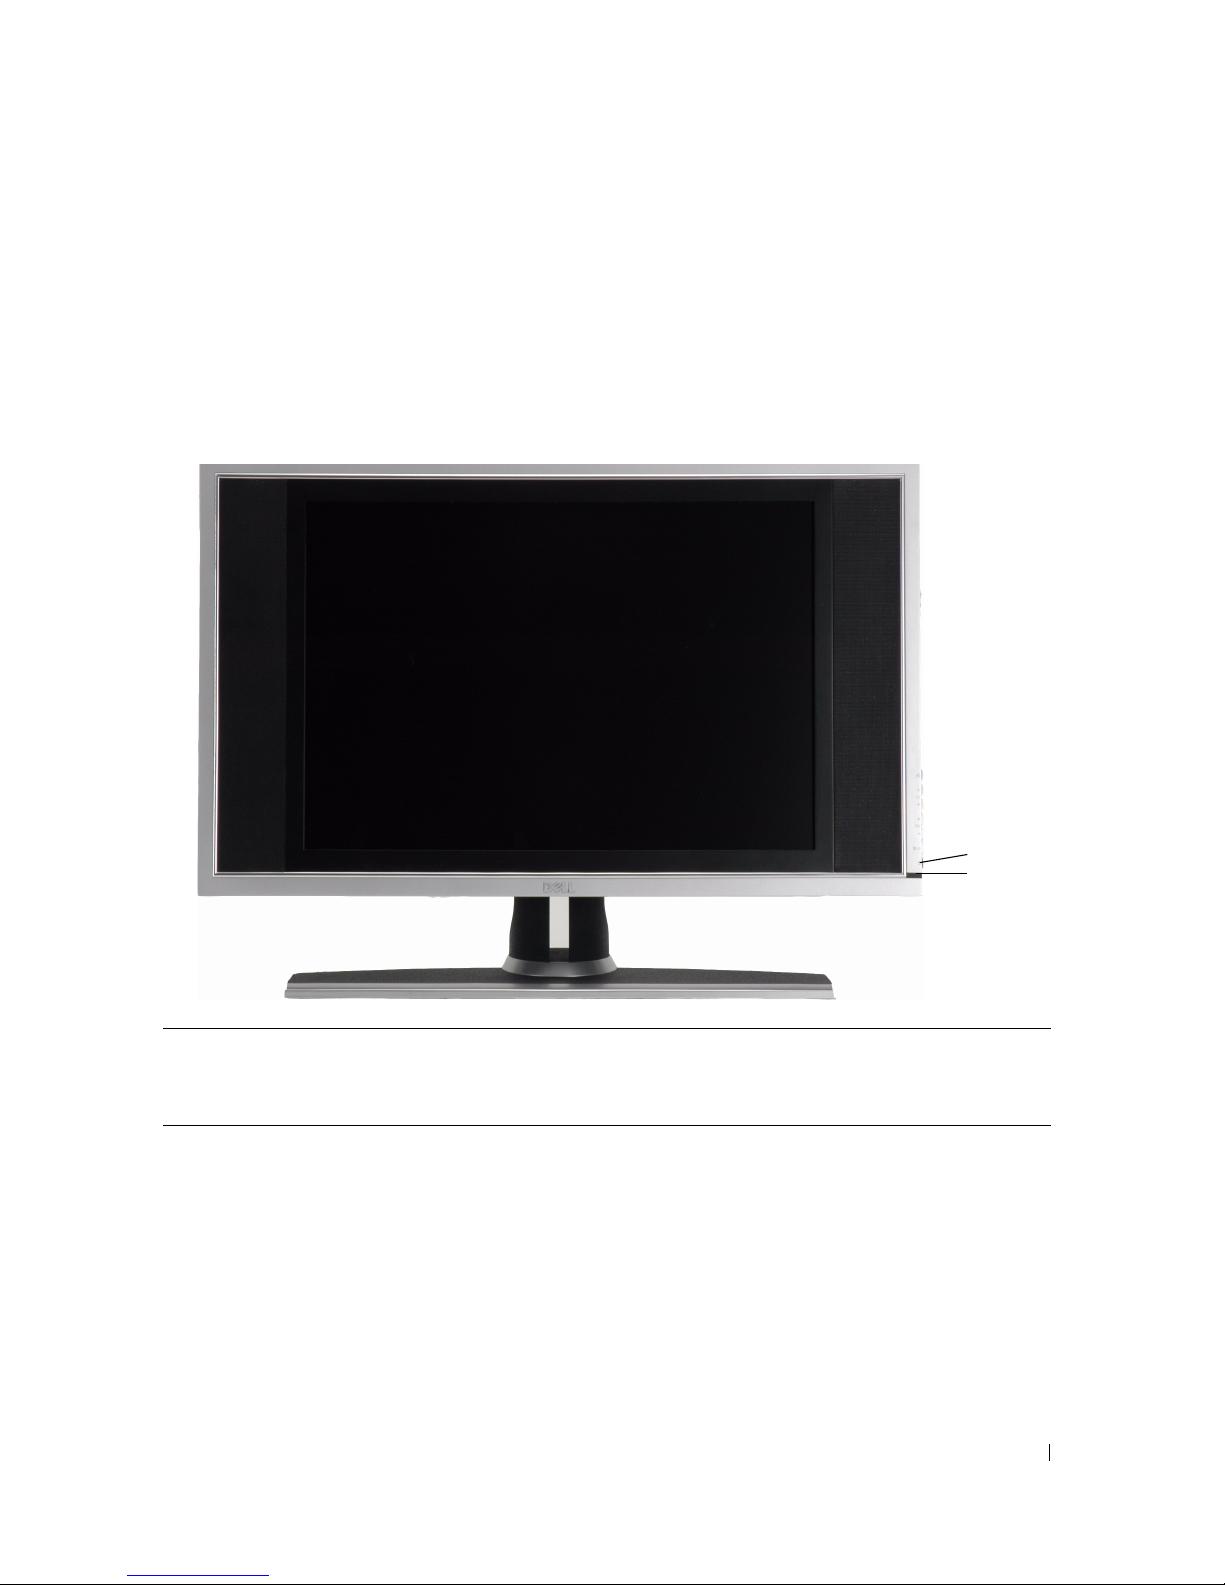
About Your LCD TV Display 5
1
About Your LCD TV Display
Front View
1 IR receiver Senses the signal from the remote control.
2 Power indicator light (LED) The light is blue when the LCD TV display is on and amber
when the LCD TV display is in power save mode.
2
1

6 About Your LCD TV Display
www.dell.com | support.dell.com
Right Side View
1 Power button
Press to turn the LCD TV display on and off. The power button
is blue when it is on and amber when it is in power saving
mode.
2
TV Menu menu button Press to enable the TV Menu.
3
Volume button Press to decrease the volume.
4 Volume button Press to increase the volume.
5 Channel button
Press to select the previous channel or navigate through the TV
Menu.
6
Channel button
Press to select the next channel or navigate through the TV
Menu.
7
Input Select button Press to display the Input Select menu.
2
1
3
4
5
6
7
OK

About Your LCD TV Display 7
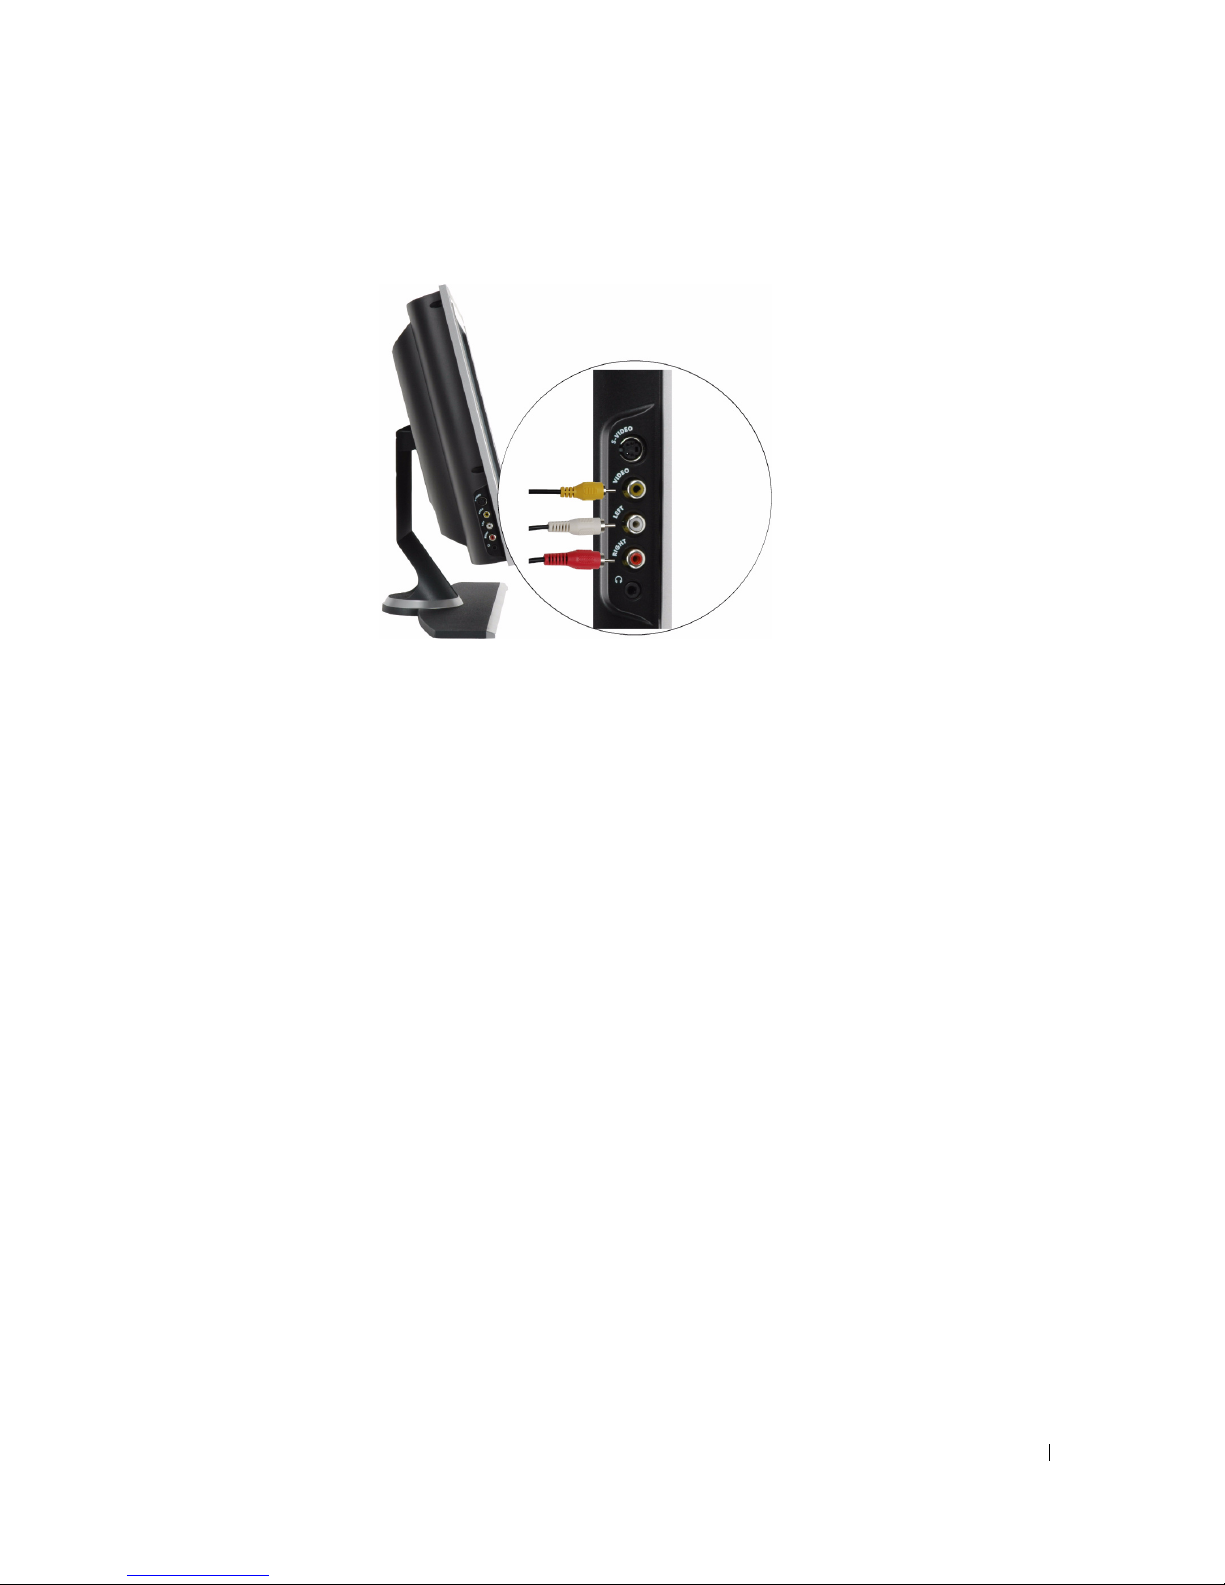
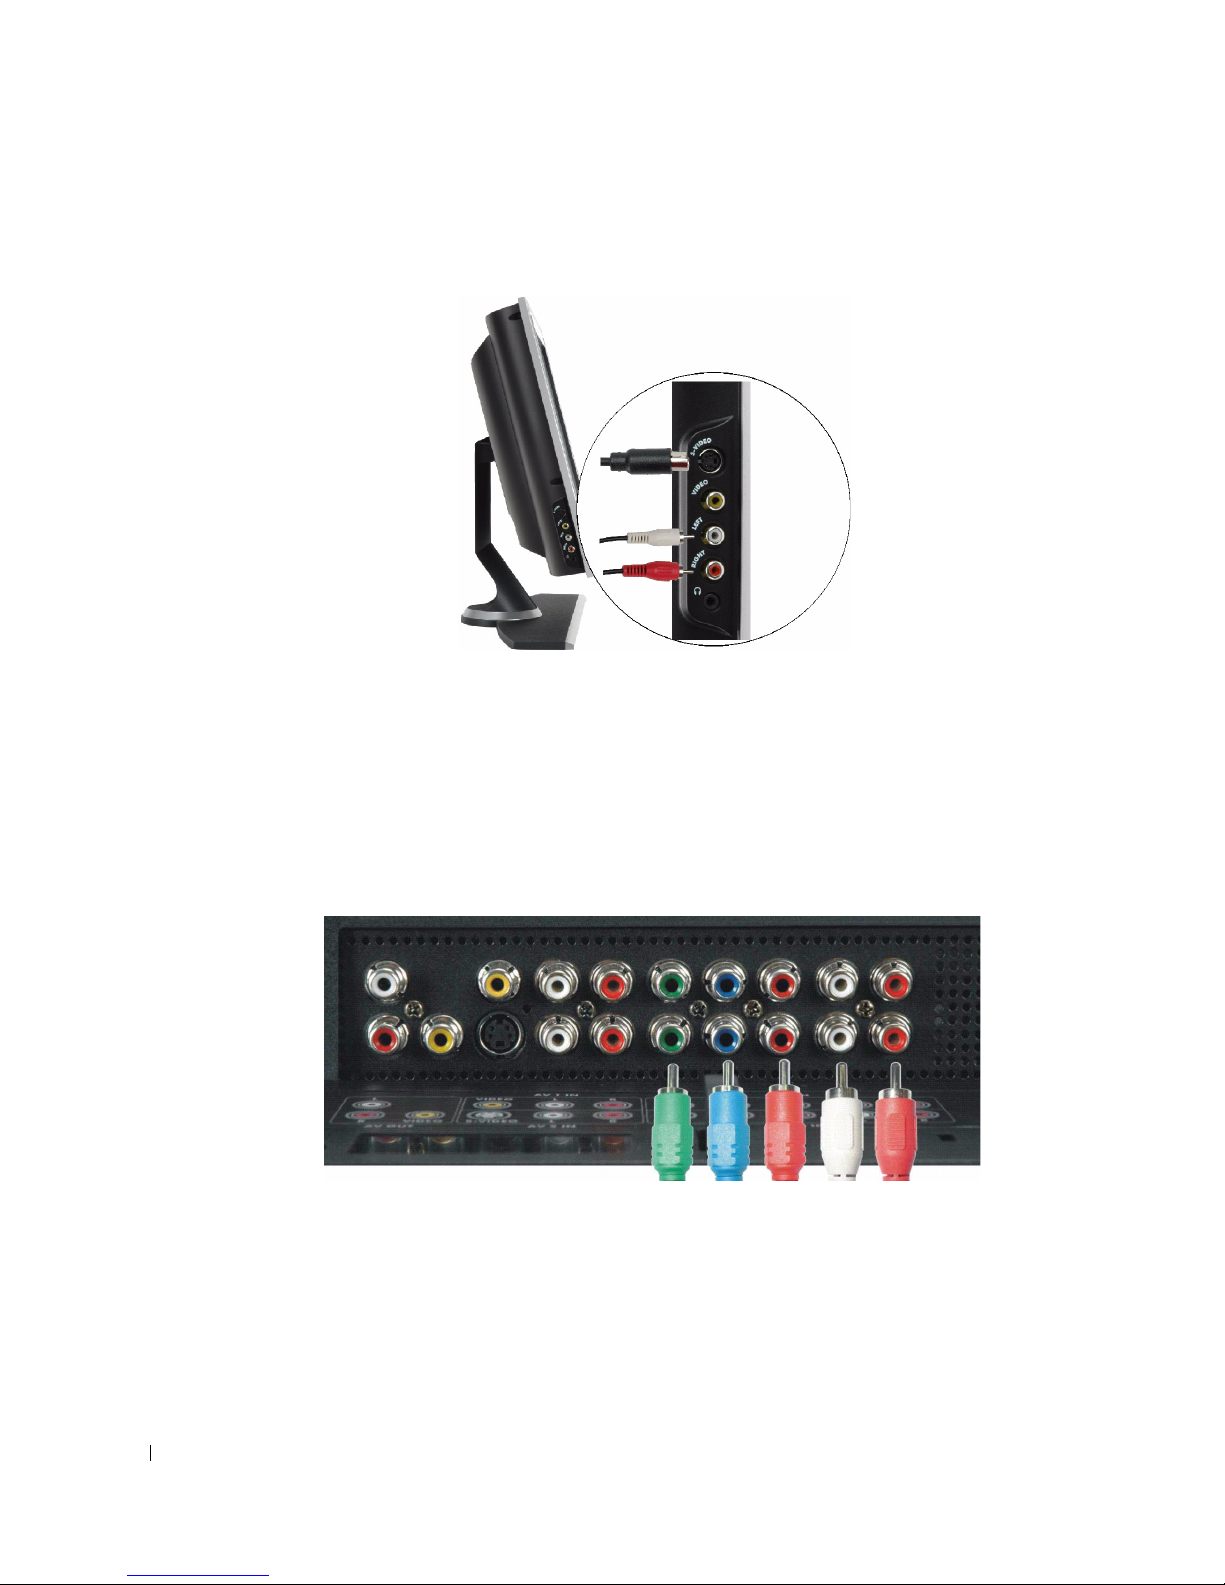
Left Side View
1 AV SIDE (S-Video 2) Connect devices such as a video game system or a VCR.
2 AV SIDE (Composite 2) Connect devices such as a VCR or DVD player.
3 AV SIDE audio connector Use the audio connector if you have connected a device to AV
SIDE connectors.
4 Headphone connector Connect headphones.
1
2
3
4
8 About Your LCD TV Display
www.dell.com | support.dell.com
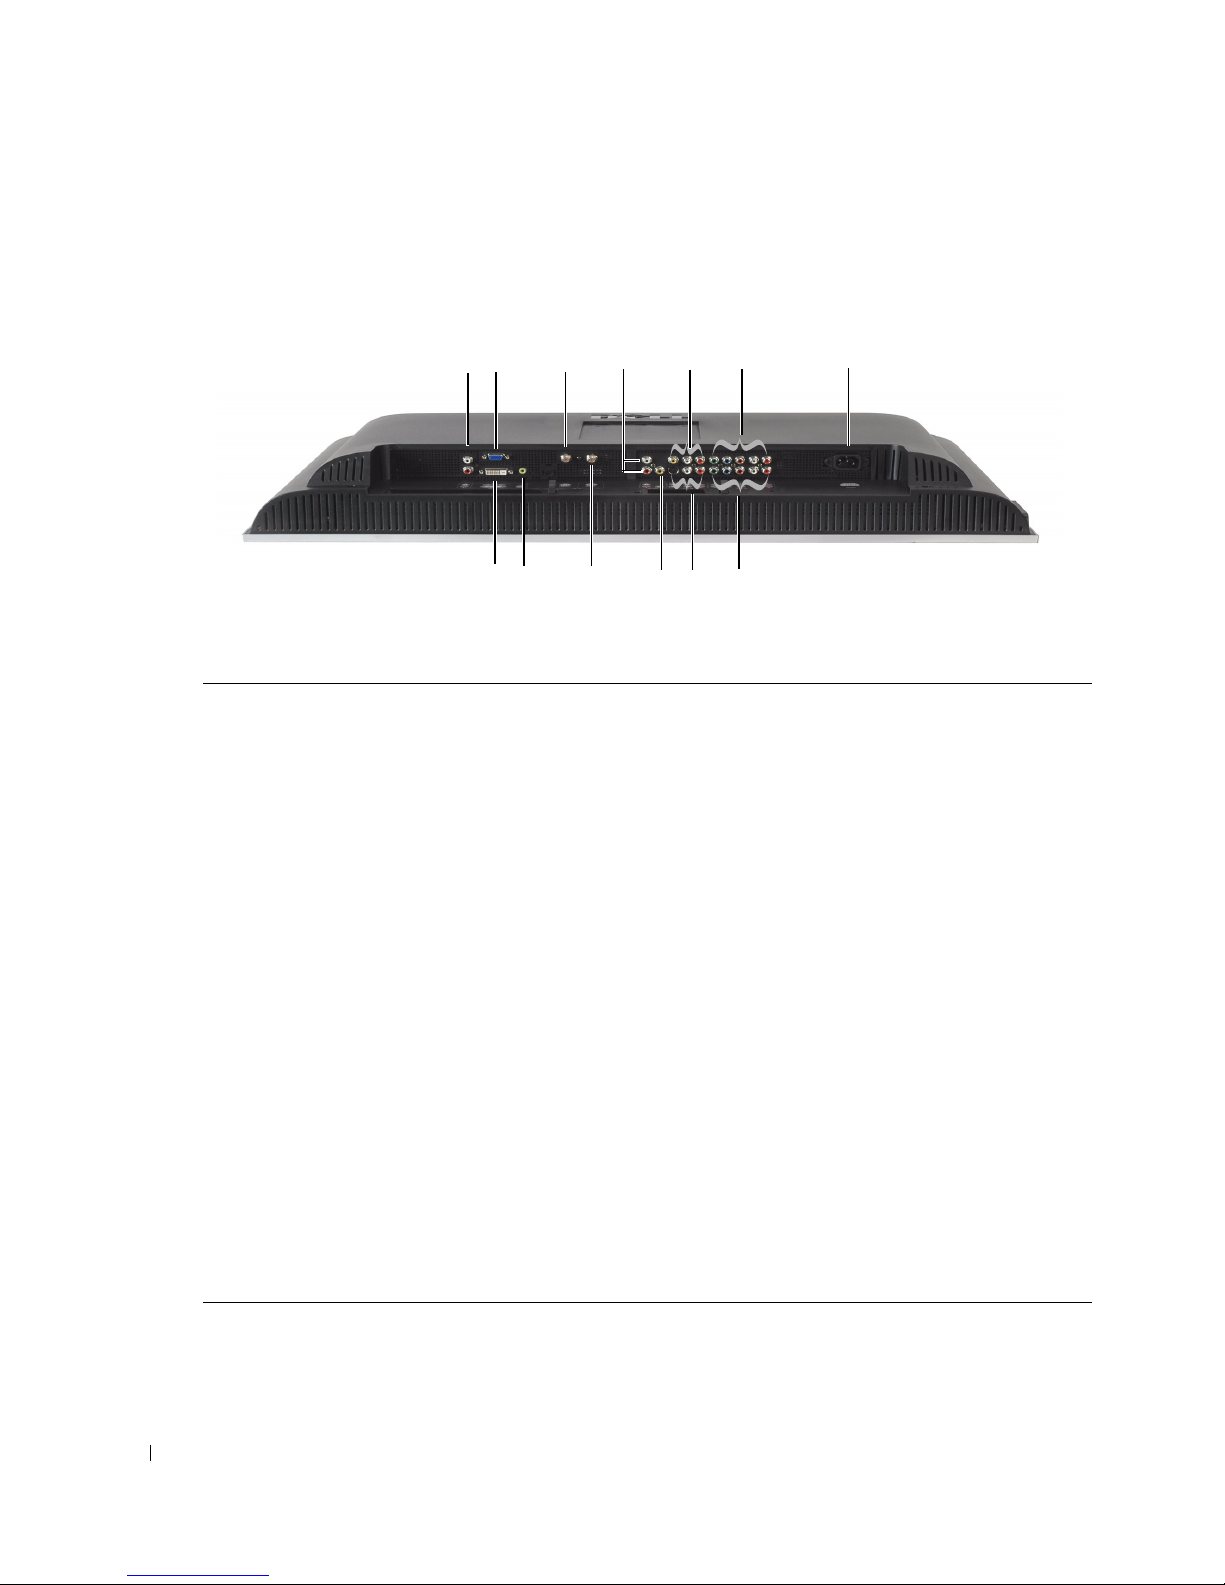
Bottom View
1 DVI audio connector (L / R) Use the DVI audio connector if you have connected a device
such as a DVD player to the DVI connector.
2 VGA Connect your computer.
3 DVI connector Connect your computer or video devices such as a DVD player.
4 Audio connector for VGA or DVI Connect the audio cable from your computer to the LCD TV
Display.
5 NTSC/Analog Cable Connect analog cable TV box or an analog antenna.
6 HDTV/Digital Cable Connect digital cable TV box or a digital antenna.
7 Composite out/Audio Out (L/R) Connect to VCR (L/R) audio inputs.
8 Composite out/Video Out Connect to VCR video input.
9 Composite video and audio
connectors (AV1)
Connect devices such as a VCR or DVD player.
10 S-Video video and audio connectors
(AV2)
Connect devices such as a video game system or a VCR.
11 Component video and audio
connectors (AV3)
Connect devices such as a DVD player or cable TV box.
12 Component video and audio
connectors (AV4)
Connect devices such as a DVD player or cable TV box.
13 Power connector Connect your power cord.
1
2
8
6
12
7
3
11
9
10
5
4
13
About Your LCD TV Display 9
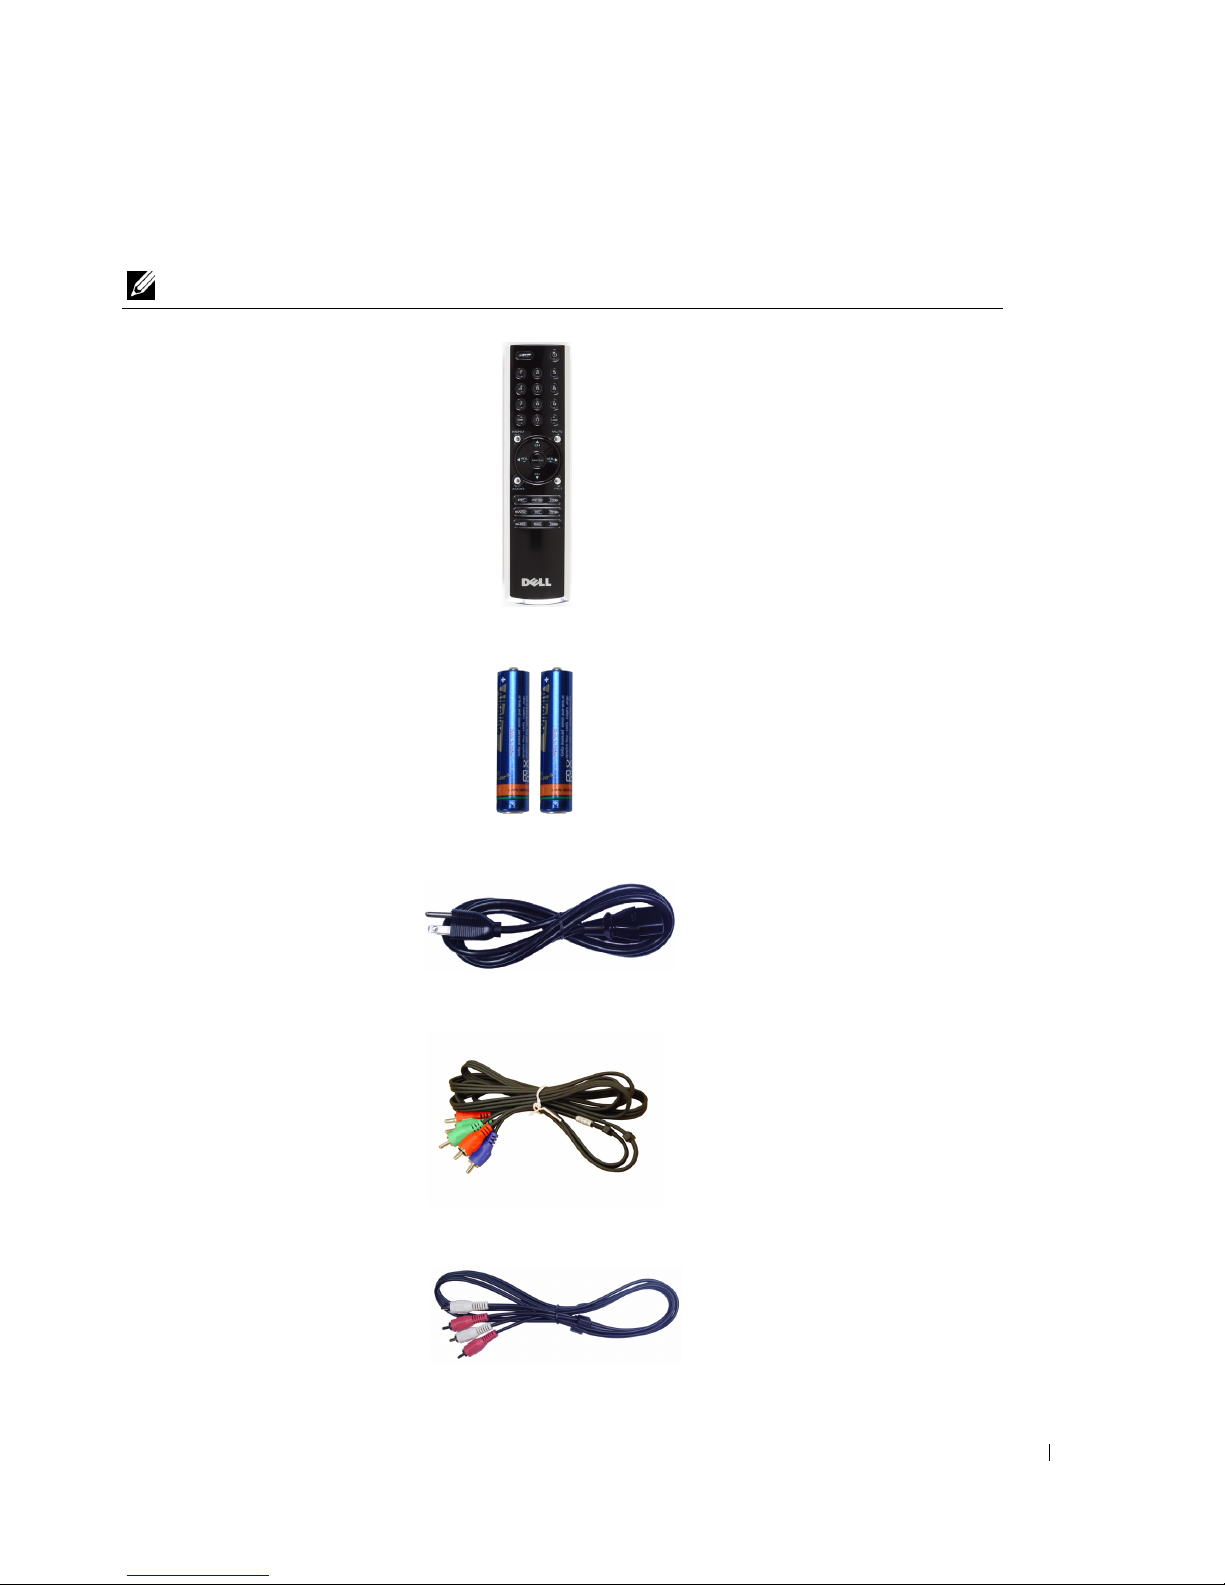
Package Contents
NOTE: If you need additional cables, contact Dell.
Remote control
AAA batteries (2)
Power cord
Component video cable
Audio cable
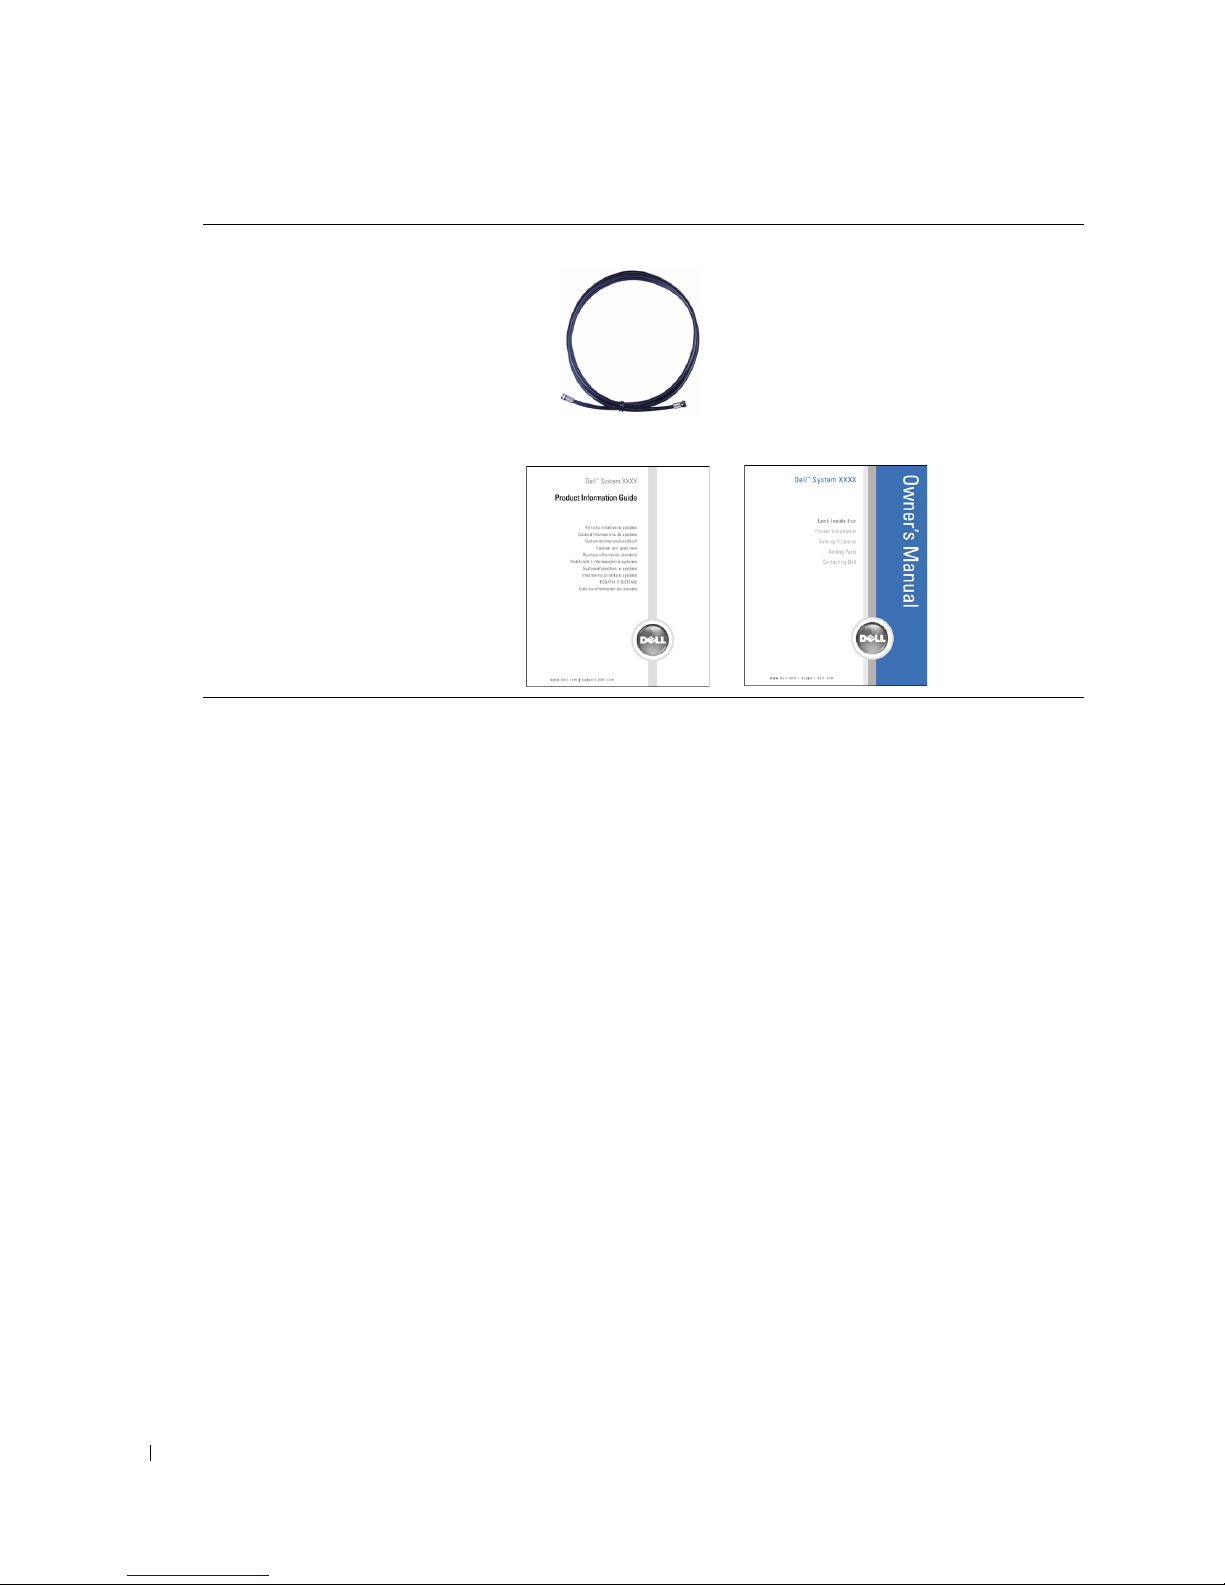
10 About Your LCD TV Display
www.dell.com | support.dell.com
Coaxial cable
Documentation:
Setup Guide
Product Information Guide
Owner's Manual
Setting Up Your LCD TV Display 11
2
Setting Up Your LCD TV Display
CAUTION: Before you begin any of the procedures in this section, follow the safety instructions
located in the
Product Information Guide
.
Proper Location for Your LCD TV Display
Consider the following environmental factors when you are deciding where to install your LCD TV
display:
• Do not store or use the LCD TV display in locations that are exposed to high heat, direct
sunlight, or extreme cold.
• Avoid moving the LCD TV display between locations with extreme temperature differences.
For more information, see
"Specifications for Your LCD TV Display"
on
page 38
.
• Do not subject the LCD TV display to severe vibration or high impact conditions. Do not
place the LCD TV display inside a car trunk.
• Do not store or use the LCD TV display in locations where the LCD TV display would be
exposed to high humidity or dusty environment.
• Do not place the LCD TV display in a location where water or other liquids could spill on or
into the LCD TV display.
Connecting Your LCD TV Display
Your LCD TV display has four standard connectors that can be used to connect devices.
NOTE: Before you connect your LCD TV display, ensure that you have all the proper cables. Some cables
may come with the device you are connecting. For a list of cables that came with your LCD TV display,
see
"Package Contents" on page 9. To order additional cables, contact Dell.
Quality Cable and Connector When to Use
Good Coaxial (RF) carries the video and audio
from one cable. The coaxial connector is
labeled, NTSC/Analog Cable or
HDTV/Digital Cable on your LCD TV
display. To locate the connector, see "Bottom
View" page 8.

12 Setting Up Your LCD TV Display
www.dell.com | support.dell.com
Good Composite carries the video signal through
a single pin. If you are using a composite
video connector you also need to connect
composite audio connectors. To locate the
connector, see "Left Side View"
page 7.
Better S-Video splits the video signal into two
signals, black-and-white and color. To locate
the connector, see "Left Side View" page 7.
Best Component splits the video signal into three
signals, two color and one black-and-white.
To locate the connector, see "Bottom View"
page 8.
Quality Cable and Connector When to Use
Setting Up Your LCD TV Display 13
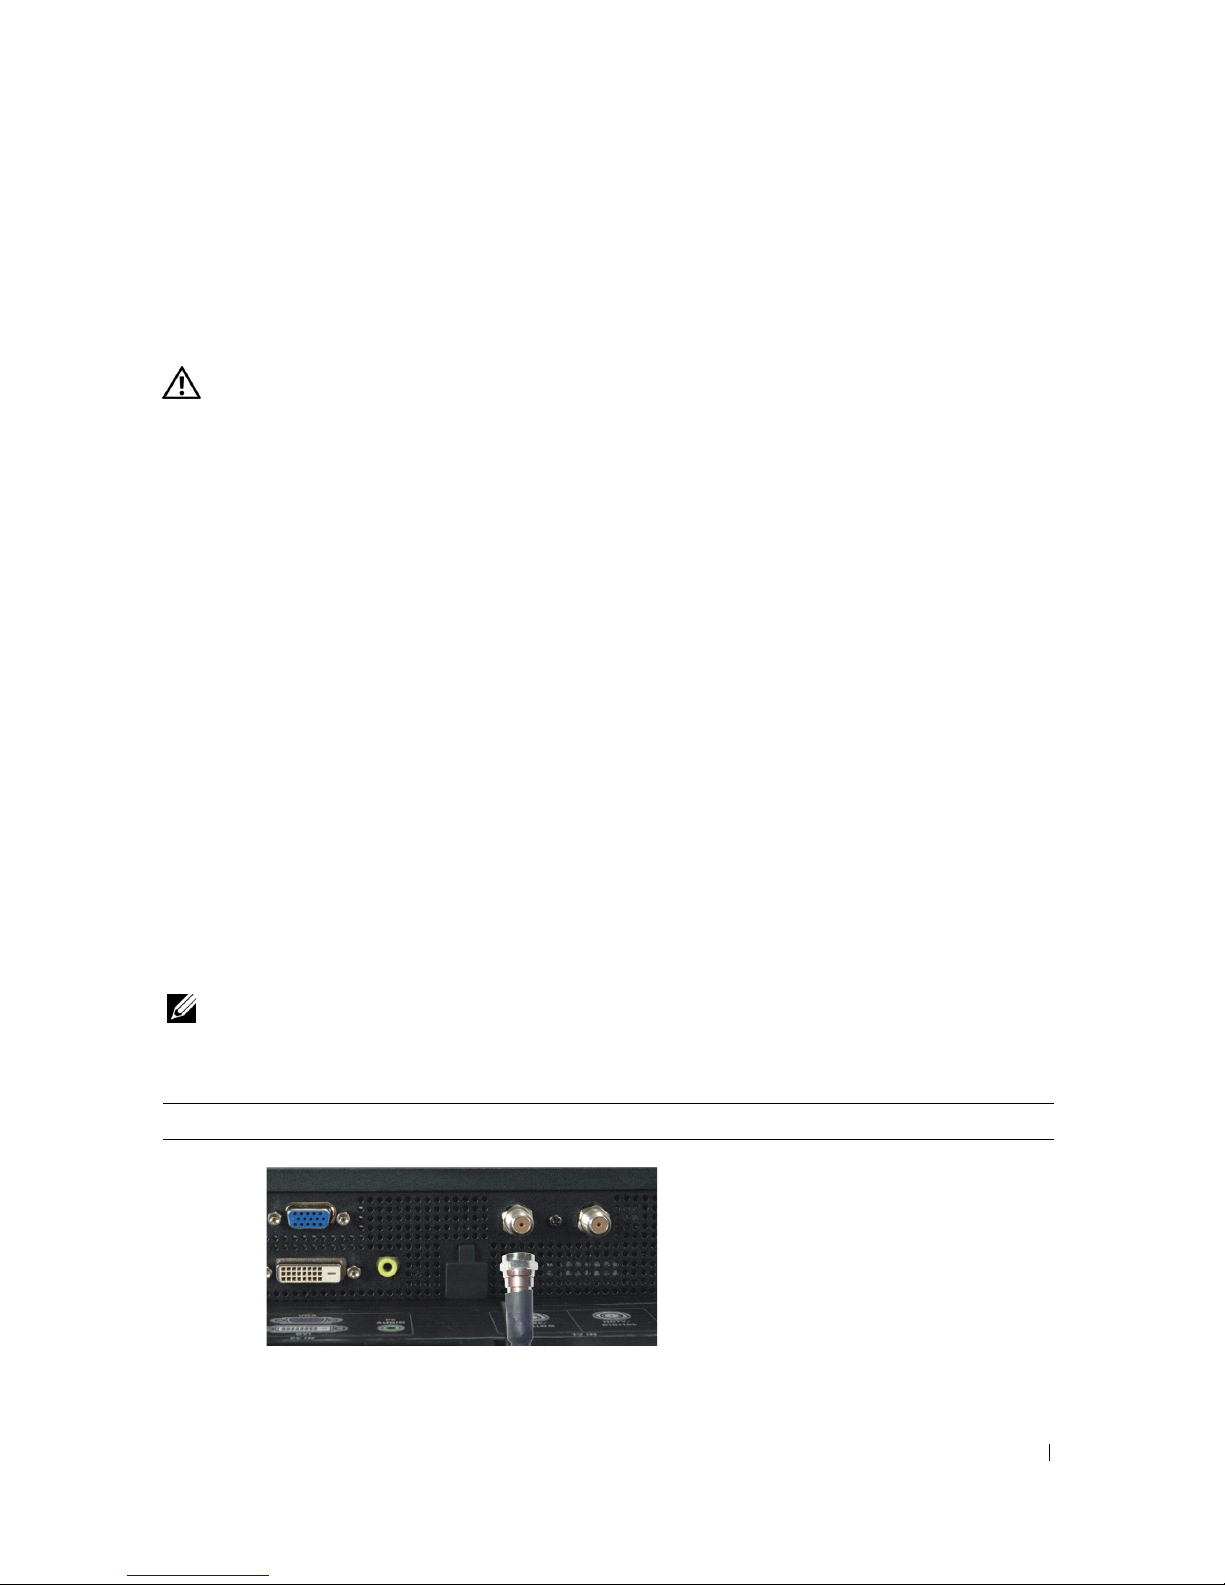
Connecting Your Computer to the LCD TV Display
Your LCD TV display has two standard connectors that can be used to connect your computer.
NOTE: The type of connector you use depends on the graphics card your computer supports.
For additional information about graphic cards, see your computer documentation.
Quality Cable and Connector When to Use
Good
A standard graphic display system for
computers that uses an analog signal and
can support resolutions up to 1360 x 768.
Better
A digital signal that can support digital
and convert analog to digital. DVI can be
used for high resolution display and can
support resolutions up to 1360 x 768.
Connect the audio cable from your computer
to the LCD TV Display Audio connector for
VGA or DVI.
14 Setting Up Your LCD TV Display
www.dell.com | support.dell.com
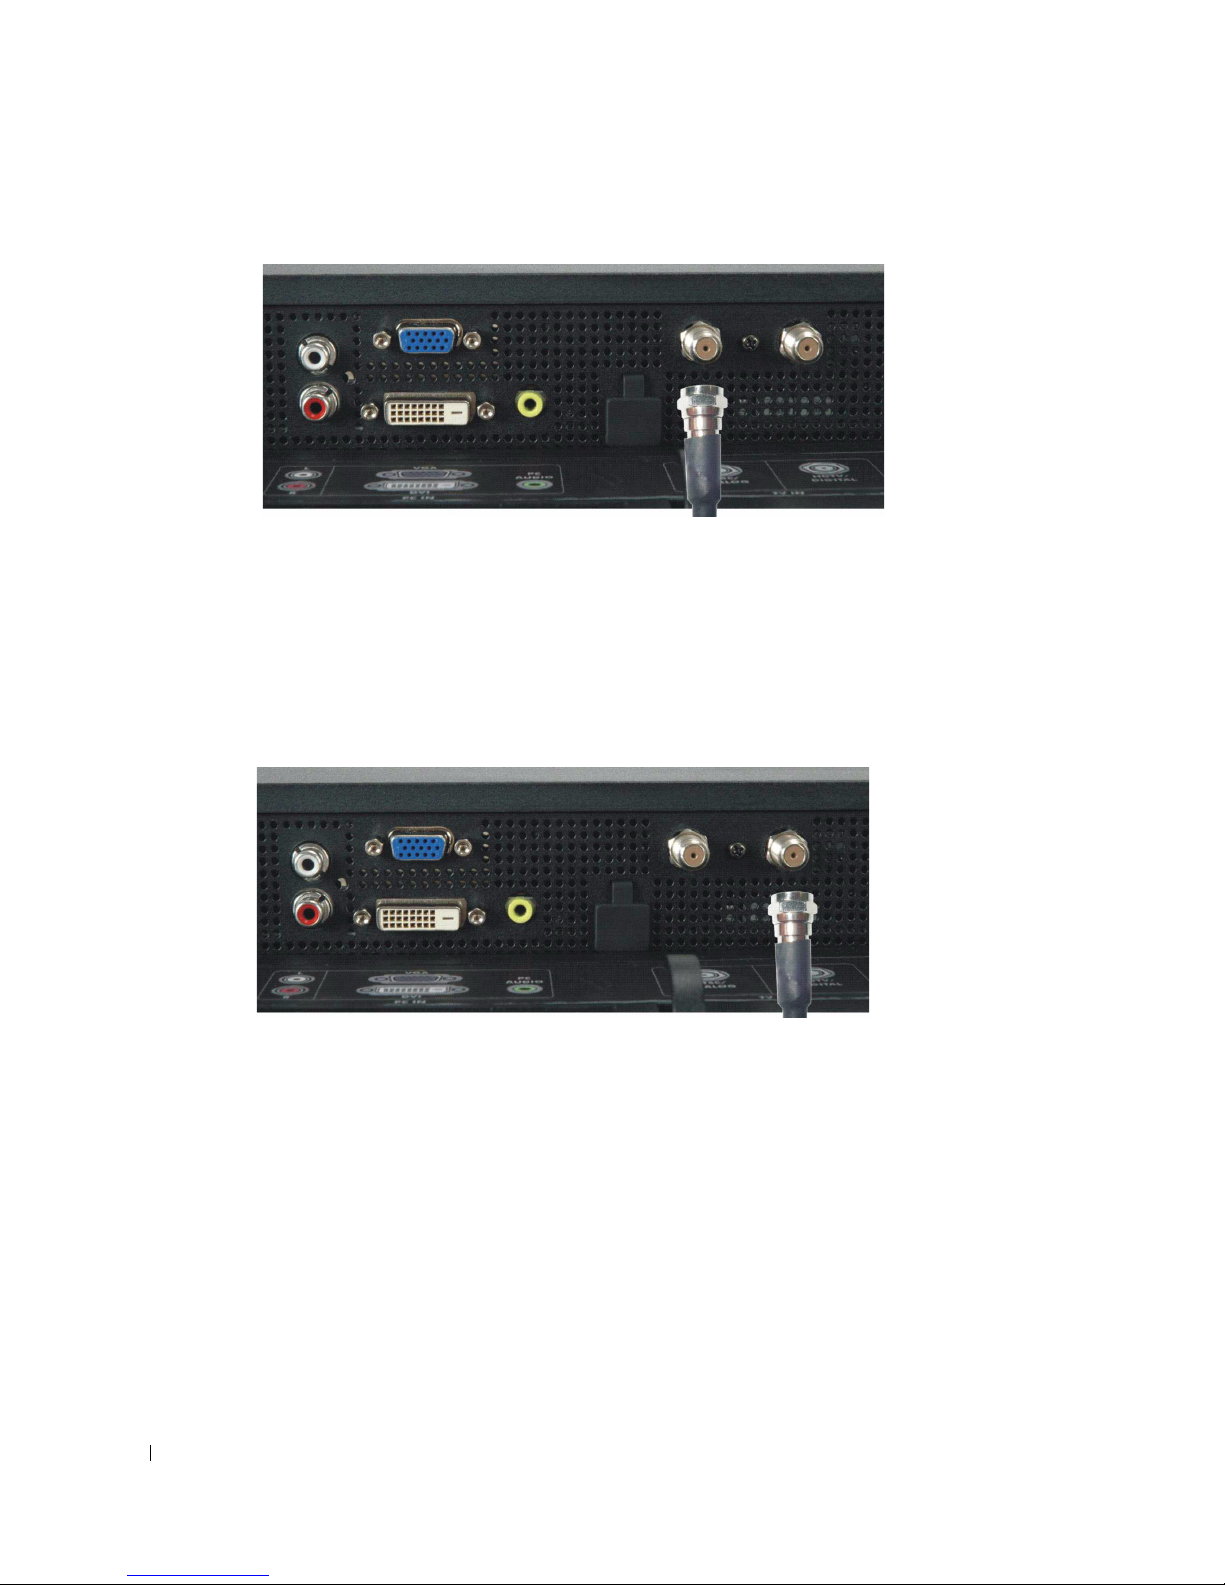
Using NTSC/Analog and HDTV/Digital
1
Turn off the LCD TV display and unplug the power cord.
2
Connect the coaxial cable to the NTSC/Analog Cable connector of the LCD TV display.
3
Plug in the power cord for the LCD TV display and turn on the LCD TV display.
4
Enter the TV Menu and select
TV Analog
. For additional information about the
Input Select
menu, see
"Input Selection Menu"
page 24.
1
Turn off the LCD TV display and unplug the power cord.
2
Connect the coaxial cable to the HDTV/Digital Cable connector of the LCD TV display.
3
Plug in the power cord for the LCD TV display and turn on the LCD TV display.
4
Enter the TV Menu and select
TV Digital
. For additional information about the
Input Select
menu, see
"Input Selection Menu"
page 24.
Setting Up Your LCD TV Display 15
Using the Composite Connector
1
Turn off the LCD TV display and unplug the power cord.
2
Connect video and audio cables from your device to LCD TV.
3
Plug in the power cords for the LCD TV display and device and turn the power on.
4
Enter the TV Menu and select the
AV SIDE (Composite 2)
. For additional information
about the
Input Select
menu, see
"Input Selection Menu"
page 24.
16 Setting Up Your LCD TV Display
www.dell.com | support.dell.com
Using the S-Video Connector
1
Turn off the LCD TV display and unplug the power cord.
2
Connect video and audio cables from your device to LCD TV.
3
Plug in the power cords for the LCD TV display and device and turn the power on.
4
Enter the TV Menu and select the
AV SIDE (S-Video 2)
. For additional information about
the
Input Select
menu, see
"Input Selection Menu"
page 24.
Using the Component Connectors
1
Turn off the LCD TV display and unplug the power cord.
2
Connect video and audio cables from your device to LCD TV.
3
Plug in the power cords for the LCD TV display and device and turn the power on.
4
Enter the TV Menu and select the
AV3 (Component 1)
or
AV4 (Component 2)
. For
additional information about the
Input Select
menu, see
"Input Selection Menu"
page 24.
Setting Up Your LCD TV Display 17
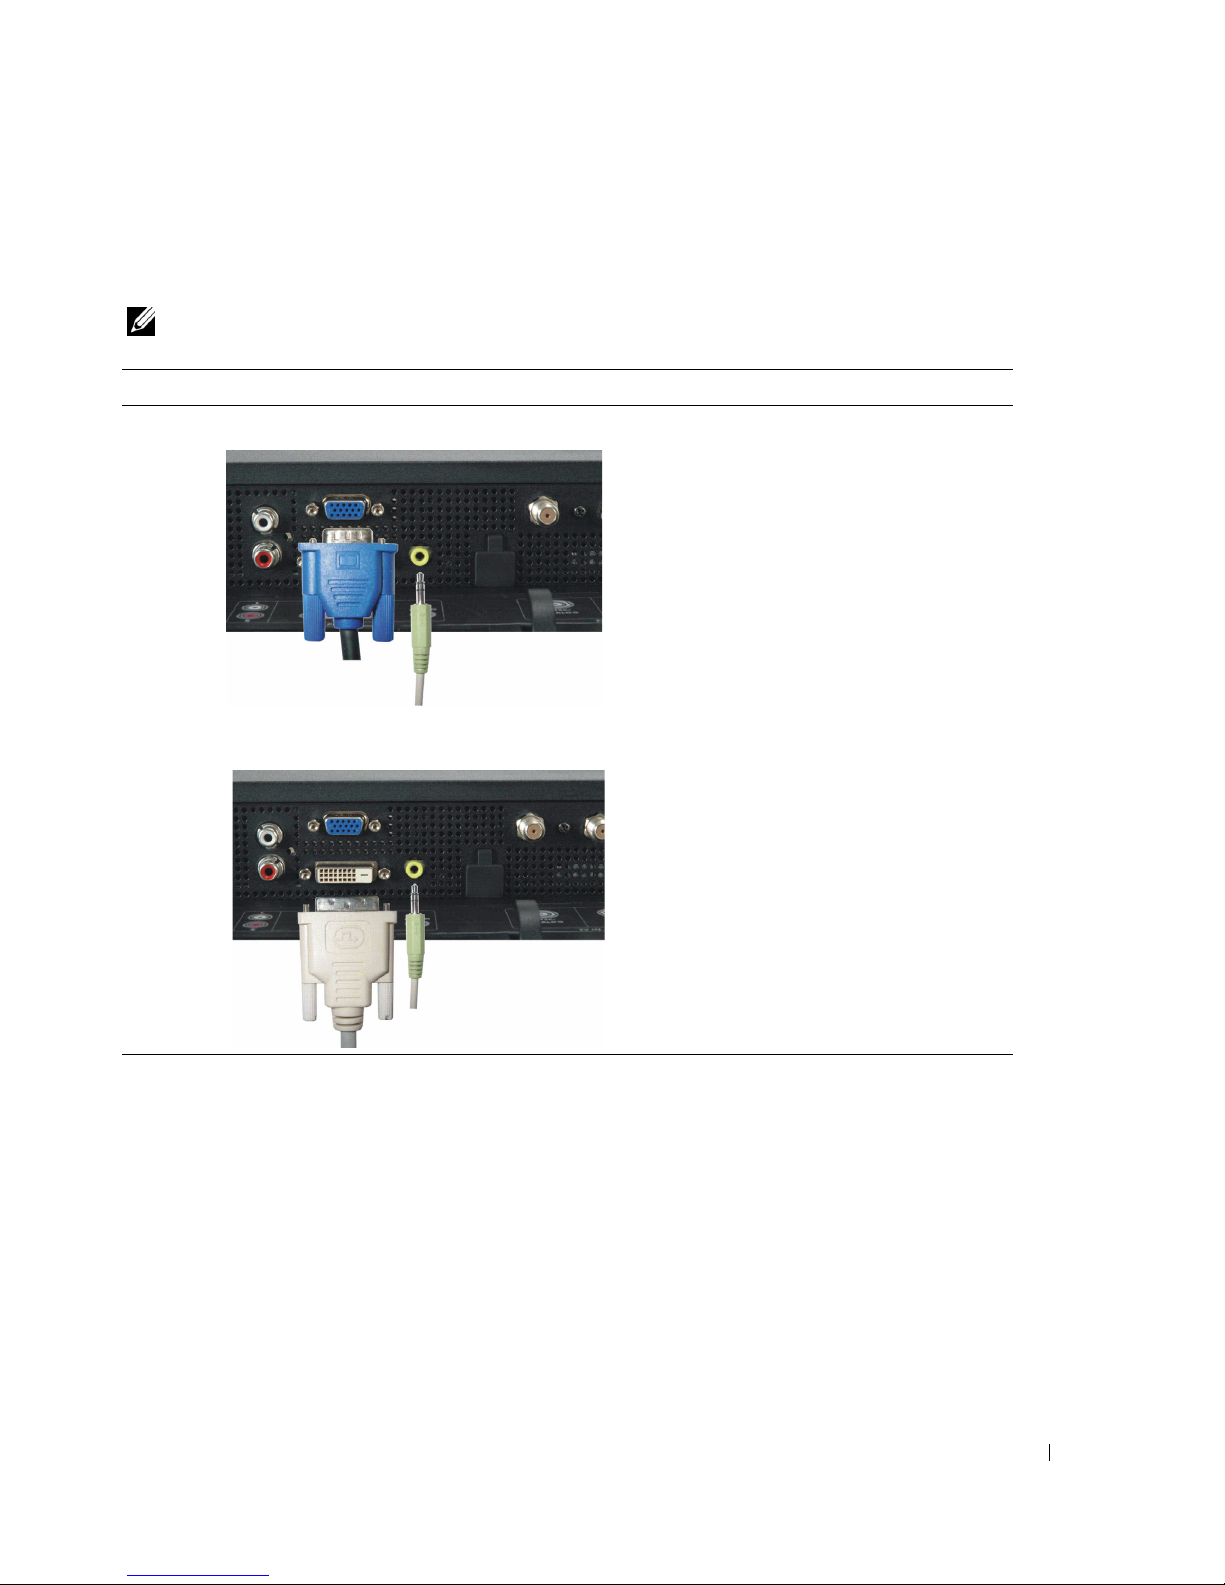
Using the DVI Connector
NOTE: Only one connector can be used for a computer, either VGA or DVI.
1
Turn off the LCD TV display and unplug the power cord.
2
Connect the white DVI cable to your LCD display TV and to the video device or your
computer.
3
Connect the audio cables.
If you are connecting a video device, use the audio connectors (red and white) or if you are
connecting a computer use the stereo connector (green).
NOTE: Some cable TV boxes may have DVI connectors, but do not support using a DVI connection. For
more information, contact your cable TV company.
4
Plug in the power cords for the LCD TV display and device and turn the power on.
5
Enter the TV Menu and select the
DVI
. For additional information about the
Input Select
menu, see
"Input Selection Menu"
page 24.
Connecting a Video Device Connecting a Computer
18 Setting Up Your LCD TV Display
www.dell.com | support.dell.com
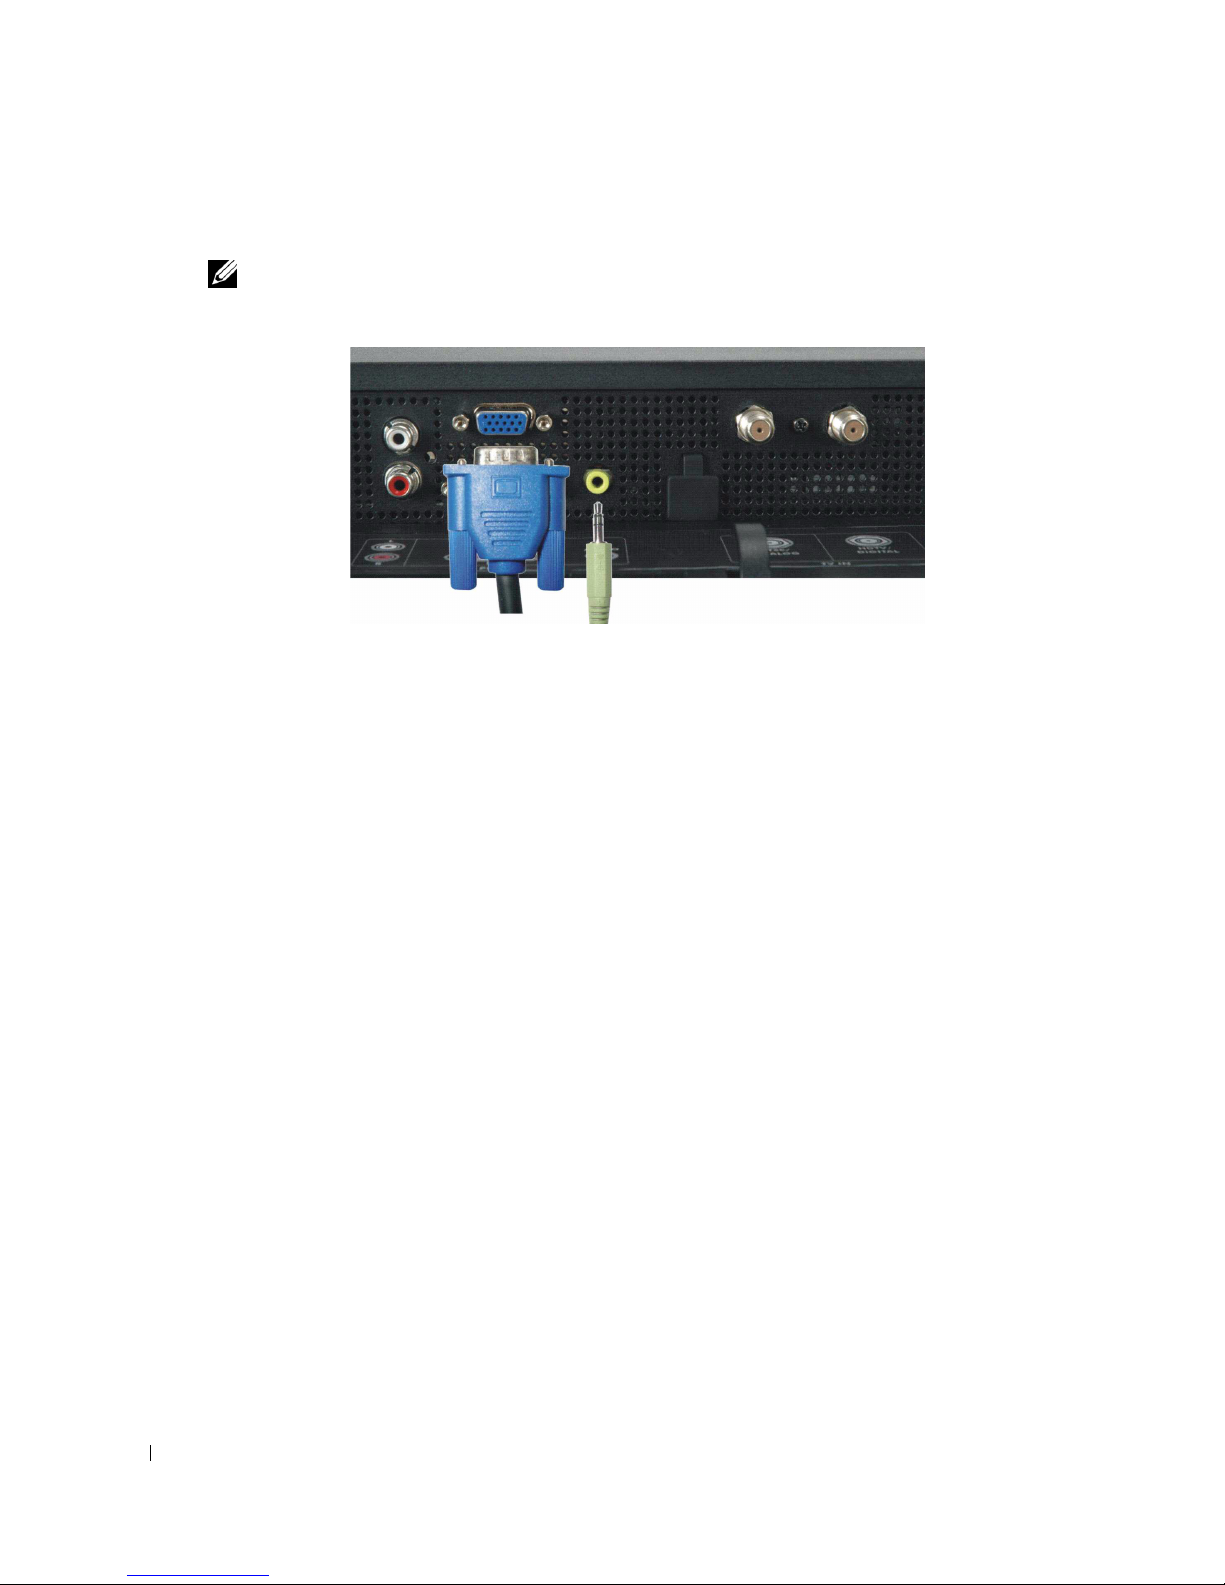
Using the VGA Connector
NOTE: Only one connector can be used for a computer, either VGA or DVI.
1
Turn off the LCD TV display and unplug the power cord.
2
Connect the blue VGA cable to your LCD TV display and to your computer.
3
Connect the green audio cable to the connector on the LCD TV display and to your
computer.
4
Plug in the power cords for the LCD TV display and computer and turn the power on.
5
Enter the TV Menu and select the
VGA
. For additional information about the
Input Select
menu, see
"Input Selection Menu"
page 24.
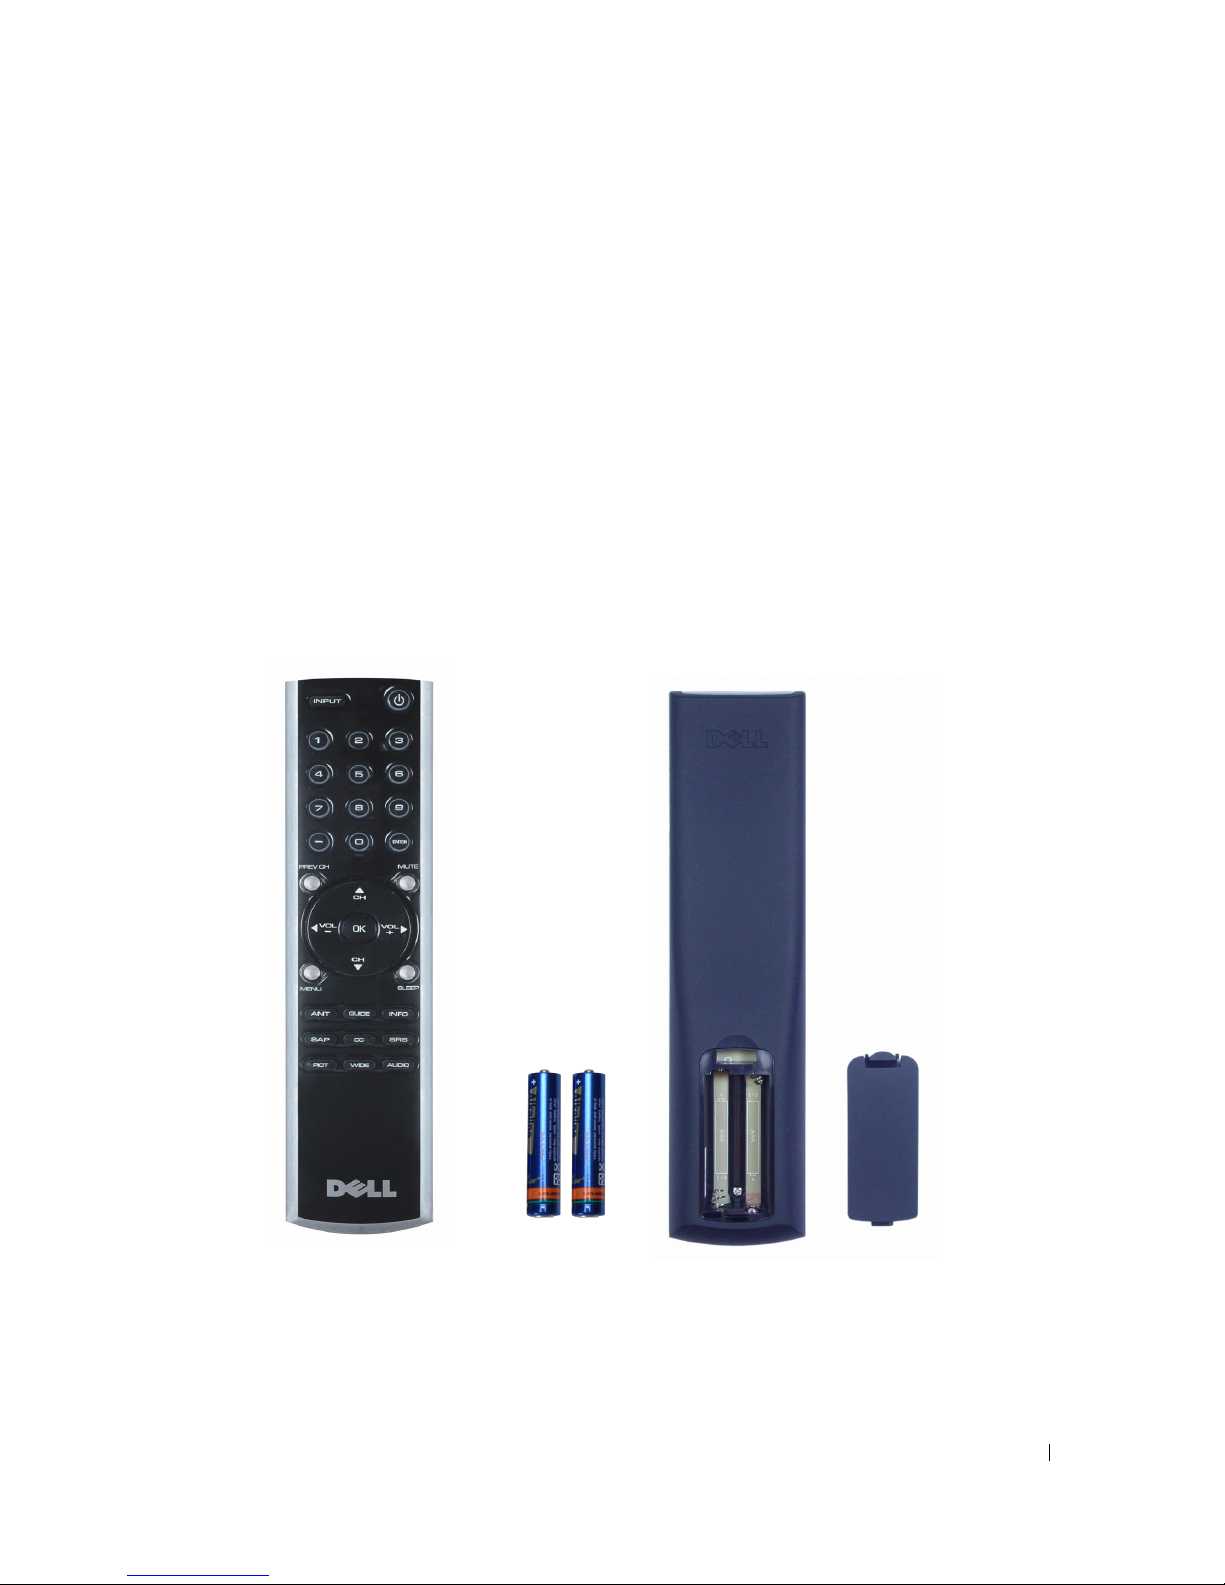
Your Remote Control 19
3
Your Remote Control
Installing Batteries
Before you can use your remote control, install two-AAA batteries.
1
Slide open the battery cover.
2
Install the batteries. Make sure that you match the + and - on the batteries with the + and symbols in the battery compartment.
3
Replace the battery cover.
20 Your Remote Control
www.dell.com | support.dell.com
Using Your Remote Control
1
23
4
21
5
6
20
18
19
7
14
11
10
16
9
8
12
13
15
17
2
3
22

Your Remote Control 21
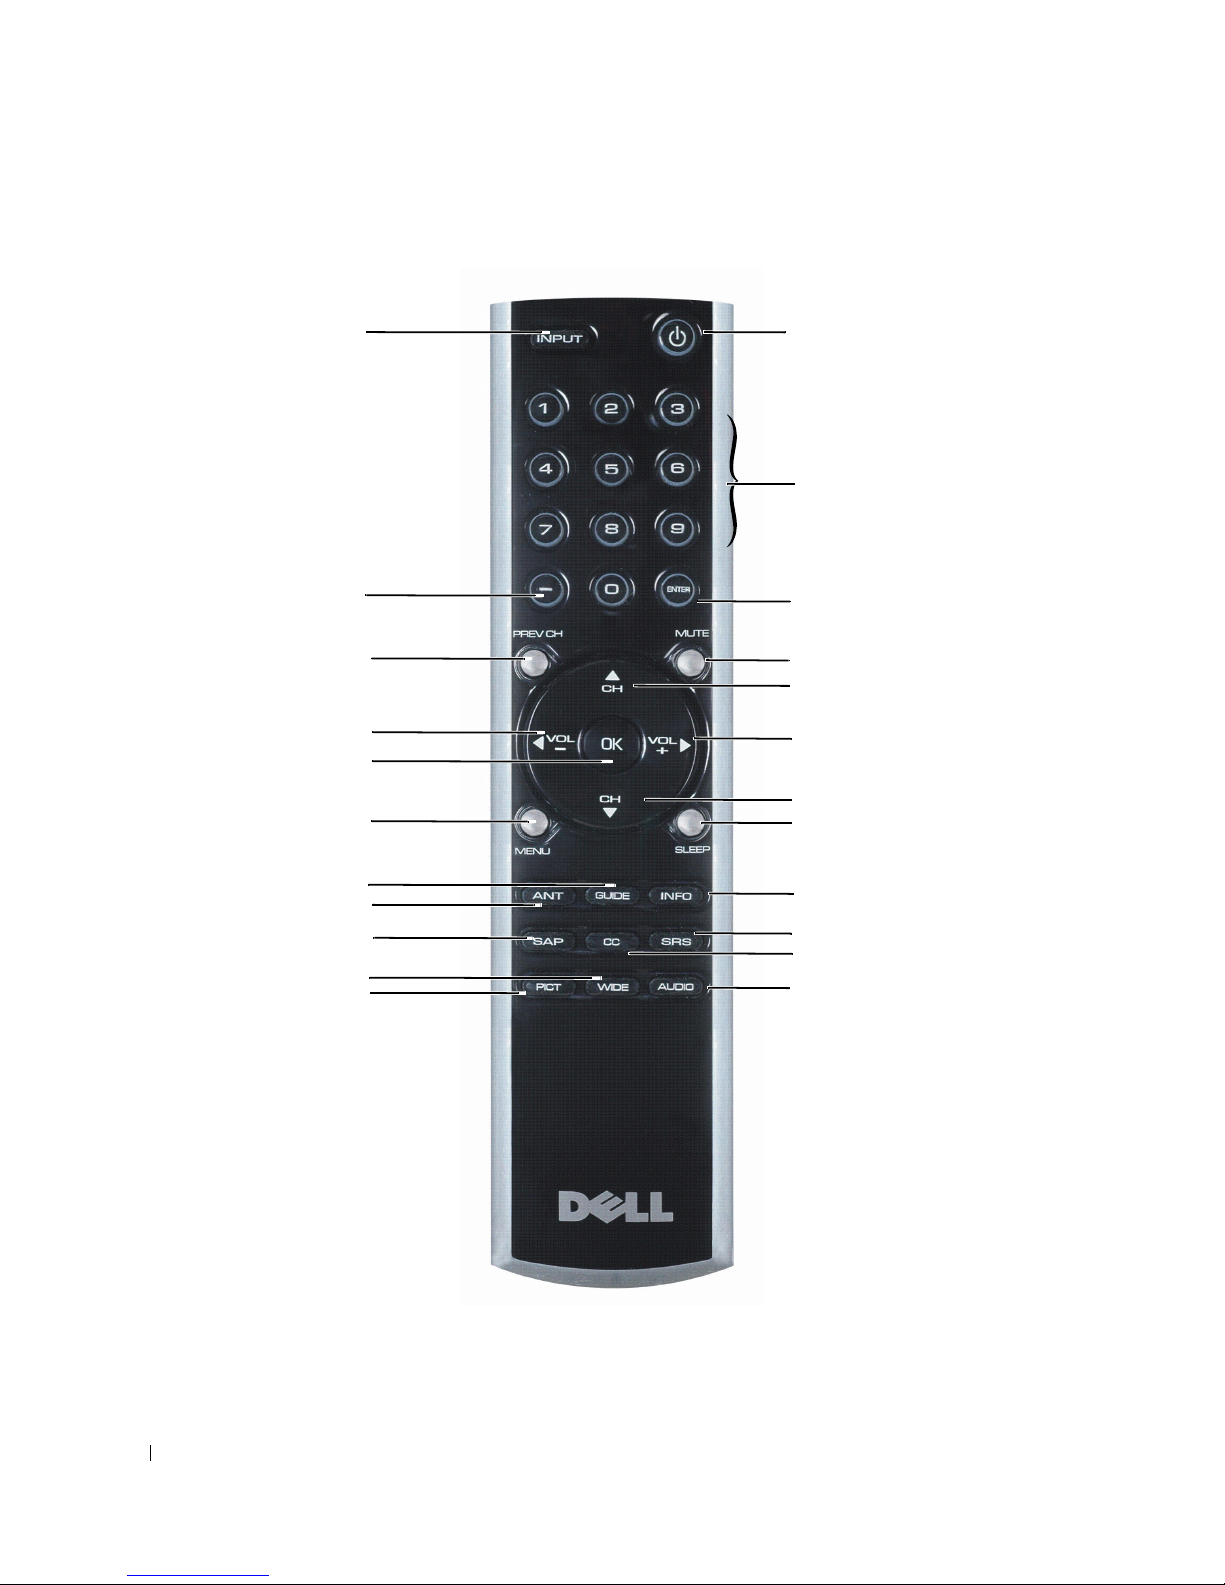
1 Power Button Turns the LCD TV display on and off.
2 Number buttons Press to select a channel.
3 Enter Selects an TV Menu option, confirms a channel selection.
4 Mute Press to turn the sound on and off.
5 CH (up icon) Press to view the next channel.
In the TV Menu, use the channel button to navigate through
the menus in the TV Menu.
6 Vol + Increases the volume.
In the TV Menu, use the volume button to navigate through
the menus.
7 CH (down icon) Press to view the previous channel.
In the TV Menu, use the channel button to navigate through
the menus in the TV Menu.
8 Sleep Turns on the sleep timer.
9 INFO Display information about your TV display (for example, in
TV Mode displays the channel you are watching.)
10 SRS Toggle SRS surround on and off.
11 CC Cycles through the Closed Caption menu.
12 Audio Cycles through the preset Audio options.
13 Pict Cycles through the preset options for the Picture menu.
14 Wide Cycles through the size (aspect ratio) options from the Picture
menu.
15 SAP Turns on
Second Audio Program (SAP).
16 ANT Selects TV tuner as input source.
17 Guide Toggle EPG on and off.
18 Menu Enters and exits the TV Menu main menu.
19 OK Selects an TV Menu option, confirms a channel selection.
20 Vol - Decreases the volume.
In the TV Menu, use the volume button to navigate through
the menus.
21 Prev CH Returns you to previously viewed channel.
22 For setting channels.
23 Input Enters and exits the Input Select menu.

22 Your Remote Control
www.dell.com | support.dell.com
Using Your LCD TV Display With a Universal or Learning
Remote Control
Preprogrammed universal remote controls can be programmed to control the following
functions on your Dell LCD TV display:
•Power
• Channel Up (+)
• Channel Down (-)
• Volume Up (+)
•Volume Down (-)
•Mute
• Input Select
NOTE:
Future preprogrammed universal remote controls may be able to control more
functions.
You can program universal remote controls to work with your Dell LCD TV display in the following
ways:
• If the remote control manual lists codes by manufacturer, use the Philips codes.
• If the remote control has a search function, this function may be used to find the
correct code.
• If the remote control has a learning function, you can program specific buttons on it from
the Dell remote control, in addition to those buttons listed above.
NOTE: For additional information, see the documentation that came with your universal or learning
remote control.
FILE LOCATION: F:\OEM MODELS\DELL LCD TV\W2607C TV Monitor\W2607C DAO OM\12-13-2005\W2607C DAO
OM\W2607C_27A0e40.fm
Using the TV Menu 23
4
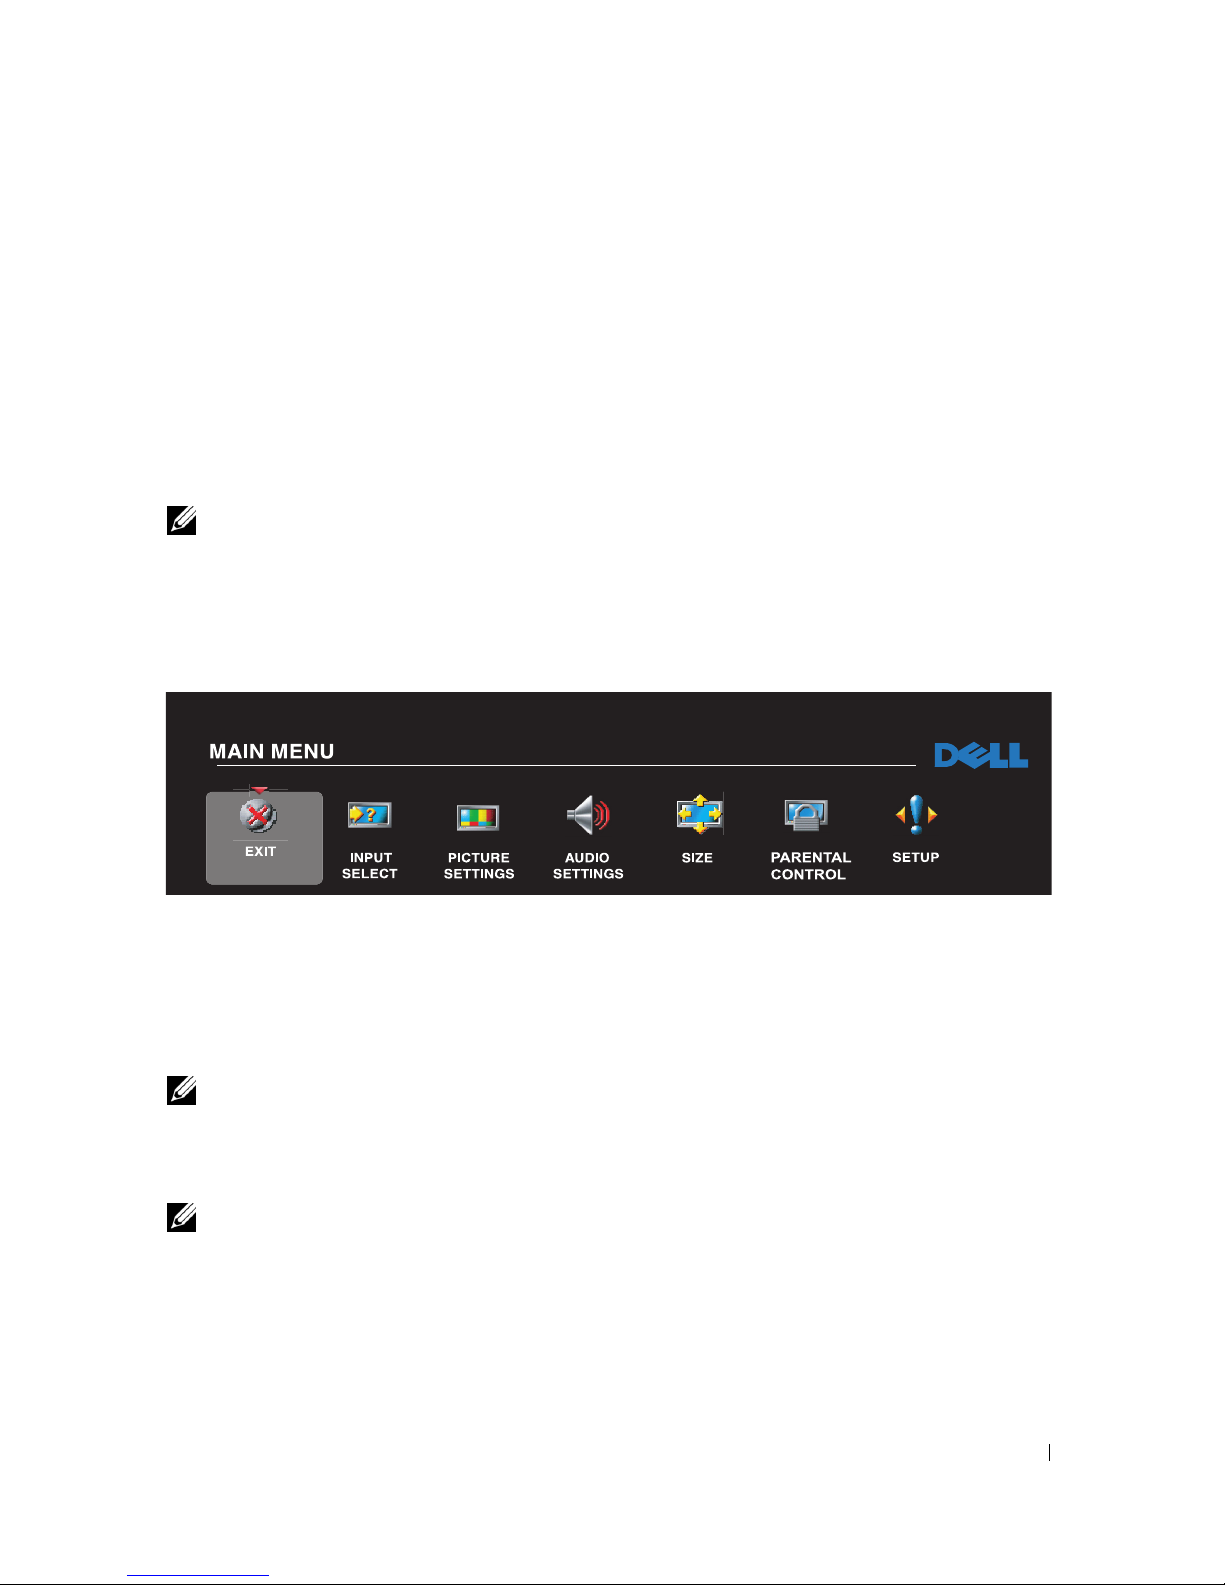
Using the TV Menu
Your LCD TV display has an TV Menu that allows you to select the proper input source, make
adjustments to the image and audio settings and set parental controls.
Using Your Remote Control With the TV Menu
NOTE: You can access and make selections to the TV Menu using the volume and channel buttons on
the side panel of the LCD TV display or you can use the remote control. Except where noted, this section
describes how to use the TV Menu with the remote control.
1
To enter the TV Menu, press the
Menu
button.
Seven icons appear along the bottom of the screen.
2
Use the left and right buttons (volume buttons) to move between the icons.
The icon appears highlighted as you move through the menu.
3
To select an option, push the OK button when the icon is highlighted.
4
A new menu appears for that selected option. Use the up and down buttons (channel
buttons) to move through the various settings.
NOTE: A red arrow appears next to the setting as you navigate through the options. A check mark
appears next to the option that you have selected.
5
Use the left and right buttons (volume buttons) and the OK button to adjust or select
settings.
NOTE: You can select Exit at any time to return to the main menu.
6
After you have made your selections,
select Exit
to return to the main menu.
7
To exit the TV Menu, select the
Exit
icon and press OK.
24 Using the TV Menu
www.dell.com | support.dell.com
FILE LOCATION: F:\OEM MODELS\DELL LCD TV\W2607C TV Monitor\W2607C DAO OM\12-13-2005\W2607C DAO
DELL CONFIDENTIAL – PRELIMINARY 12/30/05 – FOR PROOF ONLY
Selecting Your TV Menu Language
1
Press
Menu
to enter the TV Menu.
2
Select
Setup
.
3
In the
Setup
menu, select
Language
and select the language that you want the TV Menu to
appear in.
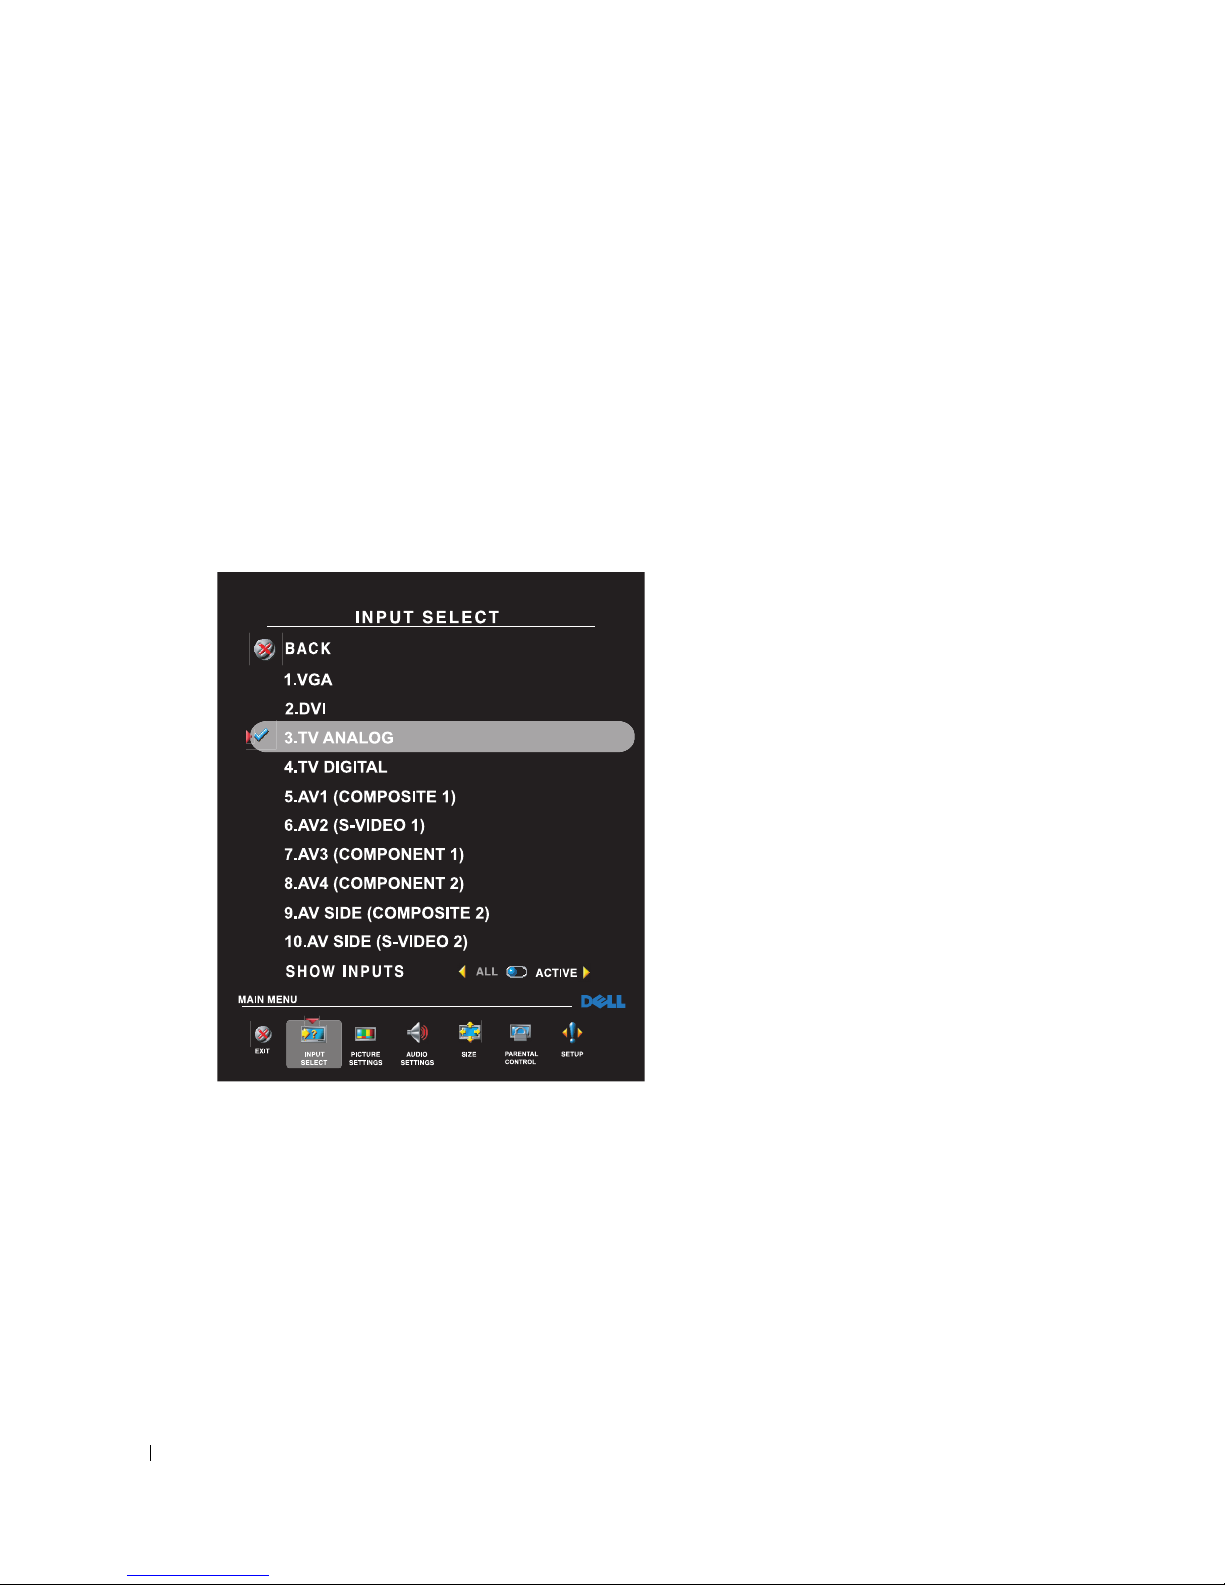
Input Select Menu
The
Input Select
menu allows you to choose the proper source based on how you have your LCD
TV display and video equipment connected. Press
Input
on the remote to go directly to the
Input
Select
menu. You can also press
Menu
and select
Input Select
from the main menu.
VGA — Select when your LCD TV display is being
used as a computer monitor and you have
connected the computer using a VGA cable. See
"Bottom View" on page 8 for the location of the
VGA connector.
DVI — Select when your LCD TV display is being
used as a computer monitor and you have
connected the computer or when you have
connected a device, such as a DVD player using the
DVI cable. See "Bottom View" on page 8 for the
location of the DVI connector.
TV Analog — Select when you have your analog
antenna or cable TV box connected to the
NTSC/Analog Cable connector. See "Bottom View"
on page 8 for the location of the coaxial connector.
TV Digital — Select when you have your digital
antenna or cable TV box connected to the
HDTV/Digital Cable connector. See "Bottom View"
on page 8 for the location of the coaxial connector.
AV1 (Composite 1) — Select when you have a video device, such as a video game system, connect to
the composite connector. See"Bottom View" on page 8 for the location of the composite connector.
AV2 (S-Video 1) — Select when you have a video device, such as a VCR, connect to the S-Video
connector. See "Bottom View" on page 8 for the location of the S-Video connector.
AV3 (Component 1) — Select when you have a video device, such as a DVD player, connected to the
component connector. See "Bottom View" on page 8 for the location of the component connector.
AV4 (Component 2) — Select when you have a video device, such as a DVD player, connected to the
component connector. See "Bottom View" on page 8 for the location of the component connector.
AV SIDE (Composite 2) — Select when you have a video device, such as a video game system,
connected to the composite connector on the side of the LCD TV display. See "Left Side View" on page 7
Using the TV Menu 25
FILE LOCATION: F:\OEM MODELS\DELL LCD TV\W2607C TV Monitor\W2607C DAO OM\12-13-2005\W2607C DAO
DELL CONFIDENTIAL – PRELIMINARY 12/30/05 – FOR PROOF ONLY
for the location of the composite connector.
AV SIDE (S-Video 2) — Select when you have a video device, such as a VCR, connected to the S-Video
connector on the side of the LCD TV display. See "Left Side View" on page 7 for the location of the SVideo connector
SHOW INPUTS — Show Inputs allows you to select Active or All.
Active automatically searches the
connected input sources.
The available input sources appear in white and input sources that are not
available appear in grey. All shows all the input sources and allows you to select all the input sources even if
you do not have a device connected.
NOTE: In TV Menu Settings, located in the Setup menu, you can set the Input Select to display the
device that you have attached. For example, AV SIDE (S-VIDEO 2) would say DVD when you view the
Input Select menu.
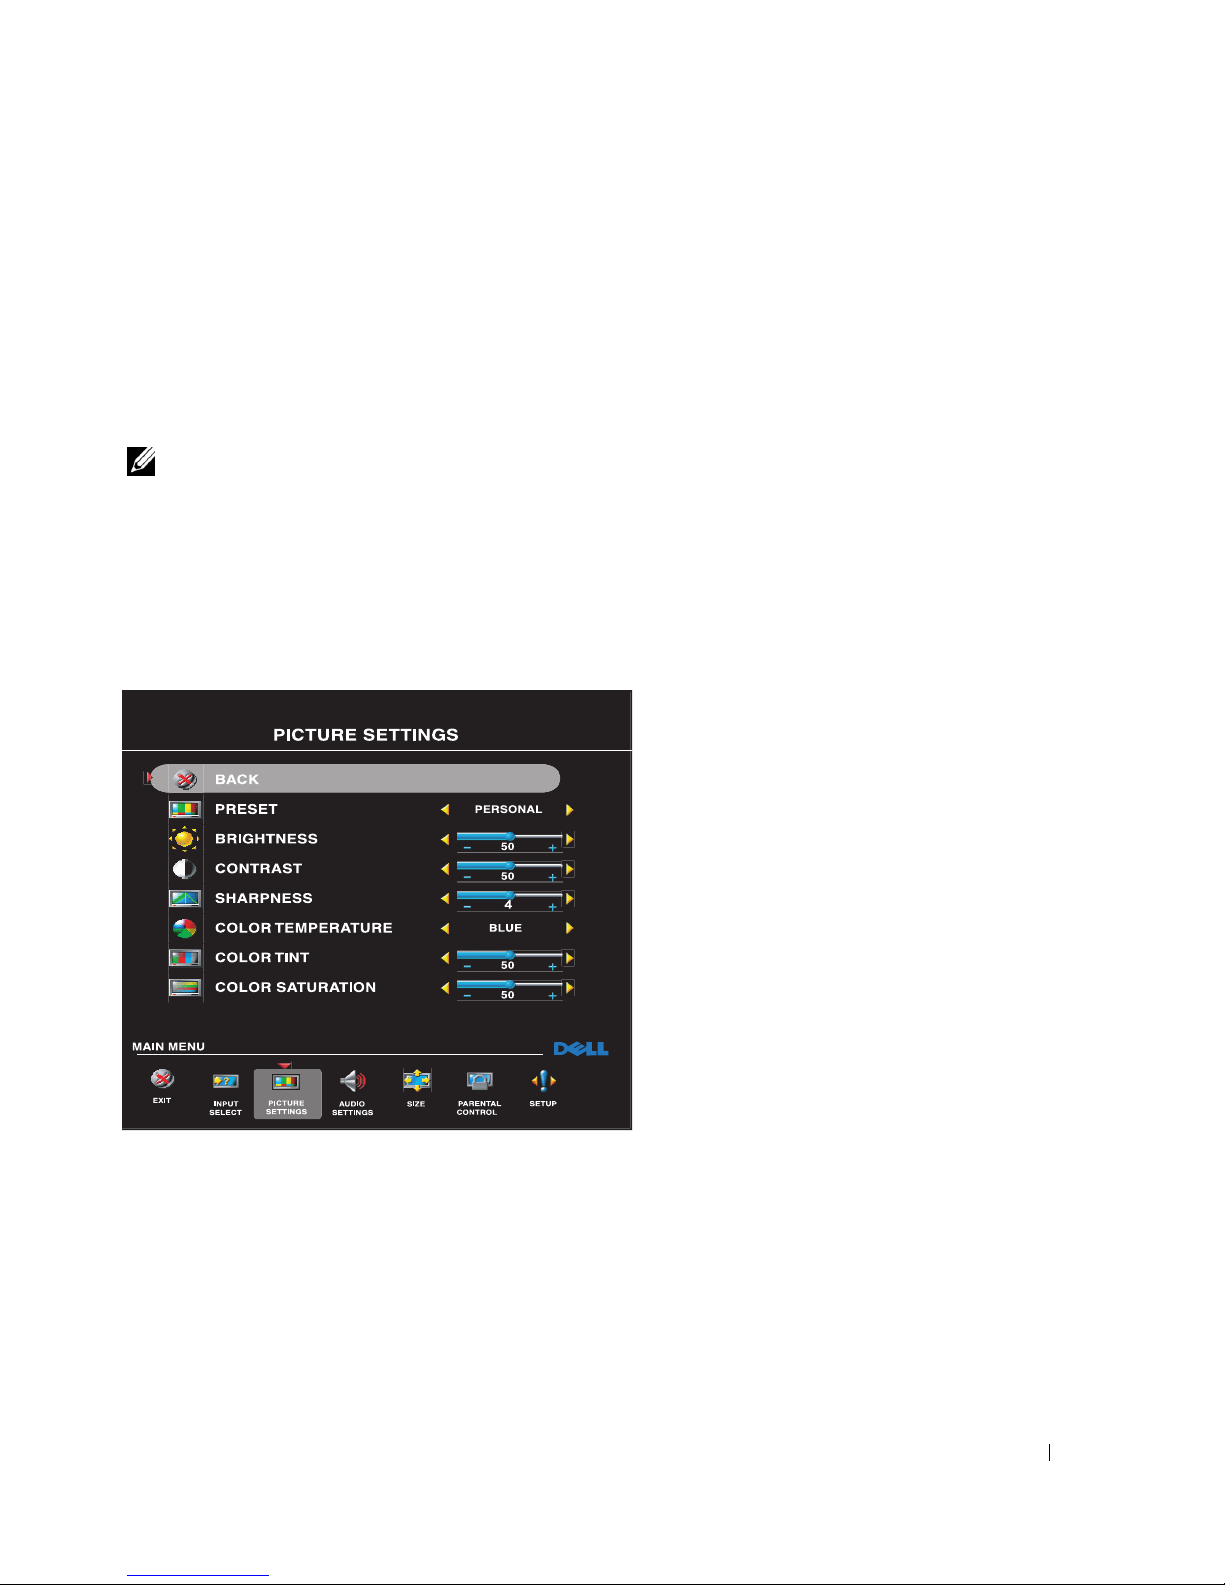
Picture Settings Menu
The
Picture Settings
menu allows you to adjust the appearance of the image including color and
brightness.
If you select one of the following preset
image settings, the individual settings
are automatically updated.
•Movies
•Sports
•Weak Signal
•Multimedia
If you select
Personal
, you can adjust
the individual settings, such as
Brightness
and
Color
.
The color temperature presets are:
Normal: 6500K
Natural: the native panel temperature
Blue: 9300K
Red: 5700K
26 Using the TV Menu
www.dell.com | support.dell.com
FILE LOCATION: F:\OEM MODELS\DELL LCD TV\W2607C TV Monitor\W2607C DAO OM\12-13-2005\W2607C DAO
DELL CONFIDENTIAL – PRELIMINARY 12/30/05 – FOR PROOF ONLY
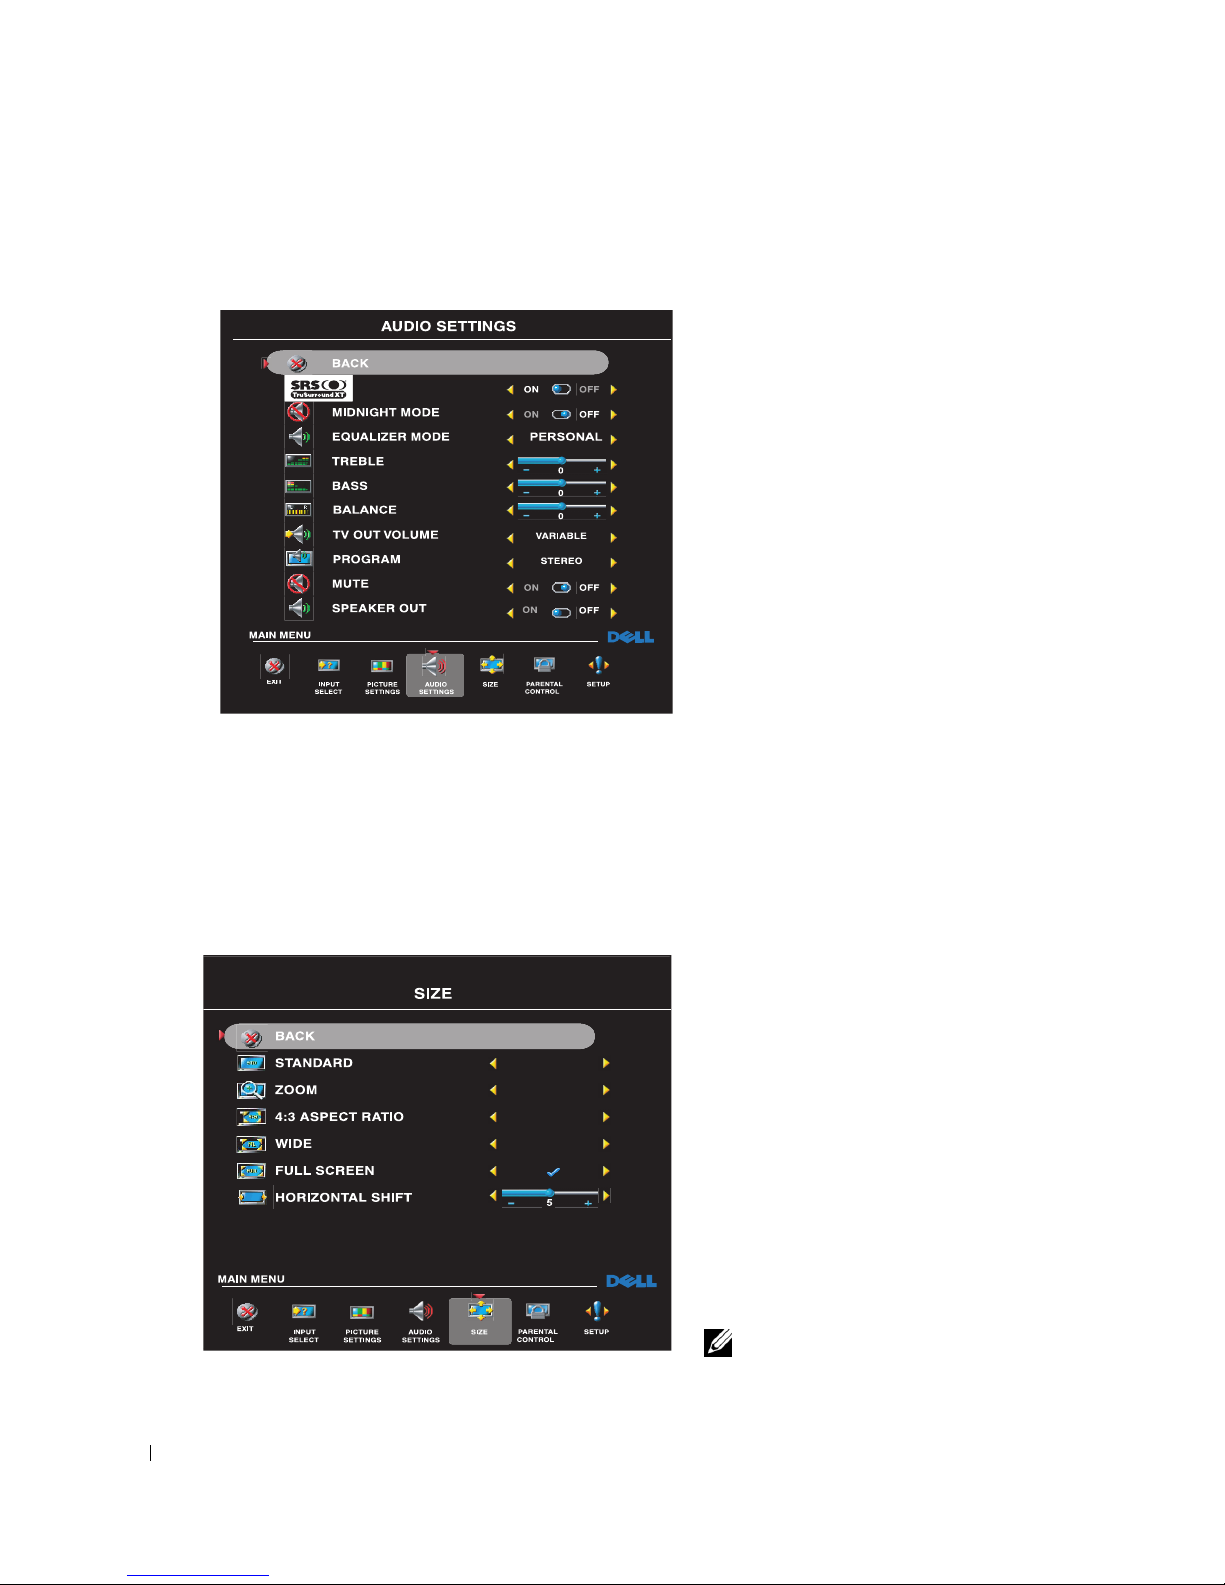
Audio Settings Menu
The
Audio Settings
menu allows you to set the audio to best fit the type of show you are watching.
SRS TruSurround XT— Delivers virtual
surround sound over two speakers from any
source, which creates a wider sound with
deep rich bass.
Midnight Mode — Evens out the large
volume variations between voice and action
scenes.
If you select one of the following preset
Equalizer Mode
settings, the individual
audio levels are automatically updated:
•Music
•Theater
•Voice
If you select
Personal
, you can adjust the
individual audio levels, such as
Bass
and
Tre bl e
.
Use
Program
to select
Stereo, Mono
, or
SAP
(Second Audio Program).
Size Menu
Size
menu allows you to adjust the appearance of the image. Use
Horizontal Shift
to adjust the
horizontal placement of the image.
Use the following settings to adjust the
aspect ratio:
Standard
— Best selection for viewing
digital HDTV, 16:9 or 22:9 DVD movies.
Zoom
— Best selection for viewing TV,
VCR or 4:3 DVD movie.
4:3
— Best selection for viewing TV, VCR or
4:3 DVD movie.
Wide
— Best selection for viewing digital
HDTV, 16:9 and 22:9 DVD movies.
Full screen
— Best selection for viewing
digital HDTV or 16:9 DVD movies.
NOTE:
Most DVDs have information about
the supported aspect ratio on the case.
Using the TV Menu 27
FILE LOCATION: F:\OEM MODELS\DELL LCD TV\W2607C TV Monitor\W2607C DAO OM\12-13-2005\W2607C DAO
DELL CONFIDENTIAL – PRELIMINARY 12/30/05 – FOR PROOF ONLY
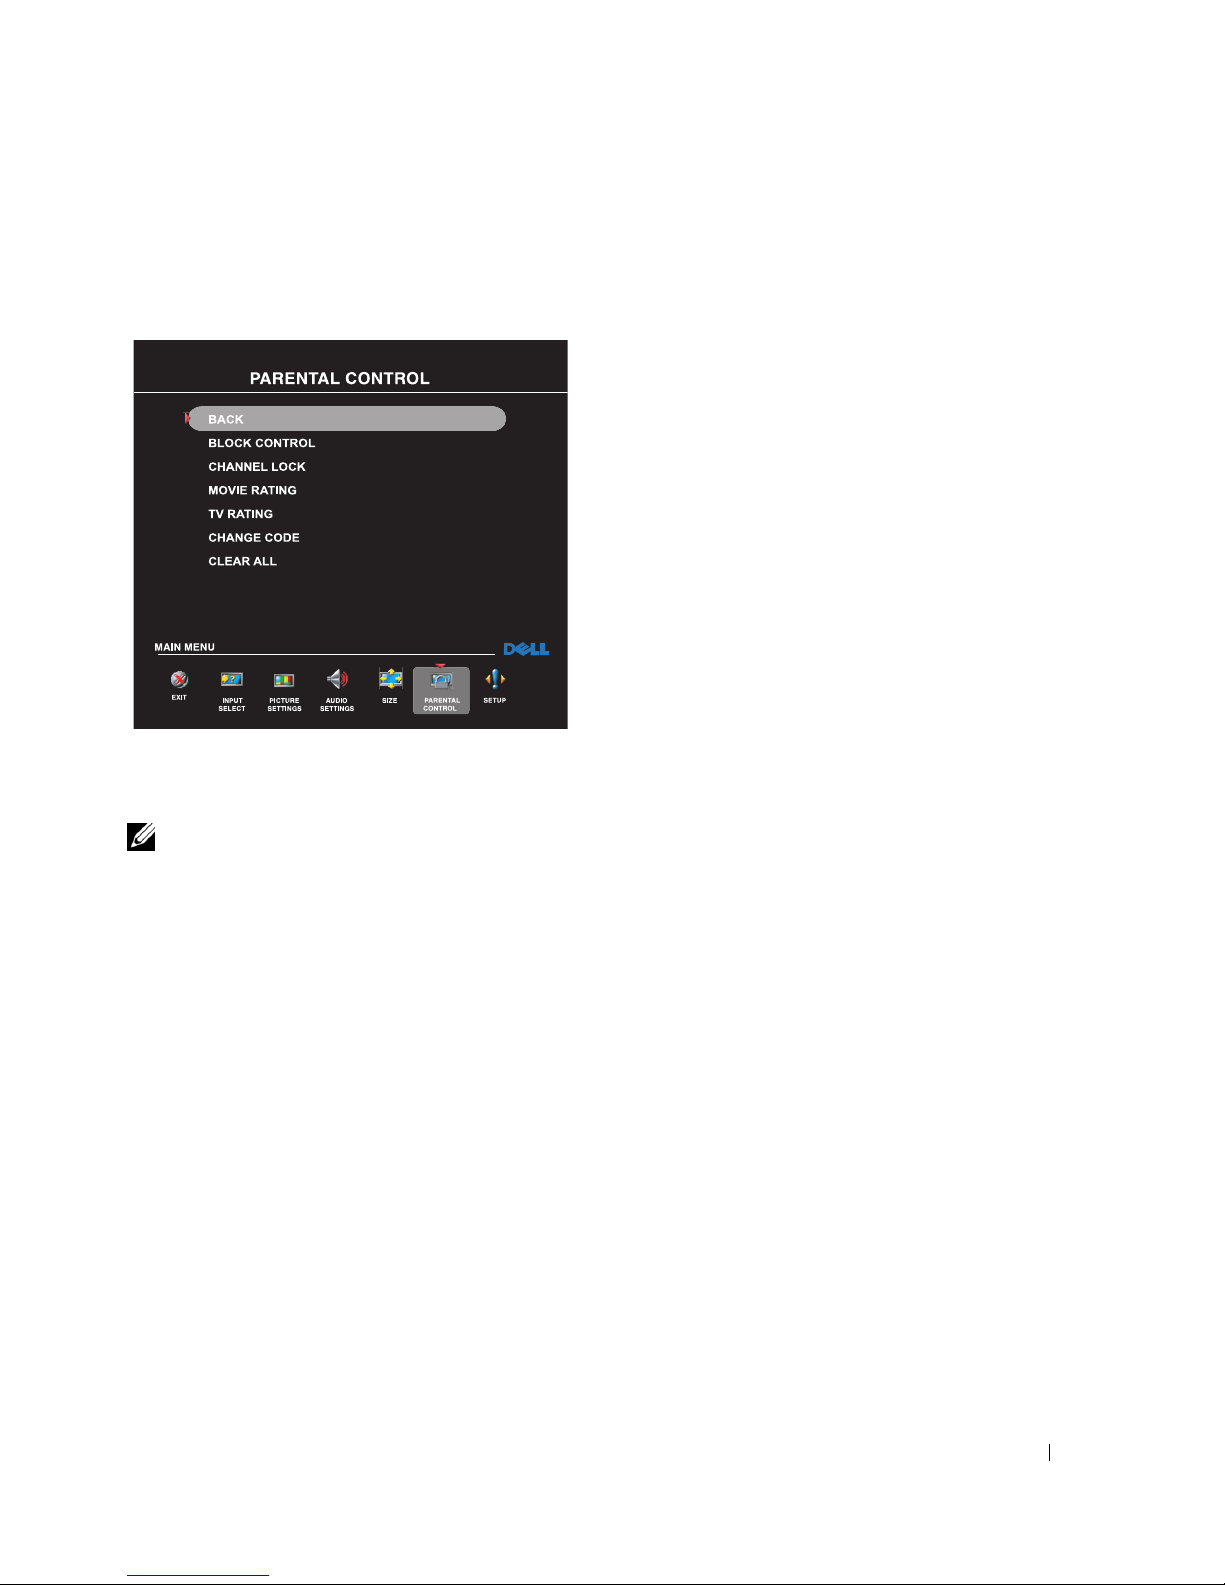
Parental Control
Parental Control allows you to restrict access of inappropriate channels and programs to
children.
To enter the
Parental Control
menu, you need
an access code. The first time you enter, use
access code
3355
. See "Setting an Access
Code" on page 27 for information on creating a
new access code.
You can set the following options to
block content:
•
Channel Lock
— Blocks selected
channels
•
Movie Rating
— Blocks movies based
on their rating (G, PG, PG-13, R,
NC-17, and X)
•
TV Ratings — Blocks TV shows based
on their rating
•
Block
Control
— Turns on or off all
your parental control settings
NOTE: You can use Clear All to unblock the channels and programs that you have set.
Setting an Access Code
After you enter the
Parental Contro
l menu for the first time, you can set your own four-digit access
code. If for any reason you lose or forget your access code, you can
press channel down and volume
decrease simultaneously
.
1
In the
Parental Control
menu, select
Change Code
.
2
Using the number pad on the remote control, enter a new access code.
3
Select
Exit
.
28 Using the TV Menu
www.dell.com | support.dell.com
FILE LOCATION: F:\OEM MODELS\DELL LCD TV\W2607C TV Monitor\W2607C DAO OM\12-13-2005\W2607C DAO
DELL CONFIDENTIAL – PRELIMINARY 12/30/05 – FOR PROOF ONLY
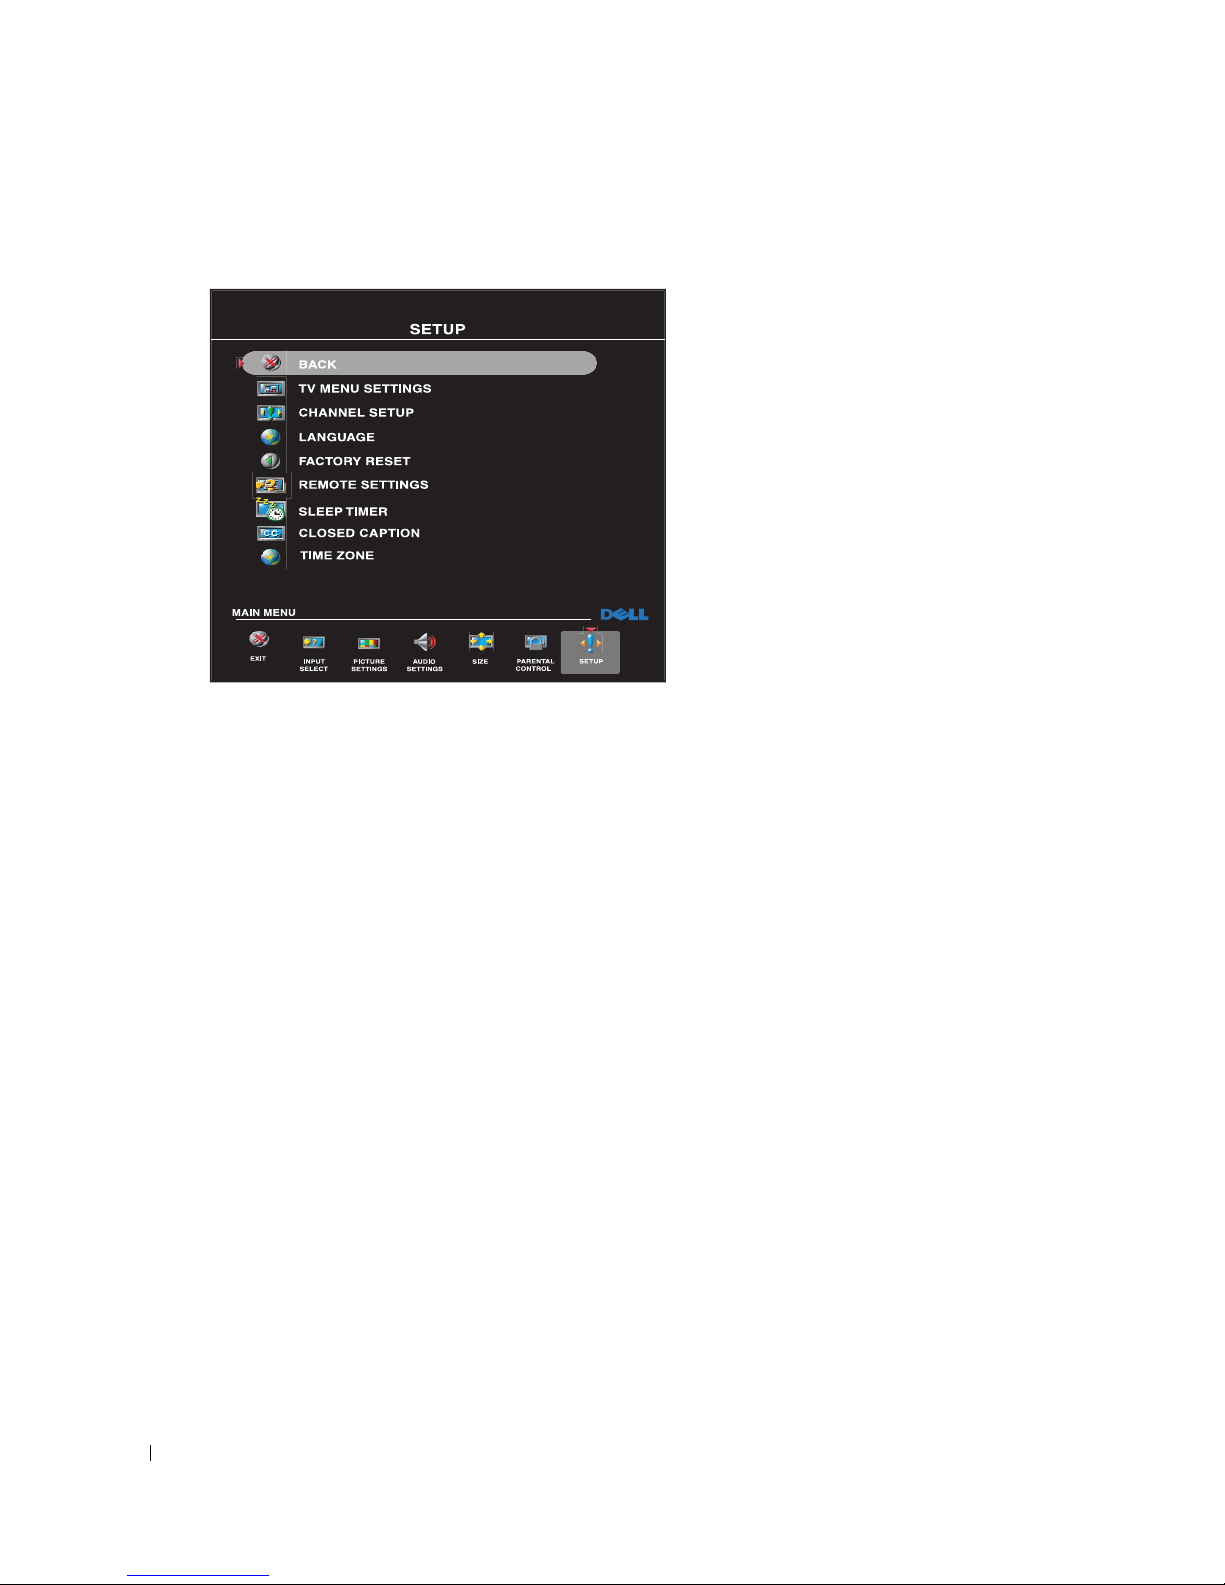
Setup Menu
Setup
menu allows you to adjust the
appearance of the TV Menu, to change the
language of the TV Menu (see "Selecting
Your TV Menu Language" on page 24) and
to restore factory settings.
Use
TV Menu Hold Time
to increase or
decrease the amount of time the TV Menu
appears. The maximum amount of time is
60 seconds.
In the
TV Menu Settings
menu you can
select
TV Button lock
to lock the TV
Menu and the side panel buttons. When
this option is enabled, only the power
button functions. To unlock the TV Menu
and side panel buttons:
1. Press the Menu button on the TV.
A message appears stating that the TV is locked.
2. While the message is on the TV, press the channel up and volume increase button
simultaneously.
Using the TV Menu 29
FILE LOCATION: F:\OEM MODELS\DELL LCD TV\W2607C TV Monitor\W2607C DAO OM\12-13-2005\W2607C DAO
DELL CONFIDENTIAL – PRELIMINARY 12/30/05 – FOR PROOF ONLY
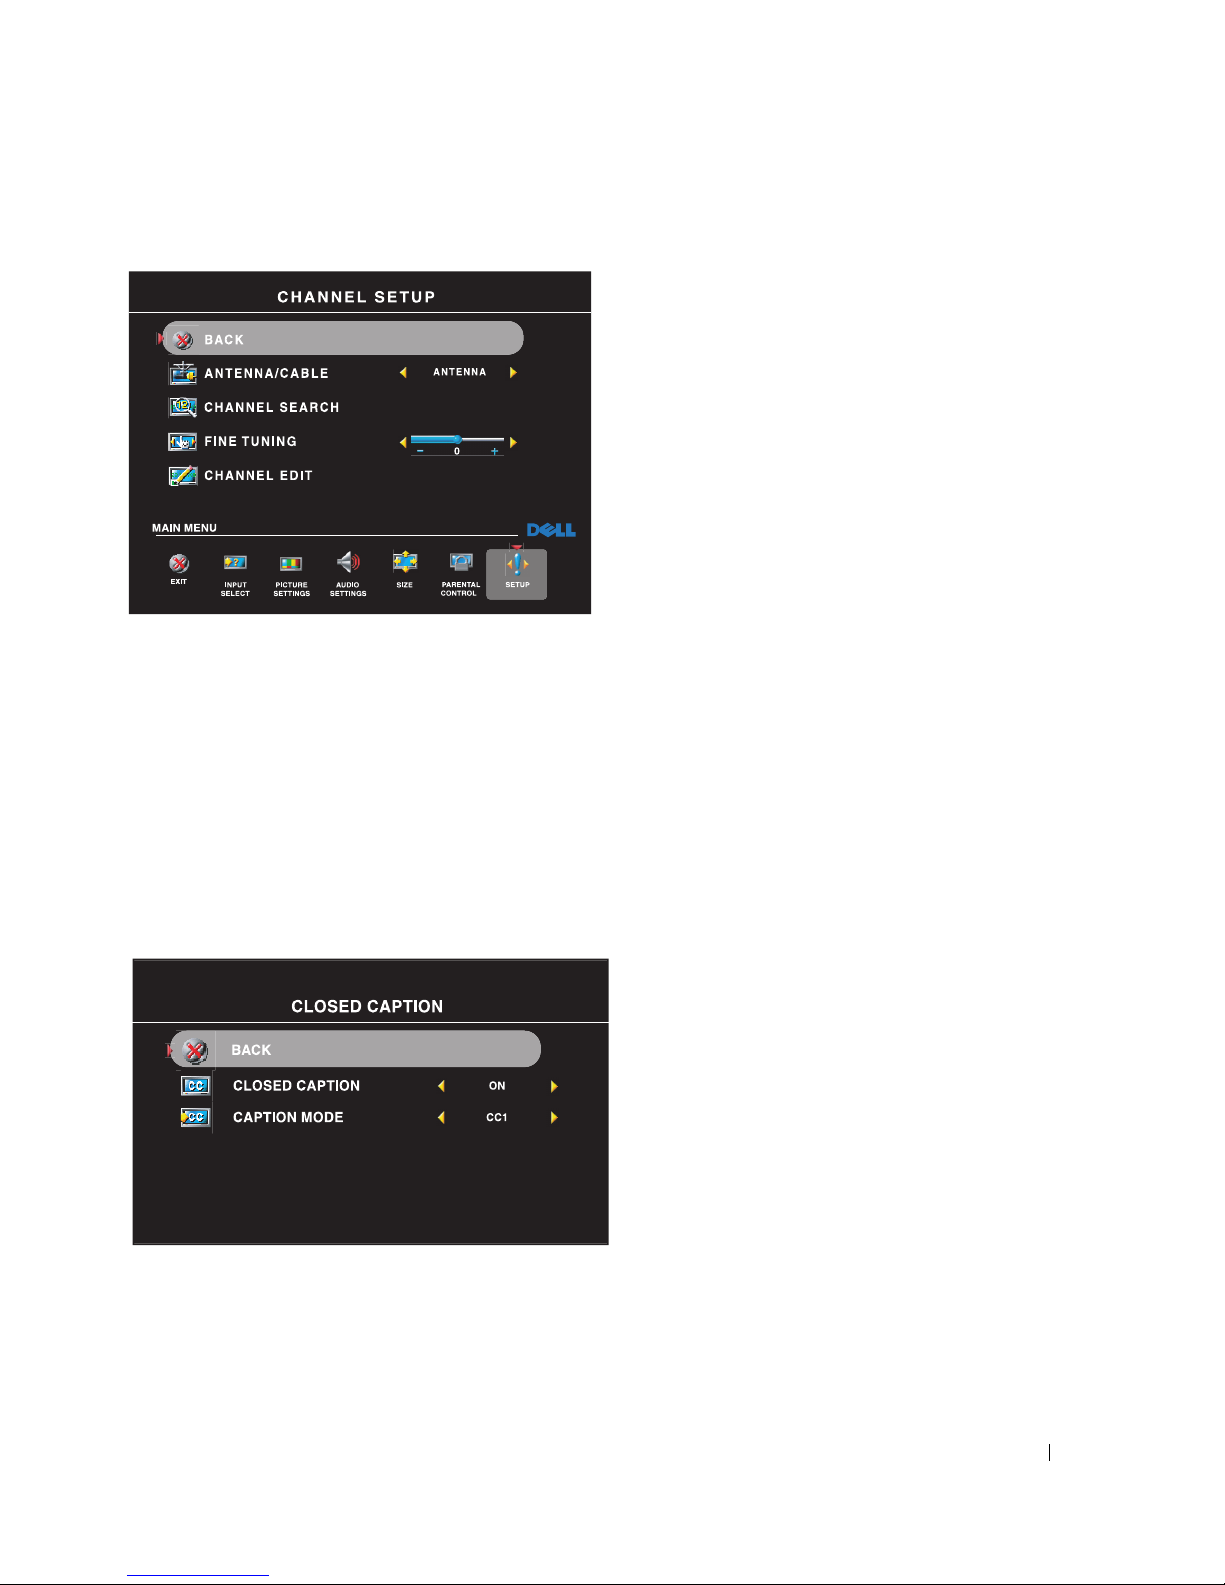
Setting Your Cable Channels
Your TV is set to automatically detect
whether you are using an antenna or cable
and then set the available channels. Some
cable providers use an older cable standard
that the TV can not automatically detect. If
you have your TV connected but can only
view channels 5 and 6, complete the
following steps:
1
Press the
Menu
button on the remote
control, or TV to enter the TV Menu.
2
Select
Setup
and then select
Channel
Setup.
3
In
Channel Setup
, select
Antenna/Cable
, and then toggle to
Cable
.
4
If selecting
Cable
does not resolve the issue, repeat steps 1 through step 3 using each available
Channel Setup
option (
HRC, IRC,
and
Antenna)
until you can view all channels.
Sleep Timer
Sleep Timer
allows you to select an increment of time after which the LCD TV display turns off
automatically. You can select from 10 minutes to 3 hours.
Closed Caption
In the
Closed Caption
menu, you can
select On, Off, or Mute. If you select
Mute, CC automatically displays when
you use the
Mute
button on the remote
control.
You can choose from the following modes:
•CC1 through CC4 and TXT1 through
TXT4 (CC1, CC2, and CC4 offer
standard C1osed Captioning and CC3
provides closed captioning in a secondary
language.)

30 Troubleshooting Your LCD TV Display
www.dell.com | support.dell.com
5
Troubleshooting Your LCD TV Display
CAUTION: If at any time you see smoke or sparks coming from your TV display, unplug the TV display
immediately and contact Dell. Do not try to perform any troubleshooting steps.
Troubleshooting Tips
NOTE: Some problems may be related to your device. See the documentation for any devices connected
to your LCD TV display.
Most problems with your LCD TV display may be caused by not having the correct input source
selected. Each connector on the LCD TV display is associated with an input source, which are
labeled
AV1
through
AV SIDE (S-Video 2)
in the
Input Select
menu.
•
AV1 (
Composite
1)— Composite connector on the bottom of the LCD TV display
•
AV2 (
S-Video 1)— S-Video connector on the bottom of the LCD TV display
•
AV3 (
Component 1)— Component connector on the bottom of the LCD TV display
•
AV4 (
Component 2)— Component connector on the bottom of the LCD TV display
•
AV SIDE (
Composite 2)— Composite connector on the side of the LCD TV display
•
AV SIDE (
S-Video 2)— S-Video connector on the side of the LCD TV display
You can also select the following input sources:
•
TV Analog — NTSC/Analog Cable connector on the bottom of the LCD TV display
•
TV Digital — HDTV/Digital Cable connector on the bottom of the LCD TV display
•
VGA
— VGA connector on the bottom of the LCD TV display
•
DVI
— DVI connector on the bottom of the LCD TV display
 Loading...