

Page 1
Notes, Notices, and Cautions
NOTE: A NOTE indicates important information that helps you make better use of your TV.
NOTICE: A NOTICE indicates either potential damage to hardware or loss of data and tells you how to avoid the
problem.
CAUTION: A CAUTION indicates a potential for property damage, personal injury, or death.
____________________
Information in this document is subject to change without notice.
© 2004 Dell Inc. All rights reserved.
Reproduction in any manner whatsoever without the written permission of Dell Inc. is strictly forbidden.
Trademarks used in this text: Dell, the DELL logo; TruSurround XT, SRS, and (o) symbol are trademarks of SRS Labs, Inc.;
Microsoft and Windows are registered trademarks of Microsoft Corporation.
Other trademarks and trade names may be used in this document to refer to either the entities claiming the marks and names or their products.
Dell Inc. disclaims any proprietary interest in trademarks and trade names other than its own.
August 2004 Rev. A00
Page 2

Contents
1 About Your TV
Front View. . . . . . . . . . . . . . . . . . . . . . . . . . . . . . . . . 5
Right Side View
Left Side View
Bottom View
Package Contents
Caring for Your TV
. . . . . . . . . . . . . . . . . . . . . . . . . . . . . . 6
. . . . . . . . . . . . . . . . . . . . . . . . . . . . . . . 7
. . . . . . . . . . . . . . . . . . . . . . . . . . . . . . . . 8
. . . . . . . . . . . . . . . . . . . . . . . . . . . . . 9
. . . . . . . . . . . . . . . . . . . . . . . . . . . . . 11
2 Setting Up Your TV
Proper Location for Your TV . . . . . . . . . . . . . . . . . . . . . . . . 13
Connecting Your TV
. . . . . . . . . . . . . . . . . . . . . . . . . . . . 13
3 Your Remote Control
Installing Batteries . . . . . . . . . . . . . . . . . . . . . . . . . . . . 21
Using Your Remote Control
Using Your TV With a Universal or Learning Remote Control
. . . . . . . . . . . . . . . . . . . . . . . . . 22
. . . . . . . . . 24
4 Using the On-Screen Display
Using Your Remote Control With the OSD . . . . . . . . . . . . . . . . . . 25
Selecting Your OSD Language
Input Select Menu
Picture Menu
Audio
. . . . . . . . . . . . . . . . . . . . . . . . . . . . . . . . . . . 28
PIP/POP/PBP
. . . . . . . . . . . . . . . . . . . . . . . . . . . . . 26
. . . . . . . . . . . . . . . . . . . . . . . . . . . . . . . 27
. . . . . . . . . . . . . . . . . . . . . . . . . . . . . . . 28
. . . . . . . . . . . . . . . . . . . . . . . 26
Contents 3
Page 3

Parental Control . . . . . . . . . . . . . . . . . . . . . . . . . . . . . . 29
Closed Caption
Sleep Timer
OSD Setup
Card Reader
. . . . . . . . . . . . . . . . . . . . . . . . . . . . . . 30
. . . . . . . . . . . . . . . . . . . . . . . . . . . . . . . . 30
. . . . . . . . . . . . . . . . . . . . . . . . . . . . . . . . . 31
. . . . . . . . . . . . . . . . . . . . . . . . . . . . . . . . 31
5 Troubleshooting Your TV
Troubleshooting Tips. . . . . . . . . . . . . . . . . . . . . . . . . . . . 33
General Problems
OSD Messages
Remote Control Problems
Problems With the Card Reader
. . . . . . . . . . . . . . . . . . . . . . . . . . . . . 34
. . . . . . . . . . . . . . . . . . . . . . . . . . . . . . 38
. . . . . . . . . . . . . . . . . . . . . . . . . 39
. . . . . . . . . . . . . . . . . . . . . . 39
Using the Self-Test Feature When Your TV is Connected
to Your Computer
Problems When Using the TV as a Monitor
. . . . . . . . . . . . . . . . . . . . . . . . . . . . . 40
. . . . . . . . . . . . . . . . . 40
6 Specifications for Your TV
Index
4 Contents
. . . . . . . . . . . . . . . . . . . . . . . . . . . . . . . . . . . . 47
Page 4
About Your TV
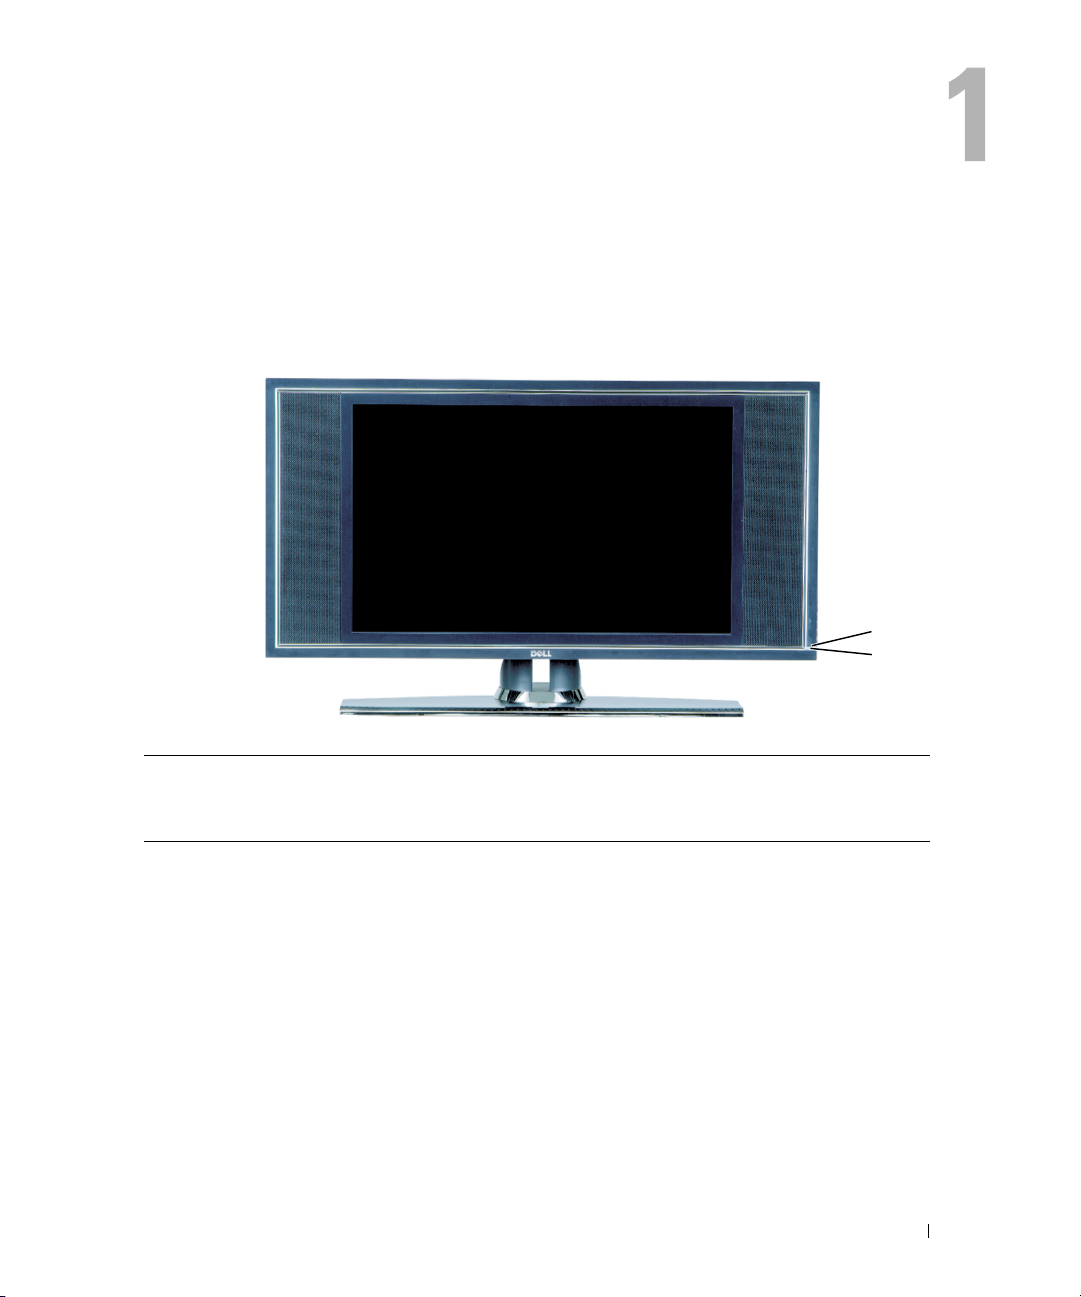
Front View
1
2
1 IR receiver Senses the signal from the remote control
2 Power indicator light (LED) The light is blue when the TV is on and amber when the TV is
in power save mode
About Your TV 5
Page 5
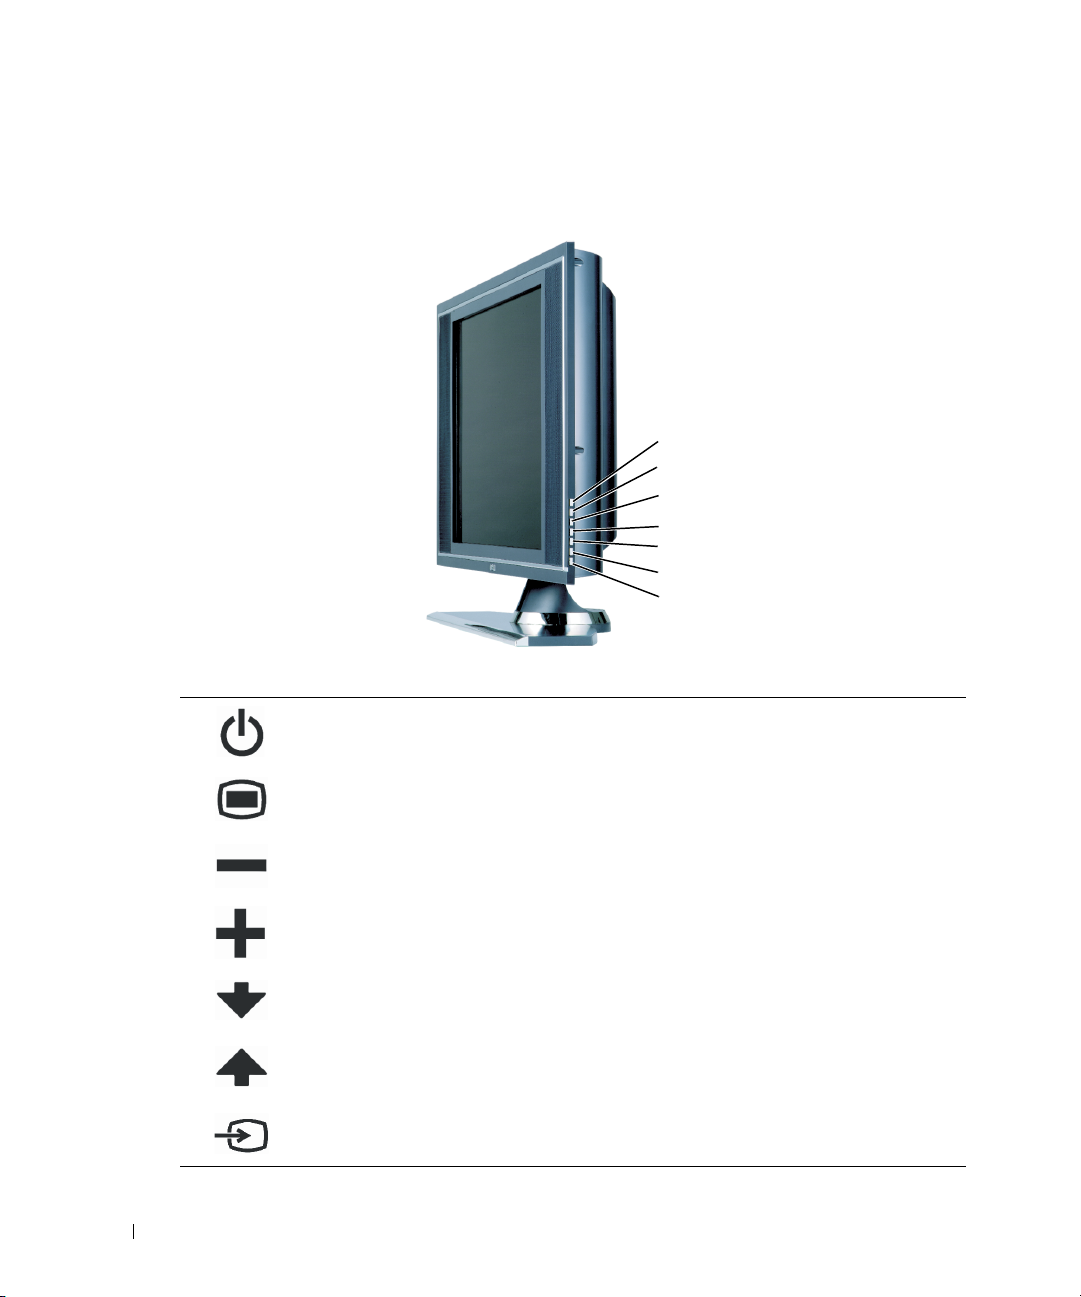
Right Side View
www.dell.com | support.dell.com
1 Power button Push to turn the TV on and off
2 OSD menu button Push to enable the on-screen display (OSD)
3 Volume button Push to decrease the volume or navigate through the on-screen
4 Volume button Push to increase the volume or navigate through the OSD
5 Channel button Push to select the previous channel or navigate through the
display (OSD)
OSD
7
6
5
4
3
3
2
1
6 Channel button Push to select the next channel or navigate through the OSD
7 Input Source button Push to display the Input Source menu
6 About Your TV
Page 6
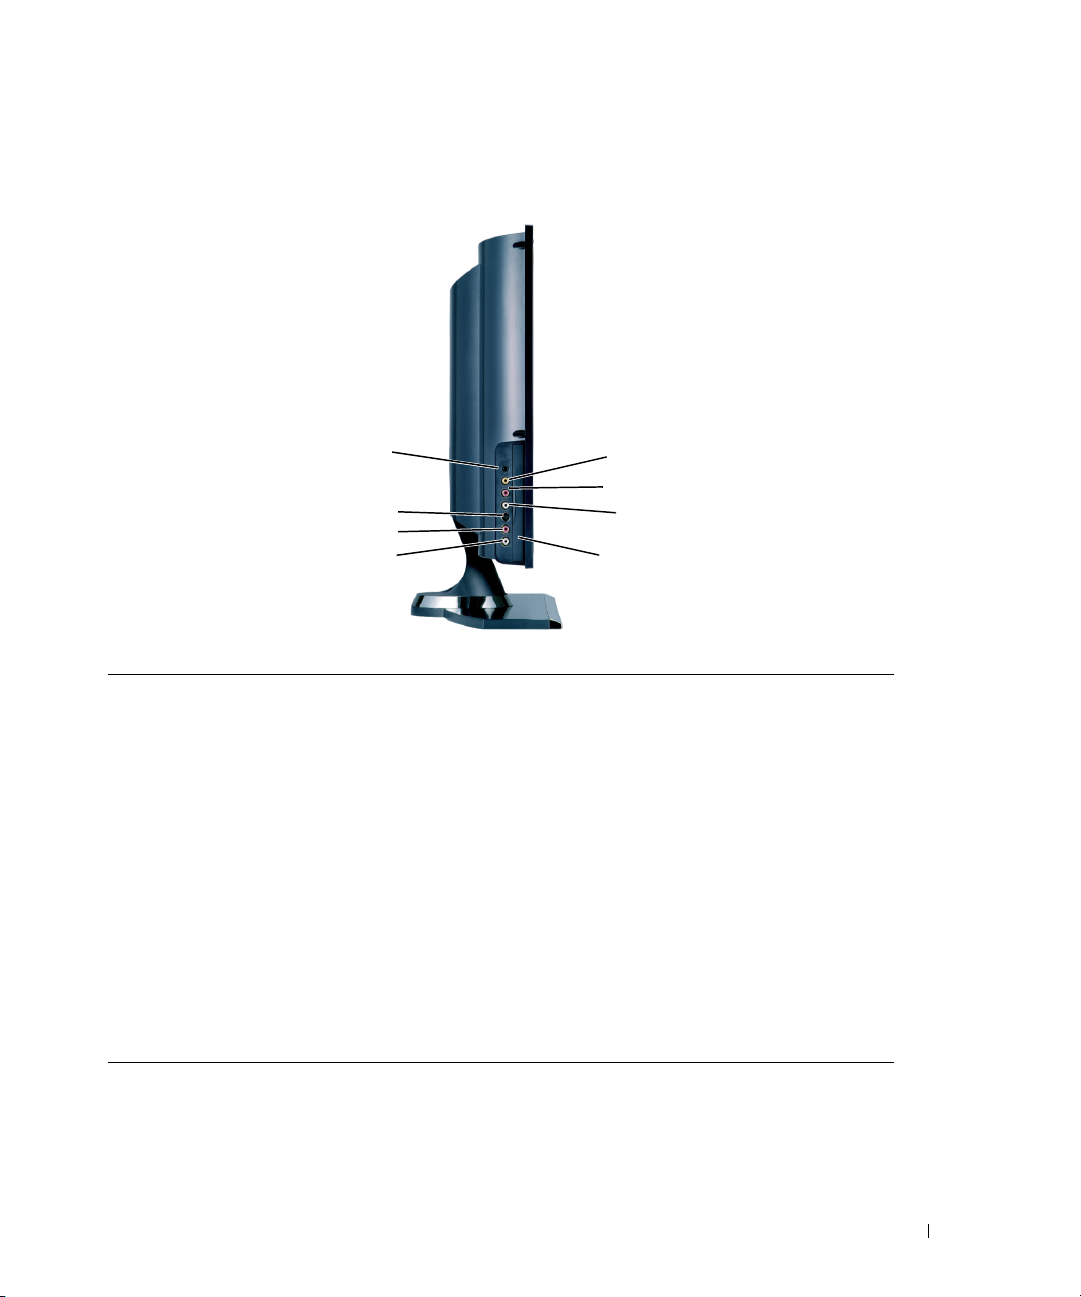
Left Side View
8
7
6
5
1 Composite video connector (AV1) Use the side composite connector for devices you connect
occasionally such as a video game system
2 R (composite right audio
connector)
3 L (composite left audio connector) Use the audio connector if you have connected a device to
4 Card reader panel Remove this panel if you are installing a card reader
5 L (S-Video left audio connector) Use the audio connector if you have connected a device to the
6 R (S-Video right audio connector) Use the audio connector if you have connected a device to S-
7 S-Video connector (AV3) Use the side S-Video connectors for devices that you connect
8 Headphone connector Connect headphones
Use the audio connector if you have connected a device to
composite connector (AV1)
composite connector (AV1)
S-Video connector (AV3)
Video connector (AV3)
occasionally, such as a camcorder
1
2
3
4
About Your TV 7
Page 7
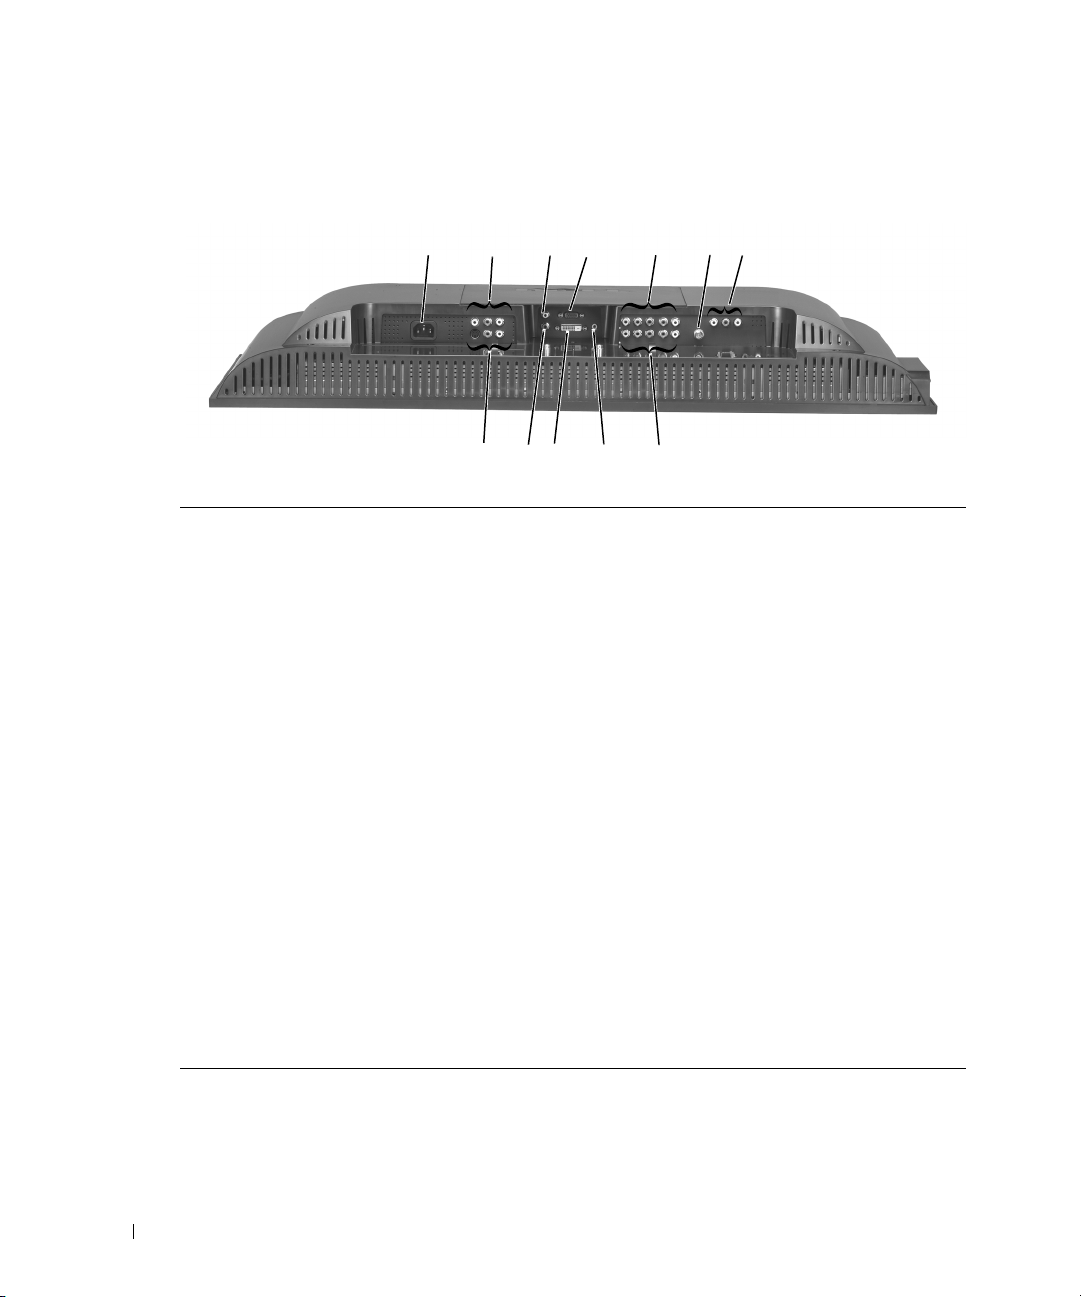
Bottom View
www.dell.com | support.dell.com
1 Power connector Connect your power cord.
2 Composite video and audio
connector (AV2)
3 DVI audio connector (L) Use the DVI audio connector if you have connected a device to
4 VGA connector Use the VGA connector to use your TV as a monitor for your
5 Component audio and video
connectors (AV6)
6 ANT/Cable Connect an antenna or cable box.
7 Composite Audio/Video Out
connector
8 Component audio and video
connector (AV5)
9 Audio connector for your computer Connect the audio cable from your computer to the TV.
10 DVI connector Connect devices such as a DVD player, set-top box, or your
11 DVI audio connector (R) Use the DVI audio connector if you have connected a device to
12 S-Video connector (AV4) Connect devices such as a video game system or a DVD player.
12
12
Connect devices such as a VCR or DVD player.
the DVI connector.
computer.
Connect devices such as a DVD player, satellite or cable box.
Connect a device such as a VCR if you have connected an
antenna or cable through the ANT/Cable connector.
Connect devices such as a DVD player, satellite or cable box.
computer.
the DVI connector.
4
5
891011
7
63
8 About Your TV
Page 8
Package Contents
NOTE: Component cables are not included with the TV. If you need additional cables, contact Dell.
Remote Control
AAA batteries (2)
Power Cable
S-Video cable
About Your TV 9
Page 9
Audio cable (2)
Composite cable
www.dell.com | support.dell.com
DVI cable
VGA cable
10 About Your TV
Page 10
Documentation
Caring for Your TV
CAUTION: Only a licensed technician should service the TV. Do not disassemble the TV.
NOTE: Before cleaning the TV, unplug it from the electrical outlet.
• To clean the surface of the panel, lightly dampen a soft, clean, lint-free cloth with water.
• To clean the TV cabinet, use a cloth lightly dampened with a mild detergent.
• Do not use chemicals such as benzene, thinner, ammonia, or any type of abrasive cleaner.
• Do not use compressed air to clean the TV.
About Your TV 11
Page 11

www.dell.com | support.dell.com
12 About Your TV
Page 12
Setting Up Your TV
CAUTION: Before you begin any of the procedures in this section, follow the safety instructions
located in the Product Information Guide.
Proper Location for Your TV
Consider the following environmental factors when you are deciding where to put your TV:
• Do not store or use the TV in locations that are exposed to high heat, direct sunlight, or
extreme cold.
• Avoid moving the TV between locations with extreme temperature differences. For more
information, see Specifications.
• Do not subject the TV to severe vibration or high impact conditions. Do not place the TV
inside a car trunk.
• Do not store or use the TV in locations where the TV would be exposed to high humidity or
dusty environment.
• Do not place the TV in a location where water or other liquids could spill on or into the TV.
Connecting Your TV
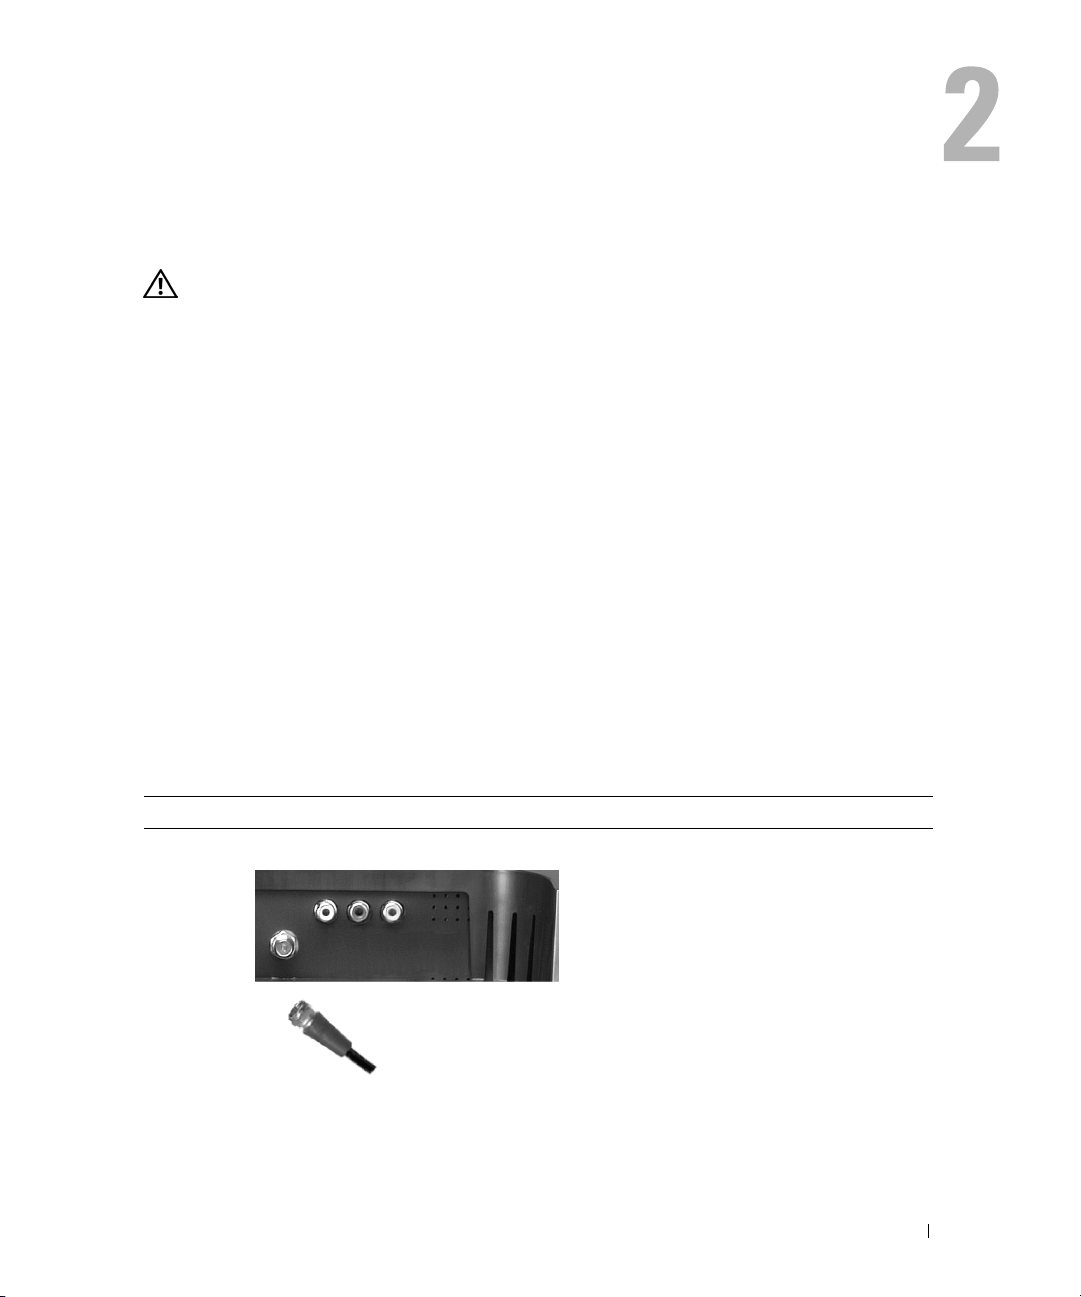
Your TV has five types of standard connectors.
Quality Cable and Connector When to Use
Good Coaxial (RF) carries the video and audio
through a single cable. The coaxial connector
is labeled ANT/Cable on your TV. To locate
the connector, see "Bottom View" on page 8.
Setting Up Your TV 13
Page 13
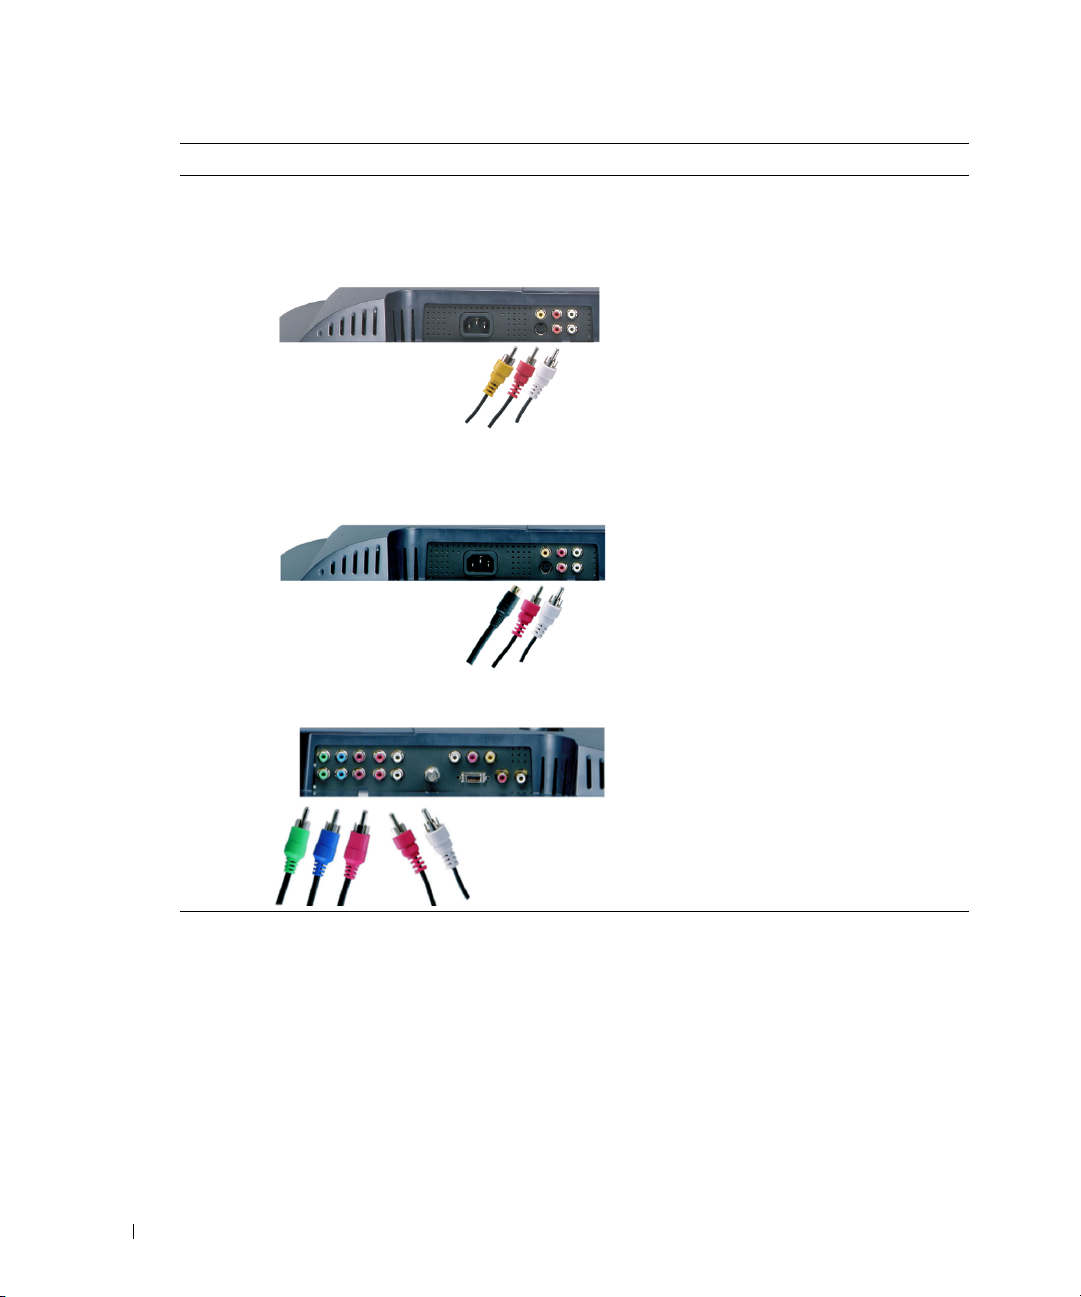
Quality Cable and Connector When to Use
Good Composite carries the video signal through a
www.dell.com | support.dell.com
Better S-Video splits the video signal into two
Best Component splits the video signal into three
single cable. If you are using a composite
video connector, you also need to connect
composite audio cables. To locate the
connector, see "Left Side View" on page 7 and
"Bottom View" on page 8.
signals, black-and-white and color. If you are
using an S-Video connector, you also need to
connect the AV cables for audio.To locate the
connectors, see "Left Side View" on page 7
and "Bottom View" on page 8."
signals, two color and one black-and-white.
Ensure that you connect all five cables. To
locate the connector, see "Bottom View" on
page 8.
14 Setting Up Your TV
Page 14
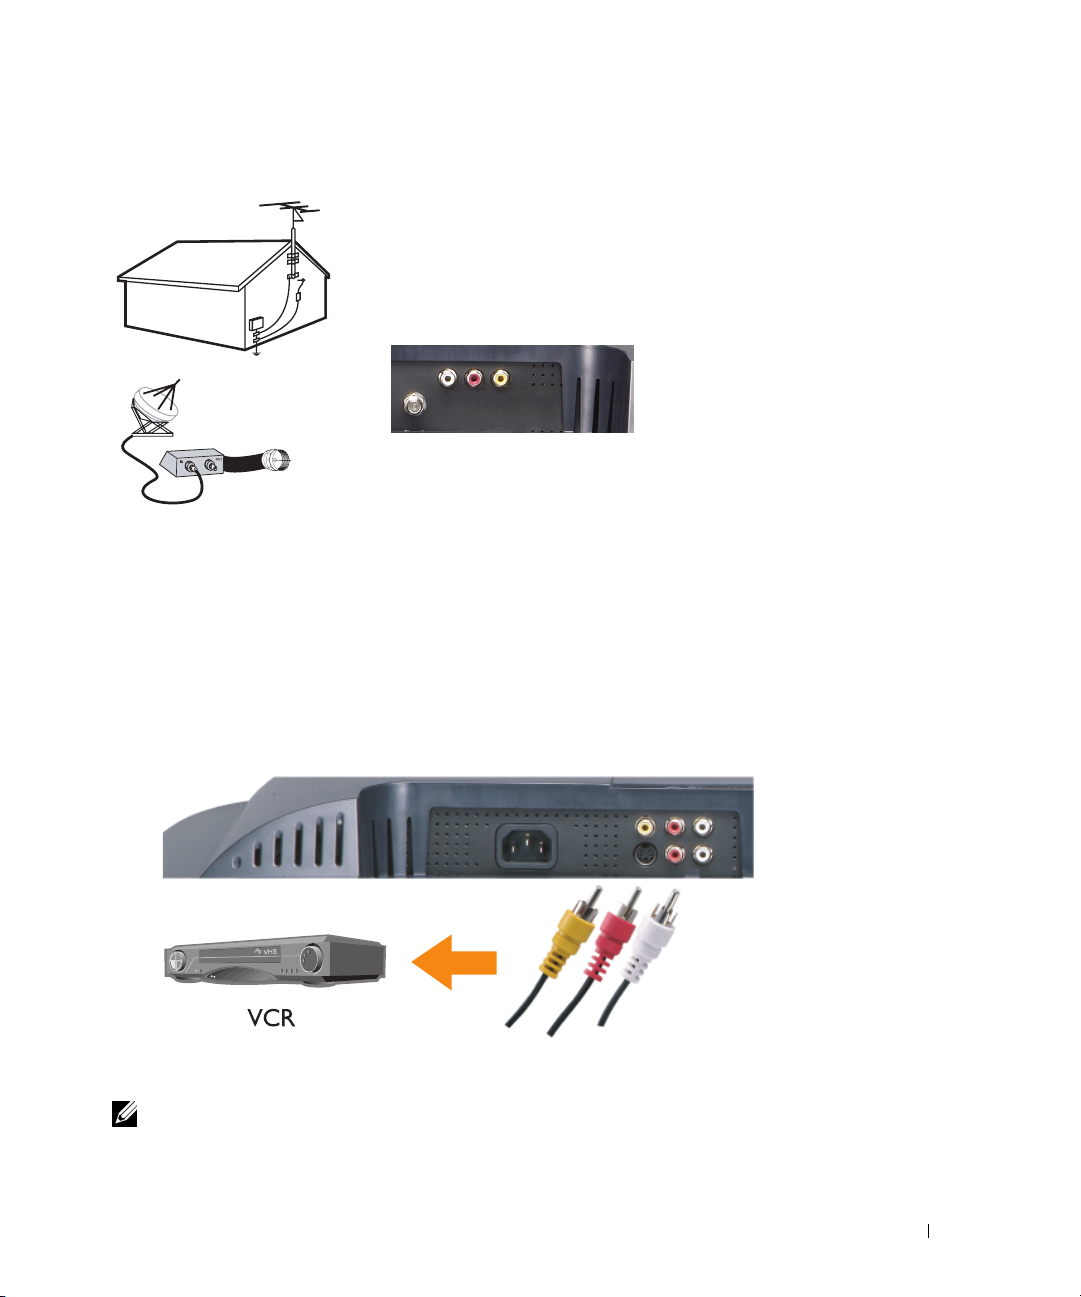
Using the ANT/Cable (Coaxial) Connector
1
Turn off the TV and unplug the power cord.
2
Connect the coaxial cable to the ANT/Cable connector of the TV.
3
Plug in the power cord for the TV and turn on the TV.
4
Enter the on-screen display (OSD) and select TV. See "Input Select Menu" on page 26.
Using the Composite Video Connector
1
Turn off the TV and unplug the power cord.
NOTE: If you are connecting a device that you want to be able to remove, such as a camcorder, use the
composite video connector on the side of the TV.
Setting Up Your TV 15
Page 15
2
Connect your device including the audio cables.
3
Plug in the power cords for the TV and devices and turn them on.
4
Enter the OSD and select the proper composite input. See "Input Select Menu" on page 26.
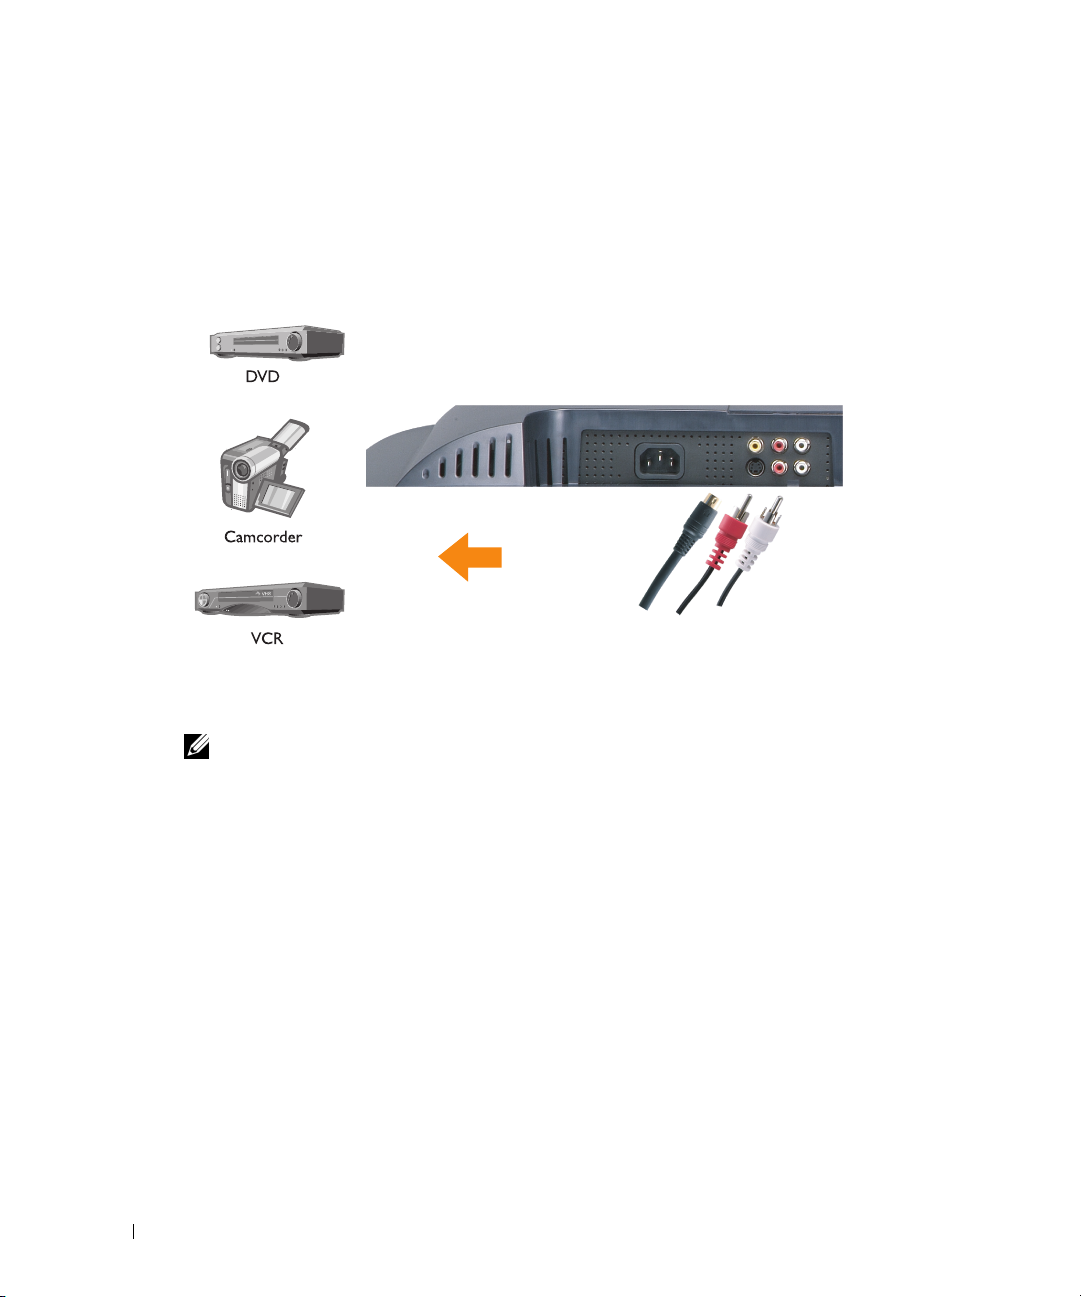
Using the S-Video Connector
www.dell.com | support.dell.com
1
Turn off the TV and unplug the power cord.
NOTE: If you are connecting a device that you want to be able to remove, such as a camcorder, use the
S-Video connector on the side of the TV.
Connect your device including the audio cables.
2
3
Plug in the power cords for the TV and devices and turn them on.
4
Enter the OSD and select the proper S-Video input. See "Input Select Menu" on page 26.
16 Setting Up Your TV
Page 16
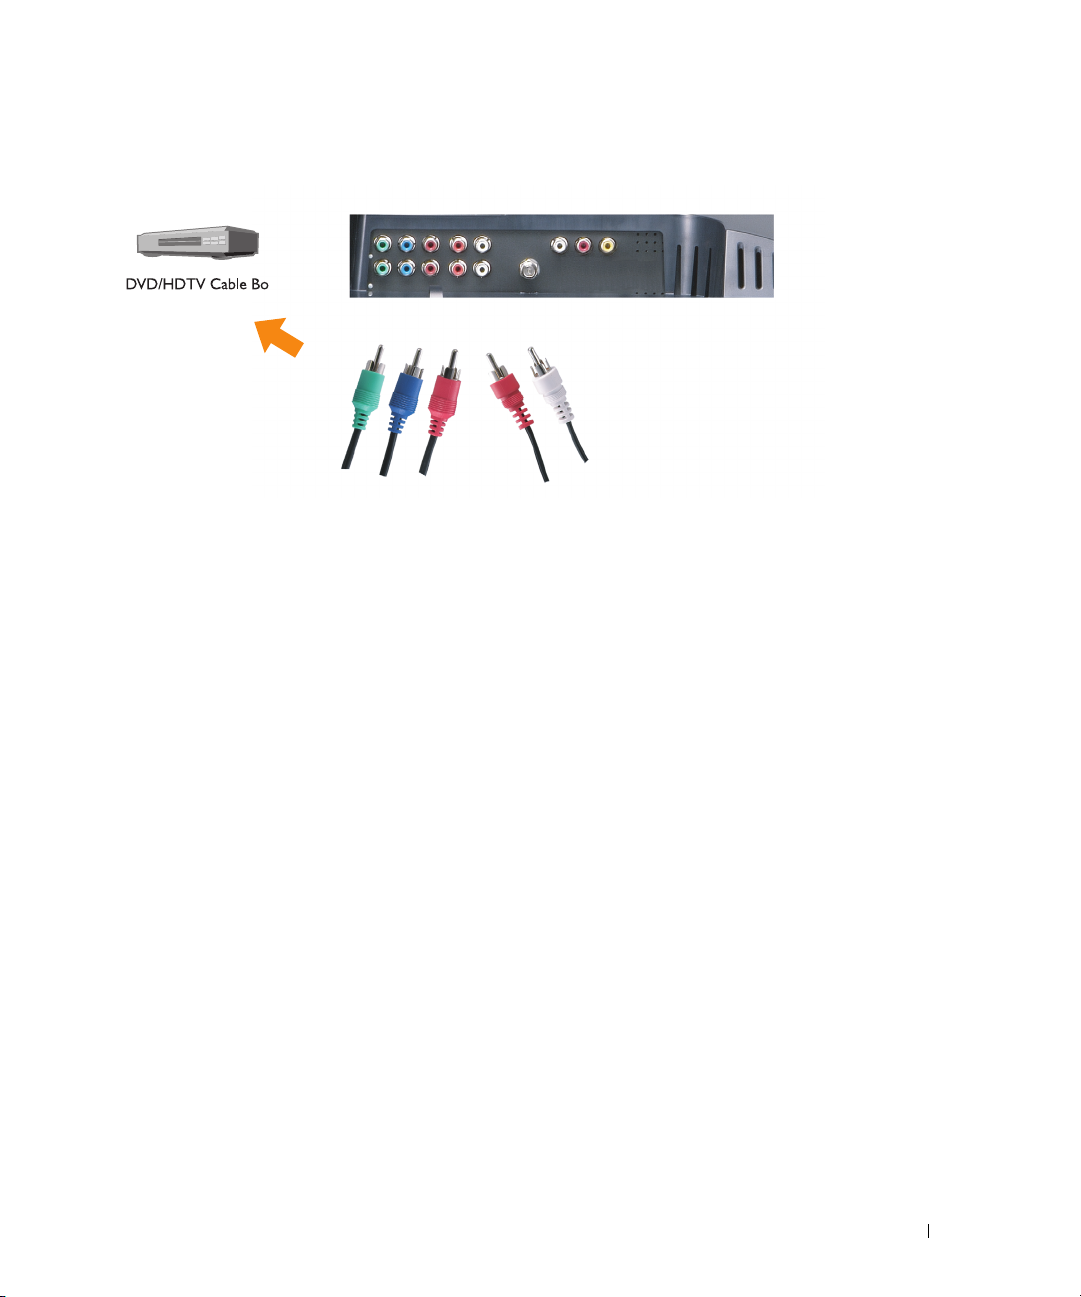
Using Component Connectors
1
Turn off the TV and unplug the power cord.
2
Connect your device including the audio cables.
3
Plug in the power cords for the TV and devices and turn them on.
4
Enter the OSD and select the proper component input. See "Input Select Menu" on page 26.
Setting Up Your TV 17
Page 17
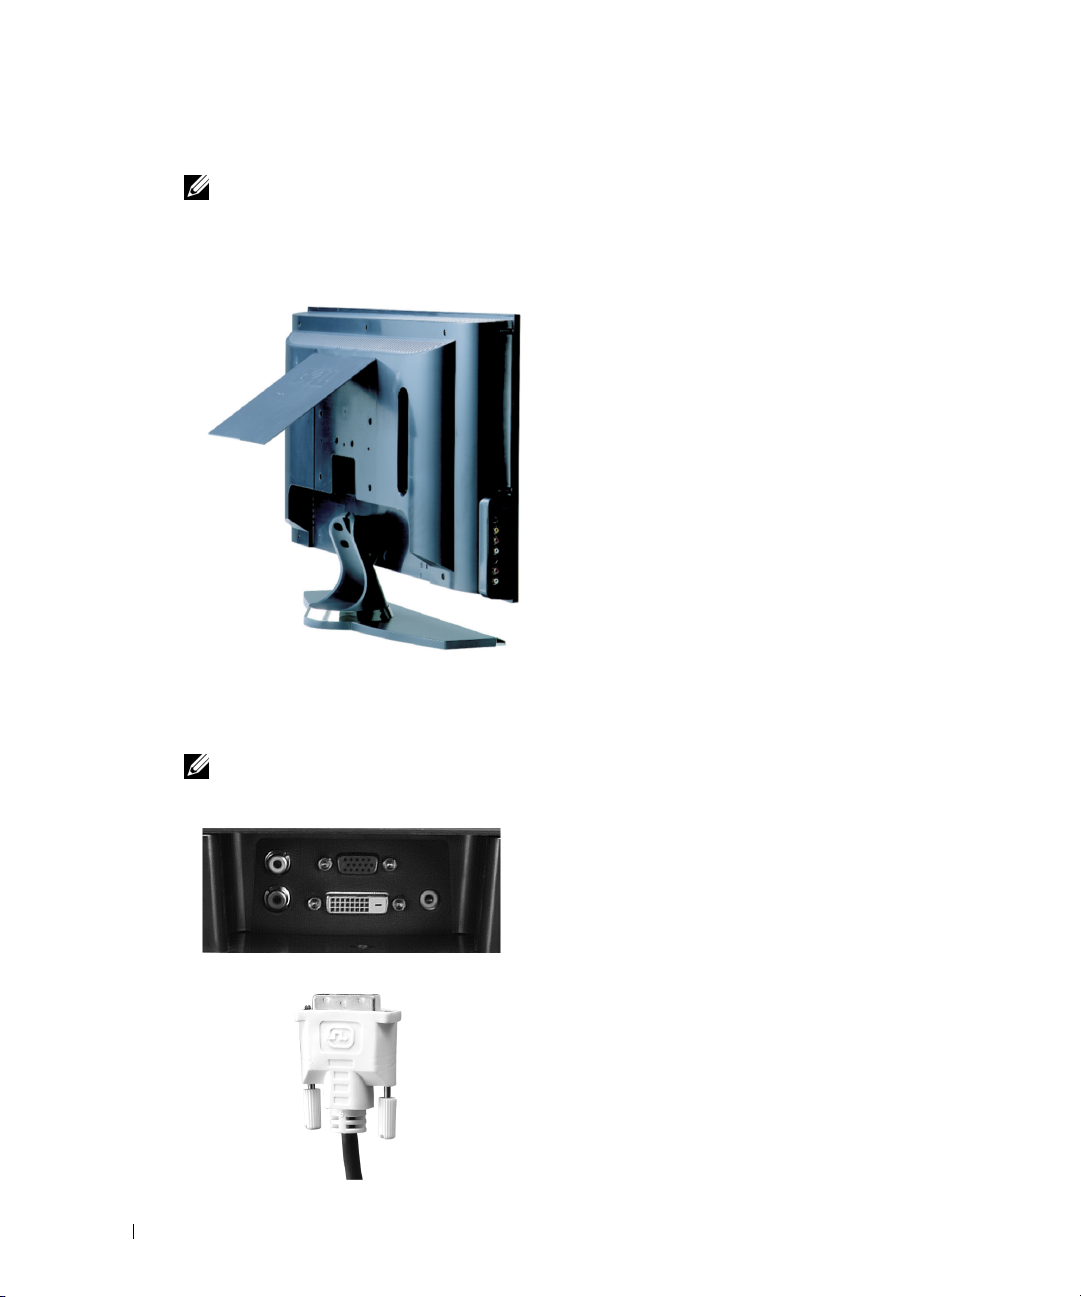
Using the DVI Connector
Only one connector can be used for a computer, either VGA or DVI.
1
Turn off the TV and unplug the power cord.
2
Remove the back cover from the TV by pulling the cover toward you and lifting it away.
www.dell.com | support.dell.com
3
Connect the white DVI cables and the audio cables.
If you are connecting a video device, use the audio connectors (red and white) of if
connecti
ng
a computer use the stereo connector (green).
you
are
NOTE: Some cable boxes may have DVI connectors, but do not support using a DVI connection. For
more information, contact your cable TV company.
18 Setting Up Your TV
Page 18
4
Replace the back cover.
5
Plug in the power cords for the TV and devices and turn them on.
6
Enter the OSD and select
DVI
. See "Input Select Menu" on page 26.
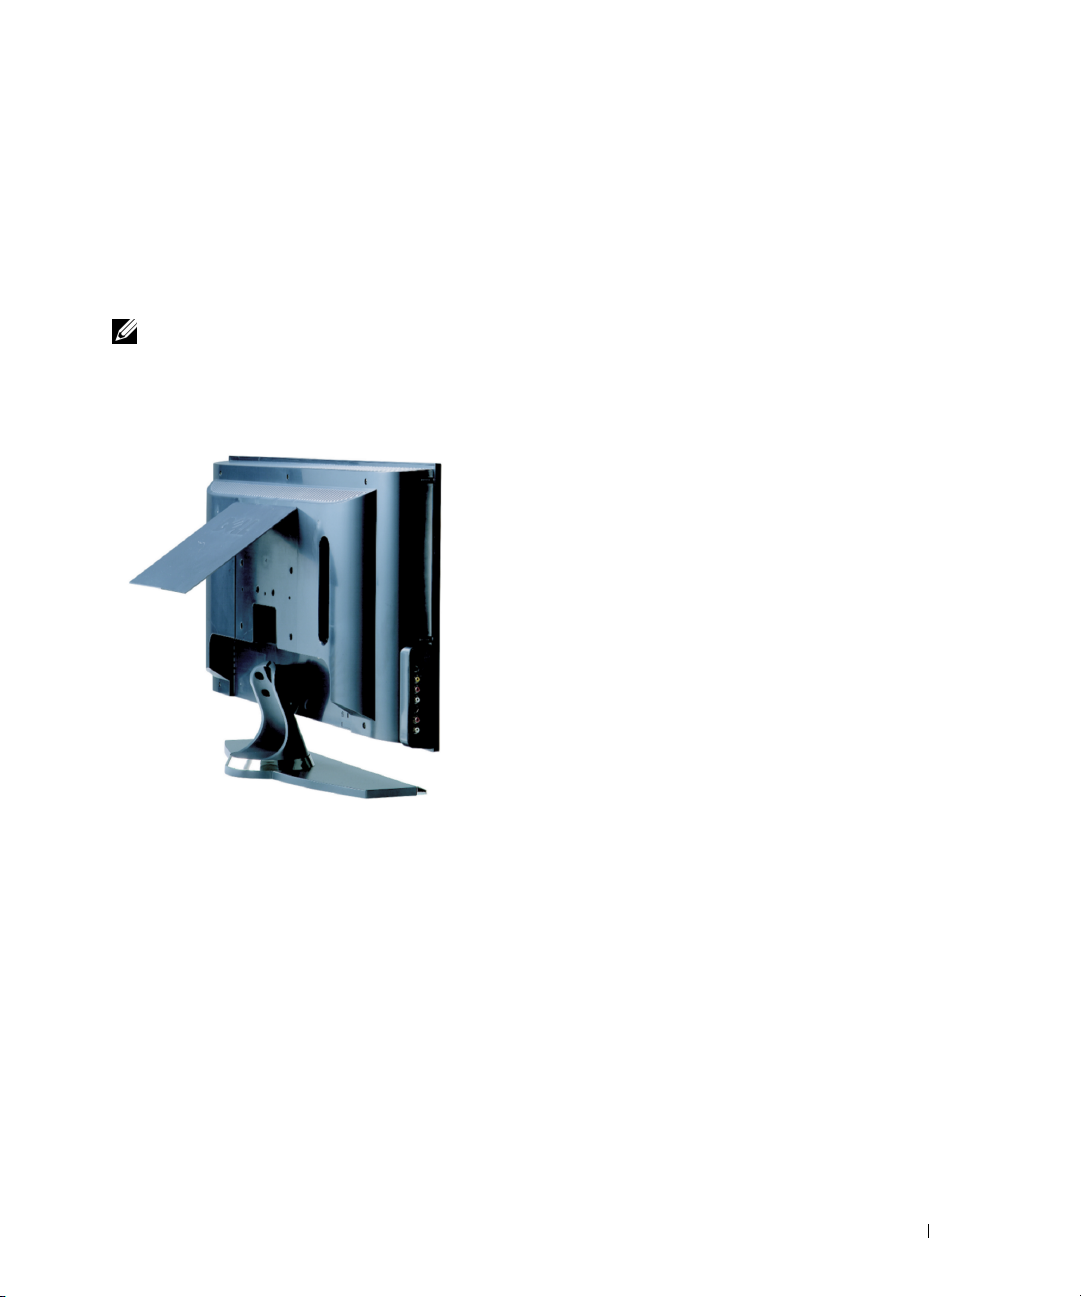
Using VGA (PC Analog)
.
You can use your TV as a computer monitor using a VGA connector
NOTE: Only one connector can be used for a computer, either VGA or DVI.
Turn off the TV and unplug the power cord.
1
2
Remove the back cover from the TV by pulling the cover toward you and lifting it away.
Setting Up Your TV 19
Page 19
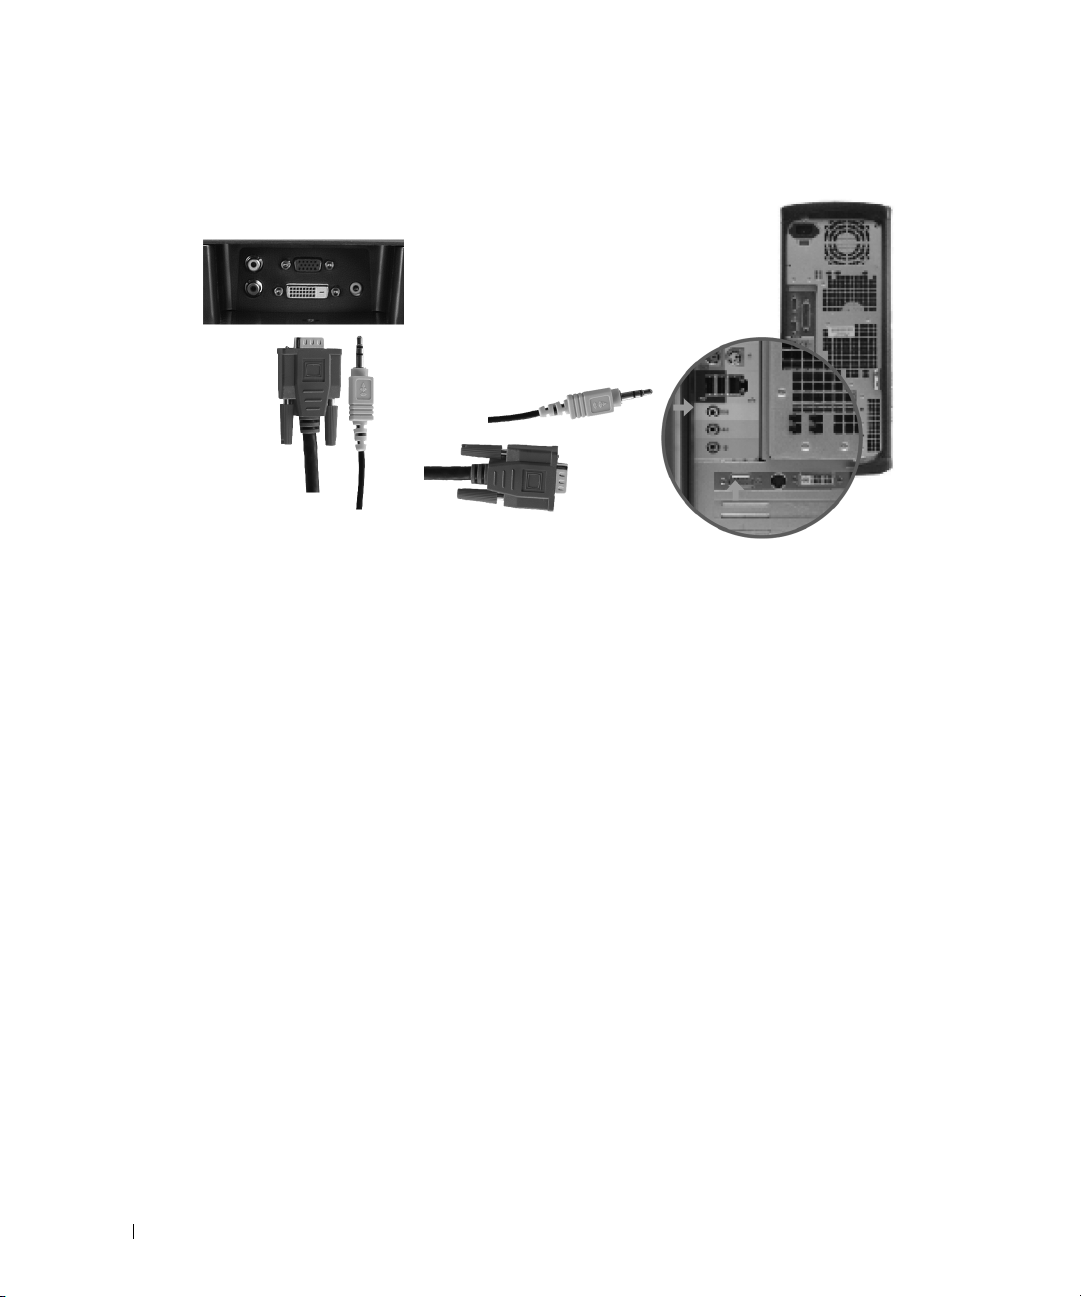
3
Connect the blue VGA cable to your TV and to your computer.
www.dell.com | support.dell.com
4
Connect the green audio cable to the connector on the TV and to your computer.
5
Replace the back cover.
6
Plug in the power cords for the TV and devices and turn them on.
7
Enter the OSD and select the
PC Analog
. See "Input Select Menu" on page 26.
20 Setting Up Your TV
Page 20

Your Remote Control
Installing Batteries
Before you can use your remote control, install two-AAA batteries.
1
Open the battery cover.
2
Install the batteries. Make sure that you match the + and - on the batteries with the + and symbols in the battery compartment.
3
Close the battery cover.
Your Remote Control 21
Page 21
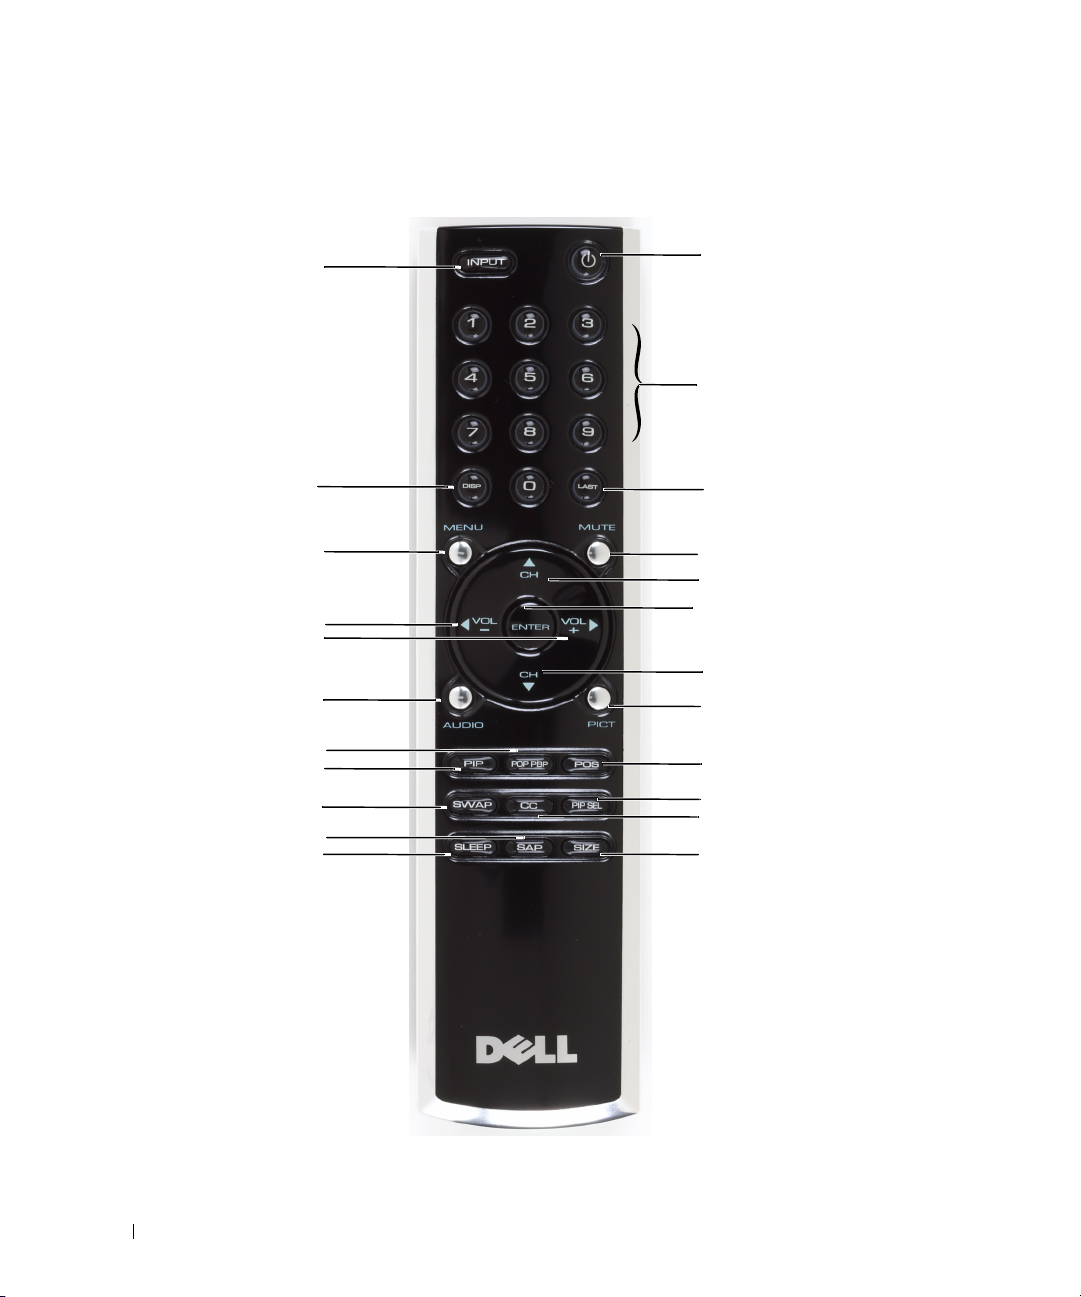
Using Your Remote Control
www.dell.com | support.dell.com
23
22
21
20
19
18
17
16
15
14
13
1
2
3
4
5
6
7
8
9
10
11
12
22 Your Remote Control
Page 22

1 Power Button Turns the TV on and off
2 Number buttons Press to select a channel
3 Last Returns you to the previously viewed channel
4 Mute Press to turn off the sound. Press again to turn on the sound
5 CH (up icon) Push to view the next channel
In the OSD, use the channel button to navigate through the
menus in the on-screen display (OSD)
6 Enter Select an OSD option, confirms a channel selection, selects an
image when in card reader mode
7 CH (down icon) Push to view the previous channel
In the OSD, use the channel button to navigate through the
menus in the on-screen display (OSD)
8 Pict Cycles through the preset options for the Picture menu
9 Pos Changes the position of the Picture-In-Picture (PIP) window
10 PIP Sel Toggles between windows when you use Picture-In-Picture
(PIP), Picture-Outside-Picture (POP), or Picture-By-Picture
(PBP)
11 CC Cycles through the Closed Caption menu
12 Size Cycles through the size options from the Size menu
13 Sleep Turns on the sleep timer
14 SAP Turns on
15 Swap Swaps images when using PIP, POP, or PBP
16 PIP Enters and exits PIP mode
17 POP PBP Enters and exits POP or PBP mode
18 Audio Cycles through the preset Audio options
19 Vol + Increases the volume
In the OSD, use the volume button to navigate through the
menus.
20 Vol - Decreases the volume
In the OSD, use the volume button to navigate through the
menus.
21 Menu Enters and exits the OSD main menu
22 Disp Displays information about your TV (for example, in TV
Mode displays the channel you are watching)
23 Input Enters and exits the Input Select menu
Second Audio Program (SAP)
Your Remote Control 23
Page 23

Using Your TV With a Universal or Learning Remote Control
Preprogrammed universal remote controls can be programmed to control the following functions
on your Dell TV:
•Power
• Channel Up (+)
• Channel Down (-)
• Volume Up (+)
• Volume Down (-)
• Mute
www.dell.com | support.dell.com
• Input Select
NOTE:
You can program universal remote controls to work with your Dell TV in the following ways:
• If the remote control manual lists codes by manufacturer, the TV can work with Philips codes.
• If the remote control has a search function, this function may be used to find the correct
• If the remote control has a learning function, you can program specific buttons on it from the
NOTE: See the remote control documentation for specific instructions for your universal remote control.
Future preprogrammed universal remote controls may be able to control more
functions.
code.
Dell remote control, in addition to those buttons listed above.
24 Your Remote Control
Page 24
Using the On-Screen Display
Your TV has an on-screen display (OSD) that allows you to select the proper input source, make
adjustments to the image and audio settings, select to view Picture-In-Picture, Picture-OutsidePicture, and Picture-By-Picture, and set parental controls. The OSD also allows you to chose how to
view the images when using the card reader and to make adjustments to the image if you are using
the TV as your computer monitor.
Using Your Remote Control With the OSD
NOTE: You can access and make selections to the OSD using the volume and channel buttons on the
side panel of the TV or the remote control. Except where noted, this section describes how to use the
OSD with the remote control.
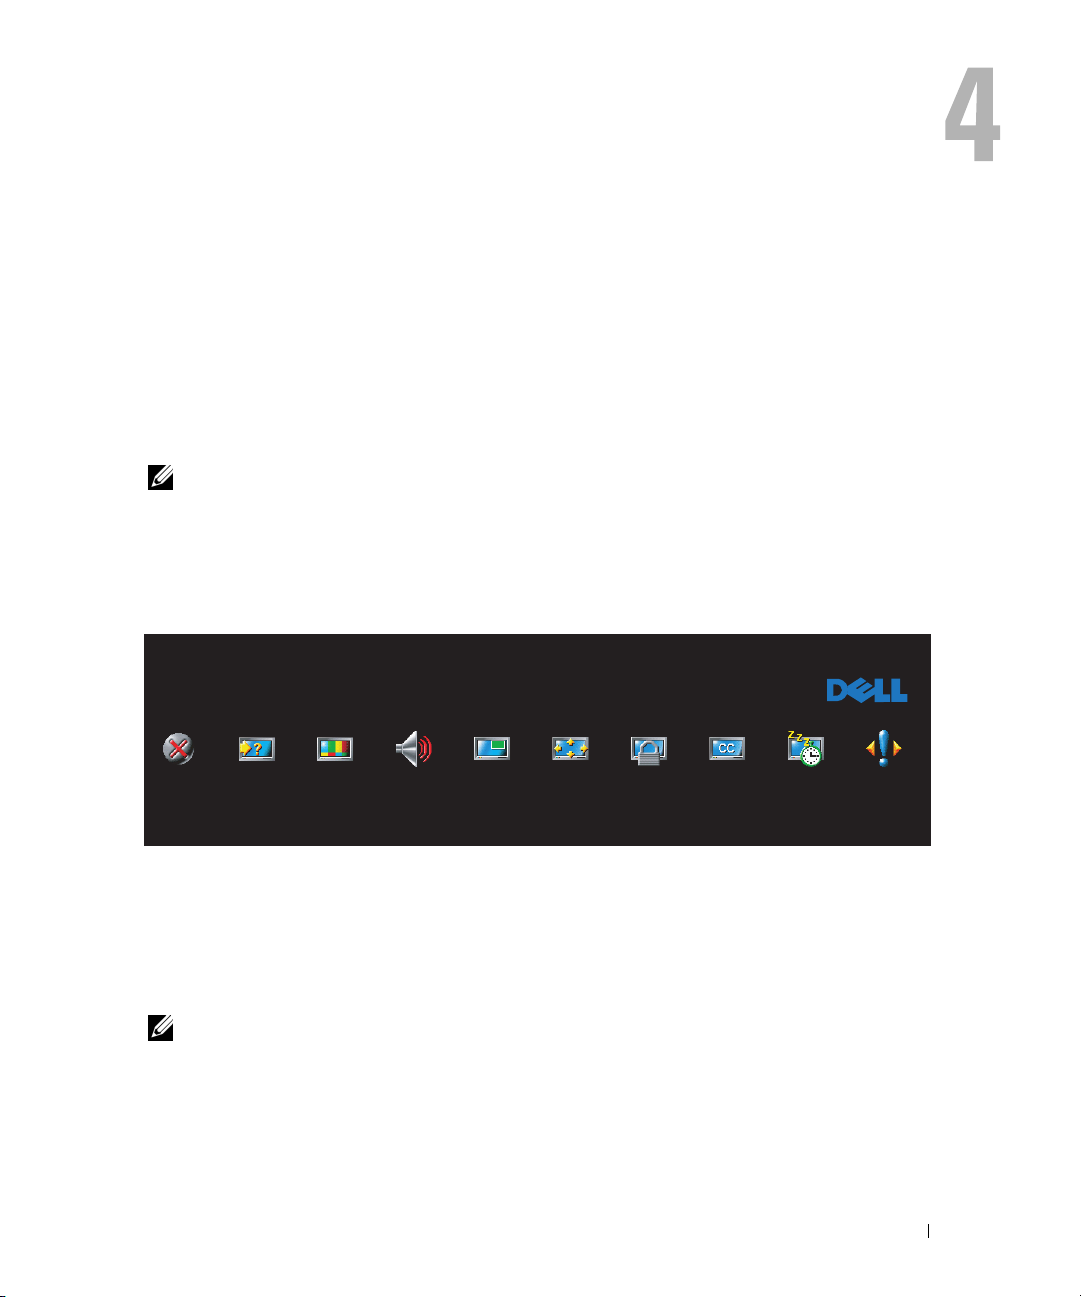
1
To enter the OSD, press the
Nine icons appear along the bottom of the screen.
MAIN MENU
Menu
button.
EXIT
2
INPUT
SELECT
Use the left and right buttons (volumel buttons) to move between the icons.
PICTURE
AUDIO
PIP/POP
PBP
SIZE
PARENTAL
CONTROL
CLOSED
CAPTION
SLEEP
TIMER
The icon appears highlighted as you move through the menu.
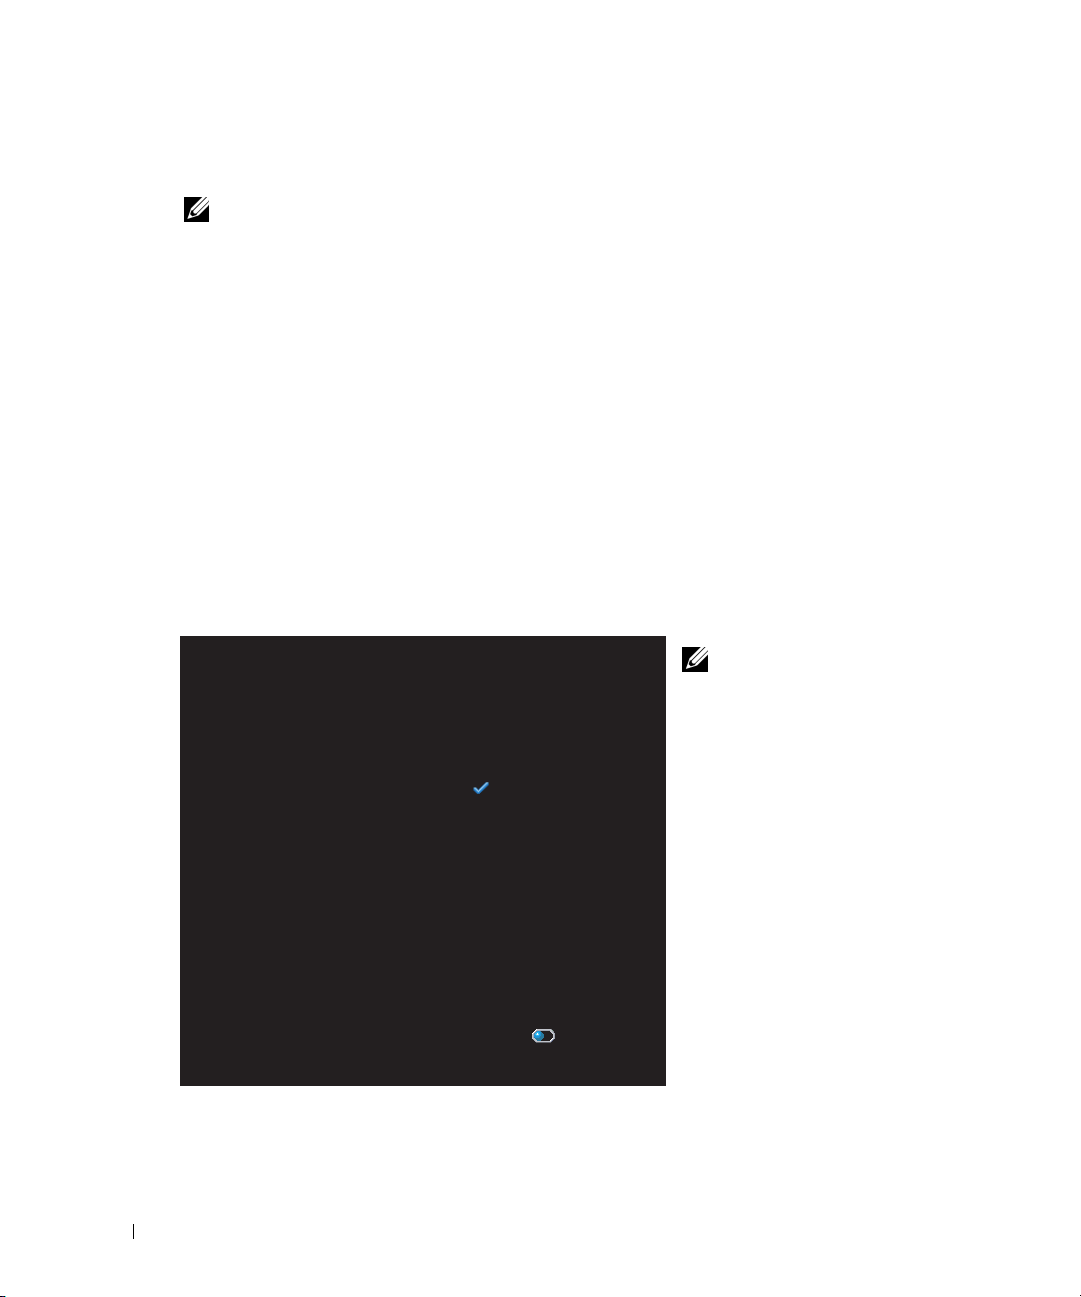
3
To select an option, push the
4
In the option menu, use the up and down (channel) buttons to move through the various
Enter
button when the icon is highlighted.
settings.
NOTE: A red arrow appears next to the setting as you navigate through the options. A check mark
appears next to the option that is selected.
Using the On-Screen Display 25
SETUP
Page 25
5
Use the up and down buttons (channel buttons) and the
settings.
NOTE: You can select Exit to return to the main menu or press Menu to exit the OSD.
After you have made your selections, select the
6
7
To exit the OSD, press
Selecting Your OSD Language
1
Press
Menu
2
Select
Setup
3
In the
www.dell.com | support.dell.com
Setup
appear in.
Input Select Menu
The
Input Select
video equipment connected. Press
You can also press
Enter
button to adjust or select
Exit.
Menu
on the remote or select
Exit
from the main menu.
to enter the OSD.
.
menu, select
Language
and select the language that you want the OSD to
menu allows you to select the proper source based on how you have your TV and
Input
Menu
and select
on the remote to go directly to the
Input Select
from the main menu.
Input Select
menu.
EXIT
VGA
DVI
TV
AV1 (COMPOSITE 1)
AV1 (COMPOSITE 2)
AV3 (SVIDEO 1)
AV4 (SVIDEO 2)
AV5 (COMPONENT 1)
AV6 (COMPONENT 2)
CARD READER
SHOW INPUTS ALL ACTIVE
TV — Select when you have your antenna or cable connected to the ANT/Cable connector. See "Bottom
View" on page 8 for the location of the ANT/Cable connector.
26 Using the On-Screen Display
INPUT SELECT
NOTE: Show Inputs allows you to
select Active or All. Active searches for
which connectors are being used. The
available input sources appear in white
and input sources that are not available
appear in grey. All shows all the input
sources and allows you to select all the
input sources even if you do not have a
device connected.
VGA — Select when your TV is being
used as a computer monitor and you
have connected the computer using a
VGA cable. See "Bottom View" on
page 8 for the location of the VGA
connector.
DVI — Select when you have a device,
such as a set-top box, connected to the
DVI connector. See "Bottom View" on
page 8 for the location of the DVI
connector.
Page 26
AV1 — Select when you have a video device, such as a video game system, connected to the composite
connector on the side of the TV. See "Left Side View" on page 7 for the location of the composite
connector.
AV2 — Select when you have a video device, such as a DVD player, connected to the composite connector
on the back of the TV. See "Bottom View" on page 8 for the location of the composite connector.
AV3 — Select when you have a video device, such as a VCR, connected to the S-Video connector on the
side of the TV. See "Left Side View" on page 7 for the location of the S-Video connector.
AV4 — Select when you have a video device, such as a DVD player, connected to the S-Video connector
on the back of the TV. See "Bottom View" on page 8 for the location of the S-Video connector.
AV5 — Select when you have a video device, such as a satellite receiver, connected to the component
connector. See "Bottom View" on page 8 for the location of the component connector.
AV6 — Select when you have a video device, such as a DVD player, connected to the component
connector. See "Bottom View" on page 8 for the location of the component connector.
NOTE: In OSD Settings, located in the Setup menu, you can set the Input Select to display the device
that you have attached. For example, AV2 would say DVD when you view the Input Select menu.
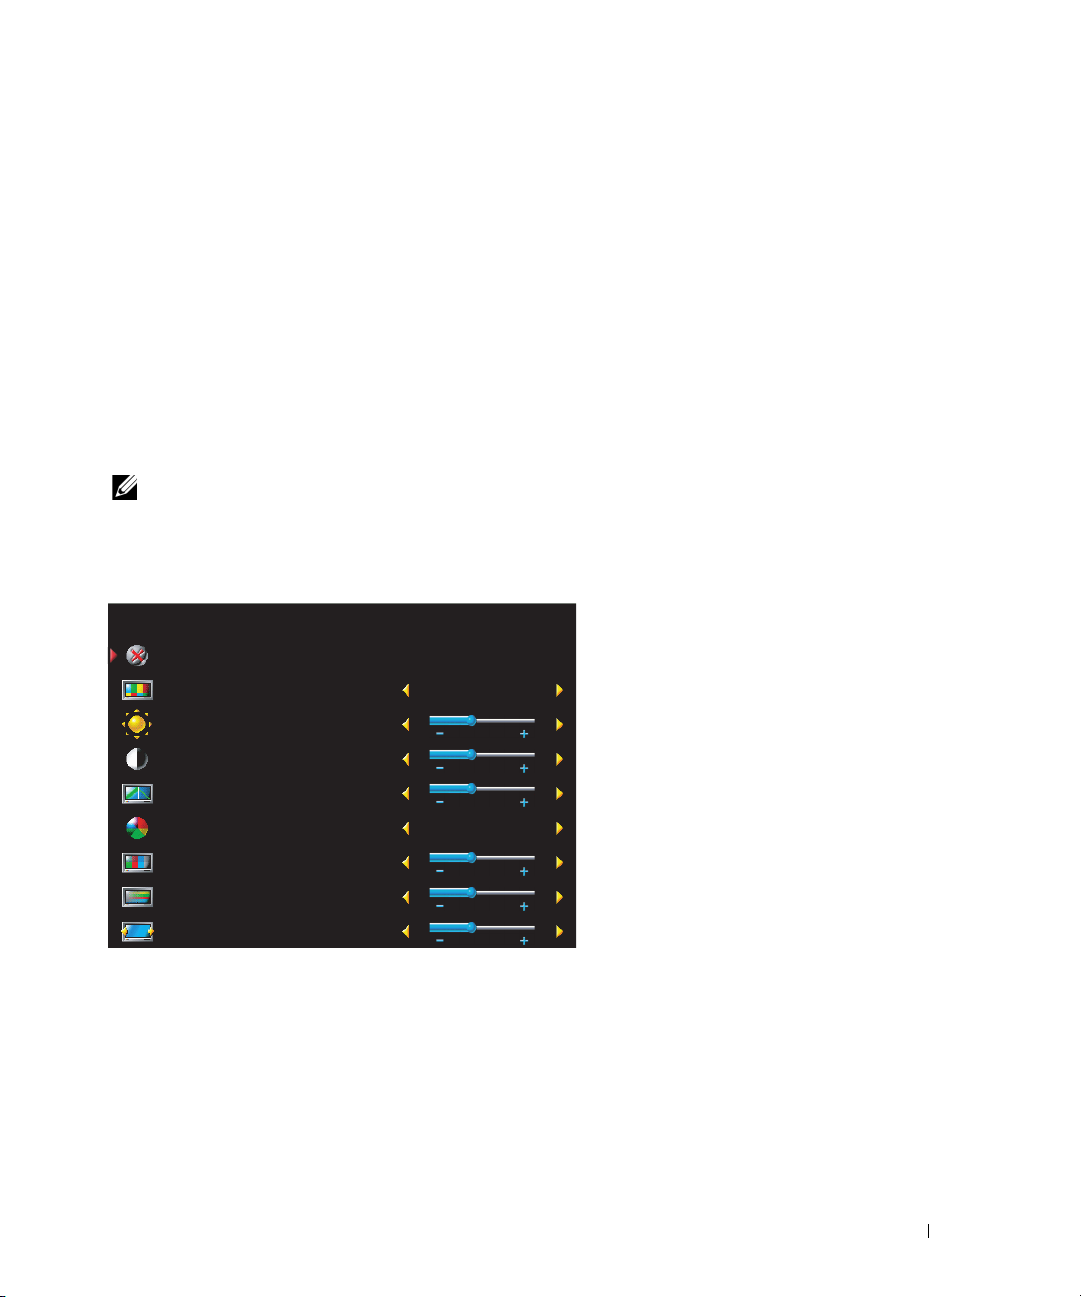
Picture Menu
PICTURE
BACK
PRESET
BRIGHTNESS
CONTRAST
SHARPNESS
COLOR TEMP.
COLOR TINT
COLOR SATURATION
HORIZONTAL SHIFT
The color temperature presets are:
• Natural: the native panel temperature
• Normal: 6500K
• Blue: 9300K
• Red: 5700K
PERSONAL
38
38
38
NATURAL
38
38
38
If you select one of the following
preset image settings, the individual
settings are automatically updated to
provide the best picture for the
selected content:
•Movies
•Sports
•Weak Signal
•Multimedia
If you select
Personal
, you can adjust
the individual settings, such as
Brightness
and
Color
.
Using the On-Screen Display 27
Page 27
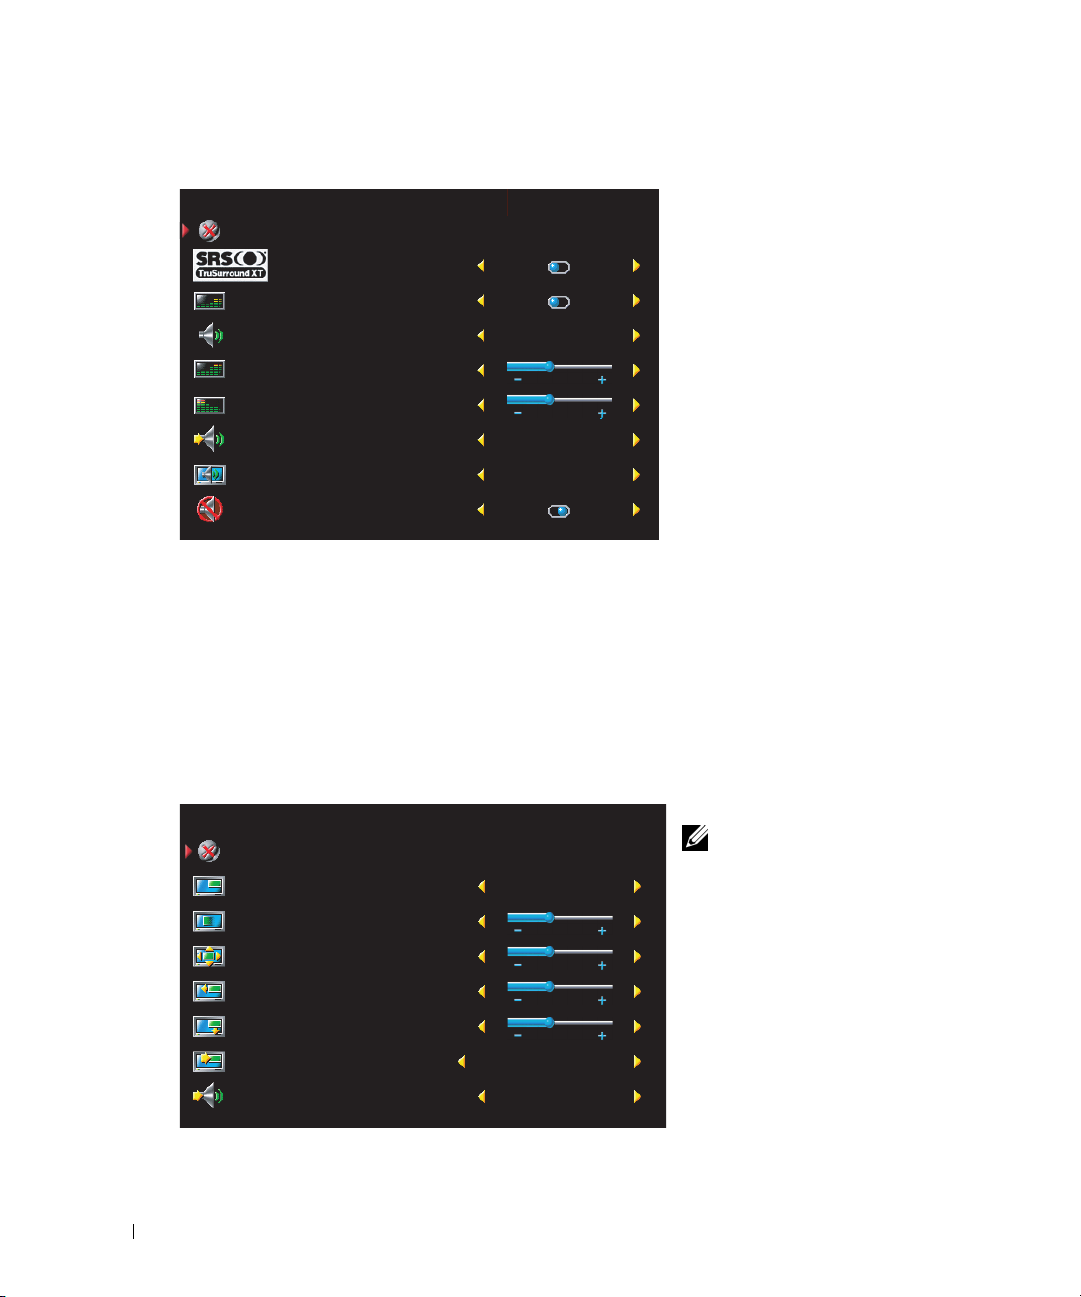
Audio
BACK
MIDNIGHT MODE
EQUALIZER MODE
TREBLE
BASS
www.dell.com | support.dell.com
TV OUT VOLUME
PROGRAM
MUTE
• Theater
•Voice
If you select
Use
Audio Program
Personal
PIP/POP/PBP
You can view multiple active sources simultaneously using Picture-In-Picture (PIP), PictureOutside-Picture (POP), or Picture-By-Picture (PBP).
AUDIO
Midnight Mode — Evens out the
large volume variations between
ON OFF
ON OFF
PERSONAL
38
38
FIXED
STEREO
ON OFF
voice and action scenes.
SRS TruSurround XT— Delivers
virtual surround sound over two
speakers from any source, which
creates a wider sound with deep rich
bass.
If you select one of the following
preset
Equalizer Mode
individual audio levels are
automatically updated:
•Music
, you can adjust the individual audio levels, such as
to select
Stereo, Mono
, or
SAP
(Second Audio Program).
Bass
and
settings, the
Tr eb le
.
BACK
PIP/POP/PBP
TRANSPARENCY
SIZE
H. POSITION
V. POSITION
PIP SOURCE
AUDIOS SOURCE
28 Using the On-Screen Display
PIP/POP/PBP
PIP
38
38
38
38
TV
PRIMARY
NOTE: You can use the PIP button
or the POP/PBP button on the remote
control to turn on and off PIP, POP, and
PBP.
If you are in PIP, POP, or PBP mode,
use the
SWAP
button on the remote
control to switch primary and
secondary sources
Use
PIP Sel
button on the remote control to
switch control between windows.
In the OSD, you can adjust the
Transparency
(horizontal) and
, the
Size
, and H
V
(vertical)
Page 28

Position
of the PIP windows. When you are selecting the horizontal orientation, - moves the
window left and + moves the window to the right. When you are adjusting the vertical orientation,
0 is at the top of the screen and 100 is at the bottom of the screen.
For POP, you can select from three different POP options:
•
POP1
— one window
•
POP3
— three windows
POP12
•
POP Scan Mode
selected channels that appear in the windows.
— twelve windows
allows you to select
Sequential
Float
or
Float. Sequential
mode plays the source for
rotates through each window and plays all of
the preselected channels. The rotation runs through all the available channels before it starts again
at the lowest channel.
Parental Control
Parental Control allows you to block certain channels or programs so children cannot view
programs that are not age appropriate. The options for
code is entered.
PARENTAL
BACK
PARENTAL
Parental Control
appear when a valid access
ENTER ACCESS CODE
ENTER ACCESS CODE
To enter the
code
3355
. See "Setting an Access Code" on page 30 for information on creating a new access code.
Parental Control
menu, you need an access code. The first time you enter, use access
You can set the following options to block content:
Block Controls — Turns on or off all your parental control settings
•
Channel Lock
•
•
Movie Rating
— Blocks selected channels
— Blocks movies based on their rating (G,PG,PG-13,R,NC-17,X and
UNRATED)
Using the On-Screen Display 29
Page 29

•
TV Ratings — Blocks TV shows based on their rating (TV-Y, TV-Y7, TV-G, TV-PG, TV-14, TV-
MA, No Rating)
NOTE: You can use Clear All to unblock the channels and programs that you have set.
Setting an Access Code
After you enter the
code. If for any reason you lose or forget your access code, you can use the default code.
1
In the
Parental Control
2
Using the number pad on the remote control, enter a new access code.
3
Select
Exit
www.dell.com | support.dell.com
Closed Caption
Parental Contro
.
l menu for the first time, you can set your own four-digit access
menu, select
Change Code
.
CLOSED CAPTION
BACK
CLOSED CAPTION
CAPTION MODE
ON
CC1
You can chose from the following
Closed Caption
•CC1 through CC4 and TXT1
through TXT4 (CC1, CC2, and
CC4 offer standard Closed
Captioning and CC3 provides
closed captioning in a secondary
language.)
• CC Mute (automatically turns CC on when you mute the TV volume)
Sleep Timer
Sleep Timer
You can select from 10 minutes to 3 hours.
allows you to select an increment of time after which the TV turns off automatically.
modes:
30 Using the On-Screen Display
Page 30
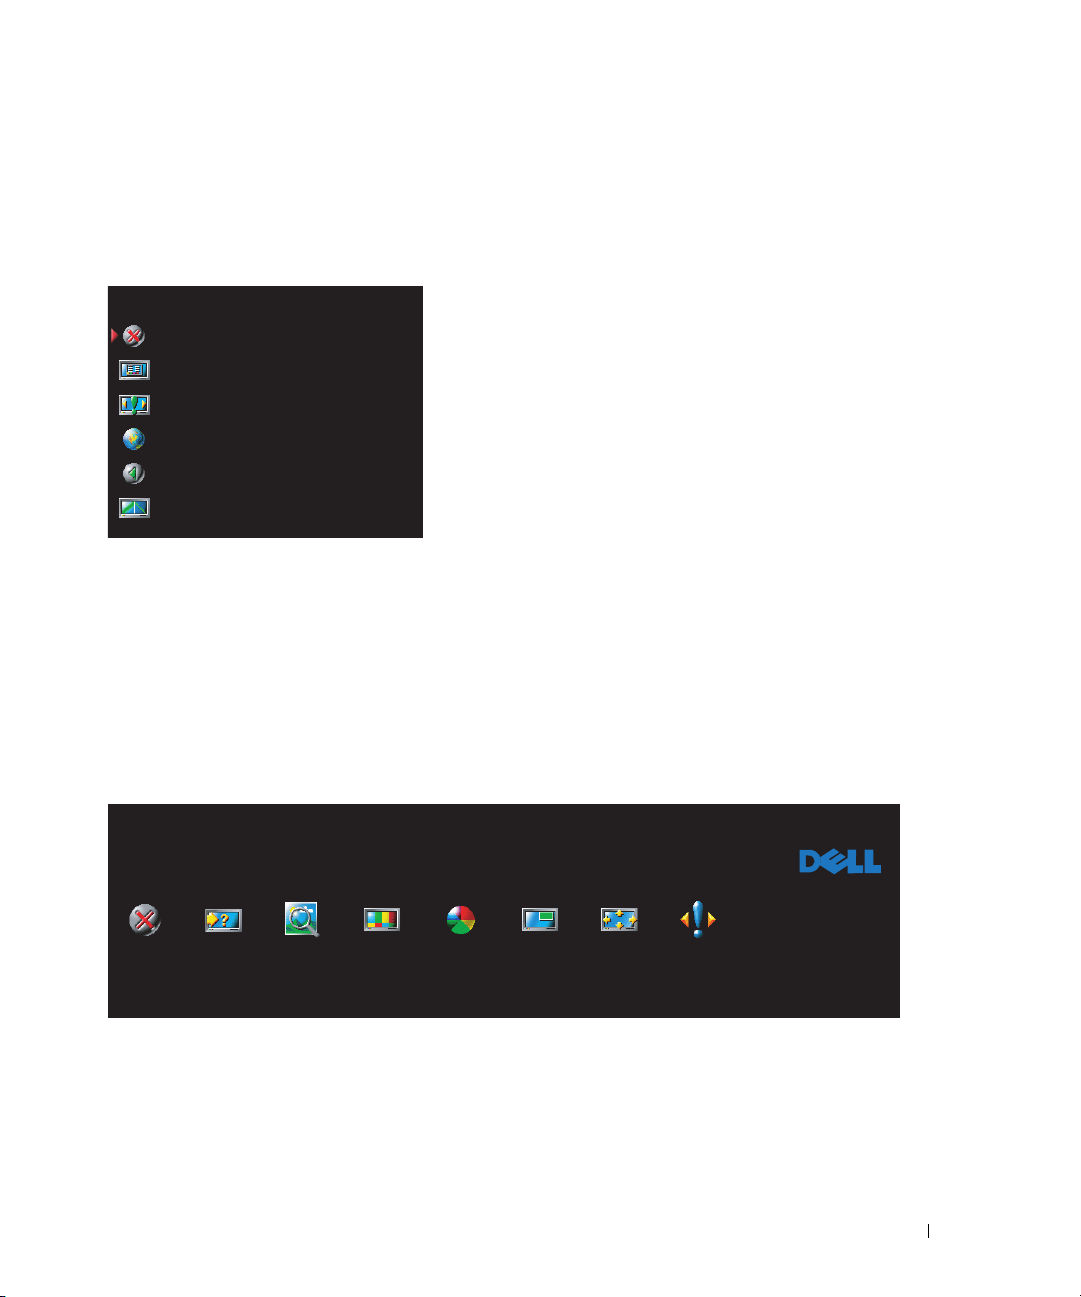
OSD Setup
OSD setup allows you to adjust the appearance of the OSD, set the channels when in TV mode,
change the language of the OSD (see "Selecting Your OSD Language" on page 26), and restore
factory settings.
SETUP
BACK
OSD SETTING
CHANNENL SETUP
LANGUAGE
FACTORY RESET
DVI SETTINGS
OSD Hold Time
of time the OSD appears. The maximum amount of time
is 60 seconds.
In the
OSD Setup
to lock the buttons on the side panel. When this option is
enabled, only the power button functions. Hold the
volume increase and the channel increase buttons
together for 10 seconds to unlock the buttons.
If you are using the DVI connector, you may need to verify
to increase or decrease the amount
menu, you can select
TV Button Lock
Use
the following settings:
Source
— The default setting is
device is being used. If the image does not display correctly, you can select the source,
Auto
. The TV automatically detects if a computer (PC) or video
PC
or
Video
depending on the device you are using.
Color
— The default color space is
the setting to
YUV.
RGB.
If the colors are not displaying correctly, you can change
Card Reader
,
A card reader allows you to view digital photos on your TV.
MAIN MENU
EXIT
INPUT
SELECT
IMAGE
MGMT
PICTURE
COLOR
SETTINGS
PIP/POP
PBP
Your card reader supports the following card types:
• Compact Flash
• Secure Digital
• Memory Stick
SIZE
SETUP
Using the On-Screen Display 31
Page 31

• Smart Media
• Multimedia Card (MMC)
NOTE: To purchase a card reader, contact Dell.
IMAGE MANAGEMENT
BACK
DISPLAY MODE
TRANSITIONS
NEXT IMAGE
www.dell.com | support.dell.com
PREVIOUS IMAGE
DELETE IMAGE
RO TATE
PHOTO INFO
IMAGE SIZE
The
Image Management
menu allows you select how
to display your photos, including viewing the photos as
a slide show, rotating photos, selecting different
transitions between photos, and displaying photo
information, such as date and time the photo was
taken.
32 Using the On-Screen Display
Page 32

Troubleshooting Your TV
CAUTION: If at any time you see smoke or sparks coming from your TV, unplug the TV immediately and
contact Dell. Do not try to perform any troubleshooting steps.
Troubleshooting Tips
NOTE: Some problems may be related to devices you have connected to your TV. For additional
troubleshooting help, see the documentation for any devices connected to your TV.
Most problems with your TV may be caused by not having the correct input source selected. Each
connector on the TV (side and bottom) is associated with an input source, which are labeled
through
•
•
•
•
•
•
You can also select the following input sources:
•
•
•
AV6
in the
Input Source
AV1
— Composite connector on the side of the TV
AV2
— Composite connector on the bottom of the TV
AV3
— S-Video connector on the side of the TV
AV4
— S-Video connector on the bottom of the TV
AV5
— Component connector on the bottom of the TV
AV6
— Component connector on the bottom of the TV
TV
- ANT/Cable connector on the bottom of the TV
VGA
- VGA connector on the bottom of the TV
DVI
- DVI connector on the bottom of the TV
menu.
AV1
Troubleshooting Your TV 33
Page 33

General Problems
Problem Possible Solution
Poor picture quality while watching TV and
using a device such as a DVD player or a VCR
www.dell.com | support.dell.com
1
Check the aspect ratio settings in the OSD. Press the
Menu
button on the remote control and select
For more information on using the OSD, see "Using
the On-Screen Display" on page 25.
2
Reconnect the device using the same type of
connector. For example, if you are using the composite
connector on the bottom, try connecting the device to
the composite connector on the side of the TV. See
"About Your TV" on page 5 for the location of the
connectors.
After you connect the device, change the input source
in the OSD. See "Input Select Menu" on page 26 for
more information.
3
Connect the device using a different connector. For
example, if you are experiencing the problem using a
composite connector, try using the component
connector.
Size
NOTE: To connect to a different connector, you need the
appropriate cables for that connector. See your device
documentation for a list of supported connections.
After you connect the device, change the input source
in the OSD. See "Input Select Menu" on page 26 for
more information.
4
Reset the original factory defaults. Press
Setup
remote control, select
Reset
.
5
Adjust the color temperature. Press
remote control, select
Temperature
.
, and then select
Picture
, and then select
Menu
Menu
on the
on the
Factory
Color
NOTE: Some set top boxes offer aspect ratio. See your
device documentation for more information.
.
34 Troubleshooting Your TV
Page 34

Problem Possible Solution
Poor picture quality when using a device
connected to the ANT/Cable (coaxial)
connector
1
Ensure TV is selected as the input source in the
menu. See "Input Select Menu" on page 26 for
Source
more information.
2
Press
Menu
on the remote control, select
then select
3
Check the aspect ratio settings in the OSD. Press the
Menu
Channel Setup
button on the remote control and select
For more information on using the OSD, see "Using
the On-Screen Display" on page 25.
4
Reset the original factory defaults. Press
remote control, select
.
Reset
5
Adjust the color temperature. Press
remote control, select
Temperature
6
The problem may be with your device, contact your
service provider.
Nothing appears on my TV 1
Ensure the TV is turned on.
2
Verify that all the cables are properly connected to the
TV, including the power cable.
3
Check to see if there is a blue or amber light on the
lower, right-hand corner of the TV. A blue light
indicates the TV is on. An amber light, means the TV
is in power save mode.
4
Ensure the proper source is selected in the
menu. See "Input Select Menu" on page 26 for
Source
more information.
5
Reconnect any devices that are currently connected to
the TV. If you are using multiple devices, connect and
test one device at a time.
6
Connect another device that you know is working
properly.
7
Reset the original factory defaults. Press
remote control, select
.
Reset
Input
Setup
, and
. This resets the channels.
Size
.
Menu
on the
Setup
, and then select
Picture
, and then select
Menu
Factory
on the
Color
.
Input
Menu
on the
Setup
, and then select
Factory
Troubleshooting Your TV 35
Page 35

Problem Possible Solution
No sound 1
www.dell.com | support.dell.com
Double image or no image with DVD Turn off the progressive scan on the DVD player. Your
Ensure mute is not turned on. Pressing the
Mute
button on the remote control turns the mute function
on and off.
2
If only certain TV channels do not have sound, verify
that the proper source is selected in the
Input Source
menu.(For more information, see "Input Select Menu"
on page 26).
3
Verify that the audio cables are firmly connected to
both the audio input connectors on your TV and audio
output connectors on your devices. Ensure that the
cable colors match the connectors colors.
4
Also, ensure that the audio cables are connected to the
same row as the video cables. See "About Your TV" on
page 5 for the location of the connectors.
5
Reconnect the device using the same type of
connector. For example, if you are using the composite
connector on the bottom, try connecting the device to
the composite connector on the side of the TV. See
"About Your TV" on page 5 for the location of the
connectors.
After you connect the device, change the input source
in the OSD. See "Input Select Menu" on page 26 for
more information.
6
Connect the device using a different connector. For
example, if you are experiencing the problem using a
composite connector, try using the component
connector.
NOTE: To connect to a different connector, you need the
appropriate cables for that connector. See your device
documentation for a list of supported connections.
After you connect the device, change the input source
in the OSD. See "Input Select Menu" on page 26 for
more information.
7
Test the device on a different TV.
NOTE: If you are using PIP/POP/PBP, ensure the proper
Audio Source is selected. Press Menu on your remote
control, and select PIP/POP/PBP.
Dell™ TV offers built-in deinterlacer that is equal to or
better quality than the deinterlacer on your DVD player.
For more information about progressive scan on your
DVD player, see the documentation for your DVD
player
36 Troubleshooting Your TV
Page 36

Problem Possible Solution
Picture is too dim or too bright
The screen is not centered correctly 1
Screen has one or more lines 1
Update the color settings in the OSD. Press
Picture
remote control and select
.
Update the size settings in the OSD. Press
the remote control and select
2
Reset the original factory defaults. Press
remote control, select
.
Reset
Size
Setup
, and then select
Menu
Menu
.
Menu
Factory
Check the aspect ratio settings in the OSD. Press the
Menu
button on the remote control and select
on the
on
on the
Size
.
For more information on using the OSD, see "Using
the On-Screen Display" on page 25.
2
Ensure the proper source is selected in the
Source
menu. See "Input Select Menu" on page 26 for
Input
more information.
3
Try connecting a different device. Ensure that you
properly connect the cables and update the input
source in the OSD.
4
Update the size settings in the OSD. Press
Size
the remote control and select
5
Reset the original factory defaults. Press
remote control, select
.
Reset
Setup
.
, and then select
Menu
Menu
on
on the
Factory
The side panel buttons do not work Check the OSD to see if the buttons have been locked.
Press Menu on your remote control, select Setup.
If you are unable to use the remote control, press the
volume up and the channel up buttons on the side of
the TV for 10 seconds to unlock the buttons.
The picture is too small
1
Adjust the size settings. Press
control, and select
2
This may be a problem with your device. See the
Size
Menu
on the remote
.
documentation for the device.
Troubleshooting Your TV 37
Page 37

OSD Messages
While using your TV, the following messages may appear.
Message Possible Solution
Auto Adjust No action required, the TV is performing an auto
Out of Range Check the optimal resolution settings.
www.dell.com | support.dell.com
No Video Input
TV Button Lock To unlock, press Menu on your remote control,
In Power Save Mode
Press any key on keyboard or move mouse
In Power Save Mode
Please Check Video Signal
Self Test Appears for computer source when there is nothing
adjustment.
You may need to download a new video driver. For
more information, go to support.dell.com.
1
Check all cables are properly connected.
2
Ensure the proper source is selected in the
Source
menu. See "Input Select Menu" on
page 26 for more information.
select Setup.
If you are unable to use the remote control, press
the volume up and the channel up buttons on the
side of the TV for 10 seconds to unlock the buttons.
If you have a computer connected to the TV and
there is no signal detected, the TV goes in to sleep
mode. The power light is amber when the TV in is
sleep mode.
Press any key on the keyboard or move the mouse to
wake the TV.
If you are using a video device and it has been
inactive for 30 minutes the TV goes in to power
save mode. The power light is amber when the TV
is in power save mode.
plugged in. Select VGA or DVI from Input Select
menu and nothing is plugged in. Plug a computer
in to the VGA or DVI.
Input
38 Troubleshooting Your TV
Page 38

Message Possible Solution
No Card Detected in Card Reader Remove and reinstall the card.
Ensure you are using a card that is supported by the
card reader. Your card reader supports the following
card types:
• Compact Flash
• Secure Digital
•Memory stick
•Smart Media
• Multimedia card
Remote Control Problems
Problem Possible Solution
The TV does not respond when
using the remote control
1
Point the remote control directly at the lower right corner of the
TV. Be sure that nothing is blocking the front of the TV. For the
location of the IR, see "Front View" on page 5.
2
Verify that the batteries are properly installed.
3
If the batteries are old, install new batteries.
NOTE: Bright lights or other infrared devices may interfere with your
remote control and IR on the TV.
Problems With the Card Reader
Your card reader supports jpeg file formats and the following card types:
• Compact Flash
• Secure Digital
• Memory Stick
• Smart Media
• Multimedia Card (MMC)
Follow the installation instructions that came with your card reader. When you install the card
reader, locate the arrow on the front of the card reader and ensure that the arrow is pointing up
when you slide the card reader in to place.
Menu
When the card reader is installed, press
then select
Card Reader
.
on the remote control, select
Input Source
Troubleshooting Your TV 39
, and
Page 39

Using the Self-Test Feature When Your TV is Connected to
Your Computer
When your computer is connected to the TV through DVI or VGA connector you can use the selftest feature to check whether your TV is functioning properly. If your TV and computer are
properly connected but the TV screen remains dark, run the TV self-test by performing the
following steps:
1
Turn off both your computer and the TV.
2
Unplug the video cable from the back of the computer.
3
Turn on the TV.
www.dell.com | support.dell.com
If the TV cannot sense a video signal and is working correctly, the floating "Dell - Self-Test
Feature Check" dialog box appears on the screen (against a black background).
While in self-test mode, the power light remains green and the self-test pattern scrolls
through the screen continually. This box also appears during normal system operation if the
video cable becomes disconnected or damaged.
4
Turn off your TV and reconnect the video cable; then turn on both your computer and the
TV. If your TV screen remains blank, the problem may be with your computer or graphic card.
See your computer documentation for more information.
Problems When Using the TV as a Monitor
NOTE: You can only connect your computer to the TV using a VGA connector.
Problem Possible Solution
The picture is off-centered or too small
40 Troubleshooting Your TV
1
Use
Auto Adjust
Press
Menu
Settings
2
Check the optimal resolution settings.
You may need to download a new video driver. For
more information, go to
, and then select
to check the
to enter the OSD, select
Image Settings
Auto Adjust
support.dell.com
.
Image
.
.
NOTE: Some older video cards may not support the
resolution settings for the TV.
Page 40

Problem Possible Solution
No audio 1
Ensure the green audio cable is connected to
audio connector on the TV and on the computer.
For the location of the connector on the TV see,
"Using VGA (PC Analog)." on page 19." See your
computer documentation for the location of
connectors on your computer.
Do not connect the audio cable to the headphone
jack.
2
Ensure the volume on the computer is not muted.
3
Verify that sound on your computer is working by
checking the speakers. See your computer
documentation for information on
troubleshooting your computer.
4
Disconnect the TV from the computer and test to
see if the TV volume works.
PIP/POP/PBP not working 1
Ensure the settings in the OSD are properly set.
Menu
Press
PIP/POP/PBP
2
Swap the video and audio source.
to enter the OSD, and select
.
No video NOTE: If you see a self-test, it means there is a
problem with your video card or you are using the
wrong input source.
1
Ensure the TV is turned on.
2
Verify that all the cables are properly connected to
the TV, including the power cable.
3
Check to see if there is a blue or amber light on
the lower, right-hand corner of the TV. A blue light
indicates the TV is on. An amber light, means the
TV is in power save mode.
4
Ensure
PC Analog
is selected in the
Input Source
menu. See "Input Select Menu" on page 26 for
more information.
5
Reconnect the computer.
6
Connect another device that you know is working
properly.
7
Reset the original factory defaults. Press
the remote control, select
Factory Reset
.
Setup
Menu
, and then select
on
Troubleshooting Your TV 41
Page 41

www.dell.com | support.dell.com
42 Troubleshooting Your TV
Page 42

Specifications for Your TV
General
Model number W2600 LCD TV
Display type TFT Active Matrix (Color TFT LCD)
Screen size 26 inches
Viewable area 566.4
Image aspect ratio Wide screen
Video Display Capabilities 480i
Additional Features:
SAP capable
CC capable
Teletext capable
Parental control capable
x
339.8 mm (22.3 inches x 13.38 inches)
15:9 resolution
16:9 aspect ratio
480p
720p
1080i
576i (Europe)
576p (Europe)
Ye s
Ye s
Ye s
(Europe only)
Ye s
Physical Dimension
Display (with stand) 830 x 504 x 209 mm
Display (no stand) 830 x 421 x 107 mm
With Speakers N/A, non-detachable
Weight (with stand) 19 kg/41 lbs (est)
Native Resolution 1280x768 (WXGA)
HDTV Capable Yes
Specifications for Your TV 43
Page 43

Picture-In-Picture
Picture-In-Picture (PIP) Yes
Picture-Outside-Picture (POP) Yes
Picture-By-Picture (PBP) Yes
Number of Tuners 2 analog
Brightness (typical) 450 nits (typical)
Contrast Ratio 500:1 (typical)
Response time (black:white) 25 ms (typical)
www.dell.com | support.dell.com
Viewing Angle
Horizontal +/- 85 degrees
Vertical +/- 85 degrees
Inputs
Video
Composite (CVBS)
S-Video
Component
TV In (coaxial)
Audio (RCA L+R)
DVI
Computer
VGA (for use as computer monitor)
Audio(PC)
Other
Card reader
Outputs
Video
Composite (CVBS)
Audio (RCA L+R)
Headphone
two (side and bottom)
two (side and bottom)
two (bottom)
one (bottom)
7 pair
1 (bottom)
1 (bottom)
1 (bottom)
one (side)
one (bottom)
one pair
one (side)
44 Specifications for Your TV
Page 44

Audio
Effects SRS TruSurround XT
Midnight Mode
Speakers (integrated) 15 watts/channel
30 watts total
Specifications for Your TV 45
Page 45

www.dell.com | support.dell.com
46 Specifications for Your TV
Page 46

Index
A
About
side connectors, 5
side panel buttons, 5
TV, 5
Access Code
creating, 30
Adjust, 28
brightness, 27
color, 27
Antenna, 15
Audio, 28
effects, 28
stereo, 28
B
Back cover
removal, 18-19
Button
lock, 31
unlock, 31
Buttons
channel up and down, 6
channels, 22
Enter, 22
Input Source, 6
OSD, 6
PIP, 22
power, 6
remote control, 22
Side panel, 6
volume, 6, 22
C
Cables, 9
Card reader, 7
supported cards, 31
Channel, 31
blocking, 29
Cleaning, 11
Closed caption, 30
Coax, 15
Component, 17
Connecting an Antenna, 15
Connecting Cable
coax, 15
Connecting devices
Cable box, 13
camcorder, 13
DVD player, 13
Satellite box, 13
VCR, 13
Connector
VGA, 19
Connectors, 7
AV1, 7
AV2, 7- 8
AV4, 8
AV5, 8
AV6, 8
coax, 8, 13
component, 8, 13, 17
composite, 13, 15
DVI, 1 8
DVI HDCP, 1 3
DVI-HDCP, 8, 18
location of, 8
power, 8
quality, 13
side panel, 7
S-Video, 13, 16
D
DVI-HDCP, 18
F
Factory settings
restore, 31
H
headphones, 7
Index 47
Page 47

I
Input Select
Input sources, 26
Input Source, 22
rename, 31
IR receiver, 5
M
Midnight Mode, 28
Monitor, 19
O
On-Screen Display, 25
OSD, 22, 25
access code, 29
appearance of, 31
Audio, 28
card reader, 31
closed caption, 30
Input Select, 26
language, 26
Main Menu, 25
messages, 38
Parental Control, 29
PBP, 28
Picture, 27
PIP, 28
POP, 28
remote control, 25
setup, 31
sleep timer, 30
using, 25
P
Package contents, 9
Parental Control
access code, 29
Picture-By-Picture, 28
Picture-In-Picture, 28
Picture-Outside-Picture, 28
Power indicator
amber light, 5
blue light, 5
Power light
amber, 5
blue, 5
Problems
remote control, 39
TV, 33
R
Remote
Univeral remote, 24
Remote control, 25
batteries, 21
buttons, 22
problems with, 39
using, 21
S
Self Test, 40
setup, 31
Sleep Timer, 30
Specifications, 43
SRS, 28
S-Video, 16
T
Troubleshooting, 33
computer, 40
general problems, 34
monitor, 40
OSD, 38
remote control, 39
self test, 40
TV
connectors, 13
location, 13
set up, 13
U
Univeseral remote, 24
V
VGA, 19
48 Index
Page 48

Televisor LCD Dell™ W2600
de 26 pulgadas
Manual del propietario
Modelo W2600
www.dell.com | support.dell.com
Page 49

Notas, avisos y advertencias
NOTA: Una NOTA indica información importante que ayuda a una mejor utilización del televisor.
AVISO: un AVISO indica un posible daño al equipo o una pérdida de información y explica cómo evitar el problema.
ADVERTENCIA: Una ADVERTENCIA indica posibles daños materiales, daños personales o incluso muerte.
____________________
La información contenida en este documento puede cambiar sin previo aviso.
© 2004 Dell Inc. Reservados todos los derechos.
La reproducción de este documento por cualquier procedimiento sin el permiso por escrito de Dell Inc. está totalmente prohibida.
Marcas comerciales utilizadas en este texto: Dell, el logotipo de DELL; TruSurround XT, SRS, y el símbolo (o) son marcas
comerciales de SRS Labs, Inc.; Microsoft y Windows son marcas registradas de Microsoft Corporation.
En este documento pueden aparecer otras marcas y nombres comerciales para hacer referencia a las entidades propietarias de las marcas,
nombres o productos. Dell Inc. renuncia a todo interés propietario sobre otras marcas y nombres comerciales aparte de los suyos.
Agosto de 2004 Rev. A00
Page 50

Contenido
1 Acerca de su televisor
Vista frontal . . . . . . . . . . . . . . . . . . . . . . . . . . . . . . . . 53
Vista del lado derecho
Vista del lado izquierdo
Vista inferior
. . . . . . . . . . . . . . . . . . . . . . . . . . . . . . . 56
Contenido del paquete
Cuidados del televisor
. . . . . . . . . . . . . . . . . . . . . . . . . . . 54
. . . . . . . . . . . . . . . . . . . . . . . . . . 55
. . . . . . . . . . . . . . . . . . . . . . . . . . . 57
. . . . . . . . . . . . . . . . . . . . . . . . . . . 59
2 Configuración del televisor
Ubicación adecuada del televisor . . . . . . . . . . . . . . . . . . . . . 61
Conexión del televisor
. . . . . . . . . . . . . . . . . . . . . . . . . . . 61
3 El mando a distancia
Instalación de las pilas . . . . . . . . . . . . . . . . . . . . . . . . . . 69
Uso del mando a distancia
Utilización del televisor con un mando a distancia universal
o con funciones de aprendizaje
. . . . . . . . . . . . . . . . . . . . . . . . . 70
. . . . . . . . . . . . . . . . . . . . . . 72
4 Uso de la presentación en pantalla (OSD)
Uso del mando a distancia con la presentación en pantalla (OSD) . . . . . . 73
Selección del idioma de la presentación en pantalla
Menú Selección de entrada
Menú Imagen
Sonido
PIP/POP/PBP
. . . . . . . . . . . . . . . . . . . . . . . . . . . . . . . 76
. . . . . . . . . . . . . . . . . . . . . . . . . . . . . . . . . . 77
. . . . . . . . . . . . . . . . . . . . . . . . . . . . . . . 78
. . . . . . . . . . . . . . . . . . . . . . . . 74
. . . . . . . . . . . . 74
Contenido 51
Page 51

Control parental . . . . . . . . . . . . . . . . . . . . . . . . . . . . . . 79
Subtítulos
Temporizador
Configuración de presentación en pantalla
Lector de tarjetas
. . . . . . . . . . . . . . . . . . . . . . . . . . . . . . . . . 80
. . . . . . . . . . . . . . . . . . . . . . . . . . . . . . . 80
. . . . . . . . . . . . . . . . . 81
. . . . . . . . . . . . . . . . . . . . . . . . . . . . . 82
5 Solución de problemas del televisor
Sugerencias para solucionar problemas . . . . . . . . . . . . . . . . . . 83
Problemas generales
Mensajes de OSD
Problemas del mando a distancia
Problemas con el lector de tarjetas
. . . . . . . . . . . . . . . . . . . . . . . . . . . 84
. . . . . . . . . . . . . . . . . . . . . . . . . . . . . 88
. . . . . . . . . . . . . . . . . . . . . 90
. . . . . . . . . . . . . . . . . . . . . 90
Uso de la característica de prueba automática cuando
el televisor se conecta a un ordenador
Problemas al usar el televisor como monitor
. . . . . . . . . . . . . . . . . . . 91
. . . . . . . . . . . . . . . . 92
6 Especificaciones del televisor
Indice
52 Contenido
. . . . . . . . . . . . . . . . . . . . . . . . . . . . . . . . . . . . 99
Page 52

Acerca de su televisor
Vista frontal
1 Receptor de infrarrojos Recibe la señal del mando a distancia
2 Luz del indicador de
encendido (LED)
La luz es de color azul cuando el televisor está encendido y
de color ámbar cuando está en el modo de ahorro de energía
1
2
Acerca de su televisor 53
Page 53

Vista del lado derecho
www.dell.com | support.dell.com
1 Botón de encendido Pulse este botón para encender y apagar el televisor
2 Botón del menú de
presentación en pantalla
3 Botón de volumen Pulse este botón para disminuir el volumen o desplazarse
4 Botón de volumen Pulse este botón para aumentar el volumen o desplazarse
5 Botón de canales Pulse este botón para seleccionar el canal anterior
7
6
5
4
3
3
2
1
Pulse este botón para activar la presentación
en pantalla (OSD)
por la presentación en pantalla (OSD)
por la presentación en pantalla (OSD)
o desplazarse por la presentación en pantalla (OSD)
6 Botón de canales Pulse este botón para seleccionar el siguiente canal
7 Botón Selección
de entrada
54 Acerca de su televisor
o desplazarse por la presentación en pantalla (OSD)
Pulse este botón para mostrar el menú Selección de entrada
Page 54

Vista del lado izquierdo
8
7
6
5
1 Conector de video
compuesto (AV1)
2 R (conector del canal derecho
de sonido del conector compuesto)
3 L (conector del canal izquierdo
de sonido del conector compuesto)
4 Panel del lector de tarjetas Retire este panel si va a instalar un lector de tarjetas
5 L (conector del canal izquierdo
de sonido del conector S-Video)
6 R (conector del canal derecho
de sonido del conector S-Video)
7 Conector S-Video (AV3) Utilice los conectores S-Video para los dispositivos que conecte
8 Conector de auriculares Conecte aquí los auriculares
Utilice el conector lateral de video compuesto para los
dispositivos que conecte esporádicamente al televisor,
como una consola de videojuegos
Utilice este conector de sonido si ha conectado un dispositivo
al conector compuesto (AV1)
Utilice este conector de sonido si ha conectado un dispositivo
al conector compuesto (AV1)
Utilice este conector de sonido si ha conectado un dispositivo
al conector S-Video (AV3)
Utilice este conector de sonido si ha conectado un dispositivo
al conector S-Video (AV3)
esporádicamente, como una cámara de video
1
2
3
4
Acerca de su televisor 55
Page 55

Vista inferior
www.dell.com | support.dell.com
1 Conector de alimentación Conecte aquí el cable de alimentación.
2 Conector de video y sonido
compuesto (AV2)
3 Conector de sonido DVI
(L - izquierdo)
4 Conector VGA Utilice el conector VGA para usar el televisor como monitor
5 Conectores de sonido
y video componente (AV6)
6 ANT/Cable Conecte aquí una antena o un receptor de televisión por cable.
7 Conector de salida de
sonido y video compuesto
8 Conector de sonido
y video componente (AV5)
9 Conector de sonido
para el ordenador
10 Conector DVI Conecte aquí un dispositivo como un reproductor de DVD,
11 Conector de sonido DVI
(R - derecho)
12 Conector S-Video (AV4) Conecte aquí un dispositivo como una consola de
12
12
Conecte aquí un dispositivo como un magnetoscopio
o un reproductor de DVD.
Utilice el conector de sonido DVI si ha conectado un
dispositivo al conector DVI.
del ordenador.
Conecte aquí un dispositivo como un reproductor de
DVD o un receptor de televisión por satélite o por cable.
Conecte aquí un dispositivo como un magnetoscopio si ha
conectado una antena o un receptor de televisión por cable
al conector ANT/Cable.
Conecte aquí un dispositivo como un reproductor de DVD
o un receptor de televisión por satélite o por cable.
Conecte aquí el cable de sonido del ordenador.
un decodificador de televisión o un ordenador.
Utilice el conector de sonido DVI si ha conectado
un dispositivo al conector DVI.
videojuegos o un reproductor de DVD.
4
5
891011
7
63
56 Acerca de su televisor
Page 56

Contenido del paquete
NOTA: Los cables de componente no se incluyen con el televisor. Si necesita cables adicionales,
póngase en contacto con Dell.
Mando a distancia
2 pilas AAA
Cable de alimentación
Cable S-Video
Acerca de su televisor 57
Page 57

Cable de sonido (2)
Cable compuesto
www.dell.com | support.dell.com
Cable DVI
Cable VGA
58 Acerca de su televisor
Page 58

Documentación
Cuidados del televisor
ADVERTENCIA: El televisor sólo debe ser reparado por un técnico cualificado. No intente
desmontar el aparato.
NOTA: Antes de limpiar el televisor, desconéctelo de la toma de corriente.
• Para limpiar la superficie del panel, utilice un paño limpio ligeramente humedecido
y que no suelte pelusa.
• Para limpiar la carcasa del televisor, utilice un paño ligeramente impregnado de un
detergente suave.
• No utilice productos químicos como benceno, disolvente, amoniaco ni ningún tipo
de limpiador abrasivo.
• No utilice aire comprimido para limpiar el televisor.
Acerca de su televisor 59
Page 59

www.dell.com | support.dell.com
60 Acerca de su televisor
Page 60

Configuración del televisor
ADVERTENCIA: Antes de llevar a cabo los procedimientos descritos en esta sección,
siga las instrucciones de seguridad indicadas en la Guía de información del producto.
Ubicación adecuada del televisor
Cuando vaya a decidir el lugar en el que va a colocar el televisor, tenga en cuenta los siguientes
factores ambientales:
• No almacene ni utilice el televisor en lugares expuestos a altas temperaturas, luz solar directa
o frío intenso.
• Evite mover el televisor de un lugar a otro en el que exista una gran diferencia de temperatura.
Si desea más información, consulte las Especificaciones.
• No someta el televisor a fuertes vibraciones o golpes. No coloque el televisor en el maletero
del automóvil.
• No almacene ni utilice el televisor en lugares polvorientos o en los que se encuentre expuesto
a altos niveles de humedad.
• No coloque el televisor en un lugar en el que el agua u otros líquidos puedan alcanzar
el interior del aparato.
Conexión del televisor
El televisor dispone de cinco tipos de conectores estándar.
Calidad Cable y conector Utilización
Buena El tipo coaxial (RF) transporta la
imagen y el sonido a través de un solo
cable. El conector coaxial se indica como
ANT/Cable en el televisor. Para localizar
el conector, consulte “Vista inferior” en la
página 56.
Configuración del televisor 61
Page 61

Calidad Cable y conector Utilización
Buena El tipo compuesto transporta la señal de
Óptima El tipo S-Video divide la señal de video
www.dell.com | support.dell.com
Superior El tipo de componente divide la señal de
video a través de un solo cable. Si va a utilizar
un conector de video compuesto, deberá
conectar también los cables de sonido
compuestos. Para localizar el conector,
consulte “Vista del lado izquierdo” en la
página 55 y “Vista inferior” en la página 56.
en dos señales, blanco y negro y color.
Si va a utilizar un conector S-Video,
también deberá conectar los cables AV
de sonido. Para localizar los conectores,
consulte “Vista del lado izquierdo” en la
página 55 y “Vista inferior” en la página 56.
video en tres señales, dos de color y una
de blanco y negro. Asegúrese de conectar
los cinco cables. Para localizar el conector,
consulte “Vista inferior” en la página 56.
62 Configuración del televisor
Page 62

Uso del conector ANT/Cable (coaxial)
1
Apague el televisor y desconecte el cable de alimentación de la toma de corriente.
2
Conecte el cable coaxial al conector ANT/Cable del televisor.
3
Conecte el cable de alimentación a la toma de corriente y encienda el televisor.
4
Active la presentación en pantalla (OSD) y seleccione TV. Consulte “Menú Selección de
entrada” en la página 74.
Uso del conector de video compuesto
1
Apague el televisor y desconecte el cable de alimentación de la toma de corriente.
NOTA: Si va a conectar un dispositivo que se pueda desconectar posteriormente, como una cámara de
vídeo, utilice el conector de video compuesto del lateral del televisor.
Configuración del televisor 63
Page 63

2
Conecte el dispositivo y los cables de sonido.
3
Conecte el cable de alimentación del televisor y de los dispositivos a la toma de corriente
y enciéndalos.
4
Active la presentación en pantalla y seleccione la entrada compuesta adecuada.
Consulte “Menú Selección de entrada” en la página 74.
Uso del conector S-Video
www.dell.com | support.dell.com
1
Apague el televisor y desconecte el cable de alimentación de la toma de corriente.
NOTA: Si va a conectar un dispositivo que se pueda desconectar posteriormente, como una cámara de
vídeo, utilice el conector S-Video del lateral del televisor.
Conecte el dispositivo y los cables de sonido.
2
3
Conecte el cable de alimentación del televisor y de los dispositivos a la toma de corriente
y enciéndalos.
4
Active la presentación en pantalla y seleccione la entrada S-Video adecuada.
Consulte “Menú Selección de entrada” en la página 74.
64 Configuración del televisor
Page 64

Uso de los conectores de componente
1
Apague el televisor y desconecte el cable de alimentación de la toma de corriente.
2
Conecte el dispositivo y los cables de sonido.
3
Conecte el cable de alimentación del televisor y de los dispositivos a la toma de
corriente y enciéndalos.
4
Active la presentación en pantalla y seleccione la entrada de componente adecuada.
Consulte “Menú Selección de entrada” en la página 74.
Configuración del televisor 65
Page 65

Uso del conector DVI
Sólo puede utilizar un conector para ordenador, bien VGA o DVI.
1
Apague el televisor y desconecte el cable de alimentación de la toma de corriente.
2
Para retirar la tapa trasera del televisor, tire de la tapa hacia usted y levantátela.
www.dell.com | support.dell.com
3
Conecte los cables DVI blancos y los cables de sonido.
Para conectar un dispositivo de vídeo, utilice los conectores de sonido (rojo y blanco);
o bien,
para
conectar un ordenador, utilice el conector estéreo (verde).
NOTA: Es posible que algunos decodificadores de televisión por cable dispongan de conectores
DVI pero no permitan una conexión DVI. Si desea más información, póngase en contacto con la
compañía de televisión por cable.
66 Configuración del televisor
Page 66

4
Vuelva a colocar la tapa trasera.
5
Conecte el cable de alimentación del televisor y de los dispositivos a la toma de corriente
y enciéndalos.
6
Active la presentación en pantalla y seleccione
DVI
. Consulte “Menú Selección de entrada”
en la página 74.
Uso de VGA (PC análogo)
Puede utilizar el televisor como un monitor de ordenador mediante el conector VGA.
NOTA: Sólo puede utilizar un conector para ordenador, bien VGA o DVI.
Apague el televisor y desconecte el cable de alimentación de la toma de corriente.
1
2
Para retirar la tapa trasera del televisor, tire de la tapa hacia usted y levantátela.
Configuración del televisor 67
Page 67

3
Conecte el cable VGA azul al televisor y al ordenador.
www.dell.com | support.dell.com
4
Conecte el cable de sonido verde al conector del televisor y al ordenador.
5
Vuelva a colocar la tapa trasera.
6
Conecte el cable de alimentación del televisor y de los dispositivos a la toma de corriente
y enciéndalos.
7
Active la presentación en pantalla y seleccione
entrada” en la página 74.
PC analógica
. Consulte “Menú Selección de
68 Configuración del televisor
Page 68

El mando a distancia
Instalación de las pilas
Antes de utilizar el mando a distancia, instale dos pilas de tipo AAA.
1
Abra la tapa de las pilas.
2
Instale las pilas. Asegúrese de que los polos + y - de las pilas coinciden con
los símbolos + y - del compartimiento de las pilas.
3
Cierre la tapa de las pilas.
El mando a distancia 69
Page 69

Uso del mando a distancia
www.dell.com | support.dell.com
23
22
21
20
19
18
17
16
15
14
13
1
2
3
4
5
6
7
8
9
10
11
12
70 El mando a distancia
Page 70

1 Botón de encendido Enciende y apaga el televisor
2 Botones numéricos Pulse estos botones para seleccionar un canal
3 Last Vuelve al anterior canal visualizado
4 Mute Pulse este botón para desactivar el sonido. Púlselo de nuevo para activarlo
5 CH (icono arriba) Pulse este botón para ver el siguiente canal
En la presentación en pantalla (OSD), utilice el botón de canales
para desplazarse por los menús de la presentación en pantalla
6 Enter Selecciona una opción de la presentación en pantalla (OSD), confirma
una selección de canal, selecciona una imagen cuando se encuentra en
el modo de lector de tarjetas
7 CH (icono abajo) Pulse este botón para ver el canal anterior
En la presentación en pantalla (OSD), utilice el botón de canales
para desplazarse por los menús de la presentación en pantalla
8 Pict Recorre en ciclo las opciones predeterminadas del menú Imagen
9 Pos Cambia la posición de la ventana de imagen sobre imagen (PIP)
10 PIP Sel Cambia de una ventana a otra cuando se utilizan las funciones de imagen
sobre imagen (PIP), imagen fuera de imagen (POP) o imagen junto a
imagen (PBP)
11 CC Recorre en ciclo las opciones del menú Subtítulos
12 Size Recorre en ciclo las opciones de tamaño del menú Ta m a ño
13 Sleep Activa el temporizador
14 SAP Activa la opción
15 Swap Intercambia las imágenes cuando se utiliza PIP, POP o PBP
16 PIP Activa y desactiva el modo PIP
17 POP PBP activa y desactiva el modo POP o PBP
18 Audio Recorre en ciclo las opciones predeterminadas de Sonido
19 Vol + Aumenta el volumen
En la presentación en pantalla (OSD), utilice el botón de volumen
para desplazarse por los menús
20 Vol - Disminuye el volumen
En la presentación en pantalla (OSD), utilice el botón de volumen
para desplazarse por los menús
21 Menu Activa y desactiva el menú principal de la presentación en pantalla (OSD)
22 Disp Muestra información acerca del televisor (por ejemplo, en Modo TV
muestra el canal que se está visualizando)
23 Input Activa y desactiva el menú Selección de entrada
Segundo programa de sonido (SAP)
El mando a distancia 71
Page 71

Utilización del televisor con un mando a distancia
universal o con funciones de aprendizaje
Es posible programar los mandos a distancia universales para controlar las siguientes funciones
de su televisor Dell:
• Encendido
• Canal siguiente (+)
• Canal anterior (-)
• Aumentar volumen (+)
www.dell.com | support.dell.com
• Reducir volumen (-)
•Silencio
• Selección de entrada
NOTA:
Para programar los mandos a distancia universales, de forma que funcionen con su televisor Dell,
puede utilizar los siguientes métodos:
• Si el manual del mando a distancia incluye una lista de códigos clasificada por el fabricante
• Si el mando a distancia dispone de una función de búsqueda, puede utilizarla para encontrar
• Si el mando a distancia dispone de una función de aprendizaje, podrá programar cualquier
NOTA: Consulte la documentación del mando a distancia para obtener instrucciones detalladas acerca
Es posible que próximos mandos a distancia universales permitan controlar
funciones adicionales.
del televisor, puede seleccionar los códigos de Philips.
el código apropiado.
botón, además de los indicados anteriormente, a partir de las funciones del mando
a distancia de Dell.
de su mando a distancia universal.
72 El mando a distancia
Page 72

Uso de la presentación en pantalla (OSD)
El televisor dispone de una presentación en pantalla (OSD) que permite seleccionar la entrada
correcta, realizar ajustes en la configuración de la imagen y del sonido, seleccionar las funciones
de imagen sobre imagen (PIP), imagen fuera de imagen (POP) o imagen junto a imagen (PBP)
y establecer los controles de acceso a menores. La presentación en pantalla (OSD) también permite
determinar la manera en la que se visualizan las imágenes cuando se utiliza el lector de tarjetas
y realizar cambios en la imagen si se utiliza el televisor como monitor de ordenador.
Uso del mando a distancia con la presentación
en pantalla (OSD)
NOTA: Es posible activar la presentación en pantalla (OSD) y realizar selecciones en ella mediante
los botones de volumen y de canal del panel lateral del televisor o del mando a distancia. Esta sección
describe la manera de utilizar la presentación en pantalla (OSD) con el mando a distancia, excepto
cuando se indique otra cosa.
Para activar la presentación en pantalla, pulse el botón
1
Aparecerán nueve iconos en la parte inferior de la pantalla.
MENÚ PRINCIPAL
Menu
.
SALIR
2
SELECCIONAR
ENTRADA
IMAGEN
SONIDO
PIP/POP
PBP
Utilice los botones izquierda y derecha (botones de volumen) para desplazarse de un icono a otro.
TAMAÑO
CONTROL
PARENTAL
SUB-
TÍTULOS
TEMPO-
RIZADOR
CONFIGUR.
Los iconos se irán resaltando a medida que se desplace.
3
Para seleccionar una opción, pulse
4
En el menú de opciones, utilice los botones arriba y abajo (botones de canales)
Enter
cuando el icono esté resaltado.
para desplazarse por los diversos valores.
NOTA: A medida que se desplace por las opciones, aparecerá una flecha roja junto a ellas.
Junto a las opciones seleccionadas aparece una marca de selección.
Uso de la presentación en pantalla (OSD) 73
Page 73

5
Utilice los botones arriba y abajo (botones de canales) y el botón
o seleccionar valores.
NOTA: Puede seleccionar Exit para volver al menú principal o pulsar Menu para salir de la presentación
en pantalla (OSD).
Cuando haya realizado sus selecciones, seleccione
6
7
Para salir de la presentación en pantalla (OSD), pulse
o seleccione
Selección del idioma de la presentación en pantalla
1
Pulse
www.dell.com | support.dell.com
2
3
Menu
Seleccione
En el menú
la presentación en pantalla.
Menú Selección de entrada
Exit.
Exit
desde el menú principal.
para entrar en la presentación en pantalla.
Configuración
Setup
, seleccione
.
Idioma
y seleccione el idioma en el que desee que aparezca
Enter
Menu
en el mando a distancia
para ajustar
El menú
Selección de entrada
permite seleccionar la entrada apropiada según el modo en
que tenga conectado el equipo de televisor y vídeo. Pulse
ir directamente al menú
Selección de entrada
SELECCIÓN DE ENTRADA
SALIR
VGA
DVI
TV
AV1 (COMPUESTO 1)
AV2 (COMPUESTO 2)
AV3 (S-vídeo 1)
AV4 (S-vídeo 2)
AV5 (COMPONENTE 1)
AV6 (COMPONENTE 2)
LECTOR DE TARJETA
MOST. ENTRADAS TODOS ACTIVAR
Selección de entrada
en el menú principal.
. También puede pulsar
Input
en el mando a distancia para
Menu
y seleccionar
NOTA: Mostrar entradas permite
seleccionar Activar o Todos.
Active búsquedas para los
conectores que se estén
utilizando. Las selecciones de
entrada disponibles aparecen
en blanco mientras que las que
no lo están se muestran en gris.
Todos muestra todas las
selecciones de entrada y permite
seleccionar entre todas las
selecciones de entrada incluso
aunque no tenga conectado
un dispositivo.
VGA — Seleccione esta opción cuando
el televisor se utilice como monitor
del ordenador y haya conectado el
ordenador con un cable VGA. Consulte
“Vista inferior” en la página 56 para
conocer la ubicación del conector VGA.
74 Uso de la presentación en pantalla (OSD)
Page 74

DVI — Seleccione esta opción cuando tenga un dispositivo, por ejemplo, un decodificador de televisión,
conectado al conector DVI. Consulte “Vista inferior” en la página 56 para conocer la ubicación del
conector DVI.
TV — Seleccione esta opción cuando tenga una antena o cable conectados al conector ANT/Cable.
Consulte “Vista inferior” en la página 56 para conocer la ubicación del conector ANT/Cable.
AV1 — Seleccione esta opción cuando tenga un dispositivo de vídeo, por ejemplo, una consola de
videojuegos, conectado al conector compuesto del lateral del televisor. Consulte “Vista del lado izquierdo”
en la página 55 para conocer la ubicación del conector compuesto.
AV2 — Seleccione esta opción cuando tenga un dispositivo de vídeo, por ejemplo, un reproductor de
DVD, conectado al conector compuesto del lateral del televisor. Consulte “Vista inferior” en la página 56
para conocer la ubicación del conector compuesto.
AV3 — Seleccione esta opción cuando tenga un dispositivo de vídeo, por ejemplo, un magnetoscopio,
conectado al conector S-Video del lateral del televisor. Consulte “Vista del lado izquierdo” en la página 55
para conocer la ubicación del conector S-Video.
AV4 — Seleccione esta opción cuando tenga un dispositivo de vídeo, por ejemplo, un reproductor
de DVD, conectado al conector S-Video del lateral del televisor. Consulte “Vista inferior” en la página 56
para conocer la ubicación del conector S-Video.
AV5 — Seleccione esta opción cuando tenga un dispositivo de vídeo, por ejemplo, un receptor por
satélite, conectado al conector componente. Consulte “Vista inferior” en la página 56 para conocer la
ubicación del conector componente.
AV6 — Seleccione esta opción cuando tenga un dispositivo de vídeo, por ejemplo, un reproductor
de DVD, conectado al conector componente. Consulte “Vista inferior” en la página 56 para conocer
la ubicación del conector componente.
NOTA: En Ajustes OSD, que se encuentra en el menú Configuración, puede establecer la Selección de
entrada para mostrar el dispositivo que tenga conectado. Por ejemplo, AV2 indicaría DVD cuando viera
el menú Selección de entrada.
Uso de la presentación en pantalla (OSD) 75
Page 75

Menú Imagen
ATRÁS
VAL. PREDET.
BRILLO
CONTRASTE
NITIDEZ
www.dell.com | support.dell.com
TEMP. DE COLOR
TINTE DE COLOR
SATURACIÓN DE COLOR
CAMBIO HORIZONTAL
Las opciones predeterminadas para la intensidad de color son las siguientes:
• Natural: intensidad normal del panel
• Normal: 6500K
• Azul: 9300K
• Rojo: 5700K
IMAGEN
PERSONAL
38
38
38
NATURAL
38
38
38
Si selecciona una de las opciones
de imagen predeterminadas siguientes,
la opción individual se actualiza
automáticamente para proporcionar
la mejor imagen para el contenido
seleccionado:
• Películas
• Deportes
• Señal débil
• Multimedios
Si selecciona
la opción individual, como
Color
.
Personal
, puede ajustar
Brillo
y
76 Uso de la presentación en pantalla (OSD)
Page 76

Sonido
ATRÁS
MODO NOCTURNO
MODO ECUALIZAD.
AGUDOS
GRAVES
VOL. SALIDA TV
PROGRAMA
SILENCIO
•Música
• Teatro
•Voz
Si selecciona
Programa de audio Estéreo, Mono
Use
Personal
, puede ajustar los niveles de sonido individuales, como
sonido).
SONIDO
Medianoche: reduce las diferencias
de volumen entre las escenas de
ENCENDIDO
ENCENDIDO
PERSONAL
ESTÉREO
ENCENDIDO
APAGADO
APAGADO
38
38
FIJO
APAGADO
acción y los diálogos.
SRS TruSurround XT: utiliza dos
altavoces para reproducir sonido
envolvente virtual a partir de
cualquier fuente, creando sonidos
más amplios y tonos graves más
profundos.
Si selecciona una de las opciones
predeterminadas siguientes de
Modo ecualizado
sonido individuales se actualizan
automáticamente:
Gaves
o
SAP
(Second Audio Program o Segundo programa de
, los niveles de
y
Agudos
.
Uso de la presentación en pantalla (OSD) 77
Page 77

PIP/POP/PBP
Puede ver varias selecciones activas simultáneamente con las funciones de imagen sobre
imagen (PIP), imagen fuera de imagen (POP) o imagen junto a imagen (PBP).
ATRÁS
PIP/POP/PBP
TRANSPARENCIA
www.dell.com | support.dell.com
horizontal
TAMAÑO
POSICIÓN HOR
POSICIÓN VER
ORIGEN PIP
ORIGEN DE SONIDO
y
Posición vertical
mueve la ventana a la izquierda y + la mueve a la derecha. Cuando ajusta la orientación vertical,
0 está al principio de la pantalla y 100 está al final.
Para POP, puede seleccionar entre tres opciones POP diferentes:
•
POP1
— una ventana
•
POP3
— tres ventanas
POP12
•
— doce ventanas
Modo de búsqueda POP
reproduce la selección para los canales seleccionados que aparecen en la ventana.
rota a través de cada ventana y reproduce los canales preseleccionados. La rotación se realiza
a través de todos los canales disponibles antes de comenzar de nuevo por el menor.
PIP/POP/PBP
PIP
NOTA: Puede usar los botones
PIP o POP/PBP del mando a
distancia para activar y desactivar
las funciones correspondientes.
Si está en modo PIP, POP o PBP,
38
38
use el botón
SWAP
del mando
a distancia para alternar las
selecciones principal y secundaria
38
38
TV (Televisor)
PRINCIPAL
Use el botón
PIP Sel
del mando
a distancia para alternar el control
entre las ventanas.
En la presentación en pantalla,
puede ajustar las opciones
Transparencia, Tamaño
y
de las ventanas PIP. Cuando selecciona la orientación horizontal, -
permite seleccionar
Secuencial
o
Flotante
. El modo
Secuencial
Flotante
Posición
78 Uso de la presentación en pantalla (OSD)
Page 78

Control parental
Control parental
ver programas que no sean apropiados para su edad. Las opciones de
permite bloquear ciertos canales o programas para que los niños no puedan
Control parental
cuando se especifica un código de acceso válido.
PARENTAL
ATRÁS
PARENTAL
ESCRIBIR CÓDIGO DE ACCESO
ESCRIBIR CÓDIGO DE ACCESO
Para entrar en el menú
use el código de acceso
Control parental
3355
. Consulte “Establecer un código de acceso” en la página 80 para
, necesita un código de acceso. La primera vez que entre,
obtener información sobre cómo crear otro código de acceso.
Puede establecer las opciones siguientes para bloquear el contenido:
•
Bloquear controles:
•
Bloquear canal: bloquea los canales seleccionados
Clasificación de película: bloquea las películas basándose en su clasificación (G, PG, PG-13,
•
activa o desactiva todas las opciones del control de acceso a menores
R, NC-17, X y SIN CLASIFICACIÓN)
•
Clasificación de TV: bloquea el contenido de televisión según su clasificación (TV-Y, TV-Y7,
TV-G, TV-PG, TV-14, TV-MA, Sin clasificación)
aparecen
NOTA: Puede usar Borrar todos para desbloquear los canales y programas que haya establecido.
Uso de la presentación en pantalla (OSD) 79
Page 79

Establecer un código de acceso
Cuando entra en el menú
de acceso de cuatro dígitos. Si, por algún motivo, pierde u olvida el código de acceso, puede usar
el predeterminado.
1
En el menú
2
Con el teclado numérico del mando a distancia, especifique otro código de acceso.
3
Seleccione
Control parental
Exit
Control parental
(Salir).
por primera vez, puede establecer su propio código
, seleccione
Cambiar código
.
Subtítulos
www.dell.com | support.dell.com
ATRÁS
SUBTÍTULOS
MODO SUBTÍTULOS
• CC Mute (Subtítulos activados) (activa los subtítulos automáticamente al silenciar
el volumen del televisor)
Temporizador
Sleep Timer
apaga automáticamente el televisor. Puede seleccionar un intervalo de entre 10 minutos y 3 horas.
(Temporizador) permite seleccionar un intervalo de tiempo transcurrido el cual se
SUBTÍTULOS
ENCENDIDOS
CC1
Puede elegir entre los siguientes
modos de
Subtítulos:
• CC1 a CC4 y TXT1 a TXT4
(CC1, CC2 y CC4 ofrecen
subtítulos estándar y CC3
proporciona subtítulos
en un idioma secundario).
80 Uso de la presentación en pantalla (OSD)
Page 80

Configuración de presentación en pantalla
Configuración de OSD
permite ajustar la apariencia de la presentación en pantalla, establecer los
canales cuando se está en el modo de televisor, cambiar el idioma de la presentación en pantalla
(consulte “Selección del idioma de la presentación en pantalla” en la página 74) y restaurar la
configuración de fábrica.
CONFIGUR.
Tiempo de espera OSD
para aumentar o disminuir
Use
la cantidad de tiempo que aparece la presentación
ATRÁS
AJUSTES OSD
CONFIGURACIÓN DE CANAL
IDIOMA
REST. PREDET.
CONFIGURAR DVI
en pantalla. La cantidad máxima de tiempo es de
60 segundos.
En el menú
Bloqueo de botones de TV
Configuración de OSD,
para bloquear los botones
puede seleccionar
del panel lateral. Cuando se habilita esta opción, sólo
funciona el botón de encendido. Mantenga pulsados
durante 10 segundos los botones para aumentar
el volumen e incrementar el canal para desbloquear
los botones.
Si utiliza un conector DVI, es posible que tenga que comprobar las siguientes opciones:
Origen:
la opción predeterminada es
Automático
El televisor detecta automáticamente si se utiliza
un ordenador (un PC) o un dispositivo de vídeo. Si la imagen no es correcta, seleccione la fuente
apropiada para el dispositivo que utiliza (
Color
: el espacio de color predeterminado es
la configuración a
YUV
.
PC
o
Vídeo
).
RGB
. Si los colores no son correctos, puede cambiar
Uso de la presentación en pantalla (OSD) 81
Page 81

Lector de tarjetas
Un lector de tarjetas permite ver fotografías digitales en el televisor.
MENÚ PRINCIPAL
SALIR
www.dell.com | support.dell.com
SELEC-
CIONAR
ENTRADA
El lector de tarjetas admite los tipos de tarjetas siguientes:
• Compact Flash
• Secure Digital
• Memory Stick
• Smart Media
• Multimedia Card (MMC)
NOTA: Para adquirir un lector de tarjetas, póngase en contacto con Dell.
CONTROL DE IMAGEN
ATRÁS
MODO VISUALIZACIÓN
TRANSICIÓN
IMAGEN SIGUIENTE
IMAGEN ANTERIOR
AJUSTES
DE IMAGEN
IMAGEN
AJUSTES
DE COLOR
El menú
PIP/POP
PBP
TAMAÑO
CONFIGUR.
Control de imagen
permite seleccionar
el modo en que se muestran las fotografías,
por ejemplo, se puede elegir verlas como una
presentación de diapositivas, girarlas, seleccionar
diferentes transiciones entre ellas y mostrar
información, como la fecha y la hora en que
se tomaron.
ELIMINAR IMAGEN
GIRAR
INFORMACIÓN DE FOTO
TAMAÑO DE LA IMAGEN
82 Uso de la presentación en pantalla (OSD)
Page 82

Solución de problemas del televisor
ADVERTENCIA: Si en algún momento ve humo o chispas que provengan del televisor, desconéctelo
inmediatamente y póngase en contacto con Dell. No intente realizar ninguna acción para solucionar
el problema.
Sugerencias para solucionar problemas
NOTA: Algunos problemas pueden estar relacionados con los dispositivos conectados a la televisión.
Para obtener ayuda adicional para solucionar problemas, vea la documentación de los dispositivos
conectados a la televisión.
La mayor parte de los problemas del televisor pueden deberse a que no se haya realizado la
selección de entrada correcta. Cada conector del televisor (en un lado y en la parte inferior)
se asocia con una selección de entrada, que se indica con las etiquetas
menú
Selección de entrada
AV1
•
•
•
•
•
•
También puede realizar las selecciones de entrada siguientes:
•
•
•
: conector compuesto del lateral del televisor
AV2
: conector compuesto de la parte inferior del televisor
AV3
: conector S-Video del lateral del televisor
AV4
: conector S-Video de la parte inferior del televisor
AV5
: conector componente de la parte inferior del televisor
AV6
: conector componente de la parte inferior del televisor
TV
: conector ANT/Cable de la parte inferior del televisor
DVI
: conector VGA de la parte inferior del televisor
DVI
: conector DVI de la parte inferior del televisor
.
AV1
a
AV6
en el
Solución de problemas del televisor 83
Page 83

Problemas generales
Problema Solución posible
La calidad de imagen es deficiente mientras
se ve el televisor y se usa un dispositivo
como un reproductor de DVD o un VCR
www.dell.com | support.dell.com
1
Compruebe la configuración de la relación de
aspecto en la presentación en pantalla. Pulse el botón
Menu
en el mando a distancia y seleccione
obtener más información sobre el uso de la presentación
en pantalla, consulte “Uso de la presentación en
pantalla (OSD)” en la página 73.
2
Vuelva a conectar el dispositivo con el mismo tipo
de conector. Por ejemplo, si usa el conector compuesto
de la parte inferior, pruebe a conectar el dispositivo al
conector compuesto del lateral del televisor. Consulte
“Acerca de su televisor” en la página 53 para conocer
la ubicación de los conectores.
Cuando haya conectado el dispositivo, cambie la
selección de entrada en la presentación en pantalla.
Si desea más información, consulte “Menú Selección
de entrada” en la página 74.
3
Conecte el dispositivo con otro conector. Por ejemplo,
si experimenta el problema con un conector compuesto,
pruebe a usar el conector componente.
Size
. Para
NOTA: Para conectar con un conector diferente, necesita
los cables apropiados para dicho conector. Consulte la
documentación del dispositivo para obtener una lista de las
conexiones admitidas.
Cuando haya conectado el dispositivo, cambie la
selección de entrada en la presentación en pantalla.
S desea más información, consulte “Menú Selección
de entrada” en la página 74.
4
Restablezca los valores por defecto originales de fábrica.
Menu
Pulse
Configuración
predeterminada
5
Ajuste la intensidad de color. Pulse
a distancia, seleccione
Temperatura de color
en el mando a distancia, seleccione
y, después, seleccione
.
Imagen
.
Restablecer
Menu
en el mando
y, después, seleccione
NOTA: Algunos decodificadores de televisión ofrecen
relación de aspecto. Si desea más información, consulte
la documentación del dispositivo.
84 Solución de problemas del televisor
Page 84

Problema Solución posible
La calidad de la imagen es deficiente al
usar un dispositivo conectado al conector
ANT/Cable (coaxial)
1
Compruebe que el televisor está seleccionado
como selección de entrada en el menú
entradae
. Si desea más información, consulte “Menú
Selección de entrada” en la página 74.
2
Pulse
Menu
Configuración
de canal
3
Compruebe la configuración de la relación de aspecto
. De esta forma se restablecen los canales.
en la presentación en pantalla. Pulse el botón
el mando a distancia y seleccione
más información sobre el uso de la presentación en
pantalla, consulte “Uso de la presentación en pantalla
(OSD)” en la página 73.
4
Restablezca los valores por defecto originales de fábrica.
Menu
Pulse
Configuración
predeterminada
5
Ajuste la intensidad de color. Pulse
a distancia, seleccione
Temperatura de color
6
El problema puede estar en el dispositivo; póngase
en contacto con el proveedor de servicio.
No se ve nada en el televisor 1
Compruebe que el televisor está encendido.
2
Compruebe que todos los cables están conectados
apropiadamente al televisor, incluido el de alimentación.
3
Compruebe si aparece una luz azul o ámbar en la esquina
inferior derecha del televisor. Una luz azul indica que el
televisor está encendido. Una luz ámbar significa que el
televisor se encuentra en el modo de ahorro de energía.
4
Compruebe que en el menú
está seleccionada la entrada correcta. Si desea más
información, consulte “Menú Selección de entrada”
en la página 74.
5
Vuelva a conectar los dispositivos que están conectados
al televisor. Si usa varios dispositivos, conecte y pruebe
uno cada vez.
6
Conecte otro dispositivo que sepa que funciona
apropiadamente.
7
Restablezca los valores por defecto originales de fábrica.
Menu
Pulse
Configuración
Restablecer predeterminada
fábrica).
Selección de
en el mando a distancia, seleccione
y, después, seleccione
Configuración
Menu
Ta m a ño
. Para obtener
en el mando a distancia, seleccione
y, después, seleccione
Restablecer
.
Menu
en el mando
Imagen
y, después, seleccione
.
Selección de entrada
en el mando a distancia, seleccione
(Configuración) y, después, seleccione
(Restablecer valores de
en
Solución de problemas del televisor 85
Page 85

Problema Solución posible
No se oye sonido 1
www.dell.com | support.dell.com
Compruebe que el silencio no está activado. Si se pulsa
Mute
el botón
en el mando a distancia, se activa o se
desactiva la función de silencio.
2
Si sólo algunos canales del televisor no tienen sonido,
compruebe que se ha seleccionado la entrada correcta
en
Selección de entrada
. (Si desea más información,
consulte “Menú Selección de entrada” en la página 74).
3
Compruebe que los cables de sonido están conectados
firmemente a ambos conectores de entrada de sonido
del televisor y a los conectores de salida de sonido de los
dispositivos. Compruebe que los colores de los cables
coinciden con los de los conectores.
4
Además, compruebe que los cables de sonido están
conectados a la misma hilera que los cables de vídeo.
Consulte “Acerca de su televisor” en la página 53 para
conocer la ubicación de los conectores.
5
Vuelva a conectar el dispositivo con el mismo tipo
de conector. Por ejemplo, si usa el conector compuesto
de la parte inferior, pruebe a conectar el dispositivo al
conector compuesto del lateral del televisor. Consulte
“Acerca de su televisor” en la página 53 para conocer
la ubicación de los conectores.
Cuando haya conectado el dispositivo, cambie la
selección de entrada en la presentación en pantalla.
Si desea más información, consulte “Menú Selección
de entrada” en la página 74.
6
Conecte el dispositivo con otro conector. Por ejemplo,
si experimenta el problema con un conector compuesto,
pruebe a usar el conector componente.
NOTA: Para conectar con un conector diferente, necesita
los cables apropiados para dicho conector. Consulte la
documentación del dispositivo para obtener una lista de
las conexiones admitidas.
Cuando haya conectado el dispositivo, cambie la
selección de entrada en la presentación en pantalla.
Si desea más información, consulte “Menú Selección
de entrada” en la página 74.
7
Pruebe el dispositivo en un televisor diferente.
NOTA: Si usa PIP/POP/PBP, asegúrese de que está
seleccionado el Origen de sonido apropiado. Pulse
Menu en el mando a distancia y seleccione PIP/POP/PBP.
86 Solución de problemas del televisor
Page 86

Problema Solución posible
La imagen se ve doble o no se ve ninguna
imagen con el DVD
Desactive la búsqueda progresiva en el reproductor
de DVD. El televisor Dell™ ofrece un desentrelazador
(deinterlacer) integrado que es de mejor o de igual
calidad que el del reproductor de DVD. Si desea
más información sobre la búsqueda progresiva del
reproductor de DVD, consulte la documentación
del mismo.
La imagen es demasiado débil o brillante
Actualice la configuración del color en la presentación
en pantalla. Pulse el botón
y seleccione
La pantalla no está centrada correctamente 1
Actualice la configuración del tamaño en la
Imagen
presentación en pantalla. Pulse el botón
en el mando a distancia y seleccione
2
Restablezca los valores por defecto originales de fábrica.
Pulse
Menu
Configuración
predeterminada
La pantalla tiene una o varias líneas 1
Compruebe la configuración de la relación de aspecto
en la presentación en pantalla. Pulse el botón
el mando a distancia y seleccione
más información sobre el uso de la presentación en
pantalla, consulte “Uso de la presentación en pantalla
(OSD)” en la página 73.
2
Compruebe que en el menú
está seleccionada la entrada correcta. Si desea más
información, consulte “Menú Selección de entrada”
en la página 74.
3
Pruebe a conectar un dispositivo diferente. Compruebe
que conecta apropiadamente los cables y actualice la
selección de entrada en la presentación en pantalla.
4
Actualice la configuración del tamaño en la
presentación en pantalla. Pulse el botón
en el mando a distancia y seleccione
5
Restablezca los valores por defecto originales de fábrica.
Menu
Pulse
Configuración
predeterminada
Menu
en el mando a distancia
.
Menu
Ta m a ño
.
en el mando a distancia, seleccione
y, después, seleccione
Restablecer
.
Menu
Ta m a ño
. Para obtener
Selección de entrada
Menu
Ta m a ño
.
en el mando a distancia, seleccione
y, después, seleccione
Restablecer
.
en
Solución de problemas del televisor 87
Page 87

Problema Solución posible
Los paneles del panel lateral no funcionan Compruebe si se han bloqueado los botones en
La imagen es demasiado pequeña
www.dell.com | support.dell.com
Mensajes de OSD
Mientras usa el televisor, pueden aparecer los mensajes siguientes.
Mensaje Solución posible
Auto Adjust (Ajuste automático) No se requiere ninguna acción, el televisor está
Out of Range (Fuera de alcance) Compruebe que la configuración de la resolución
No Video Input (No hay entrada de vídeo)
Bloqueo de botones de TV Para desbloquearlo, pulse Menu en el mando a
la presentación en pantalla. Pulse el botón Menu
en el mando a distancia y seleccione Configuración.
Si no puede usar el mando a distancia, pulse los botones
para aumentar el volumen y seleccionar un canal superior
en el lateral del televisor durante diez segundos con el fin
de desbloquear los botones.
1
Ajuste la configuración del tamaño. Pulse el botón
Menu
en el mando a distancia y seleccione
2
Esto puede ser un problema del dispositivo. Consulte
la documentación del mismo.
realizando un ajuste automático.
es la óptima.
Puede que necesite descargar otro controlador
de vídeo. Si desea más información, vaya a
support.dell.com.
1
Compruebe que todos los cables están
conectados correctamente.
2
Compruebe que en el menú
está seleccionada la entrada correcta. Si desea
más información, consulte “Menú Selección de
entrada” en la página 74.
distancia y seleccione Configuración.
Si no puede usar el mando a distancia, pulse los
botones para aumentar el volumen y seleccionar
un canal superior en el lateral del televisor durante
diez segundos con el fin de desbloquear los
botones.
Selección de entrada
Ta m a ño
.
88 Solución de problemas del televisor
Page 88

Mensaje Solución posible
En modo de ahorro de energía
Presione cualquier tecla en el teclado
o mueva el ratón
En modo de ahorro de energía
Compruebe señal de vídeo
Prueba automática Aparece cuando se selecciona un ordenador
No se ha detectado tarjeta en el lector de tarjeta Quite y reinstale la tarjeta.
Si el ordenador está conectado al televisor y éste
no detecta la señal, entrará en modo de suspensión.
En este modo, la luz de encendido se ilumina en
color ámbar.
Presione cualquier tecla en el teclado o mueva
el ratón para activar el televisor.
Si utiliza un dispositivo de vídeo y éste permanece
inactivo durante más de 30 minutos, el televisor
cambiará a modo de ahorro de energía. En este
modo, la luz de encendido se ilumina en color
ámbar.
como fuente y no está conectado. Por ejemplo,
si selecciona VGA o DVI en el menú Seleccionar
entrada y no hay ninguna conexión. Conecte un
ordenador mediante una conexión VGA o DVI.
Compruebe que usa una tarjeta que admita el
lector de tarjetas. El lector de tarjetas admite
los tipos de tarjetas siguientes:
• Compact Flash
• Secure Digital
•Memory Stick
•Smart Media
• Multimedia Card
Solución de problemas del televisor 89
Page 89

Problemas del mando a distancia
Problema Solución posible
El televisor no responde cuando
se usa el mando a distancia
www.dell.com | support.dell.com
Problemas con el lector de tarjetas
El lector de tarjetas admite los formatos de archivos jpeg y los tipos de tarjetas y siguientes:
• Compact Flash
• Secure Digital
• Memory Stick
• Smart Media
• Multimedia Card (MMC)
Siga las instrucciones de instalación que venían con el lector de tarjetas. Cuando instale el lector
de tarjetas, busque la flecha de la parte delantera del mismo y compruebe que señala hacia arriba
cuando lo deslice en su sitio.
Una vez instalado el lector de tarjetas, pulse
de entrada
y
Lector de tarjetas
1
Apunte el mando a distancia directamente a la esquina inferior
derecha del televisor. Compruebe que no hay nada que bloquee
la parte delantera del televisor. Para saber la ubicación de los
infrarrojos, consulte “Vista frontal” en la página 53.
2
Compruebe que las pilas están instaladas correctamente.
3
Si las pilas son viejas, instale unas nuevas.
NOTA: Las luces brillantes u otros dispositivos de infrarrojos pueden
interferir con el mando a distancia y los infrarrojos del televisor.
Menu
en el mando a distancia, seleccione
Selección
.
90 Solución de problemas del televisor
Page 90

Uso de la característica de prueba automática
cuando el televisor se conecta a un ordenador
Cuando el ordenador se conecta al televisor a través de un conector DVI o VGA, puede utilizar
la función de prueba automática para comprobar si el televisor funciona apropiadamente. Si el
televisor y el ordenador están conectados correctamente pero la pantalla del televisor permanece
oscura, siga estos pasos para realizar la prueba automática del televisor:
1
Desactive el ordenador y el televisor.
2
Desconecte el cable del vídeo de la parte trasera del ordenador.
3
Encienda el televisor.
Si el televisor no puede percibir una señal de vídeo y funciona correctamente, el cuadro de
diálogo flotante de la función de prueba automática de Dell aparece en la pantalla (sobre una
pantalla en blanco).
Mientras esté activo el modo de prueba automática, la luz de encendido permanece de
color verde y el patrón de prueba automática se desplaza por la pantalla continuamente.
Este cuadro también aparece durante el funcionamiento normal del sistema si el cable
del vídeo se desconecta o se daña.
4
Desactive el televisor y vuelva a conectar el cable del vídeo; después, encienda el ordenador
y el televisor. Si la pantalla del televisor sigue en blanco, el problema puede estar en el
ordenador o en la tarjeta gráfica.
Consulte la documentación del ordenador para obtener más información.
Solución de problemas del televisor 91
Page 91

Problemas al usar el televisor como monitor
NOTA: Sólo puede conectar el ordenador al televisor mediante un conector VGA.
Problema Solución posible
La imagen es demasiado pequeña
o está descentrada
www.dell.com | support.dell.com
No se oye sonido
PIP/POP/PBP no funciona 1
1
Use
Ajuste automático
Ajustes de imagen
en la presentación en pantalla, seleccione
Ajustes de imagen
automático
2
Compruebe que la configuración de la resolución
es la óptima.
Puede que necesite descargar otro controlador
de vídeo. Si desea más información, vaya a
support.dell.com
.
para comprobar los
. Pulse
Menu
y seleccione
.
para entrar
Ajuste
NOTA: Algunas tarjetas de vídeo antiguas pueden
no admitir la configuración de la resolución para
el televisor.
1
Compruebe que el cable de sonido verde está
conectado al conector de sonido del televisor y del
ordenador. Para saber la ubicación del conector del
televisor, consulte “Uso de VGA (PC análogo)” en
la página 67. Consulte en la documentación del
ordenador la ubicación de sus conectores.
No conecte el cable de sonido a la clavija de los
auriculares.
2
Compruebe que el volumen del ordenador no
está silenciado.
3
Compruebe los altavoces para cerciorarse de
que el sonido del equipo funciona. Consulte
la documentación del ordenador para obtener
información sobre cómo solucionar problemas
del mismo.
4
Desconecte el televisor del ordenador y pruebe
si el volumen del televisor funciona.
Compruebe que la configuración de la
presentación en pantalla está establecida
Menu
correctamente. Pulse
en la presentación en pantalla y seleccione
PIP/POP/PBP.
2
Intercambie la selección de vídeo y de sonido.
para entrar
92 Solución de problemas del televisor
Page 92

Problema Solución posible
No se ve el vídeo NOTA: Si se realiza una prueba automática, significa
que hay un problema con la tarjeta de vídeo o que
está usando la selección de entrada equivocada.
1
Compruebe que el televisor está encendido.
2
Compruebe que todos los cables están conectados
apropiadamente al televisor, incluido el de
alimentación.
3
Compruebe si aparece una luz azul o ámbar en la
esquina inferior derecha del televisor. Una luz azul
indica que el televisor está encendido. Una luz
ámbar significa que el televisor se encuentra en
el modo de ahorro de energía.
4
Compruebe que la opción
seleccionada en el menú
PC análogo
está
Selección de entrada
.
Si desea más información, consulte “Menú
Selección de entrada” en la página 74.
5
Vuelva a conectar el ordenador.
6
Conecte otro dispositivo que sepa que funciona
apropiadamente.
7
Restablezca los valores por defecto originales
Menu
de fábrica. Pulse
seleccione
Configuración
Restablecer predeterminada
en el mando a distancia,
y, después, seleccione
.
Solución de problemas del televisor 93
Page 93

www.dell.com | support.dell.com
94 Solución de problemas del televisor
Page 94

Especificaciones del televisor
General
Número de modelo TV LCD W2600
Tipo de pantalla TFT de matriz activa (LCD TFT en color)
Tamaño de la pantalla 26 pulgadas (660,4 mm)
Área visible 566.4
Relación de aspecto Panorámica
Posibilidades de la pantalla 480i
Características adicionales:
Admite SAP
Admite CC (subtítulos)
Admite teletexto
Admite control parental
x
339,8 mm (22,3 x 13,38 pulgadas)
resolución 15/9
relación de aspecto 16/9
480p
720p
1080i
576i (Europa)
576p (Europa)
Sí
Sí
Sí
(sólo en Europa)
Sí
Dimensiones
Pantalla (con soporte) 830 x 504 x 209 mm
Pantalla (sin soporte) 830 x 421 x 107 mm
Con altavoces N/D, no se pueden separar
Peso (con soporte) 19 kg/41 libras (aprox.)
Resolución nativa 1280x768 (WXGA)
Admite HDTV (televisión de alta definición) Sí
Especificaciones del televisor 95
Page 95

Imagen sobre imagen
Imagen sobre imagen (PIP) Sí
Imagen fuera de imagen (POP) Sí
Imagen junto a imagen (PBP) Sí
Número de sintonizadores 2 analógicos
Brillo (normal) 450 nt (normal)
Relación de contraste 500/1 (normal)
Tiempo de respuesta (negro/blanco) 25 ms (normal)
www.dell.com | support.dell.com
Ángulo de visibilidad
Horizontal +/- 85º
Vertical +/- 85º
Entradas
Video
Compuesto (CVBS)
S-Video
Componente
Entrada TV (coaxial)
Sonido (RCA izquierdo (L) + derecho (R))
DVI
Ordenador
VGA (para uso como monitor de ordenador)
Sonido (PC)
Otros
Lector de tarjetas
Salidas
Video
Compuesto (CVBS)
Sonido (RCA izquierdo (L) + derecho (R))
Auriculares
2 (en un lado y en la parte inferior)
2 (en un lado y en la parte inferior)
2 (en la parte inferior)
1 (en la parte inferior)
7 pares
1 (en la parte inferior)
1 (en la parte inferior)
1 (en la parte inferior)
una (en un lado)
una (en la parte inferior)
un par
una (en un lado)
96 Especificaciones del televisor
Page 96

Sonido
Efectos SRS TruSurround XT
Modo nocturno
Altavoces (integrados) 15w por canal
30 w en total
Especificaciones del televisor 97
Page 97

www.dell.com | support.dell.com
98 Especificaciones del televisor
Page 98

Indice
A
Acerca de
botones del panel lateral, 53
conectores laterales, 53
TV (Televisor), 53
Ajustar, 77
brillo, 76
color, 76
Antena, 63
Auriculares, 55
B
Botón
bloquear, 81
desbloquear, 81
Botones
canal siguiente y anterior, 54
canales, 70
encendido, 54
Enter, 70
mando a distancia, 70
OSD, 54
Panel lateral, 54
PIP, 70
selección de entrada, 54
volumen, 54, 70
C
Cables, 57
Canal, 81
bloquear, 79
Coaxial, 63
Código de acceso
crear, 80
Componente, 65
Conector
VGA, 67
Conectores, 55
AV1, 5 5
AV2, 55-56
AV4, 5 6
AV5, 5 6
AV6, 5 6
calidad, 61
coaxial, 56, 61
componente, 56, 61, 65
compuesto, 61, 63
DVI, 66
DVI HDCP, 61
DVI-HDCP, 56, 66
encendido, 56
panel lateral, 55
S-Video, 61, 64
ubicación de los, 56
Conexión de dispositivos
cámara de video, 61
magnetoscopio, 61
receptor de televisión por
cable, 61
receptor de televisión por
satélite, 61
reproductor de DVD, 61
Conexión de una antena, 63
Conexión del cable
coaxial, 63
Configuración, 81
Configuración de fábrica
restaurar, 81
Contenido del paquete, 57
Control de acceso a menores
código de acceso, 79
D
DVI-HDCP, 66
E
Especificaciones, 95
I
Imagen fuera de imagen, 78
Imagen junto a imagen, 78
Imagen sobre imagen, 78
Indicador de encendido
luz ámbar, 53
luz azul, 53
L
Lector de tarjetas, 55
tarjetas admitidas, 82
Indice 99
Page 99

Limpieza, 59
Luz de encendido
ámbar, 53
azul, 53
M
Mando a distancia, 73
botones, 70
mando a distancia
universal, 72
pilas, 69
problemas con, 90
uso, 69
Mando a distancia
universal, 72
Modo nocturno, 77
Monitor, 67
O
OSD, 70, 73
apariencia de, 81
código de acceso, 79
Configuración, 81
control de acceso a
menores, 79
idioma, 74
imagen, 76
lector de tarjetas, 82
mando a distancia, 73
mensajes, 88
menú principal, 73
PBP, 78
PIP, 78
POP, 78
selección de entrada, 74
sonido, 77
temporizador, 80
transcripción, 80
uso, 73
P
Presentación en pantalla
(OSD), 73
Problemas
mando a distancia, 90
TV (Televisor), 83
Prueba automática, 91
R
Receptor de infrarrojos, 53
S
Selección de entrada, 70
cambiar nombre, 81
Selecciones de entrada, 74
Solucionar problemas, 83
mando a distancia, 90
monitor, 92
ordenador, 91-92
OSD, 88
problemas generales, 84
prueba automática, 91
Sonido, 77
efectos, 77
estéreo, 77
SRS, 77
S-Video, 64
T
Tap a t ra se ra
retirada, 66-67
Temporizador, 80
Transcripción, 80
TV (Televisor)
conectores, 61
configuración, 61
ubicación, 61
V
VGA, 67
100 Indice
Page 100

TV LCD Dell™ W2600 66 cm
Manuel d’utilisation
Modèle W2600
www.dell.com | support.dell.com
 Loading...