


Dell™ W2306C
(テレビ機能付き)
オーナーズマニュアル
ワイド
LCD
モニタ
モデル W2306C
www.dell.com | support.dell.com
メモ
注意
警告
、通知、注意
メモ
メモ
供します。
は、
:
注意
:
警告
:
LCD TV
は、ハードウェアを損傷させたりデータを失わせる可能性を示し、その問題を避ける方法を提
は、物的損害、人身障害、または死亡につながる可能性について示しています。
ディスプレイをより効率的に使用するための重要な情報を示しています。
____________________
この文書の情報は、将来予告なしに変更することがあります。
© 2006 Dell Inc. All rights reserved.
Dell Inc.
このテキストで使用される商標:
PowerEdge。 PowerConnect、Powe rVa ult
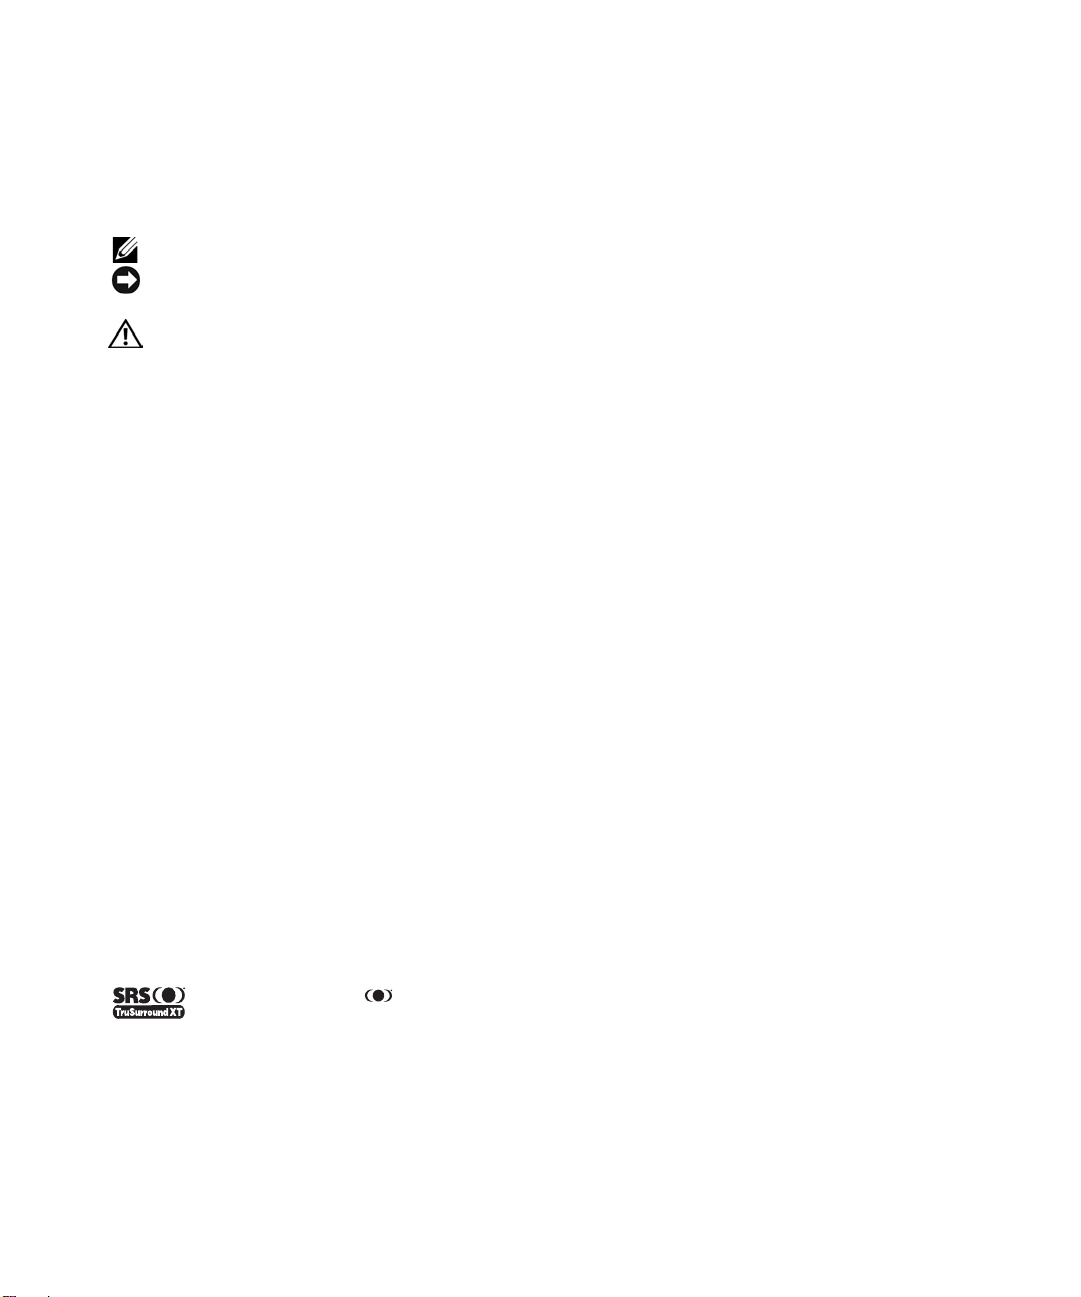
TruSurround XT
この文書で使用されているその他の商標やトレード名は、マークと名前に対する権利を主張する企業またはその製品を参照し
ています。
2006
の書面による許可なしには、どんな形式にも複製することができません。
Dell、Dimension、OptiPlex、Dell Precision、Latitude、Inspiron、DellNet、Powe rA pp
、
、
TruSurround XT、SRS
テクノロジは、
Dell Inc.はDell
年
、 記号は
SRS Labs, Inc.
以外の商標やトレード名に対する所有権を主張することはありません。
ロゴは
DELL
SRS Labs, Inc.
からライセンスを供与されて組み込まれています。
Dell, Inc.
の商標です。
の商標です。
1月Rev. A01
EMC
®
は
EMC corporation
、
の登録商標です。

目次
ワイド
1
正面ビュー . . . . . . . . . . . . . . . . . . . . . . . . . .
右側面ビュー . . . . . . . . . . . . . . . . . . . . . . . . .
左側面ビュー . . . . . . . . . . . . . . . . . . . . . . . . .
底面ビュー . . . . . . . . . . . . . . . . . . . . . . . . . .
パッケージの内容 . . . . . . . . . . . . . . . . . . . . . . .
ワイド
2
ワイド
LCD
ワイド
LCD
コンピュータをワイド
リモコン
3
バッテリをセットする . . . . . . . . . . . . . . . . . . . .
リモコンを使用する
チャンネルを選択する . . . . . . . . . . . . . . . . . . . .
モニタについて
LCD
モニタのセットアップ
LCD
モニタの正しい
モニタを接続する . . . . . . . . . . . . . . . . .
. . . . . . . . . . . . . . . . . . . . . . . . . . . . . . . . . . . . . . . .19
設置
モニタに接続する . . . . . . . . . .
LCD
l . . . . . . . . . . . . . . . . . . . . . . . . . . . . . . . . . . . . . . . . . . . . 20
. . . . . . . . . . . . . . . . . . . . . . . .5
. . . . . . . . . . . . . . . . .11
場所 . . . . . . . . . . . . .
5
11
11
13
19
22
6
7
8
9
ユニバーサルリモコンまたはラーニングリモ コンでワイド
モニタを使用する . . . . . . . . . . . . . . . . . . . .
LCD
テレビメニューを使用する
4
テレビメニューでリモコンを使用する . . . . . . . . . . . . .
テレビメニューの言語を選択する . . . . . . . . . . . . . . .
入力選択 メニュー . . . . . . . . . . . . . . . . . . . . . .
ピクチャ設定メニュー . . . . . . . . . . . . . . . . . . . .
オーディオ設定メニュー . . . . . . . . . . . . . . . . . . .
DELL CONFIDENTIAL – PRELIMINARY 12/29/05 – FOR PROOF ONLY
DELL CONFIDENTIAL – PRELIMINARY 12/29/05 – FOR PROOF ONLY
. . . . . . . . . . . . . . . . . . . . . . .24
23
24
24
25
25
26
目次
3

FILE LOCATION: P:\P_TranslateFile\C9\2005\11\C9002634-AOC-DELL W2306C_JPN_OM\OK\JP-W2306C_23J0e0TOC.fm
サイズメニュー . . . . . . . . . . . . . . . . . . . . . . .
セットアップメニュー . . . . . . . . . . . . . . . . . . . .
チャンネルのセットアップ . . . . . . . . . . . . . . . . . .
スリープタイマ . . . . . . . . . . . . . . . . . . . . . . .
ワイド
5
トラブルシューティングのヒント . . . . . . . . . . . . . . .
一般的問題 . . . . . . . . . . . . . . . . . . . . . . . . .
テレビメニューのメッセージ . . . . . . . . . . . . . . . . .
リモコンの問題 . . . . . . . . . . . . . . . . . . . . . . .
コンピュータにワイド LCDモニタを
接続しているときにセルフテスト機能を利用する
ワイド
LCD
ワイド
6
モニタのトラブルシューティング
LCD
. . . . . .
モニタをモニタとして使用しているときの問題 . . . .
モニタの仕様
LCD
. . . . . . . . . . . . . . . . . . . . . . . . .37
27
28
28
28
. . . . . . .29
29
30
34
35
35
36
7 Dell
インデックス
DELL CONFIDENTIAL – PRELIMINARY 12/29/05 – FOR PROOF ONLY
DELL CONFIDENTIAL – PRELIMINARY 12/29/05 – FOR PROOF ONLY
目次
4
に連絡する
. . . . . . . . . . . . . . . . . . . . . . . . . . . . . .
. . . . . . . . . . . . . . . . . . . . . . . . . . . . . . . . . .41
59
1
ワイド
LCD
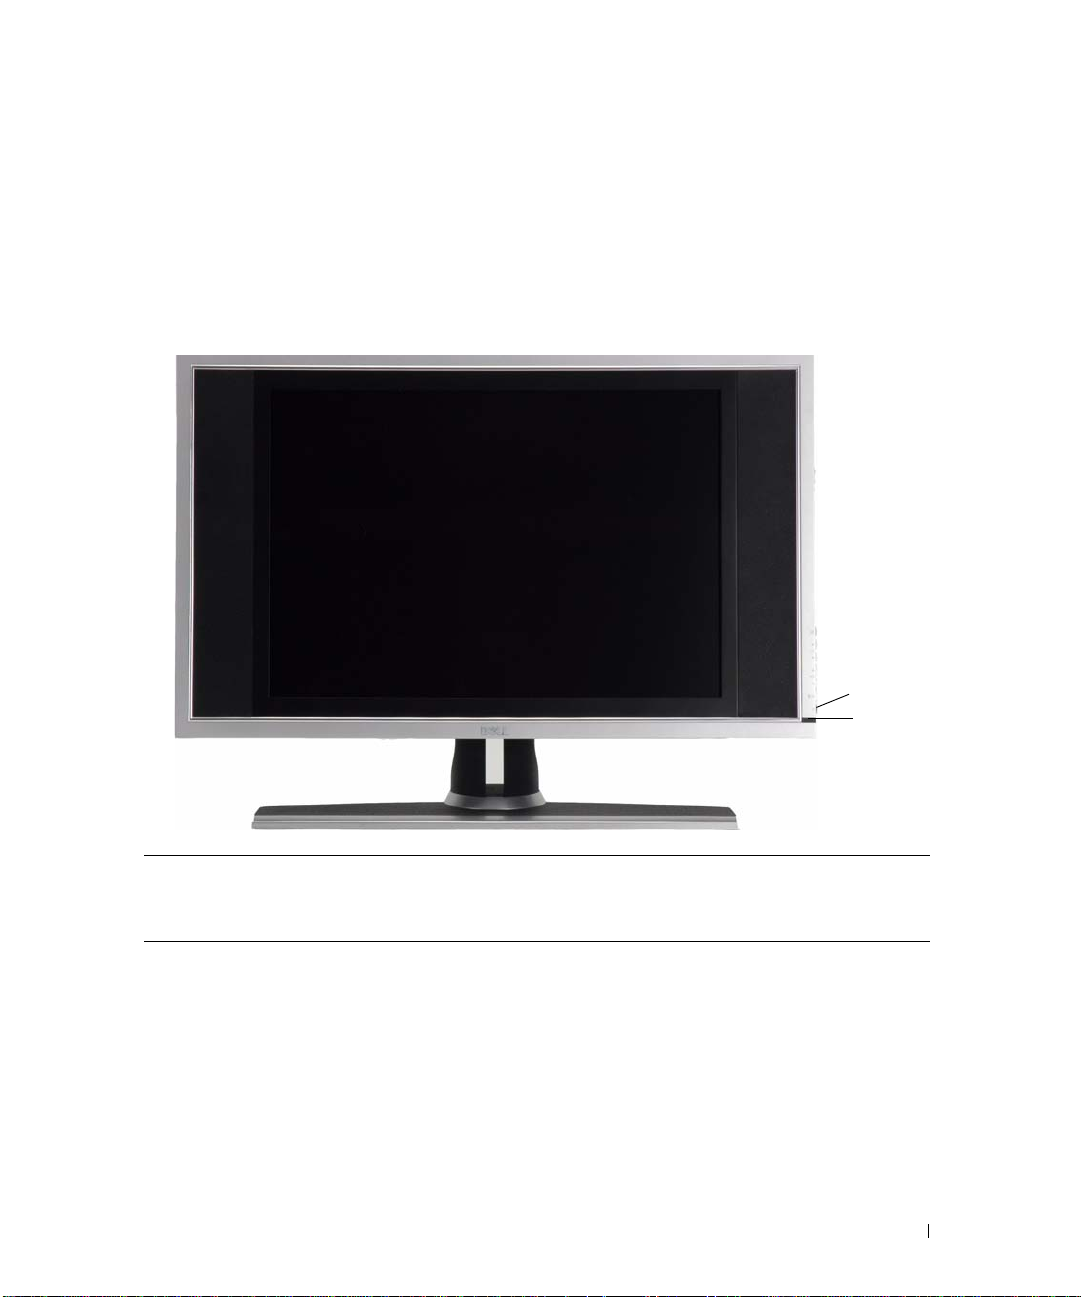
正面ビュー
モニタについて
2
1
1
赤外線受信機 リモコンからの信号を検知します。
2
電源インジケータのライト
(LED)
ライトは、ワイド
モードになっているときは黄色に点灯します。
モニタがオンのときは青、省電力
LCD
ワイド
モニタについて
LCD
5
www.dell.com | support.dell.com
K
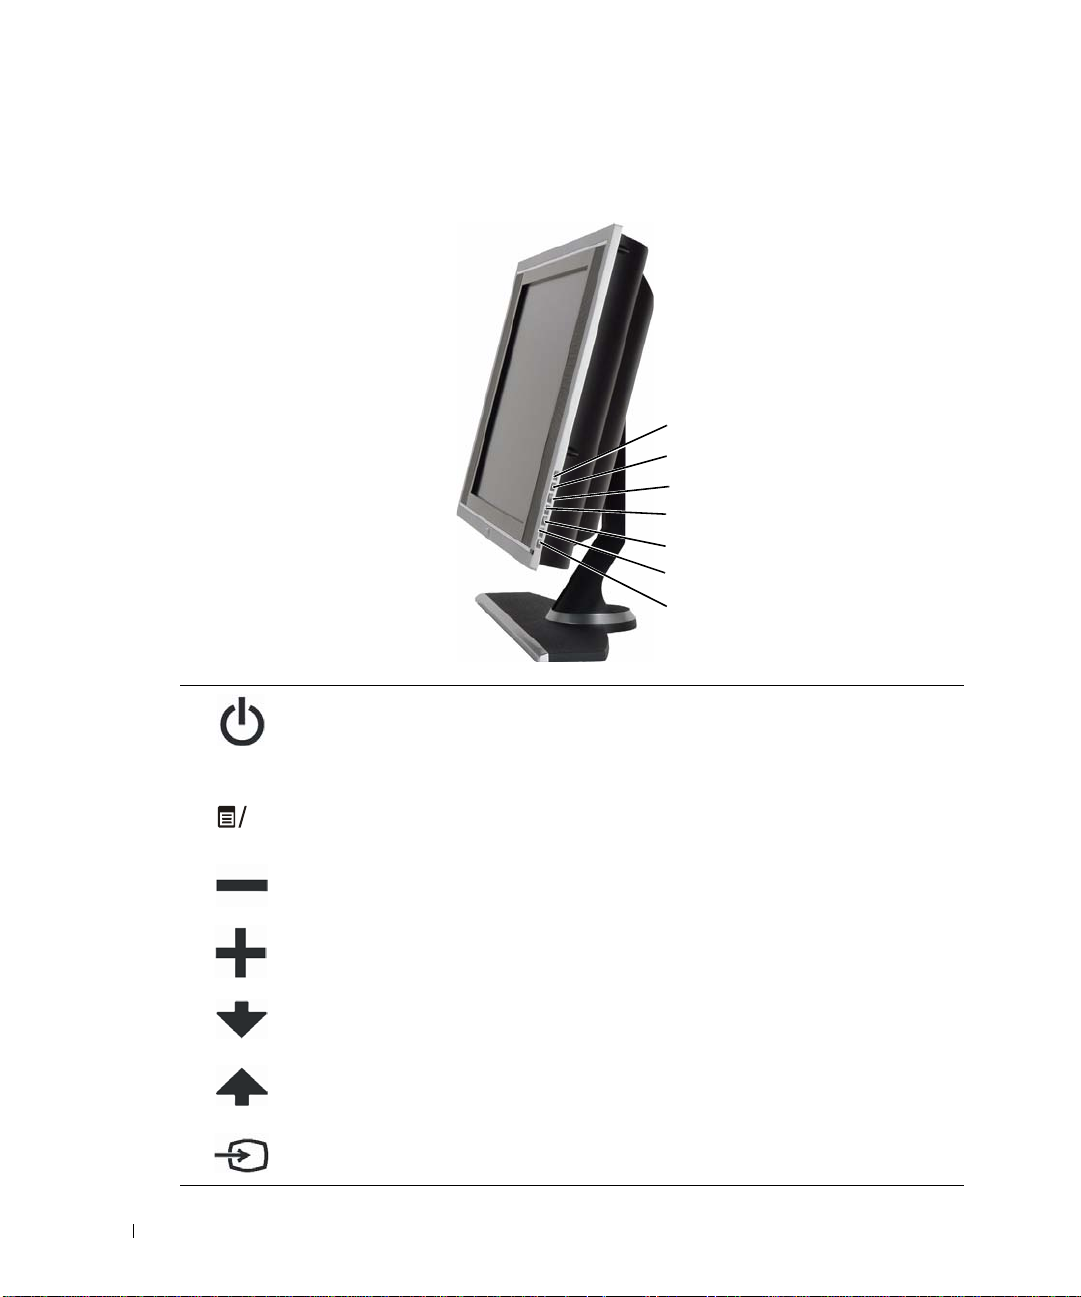
右側面ビュー
7
6
5
4
3
2
1
このボタンを押してワイド
1
電源ボタン
フを切り替えます。 電源ボタンは、オンになっているとき
は青、省電力モードになっているときは黄色で点灯しま
す。
モニタの電源のオン/オ
LCD
2
3
4
5
6
テレビメニューボタン このボタンを押してテレビメニューを有効にします。
O
音量ボタン
音量ボタン
チャンネルボタン
チャンネルボタン
このボタンを押して音量を下げたり、テレビメニューを移
動します。
このボタンを押して音量を上げたり、テレビメニューを移
動します。
このボタンを押して前のチャンネルを選択したり、テレビ
メニューを移動します。
このボタンを押して次のチャンネルを選択したり、テレビ
メニューを移動します。
7
6
ワイド
LCD
入力選択 ボタン このボタンを押して入力選択メニューを表示します。
モニタについて
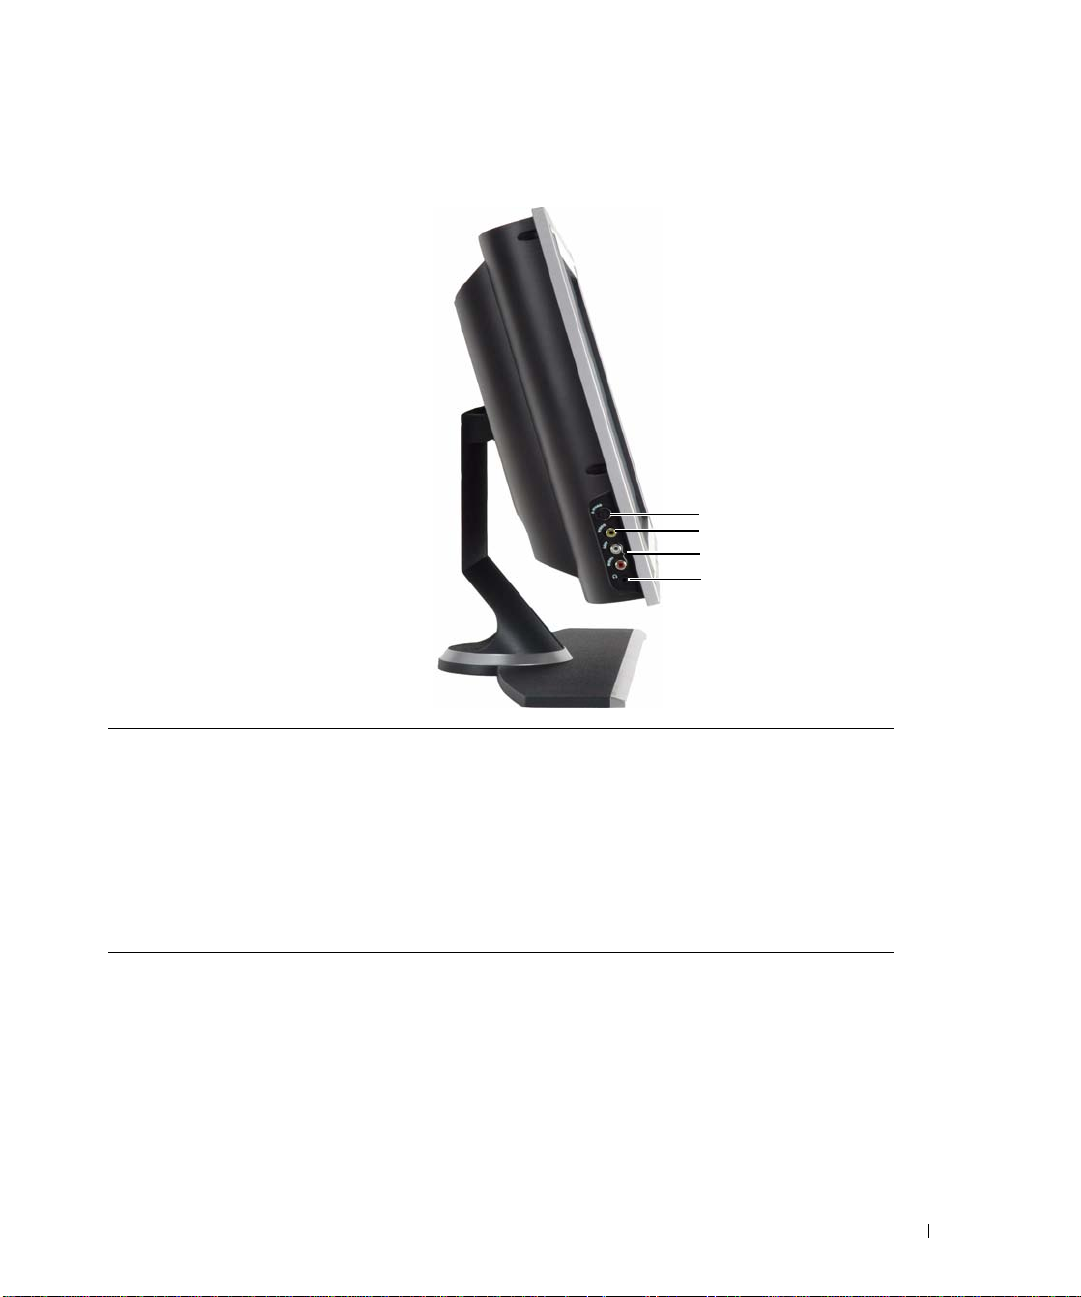
左側面ビュー
1
2
3
4
1
2
3
4
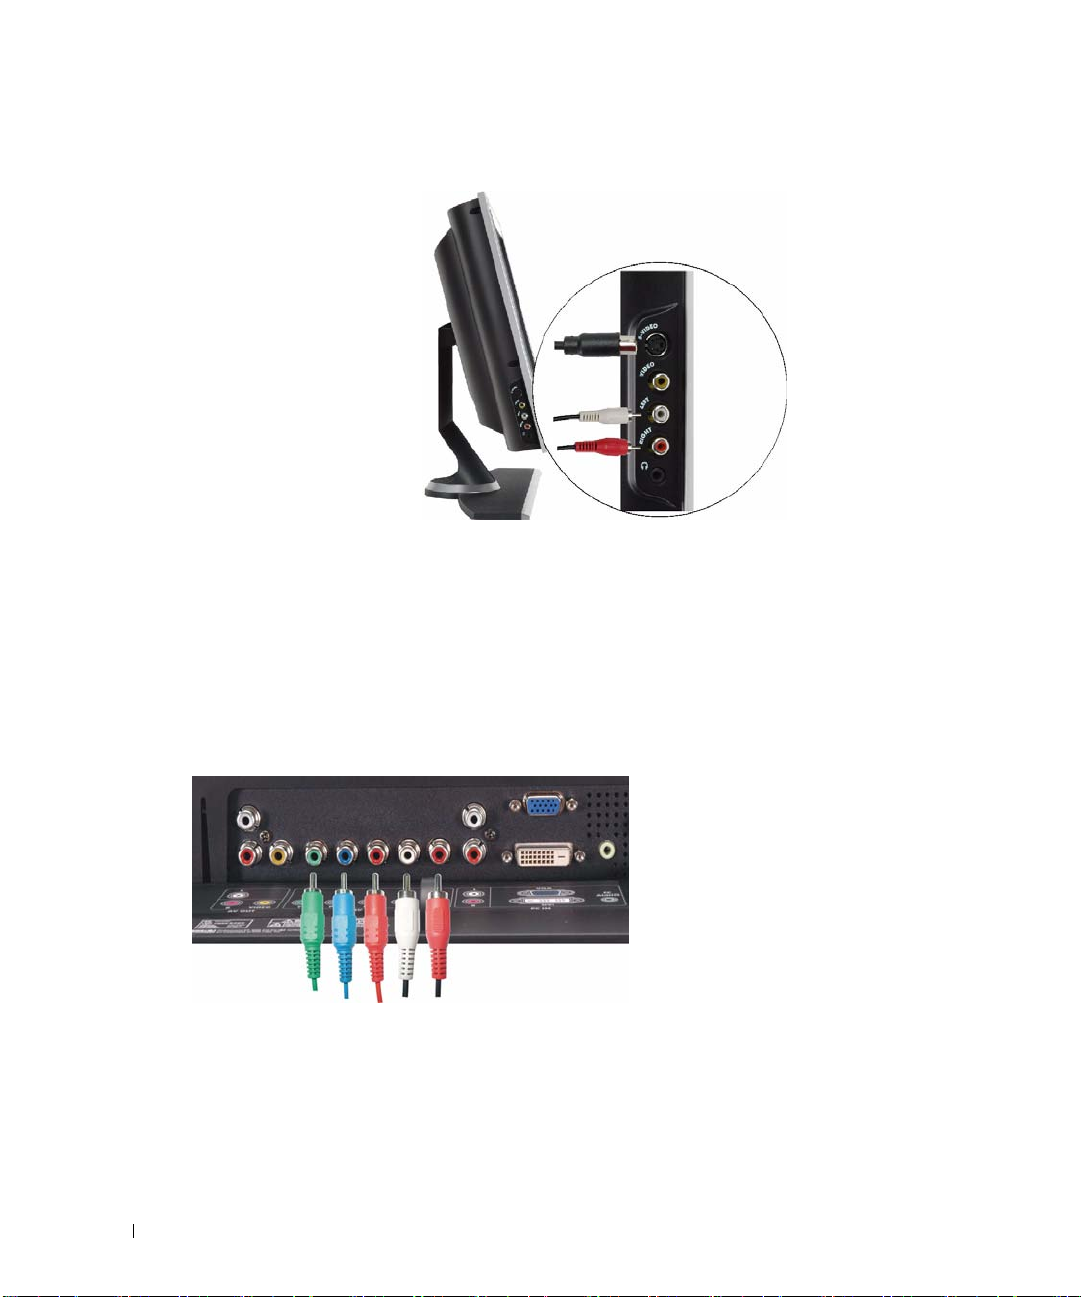
サイド(Sビデオ1) ビデオゲームシステムやビデオデッキなどの外部機器を接
AV
続します。
サイド(コンポジット1) ビデオデッキや
AV
ます。
コンポジットオーディオコネクタ外部機器を
ビデオコネクタに接続している場合、オーディオコネク
S
タを使用してください。
ヘッドフォンコネクタ ヘッドフォンを接続します。
DVD
プレーヤーなどの外部機器を接続し
(コンポジット1)
ワイド
モニタについて
LCD
7
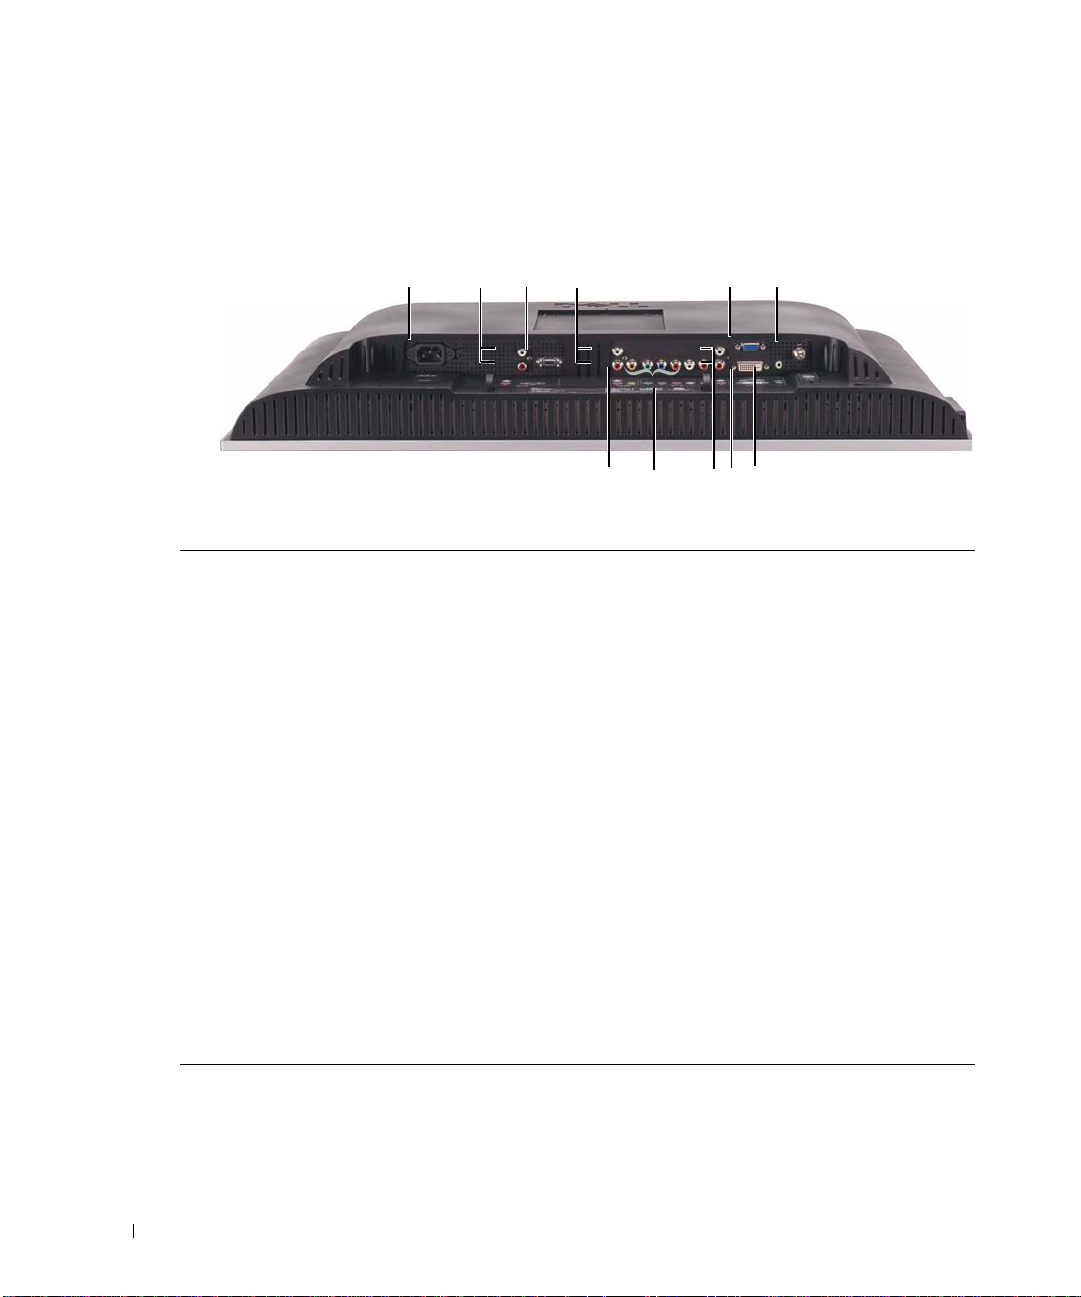
底面ビュー
www.dell.com | support.dell.com
12
1
電源コネクタ 電源コードを接続します。
2
オーディオコネクタ
D4
3
コネクタ
D4
4
コンポジットアウト
オーディオアウト
/
5
コンポジットアウト/ビデオアウト ビデオデッキを接続します。
6
コンポーネントビデオおよびオー
ディオコネクタ
7
オーディオコネクタ
DVI
(AV2) DVD
(AV1)
(L/R)
(L/R)
(L/R) DVD
8 VGA
9
10
11
コネクタ っコンピュータや
DVI
や
VGA
ケーブル ケーブルテレビやアンテナを接続します。
ANT/
用のオーディオコネクタコンピュータ から ワイド
DVI
3
4
5
6
外部機器をD4コネクタに接続している場合、D4オー
ディオコネクタを使用してください。
プレーヤーなどの外部機器を接続します。
ビデオデッキを接続します。
プレーヤーまたはケーブルテレビボックスなどの外部
機器を接続します。
プレーヤーなどの外部機器を
続している場合、
ください。
コンピュータを接続します。
DVI
DVD
機器を接続します。
ケーブル を接続します。
11
8
10
9
7
コネクタに接
DVI
オーディオコネクタを使用して
プレーヤーなどのビデオ外部
モニタへ オーディオ
LCD
8
ワイド
モニタについて
LCD
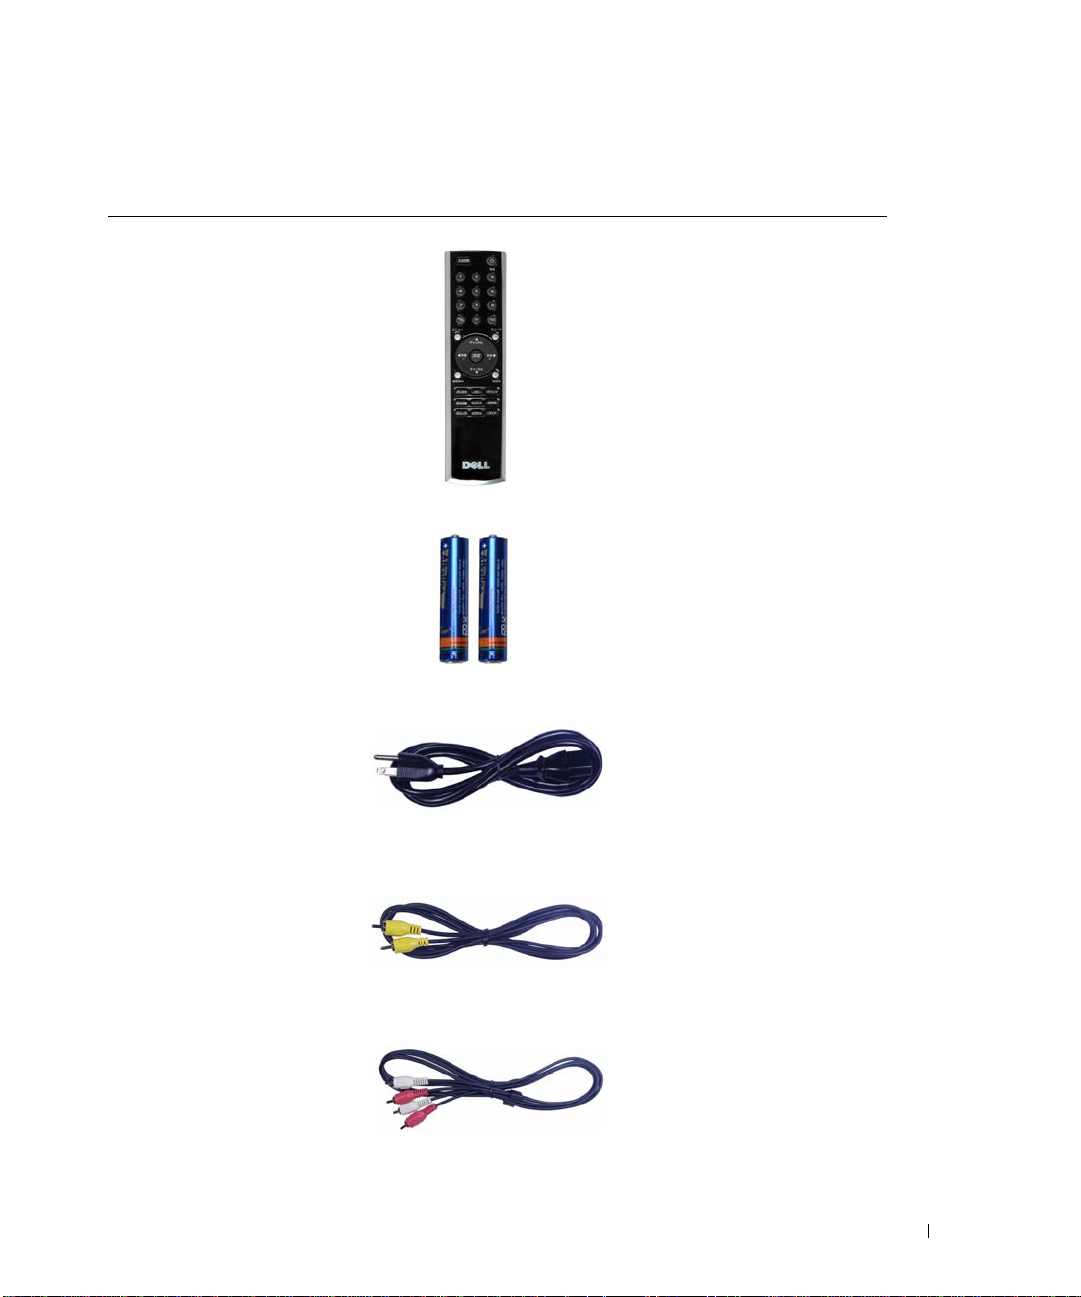
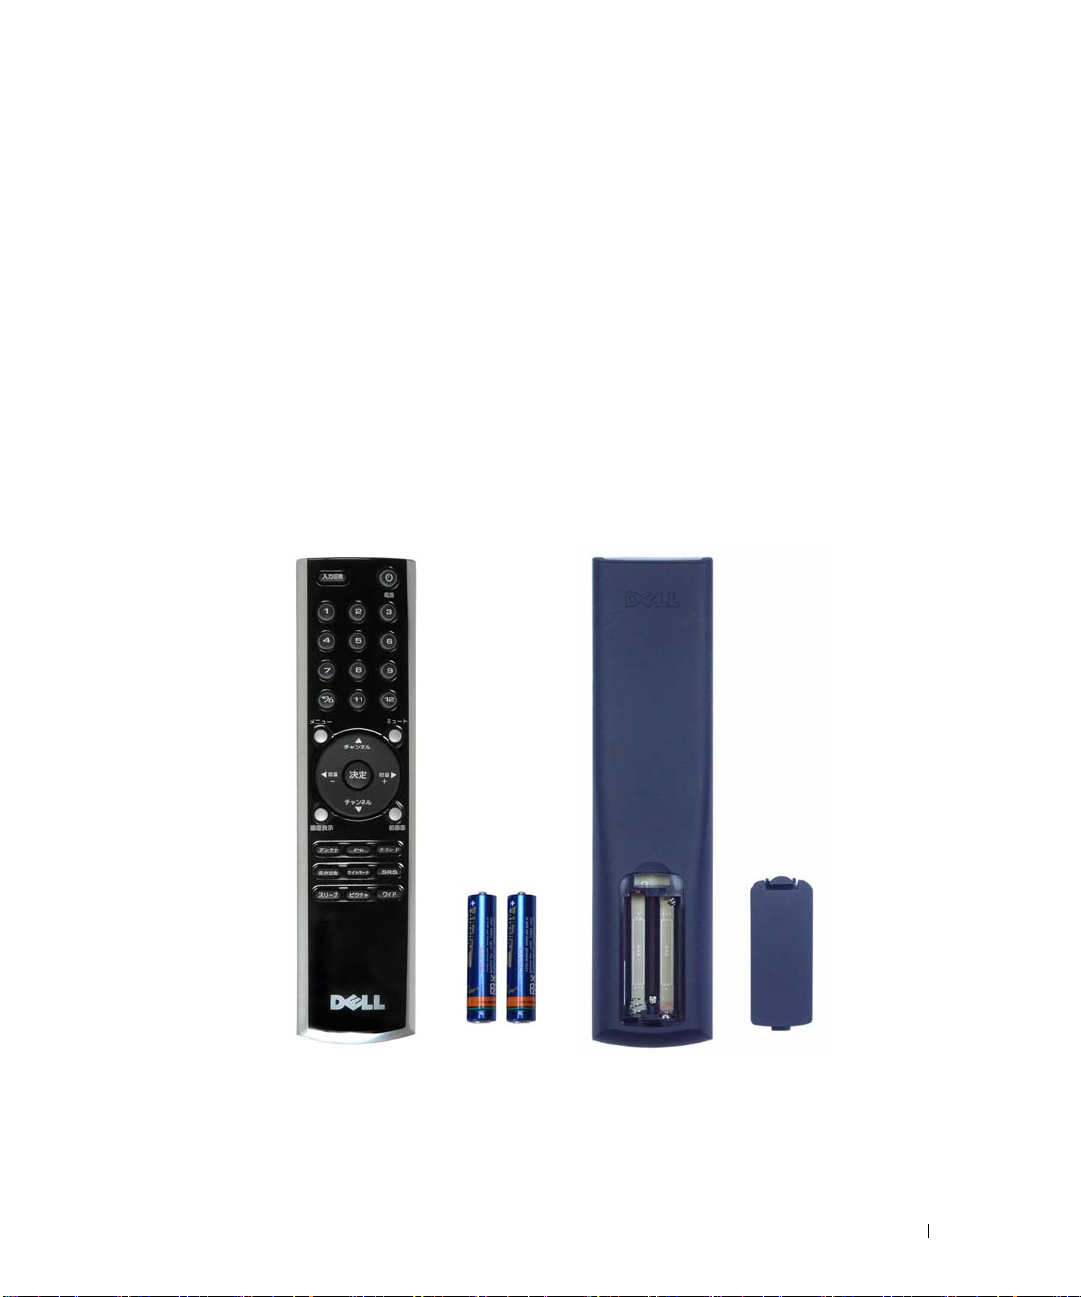
パッケージの内容
リモコン
単四バッテリ
電源コード
コンポジットビデオケーブル
オーディオケーブル
(2)
ワイド
モニタについて
LCD
9
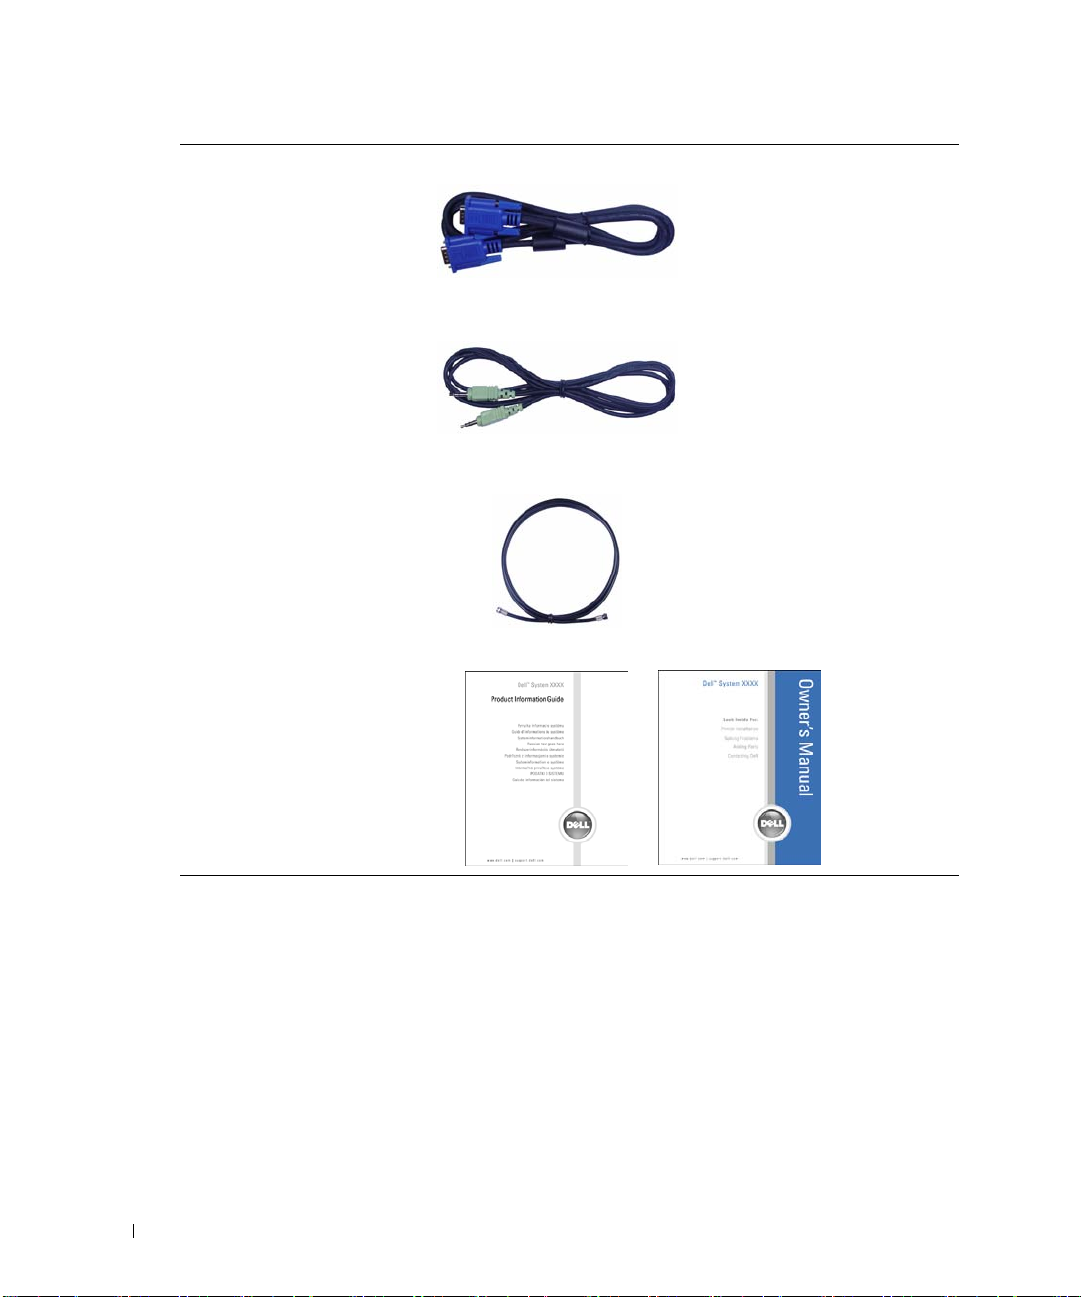
ケーブル
VGA
オーディオケーブル
PC
www.dell.com | support.dell.com
同軸ケーブル
マニュアル:
セットアップガイド
製品情報ガイド
オーナーズマニュアル
10
ワイド
モニタについて
LCD

2
ワイド
警告
:
さい。
ワイド
ワイド
•
•
•
•
•
ワイド
ワイド
されています。
LCD
高熱、直射日光、または極端な低温にさらされる場所でワイド
り使用したりしないでください。
極端な温度差がある場所間でワイド
ては、
ワイド
ニタを車のトランクに置かないでください。
ワイド
ニタを保管したり、そのような場所で使用したりしないでください。
ワイド
LCD
LCD
:
メモ
てください。
イド
参照してください。 追加ケーブルご注文に際しては、
LCD
このセクションの手順を始める前に、
LCD
37
LCD
LCD
LCD
モニタを設置しないでください。
LCD
ワイド
LCD
モニタの正しい
モニタを置く場所を決定しているとき、次の環境要因を考慮してください。
ページ
モニタにひどい振動または強い衝撃を与えないでください。 ワイド
モニタが高い湿度または埃っぽい環境にさらされる場所に、ワイド
モニタに水やその他の液体がかかったり入り込むような場所に、ワイド
モニタを接続する
モニタには、外部機器に接続するために使用できる標準コネクタが、4つ搭載
LCD
一部のケーブルは、接続している外部機器に付属している場合があります。 ワ
モニタに付属するケーブルのリストについては、8ページのパッケージ の内容を
モニタのセットアップ
製品情報ガイド
設置
モニタを移動しないでください。 詳細につい
LCD
の仕様を参照してください。
モニタ
を接続する前に、適切なケーブルがすべて揃っていることを確認し
場所
にある安全の指示に従ってくだ
にお問い合わせください。
Dell
モニタを保管した
LCD
LCD
LCD
モ
モ
DELL CONFIDENTIAL – PRELIMINARY 12/29/05 – FOR PROOF ONLY
DELL CONFIDENTIAL – PRELIMINARY 12/29/05 – FOR PROOF ONLY
DELL CONFIDENTIAL – PRELIMINARY 12/29/05 – FOR PROOF ONLY
ワイド
モニタのセットアップ
LCD
11
品質 ケーブルとコネクタ 使用時
普通 同軸
普通 コンポジットは、単一ピンを通してビデオ
www.dell.com | support.dell.com
は、ケーブルからビデオとオー
(RF)
ディオを伝送します。
イド
ベルされています。 コネクタの場所につい
ては、8ページを参照してください。
信号を伝送します。
ネクタを使用している場合、コンポジッ
トオーディオコネクタを接続する必要も
あります。
ページを参照してください。
モニタ
LCD
コネクタの場所については、
同軸ケーブルは
に
コンポジットビデオコ
ANT/
ケーブルとラ
ワ
7
12
良好
ワイド
モニタのセットアップ
LCD
ビデオはビデオ信号を、白黒とカラー
S
つの信号に分割します。 コネクタの場
の
2
所については、7ページを参照してくださ
い。
品質 ケーブルとコネクタ 使用時
最高 コンポーネントはビデオ信号を、
ラーと
します。
ページを参照してください。
つの白黒の、3つの信号に分割
1
コネクタの場所については、
つのカ
2
8
コンピュータをワイド
ワイド
つ搭載されています。
メモ
よって異なります。 グラフィックスカードの 追加情報については、コンピュータのマニュア
ルを参照してください。
品質 ケーブルとコネクタ 使用時
普通
モニタには、コンピュータに接続するために使用できる標準コネクタが、
LCD
使用するコネクタのタイプは、コンピュータがサポートするグラフィックスカードに
:
LCD
モニタに接続する
アナログ信号を使用し最大
までの解像度をサポートできる、コン
ピュータ用の標準のグラフィックディ
スプレイシステム。
1360 x 768
2
ワイド
モニタのセットアップ
LCD
13

品質 ケーブルとコネクタ 使用時
良好
www.dell.com | support.dell.com
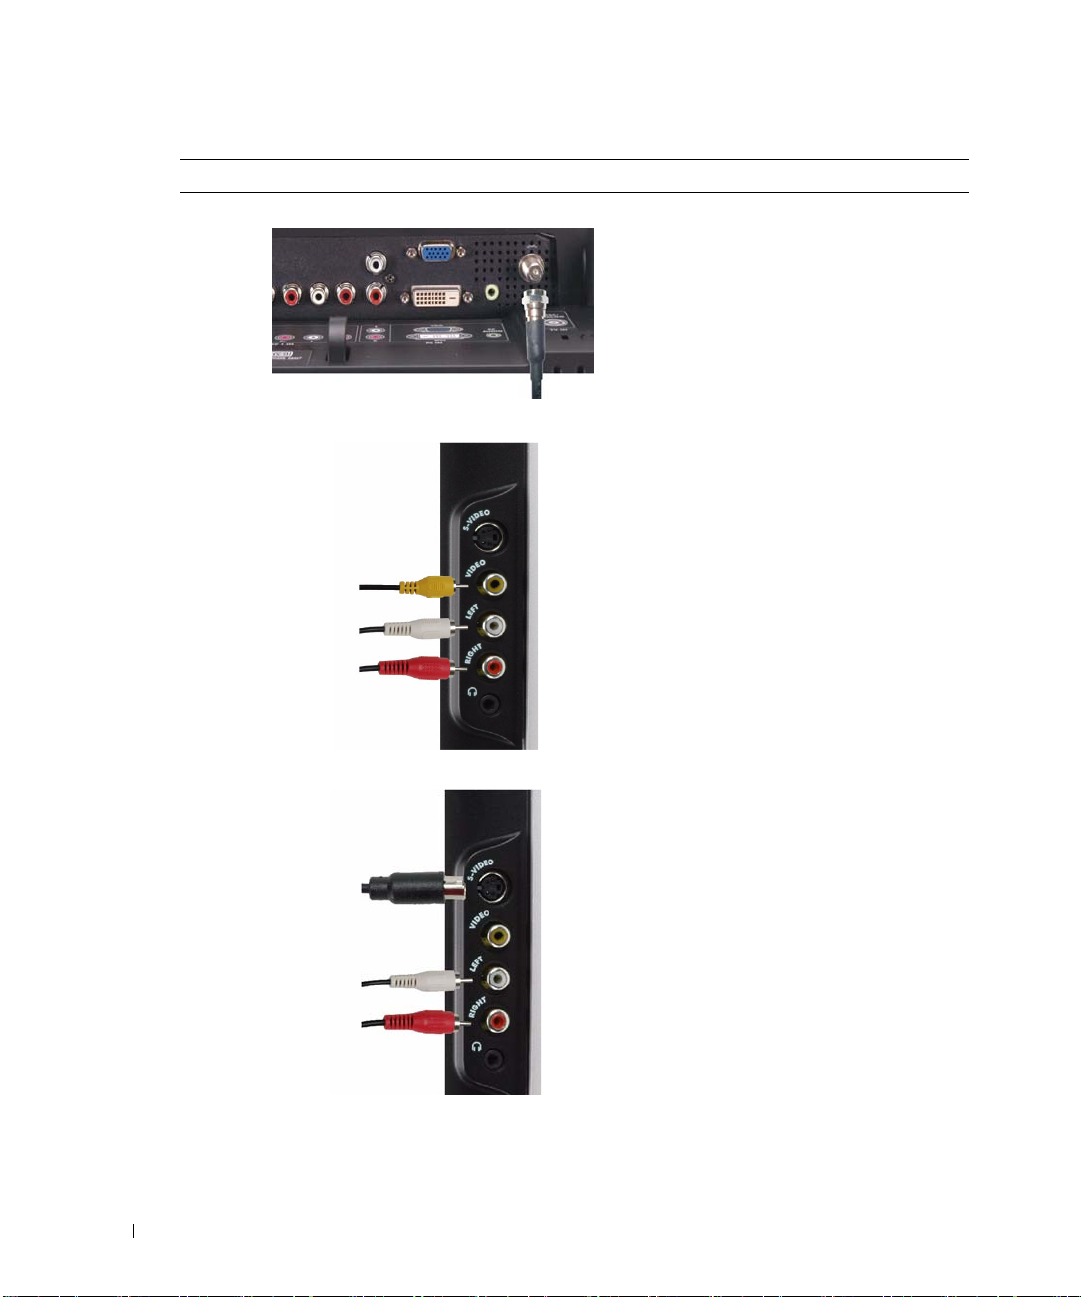
ケーブル(同軸)コネクタを使用する
ANT/
デジタルをサポートし、アナログから
デジタルに変換できるデジタル信号。
は高解像度ディスプレイで使用
DVI
し、最大
1360 x 768
までの解像度をサ
ポートできます。
コンピュータから出るオーディオケーブ
VGA
または
ルを、
モニタのオーディオコネクタに接続しま
す。
DVI
用のワイド
LCD
14
1
2
3
4
ワイド
ワイド
モニタディスプレイの電源をオフにし、電源コードをコンセントから抜き
LCD
ます。
同軸ケーブルをワイド
ワイド
モニタ用の電源コードをコンセントに差し込み、ワイド
LCD
LCD
モニタの
ケーブルコネクタに接続します。
ANT/
モニタの電源
LCD
をオンにします。
テレビメニューを入力し、TVを選択します。 [入力選択]メニューの追加情報について
は、
LCD
ページを参照してください。
25
モニタのセットアップ

コンポジットコネクタを使用する
1
ワイド
2
オーディオケーブルを組み込んだ外部機器を接続します。
3
ワイド
をオンにします。
4
テレビメニューを入力し、AVサイド(コンポジット1)を選択します。 [入力選択]メ
ニューの追加情報については、
モニタの電源をオフにし、電源コードをコンセントから抜きます。
LCD
モニタ用の電源コードをコンセントに差し込み、ワイド
LCD
ページを参照してください。
25
モニタの電源
LCD
ワイド
モニタのセットアップ
LCD
15
ビデオコネクタを使用する
S
www.dell.com | support.dell.com
1
ワイド
2
オーディオケーブルを組み込んだ外部機器を接続します。
3
ワイド
をオンにします。
4
テレビメニューを入力し、AVサイド(Sビデオ1)を選択します。 [入力選択]メニューの追
加情報については、
LCD
LCD
モニタの電源をオフにし、電源コードをコンセントから抜きます。
モニタ用の電源コードをコンセントに差し込み、ワイド
ページを参照してください。
25
モニタの電源
LCD
16
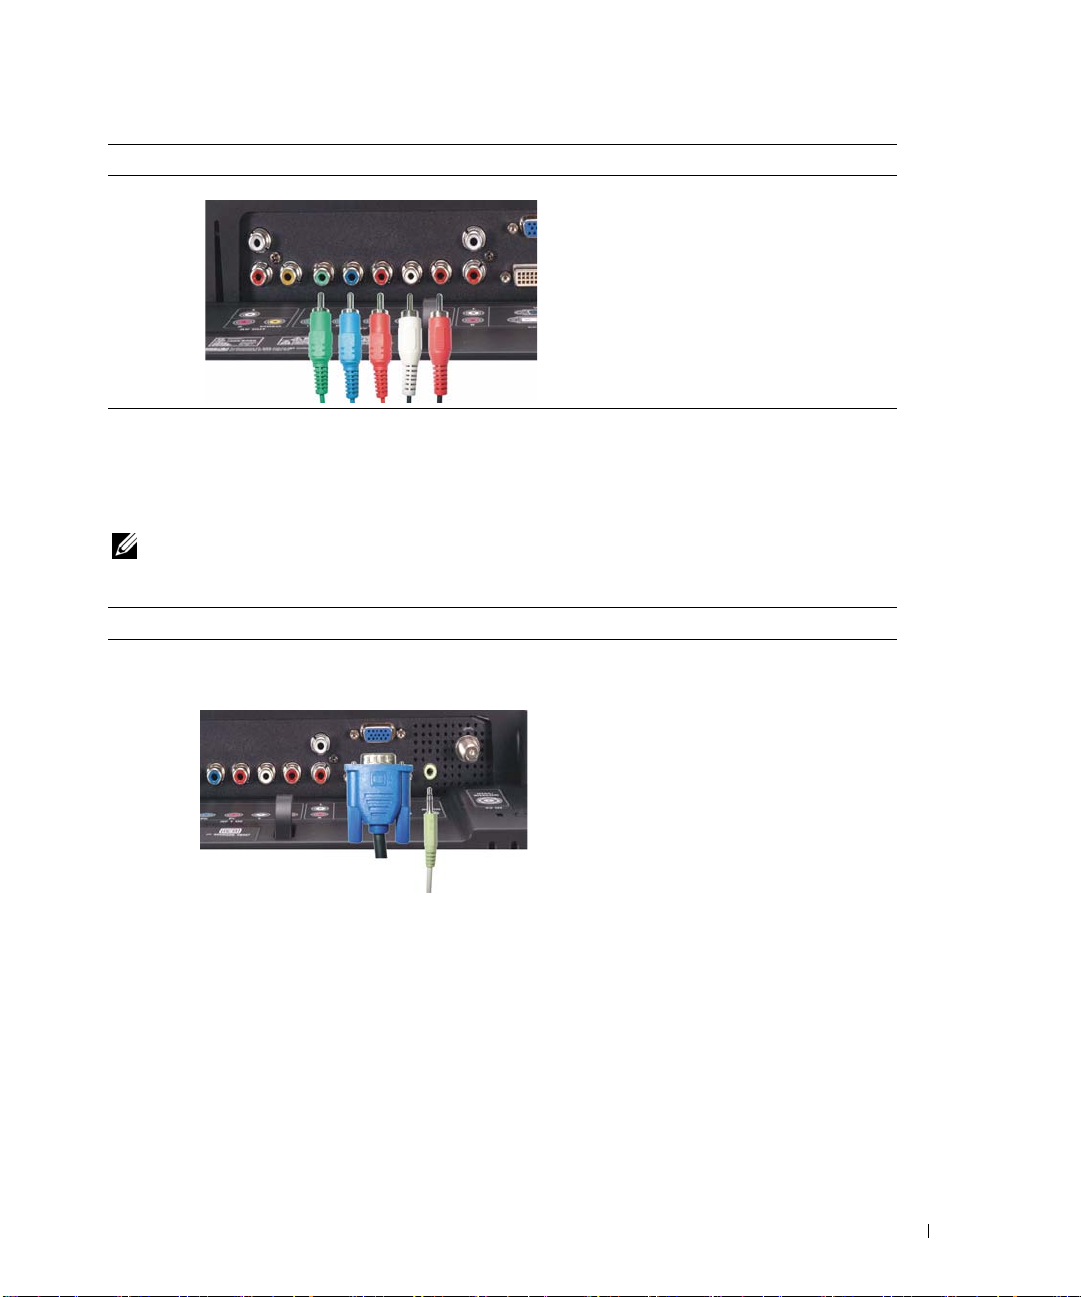
コンポーネントコネクタを使用する
1
2
3
4
ワイド
ワイド
オーディオケーブルを組み込んだ外部機器を接続します。
ワイド
をオンにします。
テレビメニューを入力し、
追加情報については、
モニタのセットアップ
LCD
モニタの電源をオフにし、電源コードをコンセントから抜きます。
LCD
モニタ用の電源コードをコンセントに差し込み、ワイド
LCD
AV1 (
ページを参照してください。
25
コンポーネント
モニタの電源
LCD
を選択します。 [入力選択]メニューの
1)
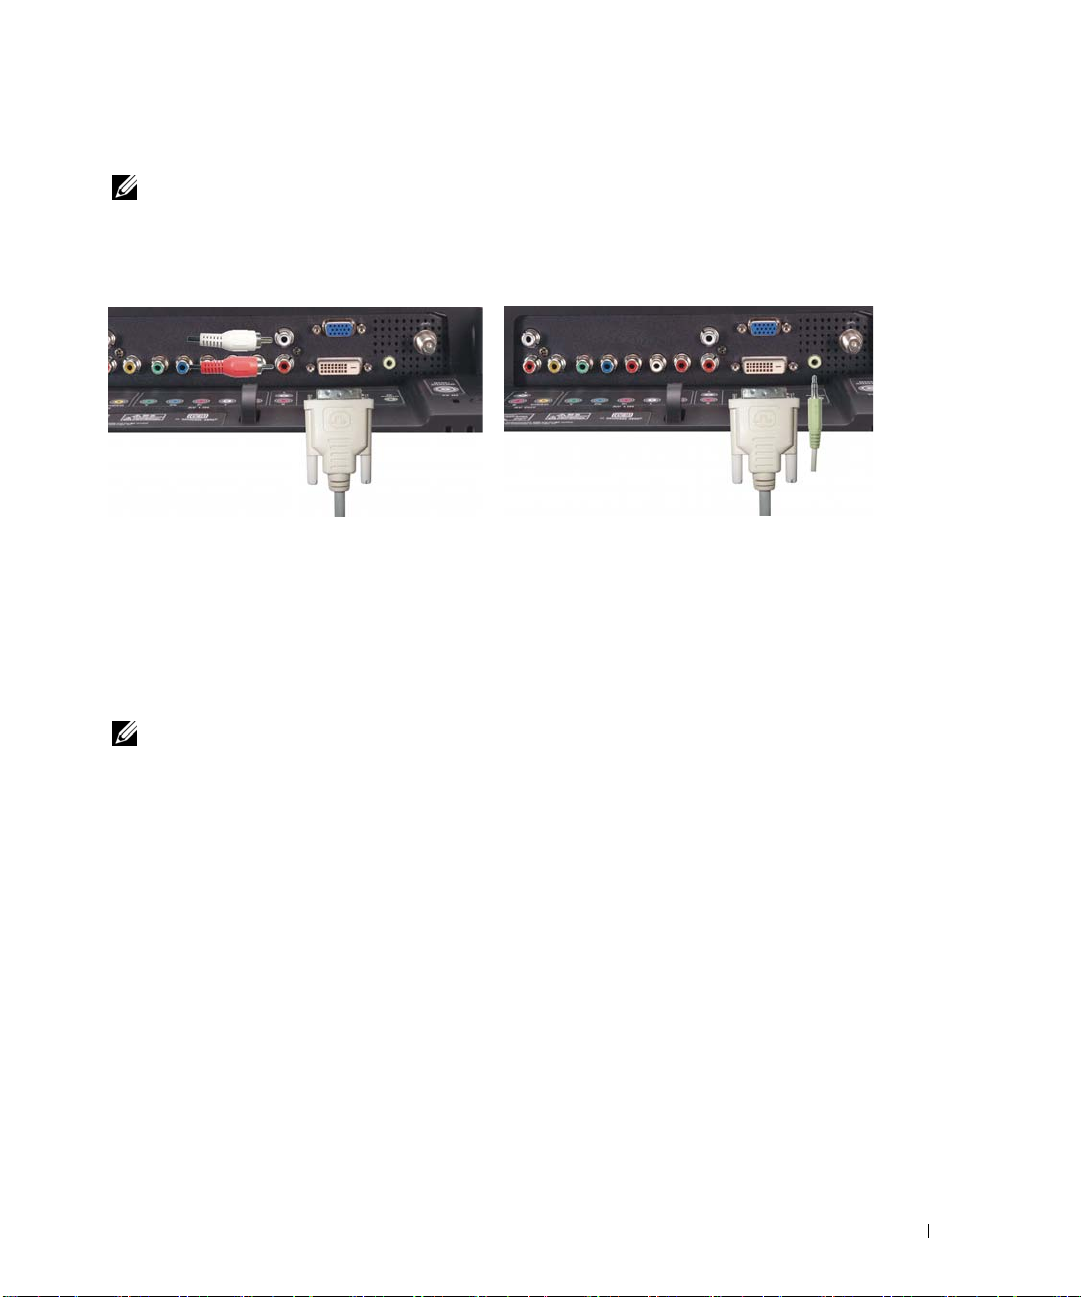
コネクタを使用する
DVI
メモ
: コンピュータに対しては、
できます。
ビデオ外部機器を接続する コンピュータを接続する
VGA
または
のうちいずれか 1つのコネクタのみを使用
DVI
1
2
ワイド
白い
DVI
モニタ
LCD
ケーブルを
の電源をオフにし、電源コードをコンセントから抜きます。
ワイド
LCD
モニタ
テレビと、ビデオ外部機器またはコンピュータ
に接続します。
3
オーディオケーブルを接続します。
ビデオ外部機器を接続している場合、オーディオコネクタ(赤と白)を使用します。
またはコンピュータを接続している場合、ステレオコネクタ(緑)を使用します。
メモ
4
5
一部のケーブルテレビボックスには
:
接続の使用はサポートしません。 詳細については、ケーブルテレビ会社にお問い合わせ
DVI
ください。
ワイド
モニタ用の電源コードをコンセントに差し込み、ワイド
LCD
をオンにします。
テレビメニューを入力し、
は、
ページを参照してください。
25
を選択します。 [入力選択]メニューの追加情報について
DVI
コネクタが装備されている場合がありますが、
DVI
モニタの電源
LCD
ワイド
モニタのセットアップ
LCD
17
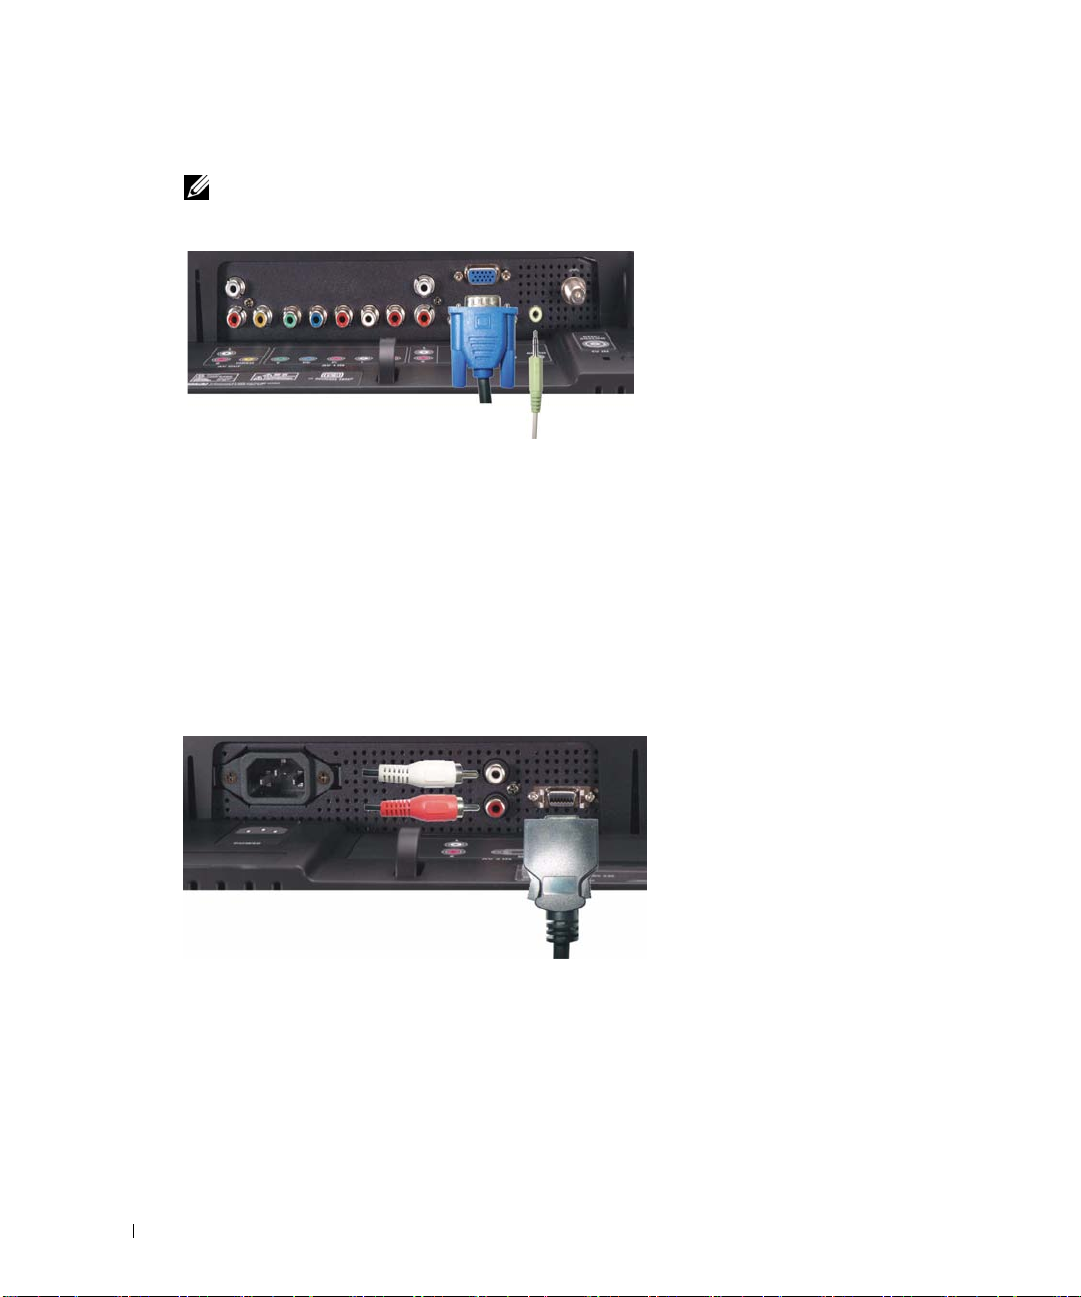
コネクタを使用する
VGA
メモ
: コンピュータに対しては、
できます。
VGA
または
のうちいずれか 1つのコネクタのみを使用
DVI
www.dell.com | support.dell.com
ワイド
1
2
青の
3
緑のオーディオケーブルを
4
ワイド
をオンにします。
5
テレビメニューを入力し、
は、
コネクタを使用する
D4
1
ワイド
2
オーディオケーブルを組み込んだ外部機器を接続します。
3
ワイド
をオンにします。
4
テレビメニューを入力するか、
LCD
VGA
LCD
ページを参照してください。
25
LCD
LCD
モニタの電源をオフにし、電源コードをコンセントから抜きます。
ケーブルをワイド
LCD
モニタ用の電源コードをコンセントに差し込み、ワイド
VGA
モニタの電源をオフにし、電源コードをコンセントから抜きます。
モニタ用の電源コードをコンセントに差し込み、ワイド
モニタとコンピュータに接続します。
LCD
モニタとコンピュータのコネクタに接続します。
モニタの電源
LCD
を選択します。 [入力選択]メニューの追加情報について
モニタの電源
LCD
AV2 (D4)
を選択します。
ページを参照してください。
25
18
ワイド
モニタのセットアップ
LCD
リモコン
バッテリをセットする
リモコンを使用する前に、単四バッテリを2本セットしてください。
1
バッテリカバーをスライドさせて開きます。
2
バッテリをセットします。 バッテリの+と-がバッテリ収納部の+と-記号に合っている
ことを確認してください。
3
バッテリカバーを元に戻します。
3
リモコン
19
リモコンを使用する
l
21
www.dell.com | support.dell.com
20
19
18
17
16
15
14
13
12
1
2
3
4
5
6
7
8
9
10
11
20
リモコン

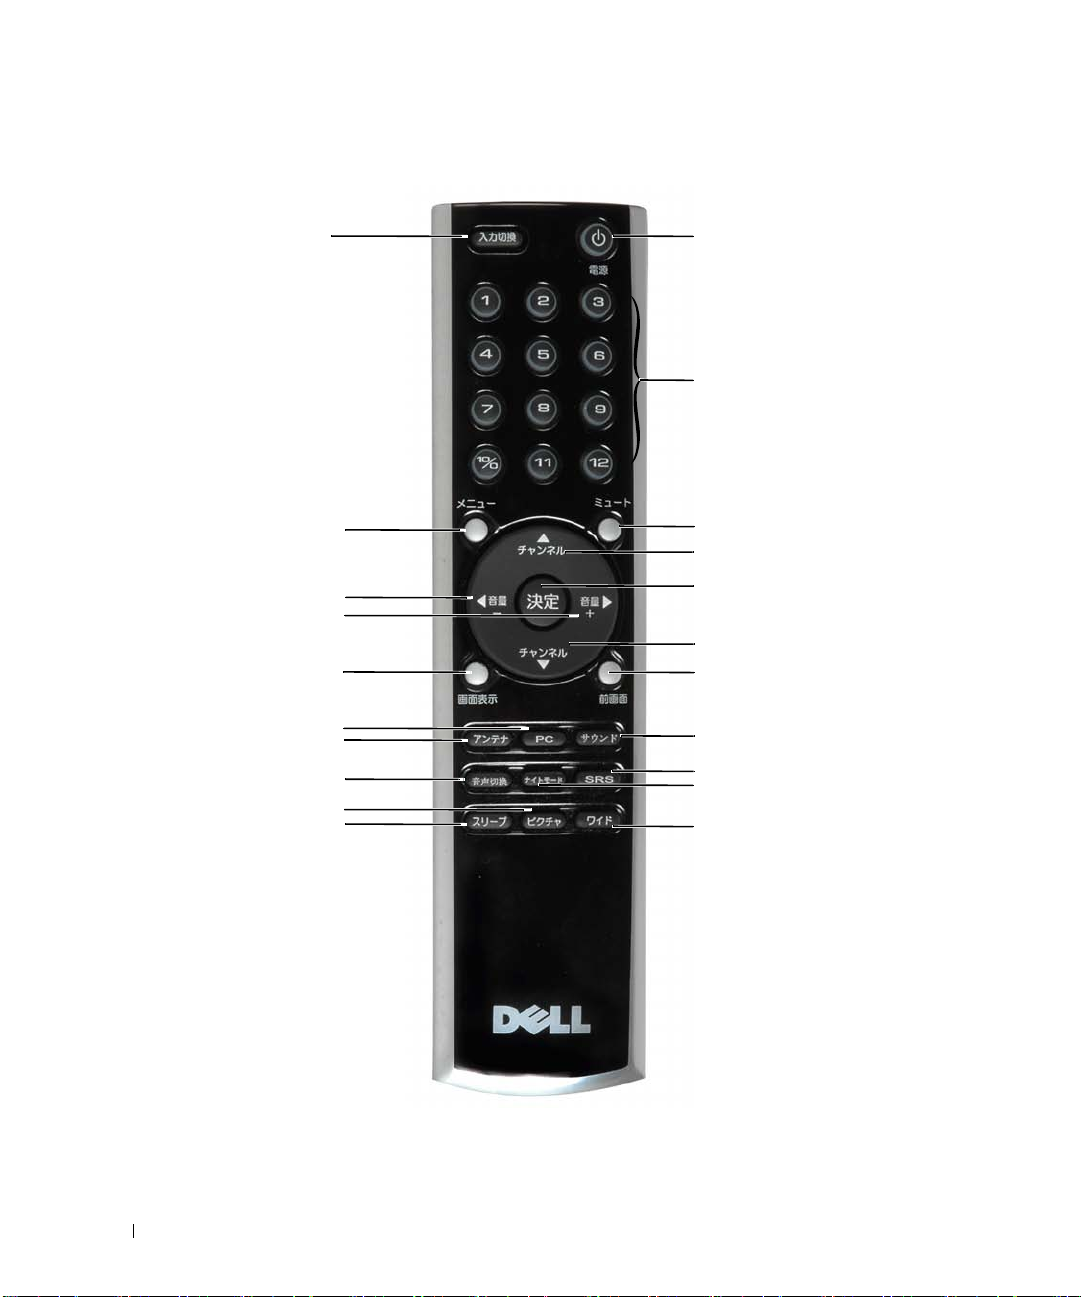
1
電源 ワイド
2
数字 このボタンを押してチャンネルを選択します
3
ミュート このボタンを押してサウンドをオフにします。
4
チャンネル このボタンを押すと上のチャンネルが表示されます
テレビメニューで、チャンネルボタンを使用し、テレビ
メニューのメニューを移動します
5
決定 テレビメニューのオプションを選択し、チャンネル選択
を確認します。
6
チャンネル このボタンを押すと下のチャンネルが表示されます
テレビメニューで、チャンネルボタンを使用し、テレビ
メニューのメニューを移動します
7
前画面 前に表示したチャンネルに戻ります
8
サウンド プリセットオーディオオプションを繰り返し表示します
9SRS
10
ナイトモード ミッドナイトのオン/オフを切り替えます
11
ワイド サイズメニューから、サイズオプションを繰り返し表示
12
スリープ スリープタイマをオンにします
13
ピクチャ ピクチャメニューのプリセットオプションを繰り返し表
14
音声切換 セコンドオーディオプログラム
15
アンテナ 入力ソース
16 PC
17
画面表示 ワイド
18
音量
+
19
音量
-
20
メニュー テレビのメインメニューを出入りします
21
入力切換 入力選択メニューを出入りします
サラウンドのオン/オフを切り替えます
SRS
します
示します
テレビチューナーを選択します
入力ソースとして
モードで、今観ているチャンネルを表示します)
テレビメニューの音量を上げ、音量ボタンを使用してメ
ニューを移動します
テレビメニューの音量を下げ、音量ボタンを使用してメ
ニューを移動します
モニタの電源のオン/オフを切り替えます。
LCD
をオンにします
(SAP)
ケーブルチャンネル選択ボタンとして、
/UHF
を選択します
VGA
モニタの情報を表示します(例えば、テレビ
LCD
リモコン
21

チャンネルを選択する
1~12
チャンネルボタンを押して、目的のチャンネルを選択します。
チャンネル
れているため、約
UHF
10/0
例えば、
www.dell.com | support.dell.com
ケーブルテレビ
ANT
押します。
例えば、チャンネル19を選択するには、
し、
のチャンネル
に変更しているとき、
10
チャンネル(2桁のチャンネル)
ボタンを押してから、2桁のチャンネル番号を押します。
UHF 40
を押して
Cable TV
を押します。
1と9
ボタンは2桁のチャンネルの選択に割り当てら
10/0
秒間待つ必要があります。
3
のチャンネルを選択するには、
(ケーブルテレビ)
を選択し、ケーブルテレビのチャンネル番号を
を押し、テレビメニューで
ANT
10/0、4
を押してから0を押します。
Cable TV
を選択
22
リモコン

ユニバーサルリモコンまたはラーニングリモ
コンでワ
イド
プレプログラムユニバーサルリモコンは、
ロールするためにプログラムできます。
•
•
•
•
•
•
•
次のように
ムすることができます。
•
•
•
LCD
電源
チャンネル上
チャンネル下
音量上
音量下
ミュート
入力切換
メモ
ルすることができます。
リモコンのマニュアルにメーカーによるコードが一覧表示されている場合、
コードを使用してください。
リモコンに検索機能が付いている場合、この機能は正しい コードを検索するために使
用できます。
リモコンに学習機能が付いている場合、上に一覧表示したボタンの他に、
ンから特定のボタンをプログラムすることができます。
メモ
るマニュアルを参照してください。
モニタを使用する
ワイド
Dell
(+)
(-)
(+)
(-)
将来のプレプログラムユニバーサルリモコンは、さらに多くの機能をコントロー
:
Dell
ワイド
LCD
モニタ
で作動するように、ユニバーサルリモコンをプログラ
追加情報については、ユニバーサルリモコンまたはラーニングリモコンに付属す
:
LCD
モニタ
の次の機能 をコント
Dell
Philips
リモコ
の
リモコン
23
ЙtЙ@ЙCЙгЗГиНид: P:\P_TranslateFile\C9\2005\11\C9002634-AOC-DELL W2306C_JPN_OM\OK\JP-W2306C_23J0e40.fm
テレビメニューを使用する
4
ワイド
し、画像とオーディオ設定を調整することができます。
モニタにはテレビメニューが組み込まれているため、適切な入力ソースを選択
LCD
テレビメニューでリモコンを使用する
メモ
ワイド
:
使用して、テレビメニューにアクセスしたり選択を行うことができます。
除き、このセクションではリモコンでテレビメニューを使用する方法について説明します。
1
テレビメニューに入るには、
www.dell.com | support.dell.com
画面の下部に、
2
左右のボタン(音量ボタン)を使用して、アイコン間を移動します。
メニューを移動するたびに、アイコンが強調表示されます。
3
オプションを選択するには、アイコンが強調表示されているときに
ます。
4
その選択したオプションの新しいメニューが表示されます。 上下ボタン(チャンネル
ボタン)を使用して、さまざまな設定を移動します。
メモ
5
6
7
オプションを移動するたびに、設定の隣りに赤い矢印が表示されます。 選択したオプション
:
の隣りに、チェックマークが表示されます。
左右のボタン(音量ボタン)と
す。
メモ
(終了)
Exit
:
選択を行ったら、
テレビメニューを終了するには、
モニタの側面パネルの音量とチャンネルボタンを使用して、またはリモコンを
LCD
特に明記する場合を
メニュー
つのアイコンが表示されます。
6
を選択して、いつでもメインメニューに戻ることができます。
メニュー
ボタンを押してメインメニューに戻ります。
タンを押します。
決定
ボタンを押し
決定
ボタンを使用して、設定を調整または選択しま
Exit
(終了)
アイコンを選択し
決定
を押します。
テレビメニューの言語を選択する
1 メニューを押して、テレビメニューに入ります。
2 セットアップを選択します。
24 テレビメニューを使用する
DELLг@сЯ с у\о12/29/05 с йQиэкНуP

ЙtЙ@ЙCЙгЗГиНид: P:\P_TranslateFile\C9\2005\11\C9002634-AOC-DELL W2306C_JPN_OM\OK\JP-W2306C_23J0e40.fm
3 セットアップメニューで、言語を選択し、テレビメニューを表示する言語を選択し
ます。
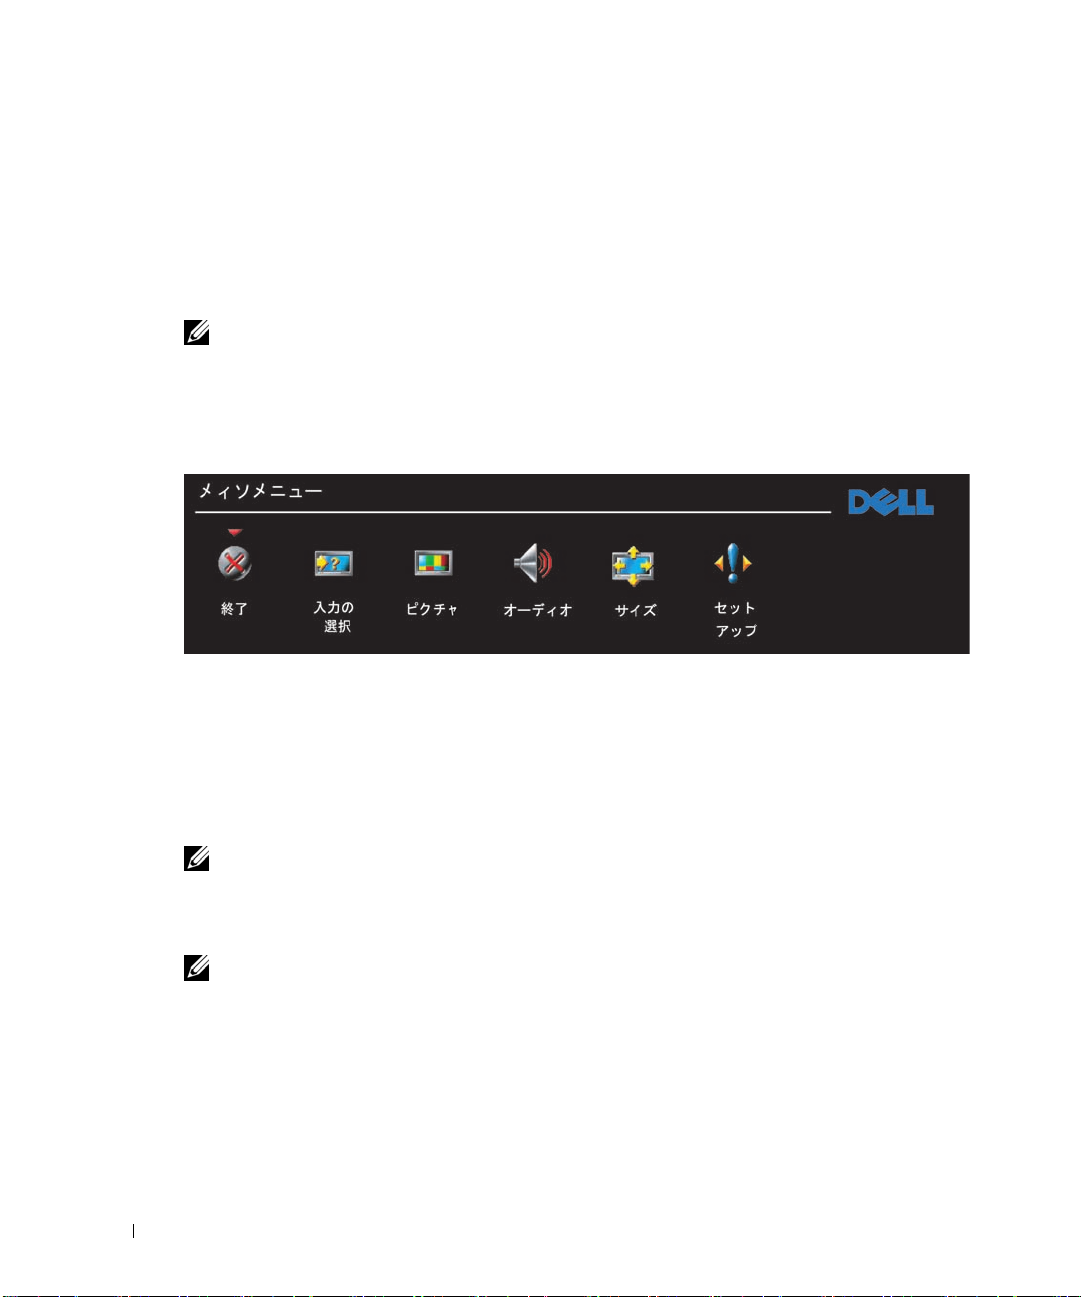
入力選択 メニュー
入力選択メニューでは、ワイド
なソースを選択します。
ます。
メニューを押して、メインメニューから入力選択を選択することもできます。
AV2 (D4) — DVD
接続しているときに、選択します。
参照してください。
AV SIDE
ニタ側面のコンポジットコネクタに接続しているときに、選択します。 コンポジットコネクタの場
所については、
AV SIDE(S
ビデオコネクタに接続しているときに、選択します。 Sビデオコネクタの場所については、8ペー
ジの
入力の表示—入力の表示では、アクティブまたはすべてを選択します。 アクティブは、どのコ
ネクタが使用されているかを検索します。
力ソースはグレーで表示されます。 すべては、すべての入力ソースを表示し、外部機器を接続して
いない場合でさえすべての入力ソースを選択できます。
(コンポジット1)—ビデオゲームシステムなどのビデオ外部機器をワイド
ページの"左側面ビュー"を参照してください。
7
ビデオ1)—ビデオデッキなどのビデオ外部機器をワイド
底面ビュー"を参照してください。
"
セットアップ
メモ
:
部機器を表示することができます。 例えば、
と表示されます。
DVD
リモコンで入力切換を押すと、入力選択メニューに直接移動し
プレーヤーなどのビデオ外部機器をワイド
メニューにある テレビメニュー設定で、入力選択
モニタとビデオ機器の接続方法に基づいて、適切
LCD
VGA —
ニタとして使用されており
してコンピュータを接続しているときに、選択し
ます。
の
DVI —
タとして使用されコンピュータを接続していると
き、または
ヤーなどの外部機器を接続しているときに選択し
ます。
底面ビュー"を参照してください。
"
テレビ
ANT/
選択します。 同軸コネクタの場所については、
ページの"底面ビュー"を参照してください。
AV1 (
どのビデオ外部機器をコンポーネントコネクタに
接続しているときに、選択します。
コネクタの場所については、8ページの"底面
ビュー
コネクタの場所については、8ページの"底面ビュー"を
D4
使用可能な入力ソースは白で表示され、使用不可能な入
入力選択
ワイド
コネクタの場所については、8ページ
VGA
底面ビュー"を参照してください。
"
ワイド
DVI
コネクタの場所については、8ページの
DVI
アンテナやケーブルテレビボックスを
—
ケーブルコネクタに接続しているときに、
コンポーネント
を参照してください。
"
メニューを表示しているとき、
モニタがコンピュータのモ
LCD
モニタがコンピュータのモニ
LCD
ケーブルを使用して
1) — DVD
モニタ背面のD4コネクタに
LCD
ケーブルを使用
VGA
DVD
プレーヤーな
コンポーネント
モニタ側面の
LCD
を設定し、接続している外
LCD
AV 2
プレー
8
モ
S
は
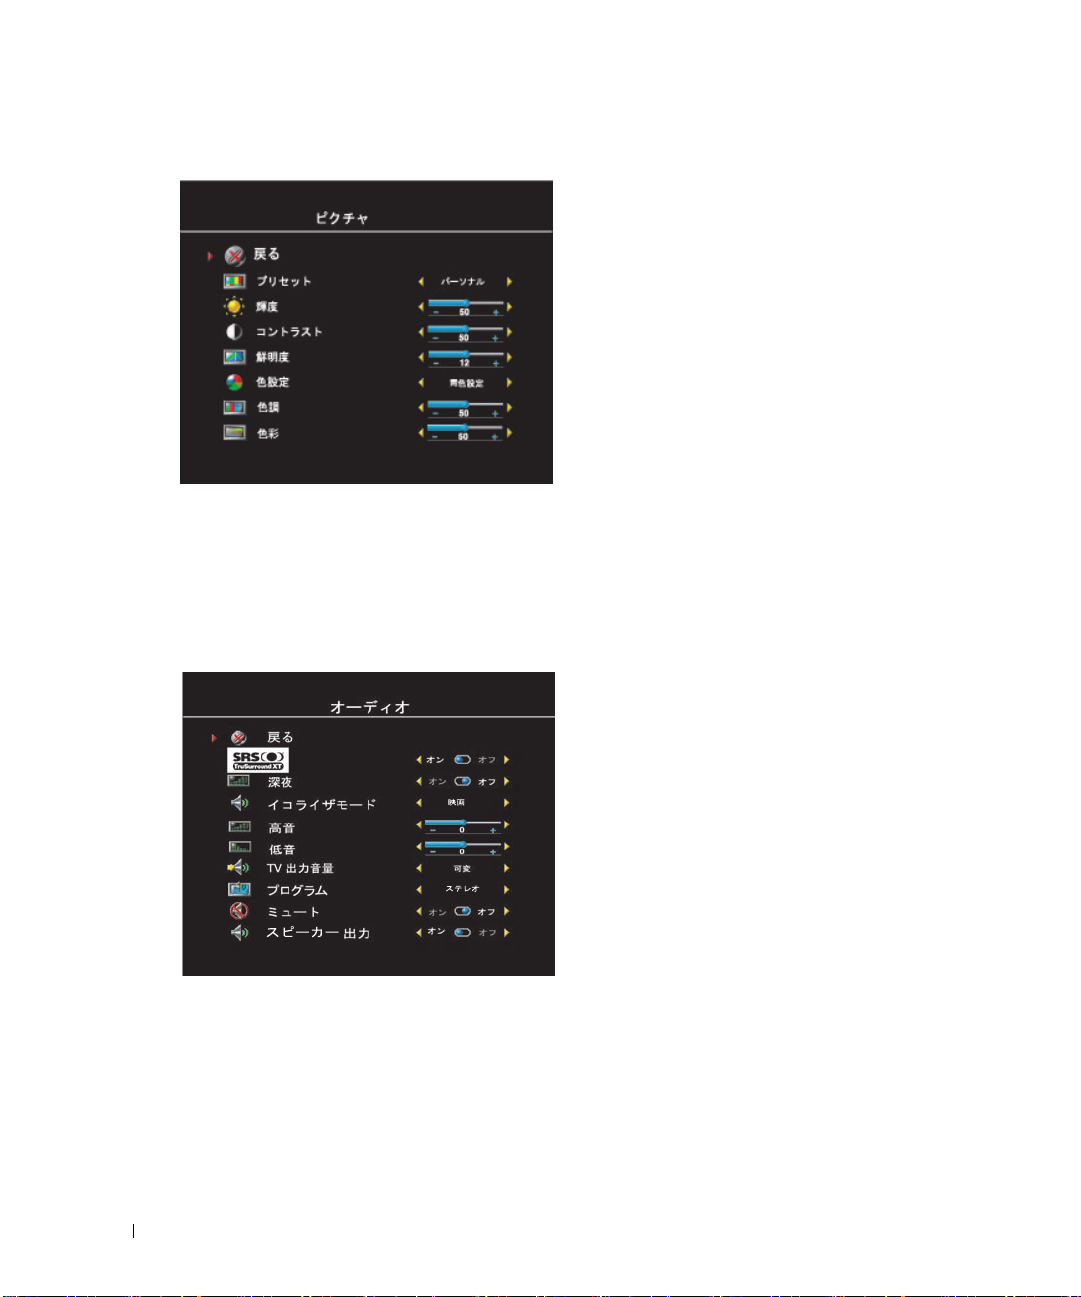
ピクチャ設定メニュー
ピクチャ設定メニューでは、カラーと輝度を含め画像の外観を調整します。
DELLг@сЯ с у\о12/29/05 с йQиэкНуP
テレビメニューを使用する 25
ЙtЙ@ЙCЙгЗГиНид: P:\P_TranslateFile\C9\2005\11\C9002634-AOC-DELL W2306C_JPN_OM\OK\JP-W2306C_23J0e40.fm
次のプリセット画像設定の1つを選択して
いる場合、個別設定が自動的に更新されま
す。
• ムービー
• スポーツ
• 弱信号
• マルチメディア
個人を選択している場合、輝度やカラーな
どの個別設定を調整することができます。
色温度プリセットは、以下の通りです。
www.dell.com | support.dell.com
• 標準:
• 標準: ネーティブのパネル温度
• 青:
• 赤:
6500K
9300K
5700K
オーディオ設定メニュー
オーディオ設定メニューでは、観ているショーのタイプにもっとも適合するようにオー
ディオを設定します。
個人
を選択している場合、低音や高音などの個別オーディオレベルを調整することができ
ます。
プログラム
26 テレビメニューを使用する
を使用して
SRS TruSurround XT —
台のスピーカーに仮想サラウンドサウンドを
提供し、深みのあるどっしりした低音を持つ
広いサウンドを作成します。
ミッドナイトモード—は、音声とアクショ
ンシーンの間の大きな音量の変化を一様にし
ます。
次のプリセット
を選択している場合、個別のオーディオレベ
ルが自動的に更新されます。
•
•
•
ステレオ、サブ、メイン
DELLг@сЯ с у\о12/29/05 с йQиэкНуP
音楽
シアター
声
、またはモノを選択します。
は任意のソースから
イコライザモード
2
設定の1つ
ЙtЙ@ЙCЙгЗГиНид: P:\P_TranslateFile\C9\2005\11\C9002634-AOC-DELL W2306C_JPN_OM\OK\JP-W2306C_23J0e40.fm
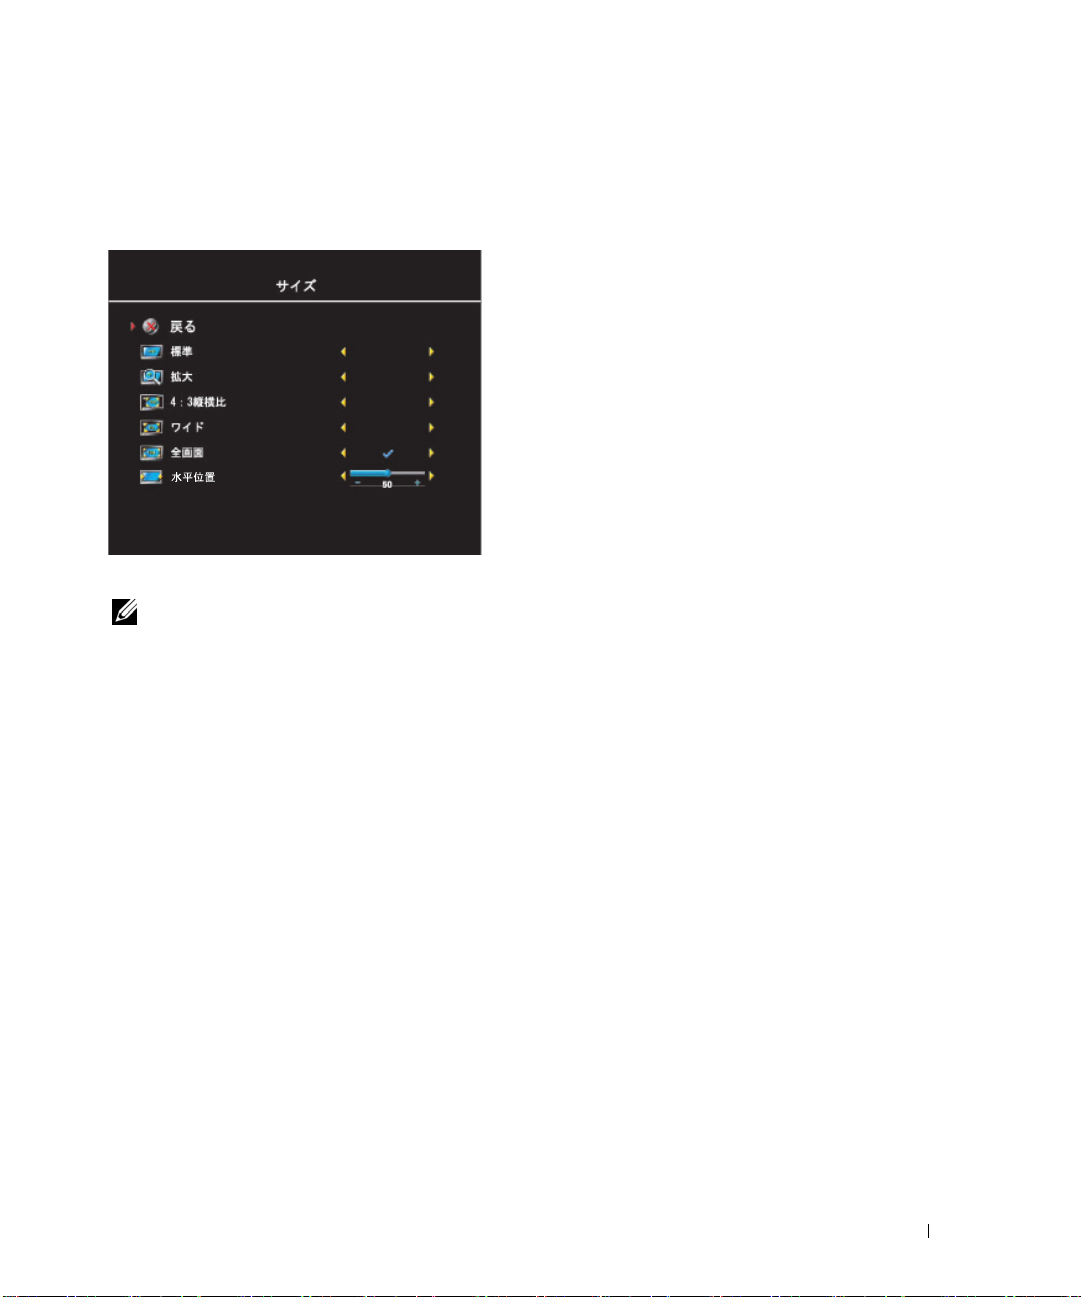
サイズメニュー
サイズメニューでは、画像の外観を調整します。 水平シフトを使用して、画像の水平配
置を調整します。
次の設定を使用して、縦横比を調整します。
メモ
ほとんどの
:
スタンダード
は
22:9 DVD
す。
ズーム
—
ムービーの表示に最適の選択です。
4:3 —
ムービーの表示に最適の選択です。
ワイド
テレビ、ビデオデッキ、
. —
22:9 DVD
す。
全画面
—HDTV
表示に最適の選択です。
には、上のサポートされる縦横比に関する情報があります。
DVD
デジタル
—
ムービーの表示に最適の選択で
テレビ、ビデオデッキ、
HDTV、16:9
また
4:3 DVD
4:3 DVD
デジタル
ムービーの表示に最適の選択で
HDTV、16:9
または
16:9 DVD
または
ムービーの
DELLг@сЯ с у\о12/29/05 с йQиэкНуP
テレビメニューを使用する 27
ЙtЙ@ЙCЙгЗГиНид: P:\P_TranslateFile\C9\2005\11\C9002634-AOC-DELL W2306C_JPN_OM\OK\JP-W2306C_23J0e40.fm
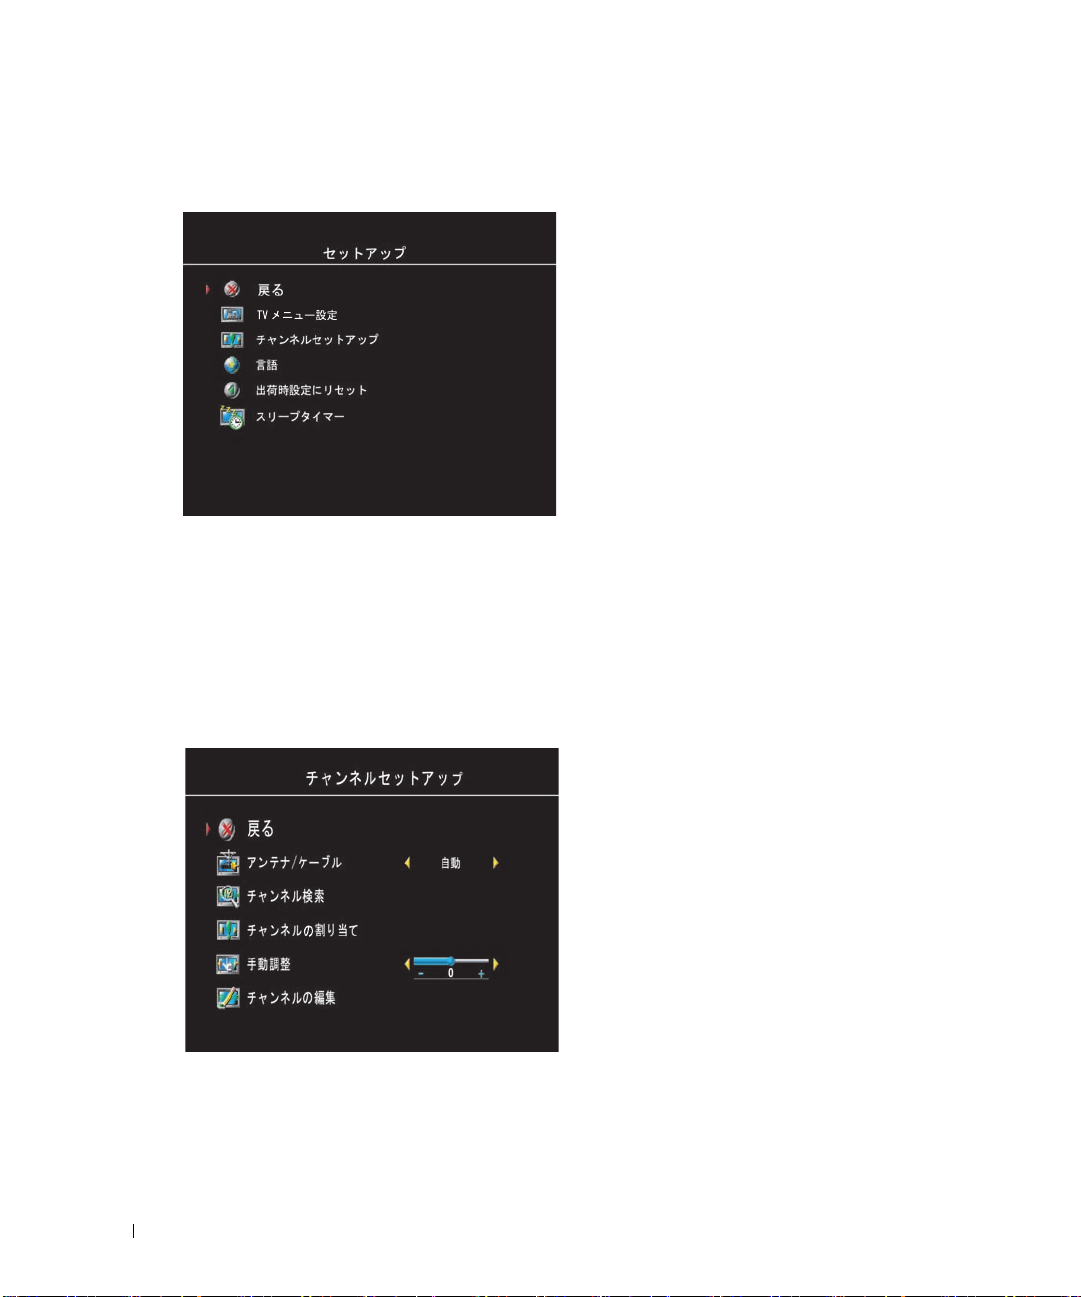
セットアップメニュー
セットアップメニューのセットアップでは、
テレビメニューの外観を調整して、テレビ
メニューの言語を変更し(
レビメニューの言語を選択する
出荷時設定に戻したりします。
テレビメニューの保持時間を使用して、テ
レビメニューが表示される時間を増減しま
す。
最大の時間は、60秒です。
テレビメニュー設定で、テレビボタンロッ
www.dell.com | support.dell.com
テレビのメニューボタンを押します。
1.
テレビがロックされたというメッセージが表示されます。
メッセージがテレビに表示されている間、チャンネル上と音量アップボタンを同時に押
2.
します。
クを選択しテレビメニューと側面パネルボ
タンをロックできます。
有効になっているとき、電源ボタンのみ機
能します。
タンをアンロックするには、以下の手順に
従います。
テレビメニューと側面パネルボ
ページの"テ
24
を参照)、
"
このオプションが
チャンネルのセットアップ
スリープタイマ
スリープタイマ
す。
28 テレビメニューを使用する
分から3時間まで選択できます。
10
では、ワイド
特定チャンネルに対してリモコンのキー番
号とディスプレイをプログラムするには、
チャンネルセットアップでチャンネル割り
当てを使用します。
モニタが自動的にオフになるまでの時間を選択できま
LCD
DELLг@сЯ с у\о12/29/05 с йQиэкНуP

5
ワイド
ティング
警告
:
にご連絡ください。 トラブルシューティングのステップを実行しようとしないでくださ
Dell
い。
ワイド
LCD
LCD
モニタのトラブルシュー
モニタ
から煙や火花が出たら、直ちにワイド
トラブルシューティングのヒント
: 一部の問題は、外部機器に関連していることがあります。 ワイド
メモ
いるすべての外部機器のマニュアルを参照してください。
ワイド
原因になっています。
おり、
•
AV
•
AV
•
AV1(
•
AV2 (D4) —
次の入力ソースを選択することもできます。
•
TV —
•
VGA —
•
DVI
モニタに関する問題のほとんどは、正しい入力ソースを選択していないことが
LCD
ワイド
入力選択
サイド(コンポジット
サイド(Sビデオ
—
メニューの
コンポーネント
ワイド
ワイド
ワイド
ワイド
モニタ底面の
LCD
LCD
LCD
LCD
モニタ底面の
AV2
1)
1) —
モニタ底面の
モニタのそれぞれのコネクタは、入力ソースに関連して
LCD
を通してAVサイド
ワイド
1)
—
ワイド
—
ワイド
モニタ底面のD4コネクタ
LCD
モニタ側面のSビデオコネクタ
LCD
LCD
ケーブルコネクタ
ANT/
VGA
コネクタ
DVI
にラベルされています。
モニタ側面のコンポジットコネクタ
モニタ底面のコンポーネントコネクタ
コネクタ
モニタのプラグを抜き、
LCD
モニタに接続して
LCD
ワイド
モニタのトラブルシューティング
LCD
29

一般的問題
問題 実行可能な解決法
テレビを見ている間、または
プレーヤーやビデオデッキなどの外
部機器を使用している間、ピクチャ
品質が落ちる
www.dell.com | support.dell.com
DVD
1
テレビメニューで縦横比設定をチェックしてください。 リ
モコンの
ます。 テレビメニューの使用法の詳細については、24ペー
ジの
さい。
2
同じタイプのコネクタを使用して、外部機器を再接続して
ください。 例えば、底面のコンポジットコネクタを使用し
ている場合、外部機器をワイド
ジットコネクタに接続してみてください。 コネクタの場所
については、
参照してください。
外部機器を接続した後、テレビメニューで入力ソースを変
更してください。
メニュー"を参照してください。
3
異なるコネクタを使用して、外部機器を接続してください。
例えば、コンポジットコネクタを使用しているときに問題
が発生した場合、コンポーネントまたはD4コネクタを使
用してみてください。
注: 異なるコネクタに接続するには、そのコネクタの適切な
ケーブルが必要です。 サポートされる接続のリストについて
は、外部機器のマニュアルを参照してください。
外部機器を接続した後、テレビメニューで入力ソースを変
更してください。 詳細については、25ページの"入力選択
メニュー"を参照してください。
4
工場出荷時設定にリセットしてください。 リモコンで
ニュー
Factory Reset
5
色温度を調整します。 リモコンで
(ピクチャ)
を選択します。
注: 一部のセットトップボックスでは、縦横比を提供してい
ます。
ださい。
メニュー
テレビメニューの言語を選択する"を参照してくだ
"
ボタンを押し、
(サイズ)
Size
を選択し
モニタ側面のコンポ
LCD
ページの"ワイド
5
モニタについて"を
LCD
詳細については、25ページの"入力選択
メ
を押し、
(出荷時設定)
を選択してから、
(セットアップ)
Setup
を選択してから、
を選択します。
メニュー
を押し、
Color Temperature
Picture
(色温度)
詳細については、外部機器のマニュアルを参照してく
30
ワイド
モニタのトラブルシューティング
LCD

問題 実行可能な解決法
ケーブル(同軸)コネクタに
ANT/
接続された外部機器を使用している
とき、ピクチャ品質が落ちる
ワイド
れない
LCD
モニタ
に何も表示さ
1
ワイド
択されていることを確認します。
ジの
2
リモコンで
してから、
選択します。
ます。
3
テレビメニューで縦横比設定をチェックしてください。 リ
モコンの
ます。 テレビメニューの使用法の詳細については、24ペー
ジの"テレビメニューの言語を選択する"を参照してくだ
さい。
4
工場出荷時設定にリセットしてください。 リモコンで
ニュー
Factory Reset
5
色温度を調整します。 リモコンで
(ピクチャ)
を選択します。
6
問題は外部機器に関連している可能性があります。サービ
スプロバイダにお問い合わせください。
1
ワイド
ます。
2
電源ケーブルを含め、すべてのケーブルがワイド
タに正しく接続されていることを確認してください。
3
ワイド
しているかどうかを確認してください。 青いライトは、ワイ
ド
LCD
ます。 黄色のライトは、ワイド
ド に入っている ことを意味しています。
4
入力選択
を確認してください。 詳細については、25ページの"ピク
チャ設定メニュー
5
ワイド
してください。
に1つの外部機器を接続してください。
6
適切に作動していることが分かっている別の外部機器を接
続します。
7
工場出荷時設定にリセットしてください。 リモコンで
ニュー
Factory Reset
モニタが
LCD
ピクチャ設定メニュー"を参照してください。
"
メニュー
Channel Setup
これで、リモコンでチャネルがリセットされ
メニュー
を押し、
(出荷時設定)
を選択してから、
モニタの電源がオンになっていることを確認し
LCD
モニタの右-下で、青または黄色のライトが点灯
LCD
モニタの電源がオンになっていることを示してい
メニューで、適切なソースが選択されていること
モニタに現在接続されている外部機器を再接続
LCD
を押し、
(出荷時設定)
入力選択
を押し、
ボタンを押し、
(セットアップ)
Setup
メニューの入力選択として選
詳細については、25ペー
(セットアップ)
Setup
(チャンネルのセットアップ)
(サイズ)
Size
を選択してから、
を選択します。
メニュー
Color
を押し、
Temperature
を選択
を選択し
メ
Picture
(色温度)
LCD
モニタが省電力モー
LCD
を参照してください。
"
複数の外部機器を使用している場合、一度
メ
(セットアップ)
Setup
を選択します。
を選択してから、
を
モニ
ワイド
モニタのトラブルシューティング
LCD
31

問題 実行可能な解決法
音が出ない 1
www.dell.com | support.dell.com
の画像が二重になる、
DVD
または画像が表示されない
ピクチャが暗い、または明るい テレビメニューで色設定を更新してください。
画面が正しくセンターの位置にこな
い
消音がオンになっていないことを確認します。 リモコンの
ミュート
わります。
2
特定のテレビチャンネルの音だけが出ない場合、テレビメ
ニューで
ページの"ピクチャ設定メニュー"を参照)。
3
オーディオケーブルが、ワイド
力コネクタと外部機器のオーディオ出力コネクタの両方に
しっかりと接続されていることを確認します。
色がコネクタの色に一致していることを確認します。
4
また、オーディオケーブルがビデオケーブルと同じ列に接
続されていることも確認します。
は、
ください。
5
同じタイプのコネクタを使用して、外部機器を再接続して
ください。 例えば、底面のコンポジットコネクタを使用し
ている場合、外部機器をワイド
ジットコネクタに接続してみてください。
については、
参照してください。
外部機器を接続した後、テレビメニューで入力ソースを変
更してください。
メニュー"を参照してください。
6
異なるコネクタを使用して、外部機器を接続してください。
例えば、コンポジットコネクタを使用しているときに問題
が発生した場合、コンポーネントまたは
用してみてください。
注: 異なるコネクタに接続するには、そのコネクタの適切な
ケーブルが必要です。
は、外部機器のマニュアルを参照してください。
外部機器を接続した後、テレビメニューで入力ソースを変
更してください。
メニュー"を参照してください。
7
異なるテレビで外部機器をテストしてください。
DVD
ださい。
デインタレーサ以上の品質のデインタレーサを組み込んでい
ます。
ついては、
い。
ニューボタンを押し、
1
テレビメニューでサイズ設定を更新してください。 リモコ
ンの
す。
2
工場出荷時設定にリセットしてください。 リモコンで
ニュー
Factory Reset
ボタンを押すと、消音機能のオン/オフが切り替
入力選択
ページの"ワイド
5
メニューを訂正する必要があります(
モニタのオーディオ入
LCD
ケーブルの
コネクタの場所について
モニタについて"を参照して
LCD
25
モニタ側面のコンポ
ページの"ワイド
5
LCD
LCD
コネクタの場所
モニタについて"を
詳細については、25ページの"入力選択
コネクタを使
D4
サポートされる接続のリストについて
詳細については、25ページの"入力選択
プレーヤーのプログレッシブスキャンをオフにしてく
刄純Cド
Dell
プレーヤーのプログレッシブスキャンの詳細に
DVD
メニュー
プレーヤーのマニュアルを参照してくださ
DVD
ボタンを押し、
モニタは、
LCD
(ピクチャ)を選択します。
Picture
Size
DVD
(サイズ)
プレーヤーの
リモコンのメ
を選択しま
を押し、
(出荷時設定)
(セットアップ)
Setup
を選択します。
を選択してから、
メ
32
ワイド
モニタのトラブルシューティング
LCD

問題 実行可能な解決法
画面に1本以上のラインが表示され
る
側面パネルボタンが作動しない テレビメニューをチェックして、ボタンがロックされている
画像が小さい 1 サイズ設定を調整してください。 リモコンのメニューボタ
1 テレビメニューで縦横比設定をチェックしてください。
モコンのメニューボタンを押し、
します。
ページの"テレビメニューを使用する"を参照してくだ
さい。
2 入力選択メニューで、適切なソースが選択されているこ
とを確認してください。 詳細については、25ページの
入力選択 メニュー"を参照してください。
3 異なる外部機器を接続してみてください。
く接続し、テレビメニューで入力ソースを更新している
ことを確認してください。
4 テレビメニューでサイズ設定を更新してください。
ンのメニューボタンを押し、
す。
5 工場出荷時設定にリセットしてください。
ニューを押し、
Factory Reset
かどうかを調べてください。
し、
側面パネルボタンを使用して、テレビメニューと側面パネル
ボタンをアンロックします。
1 メニューボタンを押します。
テレビメニューとボタンがロックされていることを示す
メッセージが表示されます。
2 メッセージが画面に表示されている間、側面パネルの音
量アップとチャンネル上ボタンを同時に押します。
テレビメニューとボタンがアンロックされていることを
示すメッセージが表示されます。
ンを押し、
2 これは、外部機器の問題の可能性があります。
マニュアルを参照してください。
テレビメニューの使用法の詳細については、
Size
(セットアップ)を選択してから、
Setup
(出荷時設定)を選択します。
リモコンのメニューボタンを押
(セットアップ)を選択します。
Setup
(サイズ)を選択します。
Size
(サイズ)を選択
Size
ケーブルを正し
(サイズ)を選択しま
リモコンでメ
外部機器の
24
リモコ
リ
"
ワイド
モニタのトラブルシューティング
LCD
33

テレビメニューのメッセージ
ワイド
メッセージ 実行可能な解決法
自動調整 対処法の必要ありません。ワイド
範囲外 最適の解像度設定をチェックしてください。
ビデオ入力がない
www.dell.com | support.dell.com
テレビボタンがロックされる アンロックするには、リモコンのメニューボタンを押し、
省電力モードで
キーボードの任意のキーを押す
か、マウスを動かします
省電力モードで
ビデオ信号をチェックしてください
自己テスト コンピュータソースがコンセントに差し込まれていないと
モニタを使用している間、次のメッセージが表示されることがあります。
LCD
モニタは自動調整を
LCD
実行中です。
新しいビデオドライバをダウンロードする必要があります。
詳細については、
い。
1
すべてのケーブルが適切に接続されていることをチェック
してください。
2
入力選択
を確認してください。 詳細については、25ページの"入力
メニュー"を参照してください。
選択
(セットアップ)を選択します。
Setup
側面パネルボタンを使用して、テレビメニューと側面パネ
ルボタンをアンロックします。
1
メニュー
テレビメニューとボタンがロックされていることを示す
メッセージが表示されます。
2
メッセージが画面に表示されている間、側面パネルの音量
アップとチャンネル上ボタンを同時に押します。
テレビメニューとボタンがアンロックされていることを示
すメッセージが表示されます。
ワイド
LCD
号が検出されなければ、ワイド
ドに入っています。 ワイド
入っているとき、電源のライトは黄色に点灯しています。
キーボードの任意のキーを押すか、マウスを動かして、ワ
イド
LCD
ビデオ外部機器の使用中に30分間非アクティブな状態が続
くと、ワイド
ド
イトは黄色に点灯しています。
思われます。入力選択メニューから
択していますが、コンセントに何も差し込まれていません。
コンピュータを
モニタが省電力モードに入っているとき、電源のラ
LCD
support.dell.com
メニューで、適切なソースが選択されていること
ボタンを押します。
モニタにコンピュータを接続している場合 信
LCD
モニタを呼び起こします。
モニタは省電力モードに入ります。 ワイ
LCD
または
VGA
にアクセスしてくださ
モニタはスリープモー
LCD
モニタがスリープモードに
または
VGA
に差し込んでください。
DVI
DVI
を選
34
ワイド
モニタのトラブルシューティング
LCD

リモコンの問題
問題 実行可能な解決法
リモコンを使用しているときに、ワ
イド
モニタが応答しない
LCD
1 リモコンをワイド
さい。 ワイド
確認してください。 IR の場所については、5ページの
ワイド
LCD
2 バッテリが正しくセットされていることを確認してくだ
さい。
3 バッテリが古くなっている場合、新しいものに交換して
ください。
明るいライトやその他の赤外線外部機器が、ワイド
注
:
LCD モニタのリモコンや IR の障害となっている可能性
があります。
モニタの左下隅に直接向けてくだ
LCD
モニタの正面を遮るものがないことを
LCD
モニタについて"を参照してください。
"
コンピュータにワイド
LCD
モニタを接続しているとき
にセルフテスト機能を利用する
コンピュータが DVI または
いるとき、自己テスト機能を使ってワイド
チェックすることができます。
のに、ワイド
ド
モニタの自己テストを実行してください。
LCD
1
コンピュータとワイド
2
コンピュータ背面からビデオケーブルのプラグを抜きます。
3
ワイド
ワイド
い場合、「
に)画面に表示されます。
セルフテストモードの間中、電源ライトは青く点灯し、自己テストパターンが画面上
を連続してスクロールします。
している場合、標準のシステム操作の間でも表示されます。
4
ワイド
ピュータとワイド
れでも明るくならない場合、コンピュータまたはグラフィックカードに問題があると
考えられます。
詳細については、コンピュータのマニュアルを参照してください。
LCD
LCD
LCD
モニタの画面が暗いままになっている場合、次のステップに従ってワイ
LCD
LCD
モニタの電源をオンにします。
モニタがビデオ信号を検知できず正しく作動しているかどうか分からな
自己テスト機能チェック」ダイアログボックスが(黒い画面を背景
Dell -
モニタの電源をオフにしてビデオケーブルを接続し直し、その後コン
モニタの電源をオンにします。 ワイド
LCD
コネクタを通してワイド LCD モニタに接続されて
VGA
モニタが正常に機能しているかどうかを
LCD
ワイド
モニタとコンピュータが正しく接続されている
LCD
モニタの電源をオフにします。
このボックスは、ビデオケーブルが外れていたり損傷
モニタの画面がそ
LCD
ワイド
モニタのトラブルシューティング
LCD
35

ワイド
注
問題 実行可能な解決法
ピクチャが中心から外れている、ま
たは小さい
www.dell.com | support.dell.com
オーディオが出ない 1
ビデオが出ない 注: 自己テストが表示される場合、ビデオカードに問題がある
LCD
または
: VGA
ことができます。
モニタをモニタとして使用しているときの問題
コネクタを使用して、コンピュータをワイド
DVI
1 自動調整
を押してテレビメニューに入り、
に、
2
最適の解像度設定をチェックしてください。
新しいビデオドライバをダウンロードする必要がありま
す。
ださい。
注: 古いビデオカードの中には、ワイド
設定に対応していないものもあります。
緑のオーディオケーブルがワイド
タのオーディオコネクタに接続されていることを確認しま
す。
ページの
コンピュータのコネクタの場所に付いては、コンピュータ
のマニュアルを参照してください。
オーディオケーブルをヘッドフォンジャックに接続しない
でください。
2
コンピュータの音量が消音になっていないことを確認して
ください。
3
スピーカーをチェックして、コンピュータのサウンドが作
動していることを確認してください。
ブルシューティングの情報については、コンピュータのマ
ニュアルを参照してください。
4
コンピュータからワイド
ニタの音量が聞こえるかどうかテストしてください。
か、間違った入力ソースを使っていることを意味します。
1
ワイド
ます。
2
電源ケーブルを含め、すべてのケーブルがワイド
タに正しく接続されていることを確認してください。
3
ワイド
しているかどうかを確認してください。
イド
います。
ドに入っていることを意味しています。
4
VGAが入力選択
す。
参照してください。
5
コンピュータを接続し直します。
6
適切に作動していることが分かっている別の外部機器を接
続します。
7
工場出荷時設定にリセットしてください。 リモコンで
ニュー
Factory Reset
を使って、
自動調整
詳細については、
ワイド
LCD
"VGA
LCD
モニタの電源がオンになっていることを確認し
LCD
モニタの右-下で、青または黄色のライトが点灯
LCD
モニタの電源がオンになっていることを示して
黄色のライトは、ワイド
詳細については、25ページの"入力選択 メニュー"を
を押し、
画像設定
を選択します。
モニタのコネクタの場所については、
コネクタを使用する"を参照してください。
メニューで選択されていることを確認しま
Setup
(出荷時設定)
をチェックします。
support.dell.com
LCD
モニタを抜き、ワイド
(セットアップ)
を選択します。
モニタに接続する
LCD
画像設定
LCD
LCD
を選択した後
にアクセスしてく
LCD
モニタの解像度
モニタとコンピュー
コンピュータのトラ
青いライトは、ワ
モニタが省電力モー
を選択してから、
メニュー
18
LCD
LCD
モニ
メ
モ
36
ワイド
モニタのトラブルシューティング
LCD

6
ワイド
全般
モデル番号
ディスプレイのタイプ
スクリーンサイズ
表示可能領域
画像の縦横比 ワイド画面
輝度(標準)
コントラスト比
応答時間
ビデオディスプレイ機能
追加機能:
対応 はい
SAP
LCD
モニタの仕様
W2306C
TFT COLOR Premium LCD
インチパネル(23インチ表示可能の画像
23
サイズ)
508.13 x 285.70mm
インチ
(20.00
解像度
16:9
縦横比
16:9
(標準)
450 nit
(標準)
550:1
(標準)
16ms
480i
480p
720p
1080i
(適用可能な場合)
576i
(適用可能な場合)
576p
ワイド
LCD
x
11.25
モニタ
インチ
)
物理的寸法
ディスプレイ(スタンド付き)
ディスプレイ(スタンドなし)
スピーカー付き 取り外し不可能
438 x 722x 177 mm
17.2" x 28.4" x 7"
365 x 722 x 98 mm
ワイド
モニタの仕様
LCD
37

物理的寸法
重量(スタンド付き)
傾き
回転
ネーティブ解像度
対応 はい
HDTV
チューナー
チューナーの数
(おおよそ)
10 kg
度
-5/+20
度
+/- 45
1366 x 768 (WXGA)
つのアナログ
1
www.dell.com | support.dell.com
表示角
水平
垂直
入力
ビデオ
コンポジット
ビデオ
S
コンポーネント
イン(同軸)
TV
オーディオ
(ビデオ外部機器と共に使用する場合)1つ(底面)
DVI
(CVBS)
(L+R)
D4
コンピュータ
(コンピュータモニタとして使用する
VGA
場合)
(コンピュータモニタとして使用する場
DVI
合)
オーディオ
(PC)
度
+/- 85
度
+/- 85
つ(側面)
1
つ(側面)
1
つ(底面)
1
つ(底面)
1
ペア
4
つ(底面)
1
つ(底面)
1
つ(底面)
1
つ(底面)
1
38
ワイド
モニタの仕様
LCD

出力
ビデオ
コンポジット
オーディオ
ヘッドフォン
オーディオ
効果
スピーカー(組込式)
(CVBS)
(L+R)
つ(底面)
1
ペア
1
つ(側面)
1
SRS TruSurround XT
マルチメディアモード
ワット/チャンネル
7
7+7
ワット
合計
ワイド
モニタの仕様
LCD
39

www.dell.com | support.dell.com
40
ワイド
モニタの仕様
LCD

FILE LOCATION: P:\P_TranslateFile\C9\2005\11\C9002634-AOC-DELL W2306C_JPN_OM\OK\JP-W2306C_23JSe70-1.fm
7
Dell
インターネット上でのデルへのアクセスは、次のアドレスをご利用ください。
•
•
お客様の国の特定の
Dell
で提供されるコードを使用してください。
最寄りのまたは国際オペレータにお問い合わせください。
国(都市)
国際アクセスコード
国コード
都市コード
アングィラ 一般のサポート フリーダイヤル
アンチグアバーブーダ
アルゼンチン
(ブエノスアイレス)
国際アクセスコード:
国コード:
都市コード:
に連絡する
www.dell.com
support.dell.com
メモ: フリーダイヤル番号は、一覧表示されている国内部で使用するためのものです。
メモ: 一部の国で、
された個別の電話番号でお受けになることができます。
れた固有の電話番号が見つからない場合、一覧表示されたサポート番号を通して
い合わせください。いただいたお電話は適切な部署にお回しします。
にお問い合わせになる必要が生じたとき、電子メールアドレス、電話番号、次の表
54
11
サポート)テクニカルサポート
(
アドレスについては、以下の表で適切な国を見つけてください。
Web
Dell XPS™ートPC
部署名またはサービス内容、ウェブサイト、
00
一般のサポート
ウェブサイト:
電子メール:
デスクトップとノートPC用の電子メール:
la-techsupport@dell.com
サーバと
メール:
カスタマーケア フリーダイヤル
テクニカルサポート フリーダイヤル
テクニカルサポートサービス フリーダイヤル
販売
に固有のサポートはそれぞれの国に対して一覧表示
ノートPCに対して一覧表示さ
XPS
度のコードを使用するかはっきりしない場合、
および電子メールアドレス
www.dell.com.ar
us_latin_services@dell.com
®
ストレージ製品用の電子
EMC
la_enterprise@dell.com
Dell
にお問
市外局番、
市内番号、および
フリーダイヤル番号
: 800-335-0031
1-800-805-5924
:
0-800-444-0730
:
0-800-444-0733
:
0-800-444-0724
0-810-444-3355
DELL CONFIDENTIAL – PRELIMINARY 1/3/06 – FOR PROOF ONLY
Dell に連絡する 41

FILE LOCATION: P:\P_TranslateFile\C9\2005\11\C9002634-AOC-DELL W2306C_JPN_OM\OK\JP-W2306C_23JSe70-1.fm
国(都市)
国際アクセスコード
国コード
都市コード
アルバ 一般のサポート フリーダイヤル
オーストラリア(シドニー)
国際アクセスコード:
国コード:
都市コード:
オーストリア(ウィーン)
国際アクセスコード:
www.dell.com | support.dell.com
国コード:
都市コード:
バハマ 一般のサポート フリーダイヤル
61
2
43
1
0011
900
部署名またはサービス内容、ウェブサイト、
および電子メールアドレス
ウェブサイト:
電子メール:
一般のサポート
ウェブサイト:
電子メール:
support.ap.dell.com
support.ap.dell.com/contactus
support.euro.dell.com
tech_support_central_europe@dell.com
自宅オフィス/小企業販売
自宅オフィス/小企業ファックス
自宅オフィス/小企業カスタマーケア
優先アカウント/企業カスタマーケア
ノートPCのみでサポート
XPS
他のすべての
宅オフィス/小企業のサポート
優先アカウント/企業サポート
代表
コンピュータに対して自
Dell
市外局番、
市内番号、および
フリーダイヤル番号
: 800-1578
13DELL-133355
0820 240 530 00
0820 240 530 49
0820 240 530 14
0820 240 530 16
0820 240 530 81
0820 240 530 14
0660 8779
0820 240 530 00
1-866-278-6818
バルバドス 一般のサポート
ベルギー(ブリュッセル)
国際アクセスコード:
国コード:
都市コード:
バーミューダ 一般のサポート
ボリビア 一般のサポート フリーダイヤル
32
2
00
ウェブサイト:
ノートPC専用のテクニカルサポート
XPS
その他すべての
ニカルサポート
テクニカルサポートファックス
カスタマーケア
企業販売
ファックス
代表
support.euro.dell.com
コンピュータ用のテク
Dell
1-800-534-3066
02 481 92 96
02 481 92 88
02 481 92 95
02 713 15 65
02 481 91 00
02 481 92 99
02 481 91 00
1-800-342-0671
: 800-10-0238
:
DELL CONFIDENTIAL – PRELIMINARY 1/3/06 – FOR PROOF ONLY
42 Dell に連絡する

FILE LOCATION: P:\P_TranslateFile\C9\2005\11\C9002634-AOC-DELL W2306C_JPN_OM\OK\JP-W2306C_23JSe70-1.fm
国(都市)
国際アクセスコード
国コード
都市コード
ブラジル
国際アクセスコード:
国コード:
都市コード:
英領ヴァージン諸島 一般のサポート フリーダイヤル
55
51
00
部署名またはサービス内容、ウェブサイト、
および電子メールアドレス
ウェブサイト:
コンピュータサポート、ハードウェアおよび
保証サポート
テクニカルサポートファックス
カスタマーケアファックス
販売
www.dell.com/br
市外局番、
市内番号、および
フリーダイヤル番号
0800 90 3355
51 481 5470
51 481 5480
0800 90 3390
1-866-278-6820
ブルネイ
国コード:
カナダ
(オンタリオ、ノースヨーク)
国際アクセスコード:
673
011
テクニカルサポート(マレーシア、ペナン)
カスタマーケア(マレーシア、ペナン)
トランザクション販売(マレーシア、ペナ
ン)
オンラインオーダーステータス:
www.dell.ca/ostatus
AutoTech
顧客サービス(自宅オフィス販売/小企業) フリーダイヤル
(自動テクニカルサポート) フリーダイヤル
604 633 4966
604 633 4888
604 633 4955
1-800-247-9362
1-800-847-4096
顧客サービス(中企業/大企業、政府) フリーダイヤル
1-800-326-9463
顧客サービス(プリンタ、プロジェクタ、テ
レビ、ハンドヘルド、デジタルジュークボッ
クス、ワイヤレス)
ハードウェア保証サポート(自宅オフィス販
売/小企業)
ハードウェア保証サポート(中企業/大企
業、政府)
ハードウェア保証サポート(プリンタ、プロ
ジェクタ、テレビ、ハンドヘルド、デジタル
ジュークボックス、ワイヤレス)
販売(自宅オフィス販売/小企業) フリーダイヤル
フリーダイヤル
1-800-847-4096
フリーダイヤル
1-800-906-3355
フリーダイヤル
1-800-387-5757
1-877-335-5767
1-800-387-5752
販売(中企業/大企業、政府) フリーダイヤル
1-800-387-5755
スペアパーツ販売と拡張サービス販売
イギリス領ケイマン諸島 一般のサポート
チリ(サンチアゴ)
国コード:
都市コード:
56
2
販売と顧客サポート フリーダイヤル
1 866 440 3355
1-800-805-7541
1230-020-4823
:
:
:
:
:
:
:
:
:
:
DELL CONFIDENTIAL – PRELIMINARY 1/3/06 – FOR PROOF ONLY
Dell に連絡する 43

FILE LOCATION: P:\P_TranslateFile\C9\2005\11\C9002634-AOC-DELL W2306C_JPN_OM\OK\JP-W2306C_23JSe70-1.fm
国(都市)
国際アクセスコード
国コード
都市コード
中国(厦門)
国コード:
都市コード:
86
592
部署名またはサービス内容、ウェブサイト、
テクニカルサポートのウェブサイト:
support.dell.com.cn
テクニカルサポートの電子メール:
cn_support@dell.com
カスタマーケアの電子メール:
customer_cn@dell.com
テクニカルサポートファックス
テクニカルサポート(
www.dell.com | support.dell.com
Inspiron™
テクニカルサポート
OptiPlex™
テクニカルサポート(サーバとストレージ) フリーダイヤル
テクニカルサポート(プロジェクタ、
スイッチ、ルータなど)
テクニカルサポート(プリンタ) フリーダイヤル
カスタマーケア フリーダイヤル
カスタマーケアファックス
自宅オフィスおよび小企業 フリーダイヤル
優先アカウント部門 フリーダイヤル
大企業のアカウント
大企業アカウントキーアカウント フリーダイヤル
大企業のアカウント北部 フリーダイヤル
大企業アカウント北部政府と教育 フリーダイヤル
大企業のアカウントノース東部 フリーダイヤル
大企業アカウント東部政府と教育 フリーダイヤル
大企業アカウントキューチーム フリーダイヤル
大企業のアカウントサウス フリーダイヤル
大企業のアカウント西部 フリーダイヤル
大企業アカウントスペアパーツ フリーダイヤル
コロンビア 一般のサポート
コスタリカ 一般のサポート
および電子メールアドレス
Dimension™
)
Dell Precision™
、および
Latitude™
)
GCP
および
、
PDA
フリーダイヤル
フリーダイヤル
、
フリーダイヤル
フリーダイヤル
市外局番、
市内番号、および
フリーダイヤル番号
592 818 1350
: 800 858 2968
: 800 858 0950
: 800 858 0960
: 800 858 2920
: 800 858 2311
: 800 858 2060
592 818 1308
: 800 858 2222
: 800 858 2557
: 800 858 2055
: 800 858 2628
: 800 858 2999
: 800 858 2955
: 800 858 2020
: 800 858 2669
: 800 858 2572
: 800 858 2355
: 800 858 2811
: 800 858 2621
980-9-15-3978
0800-012-0435
DELL CONFIDENTIAL – PRELIMINARY 1/3/06 – FOR PROOF ONLY
44 Dell に連絡する

FILE LOCATION: P:\P_TranslateFile\C9\2005\11\C9002634-AOC-DELL W2306C_JPN_OM\OK\JP-W2306C_23JSe70-1.fm
国(都市)
国際アクセスコード
国コード
都市コード
チェコ共和国(プラハ)
国際アクセスコード:
国コード:
デンマーク(コペンハーゲン)
国際アクセスコード:
国コード:
ドミニカ 一般のサポート フリーダイヤル
ドミニカ共和国 一般のサポート
エクアドル 一般のサポート フリーダイヤル
エルサルバドル 一般のサポート
フィンランド(ヘルシンキ)
国際アクセスコード:
国コード:
都市コード:
420
45
358
9
00
00
990
部署名またはサービス内容、ウェブサイト、
および電子メールアドレス
ウェブサイト:
電子メール:
テクニカルサポート
カスタマーケア
ファックス
ハードウェアと保証ファックス
代表
ウェブサイト:
ノートPC専用のテクニカルサポート
XPS
その他すべての
ニカルサポート
カスタマーケア(リレーショナル)
自宅オフィス/小企業カスタマーケア
代表(リレーショナル)
代表ファックス(リレーショナル)
代表(自宅オフィス/小企業)
代表ファックス(自宅オフィス/小企業)
ウェブサイト:
テクニカルサポート
カスタマーケア
ファックス
代表
support.euro.dell.com
czech_dell@dell.com
support.euro.dell.com
コンピュータ用のテク
Dell
support.euro.dell.com
市内番号、および
フリーダイヤル番号
: 1-866-278-
1-800-148-0530
01-899-753-0777
09 253 313 60
09 253 313 38
09 253 313 99
09 253 313 00
市外局番、
22537 2727
22537 2707
22537 2714
22537 2728
22537 2711
7010 0074
7023 0182
7023 0184
3287 5505
3287 1200
3287 1201
3287 5000
3287 5001
6821
: 999-119
DELL CONFIDENTIAL – PRELIMINARY 1/3/06 – FOR PROOF ONLY
Dell に連絡する 45

FILE LOCATION: P:\P_TranslateFile\C9\2005\11\C9002634-AOC-DELL W2306C_JPN_OM\OK\JP-W2306C_23JSe70-1.fm
国(都市)
国際アクセスコード
国コード
都市コード
フランス(パリ)(モンペリエ)
国際アクセスコード:
国コード:
都市コード:
www.dell.com | support.dell.com
ドイツ(ランゲン)
国際アクセスコード:
国コード:
都市コード:
33
(1) (4)
49
6103
00
00
部署名またはサービス内容、ウェブサイト、
および電子メールアドレス
ウェブサイト:
自宅オフィスおよび小企業
ノートPC専用のテクニカルサポート
XPS
その他すべての
ニカルサポート
カスタマーケア
代表
代表(フランス国外からの呼び出し)
販売
ファックス
ファックス(フランス国外からの呼び出し)
企業
テクニカルサポート
カスタマーケア
代表
販売
ファックス
ウェブサイト:
電子メール:
support.euro.dell.com
コンピュータ用のテク
Dell
support.euro.dell.com
tech_support_central_europe@dell.com
ノートPC専用のテクニカルサポート
XPS
その他すべての
ニカルサポート
自宅オフィス/小企業カスタマーケア
グローバルセグメントカスタマーケア
優先アカウントカスタマーケア
大企業アカウントカスタマーケア
公共部門アカウントカスタマーケア
代表
コンピュータ用のテク
Dell
市外局番、
市内番号、および
フリーダイヤル番号
0825 387 129
0825 387 270
0825 823 833
0825 004 700
04 99 75 40 00
0825 004 700
0825 004 701
04 99 75 40 01
0825 004 719
0825 338 339
01 55 94 71 00
01 55 94 71 00
01 55 94 71 01
06103 766-7222
06103 766-7200
0180-5-224400
06103 766-9570
06103 766-9420
06103 766-9560
06103 766-9555
06103 766-7000
DELL CONFIDENTIAL – PRELIMINARY 1/3/06 – FOR PROOF ONLY
46 Dell に連絡する

FILE LOCATION: P:\P_TranslateFile\C9\2005\11\C9002634-AOC-DELL W2306C_JPN_OM\OK\JP-W2306C_23JSe70-1.fm
国(都市)
国際アクセスコード
国コード
都市コード
ギリシャ
国際アクセスコード:
国コード:
グレナダ 一般のサポート フリーダイヤル
30
00
部署名またはサービス内容、ウェブサイト、
および電子メールアドレス
ウェブサイト:
テクニカルサポート
ゴールドサービステクニカルサポート
代表
ゴールドサービス代表
販売
ファックス
support.euro.dell.com
市外局番、
市内番号、および
フリーダイヤル番号
00800-44 14 95 18
00800-44 14 00 83
2108129810
2108129811
2108129800
2108129812
1-866-540-3355
グアテマラ 一般のサポート
ガイアナ 一般のサポート フリーダイヤル
1-800-999-0136
1-877-270-4609
香港
国際アクセスコード:
国コード:
インド 電子メール:
852
001
ウェブサイト:
テクニカルサポートの電子メール:
support.ap.dell.com
apsupport@dell.com
テクニカルサポート(
Inspiron™
テクニカルサポート(
Dell Precision
テクニカルサポート
(
PowerApp™APowerEdge™APowerConn
)
)
ect™APowerVault™
カスタマーケア
大企業アカウント
グローバル顧客プログラム
中規模企業部門
自宅オフィスおよび小企業部門
Dimension™
OptiPlex、Latitude
)
および
、
2969 3188
2969 3191
2969 3196
3416 0910
3416 0907
3416 0908
3416 0912
2969 3105
india_support_desktop@dell.com
india_support_notebook@dell.com
india_support_Server@dell.com
および
1600338045
1600448046
1600 33 8044
1600 33 8046
テクニカルサポート
販売(大企業アカウント)
販売(自宅オフィスおよび小企業)
:
:
DELL CONFIDENTIAL – PRELIMINARY 1/3/06 – FOR PROOF ONLY
Dell に連絡する 47

FILE LOCATION: P:\P_TranslateFile\C9\2005\11\C9002634-AOC-DELL W2306C_JPN_OM\OK\JP-W2306C_23JSe70-1.fm
国(都市)
国際アクセスコード
国コード
都市コード
アイルランド(チェリーウッド)
国際アクセスコード:
国コード:
都市コード:
www.dell.com | support.dell.com
イタリア(ミラノ)
国際アクセスコード:
国コード:
都市コード:
ジャマイカ 全般サポート(ジャマイカ国内からのみダイ
353
1
39
02
16
00
部署名またはサービス内容、ウェブサイト、
および電子メールアドレス
ウェブサイト:
電子メール:
ノートPC専用のテクニカルサポート
XPS
その他すべての
ニカルサポート
英国テクニカルサポート(英国内のみのダイ
ヤル)
自宅オフィスユーザーカスタマーケア
小企業カスタマーケア
英国カスタマーケア(英国内のみのダイヤ
ル)
企業カスタマーケア
企業カスタマーケア(英国内のみのダイヤ
ル)
アイルランド販売
英国販売(英国内のみのダイヤル)
ファックス/販売ファックス
代表
ウェブサイト:
自宅オフィスおよび小企業
テクニカルサポート
カスタマーケア
ファックス
代表
企業
テクニカルサポート
カスタマーケア
ファックス
代表
ヤル)
support.euro.dell.com
dell_direct_support@dell.com
コンピュータ用のテク
Dell
support.euro.dell.com
市外局番、
市内番号、および
フリーダイヤル番号
1850 200 722
1850 543 543
0870 908 0800
01 204 4014
01 204 4014
0870 906 0010
1850 200 982
0870 907 4499
01 204 4444
0870 907 4000
01 204 0103
01 204 4444
02 577 826 90
02 696 821 14
02 696 821 13
02 696 821 12
02 577 826 90
02 577 825 55
02 575 035 30
02 577 821
1-800-682-3639
DELL CONFIDENTIAL – PRELIMINARY 1/3/06 – FOR PROOF ONLY
48 Dell に連絡する

FILE LOCATION: P:\P_TranslateFile\C9\2005\11\C9002634-AOC-DELL W2306C_JPN_OM\OK\JP-W2306C_23JSe70-1.fm
国(都市)
国際アクセスコード
国コード
都市コード
日本(川崎)
国際アクセスコード:
国番号:
市外局番:
81
44
001
部署名またはサービス内容、ウェブサイト、
および電子メールアドレス
ウェブサイト:
テクニカルサポート(サーバ)
テクニカルサポート(海外から)(サーバ)
テクニカルサポート
(
Dimension™
テクニカルサポート(海外から)
(
Dimension™
テクニカルサポート
(Dell Precision™、OptiPlex™
support.jp.dell.com
および
および
Inspiron™
Inspiron™
)
)
、および
Latitude™)
テクニカルサポート(海外から)
(
Dell Precision™、OptiPlex™
Latitude™
テクニカルサポート
(
Axim™
テクニカルサポート(海外から)
(
Axim™
Fax
24
カスタマーケア
ビジネスセールス本部(従業員
法人営業本部(従業員数
エンタープライズ営業本部
(従業員数
公共営業本部
(官公庁、研究・ 教育機関、および医療機関)
Global Segment-Japan
個人営業部
代表
)
)
)
情報サービス
時間納期情報案内サービス
人以上)
3500
グローバル営業本部
400
、および
人未満)
400
人以上)
市外局番、
市内番号、および
フリーダイヤル番号
フリーダイヤル:
0120-198-498
81-44-556-4162
フリーダイヤル:
0120-198-226
81-44-520-1435
フリーダイヤル:
0120-198-433
81-44-556-3894
フリーダイヤル:
0120-981-690
81-44-556-3468
044-556-3490
044-556-3801
044-556-4240
044-556-1465
044-556-3433
044-556-3430
044-556-1469
044-556-3469
044-556-1760
044-556-4300
DELL CONFIDENTIAL – PRELIMINARY 1/3/06 – FOR PROOF ONLY
Dell に連絡する 49

FILE LOCATION: P:\P_TranslateFile\C9\2005\11\C9002634-AOC-DELL W2306C_JPN_OM\OK\JP-W2306C_23JSe70-1.fm
国(都市)
国際アクセスコード
国コード
都市コード
韓国(ソウル)
国際アクセスコード:
国コード:
都市コード:
ラテンアメリカ 顧客テクニカルサポート(米国、テキサス
www.dell.com | support.dell.com
ルクセンブルグ
国際アクセスコード:
国コード:
マカオ
国コード:
82
2
352
853
001
00
部署名またはサービス内容、ウェブサイト、
および電子メールアドレス
電子メール:
サポート フリーダイヤル
サポート(
ニクス、アクセサリ)
販売 フリーダイヤル
ファックス
代表
州、オースティン)
顧客サービス(米国、テキサス州、オース
ティン)
ファックス(テクニカルサポートと顧客サー
ビス)(米国、テキサス州、オースティン)
販売(米国、テキサス州、オースティン)
ファックス販売(米国、テキサス州、オース
ティン)
ウェブサイト:
サポート
自宅オフィス/小企業販売
企業販売
カスタマーケア
ファックス
テクニカルサポート フリーダイヤル
顧客サービス(中国、厦門)
トランザクション販売(中国、厦門)
krsupport@dell.com
Dimension、PDA
support.euro.dell.com
、エレクトロ
市外局番、
市内番号、および
フリーダイヤル番号
: 080-200-3800
フリーダイヤル:
080-200-3801
: 080-200-3600
2194-6202
2194-6000
512 728-4093
512 728-3619
512 728-3883
512 728-4397
512 728-4600
または
512 728-3772
3420808075
+32 (0)2 713 15 96
26 25 77 81
+32 (0)2 481 91 19
26 25 77 82
: 0800 105
34 160 910
29 693 115
DELL CONFIDENTIAL – PRELIMINARY 1/3/06 – FOR PROOF ONLY
50 Dell に連絡する

FILE LOCATION: P:\P_TranslateFile\C9\2005\11\C9002634-AOC-DELL W2306C_JPN_OM\OK\JP-W2306C_23JSe70-1.fm
国(都市)
国際アクセスコード
国コード
都市コード
マレーシア(ペナン)
国際アクセスコード:
国コード:
都市コード:
60
4
00
部署名またはサービス内容、ウェブサイト、
および電子メールアドレス
ウェブサイト:
テクニカルサポート(
OptiPlex、Latitude
テクニカルサポート(
エレクトロニクス、アクセサリ)
テクニカルサポート(
PowerEdge、PowerConnect、PowerVault
カスタマーケア フリーダイヤル
support.ap.dell.com
Dell Precision
)
Dimension、Inspiron
PowerApp
、
、
フリーダイヤル
、
フリーダイヤル
フリーダイヤル
)
市内番号、および
フリーダイヤル番号
市外局番、
: 1 800 880 193
: 1 800 881 306
: 1800 881 386
: 1800 881 306
(option 6)
トランザクション販売 フリーダイヤル
企業販売 フリーダイヤル
メキシコ
国際アクセスコード:
国コード:
モンセラー 一般のサポート フリーダイヤル
52
00
顧客テクニカルサポート
または
販売
または
顧客サービス
または
メイン
または
: 1 800 888 202
: 1 800 888 213
001-877-384-8979
001-877-269-3383
50-81-8800
01-800-888-3355
001-877-384-8979
001-877-269-3383
50-81-8800
01-800-888-3355
1-866-278-6822
オランダ領アンティル諸島 一般のサポート
001-800-882-1519
:
DELL CONFIDENTIAL – PRELIMINARY 1/3/06 – FOR PROOF ONLY
Dell に連絡する 51

FILE LOCATION: P:\P_TranslateFile\C9\2005\11\C9002634-AOC-DELL W2306C_JPN_OM\OK\JP-W2306C_23JSe70-1.fm
国(都市)
国際アクセスコード
国コード
都市コード
オランダ(アムステルダム)
国際アクセスコード:
国コード:
都市コード:
www.dell.com | support.dell.com
ニュージーランド
国際アクセスコード:
国コード:
ニカラグア 一般のサポート
ノルウェー(ライサカー)
国際アクセスコード:
国コード:
パナマ 一般のサポート
ペルー 一般のサポート
31
20
64
47
00
00
00
部署名またはサービス内容、ウェブサイト、
ウェブサイト:
ノートPC専用のテクニカルサポート
XPS
その他すべての
ニカルサポート
テクニカルサポートファックス
自宅オフィス/小企業カスタマーケア
リレーショナルカスタマーケア
自宅オフィス/小企業販売
リレーショナル販売
自宅オフィス/小企業販売ファックス
リレーショナル販売ファックス
代表
代表ファックス
ウェブサイト:
電子メール:
一般のサポート
ウェブサイト:
ノートPC専用のテクニカルサポート
XPS
その他すべての
ポート
リレーショナルカスタマーケア
自宅オフィス/小企業カスタマーケア
代表
ファックス代表
および電子メールアドレス
support.euro.dell.com
コンピュータ用のテク
Dell
support.ap.dell.com
support.ap.dell.com/contactus
support.euro.dell.com
製品用のテクニカルサ
Dell
市外局番、
市内番号、および
フリーダイヤル番号
020 674 45 94
020 674 45 00
020 674 47 66
020 674 42 00
020 674 4325
020 674 55 00
020 674 50 00
020 674 47 75
020 674 47 50
020 674 50 00
020 674 47 50
0800 441 567
001-800-220-1006
815 35 043
671 16882
671 17575
23162298
671 16800
671 16865
001-800-507-0962
0800-50-669
DELL CONFIDENTIAL – PRELIMINARY 1/3/06 – FOR PROOF ONLY
52 Dell に連絡する

FILE LOCATION: P:\P_TranslateFile\C9\2005\11\C9002634-AOC-DELL W2306C_JPN_OM\OK\JP-W2306C_23JSe70-1.fm
国(都市)
国際アクセスコード
国コード
都市コード
ポーランド(ワルシャワ)
国際アクセスコード:
国コード:
都市コード:
ポルトガル
国際アクセスコード:
国コード:
プエルトリコ 一般のサポート
セントキッツ島とネビス 一般のサポート フリーダイヤル
セントルシア 一般のサポート
セントビンセントグレナディーン 一般のサポート フリーダイヤル
シンガポール(シンガポール)
国際アクセスコード:
国コード:
48
22
351
65
011
00
005
部署名またはサービス内容、ウェブサイト、
および電子メールアドレス
ウェブサイト:
電子メール:
顧客サービス電話
カスタマーケア
販売
顧客サービスファックス
受付デスク
代表
ウェブサイト:
テクニカルサポート
カスタマーケア
販売
ファックス
support.euro.dell.com
pl_support_tech@dell.com
support.euro.dell.com
800 300 410
または
市内番号、および
フリーダイヤル番号
または
800 300 412
1-800-805-7545
1-800-882-1521
ウェブサイト:
テクニカルサポート(
エレクトロニクス、アクセサリ)
テクニカルサポート(
Dell Precision
テクニカルサポート(
PowerEdge、PowerConnect、PowerVault
カスタマーケア フリーダイヤル:
support.ap.dell.com
Dimension、Inspiron
OptiPlex、Latitude
)
PowerApp
、
、
フリーダイヤル
フリーダイヤル
、
フリーダイヤル
)
: 1800 394 7430
: 1800 394 7488
: 1800 394 7478
1 800 394 7430 (
トランザクション販売 フリーダイヤル:
1 800 394 7412
企業販売 フリーダイヤル
: 1 800 394 7419
市外局番、
57 95 700
57 95 999
57 95 999
57 95 806
57 95 998
57 95 999
707200149
800 300 413
800 300 411
または
21 422 07 10
21 424 01 12
: 1-877-441-
4731
: 1-877-270-
4609
オプション
6)
DELL CONFIDENTIAL – PRELIMINARY 1/3/06 – FOR PROOF ONLY
Dell に連絡する 53

FILE LOCATION: P:\P_TranslateFile\C9\2005\11\C9002634-AOC-DELL W2306C_JPN_OM\OK\JP-W2306C_23JSe70-1.fm
国(都市)
国際アクセスコード
国コード
都市コード
スロバキア(プラハ)
国際アクセスコード:
国コード:
南アフリカ(ヨハネスブルク)
国際アクセスコード:
www.dell.com | support.dell.com
09/091
国コード:
都市コード:
東南アジアと太平洋諸国 テクニカルサポート、顧客サービス、販売
スペイン(マドリッド)
国際アクセスコード:
国コード:
都市コード:
421
27
11
34
91
00
00
部署名またはサービス内容、ウェブサイト、
および電子メールアドレス
ウェブサイト:
電子メール:
テクニカルサポート
カスタマーケア
ファックス
テクニカルファックス
代表(販売)
ウェブサイト:
電子メール:
ゴールドキュー
テクニカルサポート
カスタマーケア
販売
ファックス
代表
(マレーシア、ペナン)
ウェブサイト:
自宅オフィスおよび小企業
テクニカルサポート
カスタマーケア
販売
代表
ファックス
企業
テクニカルサポート
カスタマーケア
代表
ファックス
support.euro.dell.com
czech_dell@dell.com
support.euro.dell.com
dell_za_support@dell.com
support.euro.dell.com
市外局番、
市内番号、および
フリーダイヤル番号
02 5441 5727
420 22537 2707
02 5441 8328
02 5441 8328
02 5441 7585
011 709 7713
011 709 7710
011 709 7707
011 709 7700
011 706 0495
011 709 7700
604 633 4810
902 100 130
902 118 540
902 118 541
902 118 541
902 118 539
902 100 130
902 115 236
91 722 92 00
91 722 95 83
DELL CONFIDENTIAL – PRELIMINARY 1/3/06 – FOR PROOF ONLY
54 Dell に連絡する

FILE LOCATION: P:\P_TranslateFile\C9\2005\11\C9002634-AOC-DELL W2306C_JPN_OM\OK\JP-W2306C_23JSe70-1.fm
国(都市)
国際アクセスコード
国コード
都市コード
スウェーデン
(ウプランドバスビー)
国際アクセスコード:
国コード:
都市コード:
スイス(ジュネーブ)
国際アクセスコード:
国コード:
都市コード:
台湾
国際アクセスコード:
国コード:
タイ
国際アクセスコード:
国コード:
46
8
41
22
886
66
00
00
002
001
部署名またはサービス内容、ウェブサイト、
および電子メールアドレス
ウェブサイト:
ノートPC専用のテクニカルサポート
XPS
その他すべての
ポート
リレーショナルカスタマーケア
自宅オフィス/小企業カスタマーケア
従業員購入プログラム
テクニカルサポートファックス
販売
ウェブサイト:
電子メール:
support.euro.dell.com
製品用のテクニカルサ
Dell
サポート
(EPP)
support.euro.dell.com
市内番号、および
フリーダイヤル番号
Tech_support_central_Europe@dell.com
ノートPC専用のテクニカルサポート
XPS
その他すべての
ポート(自宅オフィスおよび小企業)
テクニカルサポート(企業)
カスタマーケア(自宅オフィスと小企業)
カスタマーケア(企業)
ファックス
代表
ウェブサイト:
電子メール:
テクニカルサポート(
ap_support@dell.com
Inspiron、Dimension
アクセサリ)
テクニカルサポート(
PowerEdge、PowerConnect、PowerVault
カスタマーケア フリーダイヤル
トランザクション販売 フリーダイヤル
企業販売 フリーダイヤル
ウェブサイト:
テクニカルサポート(
Dell Precision
テクニカルサポート(
PowerEdge、PowerConnect、PowerVault
カスタマーケア フリーダイヤル
企業販売 フリーダイヤル
トランザクション販売 フリーダイヤル
製品用のテクニカルサ
Dell
support.ap.dell.com
OptiPlex、Latitude
、エレクトロニクス、
PowerApp
support.ap.dell.com
OptiPlex、Latitude
)
PowerApp
、
、
、
フリーダイヤル
)
、
フリーダイヤル
フリーダイヤル
)
市外局番、
0771 340 340
08 590 05 199
08 590 05 642
08 587 70 527
20 140 14 44
08 590 05 594
08 590 05 185
0848 33 88 57
0844 811 411
0844 822 844
0848 802 202
0848 821 721
022 799 01 90
022 799 01 01
: 00801 86 1011
フリーダイヤル
: 00801 60 1256
: 00801 60 1250
オプション
(
5)
: 00801 65 1228
: 00801 651 227
: 1800 0060 07
: 1800 0600 09
: 1800 006 007
オプション
(
7)
: 1800 006 009
: 1800 006 006
DELL CONFIDENTIAL – PRELIMINARY 1/3/06 – FOR PROOF ONLY
Dell に連絡する 55

FILE LOCATION: P:\P_TranslateFile\C9\2005\11\C9002634-AOC-DELL W2306C_JPN_OM\OK\JP-W2306C_23JSe70-1.fm
国(都市)
国際アクセスコード
国コード
都市コード
トリニダード/トバゴ 一般のサポート
タークス諸島・ カイコス諸島 一般のサポート フリーダイヤル
部署名またはサービス内容、ウェブサイト、
および電子メールアドレス
市外局番、
市内番号、および
フリーダイヤル番号
1-800-805-8035
1-866-540-3355
英国(ブラックネル)
国際アクセスコード:
国コード:
都市コード:
www.dell.com | support.dell.com
ウルグアイ 一般のサポート フリーダイヤル
44
1344
00
ウェブサイト:
カスタマーケアウェブサイト:
support.euro.dell.com
support.euro.dell.com/uk/en/ECare/Form/Home.asp
電子メール:
テクニカルサポート(企業/優先アカウント
dell_direct_support@dell.com
/PAD
人以上の従業員数])
[1000
ノートPC専用のテクニカルサポート
XPS
その他のすべての製品用のテクニカルサポー
ト(直接および全般)
グローバルアカウントカスタマーケア
自宅オフィスおよび小企業カスタマーケア
企業カスタマーケア
優先アカウント(
カスタマーケア
中央政府カスタマーケア
地方政府と教育カスタマーケア
ヘルスカスタマーケア
自宅オフィスおよび小企業販売
企業/公共部門セクタ販売
自宅オフィスおよび小企業ファックス
500ñ5000
人の従業員数)
0870 908 0500
0870 366 4180
0870 908 0800
01344 373 186
0870 906 0010
01344 373 185
0870 906 0010
01344 373 193
01344 373 199
01344 373 194
0870 907 4000
01344 860 456
0870 907 4006
000-413-598-2521
:
:
DELL CONFIDENTIAL – PRELIMINARY 1/3/06 – FOR PROOF ONLY
56 Dell に連絡する

FILE LOCATION: P:\P_TranslateFile\C9\2005\11\C9002634-AOC-DELL W2306C_JPN_OM\OK\JP-W2306C_23JSe70-1.fm
国(都市)
国際アクセスコード
国コード
都市コード
米国
(テキサス州、オースティン)
国際アクセスコード:
国コード:
1
011
部署名またはサービス内容、ウェブサイト、
および電子メールアドレス
自動オーダーステータスサービス フリーダイヤル
AutoTech
ピュータ)
リレーションシップ顧客用のテクニカルサ
ポートカスタマーケア(
(ノートPCとデスクトップコン
タ、プロジェクタ
顧客(自宅および自宅兼オフィス)サポート
(他のすべての
顧客サービス フリーダイヤル
従業員購入プログラム
金融サービスウェブサイト:
www.dellfinancialservices.com
金融サービス(リース/ローン) フリーダイヤル
金融サービス(
企業
顧客サービスとサポート フリーダイヤル
従業員購入プログラム
プリンタとプロジェクタサポート フリーダイヤル
公共部門(政府、教育、医療)
顧客サービスとサポート フリーダイヤル
従業員購入プログラム
販売 フリーダイヤル
Dell
アウトレットストア(
Dell
ピュータ)
ソフトウェアと周辺機器販売 フリーダイヤル
スペアパーツ販売 フリーダイヤル
拡張サービスと保証販売 フリーダイヤル
ファックス フリーダイヤル
聴覚障害者または言語障害者用の
ビス
米国領バージン諸島 一般のサポート
ベネズエラ 一般のサポート
)
製品用)
Dell
(EPP)
優先アカウント
Dell
(EPP)
(EPP)
フリーダイヤル
Dell
、プリン
TV
顧客 フリーダイヤル
[DPA]
顧客 フリーダイヤル
顧客 フリーダイヤル
改修コン
Dell
Dell
フリーダイヤル
フリーダイヤル
)フリーダイヤル
フリーダイヤル
サー
市外局番、
市内番号、および
フリーダイヤル番号
:1-800-433-9014
:1-800-247-9362
:1-877-459-7298
:1-800-624-9896
:1-800-624-9897
:1-800-695-8133
:1-877-577-3355
:1-800-283-2210
:1-800-456-3355
:1-800-695-8133
:1-877-459-7298
:1-800-456-3355
:1-800-695-8133
1-800-289-3355
またはフリーダイヤル
1-800-879-3355
:1-888-798-7561
:1-800-671-3355
:1-800-357-3355
:1-800-247-4618
:1-800-727-8320
フリーダイヤル
1-877-DELLTTY
(1-877-335-5889)
1-877-673-3355
8001-3605
:
:
:
DELL CONFIDENTIAL – PRELIMINARY 1/3/06 – FOR PROOF ONLY
Dell に連絡する 57

FILE LOCATION: P:\P_TranslateFile\C9\2005\11\C9002634-AOC-DELL W2306C_JPN_OM\OK\JP-W2306C_23JSe70-1.fm
www.dell.com | support.dell.com
DELL CONFIDENTIAL – PRELIMINARY 1/3/06 – FOR PROOF ONLY
58 Dell に連絡する

インデックス
D
Dell
連絡する
41
S
ビデオ
S
あ
アンテナ
アンテナを接続する
お
オーディオ
ステレオ
効果
け
ケーブル
ケーブルテレビを接続する
同軸
こ
コネクタ
AV 1 7
AV 2 7
D4 8
16
14
14
26
26
26
9
14
7
DVI 8, 11, 17
ビデオ
S
11, 16
VGA 8
コンポーネント
コンポジット
の場所
側面パネル
電源
同軸
品質
コンポーネント
8
8
8, 11
11
8, 11, 16
11
7
16
さ
サポート
に連絡する
Dell
41
す
スリープタイマ
28
せ
セットアップ
28
ち
チャンネル
チャンネルのセットアップ
28
28
て
デバイスを接続する
プレーヤー
DVD
VCR 11
ケーブルテレビボックス
コンピュータ
ビデオカメラ
テレビ
コネクタ
セットアップ
場所
11
テレビメニュー
オーディオ
スリープタイマ
セットアップ
チャンネルのセットアップ
28
の外観
28
ピクチャ
メッセージ
リモコン
言語
24
入力選択
と
トラブルシューティング
コンピュータ
テレビメニューのメッセー
ジ
34
モニタ
36
リモコン
一般的問題
11
11
11
11
11
11
24
26
28
28
25
34
24
25
29
35, 36
35
30
インデックス
59

自己テスト
35
に
について
ワイド
側面コネクタ
側面パネルのボタン
LCD
モニタ
5
5
5
も
モニタ
18
ゆ
ユニバーサルリモコン
り
23
入力ソース
名称変更
入力選択
入力ソース
問題
テレビ
29
リモコン
19
28
25
35
は
パッケージの内容
9
へ
ヘッドフォン
7
ほ
ボタン
アンロック
チャネル上下
チャンネル
リモコン
ロック
音量
6, 19
側面パネル
電源
6
入力
19
入力ソース
28
6
19
19
28
6
6
ま
マルチメディアモード
26
リモコン
バッテリ
ボタン
ラーニングリモコン
使用する
問題
仕様
自己テスト
縦横比
出荷時設定
リストア
赤外線受信機
調整
カラー
輝度
電源インジケータ
黄色のライト
青いライト
電源ライト
黄色
青
同軸
19, 24
19
19
19
35
37
35
27
28
5
26
25
25
5
5
5
5
14
23
60
インデックス

Dell™ W2306C Wide LCD Monitor
(With TV Functionality)
Owner’s Manual
Model W2306C
www.dell.com | support.dell.com

Notes, Notices, and Cautions
NOTE: A NOTE indicates important information that helps you make better use of your LCD TV display.
NOTICE: A NOTICE indicates either potential damage to hardware or loss of data and tells you how to avoid the
problem.
CAUTION: A CAUTION indicates a potential for property damage, personal injury, or death.
____________________
Information in this document is subject to change without notice.
© 2006 Dell Inc. All rights reserved.
Reproduction in any manner whatsoever without the written permission of Dell Inc. is strictly forbidden.
Trademarks used in this text: Dell, Dimension, OptiPlex, Dell Precision, Latitude, Inspiron, DellNet, PowerApp, PowerEdge. PowerConnect,
PowerVault, and the DELL logo are trademarks of Dell, Inc.;EMC
XT, SRS, and symbol are trademarks of SRS Labs, Inc.
TruSurround XT technology is incorporated under license from SRS Labs, Inc.
Other trademarks and trade names may be used in this document to refer to either the entities claiming the marks and names or their products.
Dell Inc. disclaims any proprietary interest in trademarks and trade names other than its own.
2006 Rev. A01
January
®
is a registered trademark of EMC corporation.; TruSurround

Contents
1 About Your Wide LCD Monitor . . . . . . . . . . . . . . . . . . . . . . . . . .65
Front View. . . . . . . . . . . . . . . . . . . . . . . . . . . . . . . . . 65
Right Side View
Left Side View
Bottom View
Package Contents
. . . . . . . . . . . . . . . . . . . . . . . . . . . . . . 66
. . . . . . . . . . . . . . . . . . . . . . . . . . . . . . . 67
. . . . . . . . . . . . . . . . . . . . . . . . . . . . . . . . 68
. . . . . . . . . . . . . . . . . . . . . . . . . . . . . 69
2 Setting Up Your Wide LCD Monitor . . . . . . . . . . . . . . . . . . . . . .71
Proper Location for Your Wide LCD Monitor. . . . . . . . . . . . . . . . . 71
Connecting Your Wide LCD Monitor
Connecting Your Computer to the Wide LCD Monitor
. . . . . . . . . . . . . . . . . . . . 71
. . . . . . . . . . . . 73
3 Your Remote Control. . . . . . . . . . . . . . . . . . . . . . . . . . . . . . . . . . .79
Installing Batteries . . . . . . . . . . . . . . . . . . . . . . . . . . . . 79
Using Your Remote Control
Selecting a Channel
Using Your Wide LCD Monitor With a Universal or Learning Remote Control
. . . . . . . . . . . . . . . . . . . . . . . . . 80
. . . . . . . . . . . . . . . . . . . . . . . . . . . . 82
. 83
4 Using the TV Menu . . . . . . . . . . . . . . . . . . . . . . . . . . . . . . . . . . . .84
Using Your Remote Control With the TV Menu. . . . . . . . . . . . . . . . 84
Selecting Your TV Menu Language
Input Select Menu
Picture Settings Menu
Audio Settings Menu
. . . . . . . . . . . . . . . . . . . . . . . . . . . . . 85
. . . . . . . . . . . . . . . . . . . . . . . . . . . 86
. . . . . . . . . . . . . . . . . . . . . . . . . . . . 86
. . . . . . . . . . . . . . . . . . . . . 85
Contents 63

Size Menu. . . . . . . . . . . . . . . . . . . . . . . . . . . . . . . . . 87
Setup Menu
Channel Setup
Sleep Timer
. . . . . . . . . . . . . . . . . . . . . . . . . . . . . . . . 88
. . . . . . . . . . . . . . . . . . . . . . . . . . . . . . . 88
. . . . . . . . . . . . . . . . . . . . . . . . . . . . . . . . 88
5 Troubleshooting Your Wide LCD Monitor . . . . . . . . . . . . . . . . .89
Troubleshooting Tips. . . . . . . . . . . . . . . . . . . . . . . . . . . . 89
General Problems
TV Menu Messages
Remote Control Problems
. . . . . . . . . . . . . . . . . . . . . . . . . . . . . 90
. . . . . . . . . . . . . . . . . . . . . . . . . . . . 94
. . . . . . . . . . . . . . . . . . . . . . . . . 95
Using the Self-Test Feature When Your Wide LCD Monitor is
Connected to Your Computer
Problems When Using the Wide LCD Monitor as a Monitor
. . . . . . . . . . . . . . . . . . . . . . . . 95
. . . . . . . . . 96
6 Specifications for Your Wide LCD Monitor. . . . . . . . . . . . . . . .97
7 Contacting Dell . . . . . . . . . . . . . . . . . . . . . . . . . . . . . . . . . . . . . .101
Index . . . . . . . . . . . . . . . . . . . . . . . . . . . . . . . . . . . 119
64 Contents

About Your Wide LCD Monitor
Front View
1
2
1
1 IR receiver Senses the signal from the remote control.
2 Power indicator light (LED) The light is blue when the wide LCD monitor is on and amber
when the wide LCD monitor is in power save mode.
About Your Wide LCD Monitor 65

Right Side View
K
www.dell.com | support.dell.com
Press to turn the wide LCD monitor on and off. The power
1 Power button
2
3
4 Volume button Press to increase the volume or navigate through the TV Menu.
5 Channel button
TV Menu button Press to enable the TV Menu.
O
Volume button Press to decrease the volume or navigate through the TV Menu.
button is blue when it is on and amber when it is in power
saving mode.
Press to select the previous channel or navigate through the TV
Menu.
7
6
5
4
3
2
1
6
7
Channel button
Input Select button Press to display the Input Select menu.
Press to select the next channel or navigate through the TV
Menu.
66 About Your Wide LCD Monitor

Left Side View
1
2
3
4
1 AV SIDE (S-Video 1) Connect devices such as a video game system or a VCR.
2 AV SIDE (Composite 1) Connect devices such as a VCR or DVD player.
3 Composite audio connector Use the audio connector if you have connected a device to
S-Video connector. (Composite 1)
4 Headphone connector Connect headphones.
About Your Wide LCD Monitor 67

Bottom View
12
www.dell.com | support.dell.com
1 Power connector Connect your power cord.
2 D4 audio connector (L/R) Use the D4 audio connector if you have connected a device to
3 D4 connector(AV2) Connect device such as a DVD player.
4 Composite out/Audio Out (L/R) Connect a VCR.
5 Composite out/Video Out Connect a VCR.
6 Component video and audio
connectors (AV1)
7 DVI audio connector (L / R) Use the DVI audio connector if you have connected a device
3
4
5
6
the D4 connector.
Connect devices such as a DVD player or cable TV box.
such as a DVD player to the DVI connector.
11
8
10
9
7
8 VGA Connect your computer.
9 DVI connector Connect your computer or video devices such as a DVD player.
10 Audio connector for VGA or DVI Connect the audio cable from your computer to the wide LCD
11 ANT/Cable Connect cable TV box or an antenna.
68 About Your Wide LCD Monitor
monitor.

Package Contents
Remote control
AAA batteries (2)
Power cord
Composite video cable
Audio cable
About Your Wide LCD Monitor 69

VGA cable
PC audio cable
www.dell.com | support.dell.com
Coaxial cable
Documentation:
Setup Guide
Product Information Guide
Owner's Manual
70 About Your Wide LCD Monitor

Setting Up Your Wide LCD Monitor
CAUTION: Before you begin any of the procedures in this section, follow the safety instructions
located in the
Product Information Guide
Proper Location for Your Wide LCD Monitor
Consider the following environmental factors when you are deciding where to put your wide LCD
monitor:
• Do not store or use the wide LCD monitor in locations that are exposed to high heat, direct
sunlight, or extreme cold.
• Avoid moving the wide LCD monitor between locations with extreme temperature
differences. For more information, see Specifications on
• Do not subject the wide LCD monitor to severe vibration or high impact conditions. Do not
place thewide LCD monitor inside a car trunk.
• Do not store or use the wide LCD monitor in locations where the wide LCD monitor would
be exposed to high humidity or dusty environment.
• Do not place the wide LCD monitor in a location where water or other liquids could spill on
or into the wide LCD monitor.
.
page 97
.
2
Connecting Your Wide LCD Monitor
Your Wide LCD monitor has four standard connectors that can be used to connect devices.
NOTE: Before you connect your
cables may come with the device you are connecting. For a list of cables that came with your
LCD monitor
, see Package Contents on page 69. To order additional cables, contact Dell.
Wide LCD monitor
, ensure you have all the proper cables. Some
Wide
Setting Up Your Wide LCD Monitor 71

Quality Cable and Connector When to Use
Good Coaxial (RF) carries the video and audio
from one cable. The coaxial connector is
labeled, ANT/Cable on your
monitor
page 68.
. To locate the connector, see
wide LCD
www.dell.com | support.dell.com
Good Composite carries the video signal through
a single pin. If you are using a composite
video connector you also need to connect
composite audio connectors. To locate the
connector, see page 67.
Better S-Video splits the video signal into two
signals, black-and-white and color. To locate
the connector, see page 67.
72 Setting Up Your Wide LCD Monitor

Quality Cable and Connector When to Use
Best Component splits the video signal into three
signals, two color and one black-and-white.
To locate the connector, see page 68.
Connecting Your Computer to the Wide LCD Monitor
Your Wide LCD Monitor has two standard connectors that can be used to connect your
computer.
NOTE: The type of connector you use depends on the graphics card your computer supports.
For additional information about graphic cards, see your computer documentation.
Quality Cable and Connector When to Use
Good
A standard graphic display system for
computers that uses an analog signal and
can support resolutions up to 1360 x 768.
Setting Up Your Wide LCD Monitor 73

Quality Cable and Connector When to Use
Better
A digital signal that can support digital
and convert analog to digital. DVI can be
used for high resolution display and can
support resolutions up to 1360 x 768.
Connect the audio cable from your computer
to the Wide LCD Monitor audio connector
for VGA or DVI.
www.dell.com | support.dell.com
Using the ANT/Cable (Coaxial) Connector
1
Turn off the wide LCD monitor display and unplug the power cord.
2
Connect the coaxial cable to the ANT/Cable connector of the wide LCD monitor.
3
Plug in the power cord for the wide LCD monitor and turn on the wide LCD monitor.
4
Enter the TV Menu and select TV. For additional information about the Input Select menu,
see page 85.
74 Setting Up Your Wide LCD Monitor

Using the Composite Connector
1
Turn off the wide LCD monitor and unplug the power cord.
2
Connect your device including the audio cables.
3
Plug in the power cords for the wide LCD monitor and device and turn them on.
4
Enter the TV Menu and select the
about the Input Select menu, see page 85.
AV SIDE (Composite 1)
. For additional information
Setting Up Your Wide LCD Monitor 75

Using the S-Video Connector
www.dell.com | support.dell.com
1
Turn off the wide LCD monitor and unplug the power cord.
2
Connect your device including the audio cables.
3
Plug in the power cords for the wide LCD monitor and device and turn them on.
4
Enter the TV Menu and select the
AV SIDE (S-Video 1)
. For additional information about
the Input Select menu, see page 85.
Using the Component Connectors
1
Turn off the wide LCD monitor and unplug the power cord.
2
Connect your device including the audio cables.
3
Plug in the power cords for the wide LCD monitor and device and turn them on.
4
Enter the TV Menu and select the
Input Select menu, see page 85.
76 Setting Up Your Wide LCD Monitor
AV1 (
Component
1)
. For additional information about the

Using the DVI Connector
NOTE: Only one connector can be used for a computer, either VGA or DVI.
Connecting a Video Device Connecting a Computer
Tu r n of f th e
1
2
Connect the white DVI cable to your
wide LCD monitor
and unplug the power cord.
wide LCD monitor
TV and to the video device or your
computer.
3
Connect the audio cables.
If you are connecting a video device, use the audio connectors (red and white) or if you are
connecting a computer use the stereo connector (green).
NOTE: Some cable TV boxes may have DVI connectors, but do not support using a DVI connection. For
more information, contact your cable TV company.
Plug in the power cords for the wide LCD monitor and device and turn them on.
4
5
Enter the TV Menu and select the
DVI
. For additional information about the Input Select
menu, see page 85.
Setting Up Your Wide LCD Monitor 77

Using the VGA Connector
NOTE: Only one connector can be used for a computer, either VGA or DVI.
www.dell.com | support.dell.com
Turn off the wide LCD monitor and unplug the power cord.
1
2
Connect the blue VGA cable to your wide LCD monitor and to your computer.
3
Connect the green audio cable to the connector on the wide LCD monitor and to your
computer.
4
Plug in the power cords for the wide LCD monitor and
5
Enter the TV Menu and select the
VGA
. For additional information about the Input Select
computer
and turn them on.
menu, see page 85.
Using the D4 Connector
1
Turn off the wide LCD monitor and unplug the power cord.
2
Connect your device including the audio cables.
3
Plug in the power cords for the wide LCD monitor and device and turn them on.
4
Enter the TV Menu and select the or
AV2 (D4)
. See page 85.
78 Setting Up Your Wide LCD Monitor

Your Remote Control
Installing Batteries
Before you can use your remote control, install two-AAA batteries.
1
Slide open the battery cover.
2
Install the batteries. Make sure that you match the + and - on the batteries with the + and symbols in the battery compartment.
3
Replace the battery cover.
3
Your Remote Control 79

Using Your Remote Control
21
www.dell.com | support.dell.com
20
19
18
17
16
15
14
13
12
1
2
3
4
5
6
7
8
9
10
11
80 Your Remote Control

1 Power Button Turns the wide LCD monitor on and off
2 Number buttons Press to select a channel
3 Mute Press to turn off the sound
4 CH (up icon) Press to view the higher channel
In the TV Menu, use the channel button to navigate through
the menus in the TV Menu
5 Enter Select an TV Menu option, confirms a channel selection.
6 CH (down icon)
7 Last Returns you to the previously viewed channel
8 Audio Cycles through the preset Audio options
9 SRS Toggle SRS surround on and off
10 Midngt Toggle midnight on and off
11 Wide Cycles through the size options from the Size menu
12 Sleep Turns on the sleep timer
13 Pict Cycles through the preset options for the Picture menu
14 SAP Turns on Second Audio Program (SAP)
15 ANT Selects TV tuner as input source/UHF cable channel selection
16 PC Selects VGA as input source
17 Disp Displays information about your wide LCD monitor (for
18 Vol + Increases the volume in the TV Menu, use the volume button
19 Vol - Decreases the volume in the TV Menu, use the volume button
20 Menu
21 Input Enters and exits the Input Select menu
Press to view the lower channel
In the TV Menu, use the channel button to navigate through
the menus in the TV Menu
button
example, in TV Mode displays the channel you are watching)
to navigate through the menus
to navigate through the menus
Enters and exits the TV main menu
Your Remote Control 81

Selecting a Channel
Channels 1 through 12
Press the channel button to select the desired channel.
You need to wait about three seconds when changing to channel 10, because the 10/0 button is
allocated to the selection of 2-digit channel.
UHF channel (2-digit channel)
Press the
For example, to select channel UHF 40, press
www.dell.com | support.dell.com
Cable TV
Press ANT to select
For example, to select cable channel 19, press
and
10/0
button and then press a 2-digit channel number.
10/0
, 4 and then 0.
Cable TV
9
.
, and then press a channel number for cable TV.
ANT
, select
Cable TV
in TV Menu, and then press 1
82 Your Remote Control

Using Your Wide LCD Monitor With a Universal or Learning
Remote Control
Preprogrammed universal remote controls can be programmed to control the following
functions on your Dell
•Power
• Channel Up (+)
• Channel Down (-)
• Volume Up (+)
•Volume Down (-)
•Mute
• Input Select
wide LCD monitor
:
NOTE:
You can program universal remote controls to work with your Dell
following ways:
• If the remote control manual lists codes by manufacturer, use the Philips codes.
• If the remote control has a search function, this function may be used to find the
• If the remote control has a learning function, you can program specific buttons on it from
NOTE: For additional information, see the documentation that came with your universal or learning
Future preprogrammed universal remote controls may be able to control more
functions.
wide LCD monitor
correct code.
the Dell remote control, in addition to the buttons listed above.
remote control.
in the
Your Remote Control 83

FILE LOCATION: P:\P_TranslateFile\C9\2005\11\C9002634-AOC-DELL W2306C_JPN_OM\OK\W2306C_23J0e40.fm
Using the TV Menu
Your wide LCD monitor has a TV Menu that allows you to select the proper input source, make
adjustments to the image and audio settings.
4
www.dell.com | support.dell.com
Using Your Remote Control With the TV Menu
NOTE: You can access and make selections to the TV Menu using the volume and channel buttons on
the side panel of the wide LCD monitor or you can use the remote control. Except where noted, this
section describes how to use the TV Menu with the remote control.
To enter the TV Menu, press the
1
Six icons appear along the bottom of the screen.
2
Use the left and right buttons (volume buttons) to move between the icons.
The icon appears highlighted as you move through the menu.
3
To select an option, press the
4
A new menu appears for that selected option. Use the up and down buttons (channel
buttons) to move through the various settings.
NOTE: A red arrow appears next to the setting as you navigate through the options. A check mark
appears next to the option that you have selected.
5
Use the left and right buttons (volume buttons) and the
settings.
Menu
button.
Enter
button when the icon is highlighted.
Enter
button to adjust or select
NOTE: You can select Exit at any time to return to the main menu.
6
After you have made your selections, press the
7
To exit the TV Menu, select the
DELL CONFIDENTIAL – PRELIMINARY 12/29/05 – FOR PROOF ONLY
84 Using the TV Menu
Exit
icon and press
Menu
button to return to the main menu.
Enter
.

FILE LOCATION: P:\P_TranslateFile\C9\2005\11\C9002634-AOC-DELL W2306C_JPN_OM\OK\W2306C_23J0e40.fm
Selecting Your TV Menu Language
1
Press
Menu
to enter the TV Menu.
2
Select
Setup
.
3
In the
Setup
menu, select
Language
and select the language that you want the TV Menu to
appear in.
Input Select Menu
The
Input Select
LCD monitor and video equipment connected. Press
Input Select
AV2 (D4) — Select when you have a video device , such as a DVD player, connected to the D4 connector
on the back of the wide LCD monitor. See "Bottom View" on page 68 for the location of the D4 connector.
AV SIDE (COMPOSITE 1) — Select when you have a video device, such as a video game system,
connected to the composite connector on the side of the wide LCD monitor. See "Left Side View" on
page 67 for the location of the composite connector.
AV SIDE (S-VIDEO 1) — Select when you have a video device, such as a video deck, connected to the SVideo connector on the side of the wide LCD monitor. See "Left Side View" on page 67 for the location of
the S-Video connector.
SHOW INPUTS — Show Inputs allows you to select Active or All. Active searches for which connectors
are being used. The available input sources appear in white and input sources that are not available appear
in grey. All shows all the input sources and allows you to select all the input sources even if you do not have
a device connected.
NOTE: In TV Menu Settings, located in the Setup menu, you can set the Input Select to display the
device that you have attached. For example, AV2 would say DVD when you view the Input Select menu.
menu allows you to select the proper source based on how you have your wide
Input
on the remote to go directly to the
menu. You can also press
Menu
and select
VGA — Select when your wide LCD monitor is being
used as a computer monitor and you have connected
the computer using a VGA cable. See "Bottom View" on
page 68 for the location of the VGA connector.
DVI — Select when your wide LCD monitor is being
used as a computer monitor and you have connected
the computer or when you have connected a device,
such as a DVD player using the DVI cable. See "Bottom
View" on page 68 for the location of the DVI connector.
TV — Select when you have your antenna or cable TV
box connected to the ANT/Cable connector. See
"Bottom View" on page 68 for the location of the coaxial
connector.
AV1 (COMPONENT 1) — Select when you have a
video device, such as a DVD player,
connected to the component connector. See "Bottom
View" on page 68 for the location of the component
connector.
Input Select
from the main menu.
DELL CONFIDENTIAL – PRELIMINARY 12/29/05 – FOR PROOF ONLY
Using the TV Menu 85

FILE LOCATION: P:\P_TranslateFile\C9\2005\11\C9002634-AOC-DELL W2306C_JPN_OM\OK\W2306C_23J0e40.fm
Picture Settings Menu
The
Picture Settings Menu
brightness.
www.dell.com | support.dell.com
allows you to adjust the appearance of the image including color and
If you select one of the following preset image
settings the individual settings are automatically
updated.
•Movies
•Sports
•Weak Signal
•Multimedia
If you select
individual settings, such as
The color temperature presets are:
• Natural: 6500K
• Normal: the native panel temperature
• Blue: 9300K
• Red: 5700K
Personal
, you can adjust the
Brightness
and
Color
.
Audio Settings Menu
The Audio Settings Menu allows you to set the audio to best fit the type of show you are watching.
If you select
Use
Program
DELL CONFIDENTIAL – PRELIMINARY 12/29/05 – FOR PROOF ONLY
86 Using the TV Menu
Personal
to select
SRS TruSurround XT— Delivers virtual
surround sound over two speakers from any
source, which creates a wider sound with deep
rich bass.
Midnight Mode — Evens out the large volume
variations between voice and action scenes.
If you select one of the following preset
Equalizer Mode
levels are automatically updated:
•Music
• Theater
•Voice
, you can adjust the individual audio levels, such as
Stereo, Sub, Main
, or
Mono
.
settings, the individual audio
Bass
and
Tr eb le
.

FILE LOCATION: P:\P_TranslateFile\C9\2005\11\C9002634-AOC-DELL W2306C_JPN_OM\OK\W2306C_23J0e40.fm
Size Menu
Size
Menu allows you to adjust the appearance of the image. Use
horizontal placement of the image.
Use the following settings to adjust the aspect
ratio:
Standard
HDTV, 16:9 or 22:9 DVD movies.
Zoom
deck or 4:3 DVD movie.
4:3
— Best selection for viewing TV, video deck
or 4:3 DVD movie.
Wide
HDTV, 16:9 and 22:9 DVD movies.
Full screen
HDTV or 16:9 DVD movies.
NOTE:
Most DVDs have information about the supported aspect ratio on the case.
Horizontal Shift
to adjust the
— Best selection for viewing digital
— Best selection for viewing TV, video
— Best selection for viewing digital
— Best selection for viewing digital
DELL CONFIDENTIAL – PRELIMINARY 12/29/05 – FOR PROOF ONLY
Using the TV Menu 87

FILE LOCATION: P:\P_TranslateFile\C9\2005\11\C9002634-AOC-DELL W2306C_JPN_OM\OK\W2306C_23J0e40.fm
Setup Menu
Setup Menu setup allows you to adjust the
appearance of the TV Menu, to change the
language of the TV Menu (see "Selecting Your
TV Menu Language" on page 85) and to
restore factory settings.
Use
TV Menu Hold Time
decrease the amount of time the TV Menu
appears. The maximum amount of time is 60
seconds.
In the
www.dell.com | support.dell.com
When this option is enabled, only the power button functions. To unlock the TV Menu and side
panel buttons:
1. Press the Menu button on the TV.
A message appears stating that the TV is locked.
2. While the message is on the TV, press the channel up and volume increase button
simultaneously.
TV Menu Settings
Button lock
panel buttons.
to lock the TV Menu and the side
to increase or
you can select
TV
Channel Setup
Sleep Timer
Sleep Timer
automatically. You can select from 10 minutes to 3 hours.
88 Using the TV Menu
allows you to select an increment of time after which the wide LCD monitor turns off
DELL CONFIDENTIAL – PRELIMINARY 12/29/05 – FOR PROOF ONLY
To program a remote control key number and
the display for a specific channel, use
Assignment
in
Channel Setup
Channel
.

Troubleshooting Your Wide LCD Monitor
5
CAUTION: If at any time you see smoke or sparks coming from your
Wide LCD Monitor
immediately and contact Dell. Do not try to perform any troubleshooting steps.
wide LCD monitor
, unplug the
Troubleshooting Tips
NOTE: Some problems may be related to your device. See the documentation for any devices connected
to your wide LCD monitor.
Most problems with your wide LCD monitor may be caused by not having the correct input source
selected. Each connector on the wide LCD monitor is associated with an input source, which are
labeled
You can also select the following input sources:
AV SIDE
•
AV SIDE (Composite 1)
•
AV SIDE (S-Video 1)
•
AV1 (Component 1)
•
AV2 (D4)
•
TV
— ANT/Cable connector on the bottom of the wide LCD monitor
•
VGA
•
DVI
through
— D4 connector on the bottom of the wide LCD monitor
— VGA connector on the bottom of the wide LCD monitor
— DVI connector on the bottom of the wide LCD monitor
AV2
in the
Input Select
— Composite connector on the side of the wide LCD monitor
— S-Video connector on the side of the wide LCD monitor
— Component connector on the bottom of the wide LCD monitor
menu.
Troubleshooting Your Wide LCD Monitor 89

General Problems
Problem Possible Solution
Poor picture quality while watching TV
and using a device such as a DVD
player or a video deck
www.dell.com | support.dell.com
1
Check the aspect ratio settings in the TV Menu. Press the
Size
button on the remote control and select
information on using the TV Menu, see "Using the TV Menu"
on page 84.
2
Reconnect the device using the same type of connector. For
example, if you are using the composite connector on the
bottom, try connecting the device to the composite connector
on the side of the wide LCD monitor. See "About Your Wide
LCD Monitor" on page 65 for the location of the connectors.
After you connect the device, change the input source in the TV
Menu. See "Input Select Menu" on page 85 for more
information.
3
Connect the device using a different connector. For example, if
you are experiencing the problem using a composite connector,
try using the component or D4 connector.
. For more
NOTE: To connect to a different connector, you need the
appropriate cables for that connector. See your device
documentation for a list of supported connections.
After you connect the device, change the input source in the TV
Menu. See "Input Select Menu" on page 85 for more
information.
4
Reset the original factory defaults. Press
Setup
control, select
5
Adjust the color temperature. Press
control, select
, and then select
Picture
, and then select
Menu
on the remote
Factory Reset
Menu
on the remote
Color Temperature
.
NOTE: Some set top boxes offer aspect ratio. See your device
documentation for more information.
Menu
.
90 Troubleshooting Your Wide LCD Monitor

Problem Possible Solution
Poor picture quality when using a
device connected to the ANT/Cable
(coaxial) connector
1
Ensure wide LCD monitor is selected as the input source in the
Input Select
more information.
2
Press
Menu
on the remote control, select
Channel Setup
3
Check the aspect ratio settings in the TV Menu. Press the
button on the remote control and select
information on using the TV Menu, see "Using the TV Menu"
on page 84.
4
Reset the original factory defaults. Press
control, select
5
Adjust the color temperature. Press
control, select
6
The problem may be with your device, contact your service
provider.
Nothing appears on my wide LCD
monitor
1
Ensure the wide LCD monitor is turned on.
2
Verify that all the cables are properly connected to the wide
LCD monitor, including the power cable.
3
Check to see if there is a blue or amber light on the lower,
right-hand corner of the wide LCD monitor. A blue light
indicates the wide LCD monitor is on. An amber light, means
the wide LCD monitor is in power save mode.
4
Ensure the proper source is selected in the
See "Input Select Menu" on page 85 for more information.
5
Reconnect any devices that are currently connected to the wide
LCD monitor. If you are using multiple devices, connect and
test one device at a time.
6
Connect another device that you know is working properly.
7
Reset the original factory defaults. Press
control, select
menu. See "Input Select Menu" on page 85 for
Setup
, and then select
. This resets the channels on your remote.
Menu
Size
. For more
Menu
on the remote
Setup
, and then select
Picture
, and then select
Setup
, and then select
Factory Reset
Menu
on the remote
Color Temperature
Input Select
Menu
on the remote
Factory Reset
.
menu.
.
.
Troubleshooting Your Wide LCD Monitor 91

Problem Possible Solution
No sound 1
Ensure mute is not turned on. Pressing the
Mute
button on
the remote control turns the mute function on and off.
2
If only certain TV channels do not have sound, then you need to
correct the
Input Select
menu in the TV Menu (see "Input
Select Menu" on page 85).
3
Verify that the audio cables are firmly connected to both the
audio input connectors on your wide LCD monitor and audio
output connectors on your devices. Ensure that the cable colors
match the connectors colors.
4
Also, ensure that the audio cables are connected to the same
www.dell.com | support.dell.com
row as the video cables. See "About Your Wide LCD Monitor"
on page 65 for the location of the connectors.
5
Reconnect the device using the same type of connector. For
example, if you are using the composite connector on the
bottom, try connecting the device to the composite connector
on the side of the wide LCD monitor. See "About Your Wide
LCD Monitor" on page 65 for the location of the connectors.
After you connect the device, change the input source in the TV
Menu. See "Input Select Menu" on page 85 for more
information.
6
Connect the device using a different connector. For example,
if you are experiencing the problem using a composite
connector, try using the component or D4 connector.
NOTE: To connect to a different connector, you need the
appropriate cables for that connector. See your device
documentation for a list of supported connections.
After you connect the device, change the input source in the TV
Menu. See "Input Select Menu" on page 85 for more
information.
7
Test the device on a different TV.
Double image or no image with DVD Turn off the progressive scan on the DVD player. Your Dell™
Wide LCD Monitor offers built-in deinterlacer that is equal to or
better quality than the deinterlacer on your DVD player. For
more information about progressive scan on your DVD player,
see the documentation for your DVD player
Picture is too dim or too bright
Update the color settings in the TV Menu. Press
remote control and select
The screen is not centered correctly 1
Picture
.
Update the size settings in the TV Menu. Press
remote control and select
2
Reset the original factory defaults. Press
control, select
Setup
Size
.
, and then select
Menu
Menu
Menu
on the remote
Factory Reset
on the
on the
.
92 Troubleshooting Your Wide LCD Monitor

Problem Possible Solution
Screen has one or more lines 1
Check the aspect ratio settings in the TV Menu. Press the
Size
button on the remote control and select
. For more
Menu
information on using the TV Menu, see "Using the TV Menu"
on page 84.
2
Ensure the proper source is selected in the
Input Select
menu.
See "Input Select Menu" on page 85 for more information.
3
Try connecting a different device. Ensure that you properly
connect the cables and update the input source in the TV
Menu.
4
Update the size settings in the TV Menu. Press
Size
remote control and select
5
Reset the original factory defaults. Press
Setup
control, select
, and then select
.
Factory Reset
Menu
on the remote
Menu
.
on the
The side panel buttons do not work Check the TV Menu to see if the buttons have been locked. Press
Menu on your remote control, select Setup.
Use the side panel buttons to unlock the TV Menu and side
panel buttons:
1
Press the Menu button.
A message appears stating that the TV Menu and buttons are
locked.
2
While the message is on the screen, press the volume increase
and channel up buttons on the side panel simultaneously.
A message appears stating that the TV Menu and buttons are
unlocked.
The picture is too small 1
Adjust the size settings. Press
Size
select
2
This may be a problem with your device. See the
.
Menu
on the remote control, and
documentation for the device.
Troubleshooting Your Wide LCD Monitor 93

TV Menu Messages
While using your wide LCD monitor, the following messages may appear.
Message Possible Solution
Auto Adjust No action required, the wide LCD monitor is performing an auto
adjustment.
Out of Range Check the optimal resolution settings.
You may need to download a new video driver. For more
information, go to support.dell.com.
1
www.dell.com | support.dell.com
No Video Input
TV Button Lock To unlock, press Menu on your remote control, select Setup.
In Power Save Mode
Press any key on keyboard or
move mouse
In Power Save Mode
Please Check Video Signal
Self Test Appears for computer source when there is nothing plugged in.
Check all cables are properly connected.
2
Ensure the proper source is selected in the
See "Input Select Menu" on page 85 for more information.
Use the side panel buttons to unlock the TV Menu and side
panel buttons:
1
Press the Menu button.
A message appears stating that the TV Menu and buttons are
locked.
2
While the message is on the screen, press the volume increase
and channel up buttons on the side panel simultaneously.
A message appears stating that the TV Menu and buttons are
unlocked.
If you have a computer connected to the wide LCD monitor and
there is no signal detected, the wide LCD monitor goes in to
sleep mode. The power light is amber when the wide LCD
monitor in is sleep mode.
Press any key on the keyboard or move the mouse to wake the
wide LCD monitor.
If you are using a video device and it has been inactive for
30 minutes the wide LCD monitor goes in to power save mode.
The power light is amber when the wide LCD monitor is in
power save mode.
Select VGA or DVI from Input Select menu and nothing is
plugged in. Plug a computer in to the VGA or DVI.
Input Select
menu.
94 Troubleshooting Your Wide LCD Monitor

Remote Control Problems
Problem Possible Solution
The wide LCD monitor does not
respond when using the remote control
1
Point the remote control directly at the lower right corner of the
wide LCD monitor. Be sure that nothing is blocking the front of
the wide LCD monitor. For the location of the IR, see "Front
View" on page 65.
2
Verify that the batteries are properly installed.
3
If the batteries are old, install new batteries.
NOTE: Bright lights or other infrared devices may interfere with
your remote control and IR on the wide LCD monitor.
Using the Self-Test Feature When Your Wide LCD Monitor is
Connected to Your Computer
When your computer is connected to the wide LCD monitor through DVI or VGA connector you
can use the self-test feature to check whether your wide LCD monitor is functioning properly. If
your wide LCD monitor and computer are properly connected but the wide LCD monitor screen
remains dark, run the wide LCD monitor self-test by performing the following steps:
1
Turn off both your computer and the wide LCD monitor.
2
Unplug the video cable from the back of the computer.
3
Turn on the wide LCD monitor.
If the wide LCD monitor cannot sense a video signal and is working correctly, the floating
"Dell - Self-Test Feature Check" dialog box appears on the screen (against a black
background).
While in self-test mode, the power light remains blue and the self-test pattern scrolls through
the screen continually. This box also appears during normal system operation if the video
cable becomes disconnected or damaged.
4
Turn off your wide LCD monitor and reconnect the video cable; then turn on both your
computer and the wide LCD monitor. If your wide LCD monitor screen remains blank, the
problem may be with your computer or graphic card.
See your computer documentation for more information.
Troubleshooting Your Wide LCD Monitor 95

Problems When Using the Wide LCD Monitor as a Monitor
NOTE: You can connect your computer to the wide LCD monitor using a VGA or a DVI connector.
Problem Possible Solution
The picture is off-centered or too small 1
www.dell.com | support.dell.com
No audio 1
No video NOTE: If you see a self-test, it means there is a problem with
Use
Auto Adjust
enter the TV Menu, select
Adjust
.
2
Check the optimal resolution settings.
to check the
Image Settings
Image Settings
, and then select
. Press
Menu
You may need to download a new video driver. For more
information, go to
support.dell.com
.
NOTE: Some older video cards may not support the resolution
settings for the wide LCD monitor.
Ensure the green audio cable is connected to audio connector
on the wide LCD monitor and on the computer. For the
location of the connector on the wide LCD monitor, see "Using
the VGA Connector" on page 78. See your computer
documentation for the location of connectors on your
computer.
Do not connect the audio cable to the headphone jack.
2
Ensure the volume on the computer is not muted.
3
Verify that sound on your computer is working by checking the
speakers. See your computer documentation for information on
troubleshooting your computer.
4
Disconnect the wide LCD monitor from the computer and test
to see if the wide LCD monitor volume works.
your video card or you are using the wrong input source.
1
Ensure the wide LCD monitor is turned on.
2
Verify that all the cables are properly connected to the wide
LCD monitor, including the power cable.
3
Check to see if there is a blue or amber light on the lower,
right-hand corner of the wide LCD monitor. A blue light
indicates the wide LCD monitor is on. An amber light, means
the wide LCD monitor is in power save mode.
4
Ensure
VGA
is selected in the
Select Menu" on page 85 for more information.
5
Reconnect the computer.
6
Connect another device that you know is working properly.
7
Reset the original factory defaults. Press
Setup
control, select
, and then select
Input Select
Menu
Factory Reset
menu. See "Input
on the remote
.
to
Auto
96 Troubleshooting Your Wide LCD Monitor

Specifications for Your Wide LCD Monitor
General
Model number W2306C Wide LCD Monitor
Display type TFT COLOR Premium LCD
Screen size 23 inch panel (23-inch viewable image size)
Viewable area 508.13
Image aspect ratio Wide screen
Brightness (typical) 450 nits (typical)
Contrast Ratio 550:1 (typical)
Response time 16ms (typical)
Video Display Capabilities 480i
Additional Features:
SAP capable Yes
x
285.70mm
x
(20.00inches
16:9 resolution
16:9 aspect ratio
480p
720p
1080i
576i (where available)
576p (where available)
11.25 inches)
6
Physical Dimension
Display (with stand) 438 x 722x 177 mm
17.2" x 28.4" x 7"
Display (no stand) 365 x 722 x 98 mm
With Speakers Non-detachable
Specifications for Your Wide LCD Monitor 97

Physical Dimension
Weight (with stand) 10 kg/22.05 lbs (est)
Tilt -5/+20 degrees
Swivel +/- 45 degrees
Native Resolution 1366 x 768 (WXGA)
HDTV Capable Yes
Tuner
Number of Tuners one analog
www.dell.com | support.dell.com
Viewing Angle
Horizontal +/- 85 degrees
Vertical +/- 85 degrees
Inputs
Video
Composite (CVBS)
S-Video
Component
TV In (coaxial)
Audio (L+R)
DVI (for use with a video device)
D4
one (side)
one (side)
one (bottom)
one (bottom)
four pairs
one (bottom)
one (bottom)
Computer
VGA (for use as computer monitor)
DVI (for use as computer monitor)
Audio (PC)
one (bottom)
one (bottom)
one (bottom)
98 Specifications for Your Wide LCD Monitor

Outputs
Video
Composite (CVBS)
Audio (L+R)
Headphone
Audio
Effects SRS TruSurround XT
Speakers (integrated) 7 watts/channel
one (bottom)
one pair
one (side)
Midnight Mode
7+7 watts total
Specifications for Your Wide LCD Monitor 99

www.dell.com | support.dell.com
100 Specifications for Your Wide LCD Monitor
 Loading...