

Page 1
Setting Up Your Monitor
Installation du moniteur | Configuración del monitor | Configuraçâo de seu monitor | Einrichten des Monitors | Configurazione del monitor | Установка монитора
A CAUTION:
Before setting up your Dell monitor,
see the safety instructions that shipped
with your monitor.
A ATTENTION :
Avant d'installer votre moniteur Dell,
lisez les consignes de sécurité
livrées avec votre moniteur.
Dell™ U2711 Flat Panel Monitor
У
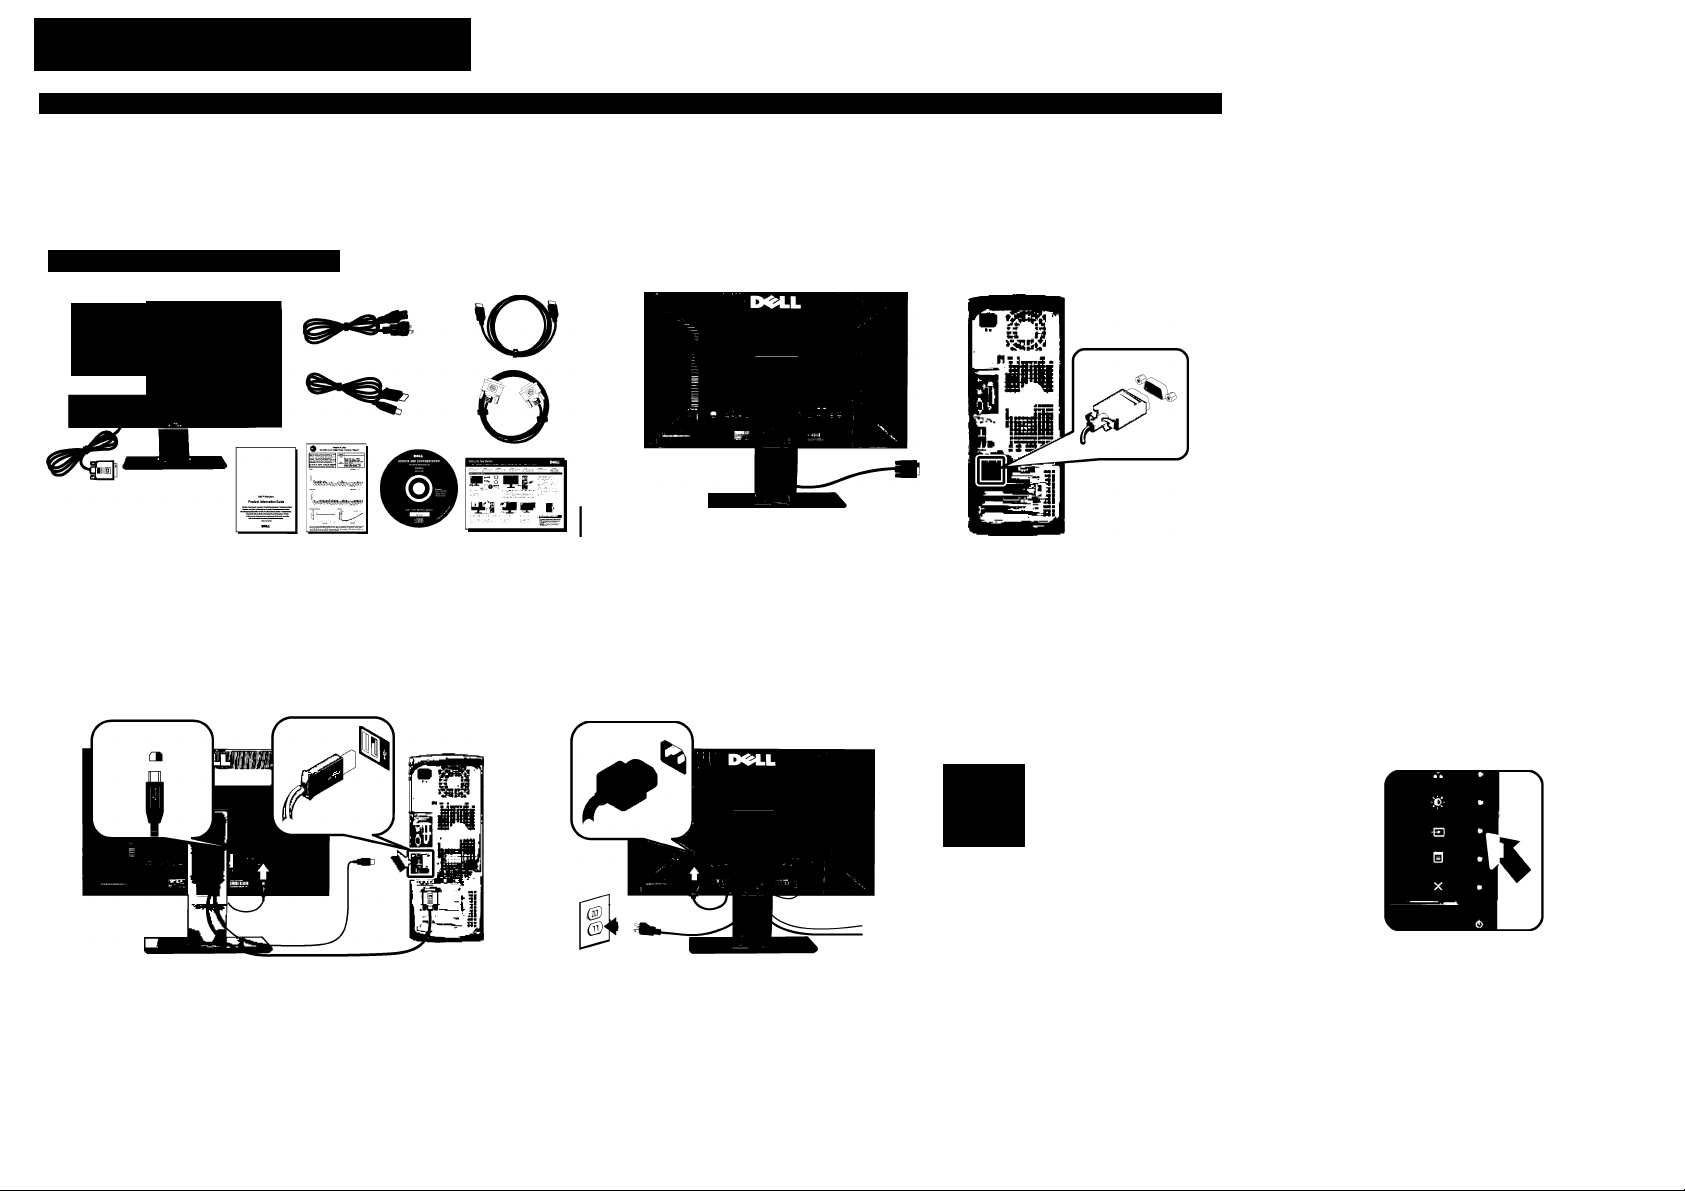
^ Verify the CDntents Df the hex
Vérifiez le contenu de la boîte
Compruebe el contenido de la caja
Verifique о conteúdo da caixa
Prüfen Sie die Inhalte im Karton
Verificare il contenuto della confezione
Проверьте содержимое упаковочной коробки
A PRECAUCIÓN:
Antes de configurar el monitor Dell,
consulte las instrucciones de seguridad
que se facilitan con el monitor.
2 Connectthe mDnitDr using ONLY ONE DfthefDllDwing cables: the white DVI cable
Dr the blue VGA cable
Connectez le moniteur en utilisant SEULEMENT UN des câbles suivants : le câble DVI blanc ou le câble VGA bleu
Conecte el monitor usando SDLAMENTE UND de los siguientes cables: El cable de DVI blanco o el cable de VGA azul
Conecte o monitor usando APENAS UM dos seguintes cabos: o cabo DVI branco ou о cabo VGA azul
Schließen Sie den Monitor NUR mit EINEM der folgenden Kabel an: das weiße DVI-Kabel oder das blaue VGA-Kabel
Collegare il monitor usando SDLD UND dei seguenti cavi: Cavo DVI bianco о cavo VGA blu
Подключите монитор, используя ТОЛЬКО ОДИН из следующих кабелей: Белый кабель DVI или синий кабель V
A ATENÇÂ0:
Antes de configurar seu monitor Dell,
leia as instruçôes de segurança que
acompanham о pruduto.
A ACHTUNG:
Bevor Sie Ihren Dell-Monitor aufstellen,
lesen Sie die Sicherheitsanweisungen,
die mit dem Monitor geliefert werden.
A AHENZIONE:
Prima di configurare il monitor Dell,
vedere le istruzioni di sicurezza
fornite con il monitor.
A ВНИМАНИЕ:
Перед настройкой вашего
монитора Dell ознакомьтесь с
инструкциями по технике
безопасности, входящими в
комплект поставки монитора.
NOTE: It is recommended that you connectthe monitor using
the white DVI cable for better performance.
REMARQUE : II est recommandé de connecter le moniteur à
l'aide du câble DVI blanc pour une meilleure performance.
NOTA: Es aconsejable que conecte el monitor con el cable
DVI bianco para que el rendimiento sea mejor.
OBSERVAÇÂO: Recomendamos a conexâo do monitor corn о
cabo branco DVI para que se tenha melhor desempenho.
HINWEIS: Es wird empfohlen, dass Sie den Monitor mit dem
weißen DVI-Kabel anschließen, um eine bessere Leistung zu
erzielen.
NOTA: Per migliorare le prestazioni, si consiglia di collegare il
monitor tramite il cavo DVI bianco.
ПРИМЕЧАНИЕ: Для улучшения отображения
советуем подключать монитор к компьютеру,
используя белый кабель DVI.
3 Connectthe USB cable to enable the USB hub and the card reader 4 Connectthe power cable
Connectez le câble USB pour activer le hub USB et le lecteur de carte
Conecte el cable USB para habilitar el concentrador USB y el lector de tarjetas
Conecte о cabo USB para habilitar о hub USB e o leitor de cartoes
Schließen Sie das USB-Kabel an, um den USB-Hub und den Kartenleser zu aktivieren
Collegare il cavo USB per attivare l'hub USB e il lettore di schede
Подключите USB-кабель, чтобы активировать USB-концентратор и устройство
считывания карт памя
Connectez le câble d'alimentation
Conecte el cable de alimentación
Conecte о cabo de alimentaçâo
Schließen Sie das Netzkabel an
Collegare il cavo di alimentazione
Подключите шнур питания
у
5 Press the power button
Appuyez le bouton d'alimentation
Puise el botón de encendido
Pressione о botâo de liga/desliga
Drücken Sie auf die Ein/Aus-Taste
Premere il pulsante di accensione
Нажмите кнопку питания
Г\
If nothing appears on the screen, touch the
Input Source Select button
Si rien n'apparaît à l'écran, touchez le bouton Sélection de la source d'entrée
Si no aparece nada en la pantalla, toque el botón de selección de fuente de
entrada
Se nada aparecer na tela, toque no botâo de Seleçâo da Fonte de Entrada
Wenn auf dem Bildschirm nichts angezeigt wird, berühren Sie die
Quellauswahl-Taste
Se sullo schermo non viene visualizzato nulla, toccare il pulsante Selezione
sorgente input
Если на экране ничего не появится, то нажмите кнопку "Выбор
источника входного сигн
Page 2
90 ± 5mm J
About Your Monitor I A propos de votre moniteur I Acerca del monitor | Sobre seu monitor | Info zum Monitor | Informazioni sul monitor | О мониторе
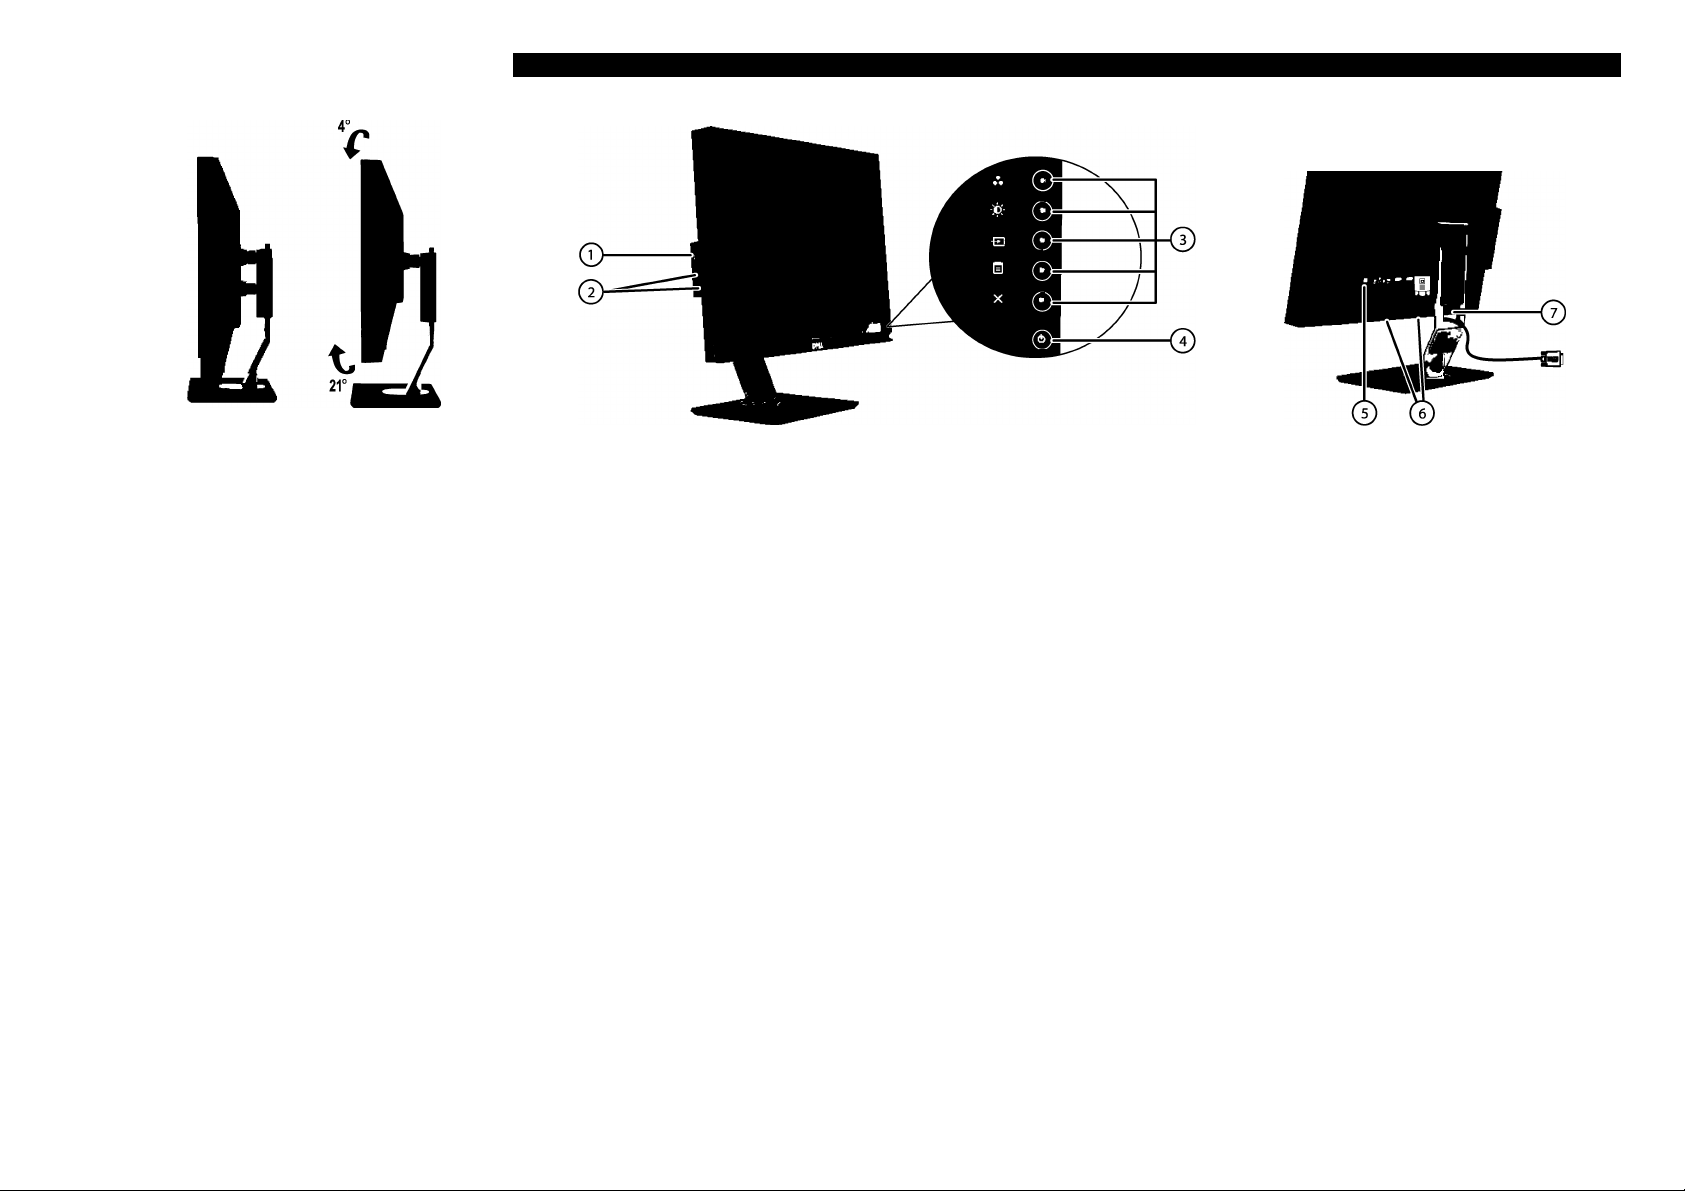
y Adjust the monitor
Ajuster le moniteur
Ajuste el monitor
Ajuste O monitor
Passen Sie den Monitor an
Regolare il monitor
Регулировка монитора
Finding Information
©
For more information, see the
User's Guide in the Drivers and
О
Л Printed in China
(Dell P/N G604T Rev.AOO)
P/N: 4J.0WA01.002
Documentation media that
shipped with your monitor.
D^LL
Trouver les Informations
Pour plus d'informations, voir le
Guide de l'utilisateur du moniteur
dans le média Pilotes et
Documentation livré avec votre
moniteur.
Information in this document is subject
to change without notice.
© 2009 Dell Inc. All rights reserved.
Reproduction of these materials in any
manner whatsoever without the written
permission of Dell Inc. is strictly forbidden.
Dell and the DELL logo are trademarks of
Dell Inc. Dell disclaims proprietary interest in
the marks and names of others.
1. Card reader
2. USB downstream ports
3. Function controls
4. Power button
5. DC power connector for
Dell Soundbar
6. Dell Soundbar mounting brackets
7. Cable management slot
1. Kartenleser
2. USB-Downstream-Anschlüsse
3. Funktionssteuerung
4. Ein-/Aus-Taste
5. Gleichstromanschluss für Dell Soundbar
6. Dell Soundbar-Befestigungsklammern
7. Platz zum Verstauen von Kabeln
Búsqueda de información
Para más información, consulte la
Guía del usuario en el CD de
Controladores y documentación
que acompaña al monitor.
Les informations contenues dans ce
document peuvent être modifiées sans
notification préaiabie.
® 2009 Dell Inc. Tous droits résenrés.
La reproduction de ces données sans
l'autorisation écrite de Dell Inc, qu'elle
qu'en soit la manière, est strictement interdite.
Dell and the logo DELL sont des marques
déposées de Dell Inc.; Dell dénie tout intérêt
propriétaire dans les marques et les noms
commerciaux autres que les siens.
Novembre 2009
1.1. Lecteur de carte
2. Ports descendants USB
3. Contrôles de fonction
4. Bouton d'alimentation
5. Connecteur d'alimentation CC de la
Soundbar Dell
6. Attaches de montage de la Soundbar Dell
7. Gaine de gestion des câbles
1. Lettore di schede
2. Porte USB per il downstream
3. Controlli funzione
4. Pulsante di accensione
5. Connettore alimentazione CC per Barra
audio Dell
6. Staffe di montaggio barra audio Dell
7. Slot per la gestione dei cavi
Procurar informaçâo
Para obter mais informagoes,
consulte o Guia do Usuàrio na
mídia de Drivers e Documentagao
enviada com seu monitor.
La información de este documento se
encuentra sujeta a cambios sin aviso previo.
© 2009 Dell Inc. Todos los derechos reservados.
Está estrictamente prohibida la reproducción
de este material de cualquier forma sin el
permiso por escrito de Dell Inc.
De//y el logotipo de DELL son marcas
registradas de Dell Inc. Dell descarga todo
su interés de propiedad sobre las marcas
y nombres de otras empresas.
Noviembre 2009
As informa(óes contidas neste documento
estSo sujeitas a aitera^áo sem aviso prèvio.
© 2009 Dell Inc. Todos os direitos reservados.
É terminantemente proibida a reprodu^áo
deste material, de qualquer forma que seja,
sem a autoriza?áo por escrito da Dell Inc.
Dell e o logo DELL sao marcas registradas
da Dell Inc. Dell nao tem interesse de
propriedade ñas marcas e nomes de
terceiros.
Novembre 2009
Finden von Informationen
Weitere Informationen finden Sie in der
Bedienungsanleitung auf der CD
„ Treiber und Dokumentation“, welcher
mit dem Monitor geliefert wird.
www.dell.com | support.dell.com
1. Lector de tarjetas
2. Puertos USB de entrada
3. Controles defunción
4. Botón de encendido (Power)
5. Conector de alimentación de CC para Dell
Soundbar
6. Soportes de montaje de Dell Soundbar
7. Ranura de organización de los cables
1. Leitor de cartao
2. Portas USB downstream
3. Controles de fungao
4. Botáo liga/desliga
5. Conector de energia CC para Dell
Soundbar
6. Suportes de fixagao do Dell Soundbar
7. Slot de gerenciamento do cabo
1. Устройство считывания карт памяти
2. Выходные разъемы USB
3. Управление функциями
4. Кнопка питания
5. Разъем питания пост, тока для звуковой системы Dell Sou
6. Кронштейны для крепления звуковой системы Dell Soundba
7. Гнездо для укладки кабелей
Dove reperire informazioni
Per ulteriori informazioni, vedere la
Guida utente in Driver e
Documentazione multimediale
fornito con il monitor.
Die informationen in diesem Dokument
können ohne Ankündigung geändert werden.
© 2009 Dell Inc. Alle Rechte Vorbehalten.
Die Reproduktion dieser Materialien auf
Jegliche Weise ohne schriftliche Genehmigung
der Dell Inc. ist strengstens untersagt.
Dell und das DELL -Logo sind Marken
der Dell Inc.. Dell erhebt keinerlei
Eigentumsansprüche auf andere als ihre
eigenen Marken und Namen.
November 2009
Le informazioni presenti in questo documento
sono soggette a modifiche senza preavviso.
©2009 Dell Ine. Tutti idiritti riservati.
La riproduzione di questi materiali in
qualsivoglia maniera senzaa l'autorizzazione
scritta di Dell Ine. è severamente proibita.
Dell e U logo DELL sono marchi di Dell Ine.
Dell declina qualsiasi rivendicazione sulla
proprietà di marchi e denominazioni di altri.
Novembre 2009
Поиск информации
Дополнительные сведения см. в
Руководстве пользователя на
компакт-диске "Драйверы и
документация", прилагаемом к
монитору.
Содержащиеся в настоящем документе
сведения могут быть изменены без
предварительного уведомления.
© 2009 Dell Inc. Все права защищены.
Воспроизведение этих материалов любым
слособом без лисьменного разрешения
комлании Dell Inc. строго запрещается.
Dell и логотип DELL являются товарными
знаками комлании Dell Inc. Компания Dell
не имеет никаких прав собственности на
товарные знаки или названия других
производителей.
Ноябрь 2009
 Loading...